


DocRob
-
Posts
1,296 -
Joined
-
Last visited
Content Type
Profiles
Forums
Gallery
Events
Everything posted by DocRob
-
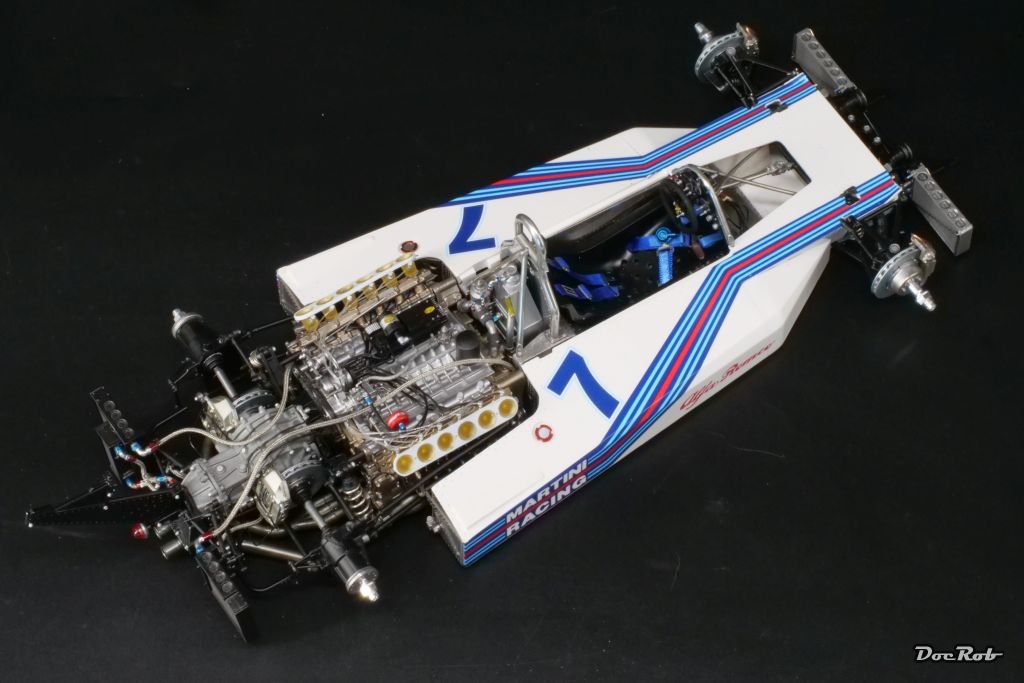
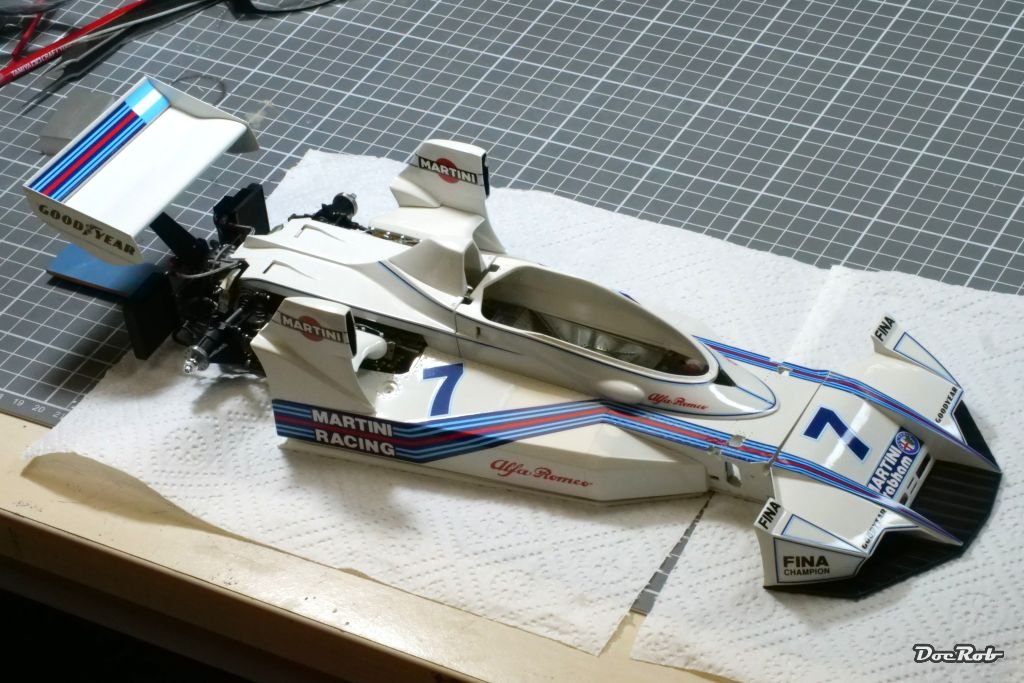
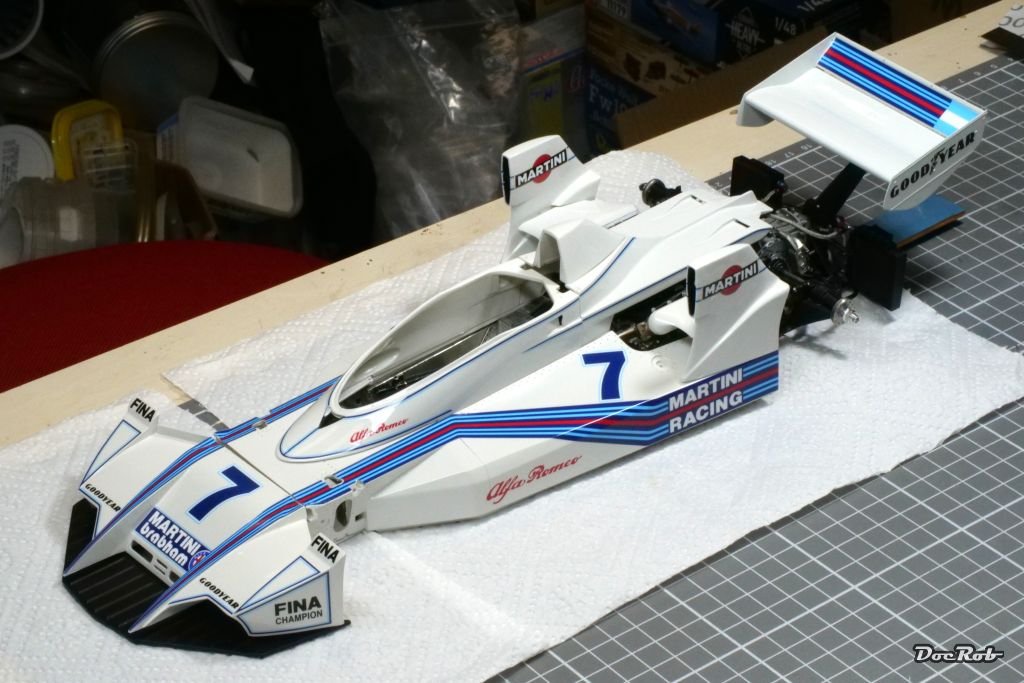
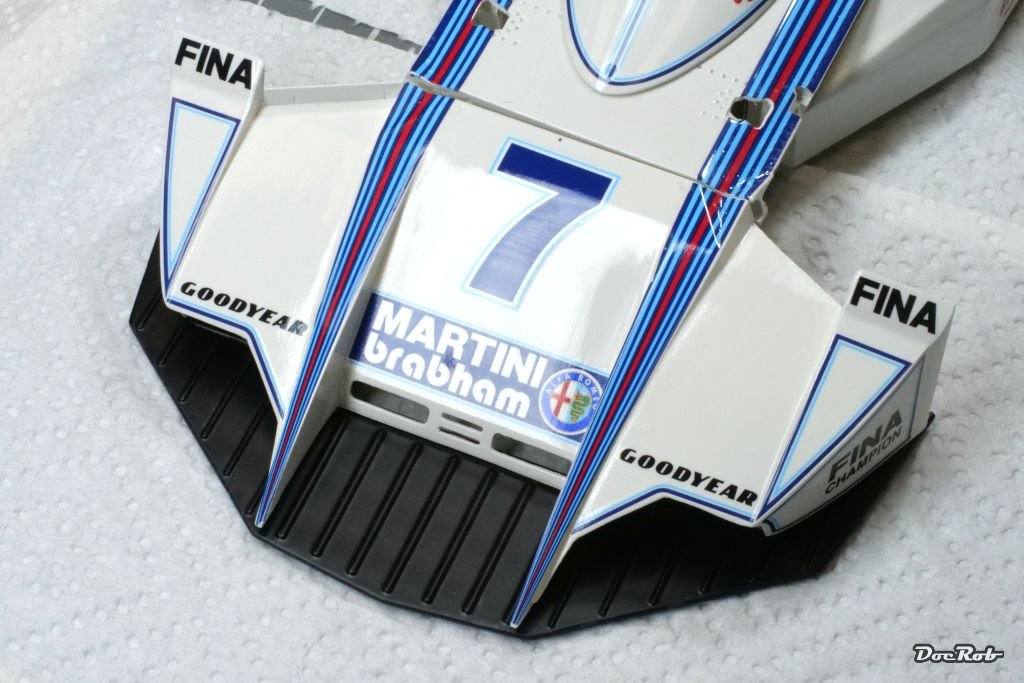
 Slowly, I´m nearing the finish line. I added many details to the body, like fasteners, bolts and rivets and worked on the final fitting of the body parts. I am always a little scared when it comes to vacuum formed parts like the smoke clear windshield. It´s always best to cut it with a pair of scissors, than sanding, because the burr is very hard to remove. Finally I got it done, using Tamiya flexible masking tape as a guideline. The clear part was glued to the body with 1mm wide double sided clear adhesive tape and then received the tiny rivets. The side air intakes are not finally glued to the body, I may let them removable for better sight on the engine, but then, I add some guiding bolts. Now I´m preparing the rims and the nose section and then wroarrrrrrrrrrr 🏁. Cheers Rob
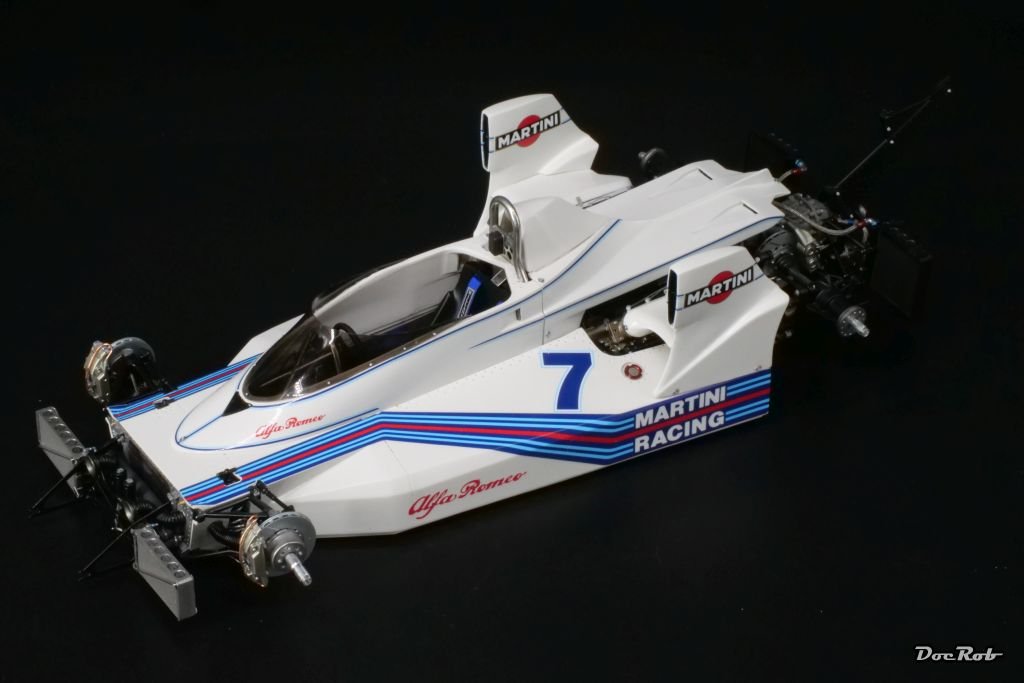
- 68 replies
-
- 15
-

-

-
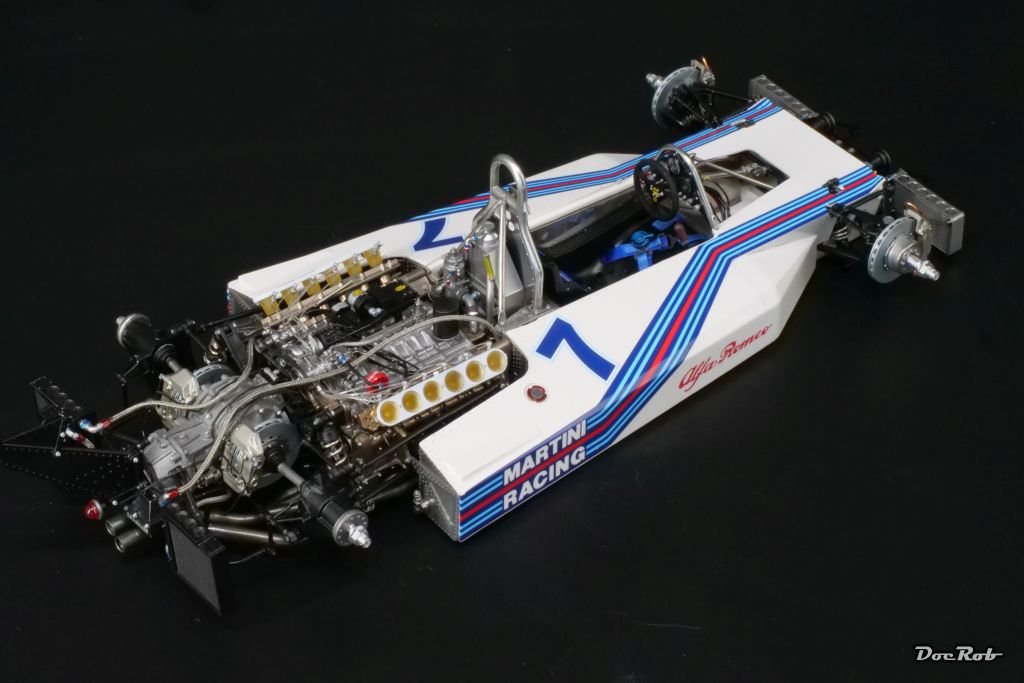
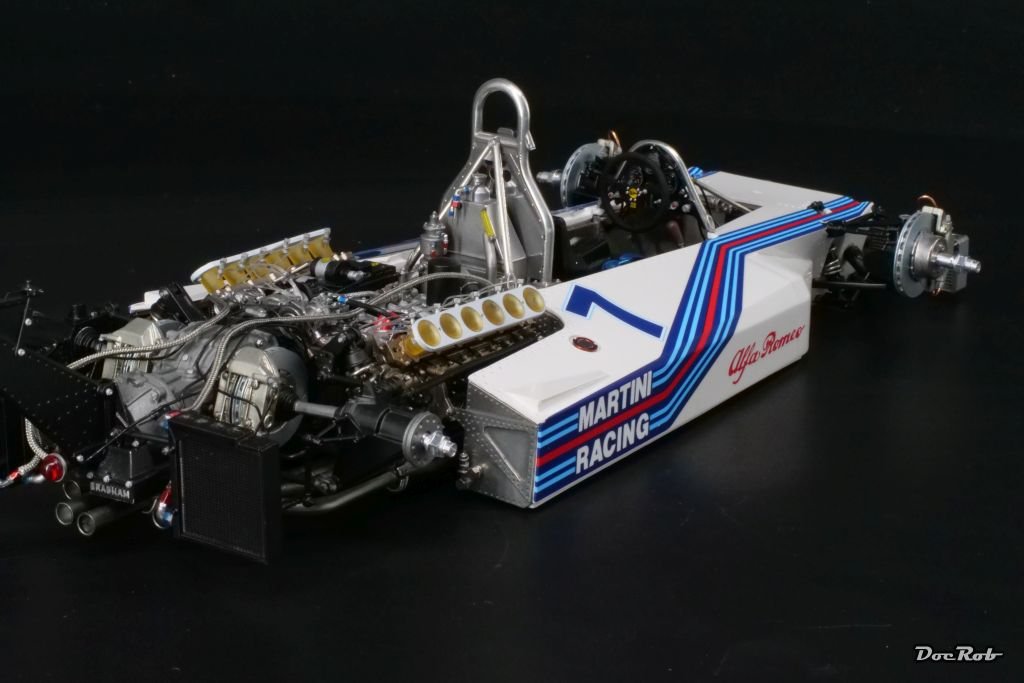
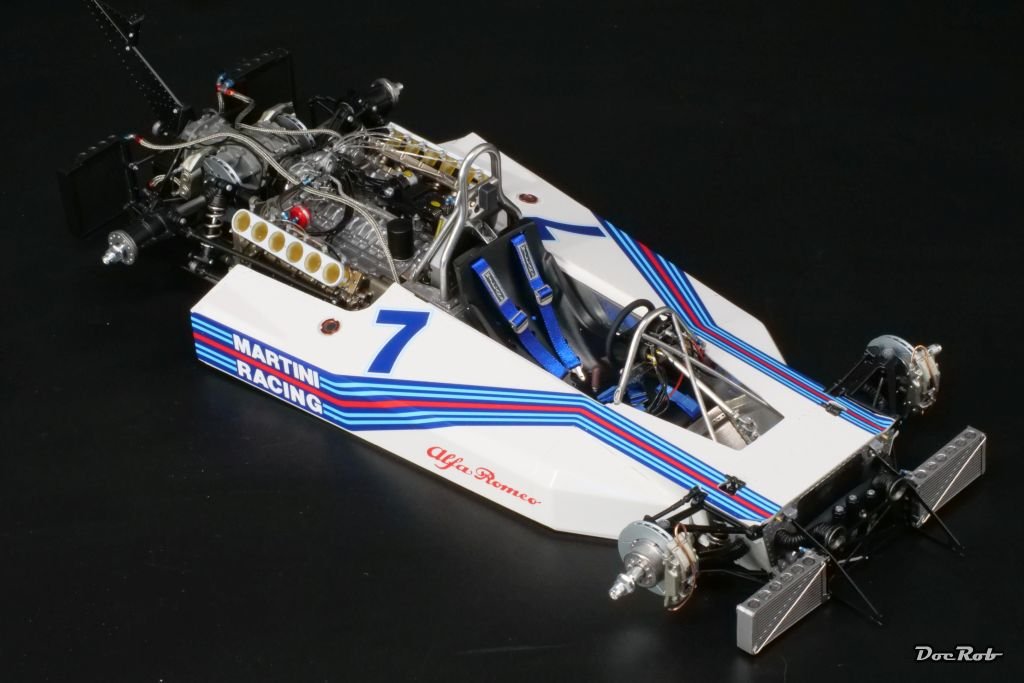
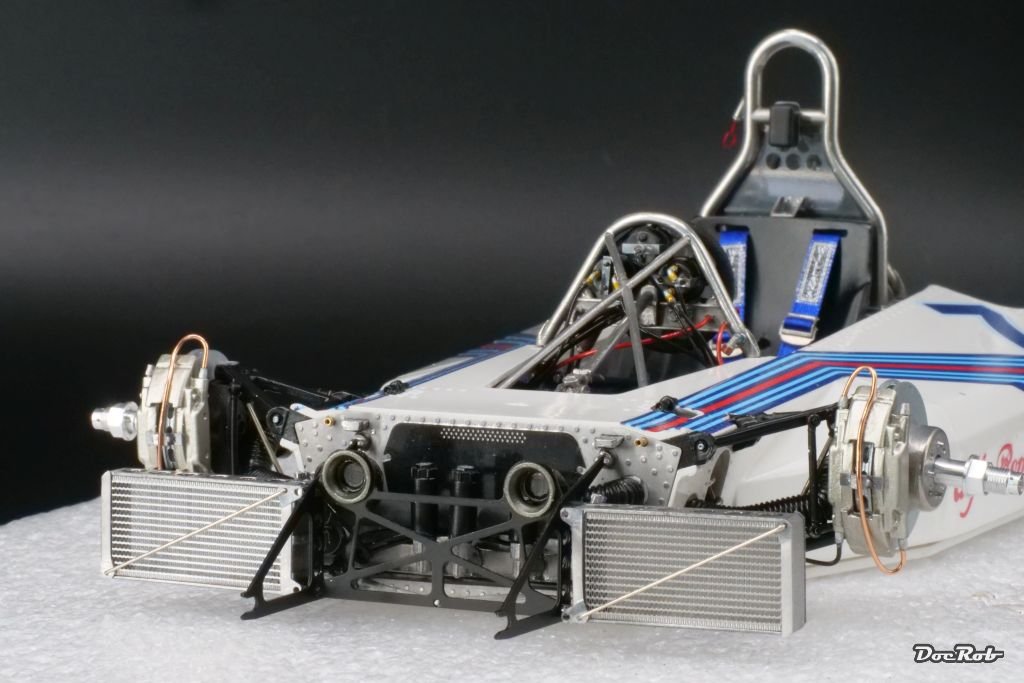
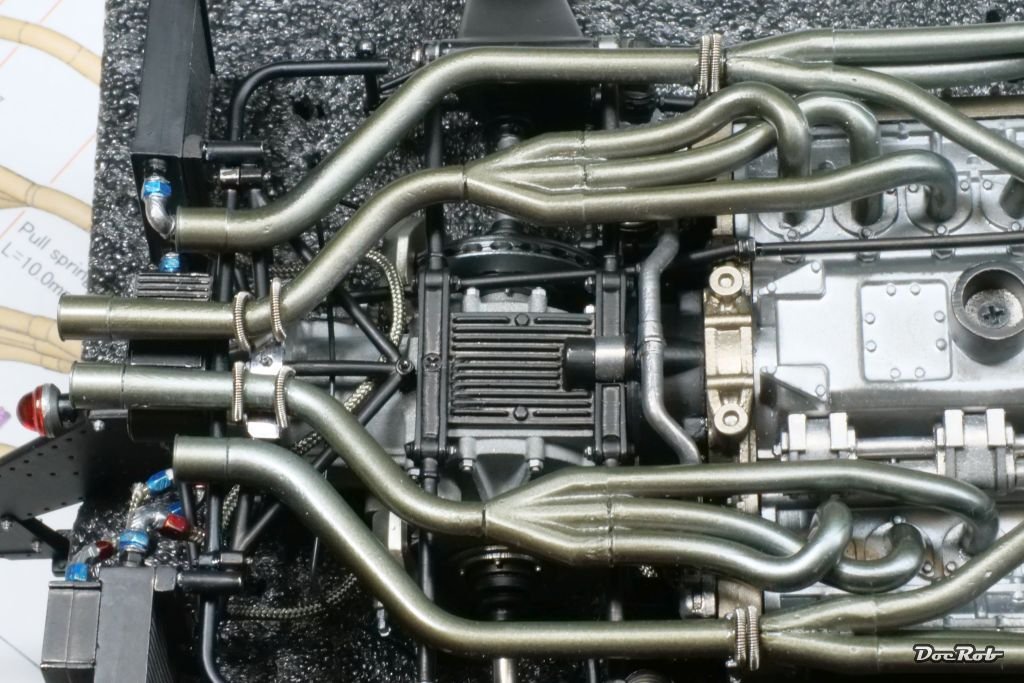
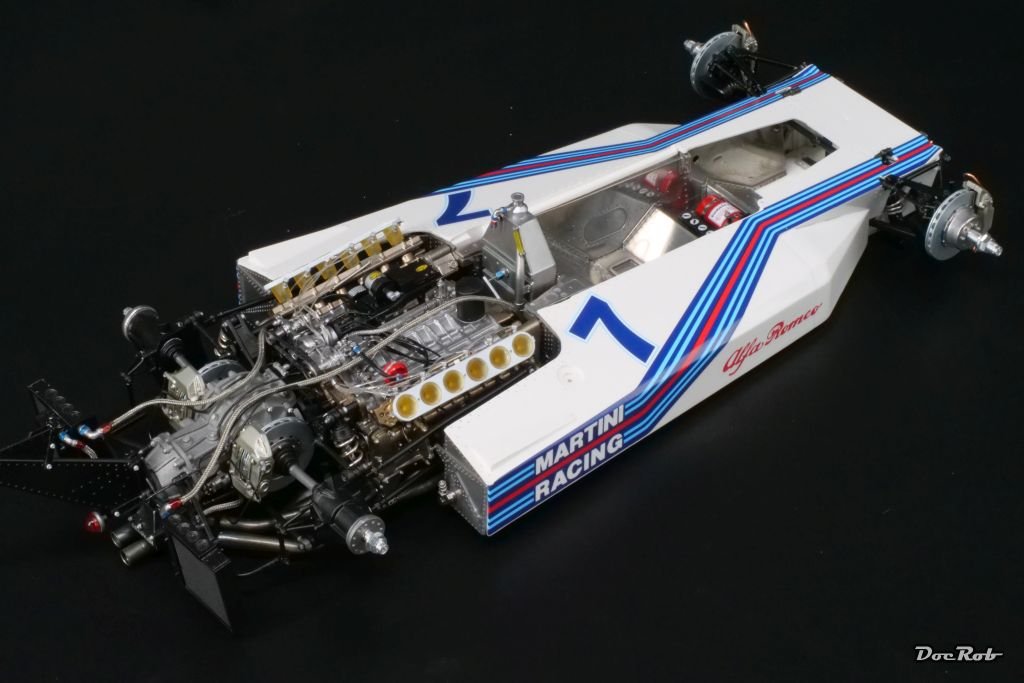
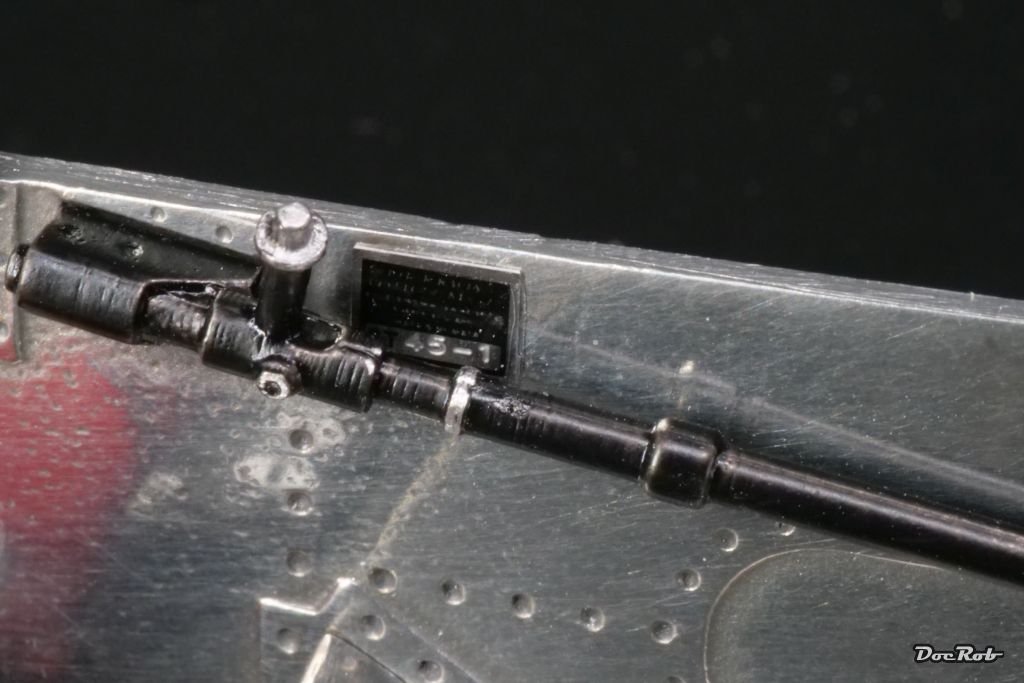
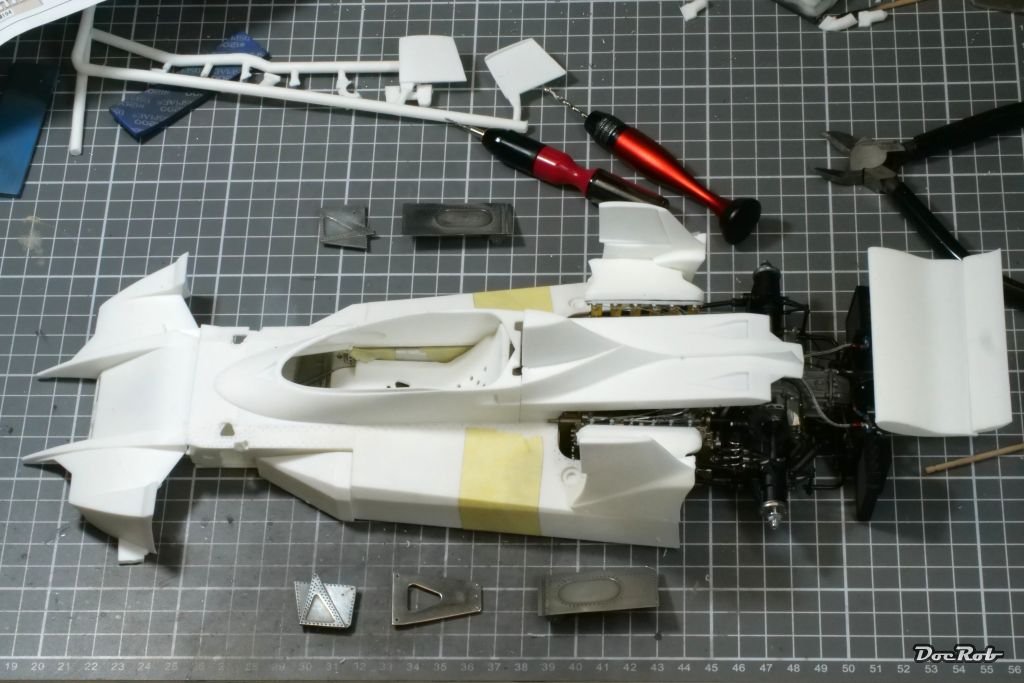
Today, I joined the engine with the monocoque. Test fitting was done before, but a last aggregate with three tubes attached needed to be fittet in between. That proved very difficult, but after some attempts, I got it done. If you ever build the kit, don´t glue the metal end plates (M142, M143) to the monocoque, like shown in step 13. Luckily I didn´t, because other ways I would have had to remove them to fit the engine in step 17. And finally, I tried the fit of the center body parts. Cheers Rob

- 68 replies
-
- 14
-
-
-
Thank you for your nice comment and for dropping into my log, Craig. I believe a forum like MSW is always a two way exchange platform, I give and I receive. I´m glad to share my experiences with my niche of modeling with you and benefited a lot through the input of fellow members in my threads or browsing through MSW, searching for help, information or just a friendly pat on the shoulder (literally). Cheers Rob
-
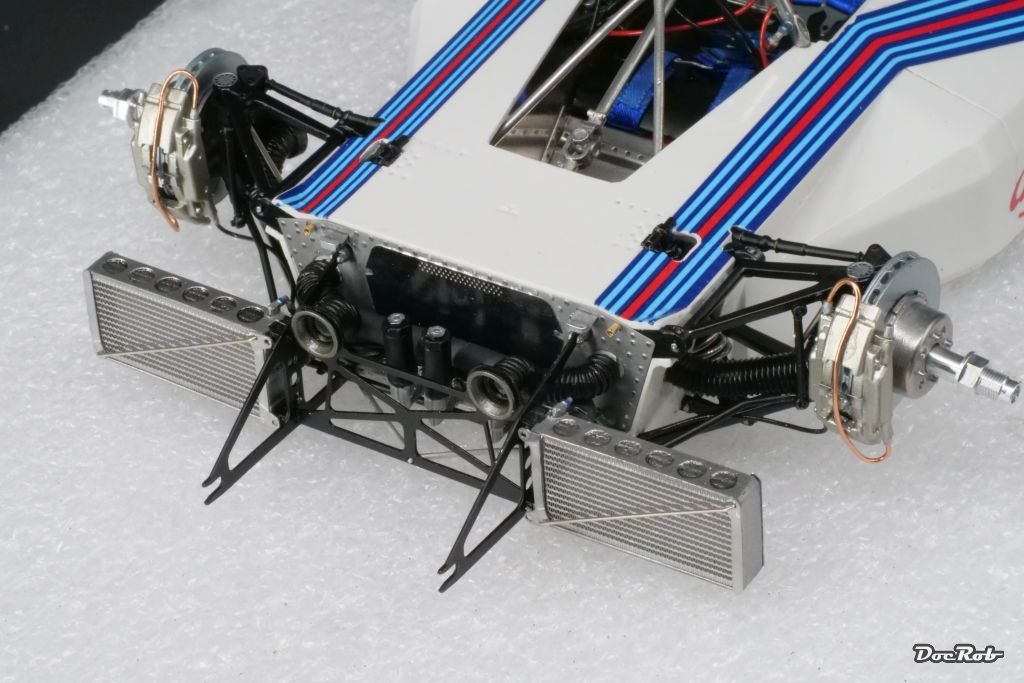
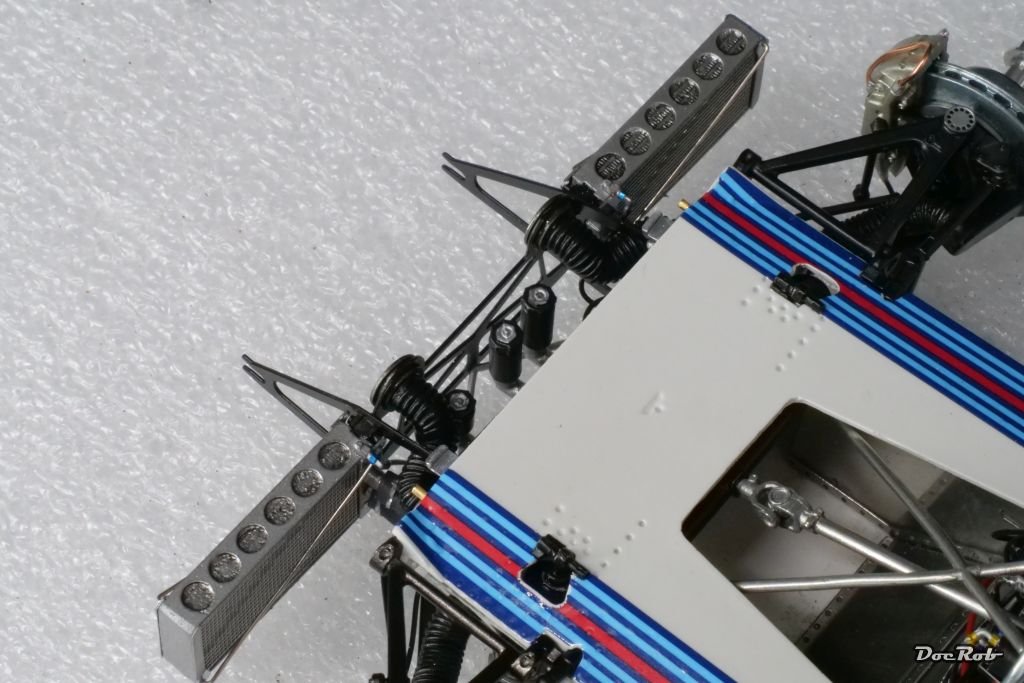
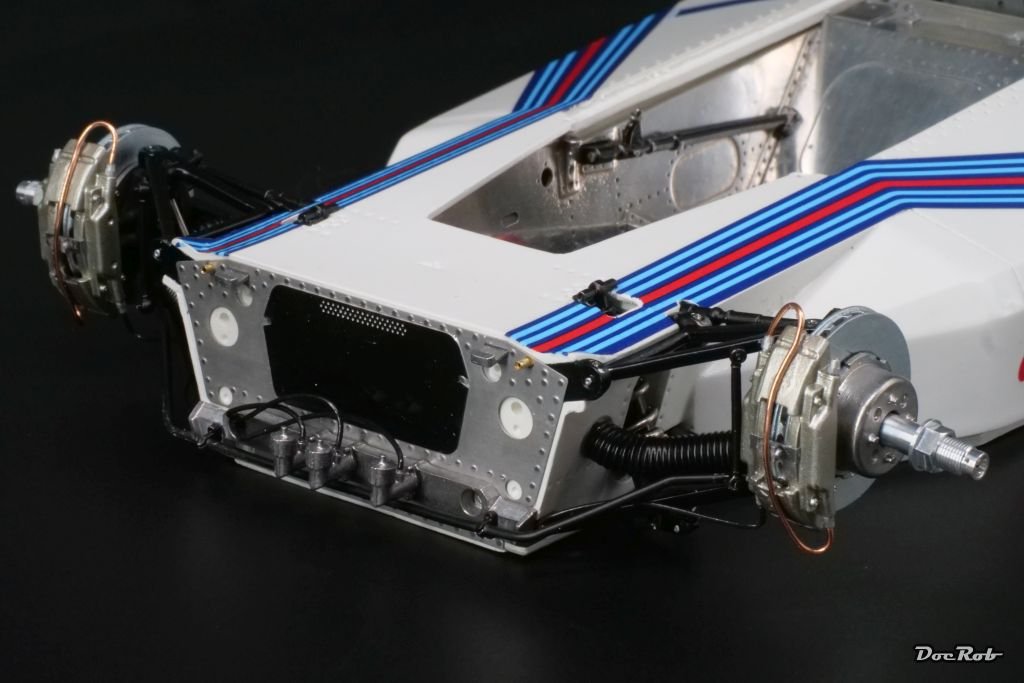
The front section was really difficult to build together due to many intersecting parts. Finally, I got the coolers glued to the framework and let dry for a while. The next difficulty was to add the front section to the monocoque. You had to plan ahead and follow the instructions to the number, to get it done. Finally, I got the four connection points glued in, while fiddling all the other ducts, hoses and wires in. I´m lucky that this part of the build is behind me now and I can look forward to marry the monocoque to the engine section soon. Cheers Rob
- 68 replies
-
- 12
-
-

-
-
Rat Fink would have liked the Rat Rod, Craig. Great work and proof of being doable. Cheers Rob
-
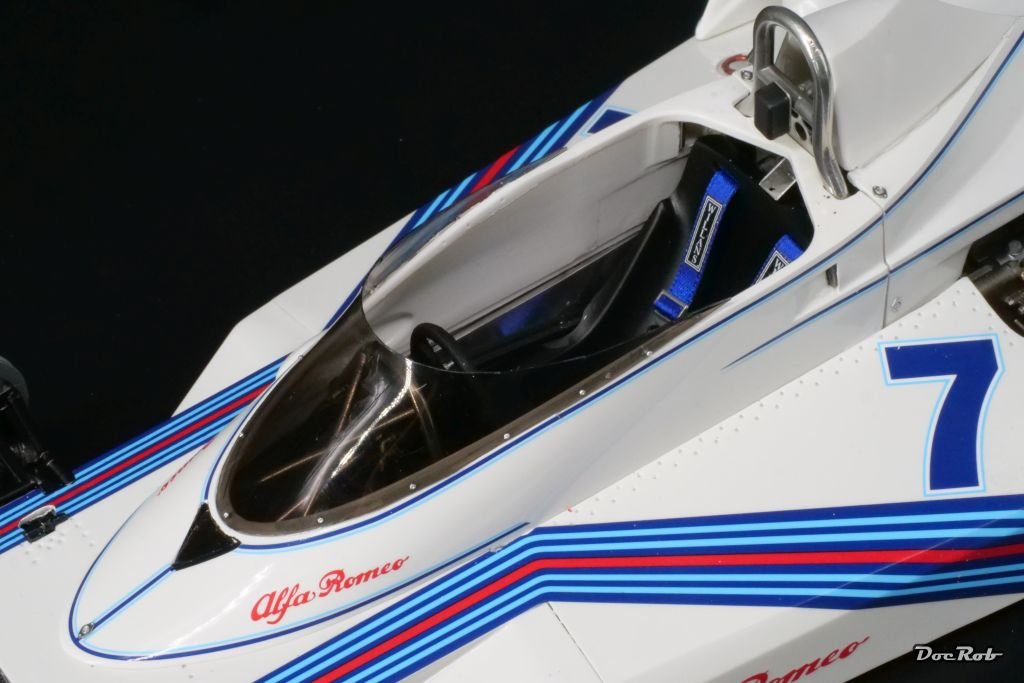
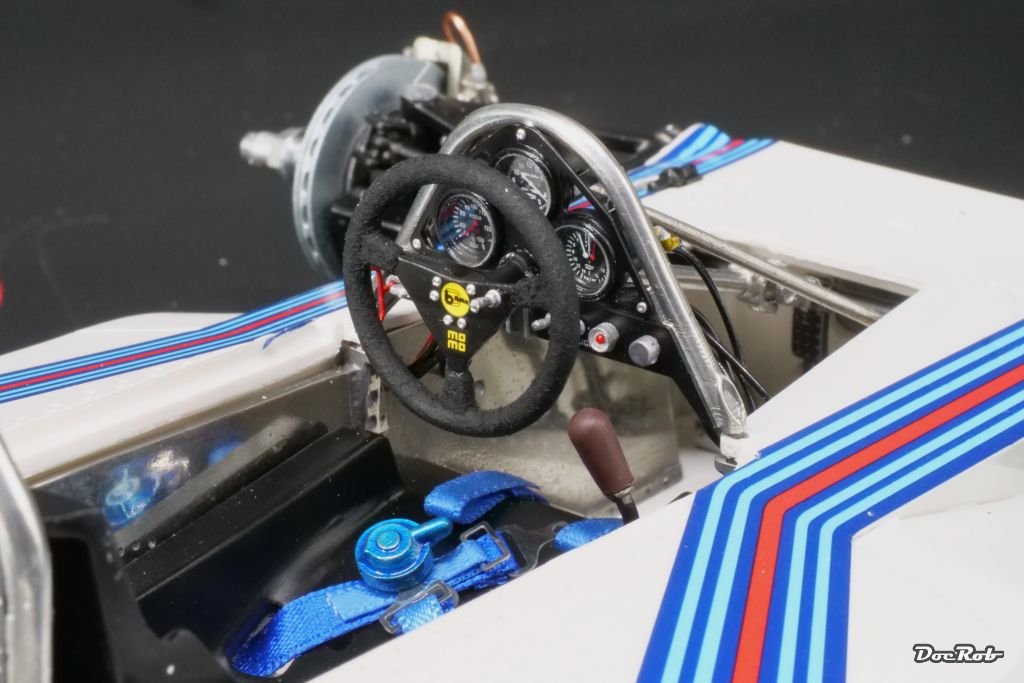
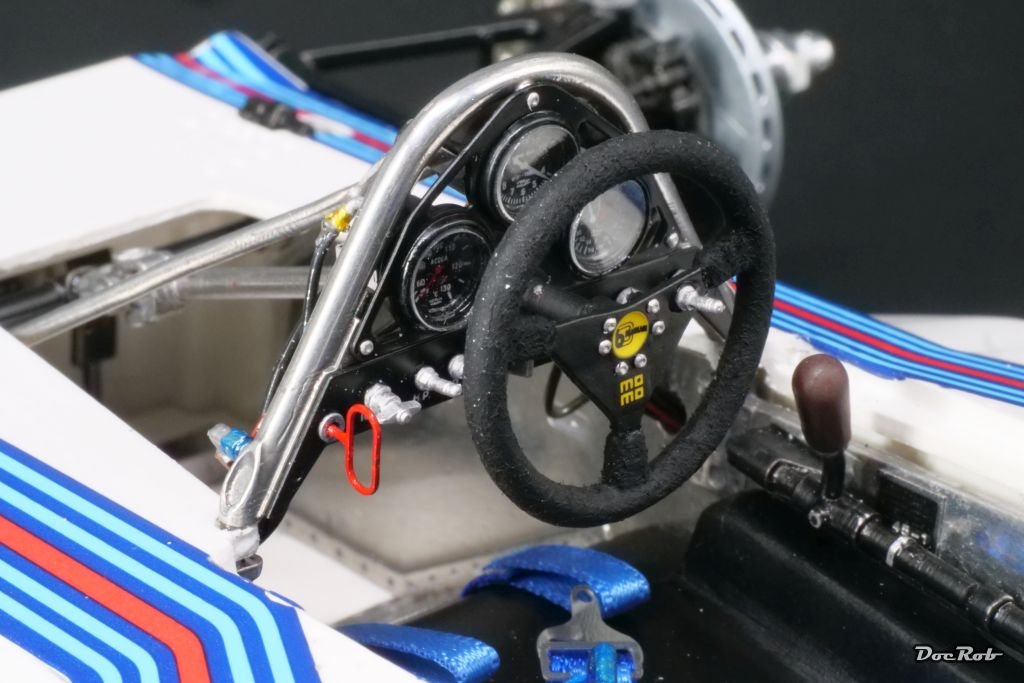
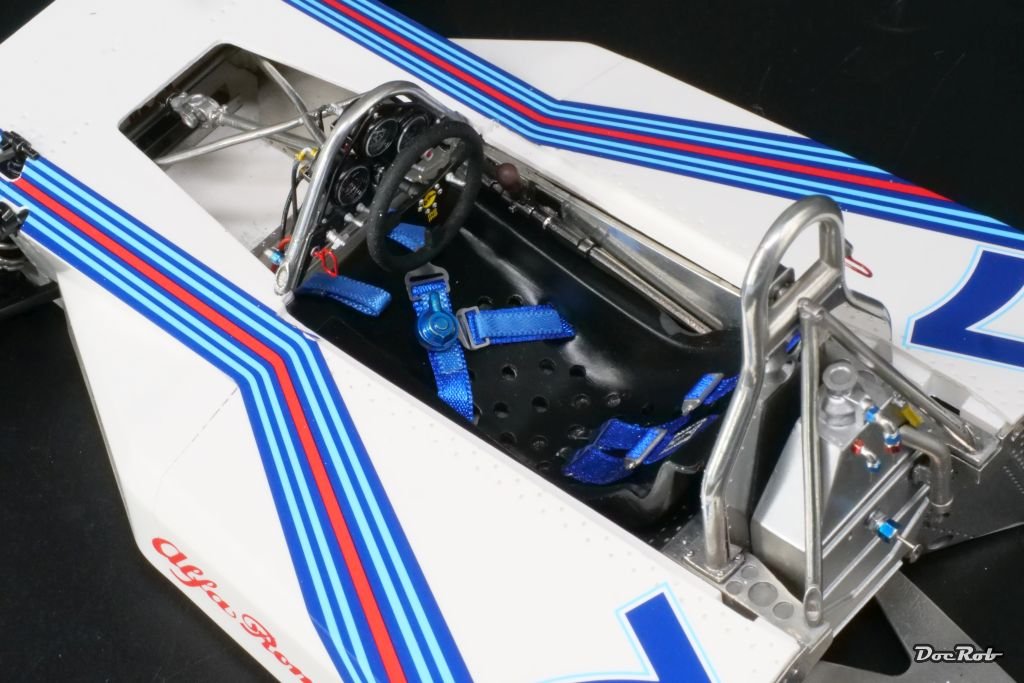
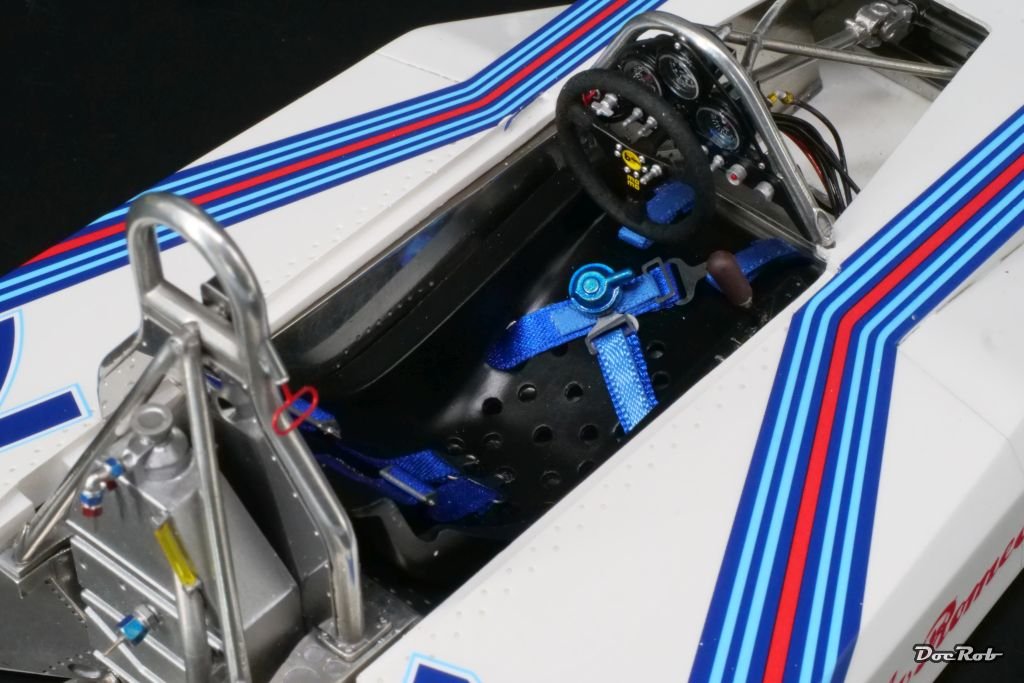
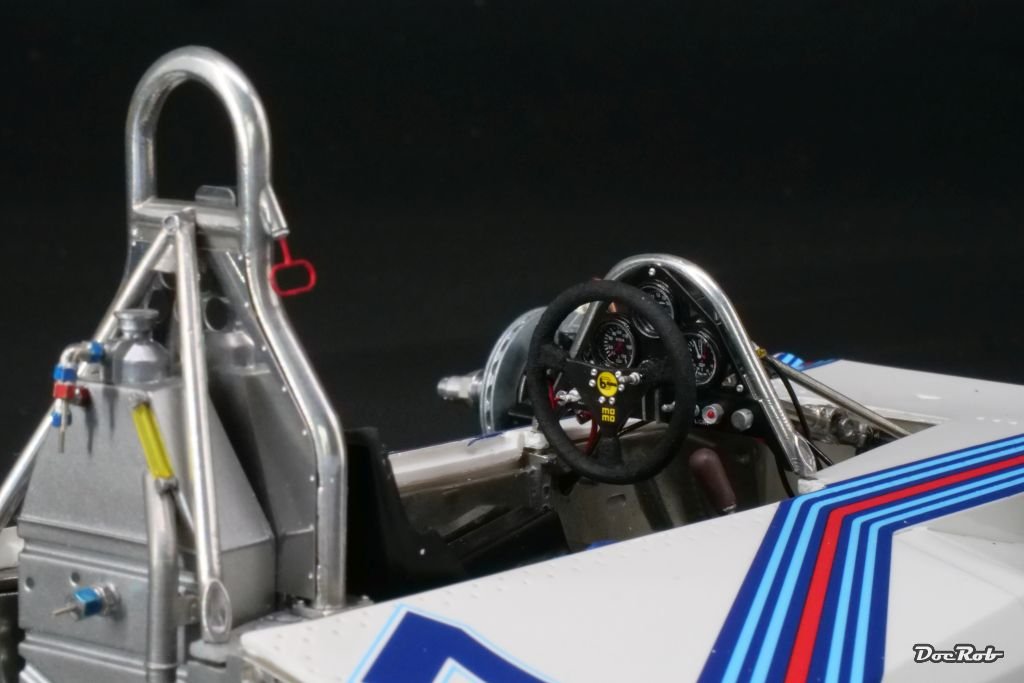
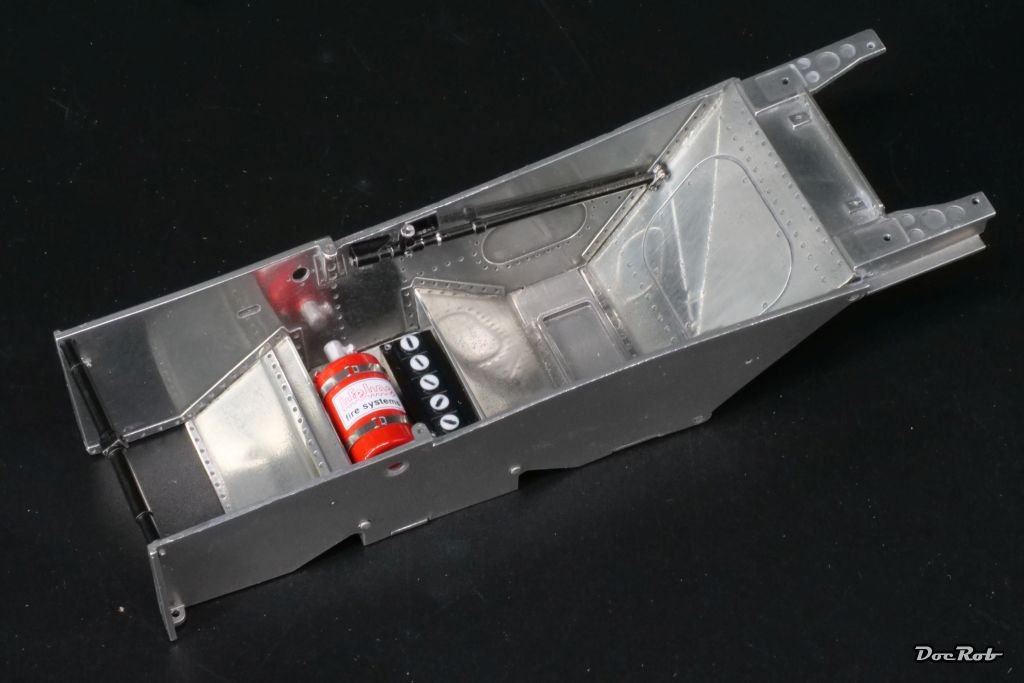
Today, I finished the front office. Before installation, I glued all the tubing and wiring to the backside with CA and let dry. Then I fiddled the steering column with the instrument panel in place and laid the wires in their correct places, a delicate affair. After adding the x-bar to the instrument panel, I made the final installments to the front side, namely the fire extinguisher pull ring and the steering wheel. Cheers Rob
- 68 replies
-
- 11
-
-
-
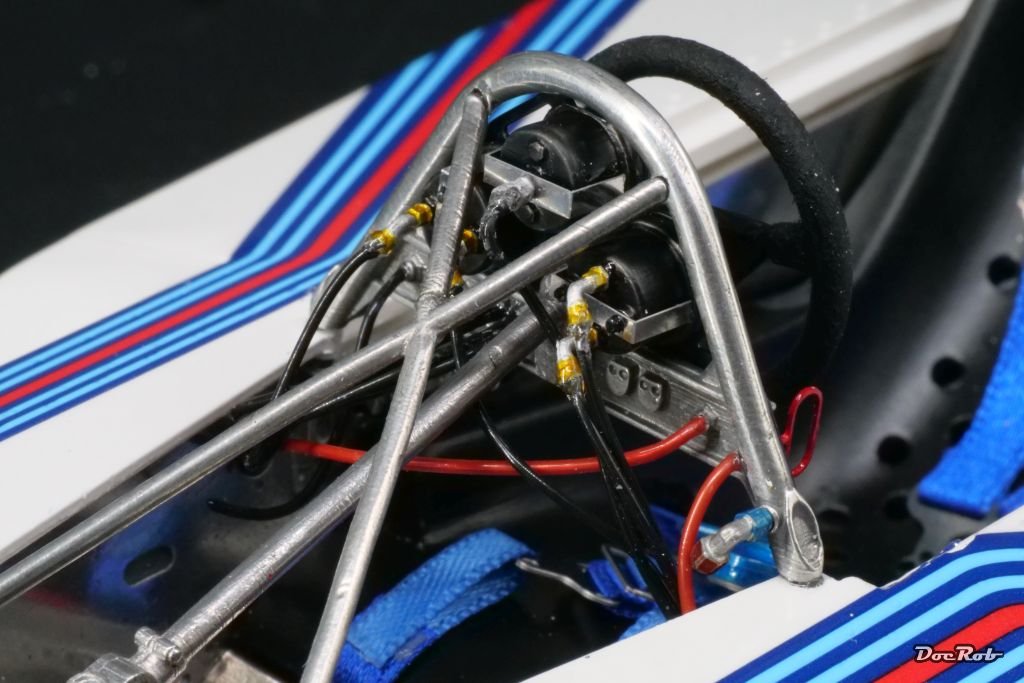
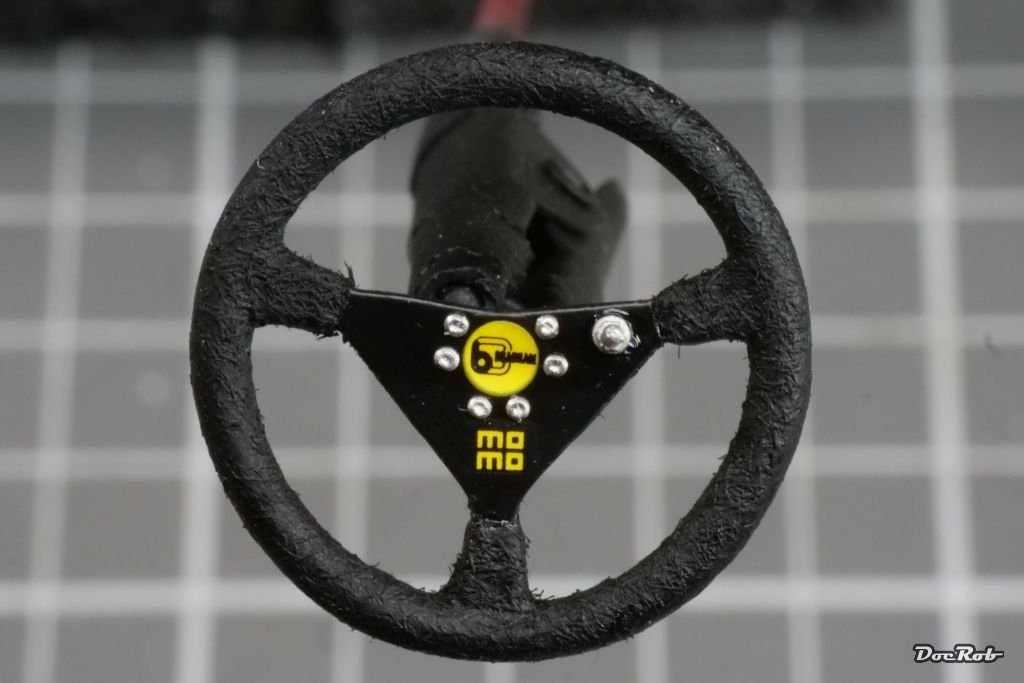
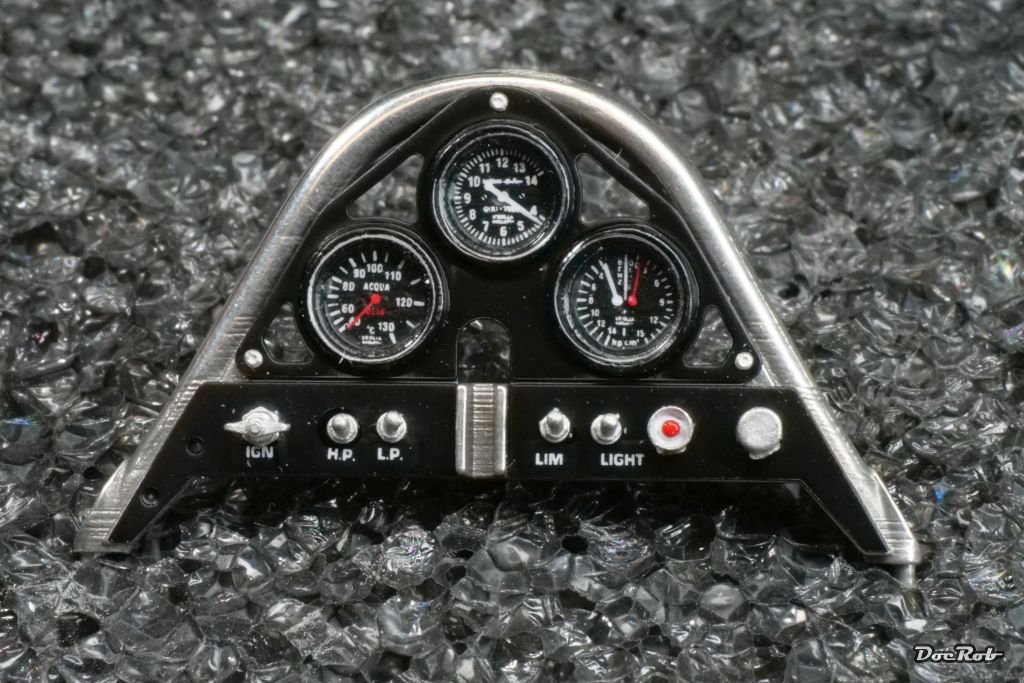
Today I finished the steering wheel, which was first airbrushed gloss black for decaling, then received the rivets, followed by a coat of semi matte clear. After drying, I masked the inner part and applied a coat of Tamiya LP flat black and dabbed in some black StreetBlister textile flocks for texture with a brush. I was not satisfied with the matte look and added a coat of Tamiya LP flat clear, again not flat enough. Finally, I used good old Tamiya XF-1 flat black. The fibers were finger dabbed into the fresh point and there are still some of them waiting for a shave. It looks a bit coarse in the pic, but this is heavy macroed. The instrument front panel, made from PE was also sprayed gloss black, followed by decaling the switches and dials, followed by a semi matte clear coat as a finish. I then added some brackets to the instruments, before gluing and riveting everything to the front roll bar, which was polished beforehand. The bezels are supplied as clear acetate circles, which I glued using Future. Last were the white metal switches, with only the fire extinguisher pull ring missing, because it´s to fragile Cheers Rob
- 68 replies
-
- 13
-
-
-
Looking very good, The wash enhanced the finish a lot. The plane is so positively ugly, I had to buy one myself . Cheers Rob
-
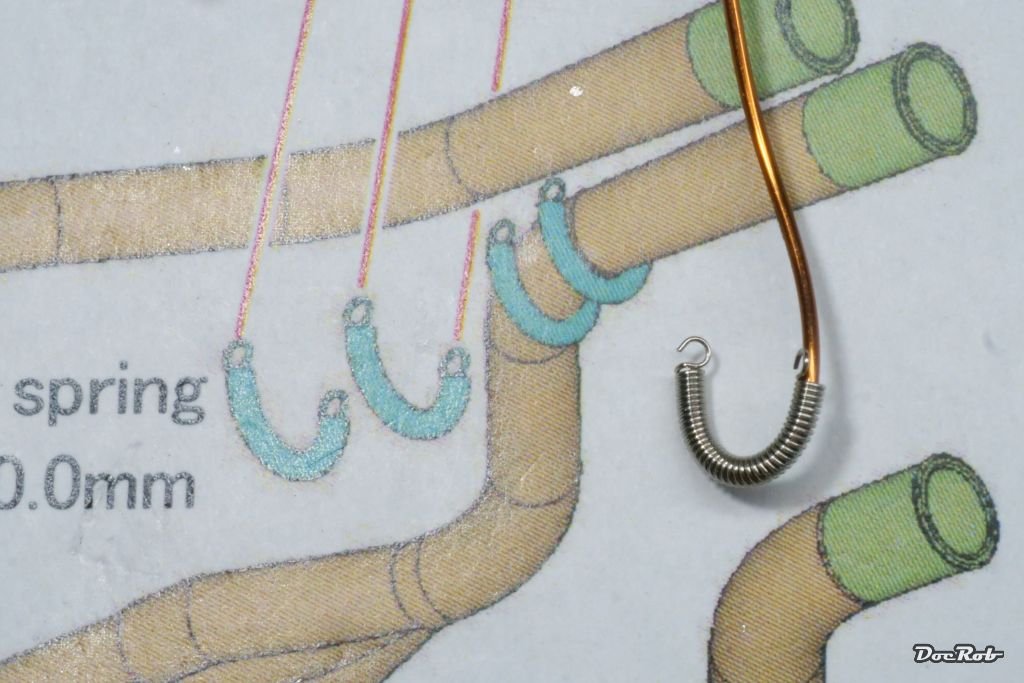
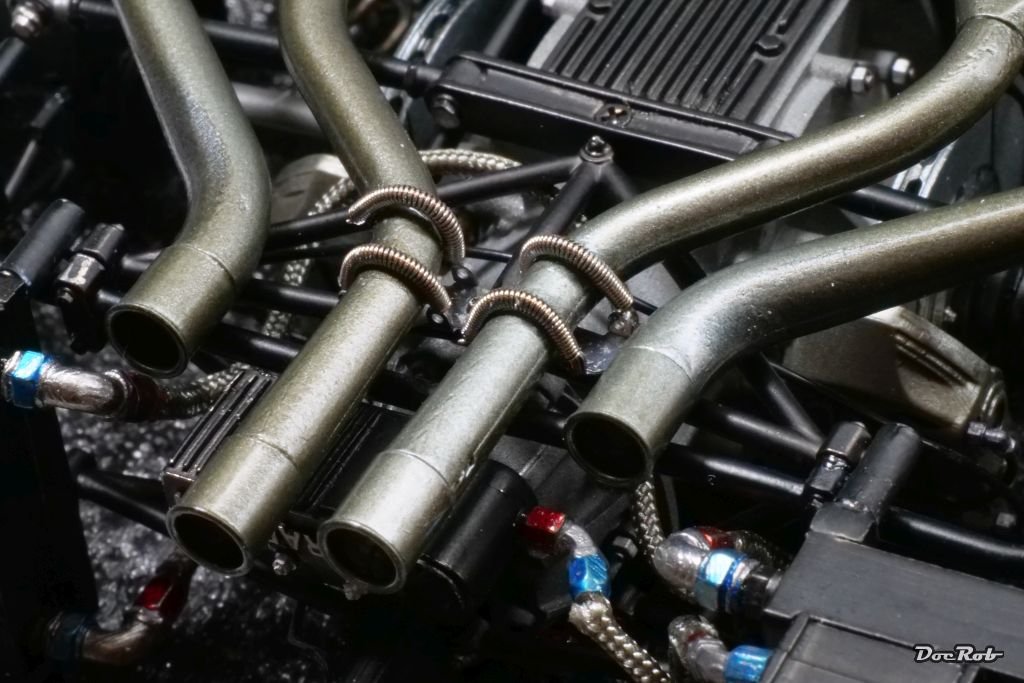
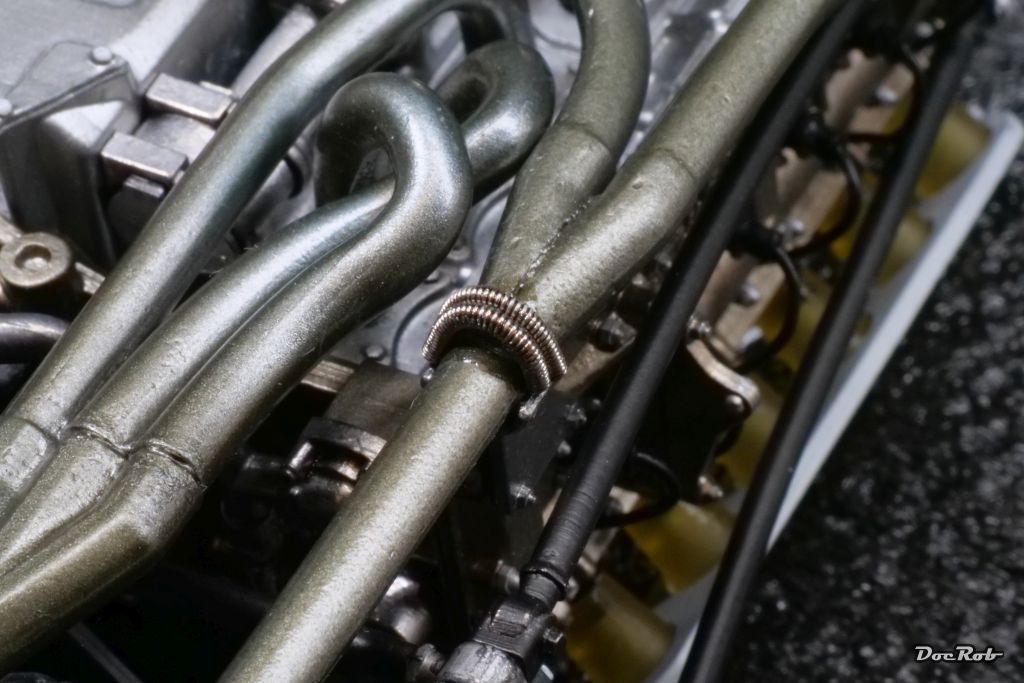
One subject out of an earlier phase of the build was still aggravating me, the coil springs, which hold the exhausts in place. There are eight and I couldn´t add a single one, despite trying really hard. Then I had an idea. What if I insert a copper wire into the coil spring, to bend it easily into the needed curve. I tried and it worked. Half an hour later, this issue was fixed and I have an open issue less on my schedule. Cheers Rob
- 68 replies
-
- 14
-
-
-
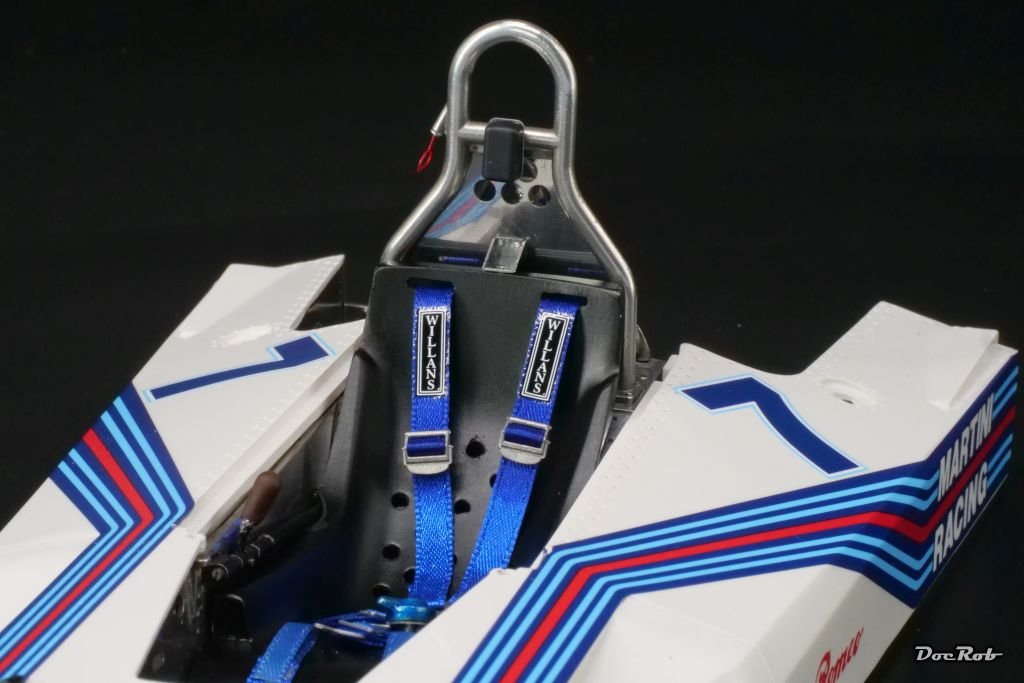
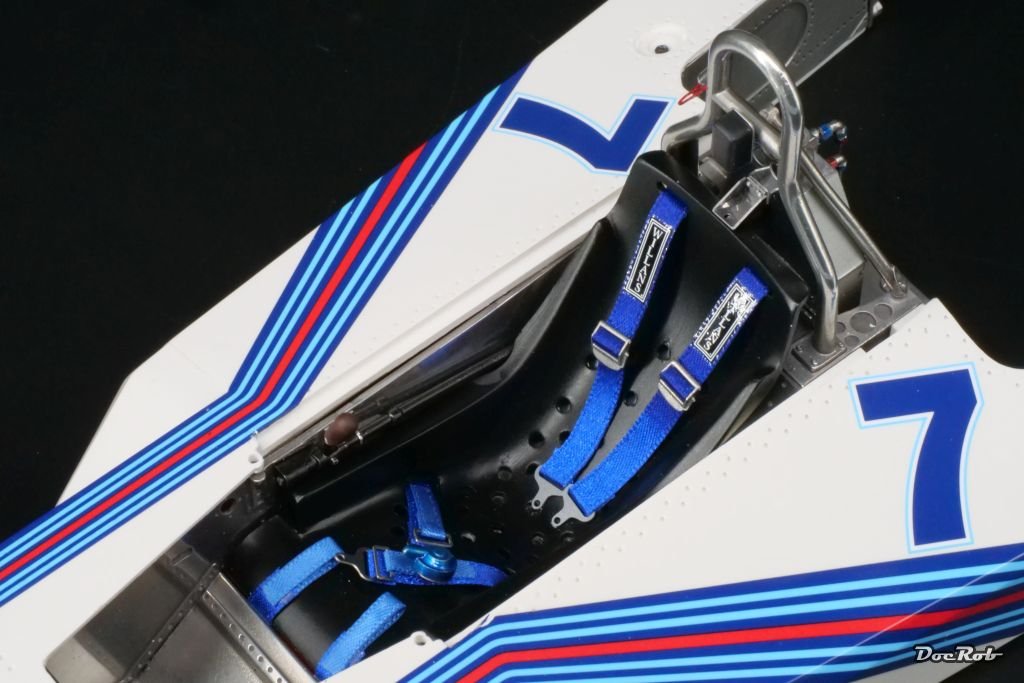
The cockpit tub starts to become busy. I added the seat belts to the seat and then this was glued into the tub. I really like MFH seat belts, as they look good and are relatively easy to assemble. There are white metal buckles and PE parts and two widths of blue ribbon. All got assembled using double sided tape, which has a strong bond and is supplied with the kit. I bought seat belt sets for other kits too, like for my 1/12 Tamiya kits. The manual placed the headrest/rollbar before the seat, but I chose to do it after, because it was easier to fiddle in the seat belts behind the seat. Cheers Rob
- 68 replies
-
- 16
-
-
-
Thank you Craig and OC, besides modeling, photography is one of my hobbies. I used to work semi professional in analogue times, but stepped out with the digital age, because I didn´t like the results earlier digital cameras were able to achieve and my go to analogue material became next to impossible to find. Long story short, since some years, I own a decent digital camera with good lenses and try my luck. Photographing model kits is not so easy. You need good lighting, solid depth of field and macro capabilities. I´m still in a learning process and have a long way to go. Photographed skillfully, the MFH kits nearly pass as real cars with all their brimming detail. Cheers Rob
-
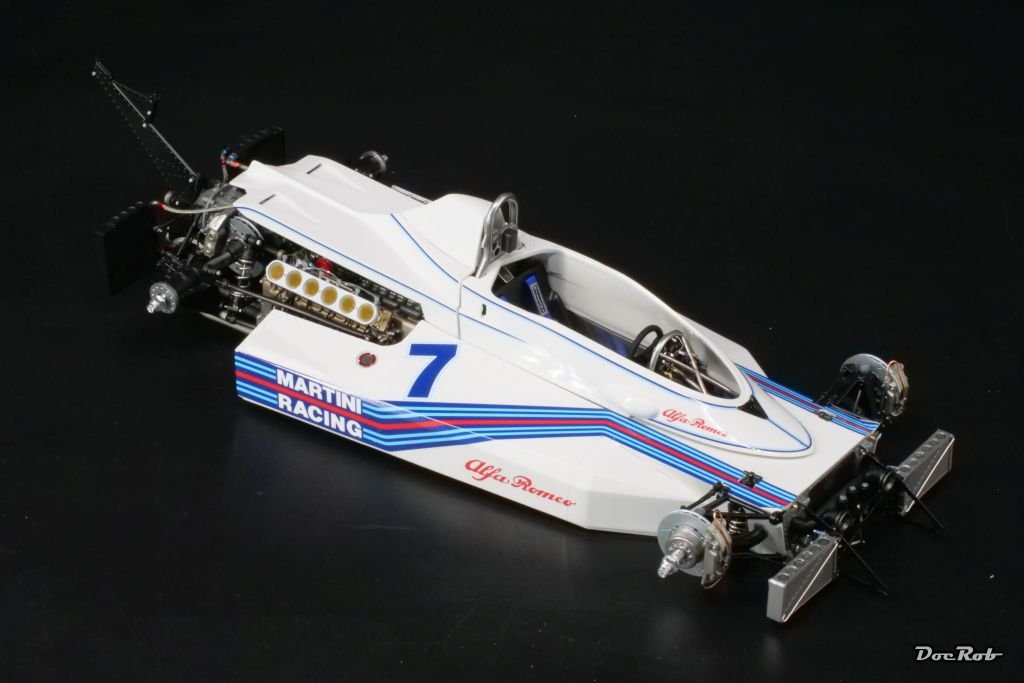
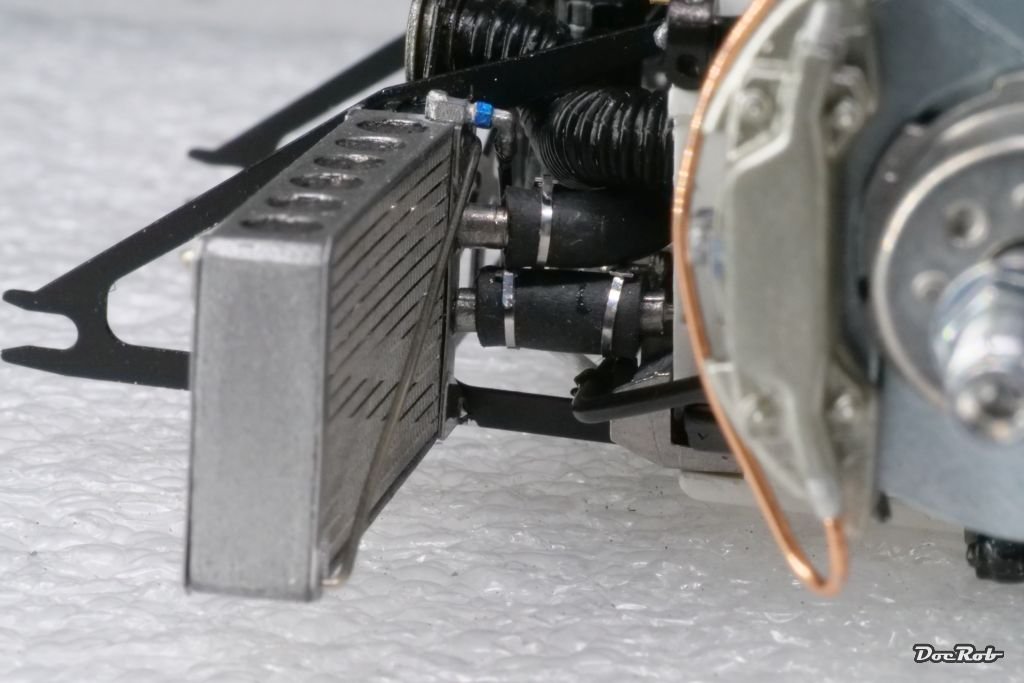
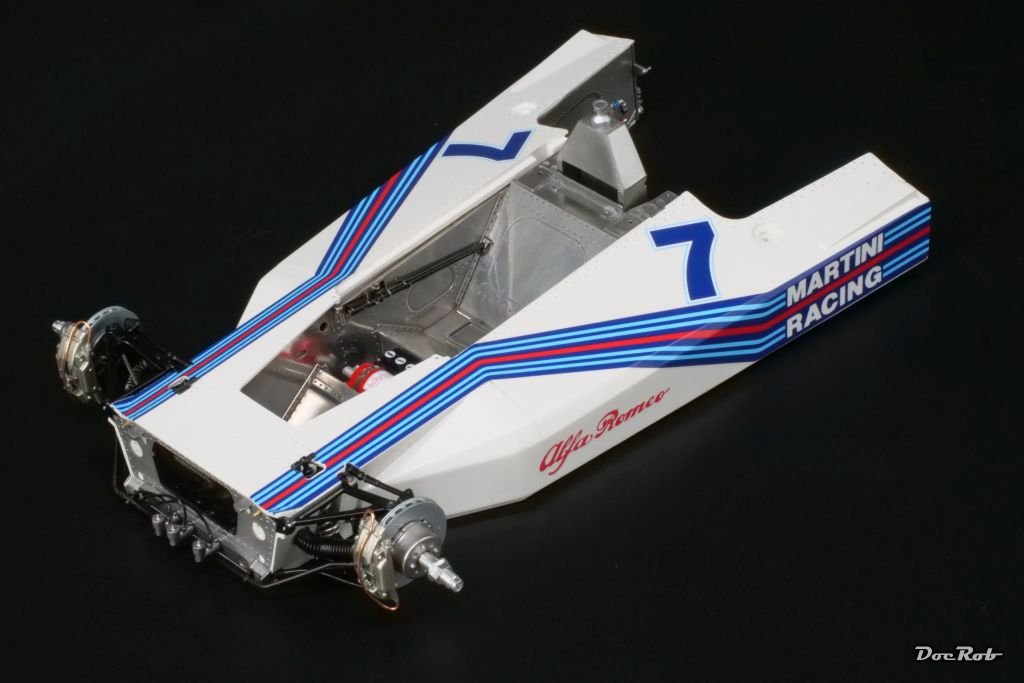
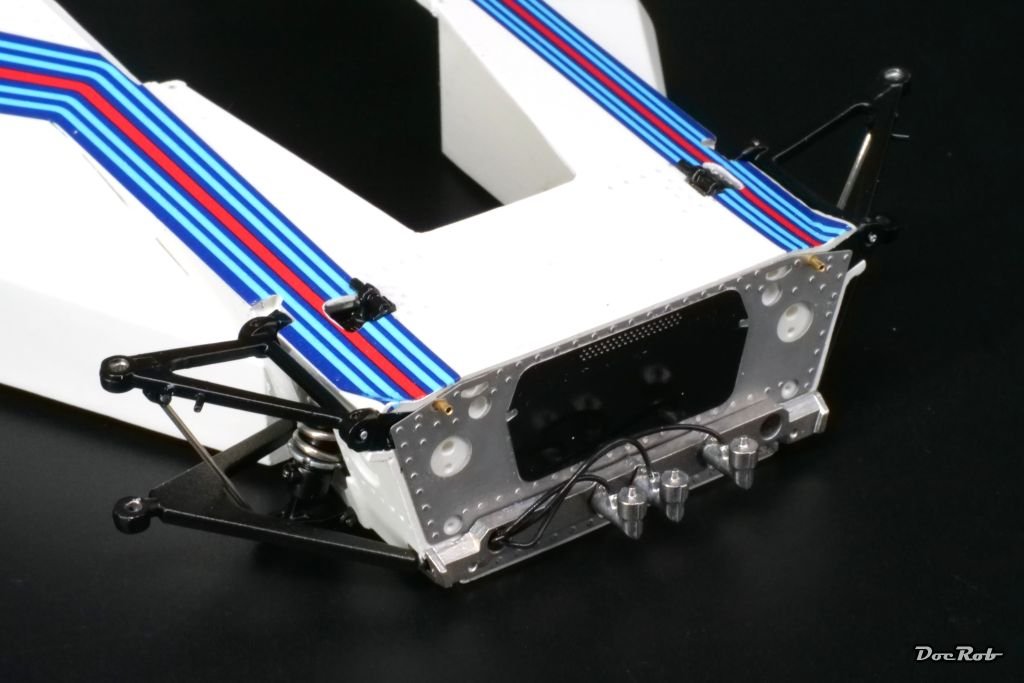
Today I achieved some very important and daunting steps, but firs things first. I finished the front section with all the parts added for the axle, brakes, steering and suspension. Some were a bit fiddly, but in all, the fit was great with that delicate section. It´s also quite robust. The axle screws are loose by design and therefore hanging on the pic. Next was the daunting part, the closing of the main body. There are so many intersecting parts, that even test fitting is a time and nerve consuming affair. Finally I got it done and everything fitted with a tiny bit of tweaking here and there. The floor pan and body are hold together with eight screws. Finally, I test fitted the engine section to the body and luckily everything fit as well. Cheers Rob


- 68 replies
-
- 13
-
-
-
Thank you Ken and Alan, the build is time consuming, but a lot of fun. I like to do one or two steps in the manual at a time, preparing the needed parts and add them to the model. The detail is indeed fantastic, these kits are little marvels. Cheers Rob
-
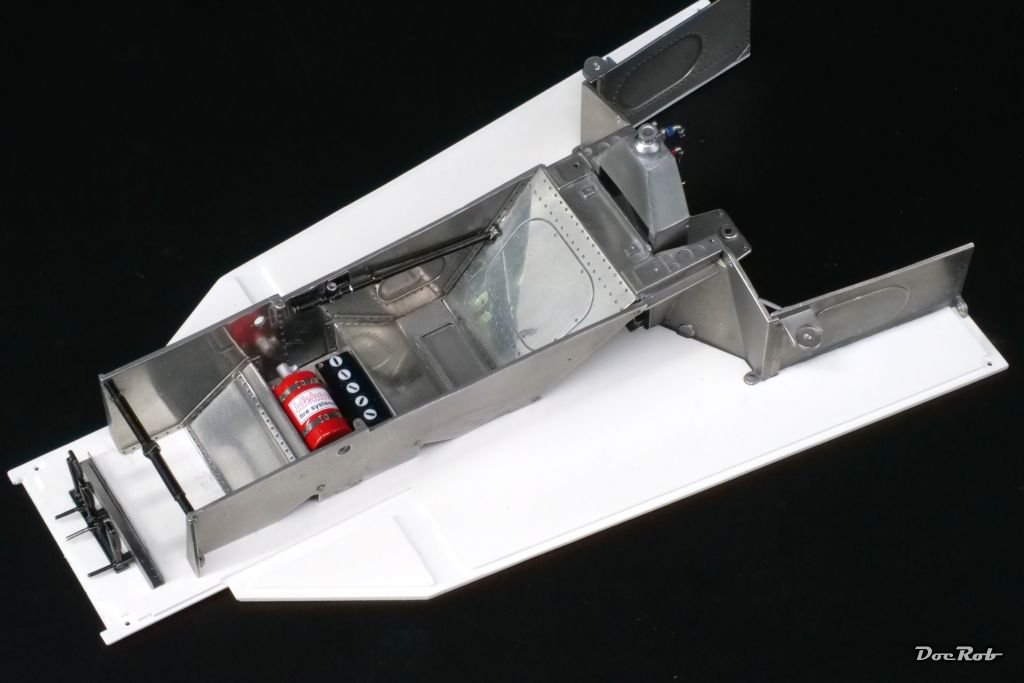
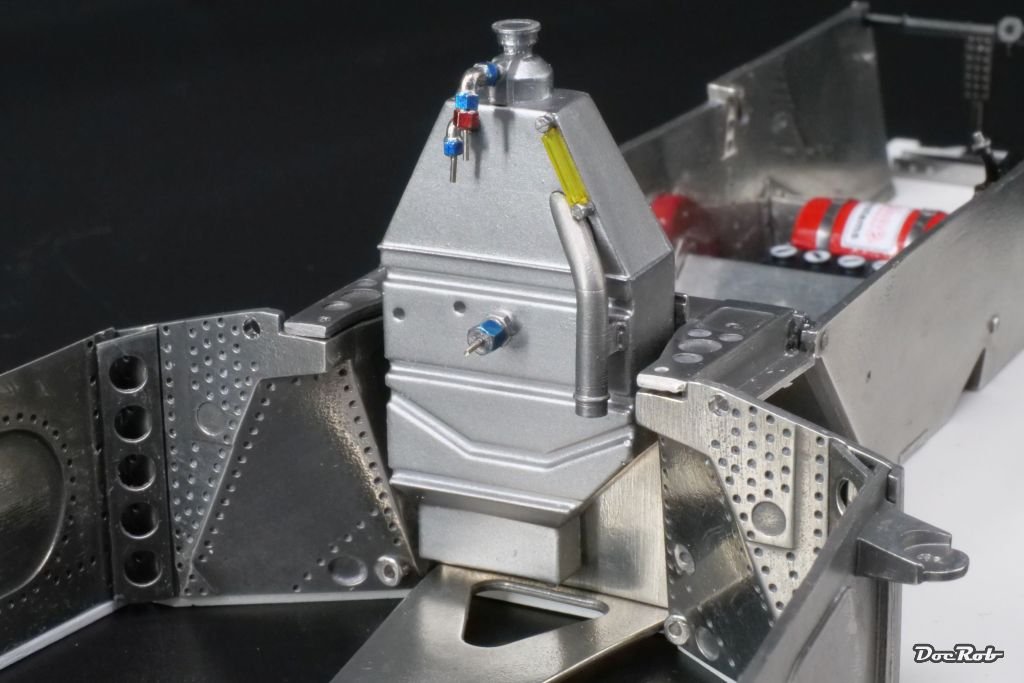
After all the body work, now it´s all about subassemblies and not to damage the polished body with scratches or CA fingerprints. The polished tub went finally onto the floor pan and got screwed there permanently. I further added some details like the pedals. The rear of the tub received the gas tank with all the needed attachments. Then I finished the front suspension sans the steering. Most delicate were some turned pins and the intersecting tubes, which hold the nose in place later. There was a need for absolute precision, to prevent gaps from the monocoque to the nose part. Cheers Rob
- 68 replies
-
- 12
-
-
-
Looks absolutely supercool, Craig. Cheers Rob
-
Absolutely fantastic result Dan. I love, how colors and decals blend and the restrained weathering. Getting the spinners right must have been a chore. Cheers Rob
-
There are few steps more rewarding in modeling than to finish a car body to a high shine surface. All the work going into took a while, but I love doing the polishing as a last step. I used Tamiya´s polishing compounds starting with coarse, then fine, followed by finish. I didn´t apply wax now, because there are still many parts to add to the body, so this will be kept to the finish. The coarse polishing is by far the most important and also time consuming one to my eye, as you remove all the tiny imperfections, check against the light and continue until all looks good, always taking care not to polish through the clear coat. I couldn´t resist a little workbench mock up. Cheers Rob


- 68 replies
-
- 12
-
-
-
Airbrushing is already done and didn´t take up much time. There are three sessions, first primer, than three coats of body paint and finally three coats of clear. The prep and polishing time exceeds the spraying time by far. Cheers Rob
-
Clear coating went very well. I used Zero Paints lacquer clear, which did a fantastic job on my Cobra Coupe. My approach is similar to the application of the base coat and it works for me. First, I spray a thin un-thinned layer, which dries very quickly with the help of the airbrush blow, to hinder the aggressive lacquers to attack the decals. The second layer after about 15 minutes consists of about 25%-30% leveling thinner and is applied "wet" After again 15 minutes of drying and leveling time, I applied the third layer, this time with 50%-60% of levelling thinner, this time very "wet". The brief drying time leads to later layers "melting into the layers applied before and give a better surface. I may could push my luck with the application of pure leveling thinner as a fourth coat, but I fear running paint. The result looks far better to the real eye than on the pictures, but I learnt through other builds, that´s always the case with high shine finishes. Anyway, today or tomorrow I will slightly sand and polish the surfaces. Cheers Rob


- 68 replies
-
- 13
-
-
Thank you Gary, in fact the decals are perfect to work with, beside that cover foil thing. I guess, it is meant to be a protective layer, but can easily be overseen. The good about the decals is, they are robust, perfectly printed with vivid color, high opacity and perfect size. They apply very good with lukewarm soap water alone. For the rivet holes on the body, I applied a bit of Micro Sol, which made them easily settle into the holes contours. The newer MFH kits have Cartograph decals without that foil, but the Cobra Coupe and the BT45 had them both. Cheers Rob
-
Finally some serious progress. I finished decaling the body parts, after a long period of prep work. My usual method is read the manual, understand the manual, drill all needed holes, fill and sand where needed, sand all resin surfaces carefully with 4000 grit, clean all the parts first in soap water (helps to reduce the static, these resin parts possess, which makes them like dust magnets) and wipe it with alcohol. Next was Mr. Color 1500 white primer, which sprayed fantastic like always. After a day of drying time, I checked the surfaces again and then applied the body color, in this case Number Five´s Brabham BT44 white, which is a tiny bit off white. I sprayed the first layer un thinned, let it cure for some minutes, followed with a mix of about 25 % leveling thinner and paint and let dry for some more minutes. The last layer was applied with about 50 % of thinner and the relatively short drying times helped, that the later layers "soaked" into the base layer. There was extremely minimal orange peel, which completely vanished after half an hour of drying. I have to say, these Number Five colors are fantastic to work with an give the best possible surface results. I used them for the Cobra Coupe as well. I feared decaling a bit with the thin pinstripes and huge decal bands slung around the body. I didn´t need to worry, the decals were fantastic to work with and were applied using warm soapy water only. One word of warning though, MFH decals are covered with a very thin very transparent plastic sheet which slightly adheres. Take care, you remove it before applying the decal, because it sticks to the foil much better than to the backing paper after soaking and you have to carefully peel the decal off the foil with a scalpel blade, which is really no fun. I only missed to remove the foil with two decals, but man, was I sweating. Cheers Rob

- 68 replies
-
- 10
-
-
-
The preparation of the resin and metal parts for all body and the front suspension is quite time consuming, but the fit is overall very good. All body parts got cleaned up, surface sanded, washed in soap water, swiped with an alcohol soaked cotton rag and finally primed with Mr Surfacer 1500 whit primer, which laid down beautifully. In the meanwhile, I glued together the polished cockpit tub and added some accessories. The battery and fire extinguisher will be hidden under the seat later. One beautiful detail is the number plate of the chassis. It has an etched part as a base, with the chassis number etched in. Onto that, you apply a transparent and black decal with the labeling, a bit hard to see on the pic. Cheers Rob
-
Very nice work and a joy to follow. Cheers Rob
-
There is not too much to show at the moment, as I´m preparing all the resin parts and some of the metal parts for the next steps. Test fitting is time consuming, but helps to recognize, where everything fits and how. During this test fitting period, I made a mock up workbench build up. Cheers Rob
-
Yesterday was the day of mano negra, the black hand . Polishing white metal makes your fingers black with the metal residues, but despite the dirt, it is fun. I used sanding sponges of 1200 to 6000 grit, to get rid off the cast imperfections, then it was about polishing with a cotton swab and Autosol metal polishing paste with works really well. I like the shiny look a lot and it could pass for polished aluminum to my eye. Today, i test fitted for some hours, as now is the decisive step, where the tub has to fit into the body, along all the mating parts. Cheers Rob

- 68 replies
-
- 11
-
