HOLIDAY DONATION DRIVE - SUPPORT MSW - DO YOUR PART TO KEEP THIS GREAT FORUM GOING! (Only 44 donations so far out of 49,000 members - C'mon guys!)
×


Srenner
-
Posts
220 -
Joined
-
Last visited
Content Type
Profiles
Forums
Gallery
Events
Everything posted by Srenner
-
What's easier?
Srenner replied to Srenner's topic in CAD and 3D Modelling/Drafting Plans with Software
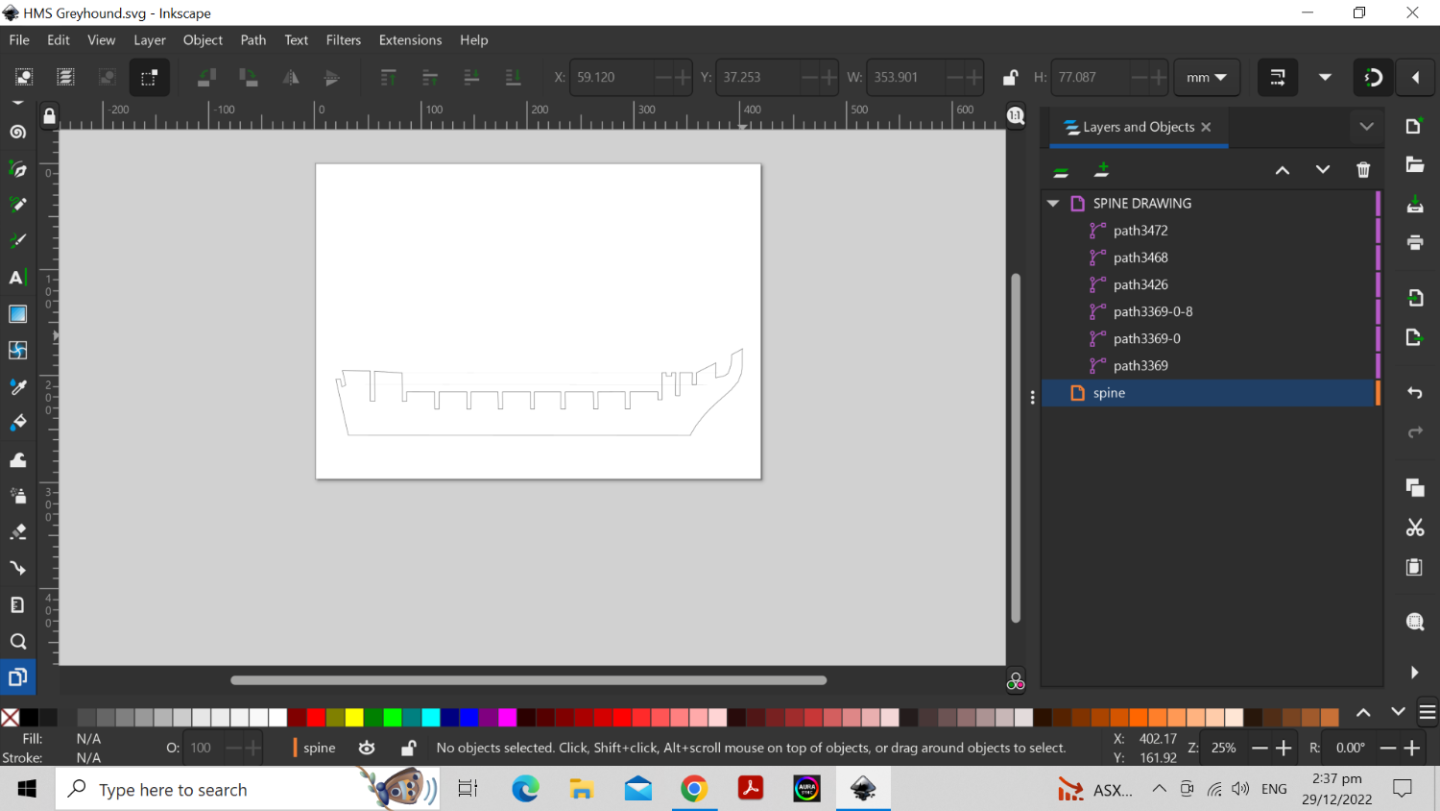
Wow Kurtis that was amazing fix of the files there... one day I just need to keep using it and practising.... You noticed that it looked pretty wonky - that's the problem with the HMS greyhound 1:100 corel kit - if you dont modify in and around ribs 8,9 and 10 the hull bulges up higher than it should to make a nice line from rib 5 and 6 to the stern. So I was going to muck around with the smoothing and lighting etc to get a better shape then take sections back to inkscape and print them out so I can cut out new bulkheads from some ply or basswood... in the future yes eventually I would like to get good enough to 3d lazer cut the rib from plywood. you started that modification process and that is where I am heading. Thanks very everyone for the help - I'm an engineer but cant use drawing packages for anything - been too long in management! Cheers Stuart -
What's easier?
Srenner replied to Srenner's topic in CAD and 3D Modelling/Drafting Plans with Software
Hi Kevin Yes ultimately I want to get into 3d printing but first I want to fix up a model from Corel that is way off and I'm doing a novel approach by using computer tools to help. Yes I could just do it by hand but I also want to get into 3d printing and cnc construction in my older life. -
What's easier?
Srenner replied to Srenner's topic in CAD and 3D Modelling/Drafting Plans with Software
Hi Kurtis, I'm trying to fill in the curves I guess... I read the other post about creating curves and then diving them sounds complicated but could give it a go... Hopefully this link works to my drop box https://www.dropbox.com/s/9dvm2siginlr063/greyhound.blend?dl=0 -
What's easier?
Srenner replied to Srenner's topic in CAD and 3D Modelling/Drafting Plans with Software
Hi Kurtis, I'm trying to post the blend file but the server doesn't want to upload? Any ideas? Thanks -
Hi... new to 3d modelling software... I have a wire frame now of the ship with plenty of nodes etc but struggling to join them into a solid mesh. Is it easier to "drap" a surface onto the outside of the frames and essentially cover them in solid or it be better to create lots of cubes and join the Dots on the nodes so to speak a bit like a Lego set.? With the compound curves in 3 dimensions its hard to get the surface to shear and bend at the right places but mega time consuming to create individual cubes to fill in spaces... and won't that also look quite blocky?
.thumb.png.90b3d4ecce6eeab135e8d85927187488.png)
-
It hasn't been so hard so far with blender and getting the different bulkheads in position... you just need to get used to using the rotation tools and setting up the orthogonal views. I think it maybe back to front but that won't matter for what I am going to use it for. The next part is getting the mesh onto the outside of the curves.. anyone have helpful tip here?
.thumb.png.1ad16130c2d4083041d723f776b9b9db.png)
.thumb.png.5d2dd0de247ef266d65326a7acd94e51.png)
-
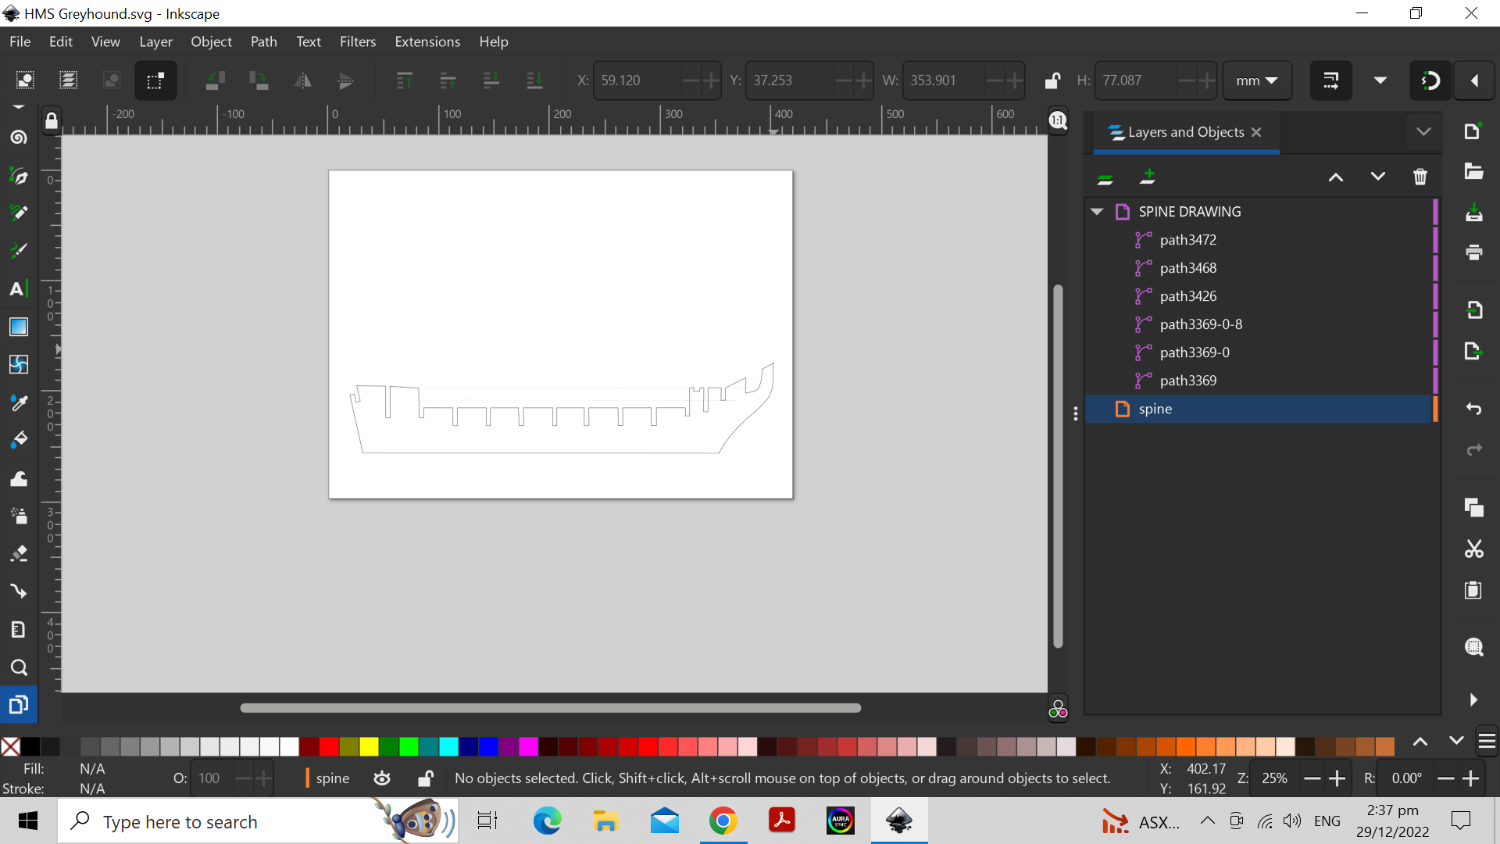
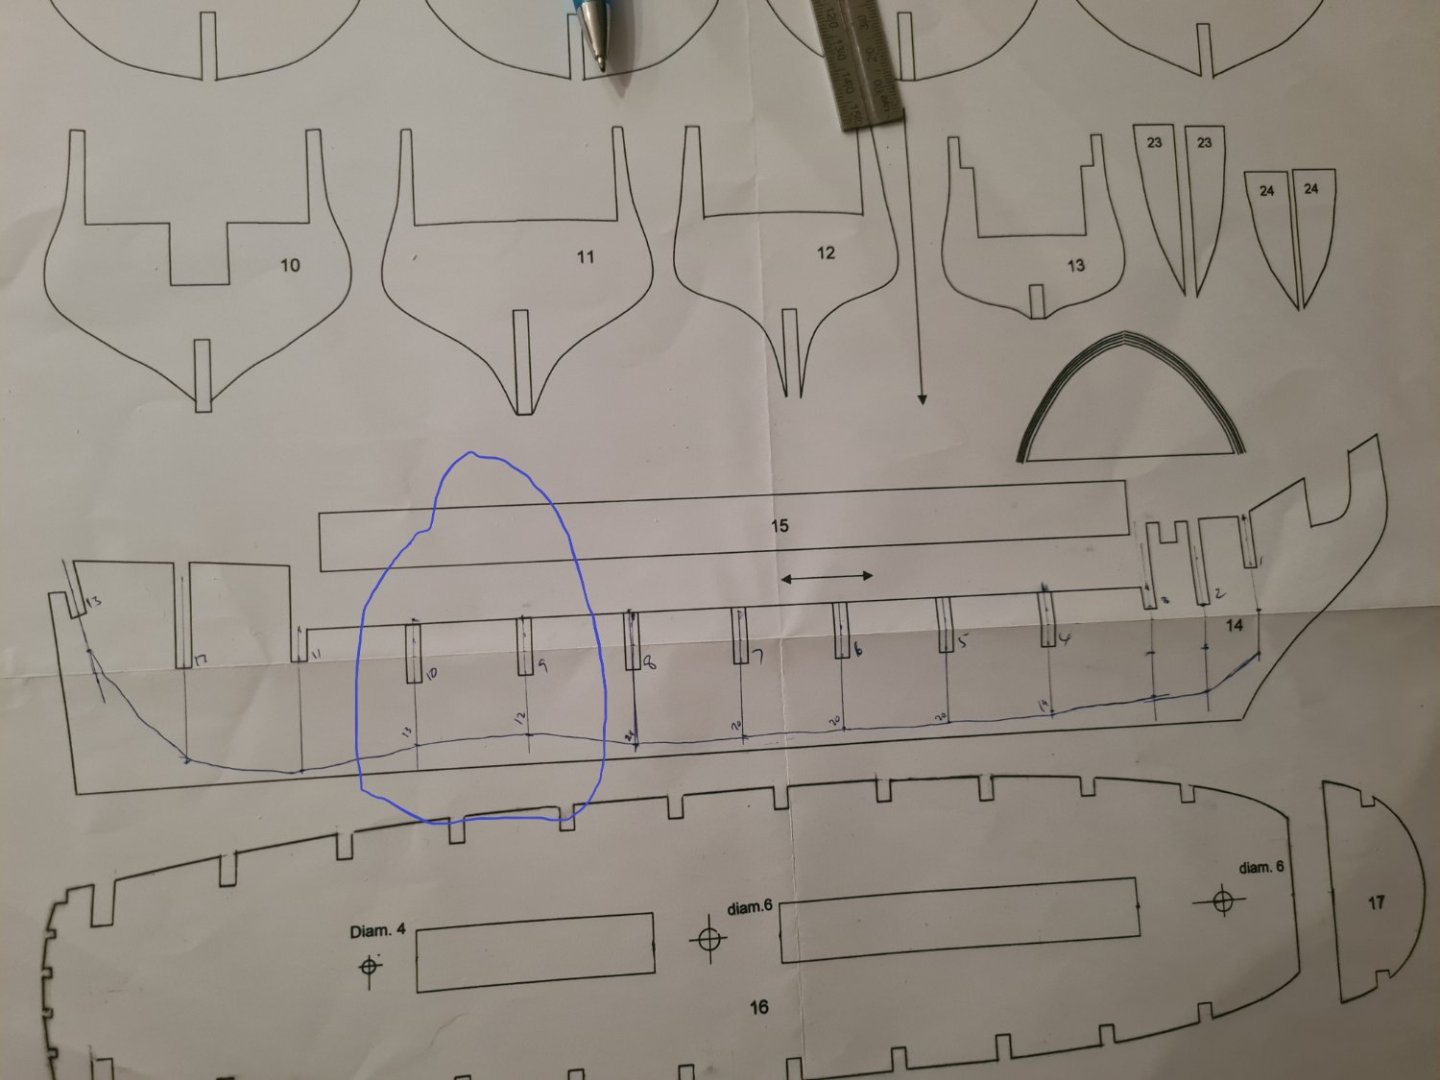
Merry Christmas to everyone and it's hot here in Auckland but I have two days to do some decent computer stuff. So I copied the plans in 600 dpi and imported them into the base layer of a Inkscape drawing. The download was quick and the package works well on my gaming computer which is amd with an graphics card and 16 megs of ram Then the playing around started... I tried to trace it as a bit map but that created literally hundreds of nodes which were a pain to edit.. what I did in the end was go into using a pen and tracing the line using a bezier curve and then dragging the node points until they were on top of the lines from the plan. I have created layers for the spine, each bulkhead and the deck. The files I have attached show the different layers and one with them all ontop of each other. I have also added guide lines to help me align the layers in blender... Tomorrow I will import this file into blender and see of I can align each layer into orthogonal layout...and then lay a mesh over the top and see what happens. I spent a bit of time rotating the scan file from the copier... it was out by a few degrees but you can do some quite fine rotations by layer using the transform function. I know from the measurement tool there is differences of up to 0.5 millimeter between the bulk heads and a theoretical bearding line but bulk heads 9 and 10 are out by 4mm.
.thumb.png.6e91f1ef0b91ef1aaf1df542a1eb7793.png)
.thumb.png.84a5ed7dac1409647d10fb15ecc20954.png)
-
I am thinking the same thing as was thinking about doing the running rigging but with sails furled so you can see the rigging better or maybe just the topsais up and the mains furled
-
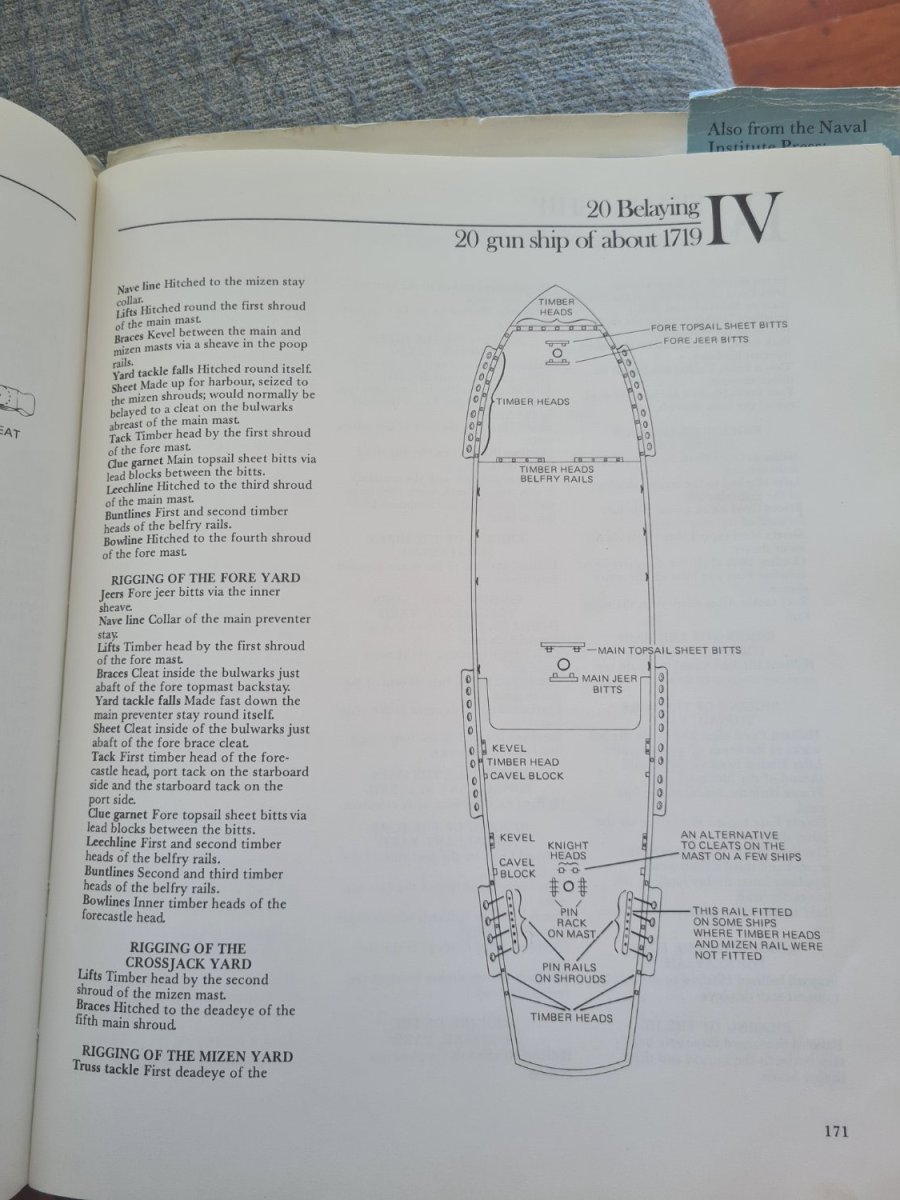
Progress without actual building on the Greyhound continues. Have downloaded Inkscape and blender 3d into a gaming computer I have for some graphics grunt. Created 4 scan files of jpeg format from the kit plans and will import them into Inkscape and trace them into different layers ready to bring them overnight to blender. I also bought the book recommended by hamilton and others for the belaying plan for a 20 gun ship of 1720. What I don't understand is there seems to be an order you rig in... is that because multiple ropes go to multiple belaying points or because other rigging runs of things already there? Is the order shrouds first then yard ropes and then sail ropes? Forgive my lack of nautical terms there... just starting to learn the proper names for things. Really looking forward to working in the computer files later today so will take some screen shots of that action as I go along.


-
Thanks hamilton - have already read all the Greyhound build logs!! Will be copying shamelessly from you.
-
Thanks Michael will do... you can scan into Inkscape? And export dxf file format?
-
I know... I can use my hands and also pen and paper to achieve a result plus minus maybe 0.5 to 1mm Maybe I can just start with illustrator and see how that goes
-
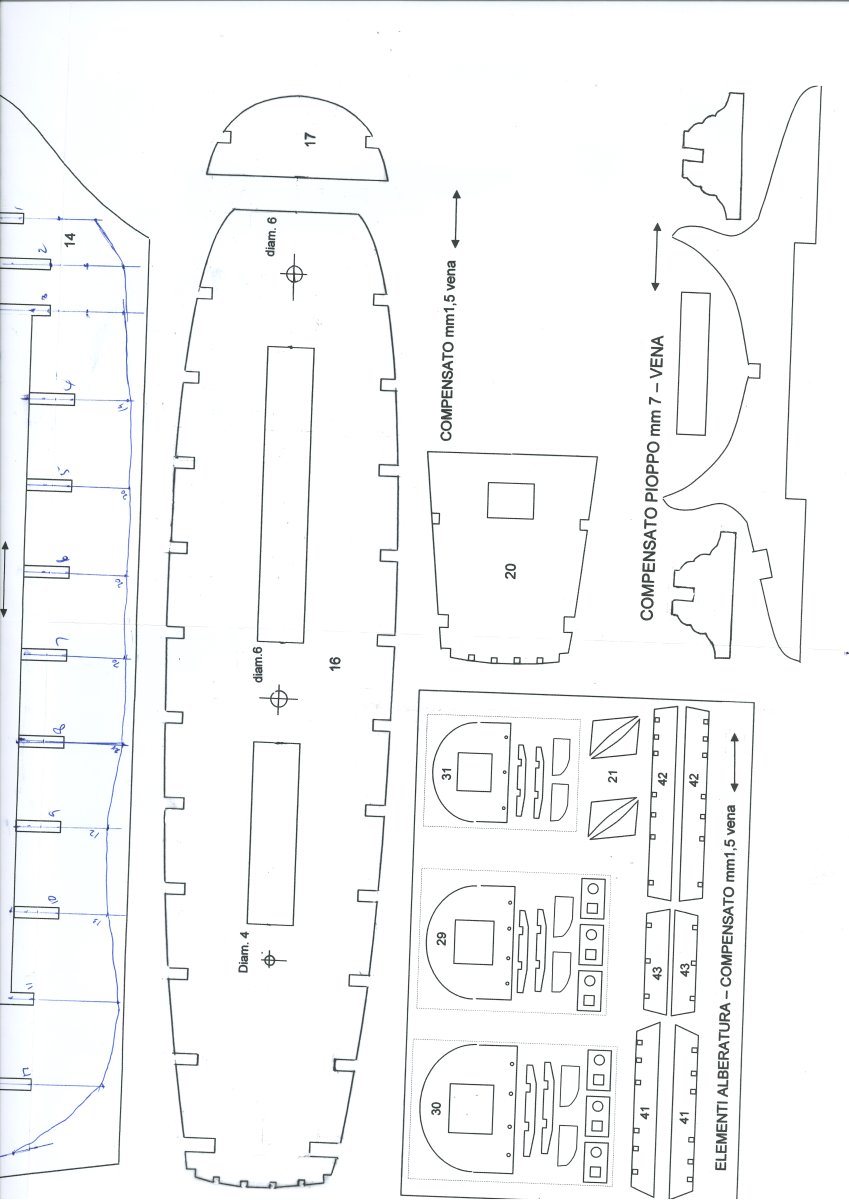
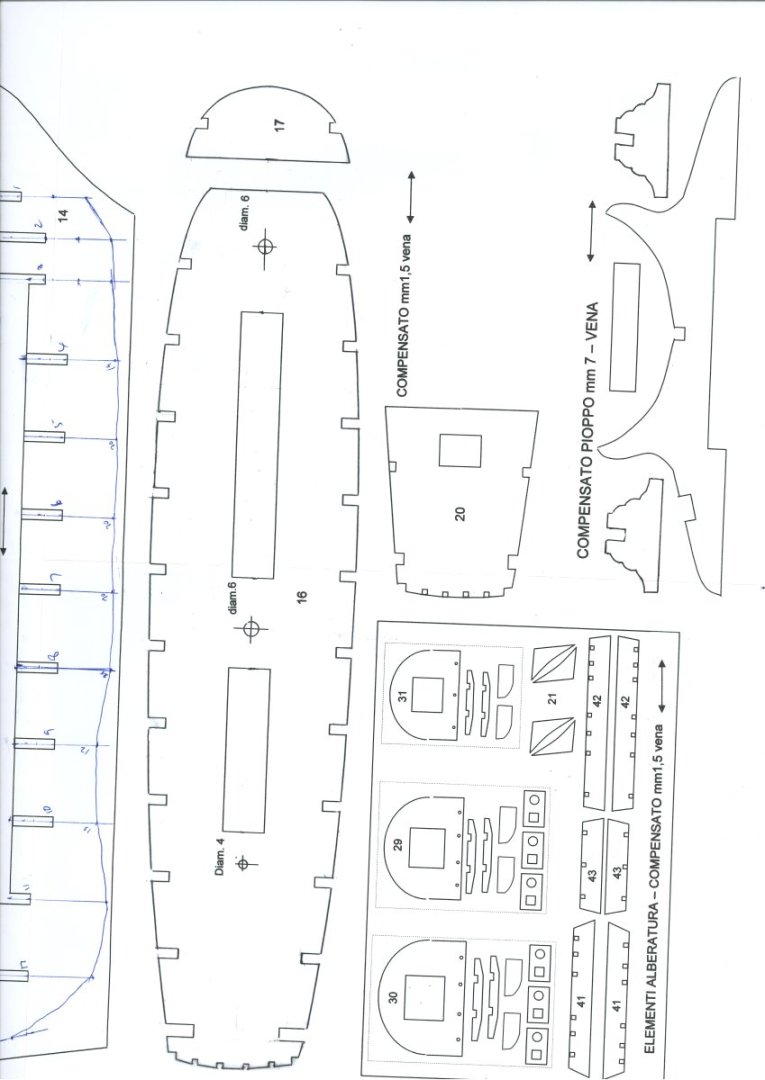
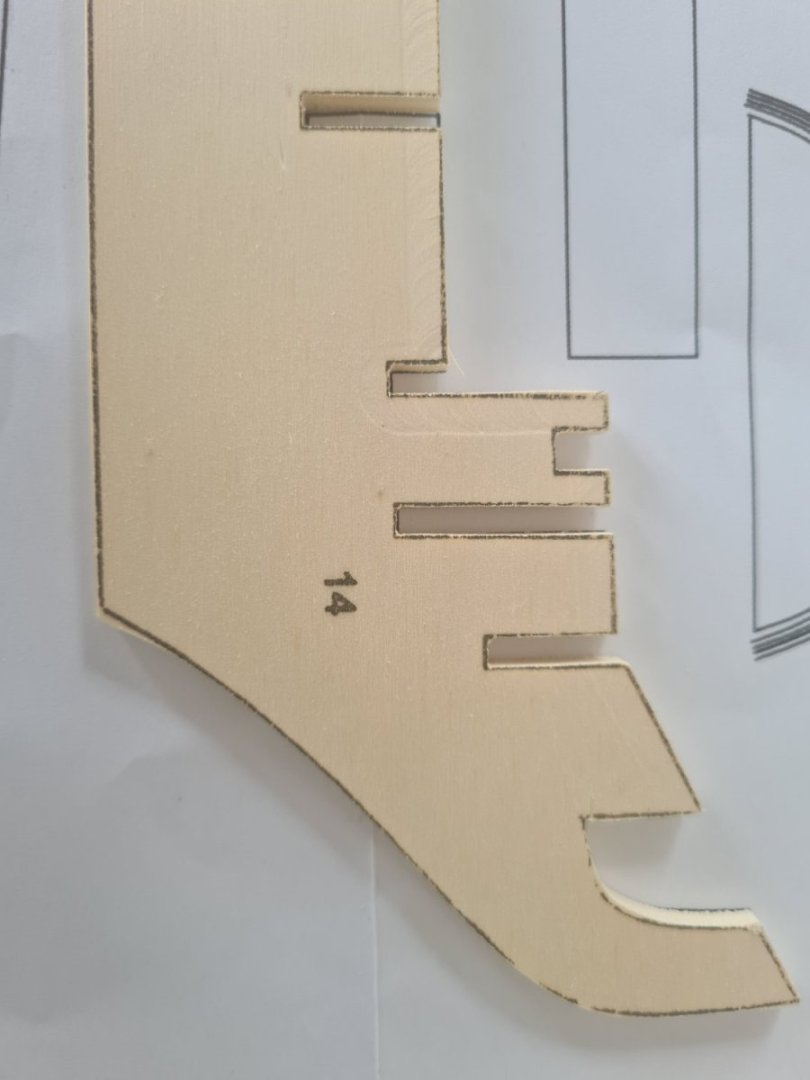
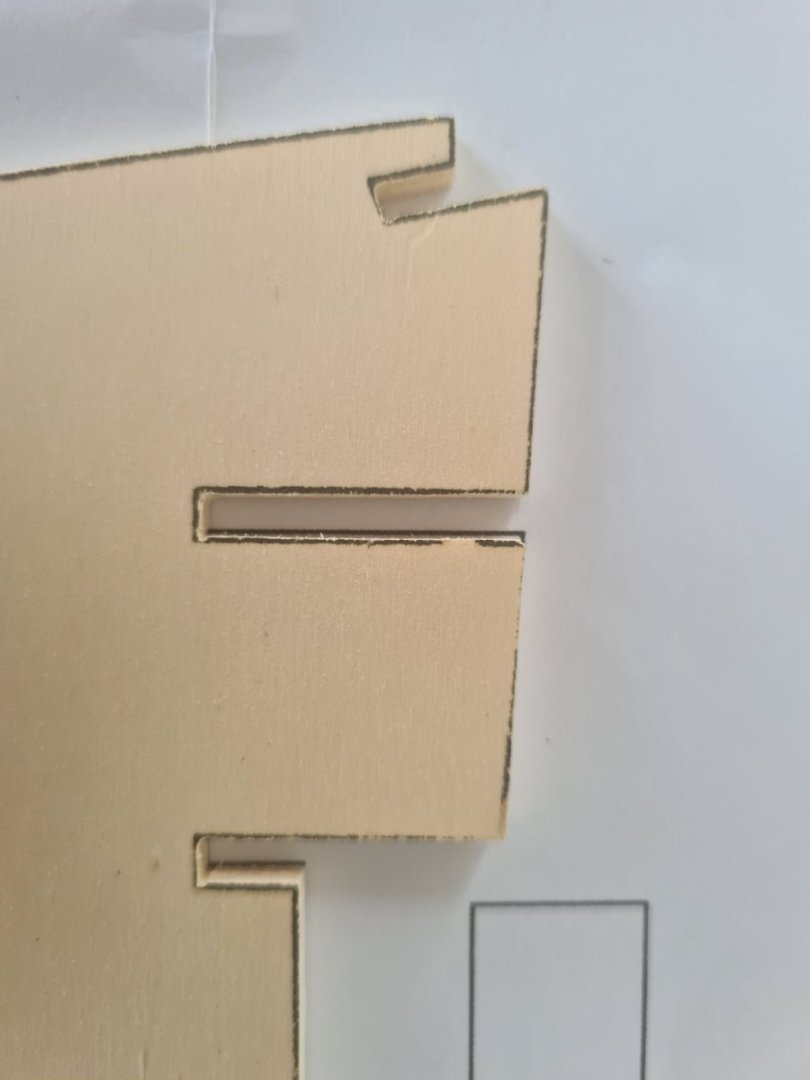
Its nearing Christmas and also im getting pressure from the wife not to start this model until the new year know how fanatical I get about the details... bit I can't help myself thinking about the known hull shape problems with the supplied bulkheads. I have done some preliminary measurements and definitely bulkheads 9 and 10 are out substantially verses the others. My plan is to purchase Adobe illustrator for a month in January for 50 nzd and then measure off the supplied bulkheads etc and draw a wire frame over three or four points on each side of the bulkhead. You can create several different views. The view of the full length of the keel as shown on the photo. I am not going to be altering the majority of the keel or the bulkheads.. only in and around 9 and 10. A view of the rear of the ship from the broadest bulkhead to the end. A view of the bow of the ship from the broadest bulkhead to the bow. A view of the top of the ship looking down. Then gulp purchasing some shade 3d time. Unless someone has it and can smooth my illustrator file for me. One month is in the region of 350 usd so it is not cheap. Or it's 850 usd for first year 250 usd afterwards. Smooth out the hulk shape in shade 3d and then send that back to illustrator as a series of sections of the inside of the planking on the hull shape. I should be able to then draw some new bulkheads in and around 9 and 10 to fit the revised hull shape. Cut them and that will fix the 9 and 10 problem. So potentially it's a little bit of scratch building around 9 and 10 and using the rest of the supplied bulkheads and keel. The advantage is I will learn how to translate scanned or measured ships lines into illustrator files that can be sent to 3d rendering models via dxf file format and to smooth out the 3d shape to a pleasant smooth contour. Then translate that back to line vector. Of course I'm spending too much money on this model but feel like the skills learned will translate into scratch building expertise and it will be intellectually stimulating
-
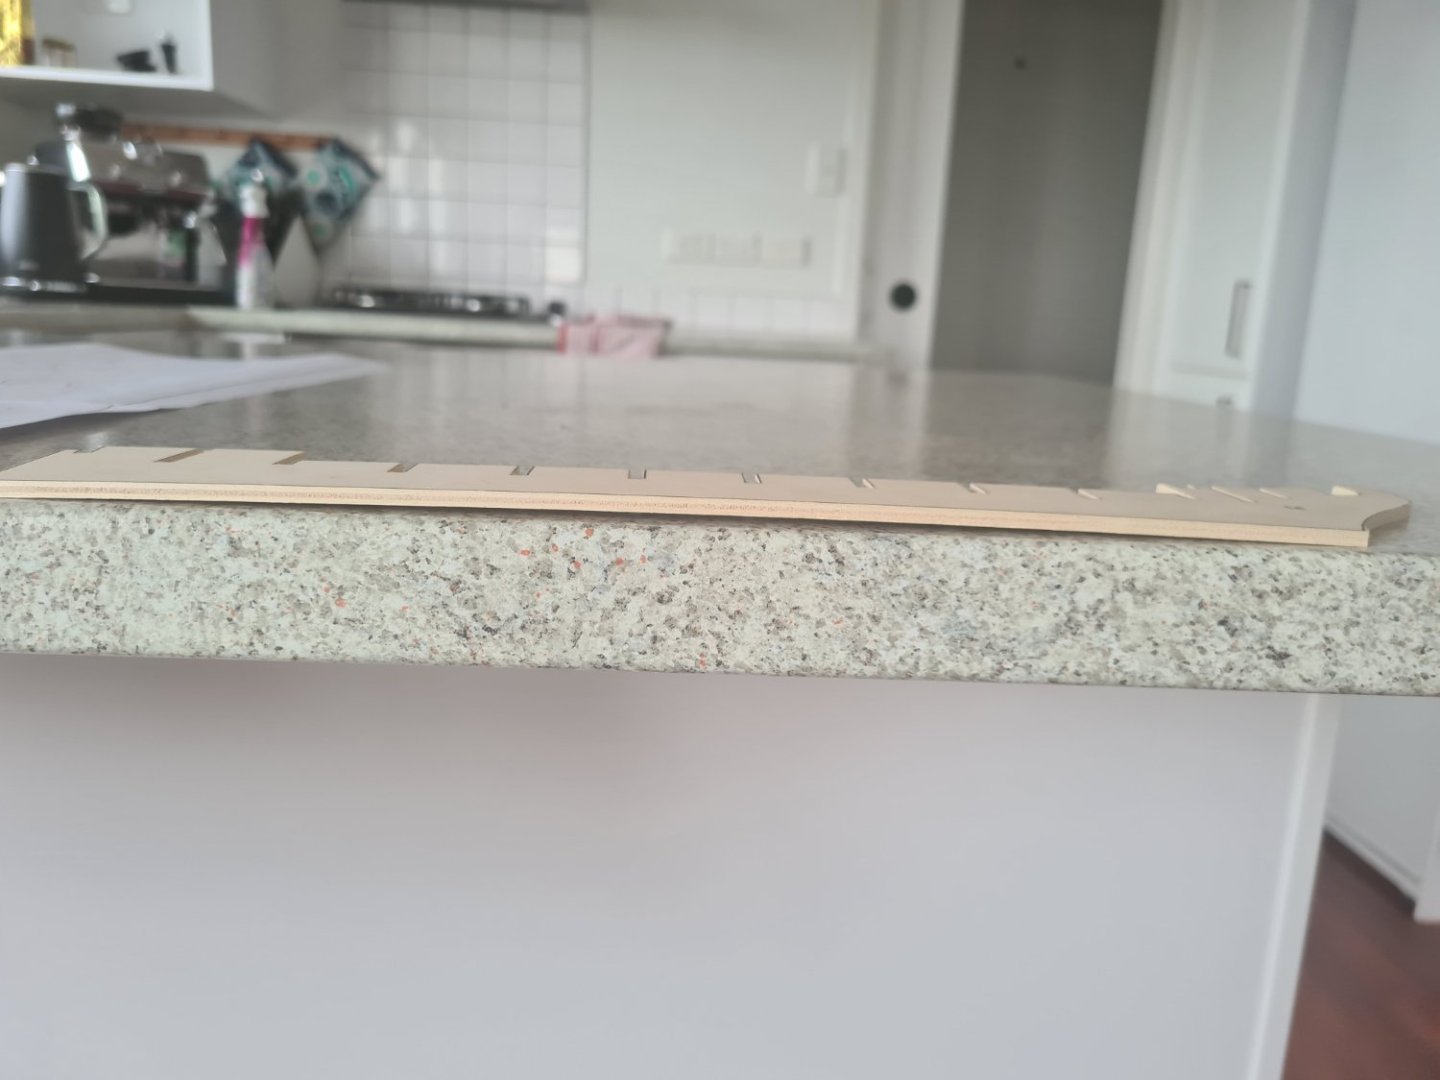
So first thing I notice is the keel is bent and also not cut out 100% accurately to the outline but looks like the "length" view on the plan lines up quite closely to the cut out.my concern is when we go to illustrator and dimensions down to 1000ths of a millimeter I can see say 1mm differences so at scale that is a difference of 0.1m to true length. I need to ask about how to fix the bend... do I press it down with a weight for a few weeks? Will that fix it or will it just bounce back? Do I steam it first then weight it down?
-
Hi Allan, Thank you for correcting me... after reading on the internet yes its a sixth rate ship, a "post ship" and not of the line of battle being too small. That's interesting because it's still got plenty of sail area but at that time its all about the number of cannons that can be fired. Thank you I learned something this morning. Cheers
-
So, reading the 3d modelling paper by member kiyoo Liwaza I think it will be possible to create a 2d diagram in Adobe illustrator of each frame plus the appropriate keel position. Export that file back to shade 3d then correct the curves in and around the bulkheads identified by member hamilton and others from this kit... from memory it's bulkhead 12 and sort out a good 3d surface across the hull shape... then export that back to Adobe illustrator and either print it off and manually cut out new bulkheads or potentially export to a laser cutter and cut revised bulkheads. I could potentially cut more bulkheads than required to improve plank gluing etc. The cost benefit of doing it this way is ridiculous. It will cost me more than I spent on the whole kit! For the software x 2 and laser cutter. However I will learn the skills in 2d and 3d modelling, maybe I can start scratch build other ships. The methods of ship building is roughly the same weither it be a kit or scratch built. The question is for plywood, laser cutting and access to good quality strip wood from around the world is it going to be a good cost effective option for ship building over the rest of my lifetime? In theory it is possible to draw any hull shape from the royal navy and create custom frames that can then be planked.... isn't it?
-
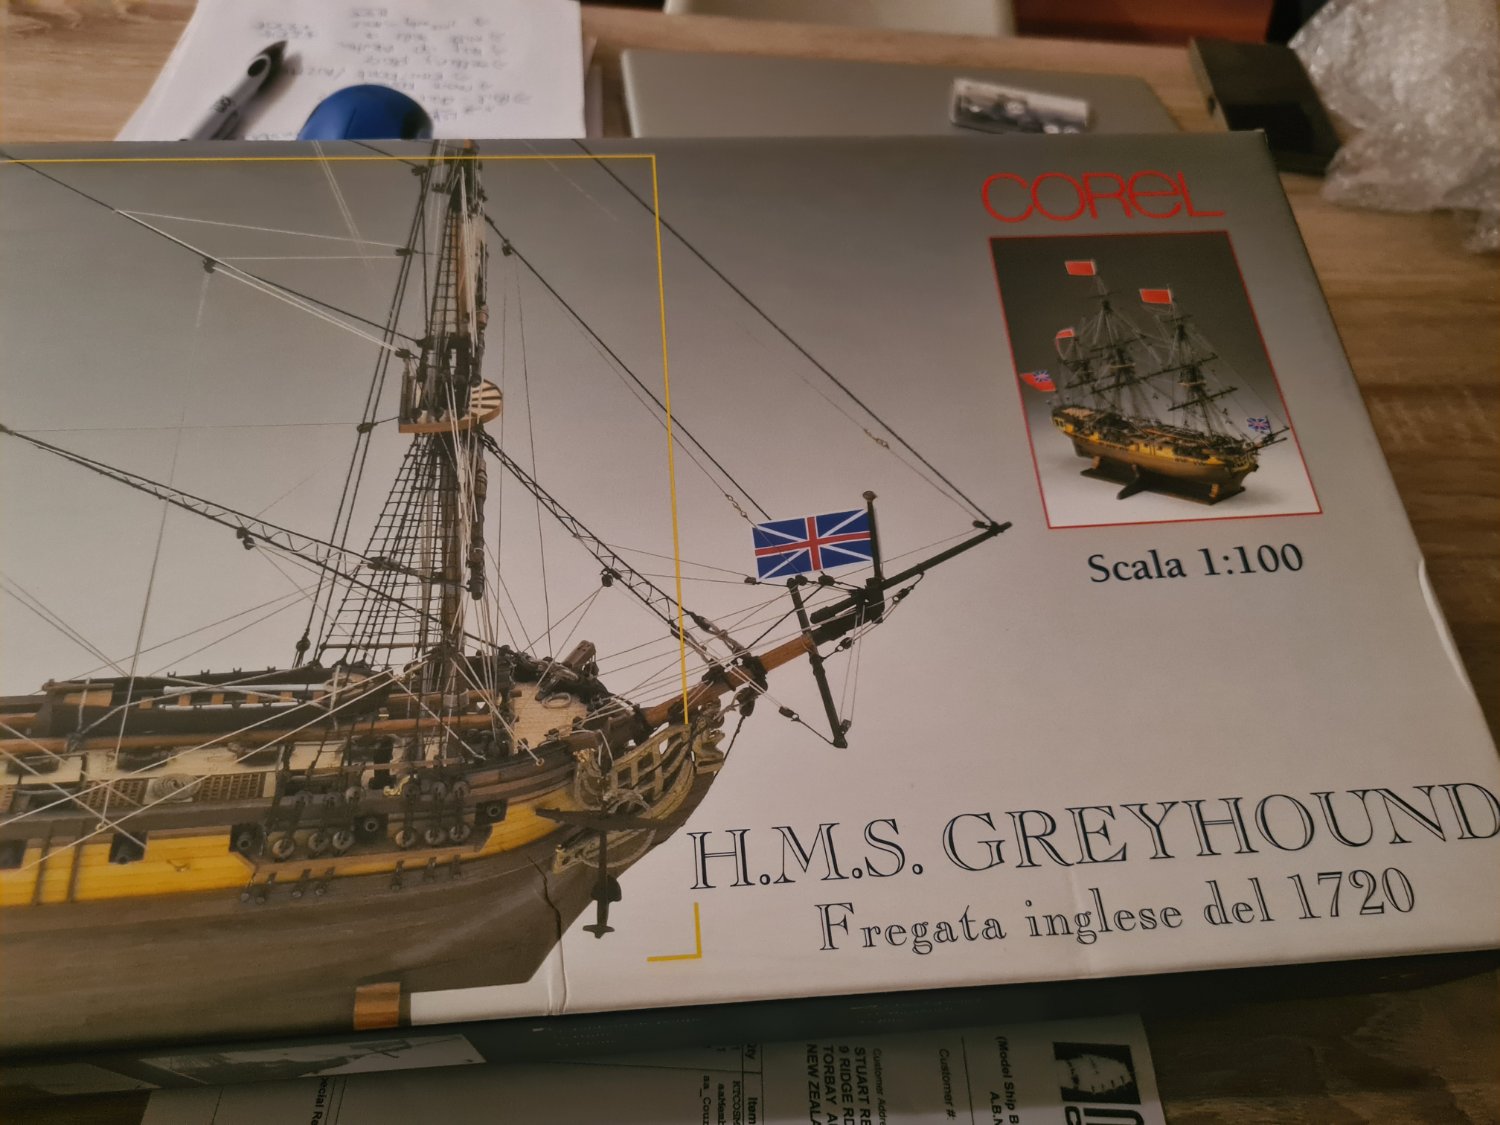
I know this kit is a bit rubbish but I'm dead keen on building a stable of HMS Royal Navy ships and starting with a sixth rate ship of the line and building upwards.. also it only has 20 cannons and doing all the details of the cannons x20 seems boring to me Goals for this kit are: Knowing that some of the bulkheads are wrong I am going to utilize navisworks and either do some 2d or 3d modelling and see if I can create my own bulkhead patterns that fix the problems and recut them... im thinking about laser cutting .. will have to see how the budget goes. Filler blocks under the first planking to provide that stability to the first planking and give a solid base. Small metal 90 degree angles to keep the bulkheads straight to the keel Less glue and more pre shaping with minimal glue to stop staining and minimal filler... famous last words.. Mark of a good craftsman?!?! Rigging the boat with sails furled to see the running rigging as well as the other rigging. It's a pretty little ship and I think I can do her justice.. will take 6-9 months I think. The 1:100 scale will make the rigging quite small though for my sausage fingers. Anyway looking forward to it.

-
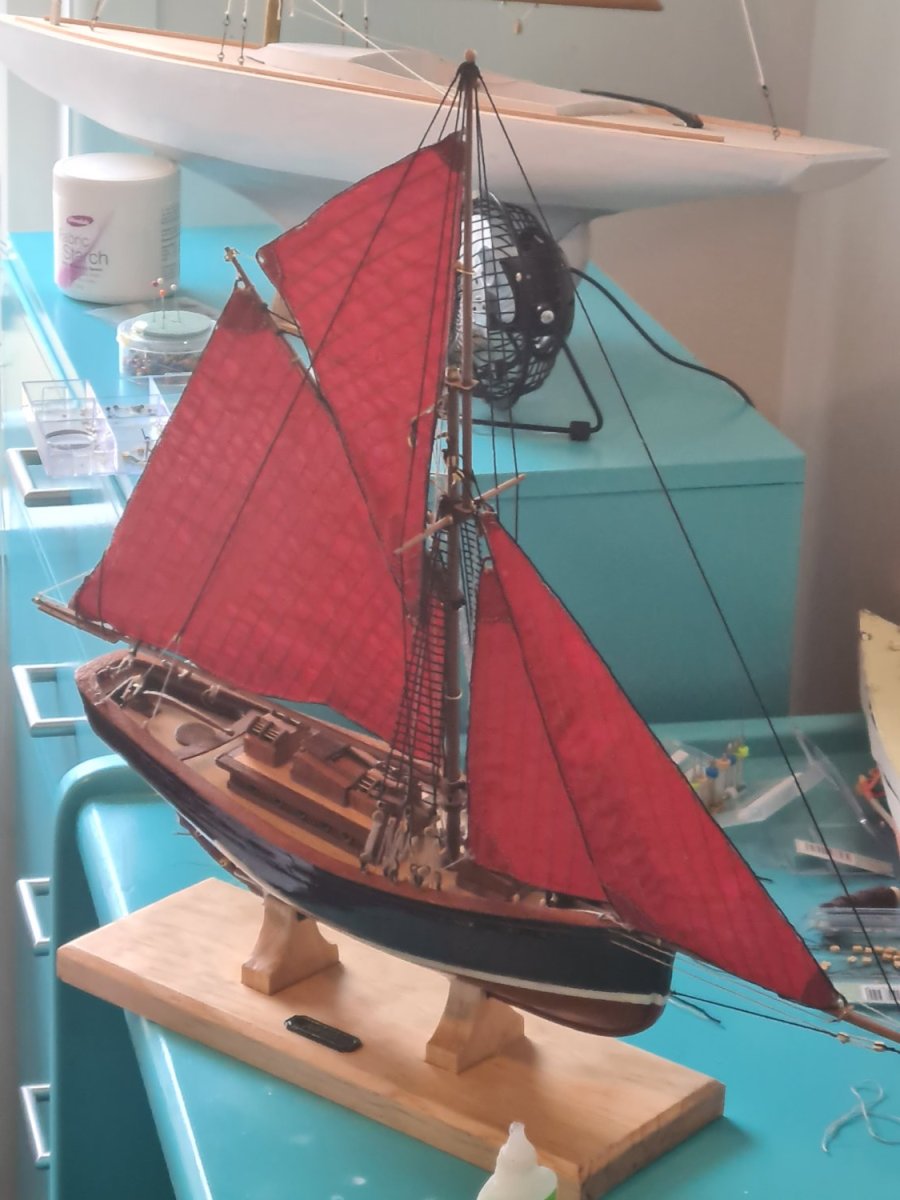
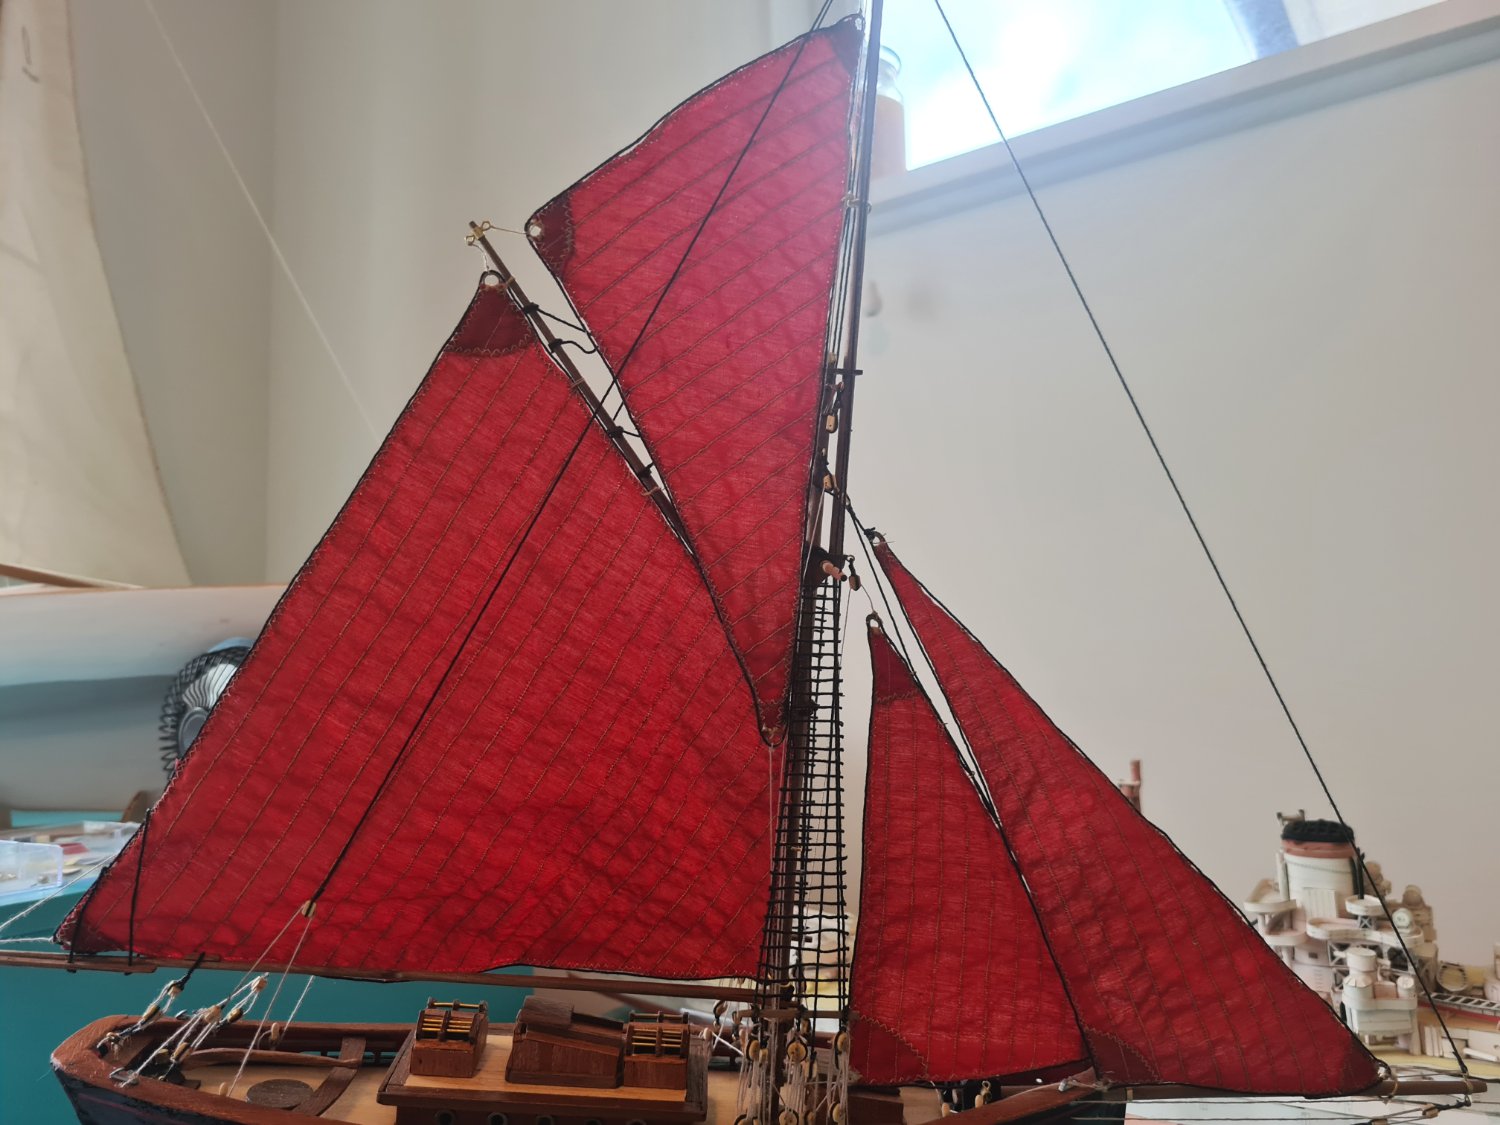
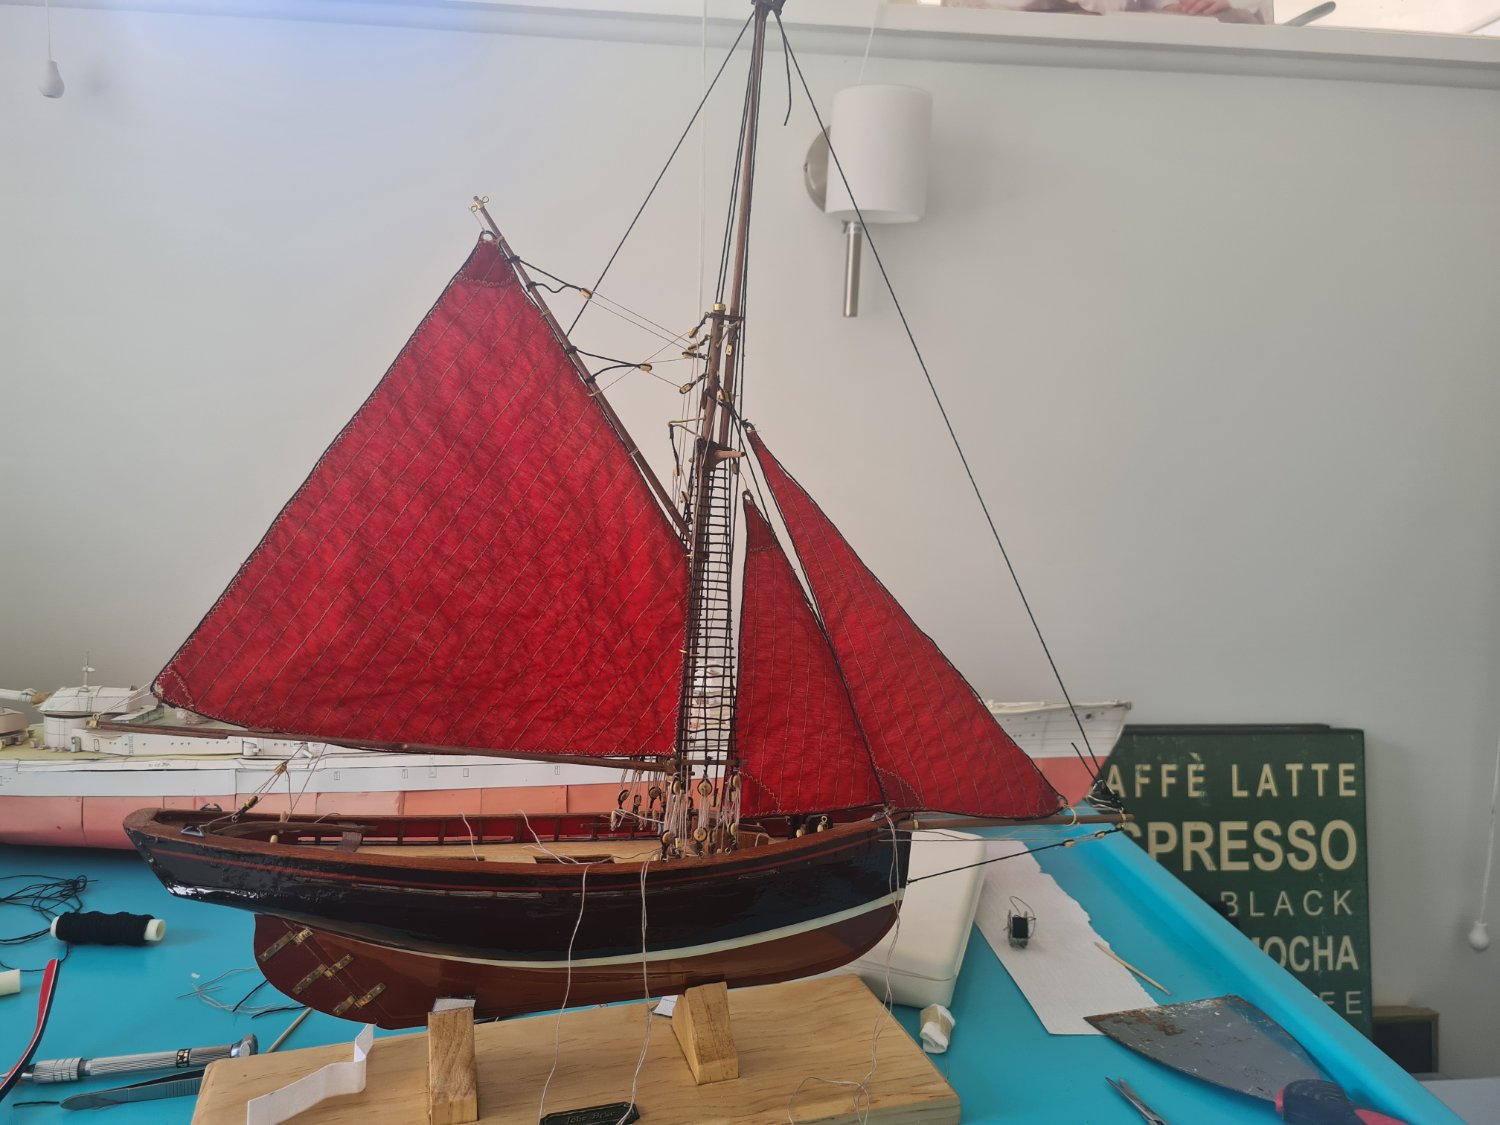
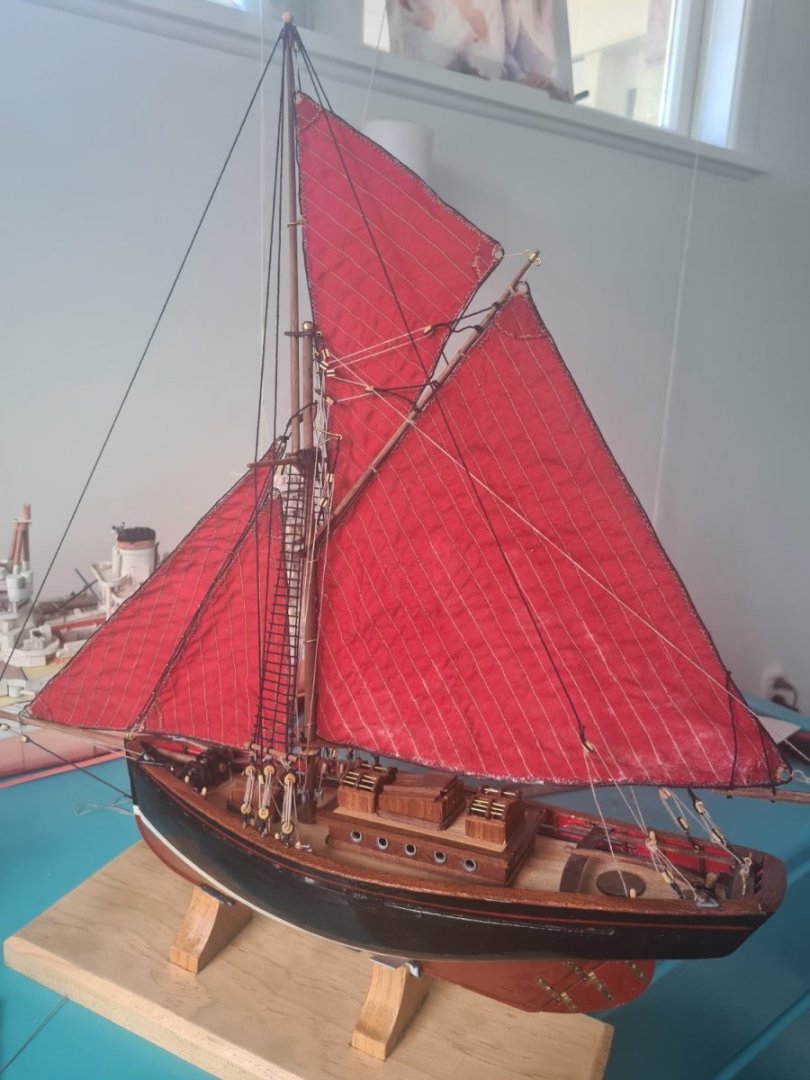
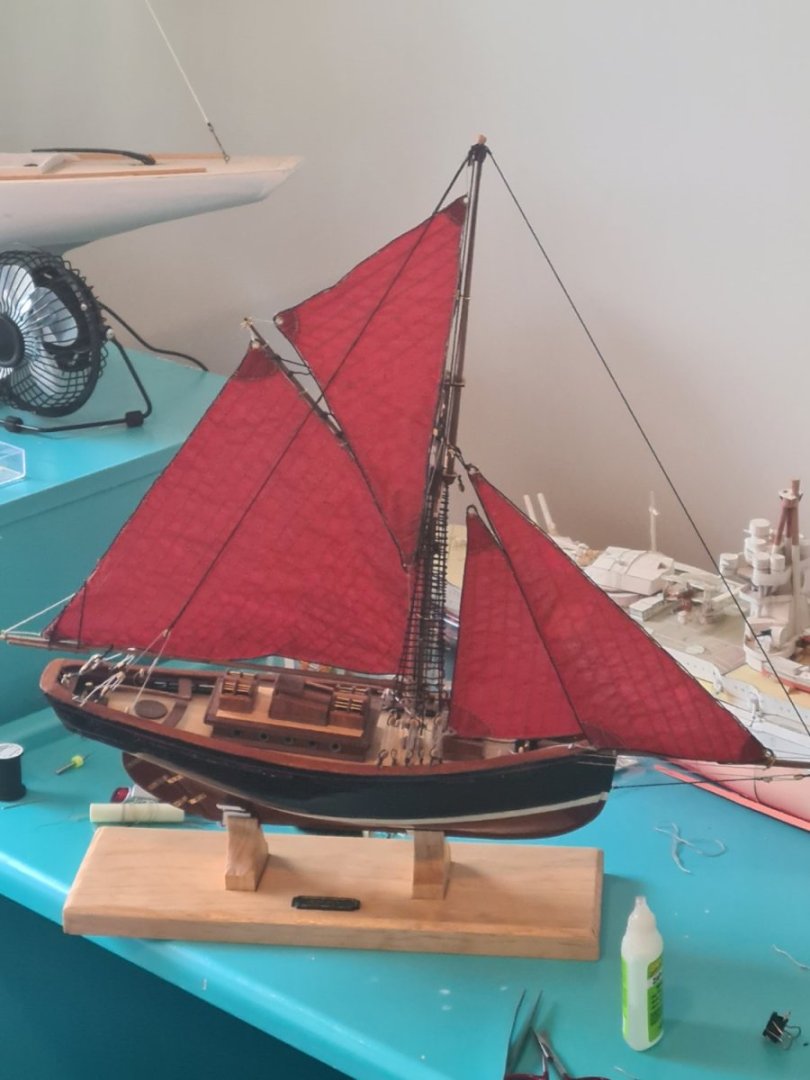
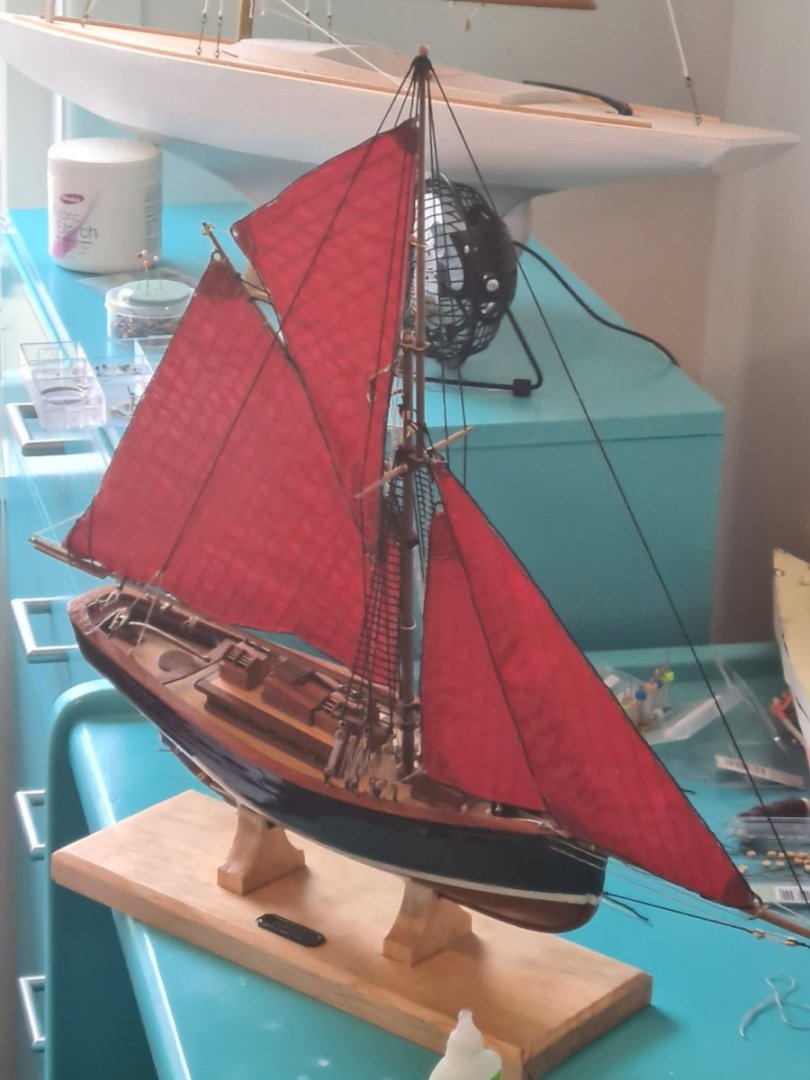
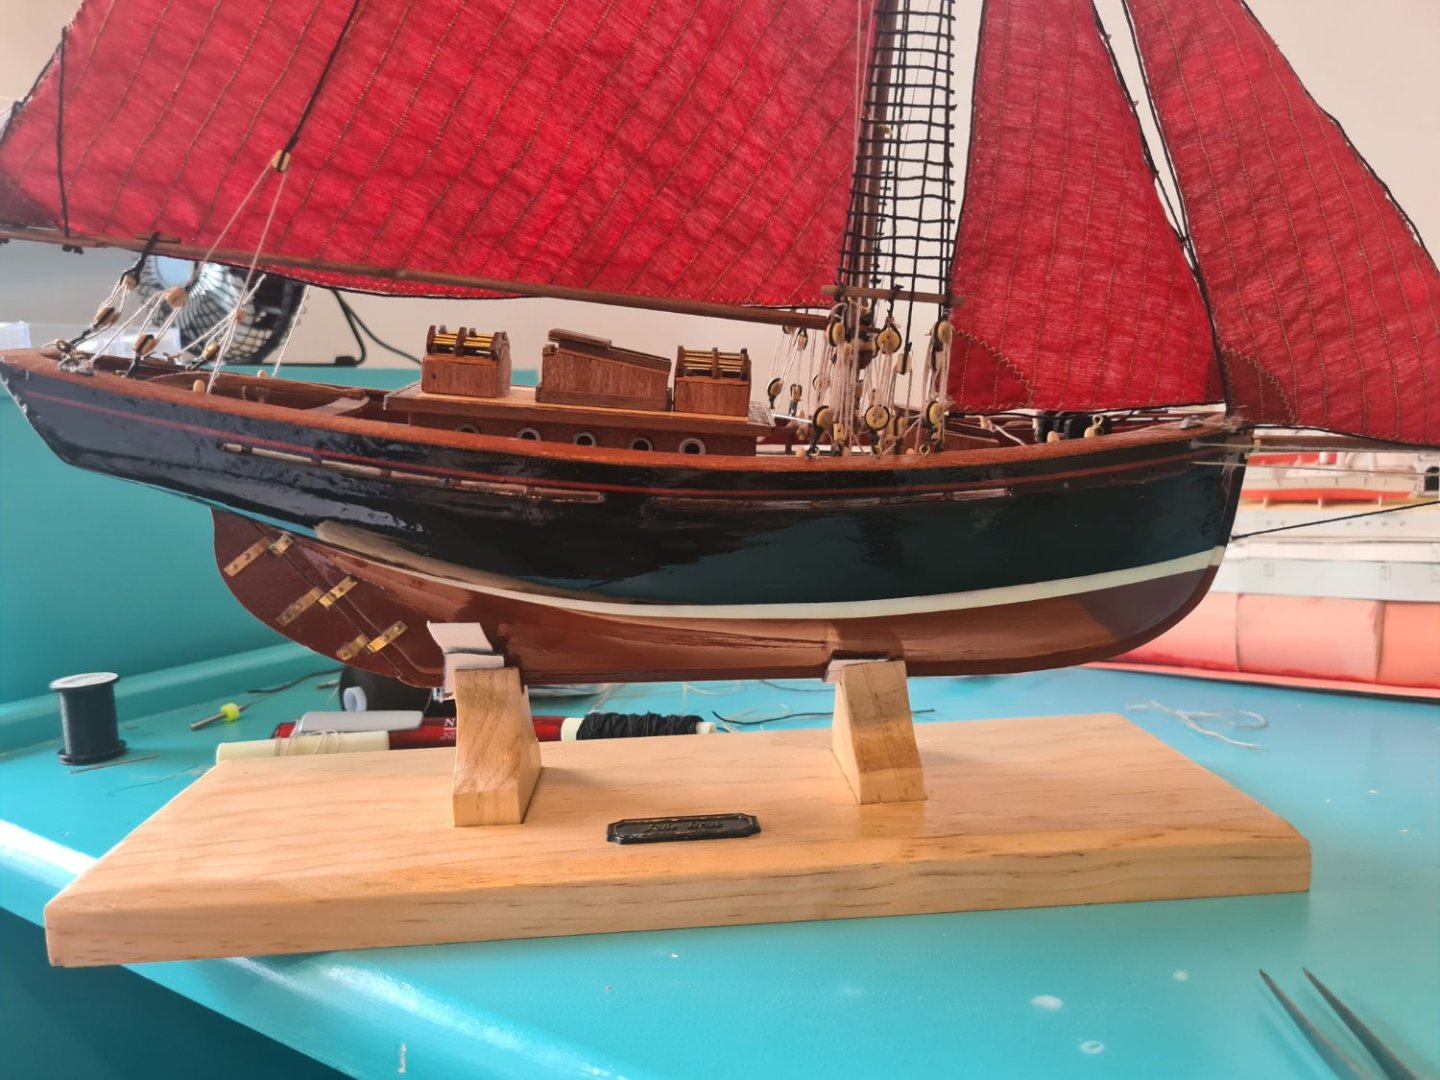
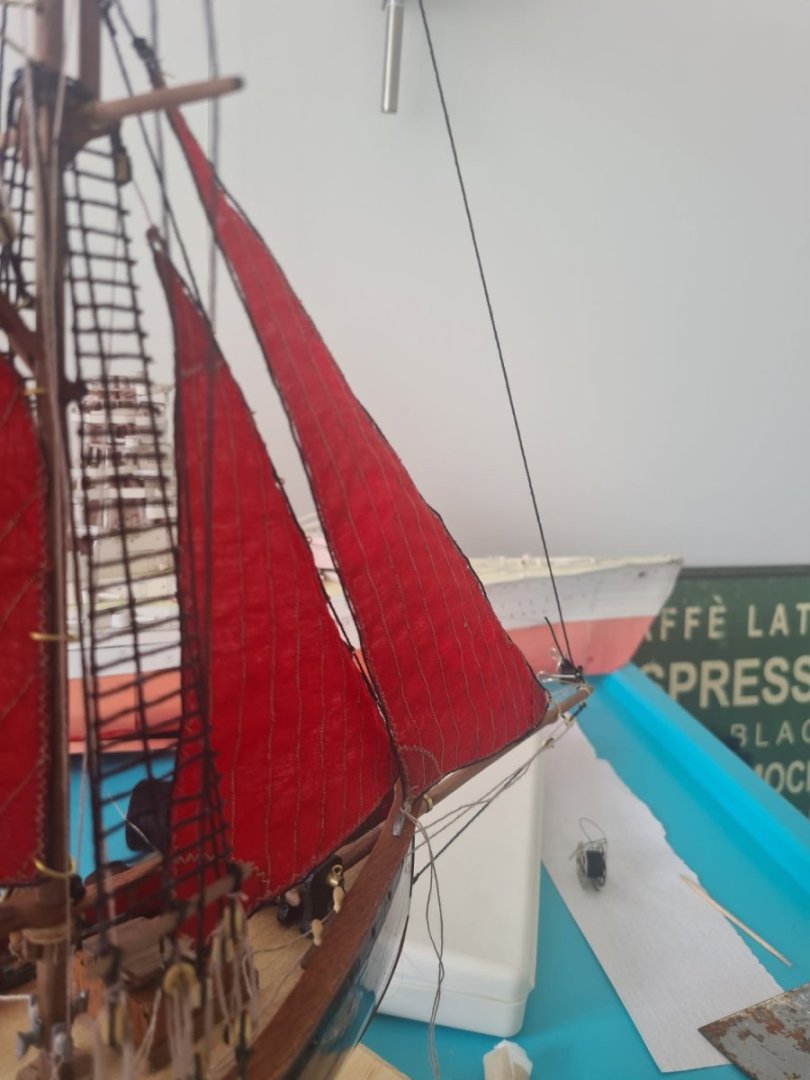
After a one month break my wife was giving me pressure to tidy up all the modelling so I said let me finish the model then I can tidy up. So I did. My only regret is that I tried to apply fabric starch to the main sail while it was on and applied it too thick... rushed it too much and it now has a salty kind of wash to it like it has been out sailing too long. Anyway I just need to make a display case for it so it doesn't get dusty and I'm already thinking about my next model have the hms Greyhound in mind but heard it's not a great kit? Learned alot on this model like the way to put the blocks and deadeyes properly and sewing my own sails and some gloss painting techniques.


-
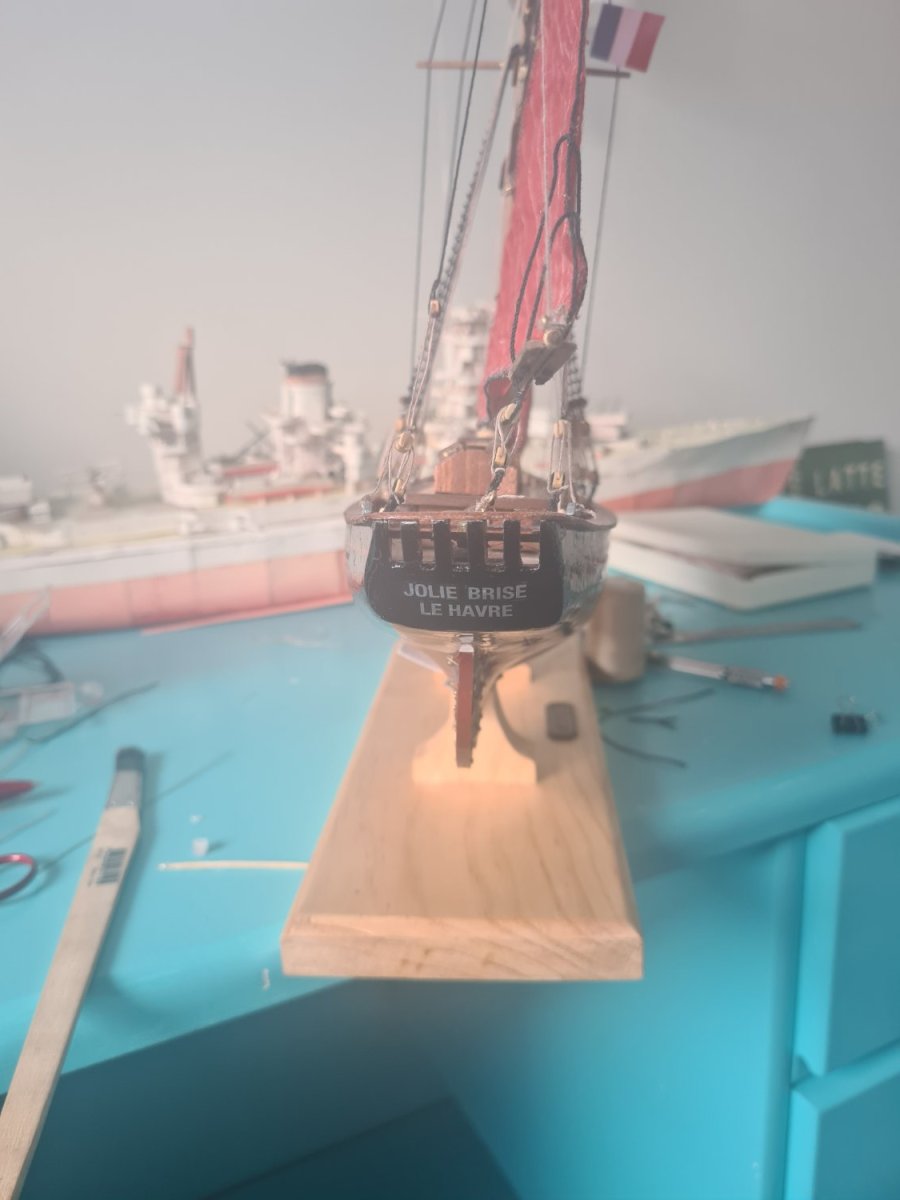
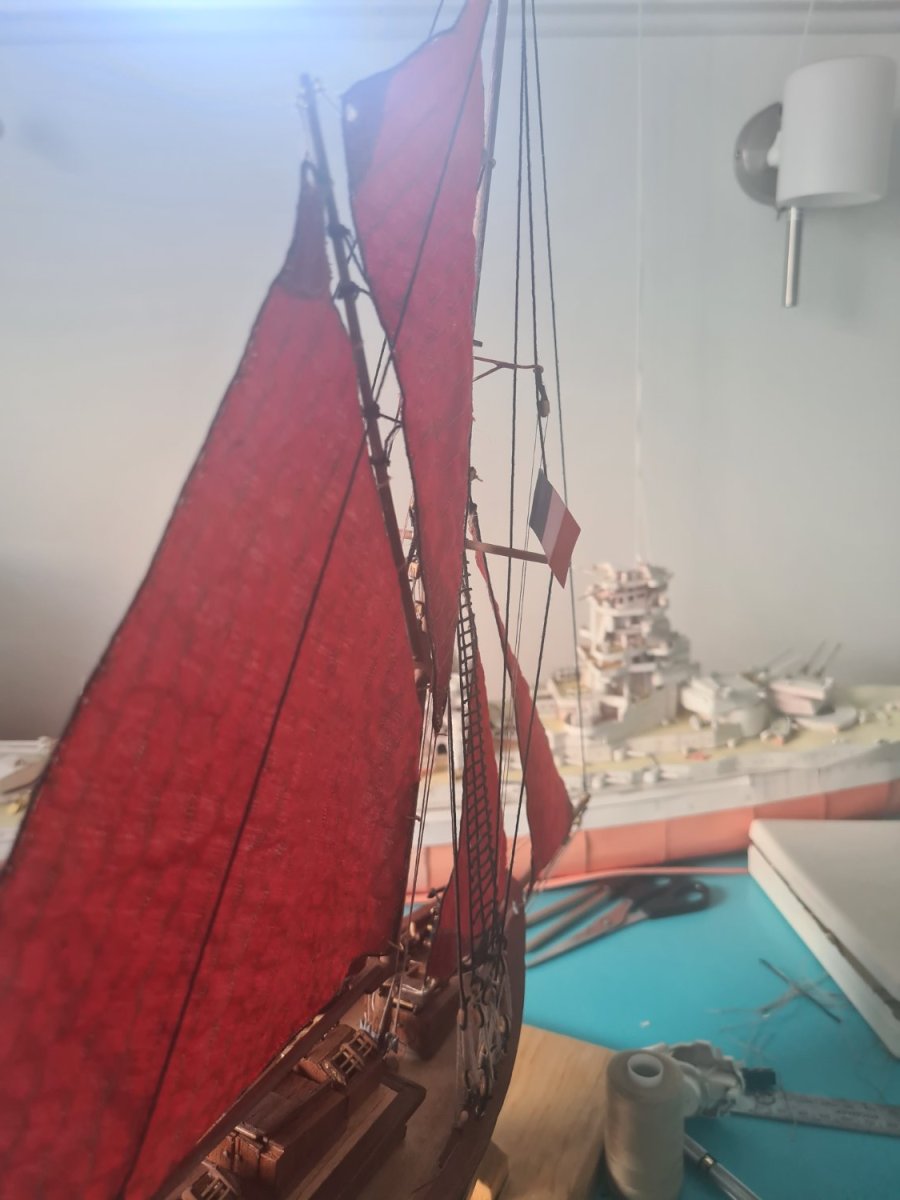
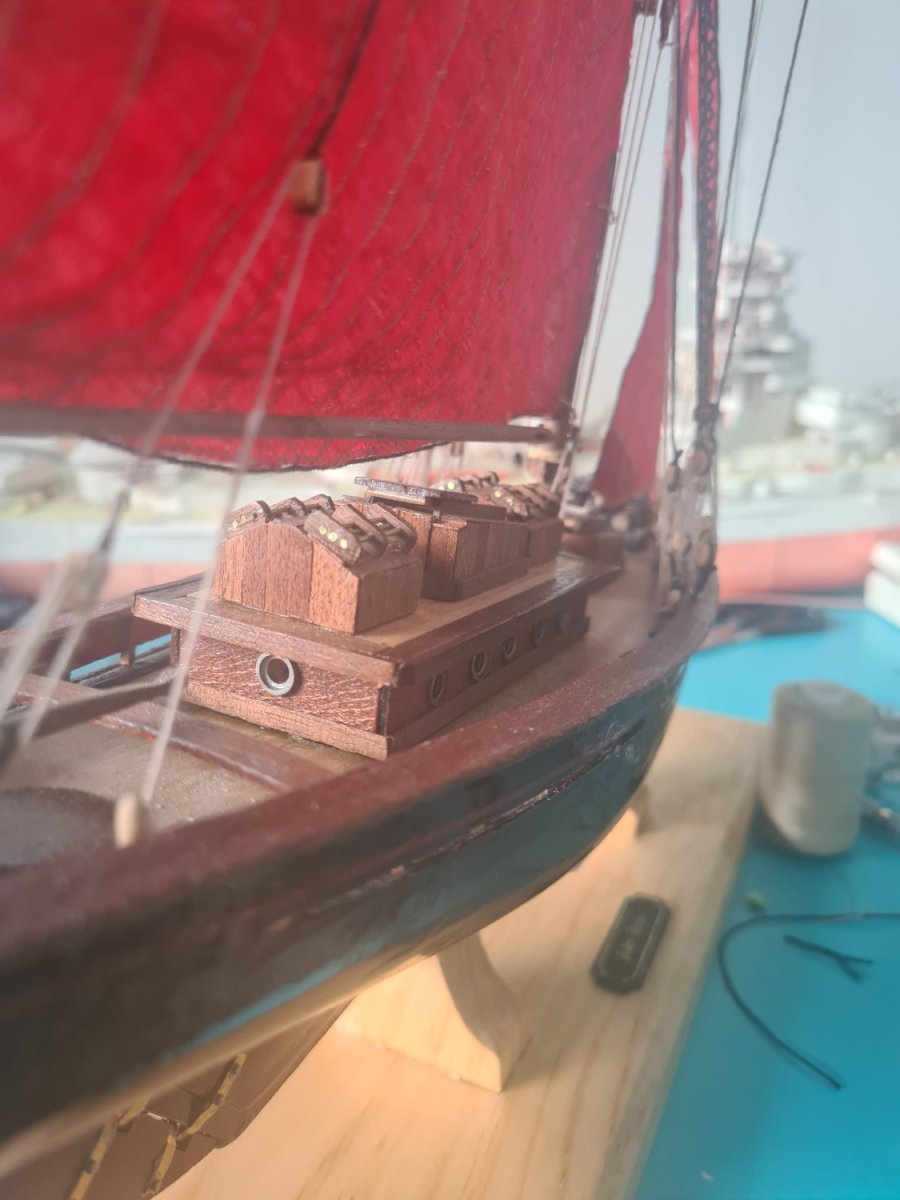
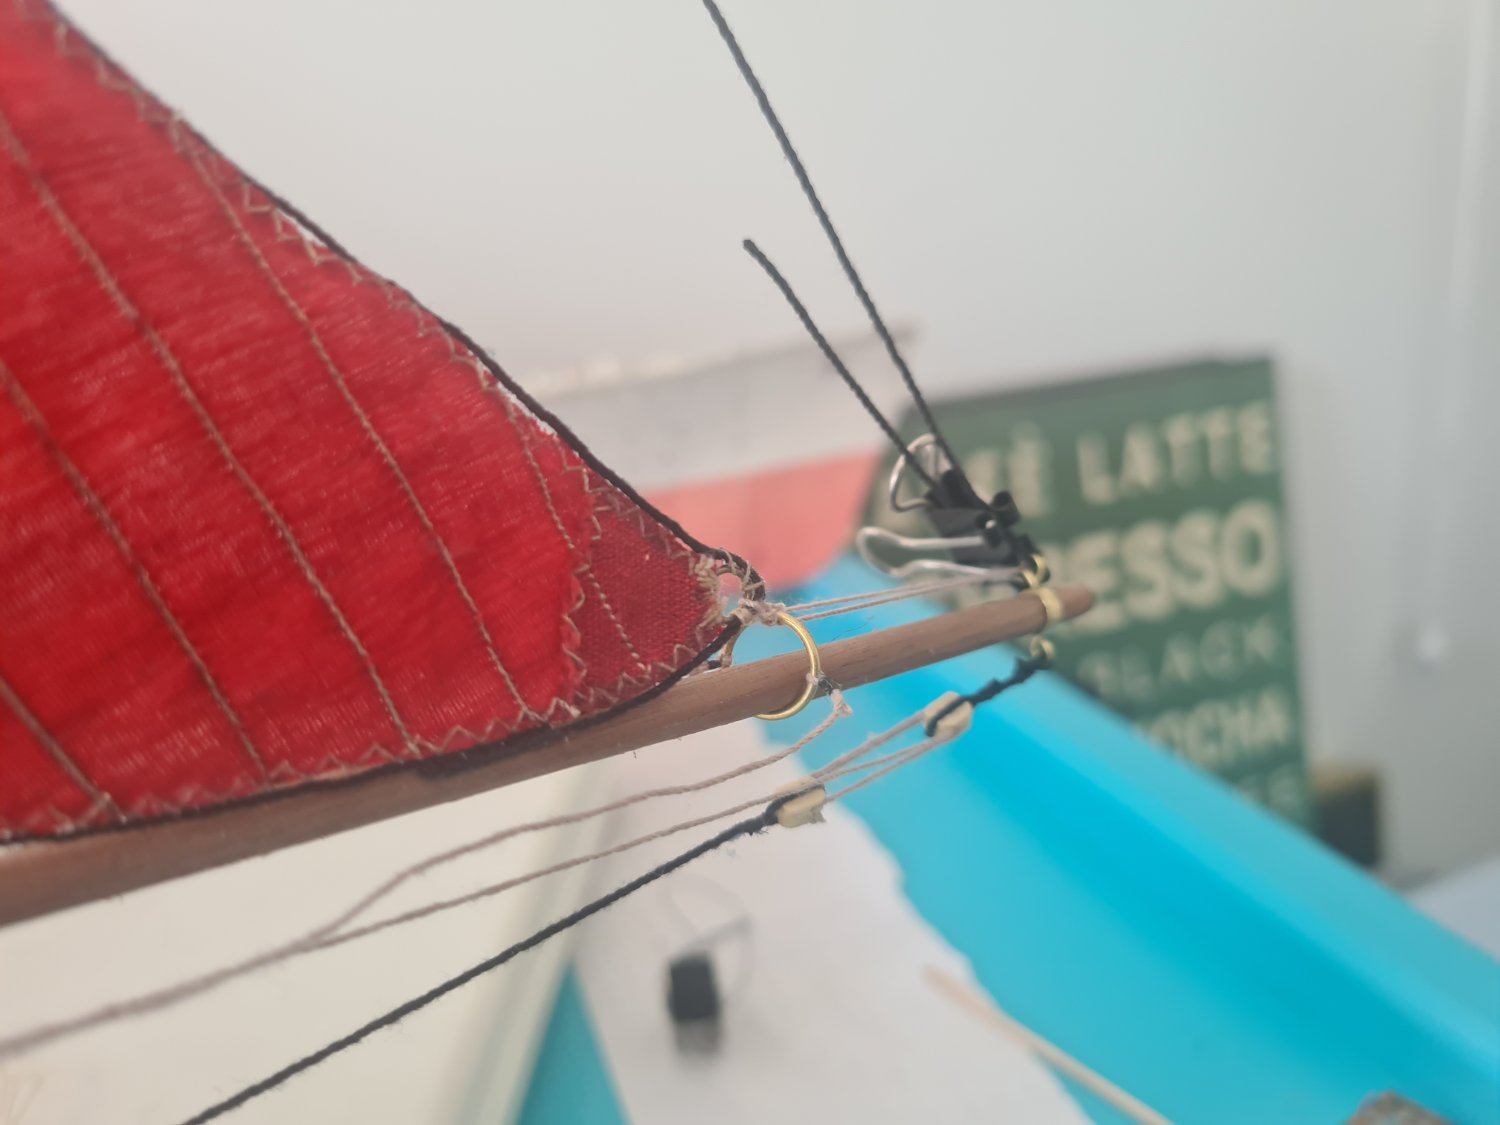
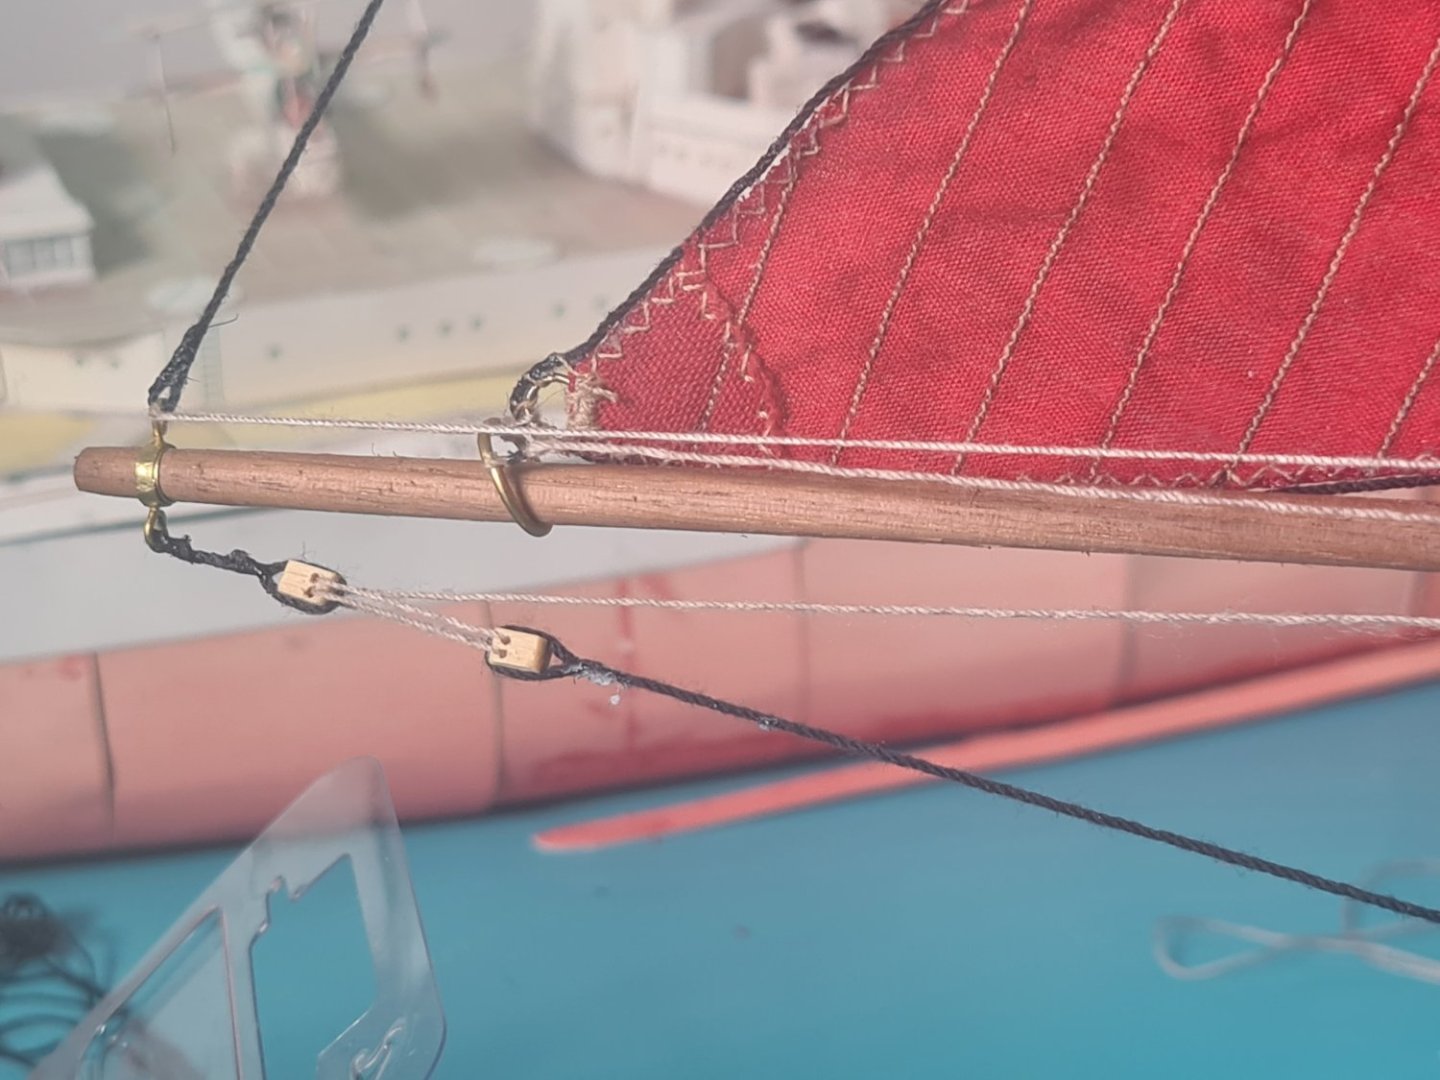
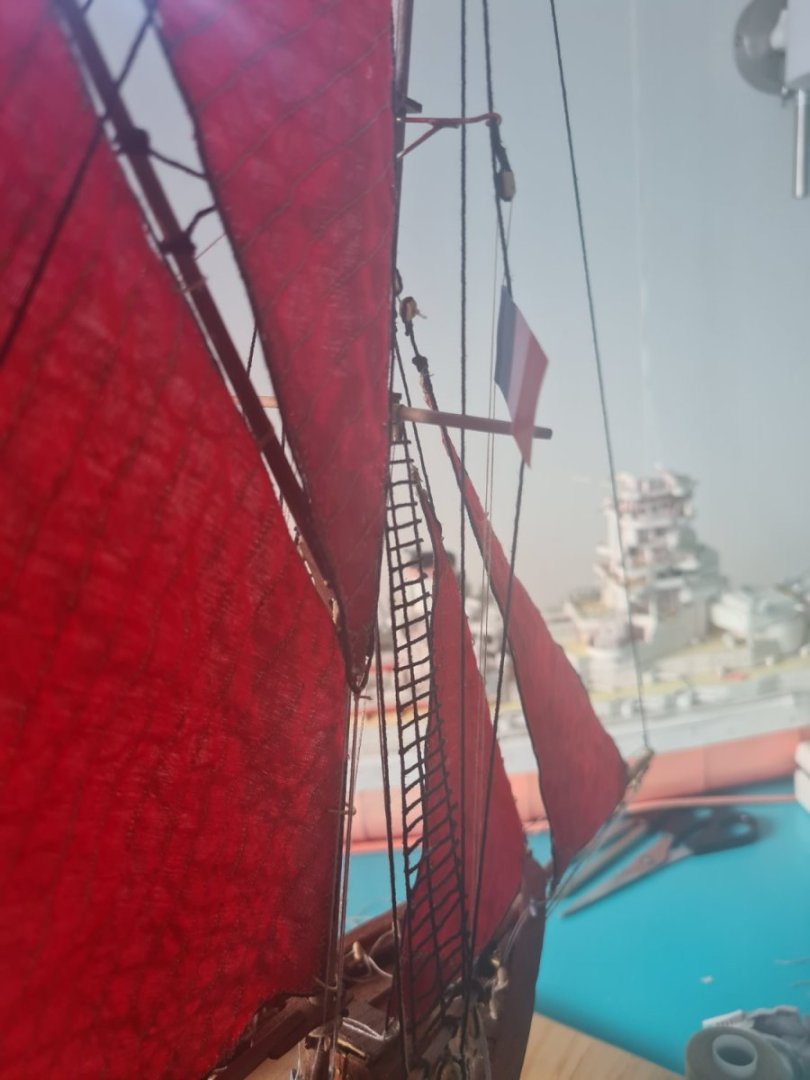
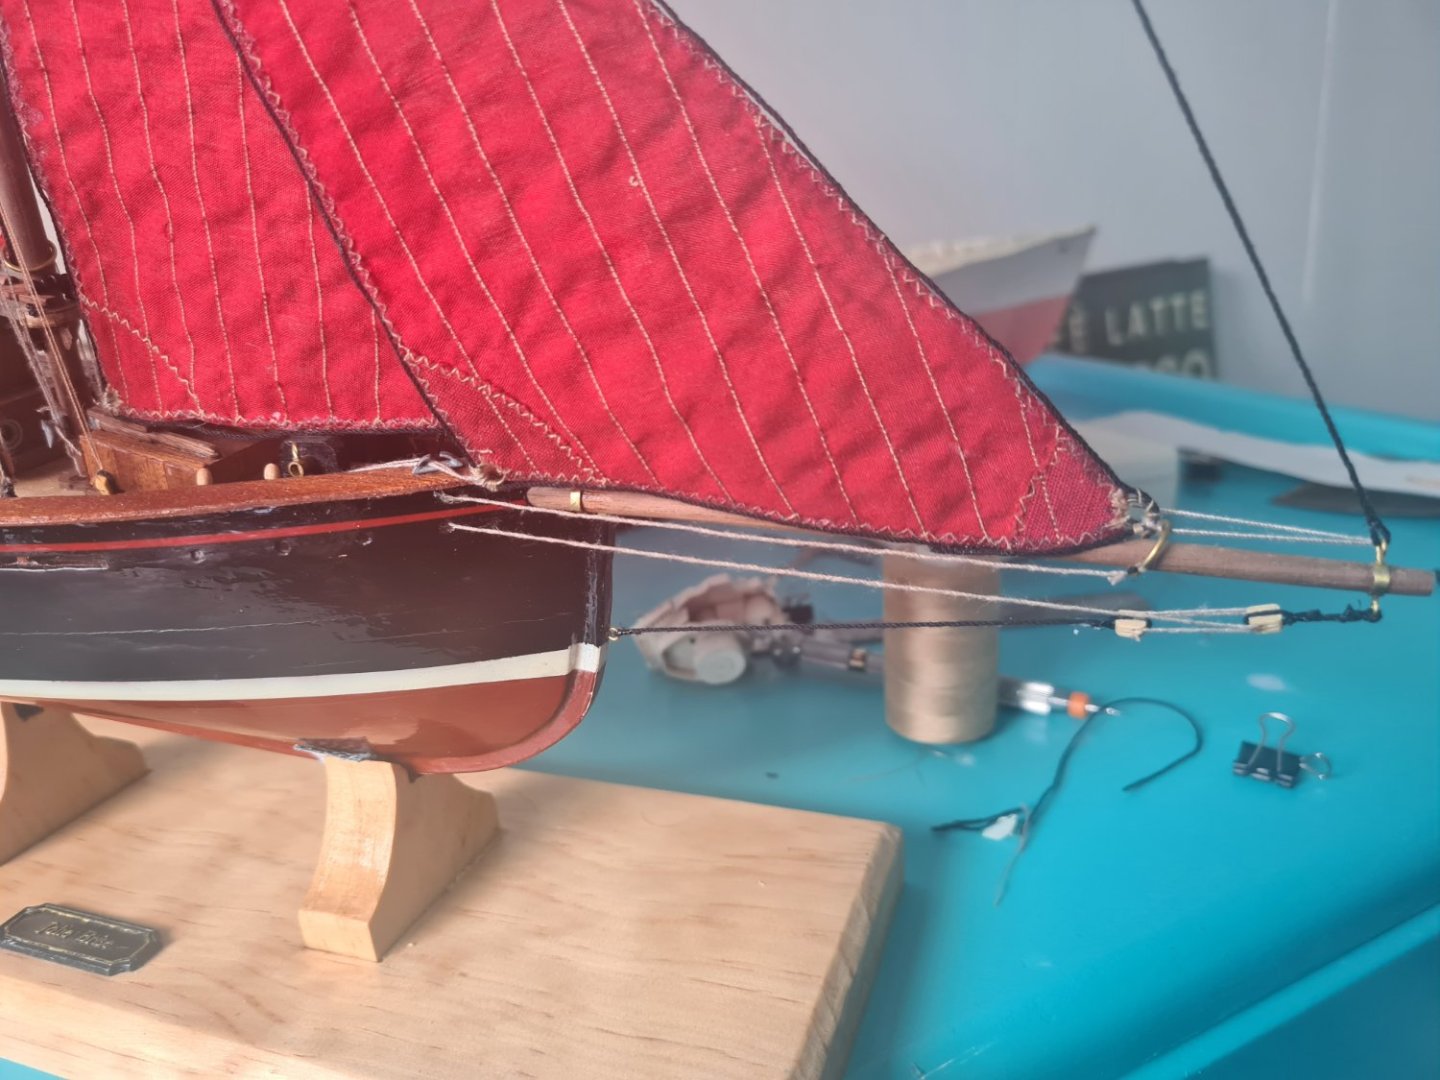
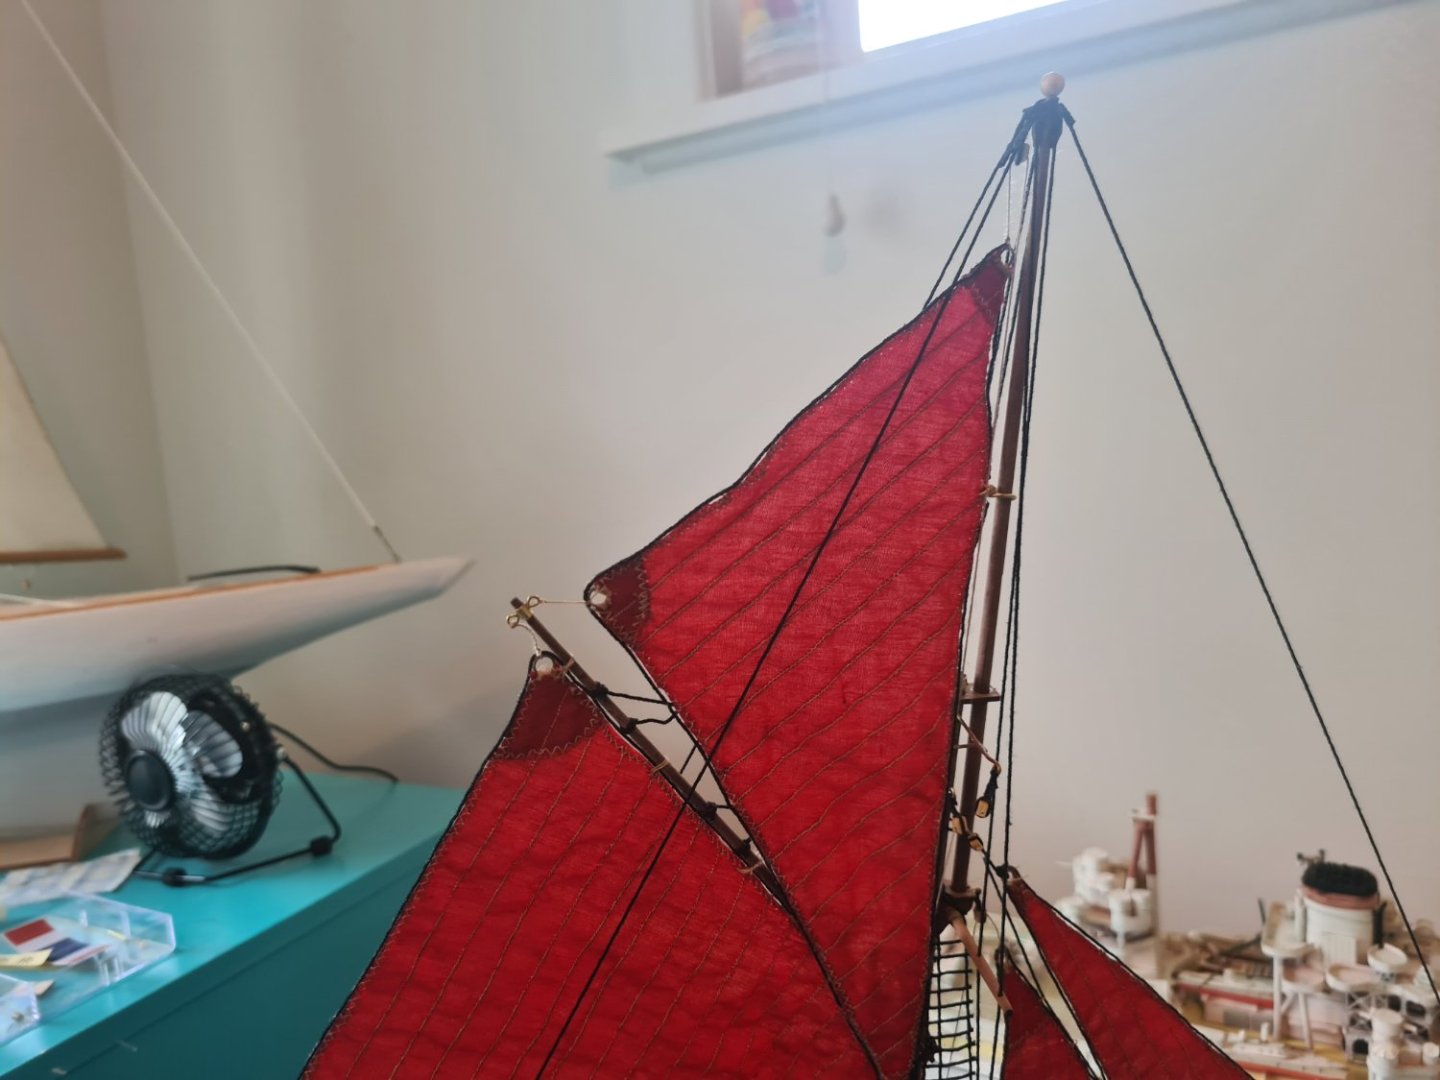
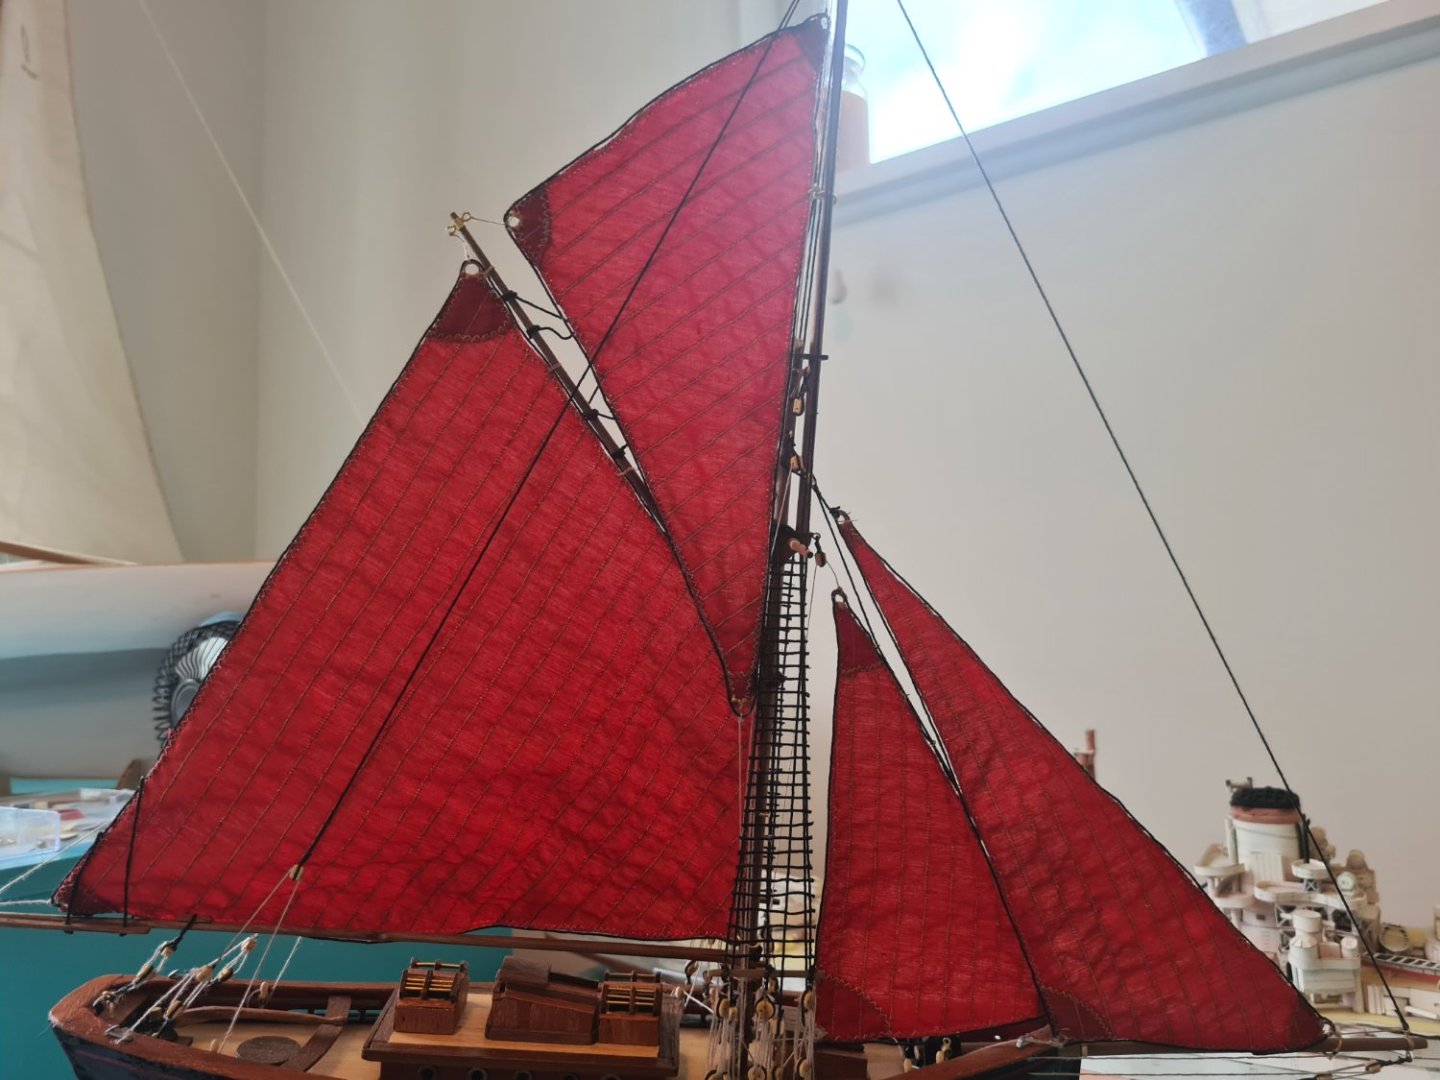
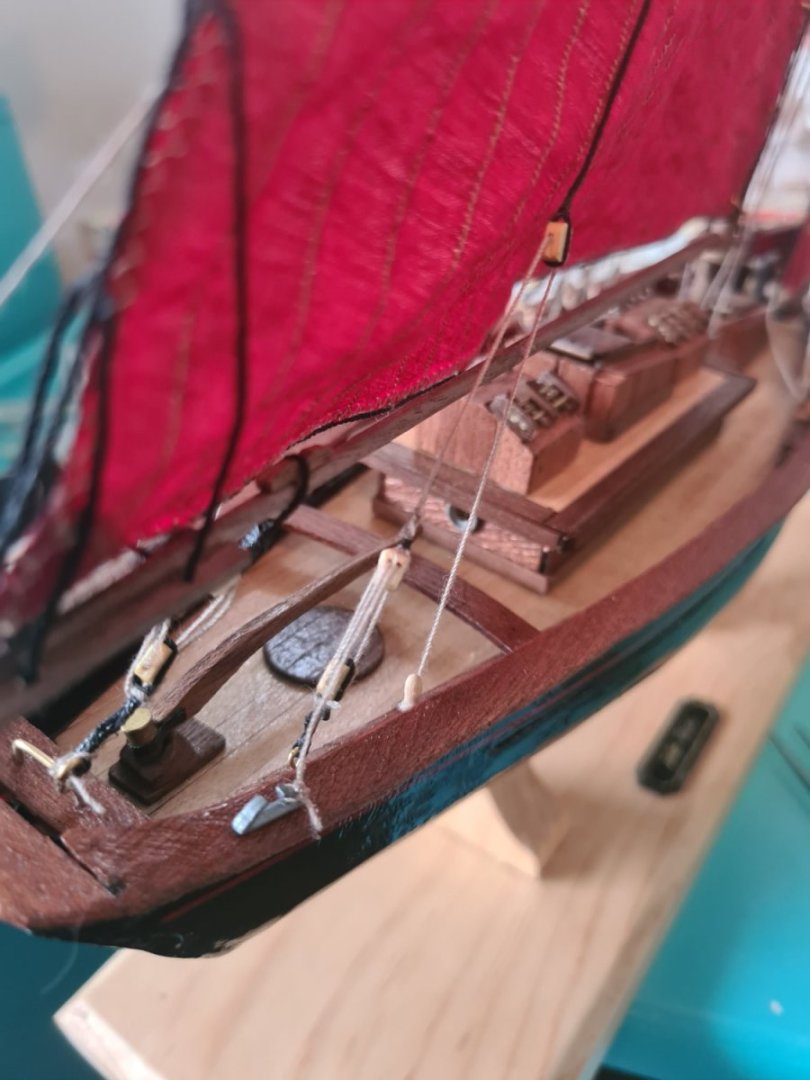
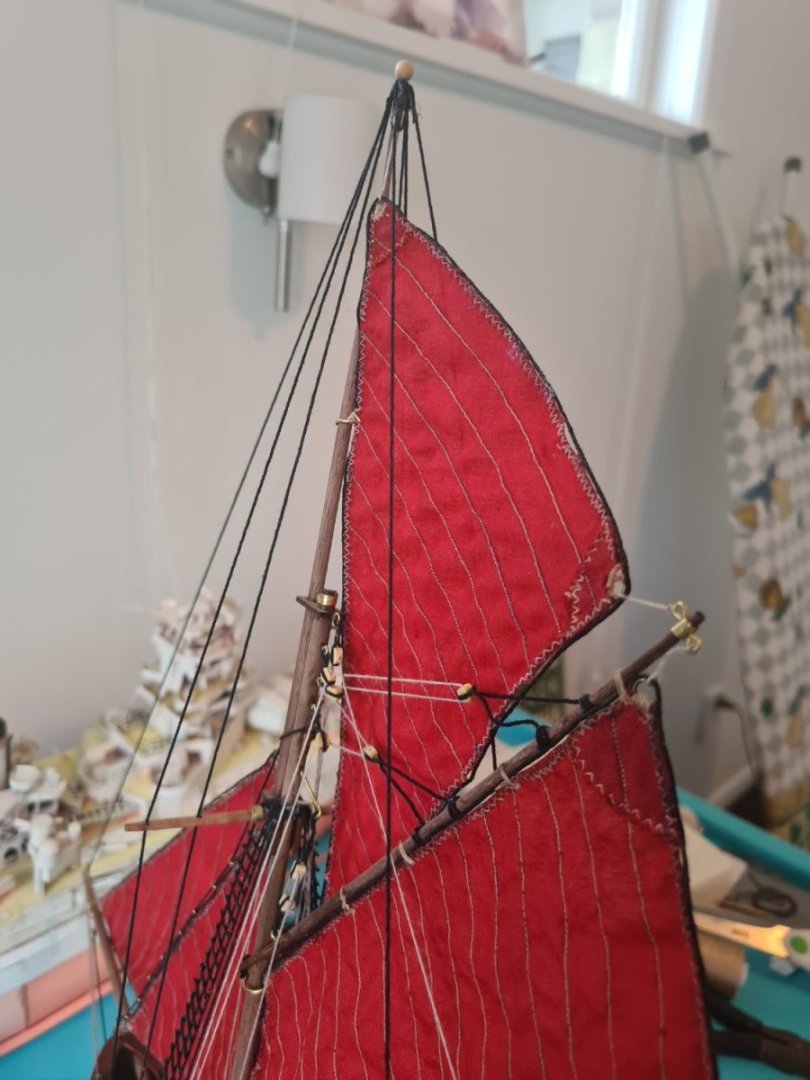
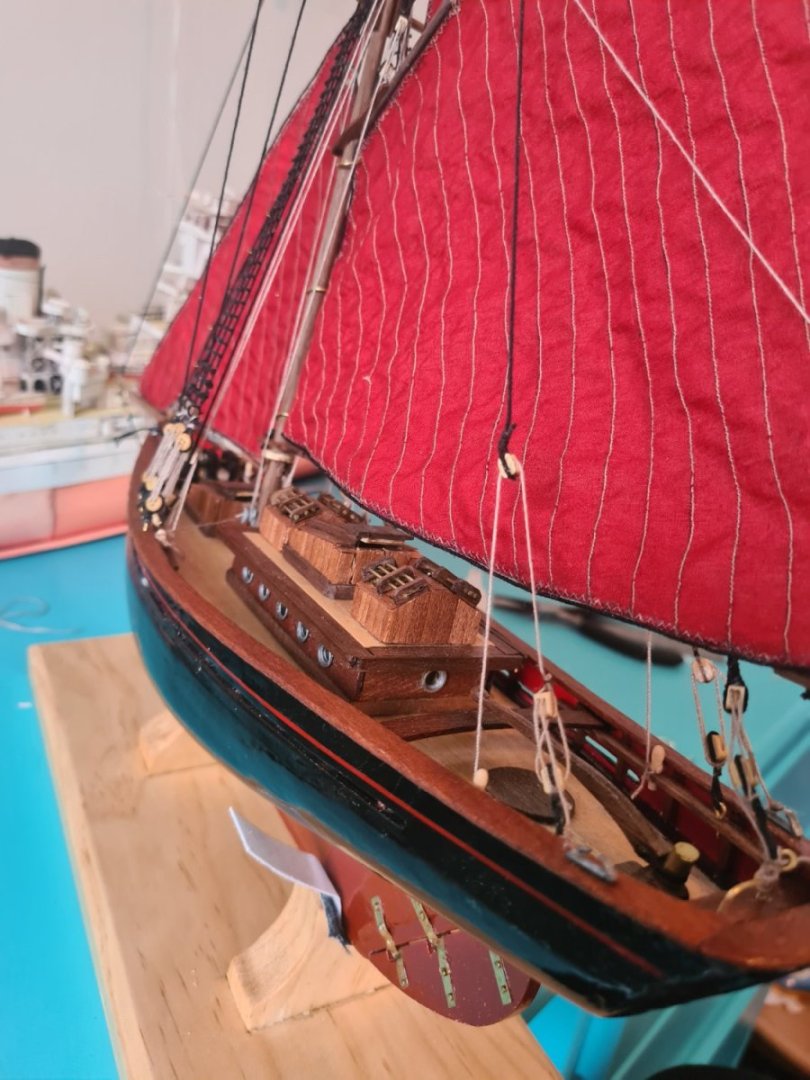
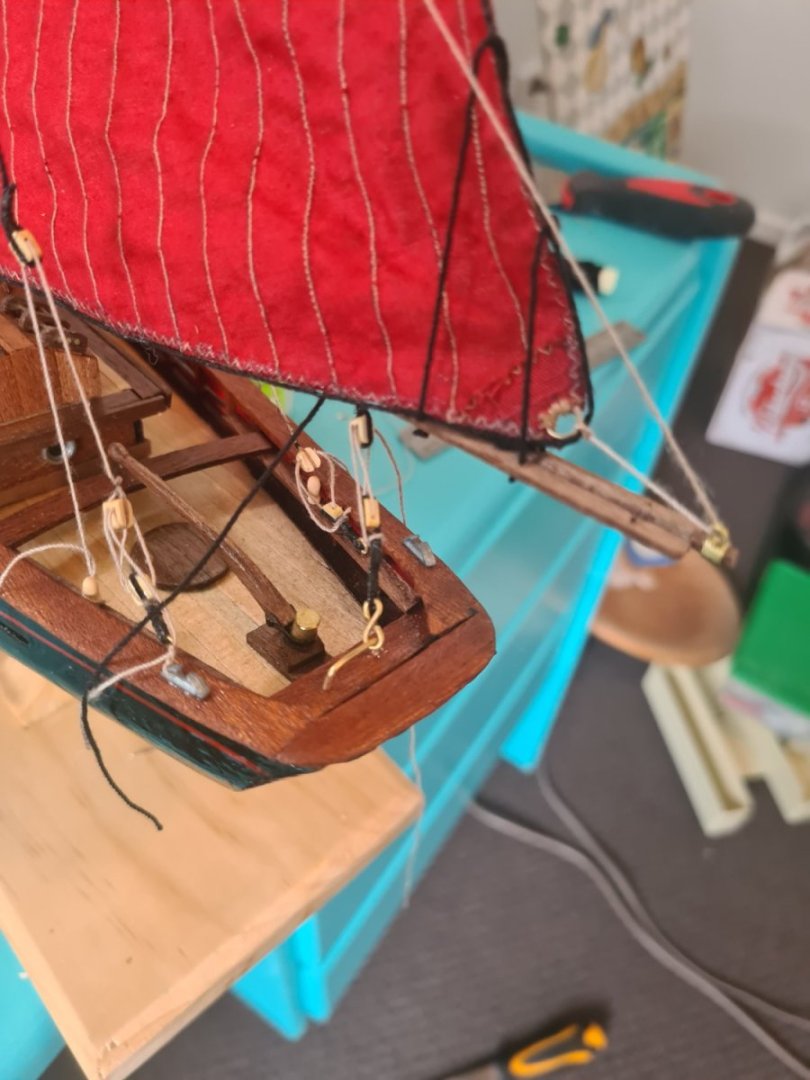
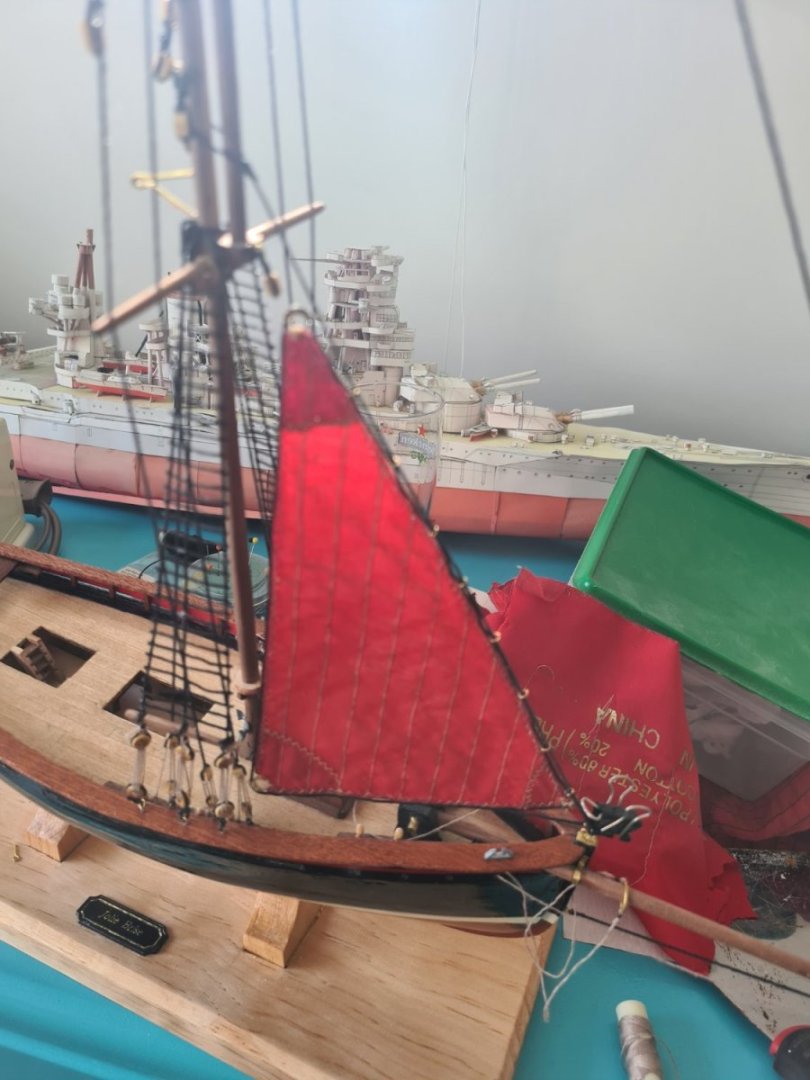
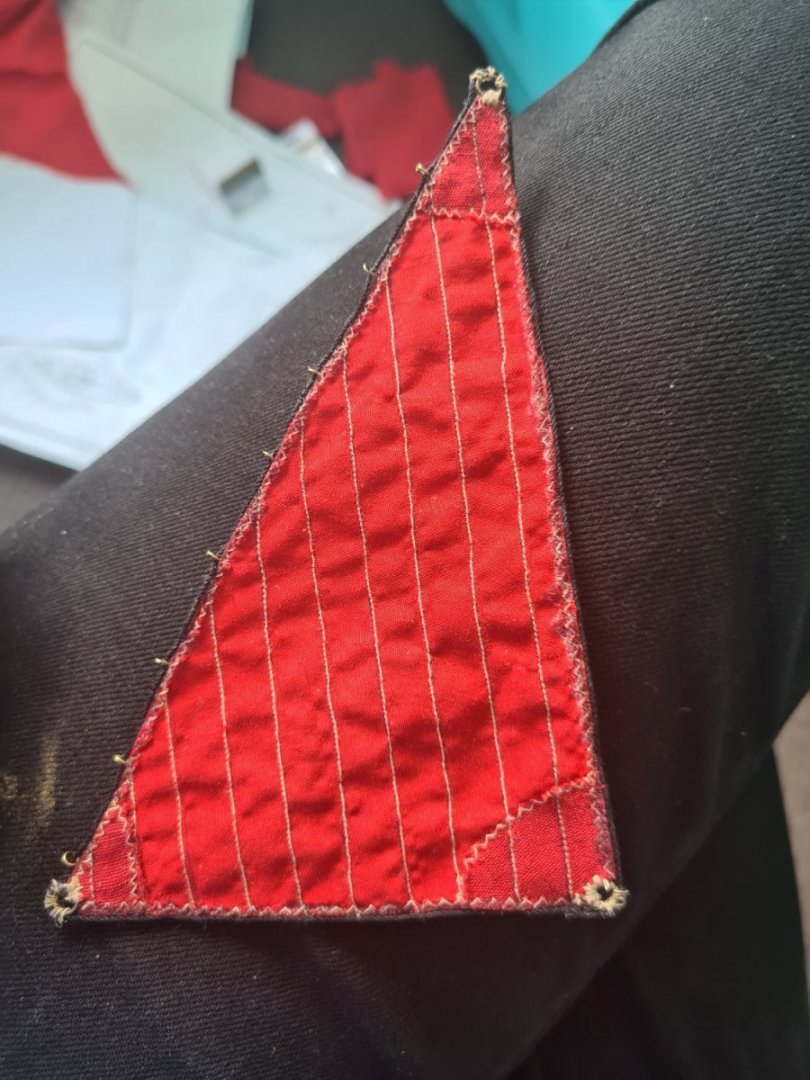
Getting very close to putting the finished label to the build. I went off plan with the topsail to emulate the pictures of the topsail attached to the mast and also the volume of the sail making it much bigger than the plan as if your a ship you want plenty of sail area up top. The only thing left to do is a much better flag than the one supplied.. going to paint one up on white cloth. And I'm going to shape the main sail with spray on starch and build it up slowly to get a realistic shape to the main sail. Oh and an anchor and anchor chain.


-
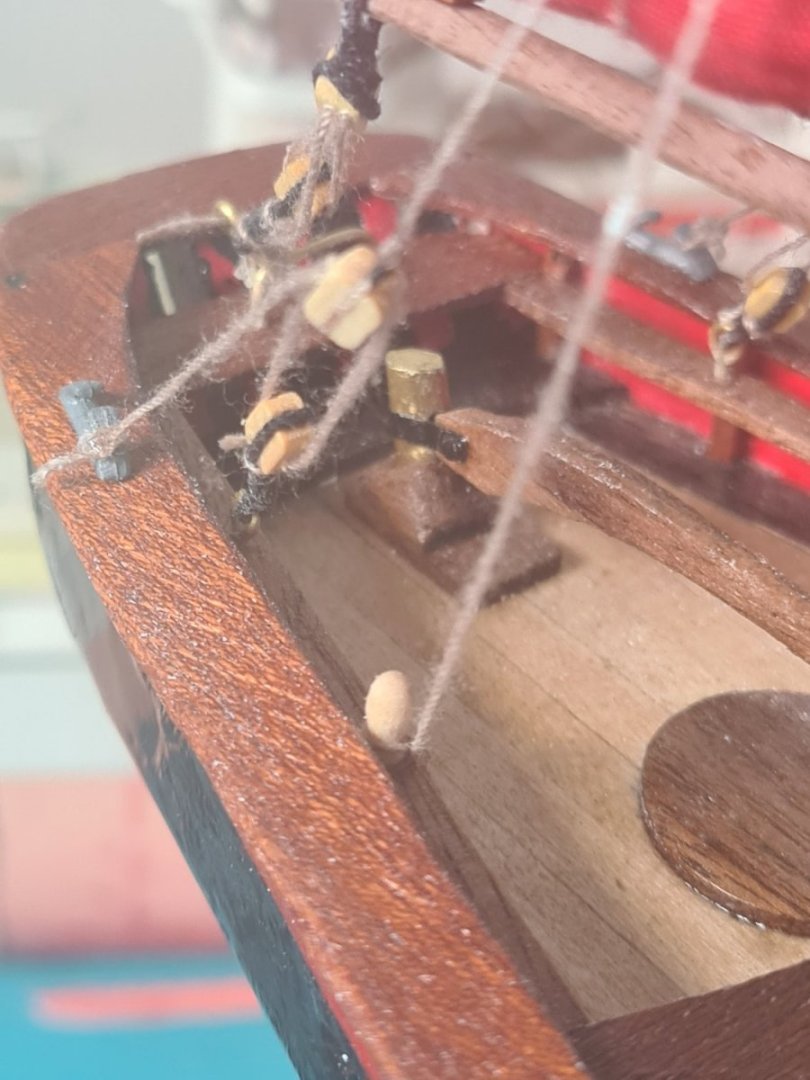
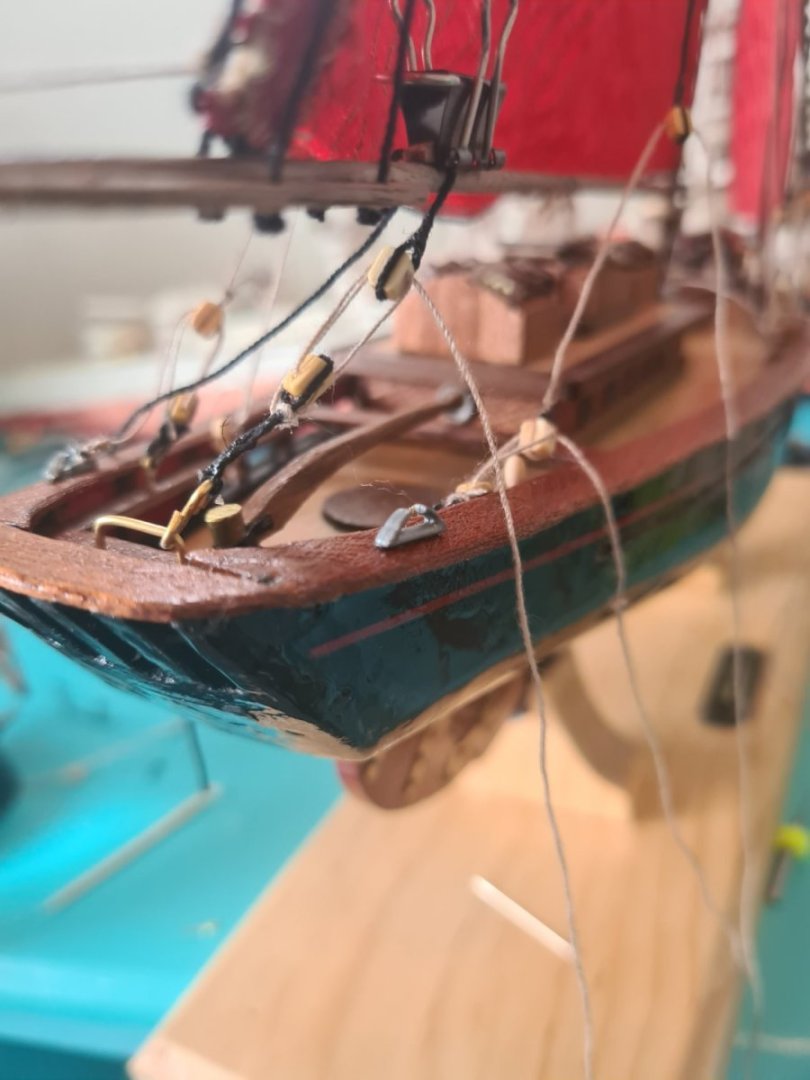
A wet day here in Auckland ... perfect modelling day in front of the sewing machine and getting closer to finishing. Boom main traveller added and been working on the rear halyard as well as sewing the top sail. At this stage I'm running out of dead eyes and things so I'm improvising with scratch building some bits and pieces just to finish. I have been looking at other builds but the currency market is all over the place... vanguard models are now cheaper for us but anything with us dollar way more expensive.
-
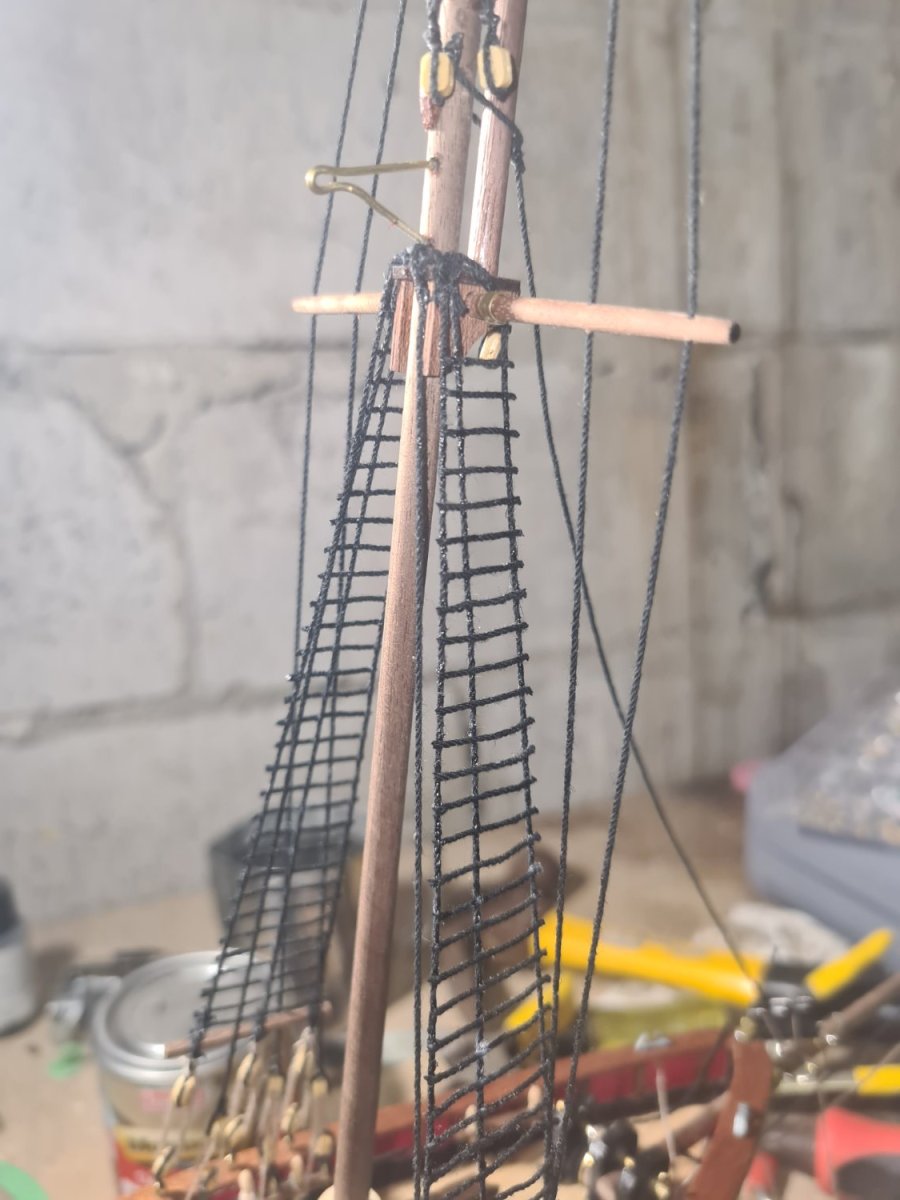
It's amazing how things come together once you have sails and can run dome rigging. My only concern is the halyard cross each other near the mast and it seems a bit messy but it's also busy with various lines etc in the way. I am learning a lot and you iys amazing how you cam use the tweezers to tie things in small spaces. It's fun seeing it all come together. Should I add another fore sail at the front? I have the top sail to go and another back stay and main traveller.


-
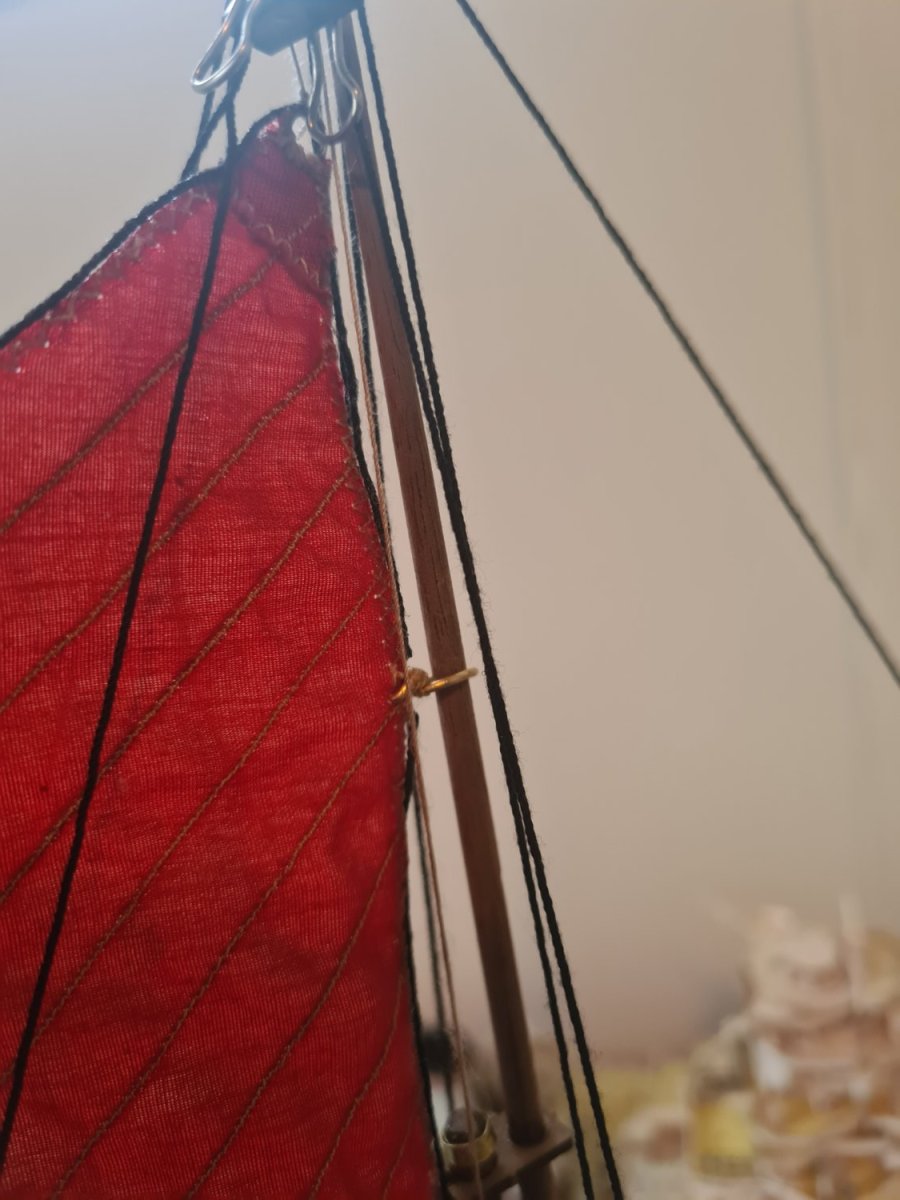
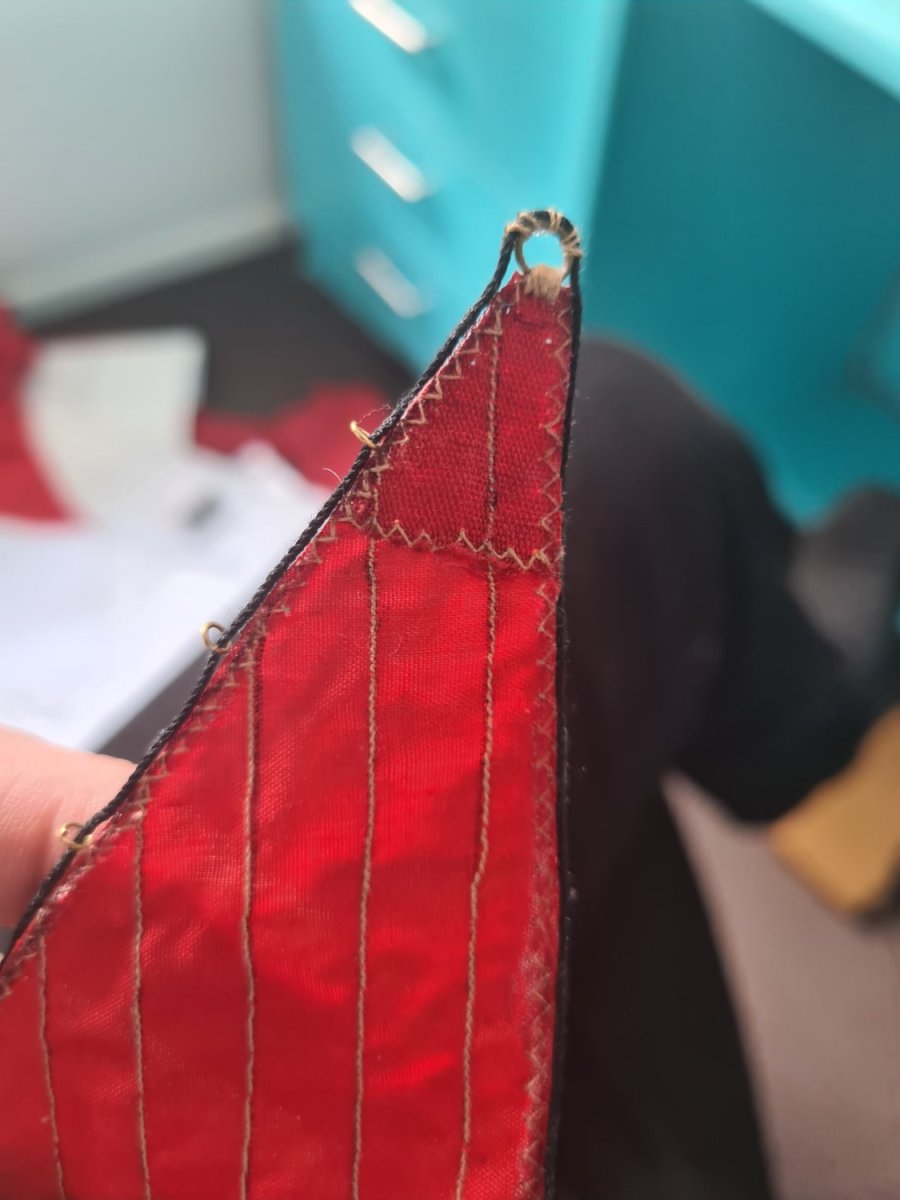
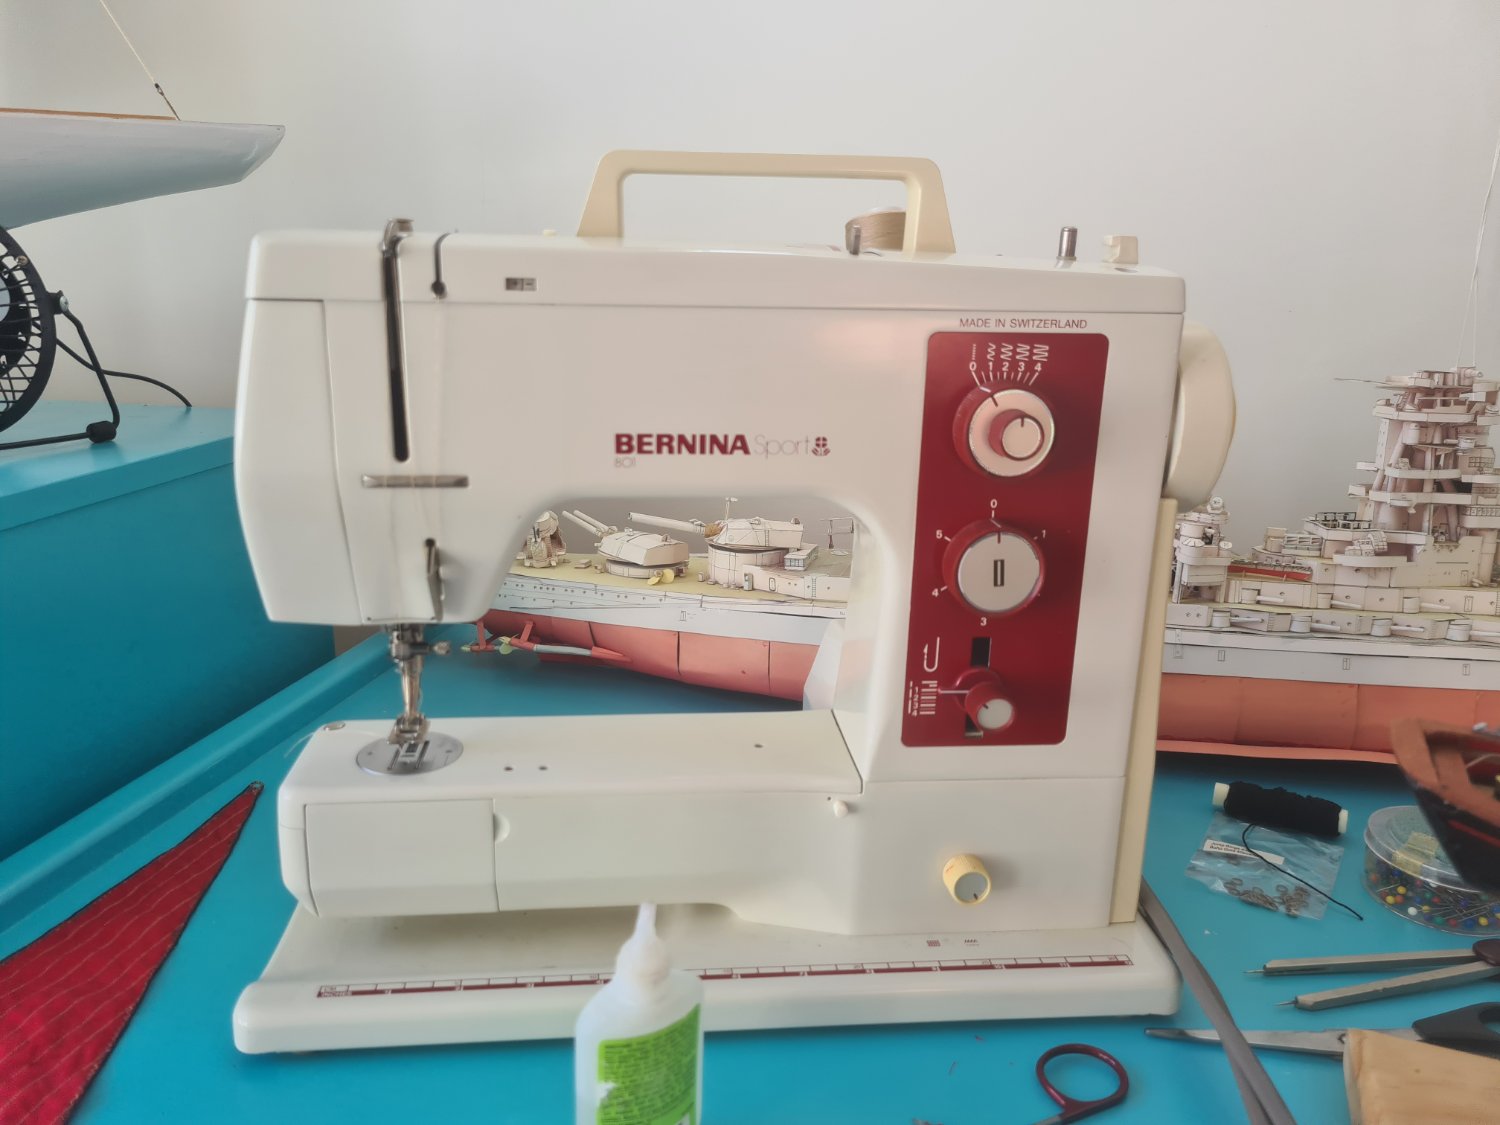
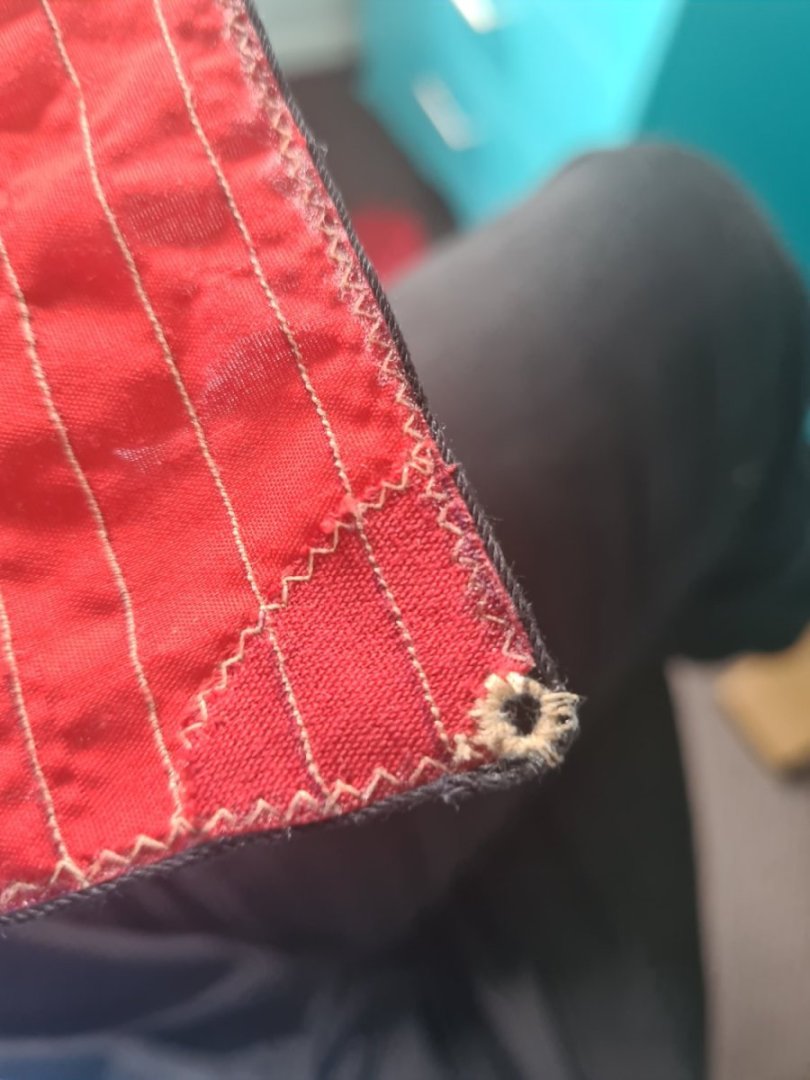
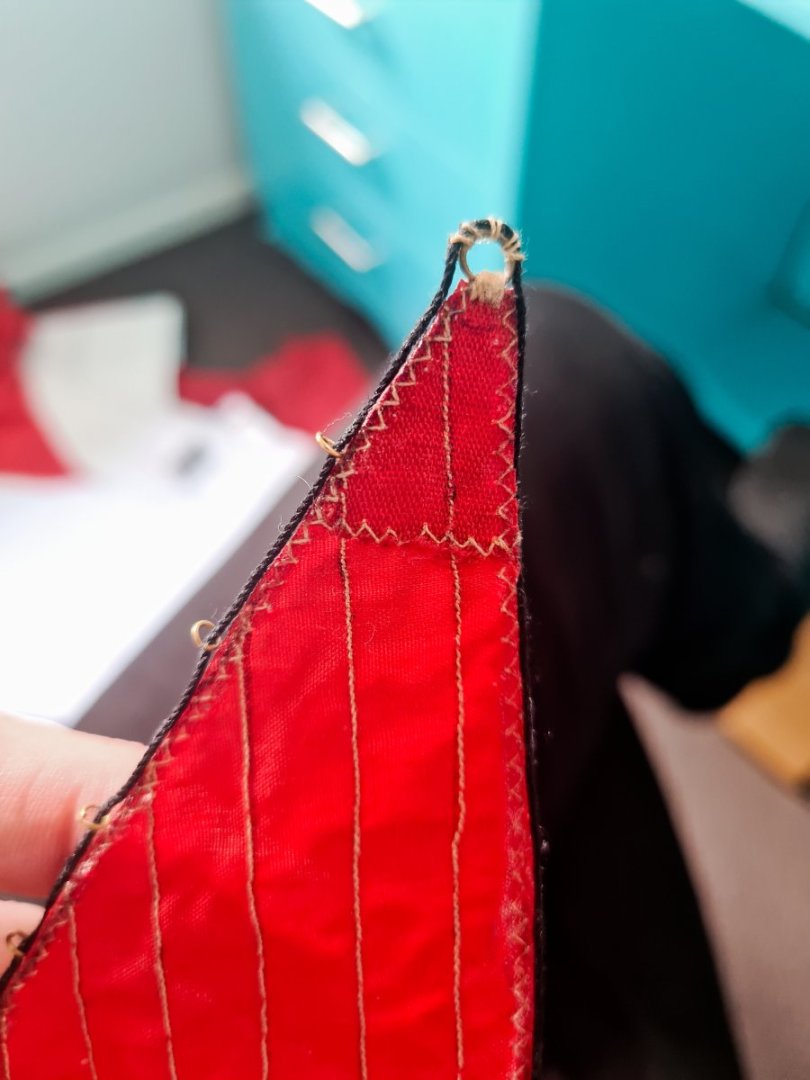
Back to it after a covid break but also been researching, viewing you tube and buying a sewing machine in order to do some sails for the boat. Firstly fabric definitely has a direction it prefers to sew in without gathering. Obviously making a triangular sail there will be one direction across the preferred way and you need to pull the fabric really tight to stop it gathering and bunching. The machine is good quality second hand one so it isn't the machine... its just that you need to be mindful. Secondly the order you do things is really important and not to double back as you cannot exactly go over your original line of stitches.. it looks rubbish if you do. Thirdly hand stitching at the end can easily ruin your good work with the machine so take care. I also found the finished sail is slightly smaller than off the paper... maybe the fabric gathers a little with stitching? Anyway I have done two sails and learned alot. Moving on to the main sail gaff next

-
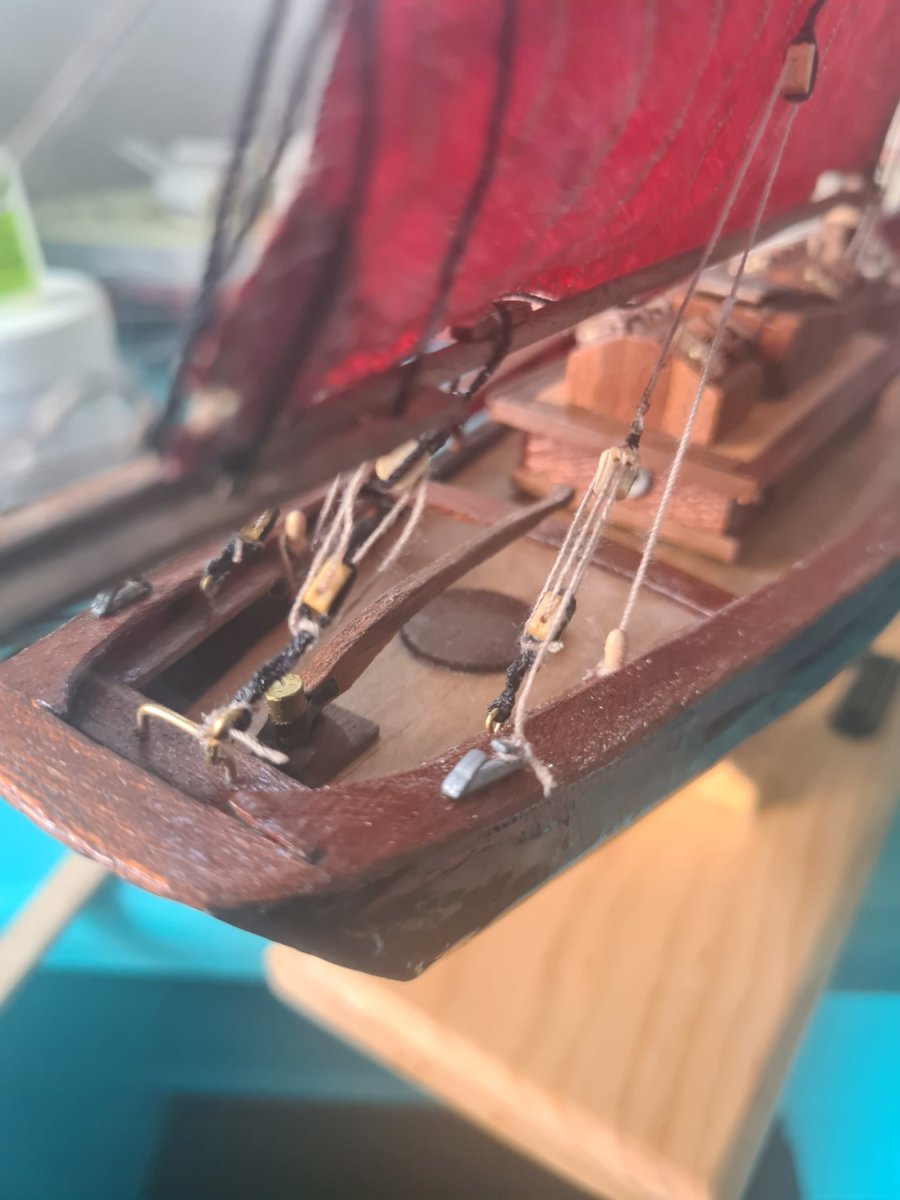
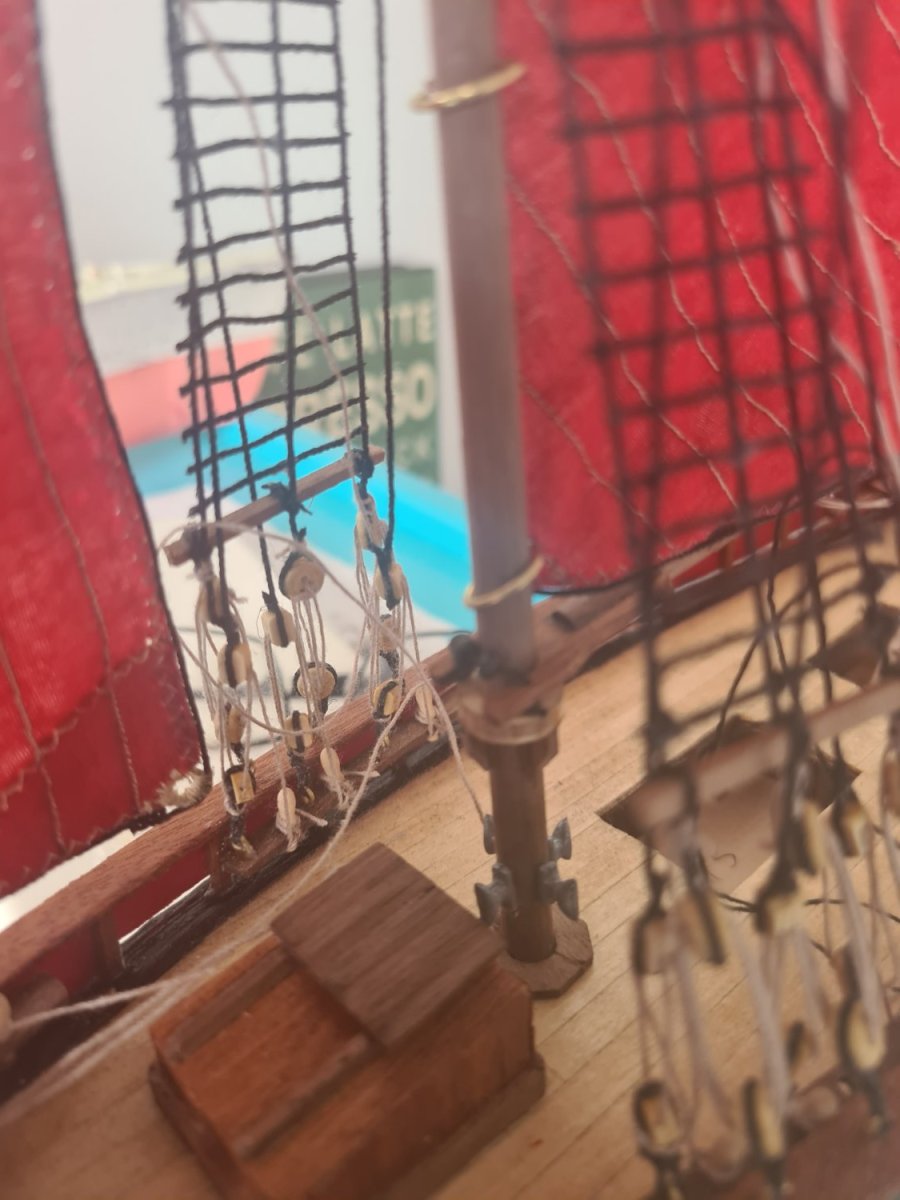
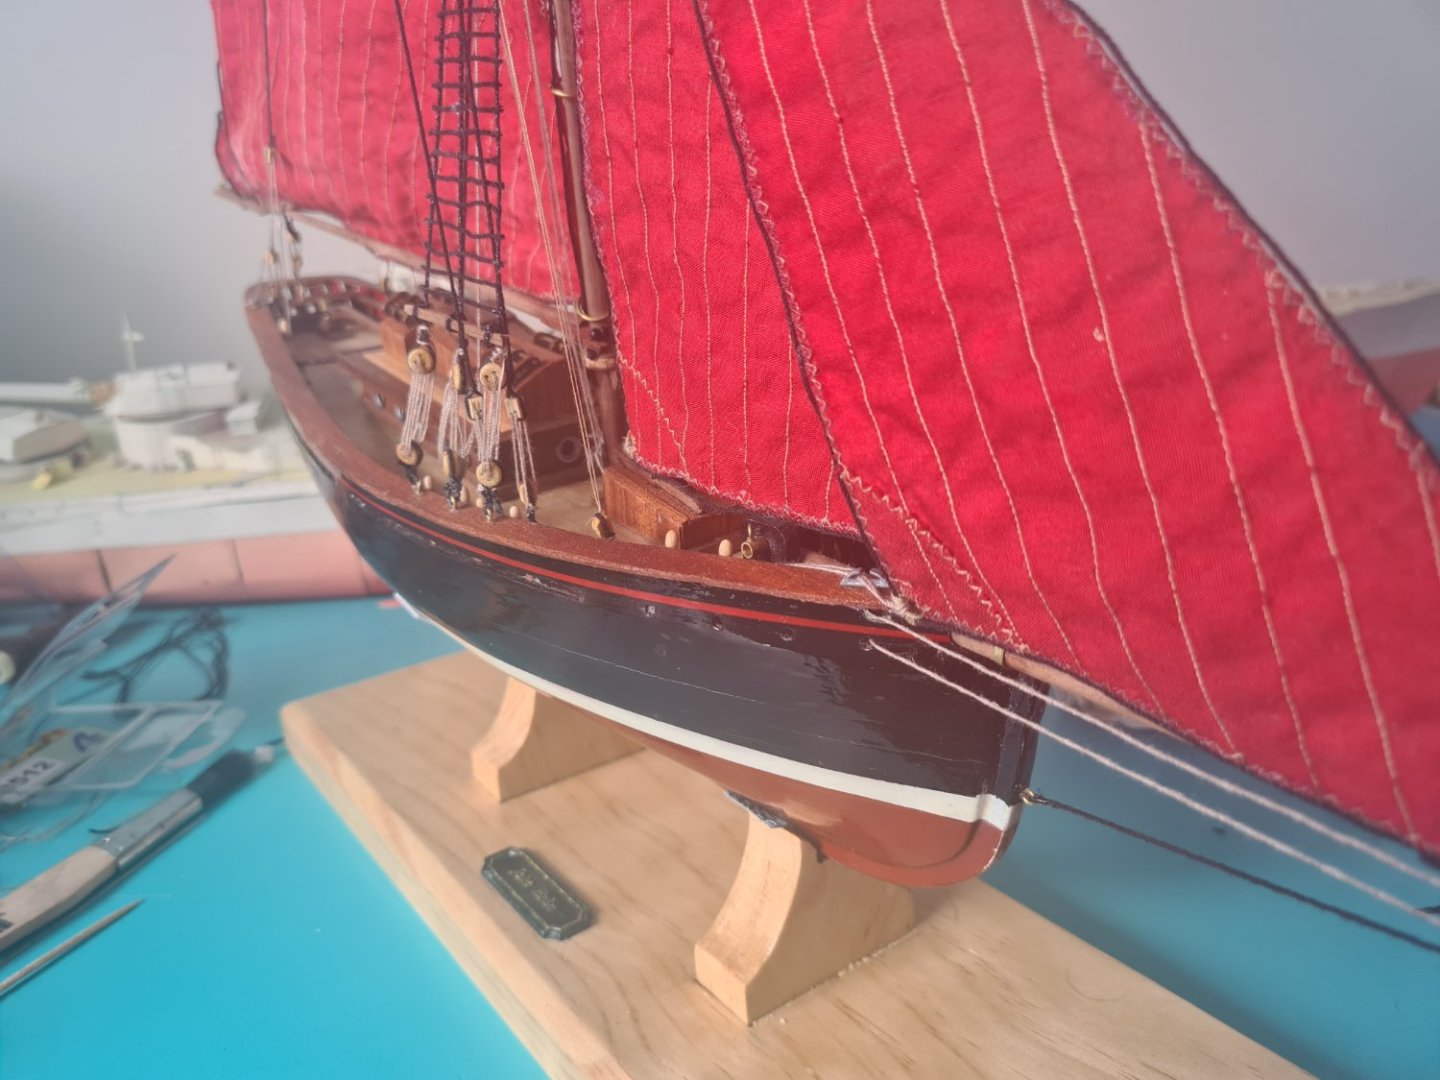
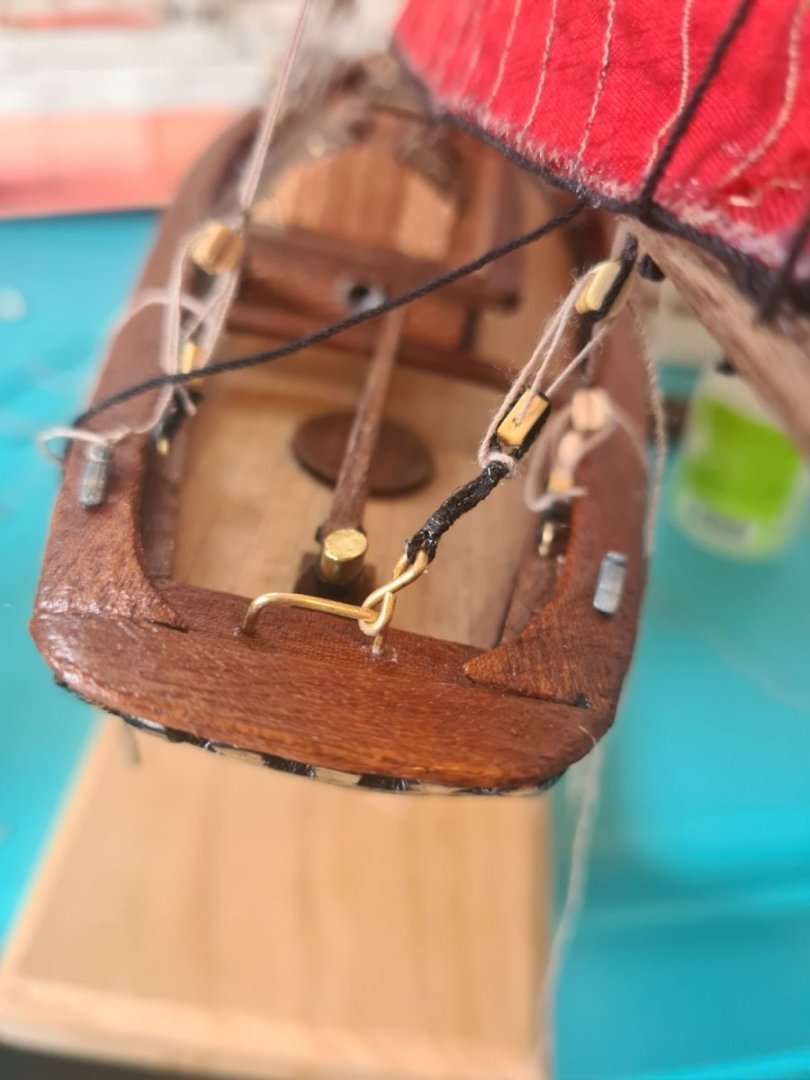
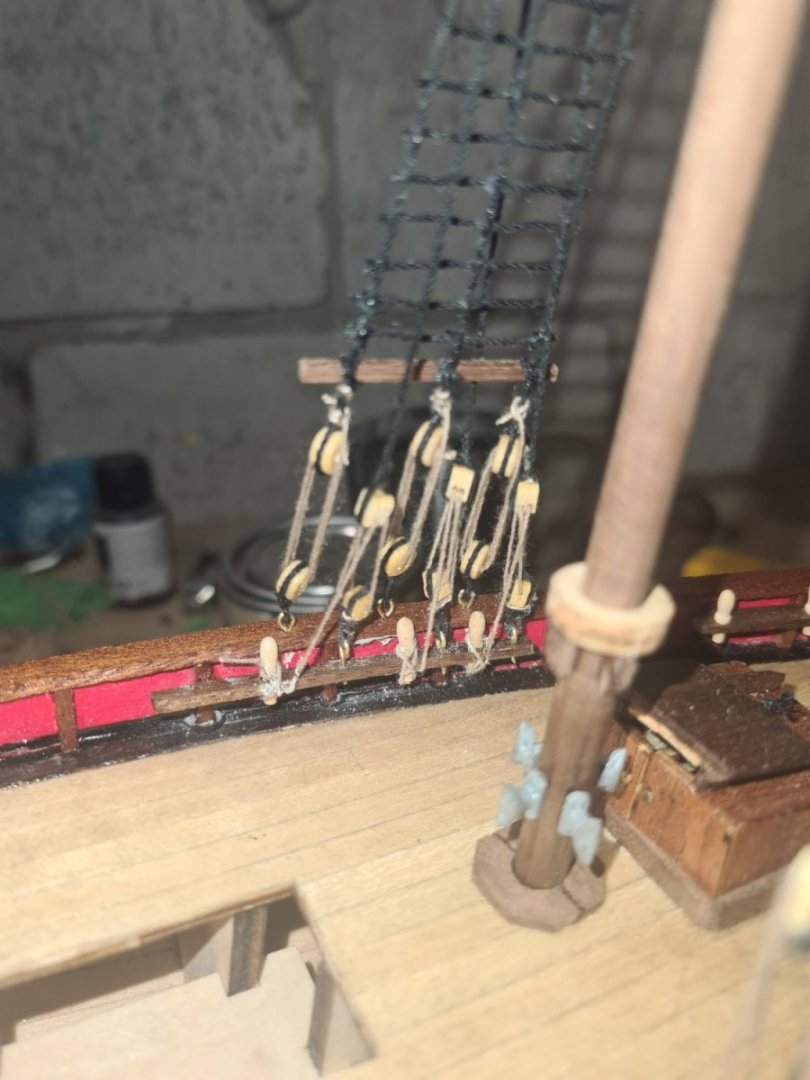
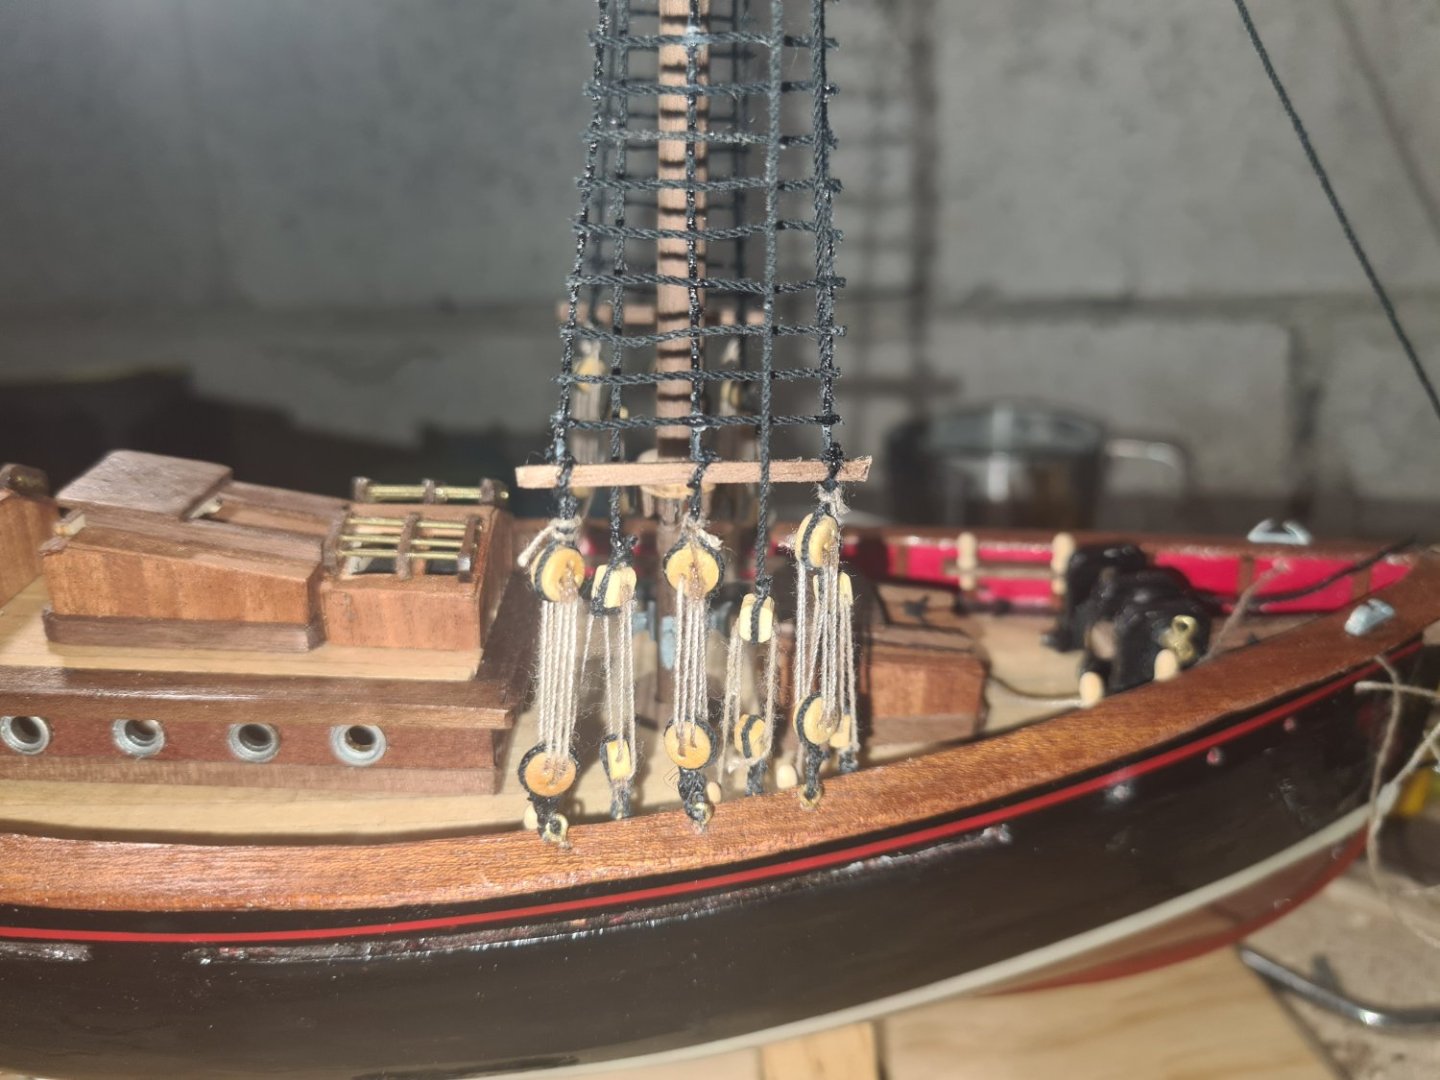
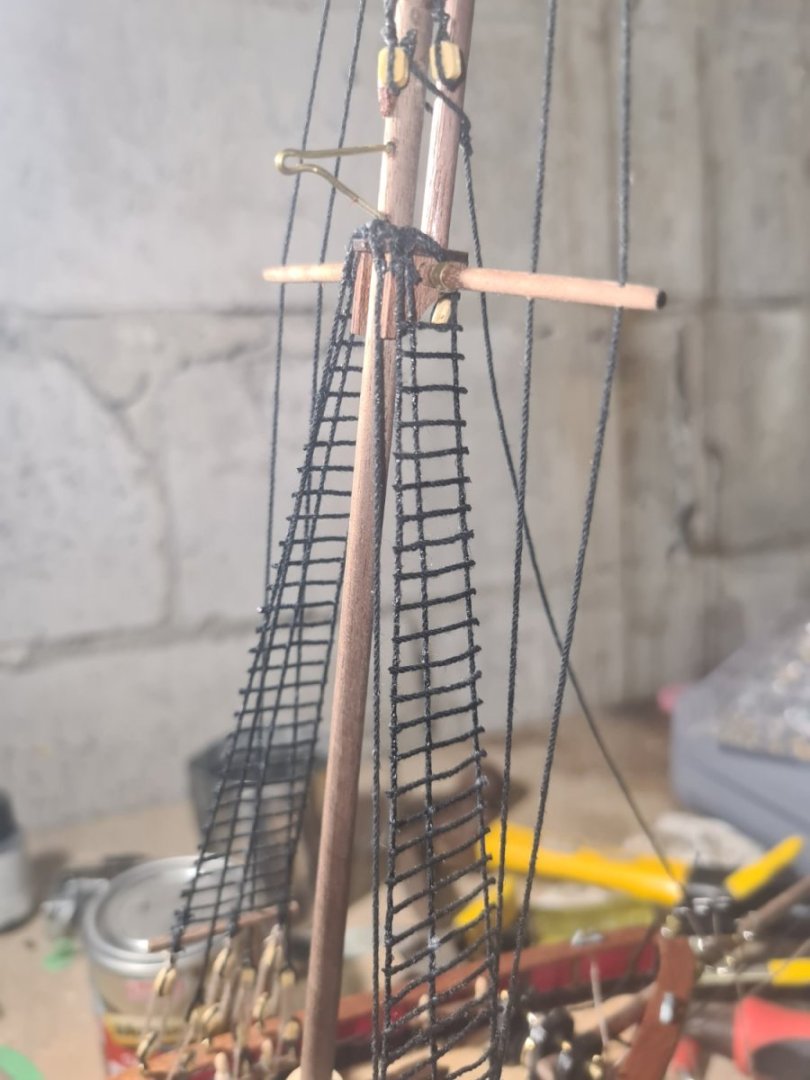
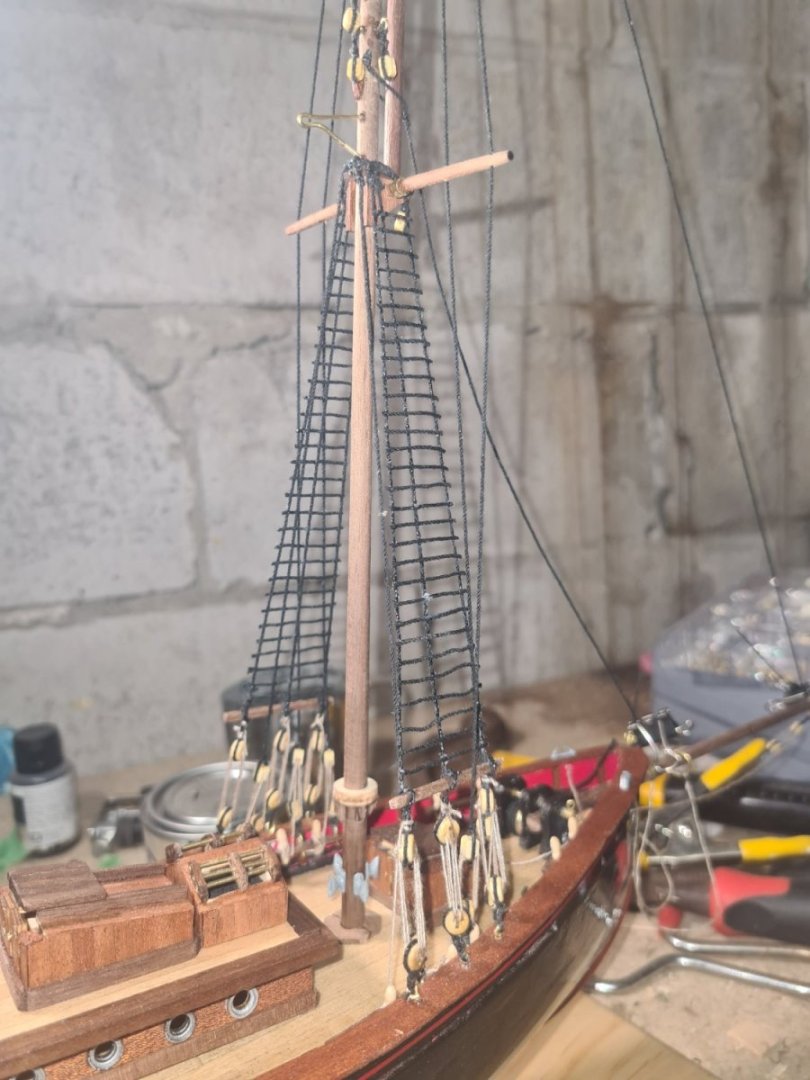
The ratings are tough to tie.. tried so many ways of timing them but very hard to do and there is 30 ratings per side x 3 shrouds so that is 90 knots if your tying them. In the end I just ca glued them and they look tidy as. There must be a trick to it that I need to learn. Also working on the stern shrouds.. they look love more modern additions to the rig but can see the benefits of them as they will tension the lines from the bow and allow the gib to be tighter as well.


-
Blocks and belaying pins and handedness
Srenner replied to Srenner's topic in Masting, rigging and sails
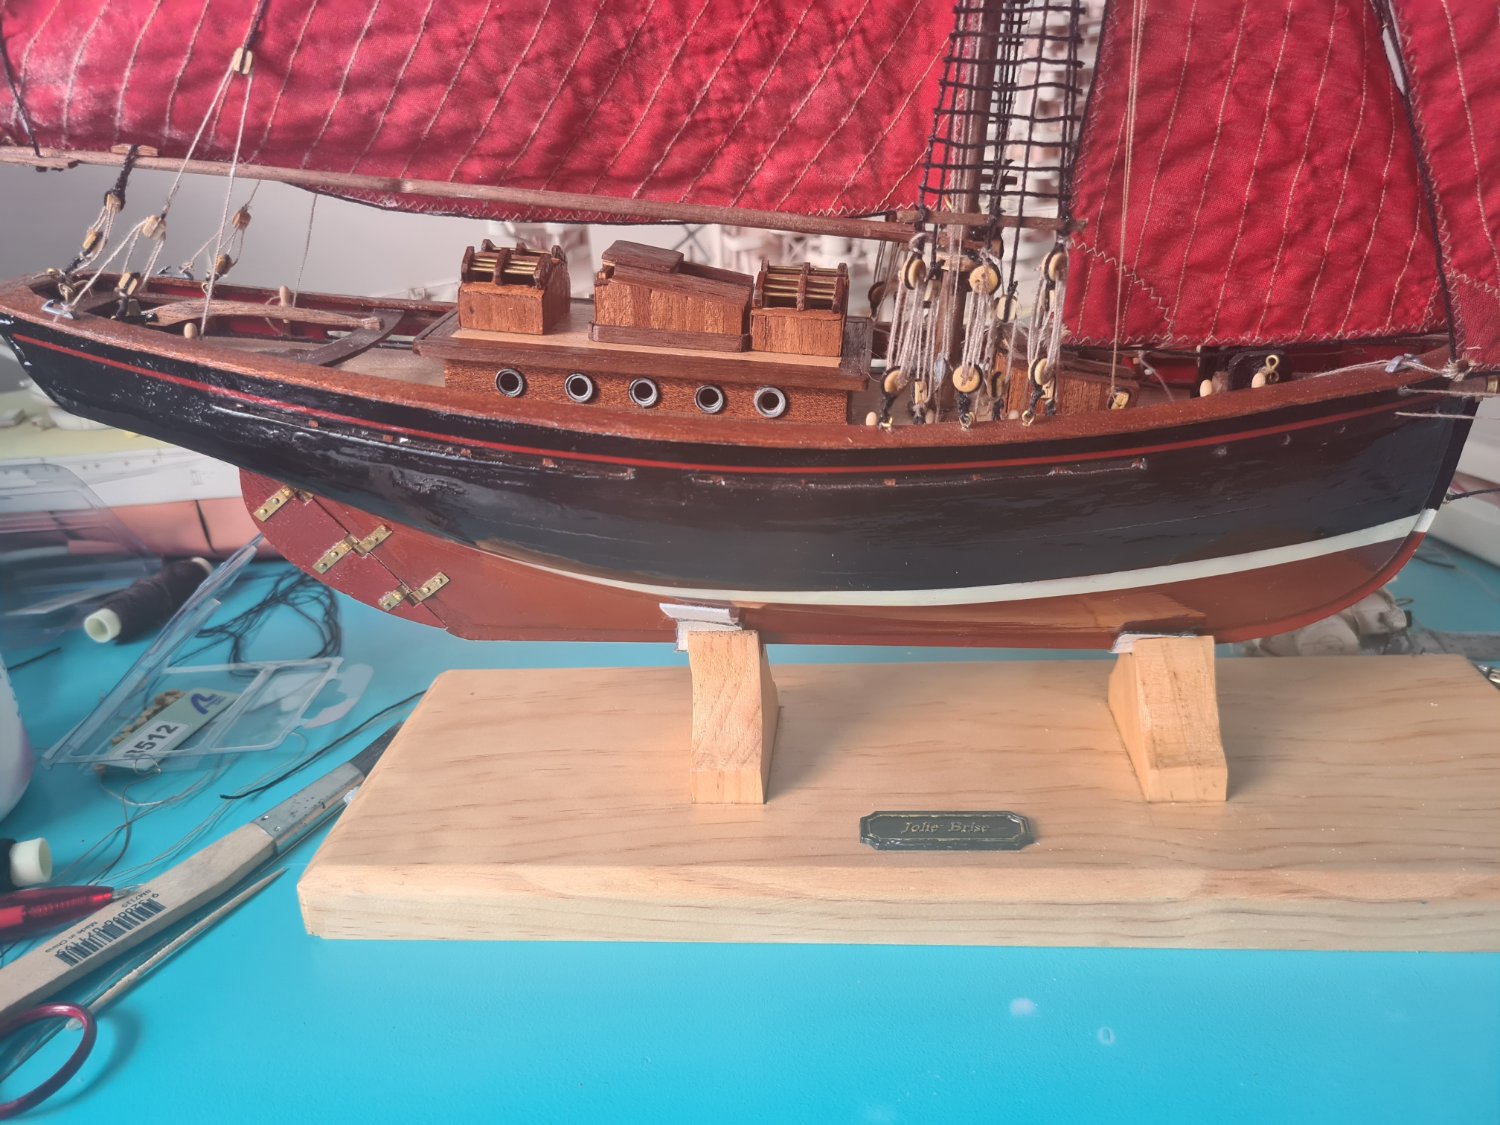
Yes pilot cutter but also modified as the rigging has been changed. I'm going off other completed build logs, pictures of the boat and also the instructions. It's quite busy in that part of the boat -
Blocks and belaying pins and handedness
Srenner replied to Srenner's topic in Masting, rigging and sails
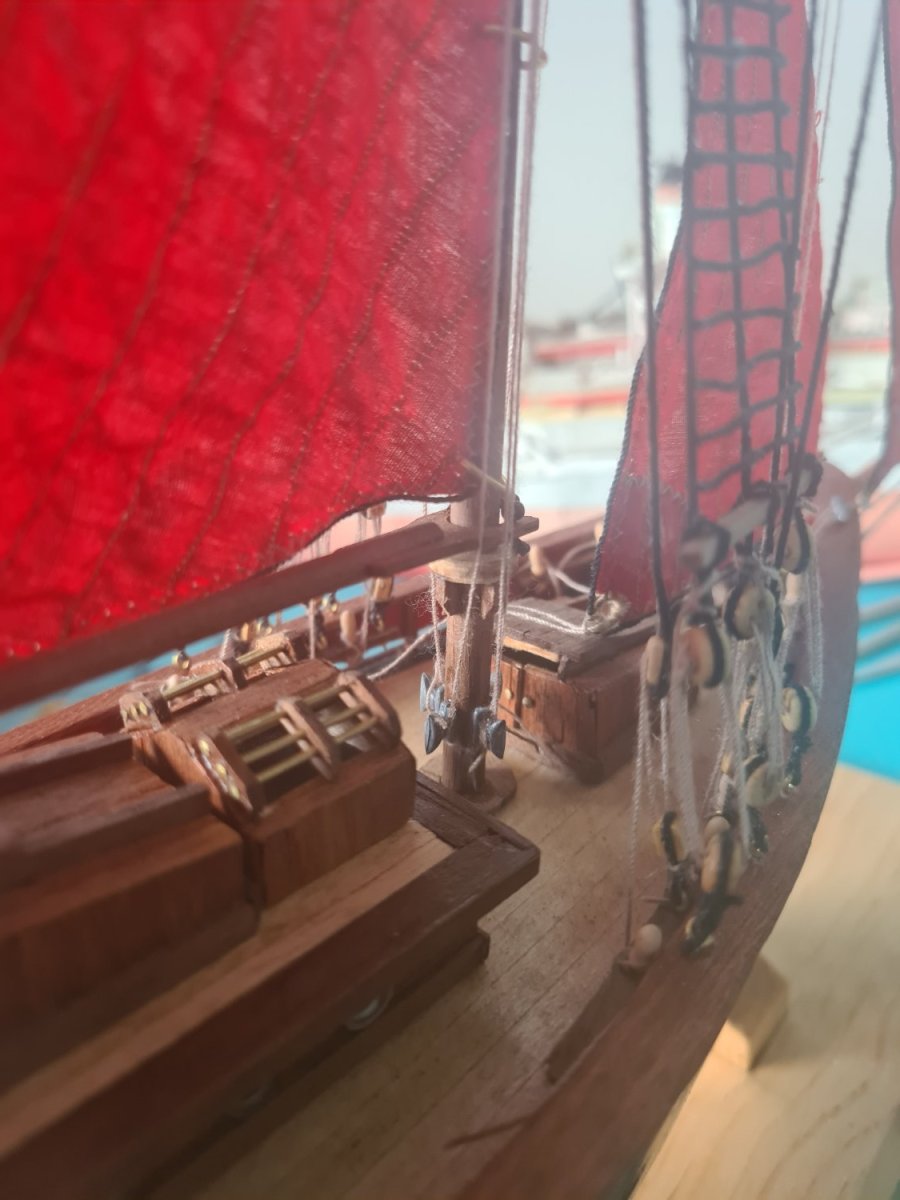
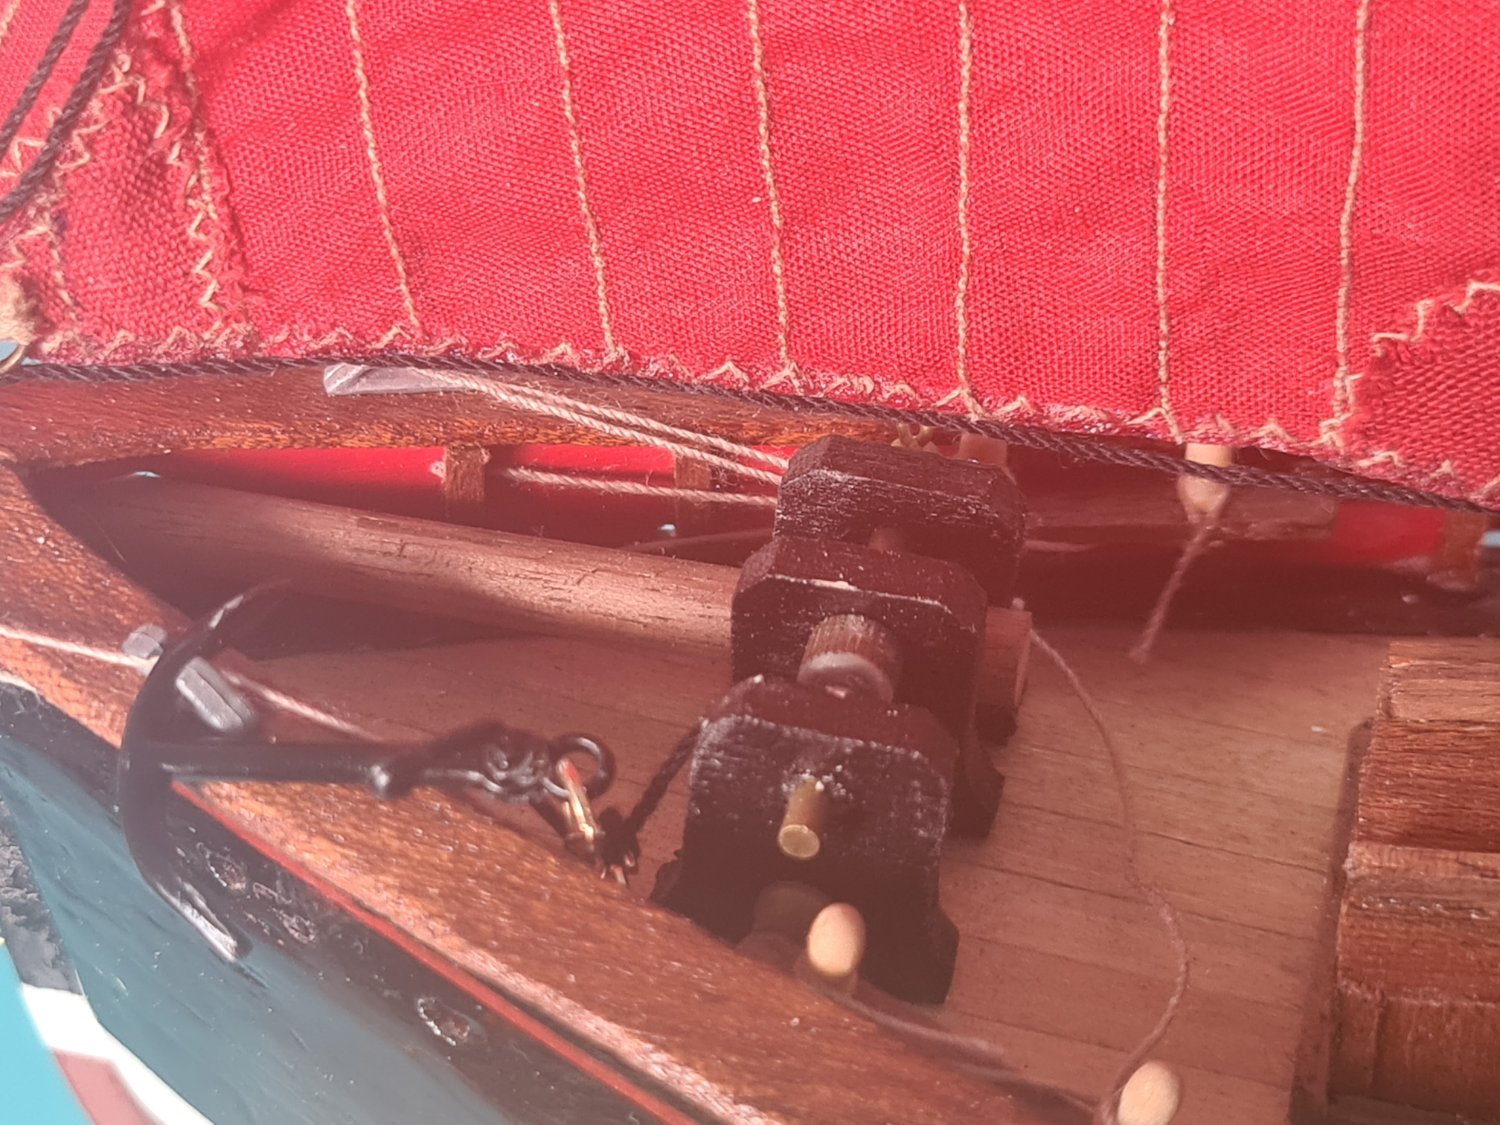
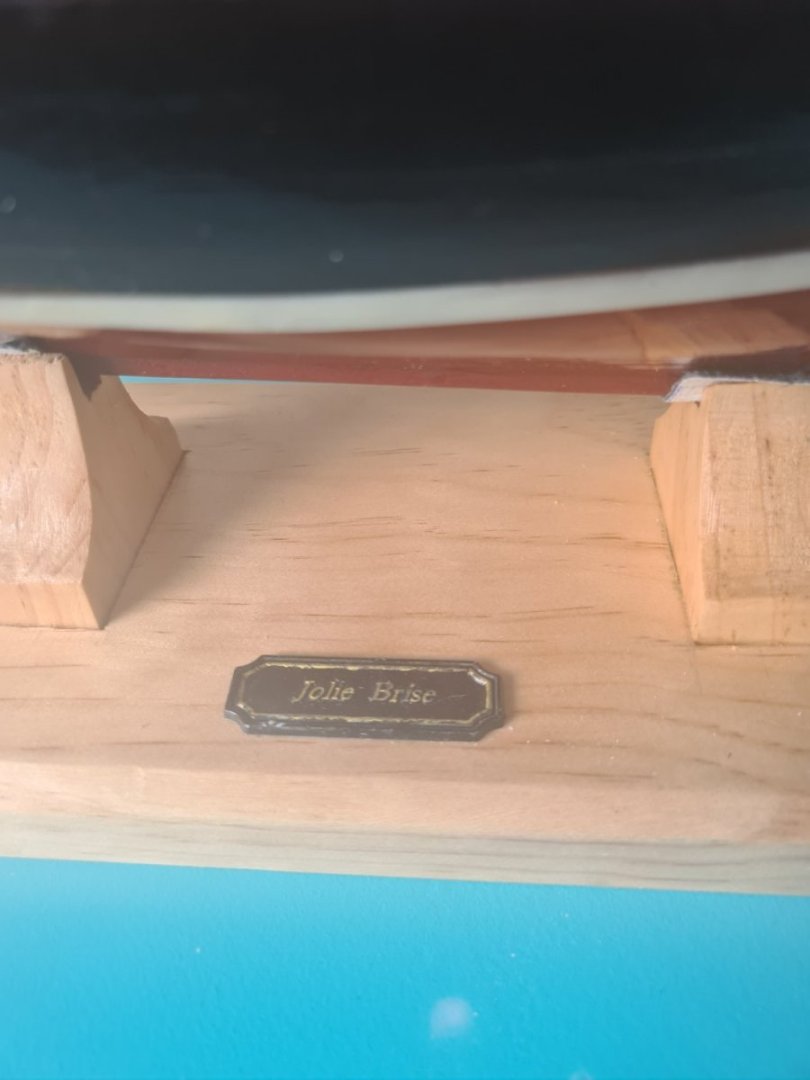
Ah thats the reason... unhelpful instructions strike again. It's not very clear how you should thread blocks etc the jolie brise AL kit. It's assumed knowledge. Thanks

.png.08f3c39182bd411299eb8c8e9bc7724b.png)
.png.e25747fadc21d140dde62008b41bfcd8.png)
.png.3ea77d3bdecf31b3a831cdcd8fce66d6.png)
.png.dfca2e83de0eaf738e7de423496bc60c.png)
.png.85c615930aa1a32872eafe25d85b026c.png)