


Jaager
-
Posts
3,084 -
Joined
-
Last visited
Content Type
Profiles
Forums
Gallery
Events
Everything posted by Jaager
-
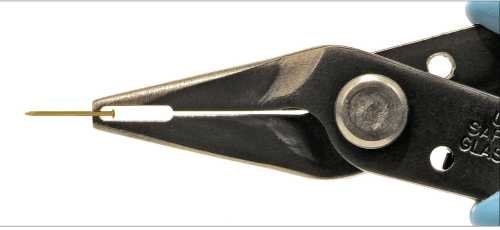
1- I forgot to add that my pin pusher also works to remove a pin . 2 - It works bamboo dowels/trunnels up to at least #50. 3 - The tool that I used before the pusher became available also works - a curved Kelly clamp. Curved Kelly clamp - I used the size most often carried by RN. Save frustration and buy quality (European) to begin with - the ones sold on hobby sites are no bargain. - with bamboo trunnels drawn from the softer species especially - the business ends of the clamps can be covered using used IV tubing. If the local hospital or clinic are no help try a vet.
-
A pin pusher is maybe theoretically a useful tool. In practice, not so much for most of us. For me, the tool that does exactly what you wish a pin pusher to do is: Pin Insertion Plier Item #: 85282 Micro-Mark Pin Insertion Plier Pin Insertion Plier Micro-Mark Pin Insertion Plier Micro-Mark Pin Insertion Plier Pin Insertion Plier Our Price $24.95 MM describes this as an exclusive product.
-
Marcus, Is your fleet going to be vessels from post 1860? If they are not, A dark dark red brown may be closer to what standing rigging was like. I just looked up the definition of Ecru - essentially it is the color of unbleached linen. This should pass for running rigging and dosing this with a dark Walnut Rit dye (or similar product) for standing rigging. This would simplify your inventory to just one color yarn (if linen) or thread if cotton.
-

31 ton Revenue cutter sails and rigging
Jaager replied to Bill Hudson's topic in Masting, rigging and sails
Bill, I strongly suggest that you avoid using the book illustration and order the plans from The Smithsonian. The particulars for this specific vessel: Page# Plan# Description Cost 101 HASS-18 US Revenue Cutter 1815 31 tons 10.00 The Processing 5.00 Processing is for up to 12 sheets I usually order 12 at one go except that the last page is for 7 because I could not find another 5 that I wanted. Smithsonian Ship Plans P>O> Box 37012 NMAH/MRC Washington, DC 20013 This vessel is a little boy. Quicker and easier to build than some you might choose. You have the spar dimensions. Books and/or the NRJ CD will provide the diameter changes over distance from the mast. The rigging would be standard for the time and the time is about as well documented as any. There is even a post here that does a pretty good job of explaining schooner spars and rigging. -
Painting White/Pot Metal.
Jaager replied to JohnB40's topic in Painting, finishing and weathering products and techniques
You have something now, so if your carving never produces a satisfactory product, you can always use what you have. As it is, you have a no lose opportunity to develop a new skill. Buy several blocks of wood that are the appropriate species and carve. It would be an inspiring way to begin scratch building - should that be your ultimate ambition. -
Harold Hahn method
Jaager replied to Essayons's topic in Building, Framing, Planking and plating a ships hull and deck
There is a model of Centurion 1732 at the NMM that is also a solid hull that was painted as though it was Navy Board. It seems to me that the peak of actual Navy Board was ~1670. The builders of the +/_ 1740 simulated Navy Board would likely have been 2 or 3 generations after the actual built up style was de rigueur. The actual shops that built them were long gone? The actual way to do it lost? The sponsor was not willing to pay for the additional cost for the built up version? The suppliers or supplies of the wood stock needed no longer existed? In their Hay Day the framing style of Navy Board models probably reflected an artistic version of then then dominant (or a past and going out of style) of the actual framing of the ships they represented. By the mid 18th century, it was replaced by "modern" and "scientific" framing style of bends and filling frames ( with many variations on the theme ) that more or less continued until it was replaced by iron frames. Perhaps enough time had passed using the new framing for there to be allowed to develop a sense of nostalgia for the old and long defeated framing style? -
It is the tack that is important. I bond my frame timbers using Titebond II - PVA - I shape my frames in station to station thick batches. The station shape from the Body plan is all of the lofting I need for the outside shape. I have a quick and simple method for getting the inside moulded shape. I scroll cut the individual timbers - it is the least wasteful way. Now comes the job of precisely aligning a thick section of stacked frame timers. Vertical alignment lines in the same place on all timbers does this. BUT, except at the dead flat no vertical line will connect the inside of all of the frames in a station to station thick section. The bevel is usually too much. Vertical lines outside the edges of the frame shape will do exactly what I want. This additional width means that there is more wood to remove. A station to station section of frame timbers is a thick layer of plywood. It needs aggressive stock removal. To keep the frames from being damaged and protect the edges at the spaces, I use temporary space fillers during the shaping process. I use construction Pine now. To keep these space fills in place during the wood removal process, I need an adhesive that will stand up to 60-80 grit sanding belt and drum force. Then, when finished, I need it to release/ reverse so that I can punch out the filler Pine. The solvent to remove it must not affect a PVA bond. I tried Duco = acetone does not affect PVA. Duco did not provide the shear hold strength that I needed. I tried liquid hide glue - heat + EtOH totally denatures the protein. It holds like a champ, but the frame thickness makes it almost impossible to get sufficient heat to the glue in the middle without cooking the actual frame timbers surface. Scotch Perm Double Stick tape holds and solvents weaken it enough to allow the Pine to be punched out. To hold, it needs pressure. This has residual adhesive staying with the frame timer surface. It is a narrow gap. It is a pain to get at. For the hold needed, it helps to burnish one side of the tape down. I now know that it is a bad idea to do the burnishing on the frame Maple instead of the spacer Pine. My system had the tape burnished to the Maple on one side of the spacer and burnished to the Pine on the other. The tape went with the burnished side. The Maple is clean on one side and gummy on the other. I also had to use a #11 blade to work the burnished tape off the Maple. It was difficult to see the residual too. Solvent and a scrapper eventually cleans it up. It is just that there a whole lot of separate open spaces between the frames of a 60 gun ship's hull. A gum rubbing crepe piece may do as well as a #11 scrapper but them's a tight space however I do it. This as been an unwelcome surprise and I just needed to vent. I have not found a "magic" strong but instantly reversible adhesive so far.
-
I am still uncertain as to the way to construct the visible part of the gun ports. That is a ways off. I am taking a break because I can find no simple way to remove the Scotch Tape adhesive from the frame openings so that I can shellac them. It resists Naphtha, Lacquer thinner, Heptane, EtOH, IsopOH, but Mineral Spirits seemed to do more than the others on a quick test. I know now that I should have only burnished the tape on the Pine filler and not the Maple frames. Now needs to return inspiration and determination - before I am seduced by another hull to frame..
-
Painting White/Pot Metal.
Jaager replied to JohnB40's topic in Painting, finishing and weathering products and techniques
John, It looks like I completely missed what you were asking. It did not occur to me that you wished to paint a metal casting to look like it was raw wood. The only practical reason for a figurehead on a model to be raw wood at all, is if the builder had actually carved it from a block of wood - and wished to show that off. As others have pointed out, in your situation pigmented covering layers should be used. The other factors - water based paint vs oil based paint - bright and garish vs subtle, subdued, and scale sensitive - is a matter of personal taste and you are the final arbiter of that. To be glib, I think the only way to get a convincing raw wood figurehead is to start with a block of wood and carve it yourself, using the casting as a guide. For this sort of part, there is a wide number of choices for wood, since among other sources pen turning stock can be used. That stuff has a high cost per BF, but fraction of a BF is small. -
Would not the core calculation be: F = mVV? The surface area that the force acted on would be an absolute bear to determine. It would also probably be dynamic, with the effective sail area adapting and changing with differences in force. I can imagine that the complexity exceeds any practical utility for a formula in predicting a wind speed vs vessel speed. Reverse calculations should work. Measure the two speeds and the necessary force can be cranked out. One factor that I keep overlooking is that a slight incremental change in wind speed can have a significant effect on vessel speed. Why the frantic and continuous changes in sail area and sail angle was necessary when wind speed was above a critical value. And also why a sudden and unfortunate change in wind direction could roll a vessel with a poor design past the point where it could right itself.
-
There is always the option to build your own. Were you in the US, I would say that this option would probably not be less expensive than a Byrnes sander when all factors are summed. The key factors: Go quality. Use a large enough motor. 1/3 HP is the sweet spot. 1/2 HP tends to be heavy and bulky. A reversible motor is NOT needed. Unless you also want it to be a medieval siege engine. DO NOT enclose the motor! Sanding is a lot of work for a motor. Work = heat. As much air flow as possible! The drum holding the sanding medium needs to have a large enough diameter - somewhere around 3 inches - before the medium was available as continuous cloth backed rolls, the width of commercial sanding sheets set the diameter. added: The drum speed should be ~1700 rpm - faster and the wood burns - slower is slower - that is a common speed for 1/3 HP motors and 1:1 on pulleys is easy. Having a mechanical grip on the roll is way more convenient than using an adhesive to hold the medium. A dead flat table that stays that way is absolutely necessary. A reliable and micro adjustable gap set and hold mechanism is a must. A dust extraction hood is absolutely needed, but no big deal. I made mine using three layers of Amazon box cardboard, liberal PVA between the layers, 1/4" square internal corner braces, and duct tape. A kludge sander will sort of work for a time, but will ultimately be a source of frustration.
-
Harold Hahn method
Jaager replied to Essayons's topic in Building, Framing, Planking and plating a ships hull and deck
As far as RN framing is concerned, you could always "eat the mushrooms!" and use one of many stylized framing alternatives. To my eye the actual RN framing has almost zero artistic merit. It was purely functional, based on necessity, was not intended to be seen and looks it. The French and North Americans tended to frame using all bends and a minimal number of cant frames if any. Be very careful with Hermoine. Especially if you use the individual bend/frame patterns in the monograph. The author of that monograph often folds in problems in his lines and lofting work. Fixed with a little or a lot of work - depending on the ship - Hermoine = minor St. Philippe = major. There are more attractive French frigates in the ANCRE inventory. -
Painting White/Pot Metal.
Jaager replied to JohnB40's topic in Painting, finishing and weathering products and techniques
I may well be totally wrong here, but: Acrylics have looked to me like they have a sandy/dusty, pastel look to them. Oil based paint seems to be more crisp with a more pure color look. "fat over lean" means that oils can be used over the primer that you have. I am not sure just how color alone can change a casting into a wood carving. I wonder if the difference is that a casting is more rounded and smoother where two planes meet. Perhaps actual carving with very sharp chisels done very lightly will produce a more angular look? You would have to touch up the primer and the oil can be a bit transparent - and - for scale effect not at all glossy - a flatting agent. Last month, Amazon was $10-15 less expensive than West Marine for their own flattening product. -
Planking
Jaager replied to bluenose2's topic in Building, Framing, Planking and plating a ships hull and deck
It is unfortunate that Yellow Poplar/ Tulip Poplar (Liriodendron tulipifera) suffers in any way from confusion with any tree in the Aspen/ Cottonwood family (Populus sp.). Both have relatively soft wood, but Yellow poplar has fiber stability and a crisp edge and smooth surface that compares well with much harder (also) closed pore species. Its only negative characteristic is that it can not decide what color it wants to be. Stain or paint or hide it inside and it will work as well as any of the more famous, favored, and certainly more expensive species with current cachet. Wood from any of the trees in the Populus family is purely awful for our purposes. It even exceeds the various species of Soft Maple in it awfulness. When I look around the commons area of my condo, and see all of the Sycamore trees (American Plane) -I mourn the missed opportunity to have Tulip Poplars in their place. I grant that they would need harvesting eventually because the trunks can get large enough to conquer the street, but it is dead on straight and tall with large leaves that have the same shape as a tulip flower. -
Melissa, First, good luck and good fortune in your experience with this. May it provide the challenge and fulfillment that many of us find in researching and fabricating model ships from the Age of Sail and before. My purpose with this is to ask / suggest - given where you live, are you familiar with the book: King William's War - Michael G. Laramie - Westholme Publishing - 2017. While it is not exactly a page turner, it does fill what for me was a major vacuum in the history of North America. It supplies a background that explains the attitudes, prejudice, and hostilities of the subsequent years. Have you already read it? Are you familiar with it?
-
Harold Hahn method
Jaager replied to Essayons's topic in Building, Framing, Planking and plating a ships hull and deck
I am not going to confirm this, but I am reasonably sure that a search of the scratch build forum using the proper key word will turn up several demonstrations in various logs. The price for the shop notes is reasonable and helps support the guild and probably this site, -
Harold Hahn method
Jaager replied to Essayons's topic in Building, Framing, Planking and plating a ships hull and deck
His presentation in the NRJ is reprinted in: Ship Modeler's Shop Notes, Vol. I $3500 -
Harold Hahn method
Jaager replied to Essayons's topic in Building, Framing, Planking and plating a ships hull and deck
Thomas, Navy Board is a particular style of framing, It is not what you built. It is the framing with spaces in line with the timbers and in alternating frames depending on altitude above the keel. Almost no one builds using this style. It was dissected and explained in early issues of Model Shipwright and by Robert Bruckshaw -there is a PDF of his out there somewhere. ( Later, there was of course NAVY BOARD SHIP MODELS by John Franklin. ) I explored using it the frame St.Philippe. The method requires that the floor and F1 be much longer than the actual timbers would have been. The round up is so much that a wide plank is needed - worse than Hahn. The very significant waste is not acceptable to me. The original models had their frames sawn out of large thin boards. It must have been nice to have Pear and Boxwood stock that was that large. My guess is that it came from luxury carriage makers. I did my first framing using Black Walnut also. I also would not use it again. The pores are just not right. I built it in the attic of a poorly AC house during a Kentucky Summer. The fingers were continuously stained purple. It is a beautiful wood to be sure, but it not suited to our needs. Your hull looks spectacular. Since the term has no exact meaning, you might as well call it Admiralty style. Are you going to use full planking above the wale? Personally, I enjoy the curves of open framing below the wale. I also think the framing above the wale is too ugly to show. The French ships are not as ugly, because they did not narrow the top timber widths very much if at all. The narrowing and jogging of RN ship top timbers have all the visual appeal of showing the 2x4 framing of a house. -
Charlie, The ammonia that ship builders used to bend wood was anhydrous ammonia. The pure stuff that is either gas or liquid under bending conditions depending on PV=nRT. The glue (lignin) that holds wood fibers together is soluble in pure ammonia - but not ammonia dissolved in water. Pure ammonia, is explosive, corrosive, and a poison. Soaking wood strips in an ammonia solution just messes up the surface of the wood. Actually dry heat will bend wood just as effectively as wet heat. If the heat source has too high a temp, the water may buy sometime before the wood surface chars. Water and steam transfer heat more efficiently than air, but on a model size piece of wood, the difference is probably measurable, but not significant enough to matter. Now about bending a rail: a rail is usually wide and relatively thin. The bend is usually along the thick dimension instead of the thin one. Wood resists this. It will try to twist. Even if you somehow manage to do it, the wood will forever try to straighten back out. The better way is to do what actual ship builders did. Break the rail up into shorter segments and spill the bend from a wide plank. Mass market kit suppliers tend not to provide the wood necessary to spill a rail. The way to achieve this is to source a supply of wide and narrow rail wood from a 3rd party supplier. Get a species that is more appropriate than the crap that most kits provide. You will be pleasantly surprised at how much better scale appropriate species of wood, look and work and if the model calls for it allows for a molding to be scraped on the outer edge.
-
Harold Hahn method
Jaager replied to Essayons's topic in Building, Framing, Planking and plating a ships hull and deck
I guess that what I am sort of suggesting is that it may prove helpful if : Admiralty style had a definitive and commonly agreed upon meaning. The sub section of POF where the hidden internal parts - hooks, riders, knees, temporary rooms, magazines etc. are modeled had a specific name. -
Harold Hahn method
Jaager replied to Essayons's topic in Building, Framing, Planking and plating a ships hull and deck
And I fully concur with that being the purpose. And, indeed, it mostly seems to be fulfilled by the builder. But it takes so much longer. It also leaves a lot of abandoned builds. It takes so long to reach a stage where a sense of positive feedback can provide the fuel to push on. It has metastasized to a point where it seems to have becomes almost the expected option. I have perspective enough that I can plod on on my own path. I wonder if someone whose skill level has exceeded the challenge and limitations of kits, would look at this current fad in POF, see the (unnecessary) complexity, and decide " nope, I am not going there.". -
Spilling (very long) planks
Jaager replied to vaddoc's topic in Building, Framing, Planking and plating a ships hull and deck
Those are, I believe, proportional dividers. The thumb screw adjustment is probably an old style and an inexpensive model. I wonder of one arm could move up and down independent of the other? It would make precision a bit of a problem. I have a set of K&E 6" dividers and the pivot is rack and pinion. My only complaint is that it does not rack down to 1:1. But there is no reason for it to do so, except that it is not useful for correcting an aberration in the <10% range. -
Harold Hahn method
Jaager replied to Essayons's topic in Building, Framing, Planking and plating a ships hull and deck
Thomas, First, now ANCRE is providing plans with an exposition of the frames at 1:48 and 1:72 of the Sane 74. At first when I looked at your photo, I was guessing that your model was a click larger than 1:48 - since your hull is larger than my framed hull of Commerce de Marseille - then I remembered that I build at 1:60 and that yours is about twice the 3D size - so 1:48? Fully masted and in a case - it will be interesting in how much habitat volume it occupies. We seem to have a definition confusion here. There is no definitive meaning for what is meant by Admiralty. I used to think it referred to POF - open frame - 17th century style framing. But now I use Navy Board framing to define that style. Then - from use here on the forum - I thought it meant a POF, open frame with no masts or short stubs for them. With you calling your hull Admiralty, well - your framing looks to be all bends with ~20% space, which would match how these 74 were actually built. But you intend to fully mast it? I cannot recall a definitive name for the current style of leaving the decks mostly open and most of the usually hidden guts present and most of the upper works outside and inside planking left off. What was once a virtuoso exercise in fully following a monograph inside as well as outside seems to have become a sort of standard. Why that is, has me banging my head to get the water out of my ears. I wonder if the additional complexity of adding more to a POF than what would be seen if it was a fully planked above the wale and decked model of a vessel as it actually sailed might frighten off some who would otherwise build POF? -
Spilling (very long) planks
Jaager replied to vaddoc's topic in Building, Framing, Planking and plating a ships hull and deck
Oh and, now that I think on it, question #2 - one side always dead straight - may be from clinker and not necessarily carvel planking. -
Spilling (very long) planks
Jaager replied to vaddoc's topic in Building, Framing, Planking and plating a ships hull and deck
Thank you Vaddoc, My questions were accepted and answered in exactly the light that was my intent. One step that was not addressed is that 11 - With 3 zones, the planking sequence should be garboard zone up #1 , then Rail down #2, then turn of the bilge zone last?


