Jaager
-
Posts
3,084 -
Joined
-
Last visited
Content Type
Profiles
Forums
Gallery
Events
Everything posted by Jaager
-

Planking
Jaager replied to bluenose2's topic in Building, Framing, Planking and plating a ships hull and deck
Neither Oak nor Walnut are really suitable for use on a ship model if they do not have their open pores sealed and then painted. The Walnut used is not Black Walnut of North American fame. The open pores and grain of either Red Oak or White Oak do not scale at all well. If it is hidden, the wood is certainly hard enough for most any part. But, it can be friable and brittle at model scales. Hard Maple, Beech, and Birch are in the same shade range and scale more appropriately. If you do your own milling, You can pick and choose the grain presentation. The same Hard Maple board can produce a wide range of grain display. It depends on the way the cut plane is oriented to the grain. If you wish softer wood, Yellow Poplar works well, but the color variation is such that only about 25% will match a light Oak shade. The various Soft Maple species are the correct shade and are indeed soft, but I find the grain to be unstable and not reliable and better used for pallets - essentially trash - It lacks enough heat content to make good firewood. -
Thinking about it, it sort of makes sense. I think that the channels are parallel to the midline. The data points in the Establishments are the place where they are most narrow. For the mizzen, the slope of the tops is a small rate of change. That said, I would probably still make it parallel - then the after end would be slightly wider. They would not be parallelograms when viewed from above, they would be a section of a large triangle. (Plane Geometry was in 1962 and I forget the name of a 4 side with all sides unequal.) OR if it is parallel with the side of the ship, only the one data point would be needed. In this case they would be parallelograms.
-
You should probably read the Caution post and the new modeler post. I will repeat a recent theme. Except for painting prior experience with plastic kits is more likely to give you an unrealistic expectation about just how much help to expect from wooden ship model kits. A plastic kit is in general a world unto itself. The instructions are usually complete for building the kit. A wooden ship is part of a much larger world. There are common skills needed to complete any one of them. Wooden kit instructions tend to not include those commonly used skills. You are generally expected to know them before you begin. If you have no prior experience with fine woodworking, you are well advised to start simple and develop them many skills needed as you go. The beginner subjects are not sexy, famous or flashy, but they will develop a foundation of needed skills and if you do boats instead of ships, gain particular skills needed for larger vessels. Pretty much all ships have boats. the boat part of ship kits are generally weak and small. A prior grounding in boat construction will help with figuring out how to model a boat at a much smaller scale. If you had a ship model that matched the scale of a boat kit, it would be the size of you living room couch or larger. Anyway, the point is that wooden kit instructions are different in nature from instructions for plastic kits.
-
Harold Hahn method
Jaager replied to Essayons's topic in Building, Framing, Planking and plating a ships hull and deck
I built Kate Cory using the method. The scantlings are a minor detail. Davis used all bends and room= space because that was how large wooden hulls from around 1900 were built and that was where he came from. It had nothing to do with how wooden hulls were framed before iron and steel took over and the old ways were lost. The last 50 years has been a long and difficult rediscovery of the older methods - at least as it applies to ship modeling. Hahn stood on Davis' shoulders, but he was focused on a narrow slice of time in his subjects to model. For the ships in his era of interest =If the station intervals are combined with the then current published scantlings - there is very little space between the floors and F1 timbers. If a hull is framed as built, it would be a solid wall of timber with 1"-2" air gaps between them. A display of this sort of framing would not be visually interesting and to my eye sort of ugly and pointless. When compared to early Navy Board style framing the esthetic differences are stark. Hahn solved this by using Davis style framing - all bends and room= space. It is just wrong for the period and the over large spaces look like poor dental hygiene. But that is just my opinion and it counts for nothing. My point is that the nature of the frame timbers and the spaces is independent of Hahn's upside down method. The framing came be anything. I will point out that singleton frames, which rely solely on end grain to end grain bonds are a nightmare as opposed to a bend which is really strong. Now with the Hahn method you are going to waste a lot of expensive wood. You willing to spot that. If you PVA bond deadwood at the keel between every frame, the hull will be stronger. If you intend to plank over everything from the main wale on up, you can PVA bond wood where the space would be and it will be really strong. If you use a temporary and easily reversible adhesive, wood can be used to fill the spaces. This makes the hull a solid and it self protects against aggressive shaping and faring - until the space fillers are removed. Take a look at my Renommee build for an alternative way of frame assembly. It is about as efficient in wood as it gets. Needs no baseboard or any other sort of support. Is about 10 times faster to loft if you must do that. I did not have open framing on Renommee because my purpose with it was to show an alternative to the awful looking POB with all all filling between the molds. You have to use your imagination to see how spaces would be included. If and when I post my Centurion log, open framing will be shown as well as a more complete explanation of the lofting method used. -
Yesterday, the book landed here from Pen and Sword. The core of it is the SeaWatch volume - old wine in new bottles. The brothers do a pert fair job of photo documenting their models in this version.
-
Veritas Miniature Worktop from Lee Valley Tools
Jaager replied to Jack12477's topic in Modeling tools and Workshop Equipment
I have some of those cutting tools. All in all, the whole kit IS kinda sexy. The most useful tool for me was a small plane that is not offered. My evaluation is that some of the tools will be useful, but special effort will be necessary to use them instead of what you would normally use. The benches and hold downs will be a stretch to apply at best. This whole set seems more useful for someone who models miniature copies of full size furniture. Something made up of right angles and flat planes. Not for something made up of near infinitely varied curves. Measure twice, cut once or avoid an impulse buy. -
Where can I find metal wire?
Jaager replied to flying_dutchman2's topic in Metal Work, Soldering and Metal Fittings
I think what Allan is saying is that - he attaches the chain plates as raw copper. He then paints it with Liver of Sulfur to blacken it. The copper would need to be absolutely clean after it was attached. Doing it this way, none of the blackened coating would be lost vs if it had been blackened prior to attachment. This suggests that LoS leaves a coating that is easily abraded back to raw copper. -
I do not do steel or anything after 1860, but given how lacking in detail is the plan that you have on view, I would shoot for a hull length of 12-18". Something that does not cry out for detail that you do not have. I would do carved hull in lamination using Pine or Yellow Poplar. Would just use sand n' sealer and paint on the wood and not try styrene or metal plates over the wood - again because both the small size and the lack of detail do not need that level. Considering what you have and where you want to go - a waterline model with simulated water in a case this may be the ticket.
-
I have Baker's books and I made a start on building the Colonial Bark of 1640 as a way to approach Navy Board framing. It taught me that Duco was not a glue worth using on wood to wood that is subject to external shaping force, even if it would be easy to debond with acetone - a pity is that. ANYWAY - there is an article in NRJ by David Antscherl that makes a convincing argument Wm Baker was way off in his assumptions and direction when he designed Mayflower II. NRJ V.58 No.4 Winter 2013 A New Interpretation of a Merchantman, circa 1600 by David Antscherl I would suggest staying far way from any Mayflower kit unless it is the Mayflower II replica that you wish to model. It is not really a realistic choice for a first kit unless some form of fine woodworking is in your background. You should probably read the first two posts in this forum for a map and cold shower about what your new path involves I do not wish to come across as a judge or any sort of official with the following. Take this as a friendly and well meant suggestion should you wish to be taken seriously. The word 'boat' defines a very specific type of watercraft. The word 'ship' also defines a specific type of large vessel although it is often stretched to include large vessels that are technically not ships. But boat and ship are not interchangeable . Doing so here tends to rub fur the wrong way. In your place, I would edit by post title from boat to ship as well as in the text of post 1.
-
I wish I had waited for Amazon. I ordered from Pen and Sword got a conformation, but nothing since. I also ordered a book that will be released at the end of the month (Anson's Navy). Perhaps they are going to send as one shipment. But otherwise crickets.
-
If you are on the US, go to your near by chain pharmacy and get a quart of 91% isopropyl rubbing alcohol. It will not affect the wood. A pipette and a hair dryer or heat gun will speed the process, just keep the dryer at a very warm distance, Hot may/will affect the wood in an ugly way. I understand why you wish to remove the stem, so that you an have at it with whatever tool you are using to fare the planking run. I do not understand why you wish to remove the Balsa. It is part of the molds(#) now. Balsa is a specious choice as a space filling wood, but it does work. I suggest a couple of alternatives. 1) If it is minor faring that is to be done, cover the sides of the stem with a multi layer of masking tape, use small files and sanding sticks with an abrading surface that runs up to the end. It will take up close and personal and a royal pain at the rabbet. 2) If you have done a major wiff with the spine and molds, drop back ten and punt. Go back to your plans, trace the spine and molds or scan in your decktop scanner, take the scan into a drawing program and adjust the scanner distortion factor and print or take the plans to an architects copy place and get exact duplicates or triplicates of the mold and spine patterns Buy good quality plywood and cut out the patterns and start over. A hand frat or coping saw will do the job for not much money unless you go with Knew. You can get thicker plywood - just may sure you choose the correct side of the slots to make wider ( away from the midship station). Consider filling between every mold. Consider using Yellow Poplar or Basswood (or Pine) for the filler Consider thinking vertical instead of horizontal for the orientation of the fillers and cut them like the molds. Consider using Yellow Poplar or Basswood or Pine instead of plywood for the actual molds. With Pine - it can be construction grade, just clear and not sap or gum A grade is safer but difficult to find. If this is a one-off model - disregard option 2, but if you wish to continue with this, the exercise and experience of option 2 will start to open a new world of possibilites as to choice for the next ship - because you have started on the scratch build road. (#) I build POF and I can assure you that the transverse pieces are not bulkheads. Western wooden ships did not have bulkheads. They a molds (moilds) of the inside the planking hull shape at various points (usually the stations) along the length of the hull. The long central piece is in no way a keel of any sort. It is a support spine.
-
Where can I find metal wire?
Jaager replied to flying_dutchman2's topic in Metal Work, Soldering and Metal Fittings
https://www.mcmaster.com/copper/shape~wire/ McMaster-Carr might be worth a look. If you wish to be independent about this - a fat wire and a jewelers draw plate with a series of hoes in your range of interest would allow for that. But wire that is hard can be difficult to pull. Steel has the advantage of becoming soft if you heat it and allow it to cool slowly. Then when it is the desired gauge it can be hardened. Copper and brass cannot be hardened by heat and quench - the more you work it, the harder it gets. -
I limit myself to pre-1860 wood and sail and I try to use the following as the bounding limits for how I build: SHIP MODEL CLASSIFICATION GUIDELINES 1980 DEPT. OF SALES AND SERVICE MYSTIC SEAPORT MUSEUM MYSTIC, CONN 1980 MUSEUM STANDARDS AND SHIP MODELS: THE INFLUENCE OF PROFESSIONAL WEGNER,DANA M NAUTICAL RESEARCH JOURNAL 1994 39 44-49 MUSEUM STANDARDS IN SHIPMODELING WEGNER,DANA M SHIPS IN SCALE 1989 34 16-17 I have no interest in contests but staying within the rules has this be a more challenging self contest.
-
Custom Paint Colors
Jaager replied to Roger Pellett's topic in Painting, finishing and weathering products and techniques
I think it is worth the $10 just to play with the devise. It offers a wealth of possibilities as far as what can be done in color witchcraft. I think it is good that you have a reasonable and economical solution to solve your goal. -
Custom Paint Colors
Jaager replied to Roger Pellett's topic in Painting, finishing and weathering products and techniques
Roger, I am a a heretic about something like this and I think that his whole exact color thing has too quick sand a foundation to warrant becoming OCD about it. First off, unless seen in person, any color captured on film, tape or electrons is going to be different. Even if you had the exact RGB number - every computer screen is going to do its own interpretation of it. Close enough is good enough. If you have a color chip or equivalent I would use a color wheel to get most of the formula. https://www.highlandwoodworking.com/artistscolorwheel.aspx Now that I know what they really are I would use artist's oil (40ml tubes) and mix my own One of the companies may have a ready made that is close or only needs more black or white or .... A little linseed oil and mineral spirits and you are set.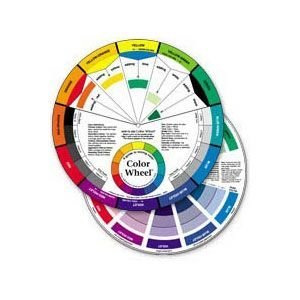
-
Kev, About which species your "Ramin" really is, now that it and its whole genus is unethical and short sited to use - it could be a lot of unrelated but similar looking species. If your kit is a European one, I would guess that it is an African species that has no catchy marketing name of its own. In any case, you should not be surprised that the manufacturer might be a bit fast and loose with the truth in their advertising copy. Danish oil is not an actual name of any single material. It is a mixture of oils - oils that are discussed here. What is actually is varies between manufactures who use the gimmick name.. One would hope that within a particular manufacturer's product that the formula would be consistent. On the serious level, there are two natural clear finish oils. "boiled" Linseed oil - which seems to be consistent - when polymerized it does not have an especially hard surface - but a model will not be used as a table top, so this does not really matter all that much. Tung oil - which is good stuff IF you get the right stuff. Just Tung oil as the name = it could be anything and may not actually contain Tung oil. Some name brands may be polyurethane. 100% pure Tung oil is the actual oil, but it can still be tricky. If it is too old, or from a generic manufacturer or you do not use a proper primer coat and leave too thick a layer, it may not "dry" (polymerize) in your lifetime. It this situation, it is a right awful mess to clean up. Good quality and properly applied Tung will leave exactly the sort of finish that you are after. The more coats, the deeper it appears. But each layer must be polymerized before you add the next. Danish oil will probably provide a more predictable finish, and one that is harder than linseed but not as hard as Tung - provided that the can is within its useby date.
-
Aceman, I apologize if this steals any of Kurt's thunder, but it is identical to the printed version, except that it is ephemeral electron based. A hard copy can even be printed, but that would not be the quality of the original. You should really consider subscribing to the NRJ electronic version if not both hard copy and digital.
-
Kurt, Yes, I am completely aware that Model Shipwrighy is under copyright protection. The situation is that I have no need or reason to break that protection. I just think it is an injustice. It seems that insults do not work to get them to show up and defend themselves. I am not going to do it, I am just part of the Peanut Gallery in this. It is a waste, but it is not my job to fit it. One of my fantasies - From a Proceedings article - i.e. "It is better to seek forgiveness than to ask for permission." . Blatantly break the copyright in order to smoke someone out at the company, who can negotiate a solution that frees up the content. They are sitting on a pot load of re-drawn lines plans by Norman Swales and ignore inquires about purchasing full size copies or how to contact Swales about the same. Are they really a government agency or labor union in disguise?
-
As a totally opinion based comment: I find that the quality and subject matter and choice of sybjects in SIS are such that the NRG provided CD are totally adequate as a way to access their information. Model Shipwright is a whole nuther thing. I have the complete run up until the original publisher went bankrupt. I cannot imagine anyone who is still involved with this and who has the first 100 or so issues letting them go. I cannot come up with any explanation other than sheer incompetency and stark imbecility to explain why the current copyright owner has not republished in an electronic format or farmed that out. Such selfish hording should void any legal protection against piracy. It would not be as though they were losing sales of anything.
-
I think that the cold hard solution is to remove the malformed rigging sections and replace with new. This time use either shellac or bookbinders PVA (pH neutral) instead of CA. A willingness to scrap subpar work and start over is a useful mindset and habit - especially for scratch build. The short redo time will save a much longer time of feeling regret every time you look at the model.
-
Poly urethane is a plastic. I used it on my Walnut stained Oak kitchen floor in KY. It looked good and held up well. It certainly has its fans here for use on a model. If you like a plastic look on a model on a vessel from 100+ years ago, it is worth a look. It is simple enough to use. Should you be more traditionally oriented, a simple, low cost, forgiving material is shellac. More coats more depth. Too shiny, Scotch Brite, steel wool, or bronze wool will dull it. A low cost way is Lee Valley shellac flakes 1/4 lb - choice of 3 shades for how warm and aged you are going for. a can of denatured alcohol for light 10% is enough (10 g in 100 ml) the medium can probably be 20% , and the dark maybe 30%. Rag or brush to apply. If you double or triple bag the dry flakes and put them in a freezer they should store for years. just make sure that they are RT before you open the stored flakes. It comes pre-mixed (avoid the silly aerosol version) just be aware that the shelf life is limited. A rule that learned in organic chem is that a reaction rate doubles for every 10 degree C temp rise. Going from 20 C to -10 /20 C is a 4-8-16 times longer half life for a compound prone to oxidation.
-
Kearnold, If this is not 'one-off' model and you intend to build others, you might consider using this as an opportunity to dip your toe into the scratch build world. Replace the wooden component castings with dublicates that you fabricate using actual scale appropriate wood. You should research the actual scantlings of the parts to be built. The castings may be over scale to begin with. If you can make friends with a near by modeler who has the proper tools, The choice of wood species available to you is much greater than that available to those who fabricate hulls. The parts that you need can come from the same stock as those turning pens since it is all small. The choices available as 4x4 and 8x4 lumber are much fewer in number.
-
Degradation of lead and Britannia fittings
Jaager replied to John Allen's topic in Metal Work, Soldering and Metal Fittings
John, I would think that a clear coat of the organic solvent sort would buy you time, but if the "white glue" is PVA, that has the potential to be a disaster. The final product in lead disease is lead acetate -I believe. I am not sure how much if any acetate is in bookbinders PVA, but all other woodworkers PVA has as much acetic acid as 5% vinegar. My guess is that a PVA coat would accelerate the disintegration of a lead casting. The clear coat using lacquer et al. has the disadvantage of not being glass and thus allowing gases to migrate across it. A quick smell of vinegar tells you that acetic acid is partially a gas at RT. -
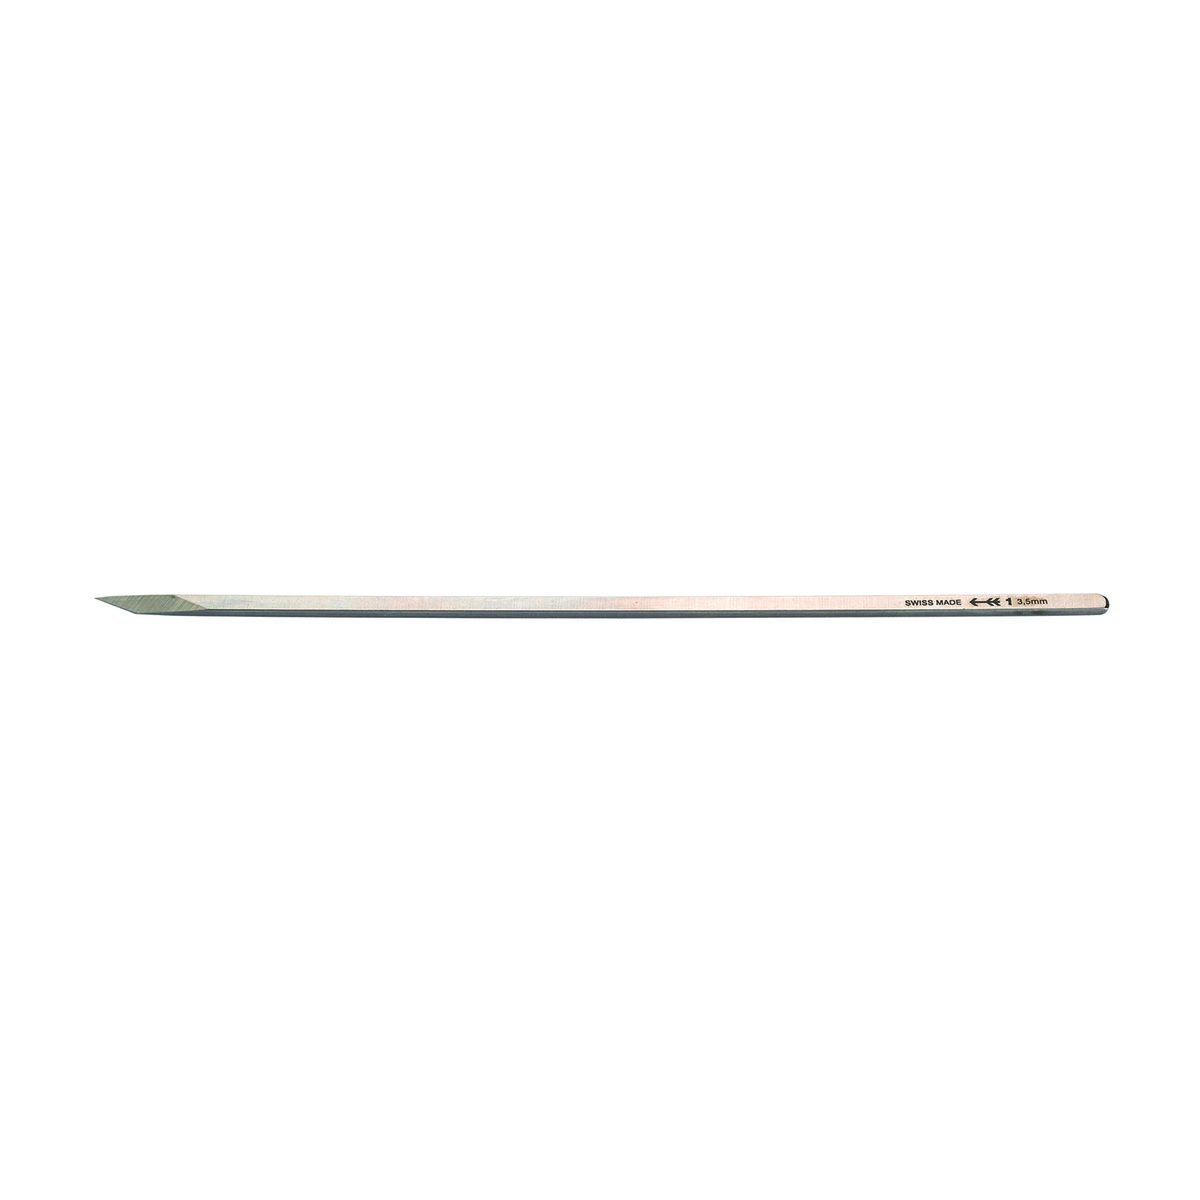
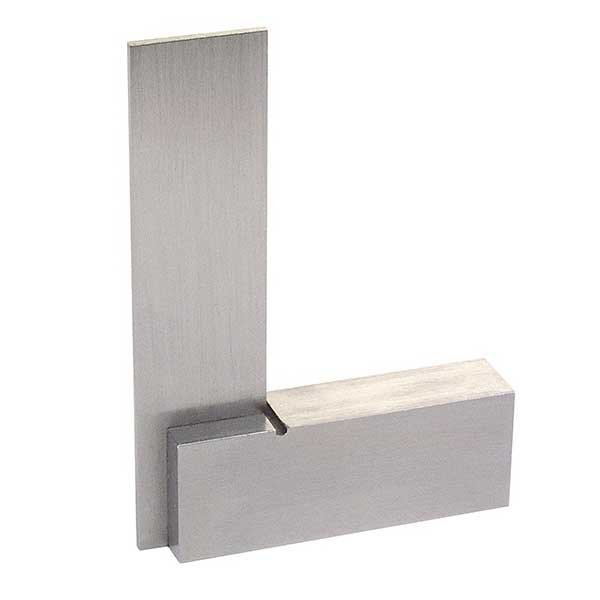
Boy! Is this something that is prone to get into a love me, love my tools sort of zone. I will just show my most often go-to basic tools for this First is a 6 inch steel ruler - Imperial and metric. The ships I model are Imperial based, but metric is easier to subdivide a distance with. a 3 inch machinist's square a technical lead pen with soft lead 2mm insert and a piece of 220 grit sandpaper to keep a ~60 degree wedge instead of a circular point. Old time woodworkers seem to prefer a knife mark and a violin makers knife like this 3mm I did not learn about a knife mark until I was too set in my ways.

-
Following a suggestion from Don Vardas : "For the time being, use a heavy grit paper (80 is about the best) for your initial "rough" sand and finish it off with lighter grits to 240 grit. If you Contact Cement the paper to a cork block it makes it a lot easier too. Buy an extra cork block and shape a "half-round" into it to do inside curves." I bought a cork bock sold for Yoga. Using my bandsaw I cut a variety of small blocks curved and angled. But rather than the aggressive and messy contact cement, I use rubber cement. It hold well enough as long as both surfaces are coated and allowed to dry before mounting the paper. This does preclude the use of Norton 7X or 10X most commonly found in big box hardware shops. Rubber cement does not like the no skid coating on the back.