


targa4403
-
Posts
39 -
Joined
-
Last visited
Content Type
Profiles
Forums
Gallery
Events
Posts posted by targa4403
-
-
1 hour ago, cdrusn89 said:
When I started to enlarge the gun ports I realized that one of the "unintended consequences" was that the gun ports (at least the aft four or five on the starboard side are now going too be to large and the provided covers will no longer fit. And when I trimmed the out bulwark I had to remove a goodly number of the pre-drilled holes which I am sure will cause a problem later.
Soooo - I am going to pause the Sphinx hull construction and work on the spars, rudder, stove, capstan etc. and hope for an inspiration to strike or "she who must be obeyed" approves another Sphinx kit.
i wish you god speed with your future endeavors; especially from getting the green light from the admiral.
-
On 3/16/2024 at 4:29 PM, SUBaron said:
Well that would be great news. After studying my work so far, I think you are right. I can’t see anywhere that I deviated so far from the plan that I’d have such a measuring error. It can’t be fixed at this point (at least I’m not willing to reverse my progress back to redoing the bulwarks), so I’ll continue and include a concave curve to my Waterway - along with the expected curve to accommodate the inner bulwark riser shape. The concave shaping is better IMHO than relying on glue to hold the Waterway.
Thank You!
-Andre
After reading all of this, I believe I owe you an apology. I thought you were talking about the camber of the deck:

- SUBaron and Scottish Guy
-
 2
2
-
9 hours ago, jpalmer1970 said:
There is also a 450mm extension bed for the Proxxon DB250 which I have found to come in handy from time to time.
Apparently the use of this part to extend the lathe bed it not recommended by the manufacturer. I don't know the reason why. Maybe it will affect the performance of the motor? I don't know. I just saw this on the internet. Have you had any issues with the bed extension?
-
38 minutes ago, SUBaron said:
This is my current dilemma. As you can see - the bulkheads are rather level when tested in small batches of 4-5 - from the aft section of the transom all the way to bulkhead E. But when I lay the Waterway timber down, there’s a large gap. It goes away when I press on the timber, however — I have not seen or read anything referring to this concave element of the waterway project. Am I missing something or is gluing or steaming this concave shape just considered too obvious to mention?


I believe it is by design.
-
1 hour ago, Der Alte Rentner said:
They have ignored repeated emails and phone calls, and have not sent any replacement stock. I've unsubscribed to their site and won't buy another thing from Model Expo. I went another route on the stock.
Yikes! how did I miss your post?
You're probably right. But finding one isn't so easy. I'll be back in the shipyard starting tomorrow and will reassess my need for one. My beef with the one I did buy was the horrible clamping on the fence. Also, to be practical for small pieces that one would be cutting on a saw of this size, the safety gear only interferes. How well can you dial in the fence for repeated cuts? Does that screw clamp put dimples in the guide rod?
I noticed that they have a special form that you have to fill out in order to get replacement parts.
I think it is under Contact US:

-
On 11/12/2023 at 6:31 AM, myxyzptlyk2003 said:
Thanks for the review. Coming from you, I can put total faith in your comments. I am currently building AL's Soleil Royal and the two kits are so very similar. Although I do question why AL chose to make the ST a single plank model whereas the SR is double planking. For me with my modeling skills a single plank model almost puts it off my list of kits to do.
I thought the ST was to be painted and copper plated?
-
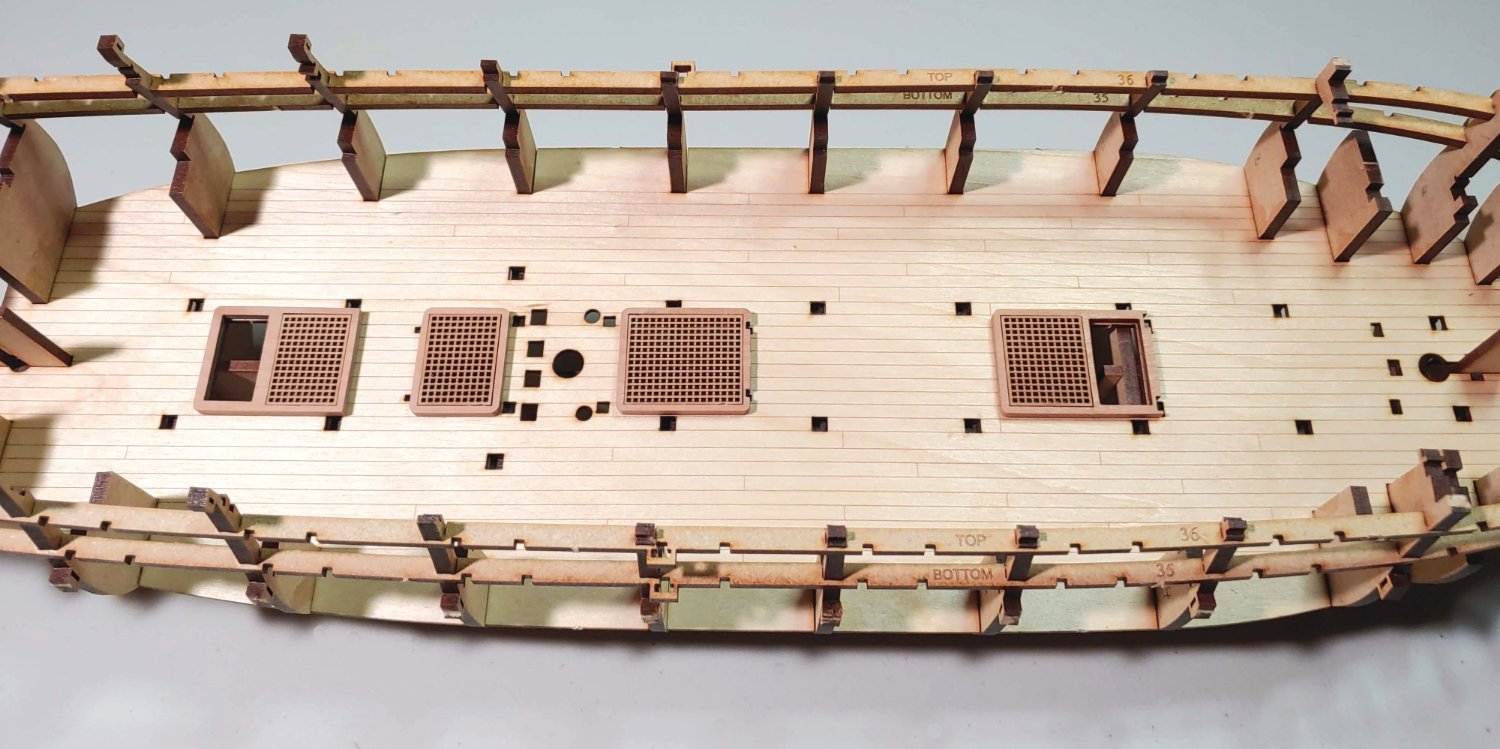
1 hour ago, KurtH said:
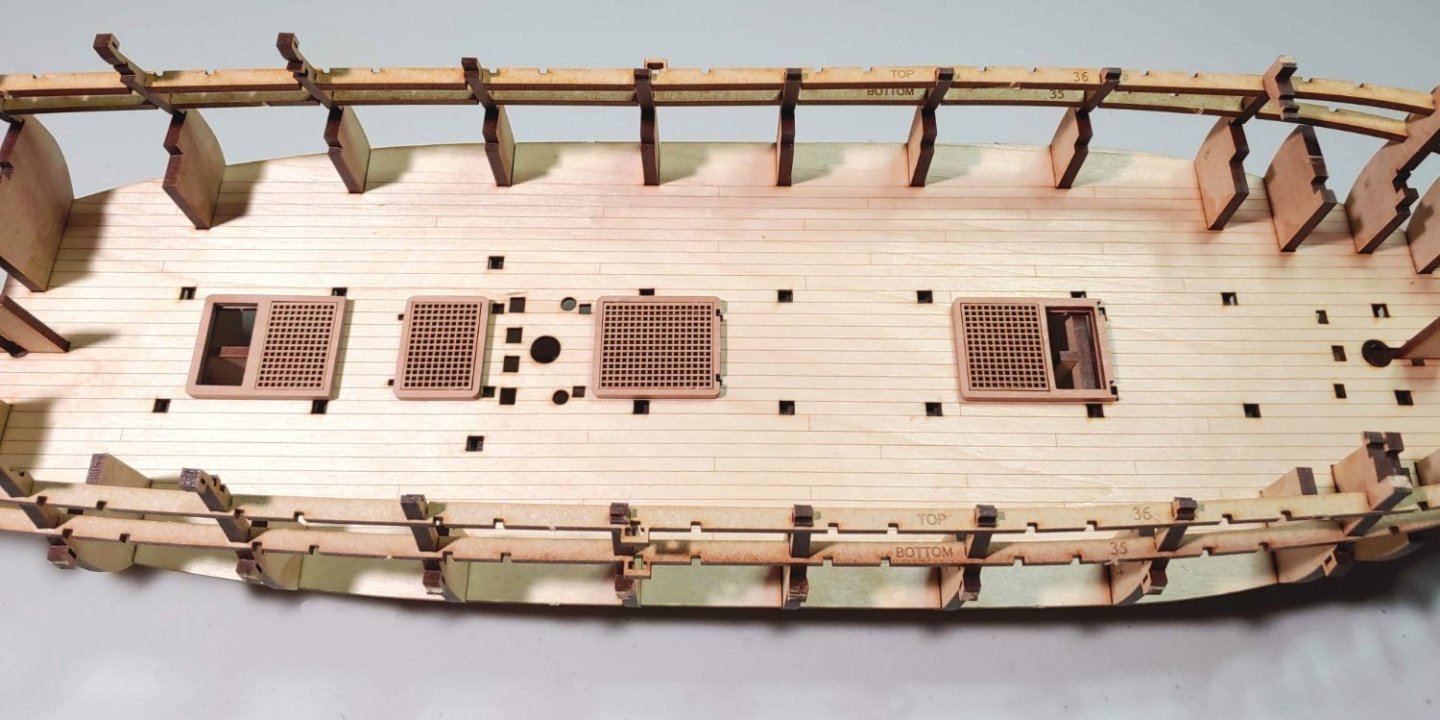
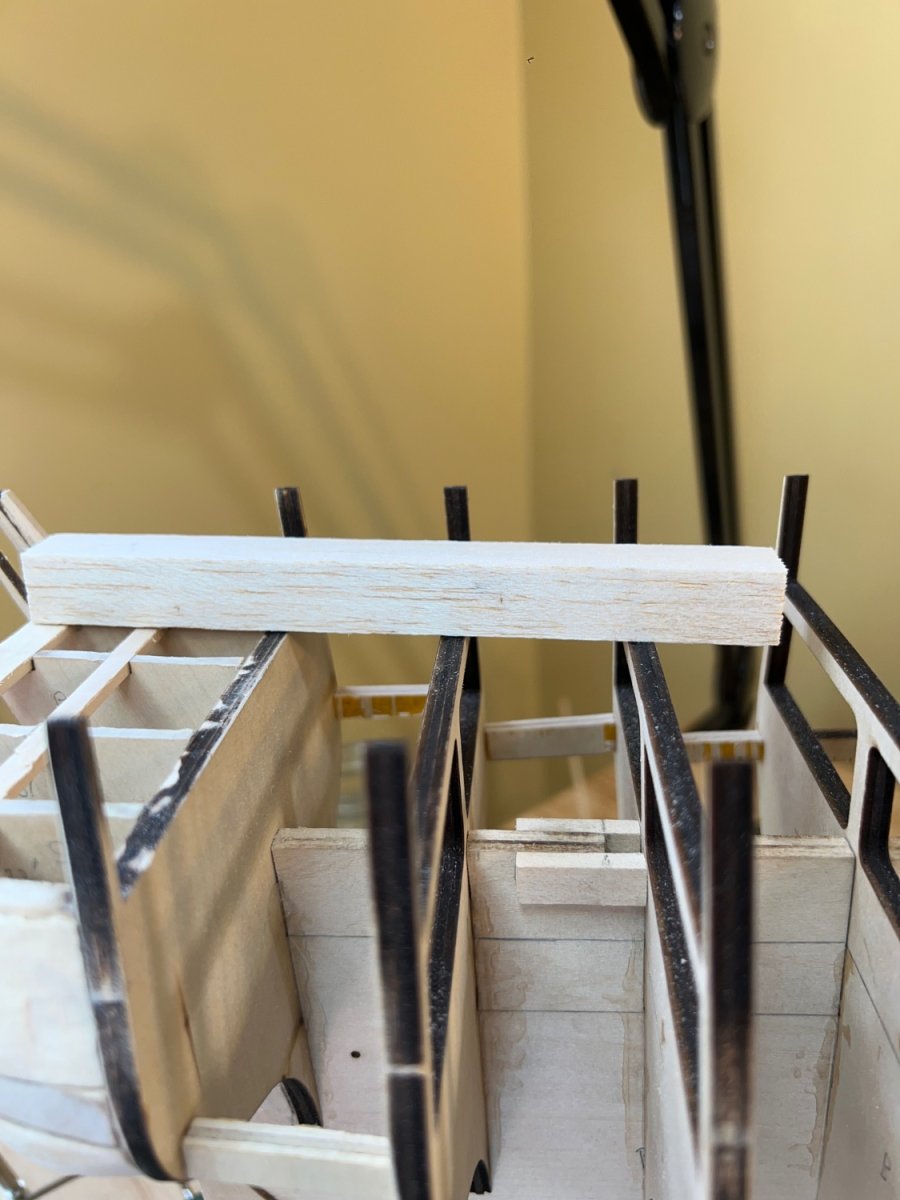
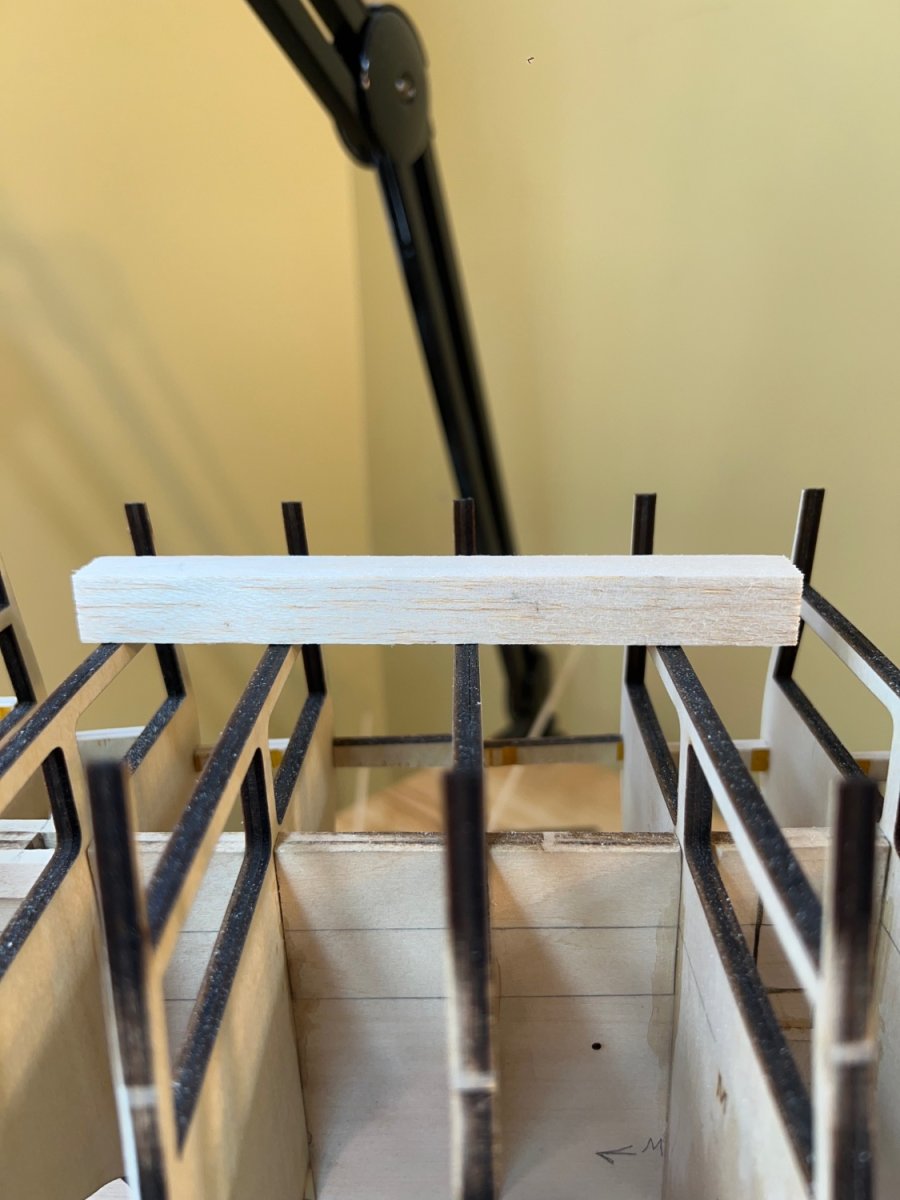
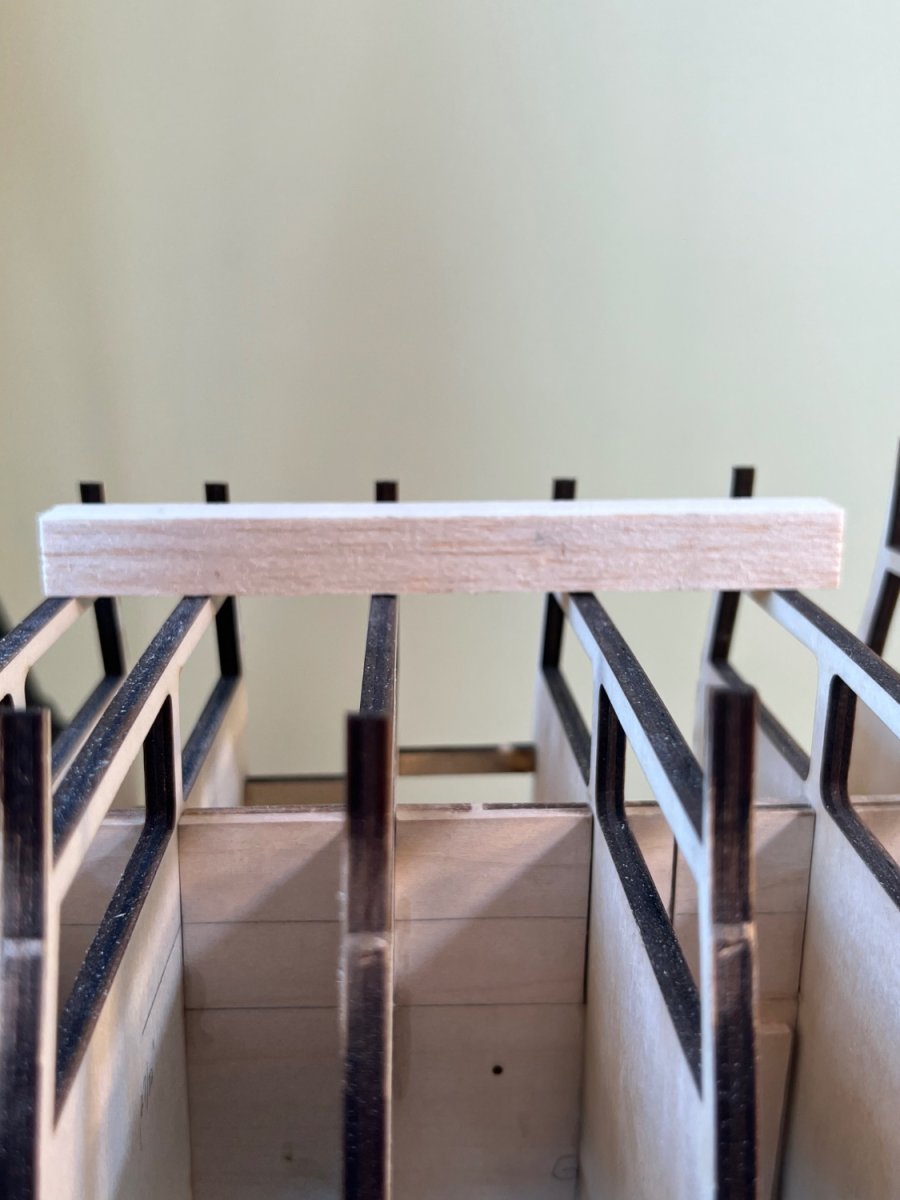
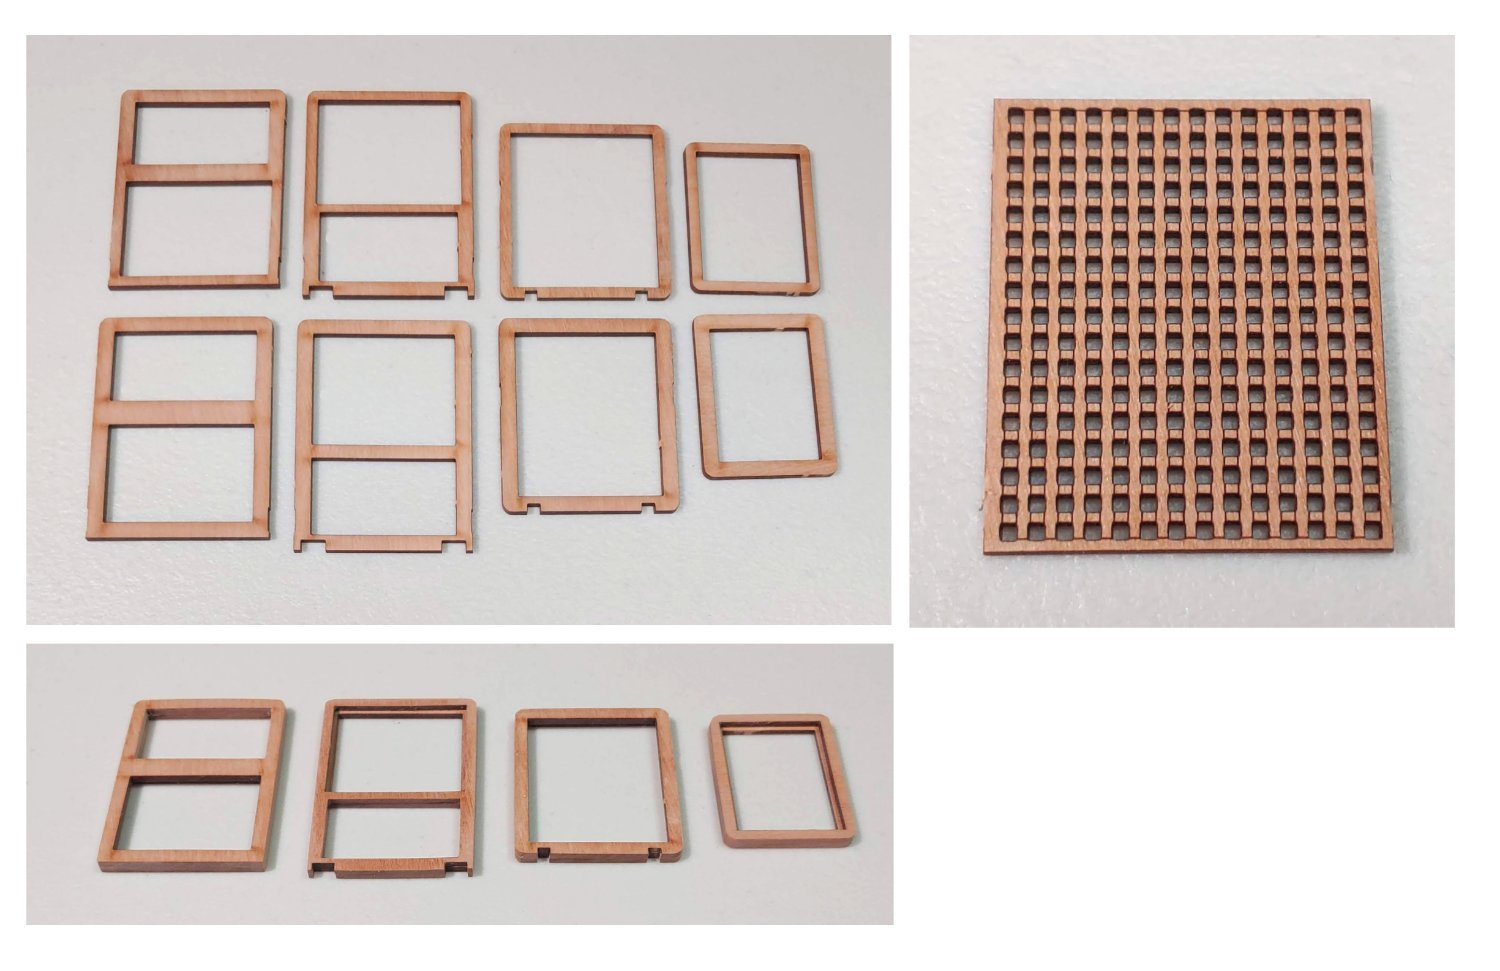
The lower deck hatch coamings come as laser cut components which are assembled to form a two layer unit into which the gratings can be inserted:

Pear is a wonderful material to work with which makes a smooth surface when sanded and varnished. This is novel for me, and helps me to reach my goal of building a model which not only looks good from a normal viewing distance but up close as well. the grates are superbly detailed as you can see. Having looked at a many different builds of many different kits from a variety of manufacturers, I have thought that having grates that are in scale is a pipe dream until now. These grates have reached that goal as you can see from this photo of the coamings and grates glued into place:
very nice!
-
43 minutes ago, Kevin-the-lubber said:
Tom, this may help https://diyodemag.com/education/exploring_3d_part_1_beginners_guide_to_fusion_360 although if you're using AutoCad it may be a bit basic for you. Either way, yes, the learning curve is steep but generally rewarding. Top tip: when F360 hangs for more than 10 seconds, ctrl+alt+del, most of the time it doesn't find a way out of the jam and the hoping and waiting is plain frustrating. Main thing that makes it hang; patterning, especially in drawings. It hates it.
Is Fusion 3D free? It's an online software, correct?
- thibaultron, tmj and mtaylor
-
3
-
1 hour ago, tmj said:
I'm looking at a 'Genmitsu' CNC router 4040 pro (Amazon), with the fourth axis accessory, for a home 'desktop' sized unit. I have a router at work, but I'd rather work on my hobby projects at home, at my leisure, and not have to bother with going to my place of work to use their 'HUGE' CNC router for small sized projects. Not very convenient. Does anyone have any experience using this specific Genmitsu 4040 Pro router? Suggestions for other routers would also be appreciated provided you have firsthand experience using the model that you recommend. 4th axis is also a huge selling point for me.
I would upgrade the spindle motor to a more powerful one. You can purchase a Z axis assembly that allows this to happen.
-
24 minutes ago, wefalck said:
Well, a grand re-opening of the Museum is scheduled for 17 November this year: https://www.musee-marine.fr/nos-musees/paris/expositions-et-evenements/les-evenements/le-vendredi-17-novembre-2023-le-musee-national-de-la-marine-rouvre-ses-portes.html
I have seen various projects and sat through various enthusiastic presentations by the director of the museum, but as various museology consultants got their fingers into that pie, it will not be the same as before. First of all, it seems to have mutated from a naval museum to a sort of ocean museum with the usual didactic raised finger. Second, the navy (who is the owner) seems to have succumbed to idea of a visual show, rather than to make the most of their material heritage. It seems that it will not be quite as bad as the NMM in Greenwich, but it will have far less the character of a study collection than it used to have. We'll have to see.
merci pour le lien.
-
9 minutes ago, dvm27 said:
If you've ever been to La Musee de la Marine there are enormous fully riffed models from floor to ceiling. It was one of the most fabulous maritime museums I've ever been to. I wonder if Wefalck has any knowledge regarding the plans for the new museum? Hopefully they will keep most of the ship models on display.
in my bucket list.
-
7 hours ago, wefalck said:
Talking about the size of models owned by the Musée de la Marine: the biggest is a fully operational demonstration model of an 18th warship that will be once again shown in the entrance hall. If I am not mistaken, it is around 4 m heigh and 6 m long ...
Their ropewalk is actually of an ordinary design, that can do 3 ply and 4 ply ropes of a fixed length. The size of ropes one can do with a machine depends, of course, on the physical strength of it and the maximum weight one can put onto moving end. Conversely, it may be difficult to make very fine, say sub-mm rope with such big ropewalk.
that is what I was thinking. I look at the hooks etc that those two ladies are using and it makes me think that they are making ropes for large ship models. But for me, Monsieur Gaétan Bordeleau's models are large.
-
-
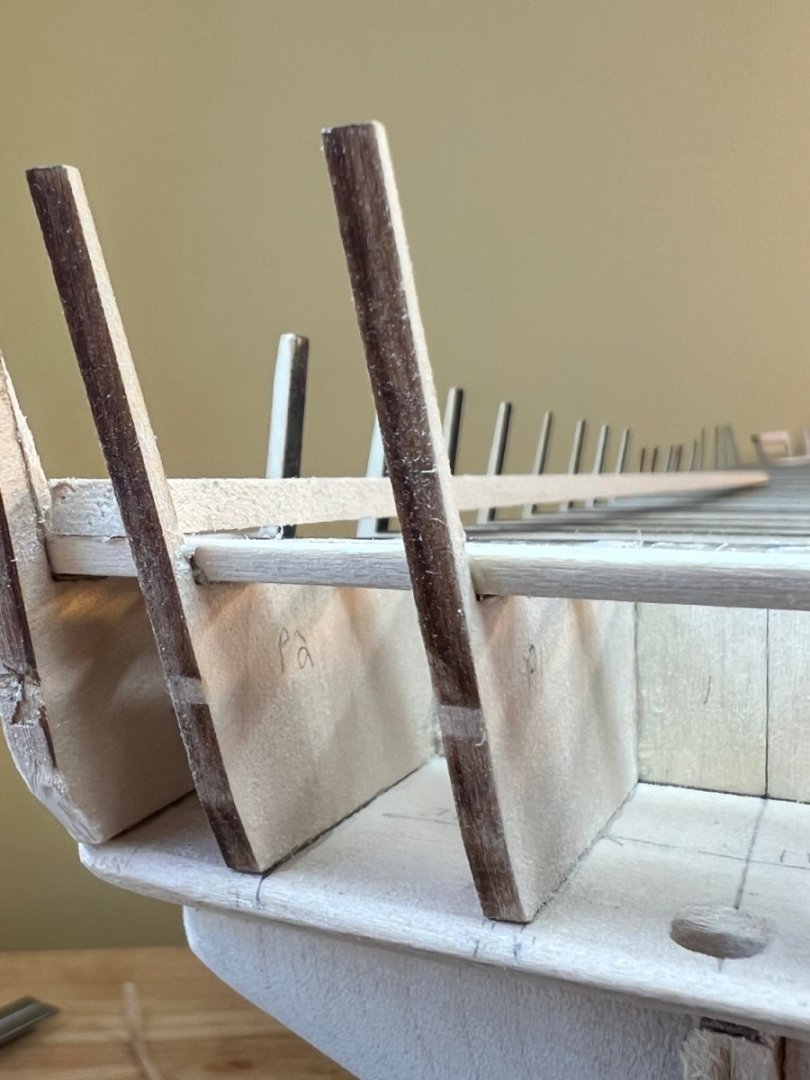
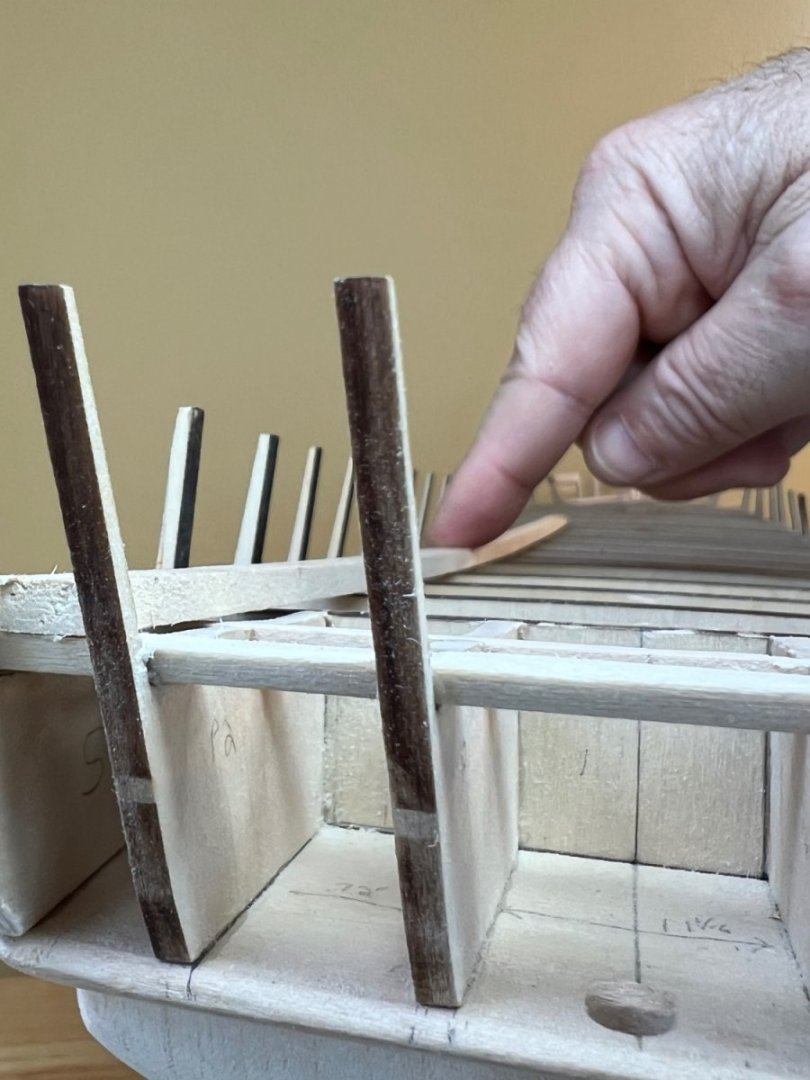
12 minutes ago, Der Alte Rentner said:
My thoughts exactly! The plan is 1:1 scale to the model. That's why I'm confused by the gunport measurements on the plan vs. the text on the plan, that I interpret to mean, use 3/64" planking. Am I misreading the plan and the 3/64" means something else?
oh i see what you are saying. if you look at that drawing, it could be interpreted to mean 4 planks of 3/64" are required for the width of the ports. I have the kit but it's buried inside my closet. What I was thinking is I would take the two pieces that make up the port lid and take measurement of the total width.
-
42 minutes ago, Der Alte Rentner said:
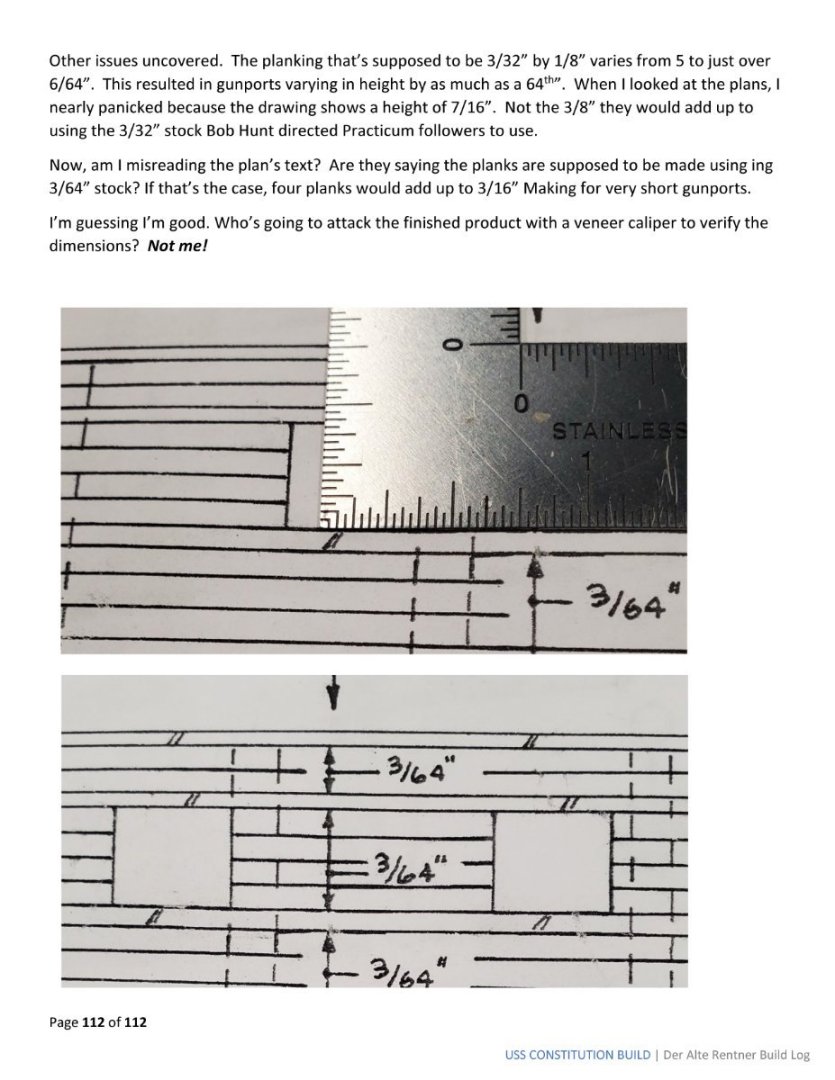
Hello. I am a little confused by this image showing 3/64 with varying heights(page 112). I thought the drawings were 1:1 scale to the model or am I incorrect?
-
4 hours ago, Sjors said:
No update but something else
When i take a look at the other Conny’s ,there is a difference with mine.
I see parts that i can not find….
I have no deck so the planks are going on the frames and at the bow i’ll be missing some lasercut parts.
Anja has found why.
It’s a kit of 15 years old!
It’s semy scratch. 🥲
So more difficult for me but i still will do my best.
I hope to show you tomorrow a little progress.
The filler blocks at the stern and bow.
Sjors
Hi, just wondering. Are you saying the kit is missing some pieces, or that you have to make those missing pieces?
-
21 hours ago, wefalck said:
What do you mean by 'making your thinner'? Normally, thinners are a simple chemicals, such as (distilled) water, alcohol, acetone or white spirit.
OK, you could do a bit of moon-shining and make your own alcohol or distill some water, but the others you cannot make at home
")
sort of. Here is a list of components for air brush thinner:
There are four ingredients:
- Distilled water
- Isopropyl Alcohol (99.9%)
- Acrylic Flow Improver
- Acrylic Fluid Retarder
- thibaultron, mtaylor and Canute
-
3
-
Hello,
I hope it's ok if I pose my question here. I was wondering if making your own thinner is better than buying already made thinner?
-
On 3/8/2023 at 10:14 AM, Ian B said:
Blimey --Parts 4 to 5 (vertical frame for the stern section) just as bad as the two deck halves earlier. What a terrible fit for such and expensive kit !!!
I put little wedges in the gaps to tighten the joints. Seems to have worked for me.
- wernerweiss, mtaylor, Canute and 2 others
-
5
-
I get the impression that European manufacturers assume some advanced level of expertise in the building process otherwise their manuals would be more detailed. It does help, though to have good plans. So, it's not just the instructions that need to be "good" but the plans as well. If you have built a ship before, the plans become your instruction manual, in a way.
- mtaylor, thibaultron and Knocklouder
-
3
-
-
13 hours ago, hof00 said:
Nice one Ian!!
I'll be following your build with interest.
(Ps. I'm still struggling with the Main Deck Rail Stanchions and provided "Thread."
I have ordered the Eduard 1/200 Chain Link Railing from Super Hobby out of sheer frustration. The photos of this stuff look good anyway. I will post my experiences when I receive this in two - four weeks, hopefully....)
Cheers and Regards,
Harry.
what a great idea. I know exactly what you mean. How many sheets did you require for this task?
-
Hello,
I too am in the process of building the Bismarck. Here is a link to a group of videos that someone has put together on building the model ship. Hope it helps.
- Canute, mtaylor, wernerweiss and 1 other
-
4
-
5 hours ago, Gregory said:
Along with what Bob is saying, I don't see that being much more useful than a pin vise. It is going to stall very easily and the tool selection is very limited compared to devices with a 1/8 collet sharing the Dremel type tools.
While not cordless, I have found this to be very useful for light work. It weighs in at 6.8 oz, so is very easy to use.

It also takes the Dremel keyless chuck eliminating the need to change collets for the smallest drill bits on up to 1/8 for all Dremel type accessories.
I should have searched harder. I bought a regular dremmel and I find it way to powerful. This thing would be perfect for me...


Rigging Constitution versus Brig Syren
in Wood ship model kits
Posted · Edited by targa4403
Other than the fact that the Constitution has 3 masts and the Brig Syren has 2, is it fair to say that the rigging is similar for both ships?