TheDuckDetective
-
Posts
12 -
Joined
-
Last visited
Recent Profile Visitors
149 profile views

-
 Keith Black reacted to a post in a topic:
Roar Ege by Scottish Guy - Billing Boats - 1:25
Keith Black reacted to a post in a topic:
Roar Ege by Scottish Guy - Billing Boats - 1:25
-
Scottish Guy reacted to a post in a topic:
Roar Ege by Scottish Guy - Billing Boats - 1:25
-
TheDuckDetective reacted to a post in a topic:
Hoogaars Yacht by TheDuckDetective - Billing Boats - 1:27 scale
-
 In my experience, miss fortune can be a very potent stimulant for creativity. If one is open to it. It seems to me that you are handling your difficulties with grace! If I had to choose I would go with cherry. Thats because the layers in the ply might be visible in the clinker strakes. Not that any viewer will see the underside of your model. But I would like to avoid it if possible. 😅 I'll be following along with your log! Rutger
- 73 replies
-
- 2
-
-
- Roar Ege
- Billing Boats
- (and 2 more)
-
TheDuckDetective reacted to a post in a topic:
Roar Ege by Scottish Guy - Billing Boats - 1:25
-
JacquesCousteau reacted to a post in a topic:
Hoogaars Yacht by TheDuckDetective - Billing Boats - 1:27 scale
-
Paul Le Wol reacted to a post in a topic:
Hoogaars Yacht by TheDuckDetective - Billing Boats - 1:27 scale
-
cotrecerf reacted to a post in a topic:
Hoogaars Yacht by TheDuckDetective - Billing Boats - 1:27 scale
-
Scottish Guy reacted to a post in a topic:
Hoogaars Yacht by TheDuckDetective - Billing Boats - 1:27 scale
-
Scottish Guy reacted to a post in a topic:
Hoogaars Yacht by TheDuckDetective - Billing Boats - 1:27 scale
-
Scottish Guy reacted to a post in a topic:
Hoogaars Yacht by TheDuckDetective - Billing Boats - 1:27 scale
-
Scottish Guy reacted to a post in a topic:
Hoogaars Yacht by TheDuckDetective - Billing Boats - 1:27 scale
-
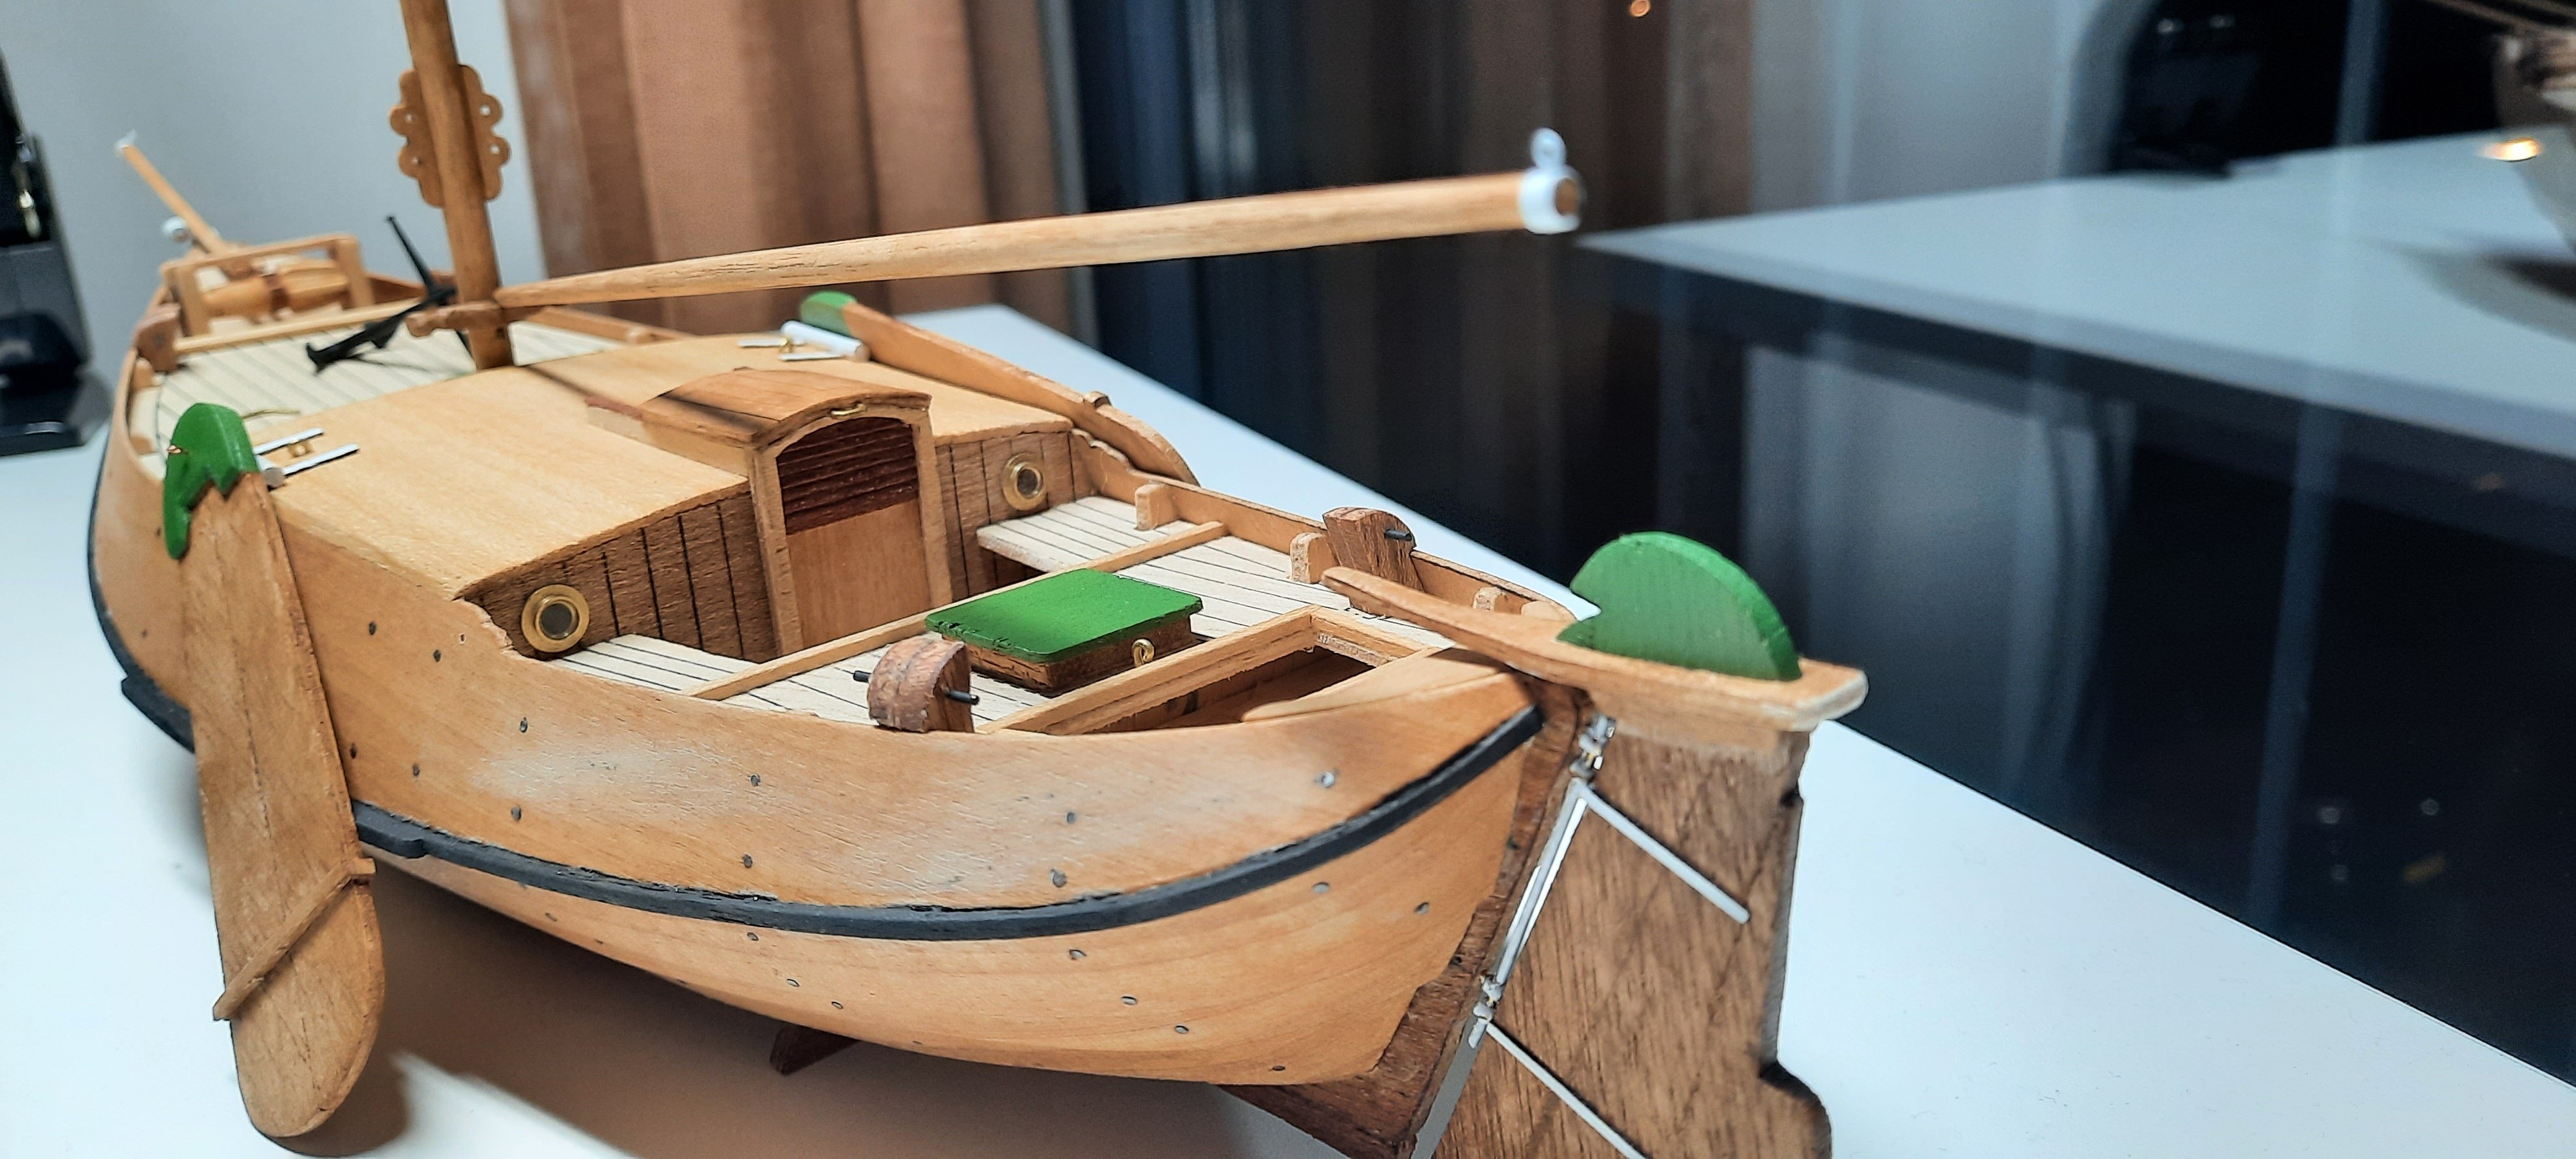
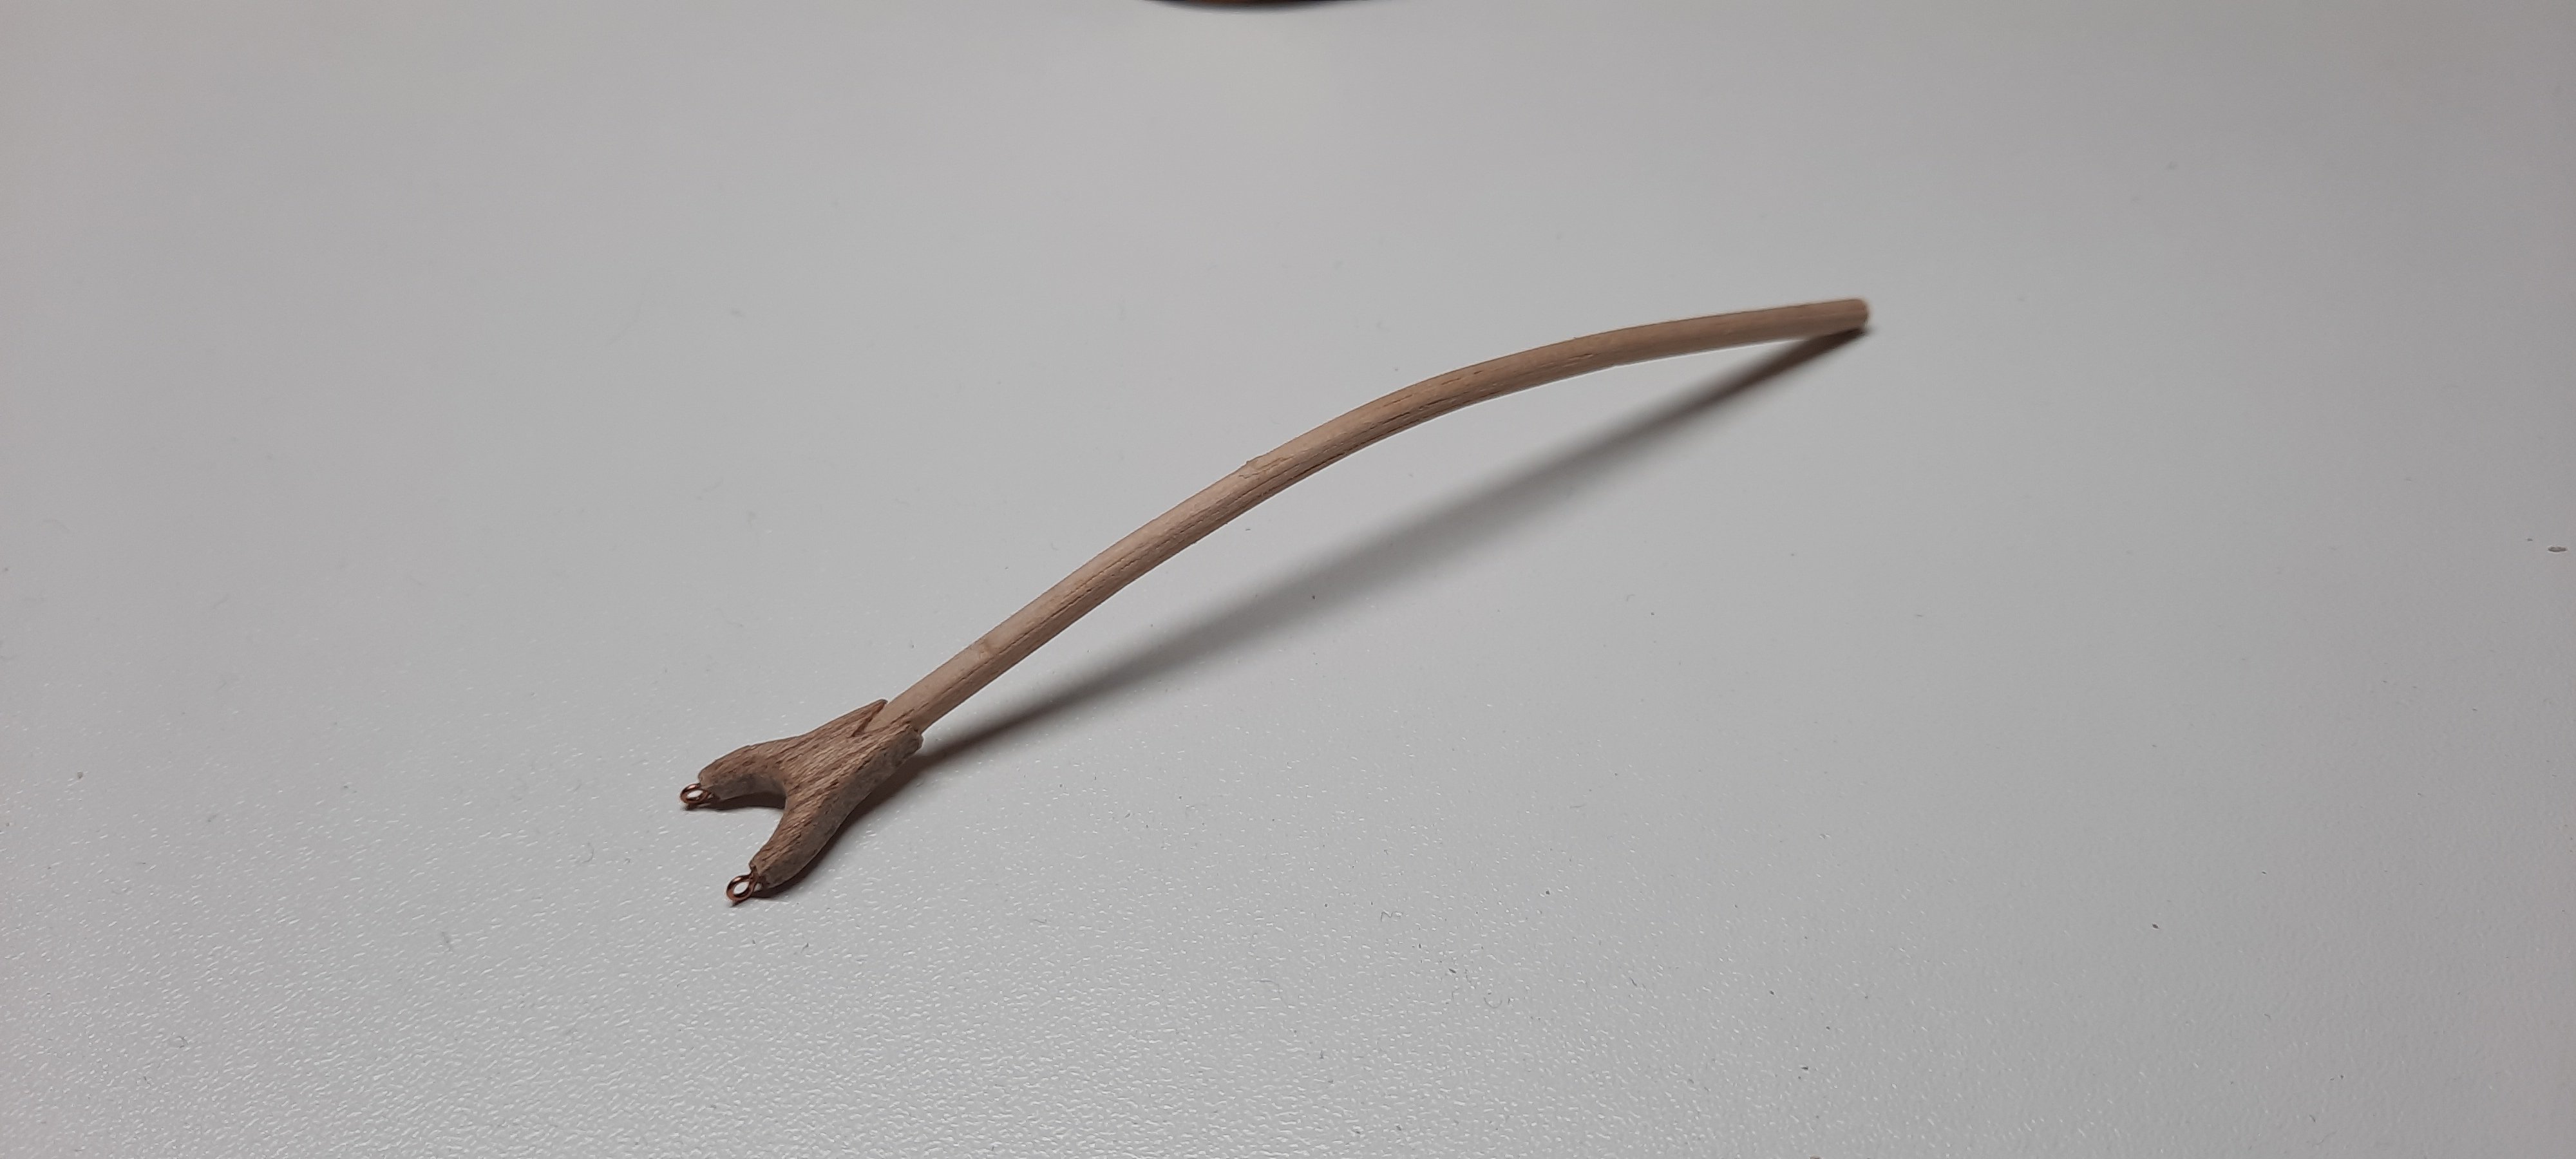
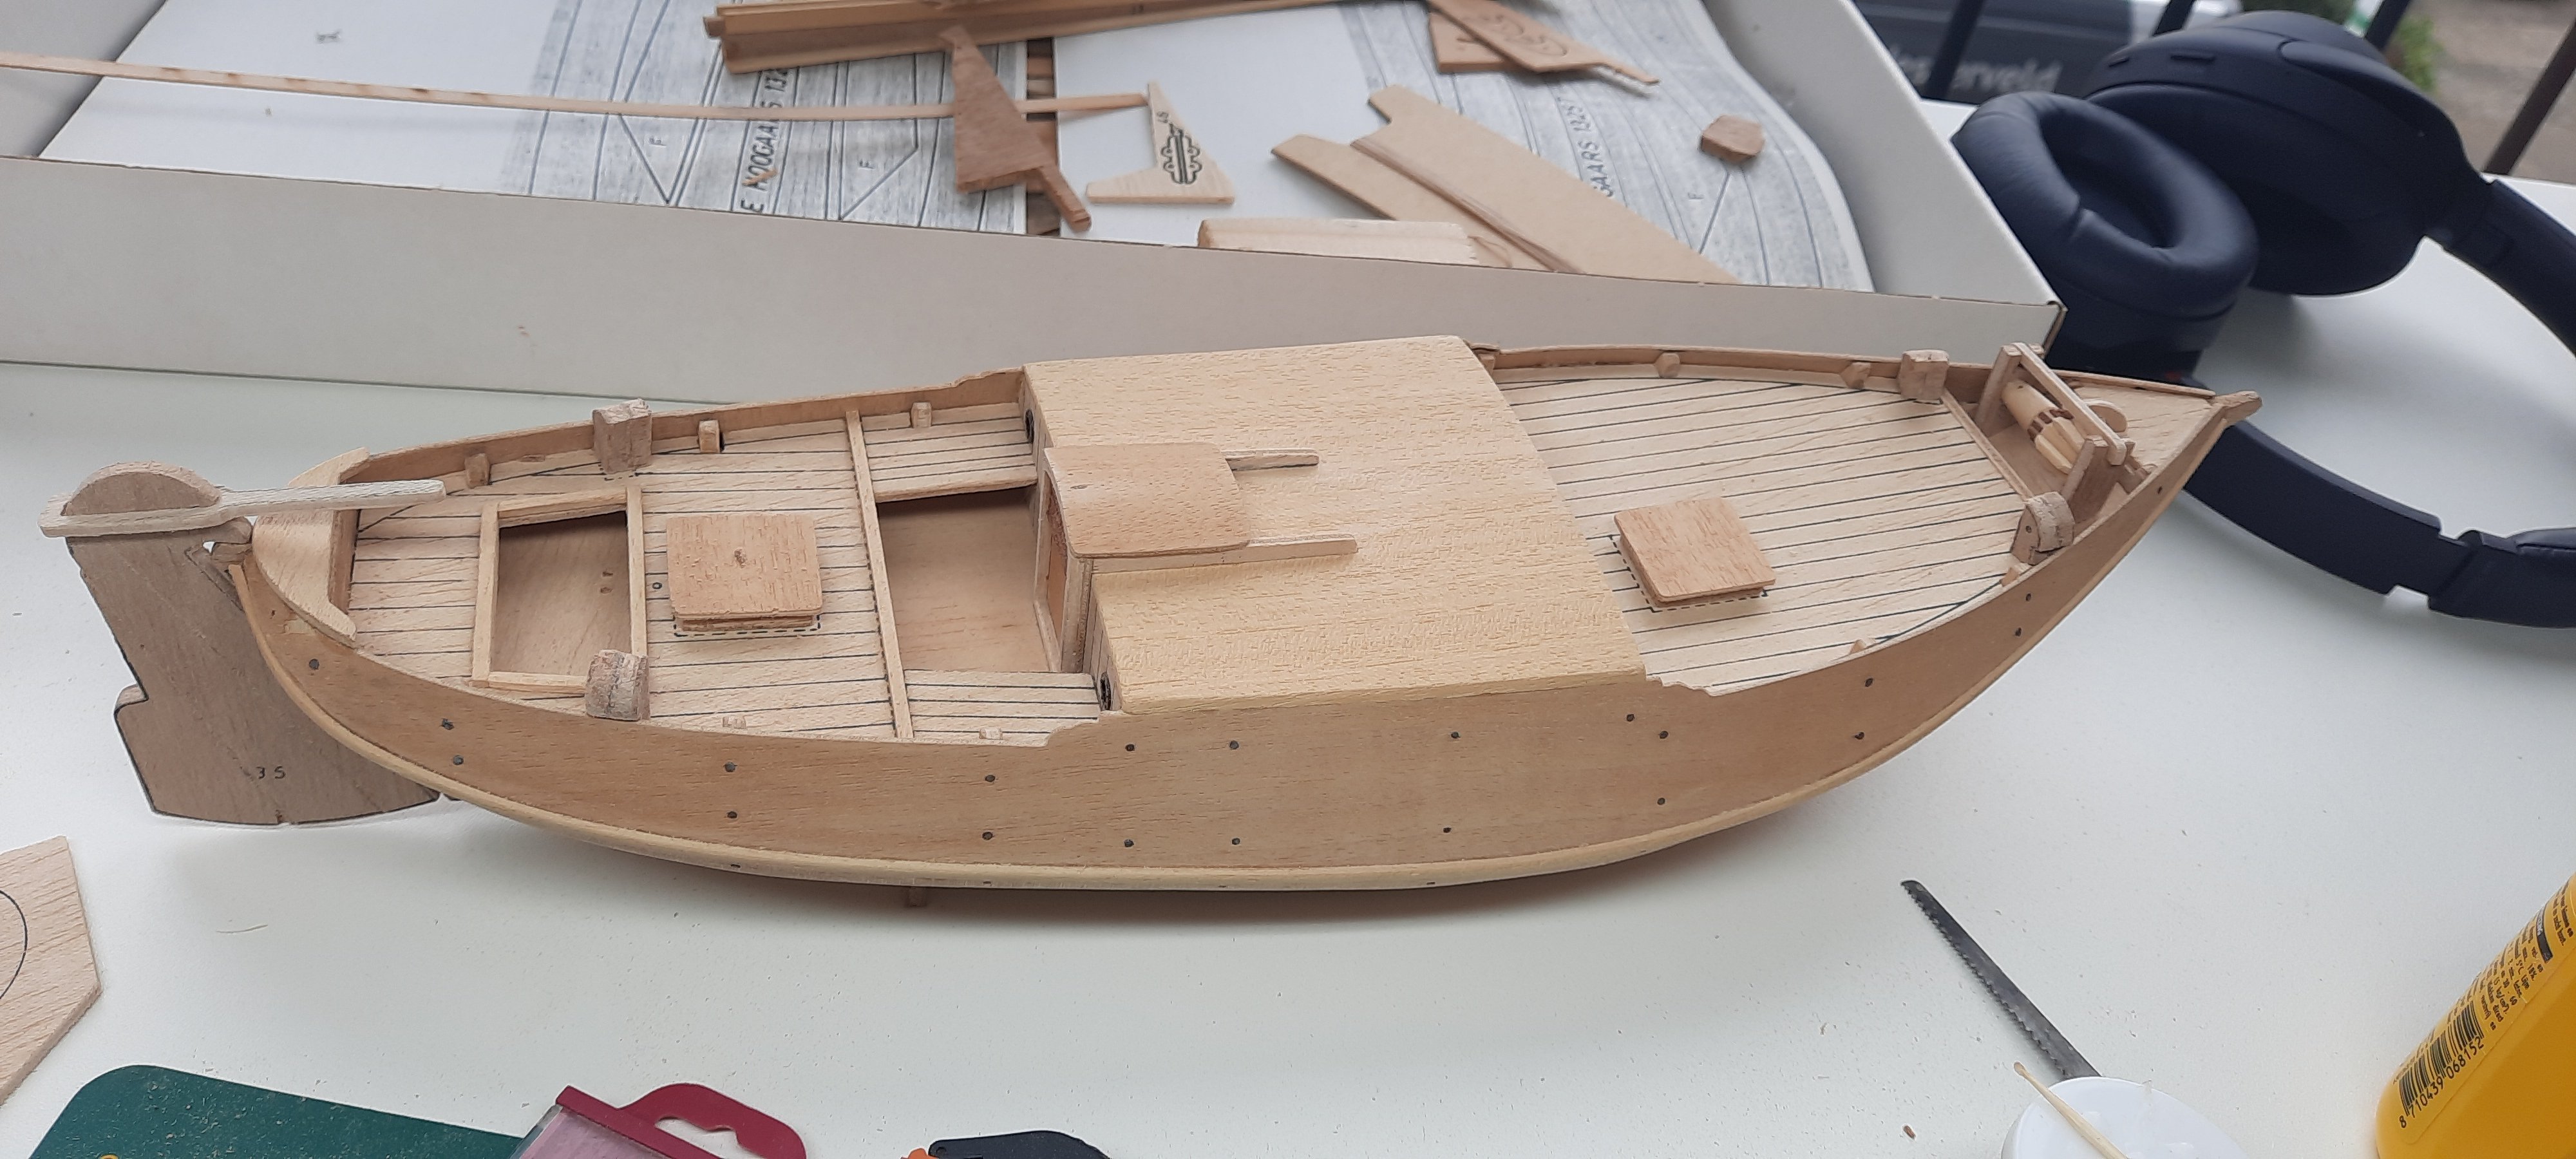
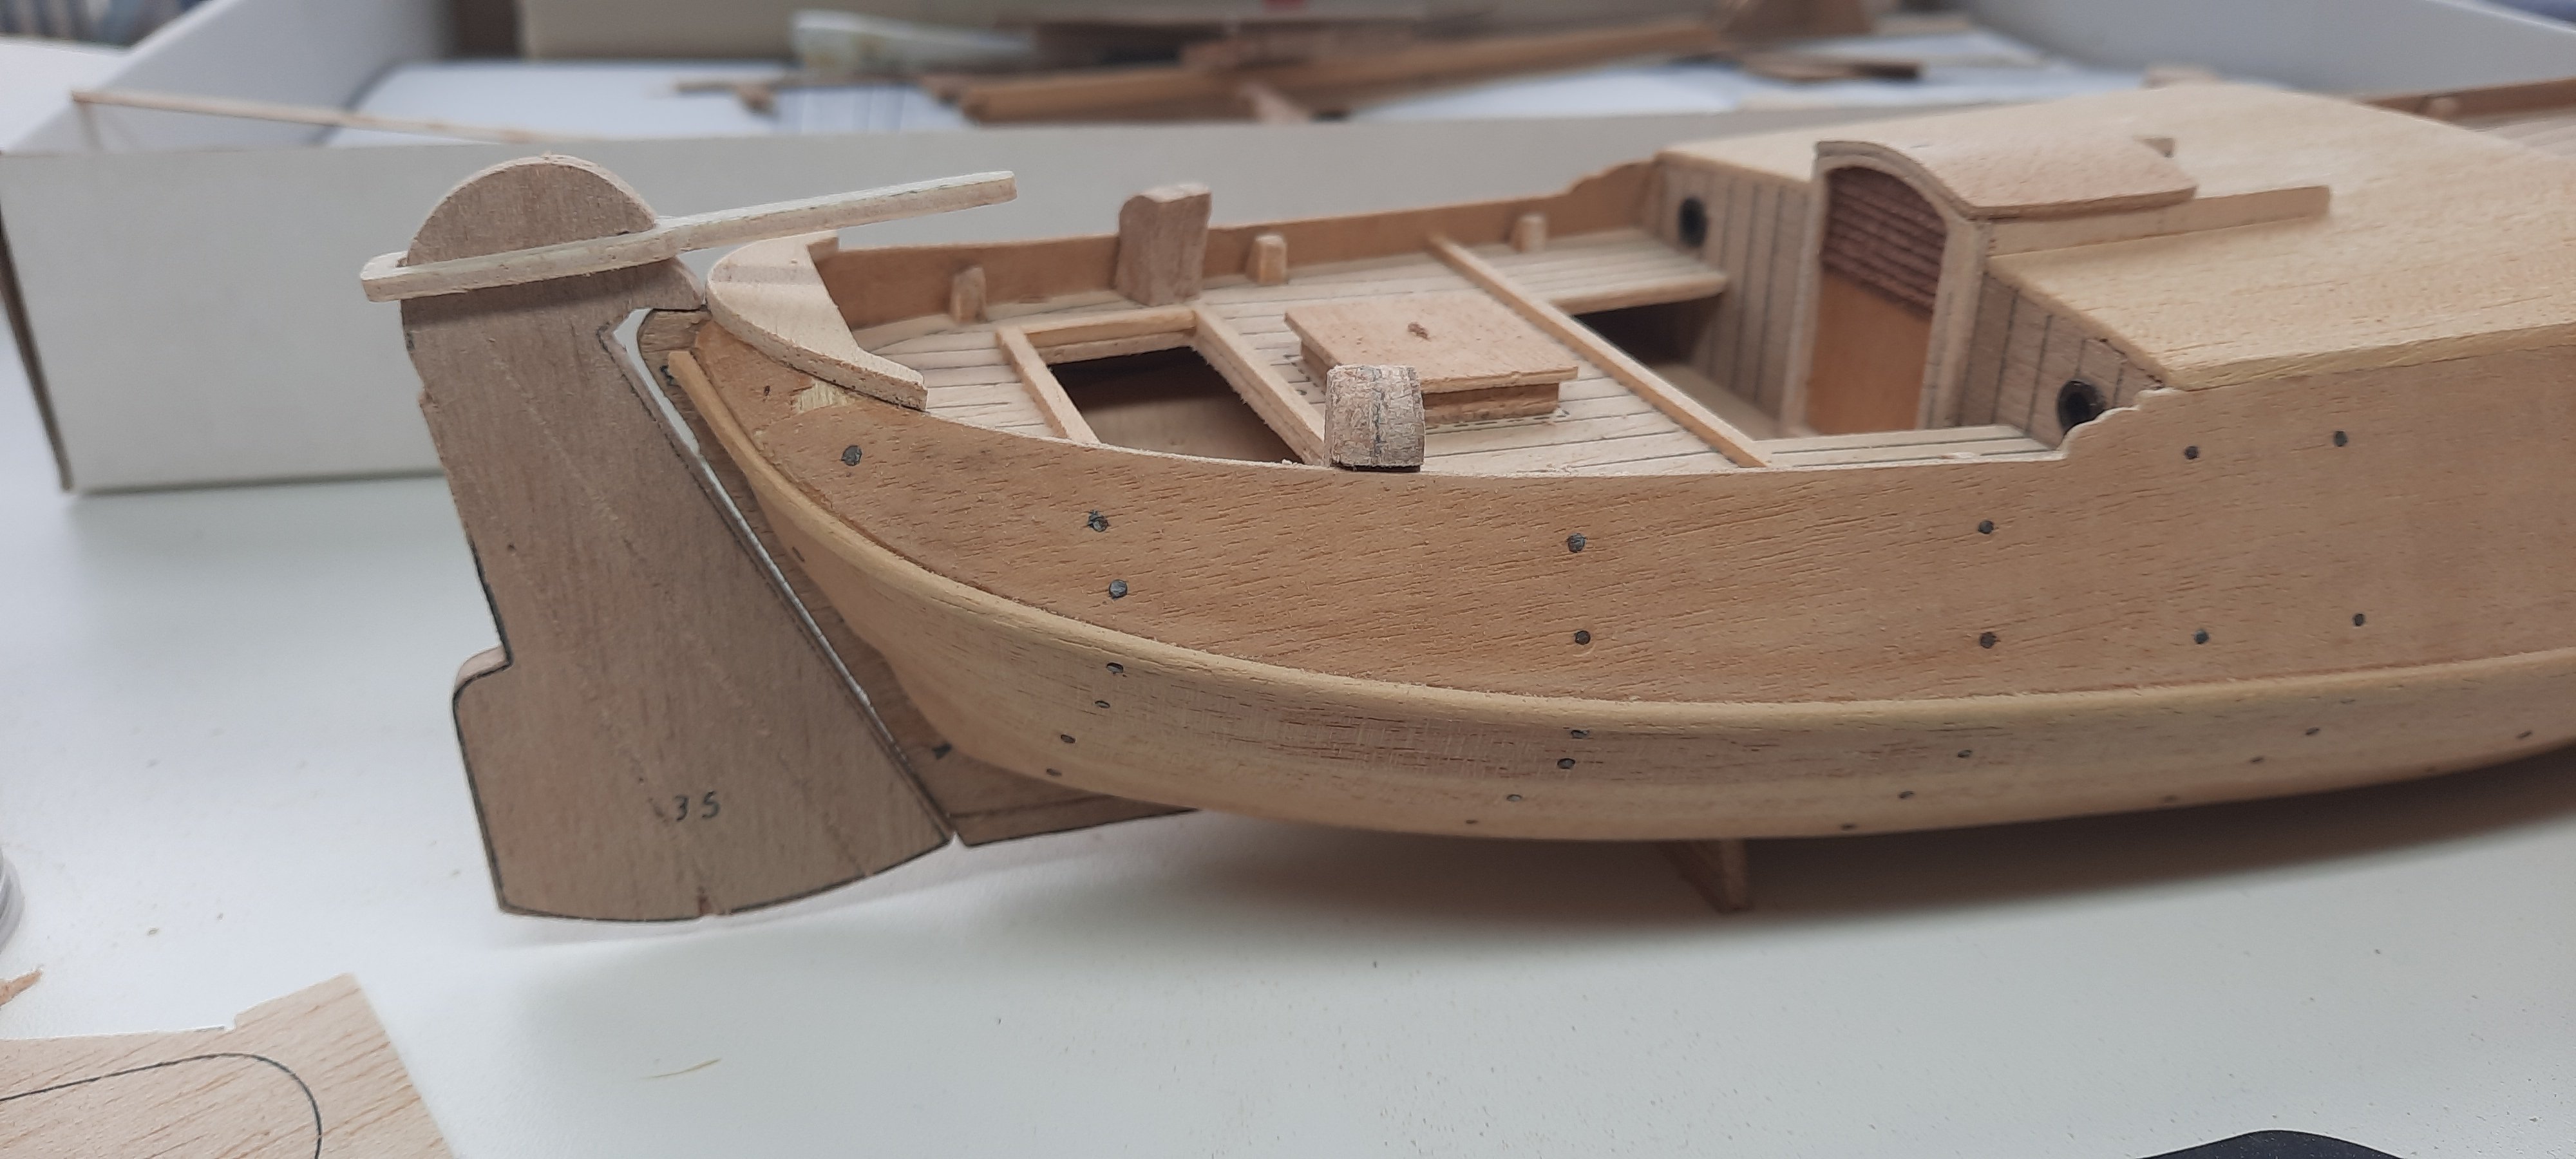
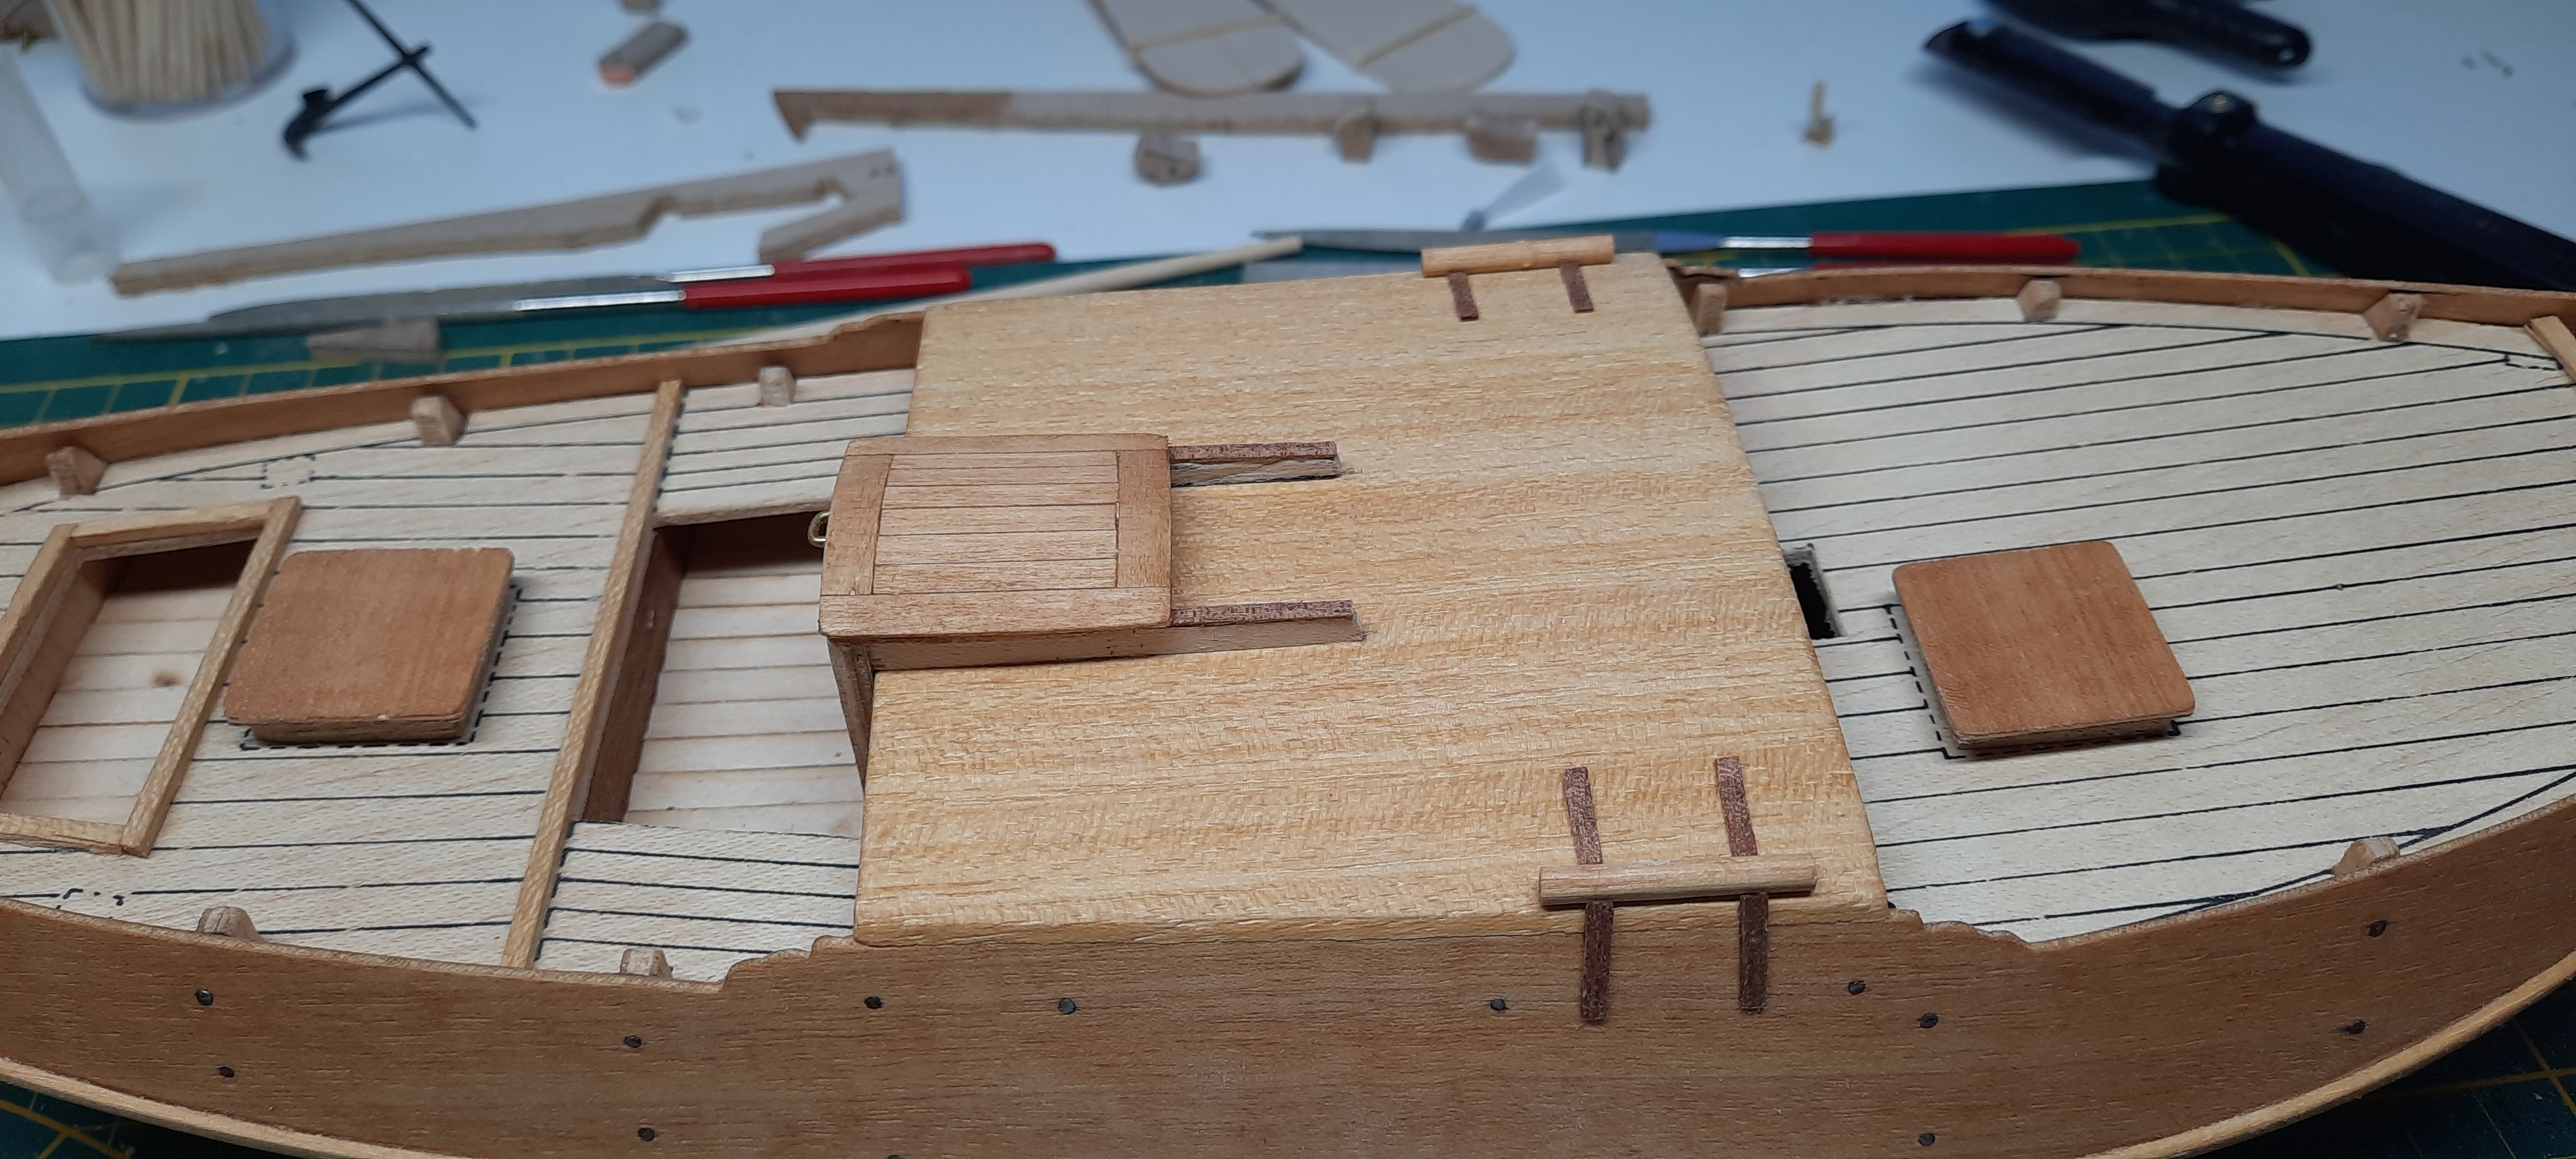
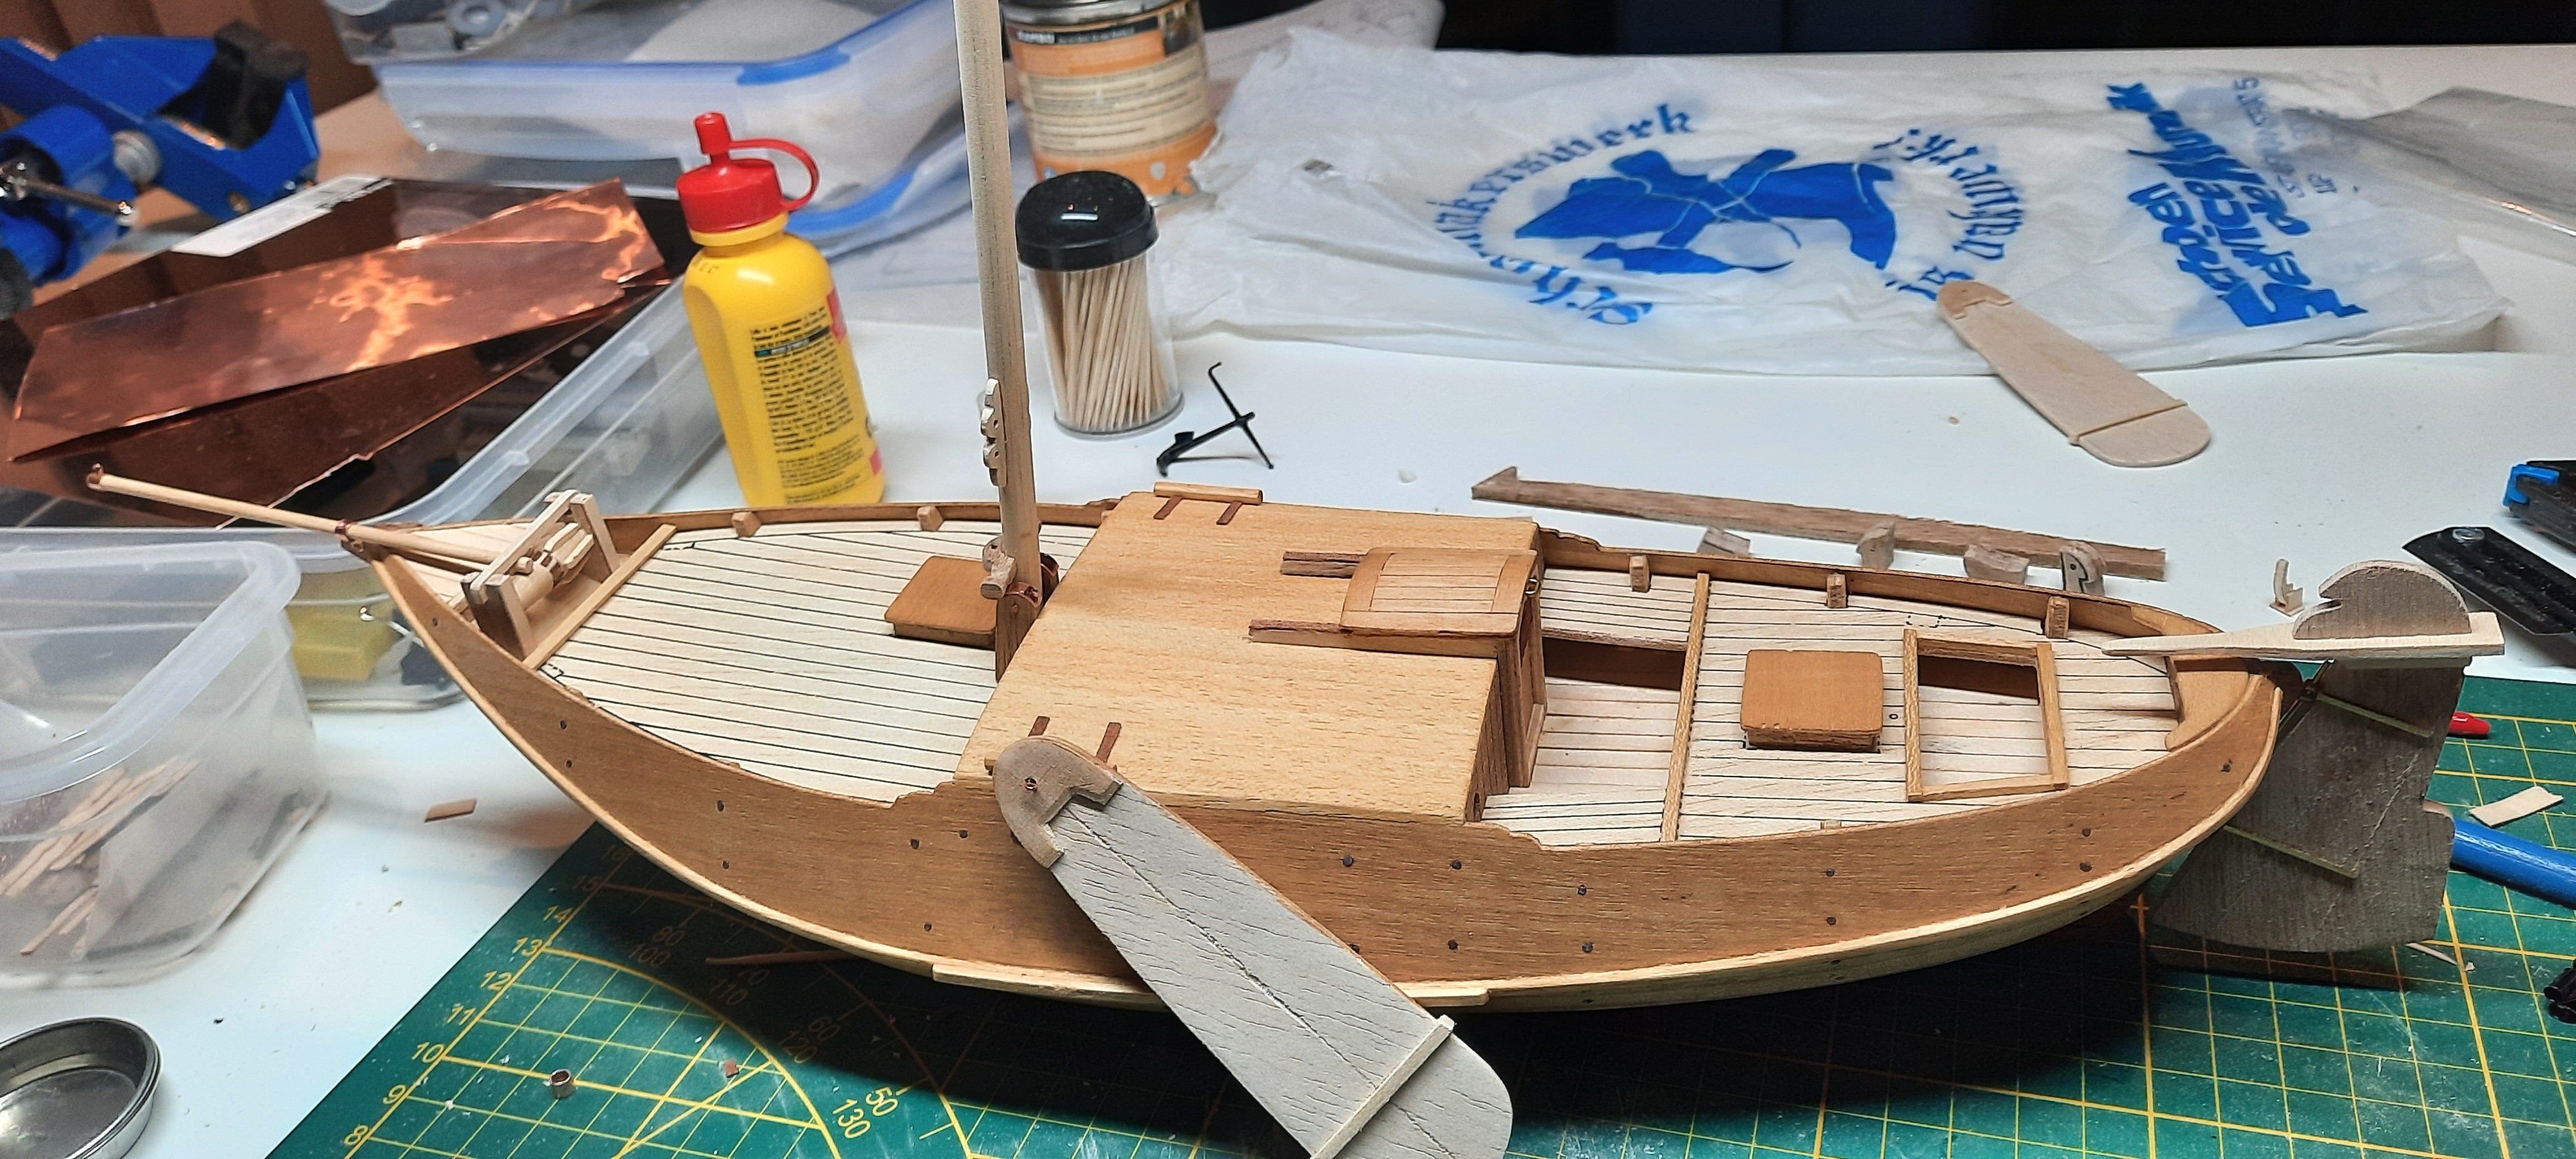
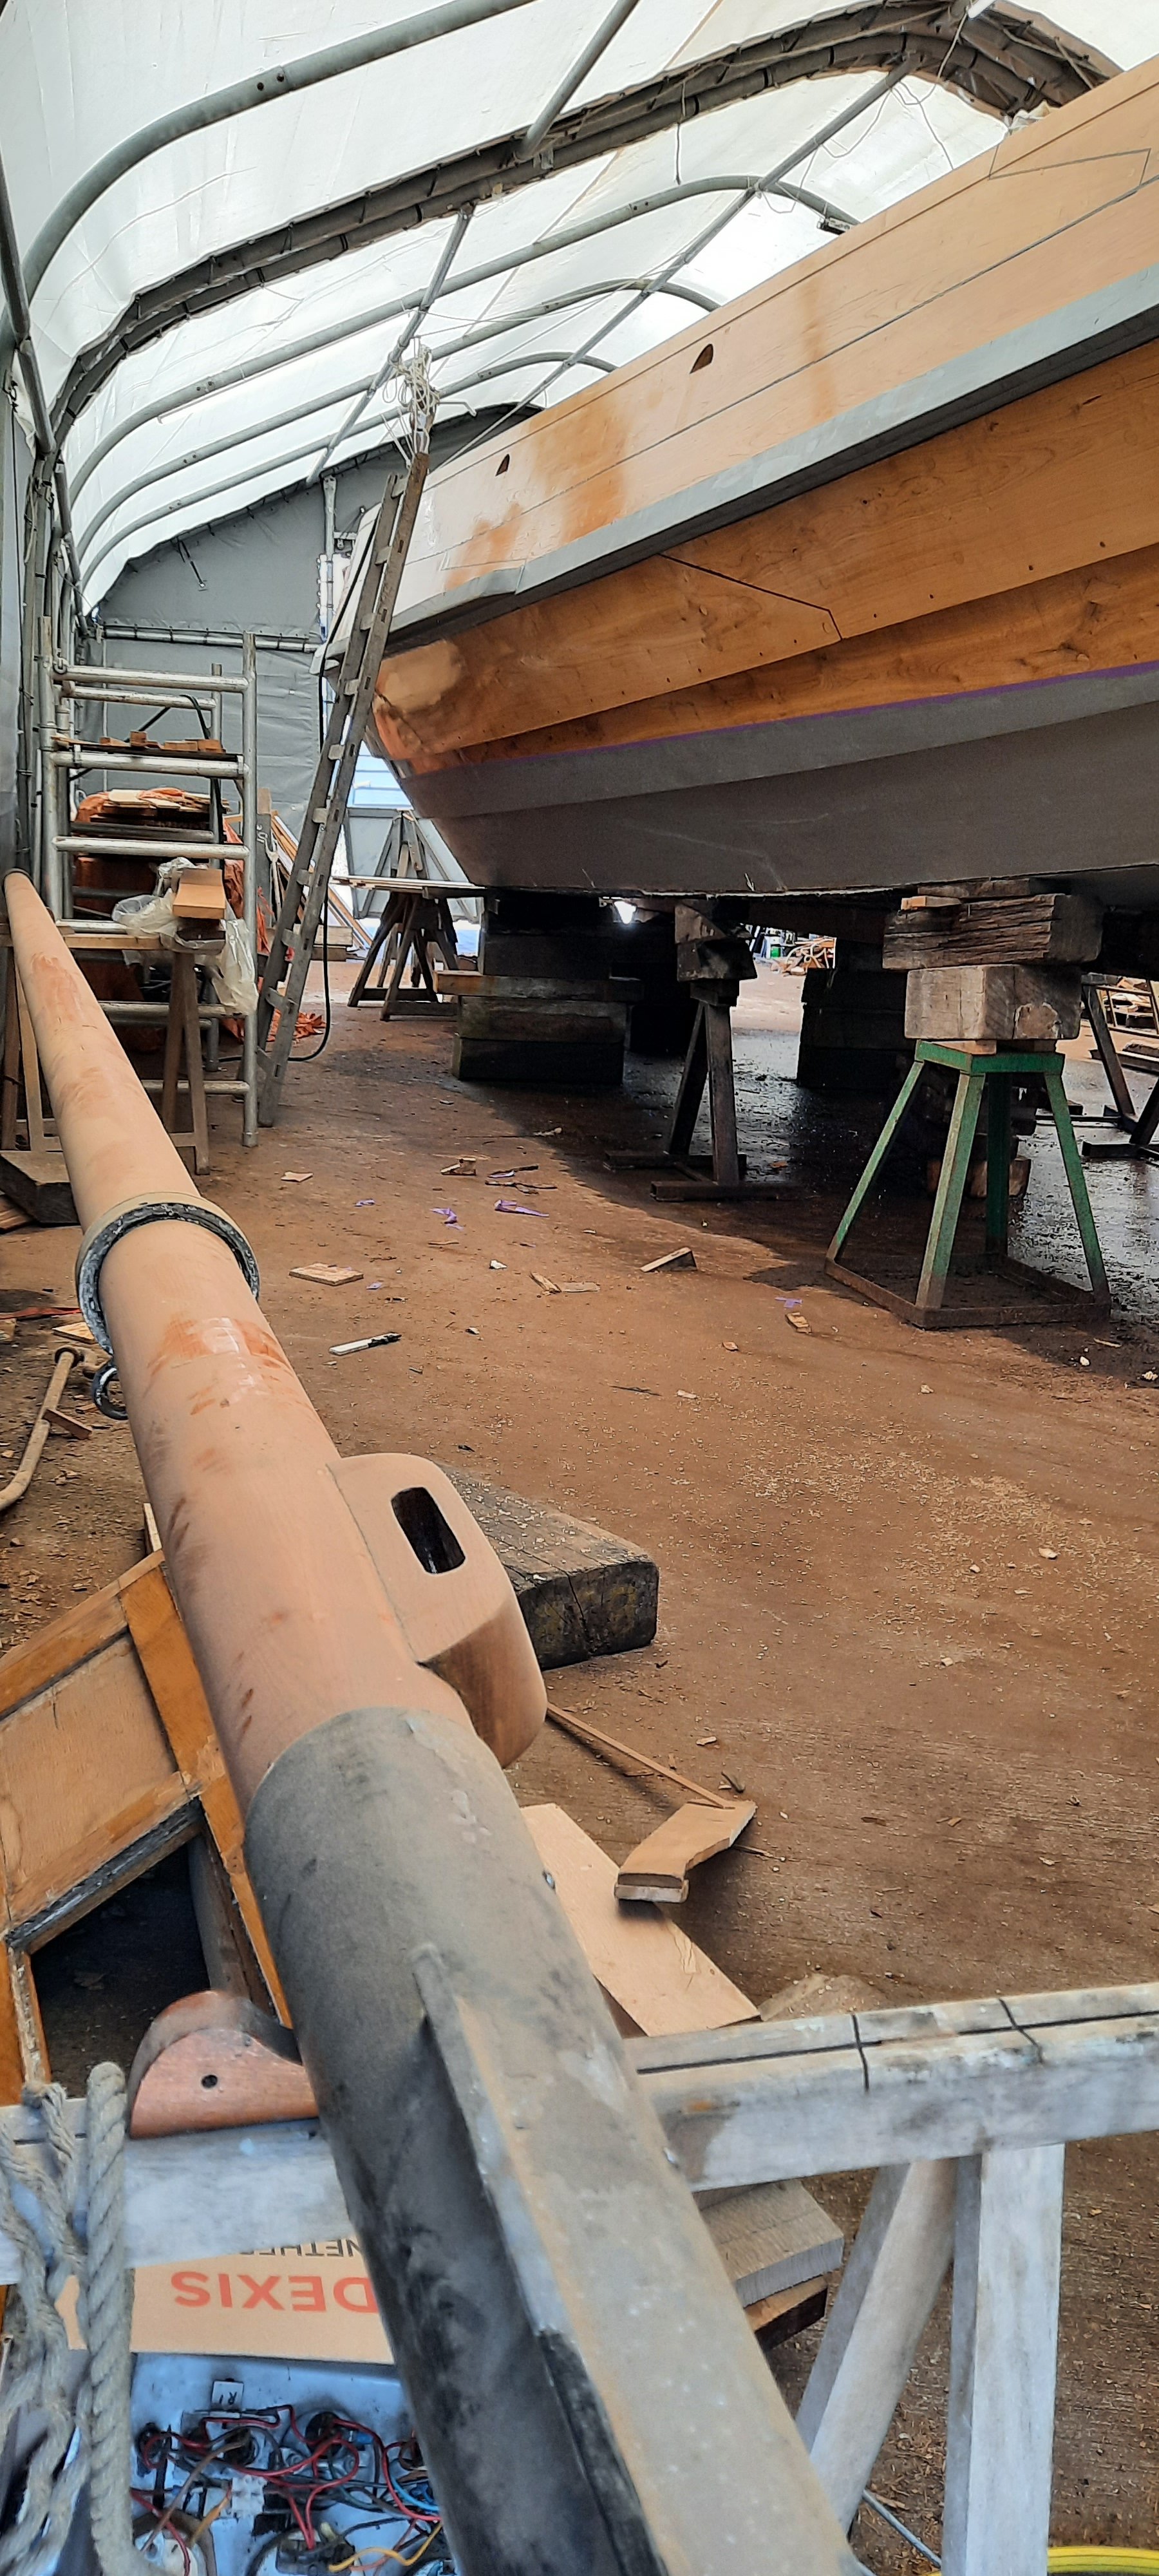
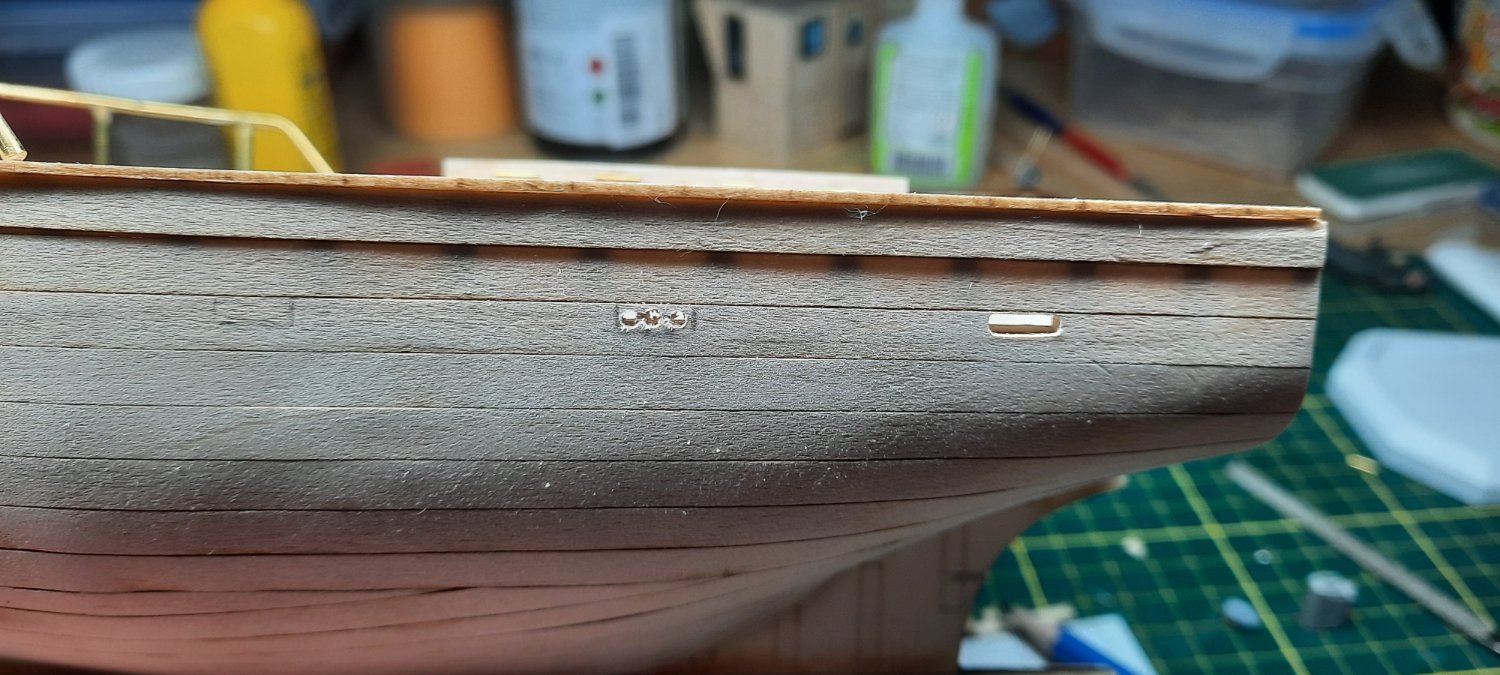
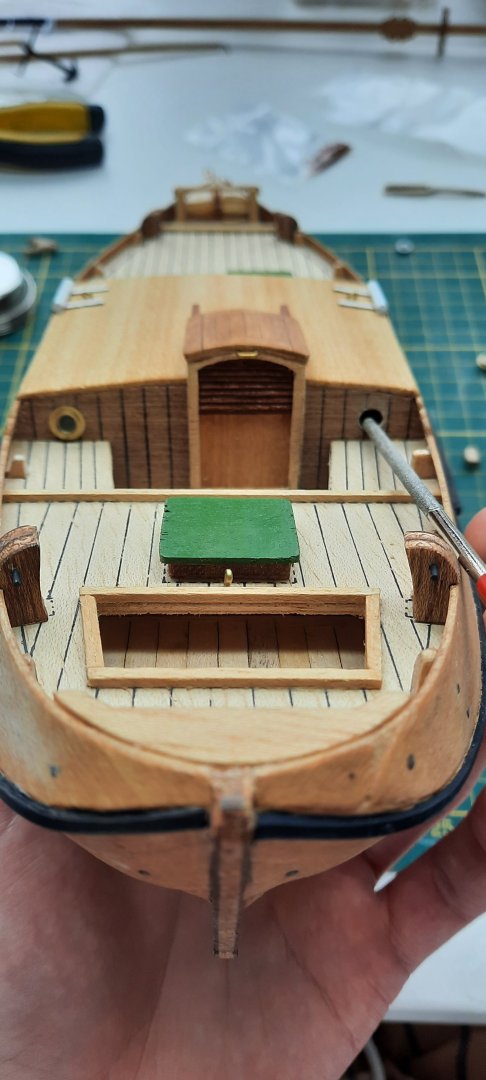
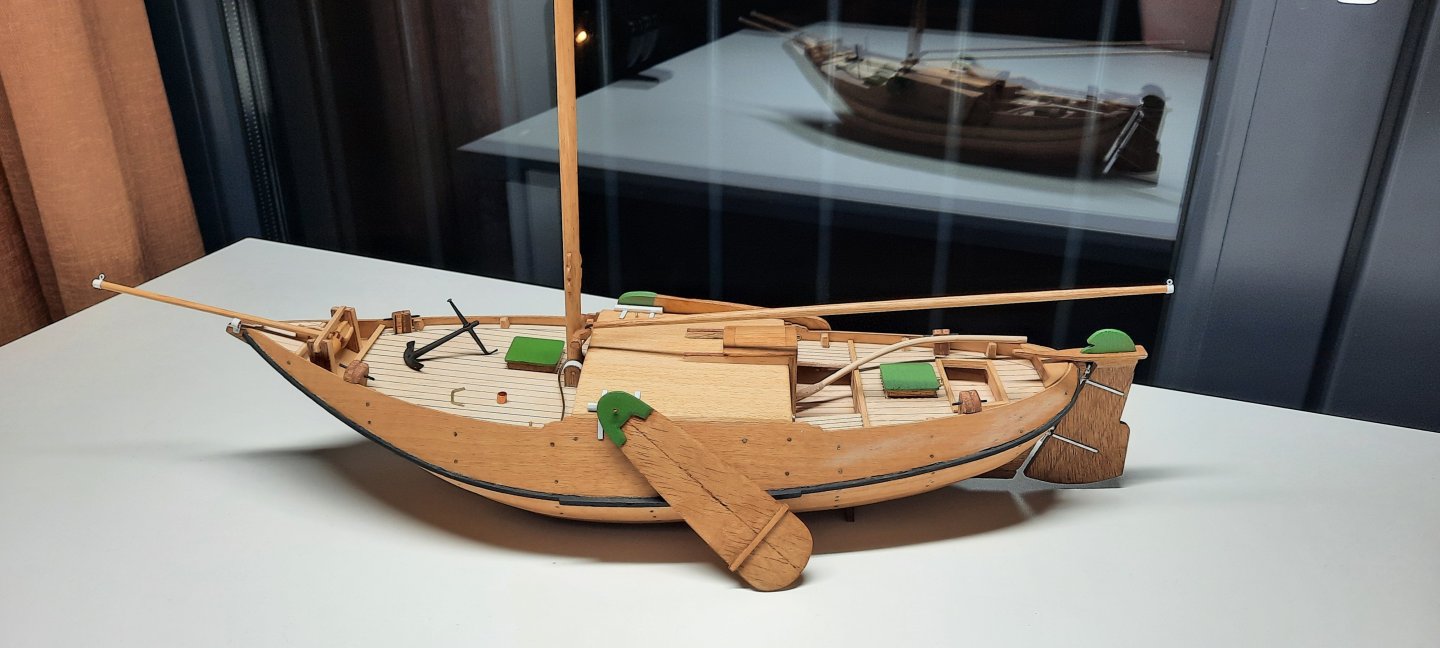
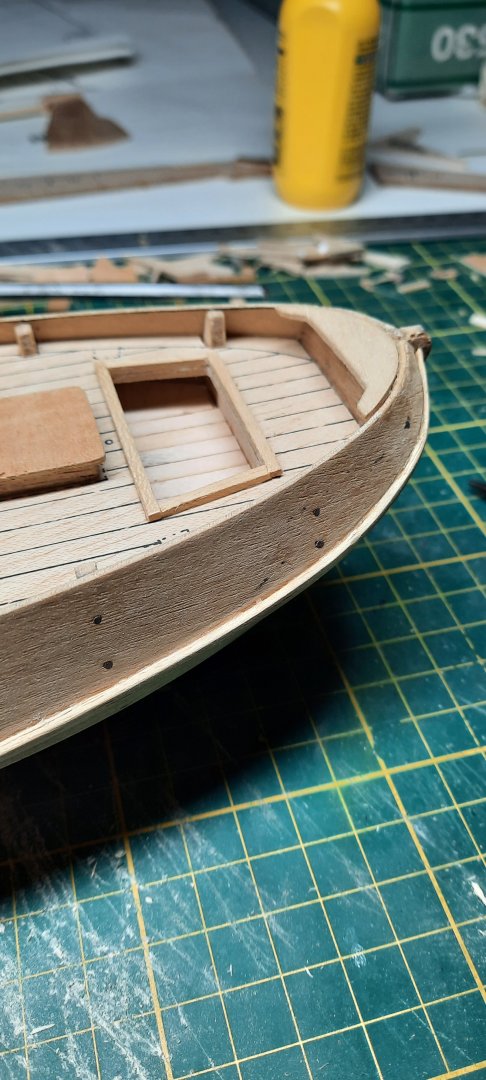
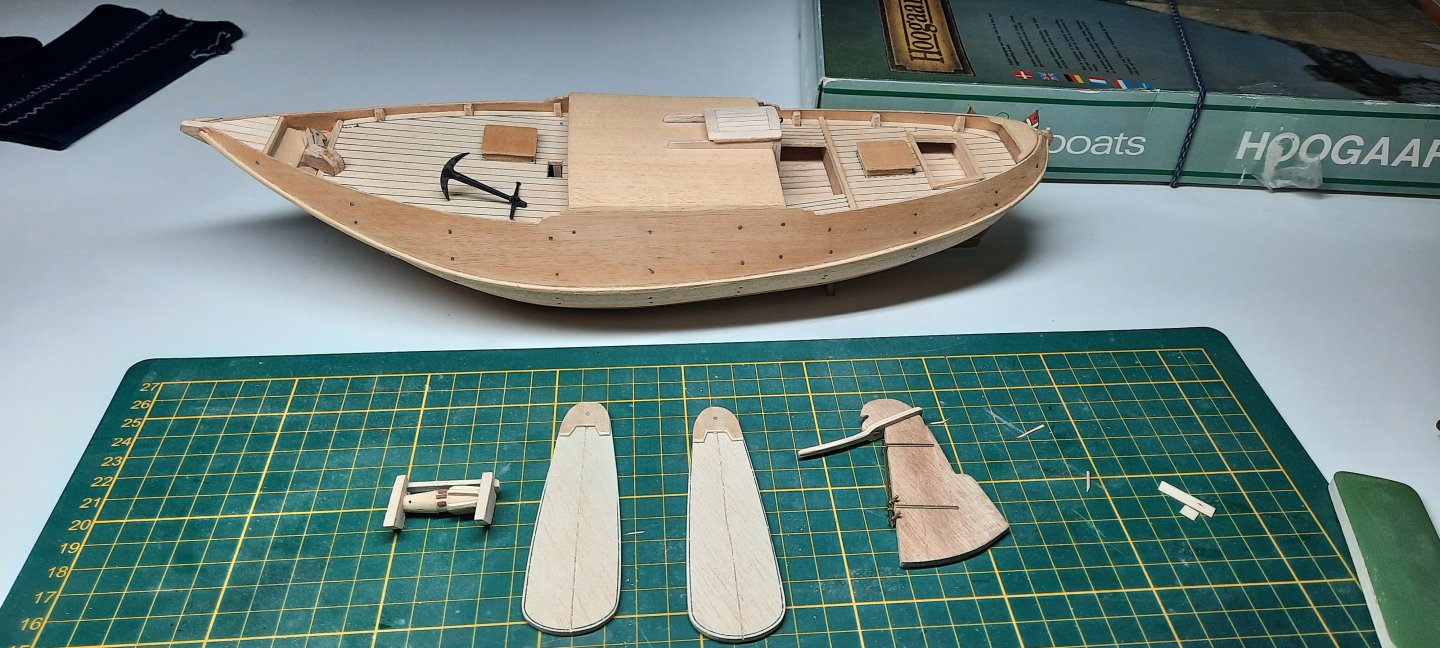
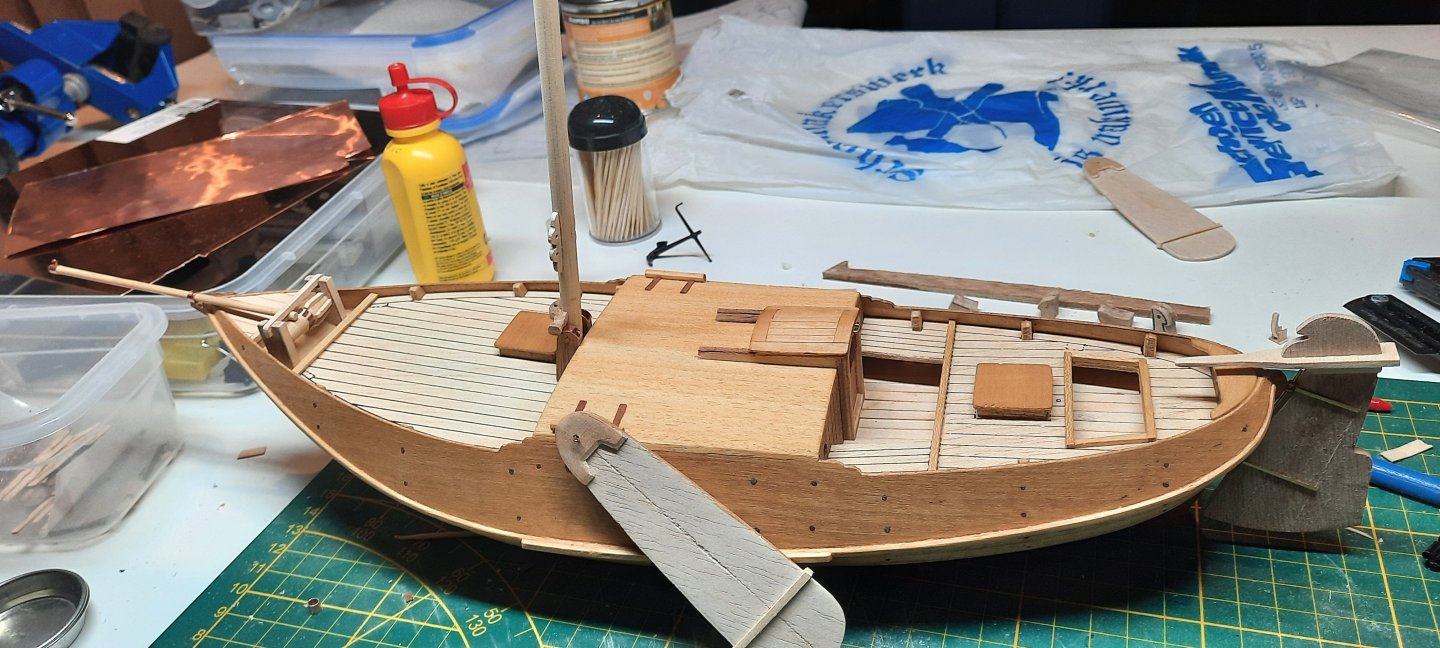
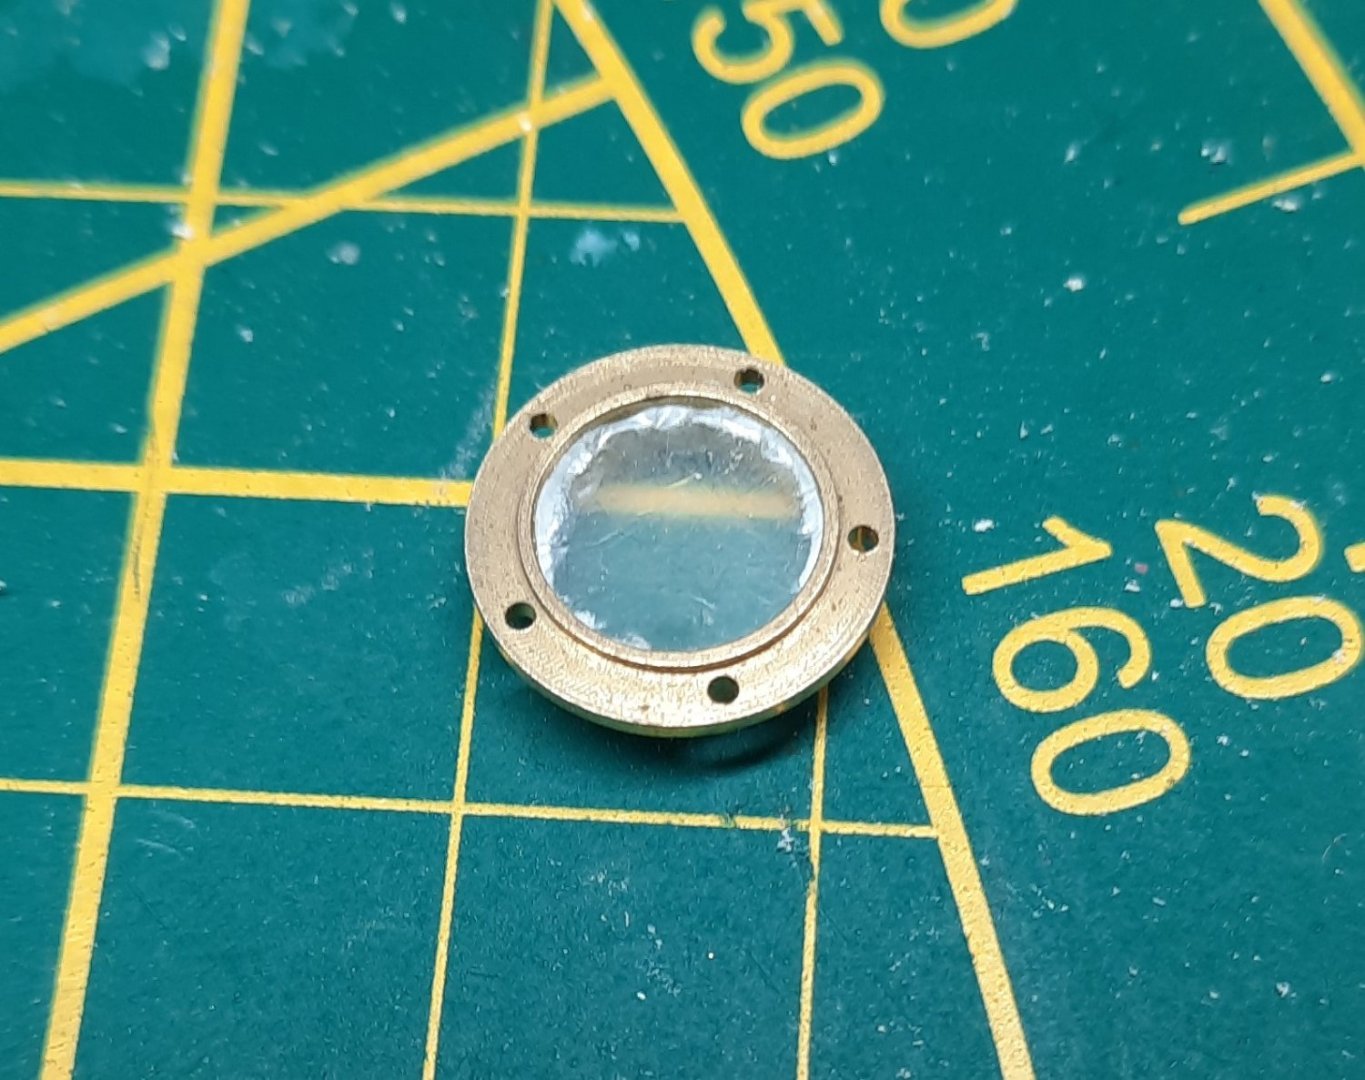
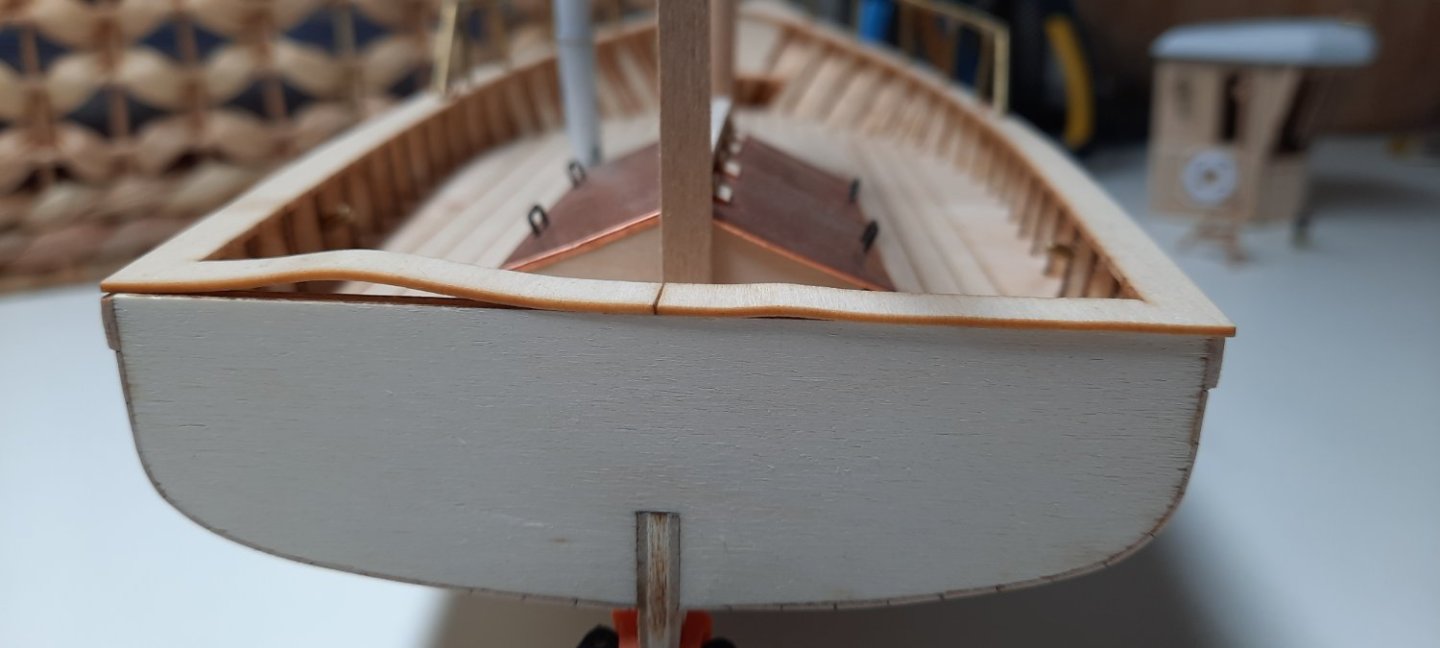
POST 4: Hull detailing Work It is time to start adding some more details and color. From my research and references I found that a lot of old Dutch yachts were finished with a deep green paint, used to highlight details on the boat. This is also what the Kit box shows but I chose different locations for the application. Based on reference pictures. First off, I wanted to add different portholes. I found these brass portholes with glass in my local modelshop. Very happy with how they look. I enlarged the openings to have them fit correctly. Spars are (almost) done. The Gaff(?(gaffel in dutch)) is bend arround a row of nails into the correct shape and letting the wet piece of wood dry in between them. Added the guide and gave it a couple of ringbolts for eventual securing arround the mast. Working on some ideas for decoration on the swords. Not sure what I want to do. The plans say to leave it empty but I think a yacht would have decoration. Most of my references show decoration on there as well. The shipyard is now (apparently)also open to visitors! Time to add some green! I wanted a very rich color and thanks to my background in military modelling I only have Olive drab.. so I mixed a green from my primary color oil paints. I really like the way it pops but still looks authentic. Let's create lots of dust very close to still wet oil paint.. what could go wrong? very happy with the look. I've also lowered the rudder so it follows the lines of the keel. This meant I had to place the Tiller higher up and the pieces of wood underneath it had to move as well. The fresh wood underneath the old location is still visible in this picture. Thats all so far. Thanks all for reading and commenting! Till Next time.


-
Paul Le Wol reacted to a post in a topic:
Hoogaars Yacht by TheDuckDetective - Billing Boats - 1:27 scale
-
TheDuckDetective reacted to a post in a topic:
Hoogaars Yacht by TheDuckDetective - Billing Boats - 1:27 scale
-
TheDuckDetective reacted to a post in a topic:
Hoogaars Yacht by TheDuckDetective - Billing Boats - 1:27 scale
-
Thank you Chris and Joachim! The kit is indeed a little rough arround the edges. Like the positioning aids on the deck are printed on the deck itself, I probably would have liked to plank the deck to hide those marks. But since the builder before me allready laid it down like this I decided to leave it as is. I consider myself co author of this particular vessel so I want to keep the original build as it is. The wood does like to fight back and I think your sigar wood comparison is pretty spot on. That is why I am thankfull the mast was allready turned to the correct dimensions by the first builder. I wouldnt want to try turning that long a spar on my powerdrill 😅
-
TheDuckDetective reacted to a post in a topic:
Duyfken by Challenger86 - FINISHED - Modellers Shipyard - 1:48
-
TheDuckDetective reacted to a post in a topic:
PHOENIX 1787 by ccoyle - Master Korabel - 1/72 - Russian brigantine of the Black Sea Fleet
-
Thank you for the nice comment Paul, I too think it's a shame that the kit is discontinued. There are still some availeable in a couple of online(dutch) shops. I do wonder what other region specific kits Billing boats(or any other company) has availeable.
-
TheDuckDetective reacted to a post in a topic:
Hoogaars Yacht by TheDuckDetective - Billing Boats - 1:27 scale
-
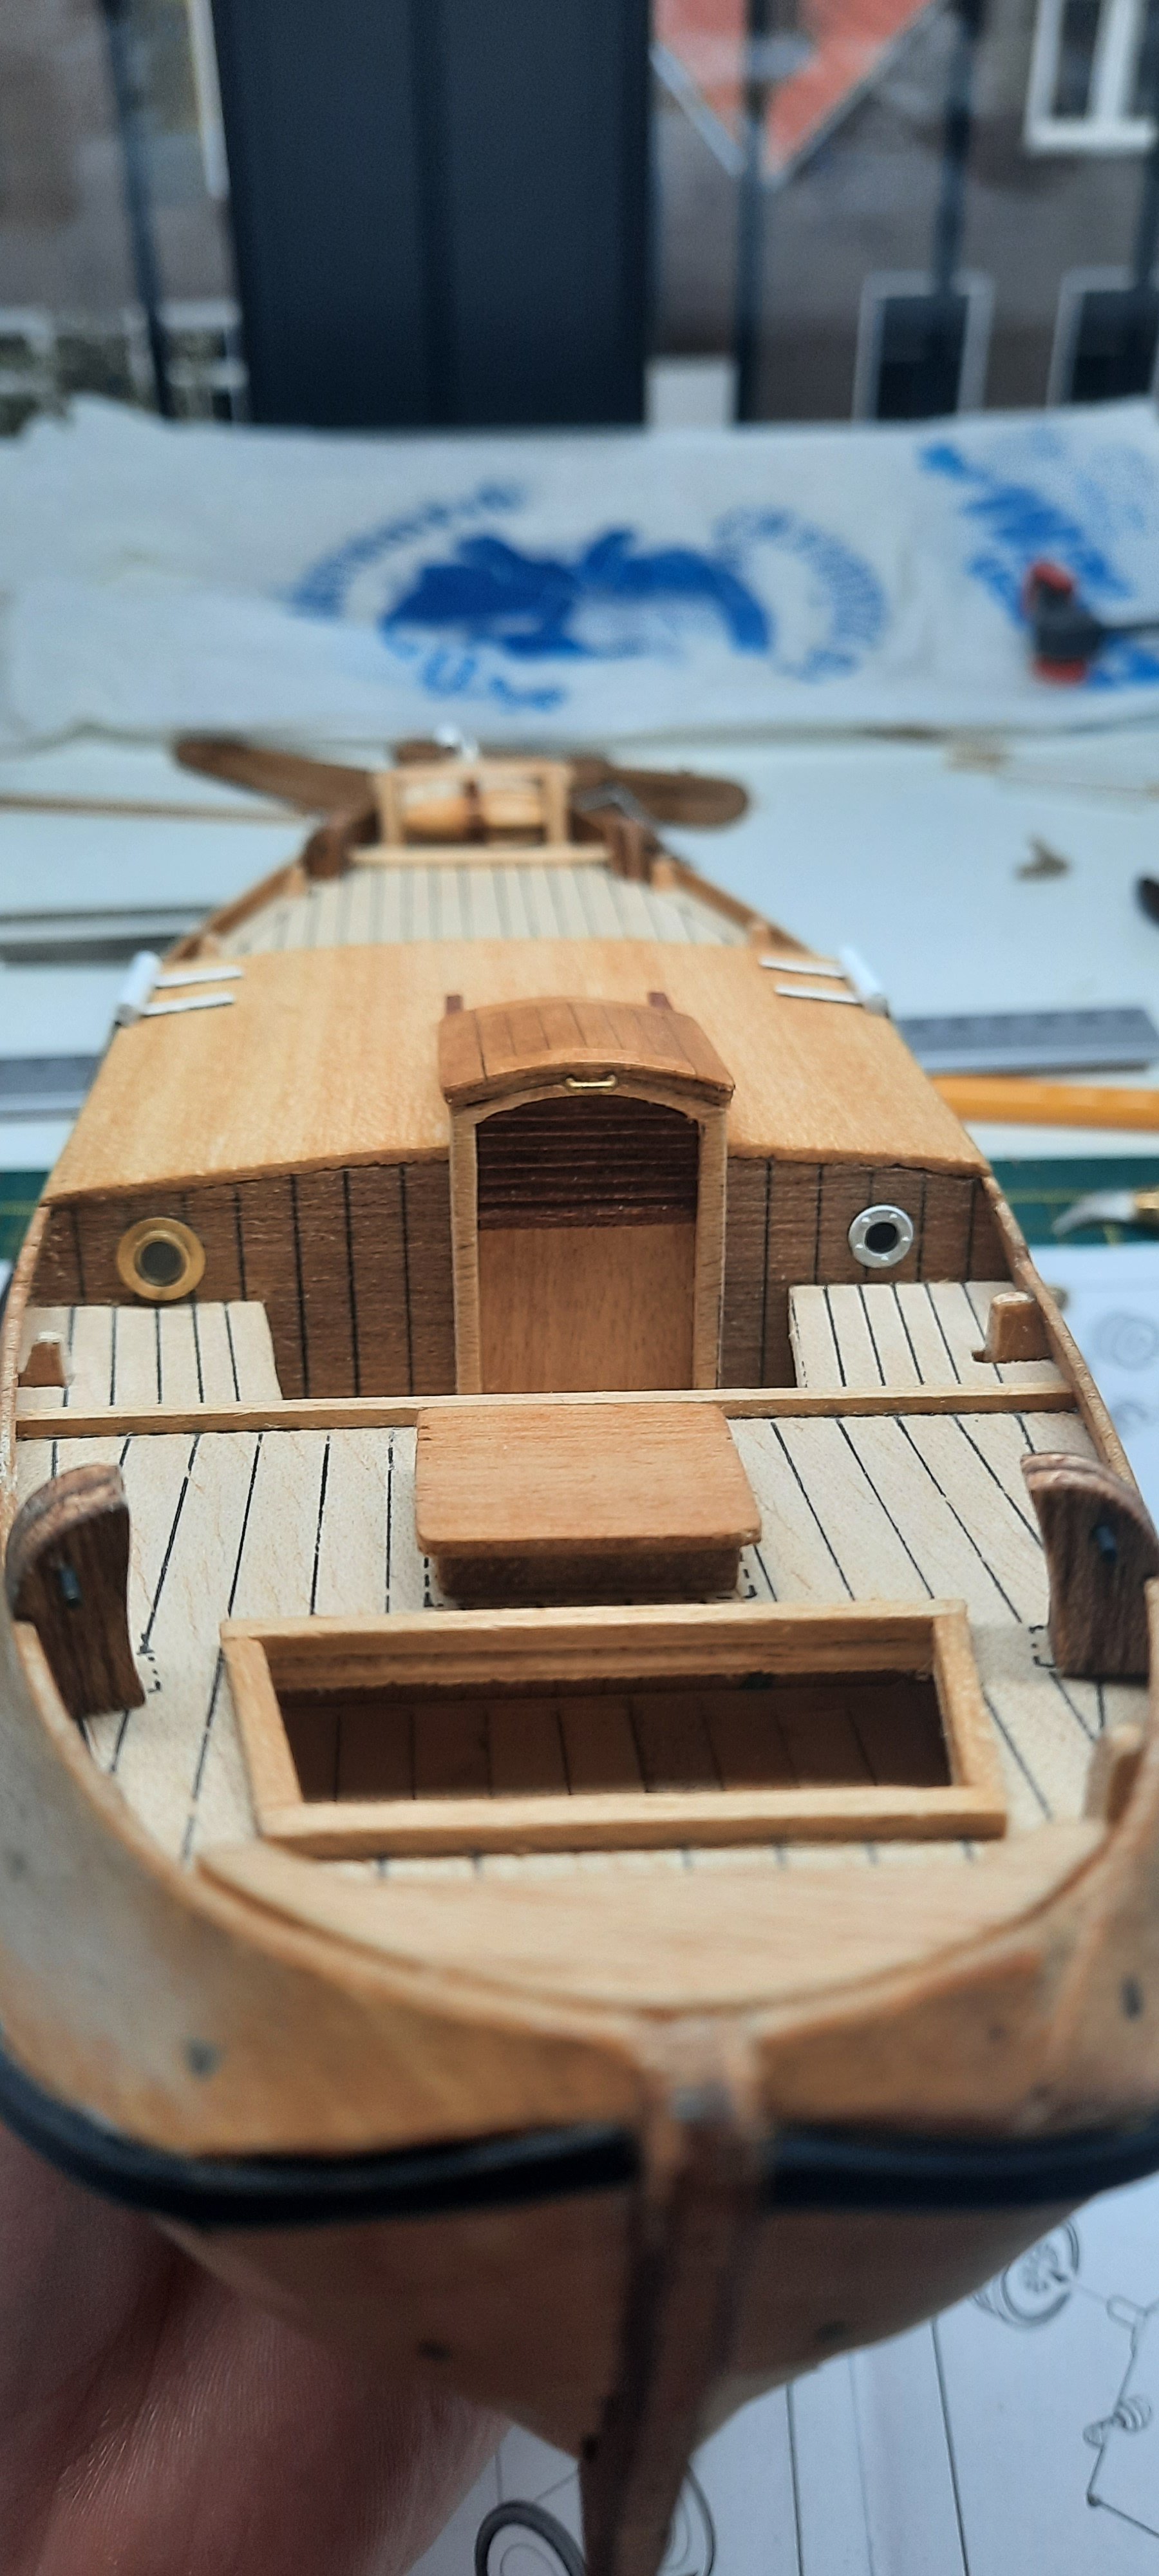
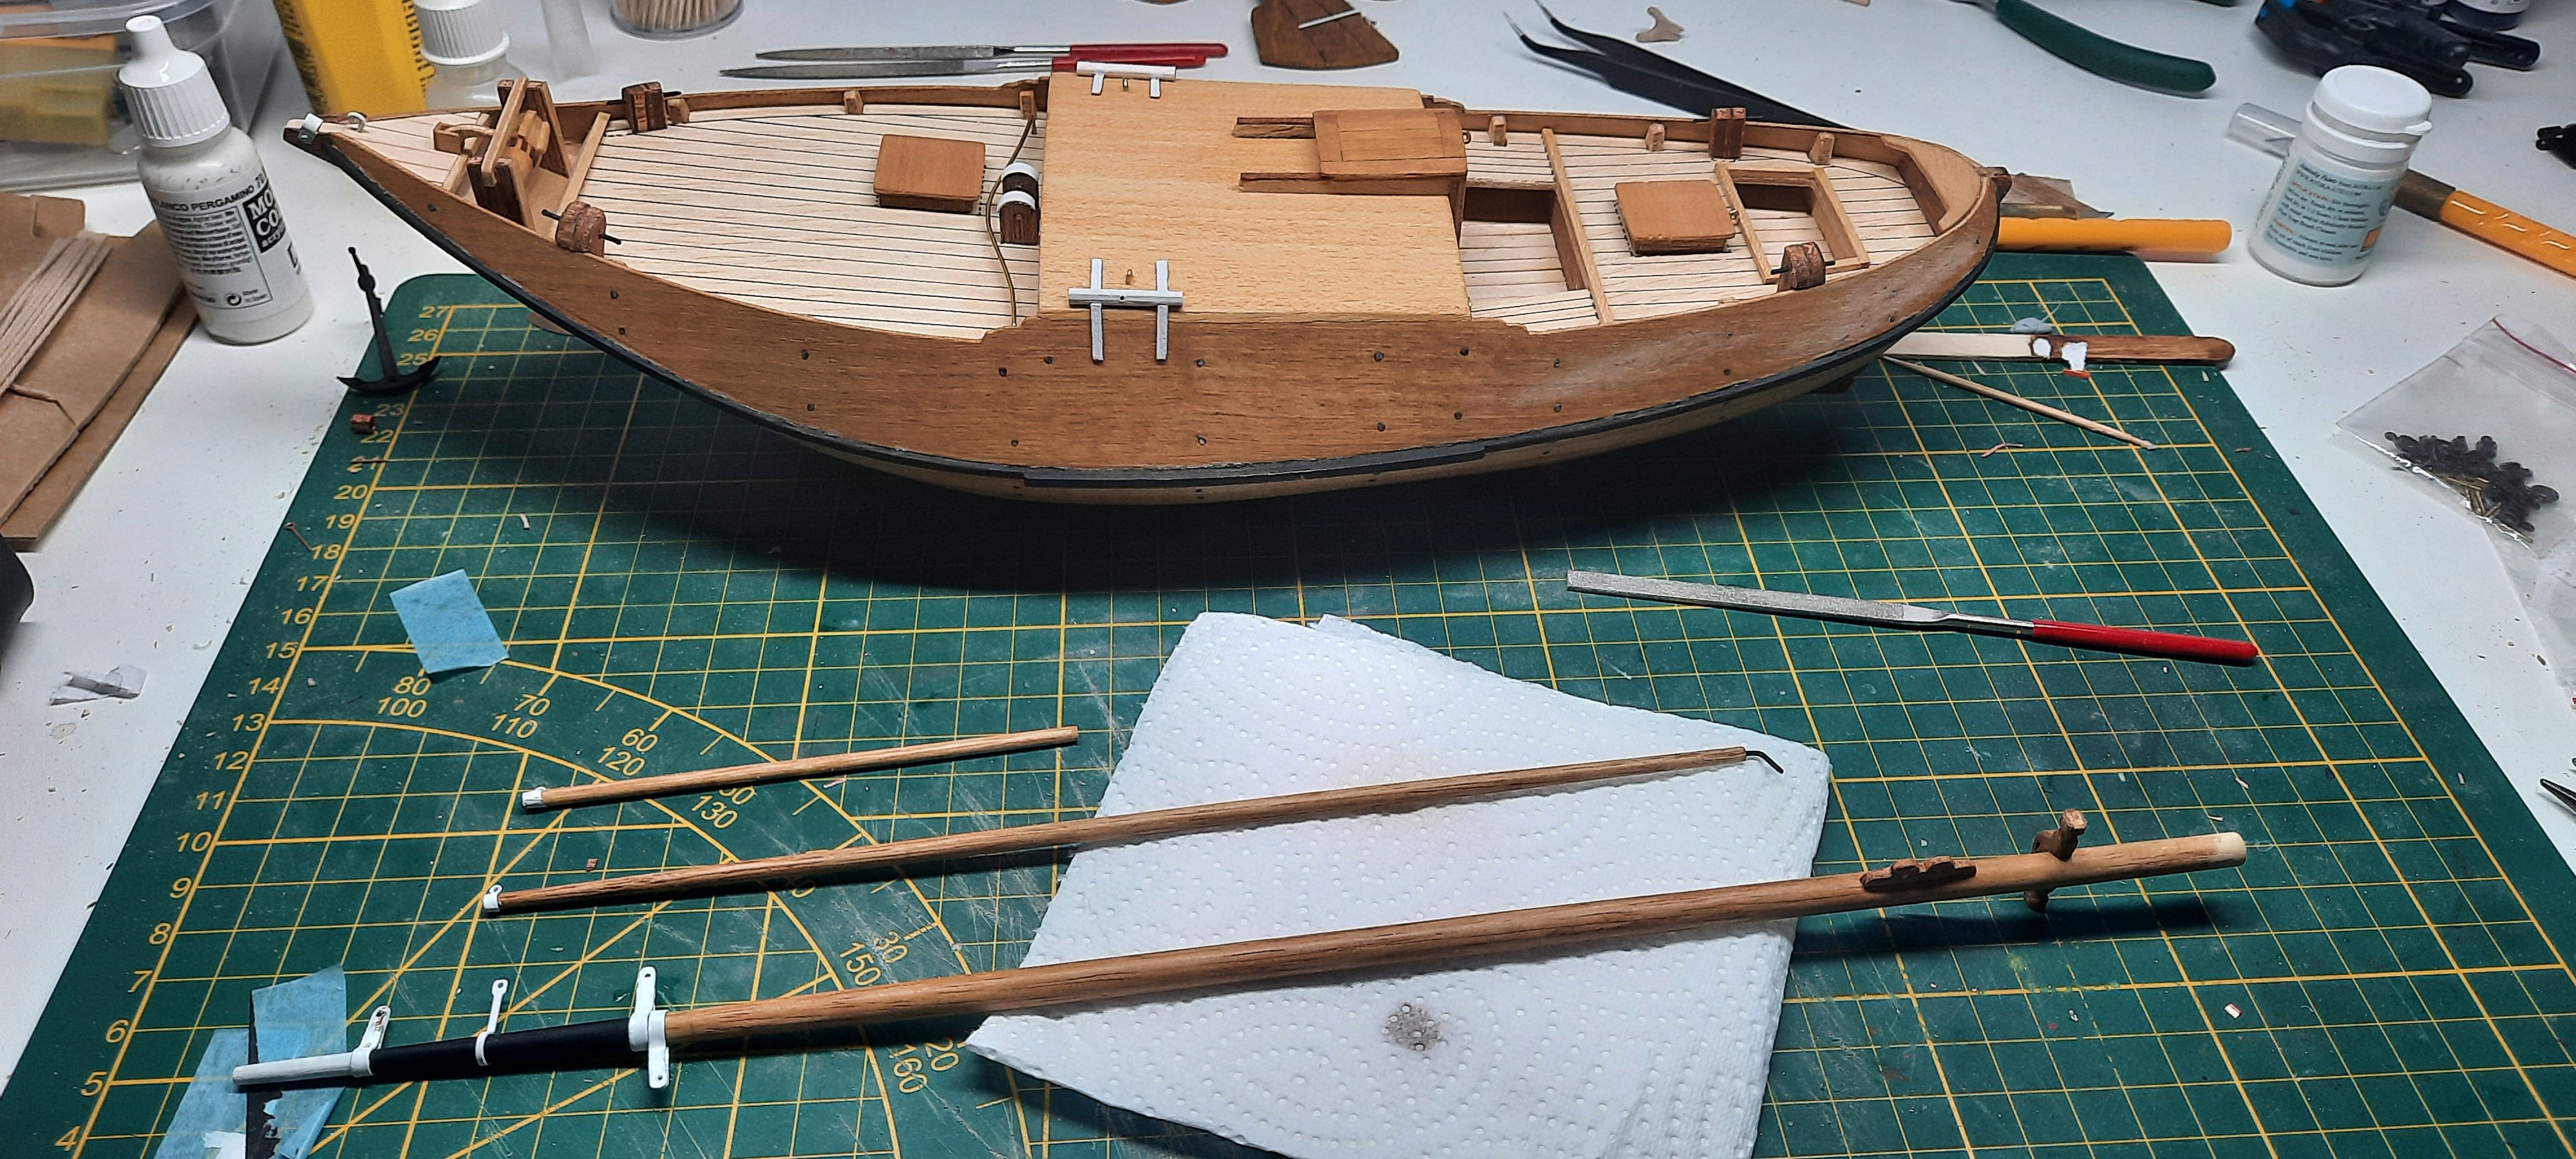
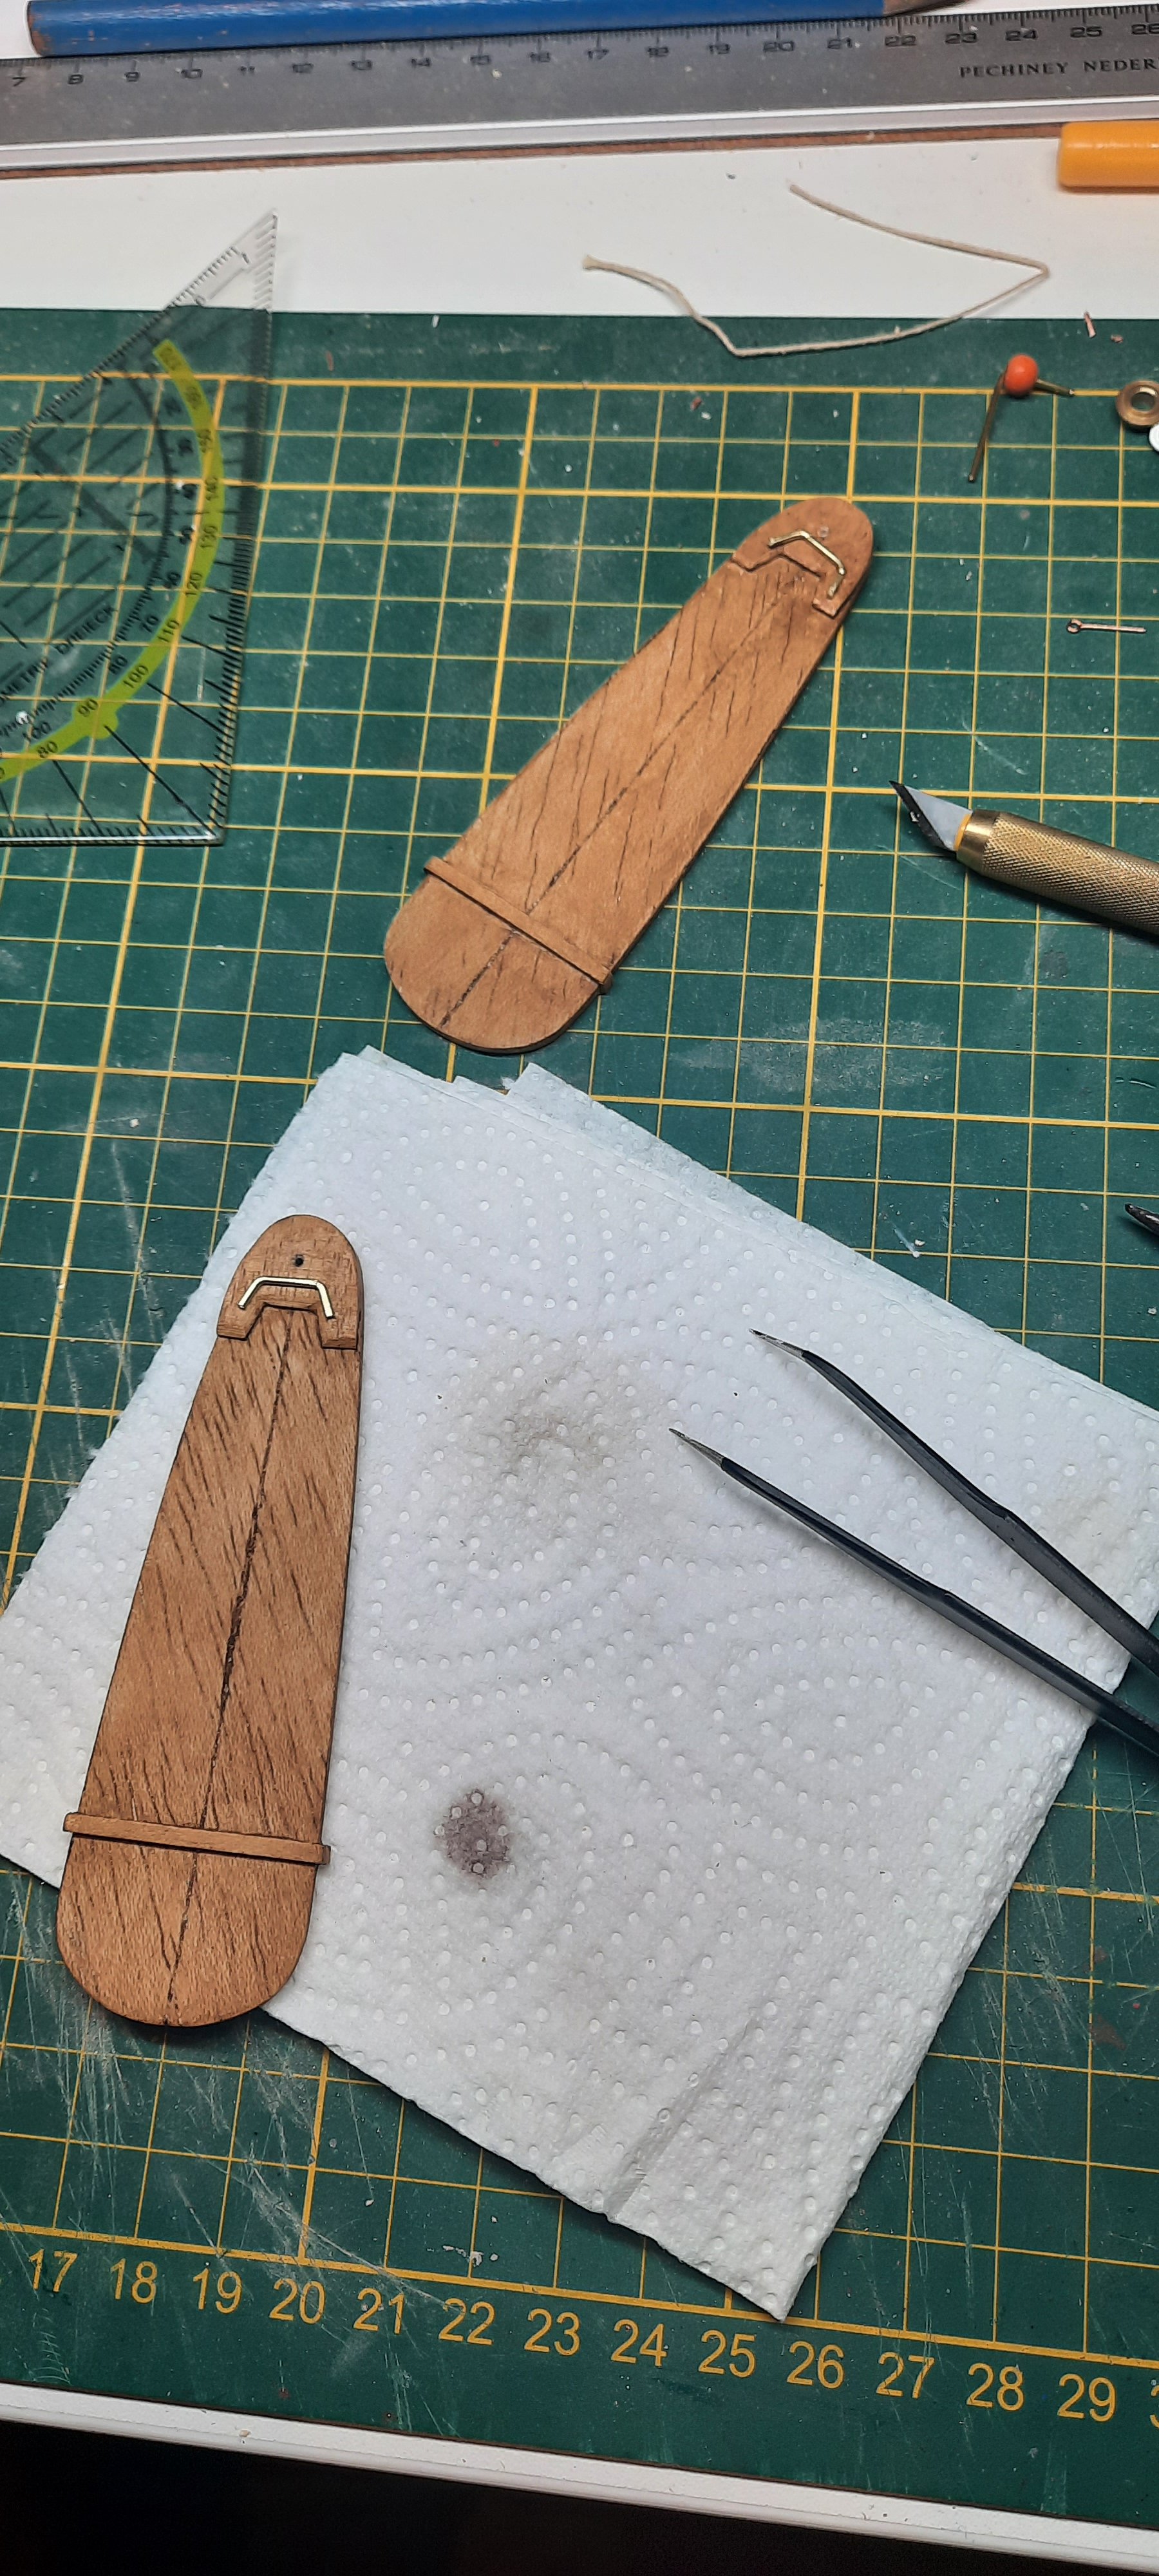
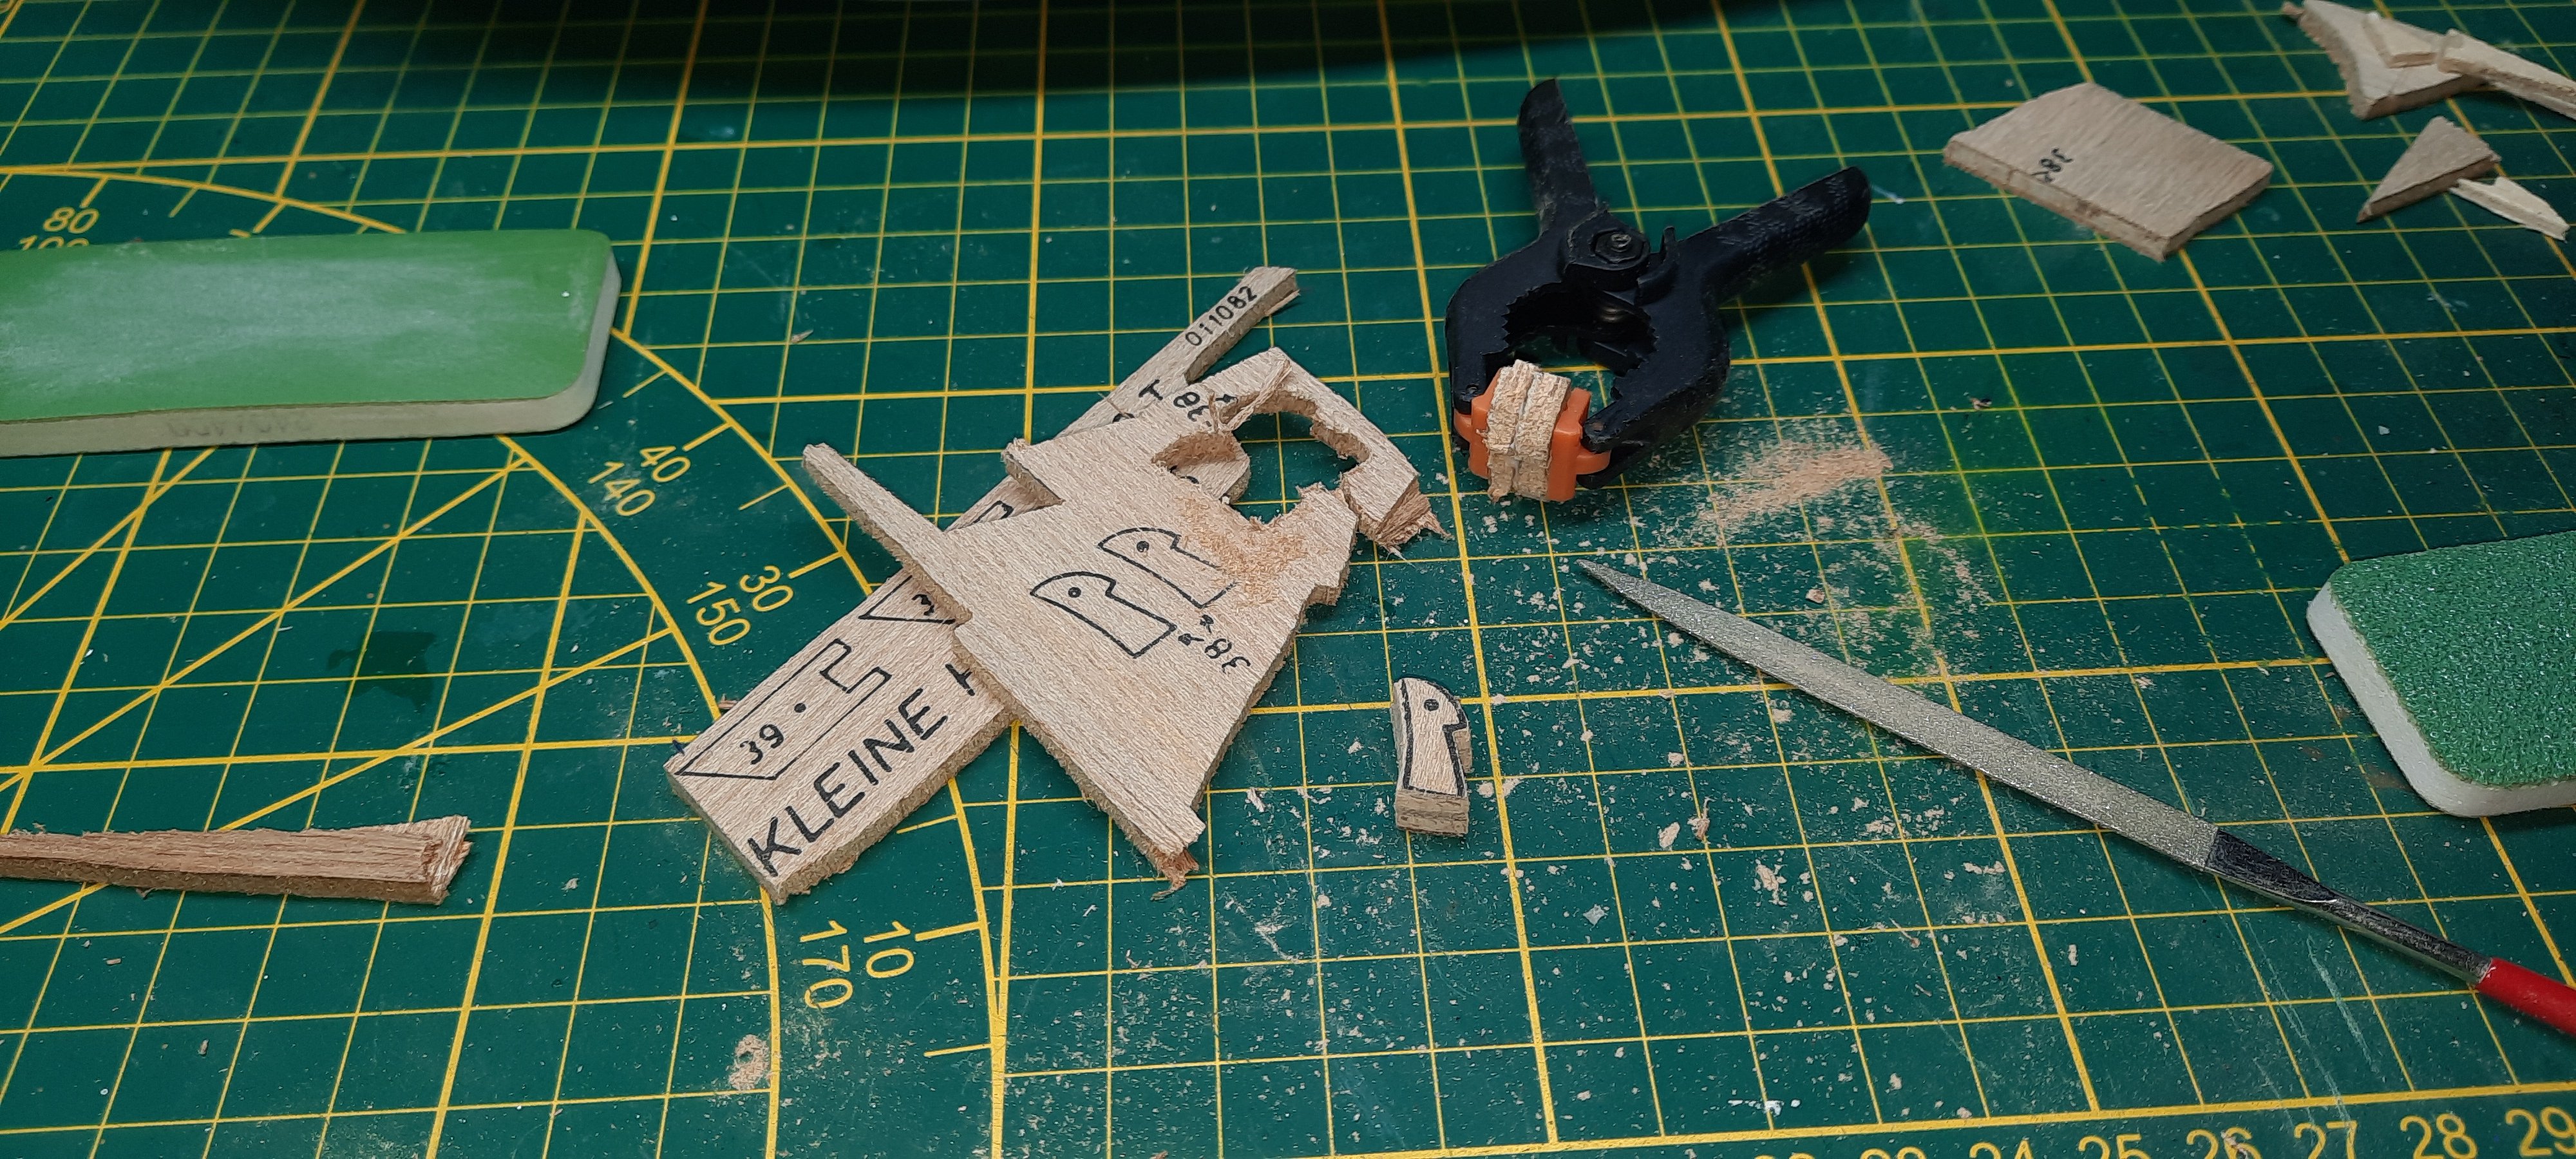
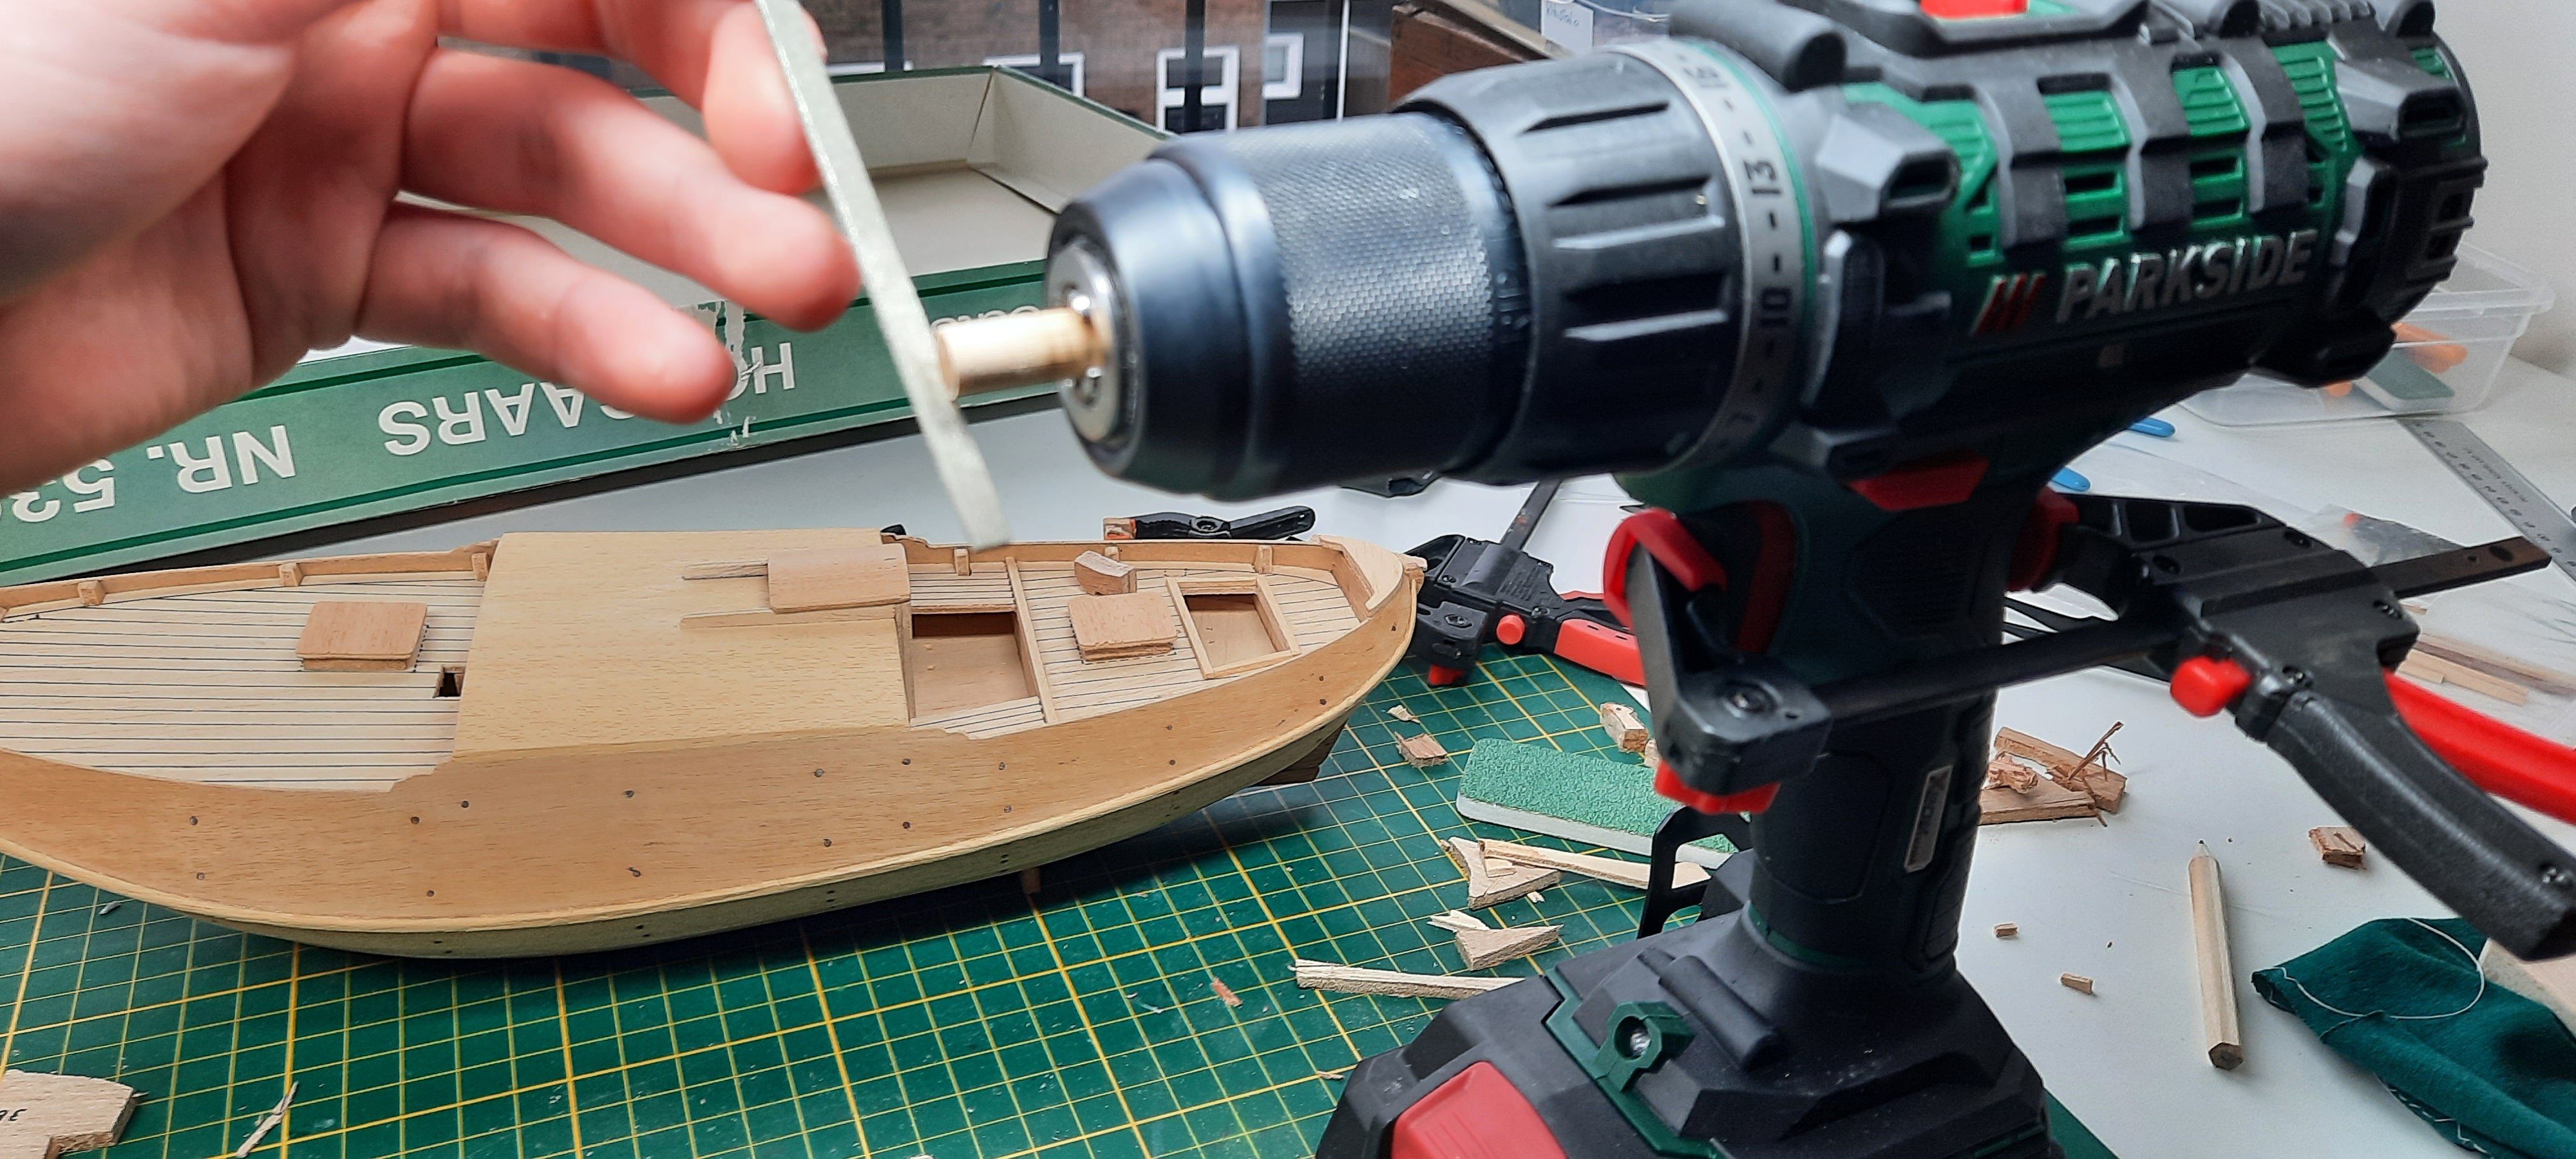
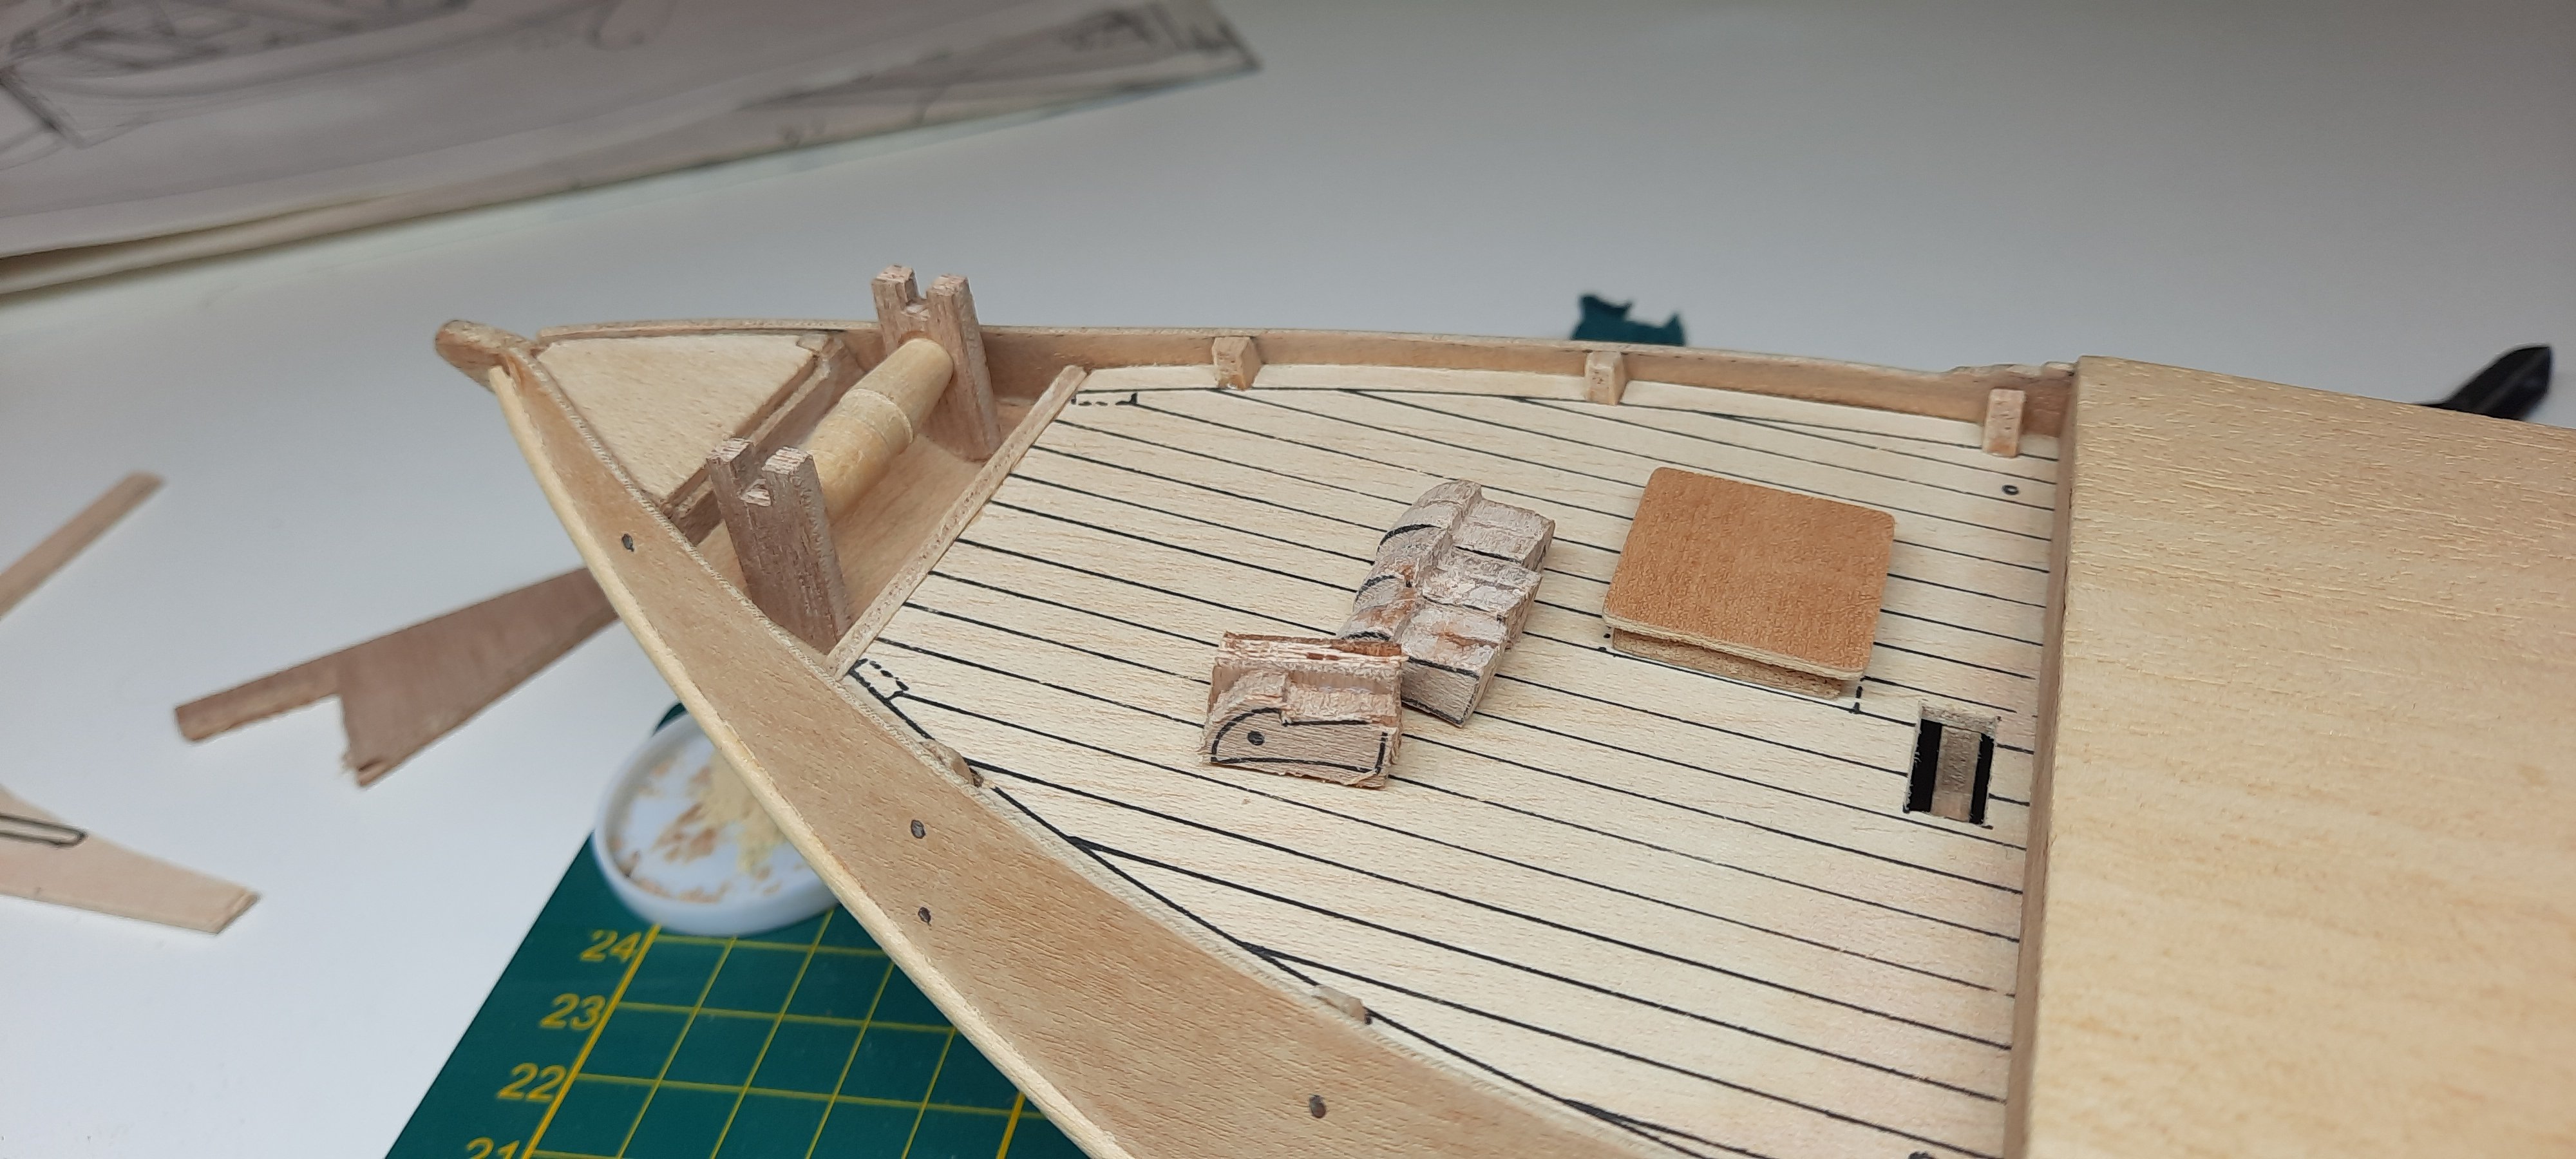
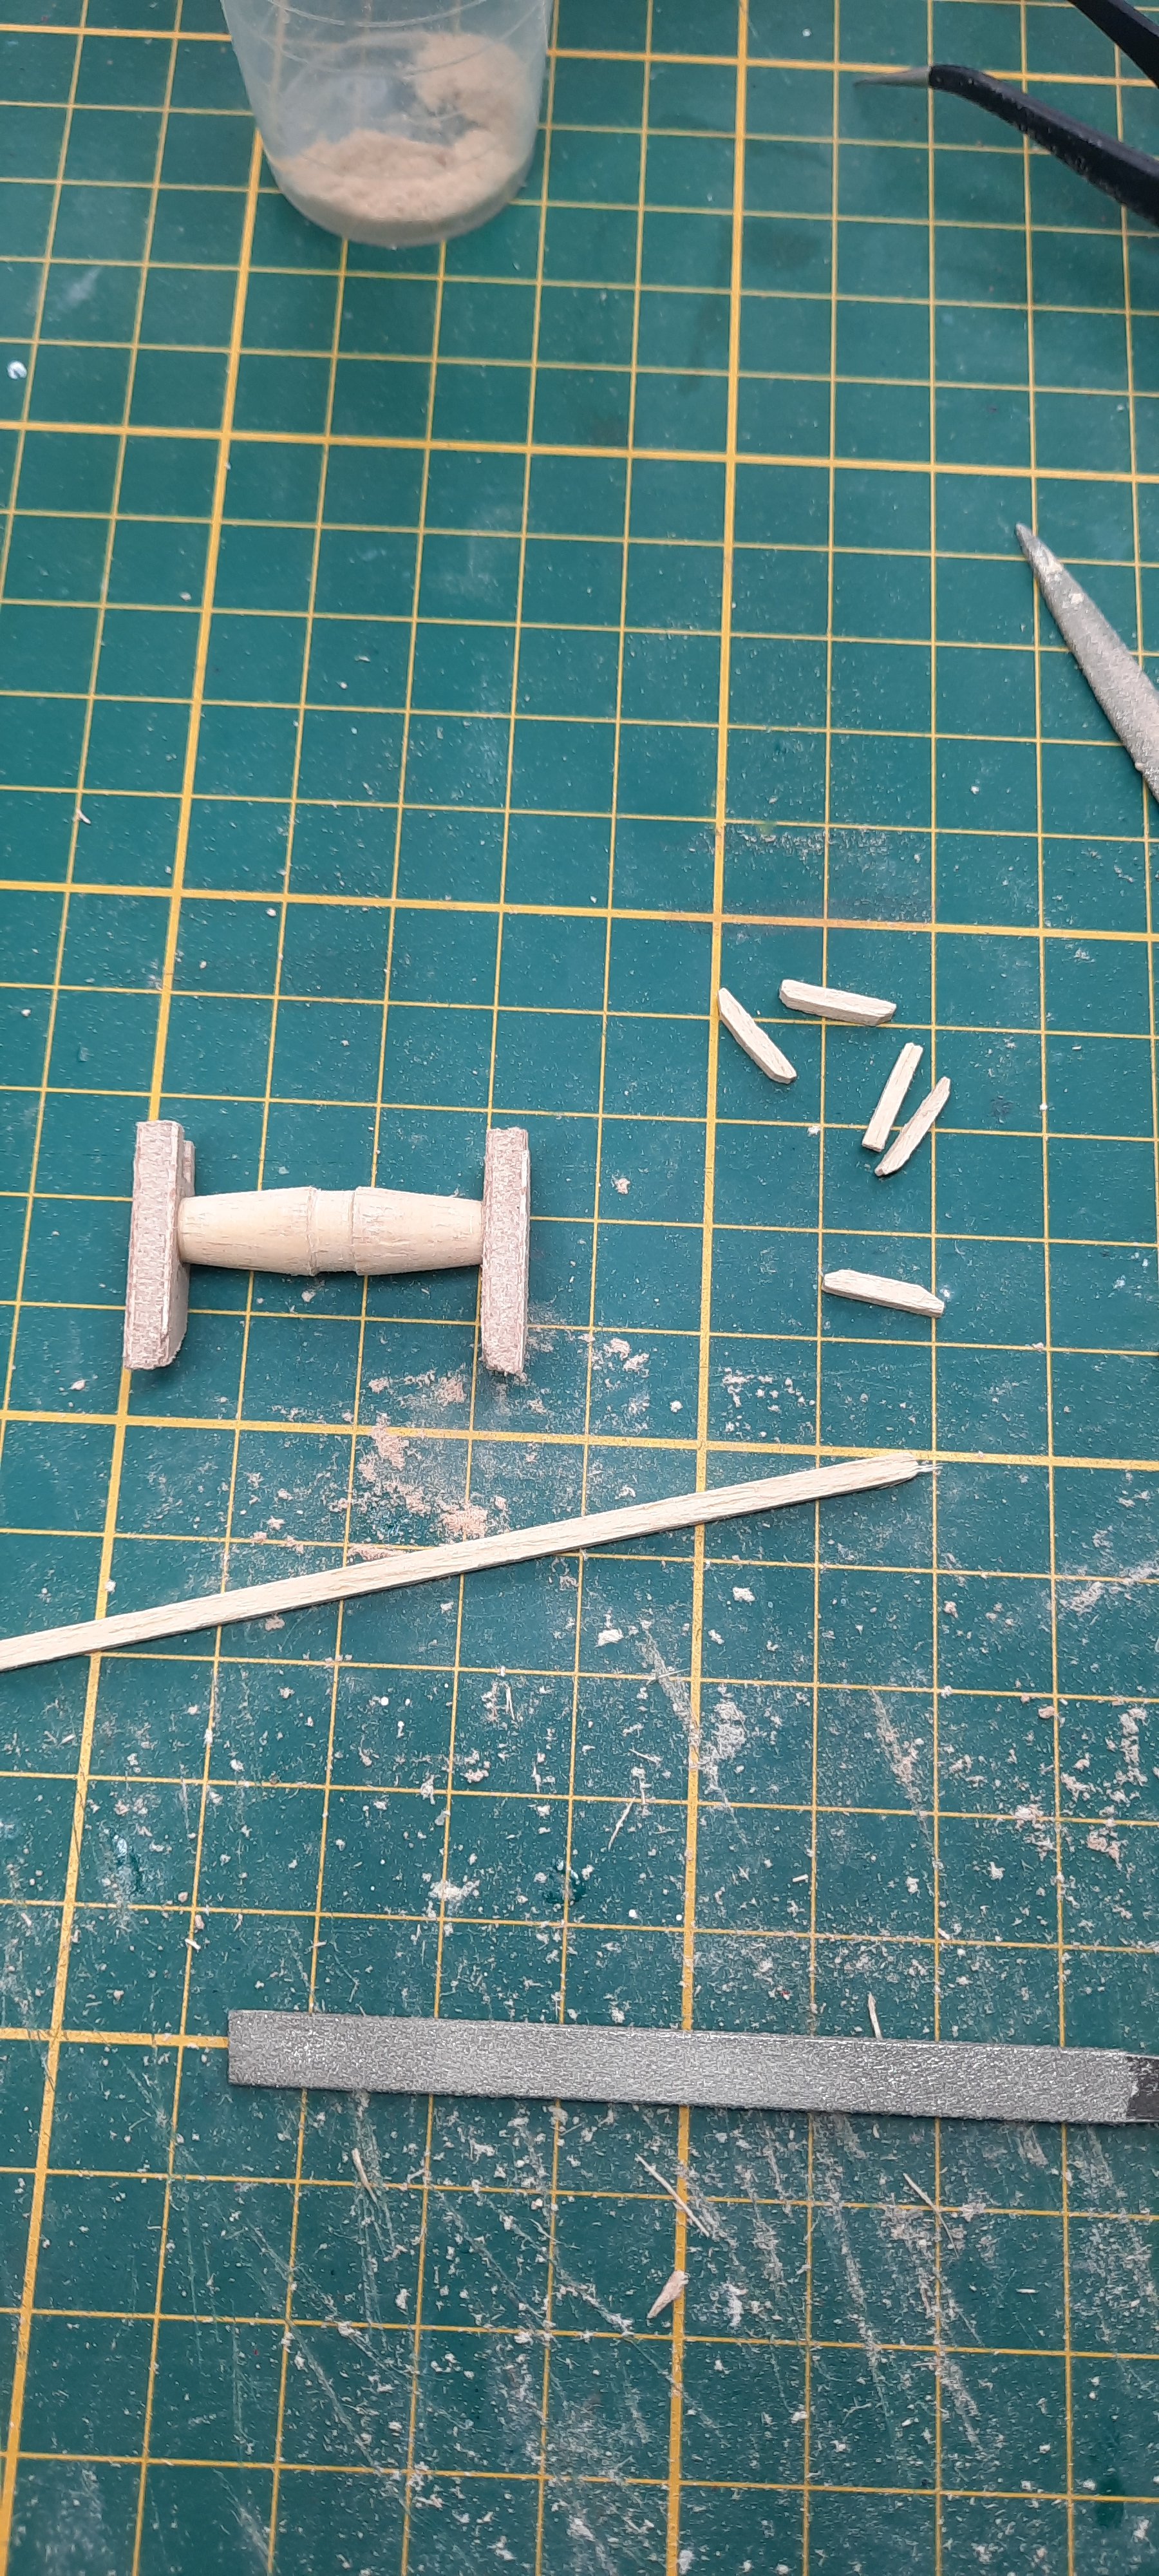
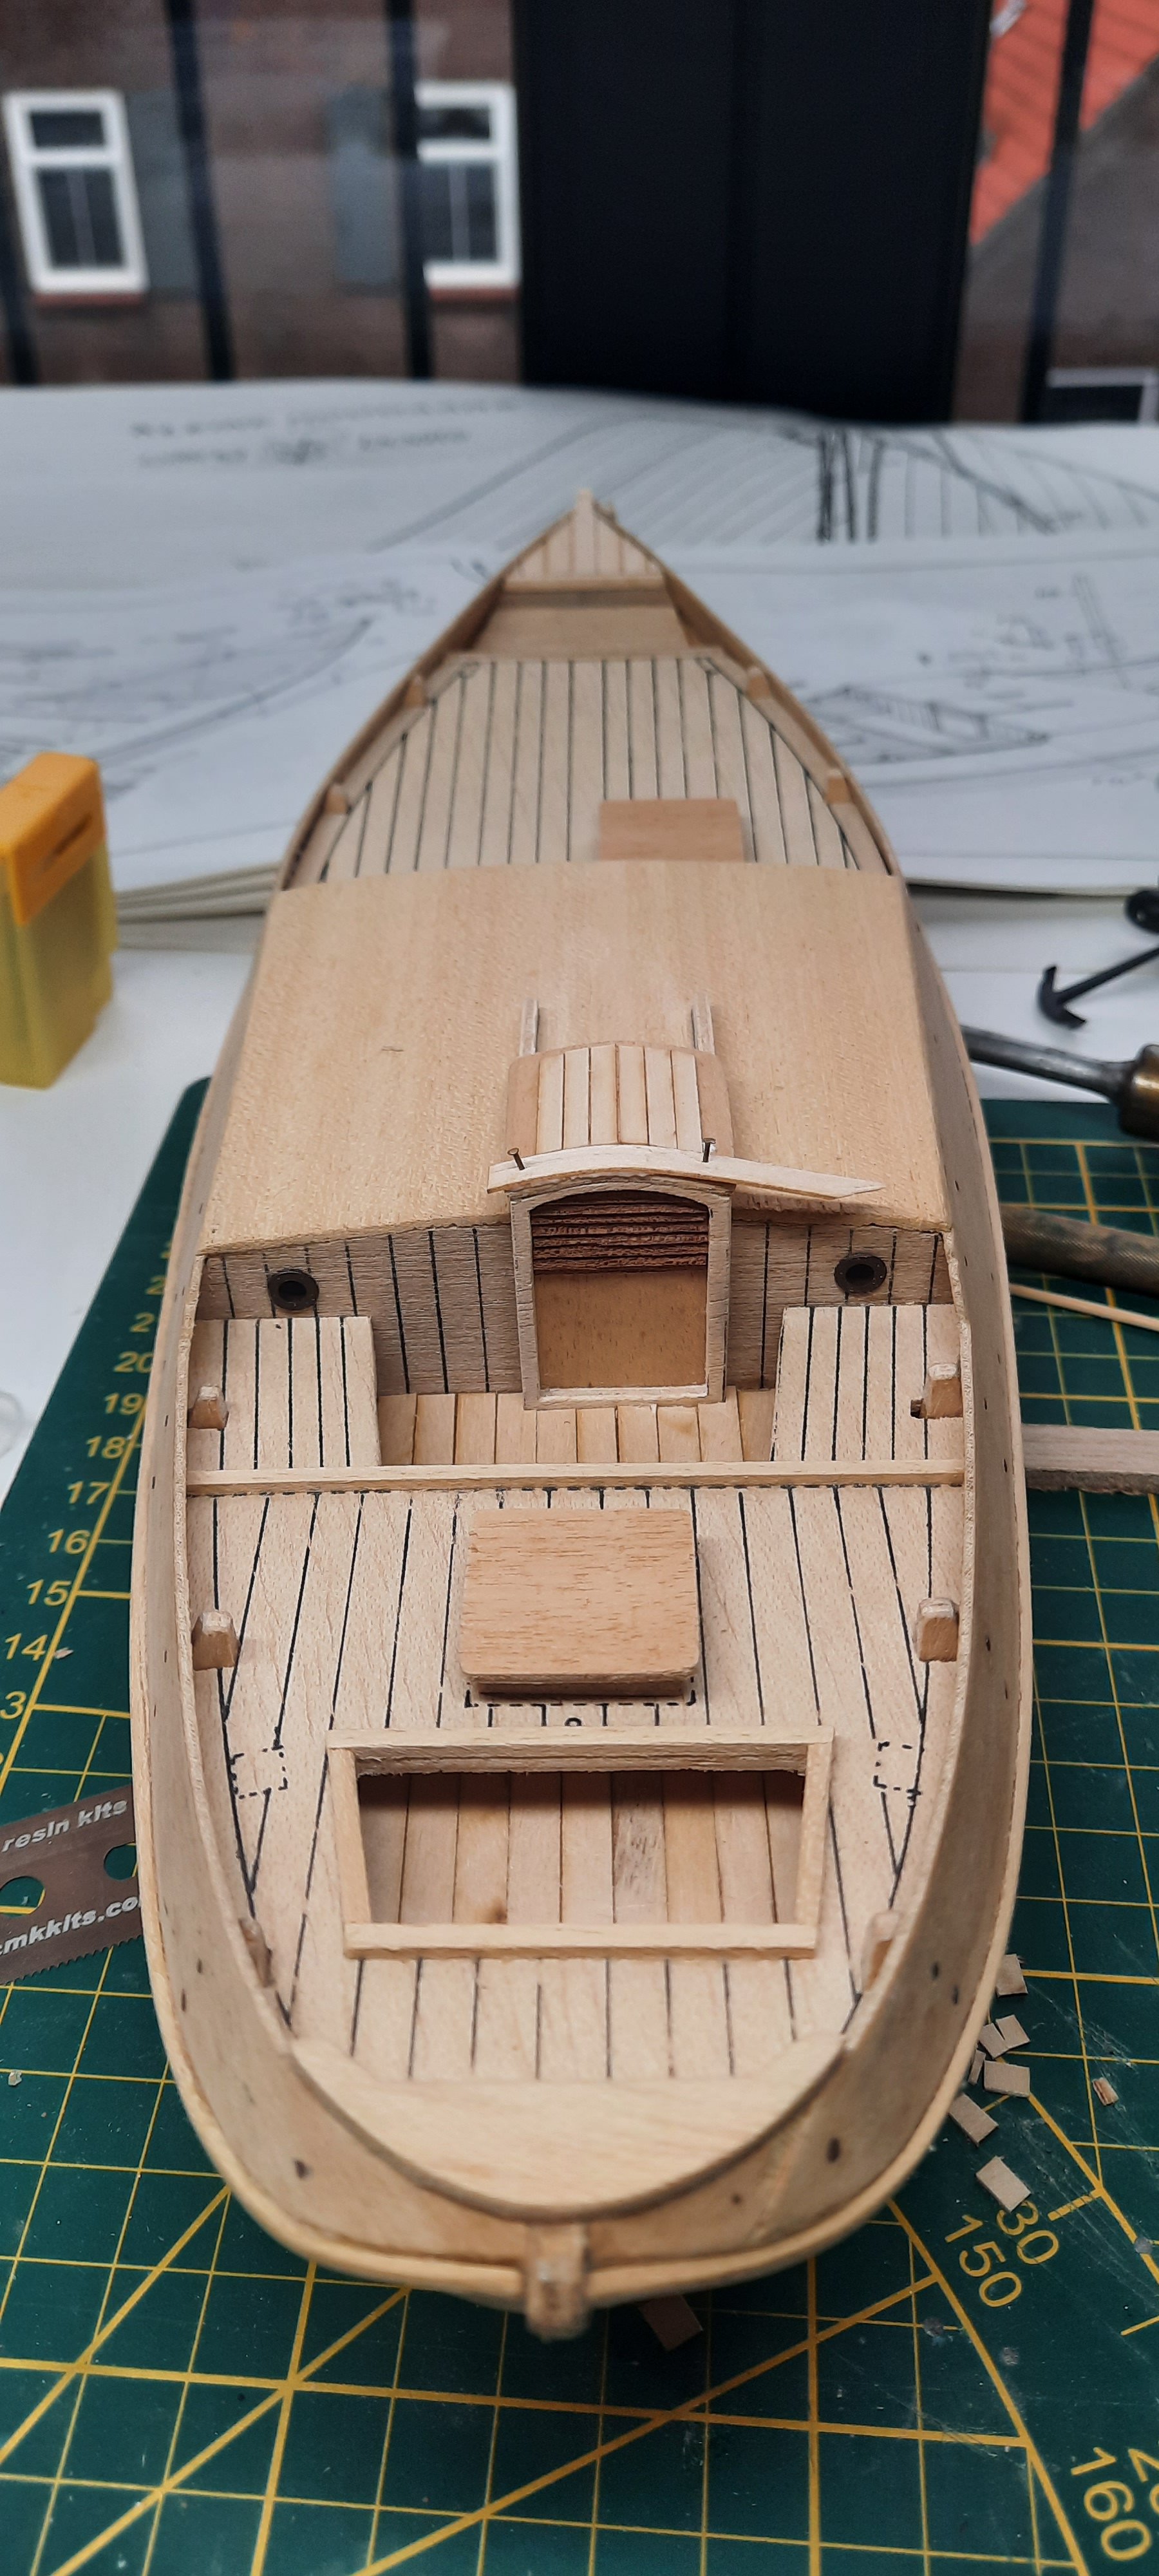
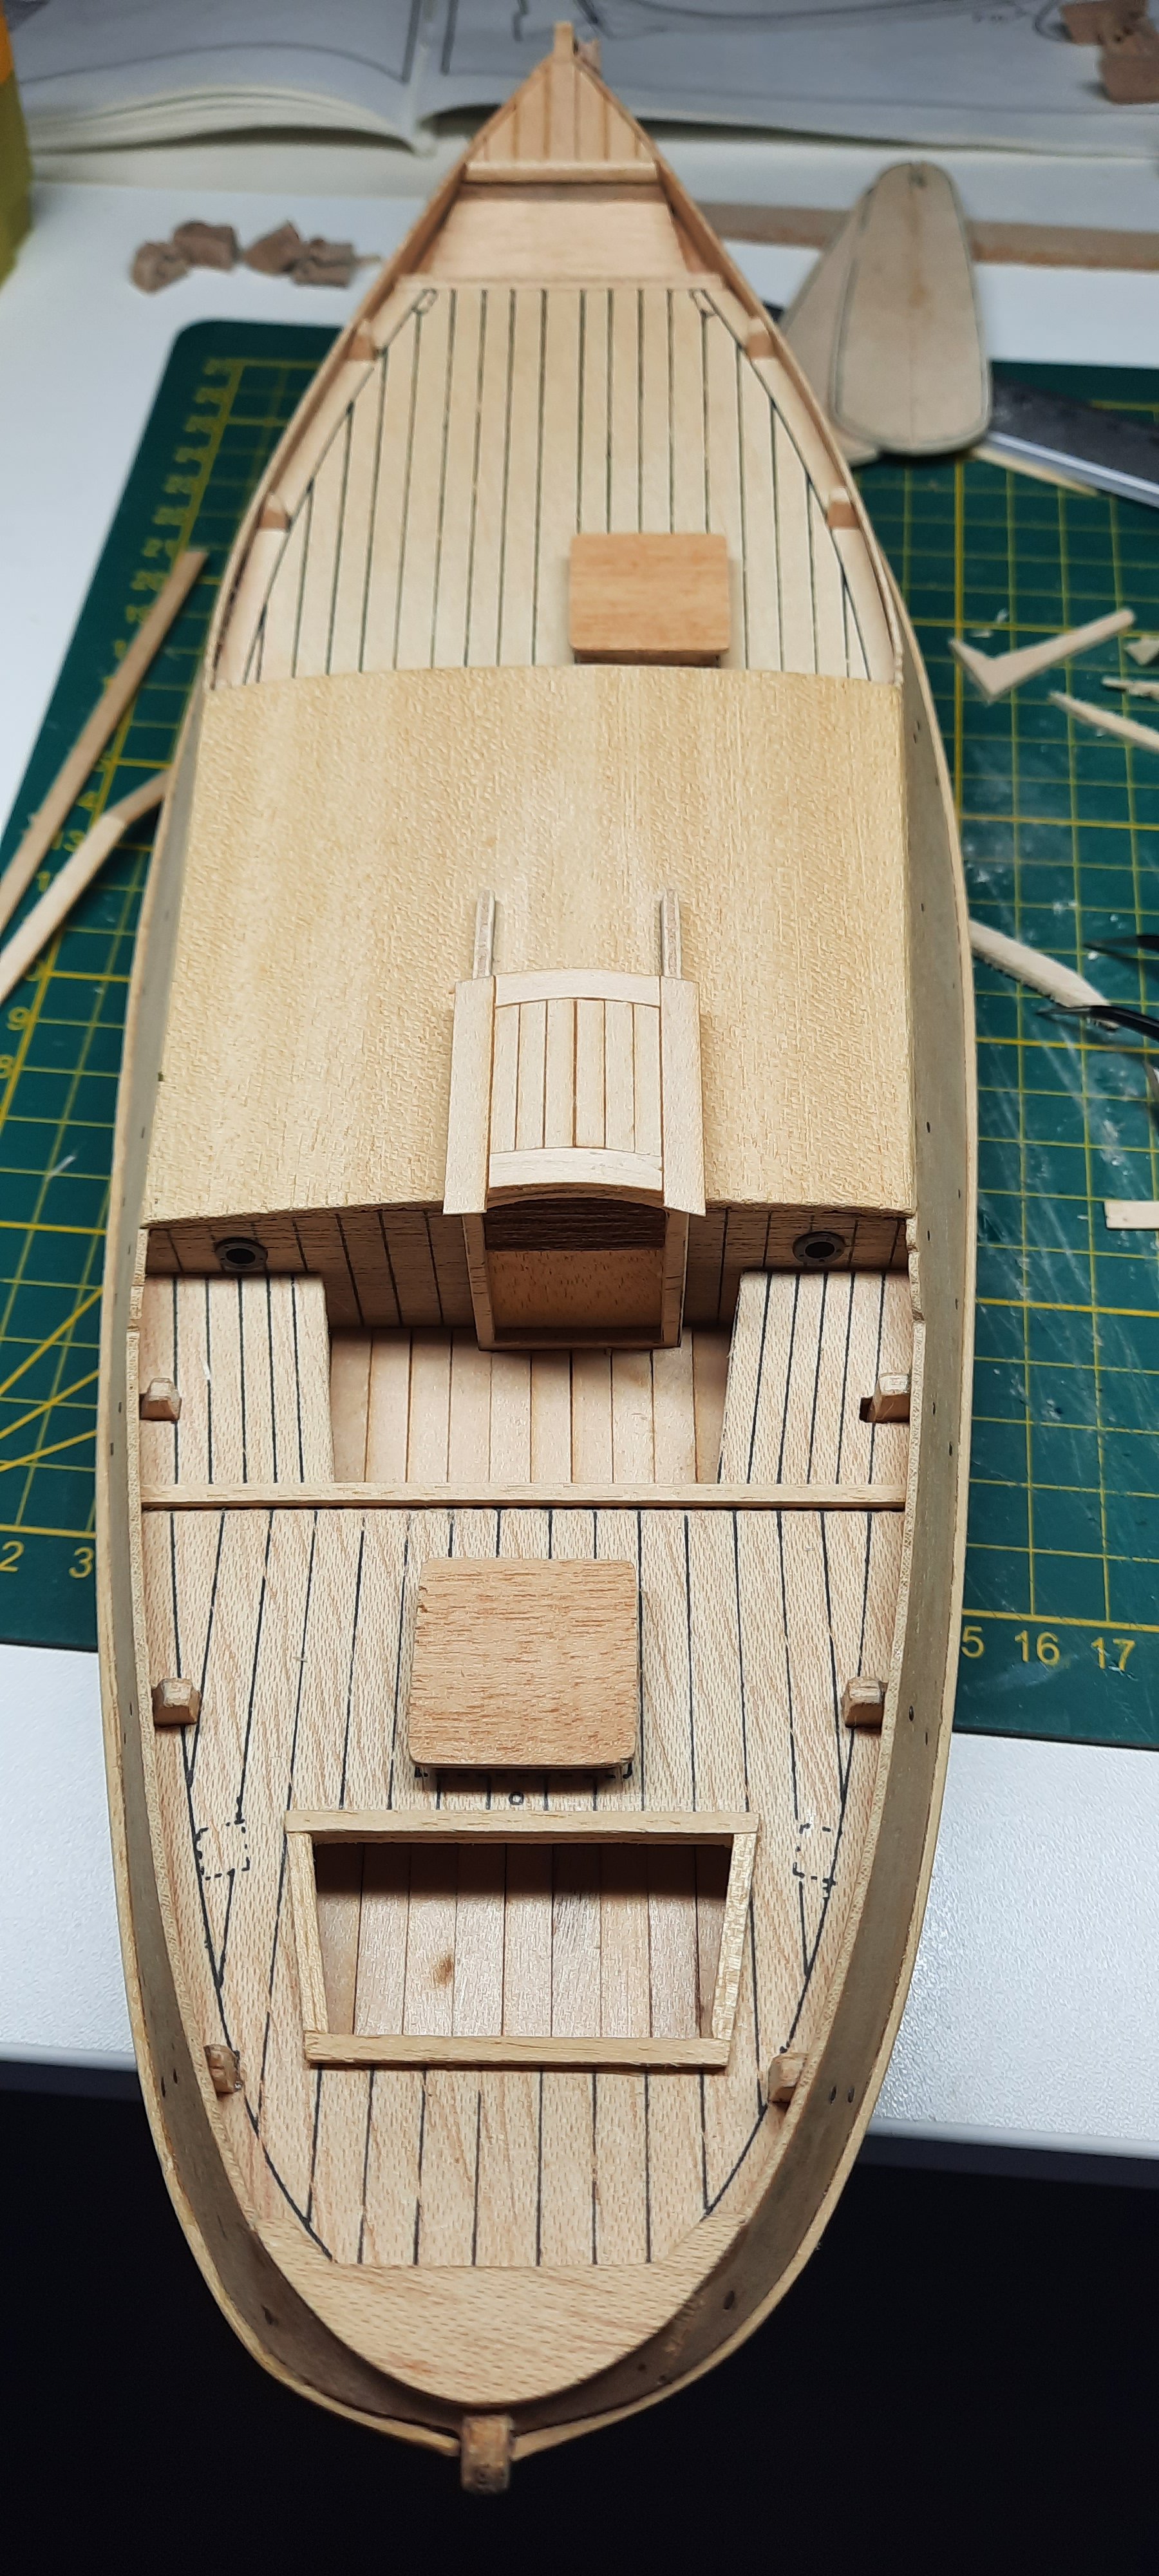
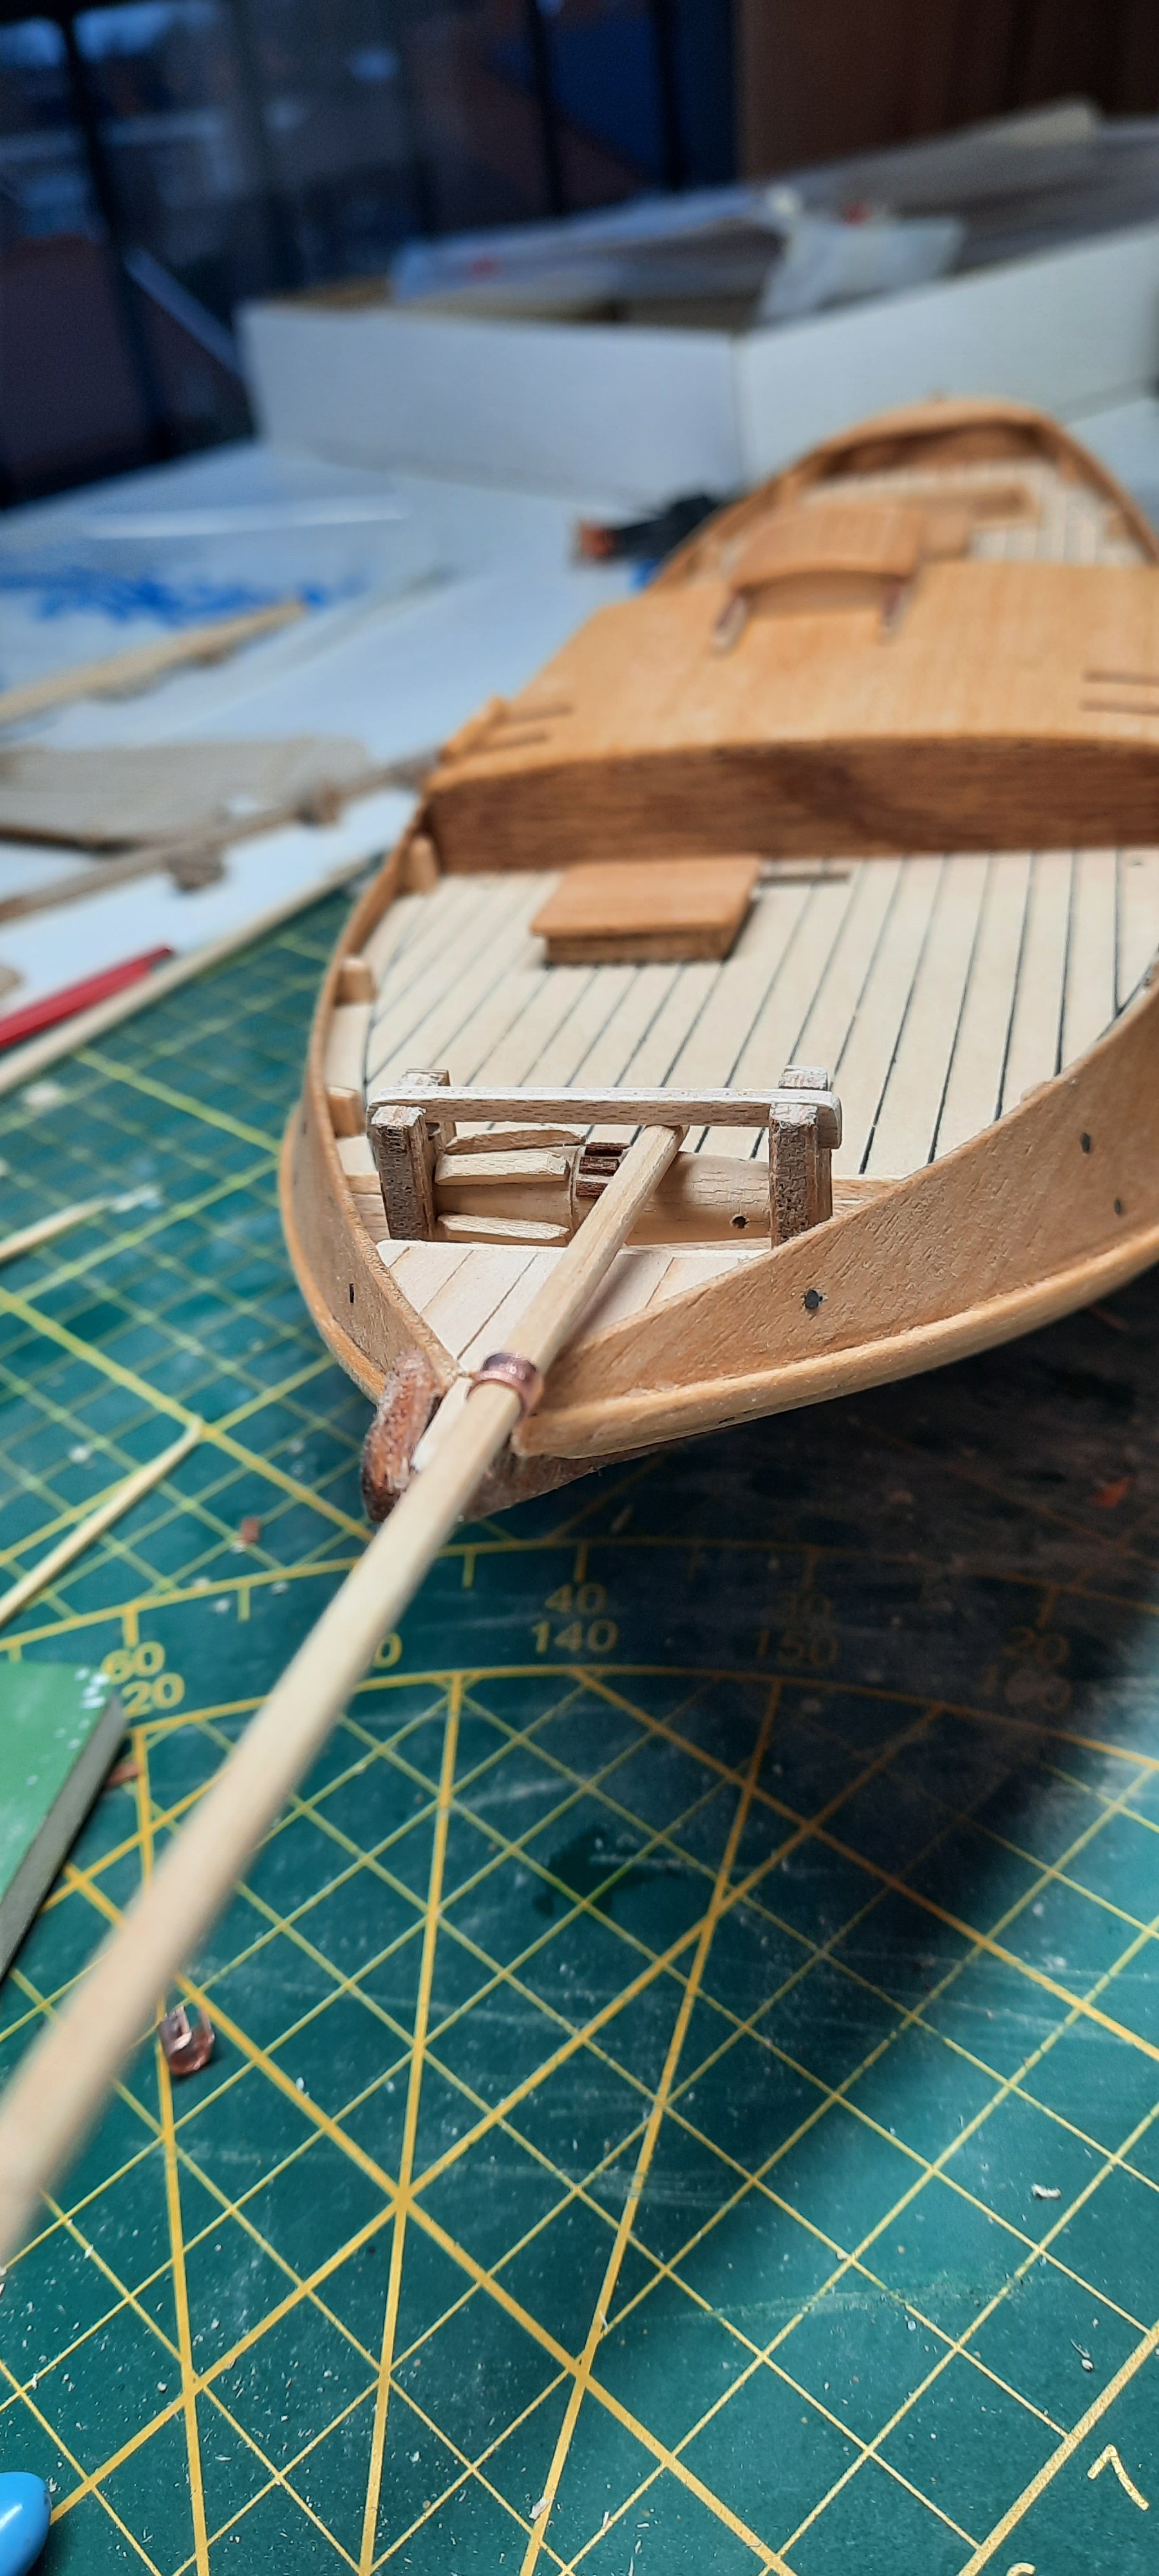
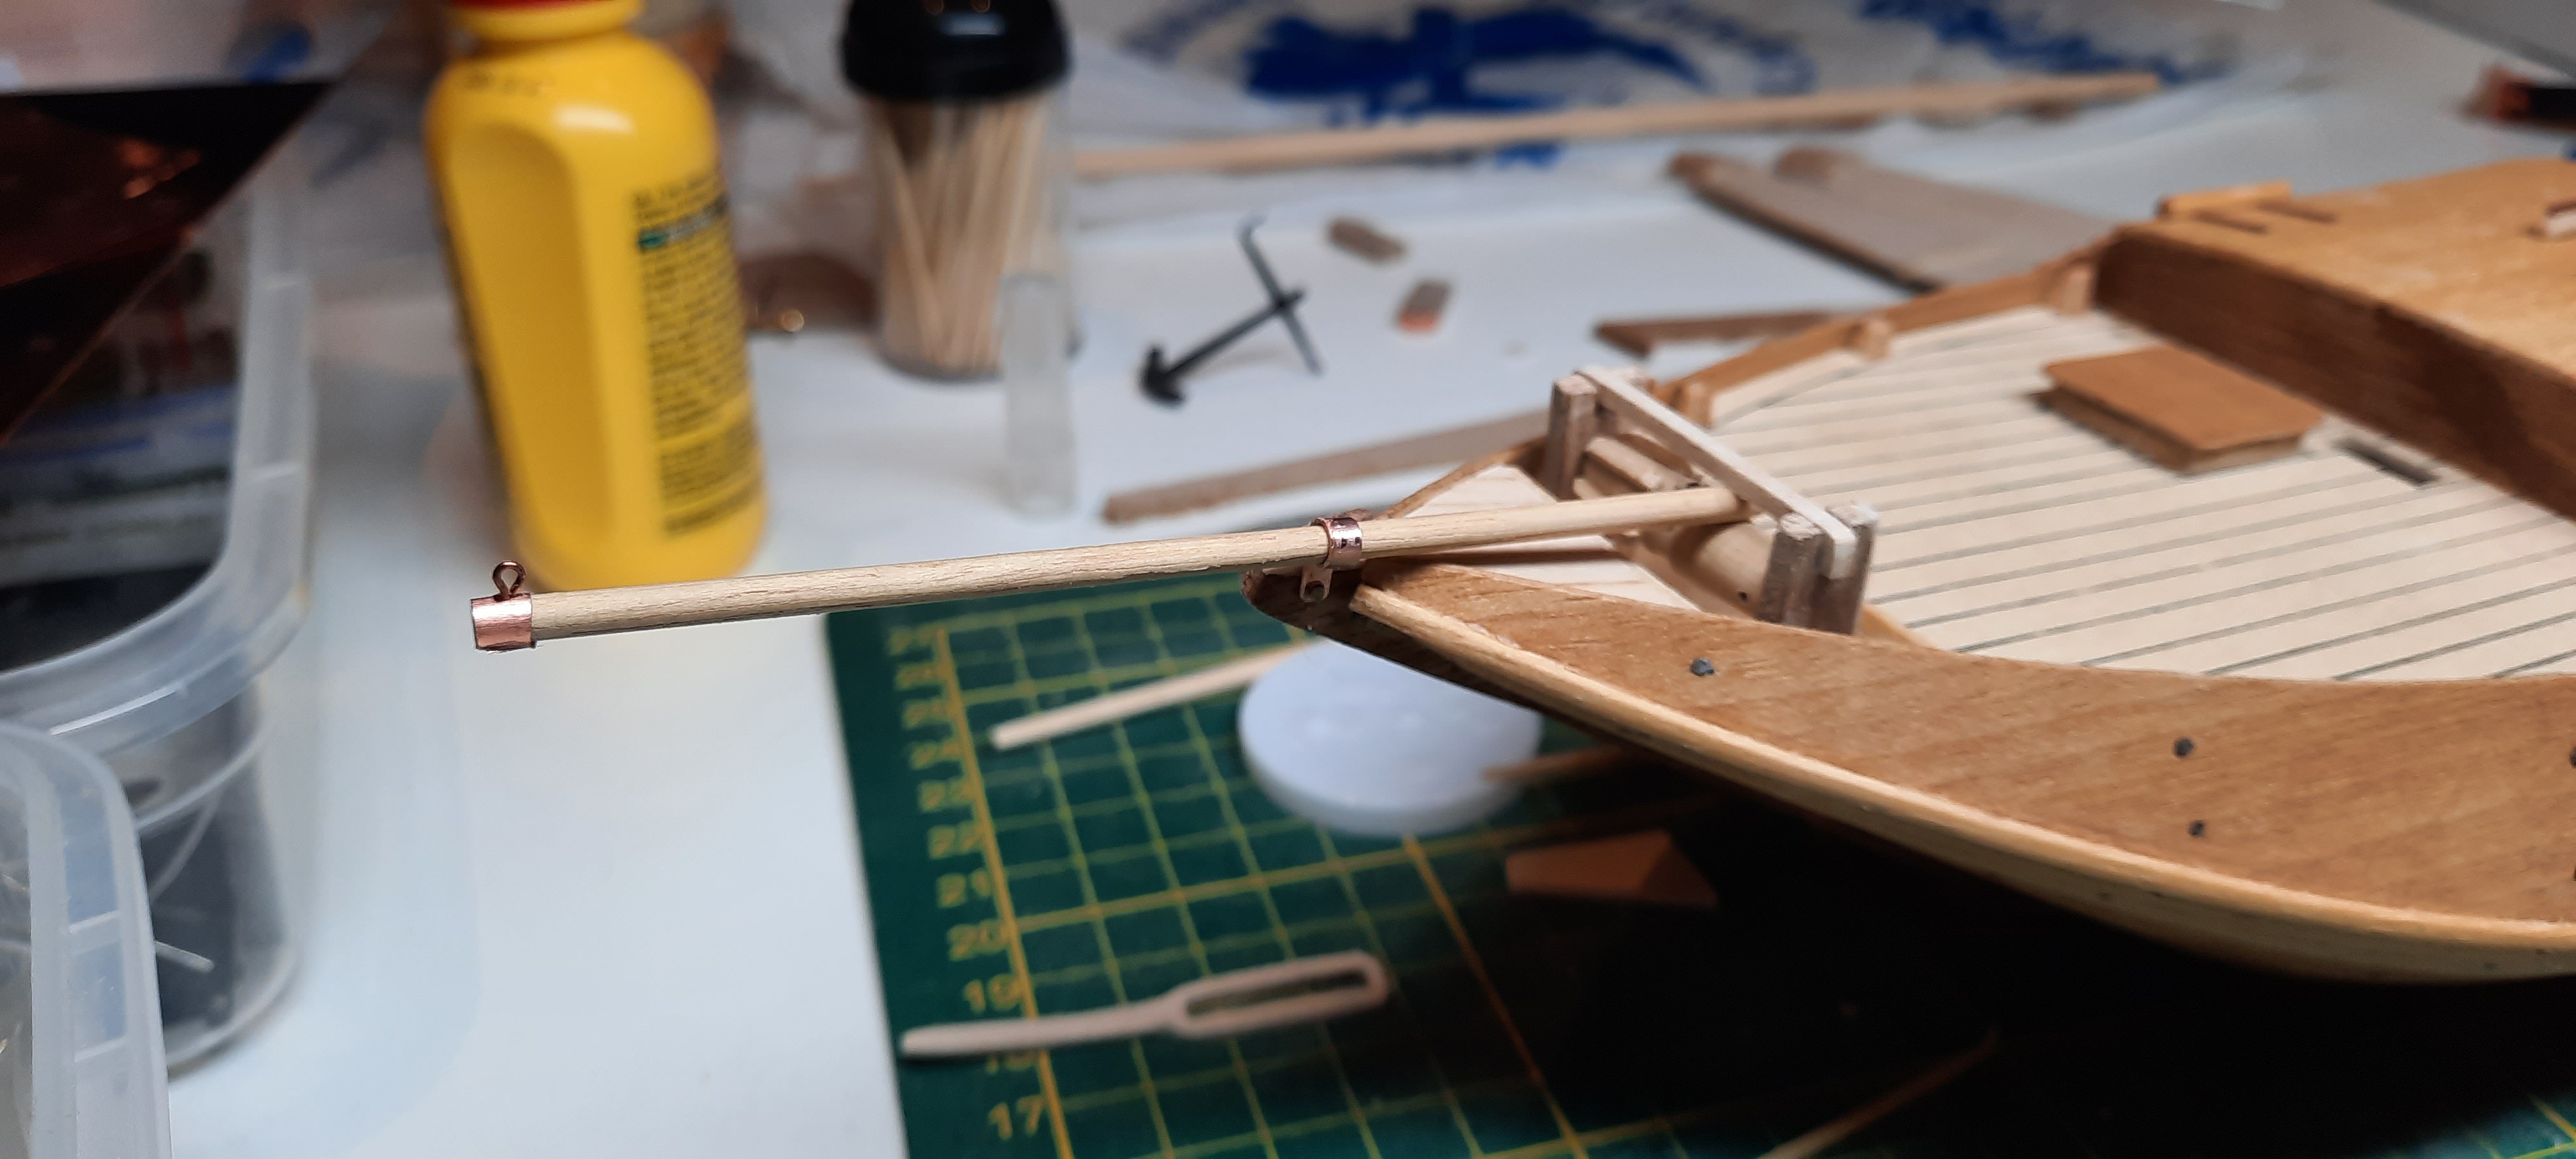
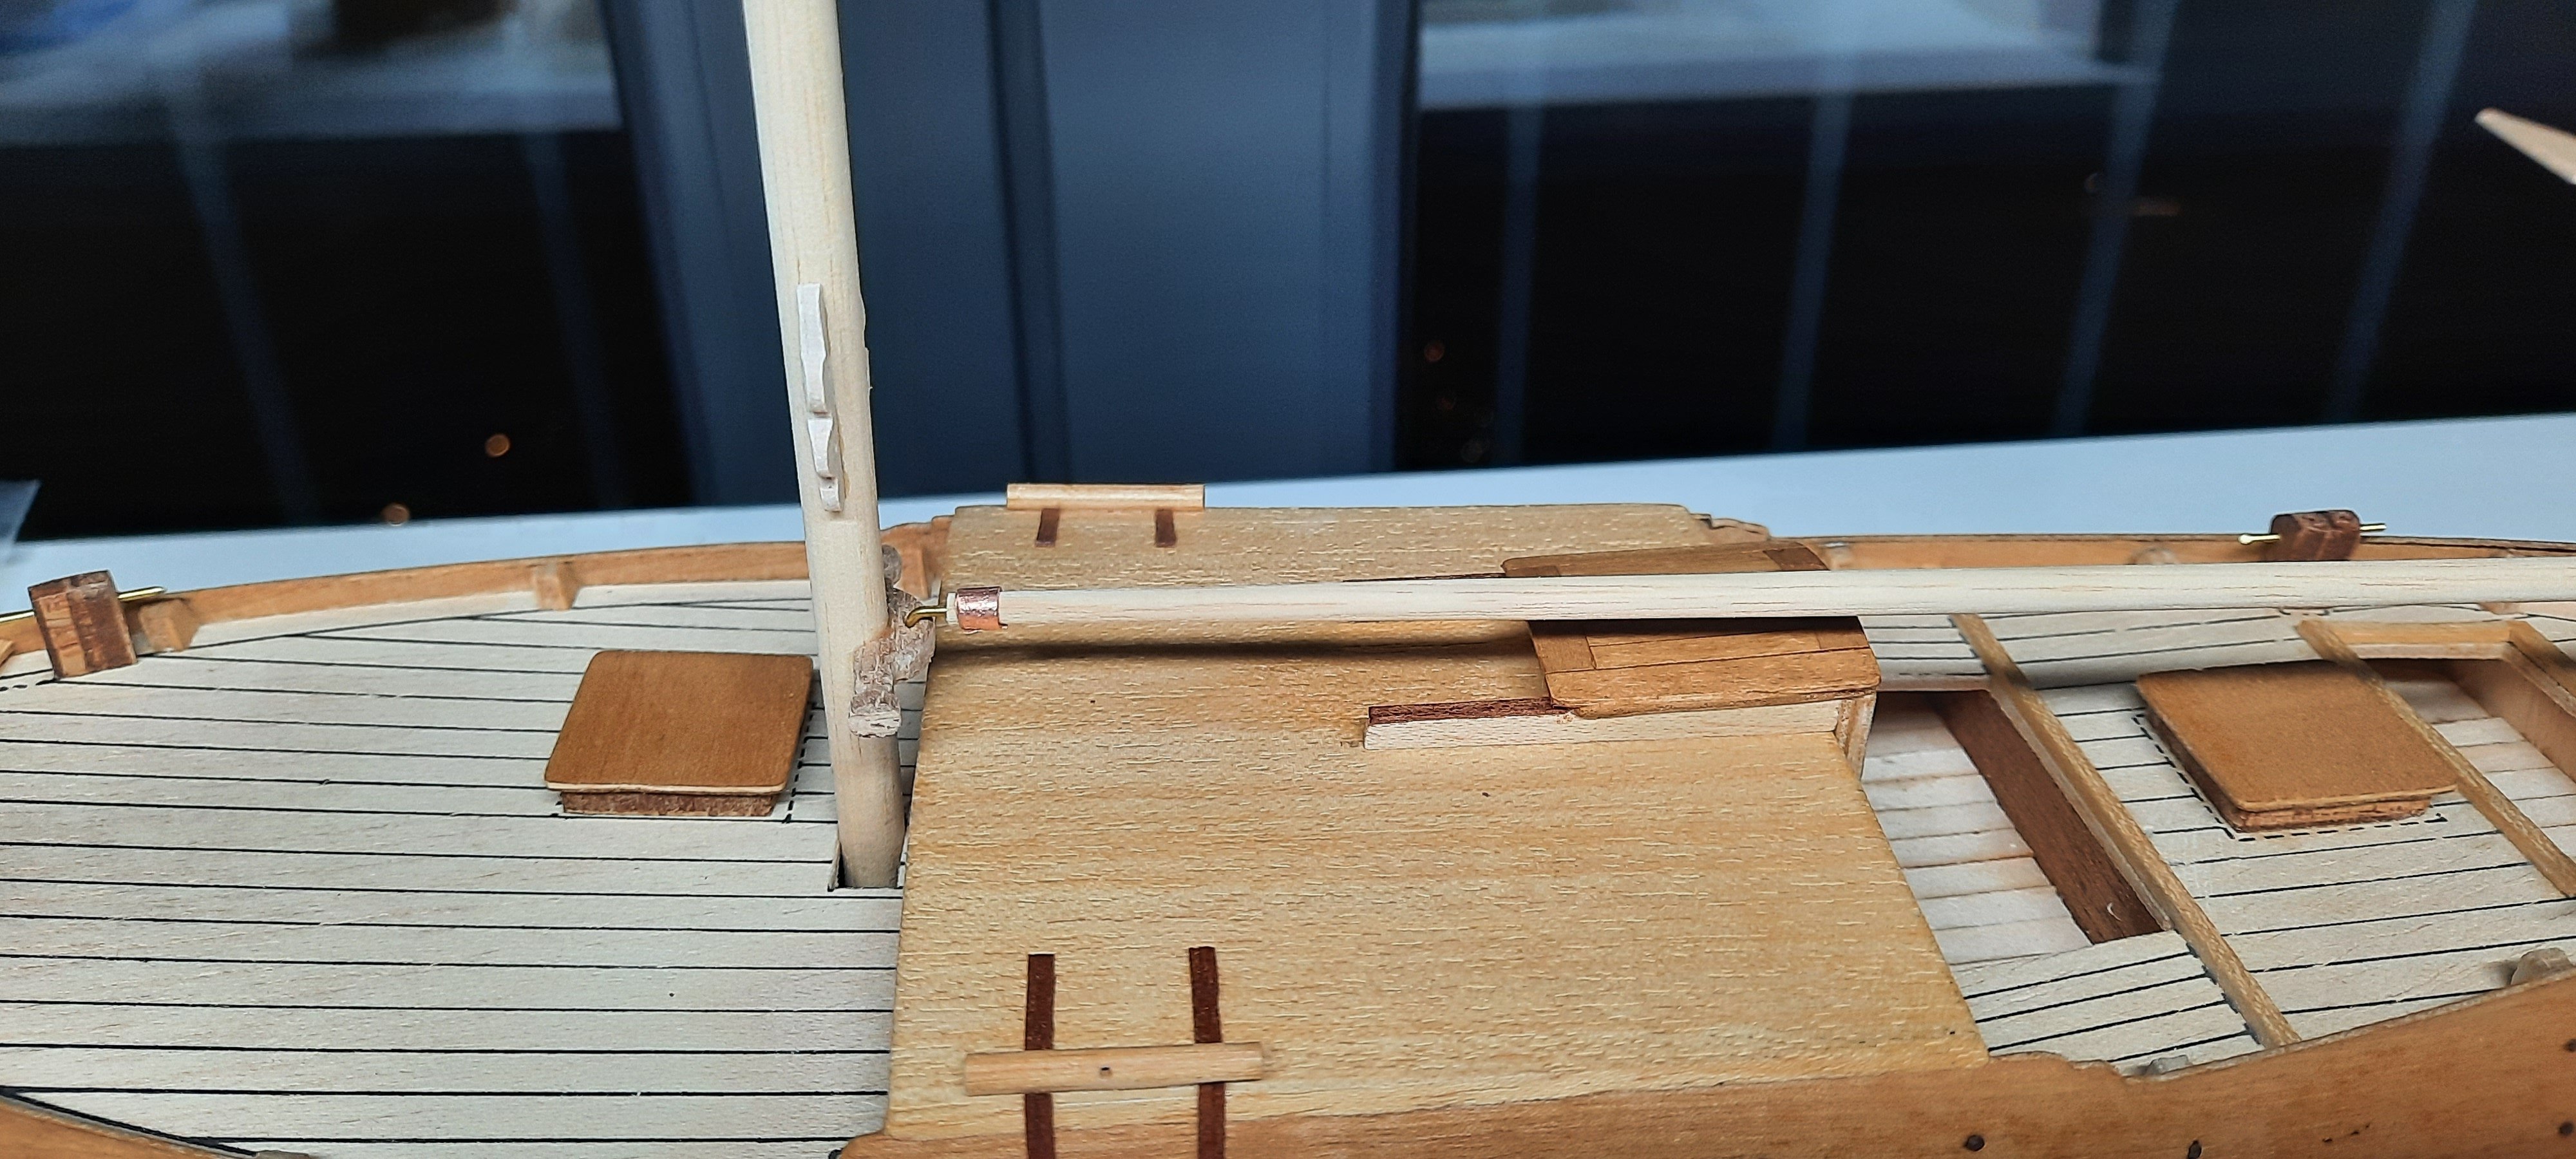
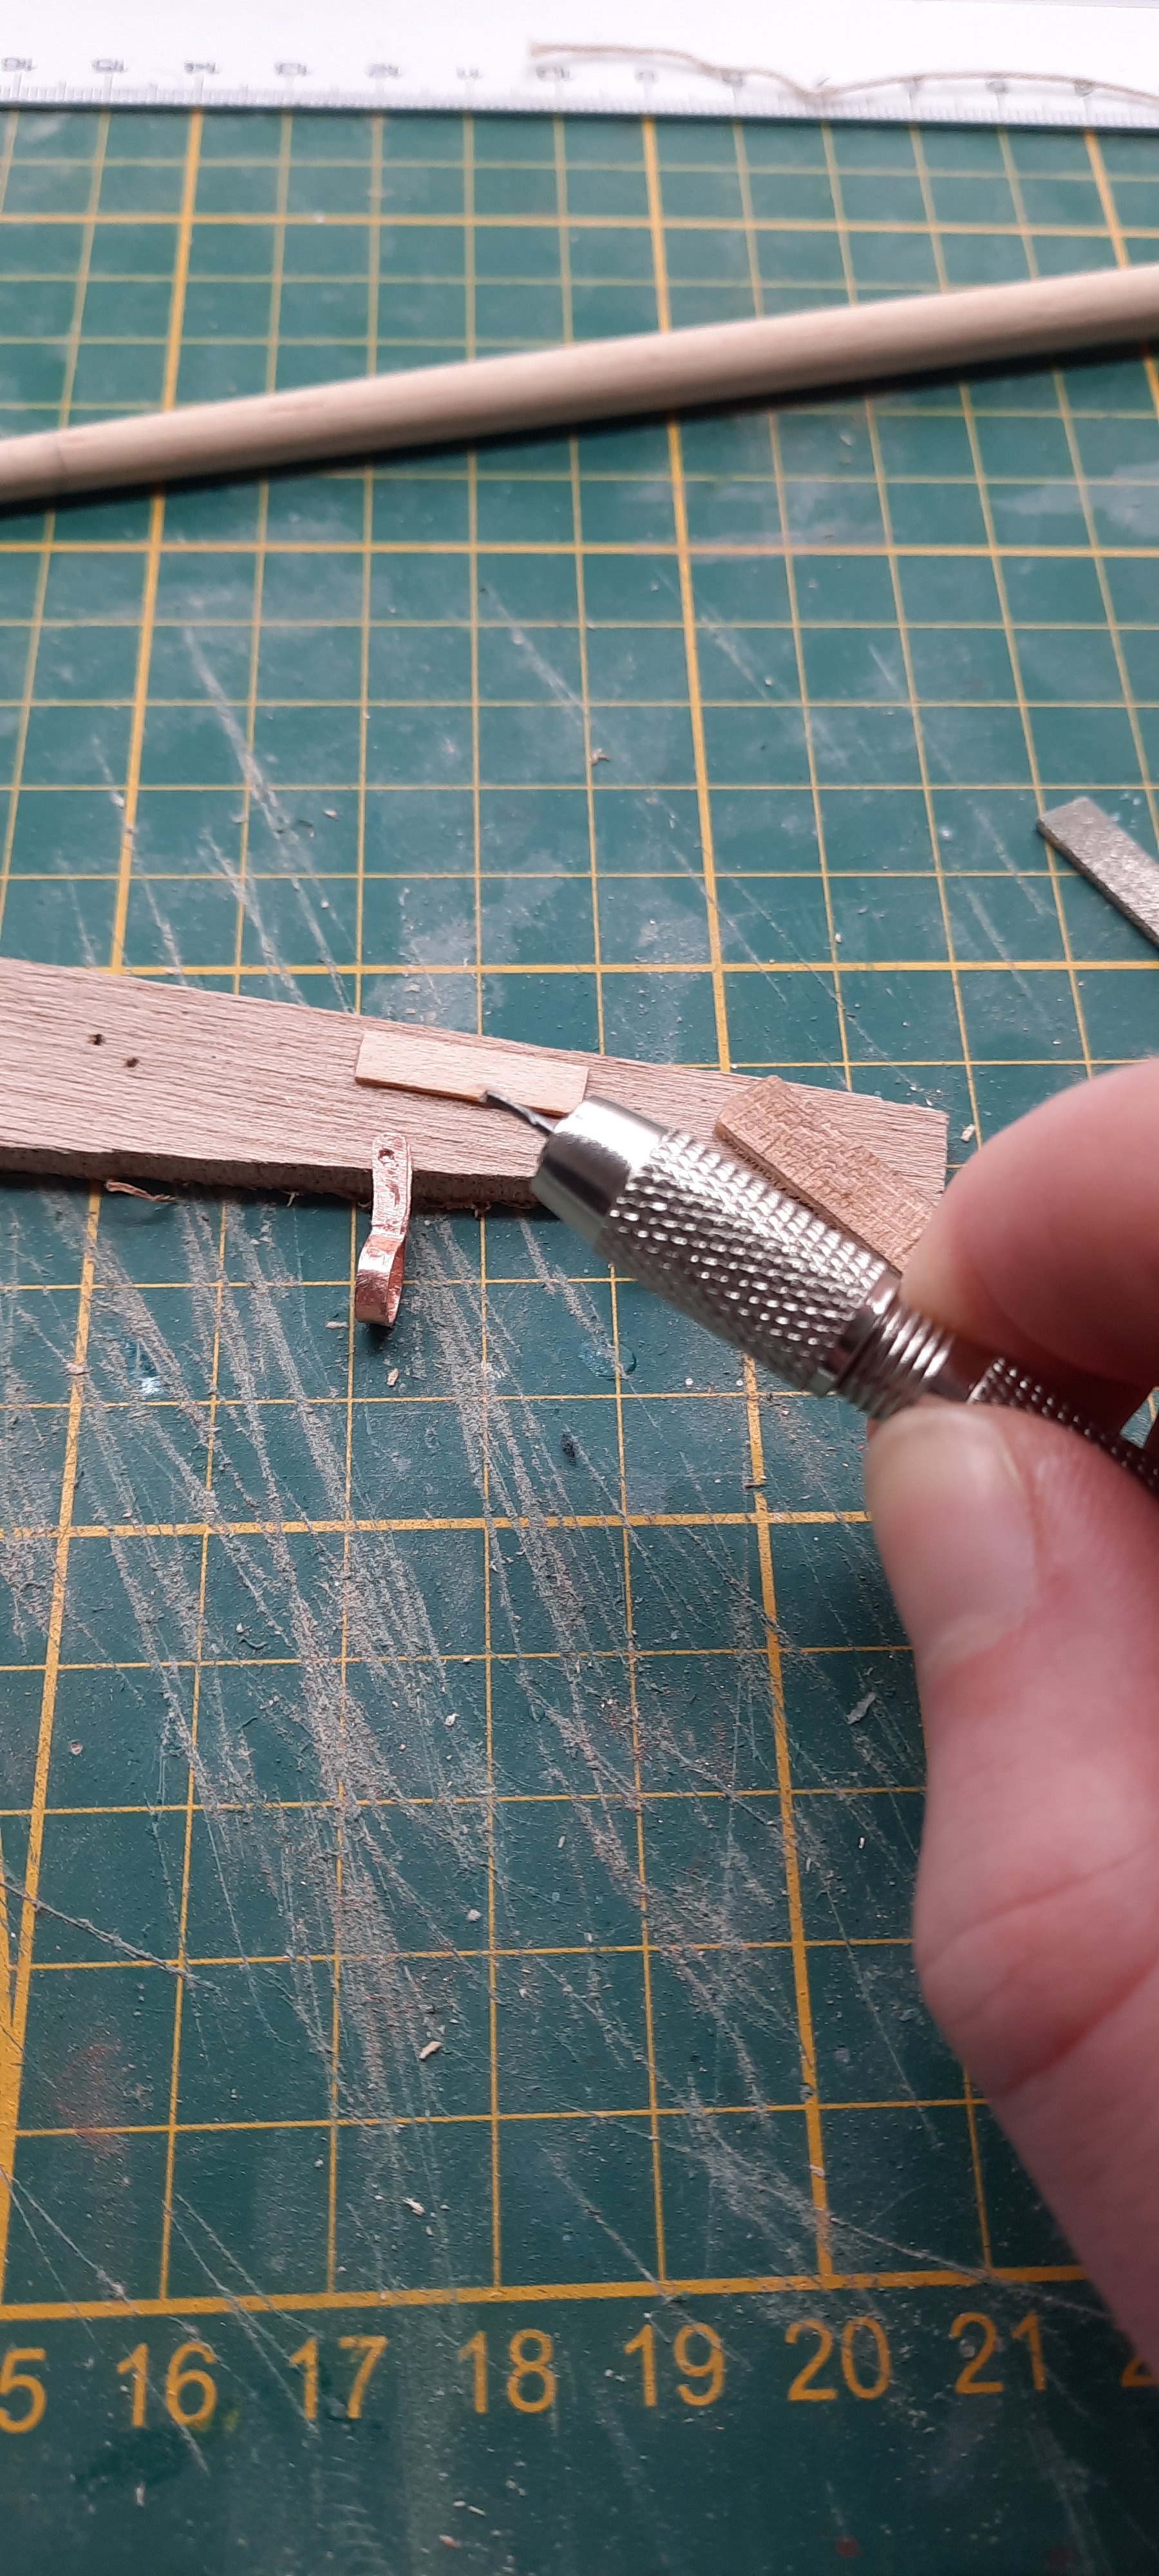
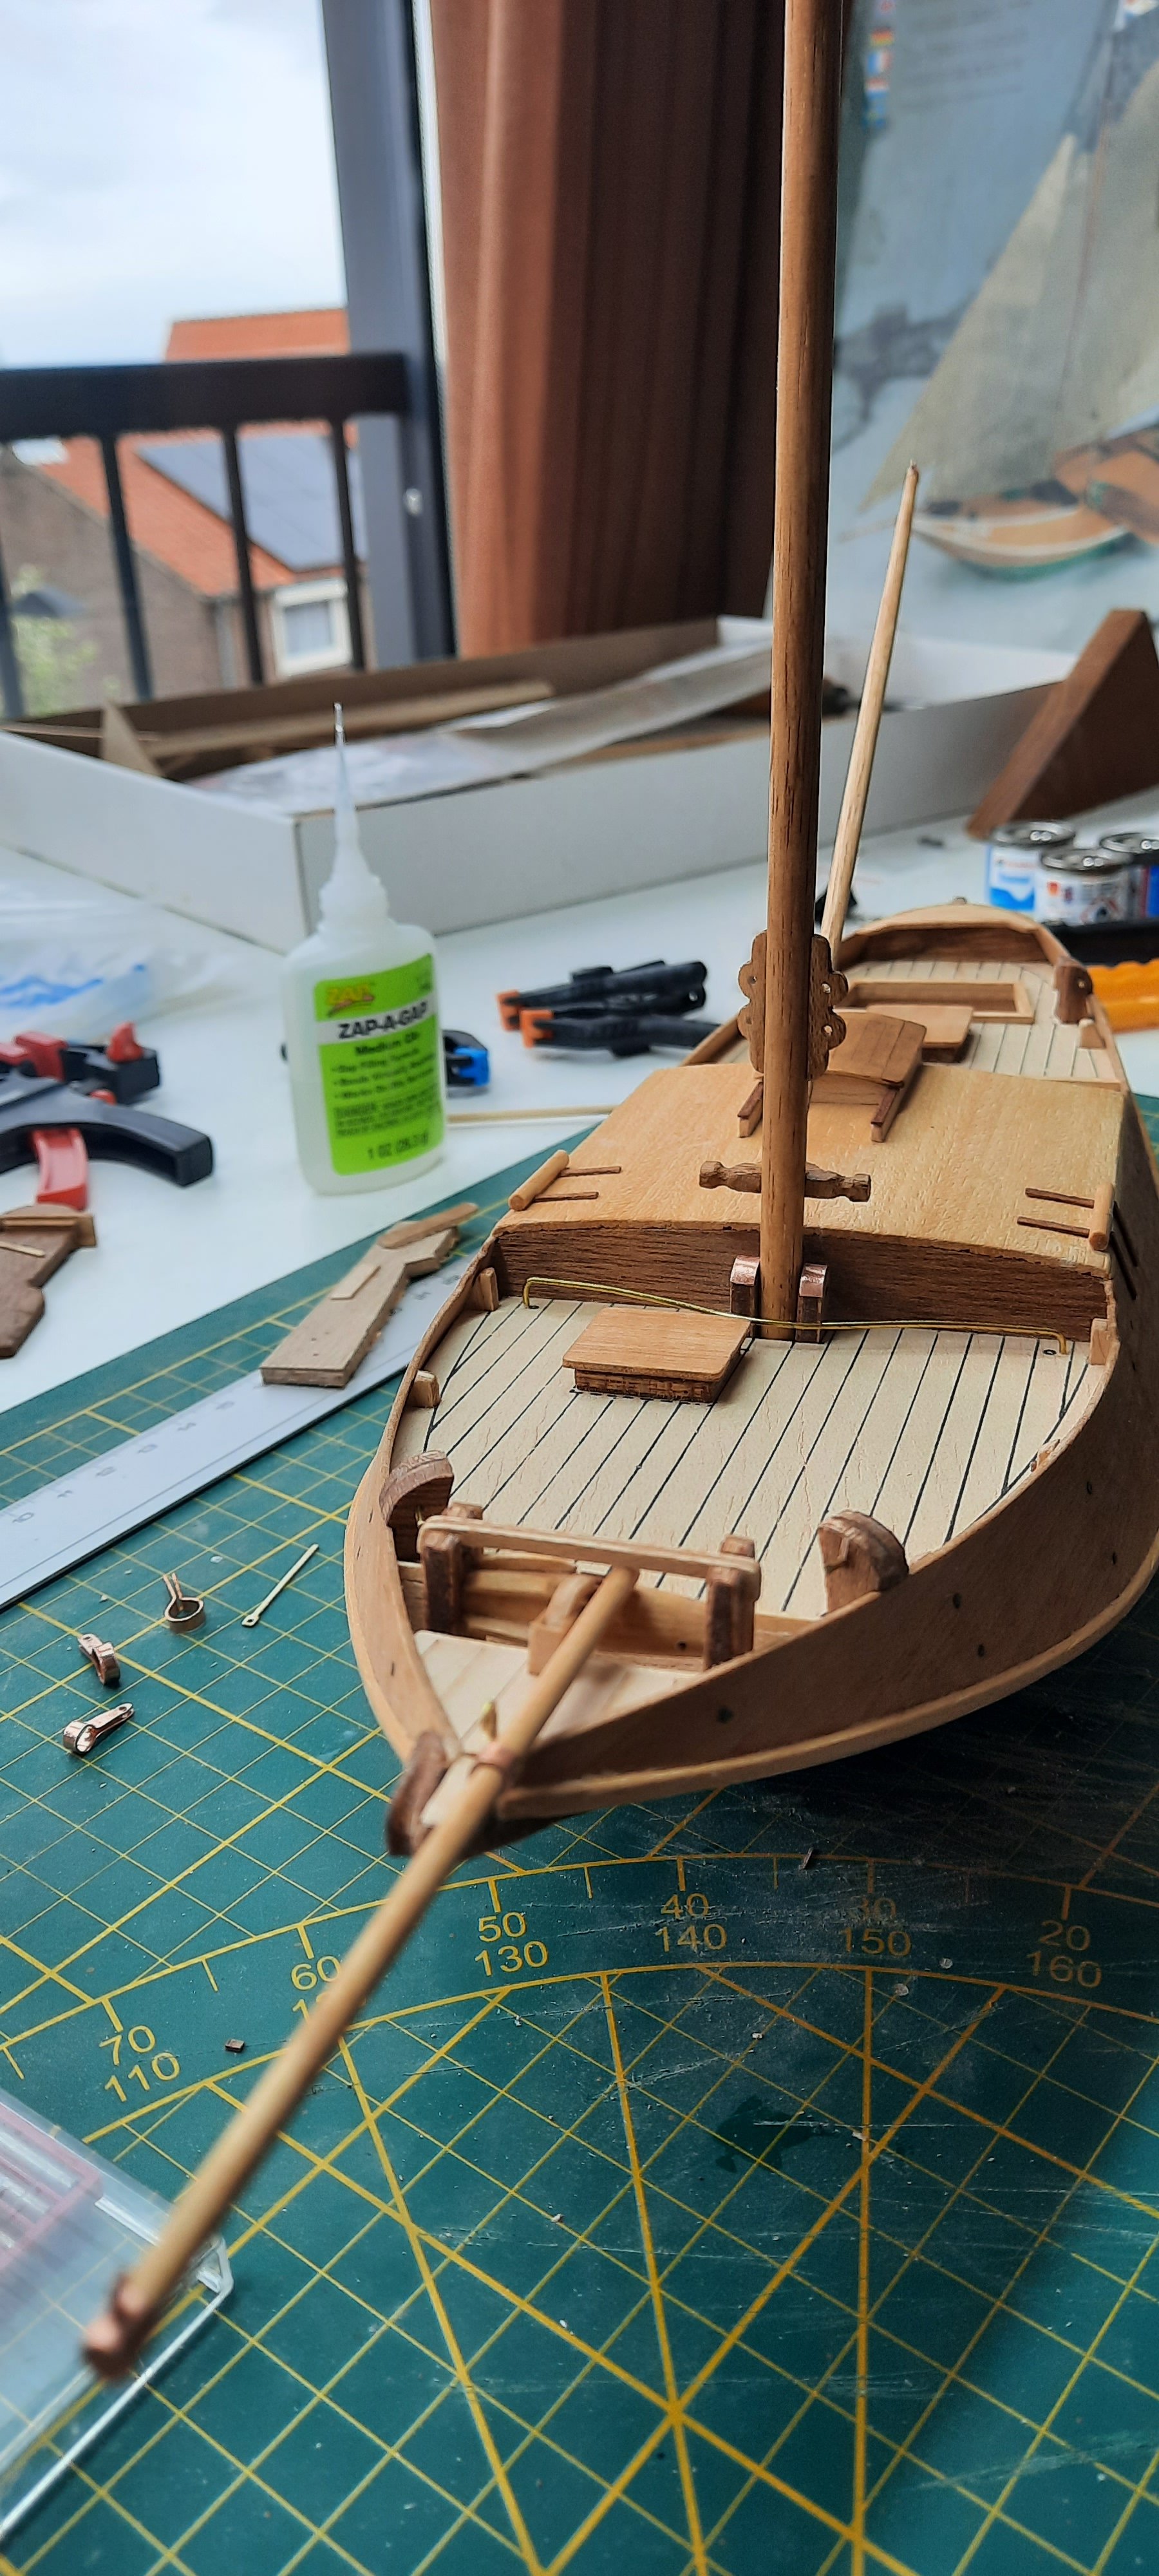
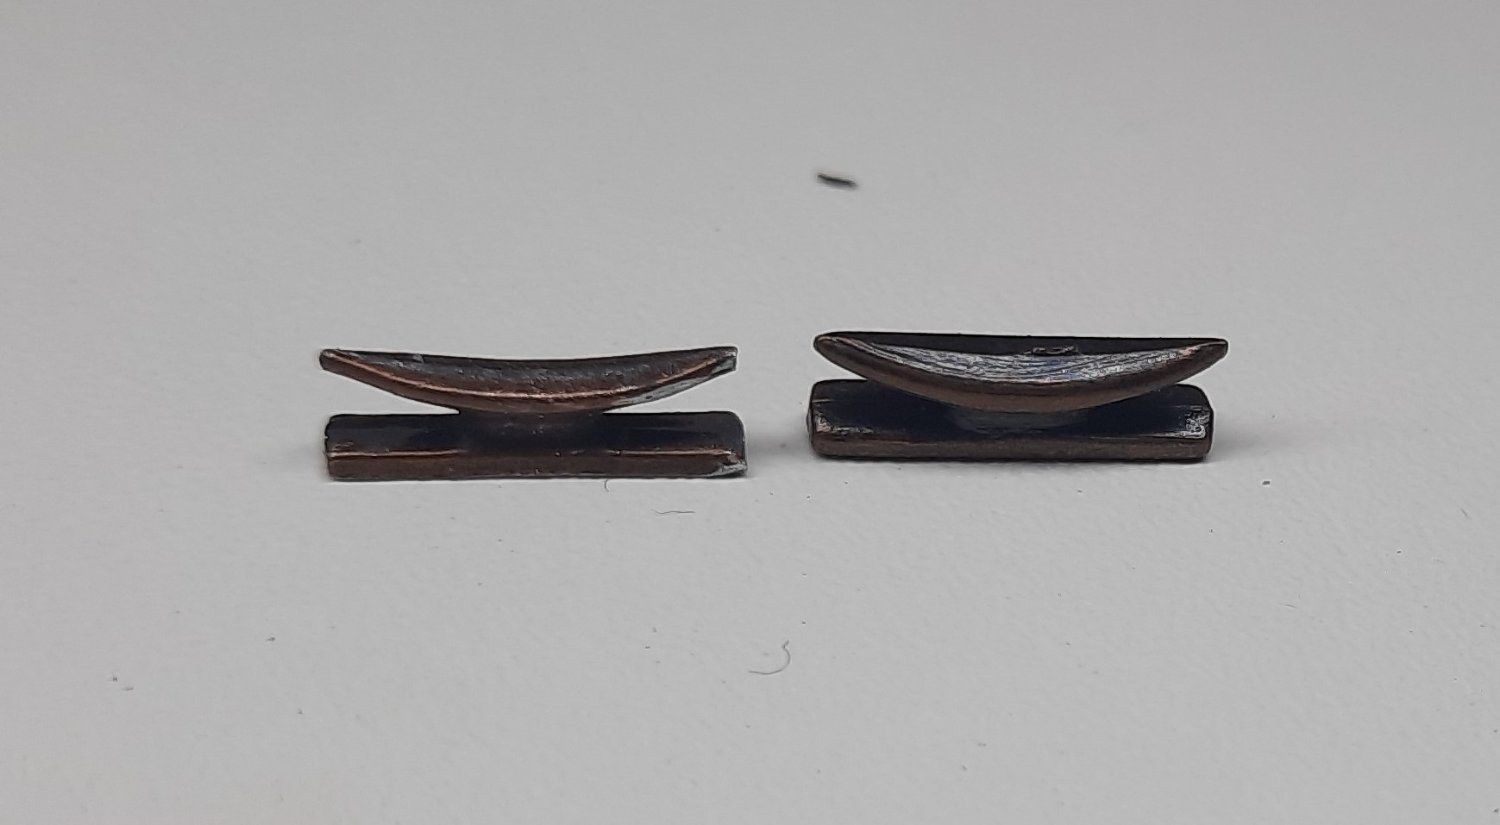
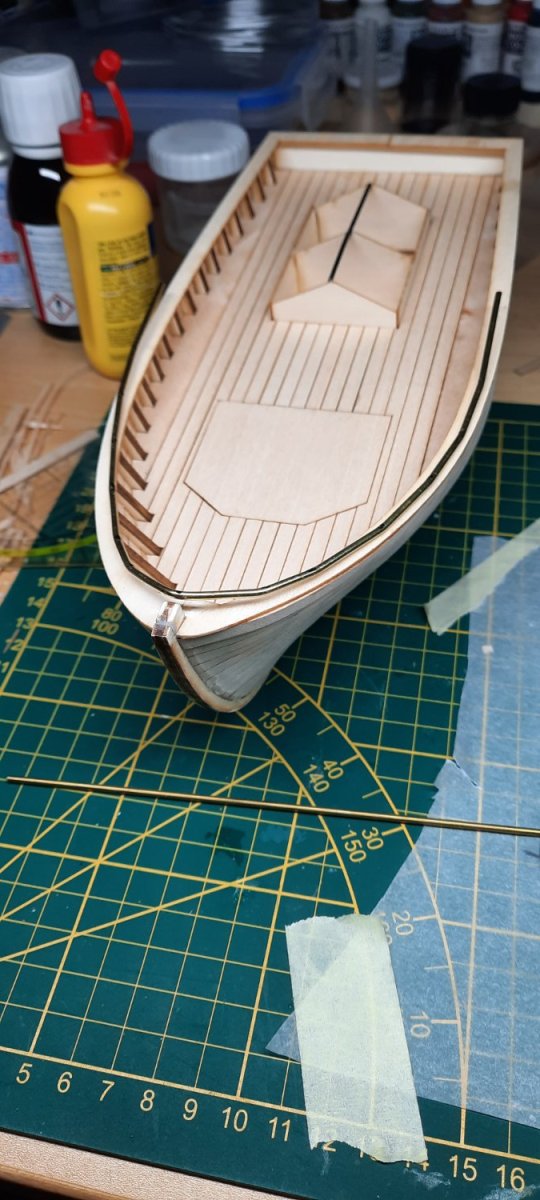
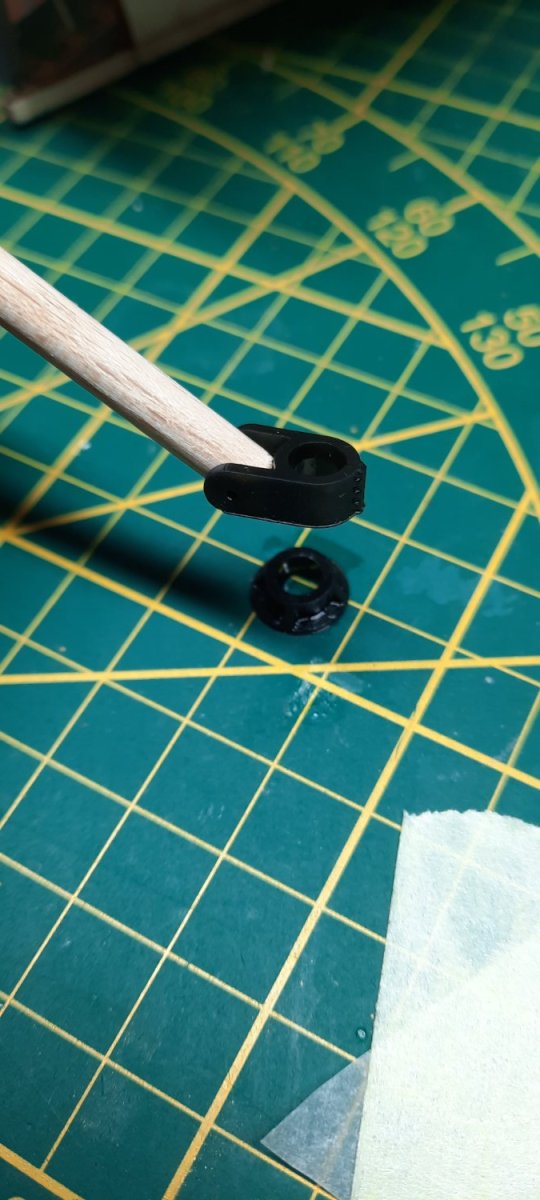
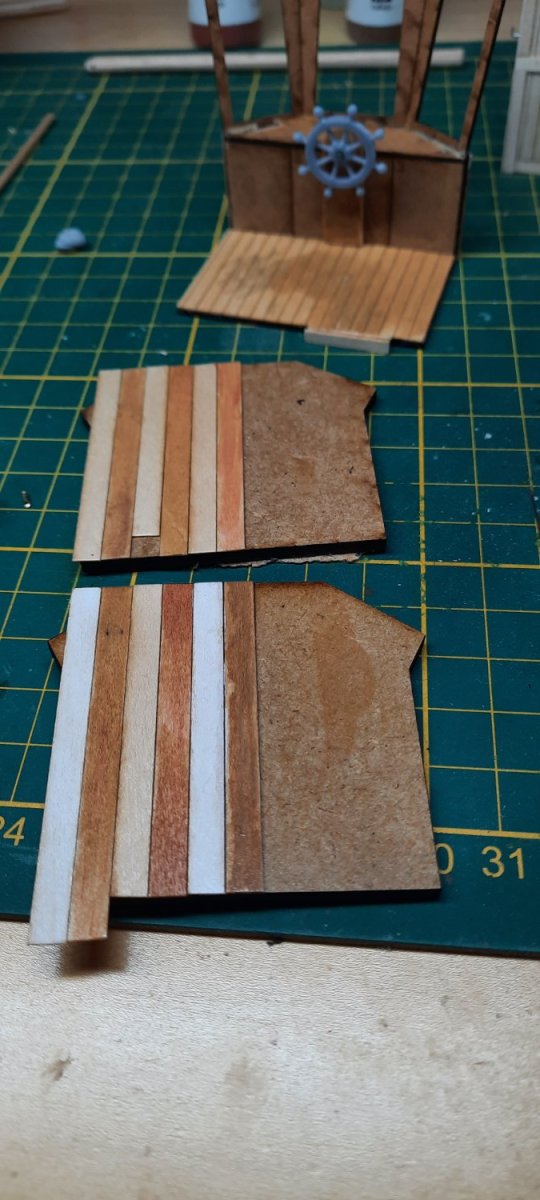
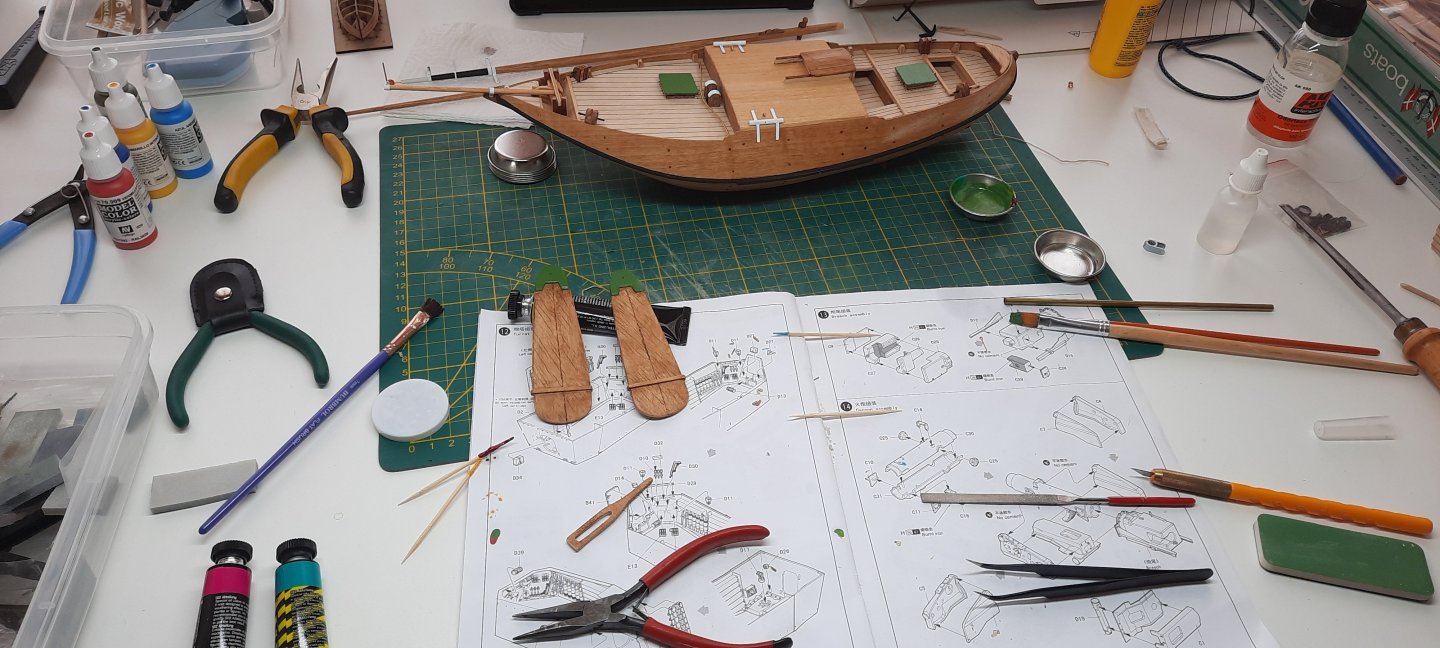
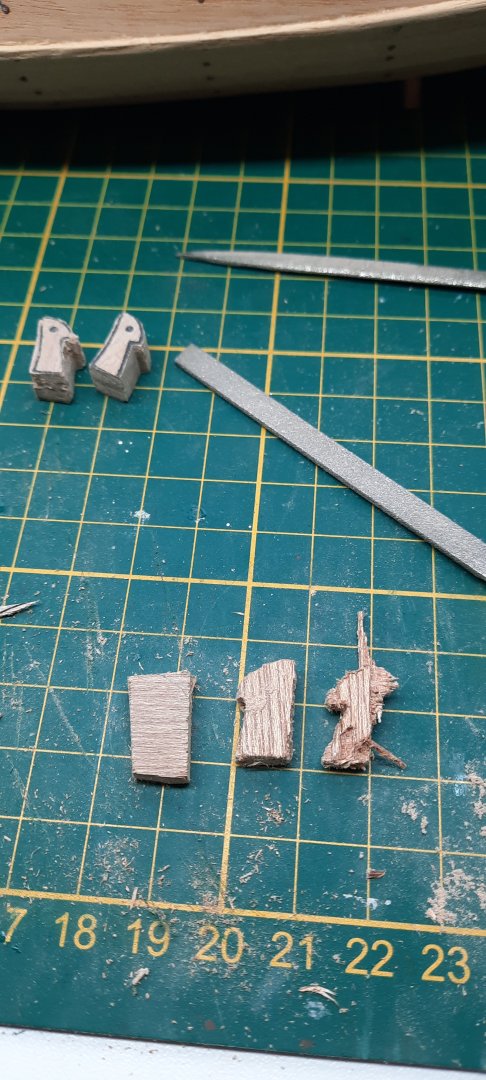
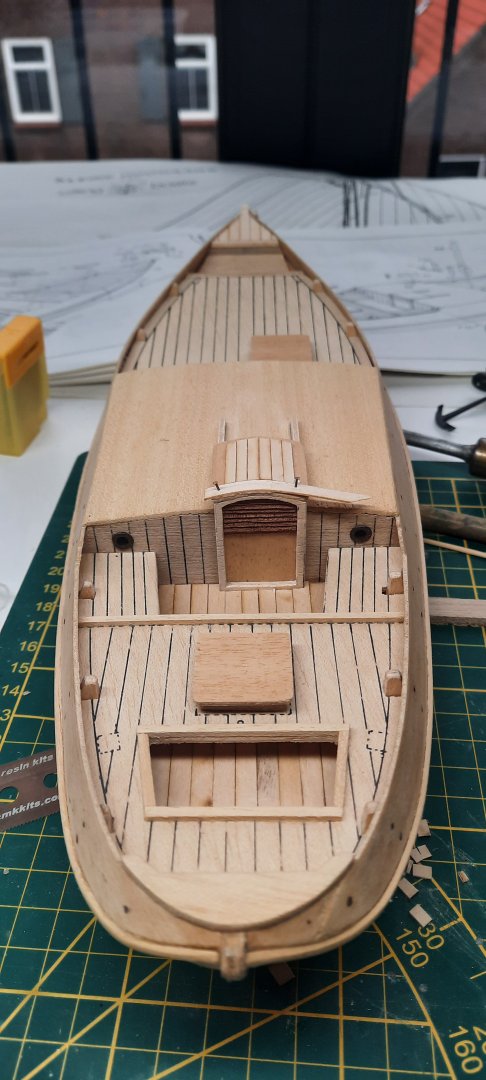
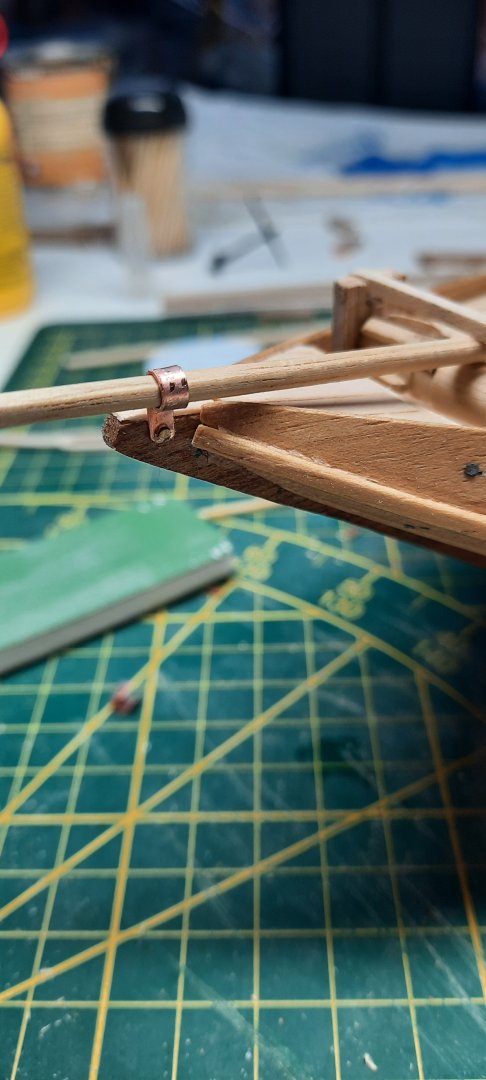
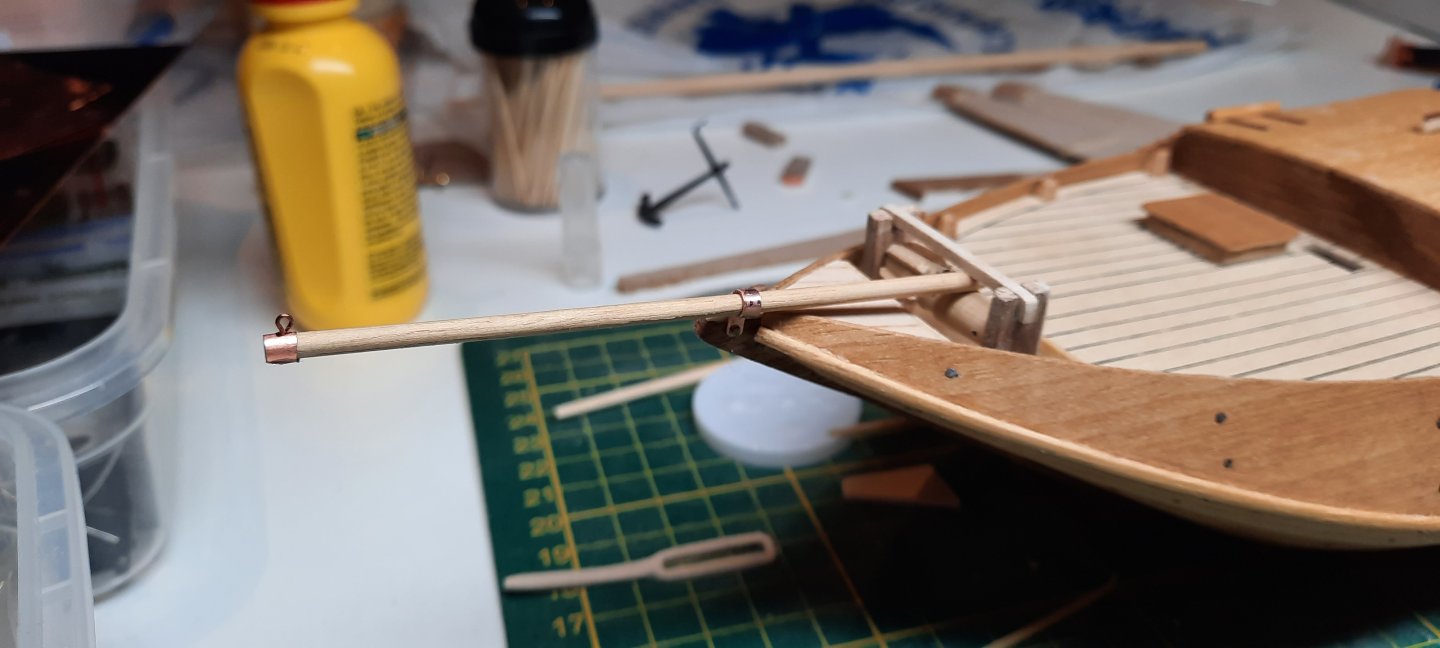
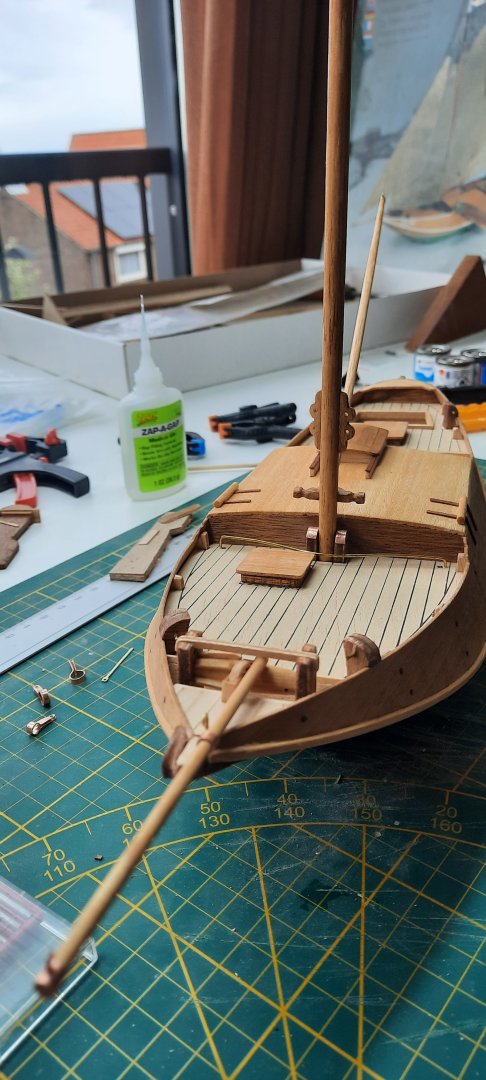
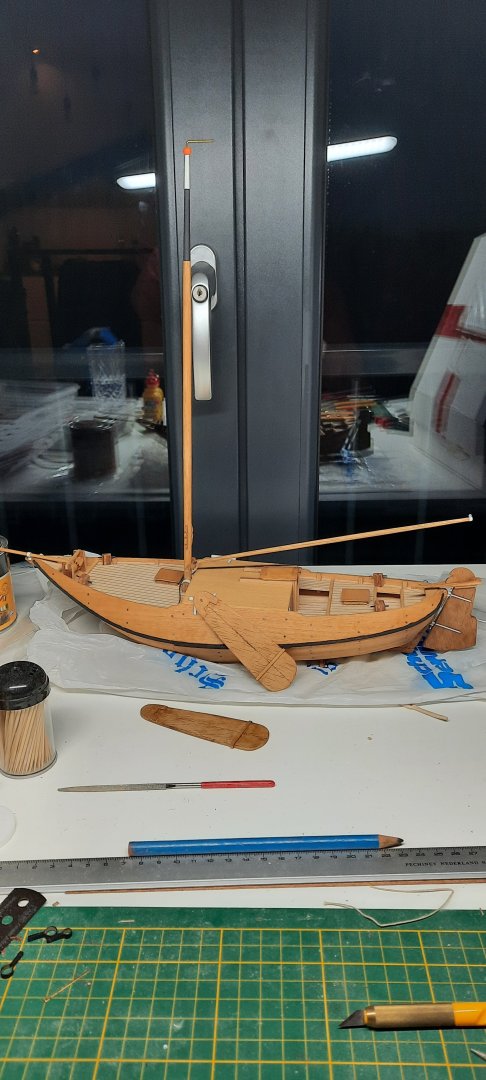
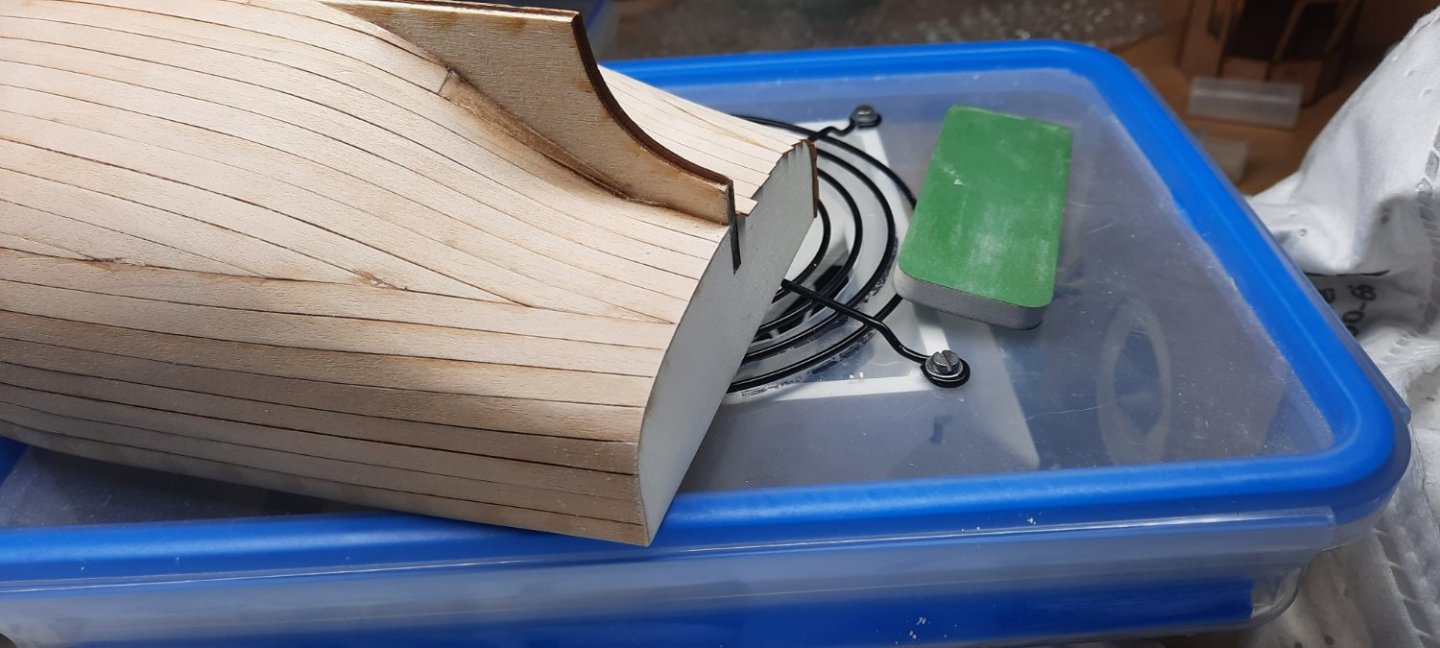
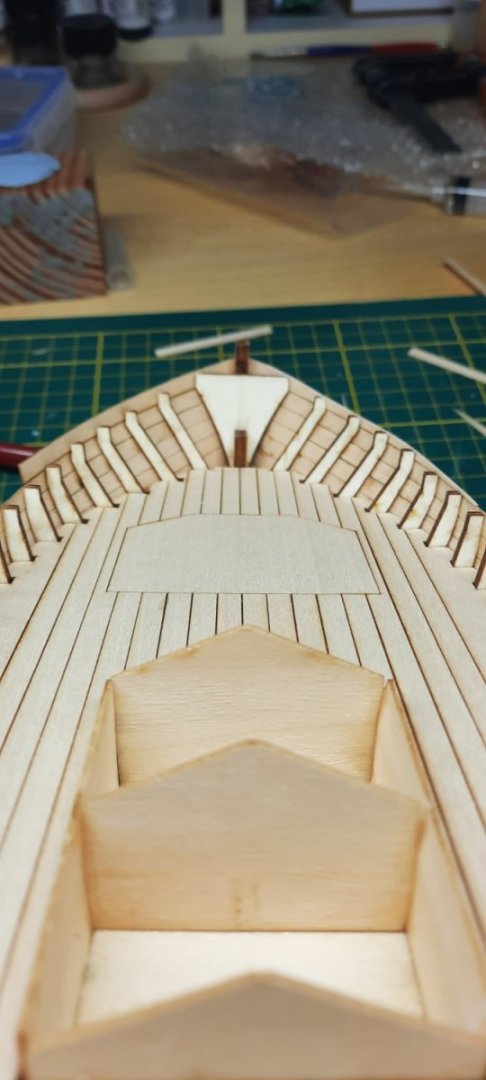
POST 3: Deck furniture and spars. This post will abreviate the progress I made this past month because I didn't remember to make enough pictures. I'll try to talk about my thought process and what happened in between pictures. I still don't have a permanent workshop and with my current storage method I do create quite a mess every time I unpack everything to start building. But the mess fuels the 'ol imagination so It's fine. I'll consider myself lucky that my partner doesn't mind the desk in the living room looking like a construction zone during most of the week. I don't really mean to complain, but the wood in this kit is very much not of the forgiving type. It's veneer of varying thicknesses, and either was stored incorrectly, is very old or was allready rather weak from the factory(or all three, which isn't improbable for this kit). But the layers of wood that should be adhered strongly together, are rather fond of fracturing and delaminating during the working of it. I started with roughly sawing out the bollards from the thicker sheet of veneer wood. First one went smoothly but the other three had to be glued back together multiple times. One of them is quite possibly more glue than wood. Two pieces per bollard. This piece was too far gone, I sawed too close to the lines. But Easily fixed with a small replacement piece. After finishing them I went on to work on the winch. I used a power drill to turn the piece into the right dimensions. Something I picked up from somebody else on this forum. It turned out rather well for a first try. Not in the instructions, but I wanted to add some detail to the winch by adding these parralel bars to one side of it. Like the smaller Hoogaars in the shed. The result will show in a later picture. Sawing the rudder before glueing it back together to simulate planks. I didn't have an actual saw yet, so my saw consists of a razor saw held in a vise with a piece of wood on top to hold it in place with. This worked better than it should have, but the precision of the cut suffered a little bit and this shows. I now have a proper holder for the razor saw. But the rudder and swords have allready been sawn. Test fit of the bollards, rudder and helmstok and winch. there is a little bit of damage on the aft side of the upper strake but I'm not bothered by it. This was also when I noticed the wood part underneath the tiller being too far up. It interrupts the nice flow of the sides so I'll be taking it off and placing it lower down. Winch. I thought the area forward of the winch deserved some more attention and decided to plank it. I also planked the footwell in front of the tiller and by the main accommodation entrance. Let's also add some planks to the top of the companionway. I really enjoy the look of those on the real yachts. I think it'll add a nice touch. Removing the stern piece and placing it lower after removing some material underneath. In the mean time I had started on the swords which will go on the sides. Note the not so clean cuts on those. I'm still happy with how they turned out. The tiller is given a slight bend. and the rudder gets its hinges. This is where I made a mistake because I assumed the metal pieces were intended for the rudder. They were instead meant for the rigging and this mistake would force me to do more metal scratchbuild work than I would like, and which I don't have the tools for. But thats for future me. Current me is still enjoying his progress.. Mounting points for the swords added. and I have given most of the boat a light pass with some danish oil. The color is a little washed out on the pictures but still quite light in real life. So I'm not sure if this is the finish I like. The decks are left untreated. This is where I realized my mistake. Those weren't rudder hinges.. they were.. Oh well. Thats also where I learned that 0.4mm plate is pretty hard to cut through with cheap nippers. Even worse to clean up afterwards. But I did manage to make an acceptable bowsprit fitting. This rigging point was not in the plans. But I didn't like the idea of just fastening the rigging with a knot arround the spar. So I made this. I'm happy with the way it looks. Test fitting. The mast has gotten its first fittings like the belaying pin bench where the goose neck connection will also connect the boom. I gave the swords an extra bar for strenght. Gooseneck. and the bollardds are in place and oiled. 0.4mm copper is a little too thick for such a small handdrill. Rail in front of the mast. Judging from the drawings its meant to allow the headsail sheet to freely move. The tackle is also in place just behind to bow. barely visible, but it is there. Gave her a lick of paint. Color scheme altered to look more like the boats in my references. I'm not sure if I should do something about the main wood color. I'd like it to be a little more rich and with a slight tinge of orange maybe. I'll be adding a sating coat as finish which will help slightly. But that probably won't get me the desired result. I'm still debating about that. This is as far as I've come. Next up is finishing painting of swords and spars and then starting the rigging. Till next time..


-
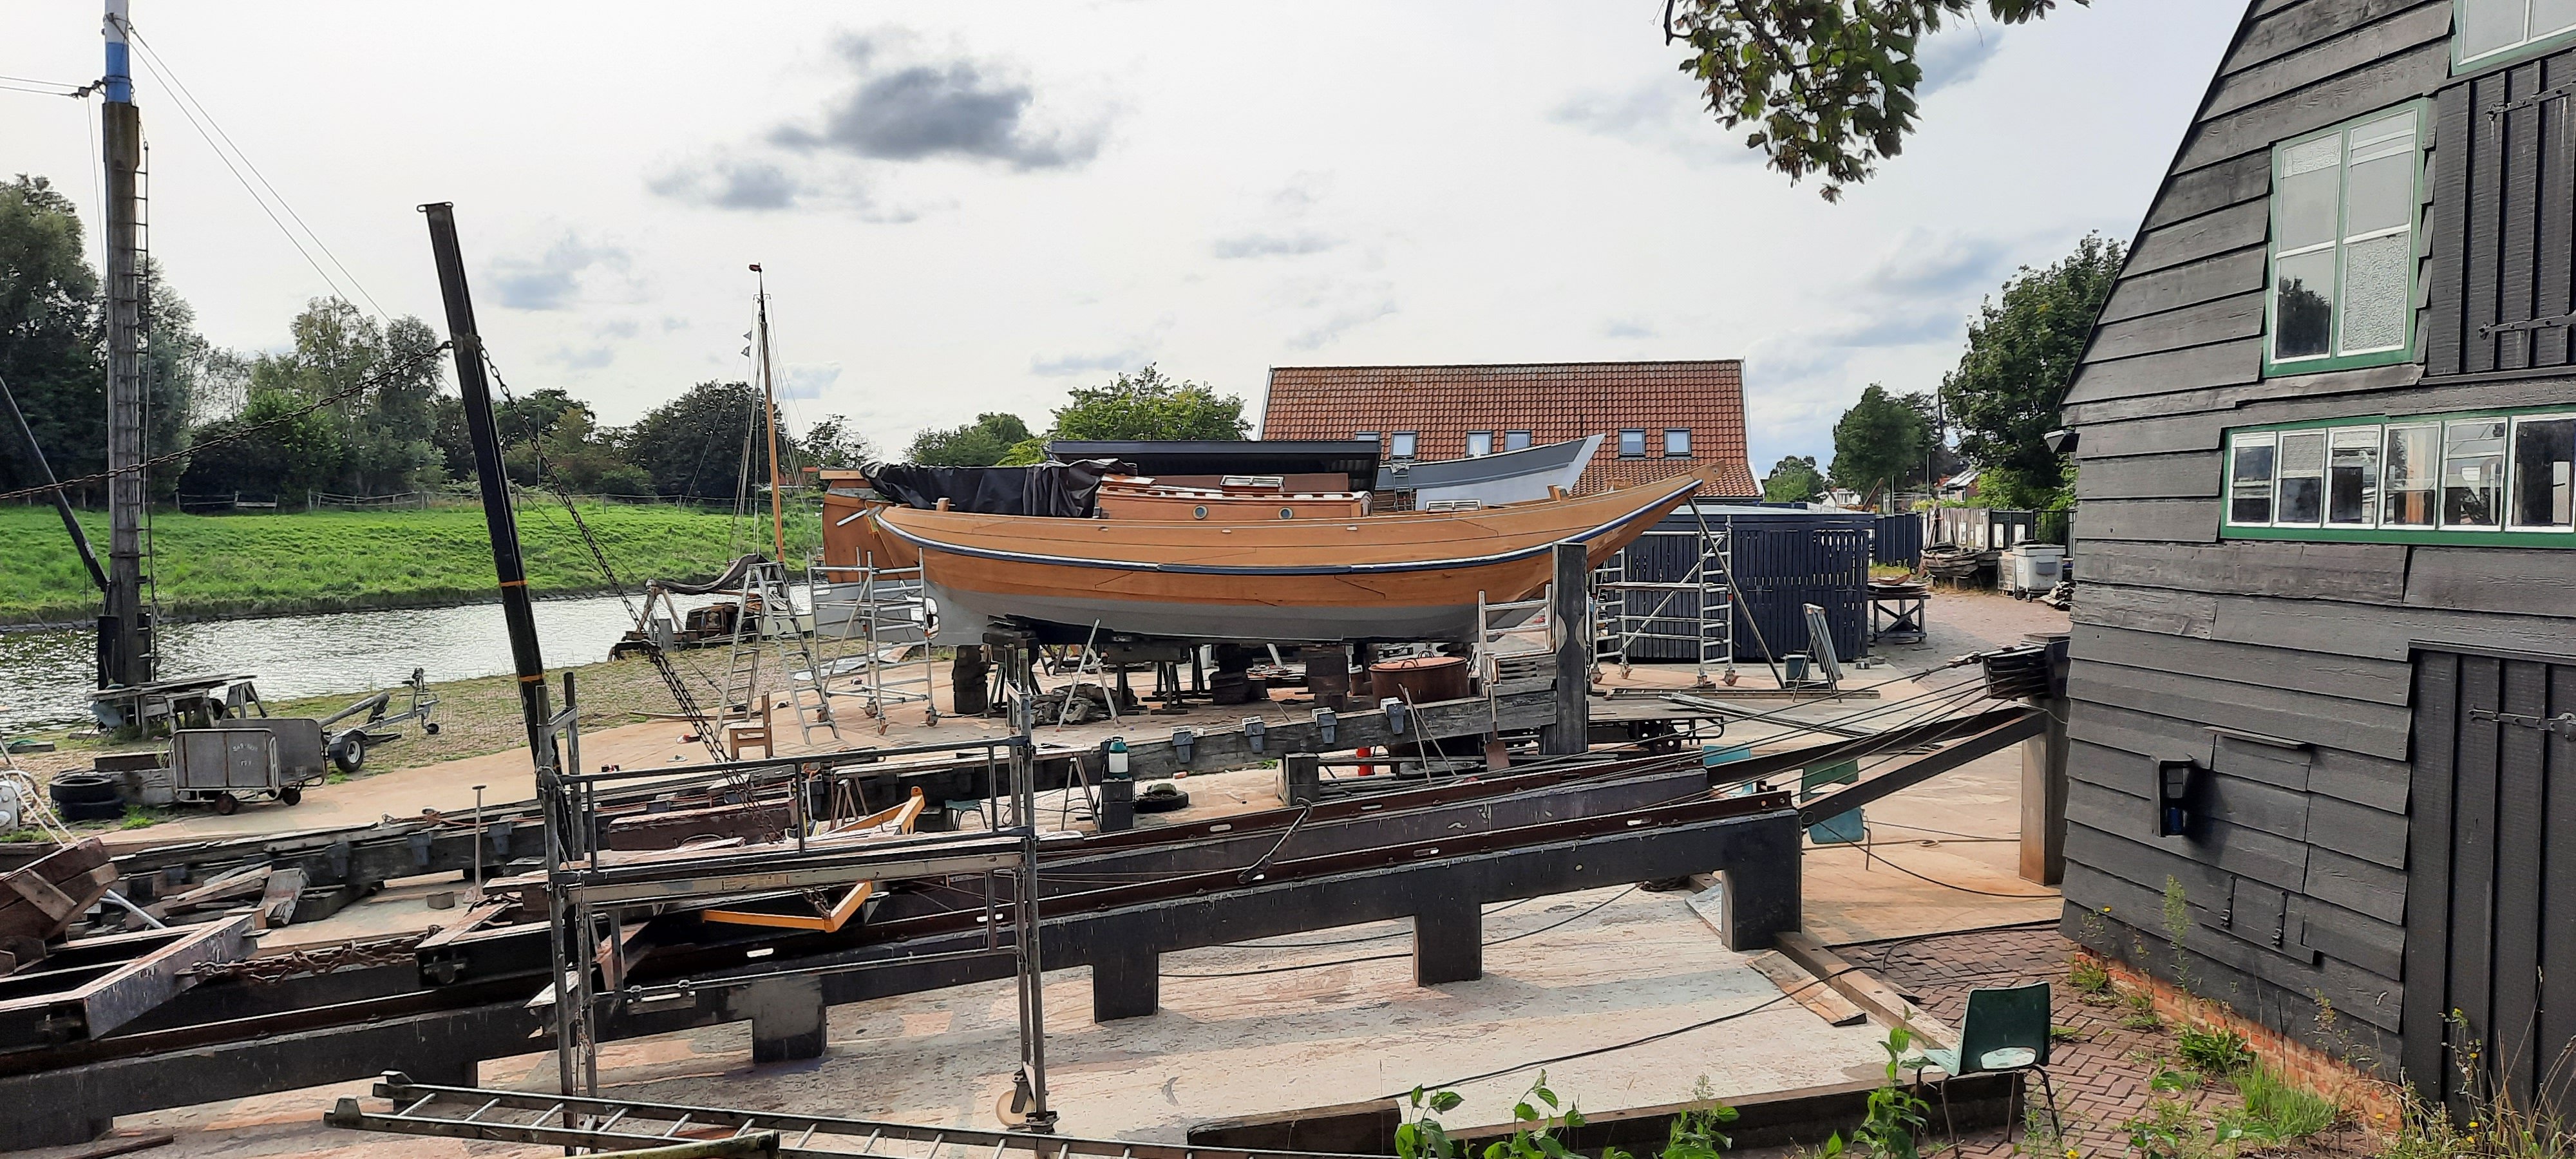
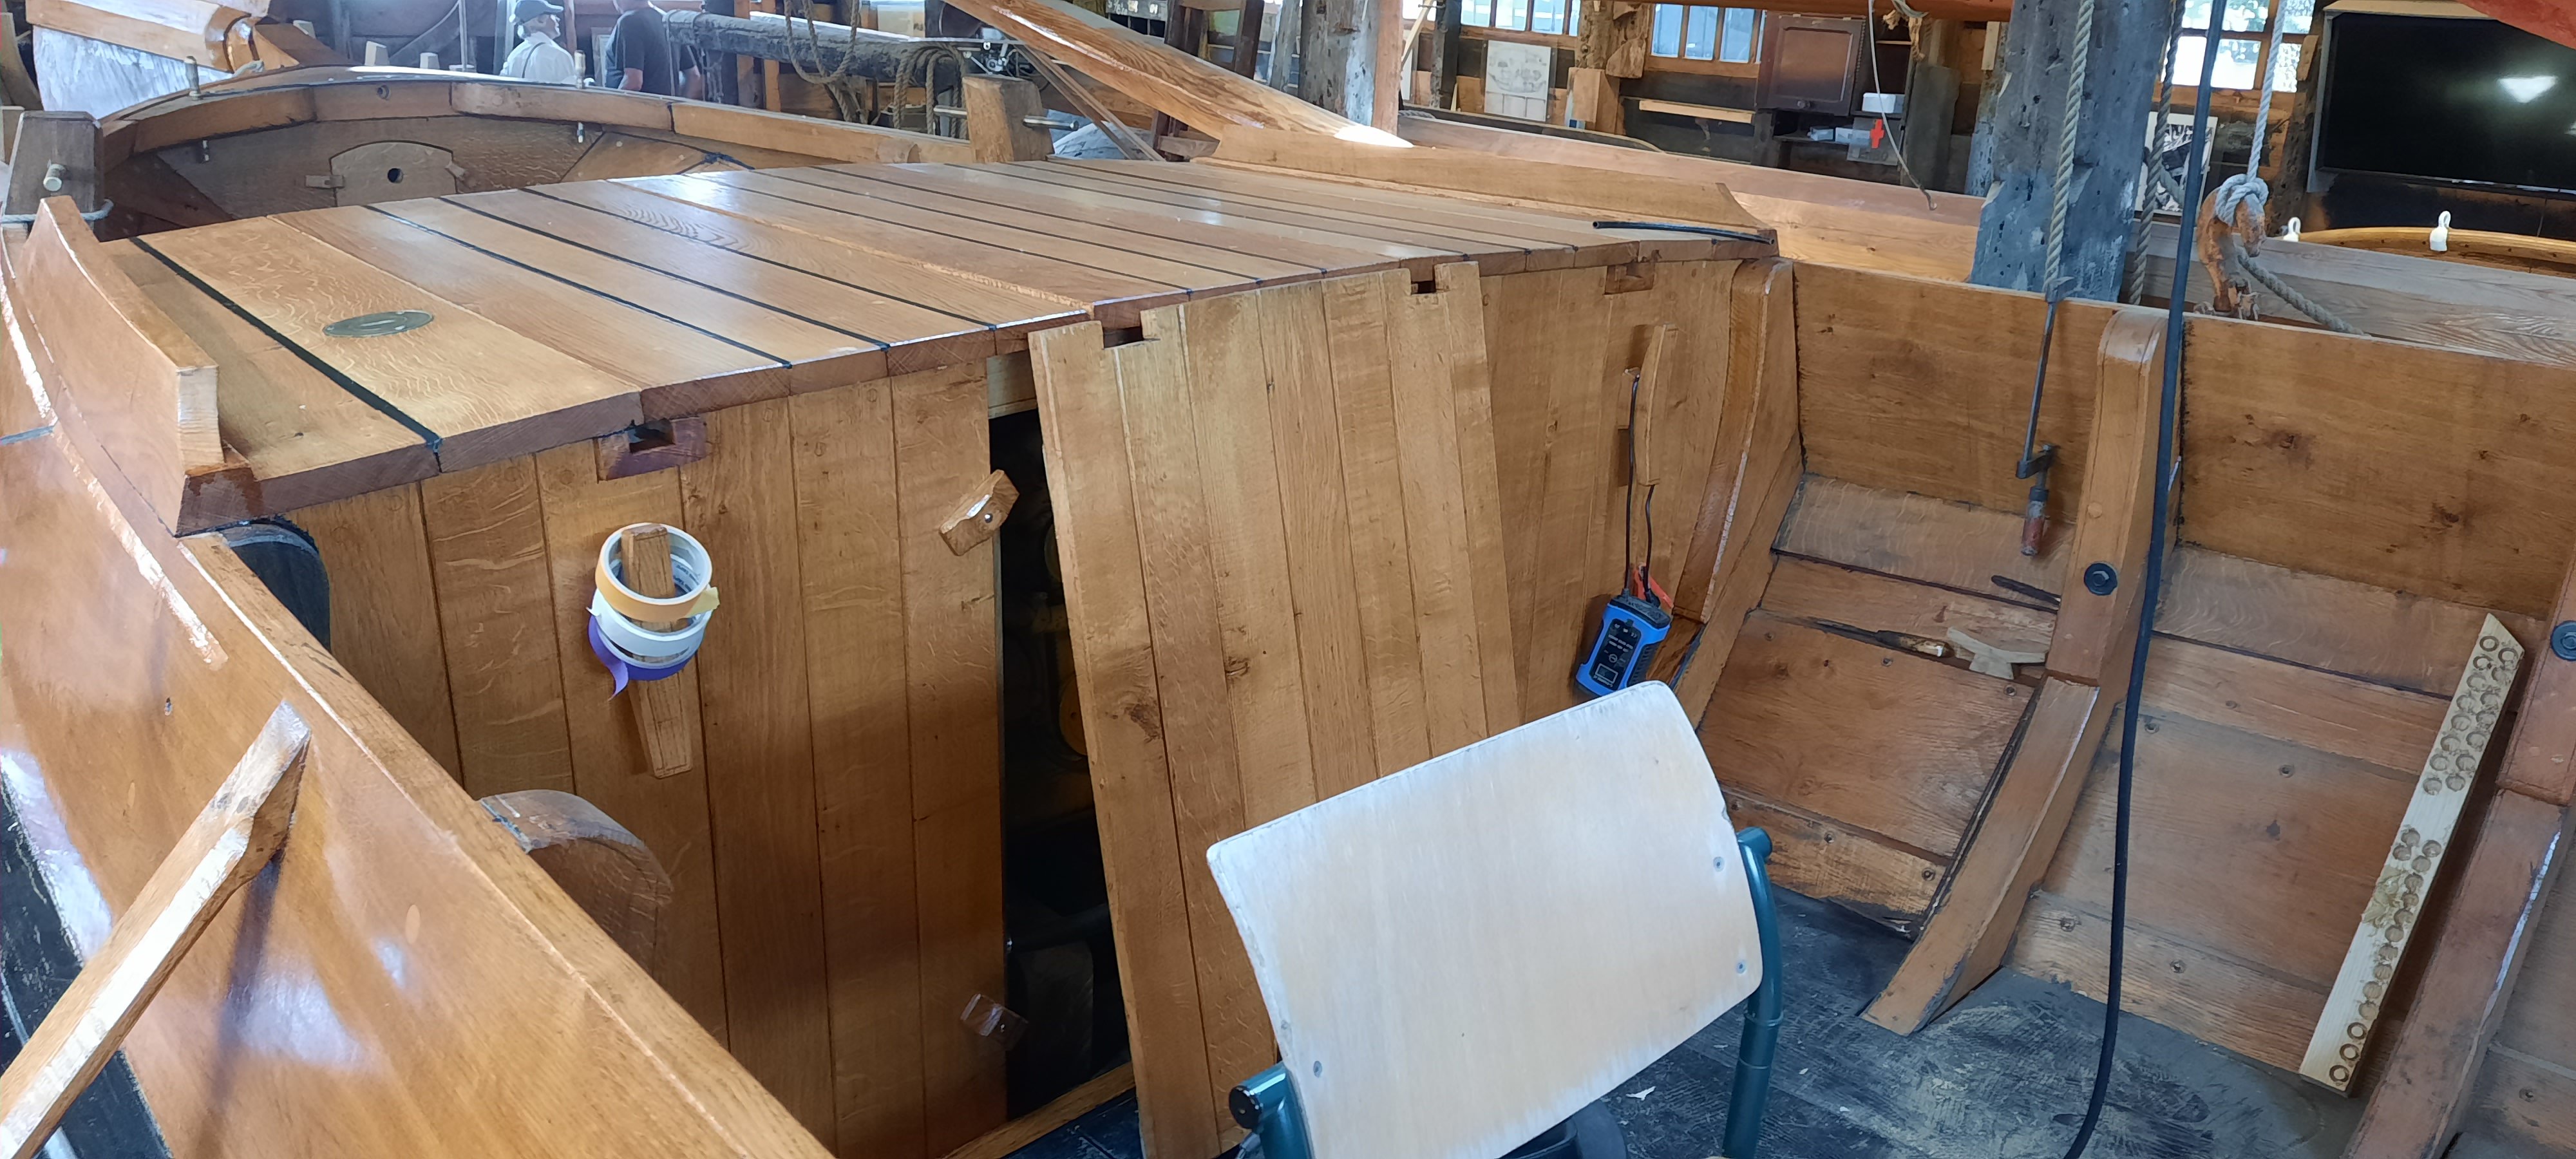
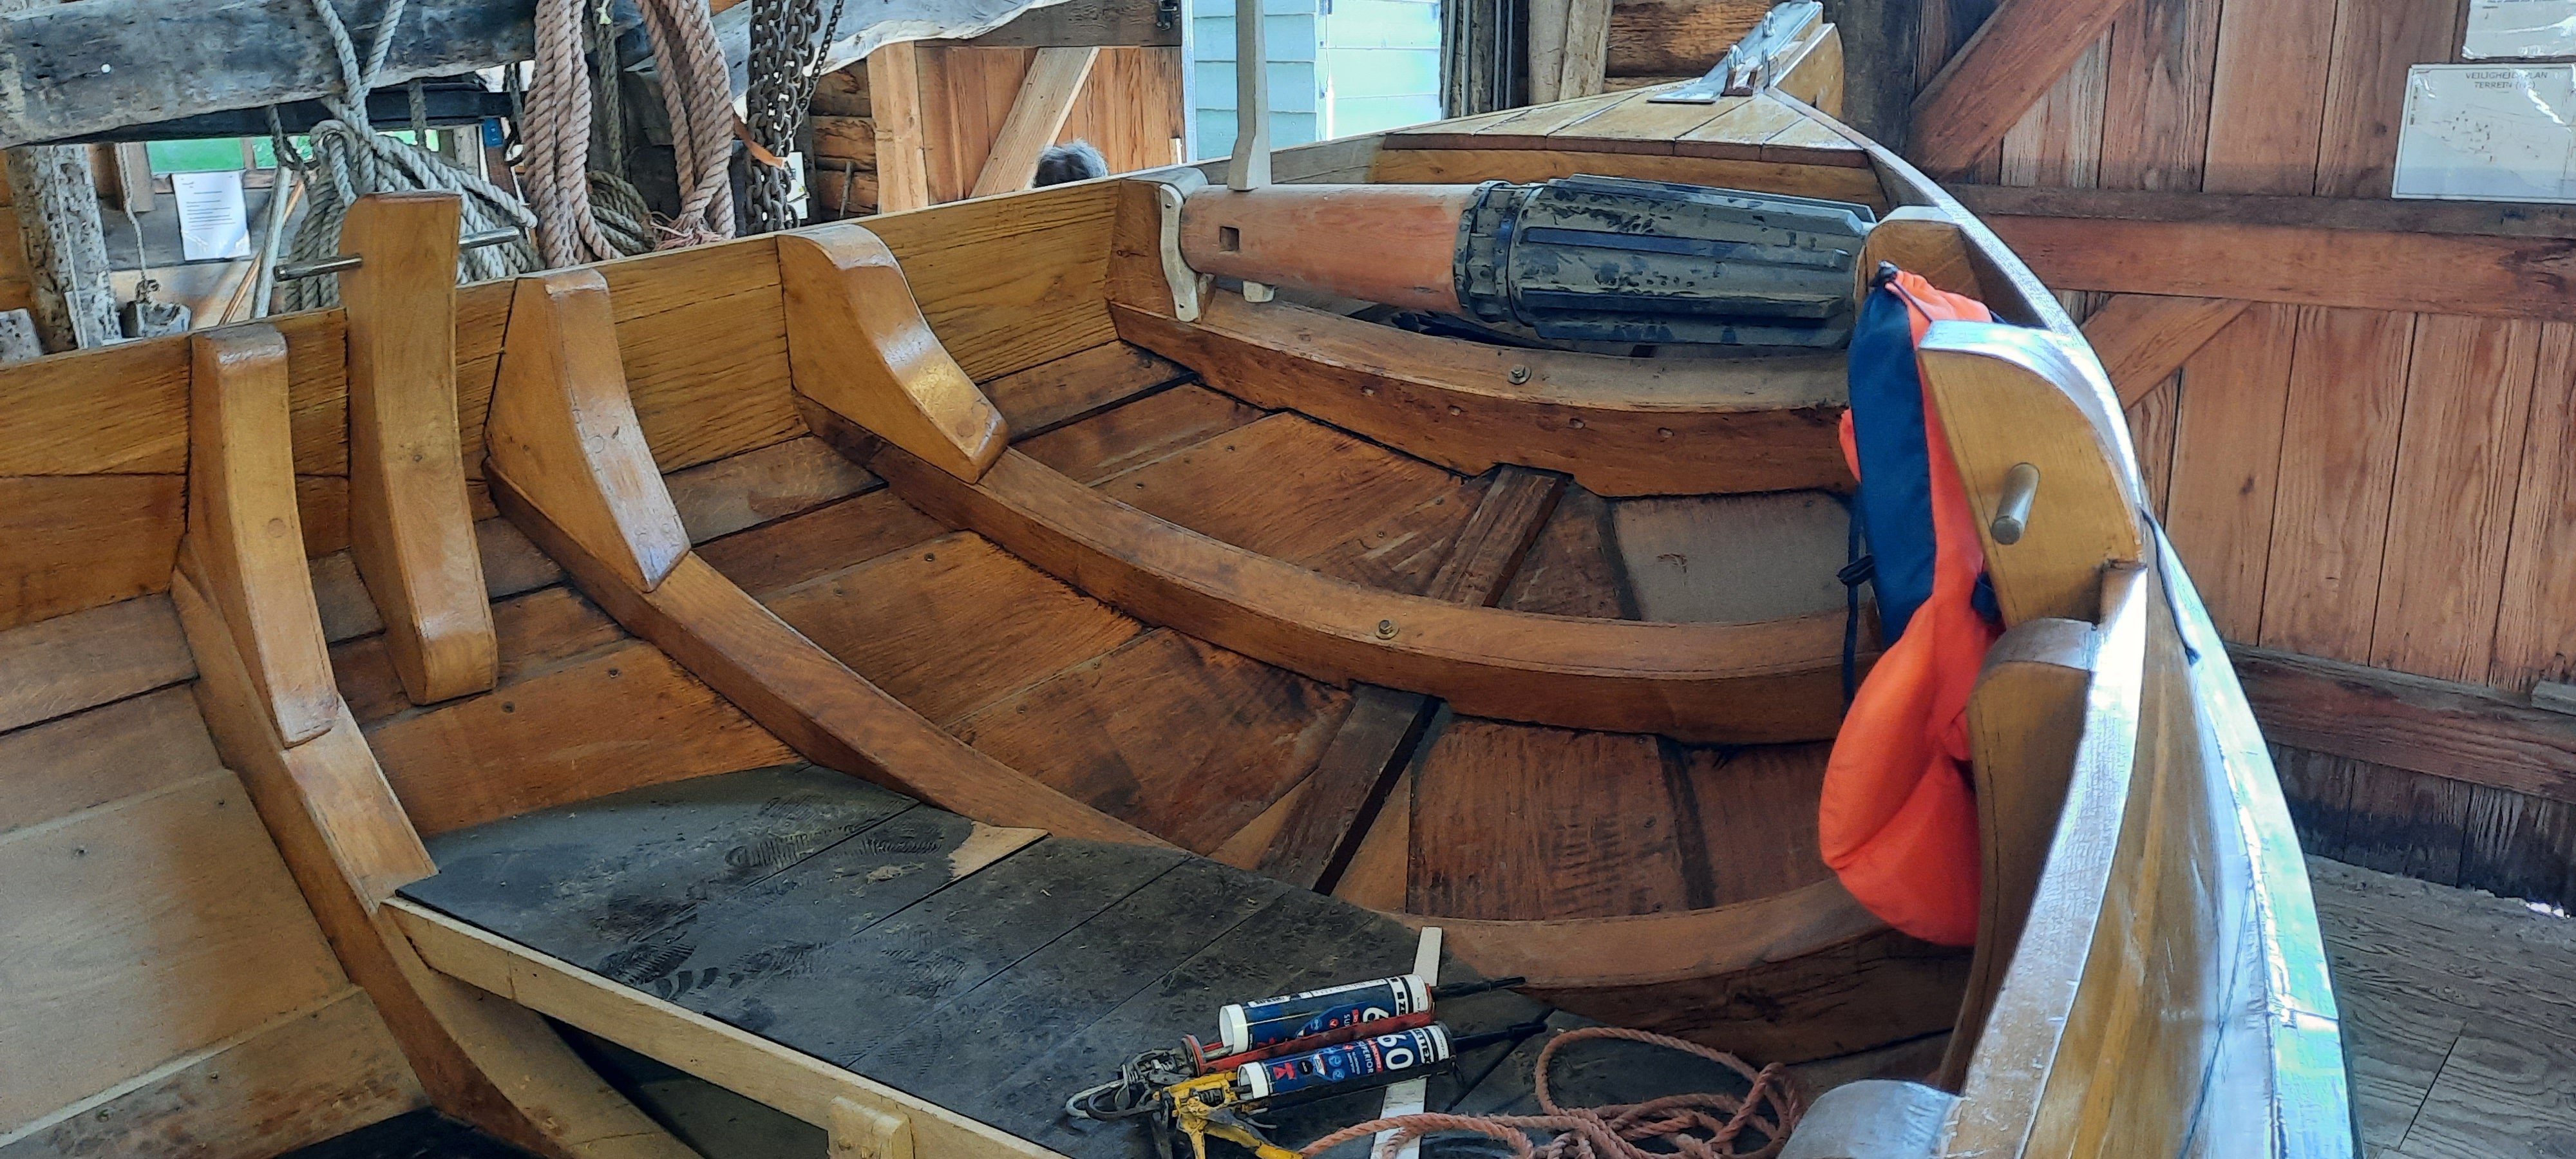
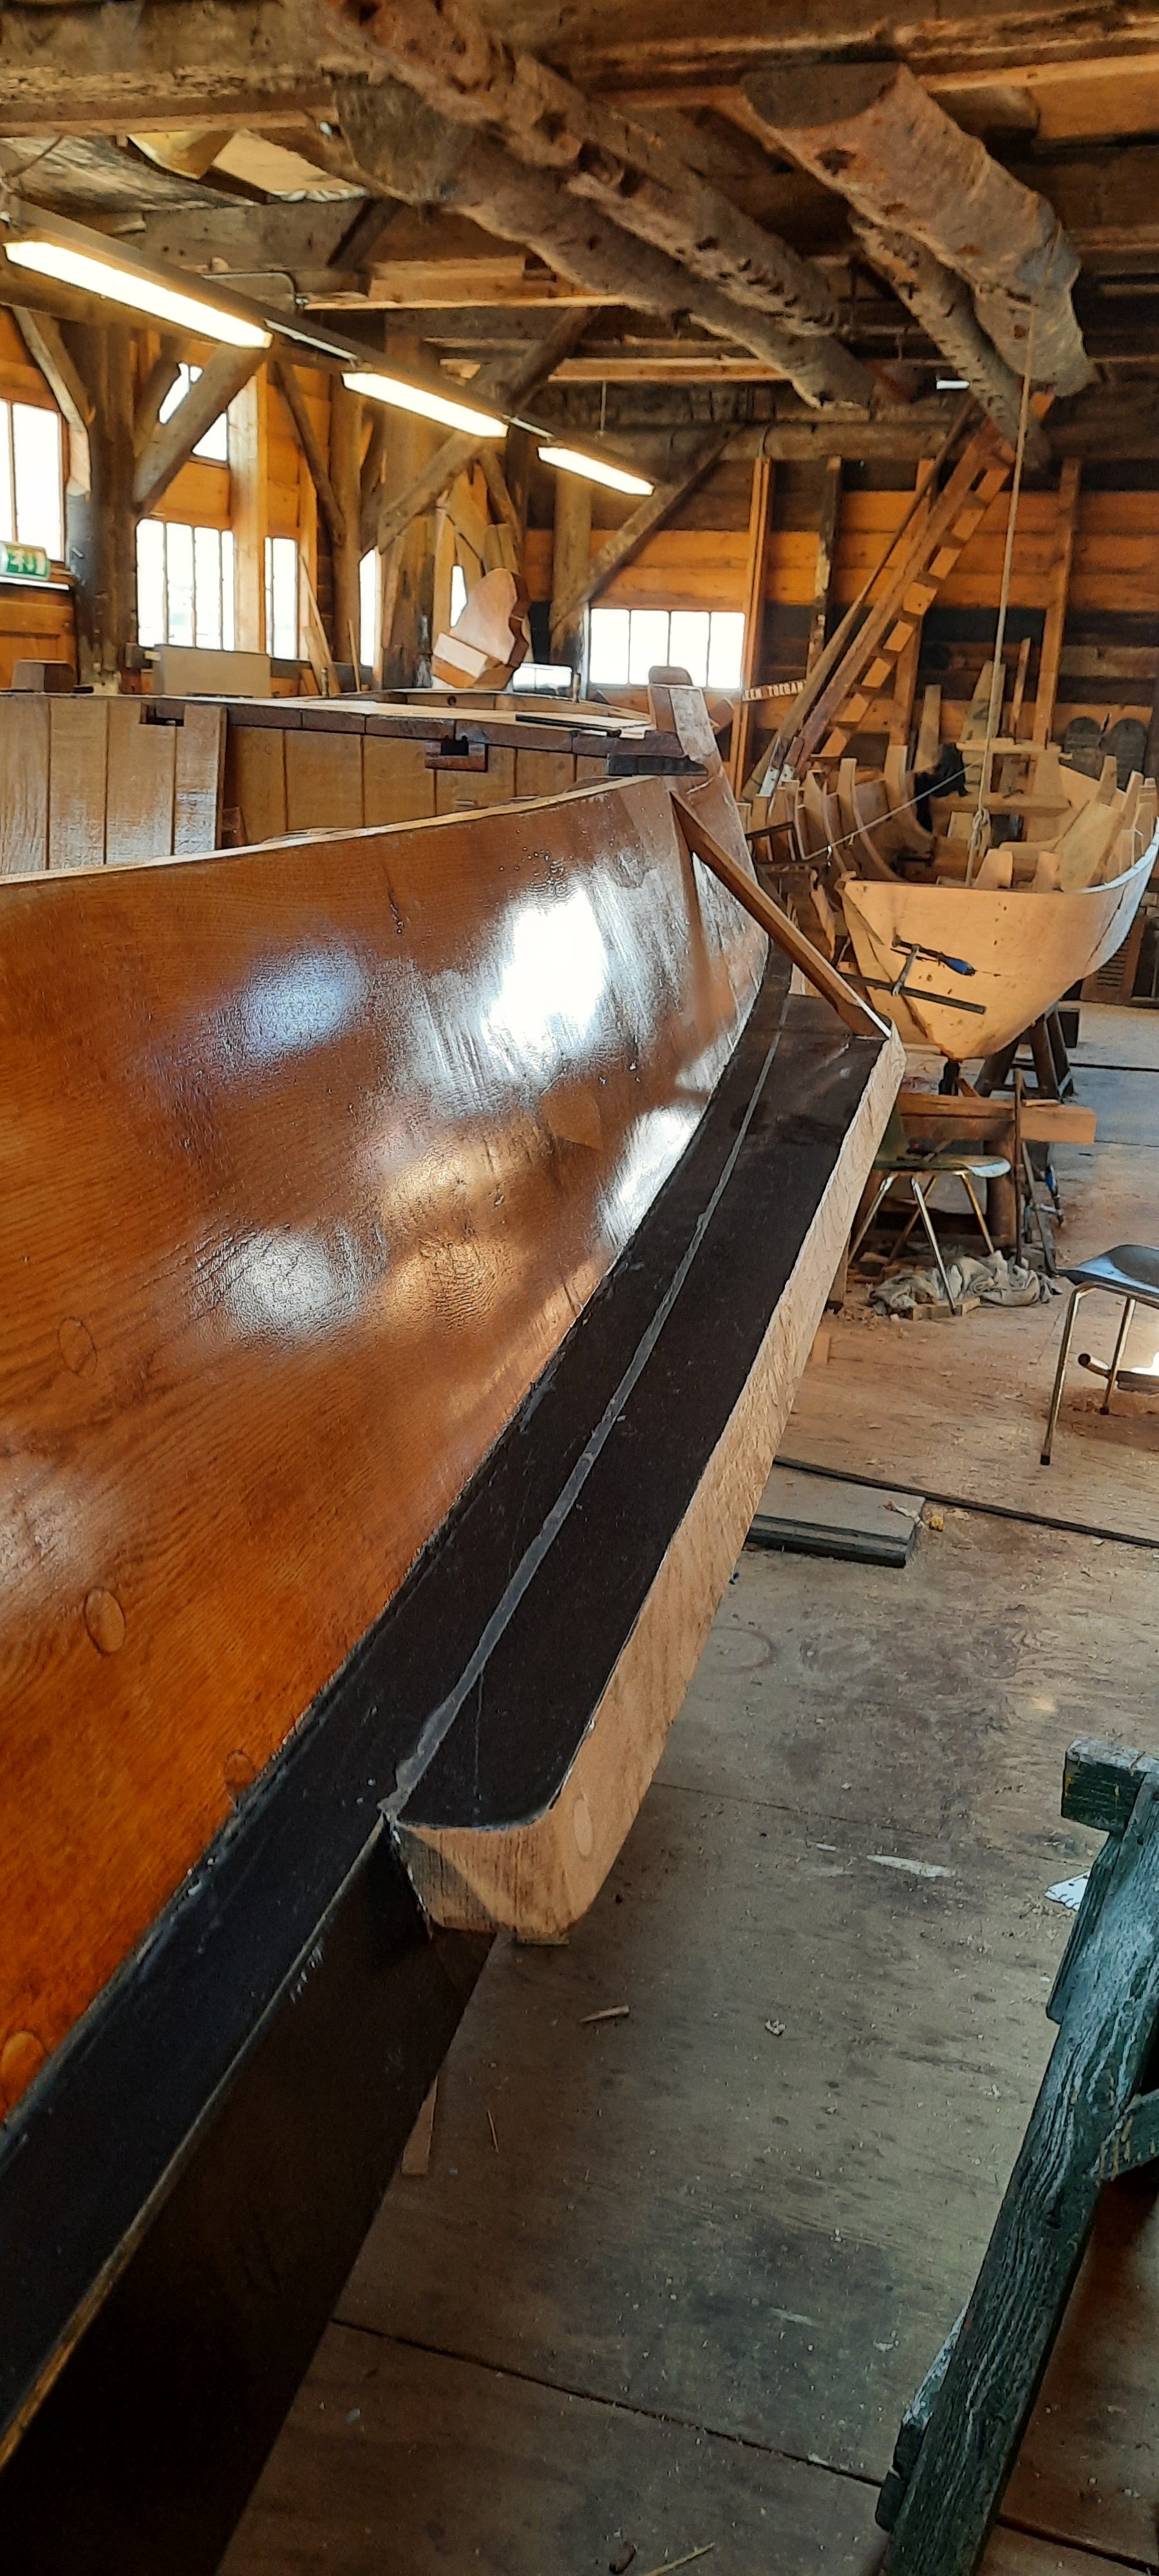
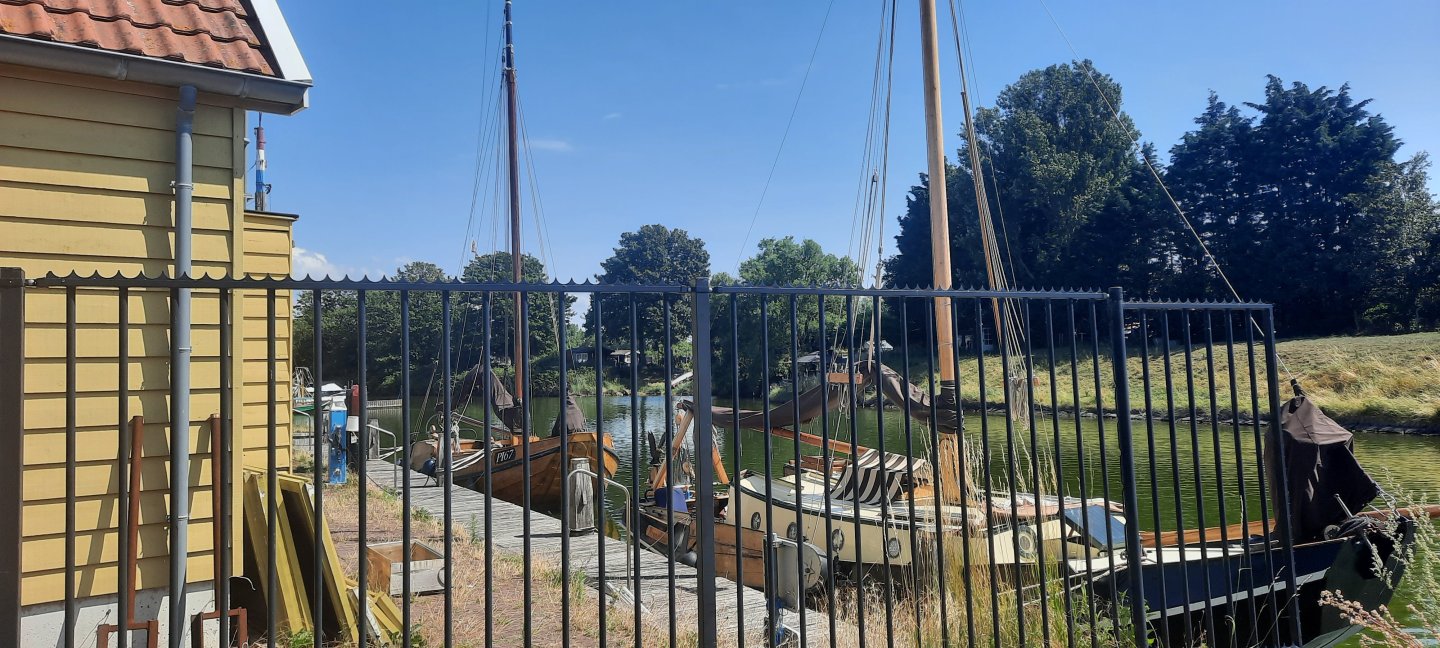
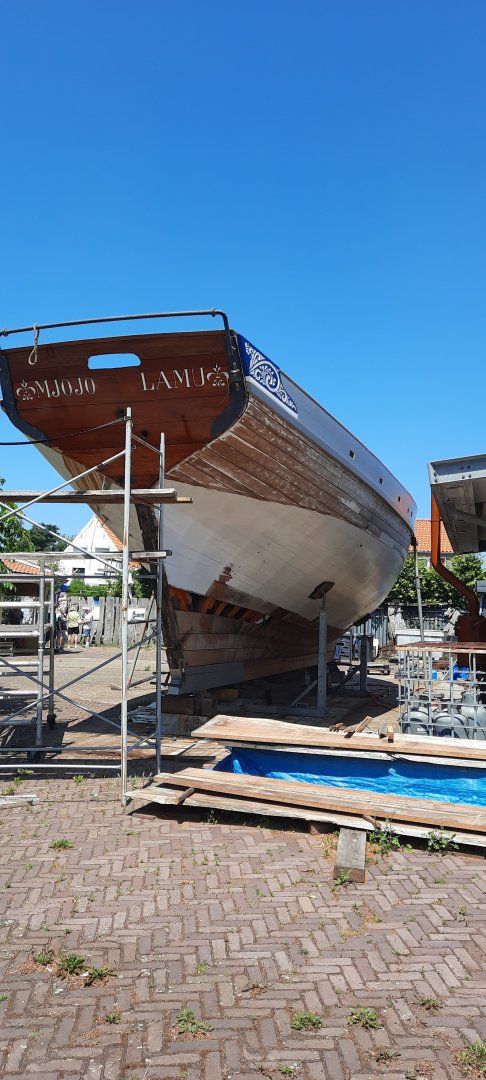
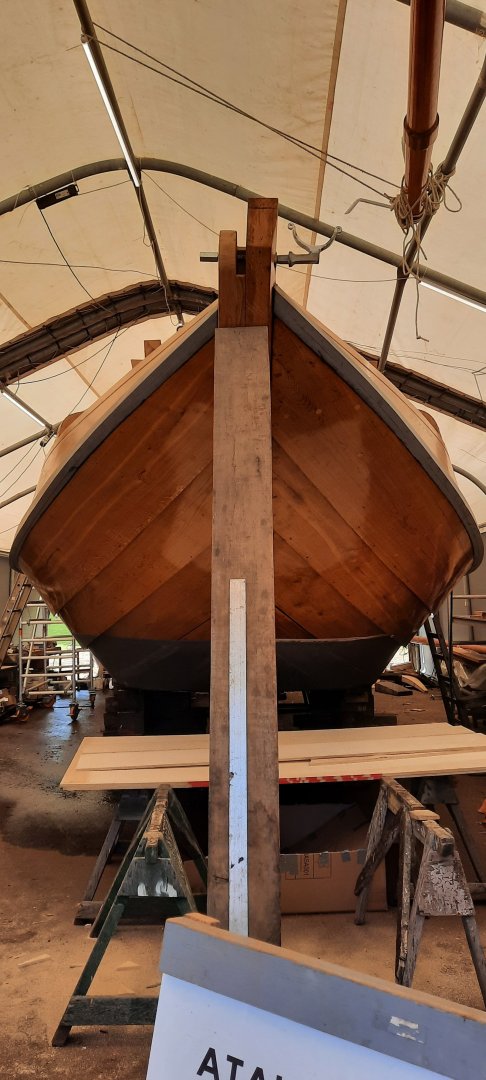
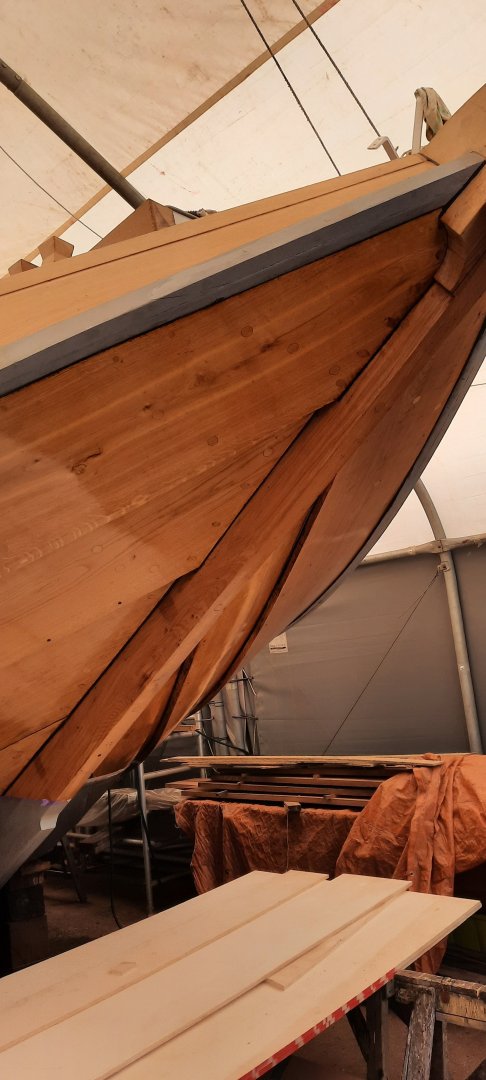
POST 2: In the field The nice thing about this project is that the real life counterpart is still being build by the shipyard in my hometown. So during last years "Fishing days" a celebratory event comparable to a fair or festival but with the fishing history of the town as the main focus, I went down to the yard to take a look at the projects currently being worked on. I took some pictures and with the permission of the yard and the boat owners I'll be posting some of them on here. A couple of boats at the waterfront. The Mjojo Lamu, a gaff cutter built in Kenia, a ship with quite an interesting story to tell. On the yard to replace her keel timbers and a couple of bow frames. Beautiful ship, but not a Hoogaars which we came for. Inside a large temporary tent The Hoogaars "Atalante" is being rebuild by her owners and the yard volunteers. Atalante is a Gaff Rigged Hoogaars originally built by the Yard in Tholen, the same yard that built the Hoogaars the Billing boat Kit is based on. It has been nearly 6 years since she's been in the water. But the large amount of work that has been done defenitly bears fruit. She looks like new. Her bow and not so symmetrical clinker strakes. The extra rubbing strake amidships for the sword to move over. The Rudder and one of the spars. This is her a couple of weeks later. From this angle its easier to spot the way this yacht is designed with the main cabin space being in the middle but leaving space at either side to walk past. This is in contrast to the large cabin in the model kit that covers the whole span of the boat from side to side. A couple of bonus pictures from the storage shed where they were working on a smaller Hoogaars with original fishing layout and a small clinker boat. That's it for the reference pictures. I always enjoyed looking around the yard every year. But this time, thanks to the model I looked with a different eye commpared to other years. How much of this I'll be able to translate into the model.. Who knows. I just wanted to share these picutures. Next up. An update on the progress I made on the model. Till next time..


-
TheDuckDetective reacted to a post in a topic:
HMS Indefatigable 1794 by Blue Ensign - FINISHED - Vanguard Models - 1:64 scale
-
TheDuckDetective reacted to a post in a topic:
Glad Tidings by Paul Le Wol - FINISHED - Model Shipways - 1/24 - pinky schooner
-
TheDuckDetective reacted to a post in a topic:
Glad Tidings by Paul Le Wol - FINISHED - Model Shipways - 1/24 - pinky schooner
-
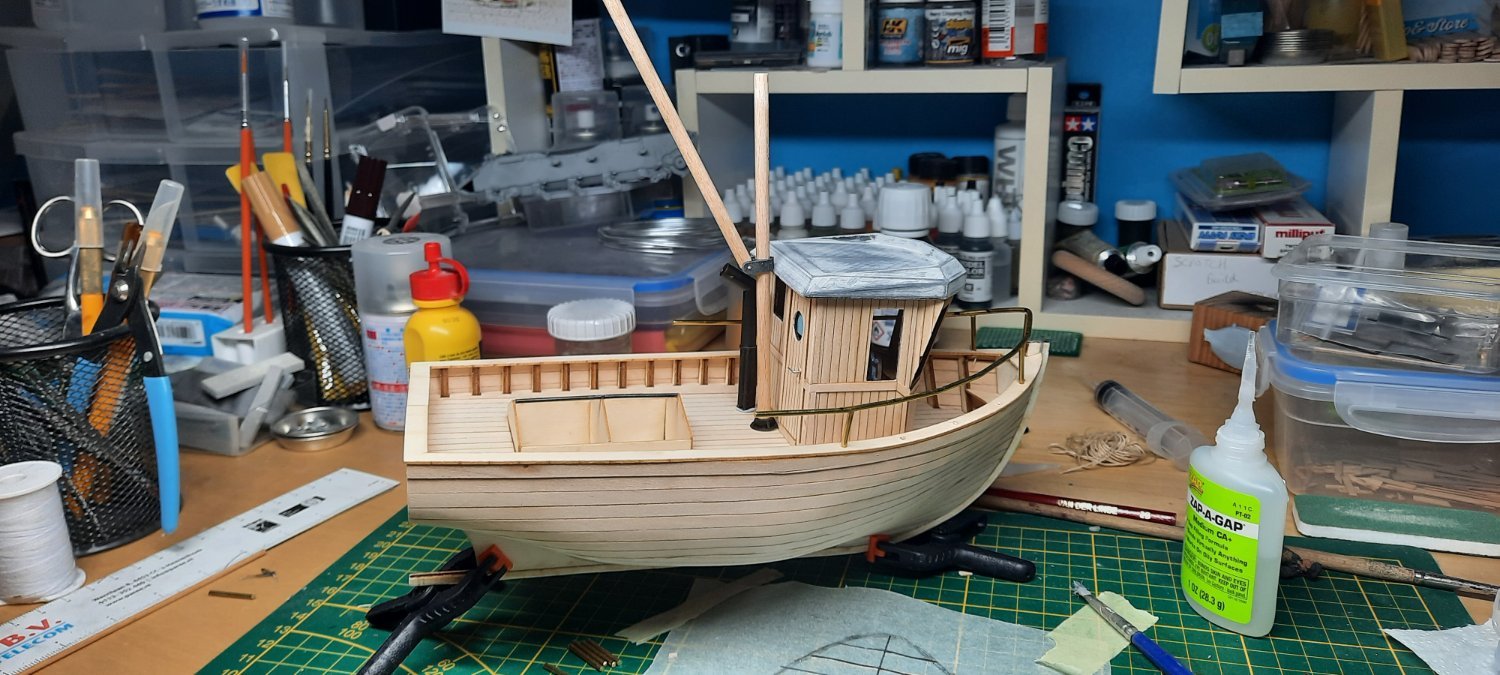
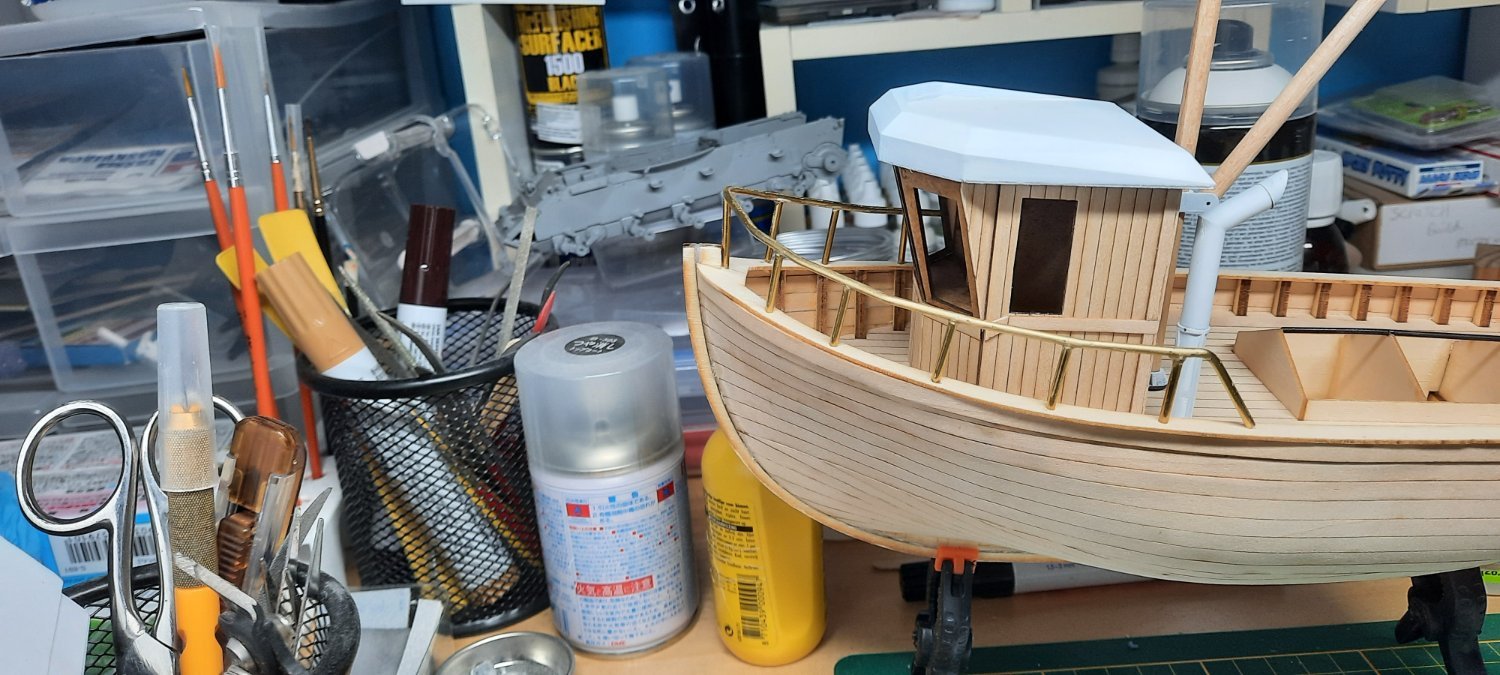
Thank you Paul! It's not a technically accurate build or anything but I'm sure it'll look nice in the living room. Last post was in April.. Time really does fly by when you're not watching. Work is still continuing on the boat though, albeit less fast. The antenna now doesn't have as steep of an angle, and I've made it some fastenings of copper plate. Although it might not be visible after painting. I've discovered a local store that stocks deck furniture and other small bits and bops, where I bought a couple of accesoires for the boat. One of those is the little brass horn which I made a small mounting to sit at the front of the roof. I've decided to make the mast longer and also slightly wider to give it more mass. Which I thought would look better. So I've reprinted the mastfoot and the swivel(which might be called a Tack, I'm not sure if thats for sails only). The cleat was made from small diameter metal wire with copper folded over to form the part that connects to the mast. The Pulley at the top of the mast is way out of scale but it was allready glued on before I really noticed. I'll keep it the way it is. Some copper plate wrapped arround the top of the mast for added detail. And I made the first eye on the boom. "Something something.. Double edged sword.." Even though it works, it might be time for a better saw.. I'm made a travel lock(not the correct term) to hold the boom. I might decide to not put it on the finished model since the rigging will hold it up. Test fitting everything. And I found some model cleats which I think look good, so they'll be used on the sides of the boat. Next up I made navigation light mountings from some stirrer sticks I found while raiding the kitchen. The lights are also from my local hobby store. Test fit with most of the smaller details. The small Chimney I made from some copper piping and 3d printed top connected with small metal wire. I didn't take any pictures during that fiddly process, but I am really happy with how it turned out. The navigation lights are maybe also a bit large for the scale, but I'm fine with how it looks. I've filed the kit window the fit the porthole I got which will add some extra detail to the door. I like how the boat looks so far. There will be some more details added and then the painting will commence. Also I feel like the boat is trying to tell me something here.. Maybe it's too humid the house. Thank you for reading and untill next time. - Duck


- 4 replies
-
- 5
-
-
- First Build
- Dioramaworld
- (and 1 more)
-
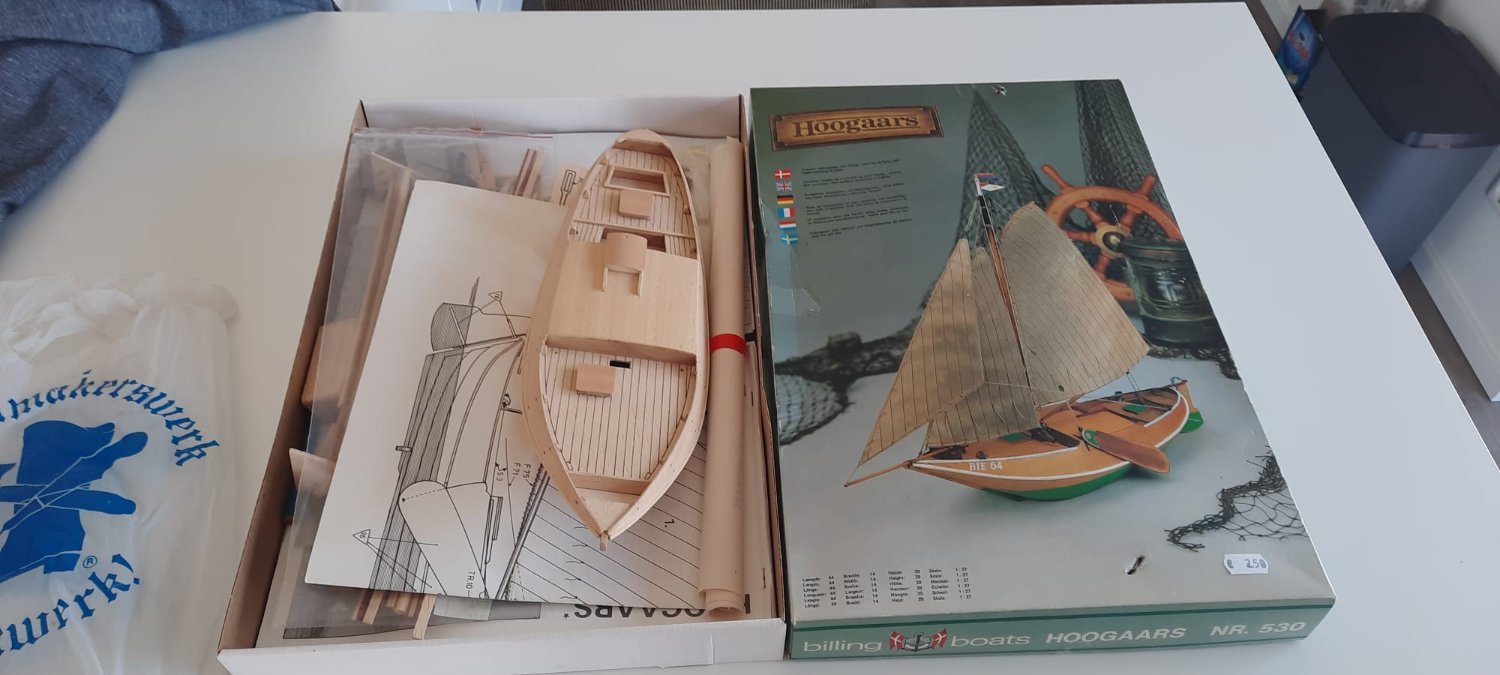
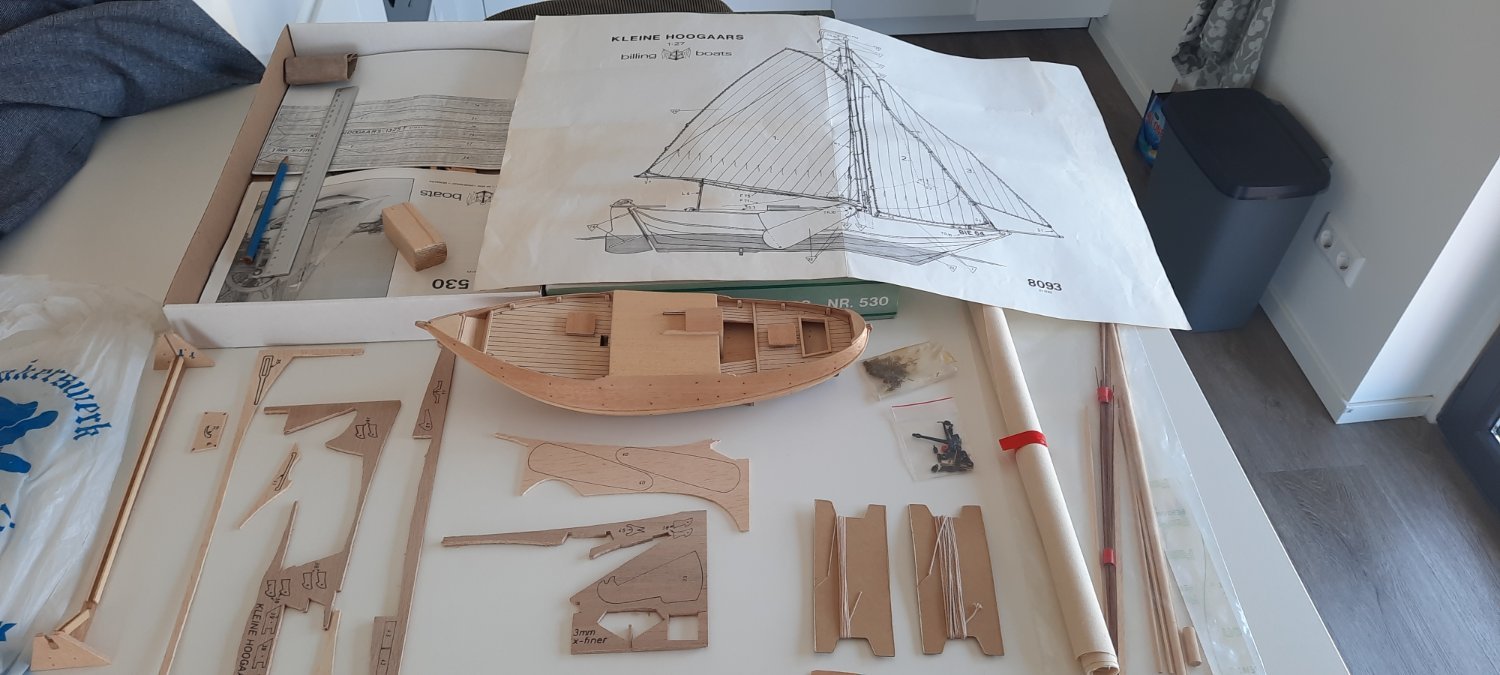
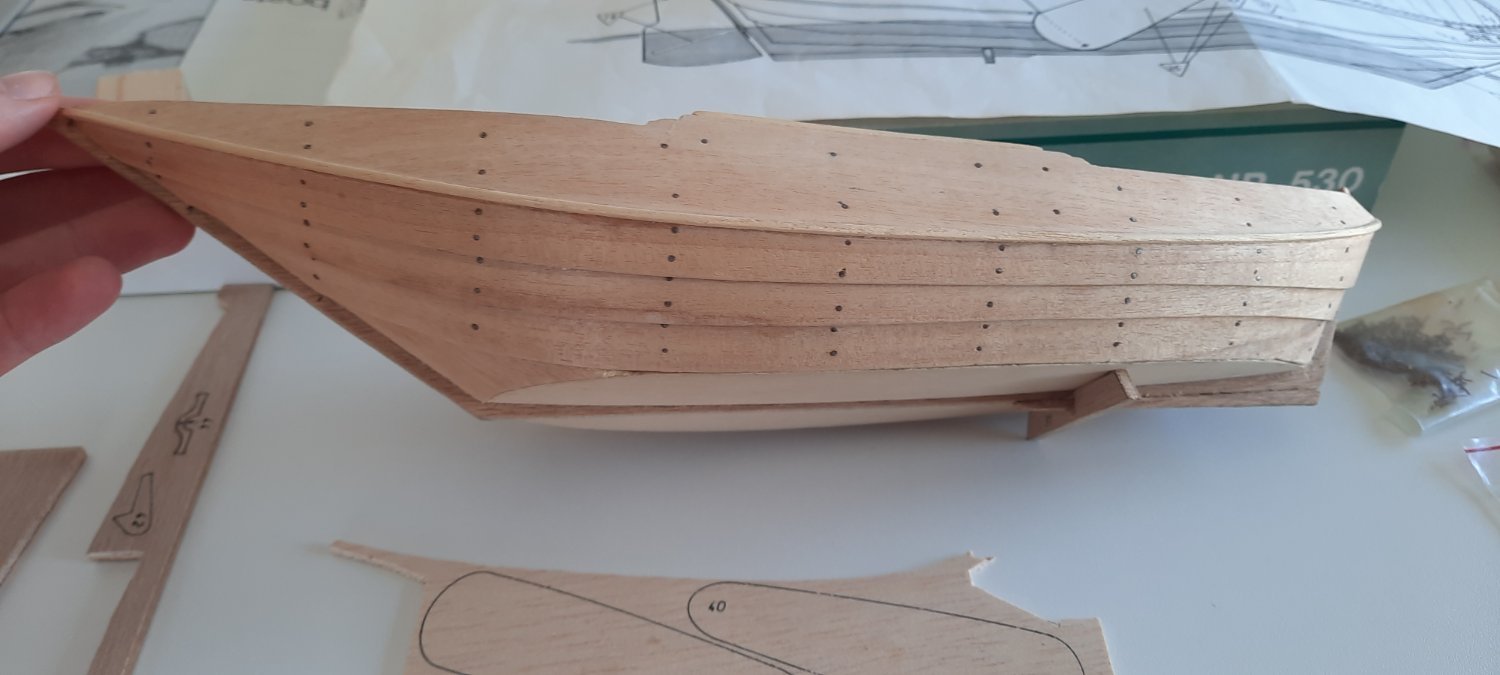
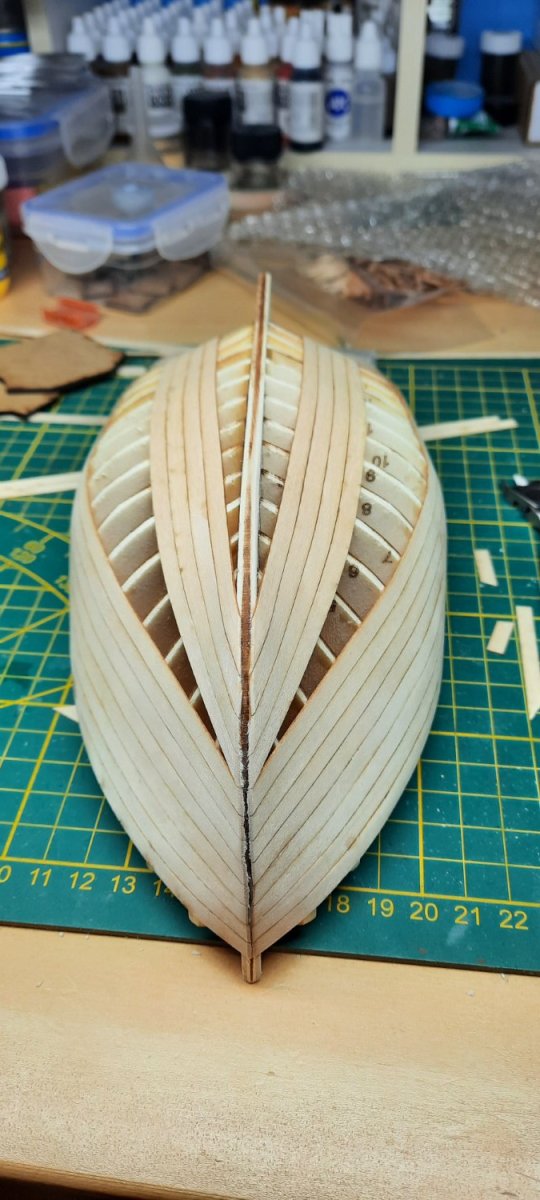
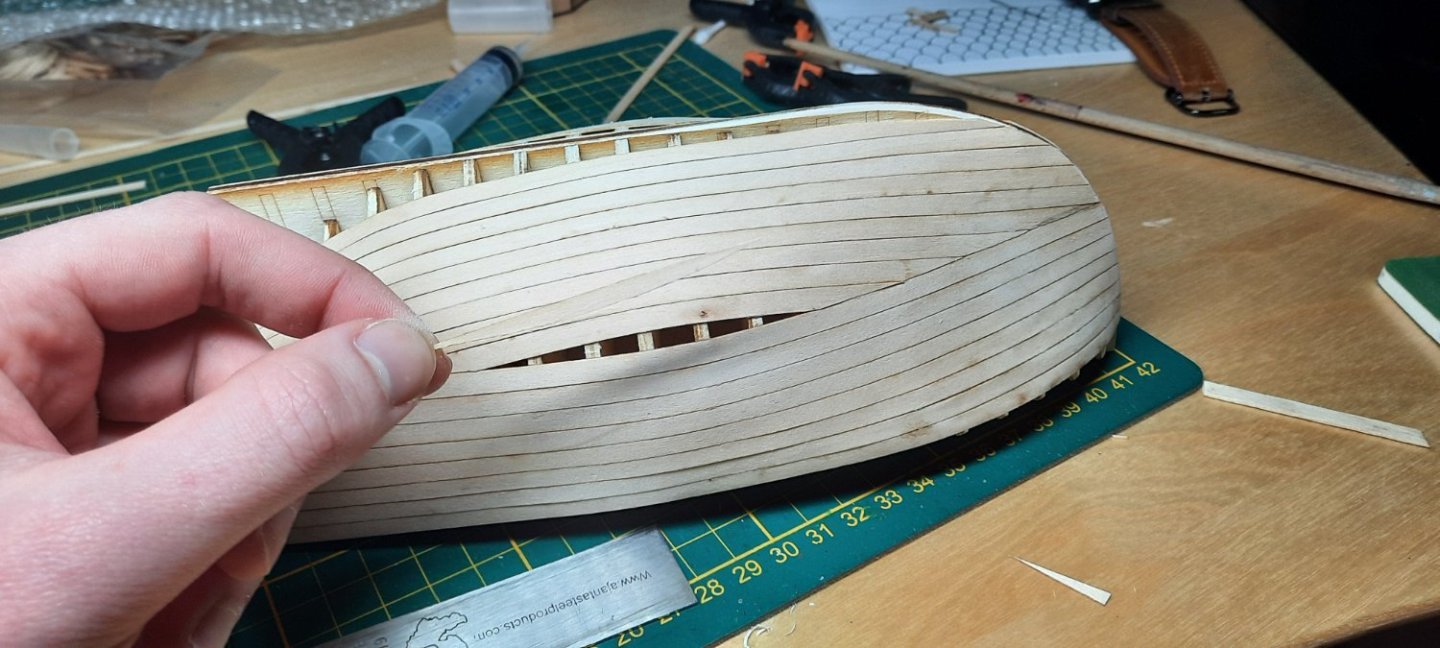
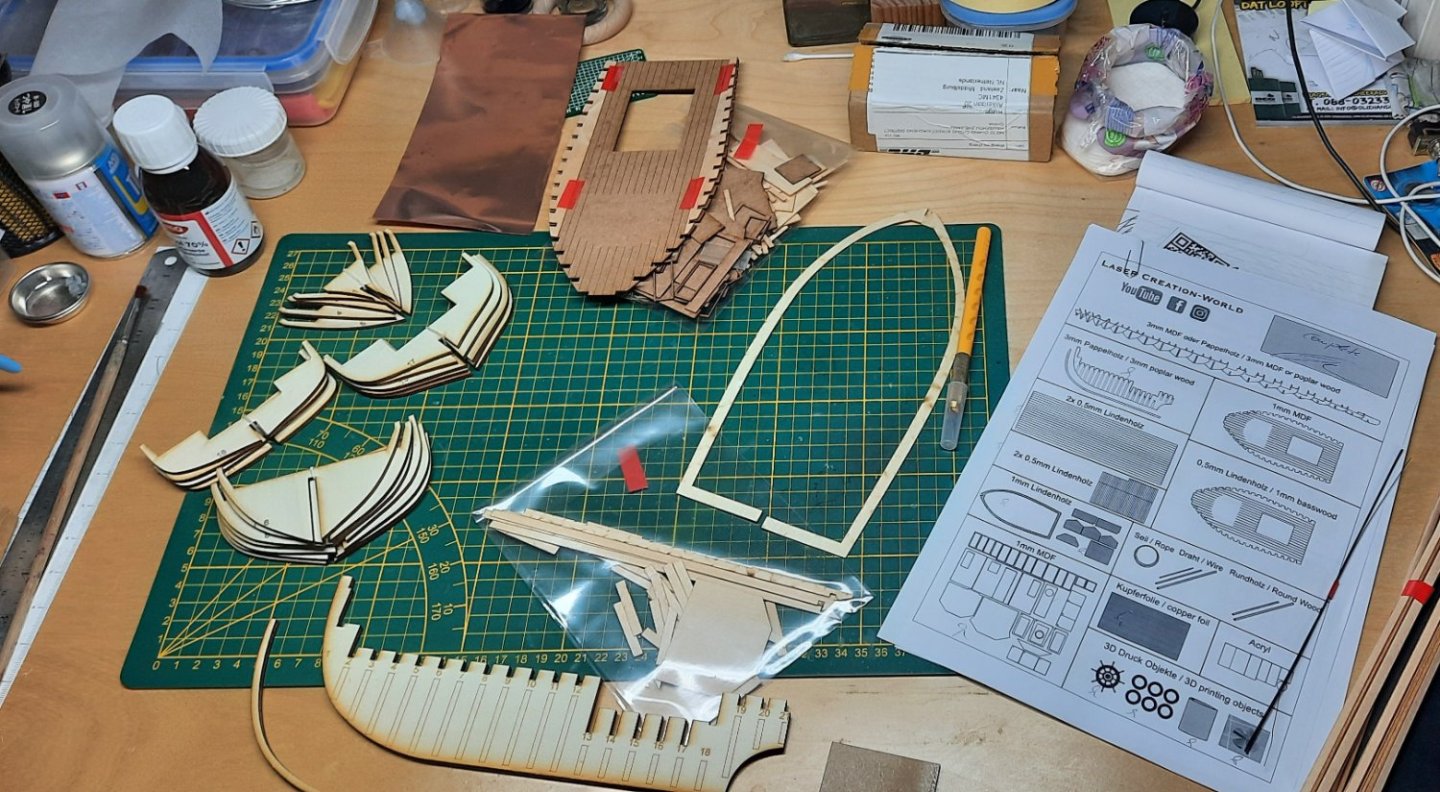
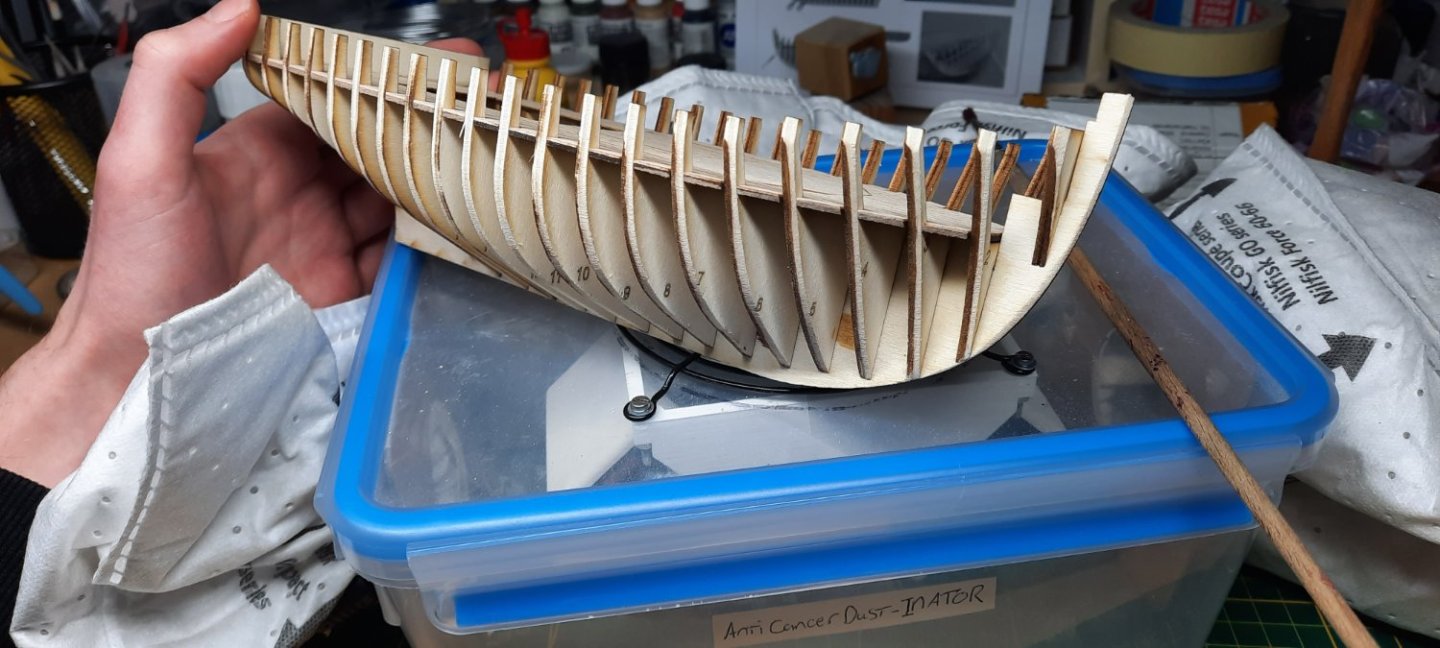
Post 1: The Project Normally I wouldn't start a new project when I still have to finish the last one. But I picked this kit up from the local Thriftshop in my new home town, while looking for a nice cupboard to put in the new house. After spotting this old and covered with a fair layer of dust (now discontinued)Billing Boats kit, I quickly checked if all the important bits were present in the box and hurried home with my new prize. The Kit is of a 1:27 scale "Hoogaars" Yacht. Now I think that "Hoogaars" isn't really a household name for most people. But it is where I am from, If one thinks of a traditionally build wooden ship. Its these flatbotomed beaties. The Town where I grew up used to be home to one of the bigger shipbuilding warfs of this part of the Netherlands and her Hoogaars ships were known as far north as Friesland and as far south as southern Belgium. History and Background. Its not entirely understood what the name "Hoogaars" means, the name is known to have been in use since the 16th century. Hoogaarsen are mainly used in the Dutch province of Zeeland (The Old-Zealand). The ships are differentiated from their other flatbotomed colleques by the sharp rise of their bows. The ships hulls have a water droplet shaped bottom hull and traditionally the side strakes are clinker-built. Depending on the shipyard they are rigged *** either Gaff- or Sprit-Rigged. The Hoogaarsen were mainly used for the fishing industry, but also as ferries, cargoships and passenger service. And they are equiped with the characteristic "Swords" that make sailing possible despite the flat botoms. Hoogaarsen were replaced as fishing ships at the end of the 19th century in favor of motorised northsea trawler type ships. During this period there were a couple of examples of hoogaarsen being built with steel hulls and equiped with engines. Some older wooden hoogaarsen were also upgraded. This upgrade didnt turn out as a success however because the wooden hulls were not suited to house a vibrating early petrol engine, and many ships quickly wore out. Luckily the wooden Hoogaarsen were still popular as pleasure yachts and many were built with a cabin and more luxurious outfitting. This is what the ship kit is. The Billing boats Hoogaars is a replica based on a ship that was built in the Warf of the town of Tholen. It was used as a ferry and after a couple of owners it ended up with a Belgian owner. This is when J. Van Beylen, A ship researcher from the Belgian Naval museum, drew the boat in detail and documented the building plans. The real boat, in a sad turn of events, but in a way we ship enthousiasts might have grown accustomed to, it didn't stand the test of time, she burned down after years of neglect. The drawings by J. Van Beylen are the only thing that is left about the boat. As far as I know there are no photographs. After a quick google I found that J. Van Beylen dedicated a small part of a book he wrote, to this particular hoogaars. And the Zeeuwsche library had a copy in its inventory. So I'll be getting that to see if there is any extra information I can find. Contents of the box The contents are remarkebly, complete. Everything was neatly put back into the box. The Spars, rope, fittings, sails, even the scrap bits of ply-wood. The hull is partly finished. There are a couple of detailing parts that are yet to be assembled onto the model. The characteristic clinker Strakes. The building quality is relatively high which makes me suspect that this wasn't someone's first rodeo. Which also makes one wonder why it ended up at the thrift store. One thing that stood out to me, is that the parts are not laser cut. So I'll be heading back to the thrift shop to find myself a small modelers saw. My plan with this project will be to follow the instructions, but I'll be pulling on books and real life examples to add a little bit more detail is the places where the kit might be lacking a little bit. I am very lucky to live within walking distance of a couple of ships that are from the same Shipyard as this model so I'll be photographing them as reference. This project will probably be on the backburner until I finish the current project. But till then I'll be researching the subject. Thanks for reading.


-
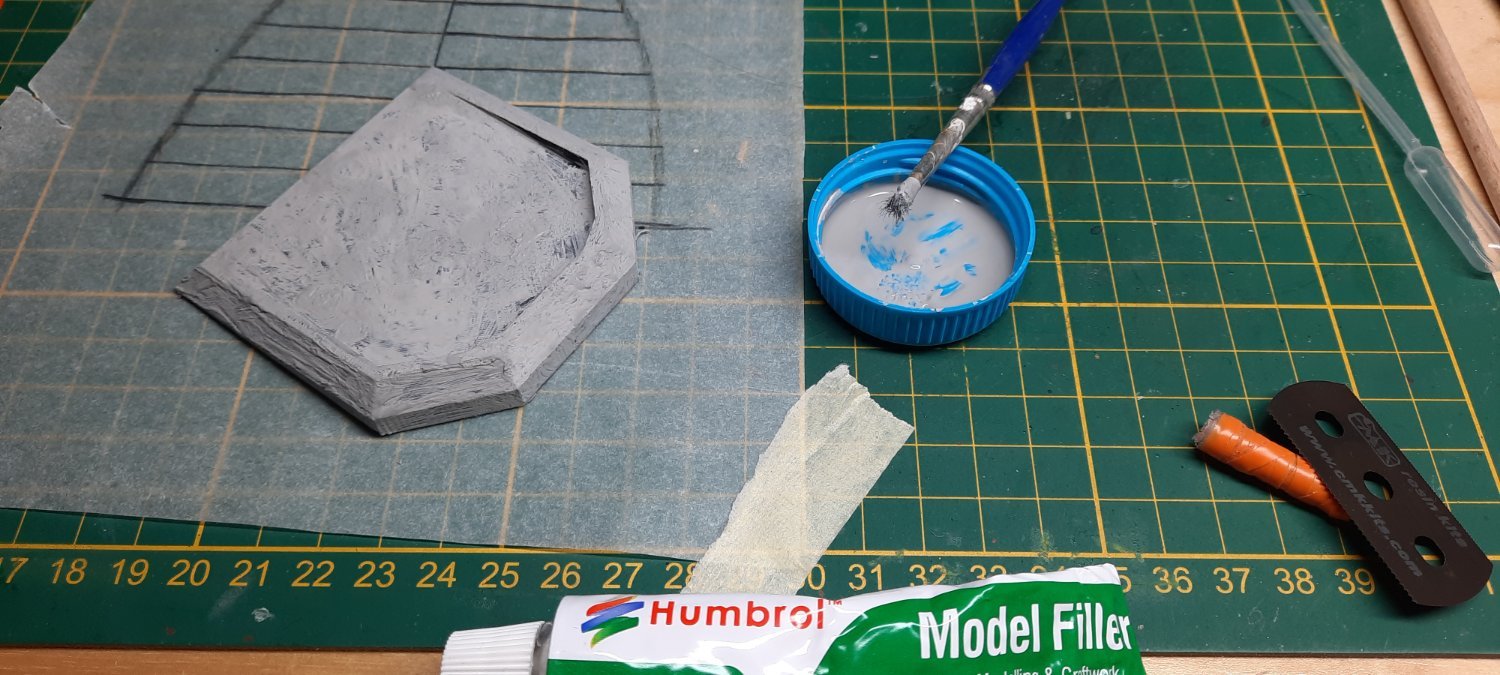
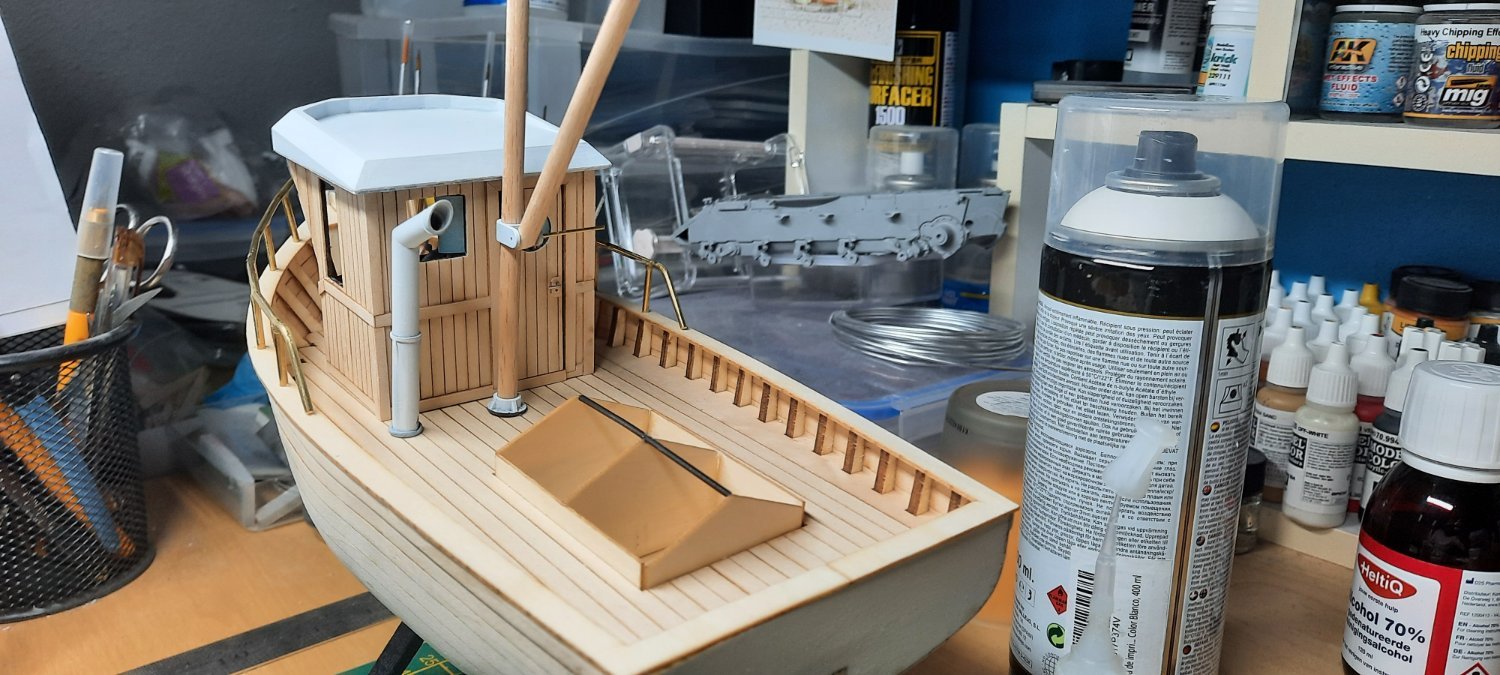
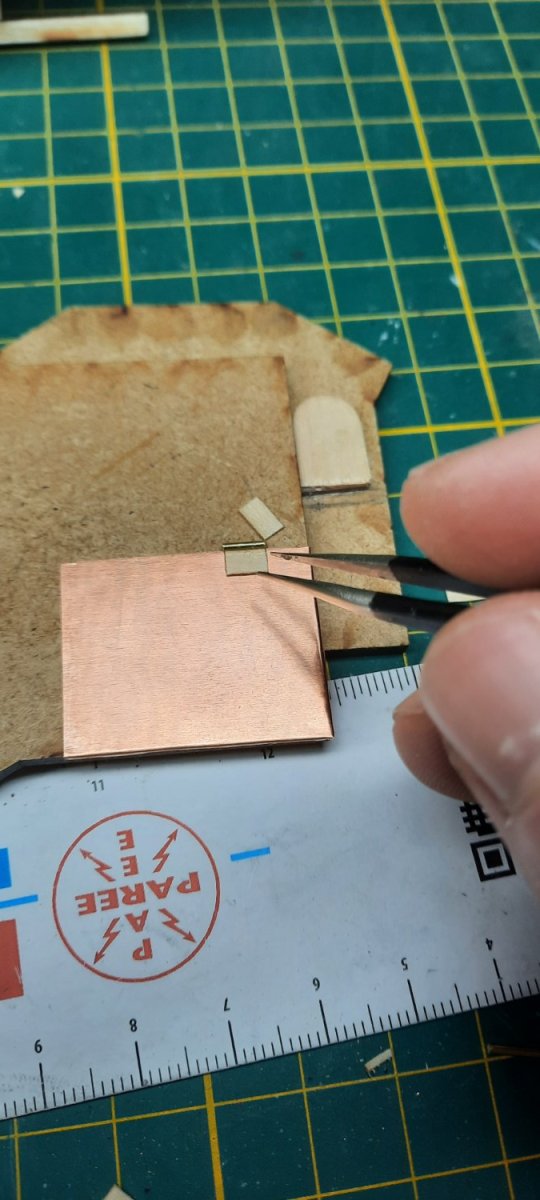
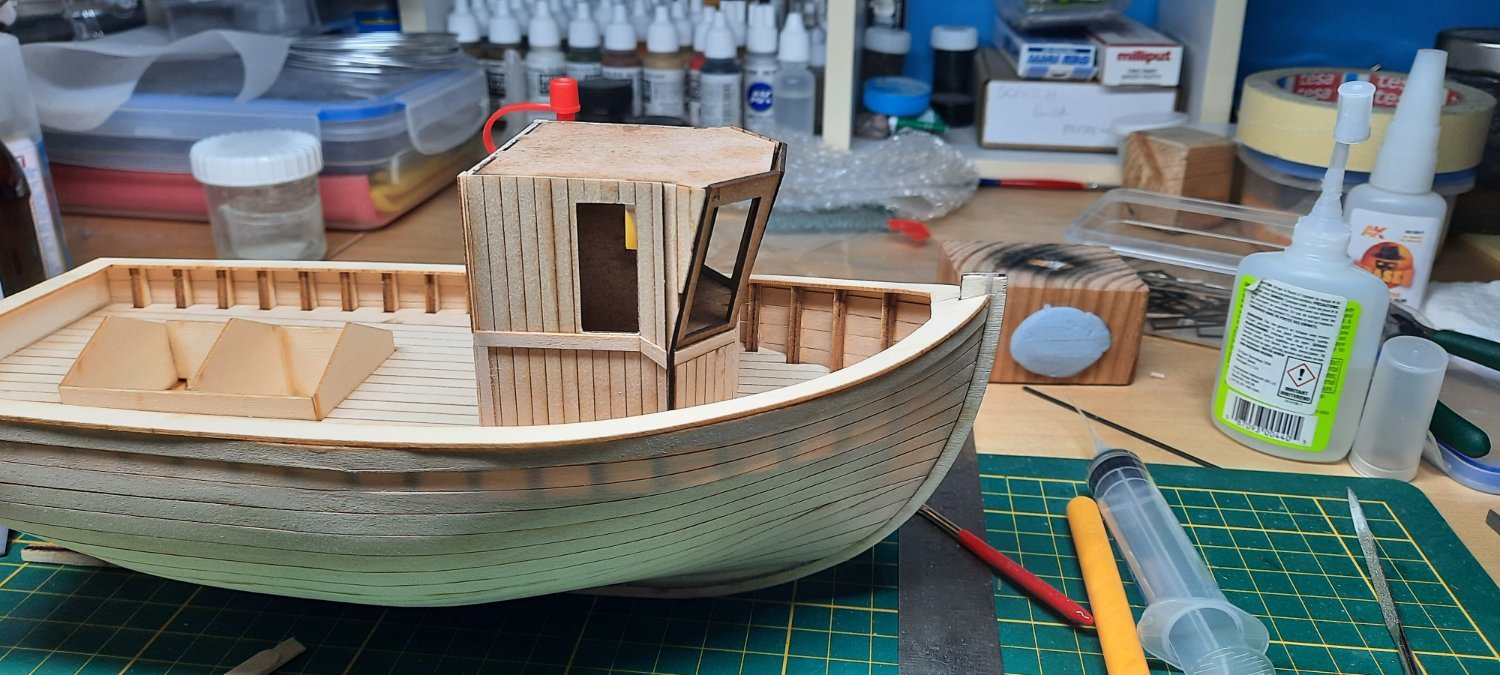
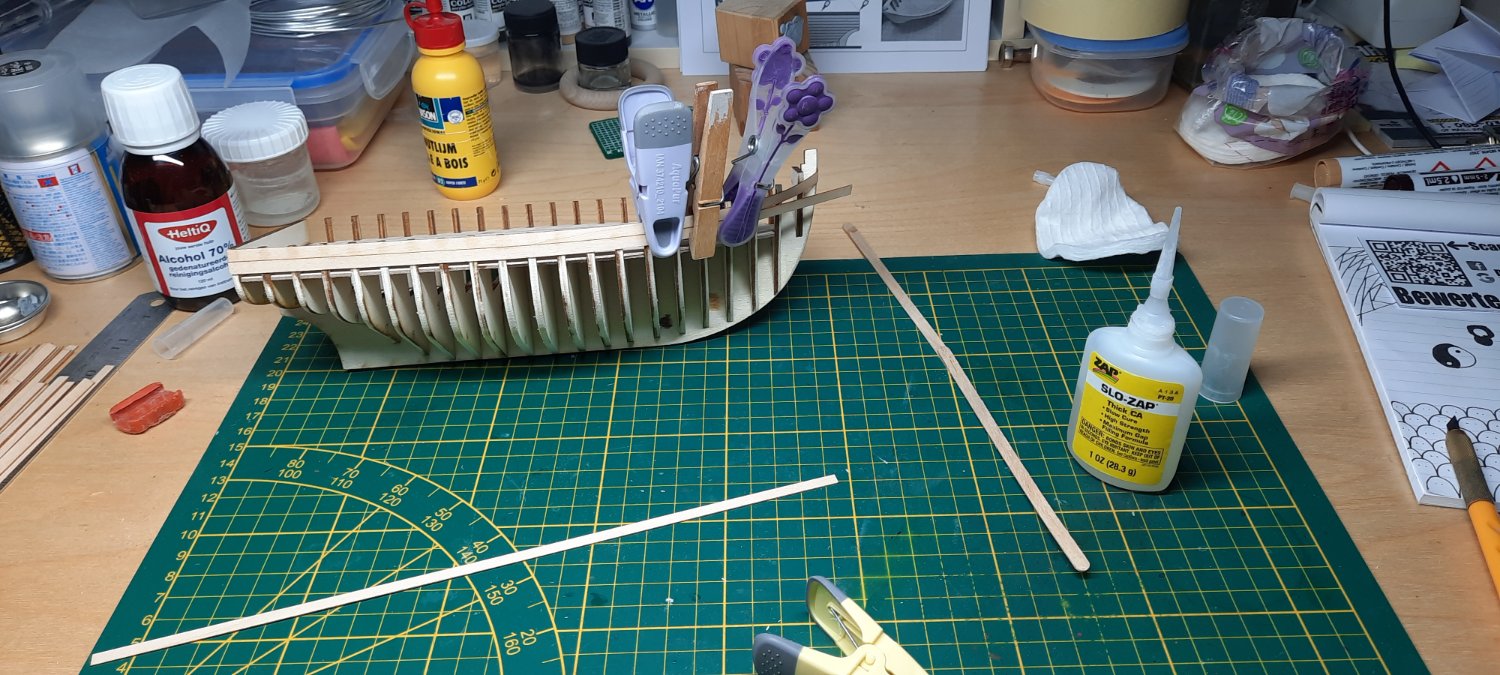
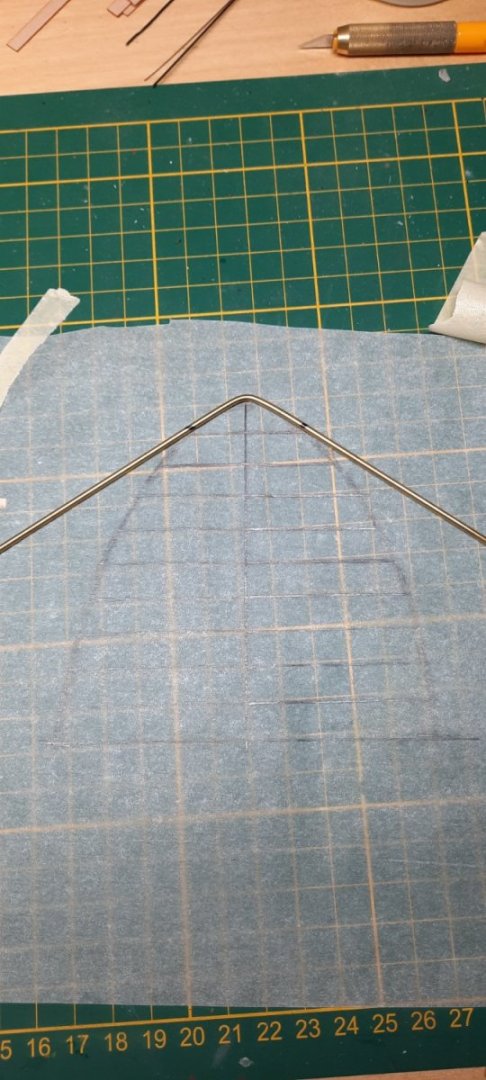
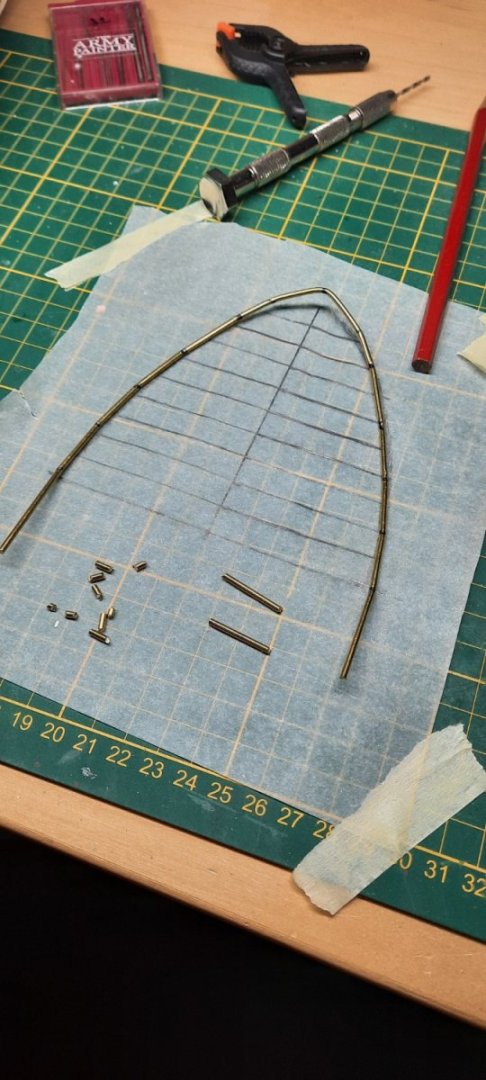
Allright, still in the midst of finishing up my graduation papers. But i've found the best way to wind down after a long day of writing to be working with my hands. So it's time for the 3rd installment of Duck building a fishing boat. Since the boat isn't based on a real example I've been taking inspiration from multiple vessels and taking the ideas that I think look good. I realise that the finished design might not work as a real working boat. But the project is allready running longer than I anticipated; which is probably something I should get used to.. Anyway... Todays post is about scratchbuilding. I wanted to give the boat a railing that runs over the bullwarks at the front. My aim is to make the boat look more modern. I decided to use 2mm brass rod to bend into the proper shape. It doesnt show in the pictures. but this was everything BUT as easy as I imagined.. I used white baking paper to trace the bow curve and used the tracings as a template. The horizontal lines are where the bends will be. After a lot of shaping. The correct shape emerged. This is me testing the height of the vertical stakes. I'm mostly eyeballing what looks good. Time for a bit of a sidetrack. I finished drawing some of the deck hardware and printed them for testfitting. Mastfoot and hinge, details are not very visible. but bolts and fasteners have also been modelled. I have to say that I'm really impressed with the accuracy of a resinprinter. I'm used to the very visible printing layers on PLA printers but the layers are nearly invisibly small on the resinprinter parts. The roof is quite a large print and thus printed with a PLA printer. Those layers will be smoothed at an upcomming step. Exhaust and roof. I smoothed the roof by covering it with modelling putty dissolved in modelling cement and sanding after drying. Everything fitted and some vertical railing parts are in place. I'm using CA glue to hold the brass rail together, but this was a mistake. I should have soldered the connections because CA glue connections are too fragile. I've lost count of the amount of times I had to re-glue one of the buggers because I was slightly too careless while handling the railing. 3D printed parts are primed and once again fitted. at this point I'm thinking about making the mast and crane larger. But I'll have to get new round stock. Hmm maybe. Time to add the hatches. The instructions called for copper plate with a handle of folded wire. I decided to add hinges and a piece of wood to fasten them on to. Small Putting scuppers in. It's finally beginning to look like a functioning vessel! I'm also experimenting with a antenna and running lights mounting point. Added a Jerrycan for added deck details. In the back of the picture the tires are visible that will be strung to the side of the boat. I think the one pictured below is too high and maybe a little bit unrealistic. That one will probably change a lot before I'm happy with it. The mast is going to be higher and pulleys will be added to opperate the crane and lifting hardware. I'm slowly nearing the end of the building stage and I've started testing some paints and wood/fastening similuation techniques. The scheme will probably look as follows: Under waterline: Antifouling Red Above waterline: Blue with white details Bulwark rail: Dark redbrown woodstain Deck: Unpainted wood Bulwarks: White Wheelhouse: White with dark wood stained details Thats all I have time for right now. Thank you for the likes and taking the time to read this log! Till next time.


- 4 replies
-
- 4
-
-
- First Build
- Dioramaworld
- (and 1 more)
-
I'm not sure if its frowned upon to revive an older topic, but I wanted to let you know that your log helped me in my own little journey. Currently in the process of deciding upon my next build, It's probably going to be The Lady Nelson. Thanks for this great build log! I've learned a lot and I enjoyed seeing your craftsmanship. Cheers from the other side of the pont!
- 55 replies
-
- 2
-
-
- lady nelson
- victory models
- (and 2 more)
-
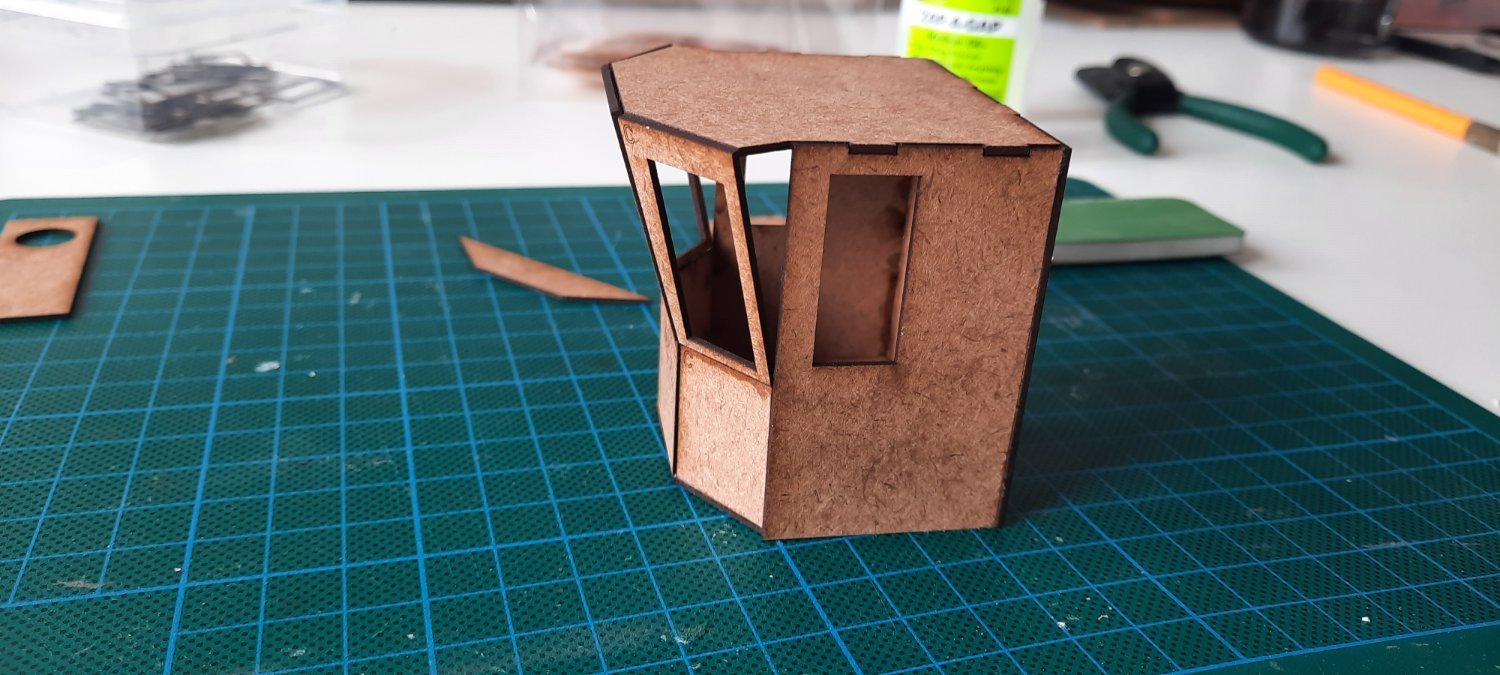
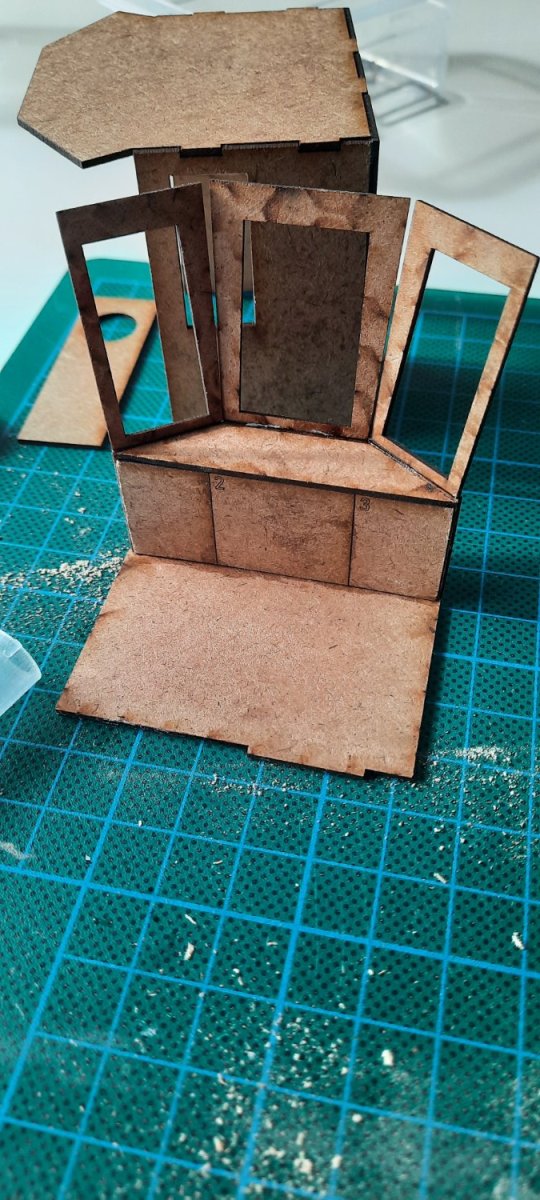
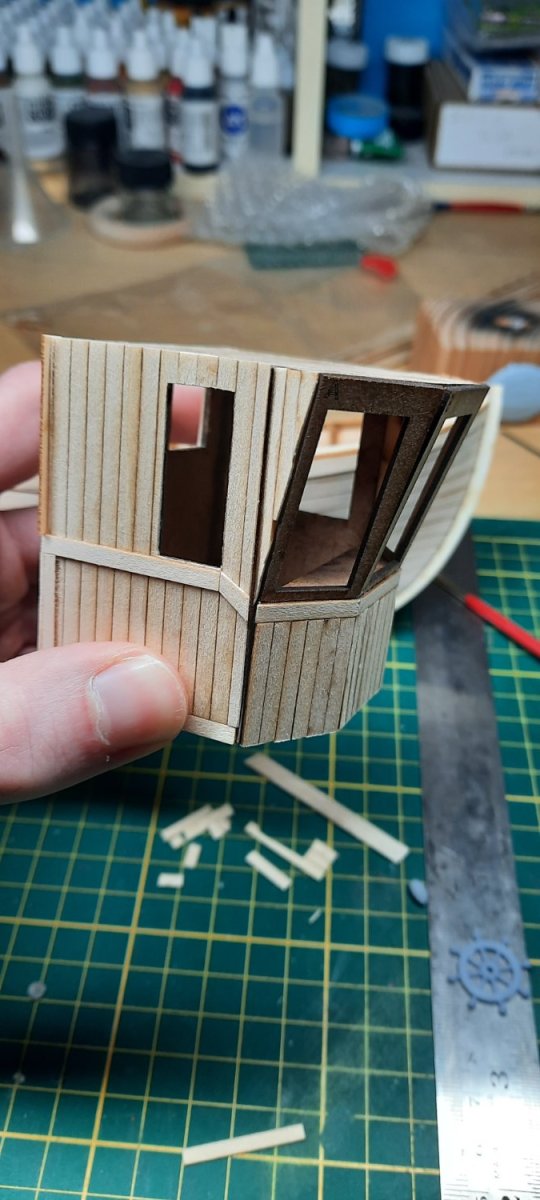
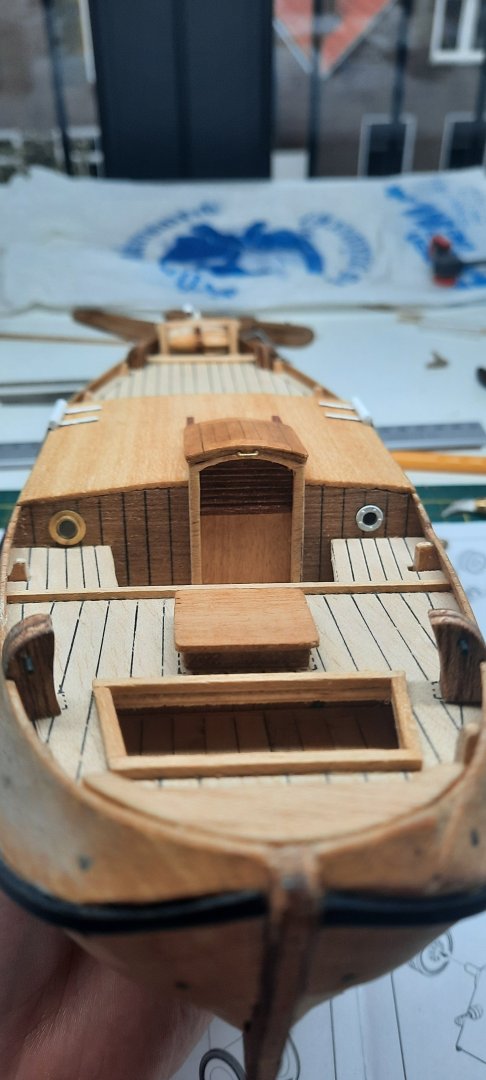
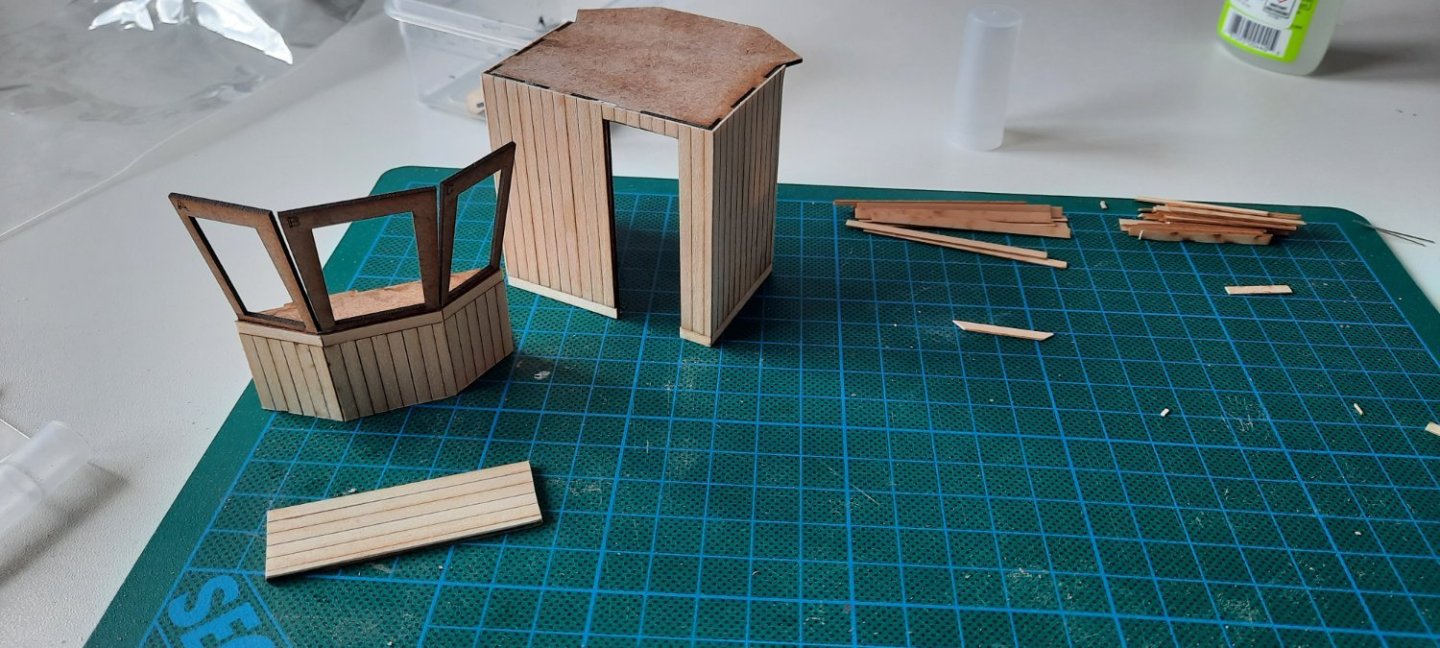
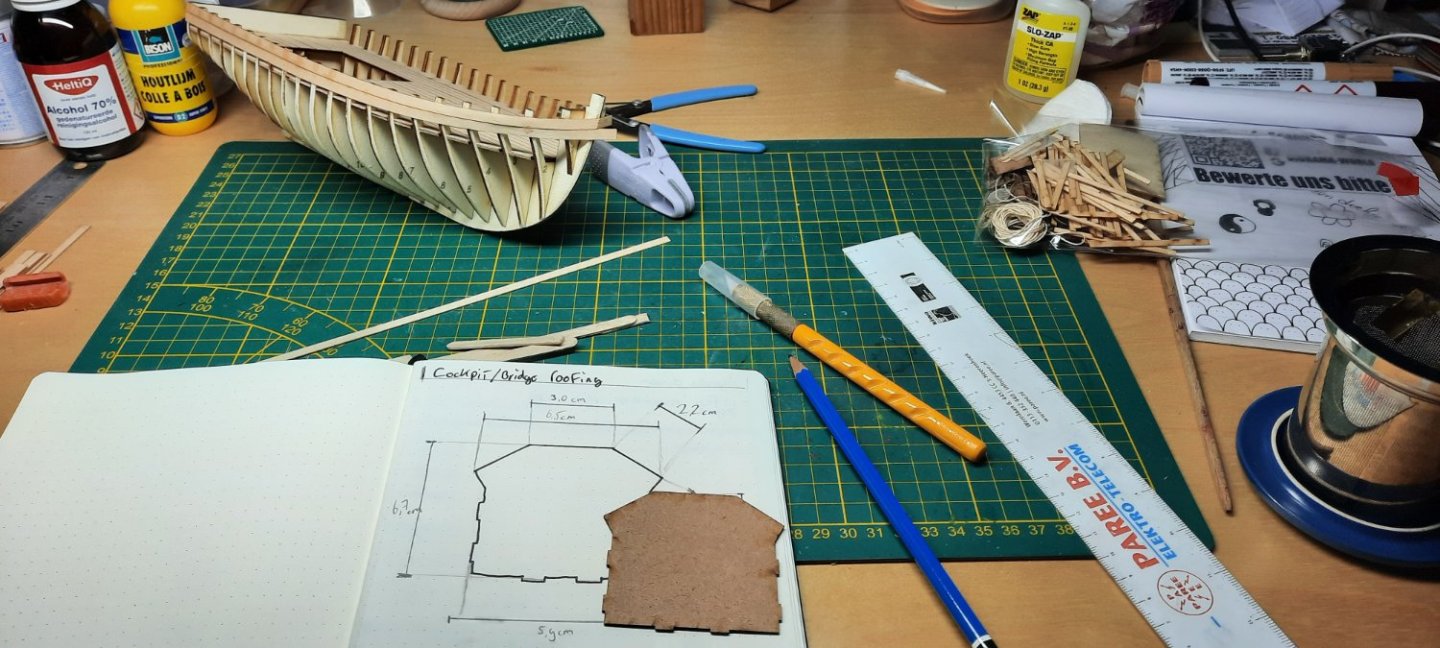
Allright, exams are over and even though I'm still in the midst of graduating I've made some time to continue the build. For the planking technique I have chosen to go with the method suggested by the Kit instructions. From the sheer strake down there'll be 8 planks total. After which a plank will be put roughly in the middle of the remaining unplanked area, this plank will run straight but touch the ends of the allready laid planks. I'm not sure what this method is called but I've seen others doing it this way too. More planks are added parallel next to the newly laid plank until there is no space for unmodified planks anymore. Now came the part which I was dreading a bit. I had to taper the planks to fit into the remaining gaps. However, after the first two planks I found a way that worked for me. Which was to put the plank up to the point of the tapered space and mark on the plank where the full width plank will fit again. Then I cut the taper into the plank by clamping it and a ruler to secure them during cutting. This worked really well. I quite like the planking proces, I find it to be meditative. Sanding planks to be true to the transom. If you take a look at the last plank next to the deadwood, you can see where I lost my patience a little bit. Not to worry, I might be able to clean that up with a bit of sanding. Over all very happy with the result of the planking. Put in some planks to raise the bow and gunwale. After fair those down to match the lines of the ship. I put on the gunwale. Now it's time to start working on the wheelhouse. The base is lasercut MDF and it will be covered in the balsa strips. This is where I first stray from the instructions because I wanted to put my own spin on the design of the wheelhouse. Base mdf Base layer of planking. The windows will be filed into existence. The doorway gets a frame and the lines underneath the windows and baseboard add detail to the structure. The lines run along the entirety of the wheelhouse to unify the design. The Keel also gets an extension which runs up to where the rudder post will be. Since last time I've switched to fast working CA glue which has made a world of difference and I will defenitly continue using it. Next up is up detailing the wheelhouse. Design and make the roof. start work on the deck furniture and deciding on the equipment. Thats all for now.


- 4 replies
-
- 6
-
-
- First Build
- Dioramaworld
- (and 1 more)
-
TheDuckDetective changed their profile photo
-
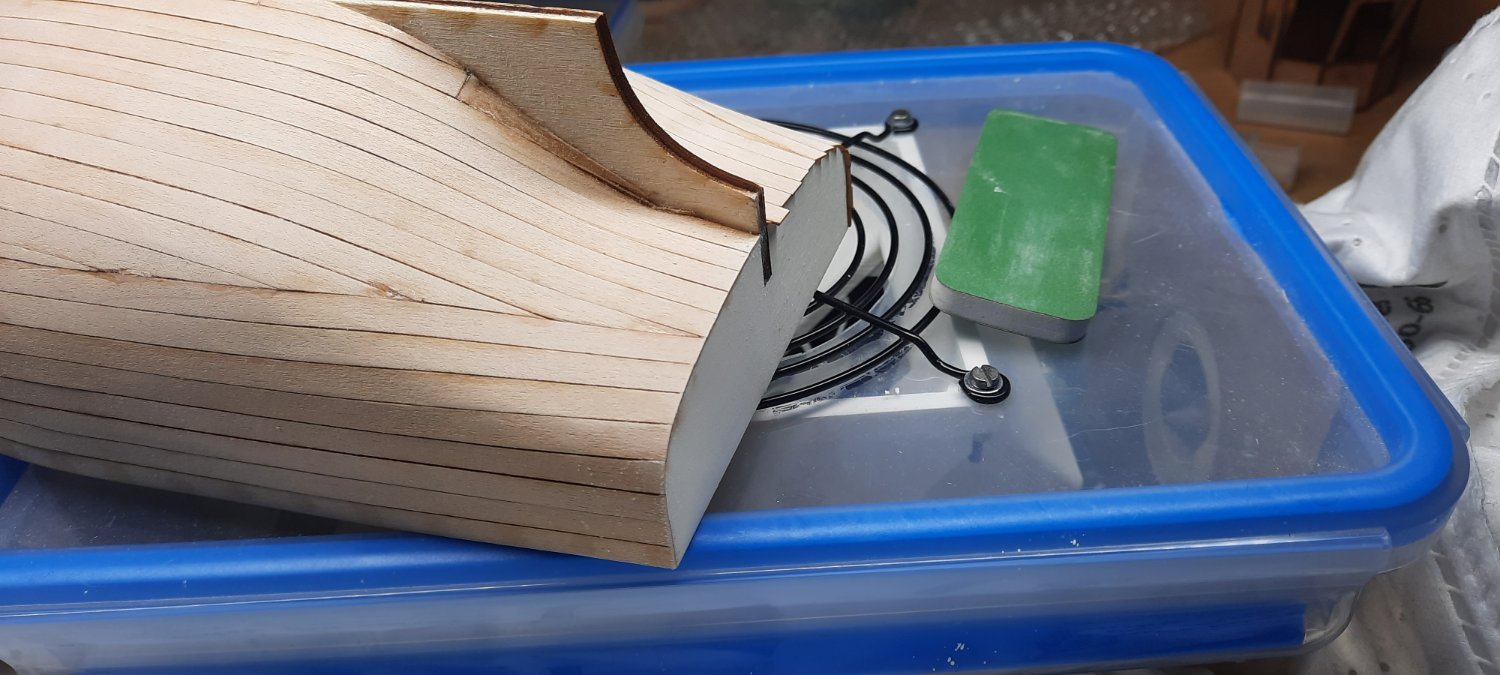
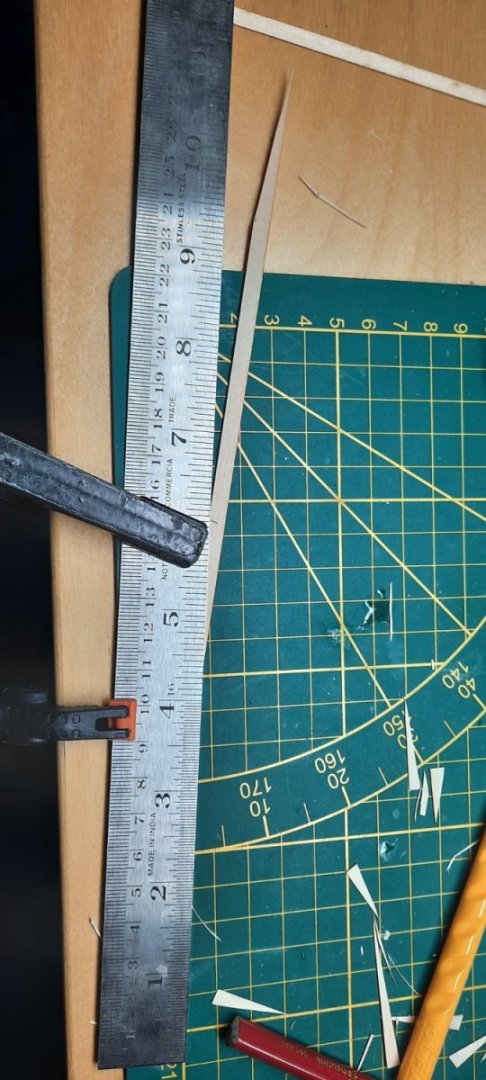
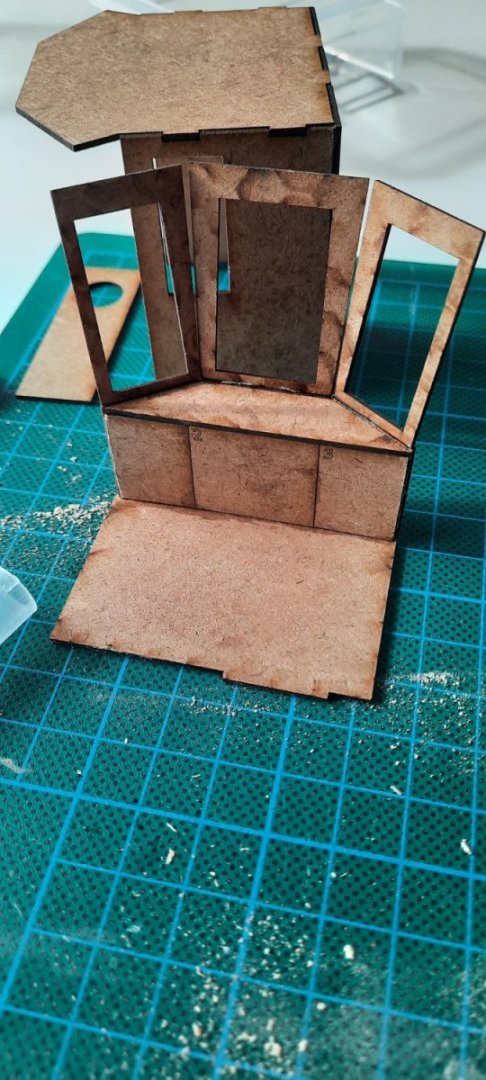
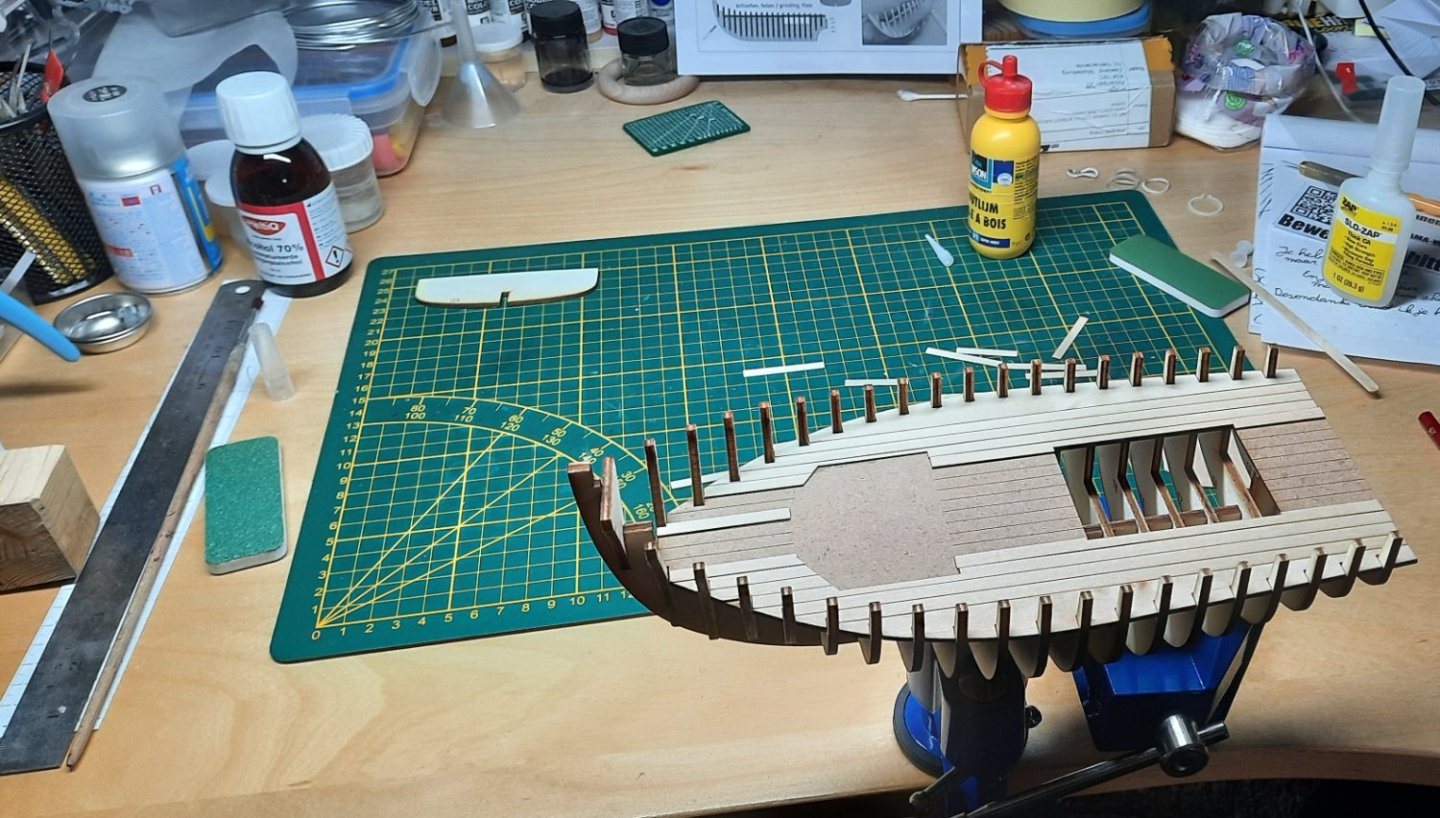
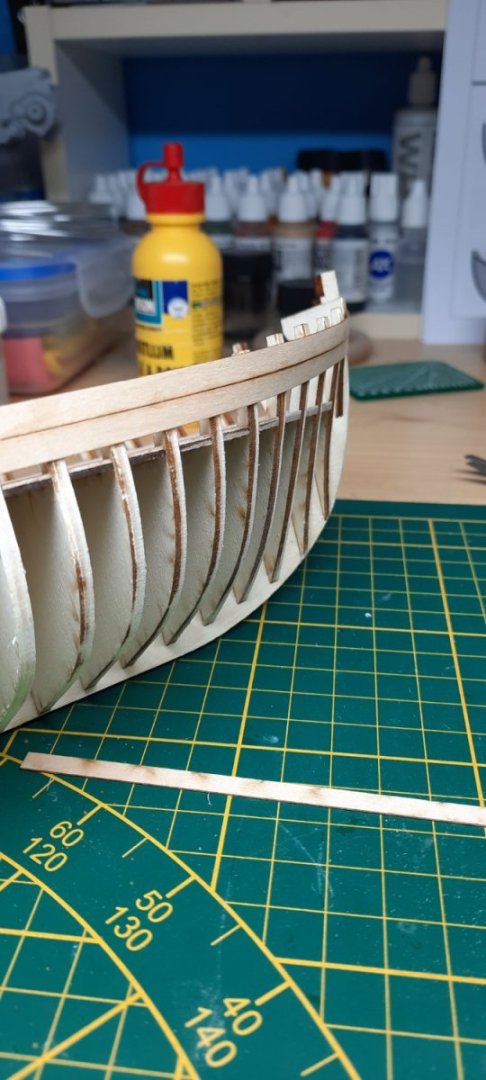
Geetings everyone, I am a new to this forum, Dutch modeler. Today I will be posting the first build log of the build that will be about me dipping my toes into wooden boat building. I have build and painted several plastic models, resin figures and metal soldiers during my adult modelling career. I've always looked in awe at the wooden ship models of those beautiful tall ships and thought of it as something that was a step too far for me and my patience. However I recently saw a youtube video about a "small" fishing vessel that looked like it would be very doable and would allow me to venture into the wooden model world to see if it was something I could enjoy. So long story short. I order the Fischerboat No.2 from Dioramaworld and while I wait for it to be sent to me, I do my research. It took quite a while to arrive because the kit is made to order. When it arrives I check the contents and everything seems to be in order. The quality seems to be really good and the instructions, which altough relatively barebones compared to most plastic model kits, are clear and I start by assembling the bulkheads and false keel. The deck goes on afterwards, everything gets clamped down and glued with CA glue. Next up is the planking of the deck, the planks have been precut and need some encouragement to fit between the stanchions(Bulkheads?). Maybe I shouldn't have glued the bulkheads to the false keel yet. Alas, Luckily nothing major gets damaged. Planking goes fast and every plank gets secured in place with CA glue. Next up is fairing the bulkheads, which was a bit tougher than I had thought. I though my rigid sanding sponge would be sufficient but it turned out to be too small and at the same time, too big at some spots. So I will be getting a sanding block and better metal files for the next build. For those who are interested. The blue box seen in the above picture is my home grown dust-extractor, based around 2 server cooling fans that filter the air through fine dust-rate vacuum cleaner bags. After I'm done fairing. It's time to start the planking. This is where I run into two problems. The first one is my glue, which is a "slow" thick CA glue. Keyword here being "slow". Which was advantageous on my other model, but is a royal pain in the rear during planking because it takes a dab of glue 7 minutes round to bond a plank to a single bulkhead. This combined with the second problem of me not having enough clamps creates a planking rate of around 2 planks, every one and a half hour. This glue obviously won't do. So I'm leaning towards buying a faster setting CA glue. But I've also seen people recommending better clamping methods paired with wood glue. or even using nails instead of clamps. I'm still on the fence about it. I'm pretty satisfied with the result so far. Even though I couldn't get the plank to bend up, towards the bow. I will be able to fix this in a later stage of the build with a steeler plank. That is as far as I have gotten this weekend. Life has restarted this monday and planking will have to continue at a later date. An order of clamps will be coming in this week so at least I will be better prepared. I'm open to idea's about how I can upgrade my planking technique. I had good fun with these first steps and I can't wait to continue. As a side note, I'm planning to rework some of the cabin. In particular the roof and on board systems. I'm also planning on replacing the mast with fishing equipment to make it look like one of the fishing boats that are moored in my local harbour. I'll be drawing the parts in CAD and printing them with a Resin 3D printer. Thats all so far. -Duck


- 4 replies
-
- 6
-
-
- First Build
- Dioramaworld
- (and 1 more)