


AndrewHenwood
-
Posts
14 -
Joined
-
Last visited
Content Type
Profiles
Forums
Gallery
Events
Posts posted by AndrewHenwood
-
-
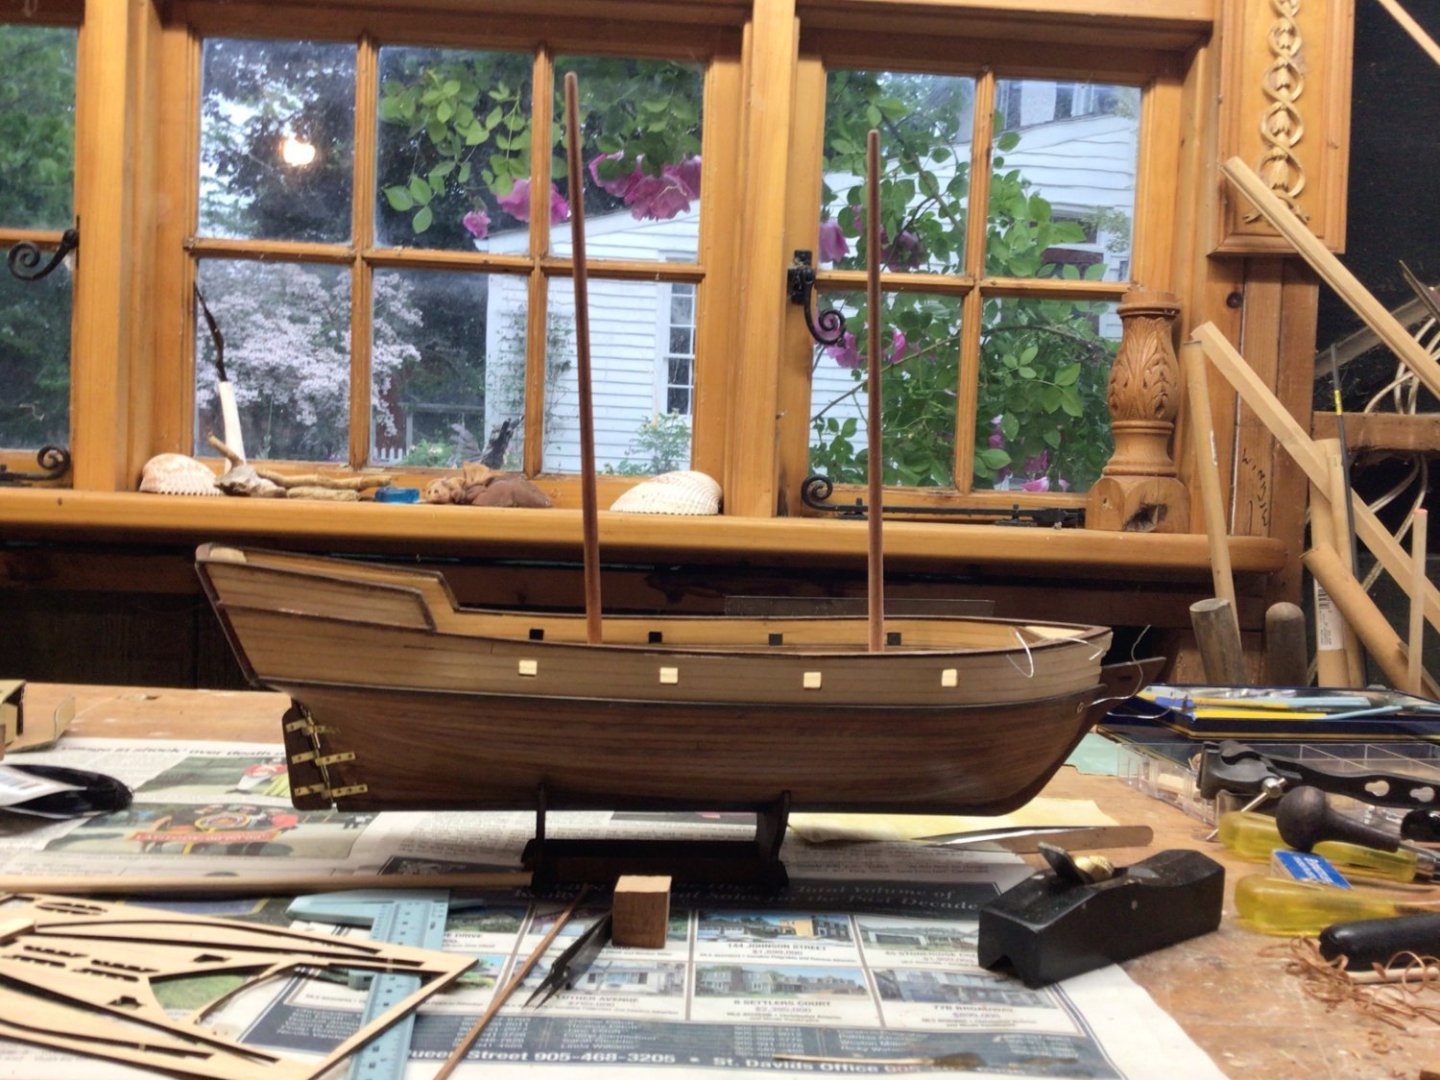
Slow progress here indeed, but I'm enjoying it very much. The instructions say I should next install all the 'deck furniture', that is items like the windlass and pumps, hatch, etc. I am beginning to stain and paint those bits and pieces. However, I am looking forward to doing the rigging, so have begun making the masts and spars at the same time.
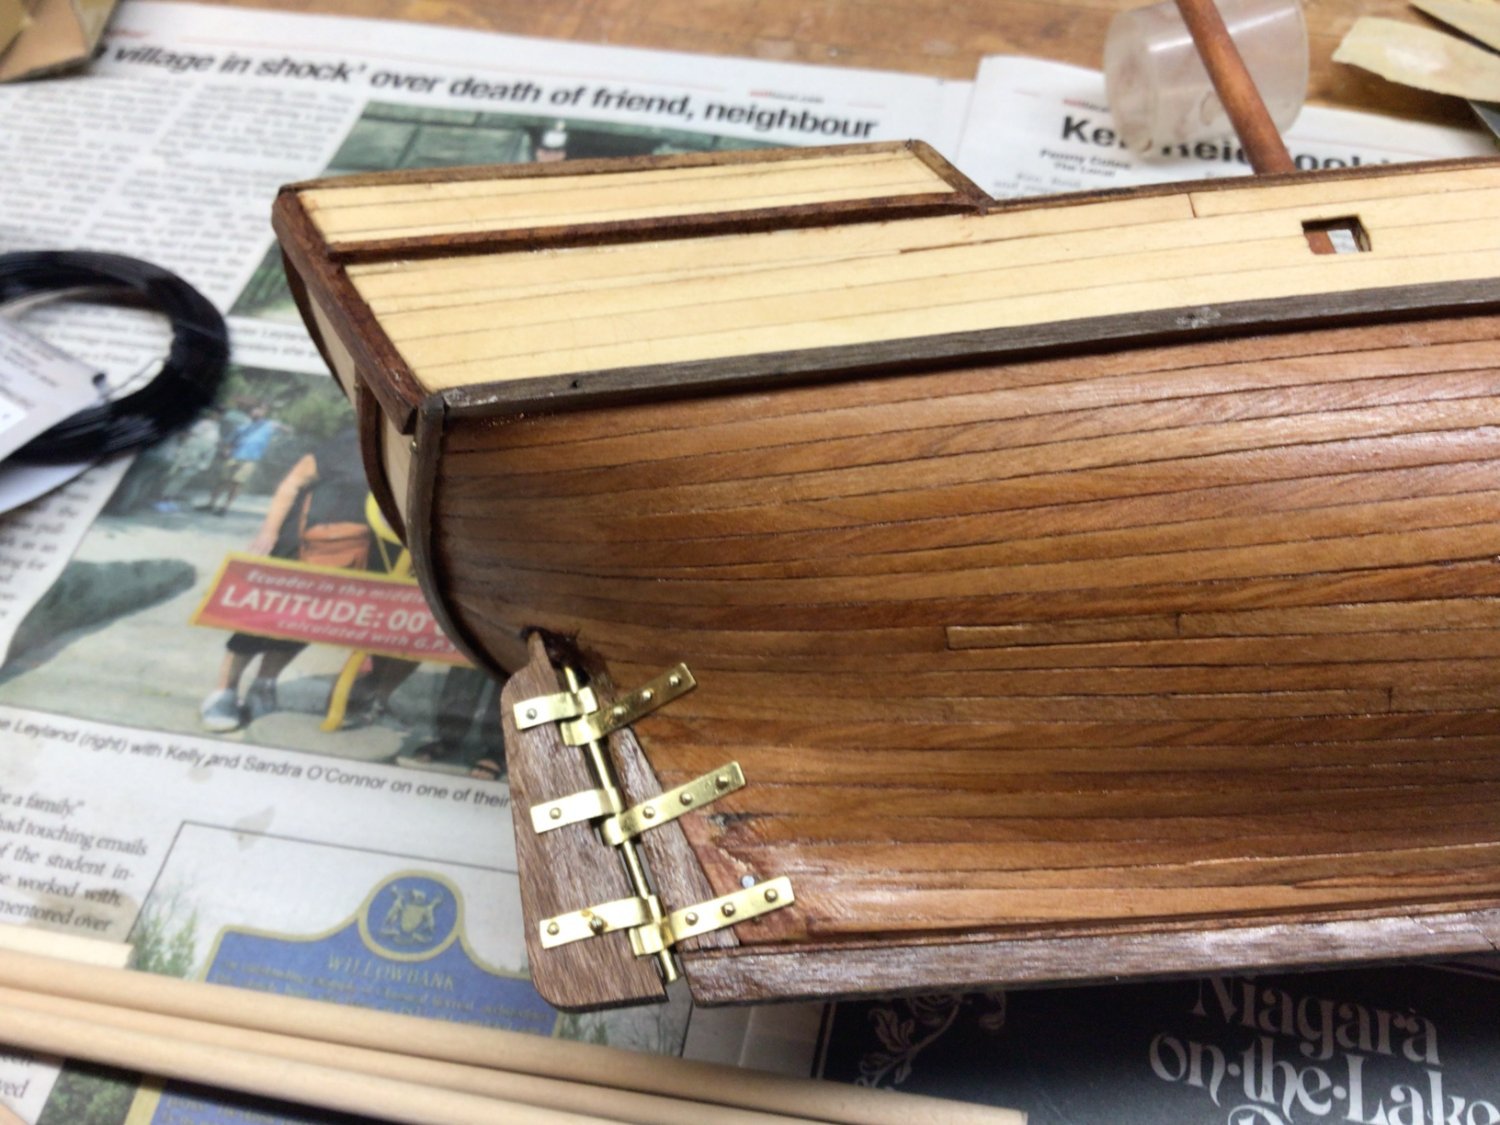
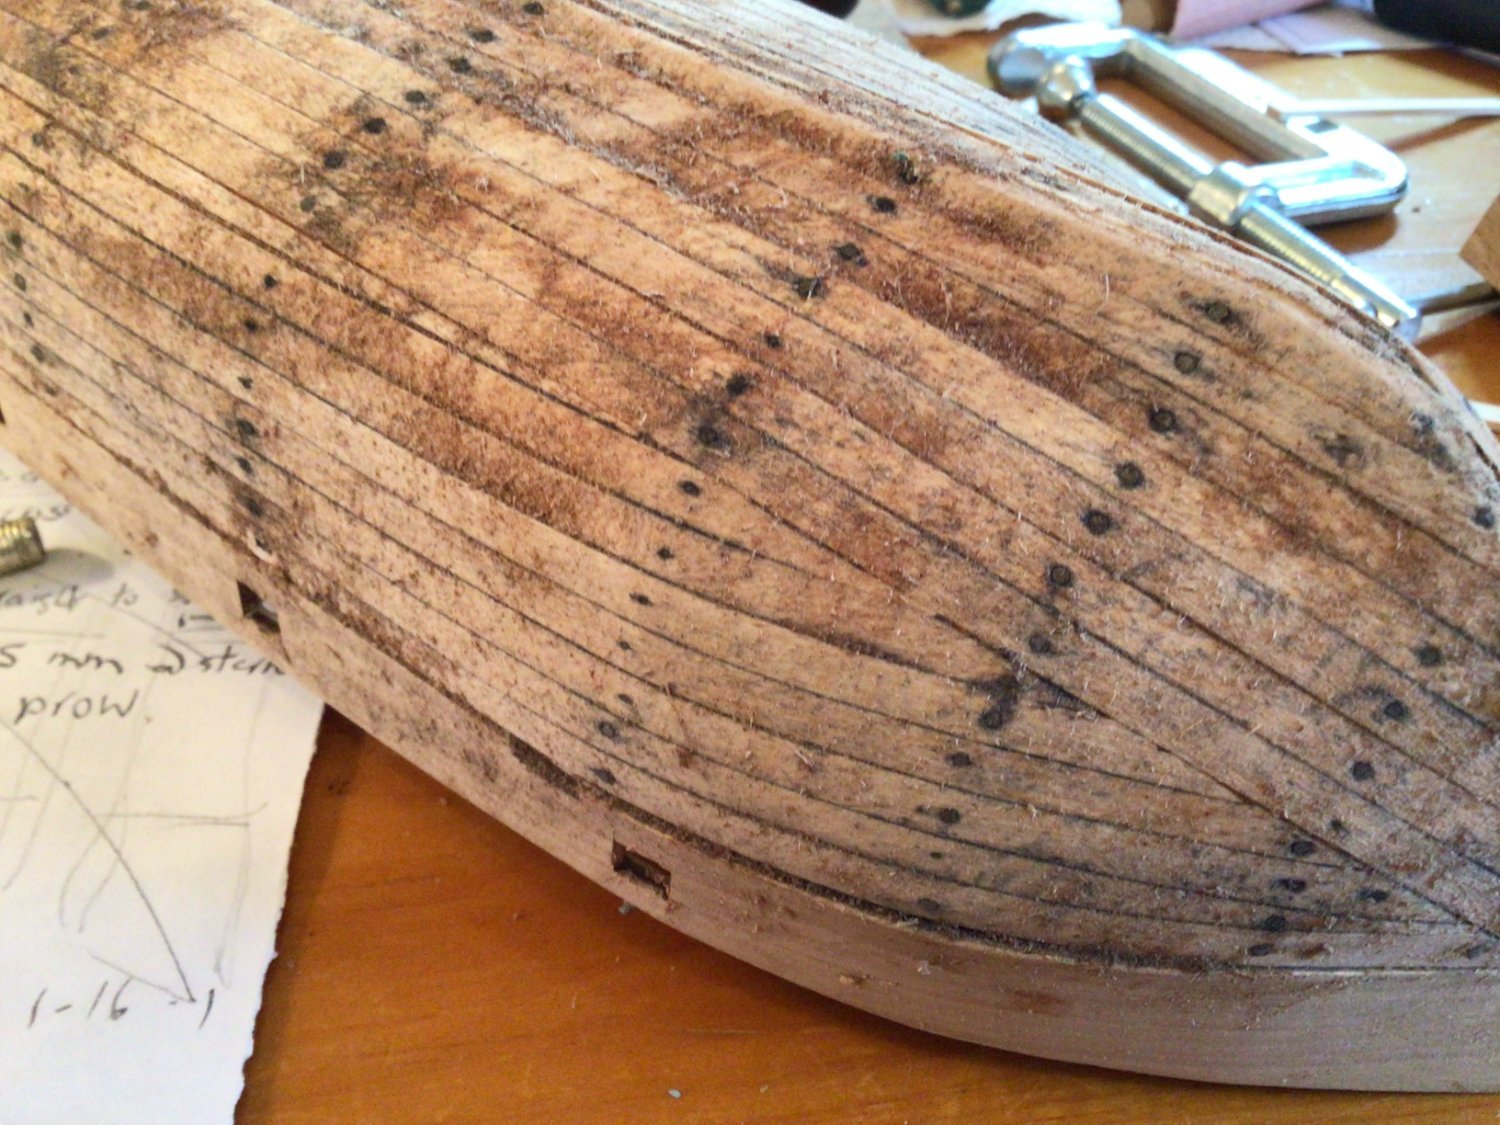
As you can see, the photos here are mainly to show the planking and rudder details. I didn't use the secondary planking provided with the kit. Those mahogany strips were 5mm wide. Since we're dealing with a scale of 1:100, that would represent planks about 20 inches wide! I didn't like that idea, so I went to my stash of cherry-wood strips and picked the narrowest, which were 1/8" wide and .5mm thick.
For the finish I brushed on two diluted coats of polyurethane gloss varnish, followed by a final coat of diluted satin, rubbing down between each coat. I much prefer to use these products thinned down. Granted that means more coats, but I'm not in a rush.

- Ryland Craze, Tom E, Mr Whippy and 3 others
-
 6
6
-
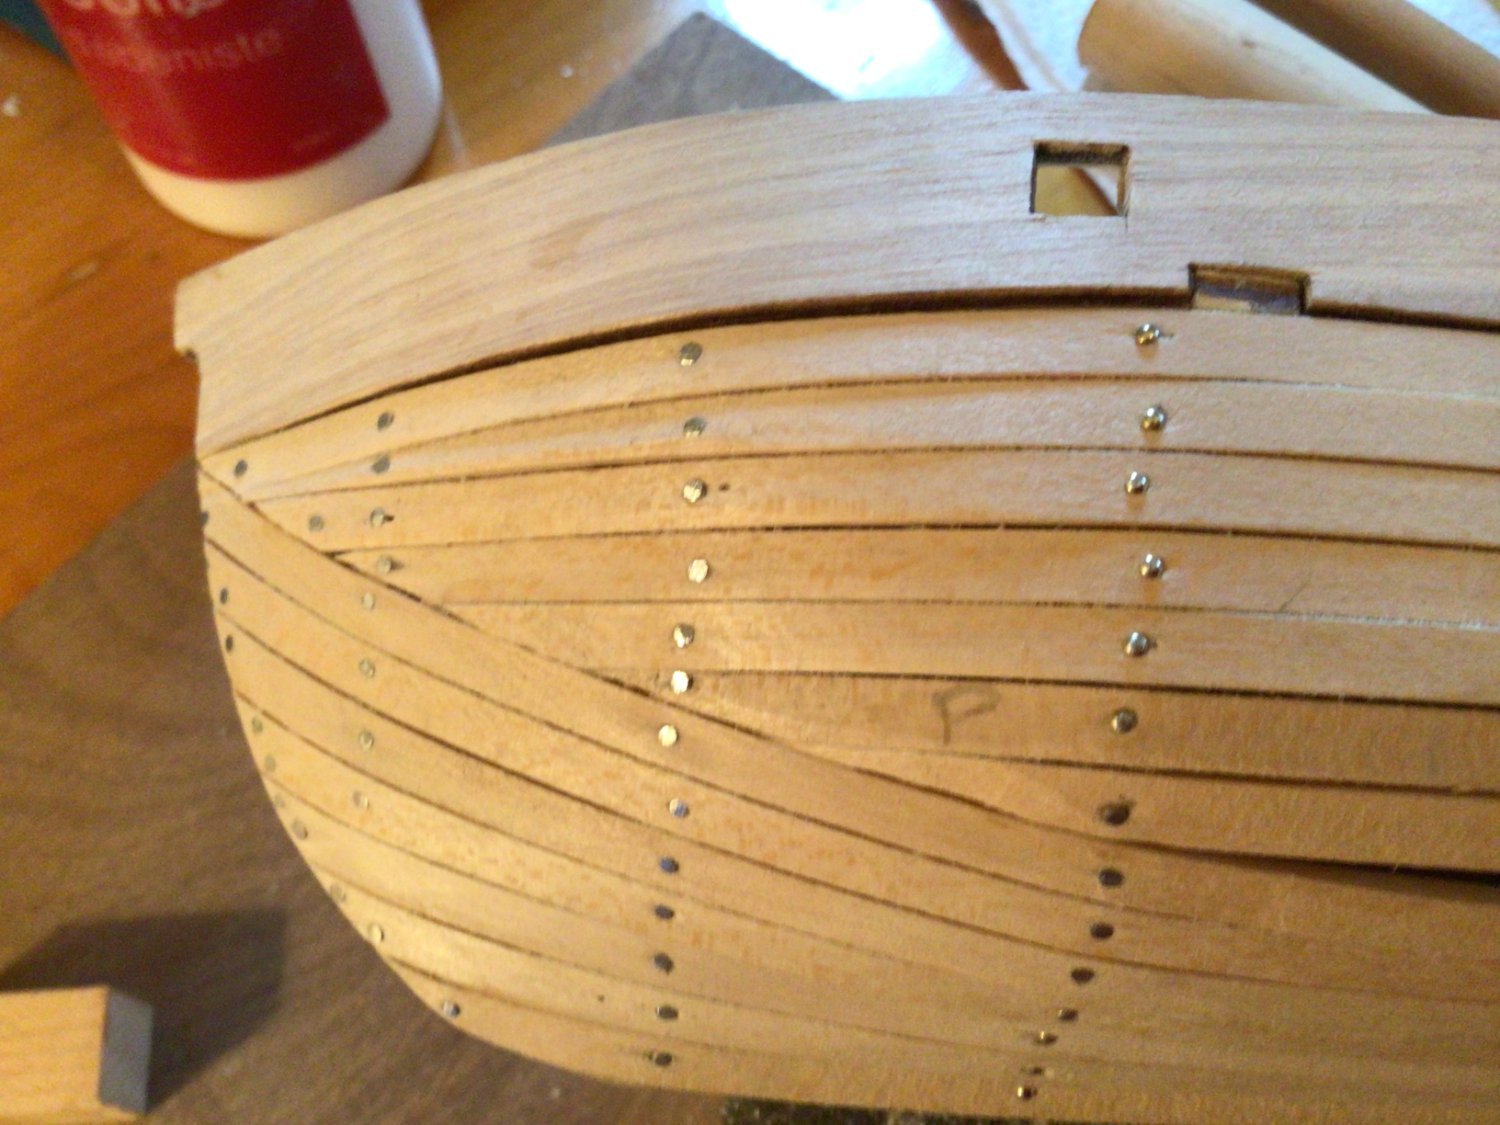
The hull has now received its second layer: cherry strips 1/8" wide by 0.5mm thick. The stem, stern post, keel parts and rubbing strakes are in place.
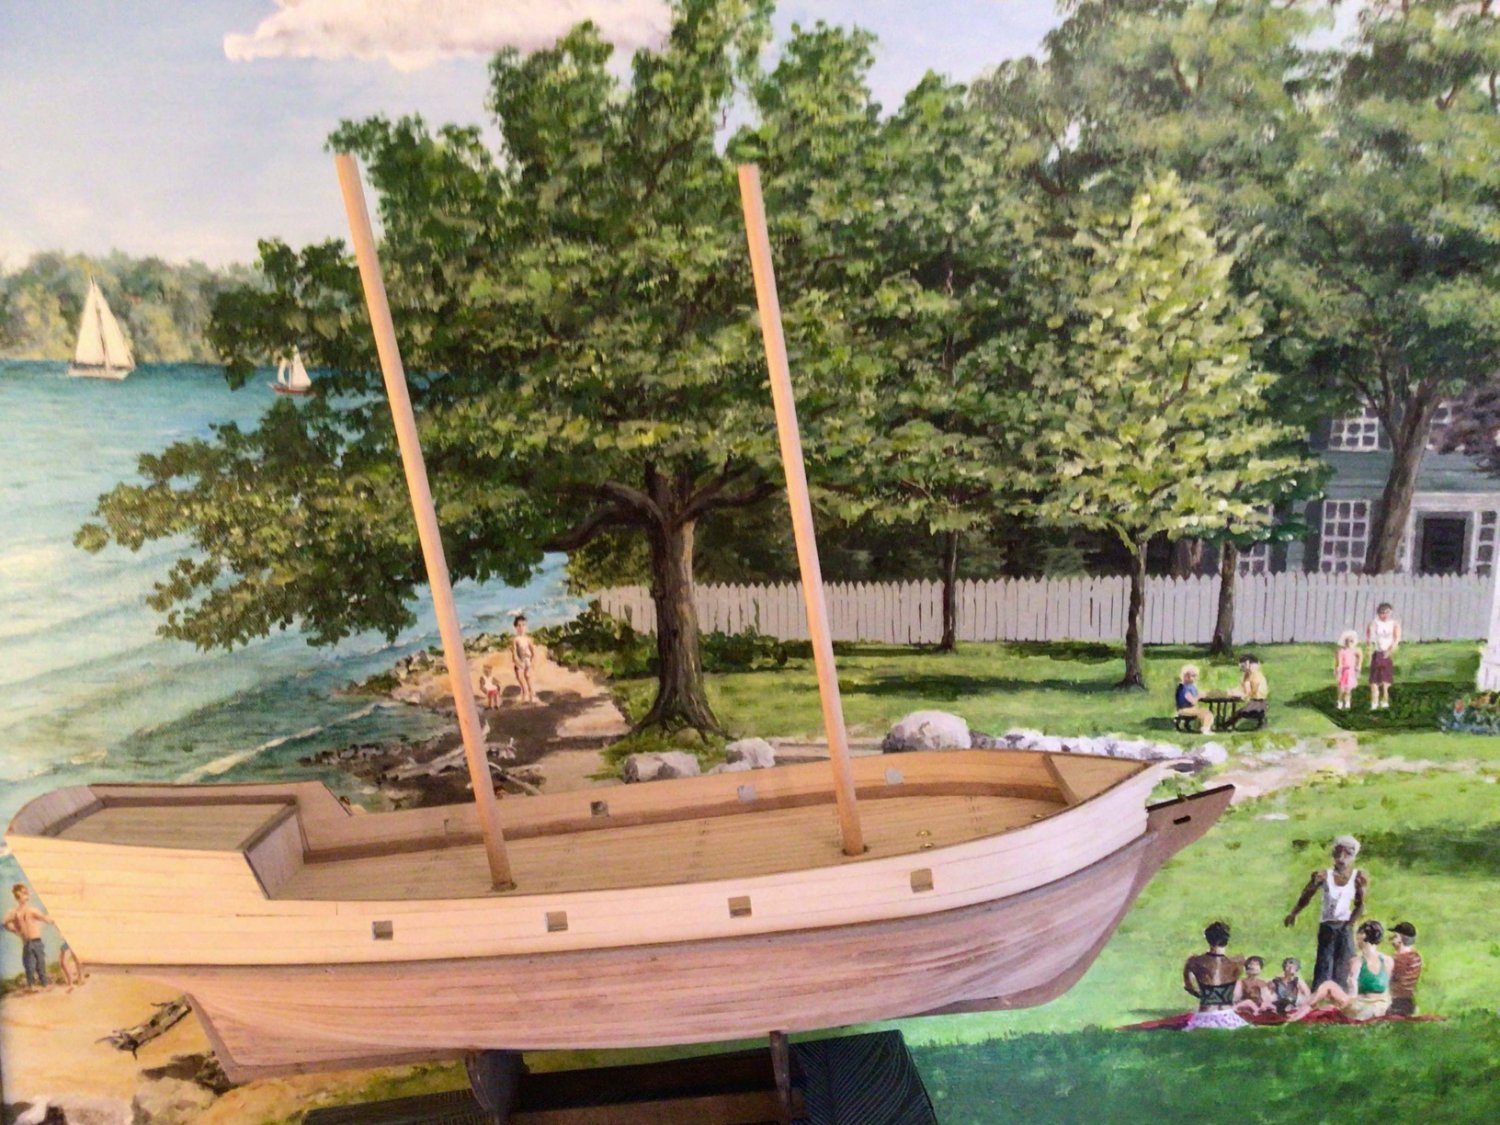
I was not happy with the mast steps in the kit; they seemed to me insecure. Instead I made two sleeves about 33mm long out of ¼" I.D, (5/16"O.D) brass tubing. I closed one end of each sleeve by gluing in a small disc cut from a ¼" dowel. I let them down through the mast holes and glued the bottom closed end of each of these sleeves to the false keel. I made sure to set the sleeves at the rake suggested on the plans. This allows me now to simply drop the masts in, leaving them loose in the sleeves. I though it might be interesting to rig this model in two ways. Firstly I will follow the kit and rig her as a schooner. But I plan to to build an alternate rig, that of a brig. With the mast mounting as I have described, I should be able to swap the rigs around from time to time. Admittedly, this may be impractical, considering all the rigging that has to be changed, but I thought I might try.

-
I used the steel pins from the kit, but treenails is a great idea, and when I searched for that somebody said 'toothpicks'. Brilliant solution! Filing down those tiny brass-plated steel pins is a real pain, and using toothpicks, since they are tapered you can choose for yourself what diameter holes to drill for them. So next time I'll do it that way.
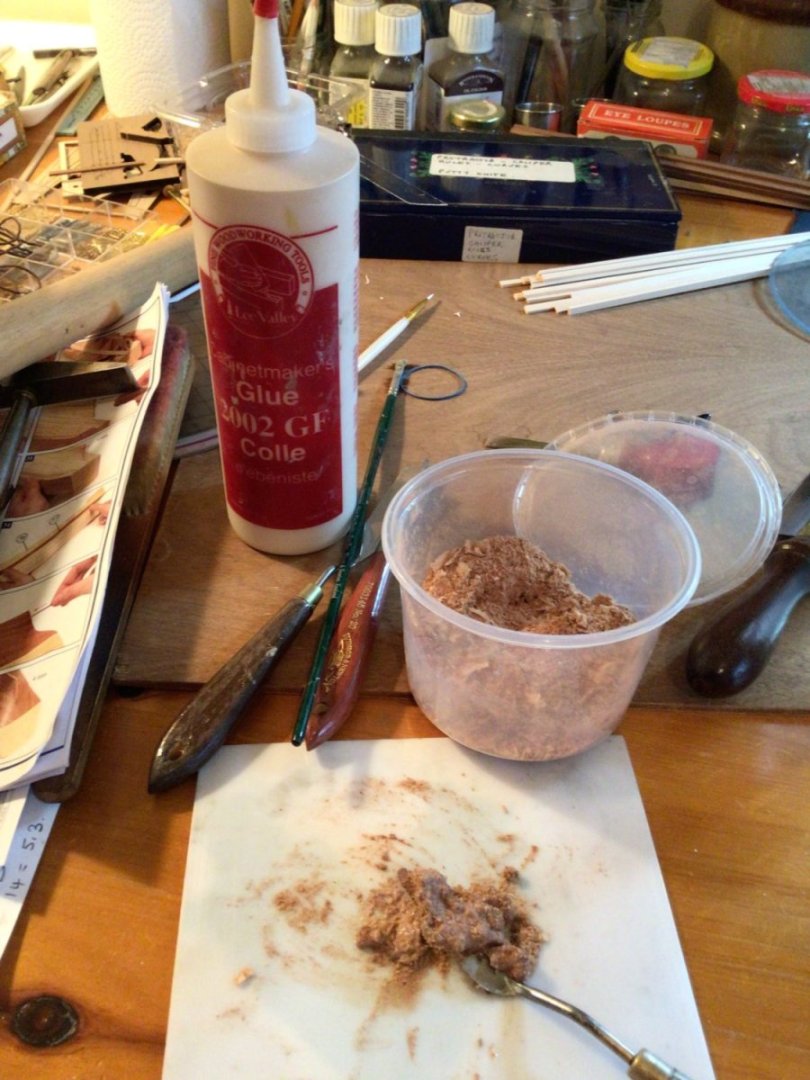
Now, as to filling the seams, or should I say caulking, OcCre doesn't suggest that, but in my mind that would give me a better surface to receive the second layer of plank. So I made up a slurry of my brown acrylic 'cabinetmakers' glue and wood powder, by which I mean the finest possible wood sawdust, which I harvest from inside the top felt bag of my over/under shop vac. I forced that slurry into the seams using my artists' putty knives.
Next will be to proceed to the second layer of planking. Bearing in mind that we are trying to adhere to the scale of 1:100, I am not so happy with using the kit planking, which is 5mm wide and .65mm thick. Multiply 5mm by a hundred and you have 50cm = more or less 20 inches. Ouch! Happily, I have a stash of cherry strips which are one eighth of an inch (3.18mm) wide and .5mm thick, so I shall use those.
I have other another commitment every morning, so I usually do my shipbuilding during the afternoon watch. By the time the dog-watches roll around I'm too tired, so my progress will be slow.
Andrew

- Haliburton, druxey and Knocklouder
-
3
-
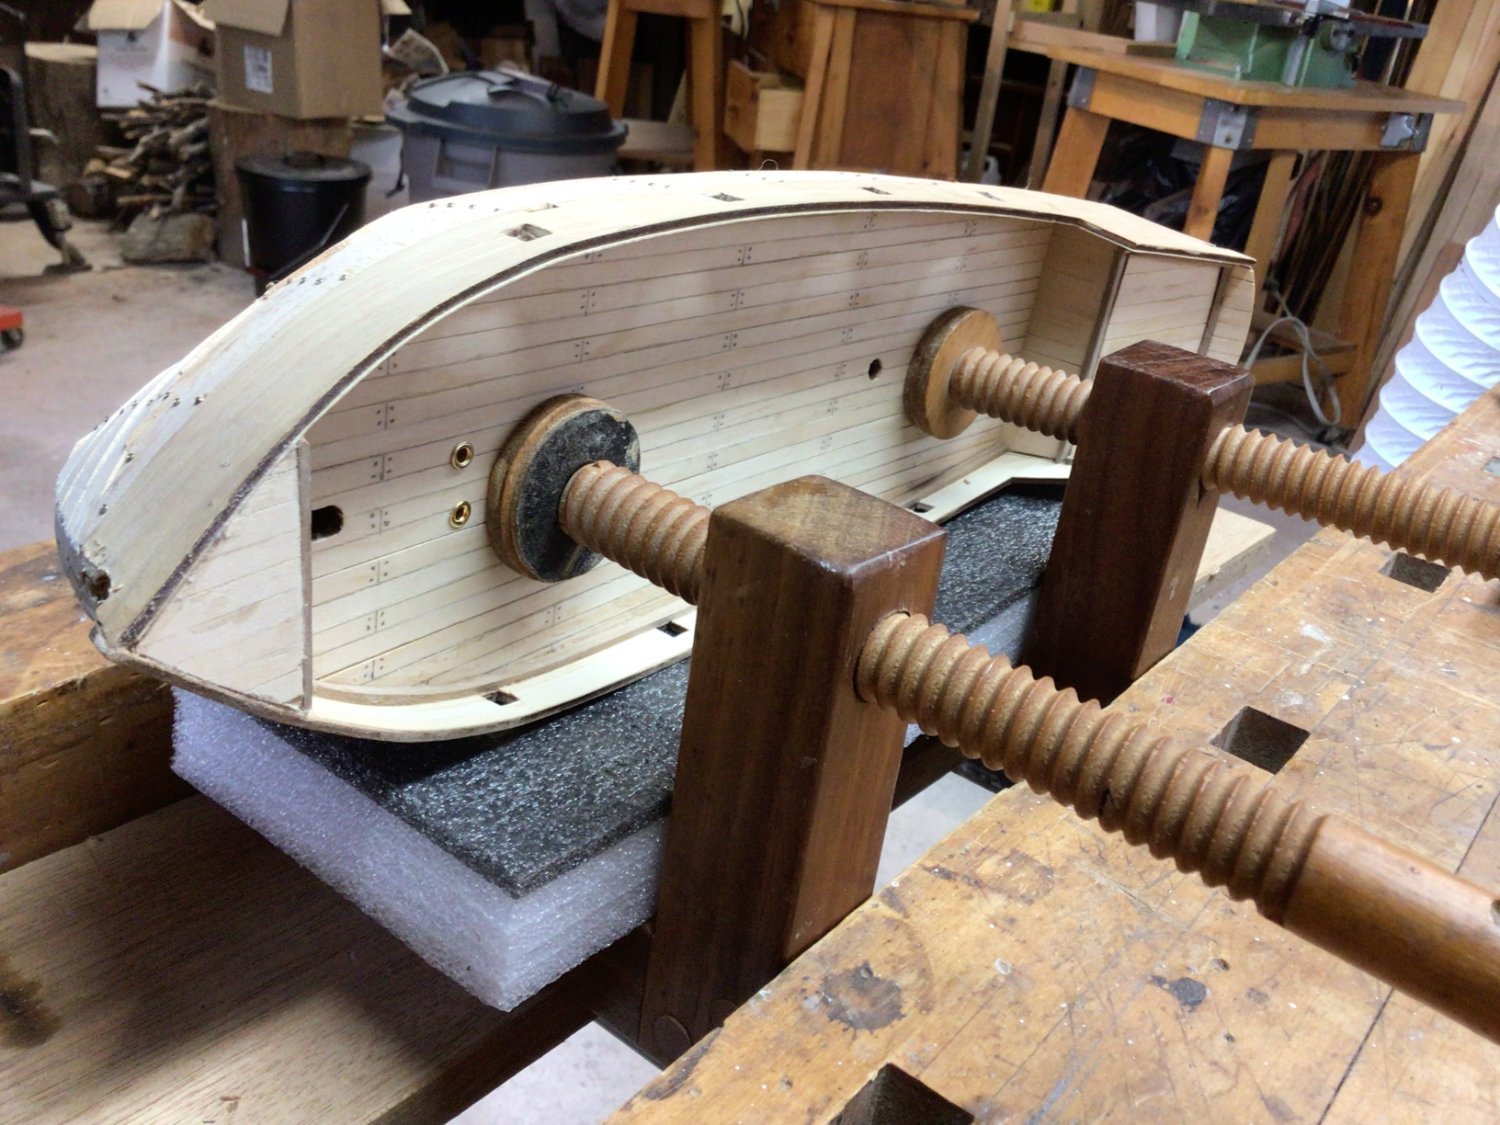
When I built my bench in 1972 and began to accumulate woodworking tools, it was for the purpose of making furniture for the new home we had just moved into. So although I have yet very few tools for model-making, things may be adapted. Here, to hold 'Albatross conveniently for planking, I am using a couple of four inch C clamps I made fifty years ago, and resting the hull on a piece of soft foam. Perfect!

-
Hello Papa D,
I am building exactly the same model, and am only a little way ahead of you. Moving slowly too, so I expect you will catch up and pass me soon. This is my first model since 1964, when I built Cutty Sark from a plastic kit. I look forward to following you.
Andrew
-
In my imagination I see a man , surrounded by those basic woodworking tools we have used for thousands of years. The Romans had planes just like ours, and an artifact of turned wood has been discovered dating from 3000BC. I can see that this man is a shipbuilder. He is laughing; shaking his head and laughing at me, as I dip my toe in the water and begin to learn the art of planking. As you can see from my illustration, I have made a dog's breakfast of it so far. But hey, tomorrow is another day, when I shall first file off the pinheads and sand the hull smooth, next make peck marks on prow and stern and at each bulkhead, then measure and carefully cut and plane each individual new plank with appropriate taper to bow and counter so that the second layer, if not perfect, may at least be a lot better . Thanks for the help already received.

- druxey, Knocklouder, Haliburton and 3 others
-
6
-
Hi Scott,
I have learned a lot this evening just by studying your progress on this. I am keeping a beady eye out to see what tools you are using. I admire your cradling arrangement and specialised vise. I notice also you have a wide variety of adhesives. But the 'tip of the day' for me was seeing your tick marks on the bulkheads preparatory to planking. Carefully planning all the tapering well in advance. Wish I read that a couple of weeks ago. I am almost finished what I call the 'underplanking', ('sub-planking?') on the Albatross. I should probably get marked a 'D' on this, maybe an 'F'. But hey!, there's another layer of planking to dress off on this. Lots to learn on this rocky road.
Andrew
-
Hello,
I discovered Model Ship World just a week or so ago. I was not then intending to build a model, but I am now.
Let me explain. I already have a sailing model boat, a Bermudian rigged sloop, 27 inches from prow to counter, 4 inch beam. Photo attached. Draft when sailing, 4½ inches; lead keel. Tonnage: 1.48kg. This was given to me by my father, probably around 1949, when I was ten years old. I used to take her to a shallow ornamental pond close to where we lived. She sailed beautifully under staysail and mainsail, but has only been in the water a handful of times in the last 70 years. This vessel was sitting in the basement, looking increasingly shabby, the sails brown and foxed, so I decided to renovate it. I sewed a new suit of sails and she looked much better. Then I began by searching for brass rings for mast hoops. That’s when I stumbled upon Modeler’s Central, then MSW and the rest is history, as they say. A bit more work is needed to finish the renovation to my existing model.
That wasn’t my first ship model actually. Just after the war, when I was about 7 years old I built a rather simple representation of a battleship. No hull as such; I started with a piece of plywood shaped to the deck plan and then built up the superstructure. I can’t remember, but there must have been plans;. This was not a kit. All the parts were from thin plywood, which I cut out by hand with a little fret saw, the cutting table clamped to the kitchen counter. The guns were made from matchsticks.
Fast forward to 1964: I put together a plastic kit model of the Cutty Sark.
So now, 60 years on from that and feeling a bit tentative about the whole thing, wanting to keep it fairly simple, I have started on the Occre Albatros kit. I am enjoying it enormously.
Andrew at Niagara
.thumb.jpg.b62b14ade032ff5c06b8c204fea9cd29.jpg)
- Bryan Woods, ccoyle, mtaylor and 6 others
-
9
-
Hi Barry, Thanks for posting your experience with Albatross. I noted particularly your remark about the sail sizes being not quite right. They do look a bit baggy in one of your photos. I'll check that out when I get the masts and spars in place. So thanks for the tip, because I recently began on my own Occre Albatros kit.
On the Modelers central website it says the scale is 1:100. I find that a bit puzzling: that would make the bulwarks five feet high, and mean that the cannons would be 24 or 32 pounders. Pretty heavy ordinance to have on the top deck. But a ship of this nature couldn't be much less than 100 feet long could it? And it only has one deck. No matter: I am delighted with the kit and the clear instructions and colour photos for every little detail. Just what a beginner like me needs. I contacted Occre, asking if this ship was copied from an original vessel. They responded promptly and warmly. There was no such vessel. The design was all theirs.
All the best. Andrew
-
Hello,
I am a total newbie here, getting along with my first ship model, 'Albatross', chosen for its simplicity. Now please forgive me if I am going over old ground, but I haven't been able to find anything relating to my problem, so need your opinion. The photo of Albatross on the kit box and online shows the masts more or less vertical, perhaps even with a little forward rake, but my research, limited because I don't know where to look, suggests that this ship might be more true historically with mast rake around 11 to 13 degrees. I would like to know this early in the build since not only will the rigging be affected, (shrouds led further aft etc), but those big gaff sails will change shape too. Your thoughts on this will be much appreciated.
Andrew


.jpg.12adff7ad7ccf059d31c645623ca2c9e.jpg)
Albatros by AndrewHenwood - OcCre - 1:100 - c.1812 - first wooden ship build - INSTALLING THE MASTS.
in - Kit build logs for subjects built from 1801 - 1850
Posted
It took some thought to get the masts stepped accurately. Originally I had glued the little 'H' shaped kit-supplied mast steps into place before decking over, as per instructions, (IMG_2812). I now found that when I inserted the masts the footing was uncertain; the masts wobbled and the rake fore and aft and the verticality athwart-ships could vary by several degrees. It would take careful wedging to make it all correct and later on carefully balanced rigging because there would still be a certain amount of slop at the mast foot. I didn't like that.
I chose instead to mount the masts into quarter-inch interior diameter brass tubing.
Whatever I was to do now around the original mast steps and keelson had to be done by feel through the quarter inch holes in the deck. I chucked a 3/16 twist drill, poked it down through the holes and by wiggling it around cut away the now unwanted wooden mast steps until I was sure that I was on the keelson. I measured the depth, deck to keelson top; 22mm.
Now I cut two pieces of tubing to 20mm long. I closed one end of each tube by gluing in a little disc cut from dowel. They looked exactly like spent cartridge cases. I slid these onto the foot of each mast, wedging them temporarily with pins so they wouldn't slip off. I then built the two jigs shown in IMG_2355. They would hold the masts exactly vertical crosswise and at the specified rake fore and aft. Next I injected a dogpile of construction glue through each mast hole, down onto the keelson. Finally, I carefully inserted the short tubes with their masts, squeezing them gently down into the glue pile until the top of the tube was exactly flush with the deck. In order for the tubes to harden in place at precisely the right angle I stabilised the whole caboodle by laying the masts into the long slots on the forward face of each jig while the glue dried.
Problem solved. The masts fit well, yet may be removed when required. I am now working on the deck furniture.