Herby63
-
Posts
148 -
Joined
-
Last visited
Content Type
Profiles
Forums
Gallery
Events
Everything posted by Herby63
-
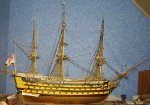
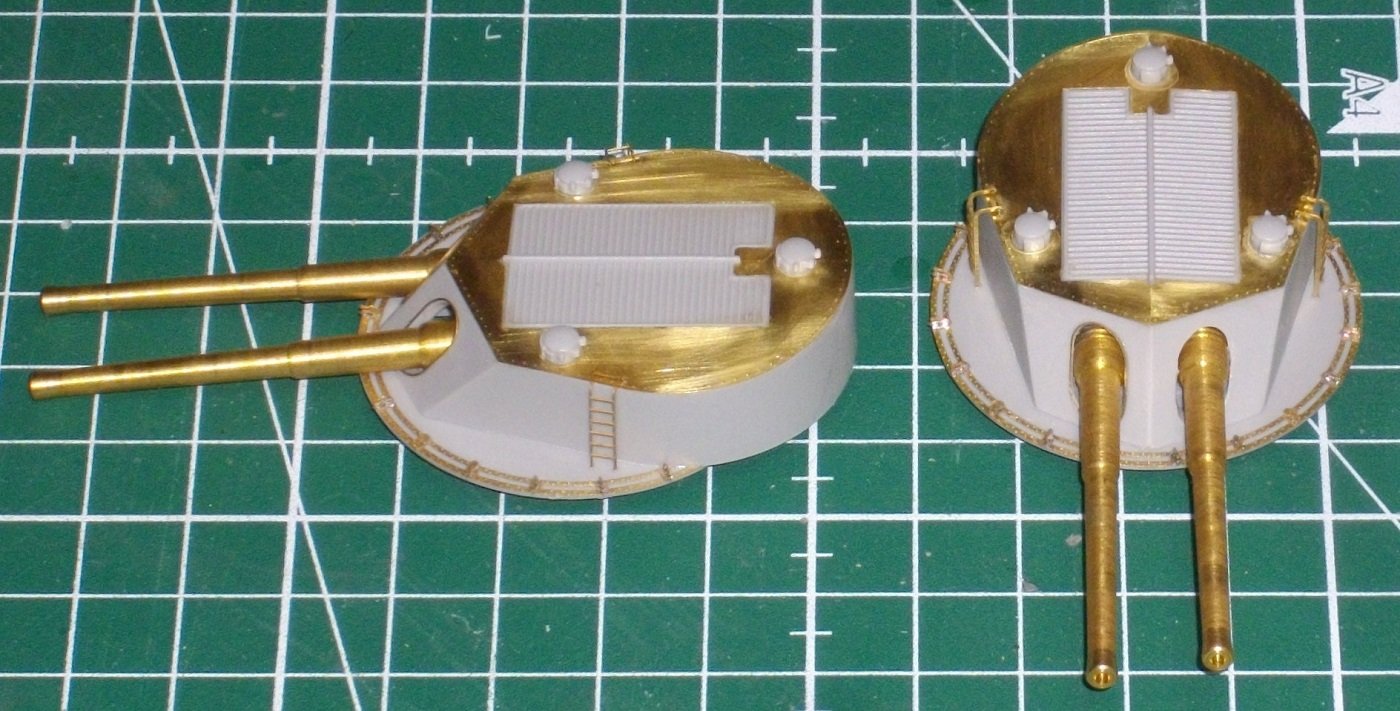
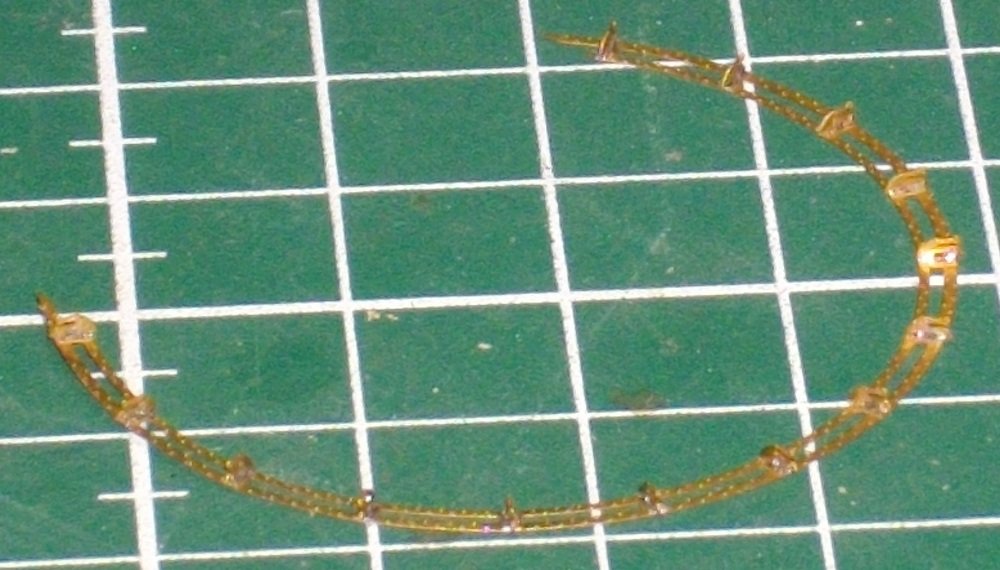
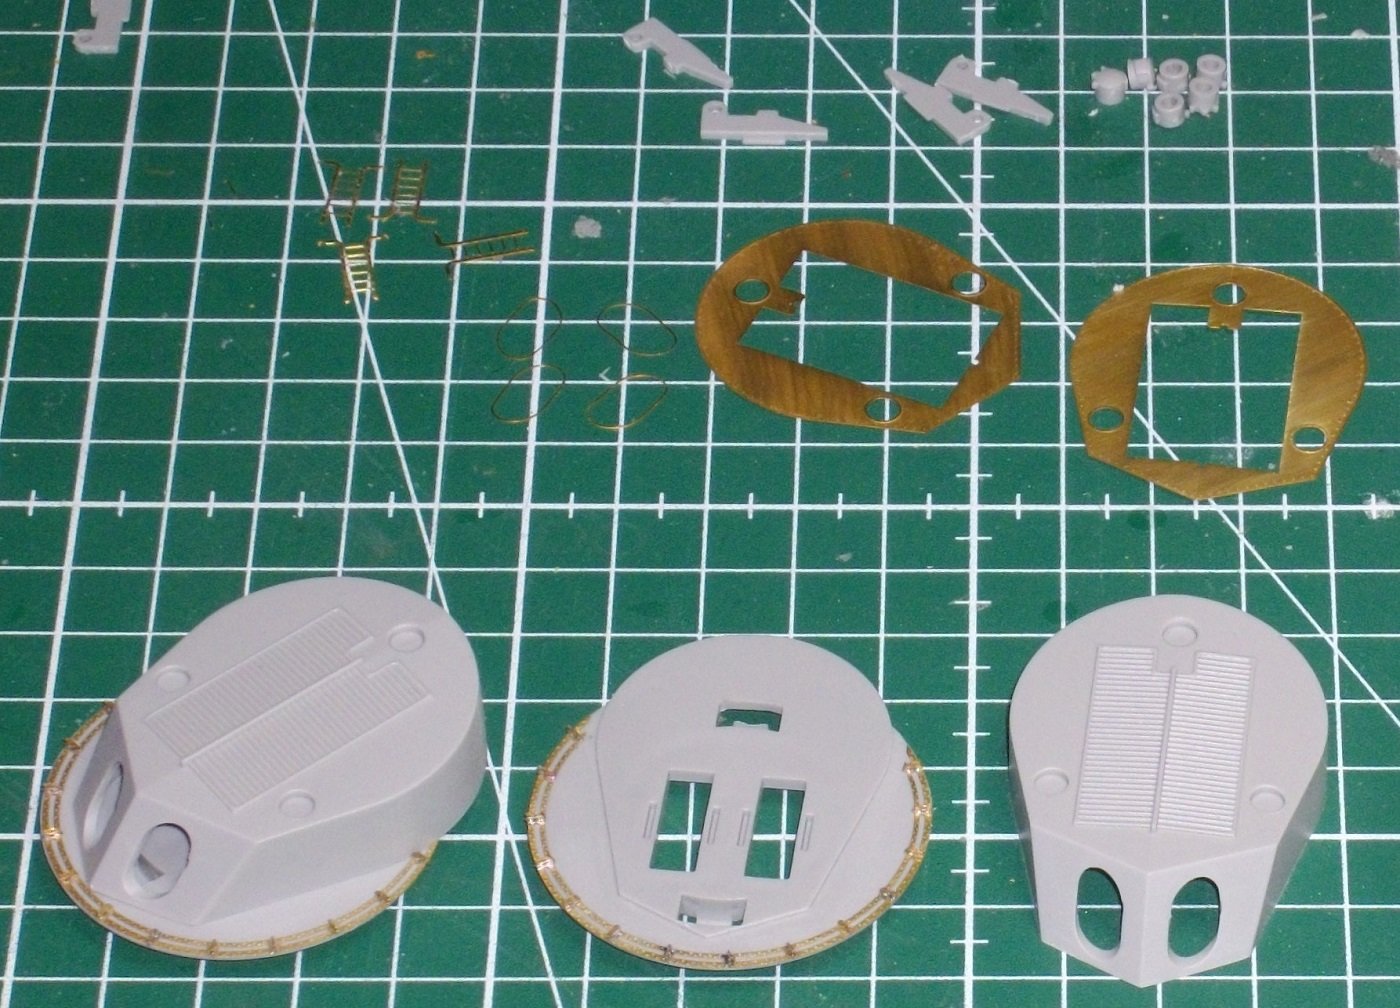
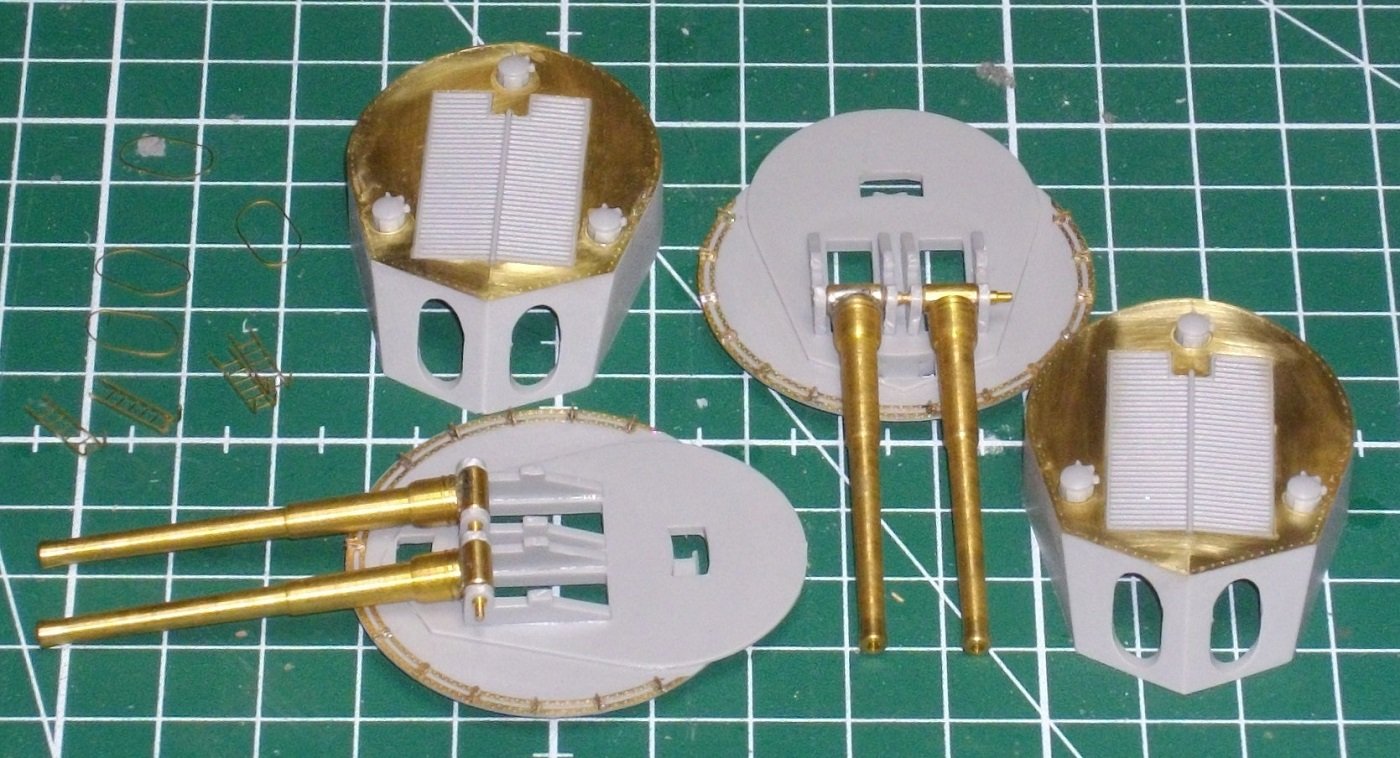
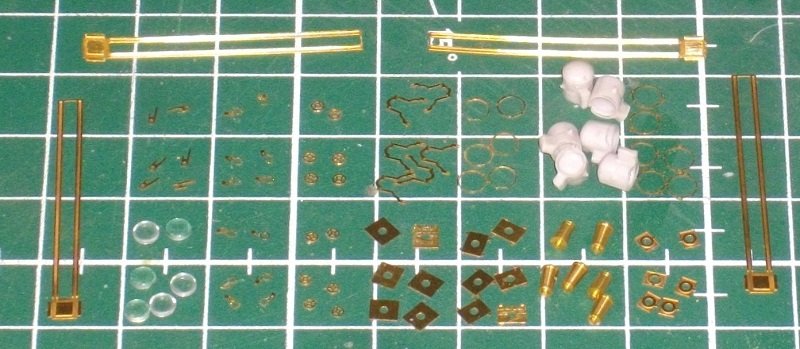
 Thank you for the lovely comment Jeff, makes me want to continu and publish a long awaited and overdue update. Due to multiple personal events in 2024 I was a bit discouraged to work on al this fiddly stuff, so I fulfilled a childhood dream for some 1/16 panzers, that I documented on the dutch modelforum. Tiger I, Elefant en Königstiger 1/16 RC by Herby63 | ModelbouwForum.nl Tiger I, Elefant en Königstiger 1/16 RC by Herby63 - deel 2 - Elefant | ModelbouwForum.nl Tiger I, Elefant en Königstiger 1/16 RC by Herby63 - deel 3 - Königstiger | ModelbouwForum.nl Now that these are finished, I am slowly taking up this build. So lets see what has been done in the past 5 months. I passed on to the main armament (step 40 in the Merit manual, to be completed with quite some pontos-parts). Here you see the parts to be assembled: I soldered the barrels to the trunions, and the tiny hooks to the rings. 1 square = 1 cm Then I glued the brass rings to the turret bases with pink Zap. I soldered the supports for the ladders that go to the sides of the turrets to the brass top plates and glued the top plates to the turret tops with pink Zap. The barrels are attached to the turret bases and the 3 small cupolas were glued to each turret top with thin cement. The fine brass linings of the turret openings for the barrels are glued in place with some pink Zap and the turret tops are glued with thin cement to the bases. Finaly the ladders are attached with a little pink Zap. After applying a basecoat, they have been airbrushed Insigna White. Until next time, enjoy medelling.


- 155 replies
-
- 4
-

-
- Mikasa
- Merit International
- (and 1 more)
-
Thx Jeff, Indeed it looks lovely in the dark, but is hard to catch in a picture.
- 155 replies
-
- 2
-
-
- Mikasa
- Merit International
- (and 1 more)
-
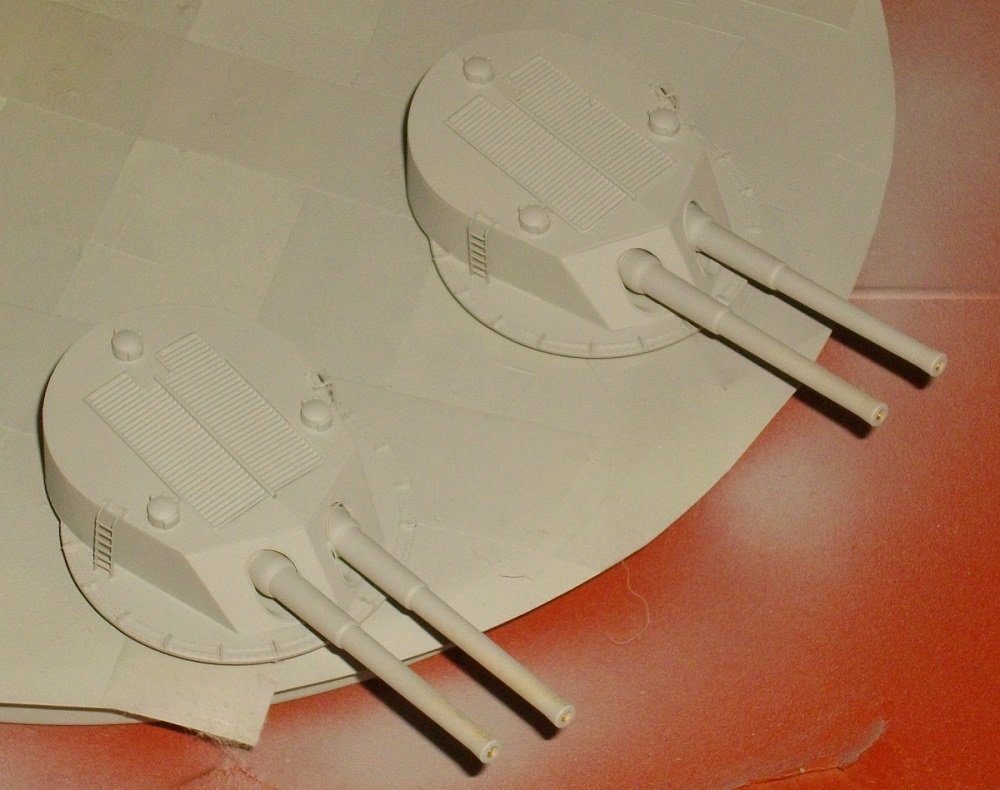
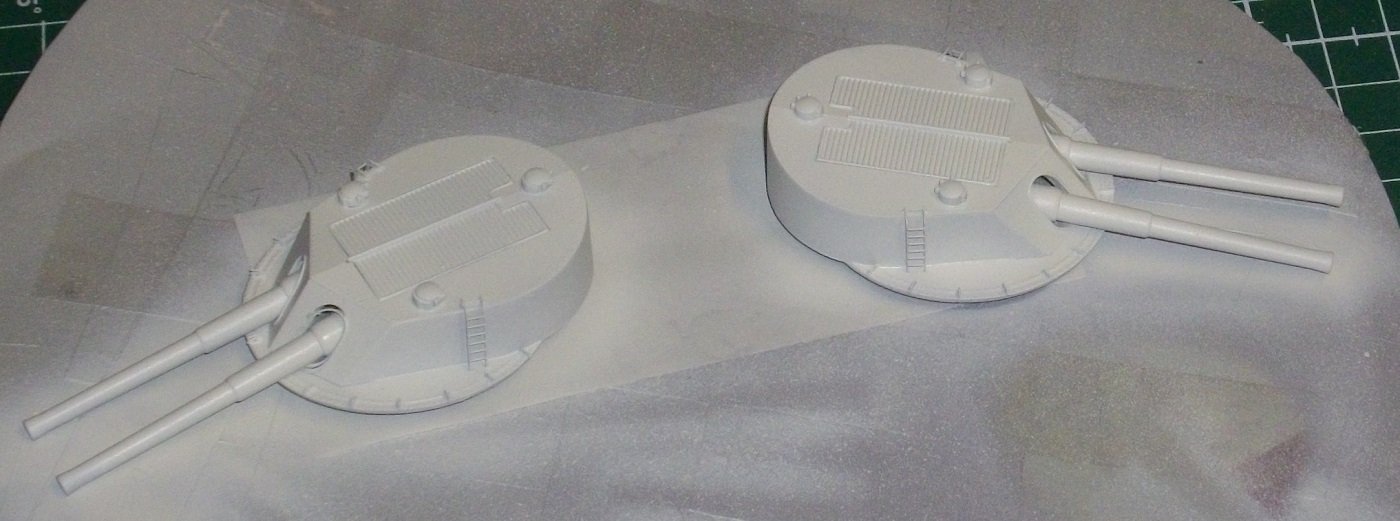
Hello dear followers, As the spraybooth is installed for an other project, I airbrushed the main guns with VMS Metal Prep 4K and grey primer and gave them their final coat of Insigna white. here is the result: Until next update, enjoy modelling.
- 155 replies
-
- 6
-
-
- Mikasa
- Merit International
- (and 1 more)
-
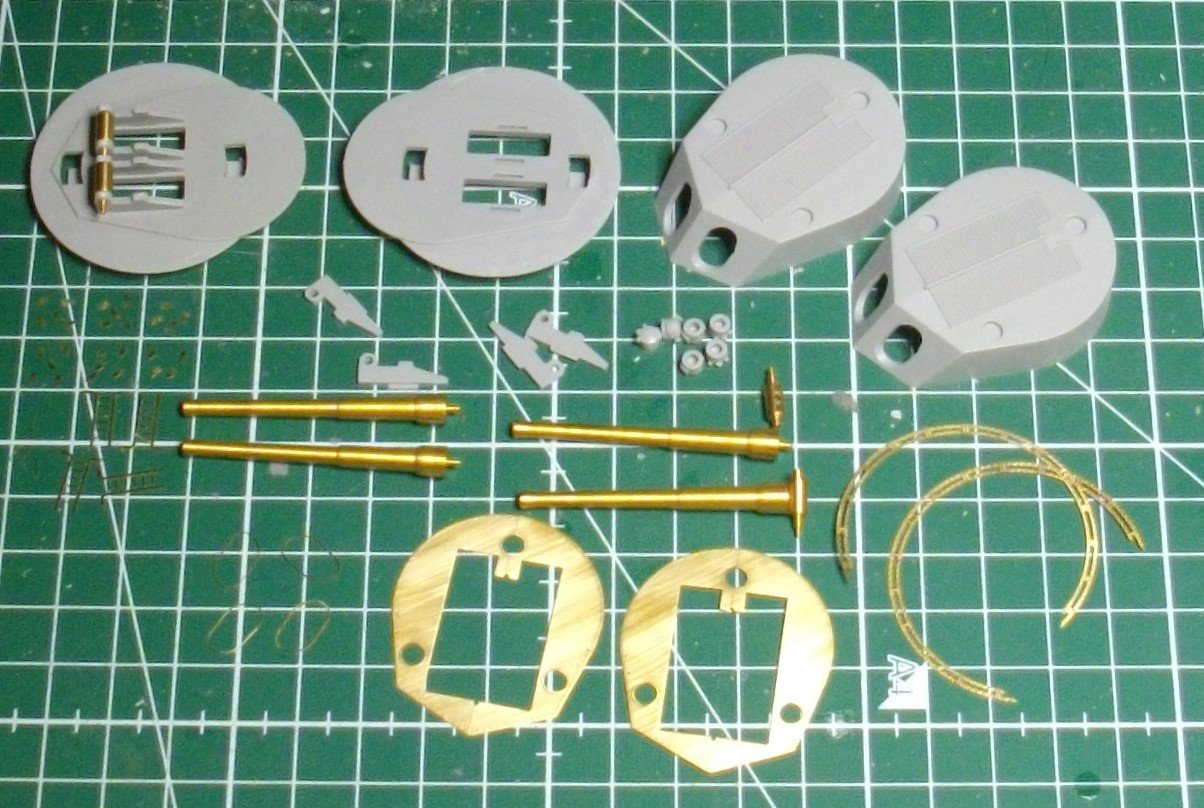
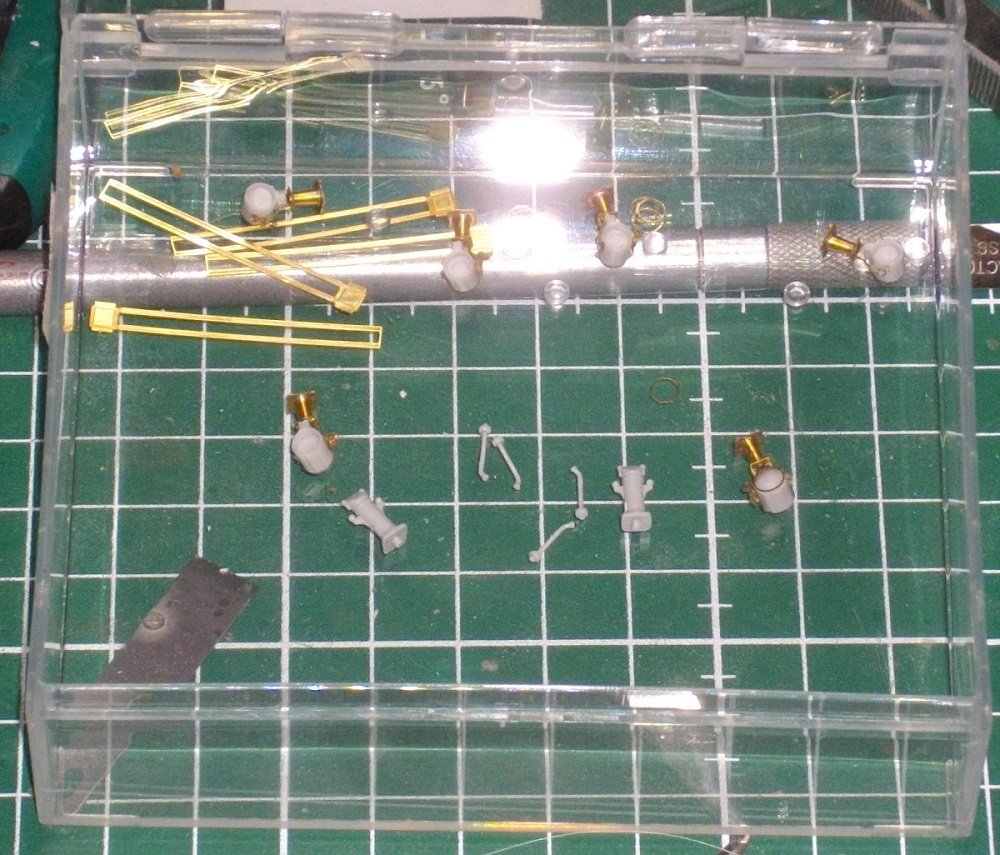
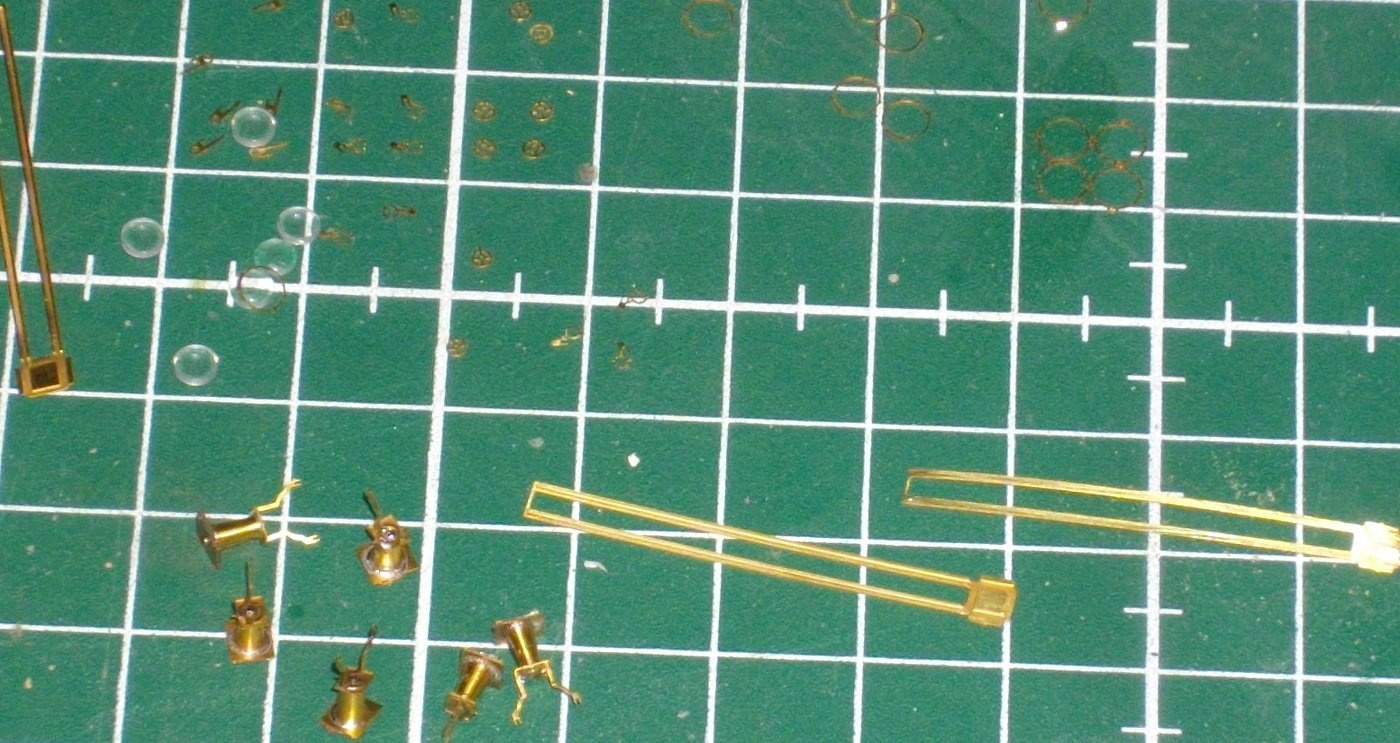
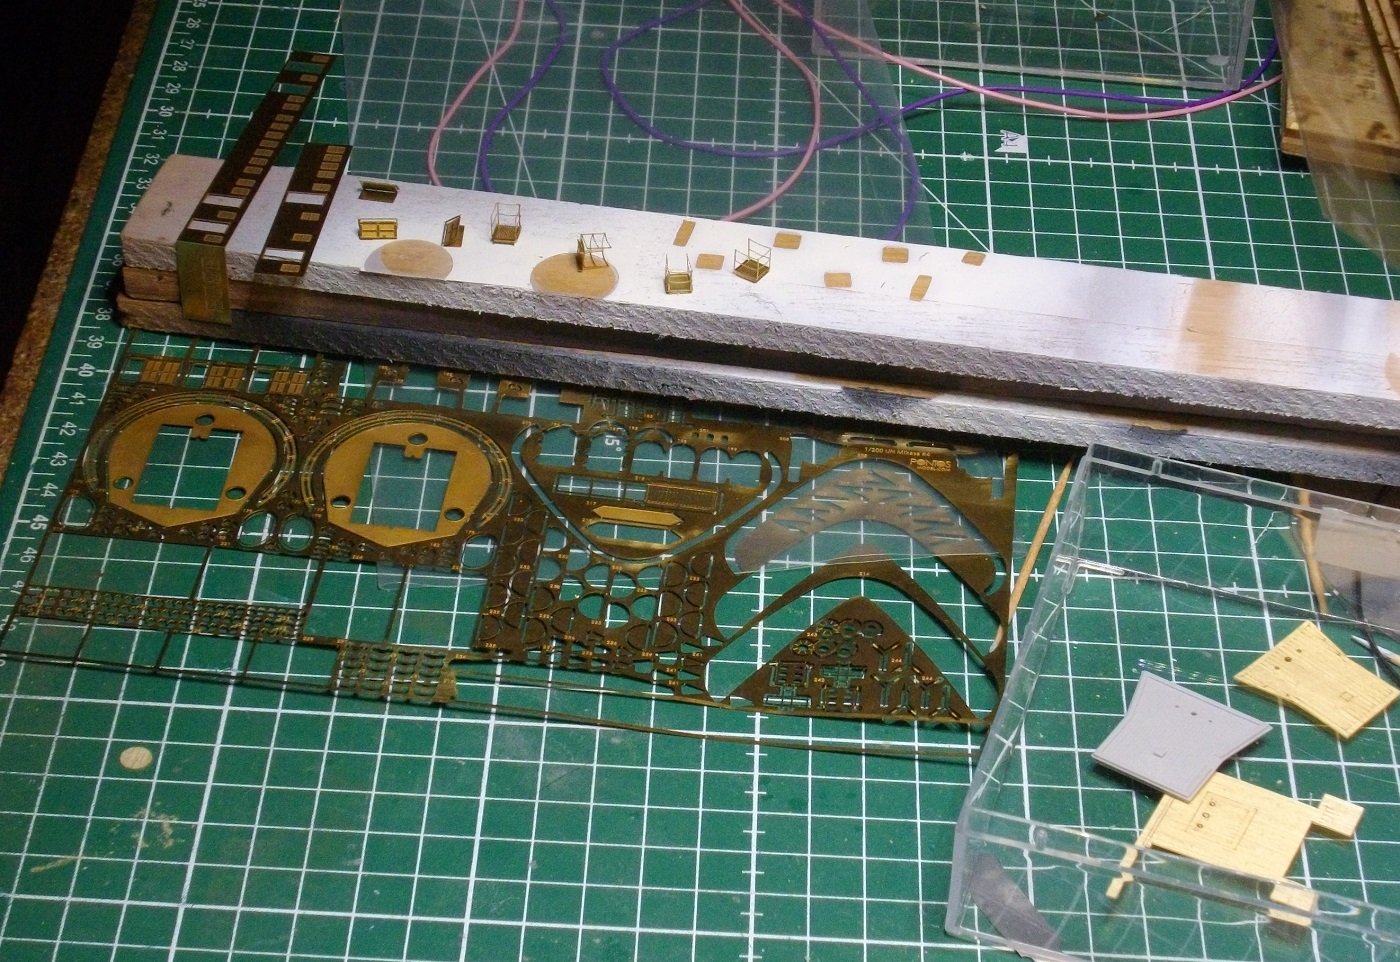
Hello dear followers, Today I show the main guns being made. The Merit parts are upgraded or, in some cases, replaced by Pontos-parts. The (Pontos)manual: The parts: The brackets have been soldered to the rings. The rings are glued to the turret bases with pink Zap (thin CA-glue. Barrels solderd to the trunnions, trunnions inserted in the cheecks and the cheecks glued with Tamiya extra thin cement to the bases. The brass rooftops were glued on with pink Zap. And finaly, the turret tops were glued on the bases. Ready for painting. Following the steps in the Merit manual, the next update will be the masts. Until next update, enjoy modelling.


- 155 replies
-
- 6
-

-
-
- Mikasa
- Merit International
- (and 1 more)
-
Hi Jölle, Pontos isued a #12 correction fret to rectify this, but my attempts to get one from them had no success. Very nice work tho.👍
- 211 replies
-
- 3
-
-

-
- Russo-Japanese War
- Mikasa
- (and 2 more)
-
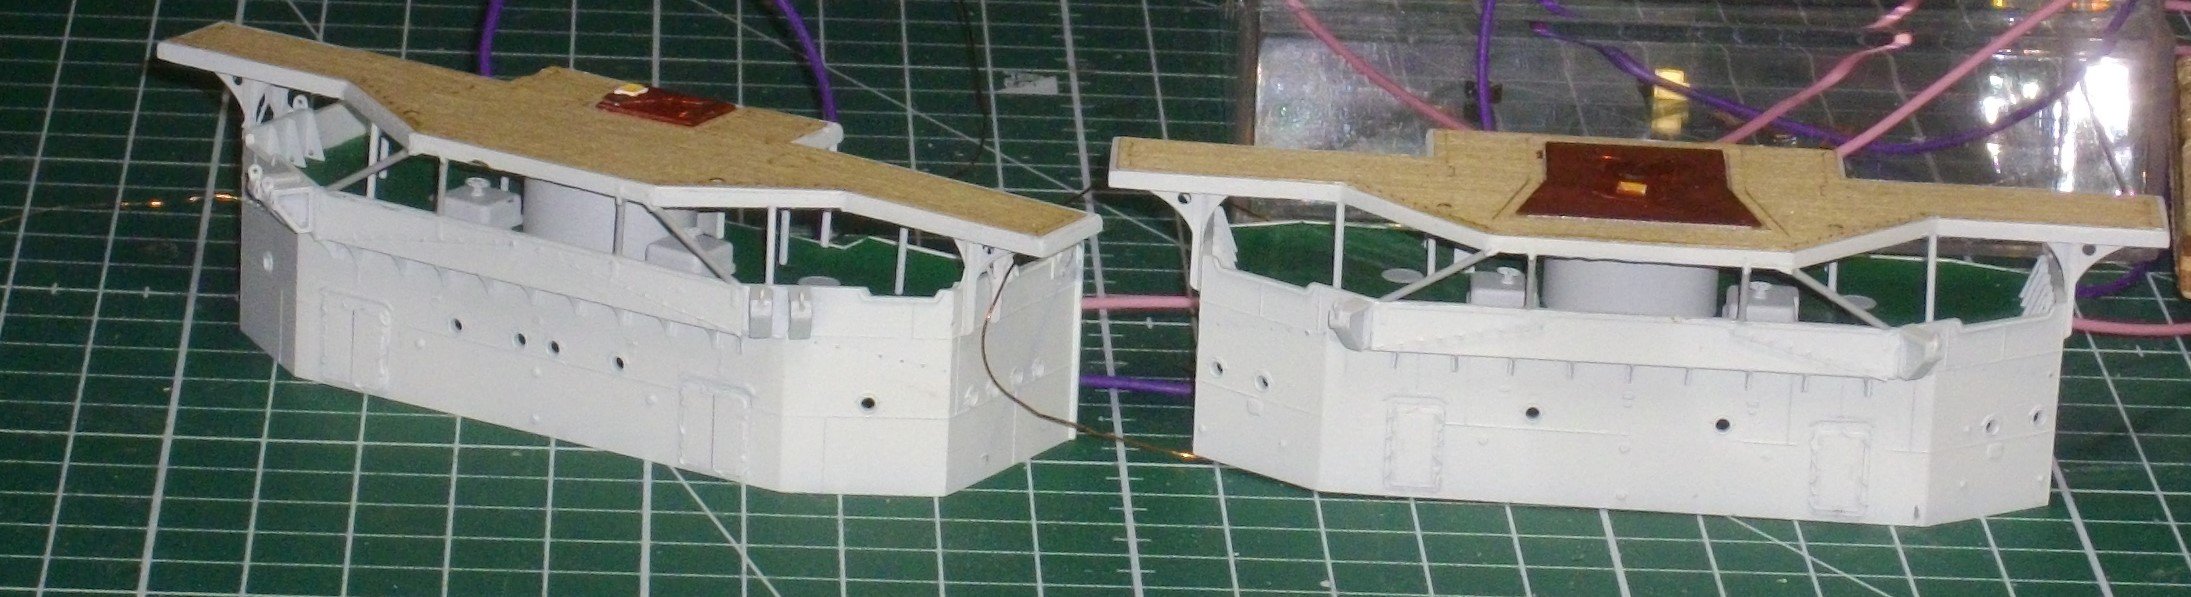
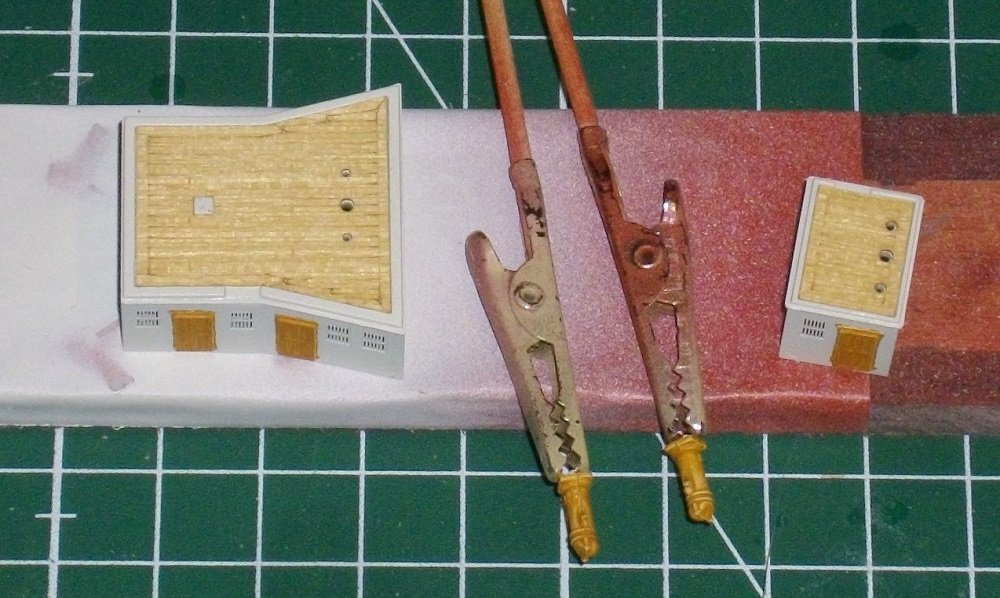
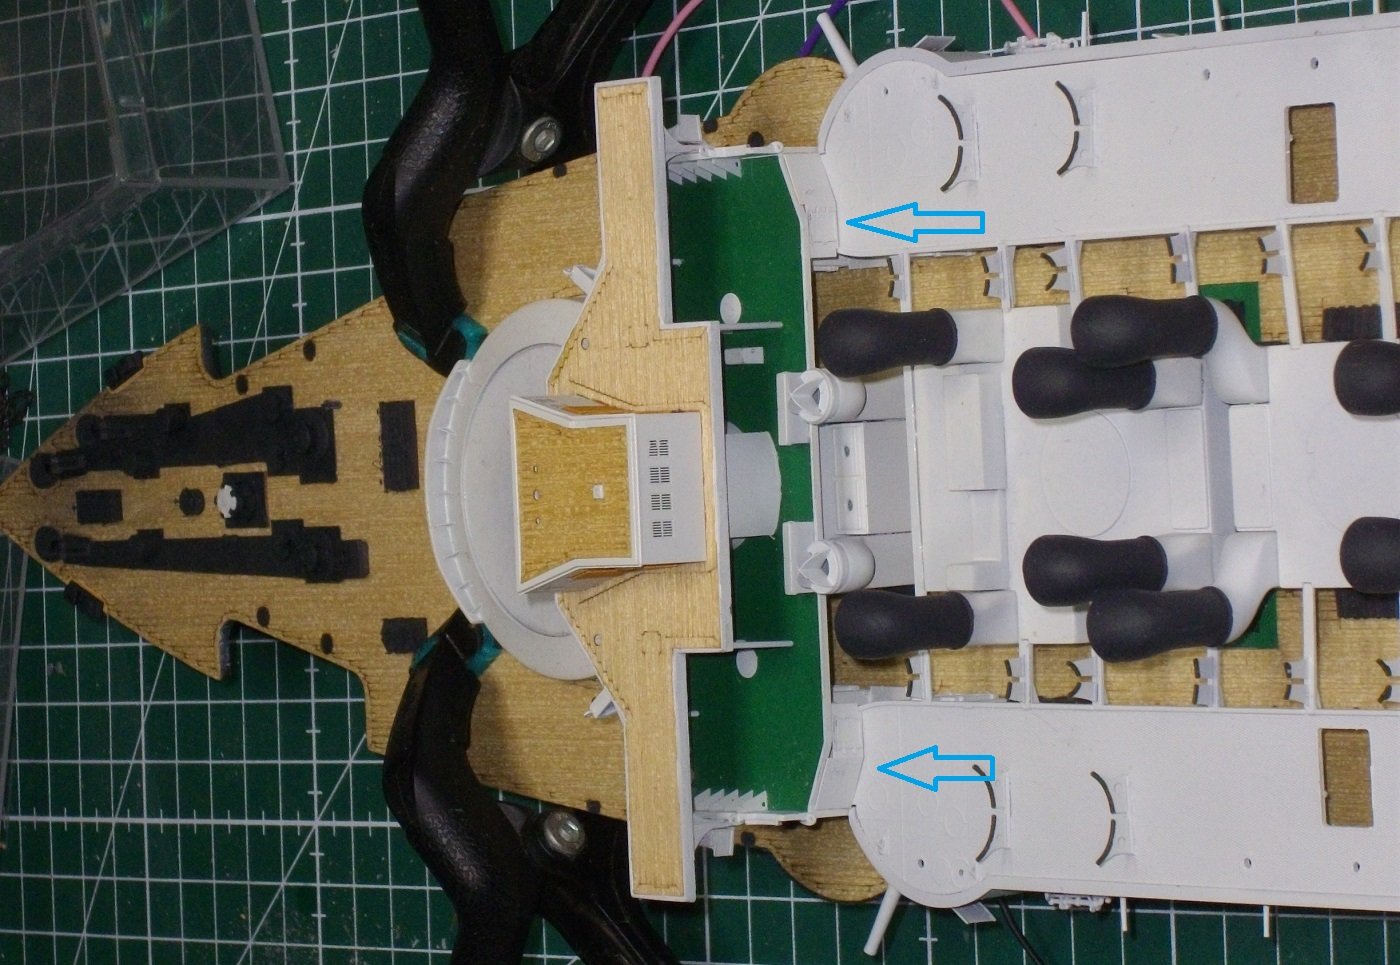
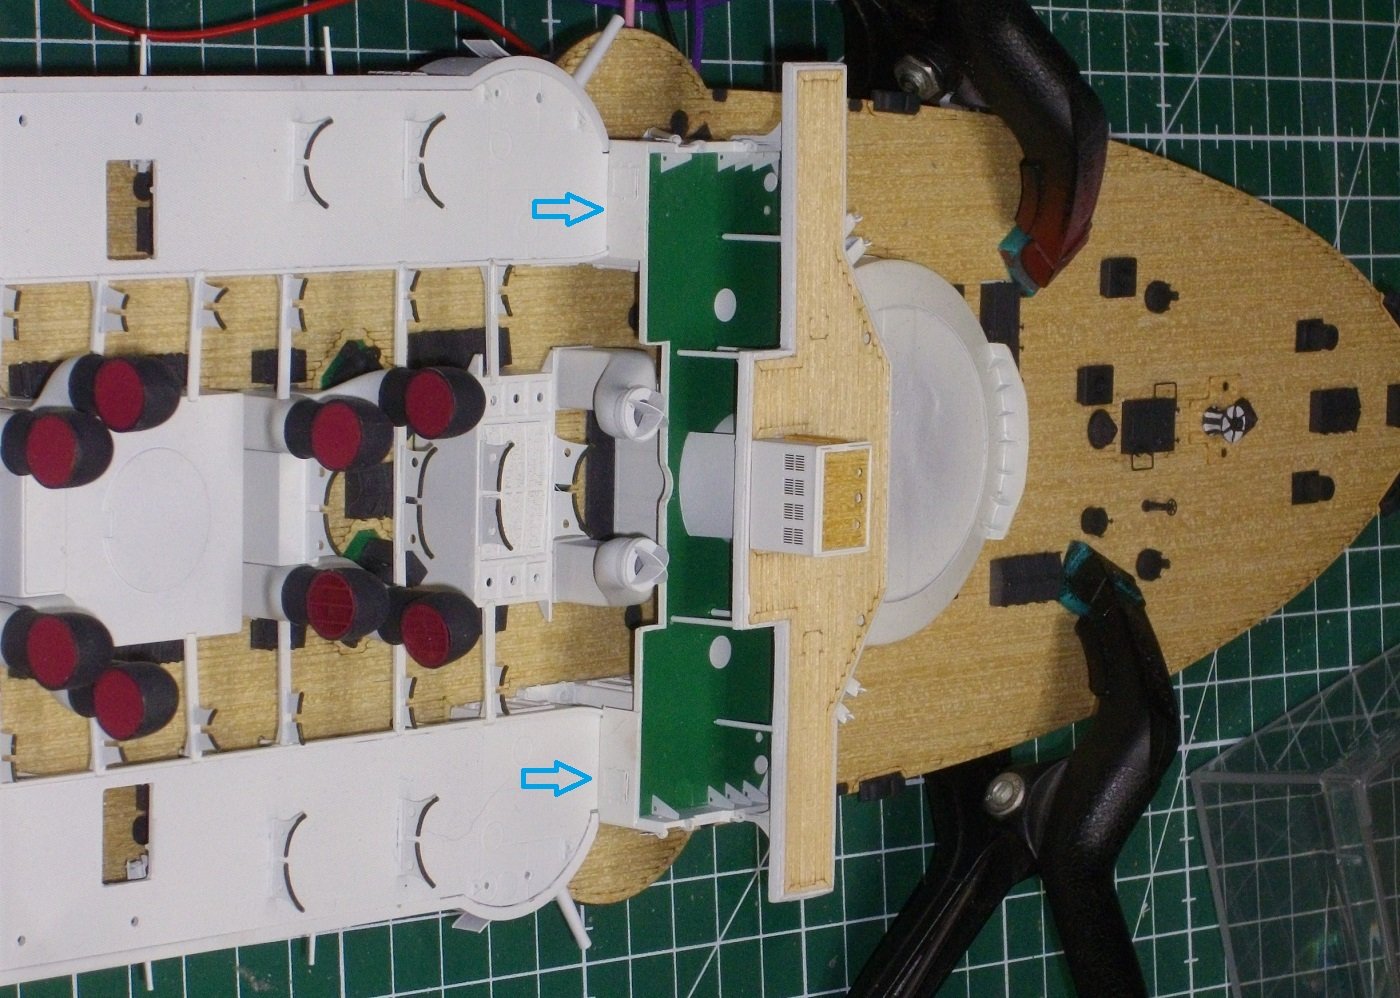
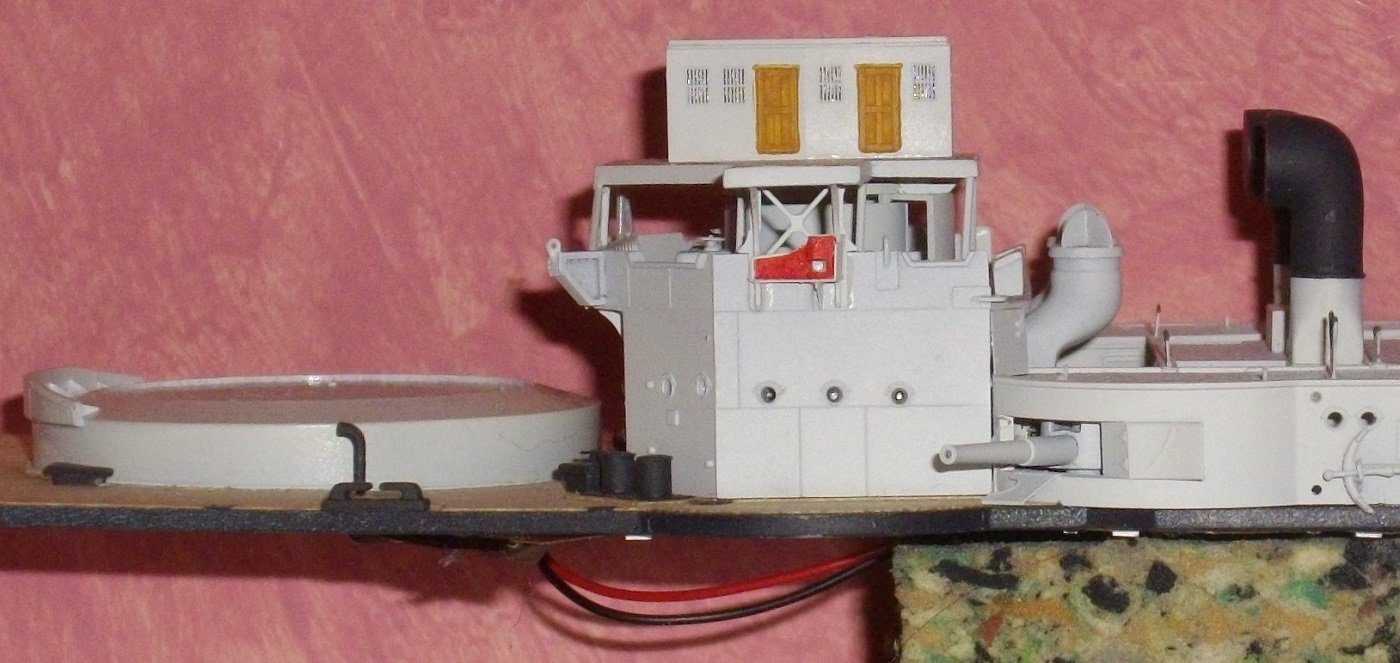
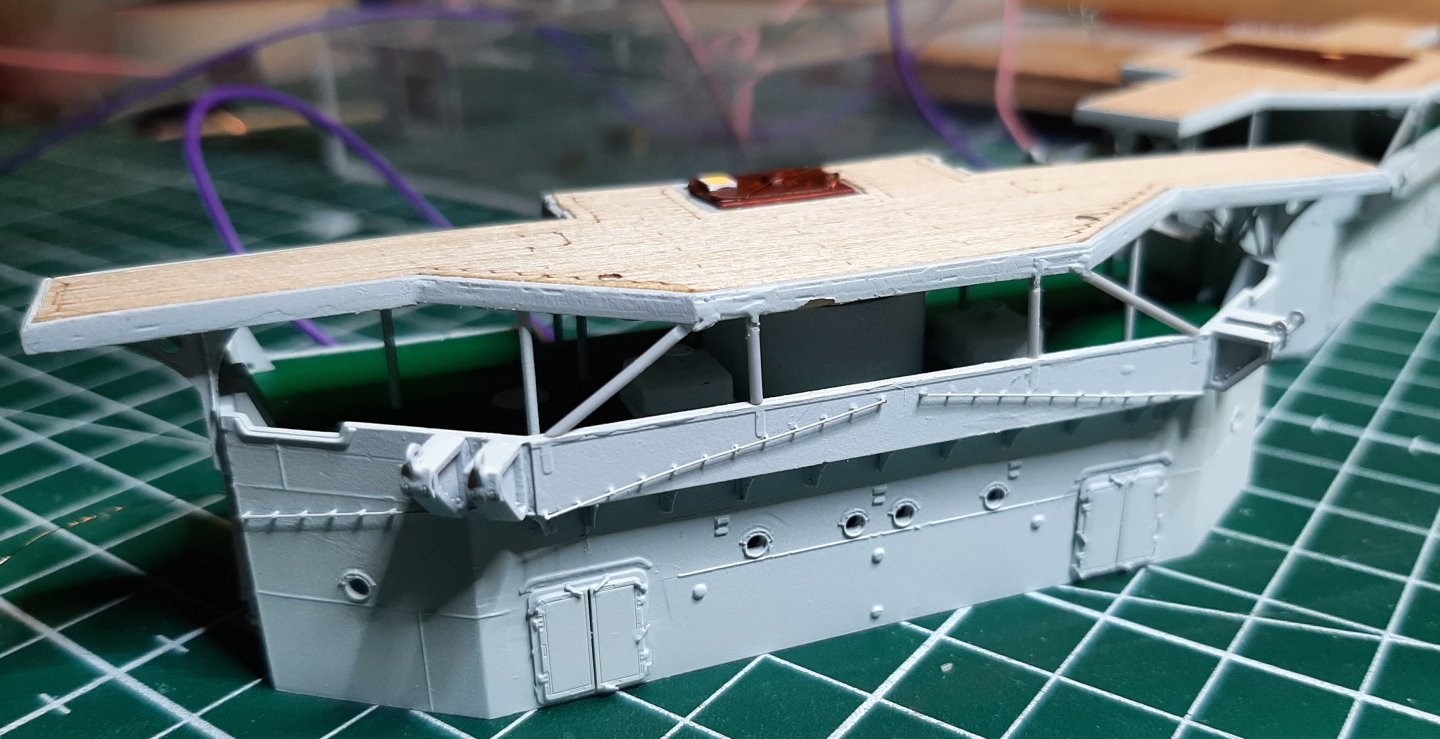
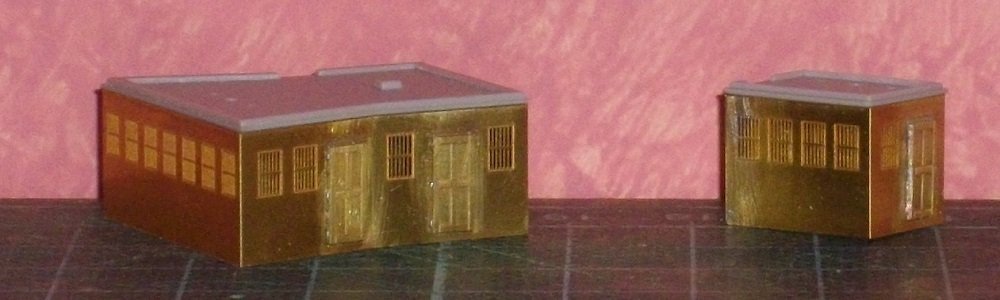
After applying a coat of gloss varnish to the rooftops, I put on the wooden decks. I painted doors and the the binnacles a wood color. The deckhouses were glued on their place with a fair amount of CA-gel and the bulkheads indicated with the blue arrows with pink Zap. Finaly I glued on the port and starboard light housings. Which gives this over all view Untill next update, enjoy modelling.

- 155 replies
-
- 5
-
-
- Mikasa
- Merit International
- (and 1 more)
-
Steps 34, 35 and 36 I primed and painted the parts Insigna White and painted the inside of the deckhouses Mahogany Untill next time.
- 155 replies
-
- 5
-
-
- Mikasa
- Merit International
- (and 1 more)
-
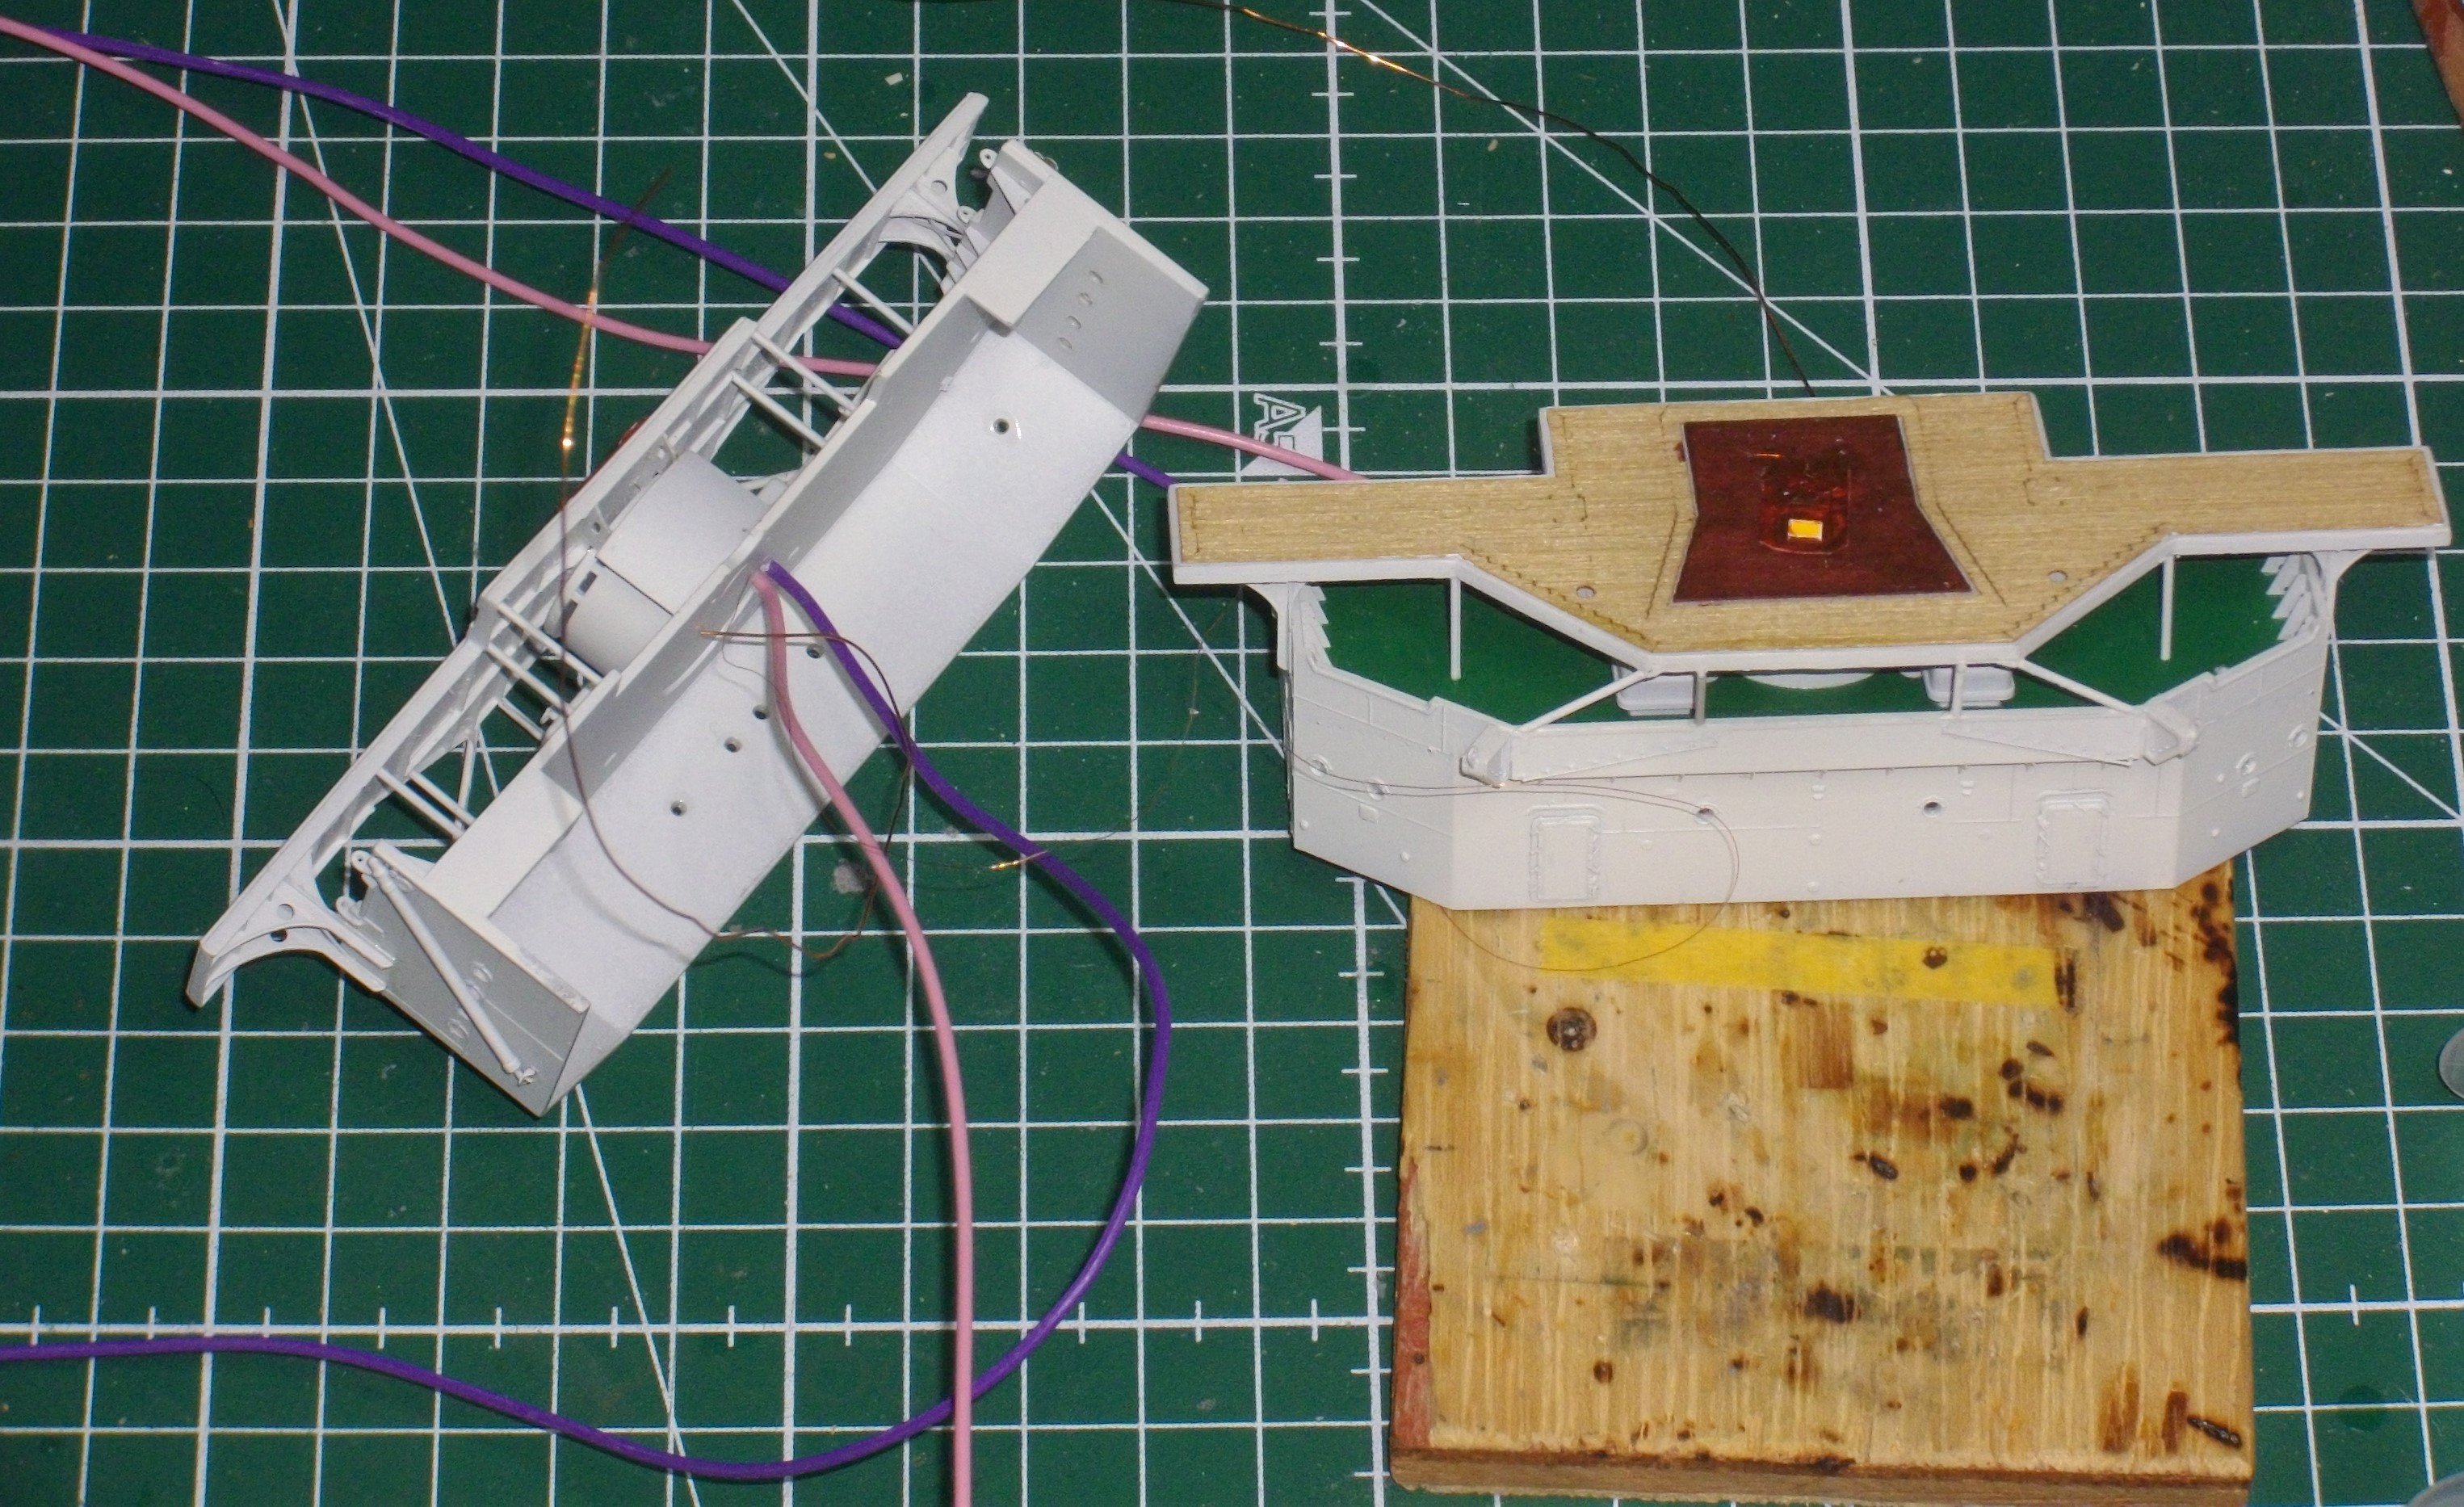
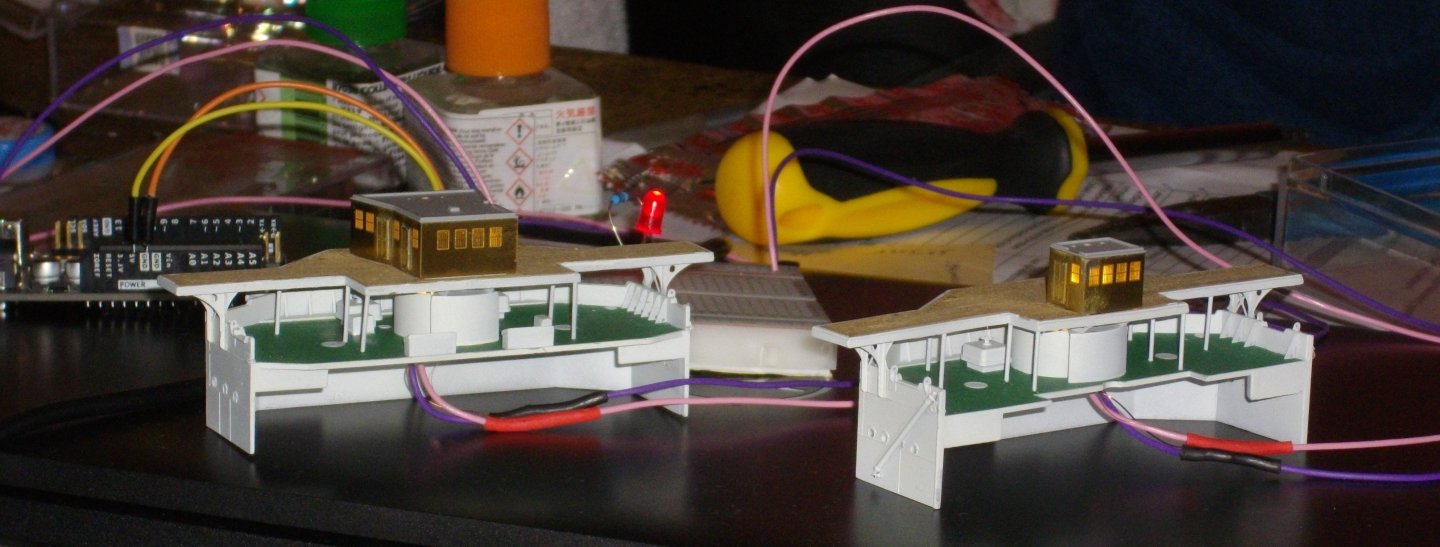
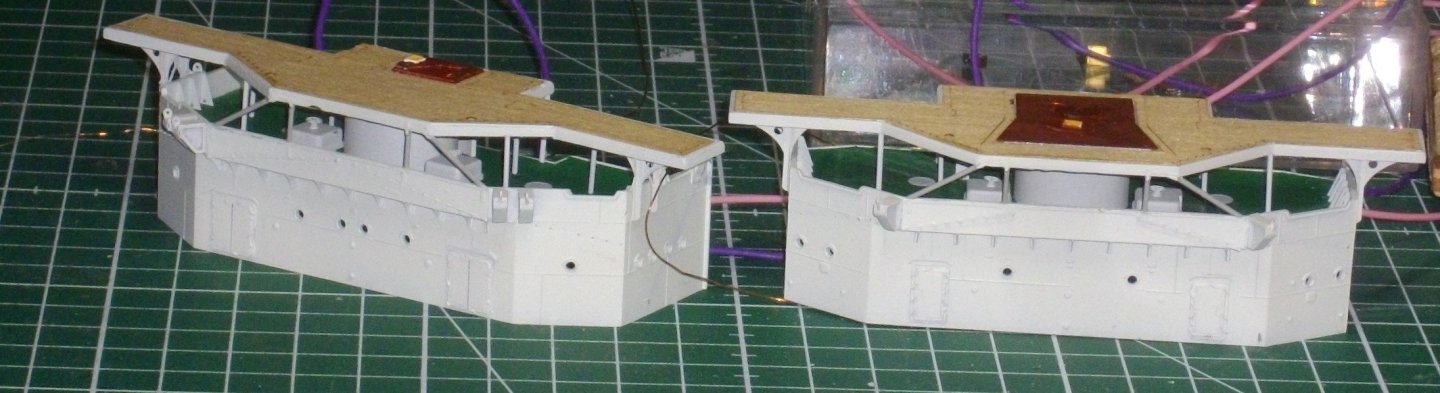
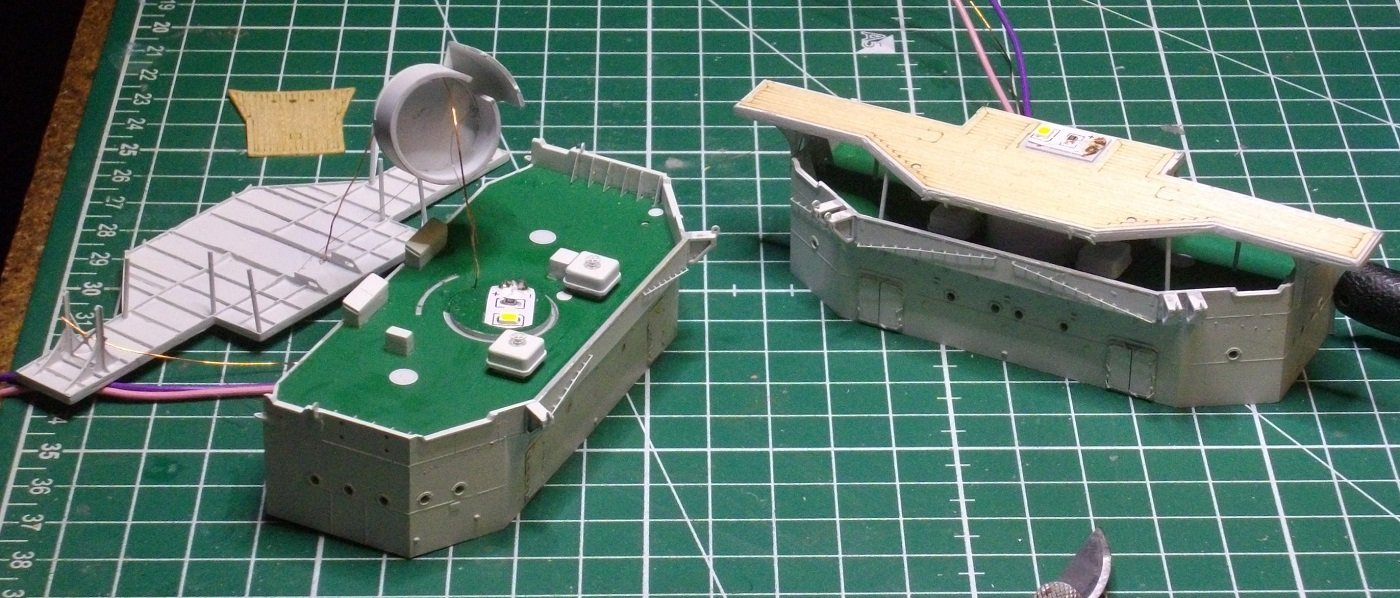
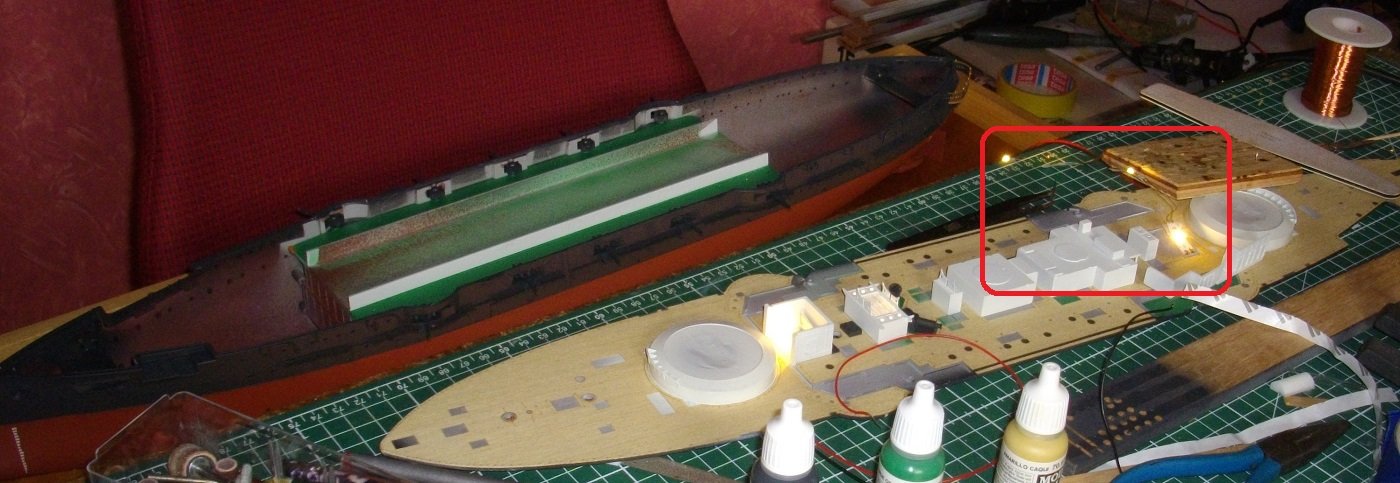
In my enthousiasm over the nice effect of the burning LED's I glued down both bridges with Revell Contacta professional, only to realise the next day that I had forgotten to make arrangements for wires of the the port and starboard signal lights to pass trough the bulckheads. External wires not being an option for me, there will not be working signallights.😭 untill next update, enjoy modelling

- 155 replies
-
- 3
-

-
-
- Mikasa
- Merit International
- (and 1 more)
-
So I made the final preparations for gluing down the bridges. I filled the portholes from the inside with Mikto Kristal Clear. And connected the wires from both LED's together, and mede a successsfull test. untill next update, enjoy modelling 😀.

- 155 replies
-
- 4
-
-
- Mikasa
- Merit International
- (and 1 more)
-
Merit compasses and communicationtubes prepared. Now all elements of Merit manual step 36 are ready for painting. untill next update, enjoy modelling and many thanks to all for the many thumbs-up👍 😀.
- 155 replies
-
- 5
-
-
- Mikasa
- Merit International
- (and 1 more)
-
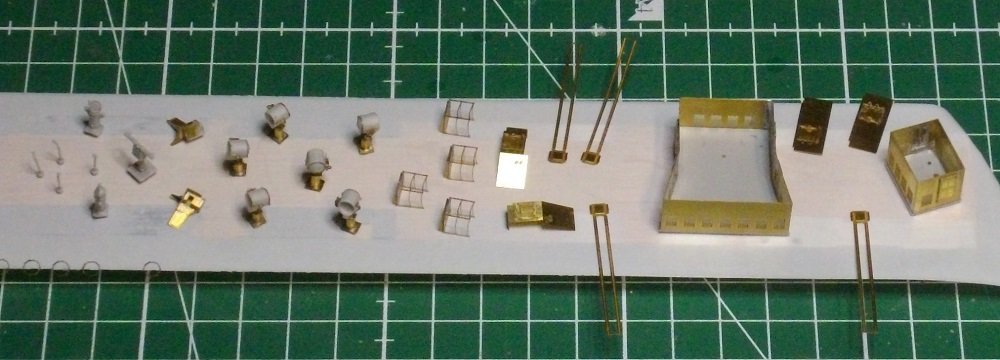
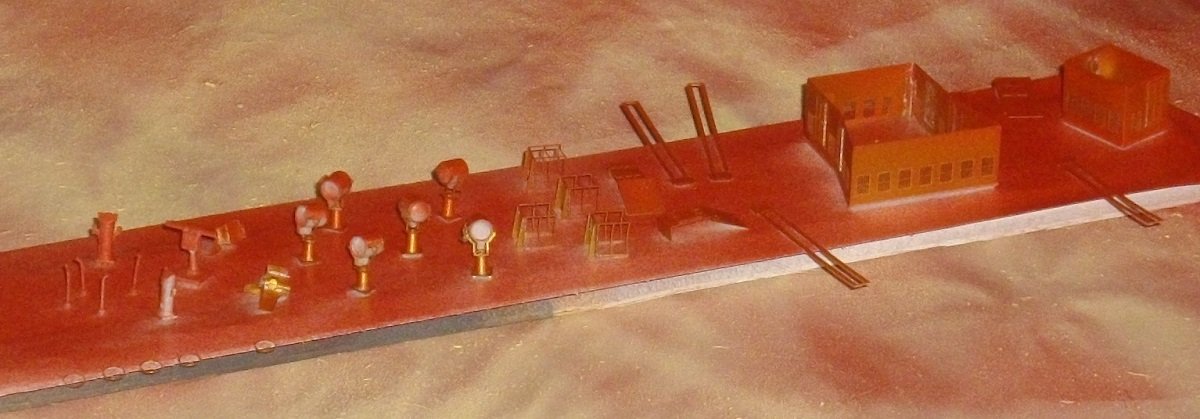
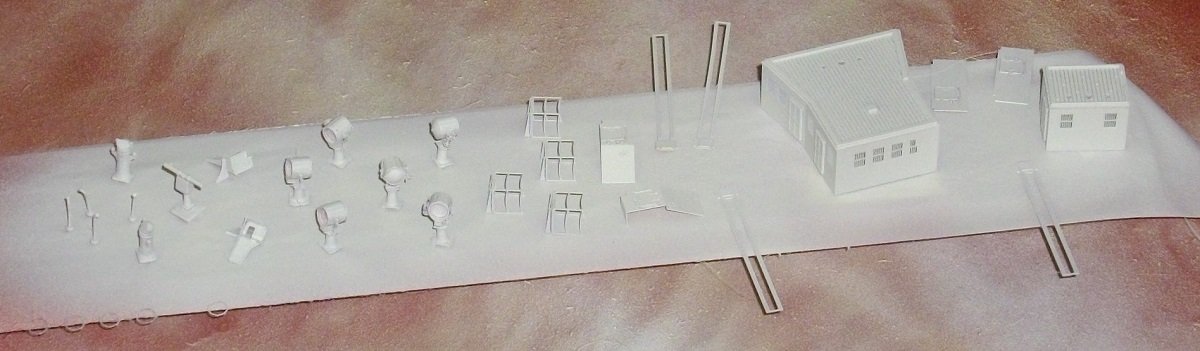
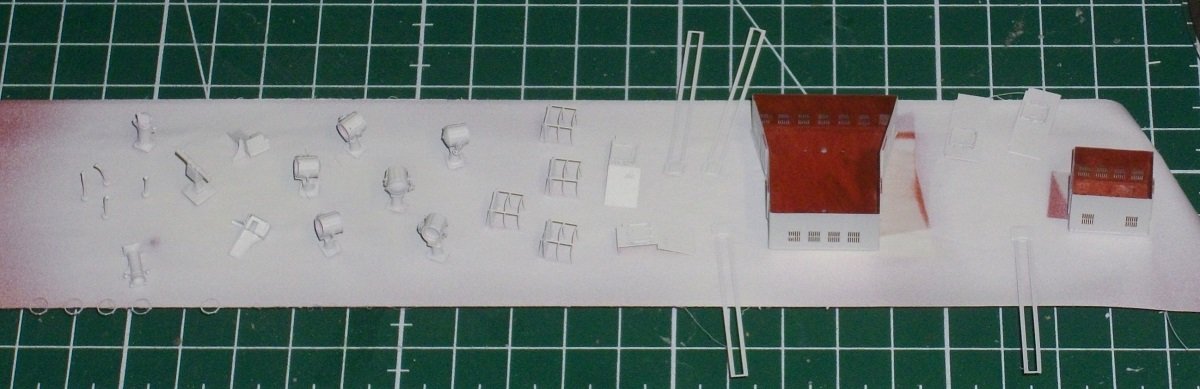
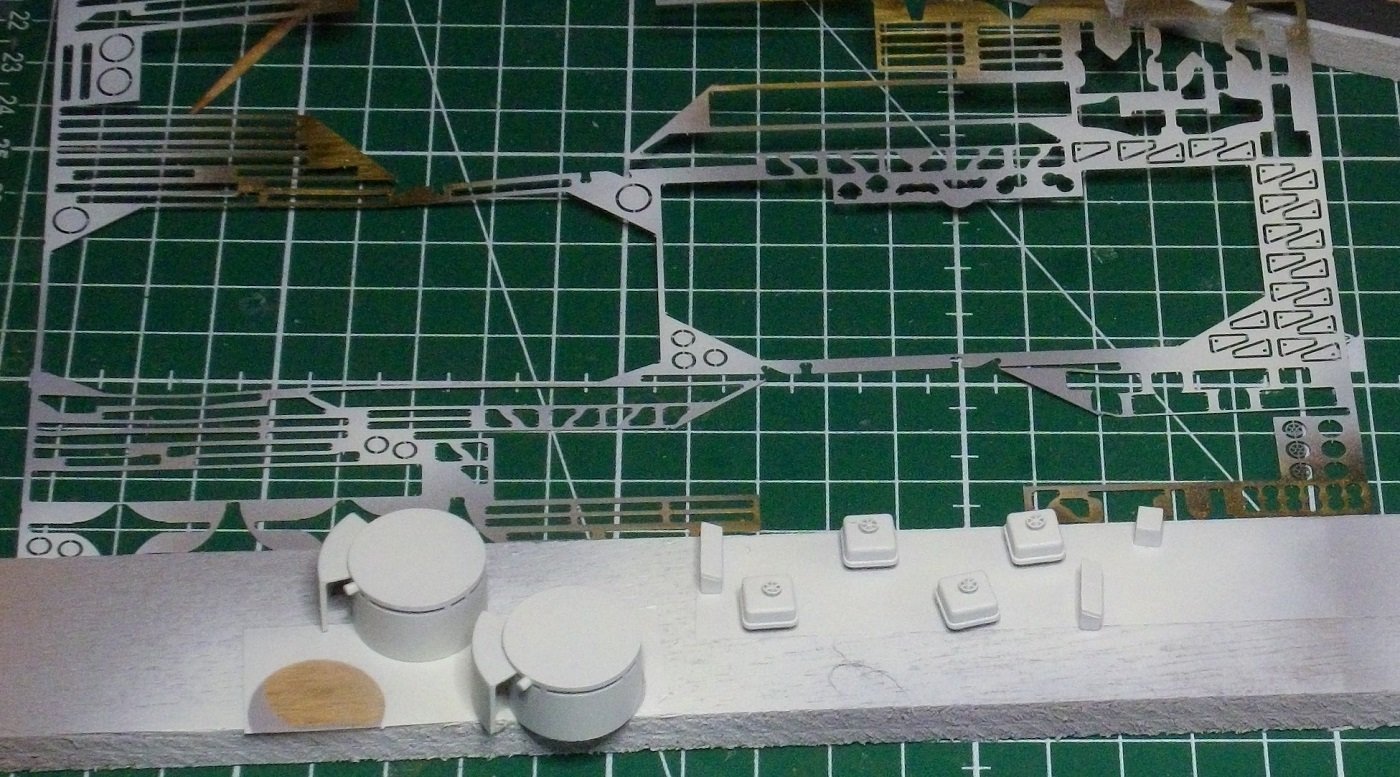
The Searchlights; The components for 6 searchlights. The bases soldered The searchlights mounted up to the point that they are ready for painting. untill next update, enjoy modelling.

- 155 replies
-
- 5
-
-
- Mikasa
- Merit International
- (and 1 more)
-
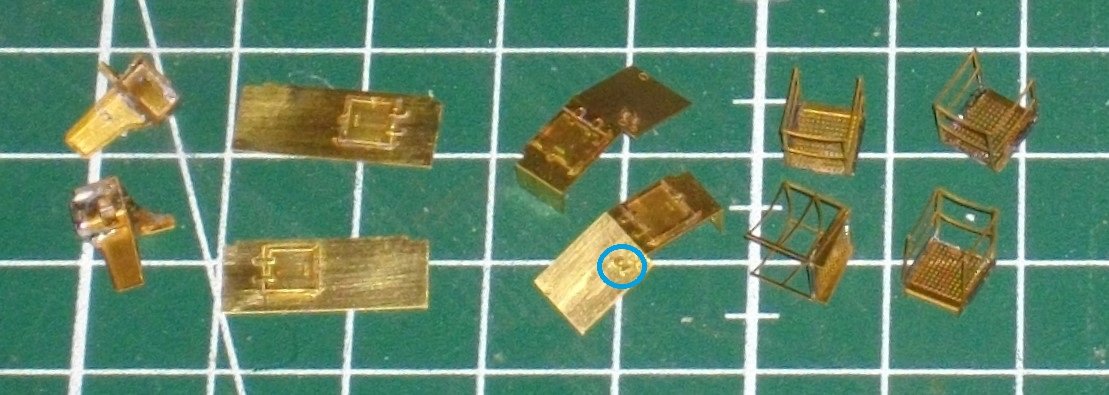
Port and starboard light fixtures bent and soldered (Pontos nrs 122 till 126) I soldered the hatches (Pontos 329 and 331) to the bulkheads (335 and 336) and 2 very small cleats (shown in the blue cirkel). untill next update, enjoy modelling.
- 155 replies
-
- 3
-
-
- Mikasa
- Merit International
- (and 1 more)
-
Front supports painted Insigna White. On with the bridge houses. I removed the sides from the Merit plastic parts. I just cut them off with a sprue cutter and sanded the underside of the ceiling flush. I collected the Pontos parts for these bridge houses and for the leadsmen's platforms. I bent and soldered theleadsmen's platforms. I soldered the doors to the cabinwalls, bent these to match the form of the plastic ceilings and glued them with pink Zap. untill next update, enjoy modelling.
- 155 replies
-
- 5
-
-
- Mikasa
- Merit International
- (and 1 more)
-
I hope you all enjoyed your holydays. I mounted the front diagonal pillars and painted the floors of the deckhouses in Mahogany. (The yellow dot is an LED) untill next update, enjoy modelling.
- 155 replies
-
- 5
-
-
- Mikasa
- Merit International
- (and 1 more)
-
The round pillars were added to the underside and the topdecks were primed and painted. The top surface is covered with a thin coat of clear gloss varnish for better edhesion of the wooden decks. Led's were added to the floorspaces of the fore and aft steeringhouses. The wires led through the floors of the top bridgedecks, through the tops of the armoured round observation posts and througt the floors of the latter, before joining all theze components together. untill next update, enjoy modelling.
- 155 replies
-
- 5
-
-
- Mikasa
- Merit International
- (and 1 more)
-
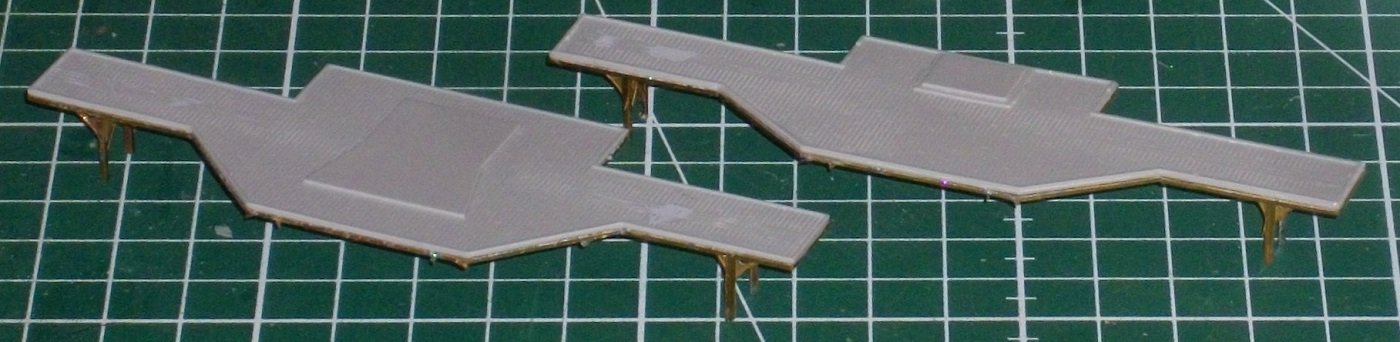
On with the upper bridge decks: - the Merit parts and the Pontos parts were joined with 5-minutes epoxy resin. After curing, I cut off the resin that squirted out of the joint. untill next update, enjoy modelling.
- 155 replies
-
- 3
-
-
- Mikasa
- Merit International
- (and 1 more)
-
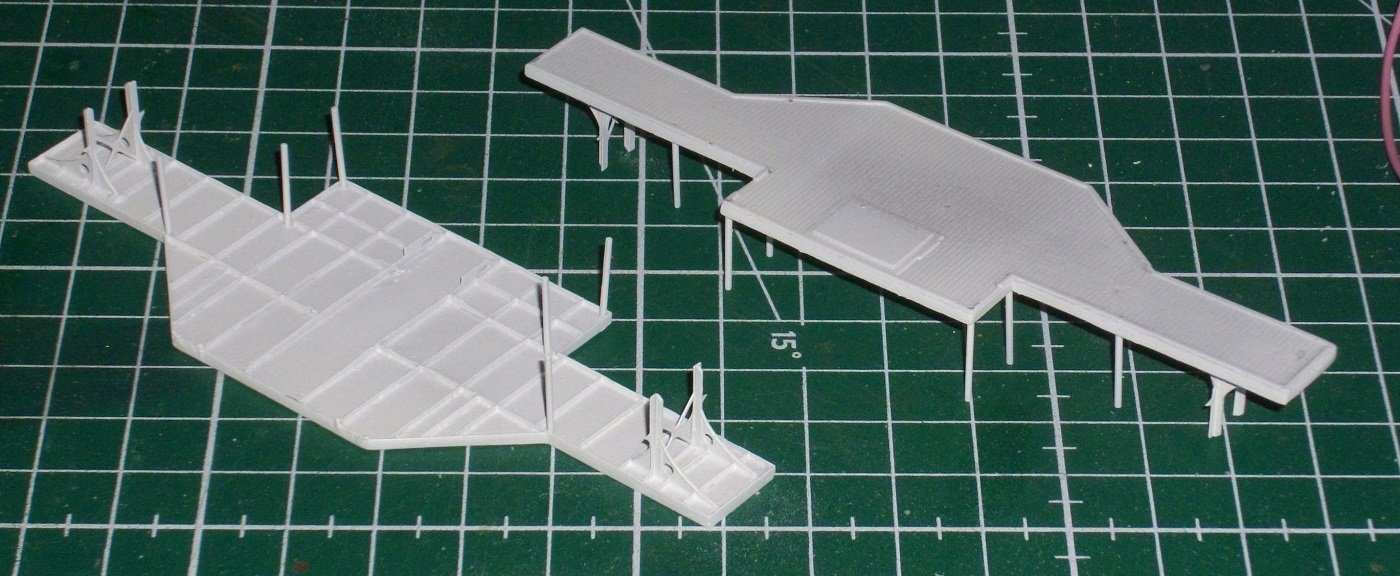
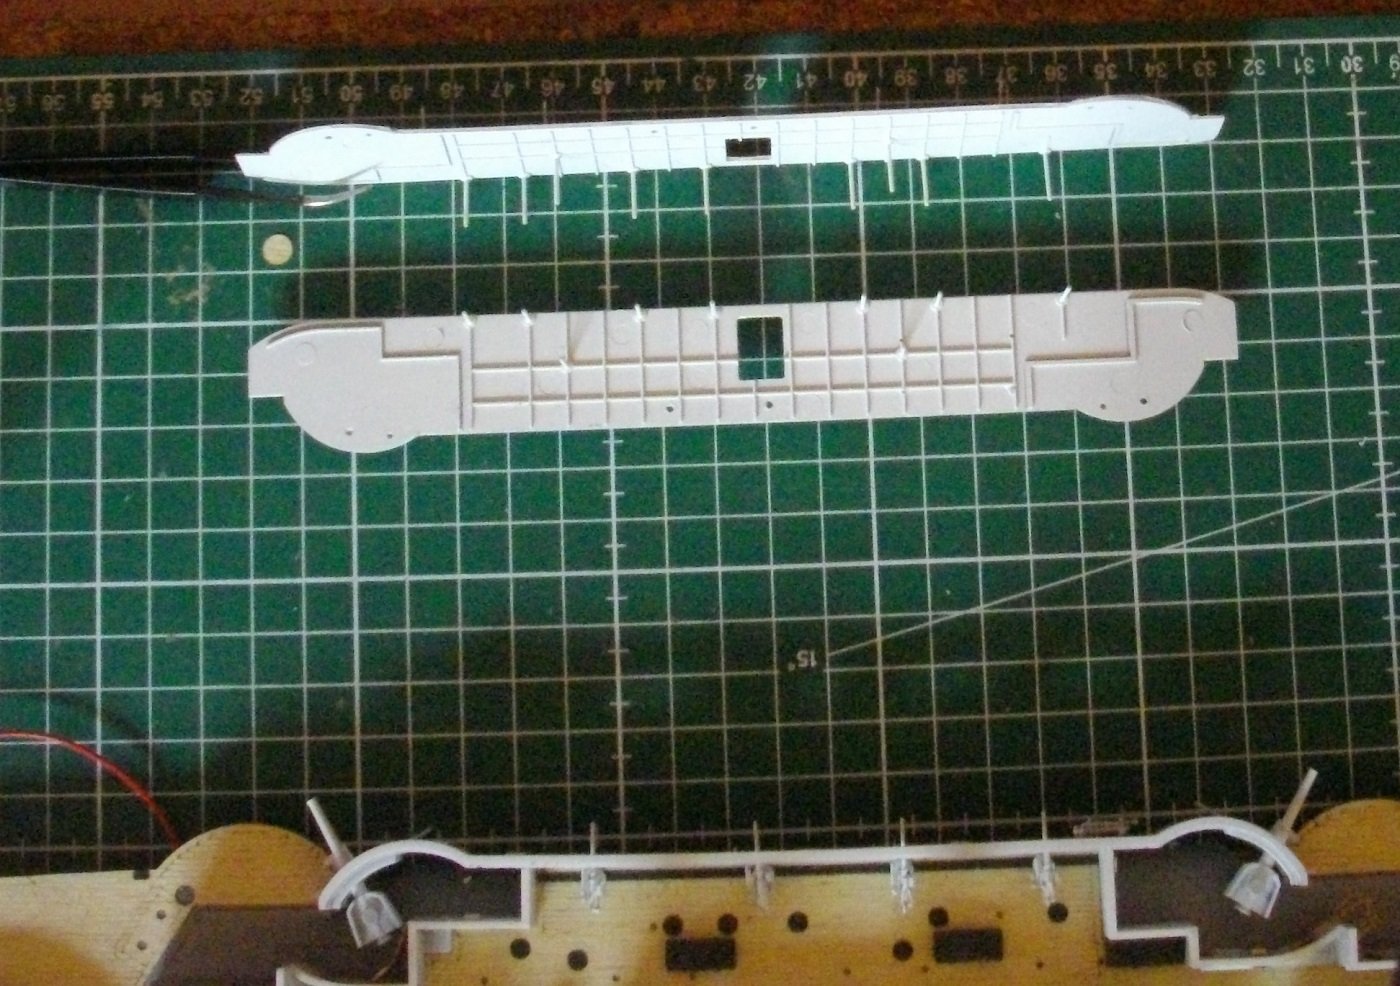
On to the upper bridge decks: - the Merit parts were undone of their moulded details - the Pontos underplates were soldered with ribs and supports. Certainly not an easy part of the model. Untill next update, enjoy modelling.

- 155 replies
-
- 5
-
-
- Mikasa
- Merit International
- (and 1 more)
-
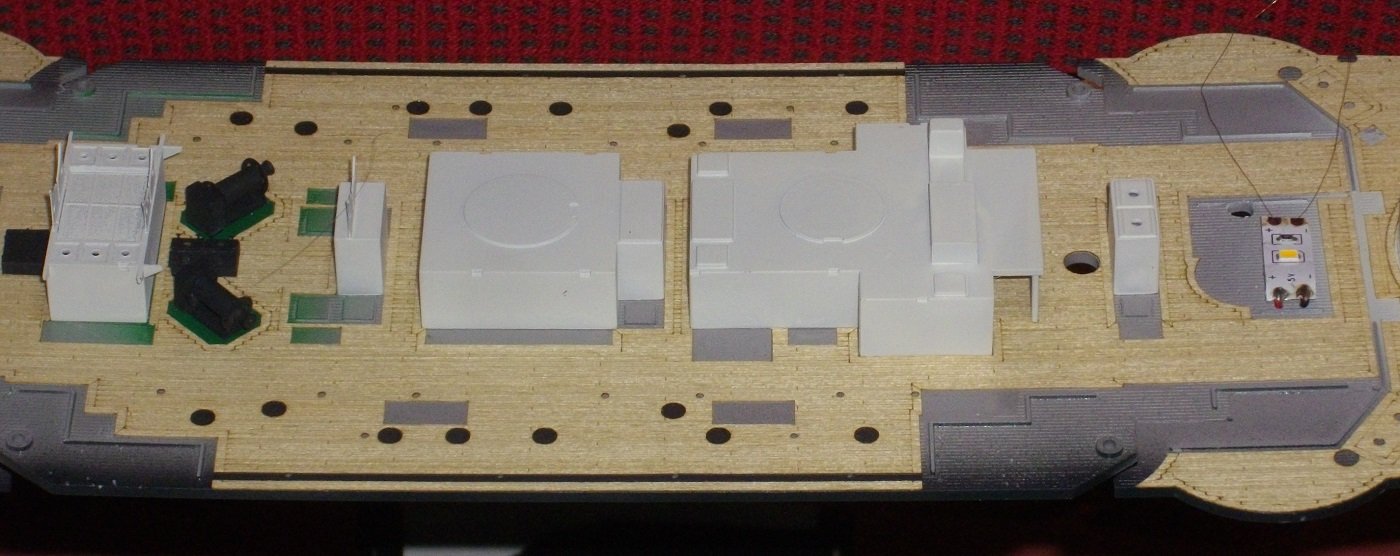
The Pontos brass decks were glued with 5 minutes epoxy-resin to the Merit bridges. Then I made a doorway in the round fortifications and glued the plate covering the entrance to the roof and prepared the other components of steps 30 (forebridge) and 32 (aft bridge). All these details were primed and painted Insigna White, and mounted in their apropriate places. Untill next update, enjoy modelling.
- 155 replies
-
- 6
-
-
- Mikasa
- Merit International
- (and 1 more)
-
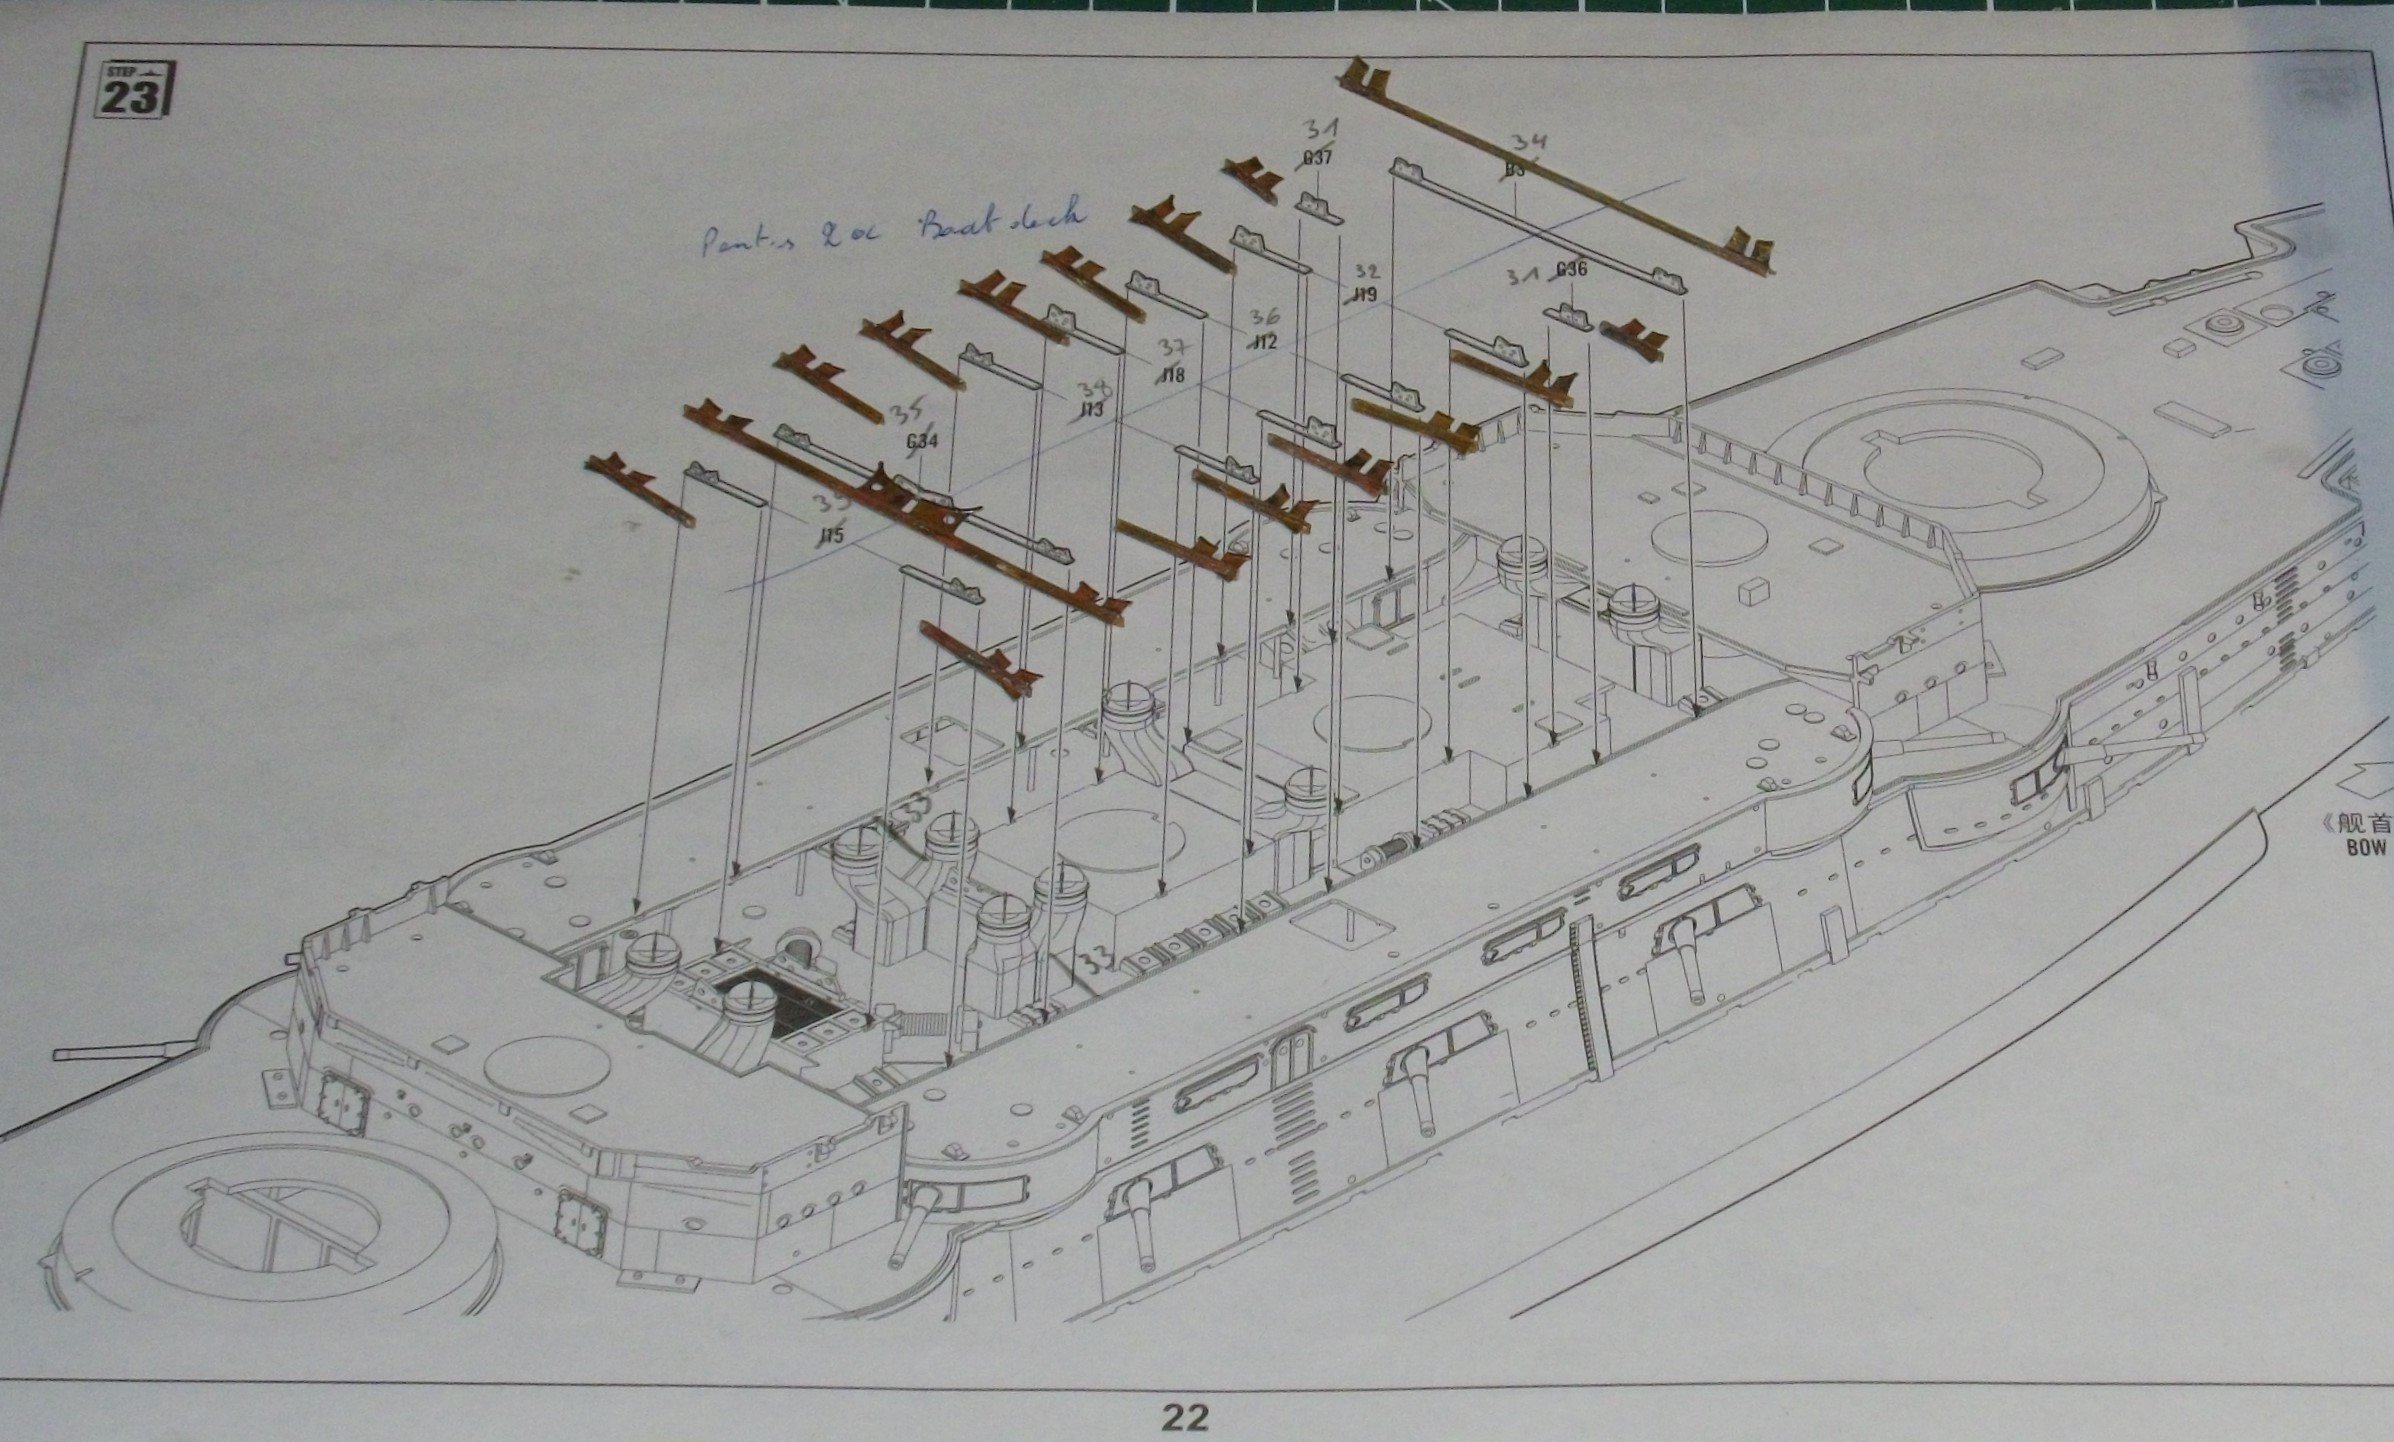
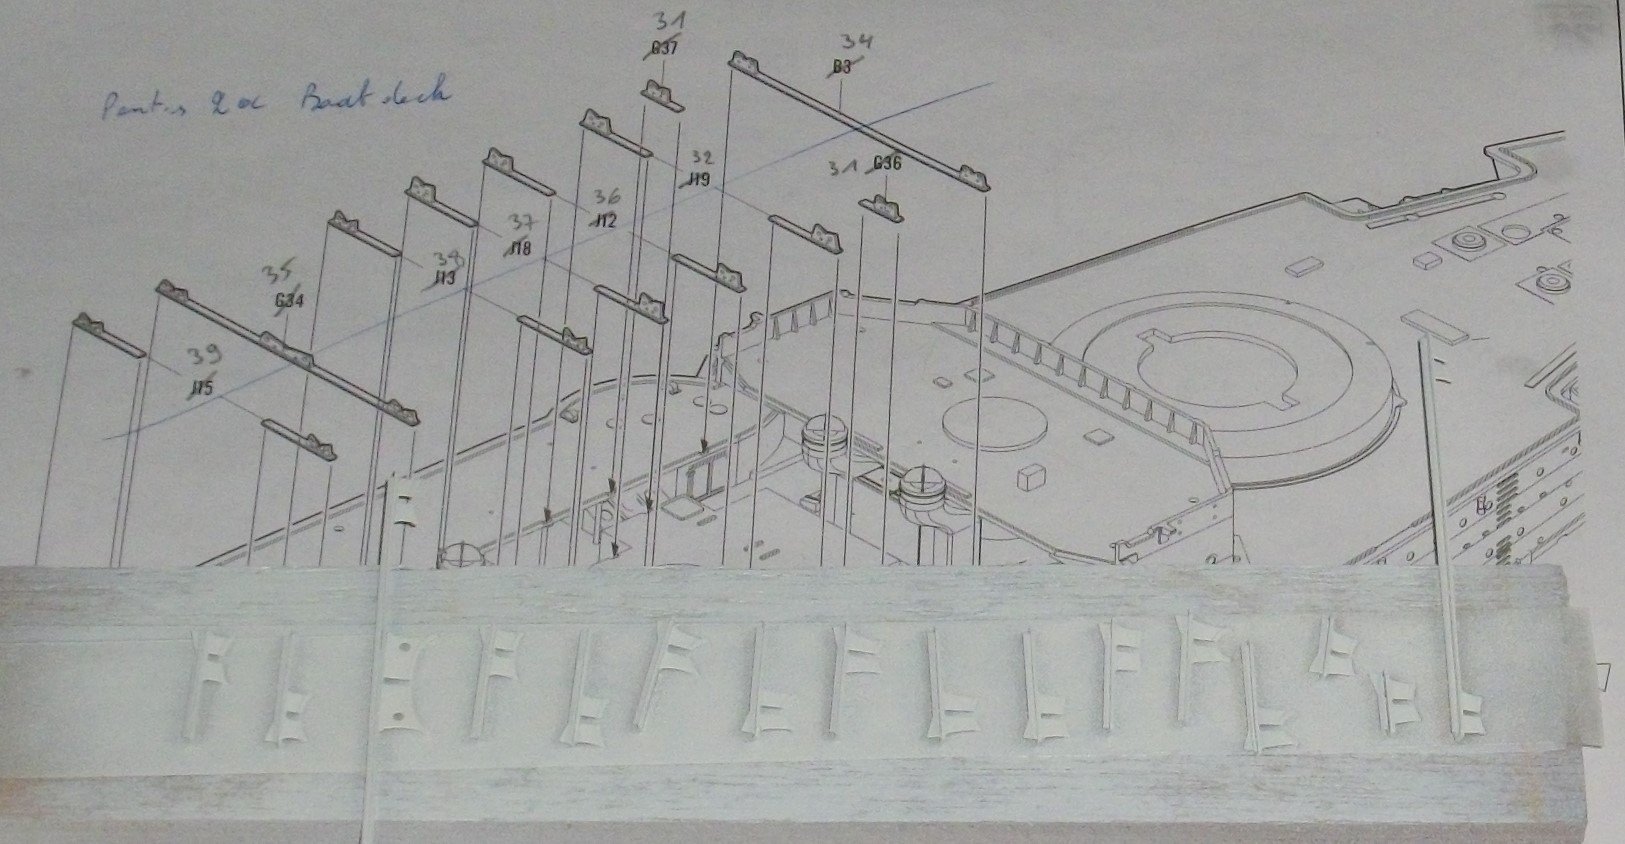
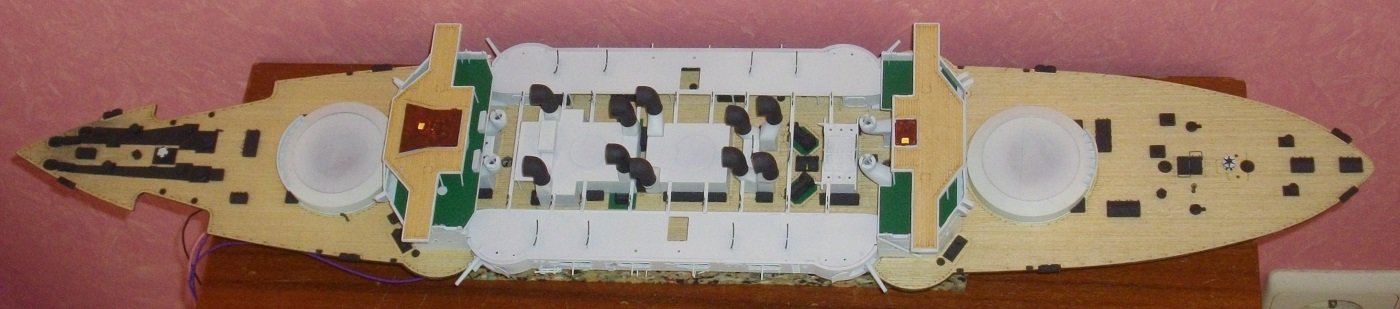
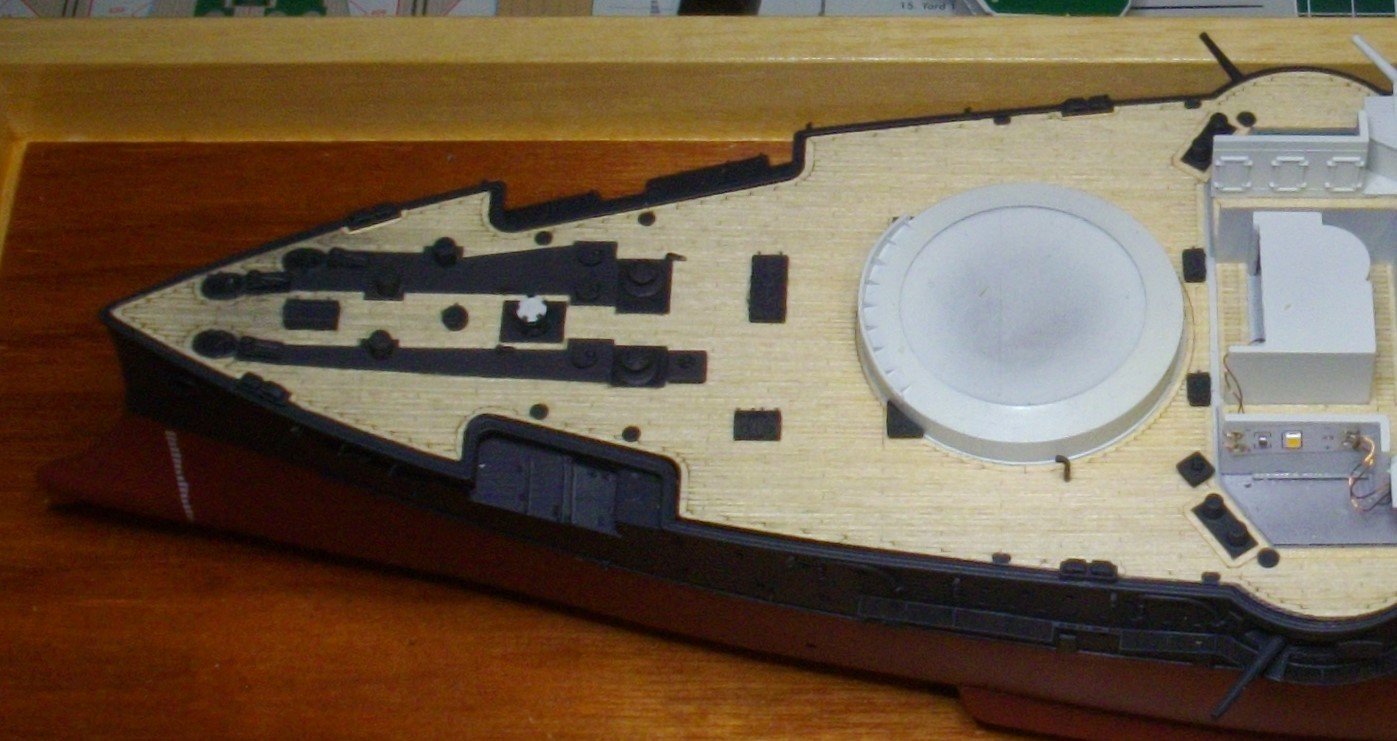
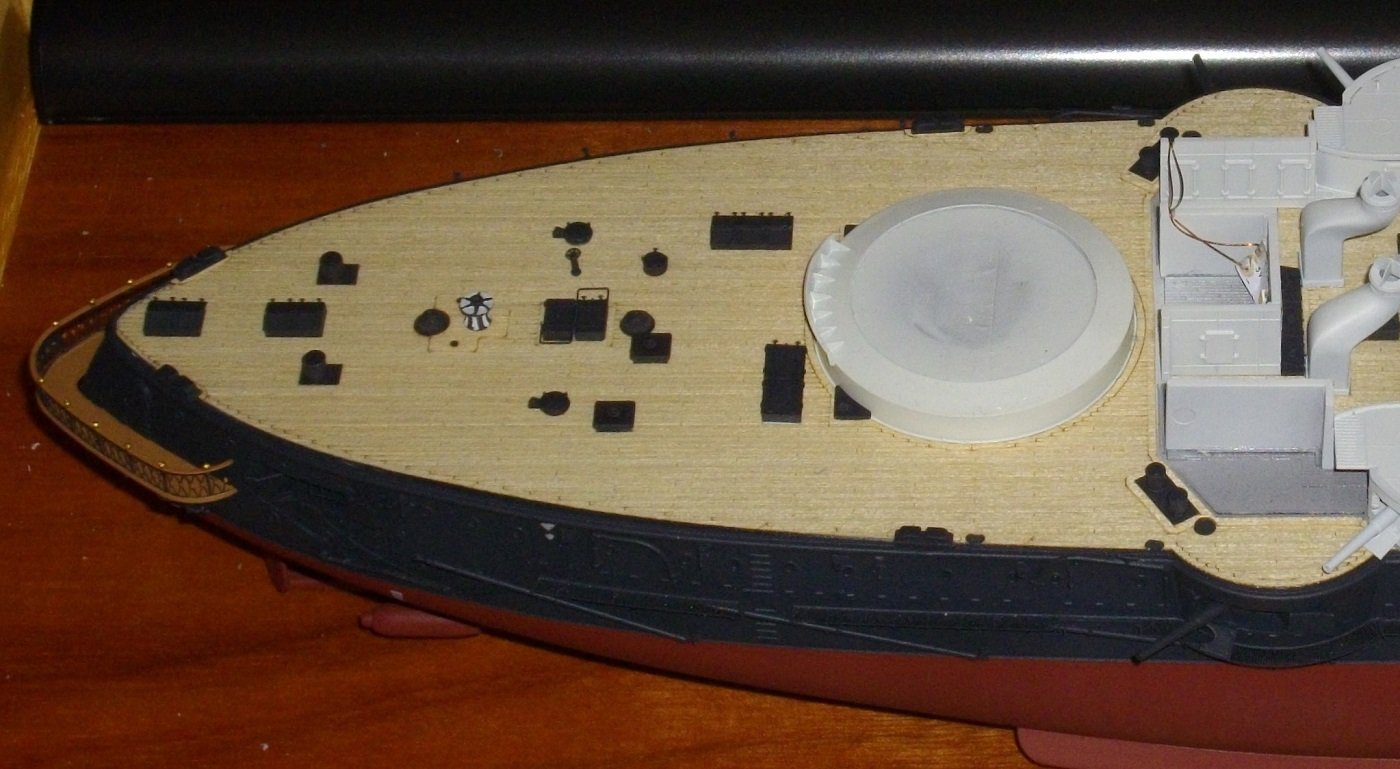
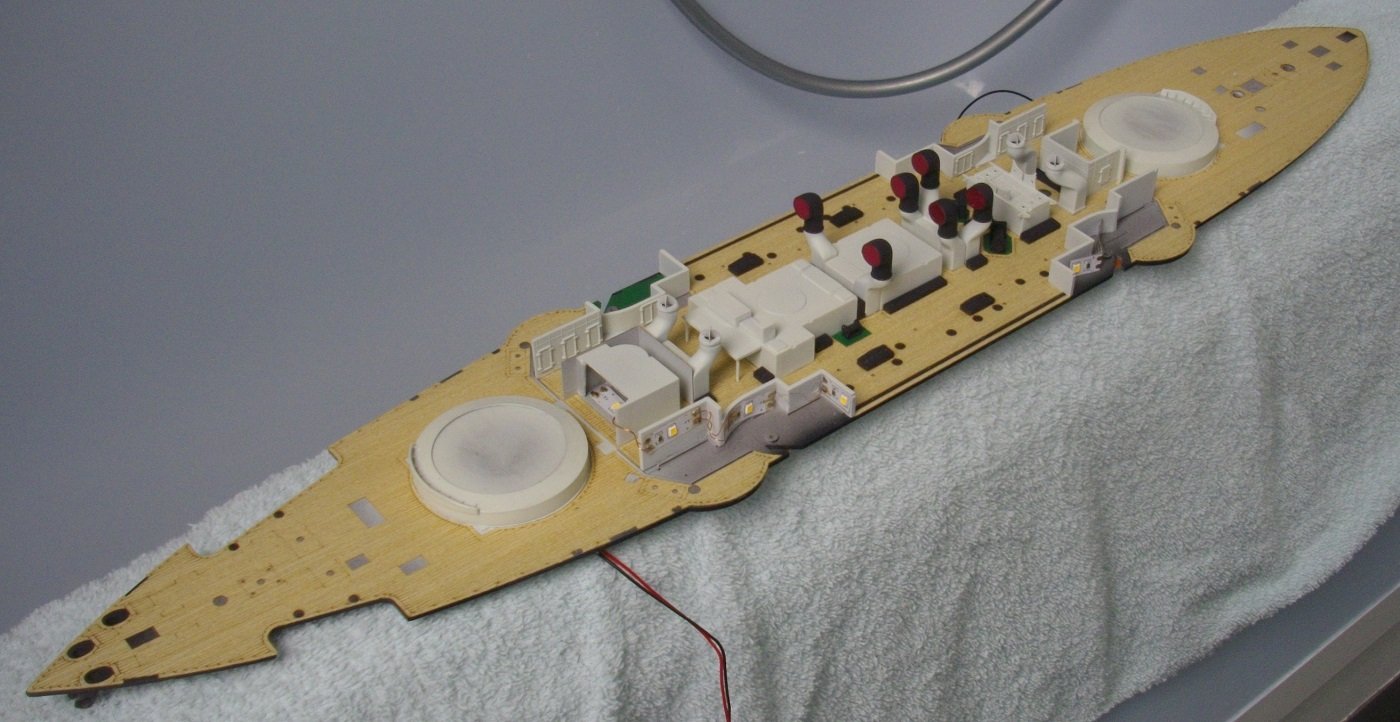
All deckdetails on both fore- and aft deck were installed, mainly with PVA-glue. That makes for quite a change in apearance. Untill next update, enjoy modelling.
- 155 replies
-
- 8
-
-
- Mikasa
- Merit International
- (and 1 more)
-
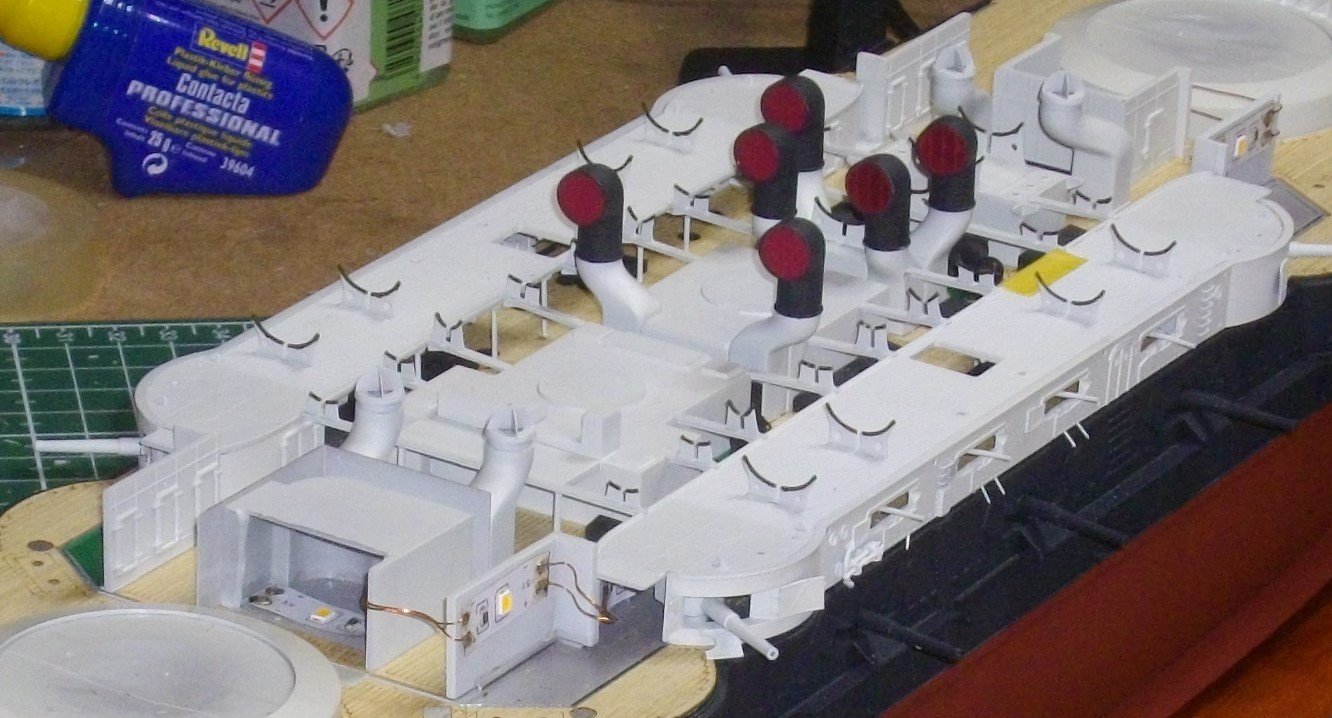
The remaining vents were assembled and glued on the fore funnelbase. Untill next update, enjoy modelling.
- 155 replies
-
- 7
-
-
- Mikasa
- Merit International
- (and 1 more)
-
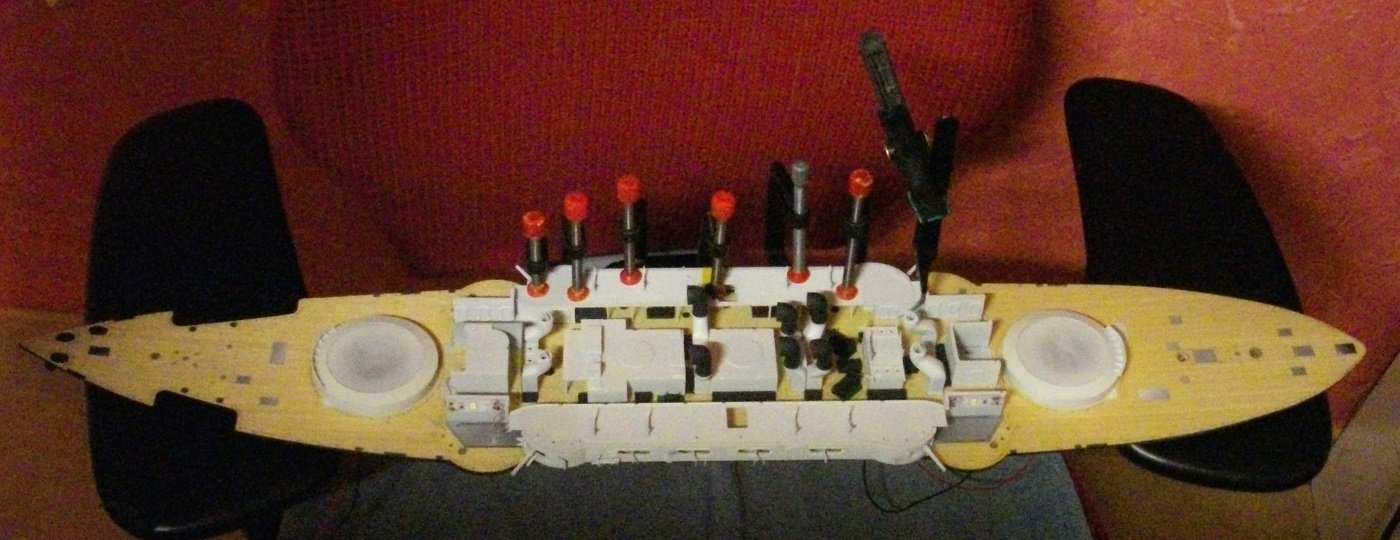
The Pontos boat supports were bent and soldered. and degreased with isopropyl alcohol in an ultrasound cleaner for 3 minutes, then primed and sprayed with Vallejo Model Air Insigna White. After painting the top sides Vallejo Model Air 71.015 Dark Green RLM71 to simulate lether protection, they were installed on the superstructure. Untill next update, enjoy modelling.
- 155 replies
-
- 5
-
-
- Mikasa
- Merit International
- (and 1 more)
-
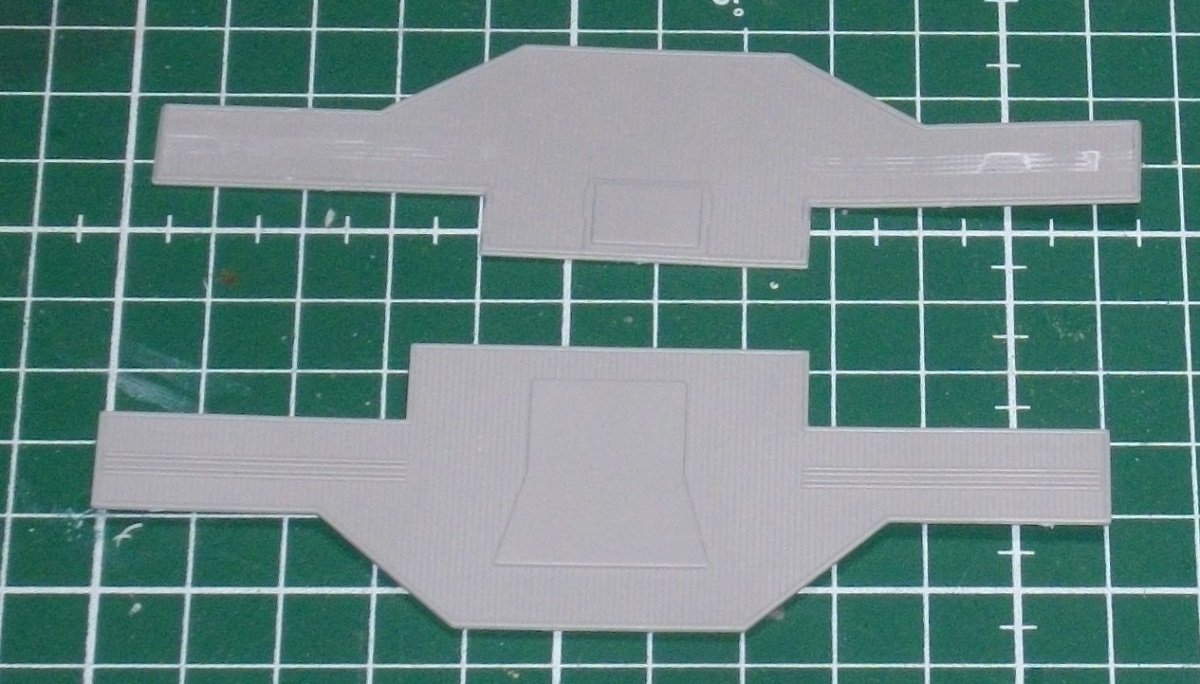
Time to lay down the boatdecks, so I glued the little plastic pilars with Tamiya extra thin cement, and lined them up with the holes in the wooden deck. When this was dry, I glued the boatdecks on the bulkheads witg Revell Contacta professional and the necessary clamps. Untill next update, enjoy modelling.
- 155 replies
-
- 5
-
-
- Mikasa
- Merit International
- (and 1 more)
-
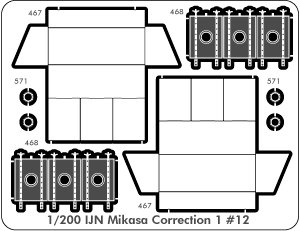
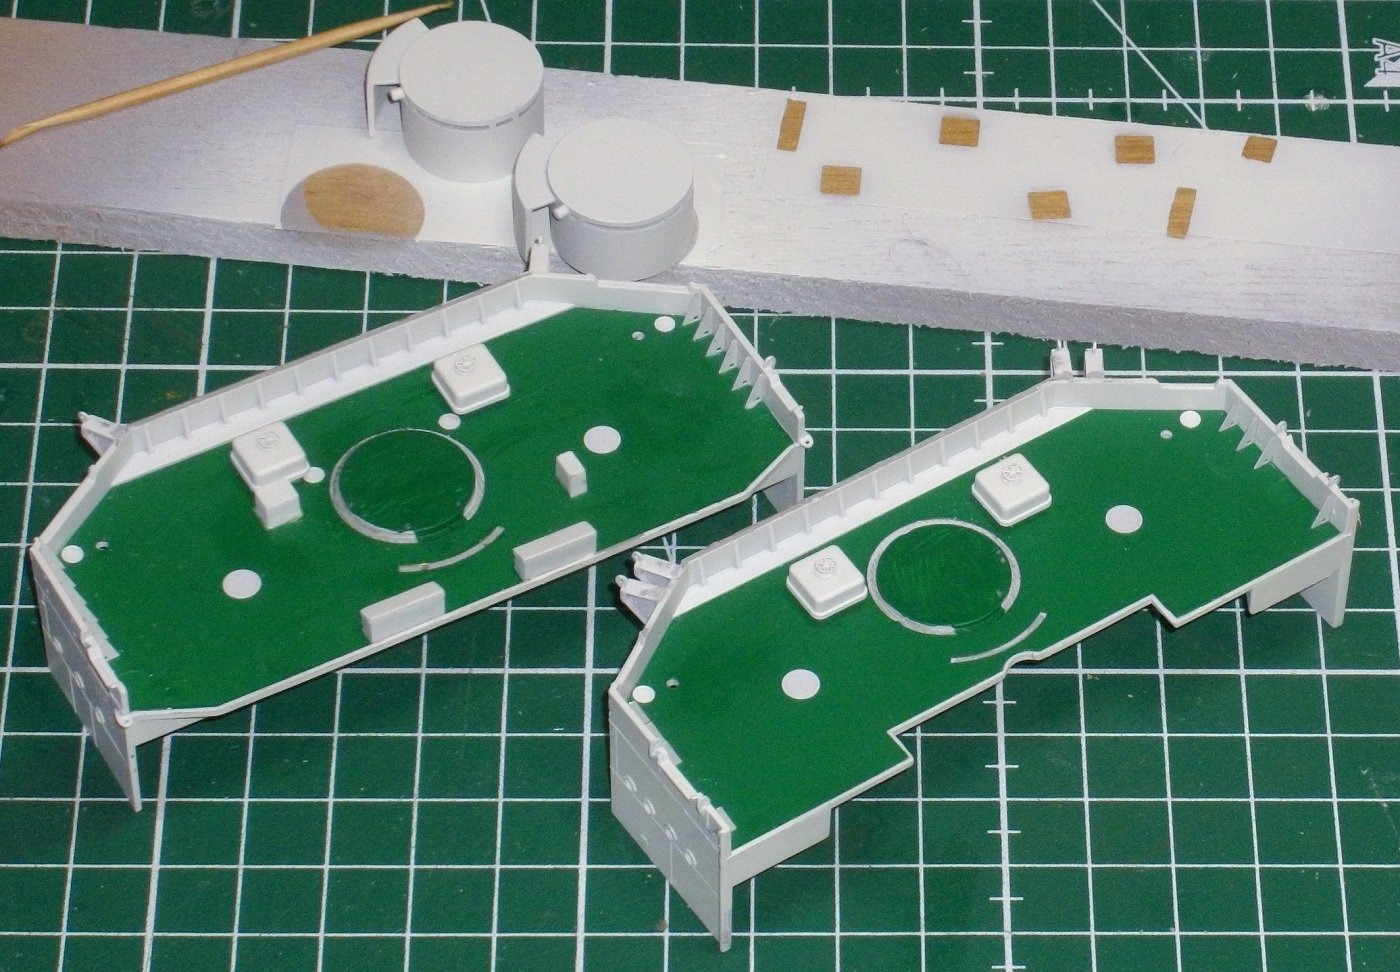
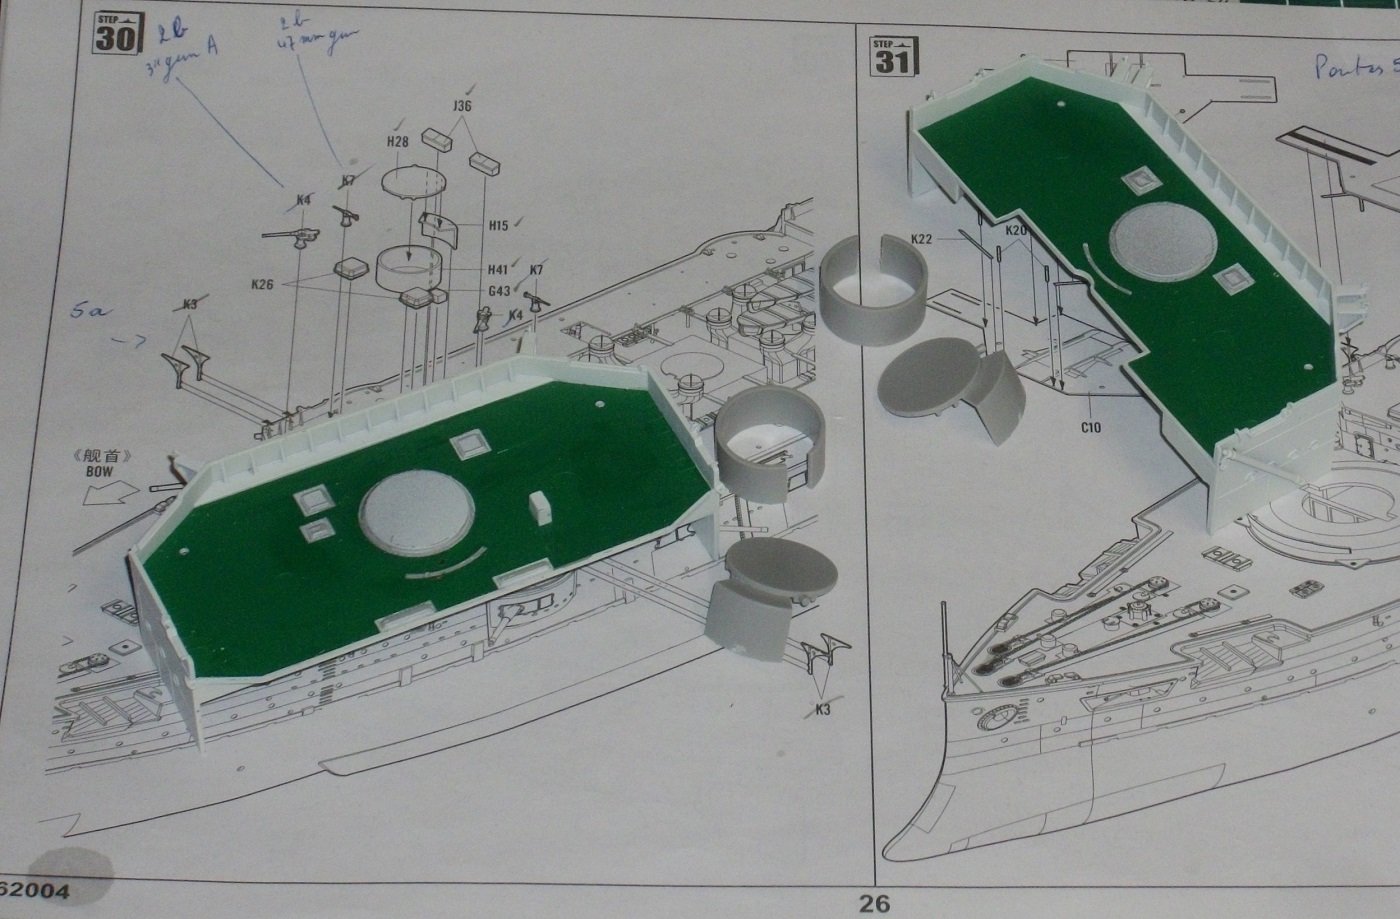
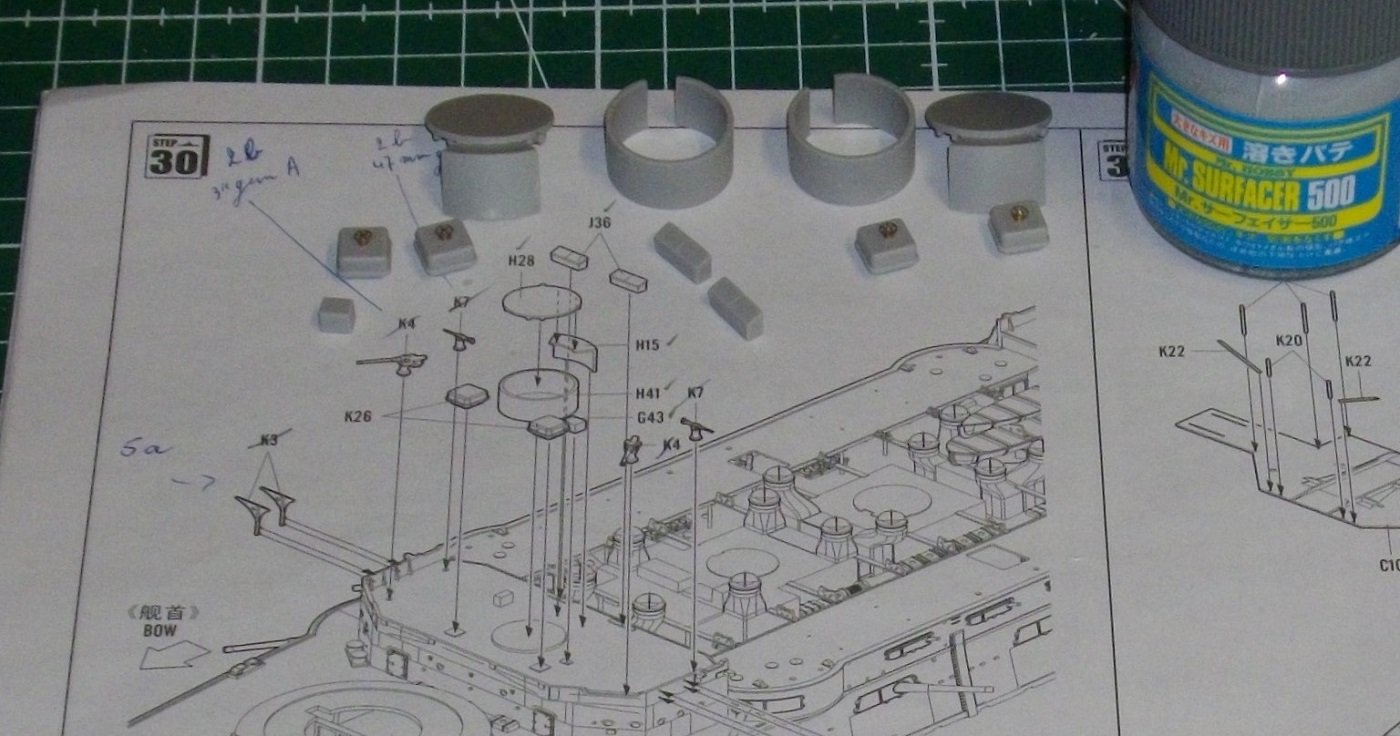
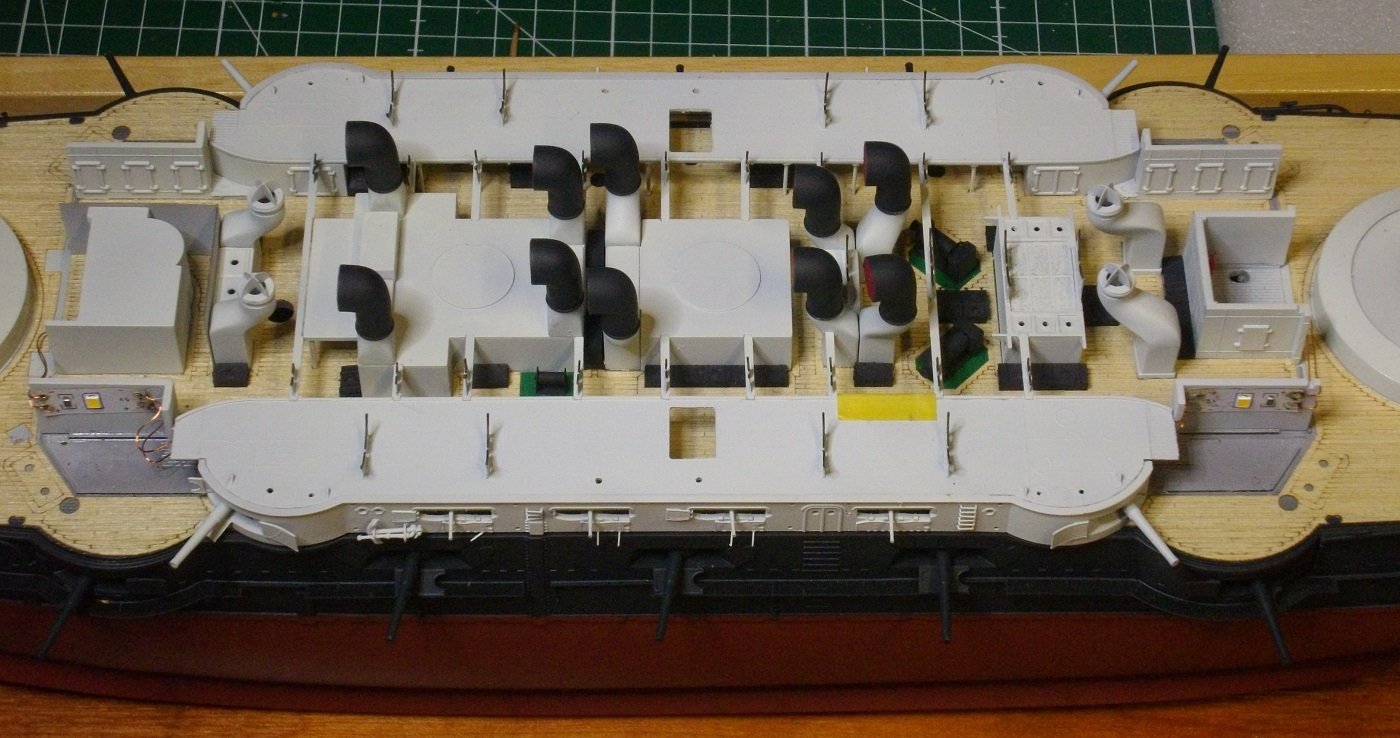
Merit steps 14 to 19: The louvres were glued to the venttops, the vents glued to the middle deck; Bulkheads glued with Revell Contacta professional. All PONTOS hatches and rails glued to the middle deck. Unfortunately The Pieces H16 were replaced with Pontos-parts with other dimentions, so those did not fit. (I stied a couple of times to obtain the correctionfret #12, but with no succes) Si I end up using the Merit parts. Lost between the middele deck infrastructure this will not stand out. Sides A16 and A17 glued to the sides. 6 and 3 inch guns glued in place with PVA-glue Untill next update, enjoy modelling.


- 155 replies
-
- 6
-
-
- Mikasa
- Merit International
- (and 1 more)
-
I wired up some LED's with 0,03 mm coated wire and tested for half an houher to be sure the wires did not get hot. Untill next update, enjoy modelling.
- 155 replies
-
- 7
-
-
- Mikasa
- Merit International
- (and 1 more)
-
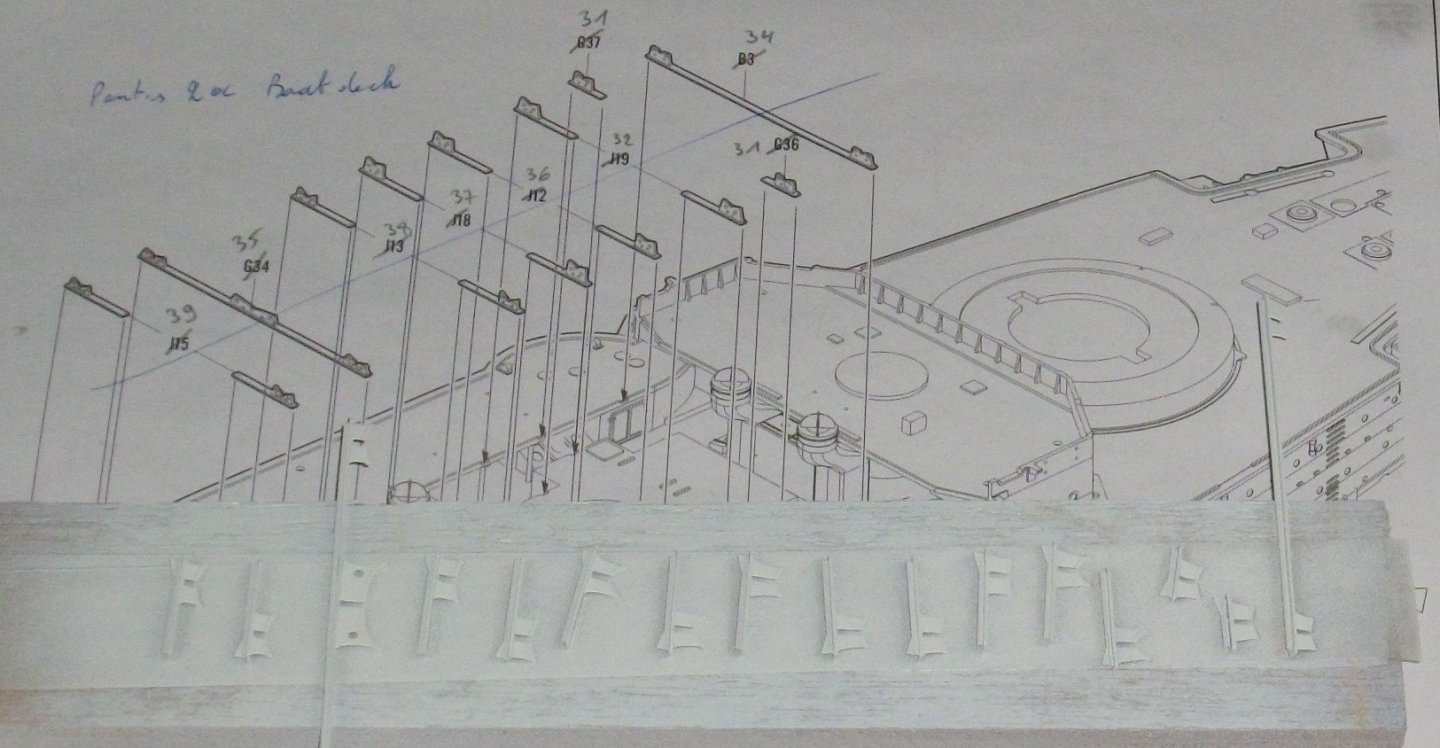
The sides of the middle part of the wooden deck were finished by adding the Pontos brass strips and a fine wooden strip. The brass strips were layed between the wood veneer, and not on it. Thus no unevenness was created . The shute covers were also glued in their place with PVA-glue. Untill next update, enjoy modelling.
- 155 replies
-
- 7
-
-
- Mikasa
- Merit International
- (and 1 more)