HAIIAPHNK
-
Posts
351 -
Joined
-
Last visited
Content Type
Profiles
Forums
Gallery
Events
Everything posted by HAIIAPHNK
-
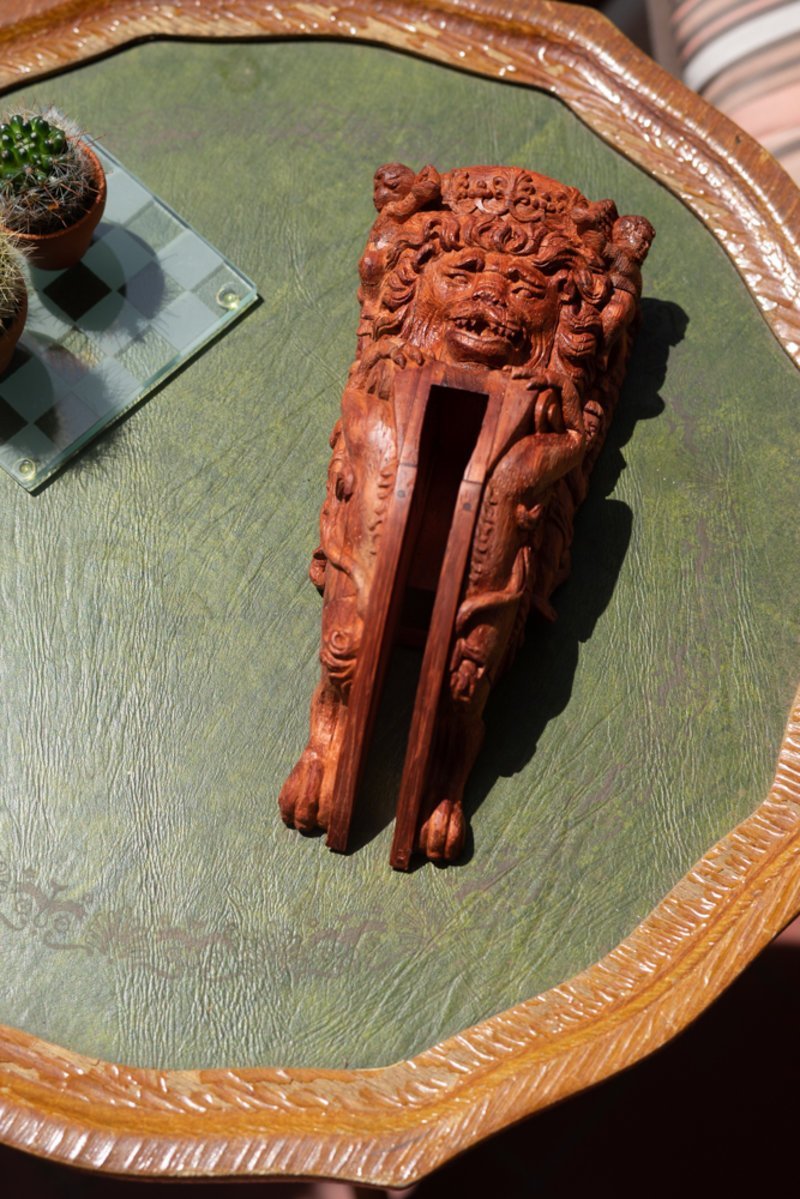
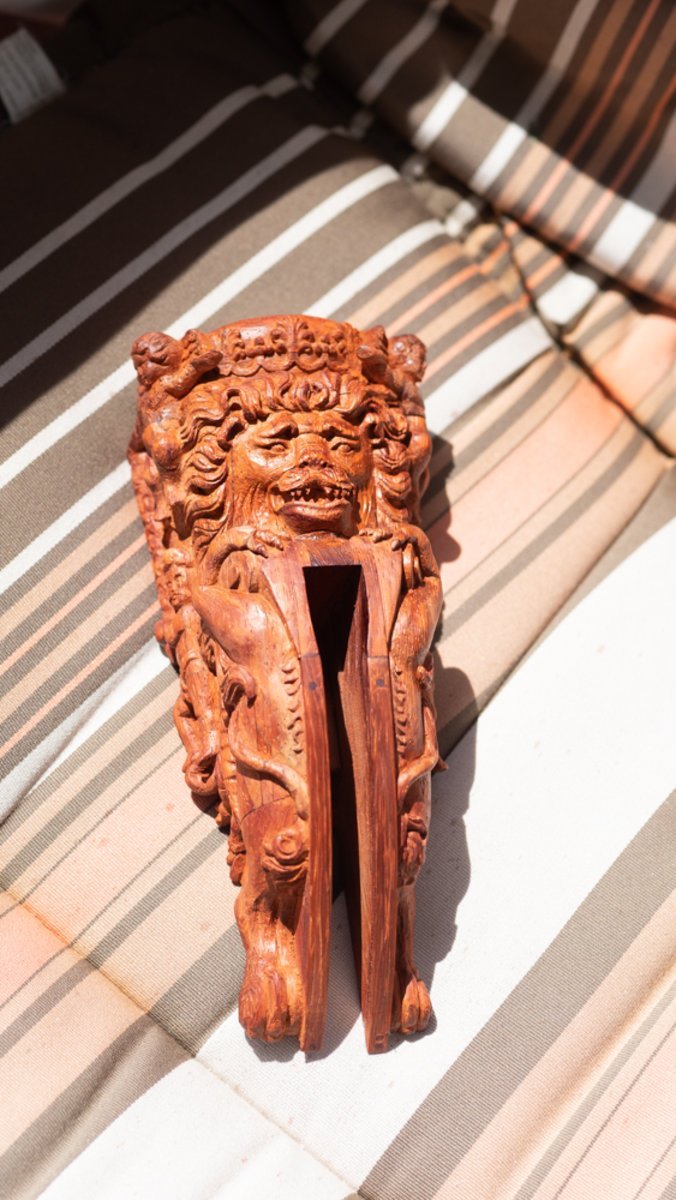
 I have previously written many times about the peculiarities of paducah. The wood darkens very quickly. And that I was very interested in what causes this darkening. Does the wood get dirty so quickly from touch or is it a reaction to light or air? As long as I held the figurine in my hands, touched it, there was always a chance to say that the touching was the cause. In order to prove the effect of light or air, you have to let the sculpture lie in the light and have nothing and no one touch it. This is the only way to compare and see the difference. And so the moment came when I decided to do a little experiment. A very dangerous one! Just kidding. It's really quite simple. I just decided to bring the lion into the light. and see if it changes. So I took my lion out on the balcony for a couple of days, and put him in such a way that the sunlight falls on him freely. The experiment lasted only two days. Just then the rains came and it was cloudy outside again. So I decided there was no point in continuing. So what can we say? What were the results of this very dangerous experiment? There were changes. During this time, the tree began to darken and became a deeper brown color. Which answers and confirms the theory that the wood is changing. Maybe it's oxidation, like an apple. I don't know the exact name of this process. Of course, the answers to such questions can probably be found on the internet. But I wanted to see for myself exactly how the changes happen. I was sure they would happen. I vividly remember what the board I bought looked like before treatment. And that it even had different sides. Most likely it was from the fact that in the stacks in the warehouse one side was in the shade and the other side was a little more lighted. So I was expecting a change. And would have been much more surprised if I hadn't seen them. The other thing is that I didn't know how quickly the changes would start to appear? And that was something I was very interested to see. After this experiment and the experience of working with a tree that is new to me, I can say that the tree also changes by touching it. It polishes very easily and acquires a kind of greasy sheen. It absorbs any dirt from your hands. And at the same time it changes very actively from simple light. So if you have the task of preserving the bright color of this wood, then this is bad news. Most likely, the wood will have to be covered with varnish or some other composition. And you will need to look for information, whether some kind of coating will help to preserve the brightness, is it even possible? In my case I don't mind the lion getting darker and darker. On the contrary, a darker tone will look more like the old wood of an ancient sculpture. A bright color is not necessary for me. So I'm happy with what I've seen in this little experiment. Of course, one could go on and complicate the experiment. For example, to check whether the paduk is affected by temperature, heating? For example, putting the wood in an oven. But I didn't do anything like that. Of course, I would never dare to bake a finished sculpture like a pie. For one thing, my sculpture is made up of glued segments, and heating it would destroy the entire bond between the segments. And secondly... perhaps the first is enough. I didn't stick the rest of the scraps in the oven either. Maybe I missed some unexpected discoveries. But I'll be honest, I wasn't that interested anymore to see if there would be any changes or not. Let at least some mysteries remain undiscovered. Maybe next time. But not now. Way and posterity will have room for their own experiments and discoveries. Or else we will know everything and they will have nothing left 🙂. Well, that's it. A little later I will describe the final conclusions again. And there is nothing more to tell within the scope of this post. ...to be continued...


-
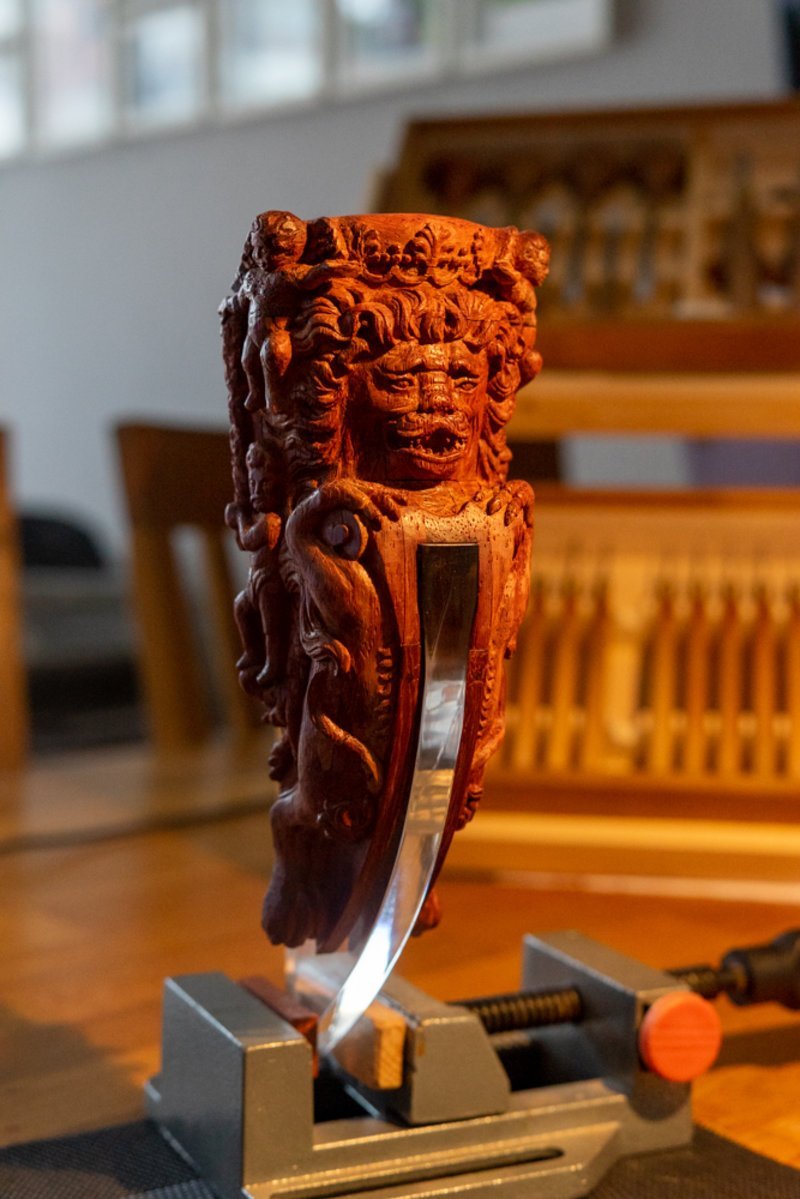
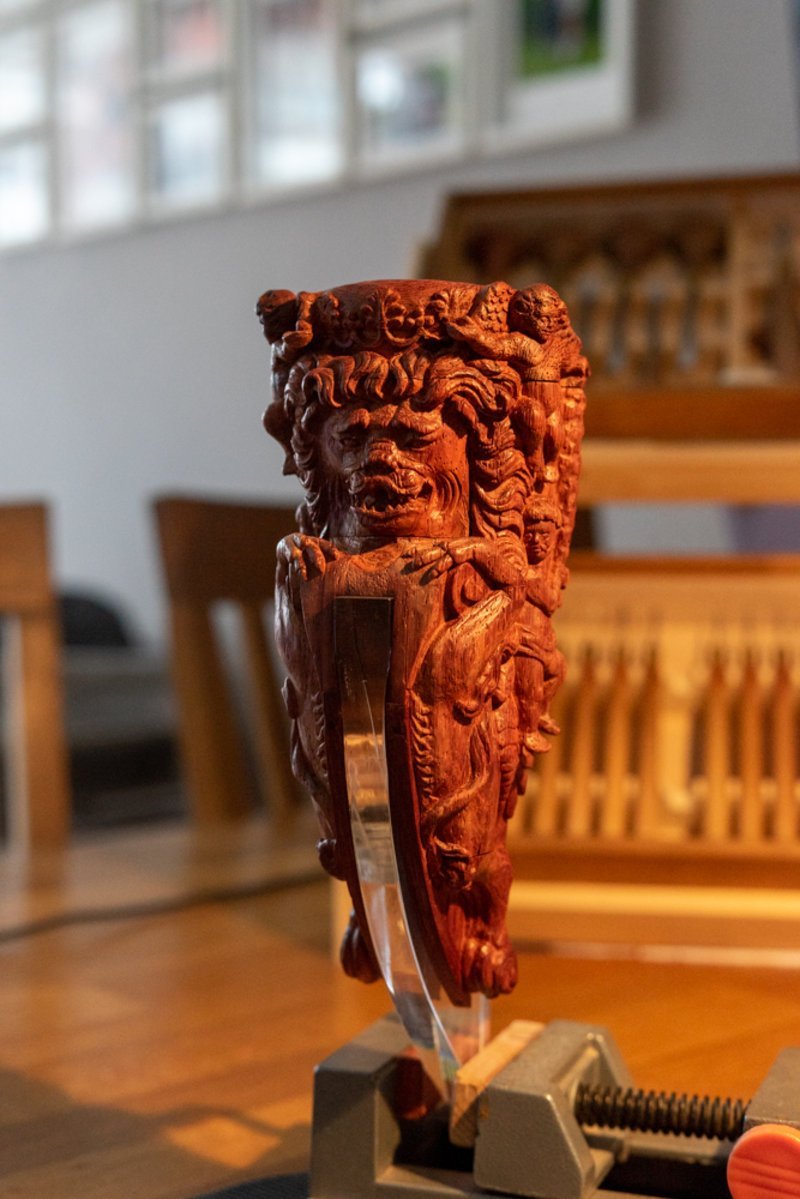
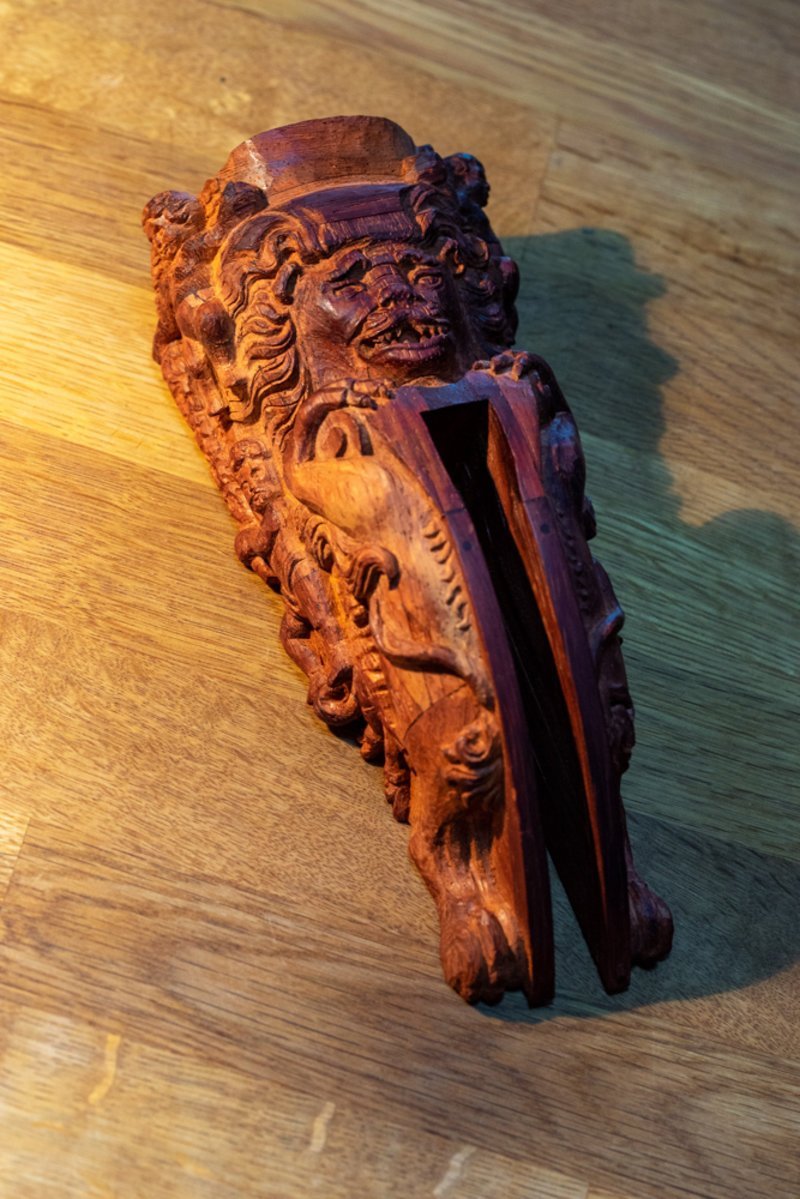
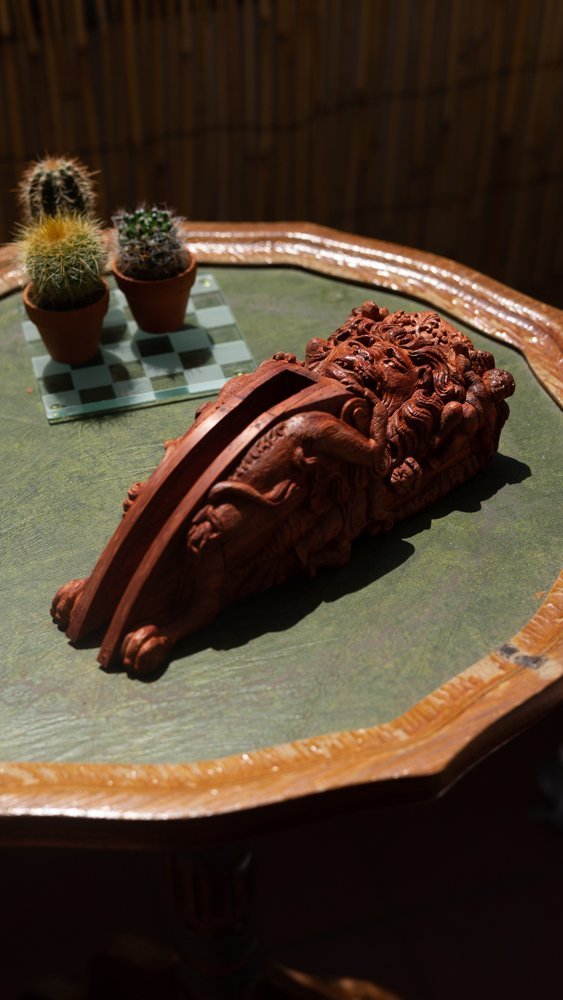
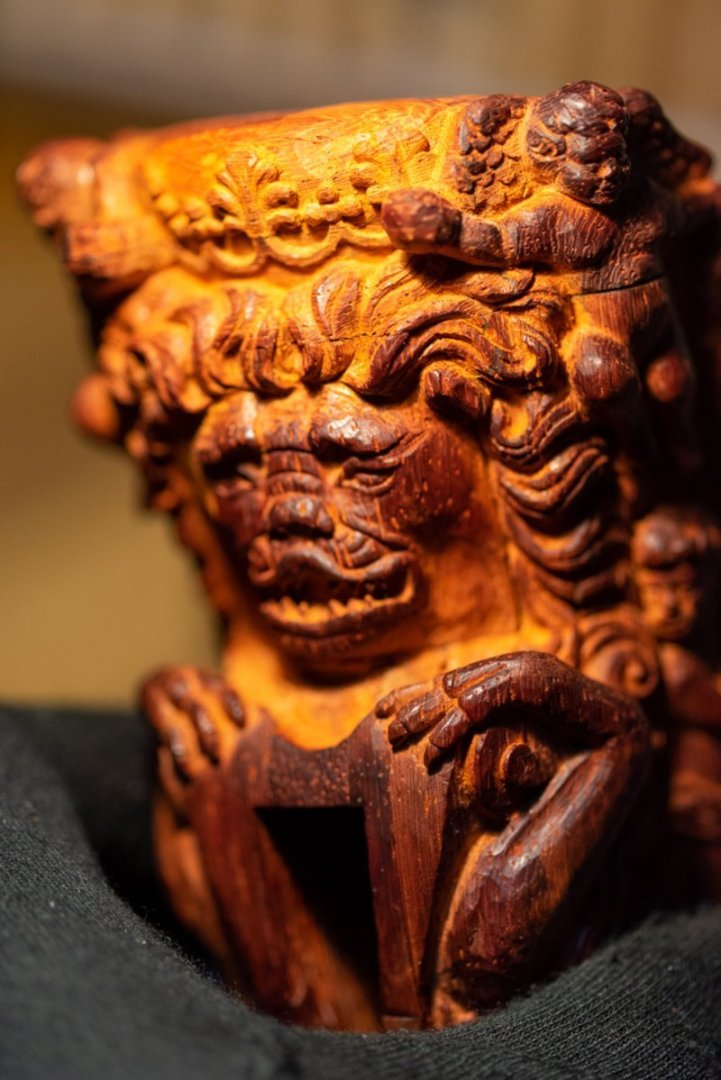
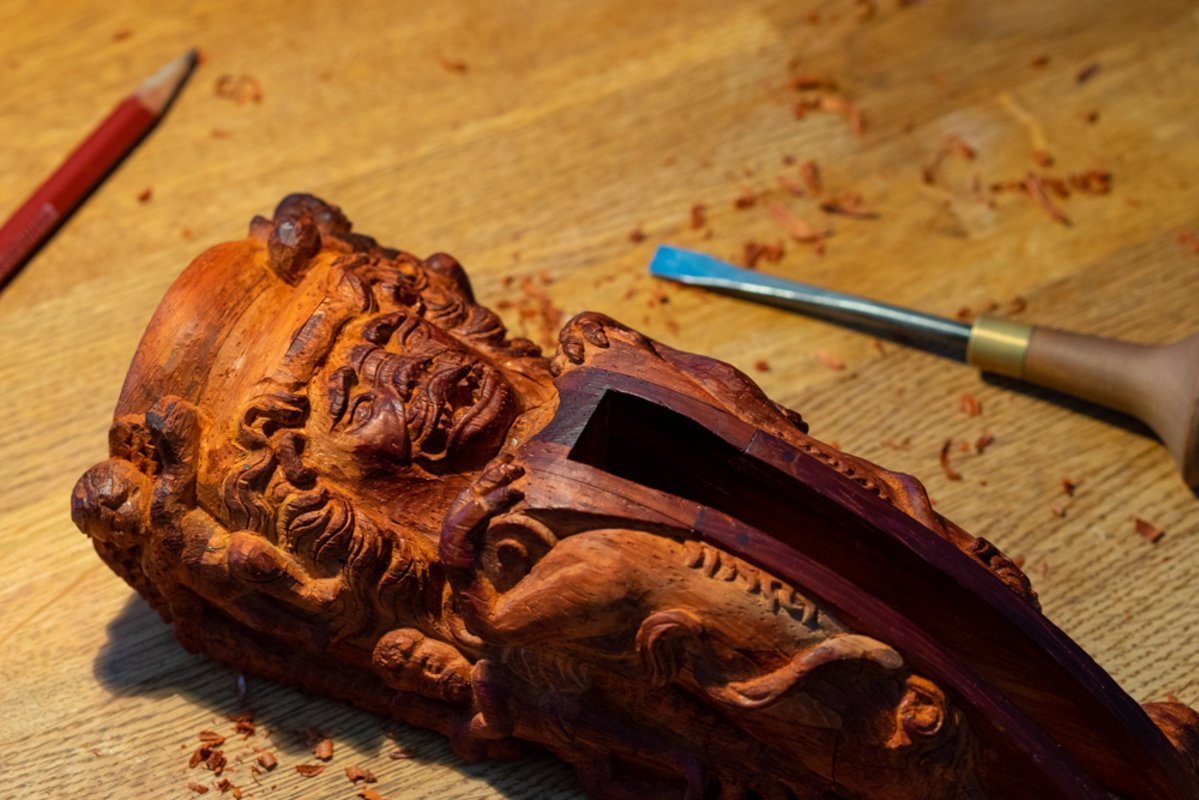
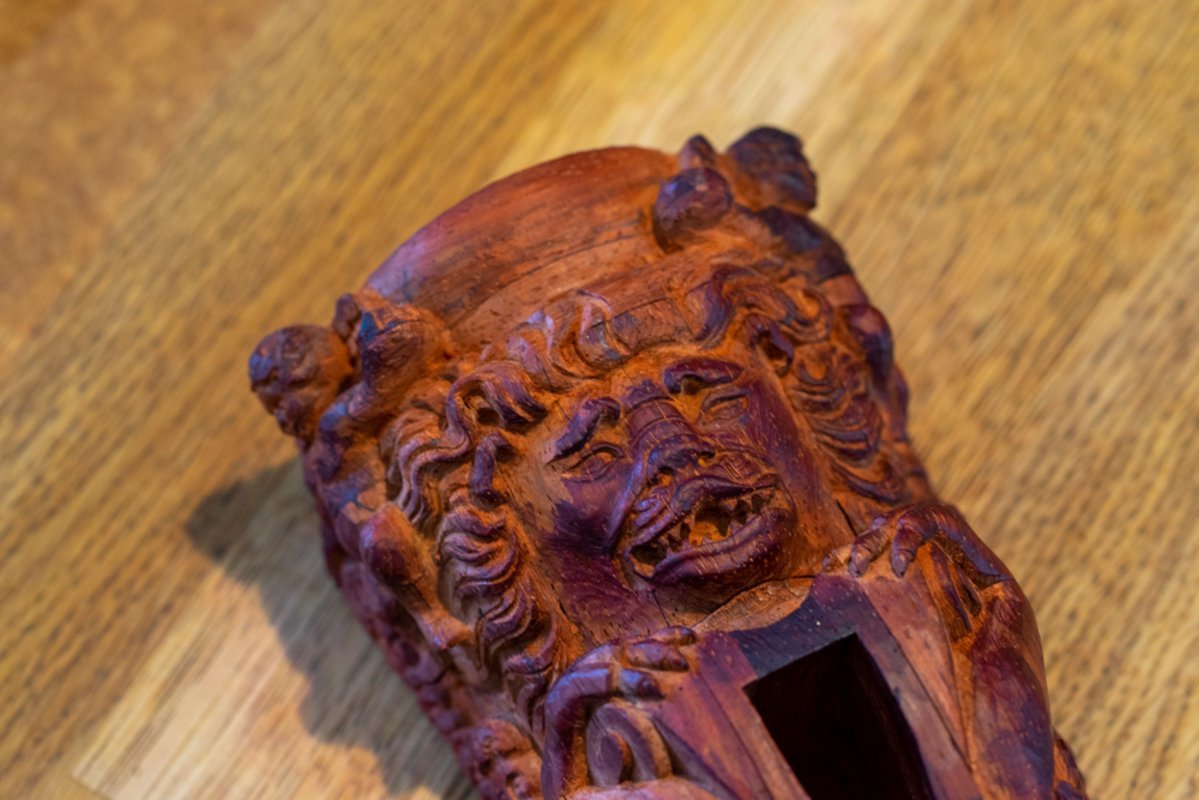
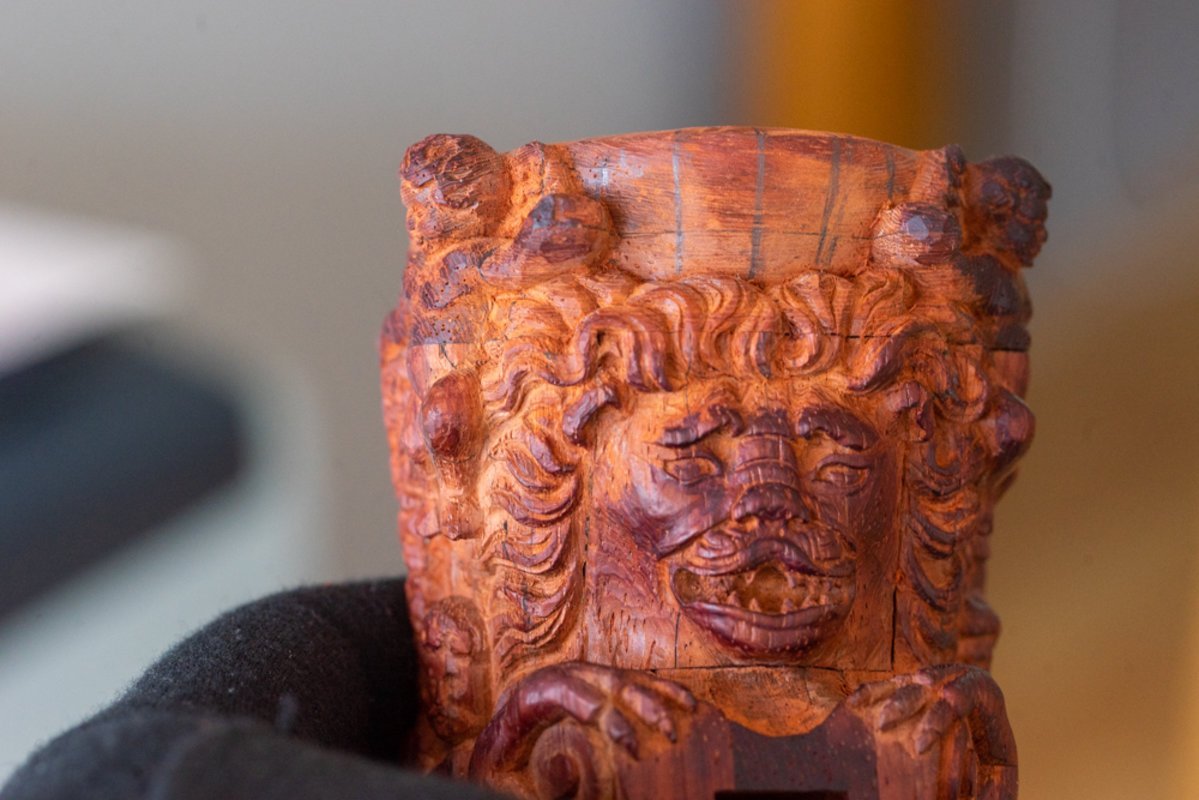
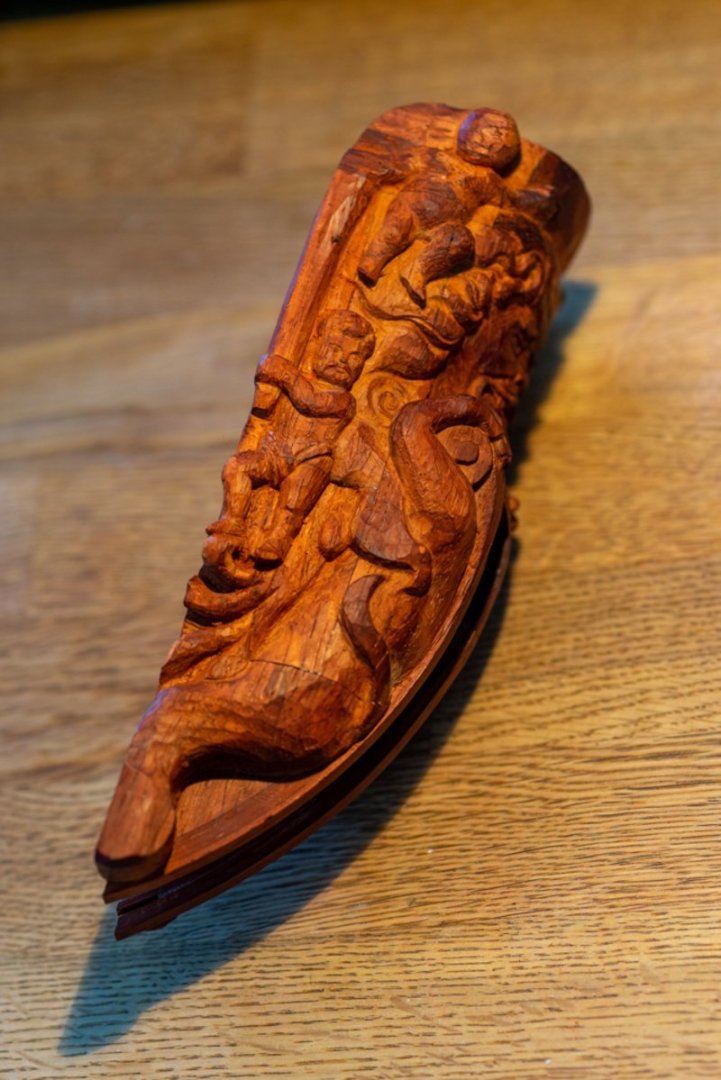
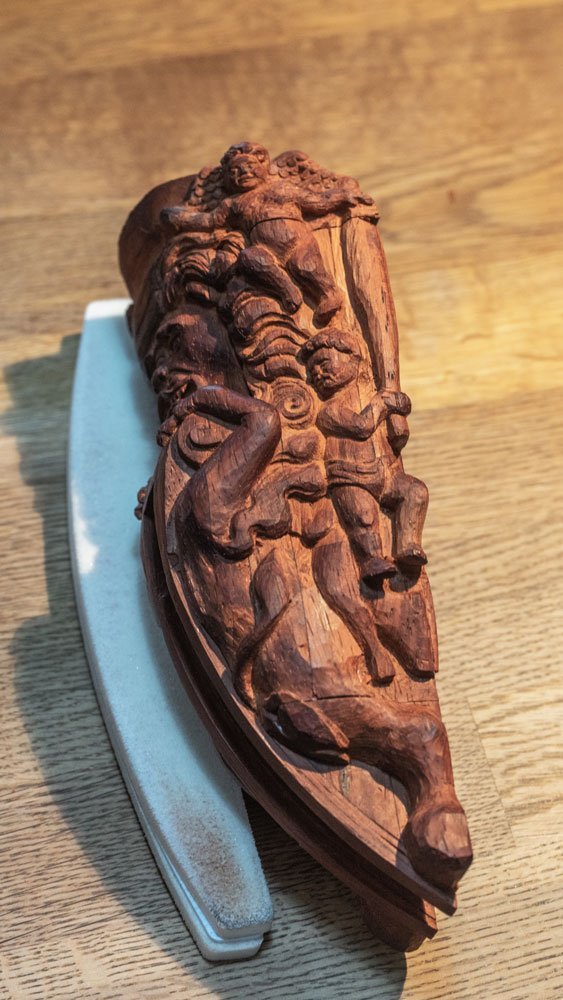
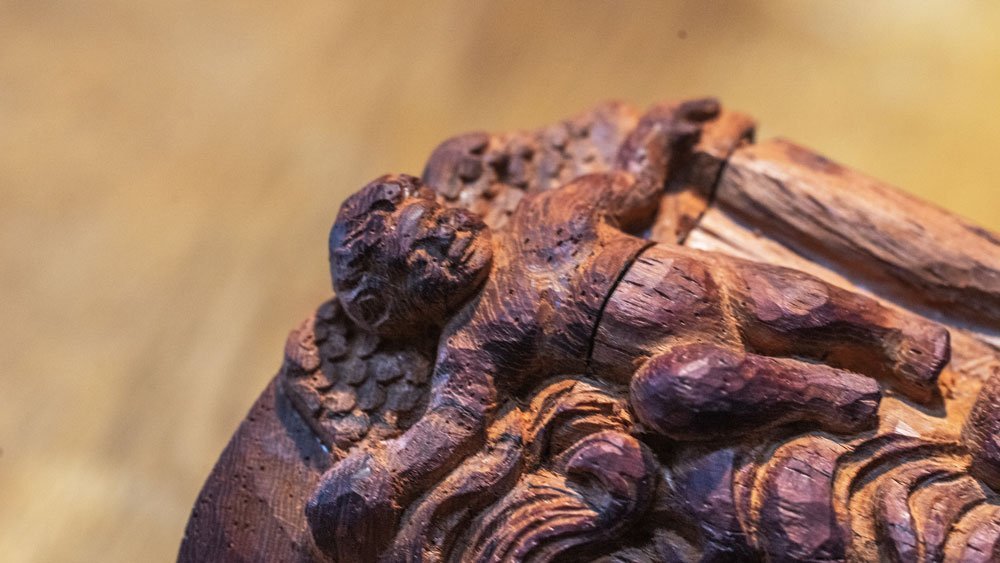
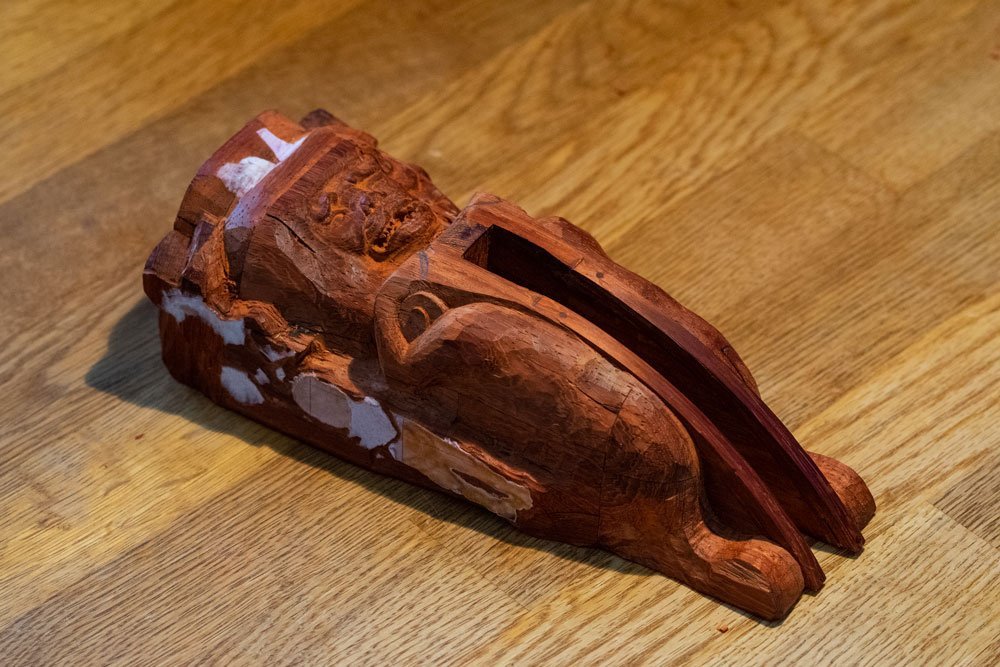
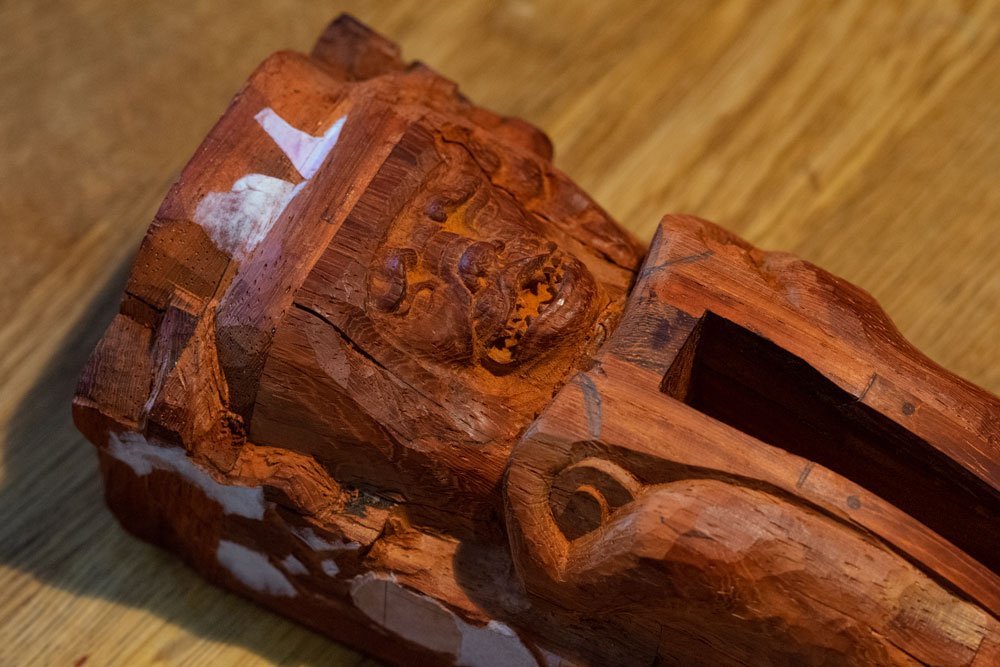
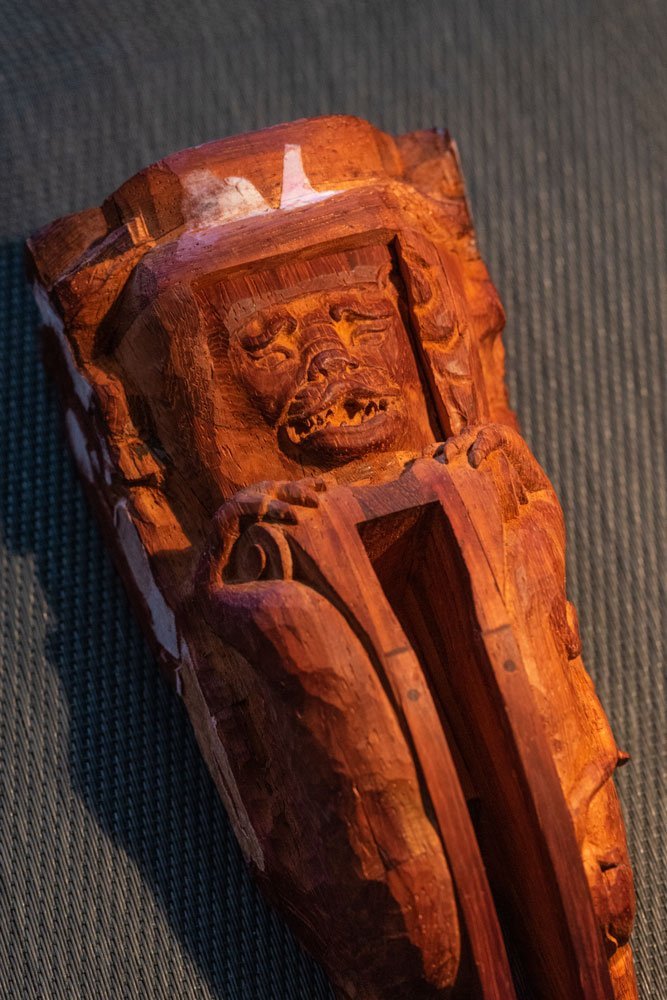
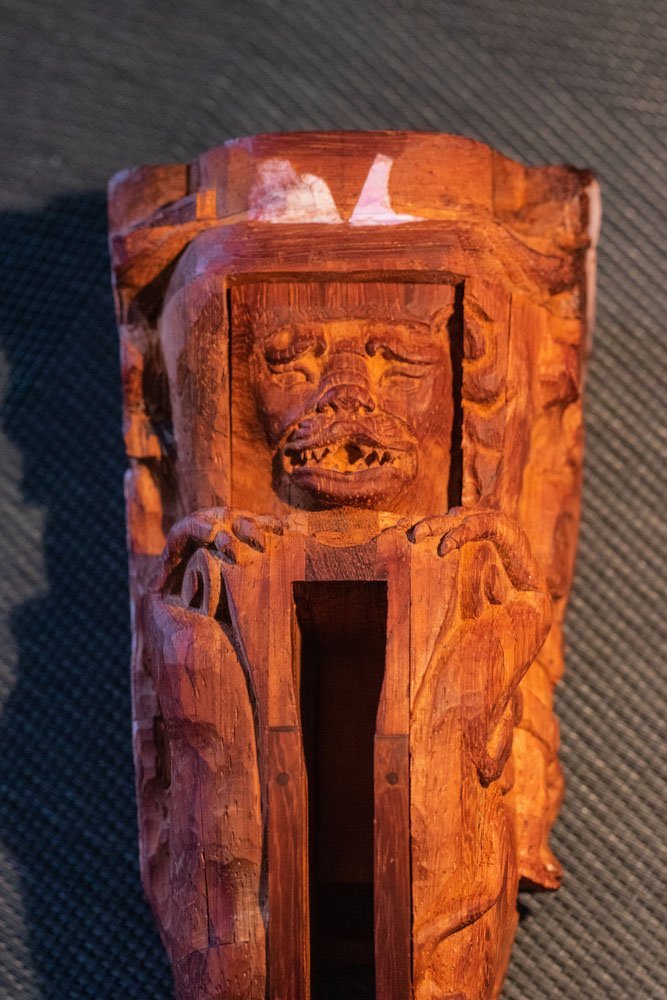
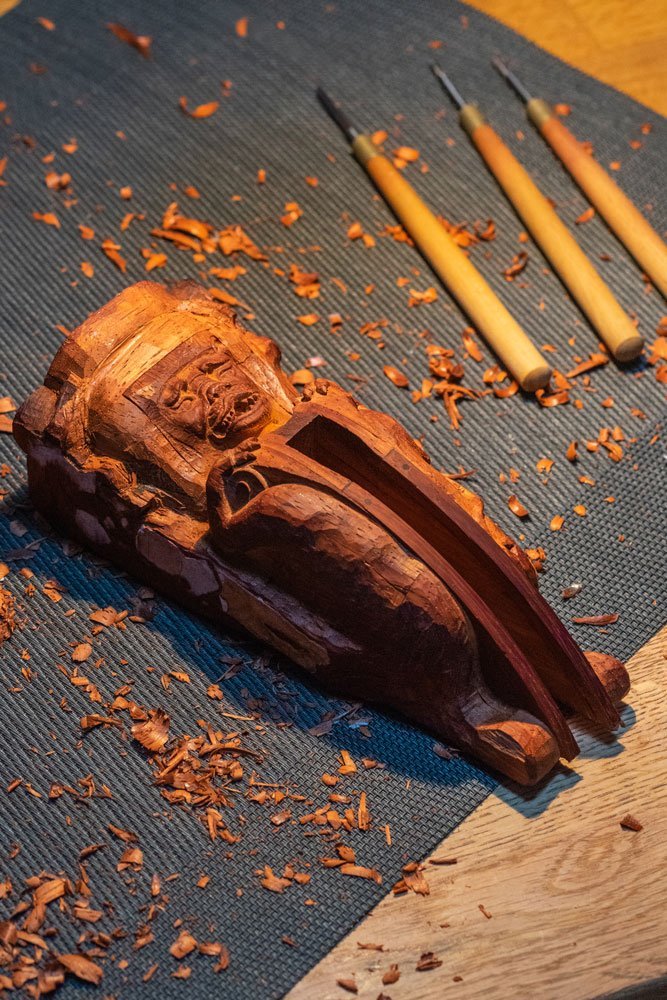
After working on the top of the head there were some minor refinements and modifications. The largest of the interventions concerned the face of my Chewbacca. The carving of the face as a separate segment on the table, detached from the rest of the sculpture required correction. Not everything could be seen, and there was a fear of cutting off too much. And in the end the face turned out a bit flat. I wanted to add more gradients. Just a little bit. I left that question out on purpose. I was waiting until I could examine the whole figure. And now I waited for that moment. I didn't take many intermediate photos. I took only the starting one, and then woke up when everything was already finished. It all happened so fast. And there's a paradox. You can't tell the difference from the finished photos. It's as if I hadn't redone anything. But there is a difference. I "sunk" deeper lower eyelids, thus changing the vertical slope of the eyes, similar actions touched the cheekbones. And the rest of the small touches. It seems that in total the changes are not noticeable, but now my soul finally got what it wanted. What's more noticeable is that now I've cleaned up the whole figure. And the fresh color looks completely different. You can also see in the last photos that the sculpture has become shiny, as if I polished it or rubbed it with oil. In this case I didn't even add a drop of oil. Since the work is not finished yet, oil can do some damage. The lion is assembled from segments that are held together with glue. And there were already moments when we had to take the sculpture apart and glue it back together again. What if I have to take it apart again? Then the oiled wood could already be in trouble. So I didn't use oil. And I wasn't going to polish it to a high gloss on purpose. That's another difference with this kind of wood. It gets shiny very easily. This effect has been seen before, and then simple contact with a glove polished the surface in the same way. Now you can see the same effect, but without the darkening.
-
Thank you for such high praise. I'm very glad you liked it.
-
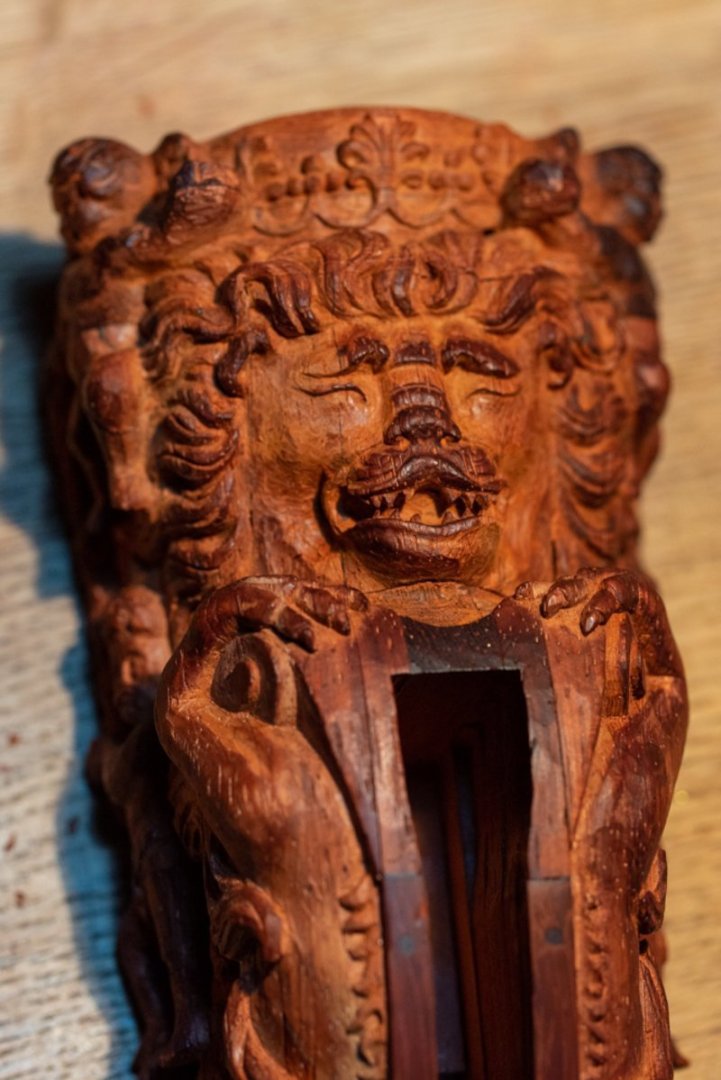
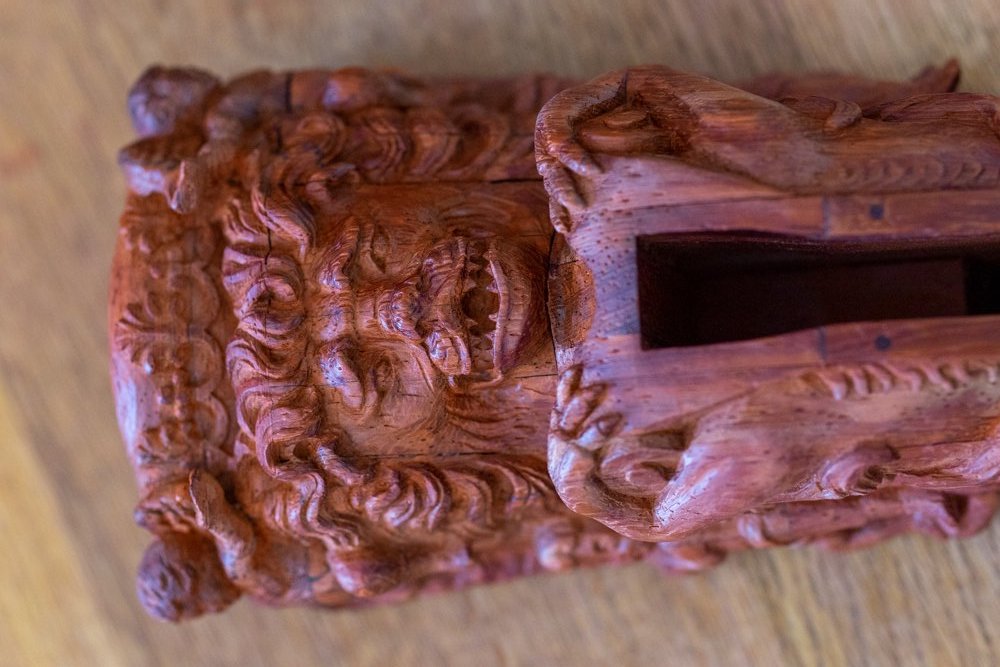
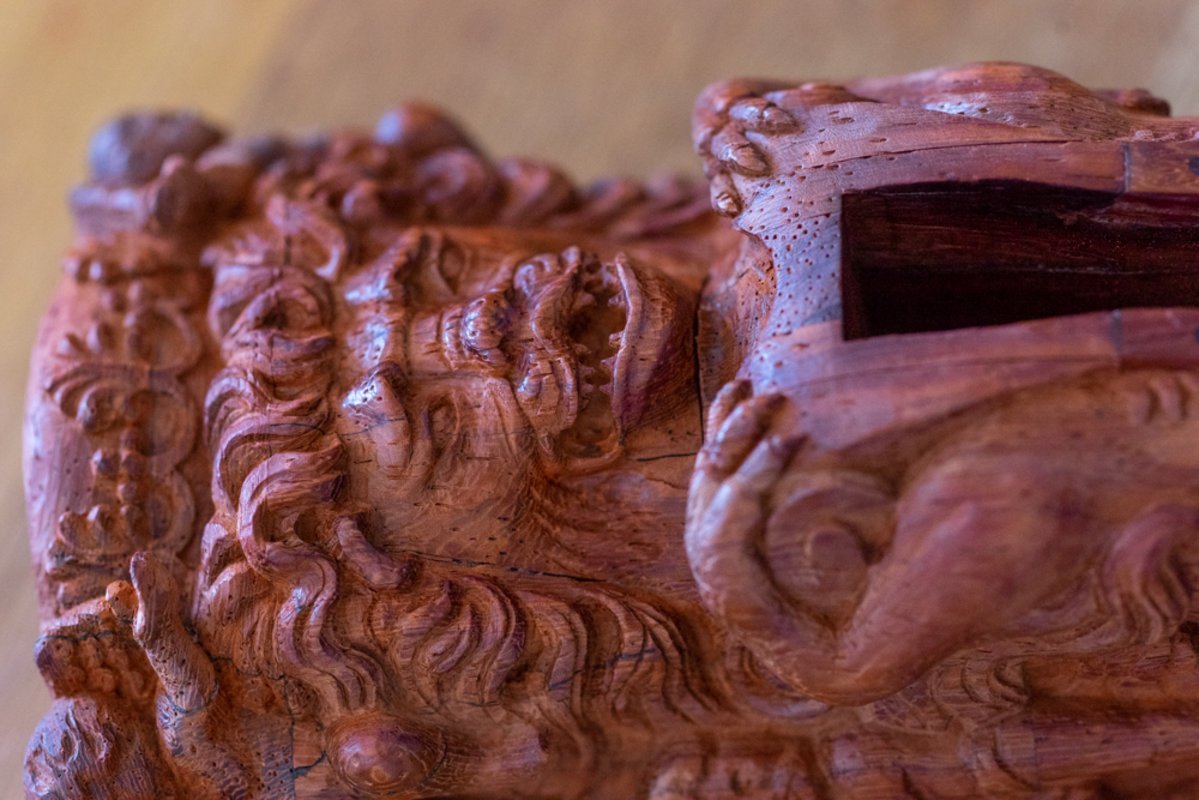
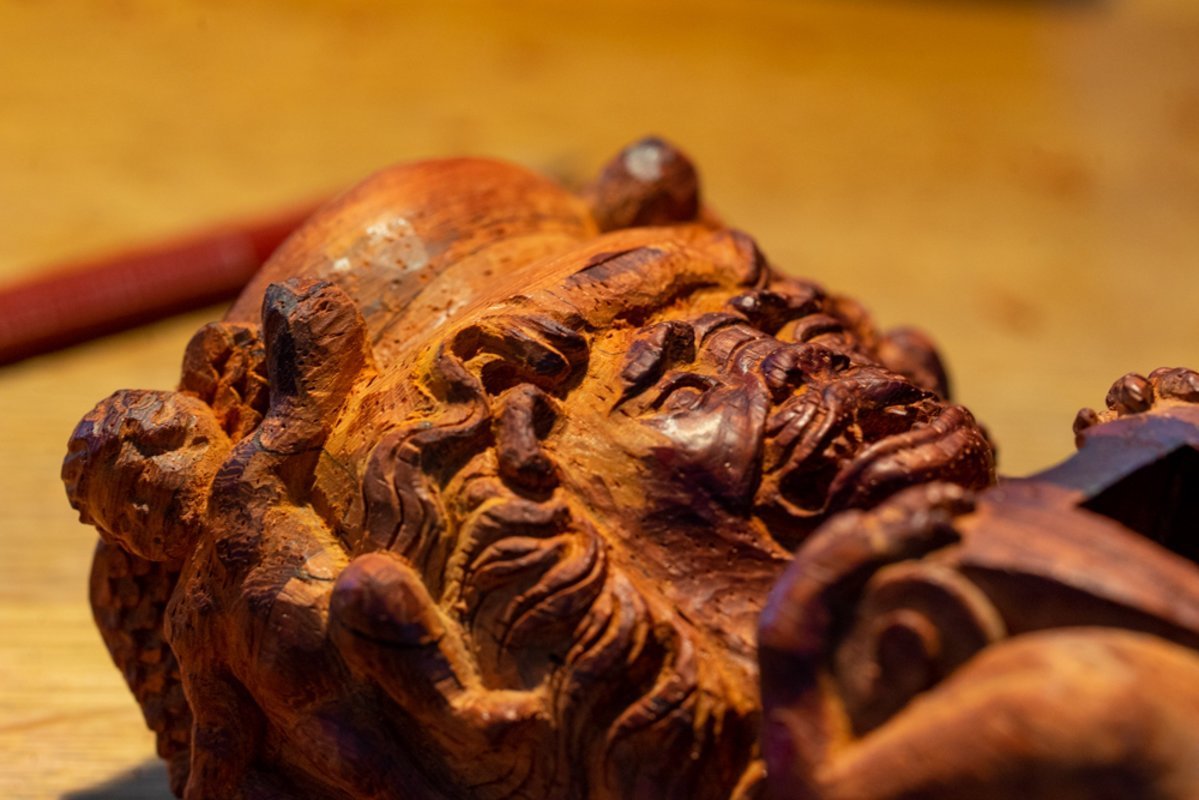
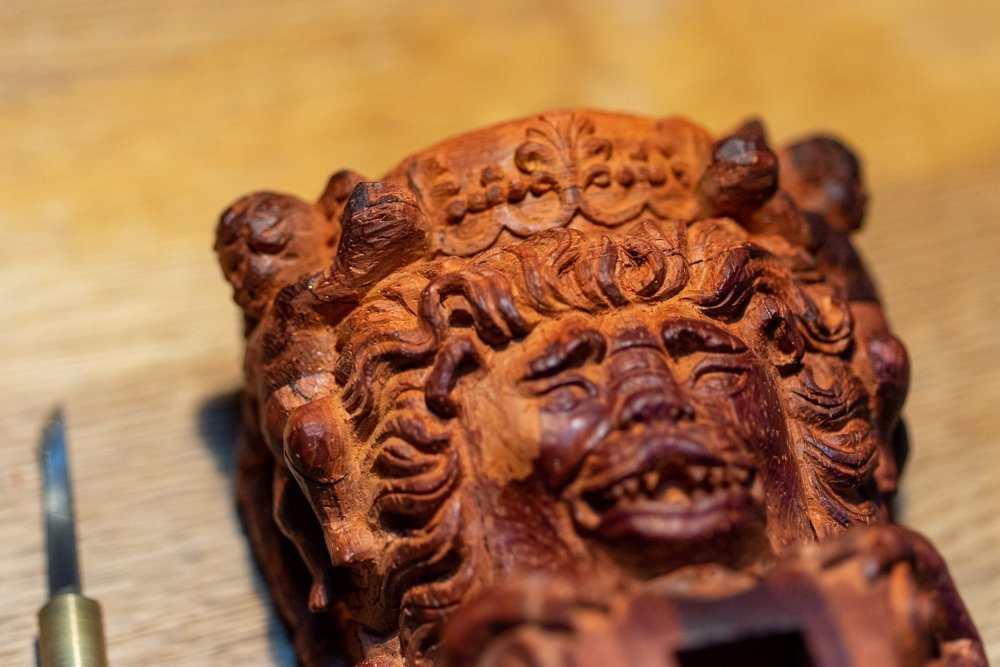
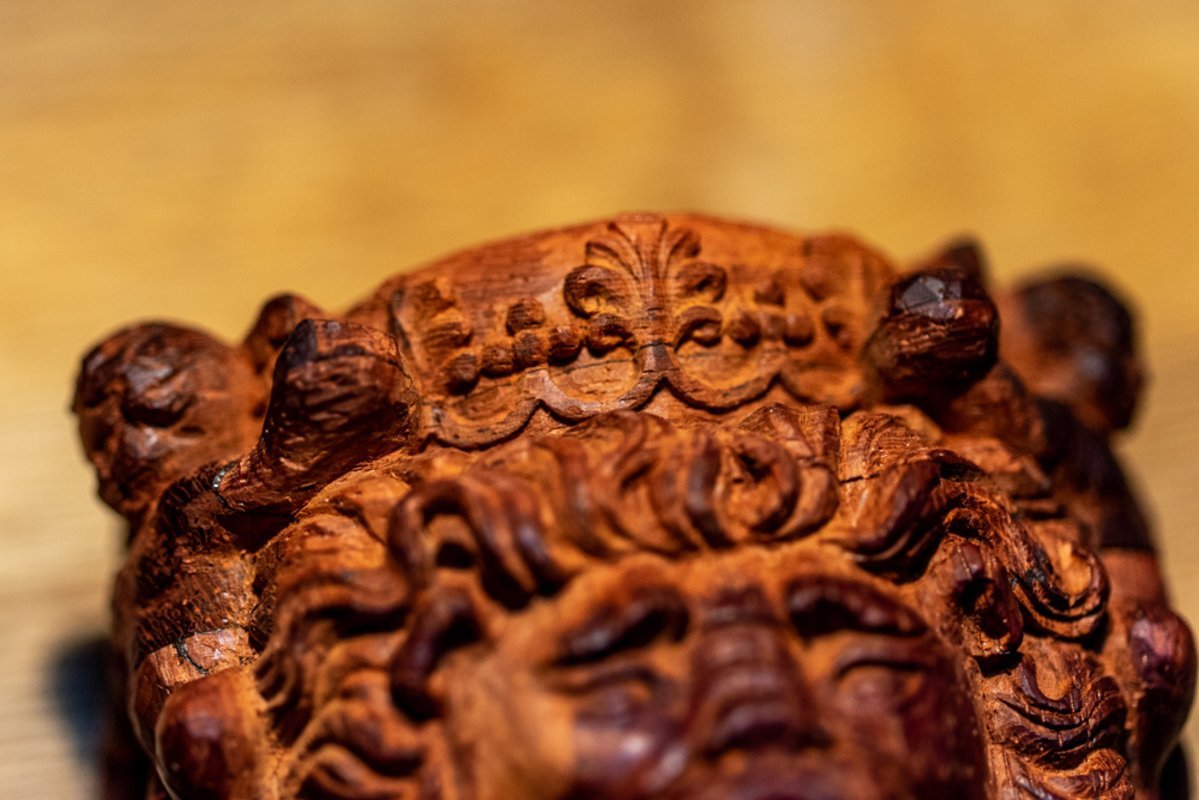
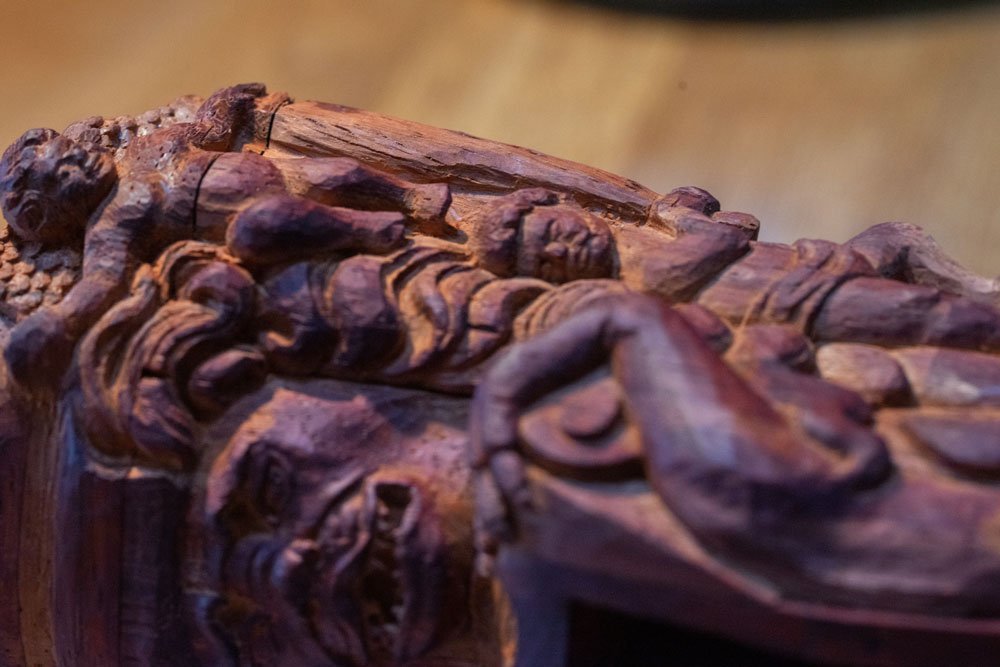
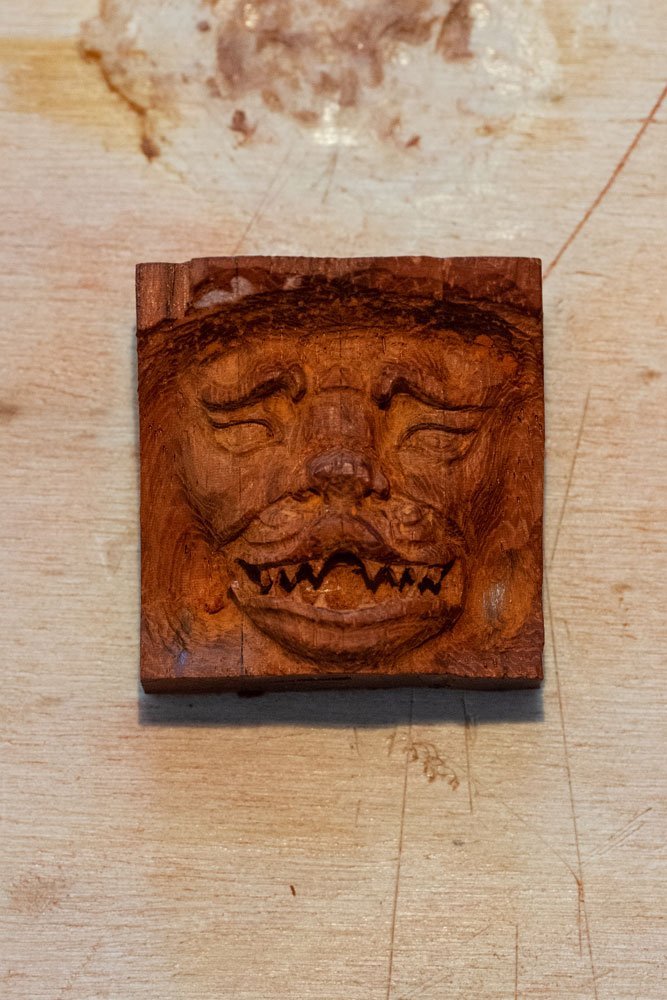
It's time for the head. The curls on the forehead were worked on, as well as the crown. I was worried at this point, as the crown is primarily a wreath pattern. And it is quite small details. If the wood crumbles somewhere on the hair, it can be easily corrected. Change the locks of hair a little and in five minutes you forget that it should not have been quite like this. And with a clear ornament this will not be the case. If the small details on the crown are cracked, the problem will be immediately noticeable. But everything went without much trouble. Maybe it is the hands have already started to get used to this capricious material. Maybe there were quality pieces in the right places that would not break off. Or maybe I was just lucky. In the end, I liked what I got in the end. Well, once again you can see how well the places where the knives removed the darkened wood are visible. And the "fresh" areas are quite different in color and tone. By this point I was no longer worried about the lion figure looking like a burn victimized fireman. Unlike humans, over time the light areas of the wood will even out in color. Oh, and I'll clean the whole figure at the very end. But I've already written about that.
- 546 replies
-
- 12
-

-

-
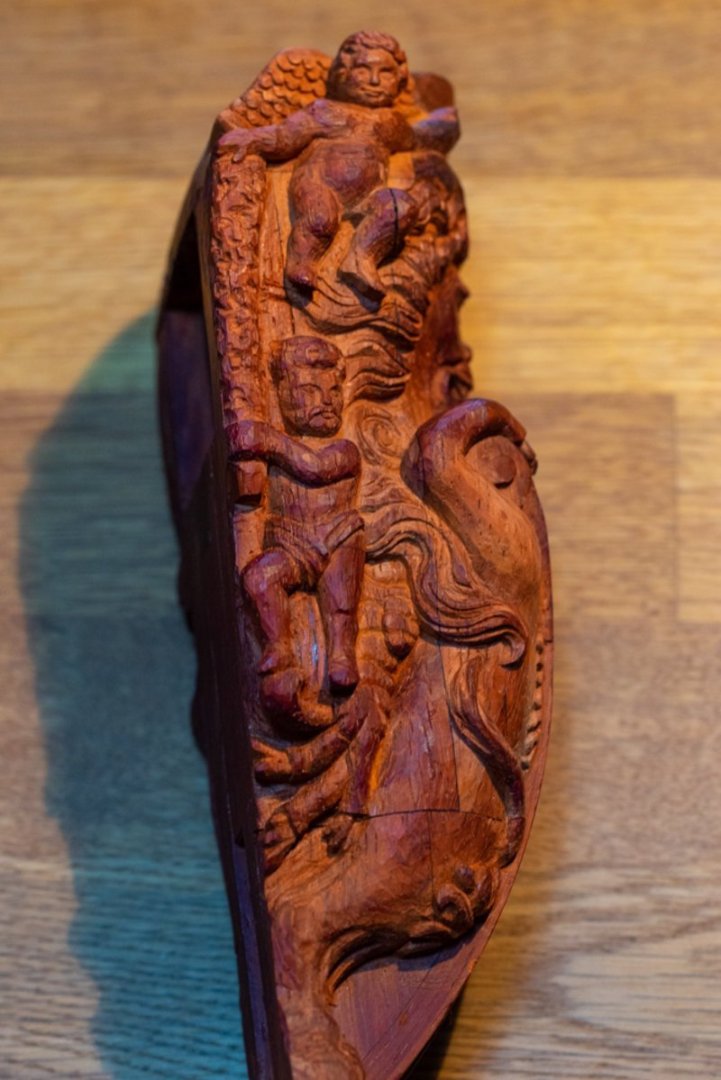
The subject of asymmetry in sculpture is a broad one. And each individual case may have different causes. For example, if we consider the sculptures on the Vasa ship, the difference could also be as an initial curvature. Or maybe it is the traces of time and destructive influence of the environment. In some other sculptures it may be evidence that the sculpture was cut first from one side and then from the other. In general, they tried to make symmetrical parts, but it did not turn out to be 100% coincidental. If we consider this particular lion figurine from the museum, then there are completely different conclusions. It is not a full-size sculpture. The master calmly held the sculpture in one hand, could easily rotate it and try to compare the details with each other. Here you cannot say for sure that several carvers could have worked. So the asymmetry in this small sculpture shows other conclusions. I can look at myself and already see the answers. When I try to make the same elements, I have to try very seriously. I have to constantly make marks, measure lines because the eye without rulers or molds just doesn't notice the mismatch. I am sure that each of us can remember such stories. So here most likely the reason was because the master or had not yet reached a high level of skill. Or that at that period of time people didn't even think about the fact that it was necessary. Well there's a slight difference. So what? It's not that big of a difference. What difference does it make that the characters on the two sides of the sculpture have differences? After all, I, as a viewer, only saw these differences when I looked closely and compared them. It wouldn't have occurred to me to compare whether all the curls were the same. It's a paradox. People used to try to make their work look like exact copies, as if it were made by a machine. And it took effort to achieve that effect. And now, when CNC, computers, 3D printers and other technologies become more and more common, it is just that perfect symmetry is much easier to achieve. Just make a mirror copy in the computer and that's it. Do each zone by hand without copying? No, I wouldn't, it would take too long. Although this is a separate topic. We can talk about the influence of new technologies on our shipboard creativity for a long time. Maybe even fight over different opinions.
-
I've been having these exact same questions. I even did some experiments to see what effect light and air have on the paduk. I will tell you about that too. Good advice. Thank you. I never thought of using chemistry. I'll have to give it a try.
-
Strange, the site loads some of the photos with a twist. And no matter how many times I tried to rotate them, it never works. That's too bad. I'll have to twist and tilt my head sideways. Or rotate the computer screen. Let it be like neck and head exercises. Against osteochondrosis. 🙃
-
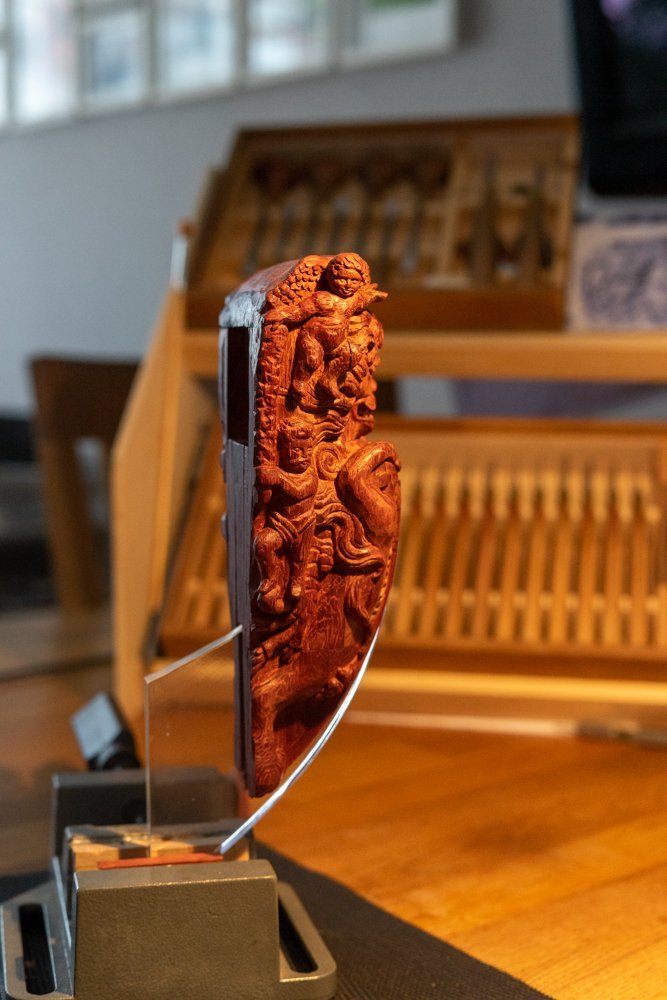
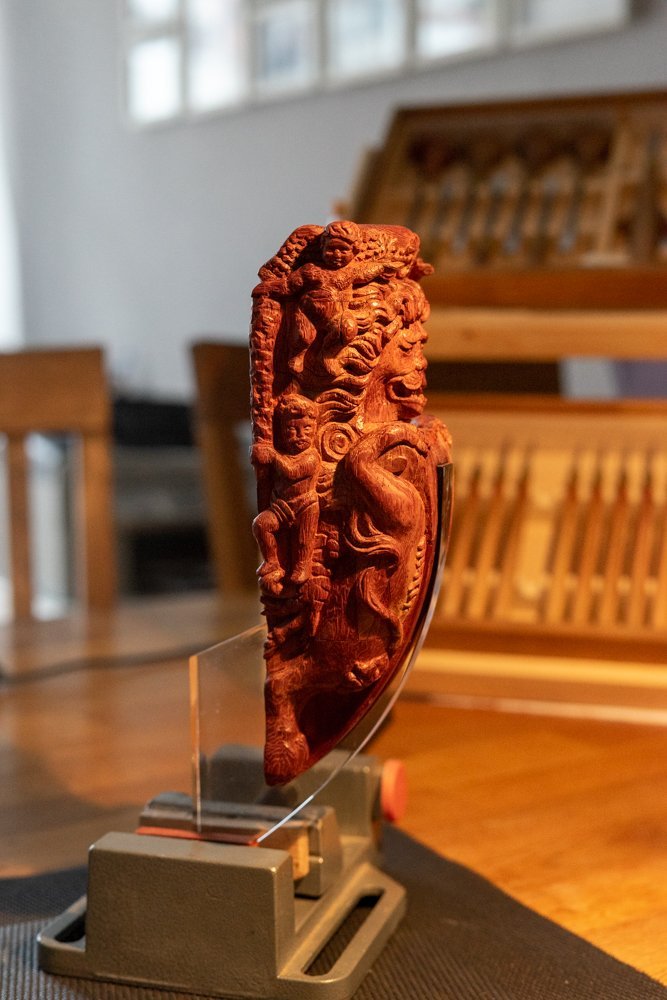
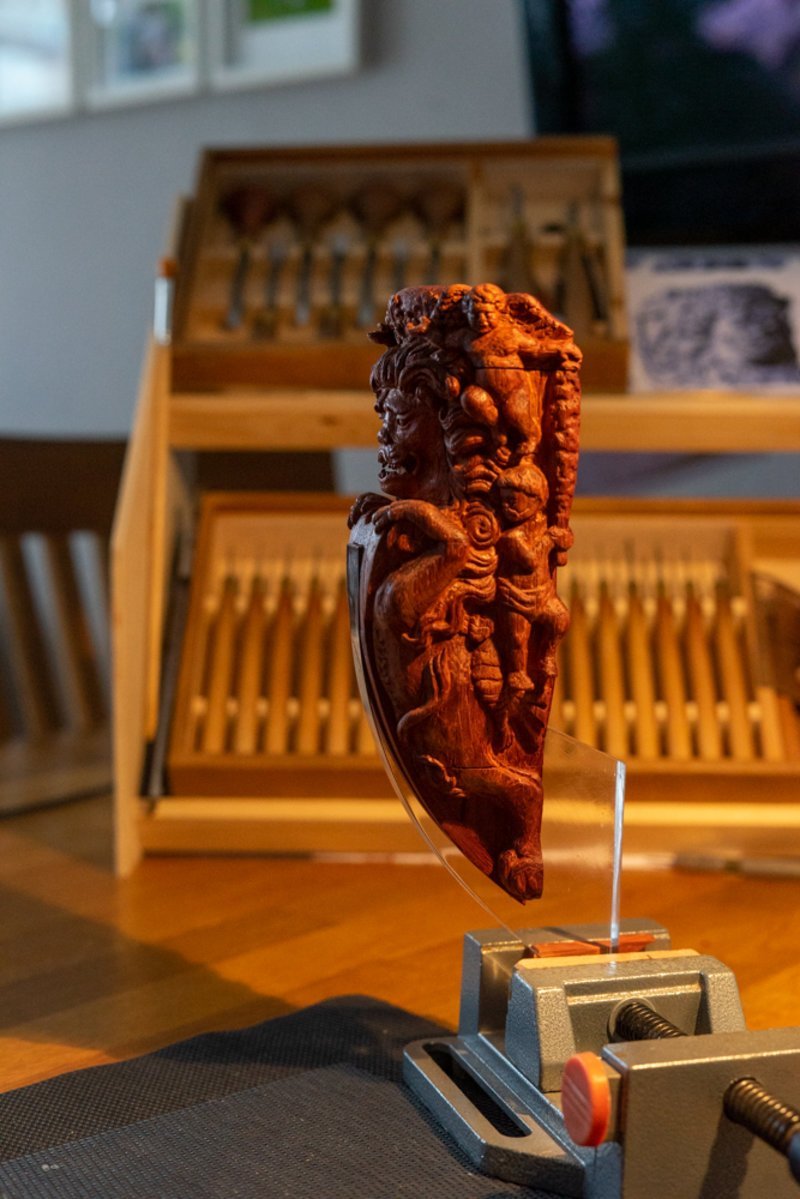
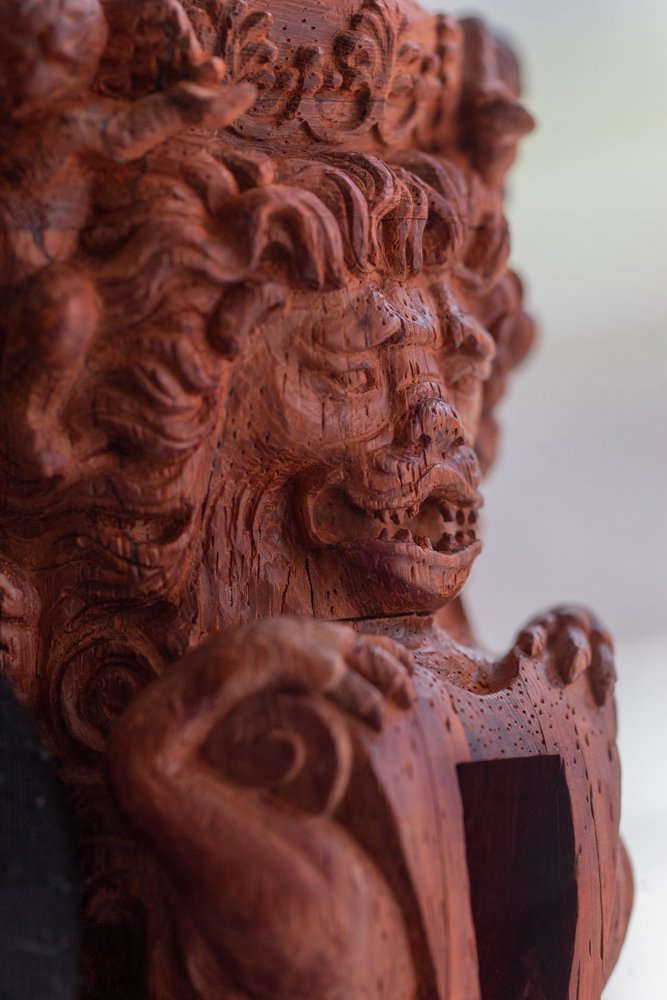
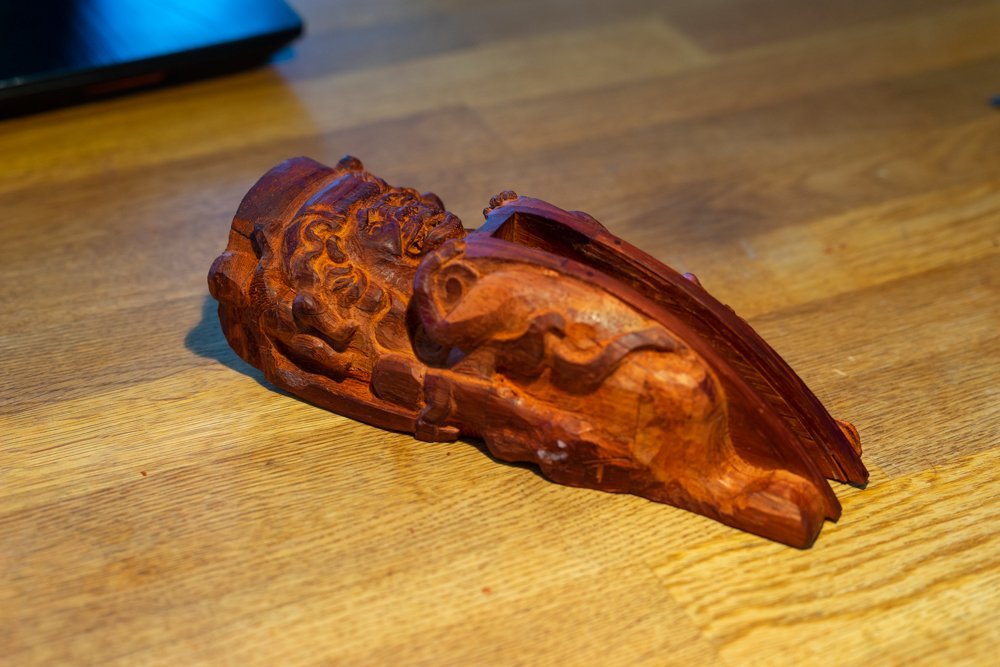
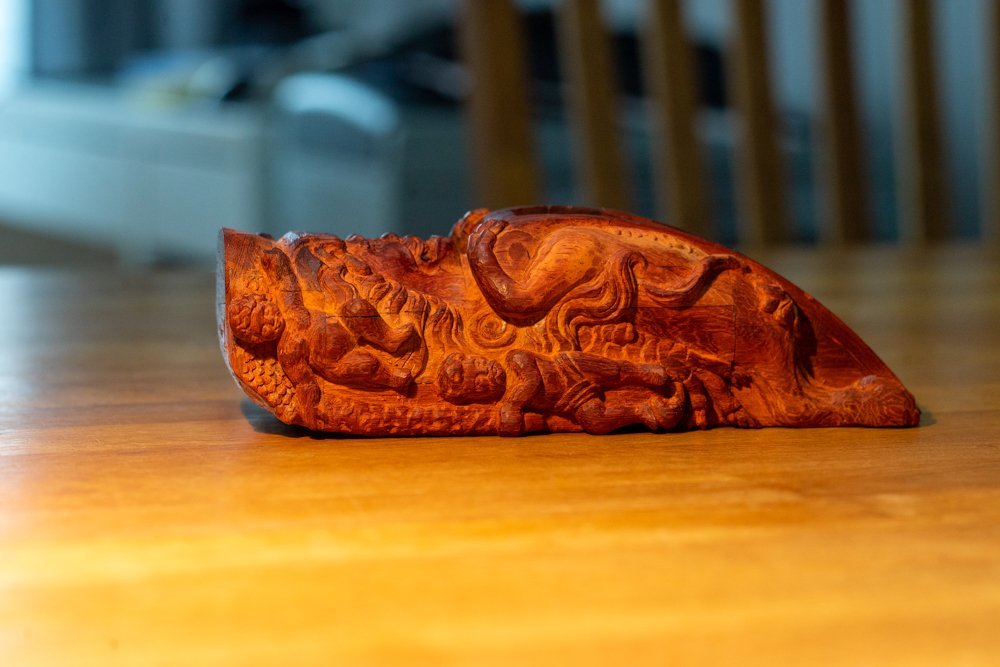
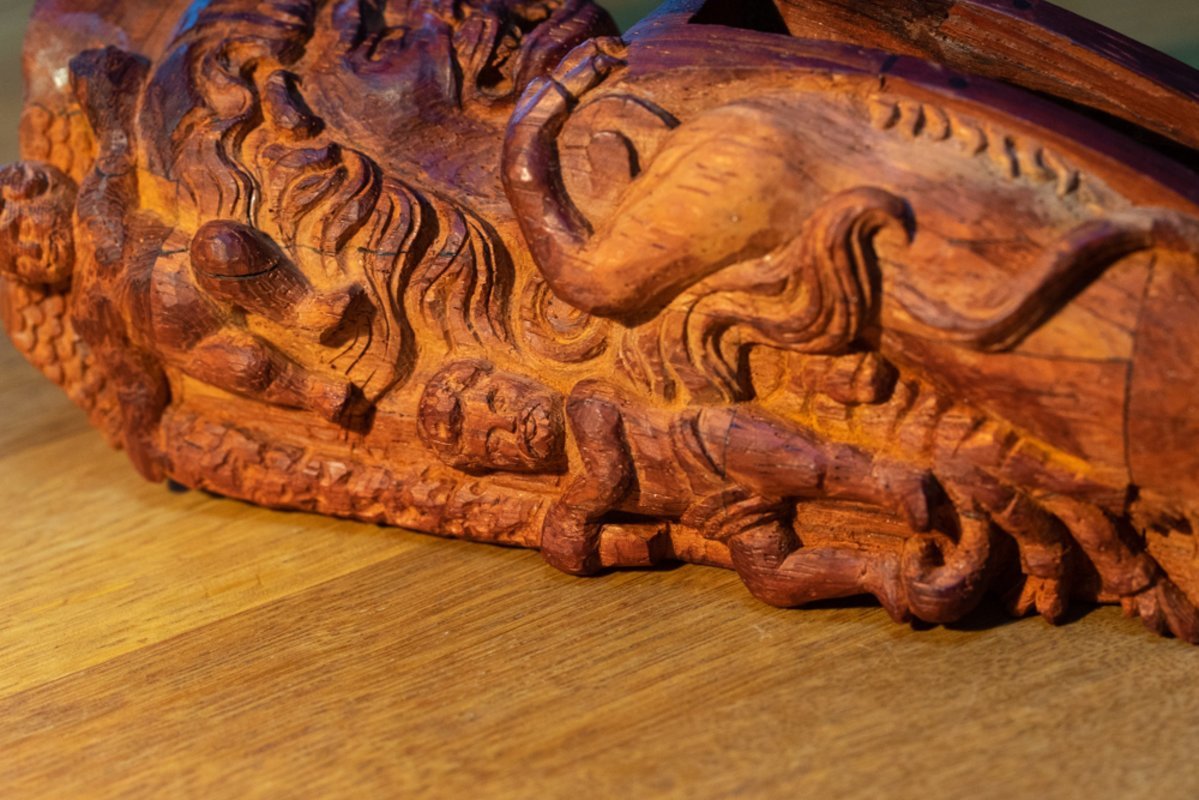
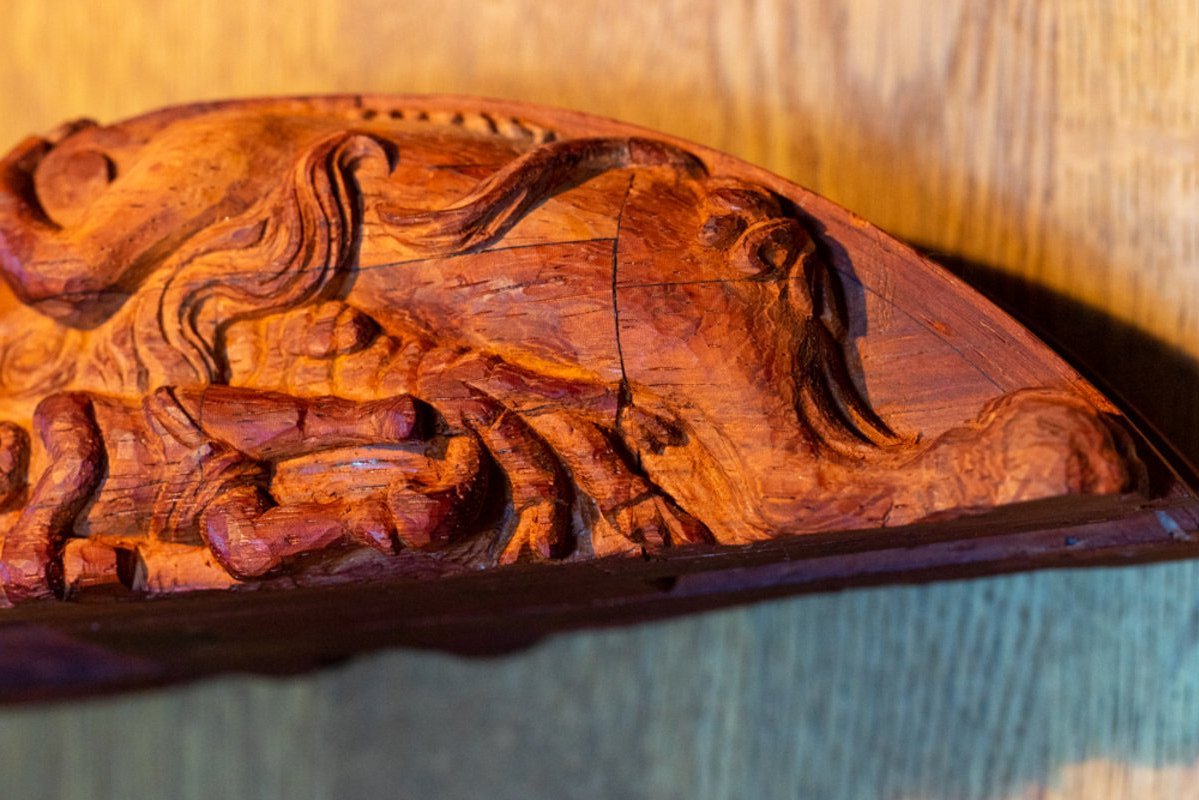
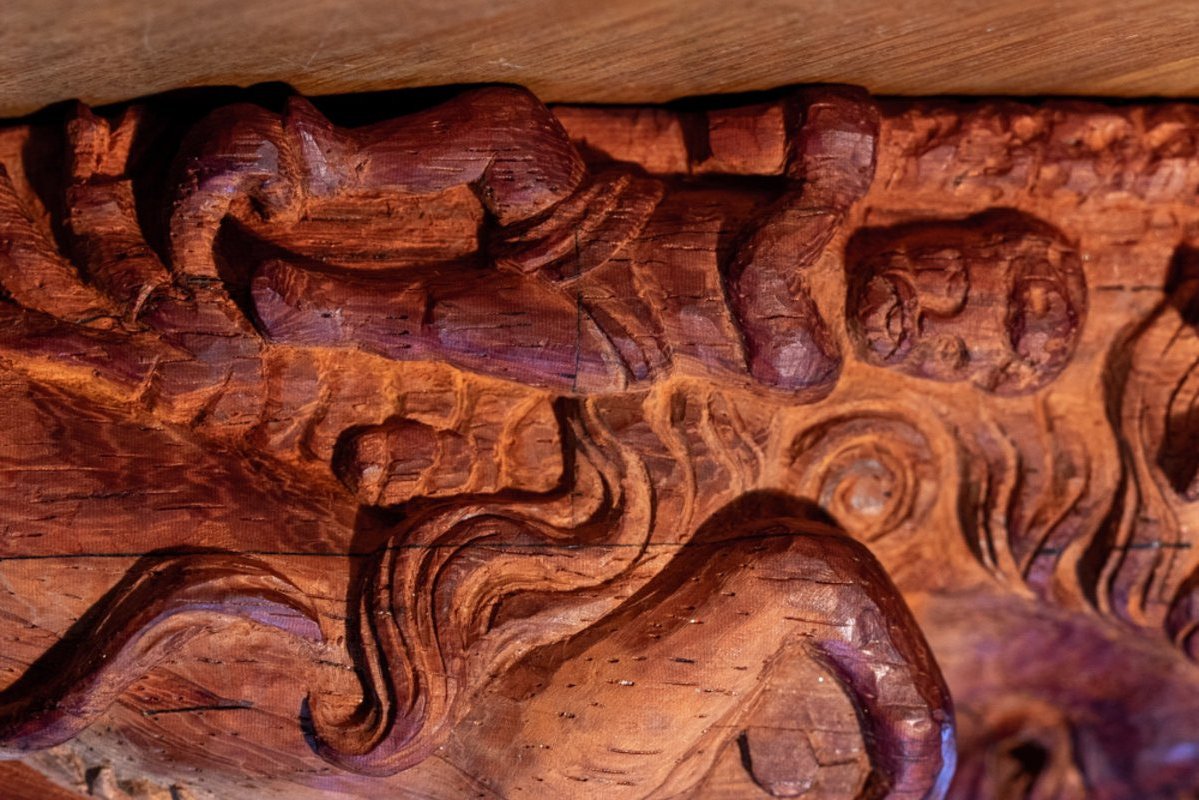
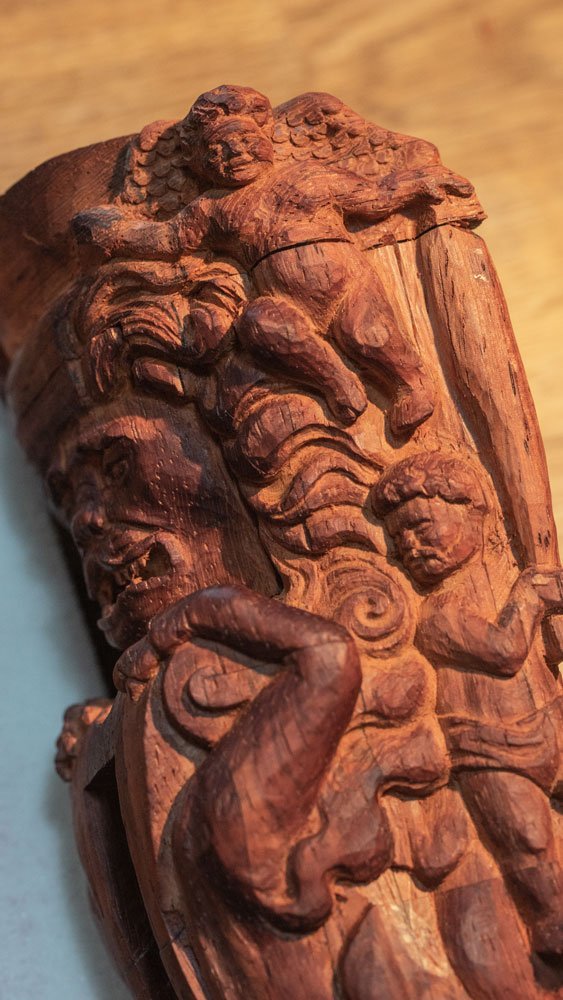
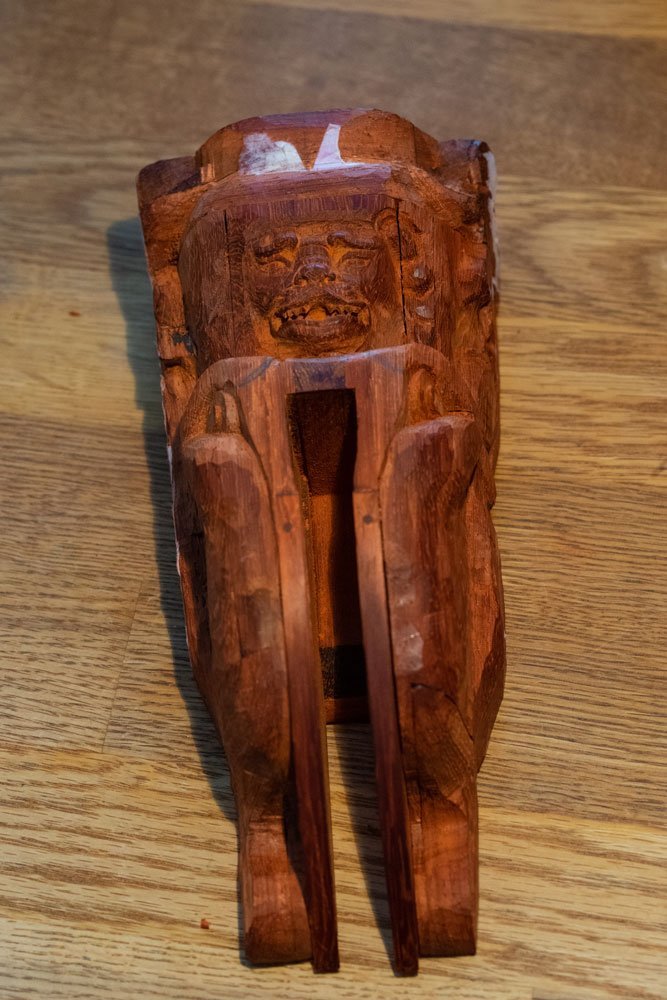
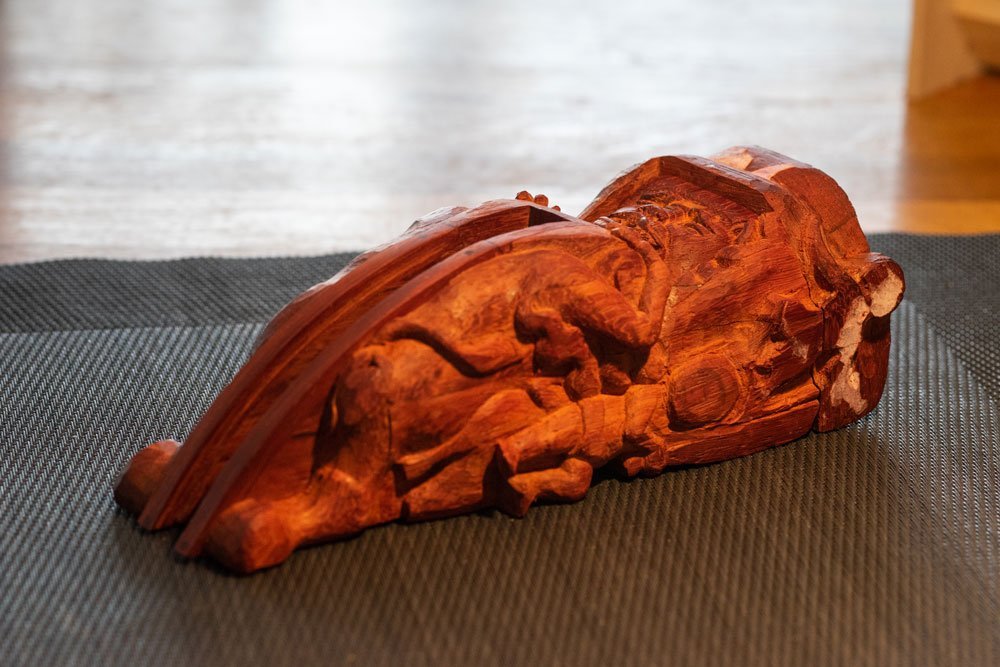
The second side of the lion figure. Often the right and left sides are processed simultaneously. To follow the symmetry and more accurately show the mirror elements of the figure. However, this time doing the carving parallel on both sides was not as necessary. In this again you can see the difference between the way modern people look at the work and the way our ancestors did it. When I talked about the lion from Vasa's ship I already mentioned that the original figure has many asymmetrical features. In this lion, the same trend has been maintained. On the museum original you can see that the two sides have slightly different nuances. Which means that both sides can be done one at a time. What I found interesting to consider was that the two sides had their own features. For example, the defeated Hydra lay on both sides of the sculpture slightly differently. The necks of these predators were different. One side had more curves than the other. The tattered holes of the wounds looked different too. The Heracles were different too. For example, they looked in different directions. I'd also like to point out another feature that was a revelation to me. Paduk gets very dirty. And I can't call it dirt. When working, you always have to make sure that the wood doesn't get dirty. This applies to any wood. This is especially true for light-colored woods. I have a very negative attitude towards sanding. In my opinion, sanding sandpaper "kills" the carving. I don't like it when a sculpture looks too smooth. So the issue with the appearance of dirt on the figure is always very important to me. It took me a long time to get used to gloves while working. I don't like them, my hands don't feel objects well. Now I can get used to the option of having my left hand gloved and my right hand with the tool without protection. At least this way I can reduce the degree of dirt on the sculpture. However, there was nothing to help me while working from this sculpture. Even with a glove on, the workpiece became covered with a dark patina very quickly. The surface also became shiny, as if I had rubbed a piece of lard or sausage on the workpiece. But you can't call it dirt. It was something else. Padouk, perhaps, oxidized or burned out in the sunlight. And the darkening process happens very quickly. It was particularly interesting to watch the dark areas form first on the most convex areas. Just like with ordinary dirt. But over time, the darkened areas become wider and wider. And they even go into the hollows. The light-colored areas turn into thin hollows in the very depths of the depressions. You can't get your hand in there, so it's clear that this process of discoloration is not just dirt. In these photos, you can see the darker areas. And you can also clearly see that where the knife has just cut away new layers of wood, the sculpture has a lighter color. In some ways, the paduk resembled an apple, where the bite or cut site becomes darker over time due to iron oxidation. In the following parts, the feature with dark areas on the wood will be seen even more. Such is the peculiarity of this type of wood. At this stage, there is no point in cleaning or renewing the darkened areas. After the carving is finished I will go over the entire surface at one time so as not to traumatize the sculpture unnecessarily. This wood is very finicky and it is very easy to ruin the work that has been done. Well, there is nothing more to tell in this issue.

-
Thank you for the high praise. I tried my best and for me the project with this Wookiee is a new challenge and a test of myself. There's still a long way to go, we'll see what happens in the end.
-
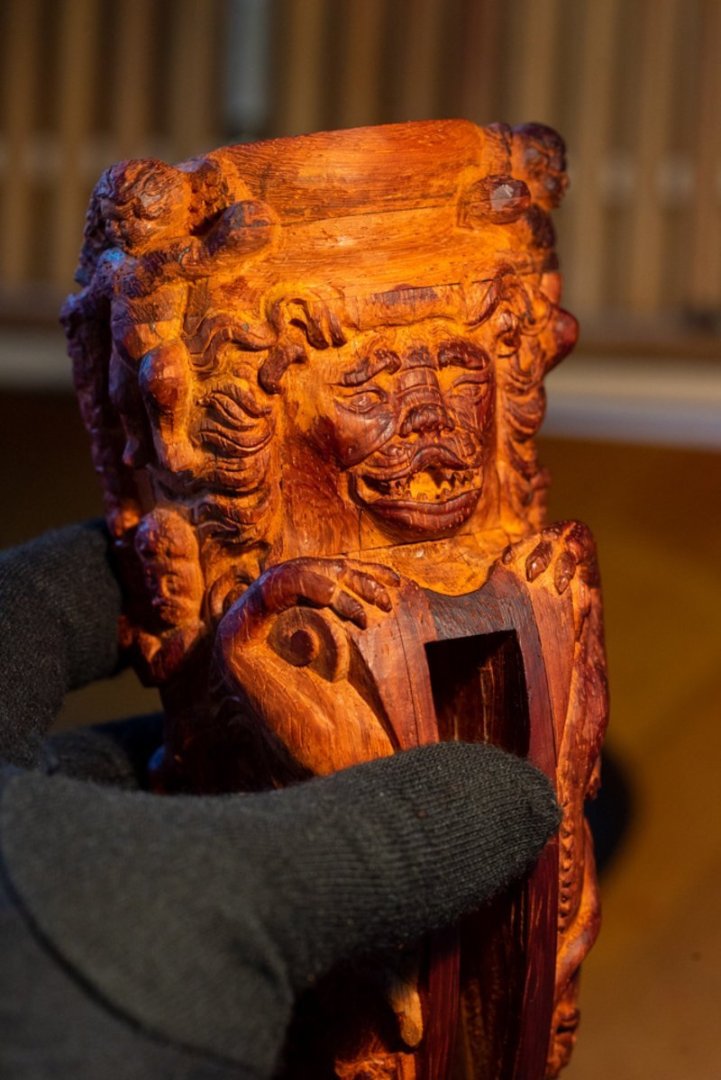
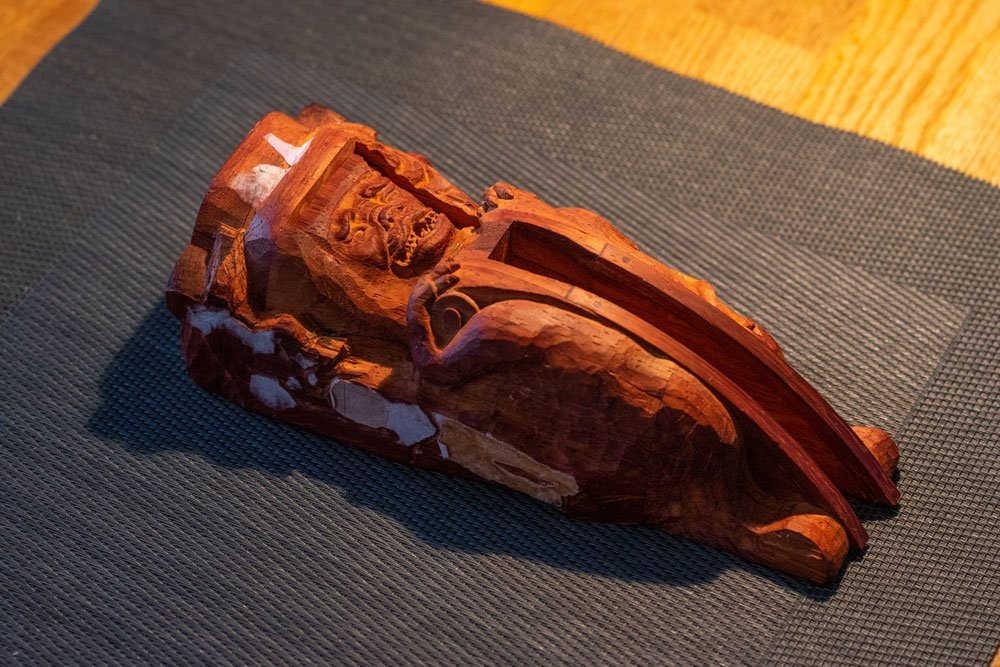
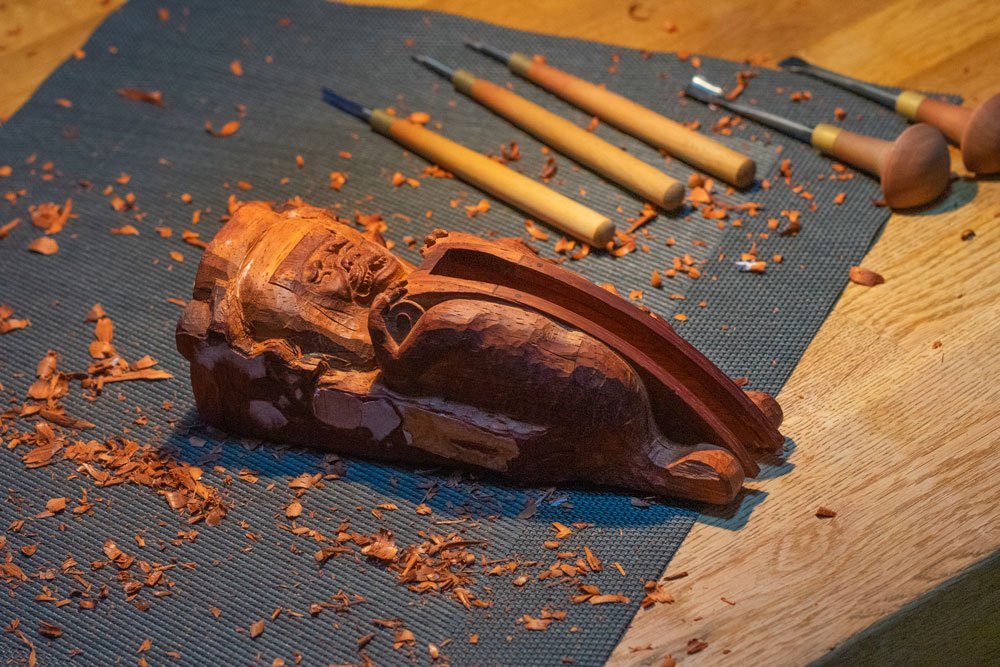
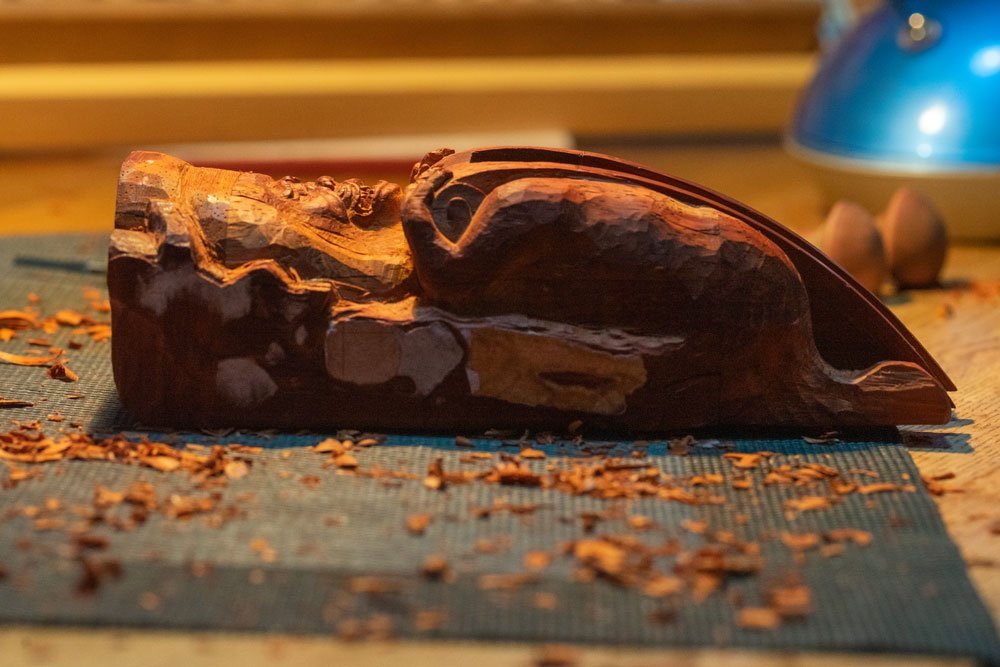
I was taking close-ups for myself, temporary photos, so to speak? For technical tests. My eyesight isn't what it used to be. I wanted to see the fine details through the optics. It always looks wrong with my eyes. The eye is more forgiving, you don't notice any mistakes. Now I realized that in macro photos there will be disadvantages in the form of roughness or tool marks. I photographed to see these disadvantages. But to my surprise everything turned out the other way around. And it's not that there are no flaws. They are. But these are the minuses that I just like. And the roughness of the wood, and polygonal traces of cuts, and notches left from the point. It's all there. And exactly where it should be. Where it should be. Or to be more correct: in sum, I really liked the fact that it was all there. Exactly where it should be in the end result. So I'm posting these shots as an excuse to share. I realize everyone has their own fetishes and understanding of how carving should look like, with what degree of accuracy and meticulousness. But as they say: all felt-tip pens are different for taste and color! I share the vision that I have. So, in my opinion, the figure looks authentic. There is a feeling that it is two hundred years old, not two days from birth. It's not the final state yet. Work on this side is ongoing. There is also something to be said about new discoveries with the work on the paduk. But I'll save that for future issues. Translated with DeepL.com (free version)
.jpg.40f5ae3c5306da301e79b5156c3c7f81.jpg)
-
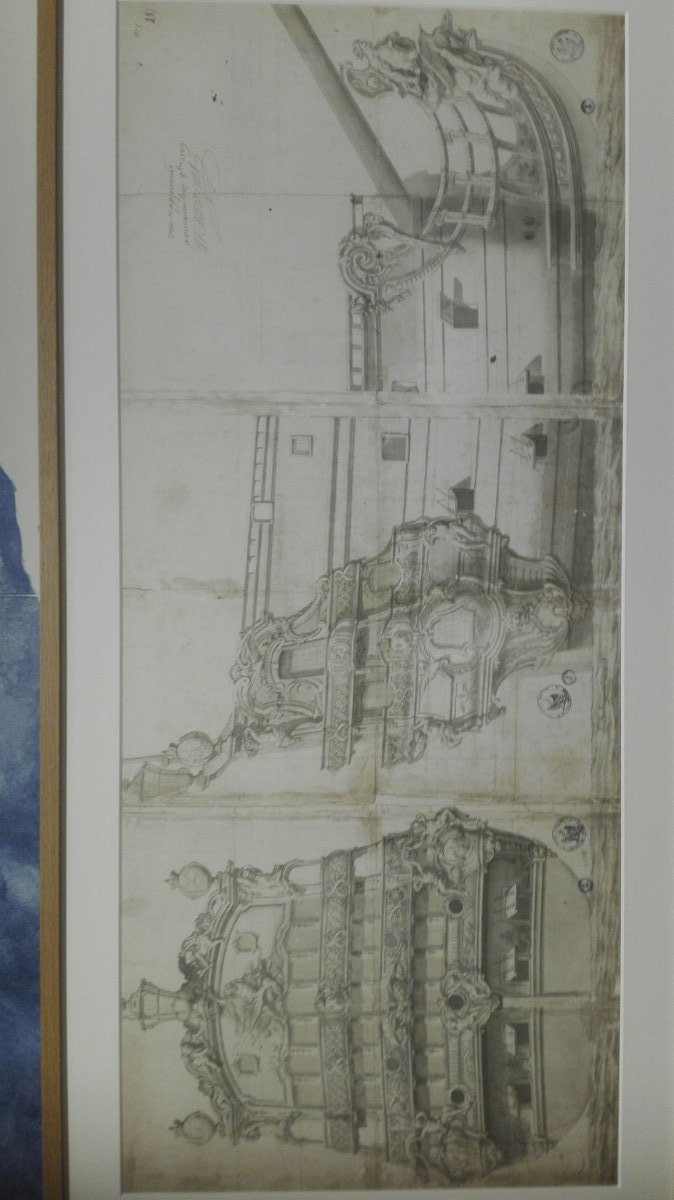
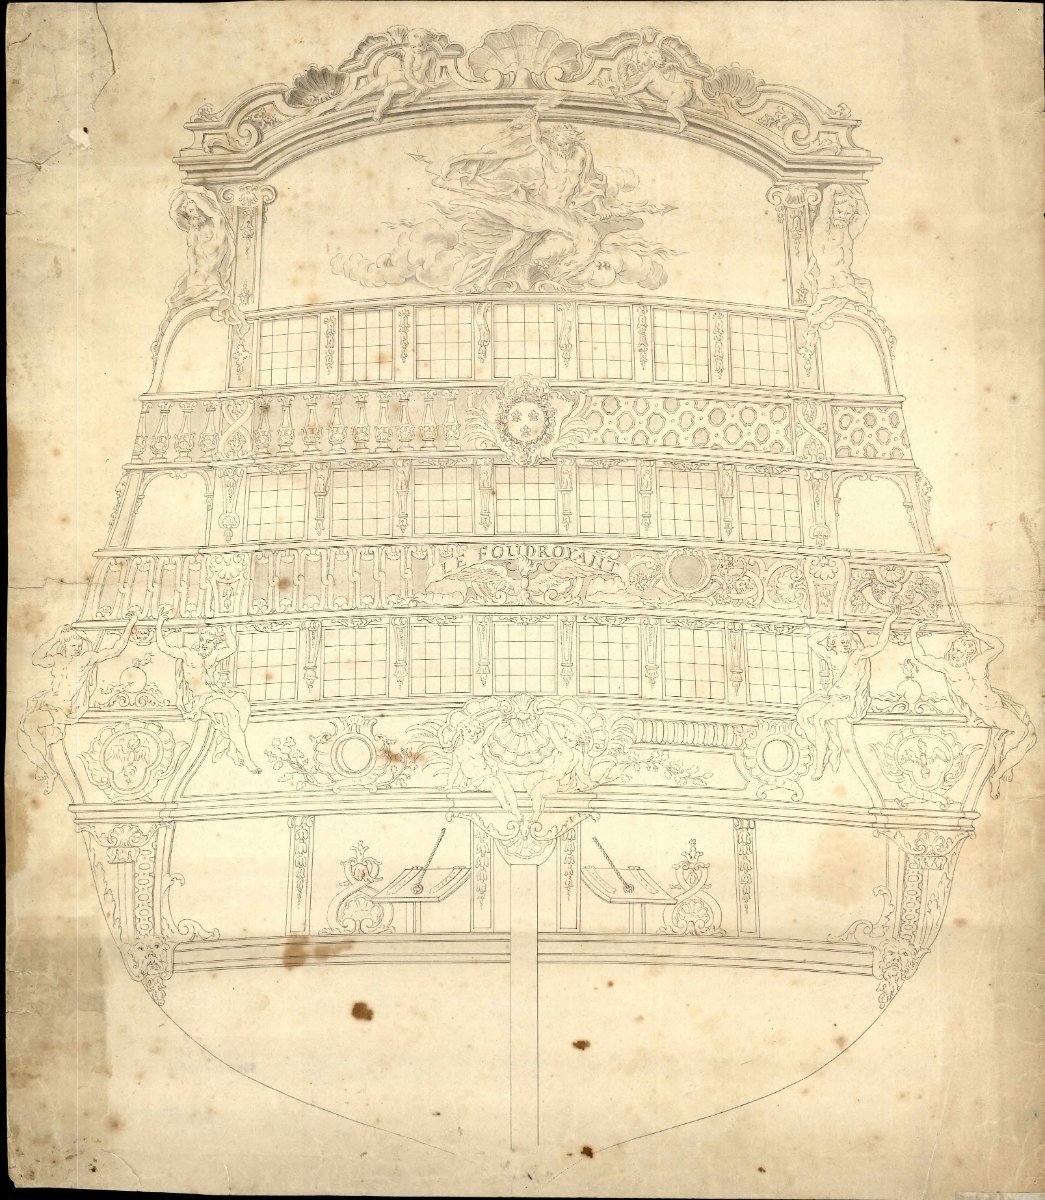
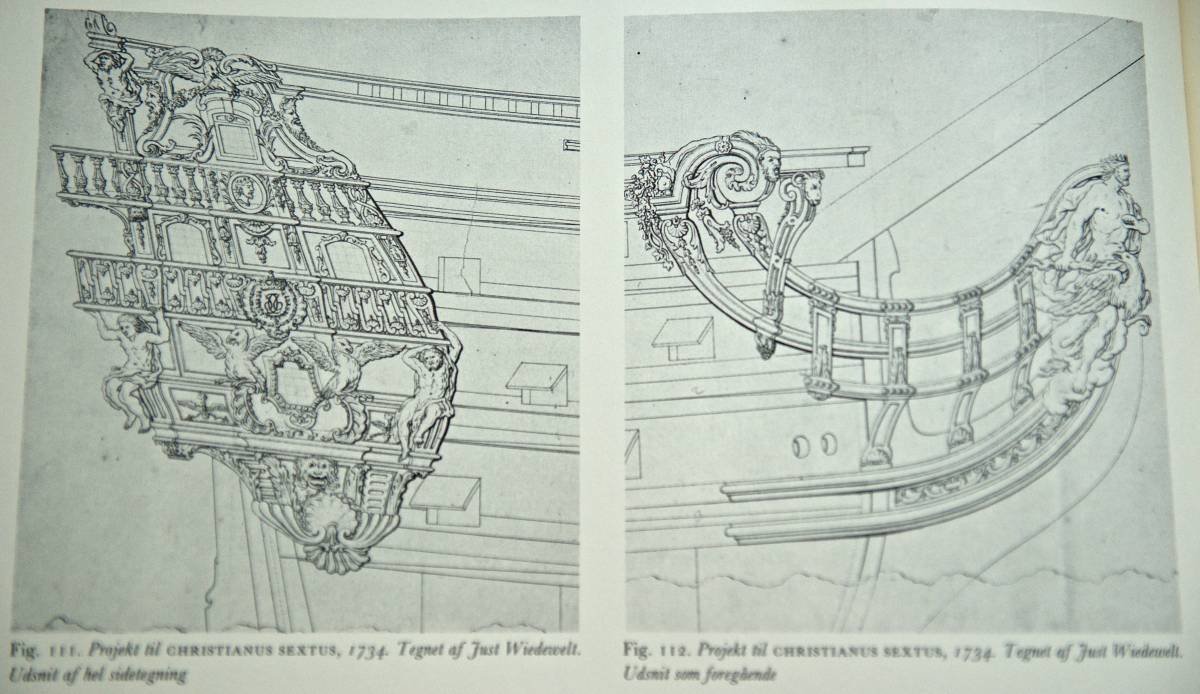
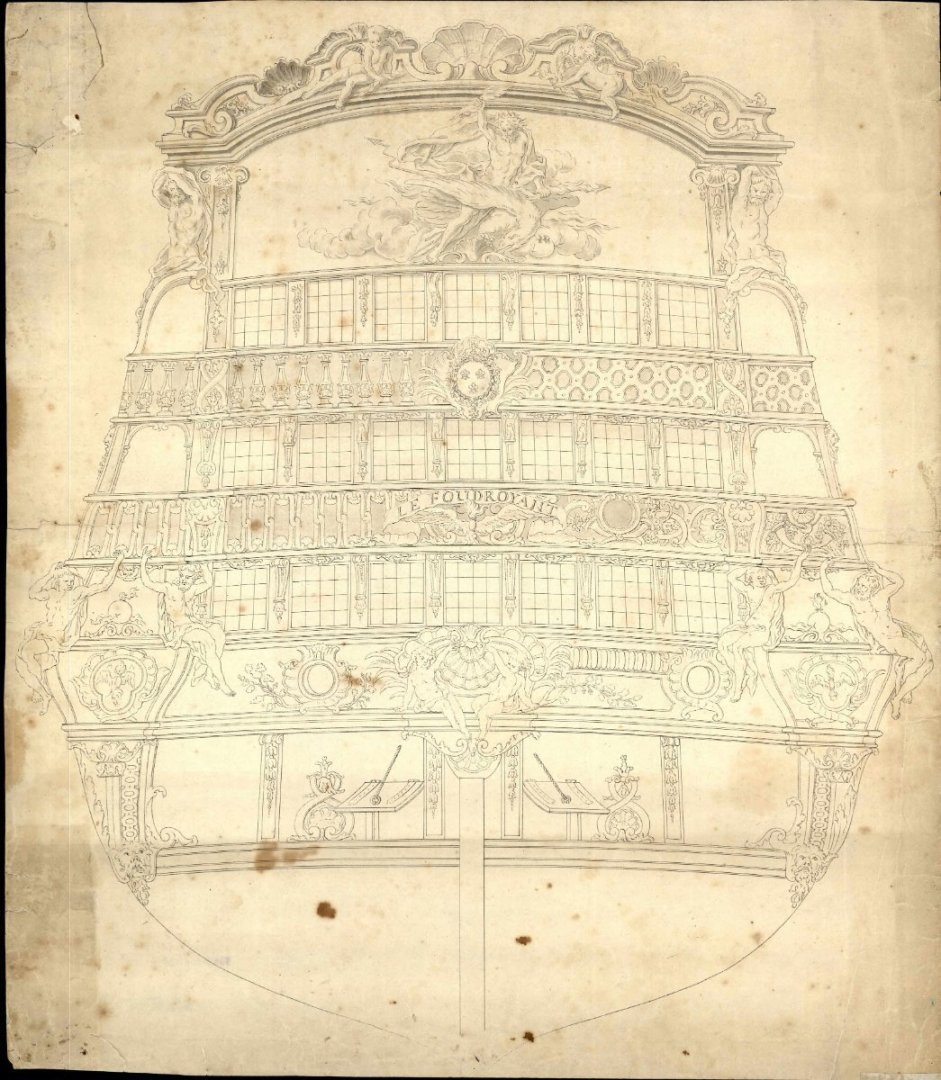
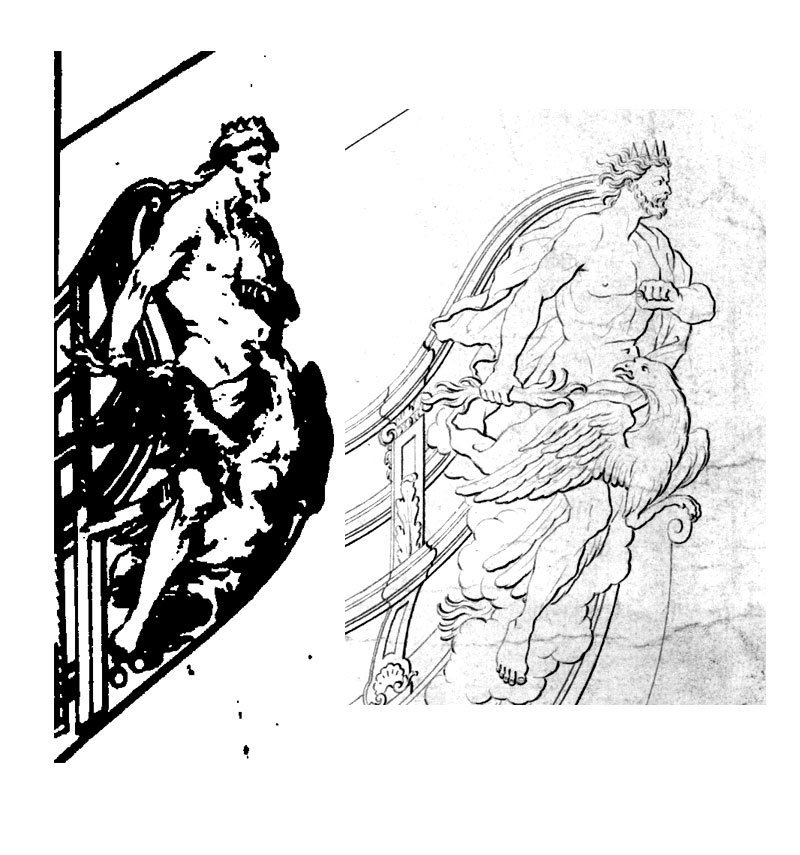
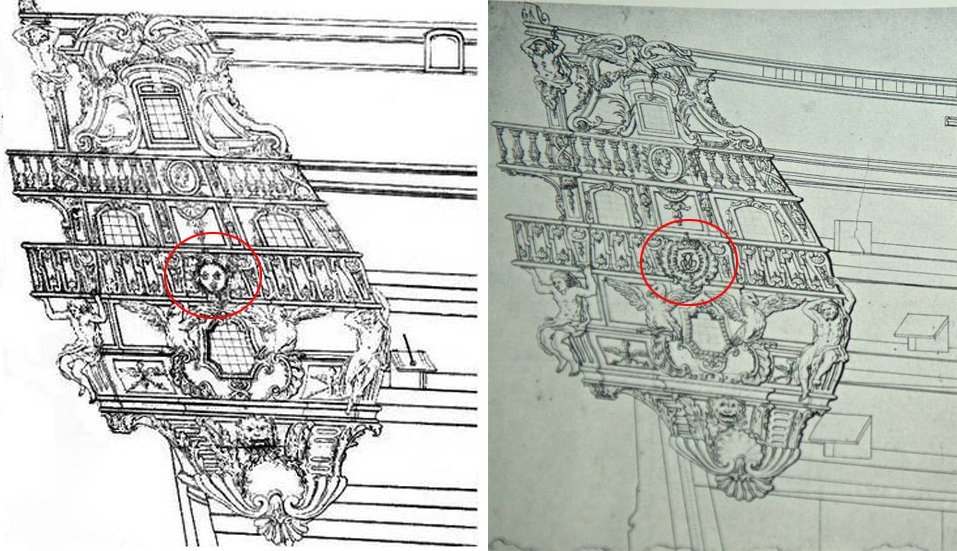
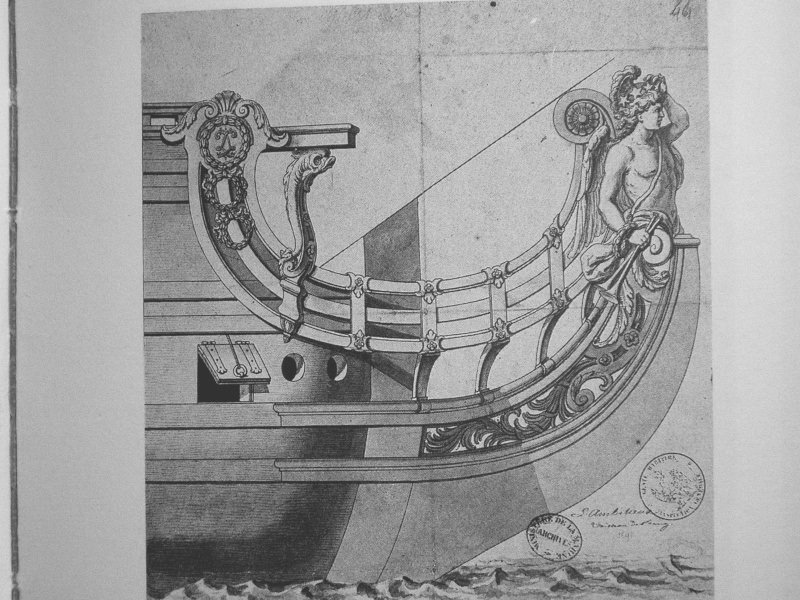
Your saying that the French adopted the experience of the Danes and copied their ships really surprised me. I even specifically started looking for sources that once served as a basis for my memory. And I found some of them. For example, here: The beginning of a long dynasty of truly talented sculptors who officially held the position of chief ship sculptor at the Holmen shipyard was started in 1729 by Johann Heimbrod, a sculptor from Saxony who had previously, in 1722, already participated in the design of ornaments for the ship "Drinning Anna Sophia". On the structural side, French and English styles dominated Danish shipbuilding, just as they did for the ship's decoration. Naturally, the chief sculptor was directly subordinate to the chief shipwright, and was given limited freedom of creativity. Heimbrod used both English and French styles in the decoration of Danish ships. The main difference between the two styles was that in England the lion was often used as a bow figure, a feature that was never used in France. Far more important was the fact that on English ships the galleries were not in the form of a balcony, but were closed, forming what was known as a loggia. The design of English ships in general represented a more compact and architecturally structured composition. French ships were not characterized by a carved hackabort, nor were the carved statues of large size that marked the transition from the stern to the quarterdeck galleries. Heimbrod, being an extremely talented craftsman, completed a large number of commissions for the design of elements of ship decoration, serving only four years. He died in 1733 and was succeeded by Just Wiedewelt, a Danish-born sculptor who was chief sculptor at Holmen from 1733 to 1757. Many of the bow compositions of the period, known from models and drawings, reveal influences from the French palace style, which Wiedewelt discovered during his extended stay in Paris from 1698 to 1715. In creating the decorations of Danish ships, he often used copies of original French drawings, sketches from life, etc., which were modified to a greater or lesser extent to conform to local realities..... Of course, all maritime countries tried to adopt the experience and design innovations of their neighbors. But still there were conditional "trendsetters", and there were those who tried to apply innovations found by others. And if we talk about copying not just individual elements of the design, but the whole hull, I still tend to believe that it was the Danes who could create "Chinese clones" of the French, and not vice versa. But that doesn't really affect the crux of the matter. The more important thing is that I found errors in myself. And you correctly pointed them out. I made a mistake in my drawings. This image belongs (as you correctly wrote) to the Danish ship HDMS Fridericus Quartus, (1699). And this image belongs to the HDMS Christianus Sixtus (1733(1734)). And it is exactly a repeat of the French Foudrant 1724. I have not found any data about Frederick that he is also copied from the French counterpart. So to claim that he is also a clone is not correct. I've sorted that out. However, I still have one question. There were two ships named Foudrant. One was in 1724. But there was also a ship of that name in the late 17th century. And there may be some confusion with the story of juggling names from one ship to another. When the ships Hubac and Pangalo switched names Soleil Royal and Foudrant . At what stage of readiness did the swap take place. Did they already have sculptures on them? And what ended up on the Foudrant breakwater? Going off of your findings that there were no images of Jupiter before the Fulminant, what stood then? P.S. It's good that these dialogs are not seen by my customer. The case is simple. There are ready sketches. And I make a model based on them. All questions about the fact that on the breakwater should stand exactly Jupiter were removed from the agenda of discussions a long time ago. And found (oh wonder!) unknown sketches of Beren confirmed the guesses about Jupiter. I'm still interested in digging into the theory.

-
Thank you. This answer can be called a point in the question of common lore and symbolism in ships. If there is ever any evidence that we don't know everything yet, this version can be brought back. And even exclaim: Wow, I thought of that ten years ago. But until then, you can let go of this conspiracy theory with a clean heart and recognize it as dead. She died before she was even born. Amen.
-
I was interested in these lines. You say that Jupiter was not seen as a major figure until the Fulminant. However, I certainly have memories of seeing such figures. I tried to find similar examples, but of the French ships I quickly remembered only _le_Foudroyant_. I still have in my folder of this ship photographs from a ship built in 1724, that is, later than the _le_Foudroyant_. But I remember that there was a ship of the same name, but of earlier construction. В 1693. In a separate section where I keep the decals, there are images with Jupiter figures, but I have kept them without specifying exactly from which ships they are taken. Therefore, I cannot say with one hundred percent certainty that these images accurately depict a figure from a ship built in 1693. This picture was shown in this post, here too le_Foudroyant is depicted. The figure looks very much like a ship built in 1724. So I don't know for sure, either it is the same ship. Or the decoration is repeated from an earlier version of the ship in the early 18th century. My library also has drawings of Danish ships. It would seem to be a bit of a mismatch because these are not French ships. However, the interesting point is that Danish ships are clones of their French counterparts, and the Danes were very meticulous in copying what they saw from the French. I even have images where the originals and the copies are side by side. And you can see how the Danes removed the royal lilies. You can see how diligent they were in redrawing the sketch. That is, their copies also show that France had ships with Jupiter figures. On the one hand you show me the conclusions, which are based on the work of people who are engaged in researches not the first day. And on the other hand I have images that have a different point of view. Foudran 1724 shows that there were definitely images after Fulminant. This ship built at the end of the 17th century I see only the transom. And purely from an artistic point of view I can say that making images of Jupiter on both stern and bow is not really logical. If I were decorating this ship, I would do it differently. And if there is already one Jupiter on the stern, I would show something different on the breakwater. I'm having trouble coming up with my own version. Most likely I would put a Jupiter on the breakwater and something different on the transom. And this is where I need your comment. What do you say? Is my data and memories wrong?


-
I'm confused. Reread several times about policy decisions and moves, but I can't find an answer, how does this answer the question about decorating ships with decor? Responding to the post about the La Superb, and L’Orgieullieux: You cite data that they are two "relatives". I guess I'm not articulating my thoughts very well after all, or the translator isn't quite translating me correctly after all. I was interested not just in the mere possibility of the existence of several ships that are built according to the same design. This fact does not require confirmation. Such ships were built in many countries. And there's no sensationalism here. I'm interested in whether there were ships with a common semantic idea. La Superb, and L’Orgieullieux do not, as far as I know, carry any common meaning. If I am wrong and in fact they do not, that would be a great discovery for me. My logic is simple. If there were no other examples in practice that ships had instances where there were "relatives in idea, history", then there is no reason to look for parallels in Fulminant and Ambitious. But if EVER it turns out that such a practice existed, and there are other examples with a common idea, then in this case it already makes sense to look for connections between our ships.
-
The first question I can ask right off the bat. I was suddenly thinking about this. Were there ever any cases where two or more ships were made as one set? So that together they would add up to a single overall idea? A lot is known about the existence of sisterships. But I can't remember instances when ships were not just made according to one set of drawings, but were "relatives" in names and decorations? Are there any such cases at all? I will be able to ask the second question later, as I need to do a bit of photo searching for that. Might get a chance to ask it tomorrow. So please don't run far away from the computer 🙂. I would really like to continue the conversation as soon as possible.
-
Hello, empathry. You continue to supply tons of interesting information. Thank you very much. I have already read somewhere about Beren as a not very skilled artist. But this is the first time I've heard about the decor below the water level. I'm in the evening now, my spouse has already gone to bed and I almost woke her up with my laughter. Or maybe I did. But I won't know until tomorrow morning. Reading about your certainty that the content of the sketches does not carry the idea, I was upset. Of course, you may be right. We humans have a tendency to romanticize the past or the future. Or to see them in darker colors than they actually were. And we imagine the era of palaces and baroque ornaments as a time of elegance and refinement. Men were gallant knights and ladies were refined and beautiful. And at the same time we forget that even in luxurious palaces there were snuff boxes for catching fleas and colognes, with which they tried to stop the odors of dirt and excrement. Everything existed at the same time. So you may be absolutely right in what you say. But it would be a shame if the sculptures we're looking at really didn't have a particularly subtle intent. Then I will pause this line of questioning. There is no point in examining the details of Jupiter on Fulminant with the same magnitude. But I do have to ask a couple of questions.
-
Hello, empathry. Thank you very much for such an extensive material. I found a lot of new things in it for me. For example, I first learned about the Salamander as a Christian symbol. Before that, I thought it only had roots in ancient myths. You really surprised me. Thank you for clarifying the question about the extent to which two ships can be "related". I had thoughts that they are two parallel projects that are not connected together by a strong bond. The fact that they were made in different shipyards and by different craftsmen gave reason to consider them separate and independent. But at the same time, I needed a good reason to put a point in my brain and to be convinced that this was the only way and no other. I thought about the fact that in terms of structure and design they could be (and were) different ships, but in terms of symbolic meaning they could also carry some one story. And I was more concerned with the decorative difference in my question than the technical difference. And the story that the decoration of the two ships tells. I don't remember exactly what the scientific term is called, when a person makes up logical chains and connections in his head. And finds such justifications that he starts to believe in them himself. That's probably how a lot of conspiracy theories come about. So I realize that in the search for hints you can go very deep and come up with fantastic versions. But I also think that art now and art then are two big differences. You said that you are a Musician and have a good understanding of music. So I will give you an example that you will definitely understand. I once met an organist (a person who plays the organ). And he told me about the story behind Bach's Toccata. And I was just amazed. It's an epochal work, it's impressive. But when I learned that it is not just a beautiful combination of sounds, but that there is a story in its structure, the power and beauty of this work became a hundred times stronger and more impressive for me. I've studied painting and I know for a fact that there are so many nuances and clues in fine art too that carry additional information. And I like to look for such nuances. So I am in a very strange position. On the one hand, the decoration of the ship absolutely definitely has its own subtleties, it's not just a collection of different patterns. And on the other hand, you have to be careful, otherwise you can find (invent for yourself) meanings that the artist didn't have. So I've already spent a lot of time trying to find some story that involved Jupiter and Apollo. Maybe jointly, or maybe they were opponents. So I'm already halfway to possibly creating a new conspiracy theory. This is a joke, of course. But there's truth in every joke. And in order to see if there was a possible connection at the level of symbolism, I had to, as a detective, look at this version as well. So I want to thank you again for your hard work. It ranked high on my "evidence, alibis, and testimony" list. I have a lot of questions about Jupiter. And you've raised some of them. But I'd like to put that aside for a moment. Tell me, do you have any information that concerns the figure of Apollo? What do the objects that accompany him mean? Maybe you know why he was depicted in this particular image? Maybe you know something about the design of the transom of this ship? I want to postpone the topic of Jupiter for a while for the reason that this sketch has just been found. And figure A... has been known for quite some time. Many people have built this ship or may have read some studies that deal with it. So the chance of finding people who can share something new is higher. In the meantime, I'm reading and looking for information about the Jupiter. Maybe there will be more out there over time that I can subsequently show.
-
Moving on. This is how Chewbacca's appearance looked after some time. I collected all the segments and the block with the lion's face back into the general figure and was about to continue working.... In this shot you can see the pencil marks below the chin. These marks show me where Wookiee's front paws will be. I was going to do them. Later in the story, I will pay attention to this. but suddenly... It wasn't the muzzle itself that had fallen in deeper. I myself reopened the figure a second time and moved the muzzle deeper. I actually put the muzzle back where it was supposed to be. I thought about it during assembly and moved it a little closer to the surface. But I decided that was wrong and put it back where it was. So why did I decide to make the adjustments first and then undo them? The answer is obvious, I just realized I had made a mistake. The thing was, the muzzle didn't turn out right on the first try. It took me quite a while to get used to the padouk, I didn't like the way it cut. Even when I could comfortably rotate the little element on the table with just the muzzle glued to the plywood. Even that I could comfortably reach tools at all angles and from any side. I still really didn't like the way the wood behaved. It wasn't cutting, it was splintering. I was worried, cursed the paduk, cursed myself, put everything on the shelf and tried to calm down and think of what I could do differently. And after a break, I cut off the faulty attempts again and tried again a little deeper. And when the muzzle is lying separately on the table, is it hard to tell if it has crossed the line or not? Has it fallen below normal or not yet? I had an idea in mind that a segmented blank might give me a plus here as well. Since I won't be able to see what's inside, I can just move the whole portrait segment closer to the surface. That's what I did. However... In these shots, you can see that I managed to carve out the lion's paws. After this stage of work, I was convinced that I was worried for nothing. And I lifted the face closer to the surface for nothing. After examining the photo with the original figure and comparing it with what I had, I came to the conclusion that the portrait is too close to the tips of the paws. So I took the blank apart for the second time and returned the muzzle to the depth it should have been originally. Now it was exactly where it needed to be. In this shot you can see that I was about to transfer the carving from the muzzle to the rest of the body and had already outlined the element with the lion's ear. Now it has separated at the seam and will need to be done again. And here you can see that except for the ear the whole side is already plowed in rough plowing, places of figures and detailing with mane and tail are outlined. All this helped to estimate how close to the surface the face is located. And the last shots for today show how the blank looks after I removed the overhanging edges around the face. There is still a lot of work ahead, but more on that in the next issues. to be continued...

- 546 replies
-
- 10
-
-
-
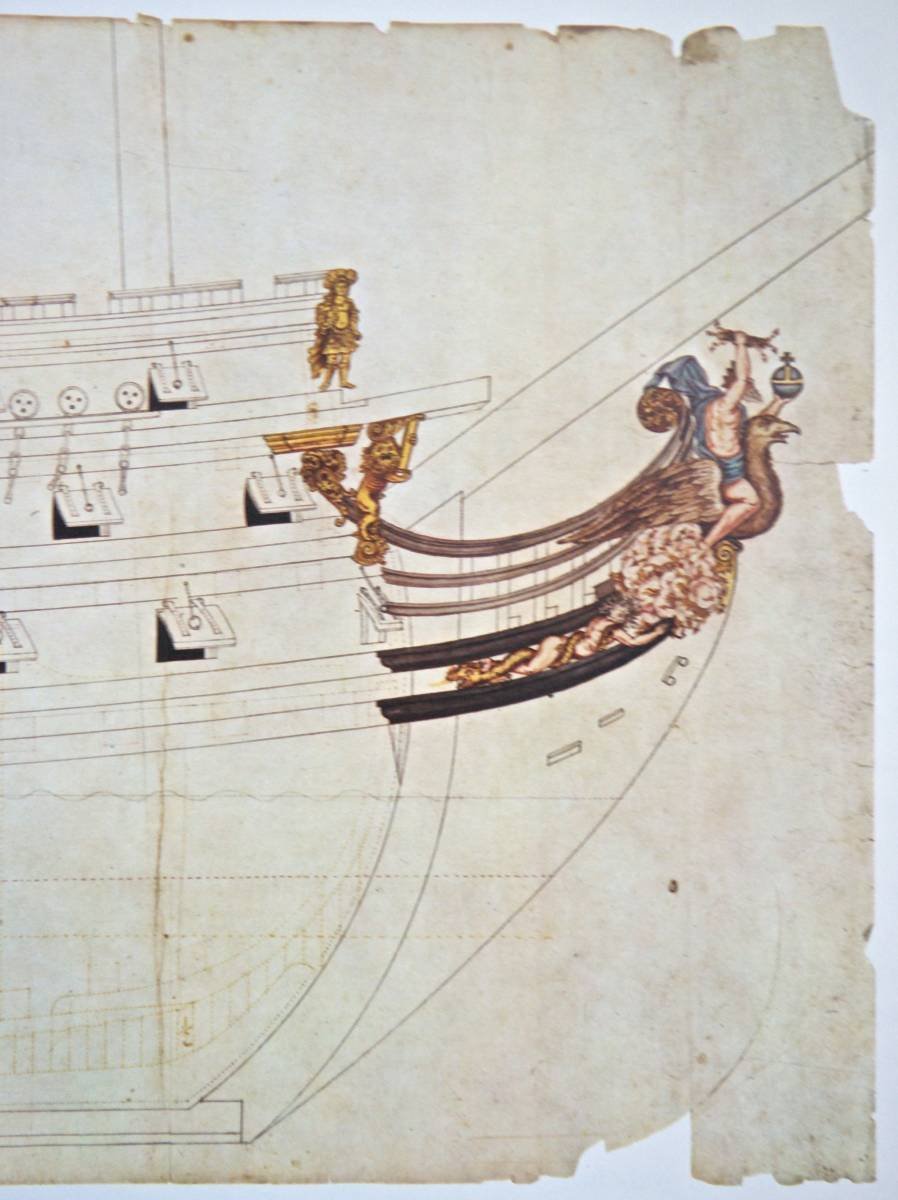
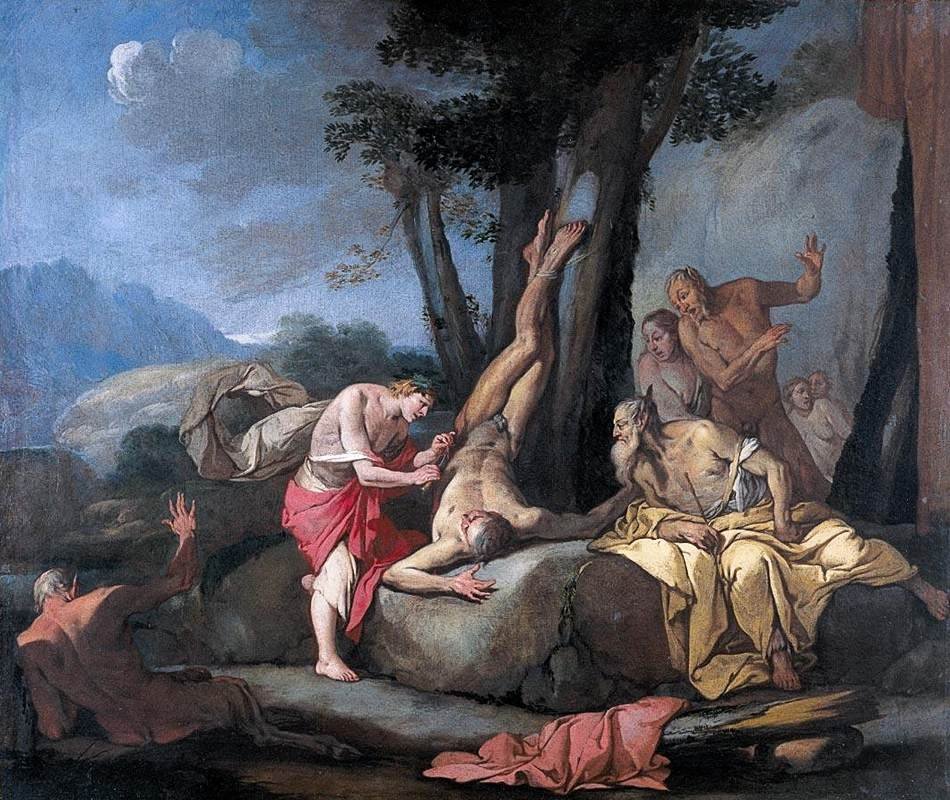
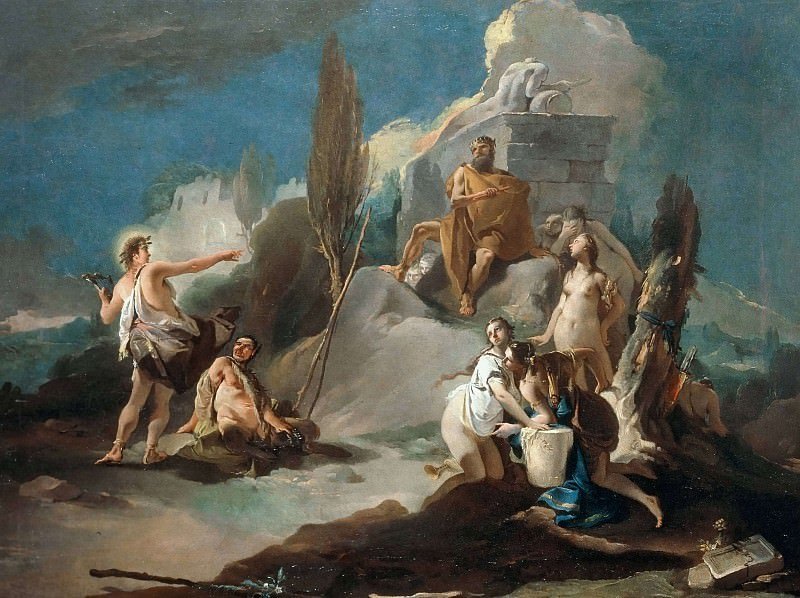
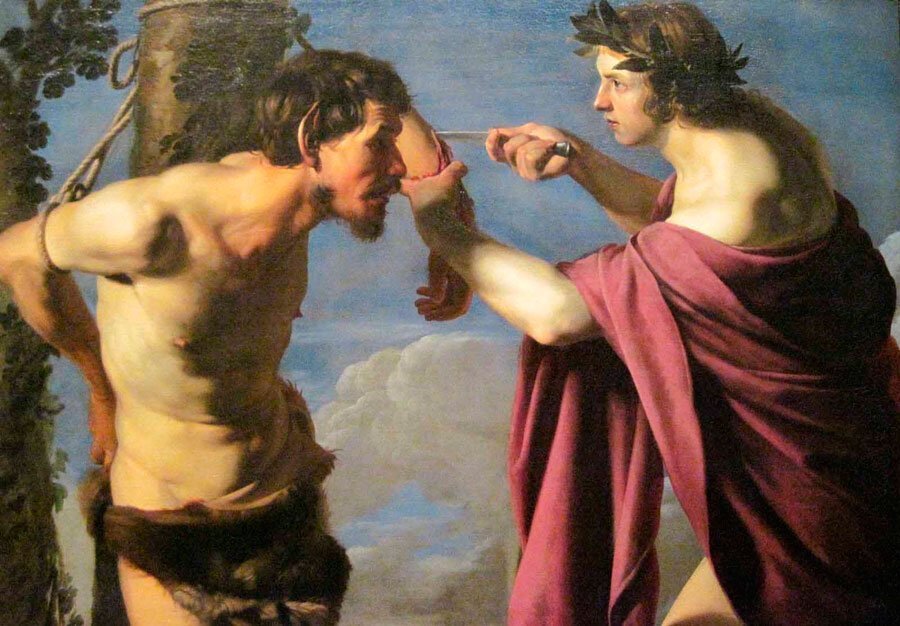
But who is ambitious here? Usually this word is applied to someone who decides to challenge the stronger. If there is a long-time champion in the ring, who does not know defeats, and a young fighter comes out against him, it is the newcomer who is more likely to be called an ambitious fighter. You can't say that about the champion. The champion ambitiously went to the fight against a newcomer that no one has heard of! How can you say that? No. So why was Apollo chosen for a ship of that name? After all, the whistles and the shepherd's bag on his shoulder hint that these are his trophies, which he has just taken off the defeated Marsius. If this particular confrontation was intended, it is hard to call Apollo Ambitious here. After all, he had other victories, for example, over the huge serpent Python. Now that feat fits much more under what might be called ambitious behavior. In the context of the conflict with Marsius, one can draw quite different conclusions. For example, we can call ambition a negative quality. And then Apollo is the one who punished for this quality the one who decided to challenge him. In politics, this can also be noted. For example, the king on the throne believes that he has the right to rule by the supreme law. And anyone who wishes to defy him is only a nothingness and trash who has forgotten his place and encroaches on what he cannot be allowed to do. Don't be proud or I will punish you severely! Maybe that's the meaning behind the name and decoration of the king. This may be true, especially remembering the ego and self-aggrandizement of the Sun-like Louis. Such a ruler was quite capable of showing everyone around him, both inside and outside his country, that he was two heads above the rest and would not tolerate challenge. But again, it doesn't all add up. If this version presents ambition as an undesirable, wrong quality of an upstart, then that's not how the ship would have been named. On the contrary, it would be something else. Something that emphasizes the right to rule. Justice. God's power. Anointed. Anything at all. But the ship is called Ambition. And it's stumping me. I can't figure out exactly what the idea is here. Maybe it's not Apollo. Maybe it's someone else. For example, there is something in this figure that very much breaks all the previous hints and found versions. It's the wings. I doubt any ancient character has wings at all. Unless Pegasus. But this thread leads nowhere at all. The only direction I can find is biblical references. Could it be some kind of angel? There are references in the Bible to angels blowing trumpets. But no matter how many times I look, the biblical options don't fit here at all. Especially when you look at the other symbols: bag, wreath, helmet. In a word, I can't fully understand what exactly this figure wanted to show. I will not mention the bas-relief on the transom of the ship. Especially since I have practically no useful information on it at all. I am sure that there must be something there that will tell better about the meaning that was put into the decoration of the ship and its name. If anyone has anything to suggest, I'd be very happy to hear all versions or accurate answers. It's not all that simple with the Fulminant either. And I have questions, but they are best put aside for now.
-
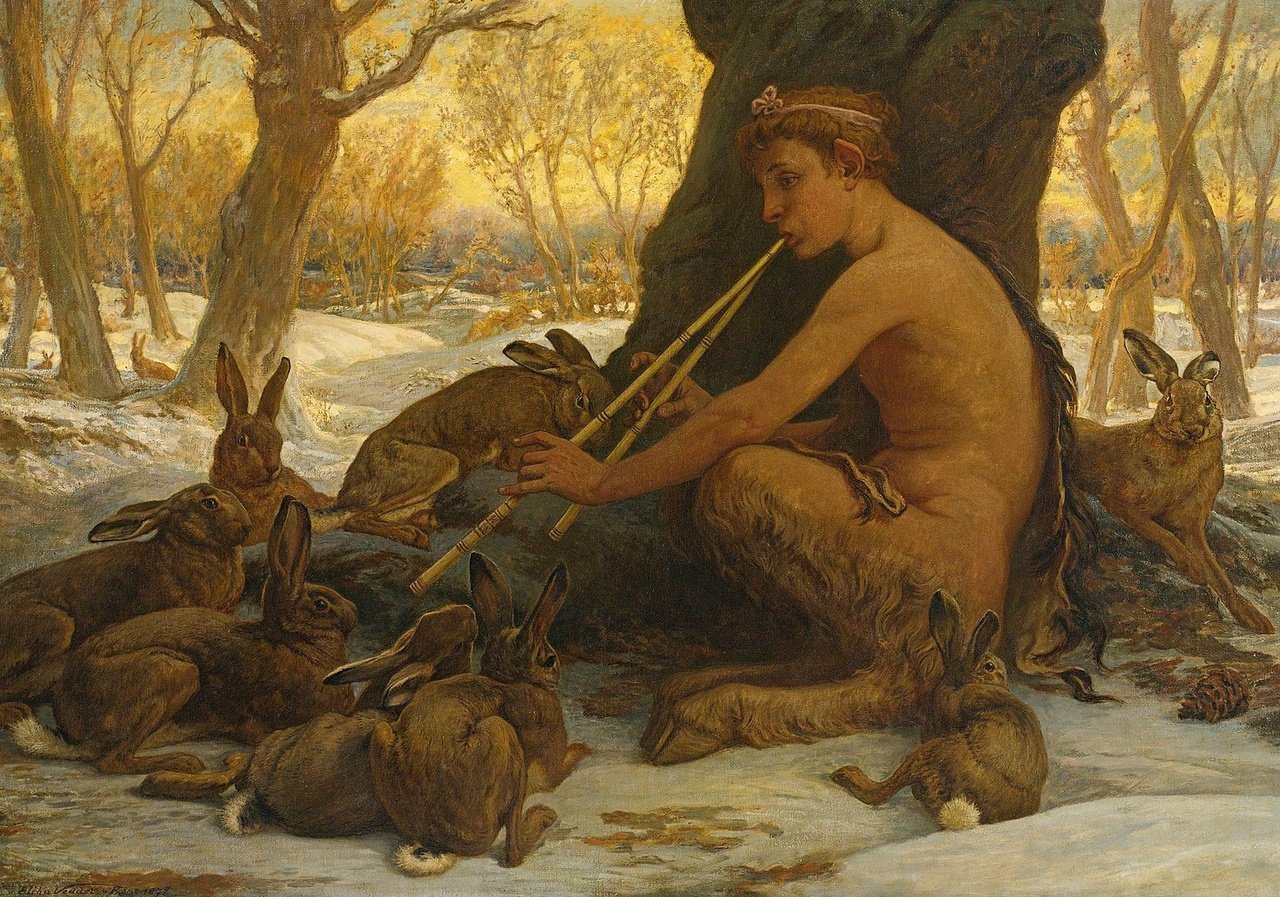
it just so happens that my introduction to the Marsius story started with this picture. And that put an imprint on the angle from which I perceived the whole story. So I'm going to tell the story of Apollo in a different way than it is described in other sources. What do you think of her? What feelings does it evoke in you? What is it depicting? The plot is quite simple. There aren't a lot of participants flashing before your eyes. And it doesn't take time to make out their movements and understand what's going on. There's a young satyr playing a piper. Again, I don't know very well what kind of instrument it is, I know that it is definitely not a saxophone, but I'm not sure about the rest. So sometimes I can randomly use different terms, for which I apologize. But let's get back to the picture. The general mood can be called peaceful, everything is calm, even the frightened hares are serenely lying down and listening to the young Marsius playing. These little animals are depicted here not only to convey peace. They personify the satyr himself. He is just like them, harmless and naive. A person who is not familiar with the plot does not guess how disturbing an idea the artist has put into this picture. To fully understand the drama, one must familiarize oneself with ancient mythology. One day the goddess Athena invents a flute - and immediately throws it away, and even with a curse: she did not like how ugly her cheeks swell when playing. Marsyas, a goat-faced satyr, a forest dweller and friend of the shepherds, was lucky enough to find the instrument cursed by the goddess. Marsius himself mastered the flute quickly, and taught it to his friends, so that the instrument, which was simple in manufacture - a reed stalk and seven holes - became a favorite pastoral pastime. But Marsius, to his misfortune, did not confine himself to his immediate surroundings. Emboldened by his musical success - all the beasts of the forest gathered to listen to him! - he challenged Apollo himself. The end of the contest was as painful as it was predictable: Apollo, declared the winner, orders Marsius to be tied to a tree and skinned as punishment for his insolence. Therefore, knowing what would happen later very pitifully for the young satyr. The plot of the contest or its sad ending was drawn by many artists. And completely different emotions reign there. It is either a noisy banal argument between two musicians. Or almost sadistic pictures of the torture of the loser Marcius. In many sources, Marsius himself is shown as a negative character. He - an inferior being decided to challenge the most talented Apollo out of pride. And the punishment from him was deserved. In the same painting, the artist Elih Vedder took a completely different path. He shows Marsius not an experienced and cunning old man, but a young boy. And the root of Marsius' self-inflicted misfortune is not pride, but naiveté. It was not AMBITION that pushed him to challenge Apollo, but childish delight at the music he had just discovered. Foolishly, he had thought that Apollo, too, simply liked to play, and that the competition would be friendly. How was he, raised in the forest, to know that sophisticated culture could go hand in hand with sophisticated cruelty... Of course, we're talking about a fictional story here. Even historical events can be interpreted from different angles, and in each case there will be a hero and an anti-hero. Let's not talk about a fairy tale. We can't tell you exactly what Marsius was like. Whether he was a naive young man who suffered from Apollo's jealousy or whether there was some evil intent in his challenge to the contest, because the winner should receive any reward he wishes. We are now discussing only the figure on the breakwater of the ship. And it is time to return to him. A little above I have specially emphasized the word which we had to single out from the whole ancient story about the contest between Apollo and Marsius. It's Ambition! After all, it is this quality that is presented as the name of the ship, its motto, its personification.
-
Who is it? I have only indirect guesses. And they don't give me a definite answer. The figure has details that seem to mix together elements from different stories. If it were a modern interpretation, it could be described as follows: The figure is wearing a tight-fitting tricot with a spider in a web on the chest, a belt with a wide bat-shaped plaque, the figure holds a large hammer in one hand and a round shield with a star in the other, and a cloak with a stylized letter S fluttering behind him. That's roughly how I see what's drawn in Ambissier's sketch. So who is it? The quickest theory that comes to mind is that it's Apollo. What do the details in this figure symbolize? In one hand we see a dudki or some other wind musical instrument. On the same hand hangs a wreath. On the side we can notice a bag. These objects can be attributed to Apollo. So the wreath (made of laurel leaves) can give a reference to the story of Daphne. This tragic story is about Apollo's love for her, but the girl did not want to be Apollo's lover and asked to be turned into a laurel tree. And from that time Apollo had a special attitude to this tree, and the laurel wreath became a symbol of his feelings, and afterwards a symbol of Apollo himself. So the wreath could speak of Apollo being in front of us. What then must it symbolize that this wreath is hanging on his arm? Why isn't it on his head? And the wreath is exactly hanging on the arm, as if it has nowhere to go. That's how I tend to act when my hands are full. I can hold long objects with my arm against my body by placing the weight under my armpit. And something in the form of a ring I can put on my hand. But in the sketch, the figure has his other hand free. And why isn't the wreath on his head? Why is there a helmet? I have never seen any mention that he was once in military attire. Who are some of the ancient characters usually depicted wearing a helmet? First and foremost I think of Mars or Ares. These are the Roman and Greek gods of war. In the second place Athena or her Roman counterpart Minerva comes to mind. Maybe someone else wore a helmet at certain moments, but I don't quickly recall such instances. Nor do I recall Apollo wearing a helmet. Then it's not Apollo, but Mars? This version is possible, but in my opinion Mars has a lot more questions. Why does Mars have a wreath? Did he triumphantly defeat someone? Then why is the wreath hanging on his arm as an unimportant thing for him. If the warlord is victorious, then the wreath on his head signifies his feat. And victory means the battle is over and he can take off his helmet. If the helmet is on his head, it means that this figure is in battle right now. But then it is too early to talk about the wreath, he has not yet won the victory. It is much more logical to assume that Apollo is here. The wreath is a permanent symbol for him. We can assume that he entered some military confrontation, took off his wreath for a while and put on the symbol of war. Why then is the wreath not in his hand? He has one hand free. In ordinary life, it could be an accident. But in this case, every little thing must have a meaning. A normal person would leave the wreath hanging only when the free hand is needed for specific actions. What then does the gesture of the left free hand mean? Is Apollo fixing his hair? Does he want to remove his helmet? Or to scratch himself? If he is about to take off his helmet, it could mean that his fight has just ended and the helmet is no longer needed. But in that case, wouldn't it make more sense to draw this figure a few seconds later, when the helmet is already in his hand? In this case, the gesture is not quite clear. And there are questions to this version from another point of view. The figure is standing on the breakwater of a warship. Usually the main figure should show either readiness for battle or determination already in battle. The moment after the battle looks more questionable to me. So maybe I'm wrong and Apollo is not going to take off his helmet? Maybe this gesture means something else? But what? He's not scratching his forehead, is he? What do the stars around his head mean? Perhaps it is again a symbol that is added to further strengthen the understanding that it is Apollo who stands before us. Among his many qualities, he is called Phebus, which means radiant, bright, shining. Though perhaps there are some other characters who could be shown with stars? I don't. If you approach it ironically, it all comes together: the stars around your head, the hand that scratches your head looks like a moment from a cartoon. Tom and Jerry. Tom is once again hit, knocked on the head. It makes stars fly above his head, and he's confused, scratching the bump where he's bruised. This is the place for a joke, of course, it can't be used in serious reflection. I just don't have anything else to add, I am at a loss and don't know what exactly is encrypted in this place. Let's move on to the following hints and symbols. What can we say about the musical trumpets. I don't know what to call them properly: dudes, whistles, vuvuzelas or something else. This object, in my opinion, again returns to the fact that Apollo is in front of us. And we should consider the pipes together with the bag. There is one story in the legends of Apollo that is different from the others. And if Apollo in other adventures is personified as the god of beauty or patron of creative people, poets. In this story, Apollo shows his other side. And it can be interpreted very differently. This is the story of a contest with a satyr named Marsyas. And I'll describe this part a little bit later.
-
What a pleasure to be in the company of people who are so deeply versed in ship engineering and French art history. Maybe you can help me find answers to some of the questions that keep me awake? I have long been concerned with the subject of symbolism in art. And how this theme is revealed on a particular moment - the ship Fulminant. Here I need to describe my question in more detail. We have already discussed it when we were trying to guess what could have stood on the ship's breakwater. What kind of sculpture would be there? And we ended up being right in our guesses. And it would seem that the fact that we found archive sketches with an accurate depiction of the main figure completely removes the question from the agenda. However, that's not entirely true. I am concerned and interested in who it is? Is it really Zeus? Or is it more correctly called Jupiter. Is it definitely him? Why do I have questions? Let me try to explain. According to various sources, the Fulminant is a ship that was built from the beginning as a paired project with two ships. Fulminant and Ambitieux. Is that right? What in this case should be understood as a pair? These are two ships that started out being built on the same project, but it was just a cost saving for the engineers. They came up with one common framework, and then each master craftsman does whatever he wants? And then the ships have nothing to do with each other. Or did the pair of two ships have one common idea, one goal? If ships had names... mm-m-m-m, Phobos and Deimos, their unified meaning would be obvious. But with the existing names, I don't see anything unified. They are more independent. Or am I wrong? And now I will move on to narrower issues. Let's first discuss the main figure in Ambitieux.
-
Yes, Empathy, it's amusing. Really our nicknames have something of the same direction. Being a friend without having empathy is impossible. And it is very interesting that you decided to have this conversation about nicknames. Thank you for reading my posts and for your high praise of my work. It's very inspiring.
-
So, this nickname is a Russian word written in Latin letters. Once upon a time I chose this nickname for one of the online games. In the game it was possible to call your character only with the English alphabet, and already in the game I communicated more with those whom I understood better. These were people from Russia, Ukraine and other parts of the world who speak Russian. That's why it was interesting for me to write my nickname in such a way that no matter what the English letters were, anyone could understand the meaning of this name correctly. The special nuance was in some letters that are in the Russian alphabet, but they are not in English. And I found a way to use such symbols so that they look like the right letters. Once I already had an account on this site, it was on that account that I started this very topic. But unfortunately that account has been lost. It's a long story, I've written a bit about it. If you're interested, you can flip through the pages and you'll find a place where I talked about this event. When I started a new account I remembered about this nickname. I got used to it and decided to use it. It is useless to look for some kind of kinship with English words in it. In this case, it will still look like I fell asleep at the computer and dropped his head on the keyboard, which formed a random set of letters. My nickname copies the Russian word, which is spelled like this "Напарник". And if all the letters are capitalized, it will look like this "НАПАРНИК". Now let's put together the Russian original and the English clone variant: НАПАРНИК - HAIIAPHNK. In English, it means "Partner." Someone who helps at work, or someone who sits next to you in a police car, likes doughnuts and is ready to protect you from a gunshot. I'd like to think I can work in a team and be a helpful and responsible friend. At least that's the kind of person I'd like to be. And I try to behave in a way that makes people around me feel comfortable and at ease. It is not always possible to be a perfect partner, sometimes it can be very difficult with me. But I try. That's the whole meaning I wanted to reflect in my nickname. It's hard for me to find the right word in English, and this was the first option I decided to keep as a result of my choice. I am well aware that the meaning is not clear to everyone. For the vast majority of people it is just a set of letters. That is why I indicated my real name. It is certainly common and easily understood by everyone. So that you do not have to go through the trouble of typing, you can address me by my first name. And use any spelling you like, either the full Alexander or the short version - Alex. For me they are both acceptable. At home I am generally called Sasha. Don't be surprised, this is the standard variant of my name in Russian. The short version. Yes, I know it's strange in many countries, and they are completely different words. But other languages have something similar. For example, the abbreviations of names like Richard to Dick, William to Bill look roughly the same to me. And so on. Well, or you can write the English version of the nickname - Partner. This will also be much easier for you. As you prefer.