-
Posts
257 -
Joined
-
Last visited
Content Type
Profiles
Forums
Gallery
Events
Everything posted by madtatt
-
Let’s move on to the internal structures and fans. The deck is slowly filling up. One thing bothered me. Two box-shaped structures were squeezed between the two main houses. Seems completely illogical to me and cannot be seen on many models, including those from museums. And that’s why I don’t use it, the corridor remains open. Especially since a small platform can be seen on both deckhouses. Probably to get to the funnels. That’s why I won’t install the boxes, but will attach a ladder and a railing here. I further refined the superstructure that accommodates the rescue cutter. The doors are from the MK1 set, the railings are from the model’s original etched parts set. And the ladders come from the leftover box. I’m starting to like it that way
- 193 replies
-
- Russo-Japanese War
- Mikasa
-
(and 2 more)
Tagged with:
-
Thank you Mark. It's nice to write with all of you again about our beautiful hobby. That's comforting.
- 193 replies
-
- Russo-Japanese War
- Mikasa
-
(and 2 more)
Tagged with:
-
Then we want to follow our words with actions and continue building. Let’s get to the internal structures. All relatively simple, geometric structures. Neatly sanded and primed. Added a few doors and hatches to make the monotonous surface more interesting. However, I am entering into an area of historically unprovable assumptions. Only the pictures of the museum ship show the inner deck of the Mikasa. But that certainly doesn’t have much to do with the original ship. So I allow myself some artistic freedom here, such as the railing, which is only placed here for customization. It is not documented historically. But it made sense to me, as you could get to the platform at the chimney via the gallery. And a ladder should also be attached to the component, otherwise how would you get up to the front gallery!? And that’s how this came about. We continue with the first 32-foot rescue cutter. A dream detail. However, there is a small problem with the cradles. They are usually not in the places where they come onto the superstructure. That’s why you can see an unsightly gap between the cradle and the cutter, see arrow. Nothing that couldn’t be corrected with thin Styrene strips. Now the boat is lying neatly in its cradles again. And so the inner deck is slowly taking shape.
- 193 replies
-
- Russo-Japanese War
- Mikasa
-
(and 2 more)
Tagged with:
-
Wow, a beautiful little diorama. A really fantastic execution for a short side project. I have never ventured onto a water surface either. This is partly because I build very large ships and the corresponding dioramas would be very large and I only have limited space in my apartment. But with your contribution here I would have excellent instructions.
-
Thank you both for the kind words. Yes, I want to see that proper progress is being made on my craft table again.
- 193 replies
-
- Russo-Japanese War
- Mikasa
-
(and 2 more)
Tagged with:
-
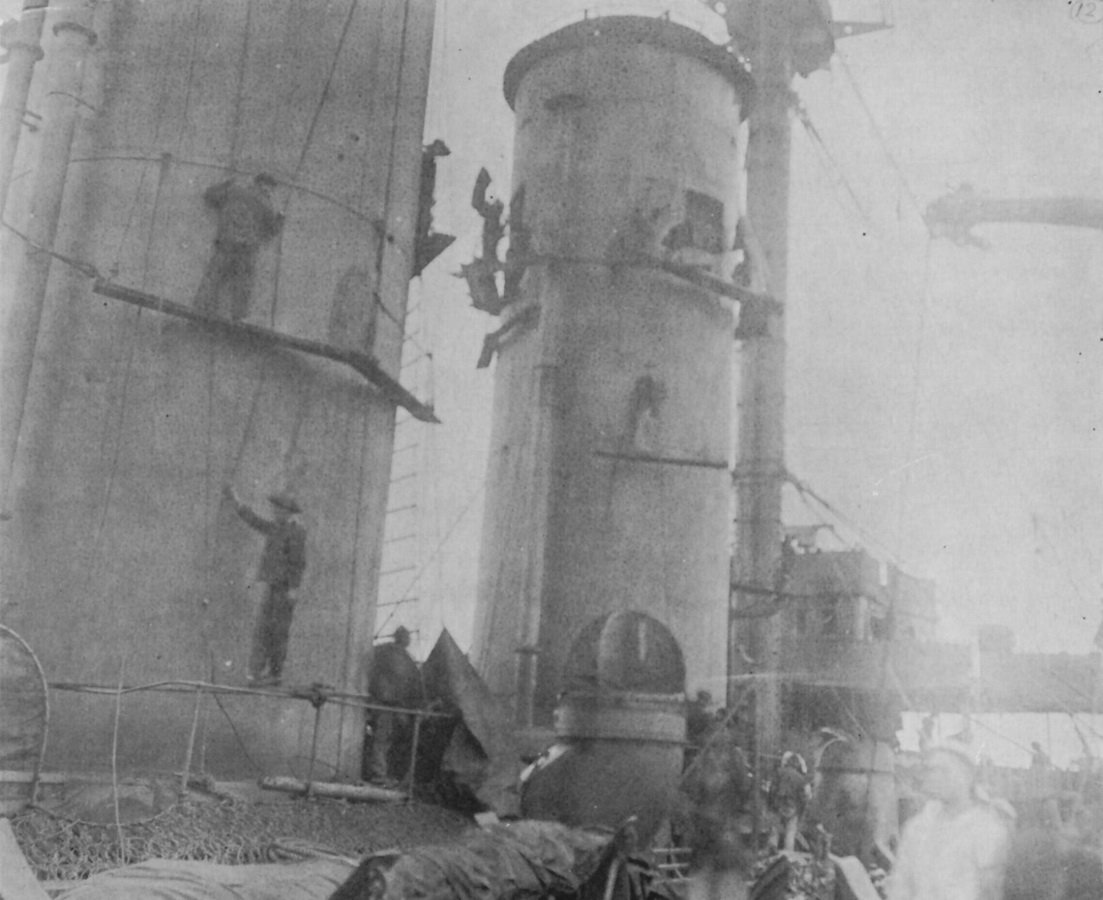
Ahoy dear model building community. I hereby report back to the craft table. My break had lasted a little longer than planned, but I had suffered a few personal blows this year. Three of my immediate family members have fallen ill with this terrible plague called cancer, including myself. I think it blows up every statistic. Three of them have now defeated it, only my mother unfortunately died from it three weeks ago. Nevertheless, everyday life is returning to my life and that’s a good thing. Even though I’m still grieving for my mother, I’m going to start doing my hobby again. I think it will comfort and distract me a little. And so my Mikasa appeared on my workbench again. First start with something small to warm up again. The barbettes were still missing splinter protection. Then I soldered the internal parts of the fans. In 1905, not all of the fan scoops were there anymore and that’s how you saw them. But I don’t know why they were removed. I researched the orientation of these internal parts as they were attached differently on different models and finally found this picture online where they are parallel to the direction of travel. And that’s how I installed them on the deck during the first superstructures. So a small start has been made and I think that I will now regularly report to you about my construction progress. So, read again…
- 193 replies
-
- Russo-Japanese War
- Mikasa
-
(and 2 more)
Tagged with:
-
Thank you for the comforting and encouraging words. This is truly a difficult time for me and my wife. But we look to the future with confidence because the therapy is having an effect and the prognosis is now very good. It is true that model building can certainly be an outlet to relieve mental pressure and I could imagine using it again soon. But that only works because the worst is probably already behind us. I would like to thank my wife again for her kind wishes for her recovery. She says she could use any encouragement.
- 193 replies
-
- Russo-Japanese War
- Mikasa
-
(and 2 more)
Tagged with:
-
Ahoy dear model building friends. There isn’t much new to report, but I wanted to get in touch again. Some people know that my wife is very sick and is currently receiving chemotherapy. I very rarely have a free head to do crafts. I would probably ruin more than move forward. But what I have done is prepare the final stand. This is easier to adjust if there is nothing on deck yet. I no longer liked the Pontos holder because it holds the ship very high. I prefer it this flat. In addition, the dry dock was expanded to include a slightly higher sheet pile wall. The cannons that look out of the casemates above cannot get their barrels later because they are one with the cannon body. And that’s why they have to be protected separately from my scatterbrainedness.
- 193 replies
-
- Russo-Japanese War
- Mikasa
-
(and 2 more)
Tagged with:
-
1/200 Trumpeter IJN YAMATO - issued by MRC/Gallery Models
madtatt replied to yvesvidal's topic in REVIEWS: Model kits
No Olaf and that will take quite a long time since I've only just started with my Mikasa.- 104 replies
-
- MRC/Gallery
- Yamato
-
(and 1 more)
Tagged with:
-
Sorry Chris and already done. It probably happened to me because I post in German and English forums. And thanks for the compliment, Mike.
- 193 replies
-
- Russo-Japanese War
- Mikasa
-
(and 2 more)
Tagged with:
-
Ahoy dear model building friends. Thank you Jeff. With my approach to the model, painting it actually takes a lot of time. I'll save myself this time if I filter out lots of tips and solutions in your construction report. 😉 I don't have much time to build models at the moment, but progress is still going slowly. I have finished aging the hull for now and turned a new ship into an old veteran. I particularly aged the anchor hawse and the area below the anchor berths, as a lot of dirt is likely to accumulate here. And port side. The chipping is also strongest here, as the anchors are likely to leave clear marks. Amidships I aged more subtly. And a little more at the rear. The painting of the fuselage only continues when the missing parts are attached to the outside, i.e. pretty much at the end. The wooden deck was also glazed and applied. Now I can start equipping the deck, which I’m looking forward to.
- 193 replies
-
- Russo-Japanese War
- Mikasa
-
(and 2 more)
Tagged with:
-
Hello dear model building friends, I’m a little further along. The first round of aging is complete. There are three filters on the underwater hull. On the gray two. Also a first washing. Above and below. I’m quite happy with it.
- 193 replies
-
- Russo-Japanese War
- Mikasa
-
(and 2 more)
Tagged with:
-
Oh, there was already some information from you that helped me with my model. Of course, it is always much easier and requires less research when you can use such a detailed report. Funnily enough, it was user CDW's model that brought me to the Mikasa. And don't worry, I'm not a fan of quick construction, I worked on my Battleship Bismarck for almost two and a half years. So thank you again for sharing this report with us.
-
A fantastic diorama for an impressive model. The prizes are well deserved. I hope that my Mikasa comes close to the quality of yours.
-
At the moment my progress is very slow because I have to take care of my sick wife. But I’ve already started aging. As always, very tedious. But the result that a little diluted dark gray paint leaves on a painted surface still amazes and fascinates me. Even after all the years I’ve been doing this. A little every day and I’ll report back when it’s done.
- 193 replies
-
- Russo-Japanese War
- Mikasa
-
(and 2 more)
Tagged with:
-
I finished all the rough work on the fuselage and was finally able to finish painting it. After a proper preshading the whole thing now looks like this. What followed was an accentuation. Which means nothing other than that I painted fine details in a lighter gray. Which was a real fiddly job. The dry decals from Pontos are really impressive. The depth marks are razor sharp. Here too, water-soluble acrylic paints have a big advantage. Small slips can be removed immediately with water without leaving any residue. This gives a decent contrast to the preshading areas. Now i can start aging.
- 193 replies
-
- Russo-Japanese War
- Mikasa
-
(and 2 more)
Tagged with:
-
Ahoy dear model building community. Due to my wife’s illness, I’m making slow progress at the moment. But it’s nice that you can distract yourself a little by doing crafts. And so I put my ship on its side again. It was time for the final details to be added before painting. For me there are always very few. Most of it is only processed towards the end. This includes the grilles in front of the bow and stern cannons and of course the crampons. I don’t use the crampons on the etched part boards. I don’t like these one hundred percent because they are of course flat. So I prefer to take thin wire and bend it to size. In addition, crampons of different thicknesses were probably installed on the Mikasa. Documented here in two old photo clippings. The arrows point to the two types of crampons. You can really see that two different diameters were used. The crampons for climbing the torpedo net racks were much thicker. And I want to represent this using 0.2 or 0.3 mm thick wire. I initially had 0.1mm wire in mind, but that wasn’t practical because it was too unstable. ( 0,2mm is 0,007 inch and 0,3mm is 0,01 inch) And this is how it turns out after checking the primer. I like it quite a bit. A few small irregularities can still be seen and will be removed with fine 1000 grit sandpaper after it has dried. But I think you can guess that the different strength crampons are like the original.
- 193 replies
-
- Russo-Japanese War
- Mikasa
-
(and 2 more)
Tagged with:
-
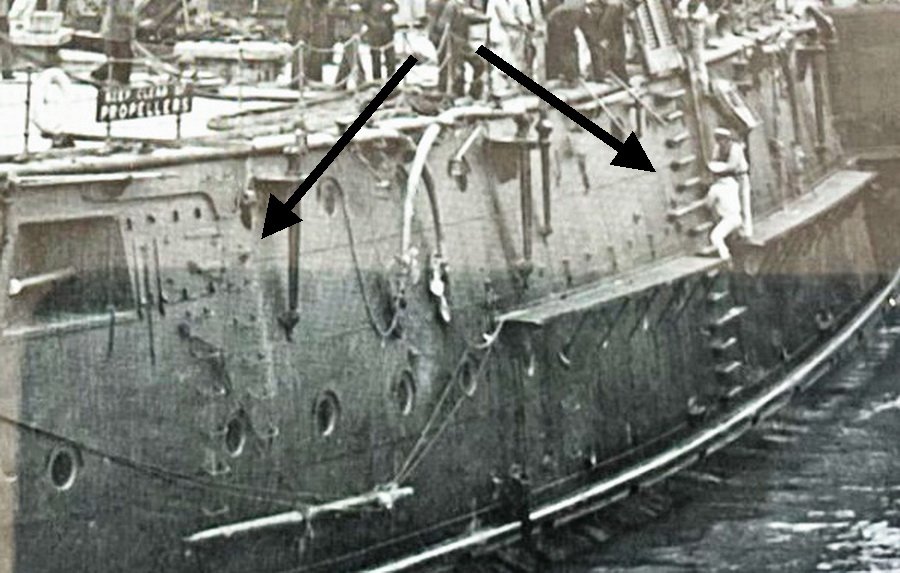
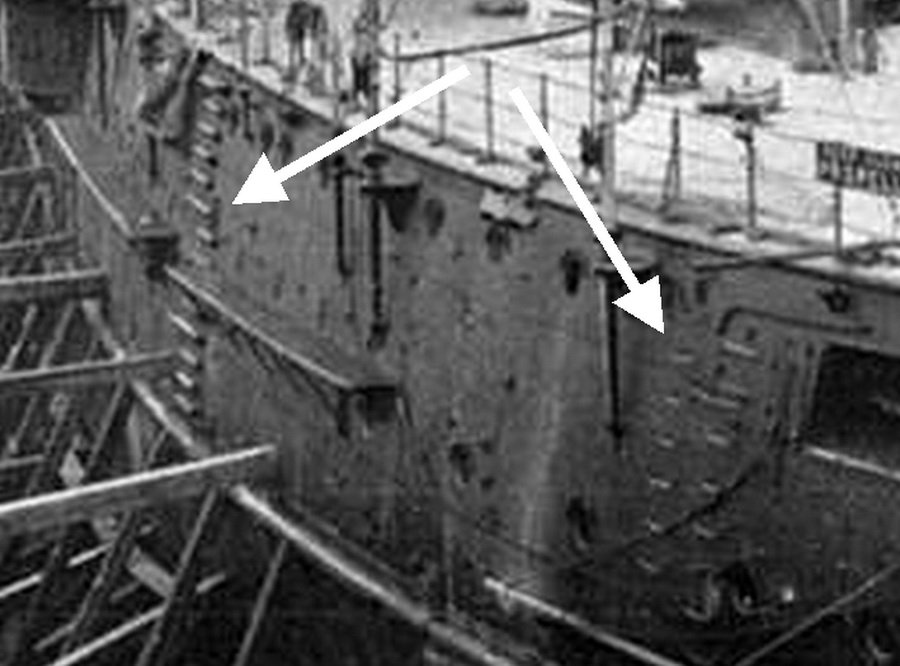
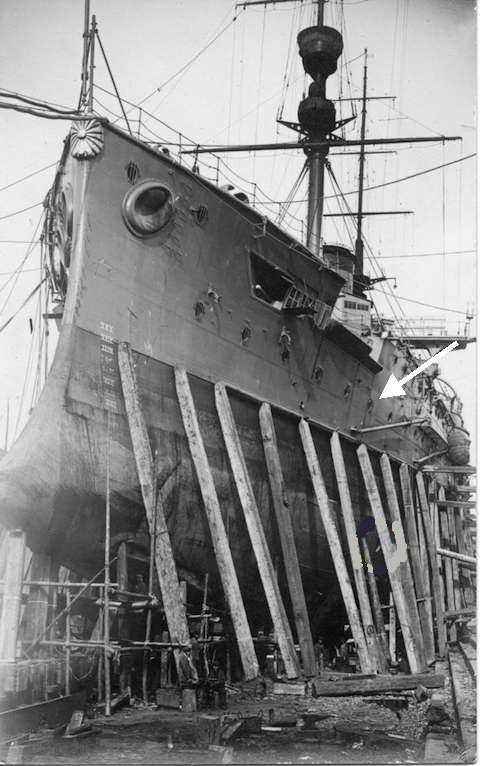
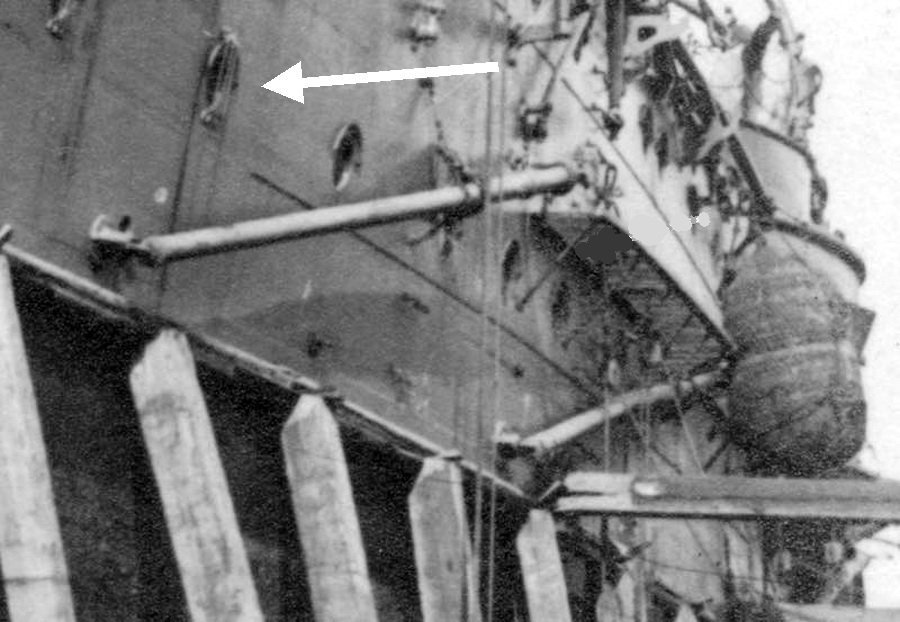
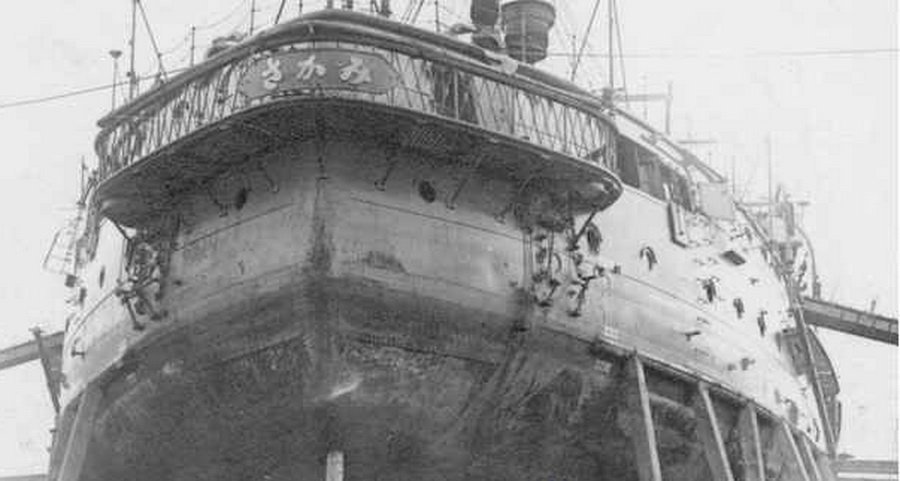
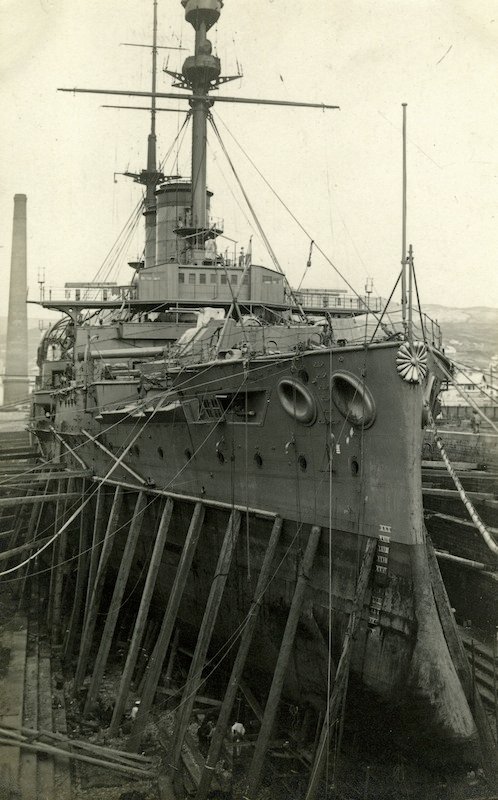
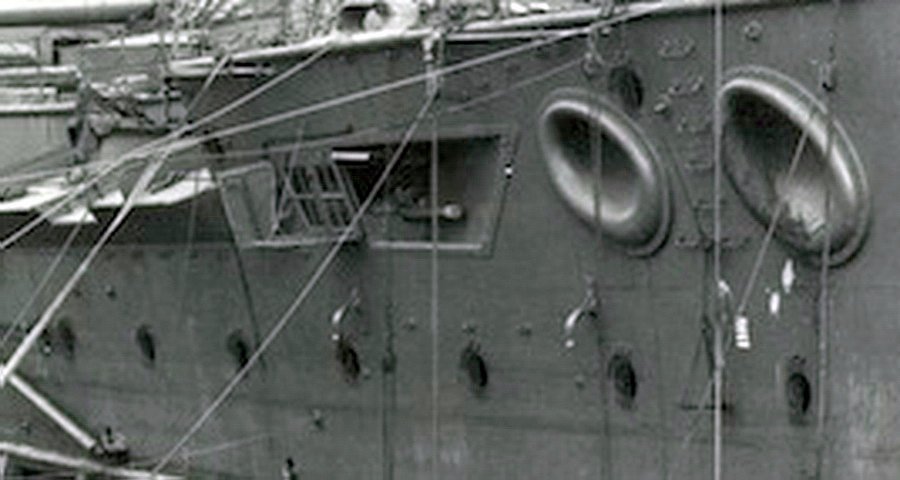
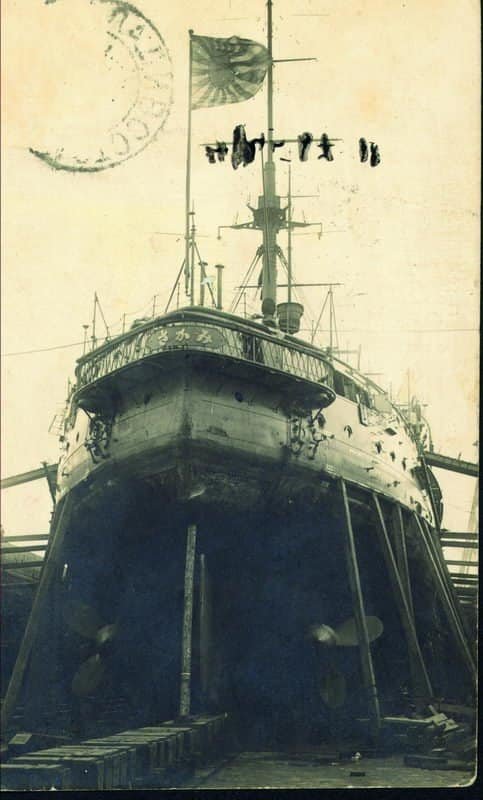
Ahoy everyone. One of the reasons why I bother to publish my construction reports in forums is the subsequent exchange of ideas. Construction phases should be questioned from time to time, this stimulates research and thus increases the historical correctness of the models. In another forum the question arose about the purpose of the barred portholes. That didn’t give me peace of mind. The grid would only have had a right to exist at the height of the anchors. On this ship, the anchors were pulled back on board with the davits and an anchor could have hit the hull or the porthole. In addition, the anchor chains ran past the portholes. So I looked at everything I had in detail again. The fact is that during active service, here in 1921, the front portholes were barred. You can see this in the following and best quality picture of the ship that I have. It was taken in Vladivostok in 1921. Here the section is enlarged. So there were bars, but you can’t really tell whether all the lower portholes on the bow were barred. Then this picture of the stern, also taken in Vladivostok in 1921. So quite late in their active service. She was in this dry dock for repairs. Here the enlarged and brightened section shows that there were definitely no grilles in front of the portholes at the rear. So the question arises as to where this protective measure went. The anchor area would be logical. I found the solution in the following picture. The white arrow points to the same porthole in both photos. You can clearly see here that the portholes were protected with grilles right up to the anchor storage areas. So get it down again. Good thing I don’t use superglue. So no act. Again, sanded clean and everything from the beginning. And replaced everything at the rear. Thank God Pontos isn’t stingy with his portholes. There are more than enough of them. Completed.
- 193 replies
-
- Russo-Japanese War
- Mikasa
-
(and 2 more)
Tagged with:
-
Thank you, both of you. And now a little mini update. The portholes are closed on the port side. At the bow. I noticed another error in the model amidships. Three more portholes were missing from the upper row of casemates. They cannot be seen in the pictures from back then. Most of the images of the ship are of poor quality and taken from a great distance. There are only some in a decent resolution very close up from the front. But of course you can’t see the casemates from the side. But on the museum ship. And since I can’t imagine that they were added later, I adopted them. And the portholes at the stern.
- 193 replies
-
- Russo-Japanese War
- Mikasa
-
(and 2 more)
Tagged with:
-
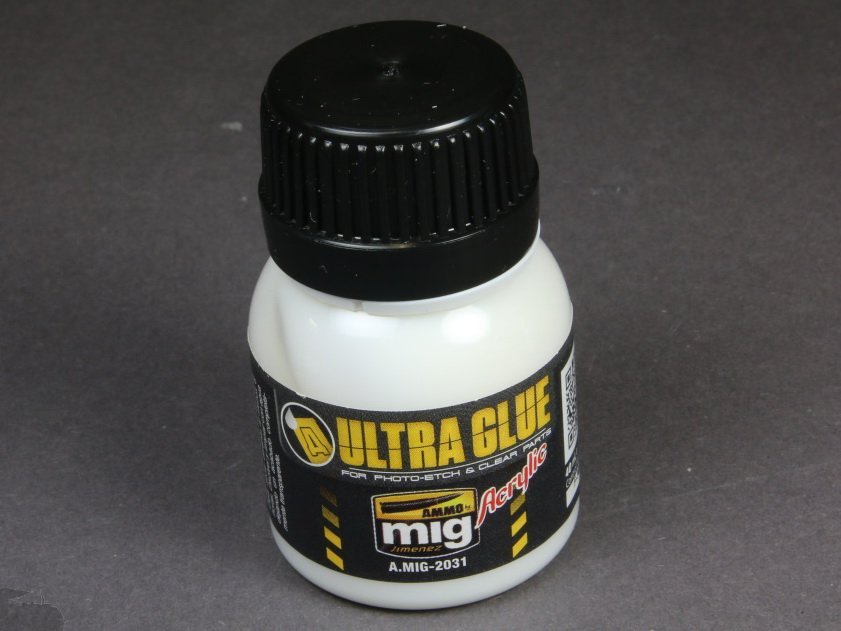
Off to the dry dock with the Mikasa. There’s enough space in here on the port and starboard sides to protect the ship while you’re tinkering without it becoming too big and unwieldy.. This means it can be safely laid on its side, for example to work on the portholes. I can also attach sheet pile walls of different heights to further increase the protection at the top. Let’s attach the first large etched parts. The anchor supports… …and the doors at the rear. The ship also had electrical cables all around the back. What purpose they had, however, is unknown to me. It will not have been demagnetizing cables. In another forum a user asked me how I work with acrylic etched part glue. I would like to show this using the rain deflectors of the portholes as an example. We need an old brush, some paper towel, a little water and the glue. I dilute this until it has about the consistency of buttermilk. Then I draw a guide line with adhesive tape to attach the etched parts neatly and straight. Now I put a ring of glue around the porthole. Then in with the etched part. The big advantage is that you have a very long time to properly align the component. Completely in contrast to superglue. After I have aligned it, I pick up the excess glue again with the brush that has been cleaned in water and dried on the paper towel. I can easily remove any edges of the glue with a dampened brush. This is also not possible with superglue. The slight shine of the dried glue can no longer be seen after painting. And so you get rain deflectors on the portholes like a string of pearls, which are also glued on extremely neatly.
- 193 replies
-
- Russo-Japanese War
- Mikasa
-
(and 2 more)
Tagged with:
-
The holes for the crampons were still missing on the upper casemates. I repeat myself, but this is one of Ponto’s great strengths. The drilling templates! Simply fix it with an adhesive strip and off you go… Next I checked the wooden deck amidships. It had to be trimmed a bit to get it to fit properly. Because of the slightly different approach, I have little leeway when installing the parts. But done satisfactorily. So I was able to add the next floor. Additional parts placed on top to check whether everything is in the correct position. Everything fits perfectly. Here are the pictures to show why I go to this length. The slits in the four round casemates would still be manageable. But this one isn’t very nice. I think this is better. After sanding three times… …and prime, I am very satisfied. And I especially like this one a lot better now. The extra two days of effort were worth it.
- 193 replies
-
- Russo-Japanese War
- Mikasa
-
(and 2 more)
Tagged with:
-
Next I went to the ship’s rudder. I had actually lost sight of that a bit. Never mind, styrene attached and painted red. Then to the upper casemates. Unnecessary holes closed again. Sanded and found to be good. So the etched parts battle could finally begin. The MK1 set has already scored its first points. Shortly before I had sanded away the rather rough details, I thought about taking a quick photo of them. Pontus had not planned anything here. Incomprehensible, even if you can hardly see it on the finished model. So, one to zero for KA Models. Still processing the remaining doors… Then the first superstructures can go on the deck. I will probably lay more electrical cables when my 0.1mm wire arrives.
- 193 replies
-
- Russo-Japanese War
- Mikasa
-
(and 2 more)
Tagged with:
About us
Modelshipworld - Advancing Ship Modeling through Research
SSL Secured
Your security is important for us so this Website is SSL-Secured
NRG Mailing Address
Nautical Research Guild
237 South Lincoln Street
Westmont IL, 60559-1917
Model Ship World ® and the MSW logo are Registered Trademarks, and belong to the Nautical Research Guild (United States Patent and Trademark Office: No. 6,929,264 & No. 6,929,274, registered Dec. 20, 2022)
Helpful Links
About the NRG
If you enjoy building ship models that are historically accurate as well as beautiful, then The Nautical Research Guild (NRG) is just right for you.
The Guild is a non-profit educational organization whose mission is to “Advance Ship Modeling Through Research”. We provide support to our members in their efforts to raise the quality of their model ships.
The Nautical Research Guild has published our world-renowned quarterly magazine, The Nautical Research Journal, since 1955. The pages of the Journal are full of articles by accomplished ship modelers who show you how they create those exquisite details on their models, and by maritime historians who show you the correct details to build. The Journal is available in both print and digital editions. Go to the NRG web site (www.thenrg.org) to download a complimentary digital copy of the Journal. The NRG also publishes plan sets, books and compilations of back issues of the Journal and the former Ships in Scale and Model Ship Builder magazines.


