HOLIDAY DONATION DRIVE - SUPPORT MSW - DO YOUR PART TO KEEP THIS GREAT FORUM GOING! (Only 72 donations so far out of 49,000 members - Can we at least get 100? C'mon guys!)
×


Pitan
-
Posts
170 -
Joined
-
Last visited
Content Type
Profiles
Forums
Gallery
Events
Everything posted by Pitan
-
Interesting, never heard that one before ... think I'd make a small change, Stable. Same expantion, but not so black.
-
Sorry for the slow reply, Paddy, but I did pretty much as @ECK suggests. The glue applied there was mean (thin), and I probably missed a few bulkheads. If I recall correctly, I did pre-bend the bulwarks to reduce the stresses later in the build.
-
Thanks Ah, from the throat - OK, that answers my question
-
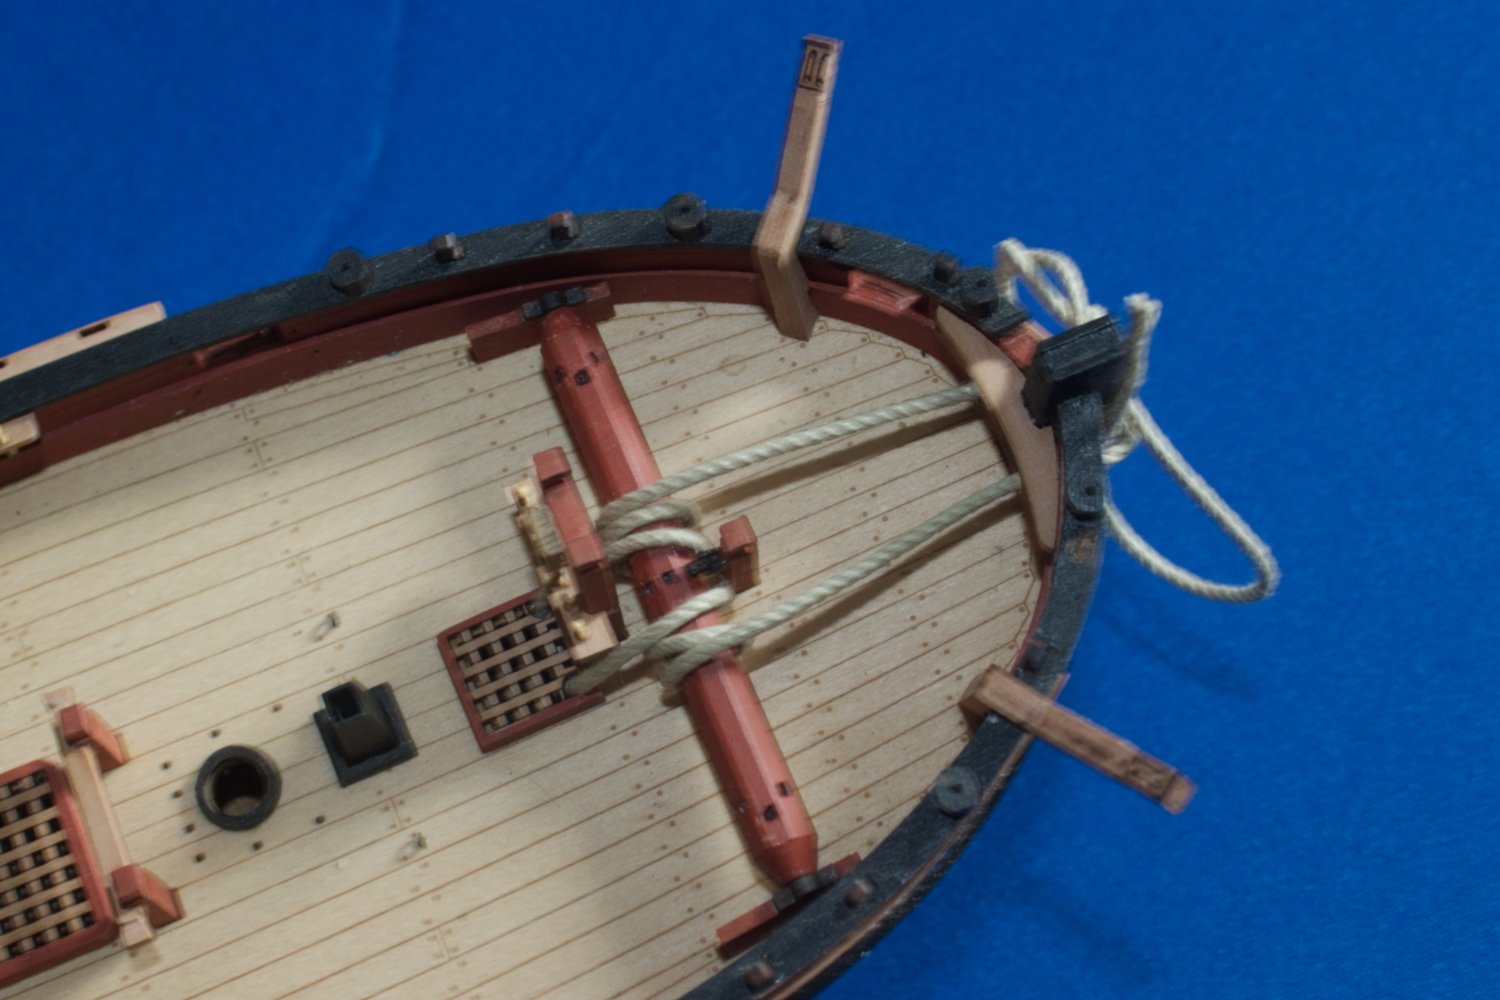
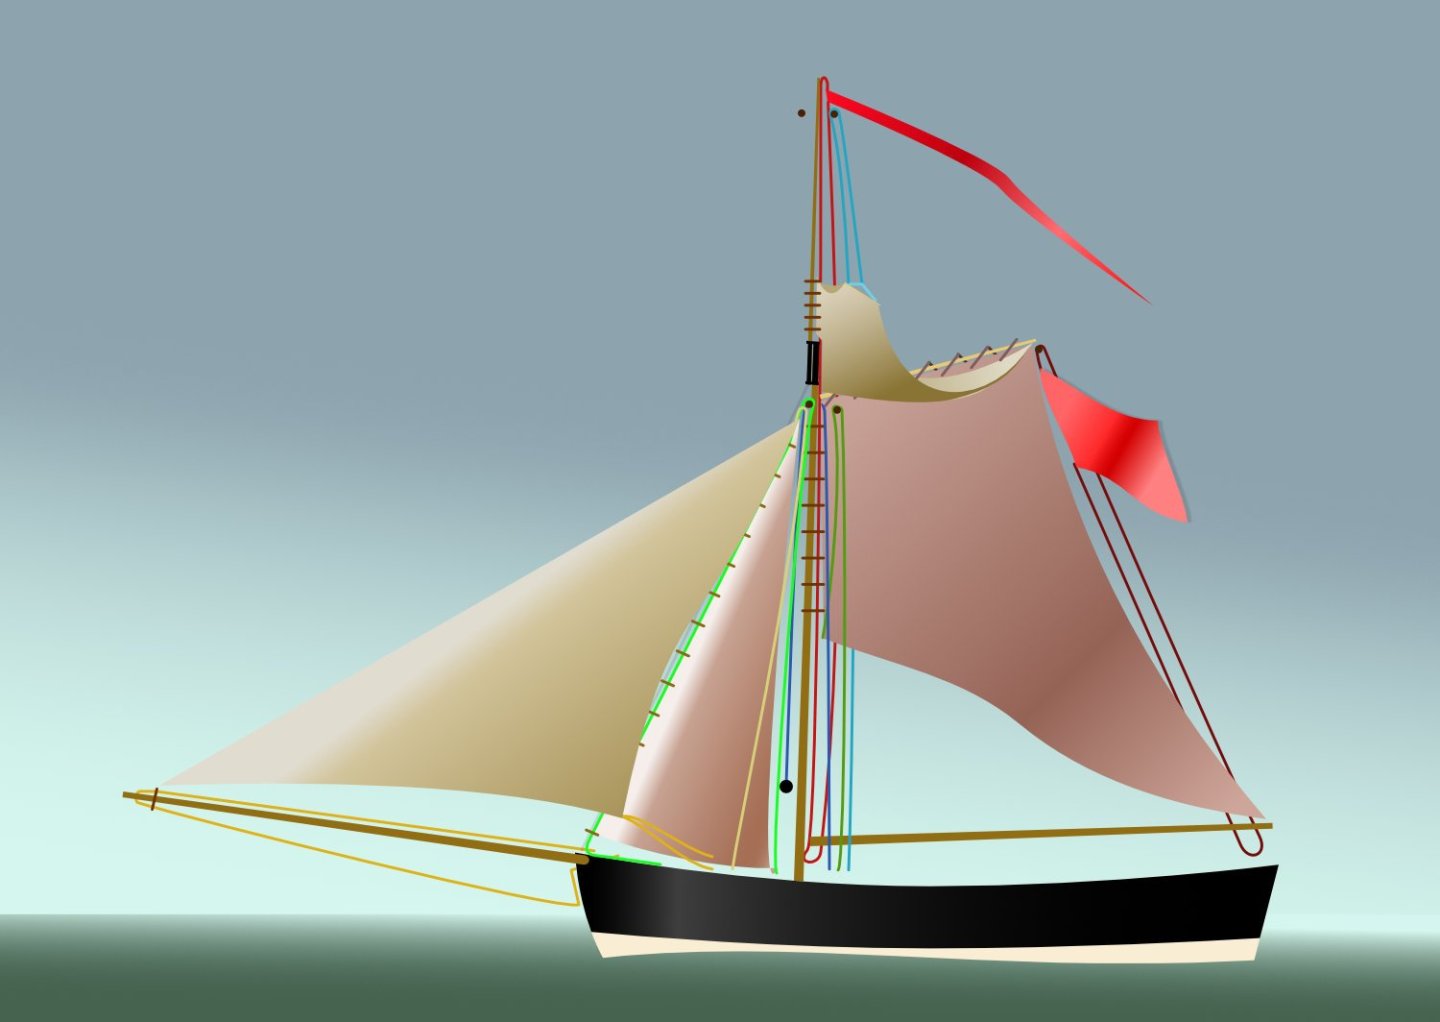
Looking at a picture of HM Revenue Cutter Wickham, the lower fore corner (tack?) of the vessel's gaff sail is raised. Link: https://artuk.org/discover/artworks/hms-revenue-cutter-wickham-164013 This raised corner appears in other images by the same artist (Robert Salmon, e.g. "The Scottish Lighthouse Board's tender" https://www.invaluable.com/auction-lot/robert-salmon-british-1775-1845-the-scottish-ligh-91-c-92142e49ab) Questions: How was the tack raised? Was there a block for an up-haul, and if so, where was it attached? Maybe to the mast, or to the gaff? Would there have been a down-haul?
-
Thank-you, she is elegant.
-
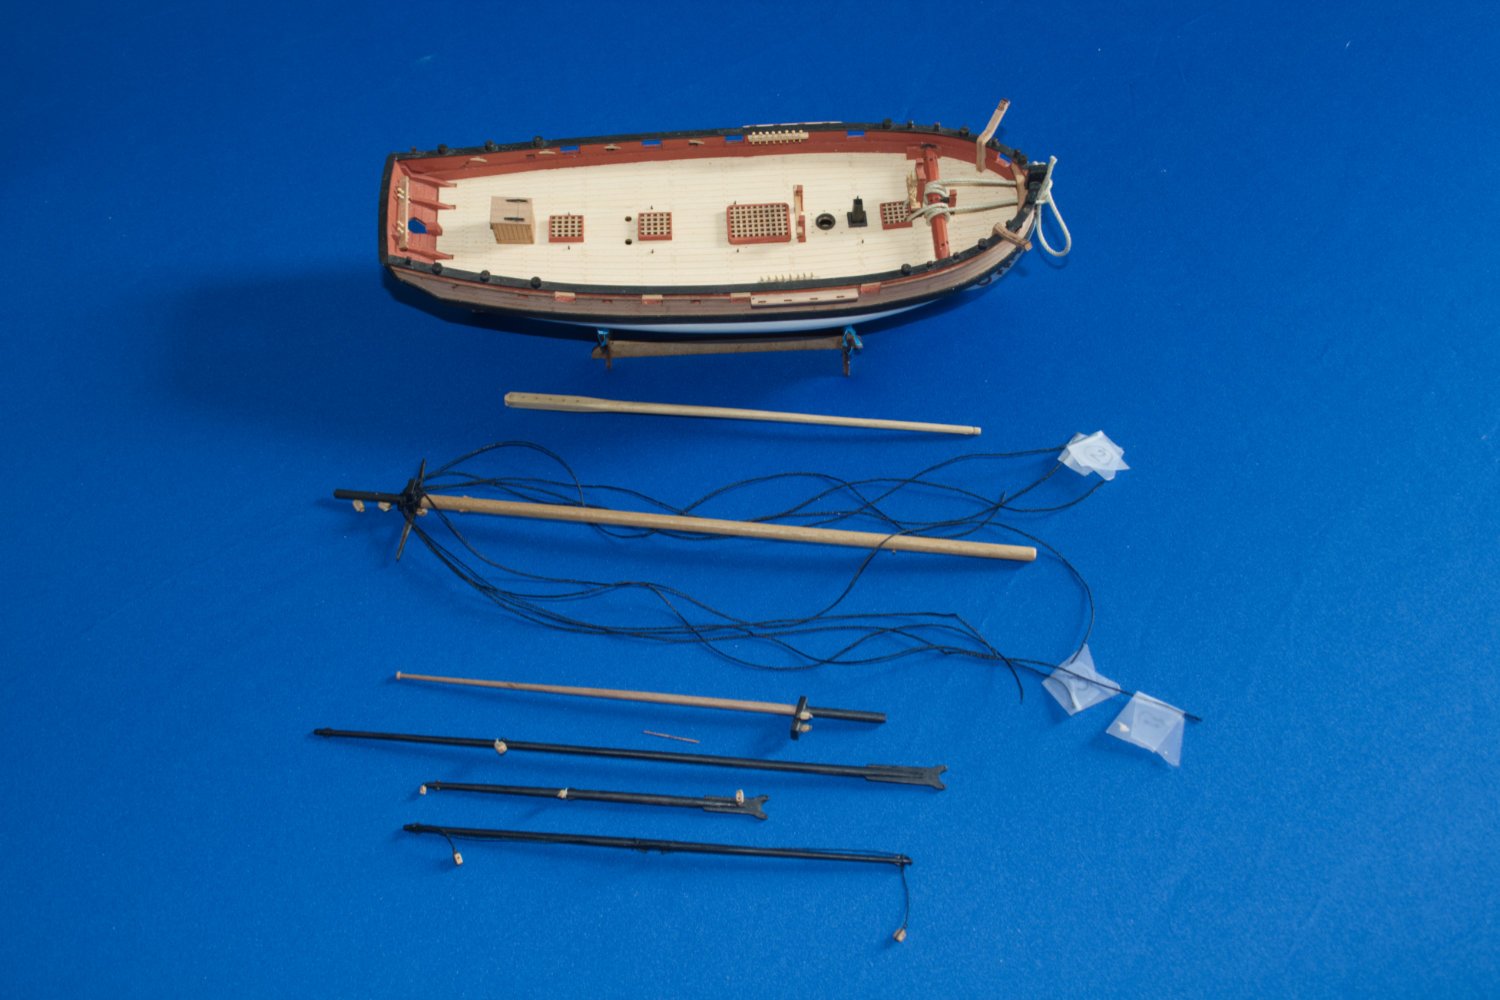
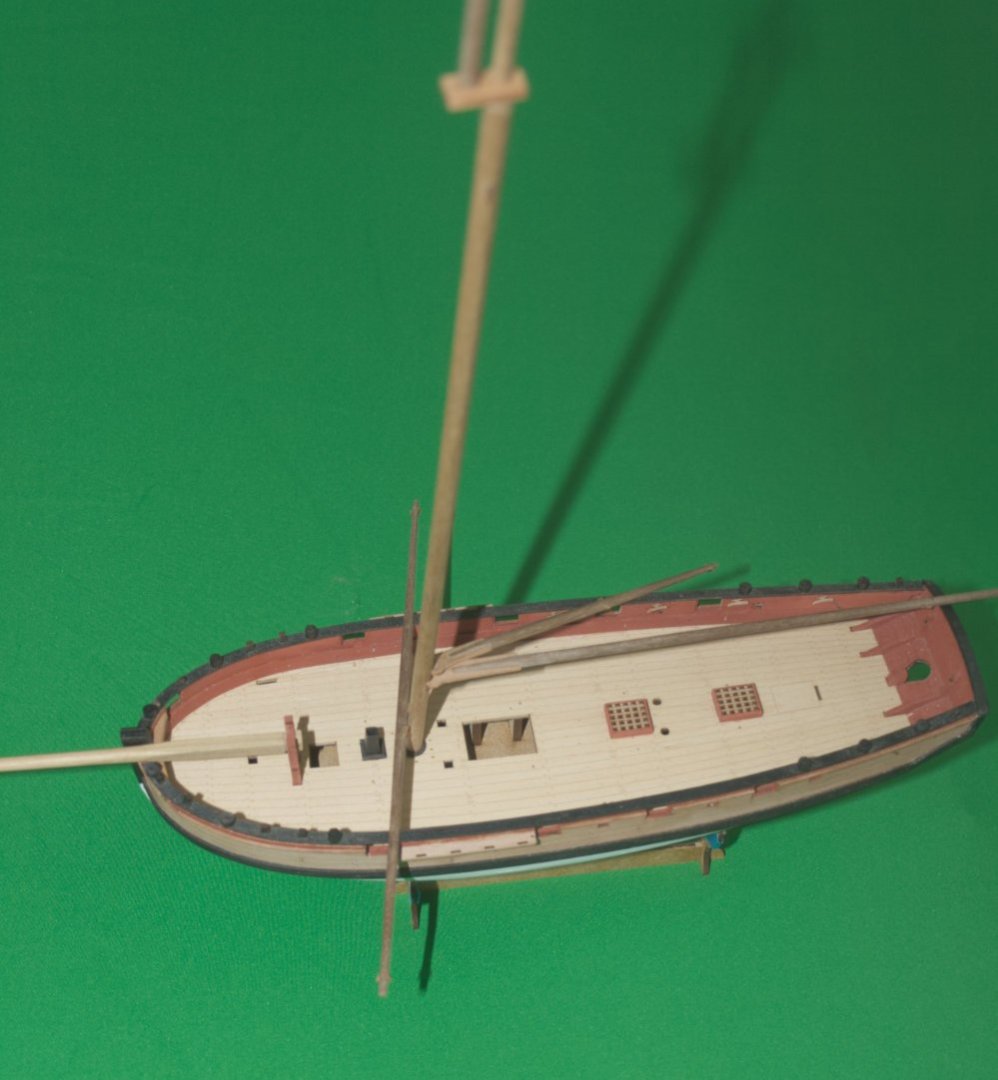
Been a while since I posted an update here. Masts and spars have been painted, and now have blocks attached, ready for mounting. I've made a few adaptations: Rather than use the supplied etched belaying pins, turned brass ones have been used The windlass was supplied now has sockets for levers (bars/spokes?).


-
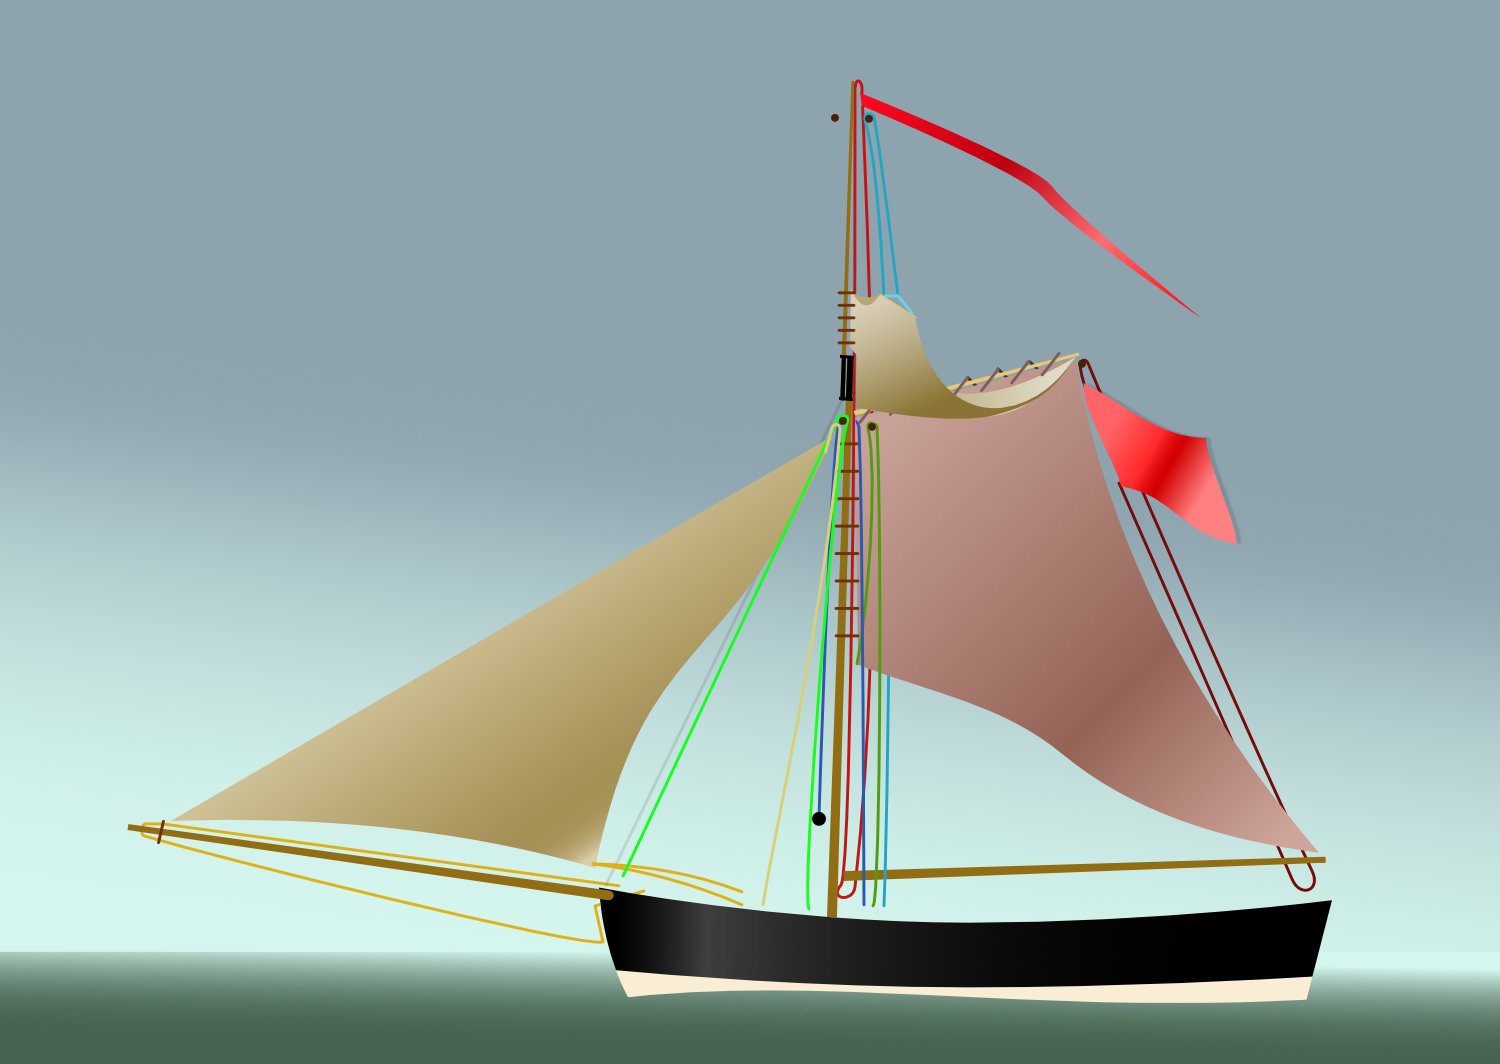
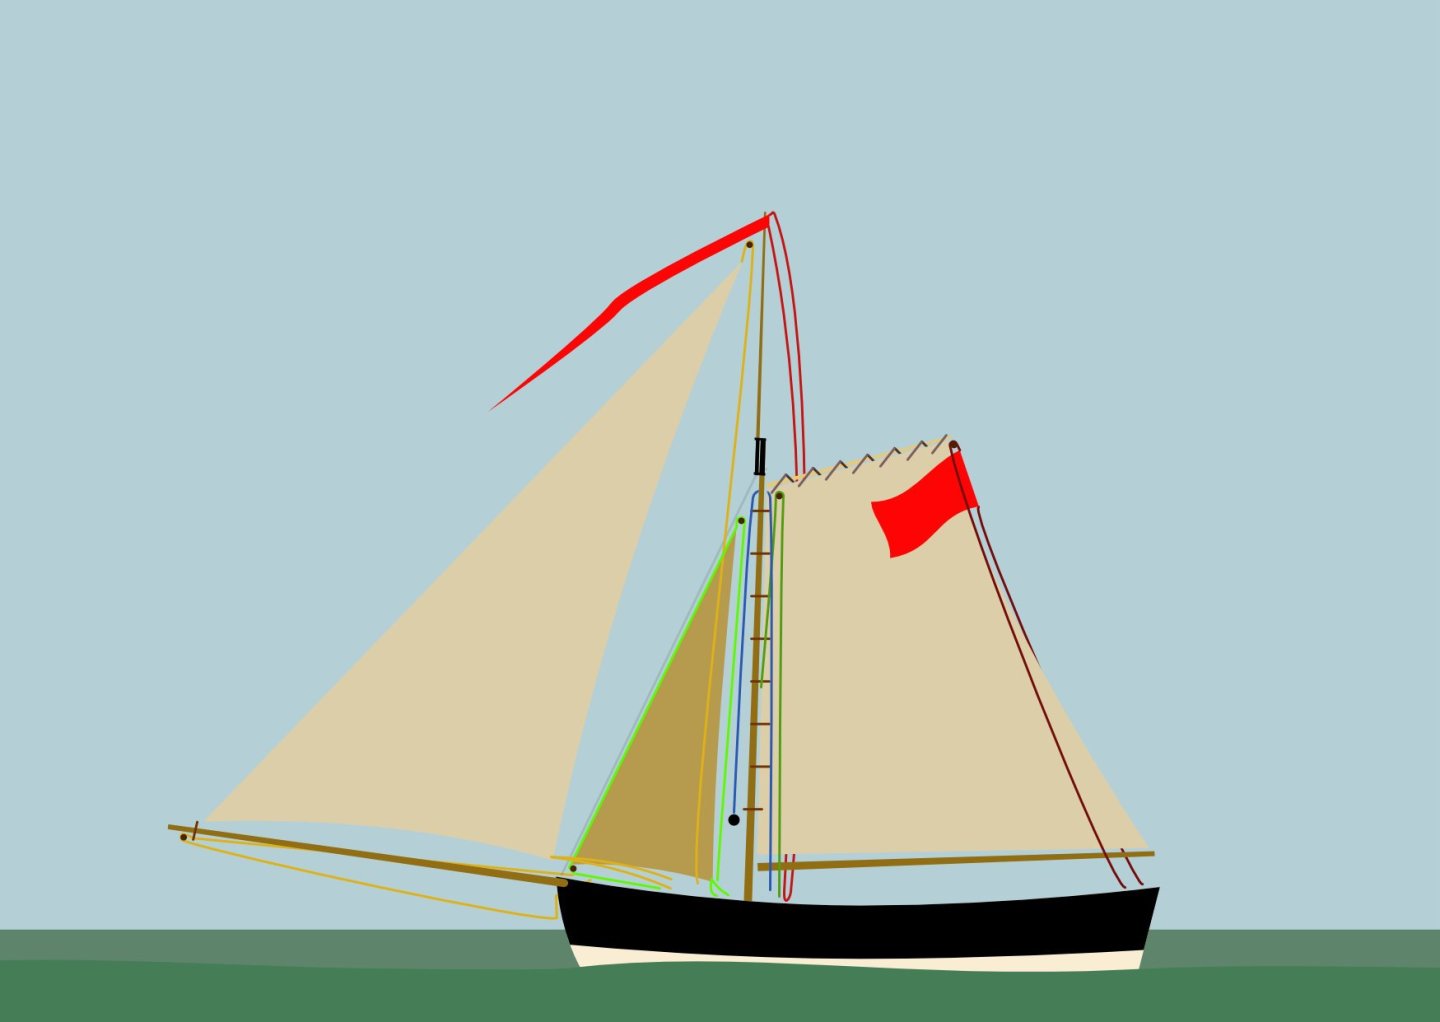
Back to Sherbourne, the masts and spars have been shaped. In the kit, Chris gives a choice of bowsprit bits, one with a round hole, and another with a square opening. I decided to use the square, and made the bowsprit from 5mm square walnut (the supplied dowel is 5mm walnut). There is a short tenon to allow me to fit the bowsprit into the bit's hole (4mm square). Lacking a lathe, I'm more comfortable making tapered masts and spars from square section wood than the round dowels supplied. As far as I recall, the only kit supplied dowel I used was the lower mast (it has no taper, though the top is narrower), spars with a taper were made from square strip. Masts dry fitted Aside: of the three yards suggested in the kit, I've only made the lower one. This is because I want to add sails. Often, near contemporary paintings show just the one yard, quite low on the mast - maybe as low as 2 man heights (10-12 foot) above the deck, sometimes higher. For example, works by Robert Salmon: The Scottish Lighthouse Board's tender (https://www.invaluable.com/auction-lot/robert-salmon-british-1775-1845-the-scottish-ligh-91-c-92142e49ab); you may also find this called a Naval Cutter, but the ensign otherwise. HM Revenue Cutter Wickham (https://artuk.org/discover/artworks/hms-revenue-cutter-wickham-164013) Revised sail plan suggestions: Based on the Scottish Lighthouse Tender Based on HM Cutter Wickham


-
That's very nice ECK, and quickly built.
-
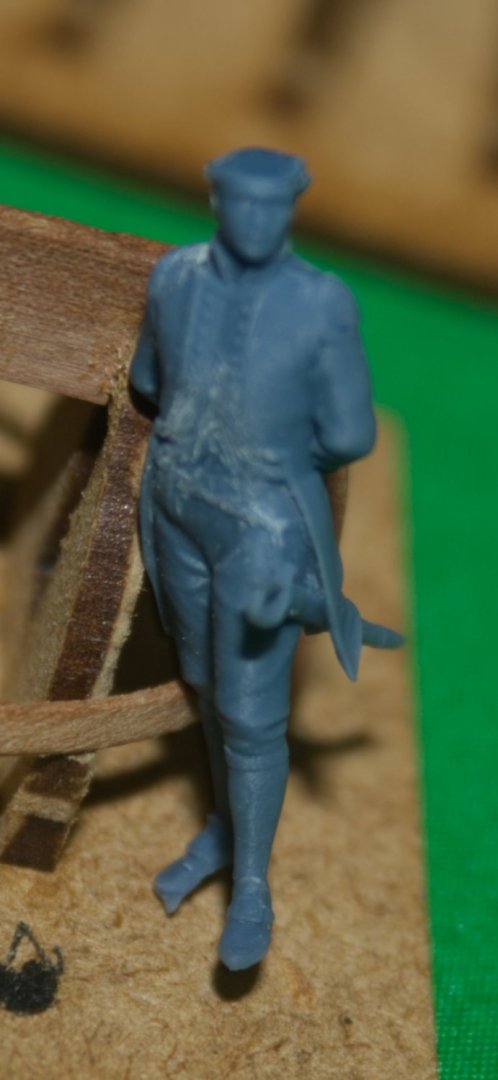
Agree, the coat tails look long for practical wear, especially on the standing figure. I'd question the standing figure's coat lacking a vent or split from the waist down; that may make sitting down difficult (though ladies skirts seem to work well enough). Digging around, I found this page of a (modern interpretation) of 19c uniforms of interest. At the bottom of the page are images of a dress coat (with lace) and an undress coat (no lace) flanking a modern copy http://www.goblinrevolution.org/costumes/navy/. Note, all three coats have horizontal pockets, missing on both the preview figures, together with a vent. This wiki page may also be of interest: https://en.wikipedia.org/wiki/Royal_Navy_ranks,_rates,_and_uniforms_of_the_18th_and_19th_centuries The portrait of Sir Edward Pellew at the top of the page shows pockets on his coat tails. If you scroll down the page, there is an illustration of 1795-1812 uniforms (https://en.wikipedia.org/wiki/Royal_Navy_ranks,_rates,_and_uniforms_of_the_18th_and_19th_centuries#1795–1812), with different ways of wearing epaulettes depending on rank; for example, commanders and captains with less than three years seniority wore only one epaulette, while lieutenants had none. Going back to the figures in this post; based on his cuffs, the standing figure would be either a mid-shipman or a lieutenant, and shouldn't wear epaulettes.
-
I know the instructions say to use CA, but I used Titebond PVA. This gives a little working time before gripping tight, and allows full length planks.
-
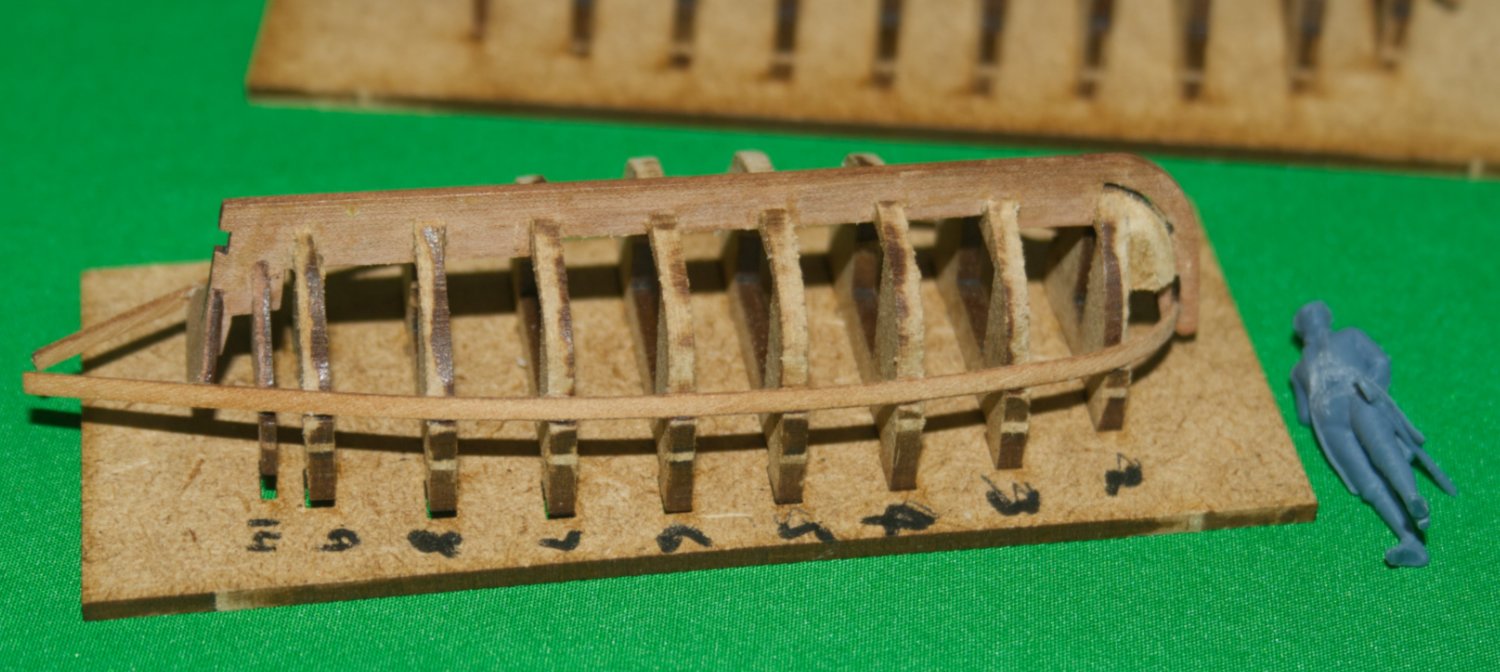
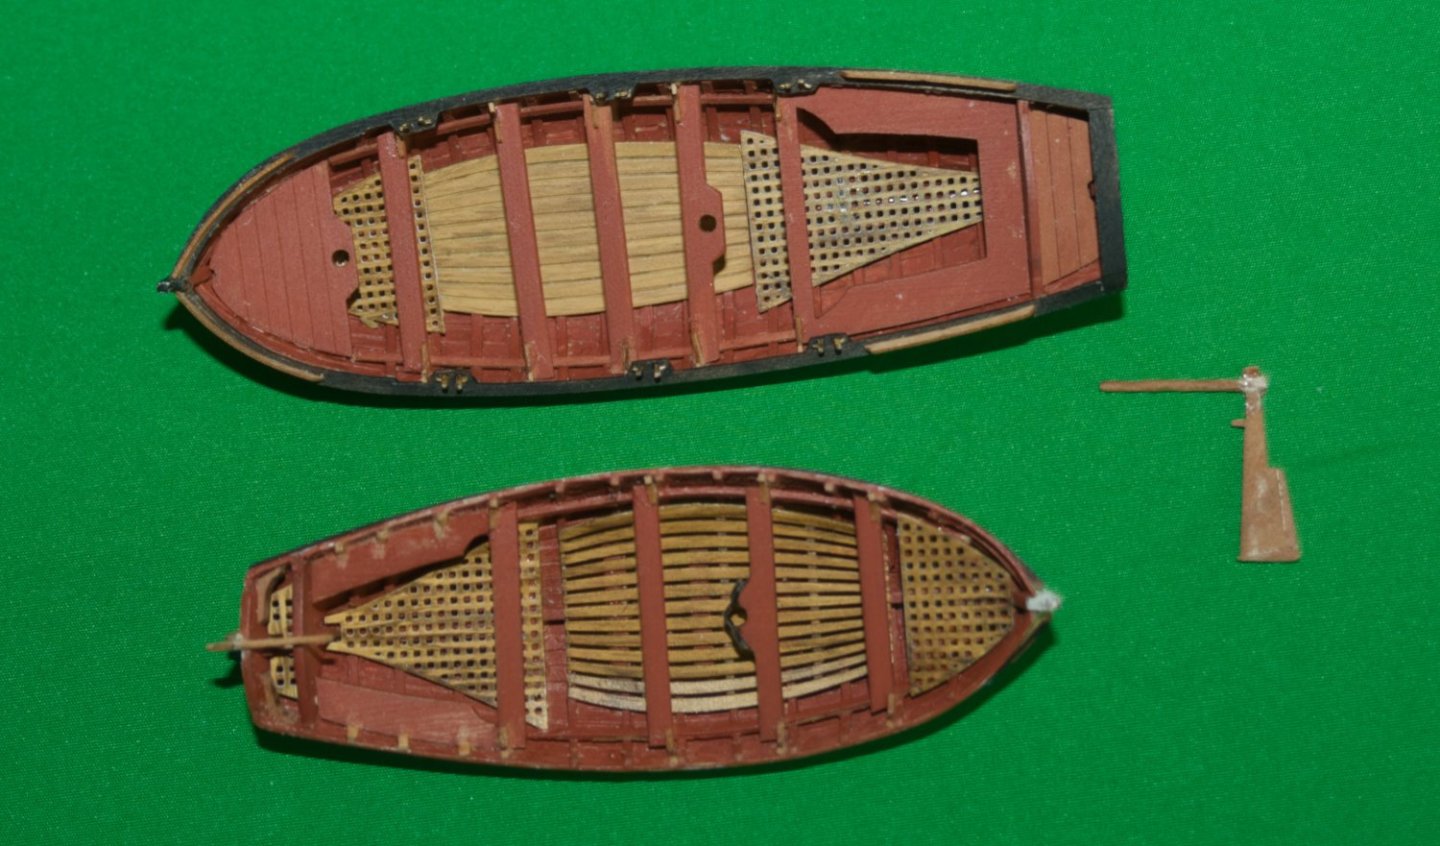
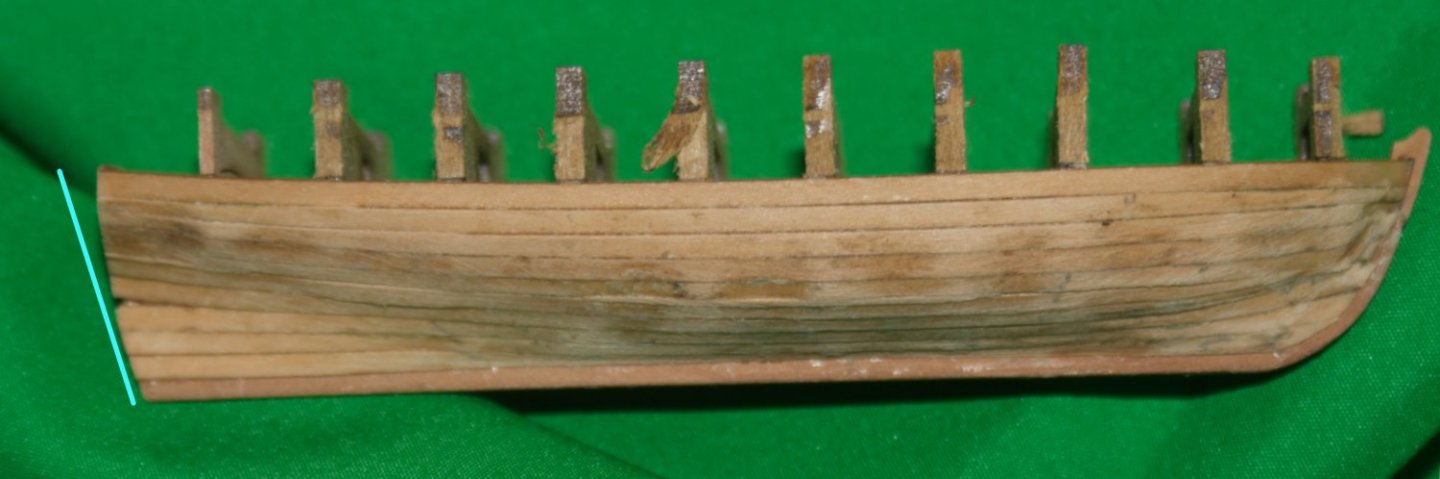
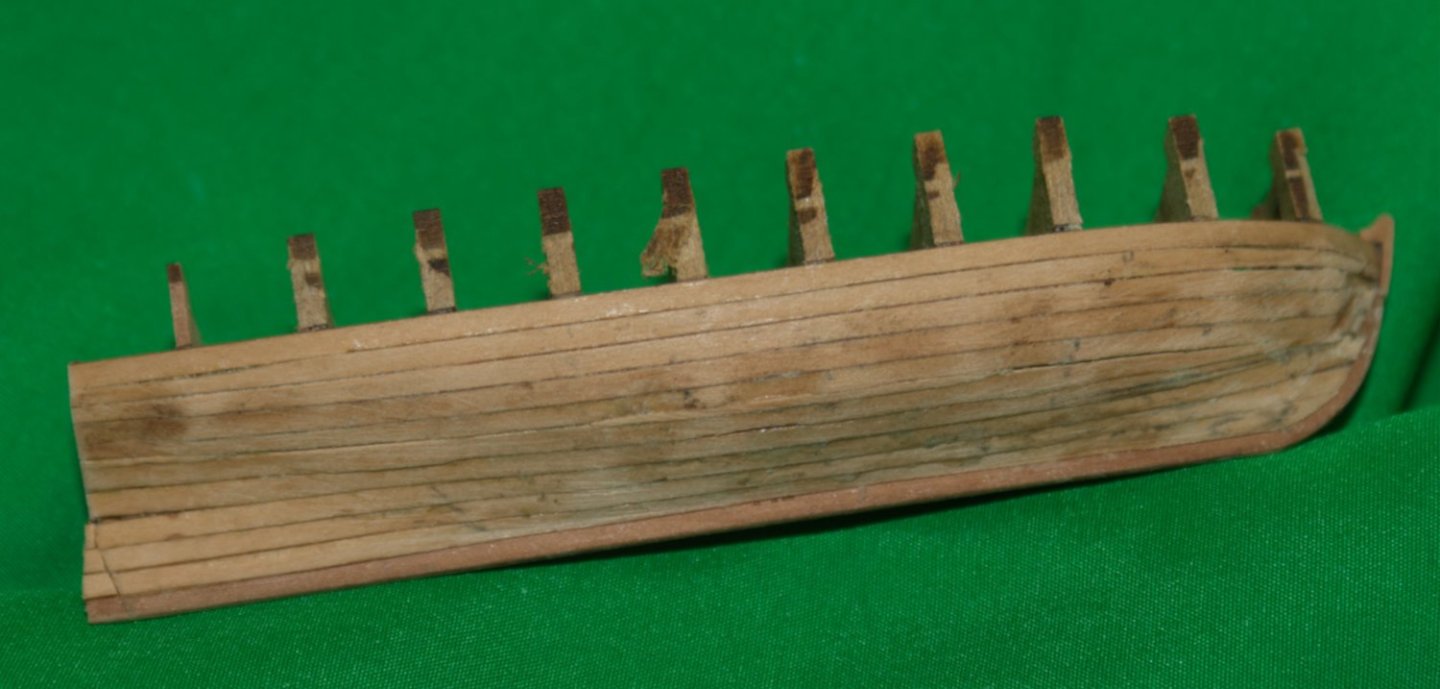
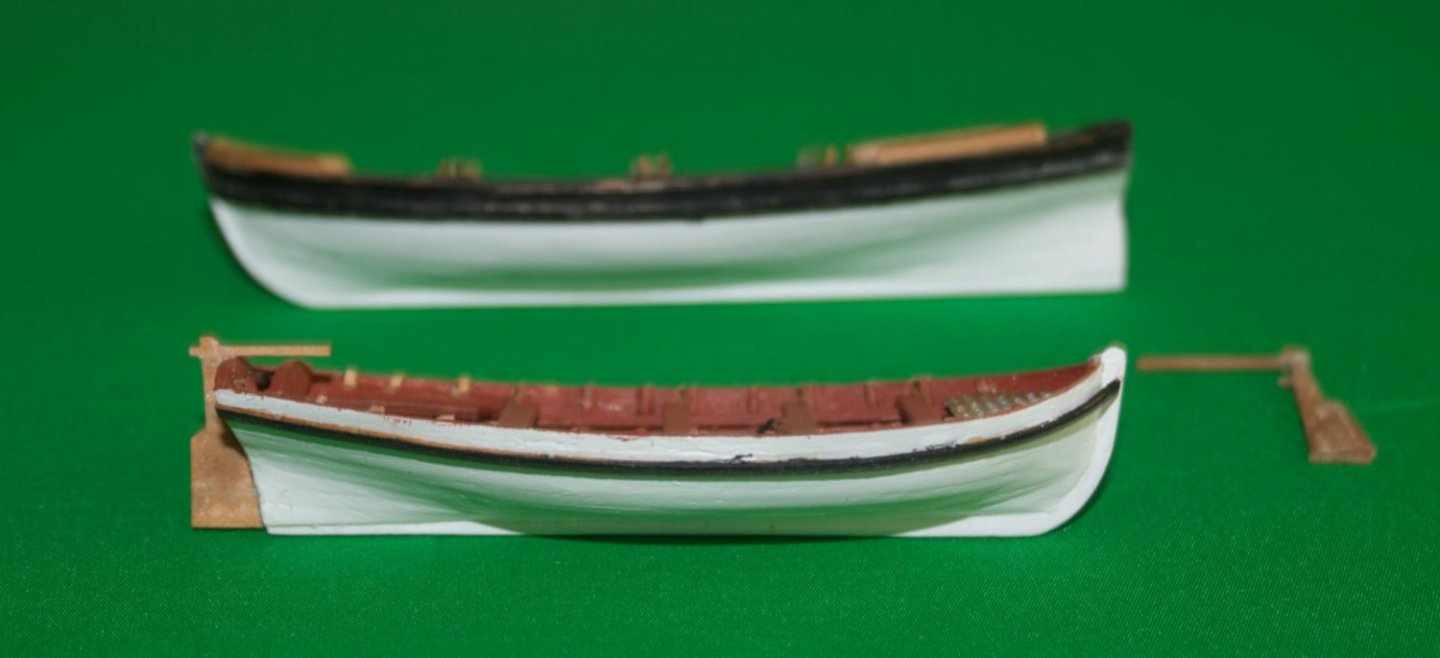
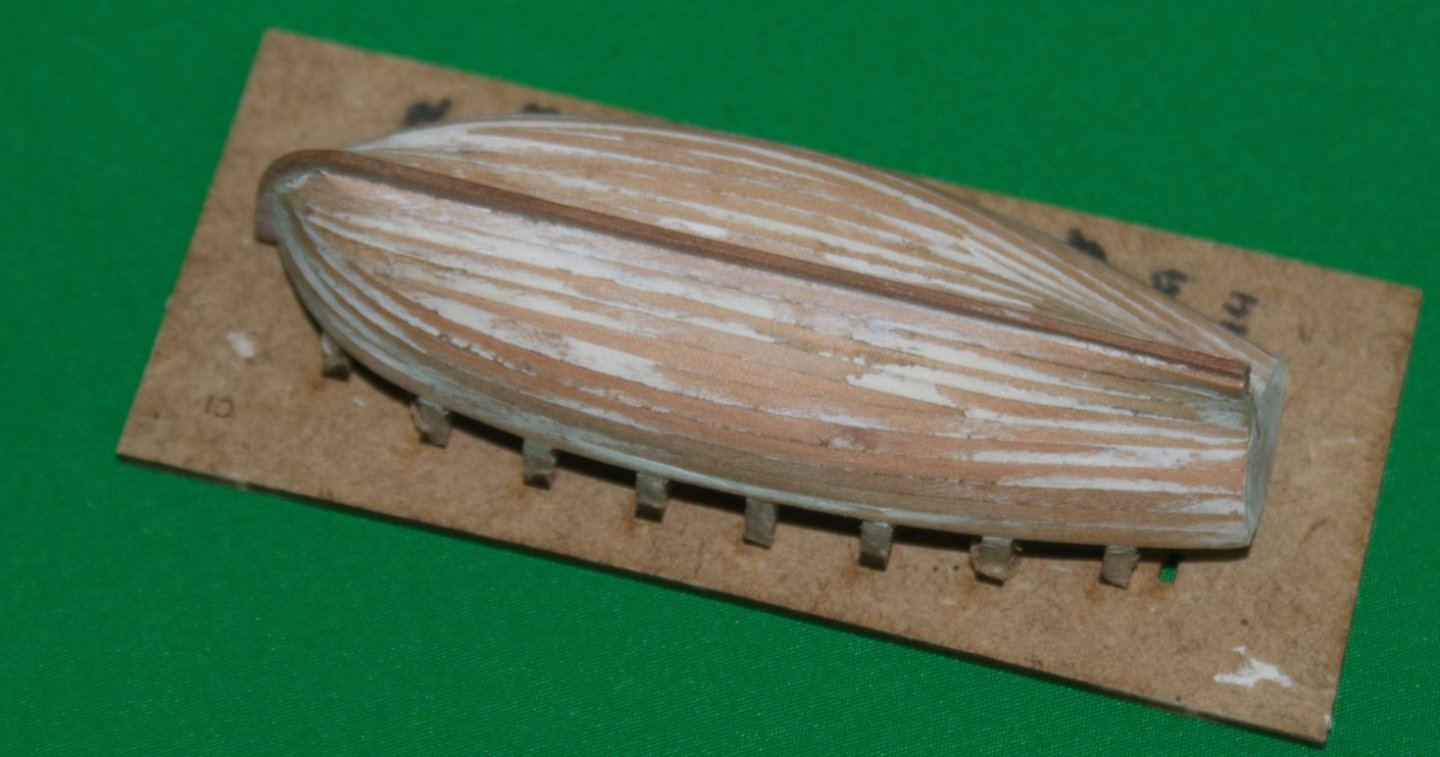
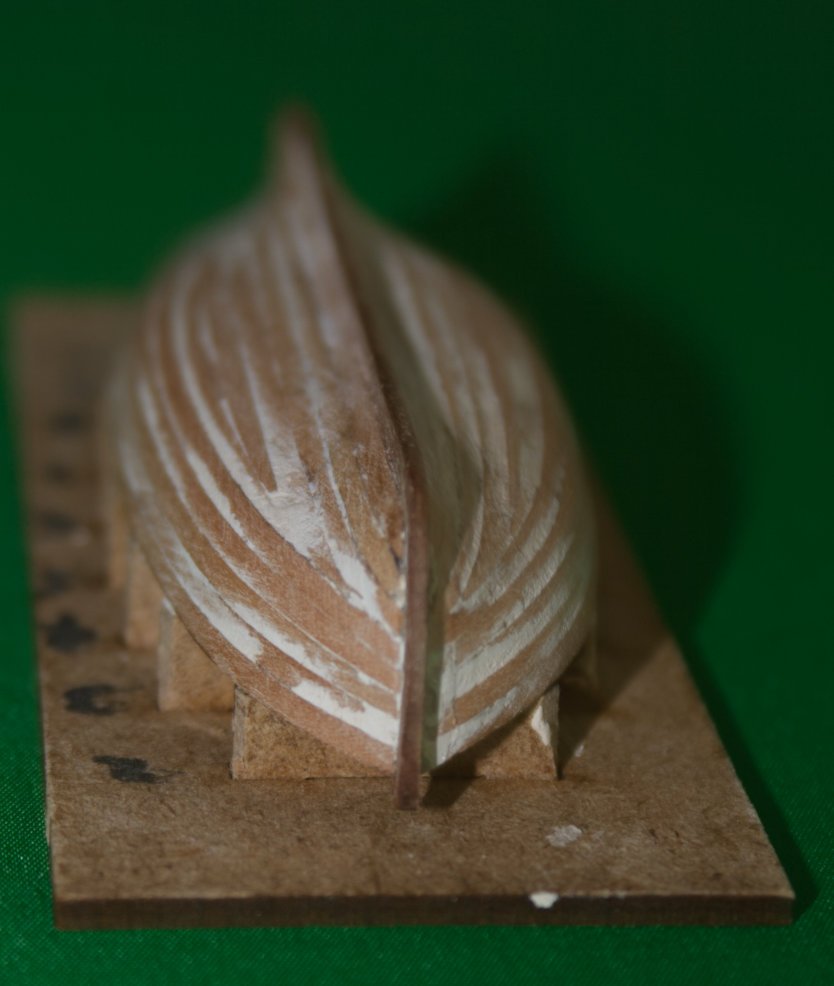
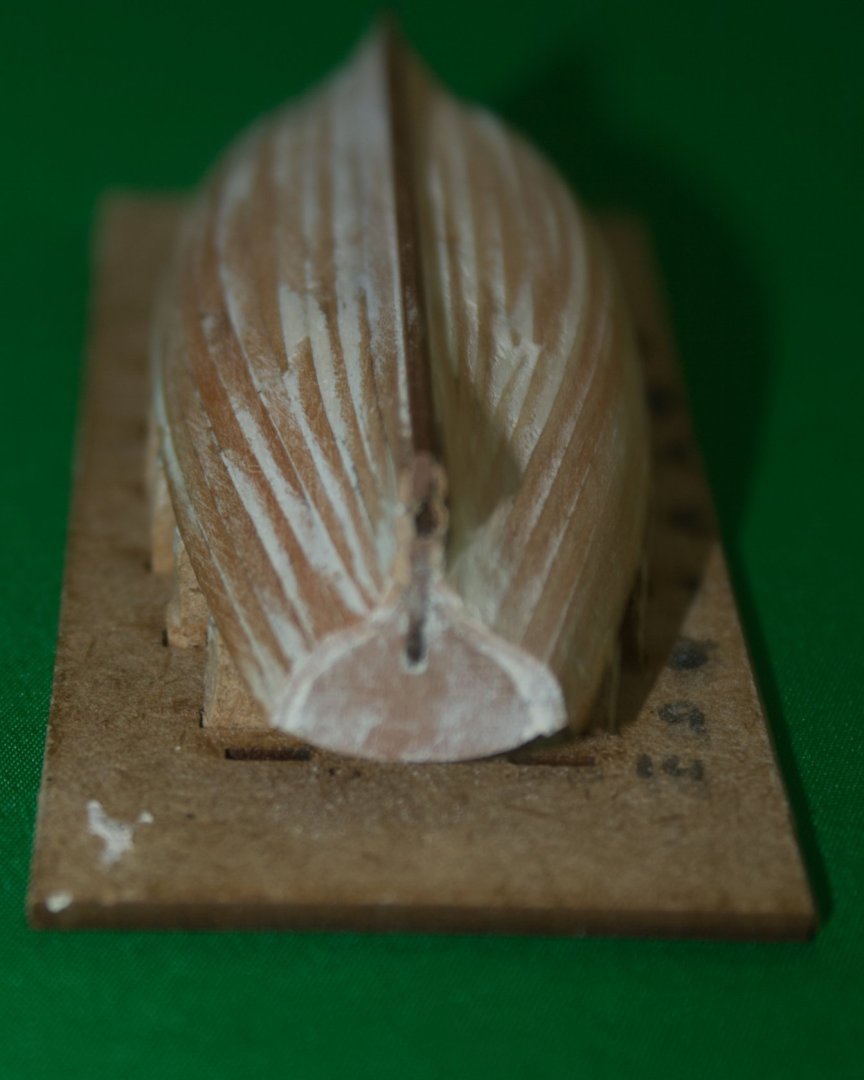
I've made some progress with the smaller boats. I mentioned earlier that the stem and stern posts on the yawl broke. The stern post survived, and looks reasonable despite further accidents. Unfortunately, when planking, I missed an issue with the stern post bending forward, with its attached transom. Short of ditching the vessel, all I could think to do was extend the keel of the yawl. This will change the look of the hull, and (IMO) mean she'll need a larger rudder to overcome the stabilising influence of that keel (hence filler in later images). Beyond that, the main build has been uneventful. If I were to build the yawl again, I'd add the knees to the benches (term?) before adding the gunwal. Adapting their heights would then be much easier. Another tip - I added the yawl's rowlocks to the gunwals before gluong the gunwals to the boat - this gave some pins that could guide final shape. I am reasonably pleased with the decks, which were painted yellow ochre (Admiralty Paints), then dry brushed with raw umber (Golden Fluid Acrylics). Still work to do on these boats ...
-
That looks good, you're ahead of me now.
-
p.s just found this (1850's painting): https://www.liverpoolmuseums.org.uk/edmund-gardner/pilotage-service-mersey Right click ion the image at the top to see the full painting.
-
Have a look at contemporary ship paintings, they'll give you a good idea of what people saw at the time. The only image I noted that shows distinct hull planking, the cutter might be clinker built: Shipping at Spithead with Merchantmen, a moored British Navy Third Rate Man o' War and the Cutter 'Thetis' in the Foreground by Francis Holman (link ) The Google search I use: https://www.google.com/search?q=cutter+ship+painting Click that and then switch to images. Most images that I found in that search are too modern for Sherbourne (i.e. late 18c or early 19c) and show copper bottomed vessels.
-
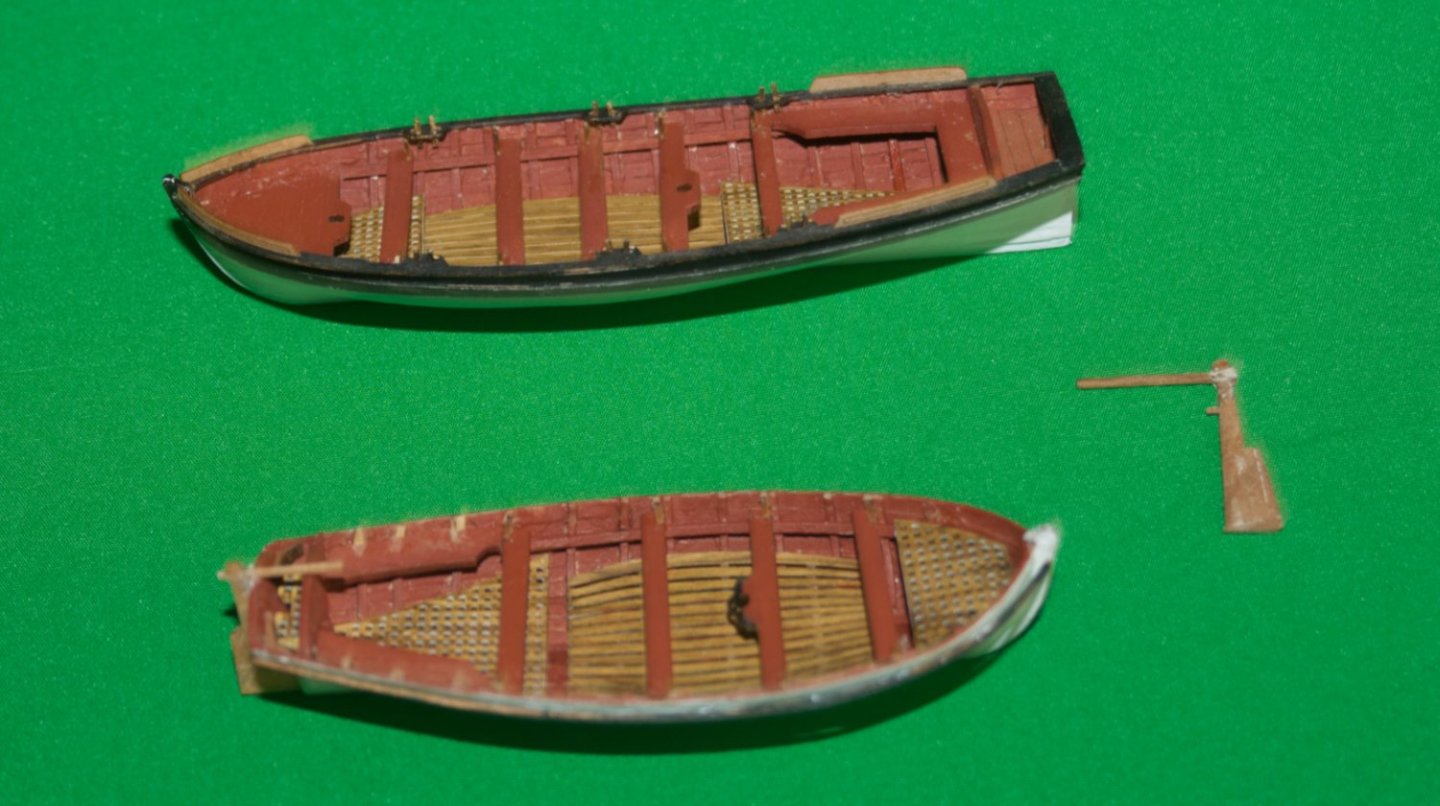
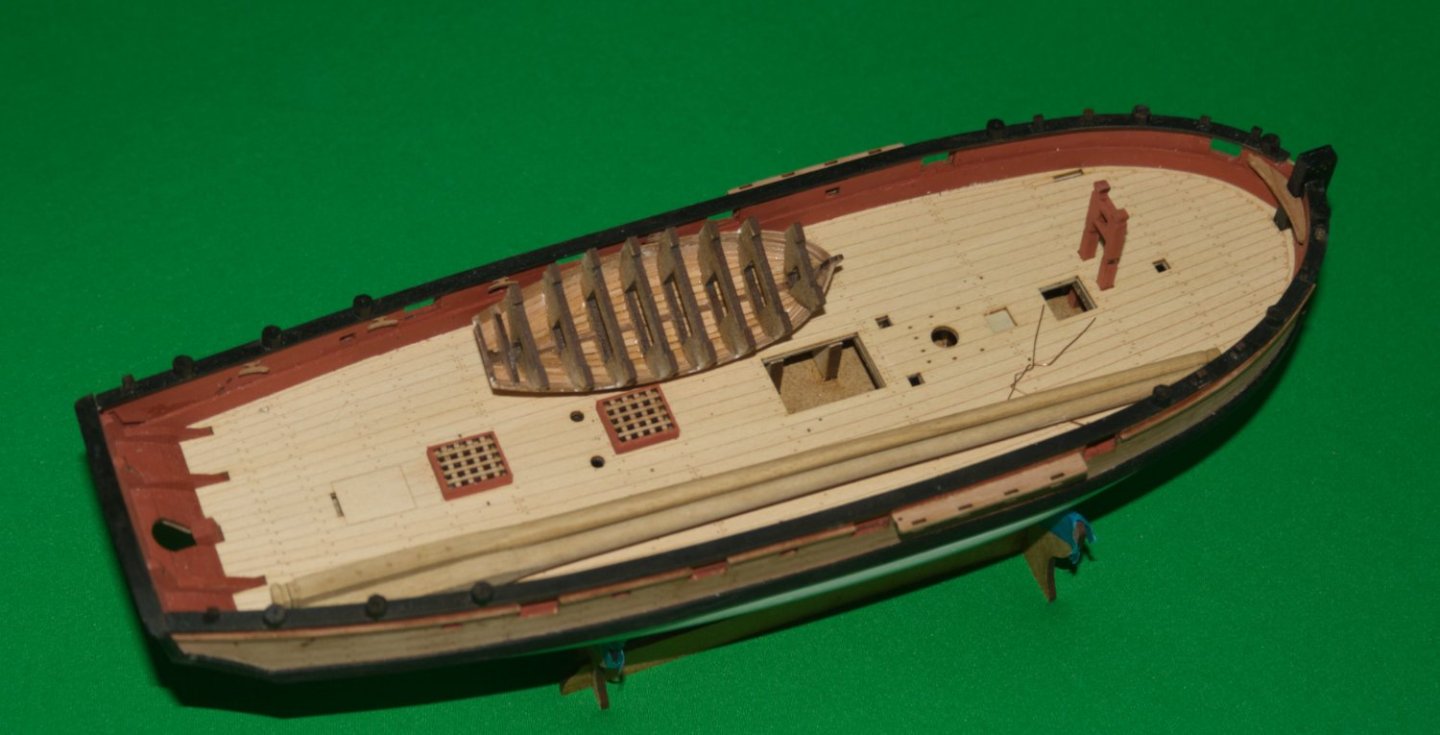
A quick update on the 18' cutter, this is now fully planked, and the planking filled & sanded. I should have reduced the planks more ate both the bow ... ... and stern. Hopefully, I'll do better on the yawl. The 18' cutter is a little big to live on Sherbourne's deck
-
Another Vanguard Sherbourne? That looks like a quick start
-
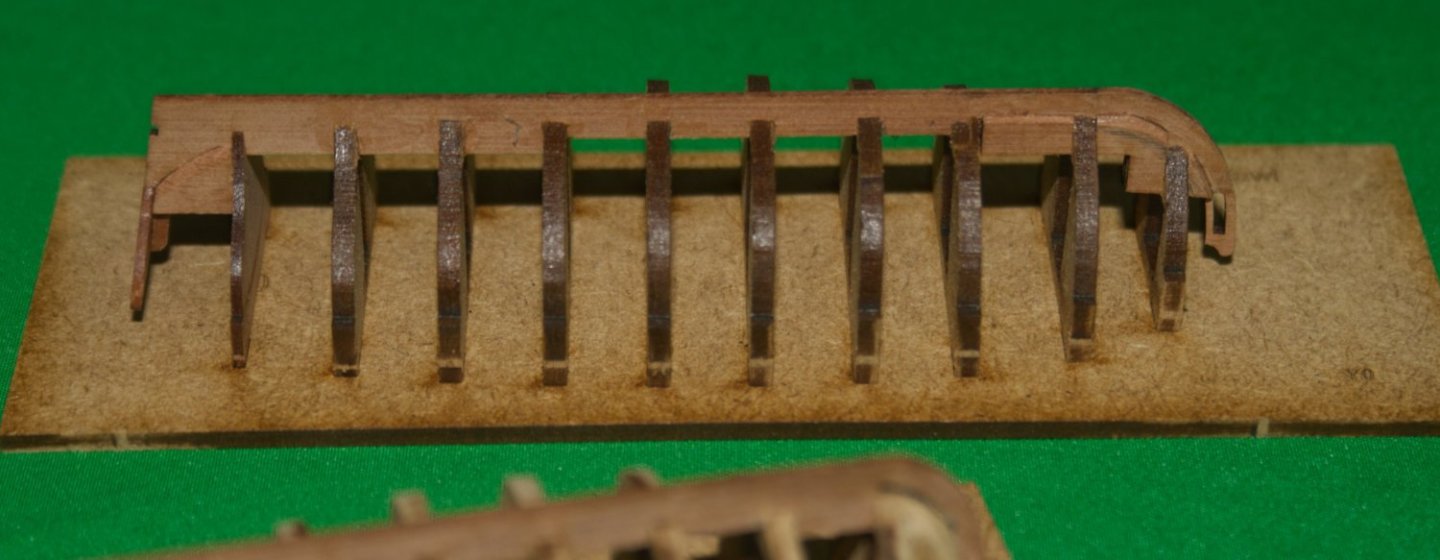
I've started work on the 18' cutter and the yawl ... and taken a look at Vanguard's Hornblower figure. The 18' cutter Loose on its building cradle, the cutter has been fairly standard up til now. The yawl The yawl has been a little more eventful, with both the stem and stern posts breaking off. The stem I found and glued back; the stern post I had to fabricate from spare wood. Ship's officer (based on Vanguard's Hornblower) # Vanguard's figures are beautiful, but they generally represent Napoleonic characters. Sherbourne was a mid-eighteenth century vessel, and would have seen earlier styles. So far, I've removed Hornblower's bicorne hat together with his epaulettes, and started cutting back his coat to suit an earlier fashion.

-
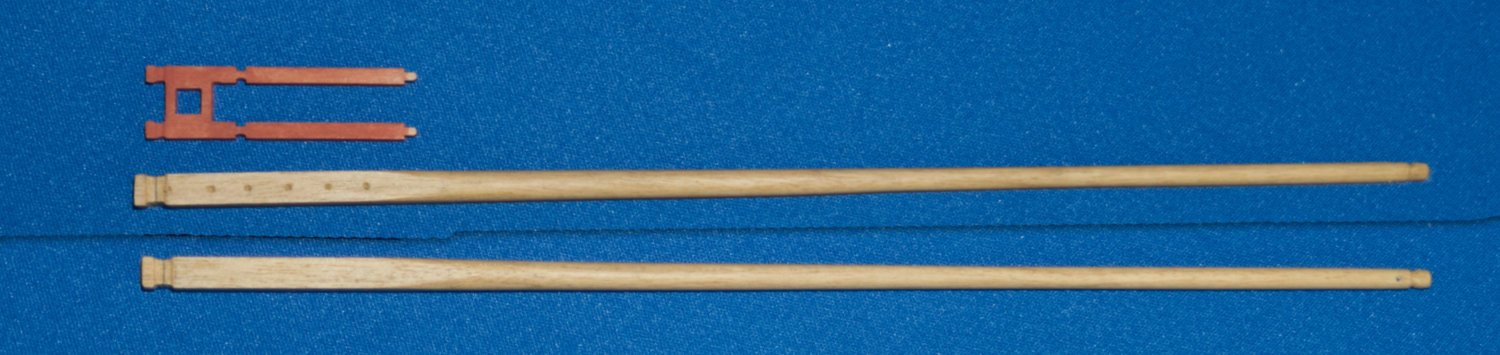
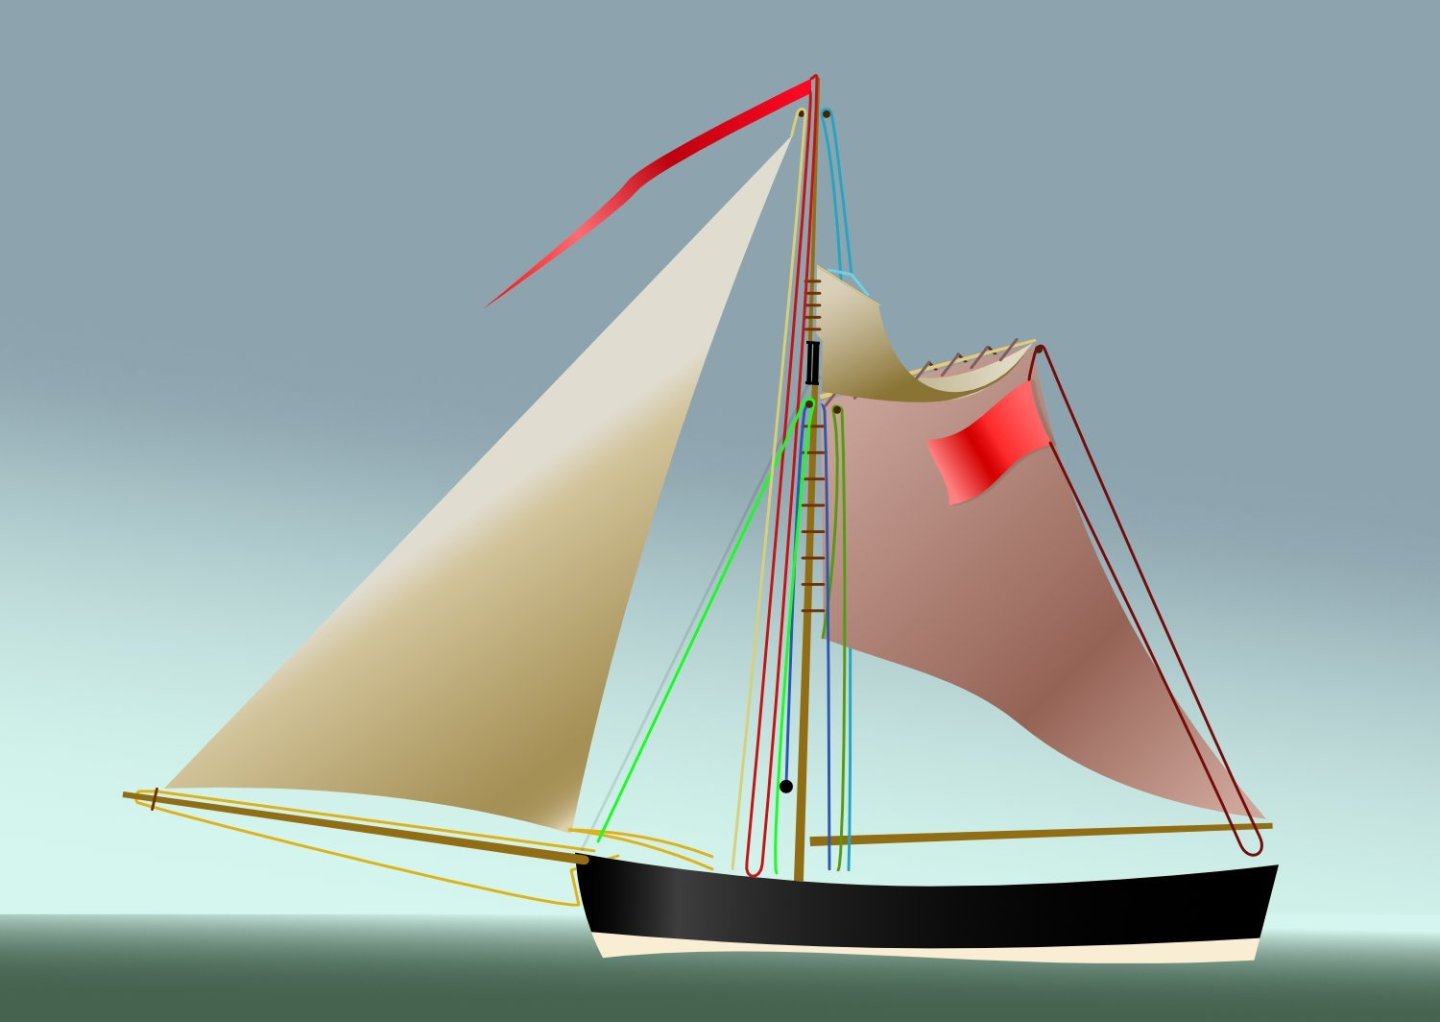
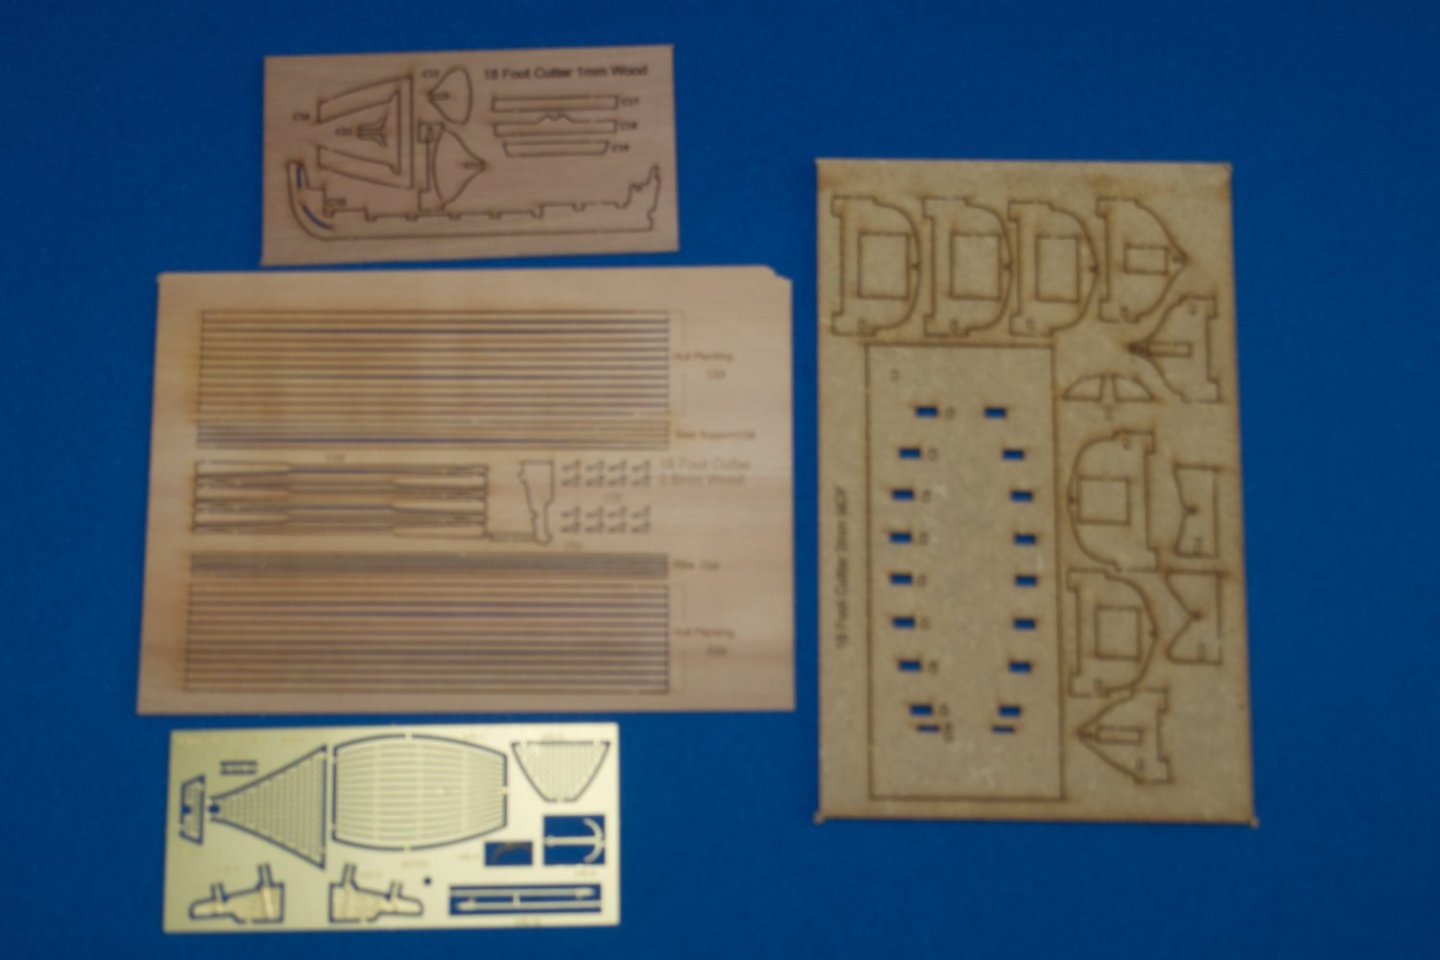
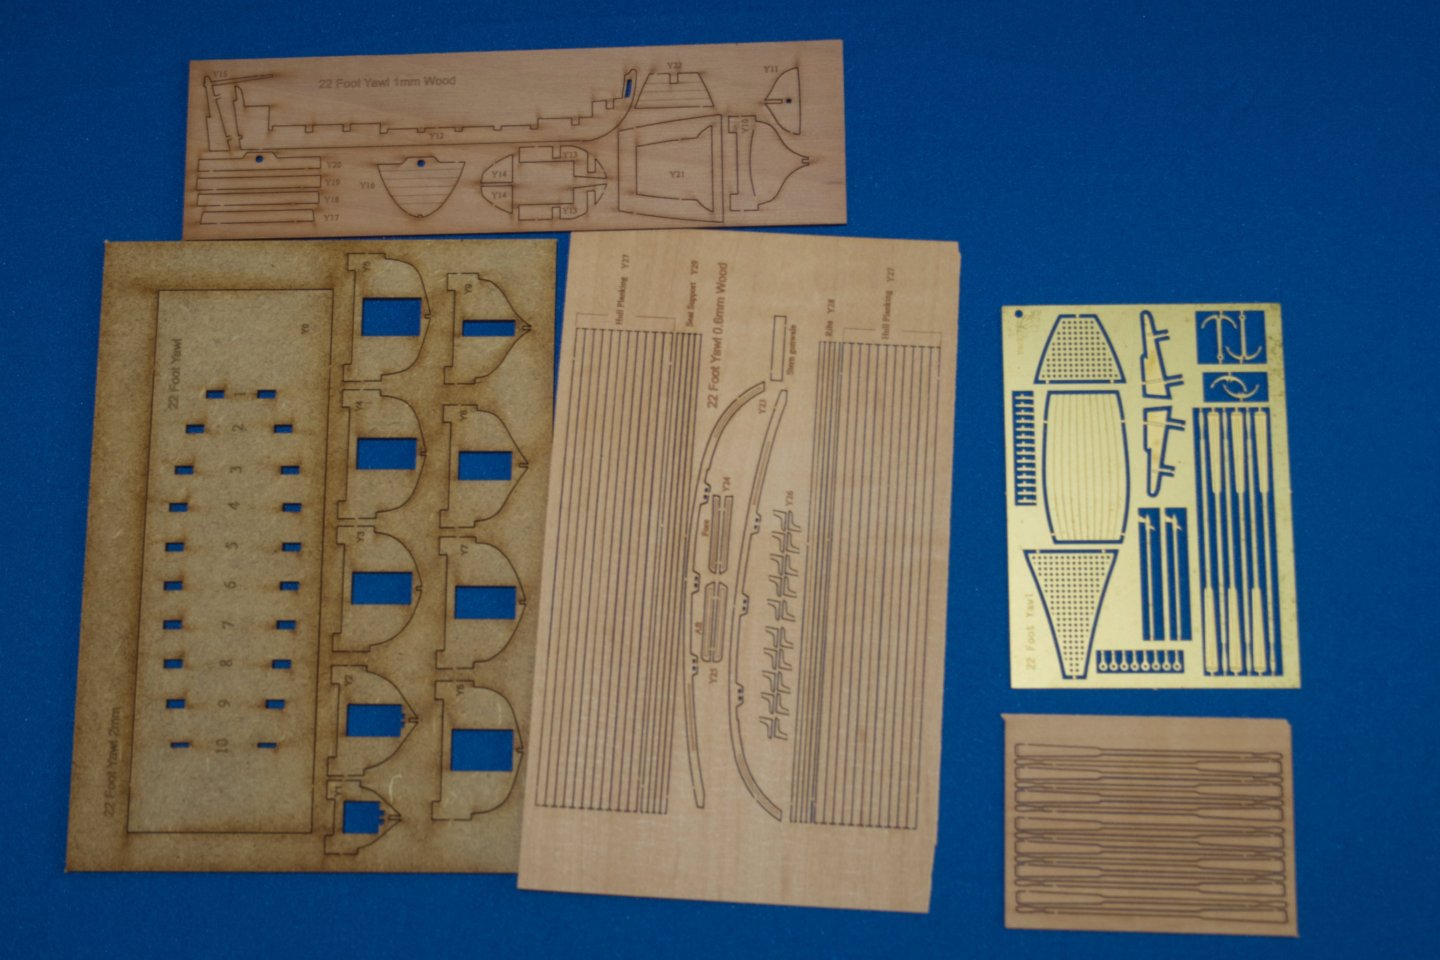
This build has been quiet of late, I've been thinking about adding sails, and final displaying of the model. So far, I have two ideas that might work: 1) based on a painting of an 1806 vessel, HM Revenue Cutter Wickham by Robert W. Salmon (1775–1851), photographed in Kings Cutters and Smugglers (E. Keble Chatterton, 1912). The original painting is, I believe, now at the Campbeltown Museum (link: https://artuk.org/discover/artworks/hms-revenue-cutter-wickham-164013). Reviewing the source image, there are some changes needed in this sketch. Any suggestions for improvements and guidance would be welcome 2) another thought, is something more conventional Again, there will be changes needed here - suggestions would be welcome. In either of these cases, I'll need a bowsprit. Vanguard supply two options for the bowsprit bitt, one with a 5mm round hole, and an alternate with a 4mm square hole. Vanguard supply some 5mm dowel for the former; I chose the latter. To make my bowsprit, I ordered some 5mm square walnut, and made a bowsprit based on Vanguard's suggested dimensions. Bitt with side and top views of my bowsprit. The bowsprit is pierced for an outhaul. My plan is to split the wood, and glue it fore-and aft of the bitt. Somewhere in Kings Cutters and Smugglers, there is a remark that revenue cutters looked like vessels with a cargo of boats. With this in mind, I ordered a couple of boats from Vanguard; an 18' cutter and a 22' yawl. 18' cutter 22' yawl

-
Good to see another Vanguard Sherbourne - and coming along very quickly.
-
It was, thanks
-
That looks like good progress. I'm intrigued by your edge bending tool, haven't seen one of those before.
- 60 replies
-
- 1
-

-
- vanguard models
- cutter
- (and 1 more)
-
I may have primed the lower hull white (if so, that would have been an acrylic rattle can car-primer). Top colours are Admiralty paint, based on a set offered by Cornwall Model Boats for the other Sherbourne kit. (One each of: Dull Black, Ironwork Black, Matt White, Yellow Ochre, Red Ochre) Think these are normal acrylics, very opaque, and a little thick for airbrushing. I hand brushed, but they might work thinned for airbrushing. Where possible, I painted parts off the model, and touched up by hand after. HTH
-
That looks like nice progress, Isaiah. That hull should be nice and straight by now?
-
Off-topic, but the Royal Collection Trust site may have items of interest. Examples Painting of "Dirk, sword and cocked hat of Lord Nelson" (Willliam Gibb): https://www.rct.uk/collection/search#/8/collection/929407/dirk-sword-and-cocked-hat-of-lord-nelson Images from Robert Southey's book Life of Lord Nelson (v1 1814) https://www.rct.uk/collection/search#/26/collection/1047034/the-life-of-lord-nelson-v-1 Less relevant, but maybe of interest [Planning for Trafalgar,] a fair copy of memoranda issued by Lord Nelson: https://www.rct.uk/collection/search#/25/collection/1198306/fair-copy-of-memoranda-issued-by-lord-nelson-regarding-tactics-and-sailing A letter from Lord Nelson [, in his own hand,] to his father following the Battle of Copenhagen: https://www.rct.uk/collection/1198309/letter-from-lord-nelson-to-his-father-following-the-battle-of-copenhagen-dated-5