
SighingDutchman
-
Posts
45 -
Joined
-
Last visited
About SighingDutchman

-
 catopower reacted to a post in a topic:
Yakatabune by SighingDutchman - FINISHED - Woody Joe - 1/24
catopower reacted to a post in a topic:
Yakatabune by SighingDutchman - FINISHED - Woody Joe - 1/24
-
mtaylor reacted to a post in a topic:
Yakatabune by SighingDutchman - FINISHED - Woody Joe - 1/24
-
Canute reacted to a post in a topic:
Yakatabune by SighingDutchman - FINISHED - Woody Joe - 1/24
-
Canute reacted to a post in a topic:
Yakatabune by SighingDutchman - FINISHED - Woody Joe - 1/24
-
Canute reacted to a post in a topic:
Yakatabune by SighingDutchman - FINISHED - Woody Joe - 1/24
-
 Many thanks, Clare. Your build log was an inspiration for me, and helped me find the zootoyz online shop, from which to order the kit. Will definitely make another WoodyJoe Japanese ship kit some time in the future.
- 7 replies
-
- 3
-
-
- Japanese boat
- yakatabune
- (and 2 more)
-
SighingDutchman reacted to a post in a topic:
Yakatabune by SighingDutchman - FINISHED - Woody Joe - 1/24
-
Archi reacted to a post in a topic:
Yakatabune by SighingDutchman - FINISHED - Woody Joe - 1/24
-
catopower reacted to a post in a topic:
Yakatabune by SighingDutchman - FINISHED - Woody Joe - 1/24
-
SighingDutchman reacted to a post in a topic:
Cutty Sark by NenadM
-
SighingDutchman reacted to a post in a topic:
Sloop Speedwell 1752 by Freebird (Rick) - Syren Ship Model Company - 1:32 Scale - POF
-
SighingDutchman reacted to a post in a topic:
HM Cutter Alert by Thukydides - FINISHED - Vanguard Models - 1:64 - first build
-
Firs49 reacted to a post in a topic:
HMS Beagle by Firs49 - OcCre - 1:60 - First Build
-
SighingDutchman reacted to a post in a topic:
HMS Ontario by myxyzptlyk - MarisStella - 1:48
-
SighingDutchman reacted to a post in a topic:
Maris Stella
-
SighingDutchman reacted to a post in a topic:
Sloop Speedwell 1752 by baribeaujm (Jean-Marc) - Syren Ship Model Company - 1:32 Scale - POF Sloop
-
The Gimps Chimp reacted to a post in a topic:
HMS Beagle by Firs49 - OcCre - 1:60 - First Build
-
I am currently doing that on an OcCre build (San Juan), to ensure that any small gaps between the first planking and the keel are filled by the second planking (and, similarly, no new gaps are introduced, particularly at the bow). Have not finished the second planking, but so far it seems to be working. I considered installing the keel even earlier, before the first planking but I think that would have risked damaging the keel during the sanding of that layer. For the second planking, that risk is small as sanding should be very limited. Some kit manufacturers, such as Vanguard, make the keel out of an inner part, installed before the first planking and two outer parts (one on each side) installed before the second planking. If the inner part were to be damaged during the first planking, that is hidden by the outer parts.
-
The Gimps Chimp reacted to a post in a topic:
HMS Beagle by Firs49 - OcCre - 1:60 - First Build
-
Yes, DonSangria, that is a good point. The AL supplied planks and the OcCre ones on this build were/are also 5x2 mm, and rather splintery. So that may be one of the reasons for my lack of success using them.
-
Thanks Mugje. I take your point about the ‘missed learning opportunity’. And I will, at some stage, revert to the ‘normal’ way of planking. But I was quite discouraged by my first planking job on the Jolly Boat, and this way of planking is helping me overcome that. Also, admittedly, I just like coming up with alternative ways to do things, so this fits right into that ‘behavioural pattern’ 😀
-
I agree, Chris. The OcCre sails are passable enough for the OcCre San Juan, but they would be a terrible quality match with the Vanguard kits. I used them on AL's Jolly Boat, my first kit, but I am not using them on this OcCre kit, because they are just not very nice (passable is not good enough anymore for me). And I would never think of using sails of this quality on your HS Sherbourne, which I am building in parallel to this one.
-
You are making quick progress. Great work. Love the sleek lines of the ship! The rigging looks daunting though.... Will follow this build with interest.
- 200 replies
-
- 2
-
-
- Flying Cloud
- Mamoli
- (and 1 more)
-
I did this on my first build also. You will be fine, as it looks like you are well under way to recover from your little mistake. My compliments on the planking job. Is looking really good, especially this being your first time!
-
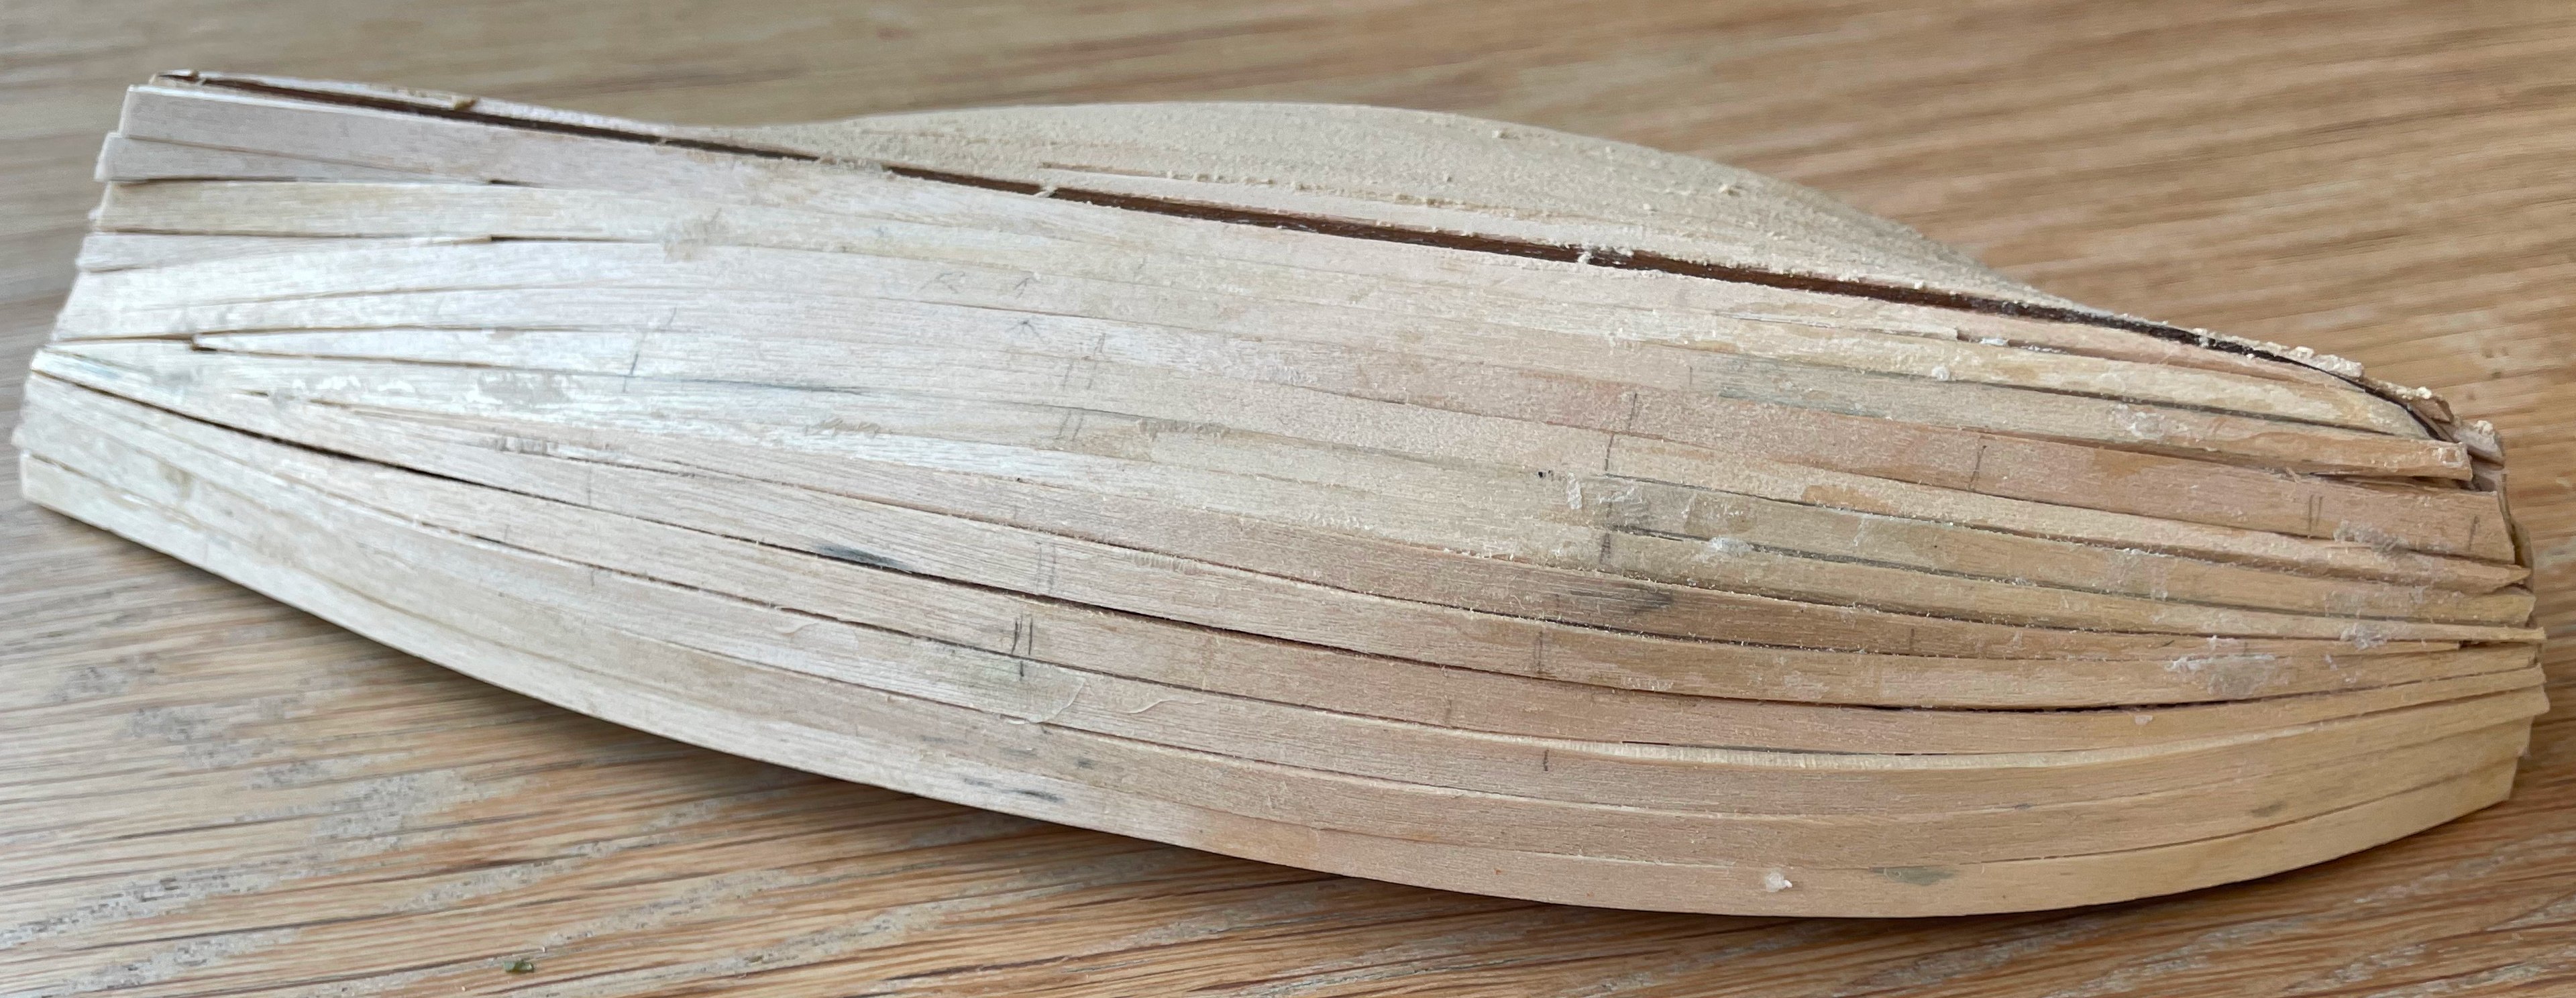
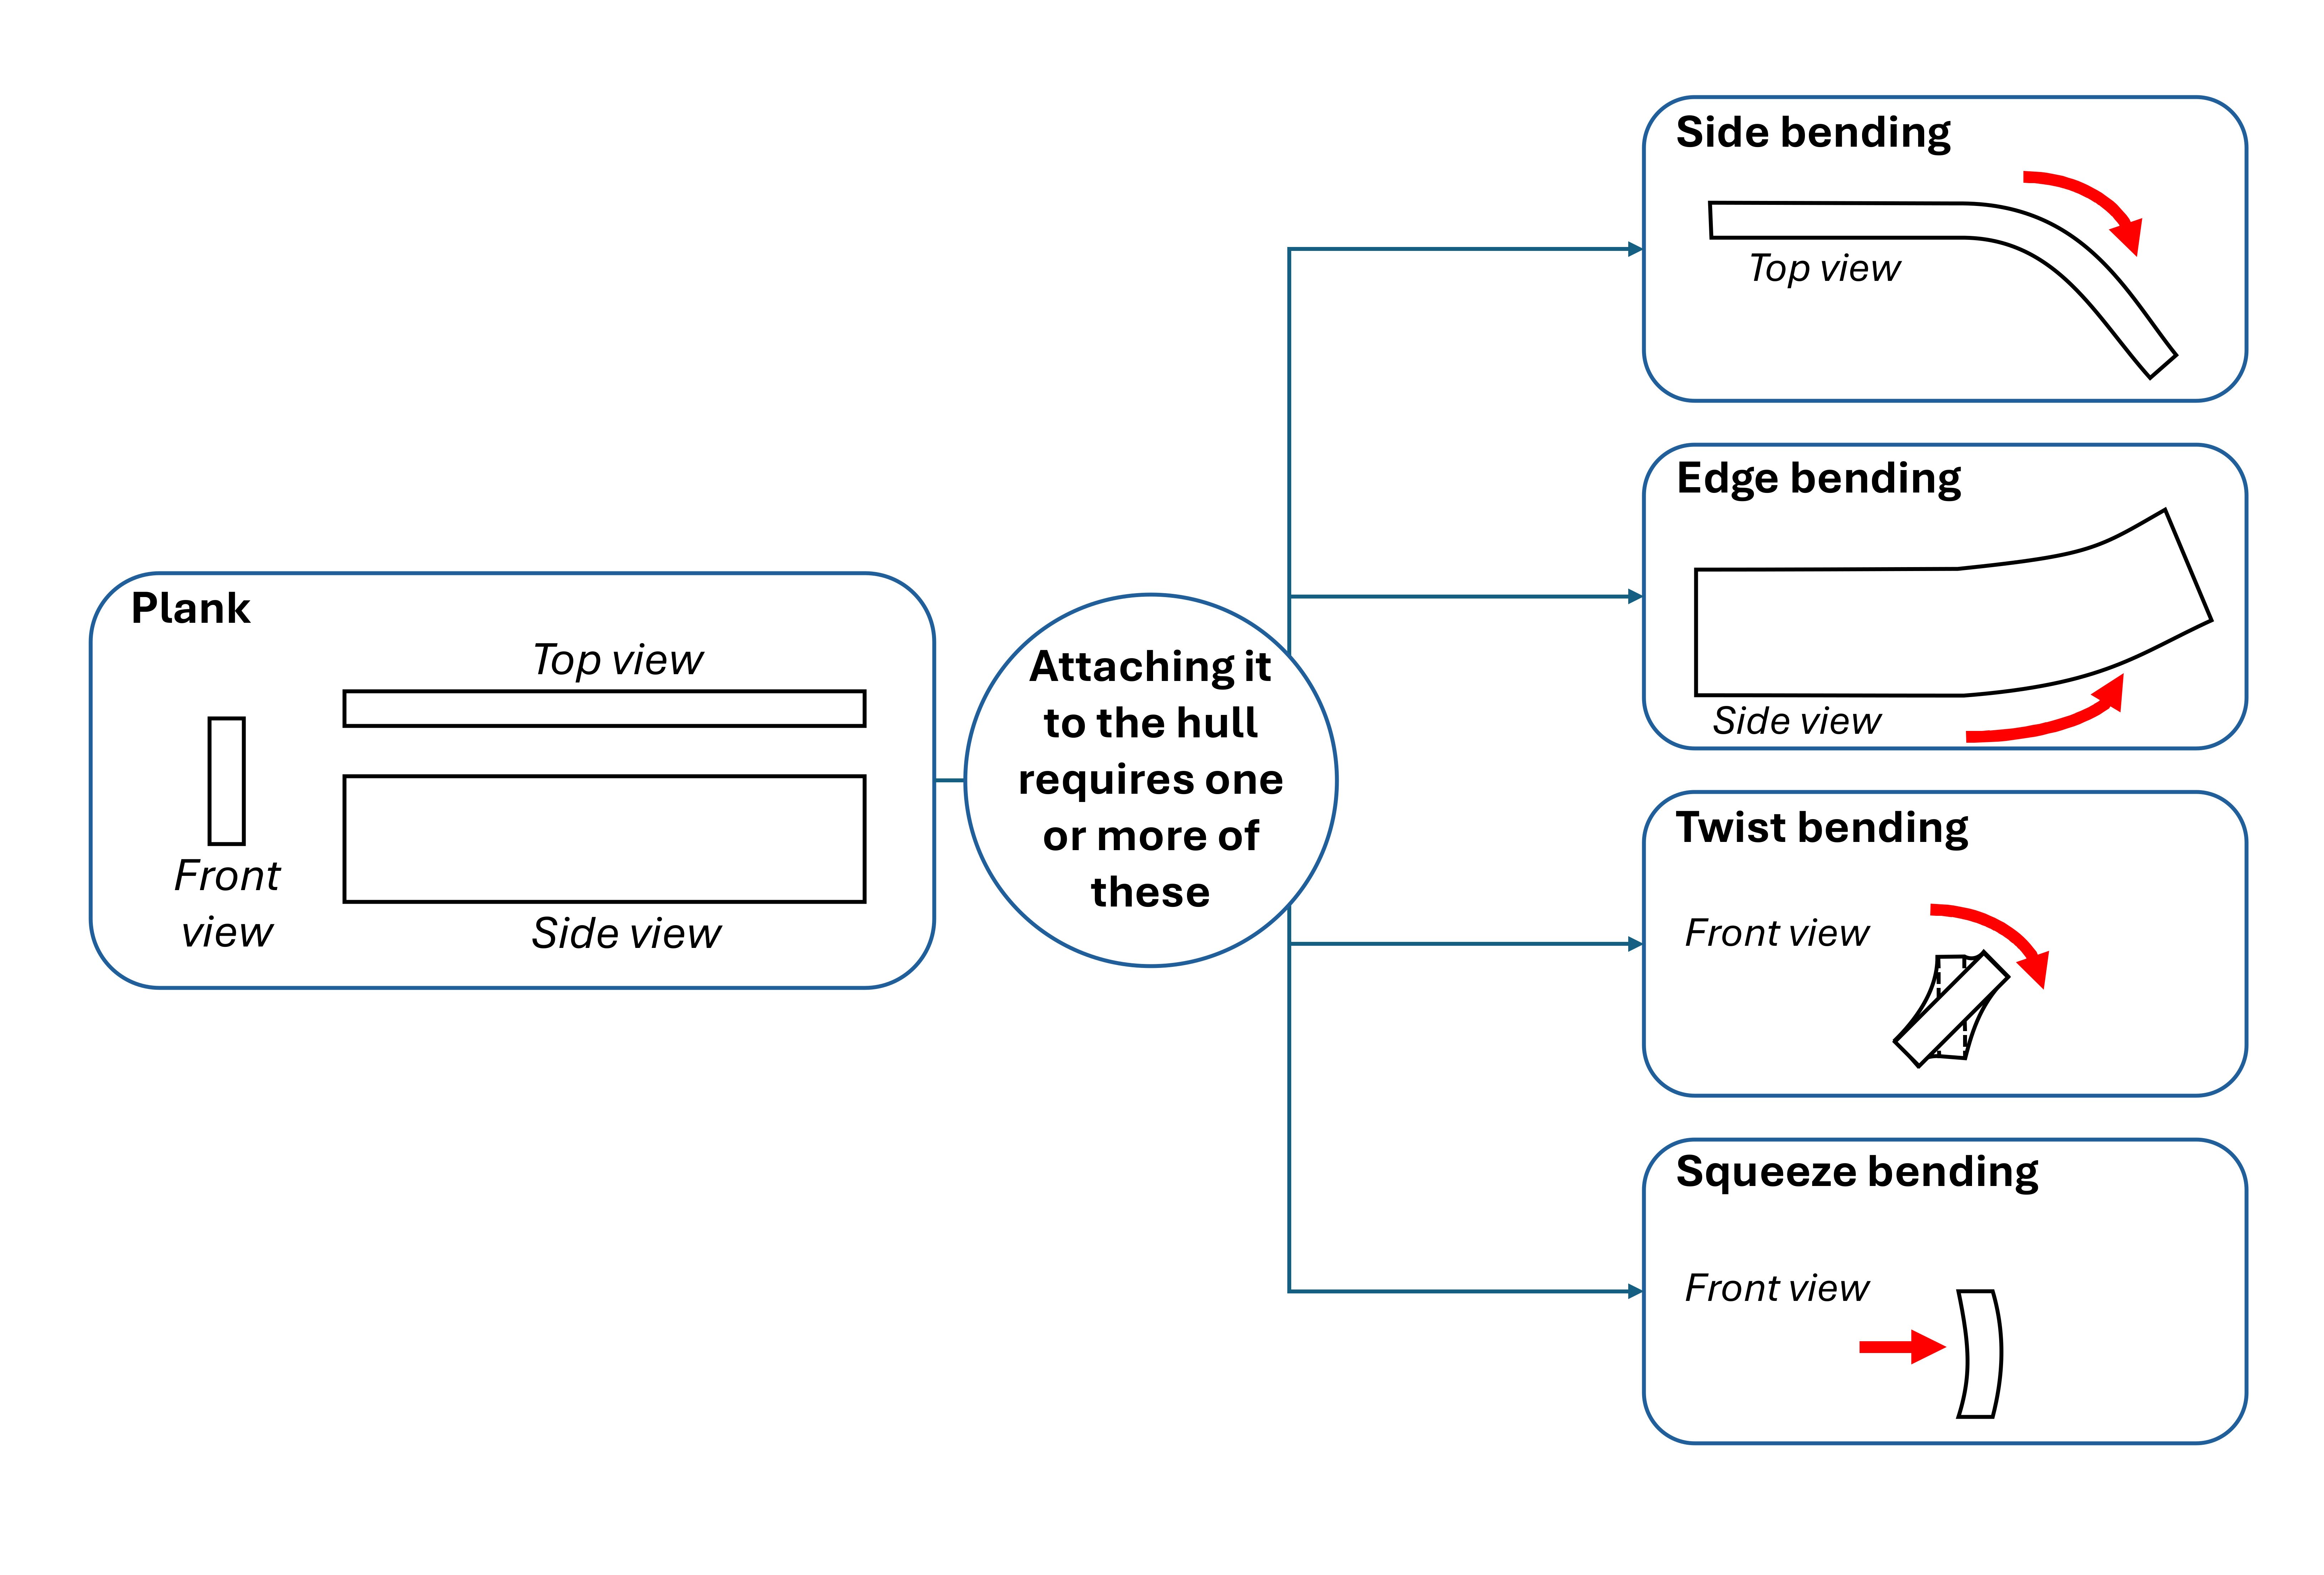
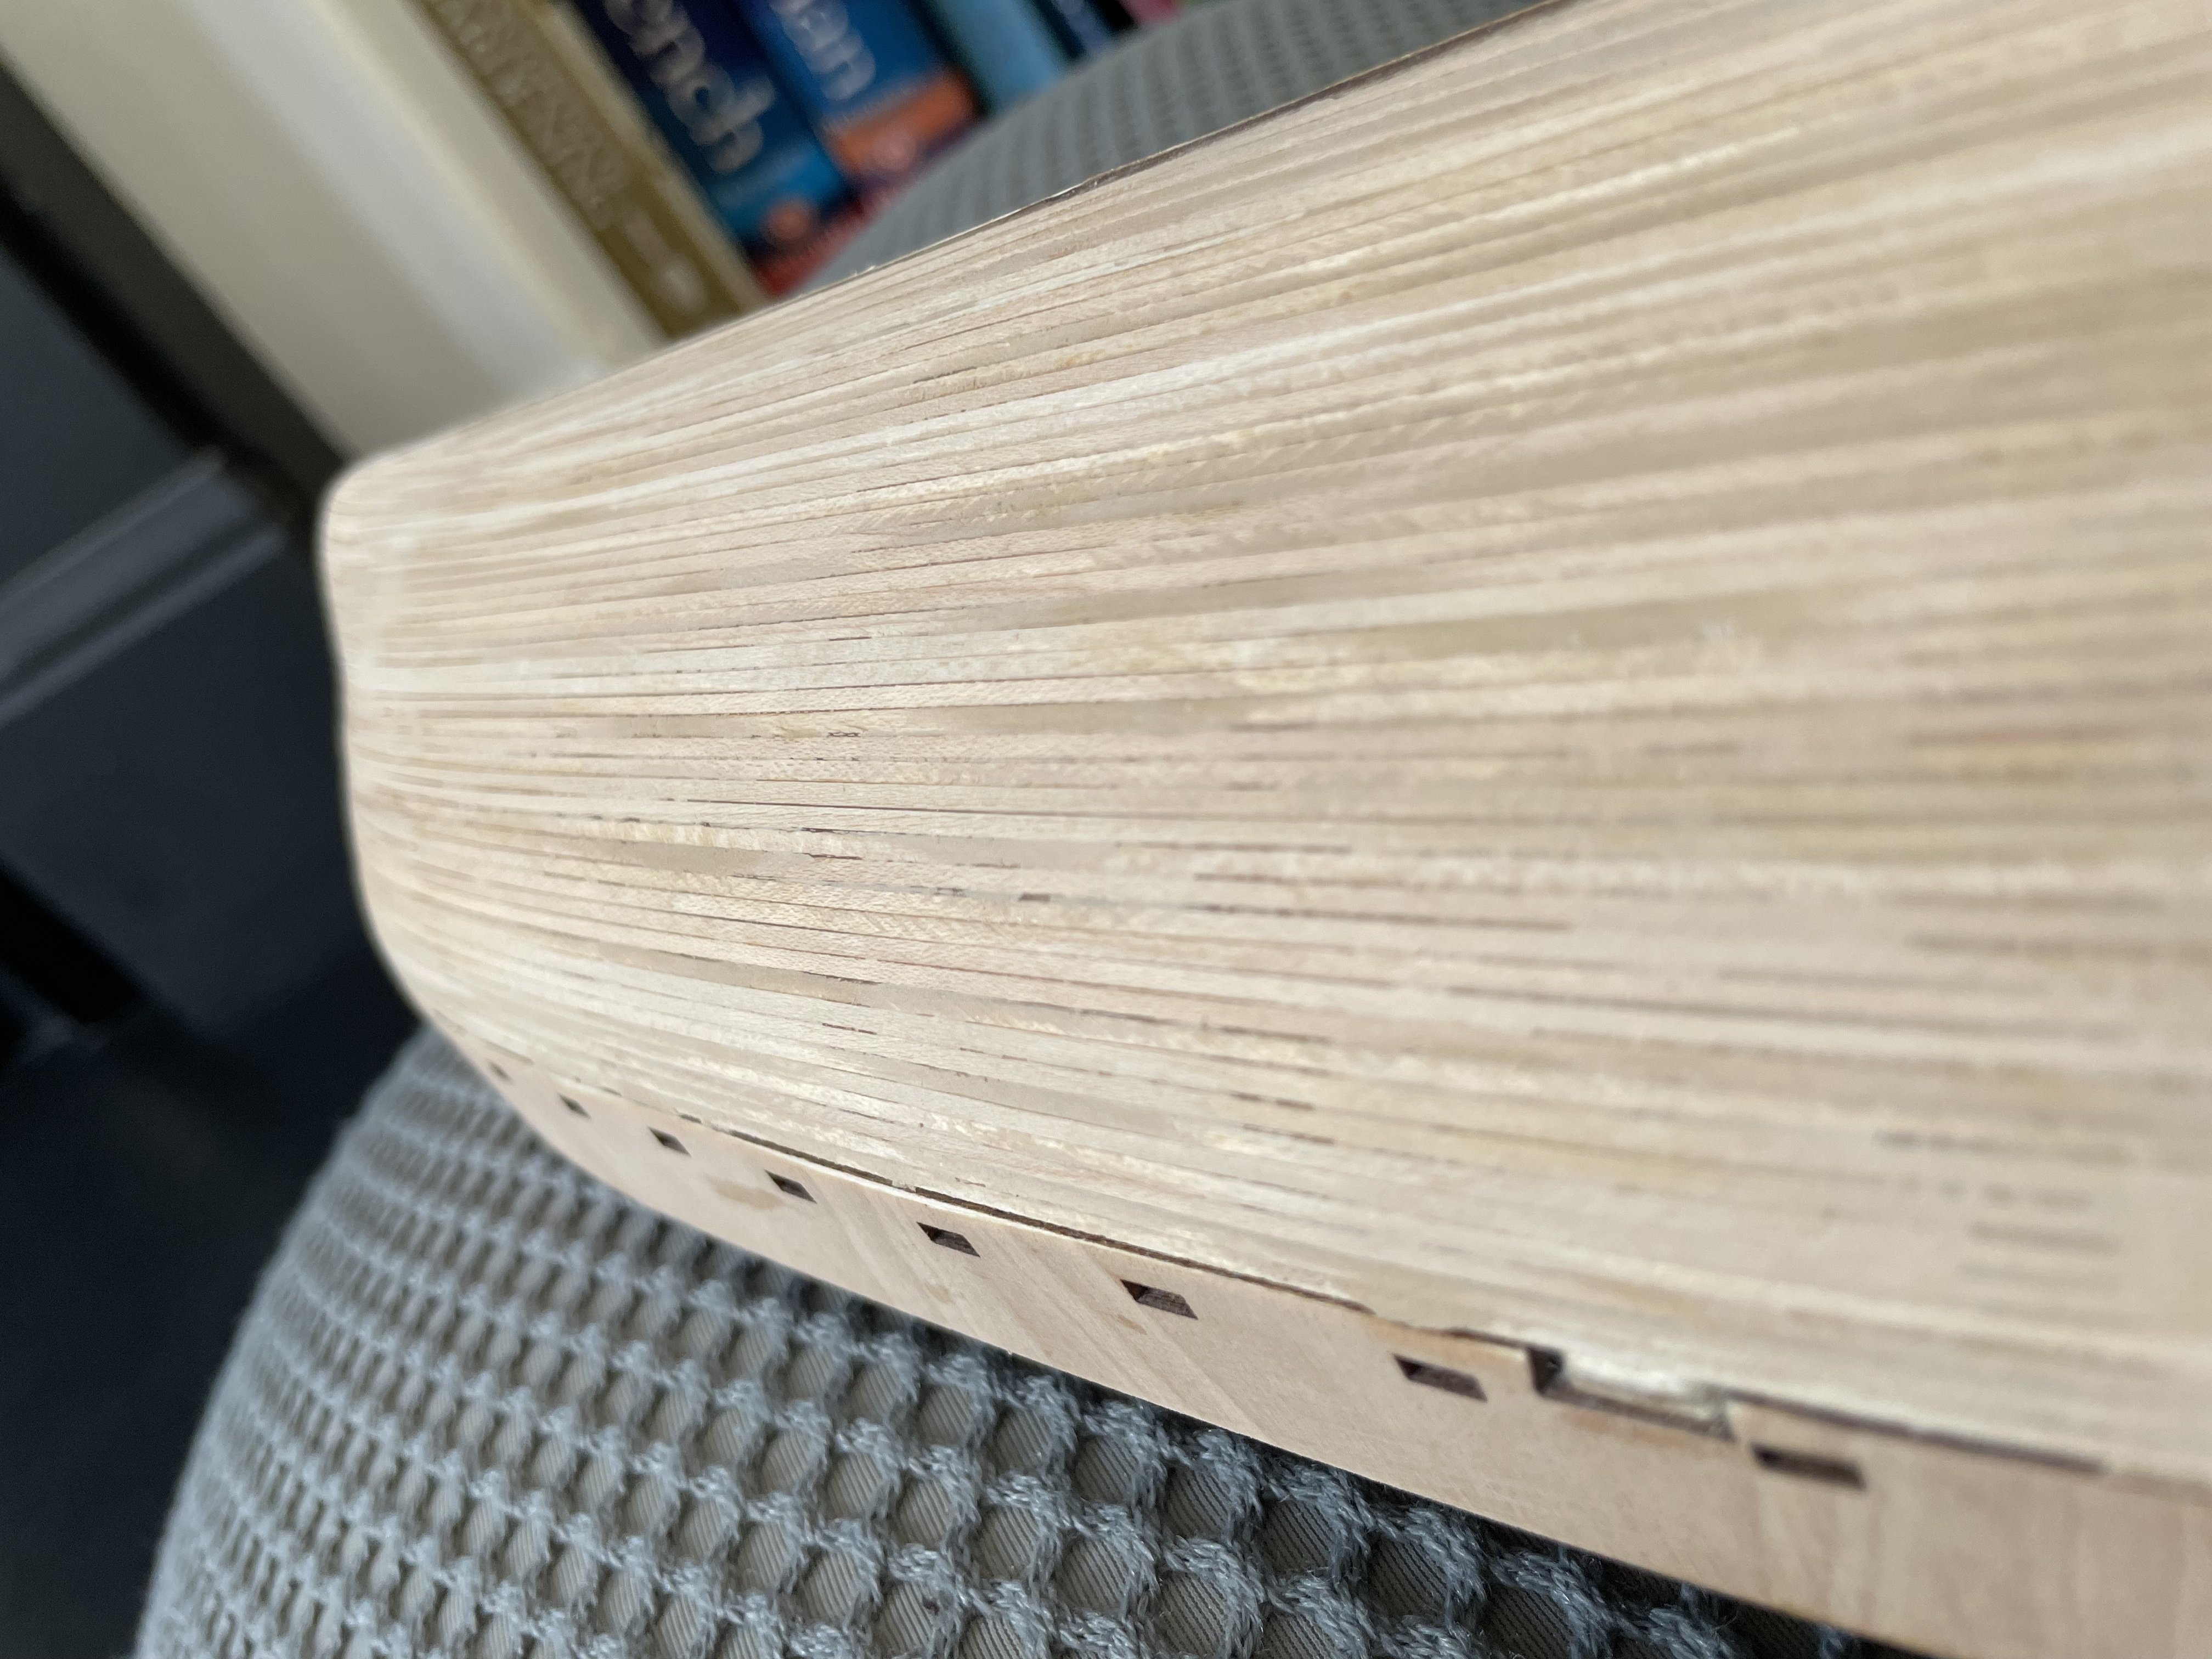
Performed a 'planking experiment' yesterday on this kit, and am reporting on the results today. A quick bit of background: I am a relative novice and I suck at planking. I just can't get those things to lay flat on the bulkheads. As an illustration, this was the sorry result of my planking job on AL's Bounty Jolly Boat. A result I found so embarassing that I did not even include it in my build log but, instead, only showed the boat after liberally applying filler and extensive sanding. And I did my best on the Jolly Boat, and took my time. I soaked planks for hours, prebent them using an electric plank bender, narrowed their width towards the stern, tried several types of glues, let planks dry clamped in place before glueing, etcetera. It took me ages as well. So, to avoid a similar disaster on this build and on my HM Sherbourne build, I put some thought into ways of making planking easier for myself. So what is it that makes it difficult (at least for me) to have planks follow the natural flow of the hull? To do so, a plank must bend in one or, most often, several directions, as illustrated in this little diagram I made (note: the terminology used for the different bending directions may be incorrect/uncommon - am happy to change them to more commonly used terms, if someone can tell me what they are). Of these, I have the greatest difficulty with edge bending, but the other types of bending are difficult enough too. The fact that most planks require several of these types of bending simultaneously further complicates things for me. However, I thought, it should be possible to reduce most of these difficulties simply by using narrower planks. If the planks are narrow enough, edge bending becomes much easier, the amount of twist require will be much reduced, and squeeze bending will be eliminated altogether. Side bending does not necessarily become easier, but that is the easies form of bending anyway. So, instead of using the 5mm wide planks provided by OcCre, I purchased a bunch of 1.5x1.5mm strips (total costs around £15) and used those instead. Here we are several (narrow) planks in. All planks were glued to the bulkheads and to the previous plank using medium viscosity superglue (30s drying time). They were not pre-bent before glueing, nor narrowed towards the stern or bow, nor clamped. At this stage, I did notice that some side-prebending was necessary at the bow, so I started doing so. After going down to about eighty percent of the hull, I started planking from the false keel upwards. As is to be expected, I ended up with a small gap (the length of the bulkheads was not an perfect multiple of 1.5mm), which I filled with a plank that I cut to more or less the correct shape. I needed one tiny filler piece at the stern as well. At about the midpoint of the bulkheads, I ran some of the planks only partially towards the bow, to create a bit of space but, in hindsight, I am not sure that that was actually necessary. The end result, before sanding and applying any wood filler, was this: I then lightly sanded the bow, applied a thin layer of light oak woodfiller, and sanded again, more aggressively this time, resulting in this: I am quite happy with this result; I think it will be a solid basis for either painting or a second planking layer. On this build, I am going to go for the latter, and am going to cut the planks for this from veneer, rather than use the sapelli planks supplied by OcCre, as I don't like the colour (too dark, I think) and I want to run a second experiment on this new layer of planking, namely shaping the planks by cutting them to the right shape from larger stock (namely, a large piece of veneer). My conclusions on this first-planking-layer experiment: for me, using these tin strips was much easier and led to much better result. I did [a] not require any complex pre-bending (just some very quick side bending at bow), [b] did not require soaking planks (and them having to let them dry before they can be glued), [c] required very little narrowing of planks (and even that was not really necessary, I think in hindsight), [d] because the strips are so narrow and so bendy, pre-planning or measuring is also not (strictly) necessary and I just 'went ahead' without it, and [e] it was very quick, because I could use superglue on the whole job; the planking of this one side of the ship took me four hours, with another hour or so added later for sanding/filling/more sanding. So, the whole hull will take me ten hours. So, even though there are many more planks to attach when using these narrow 1.5mm strips, I found that the overall time required was much less than if I had used normal width planks (5mm). Of course, this method is only suitable if the hull is to receive a second layer of planking (as in this build) or is to be entirely painted (like in my HS Sherbourne build). But for novice, incompetent modelers like myself, it was a big help to get a good first-layer planking job, and I plan to employ it on future builds as well. I would be interested in the critique of more experienced builders who happen to come accross this post. Am I cheating by planking like this? Am I missing or ignoring any obvious disadvantages of using these narrow planks? Have I re-invented the wheel?


-
Have not had time to work on my this build in the past two weeks or so, but I did have time to think about how to make planking easier for myself, and came up with a few ideas to try out. However, I don't want to try them out on this (nice) kit, and have therefore started a new build of a different kit I had lying around (build log here). After I have tested/improved my planking techniques on that build, I will report on them here and, employ them on the Sherbourne. This may take one or two weeks though.
-
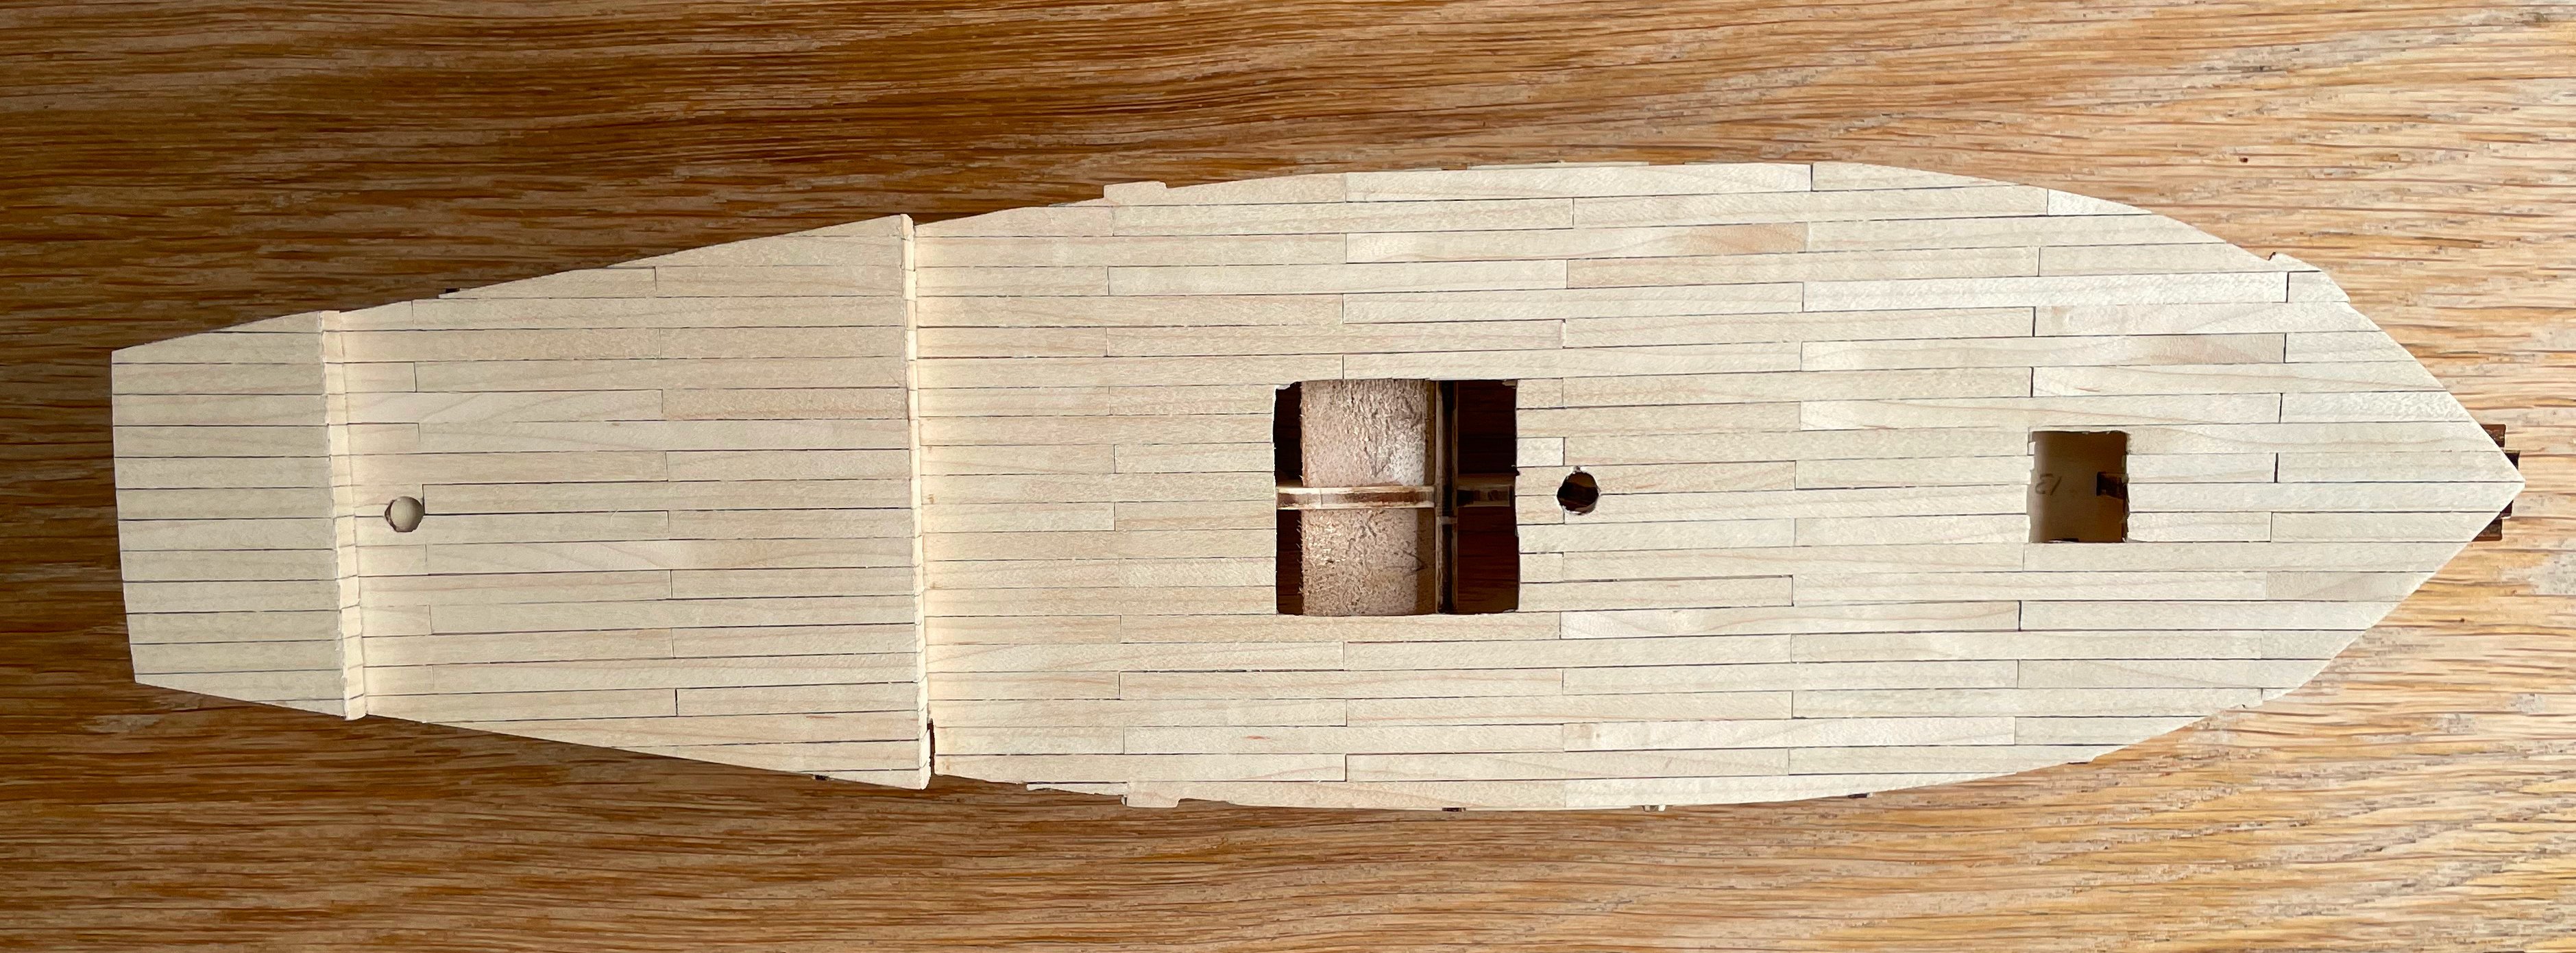
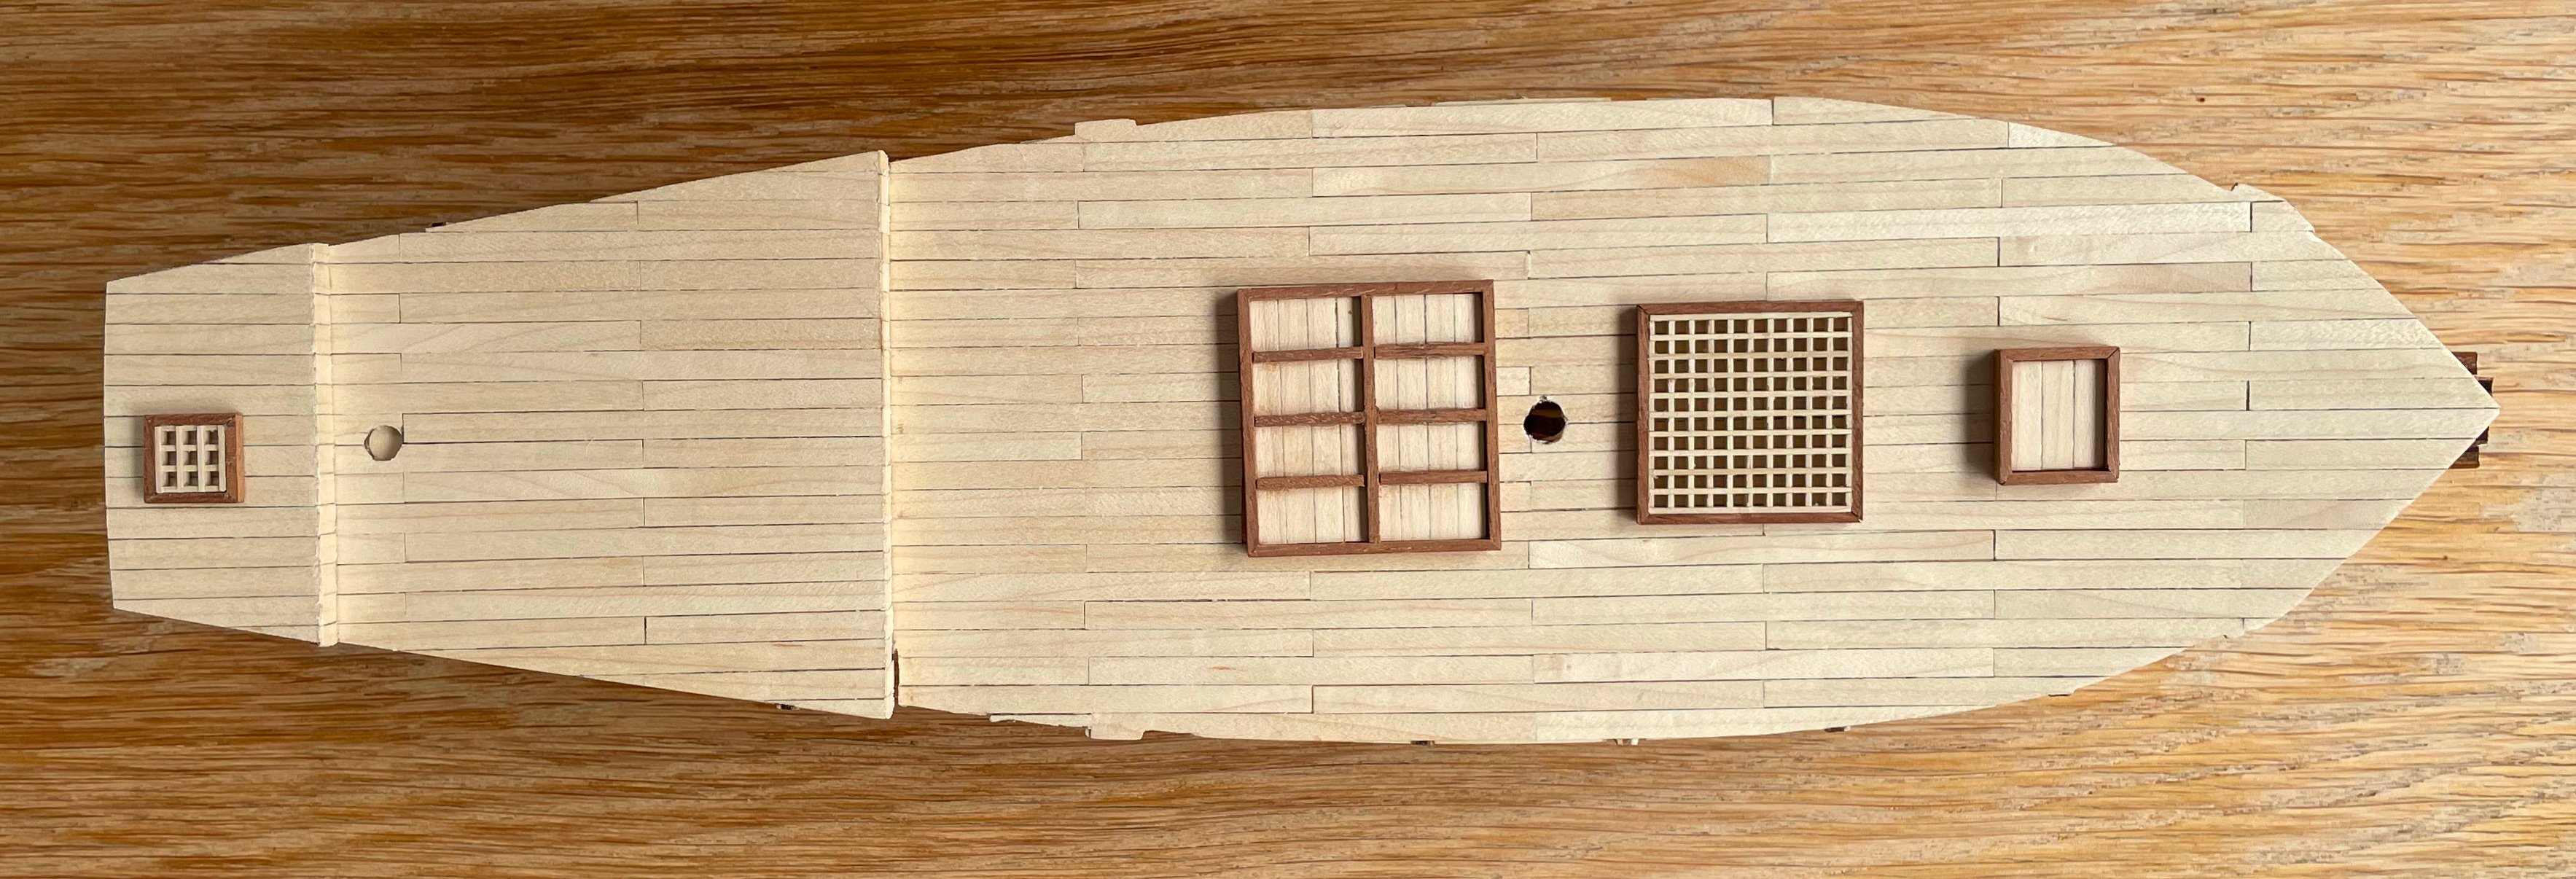
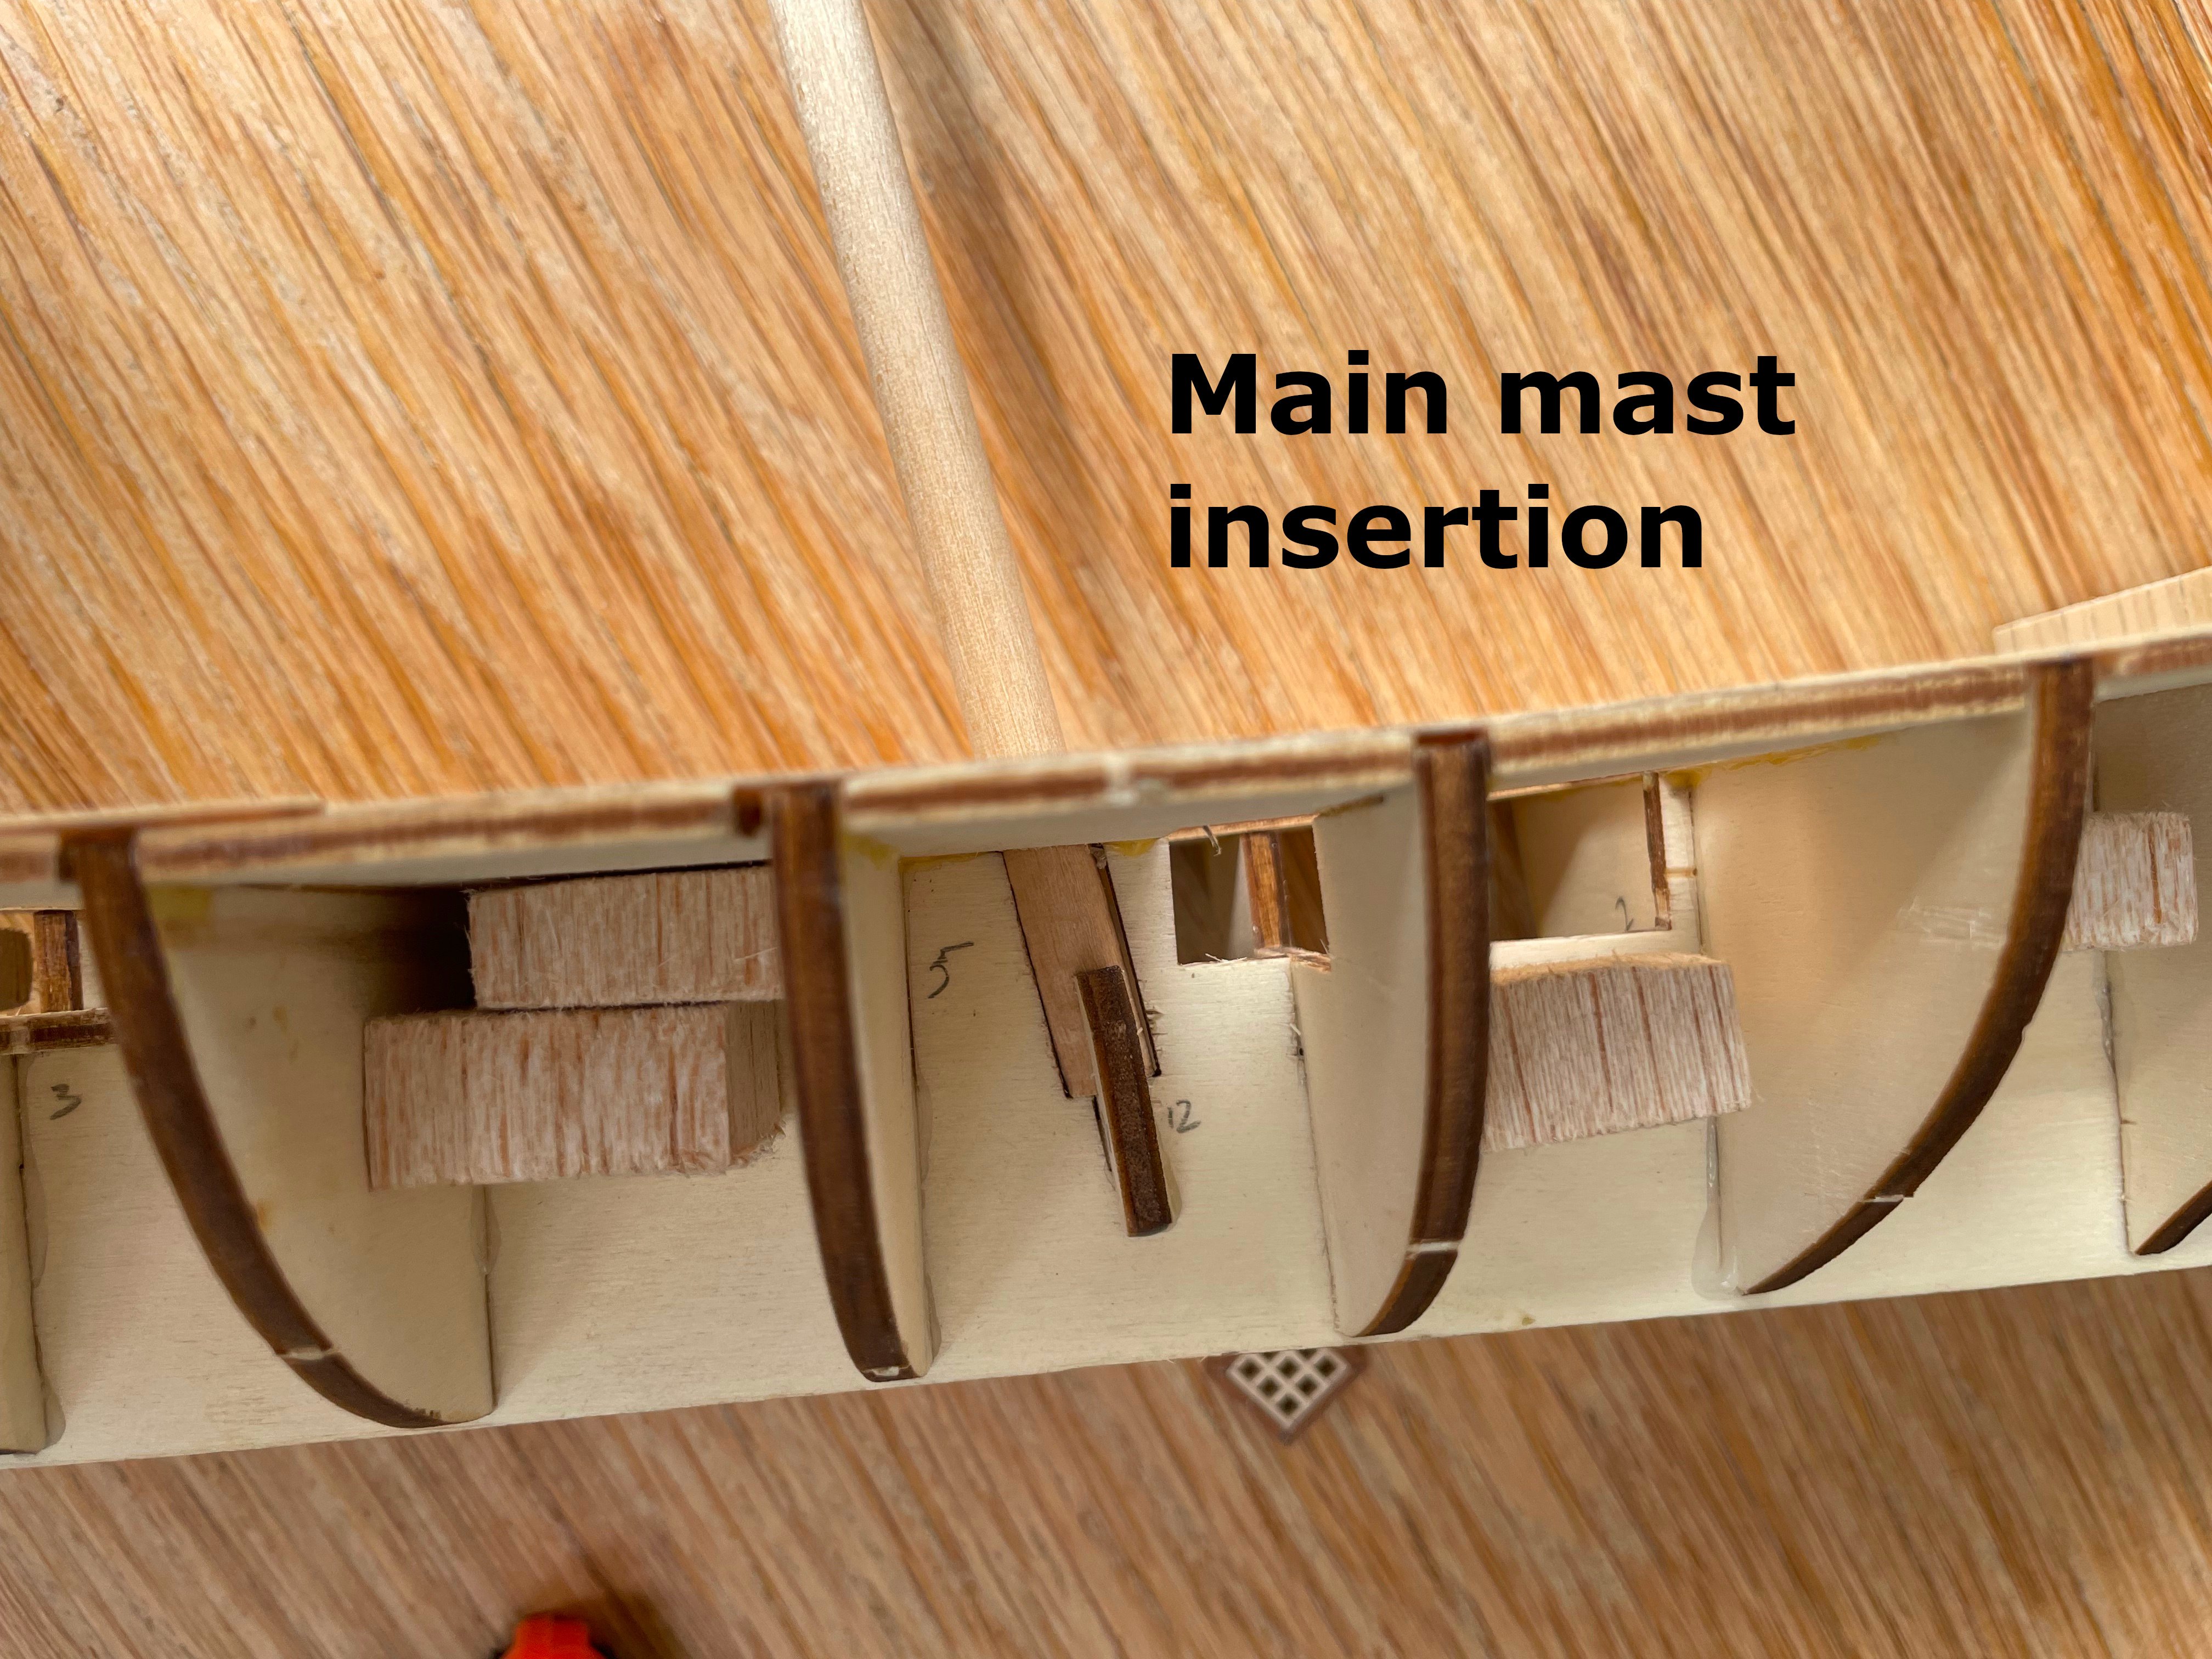
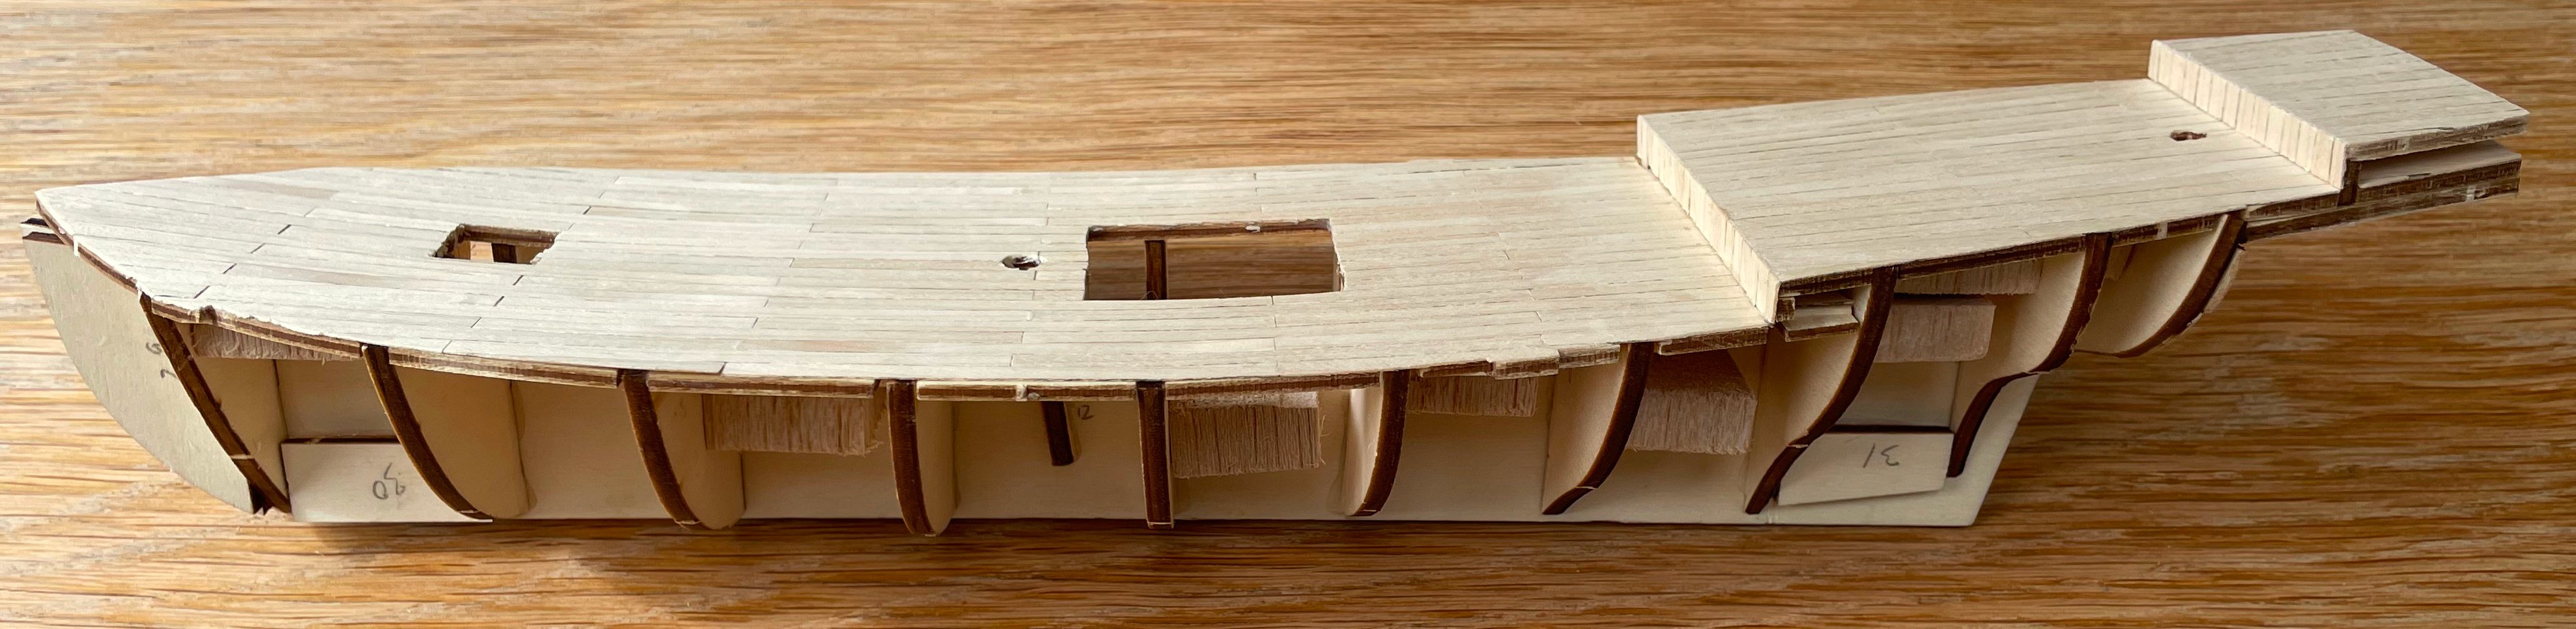
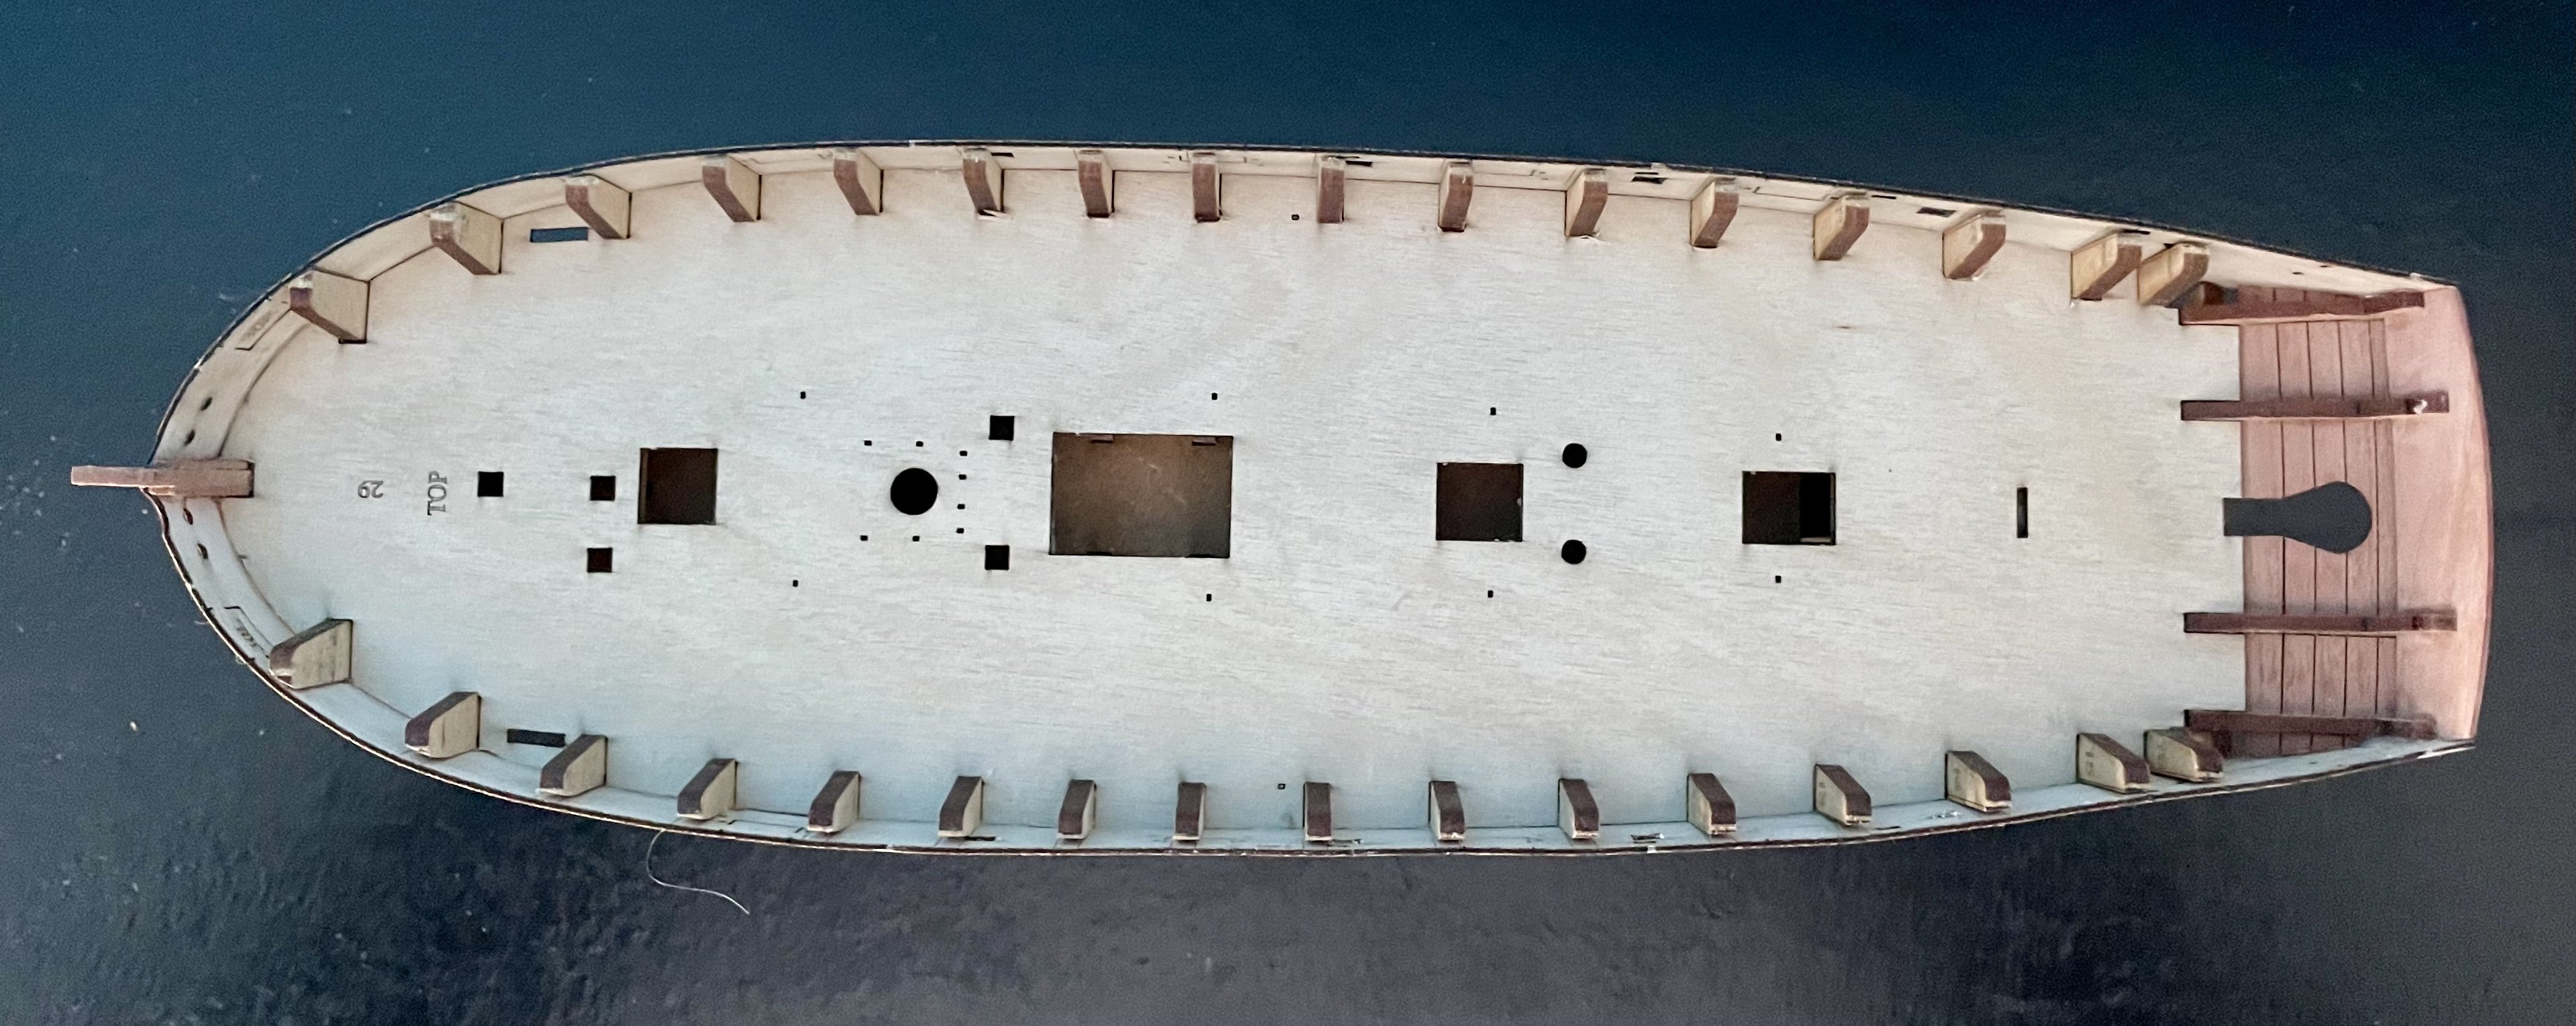
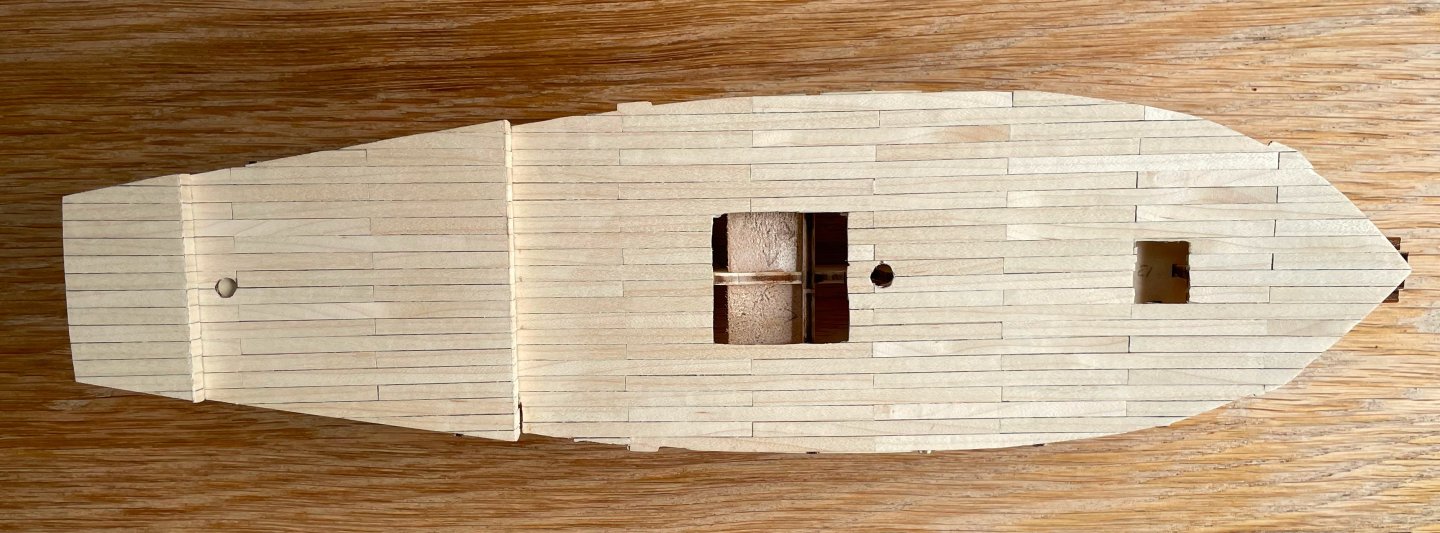
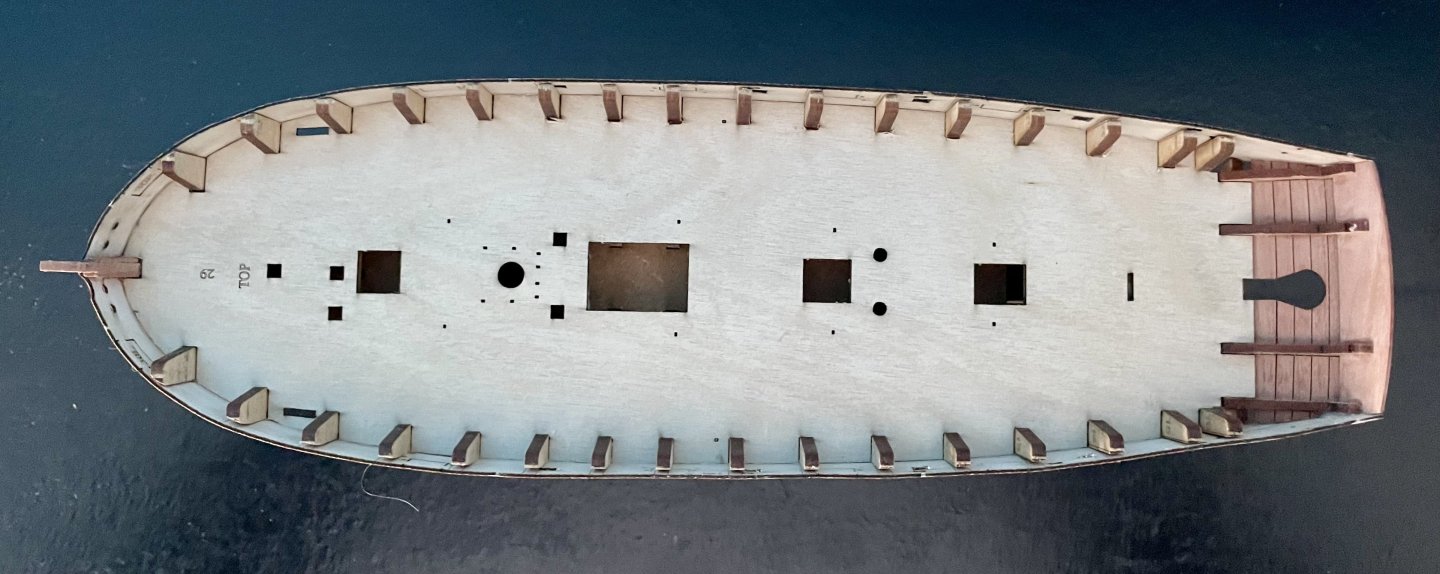
I bought this kit during the OcCre Christmas sale for the whopping amount of €45, less than half the usual price, and it was going to be my first build. But since OcCre does not deliver in the UK, I had it delivered at friends in the Netherlands and was planning to pick it up during the Christmas holidays. However, my Christmas trip to the Netherlands did not happen, and I bought two other kits in the UK (Midwest's dinghy and AL's Bounty jolly boat) and those became my first builds instead. I was recently able to finally pick up the OcCre San Juan kit, but am already working on a different kit (Vanguard's Sherbourne) and have kind of lost interest in the San Juan. However, I have now arrived at the (for me) somewhat daunting 'planking phase' in the Sherbourne build, and I have been thinking of experimenting with a few new techniques. Since I don't want to ruin the Sherbourne, I have decided to try these planking techniques on the OcCre San Juan instead; it was a cheap purchase and I had more or less decided not to build it at all earlier, so there is no great loss if the planking experiments are a failure. Nevertheless, I will try and build the San Juan to the best of my abilities; if I am doing it anyway, I may just as well try to do it well. I worked on the kit for the past two days and am no ready to start faring the bulkheads, followed by first planking. Today, I will report on my experiences with this kit up to that point. I thought it might be useful to start my build log of this kit aimed at the novice ship modeller with a little comparison to two other beginner kits which I have worked on, and which have price points which are not too far apart, namely Artesania Latina's Bounty jolly boat and Vanguard's HM armed cutter Sherbourne. I hope this is allowed in a 'build log'; if not, I am happy to remove this comparison. But I felt it might be useful for other beginners out there, who are in the process of deciding on their first or second kit. The comparison: Vanguard clearly wins in terms of quality and quantity of materials provided but, for their price, the AL and OcCre kits are not bad OcCre is by far the worst of the three in terms of instructions, which is an important differentiation point in kits aimed at absolute beginners. Both AL and Vanguard offer very detailed instruction booklets, illustrating every single step with lots of text and photos. OcCre's kit is much more traditional: two pages of minimal instruction texts and a small, separate booklets with some photos. OcCres instructions are clear and to the point, but they provide limited guidance to someone who has never built a model boat before. As an aside, even though AL's instructions are very good, Vanguard's are even better. Vanguard is also the clear winner in terms of hull construction. Here, OcCre is particularly weak, as I will discuss. AL and OcCre's kits come with sails (of reasonable quality). Vanguard's does not. In terms of historical accuracy, Vanguard's kit is excellent, as expected. AL's kits is problematic in describing the jolly boat as Captain Bligh's vessel but as a model of a contemporary ship's boat, it is not terrible, I think. I believe that there are more serious problems with OcCre's kit, as I will discuss. I think that a beginner's kit ideally offers double plank-on-bulkhead construction. Both Vanguard's and OcCre's do, but AL's has only single planking, which makes getting a good result non-trivial for a beginner; I had to resort to painting the whole hull to hide my first-planking errors. In terms of pre-cut and pre-scored elements, Vanguard's kit is, again, the clear winner, making it considerably easier (and quicker) for a beginner to get a great result. OcCre's and AL's kits are more traditional, requiring more part constructions from basic elements. Not a problem in itself, of course. Overall conclusion: none of these kits is bad, but Vanguard's is the clear winner of this comparison, even though it is, admittedly, also the most expensive. OcCre's kit is, in my opinion, clearly the worst of the three. That said, I am still enjoying the build and at the €45 I paid for it, the kit is a bargain. Onto the actual build. As usual, the process starts with gluing the bulkheads into the false keel. The fit is quite loose, and there is a lot of potential 'wiggle' in the bulkheads, up to 20 degrees or so either way. To ensure that they are aligned at a 90 degree angle to the false keel, I decided to install square pieces of balsa wood (see picture below). All the deck planking - and there is a lot of it in this kit - is made with 5mm wide, 0.6mm thick limewood. At a scale of 1:70, that translates to a width of about 35cm (14 inches) which is, I believe, probably twice as wide as actual deck planking on a ship from this period (early nineteenth century). So, not particularly accurate, but since I don't have any other stock, I nevertheless used the strips provided. The instructions say to glue the strips full length onto the (several) decks and to suggest more realistic plank length by marking the strips with a pencil at appropriate points, and to suggest tree nails with that same pencil. Rather than do that, I cut the strips to an appropriate length and glued the now much shorter pieces onto the decks. To suggest caulking, I darkened the strips on one side and one end with a pencil. I decided not to make any tree nail marks as I suspect they would not have been visible at this scale (but am happy to be corrected on that). The instructions also say to plank the main deck before glueing it onto the false keel and bulkheads. I was worried, however, that that would make it difficult to sufficiently bend the deck to the curvature of the hull assembly and therefore opted to soak the deck first, then let it dry in place overnight, then glue it in place and only then glue the deck strips in place. After attaching the deck planks to the main deck and all other surfaces that require them, we get the picture below. At this stage, it becomes clear that the kit has some peculiarities / defects. First of all, the main deck did not properly fit the positions of the bulkheads, despite my best efforts to keep everything perfectly square. Not a major problem, as the attachment points between deck and bulkhead are hidden underneath the deck planking but had I followed the kit instructions and planked the deck before attaching it, I would have had a problem here. More problematic was that the holes in the main deck for fitting the support for the higher deck were too far forward. This left me with a gap in the deck planking, which I then had to fill, resulting in a visible repair. Secondly, the main deck has two openings looking down into the hull. These are present in the ply deck and, the instructions say, need to be cut out of again after the deck has been planked. The picture below shows them from above. The kit has two sets of grates, and one would think that those should be positioned over the holes, mimicking a peek into the hull. However, instead, the holes are covered by two closed constructions, so are entirely pointless - as is visible in the second picture below. The grates are positioned straight onto the deck, which is clearly visible through them; I plan to paint black underneath, to at least suggest an opening into the hold. The grates are too small to fit over the current holes, so that is not an option. Also, the small grate at the far back is positioned over a very shallow part of the ship (only about a foot or so deep, on the 'real' ship), and would have served no conceivable function. Everything points to a mistake in the design. Thirdly, the mizzen mast is positioned in this same, very shallow aft section and, therefore, has no support at its base at all. The pictures below show both main and mizzen mast inserted into the hull construction. Compare the depth of the main mast support with the total lack of it on the mizzen mast. I find it hard to believe that a mast would ever be positioned in such a shallow part of a ship, as even moderately strong winds would immediately endanger the structural integrity of both the mast and the aft section itself. I will have to decide what to do about this when the time comes to install the mast, but I think the current design is unrealistic. Again, I am happy to be corrected. The fact that a grating and a mast are positioned over/into this extremely shallow aft section also makes we wonder if the kit design originally had a much deeper section here. I have tried to find pictures of fellucas online, and could not find a ship with a similar protruding, thin aft deck. I don't know the historical basis (plans, pictures, descriptions?) for OcCre's design. Fourthly, and relatedly, I am not entirely convinced of the historical reality of the San Juan. I cannot find any information on the ship anywhere, except as referring to this kit. The kit description gives quite a grand history for this little coastal ship, claiming it was the first ship to revisit Spain's former American colonies after the (several) war(s) of independence when 'merchant marine ships all but disappeared from the peninsula, leaving only small coastal sailing boats behind to re-establish the routes to the Antilles.' I have been unable to verify this story and find it somewhat hard to believe that there were no more suitable vessels available for the Atlantic trade, either in Spain itself or through the charter of foreign vessels. The San Juan, if it resembled the kit design, hardly seems suitable for travel outside the Mediterranean sea - the traditional area of operation of feluccas. But, of course, I may be completely wrong here. Despite these misgivings, I will continue to work on this build, and hope to start the actual 'planking exercises' shortly.


-
Thanks, Chris. Will use that method on my next (Vanguard, of course!) build.
-
PS Thanks, Robert for your helpful comments on faring and clamping for this kit.
-
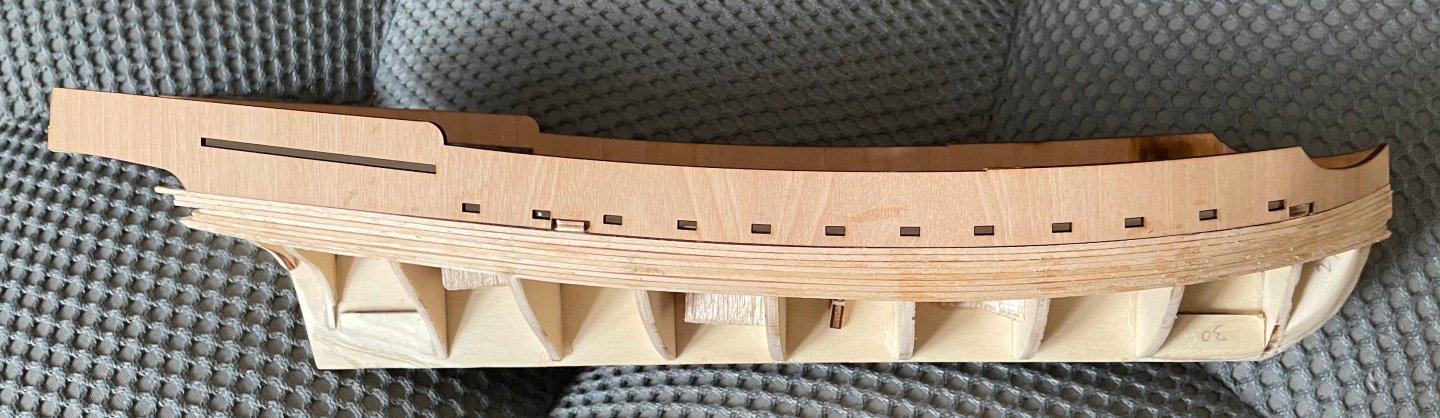
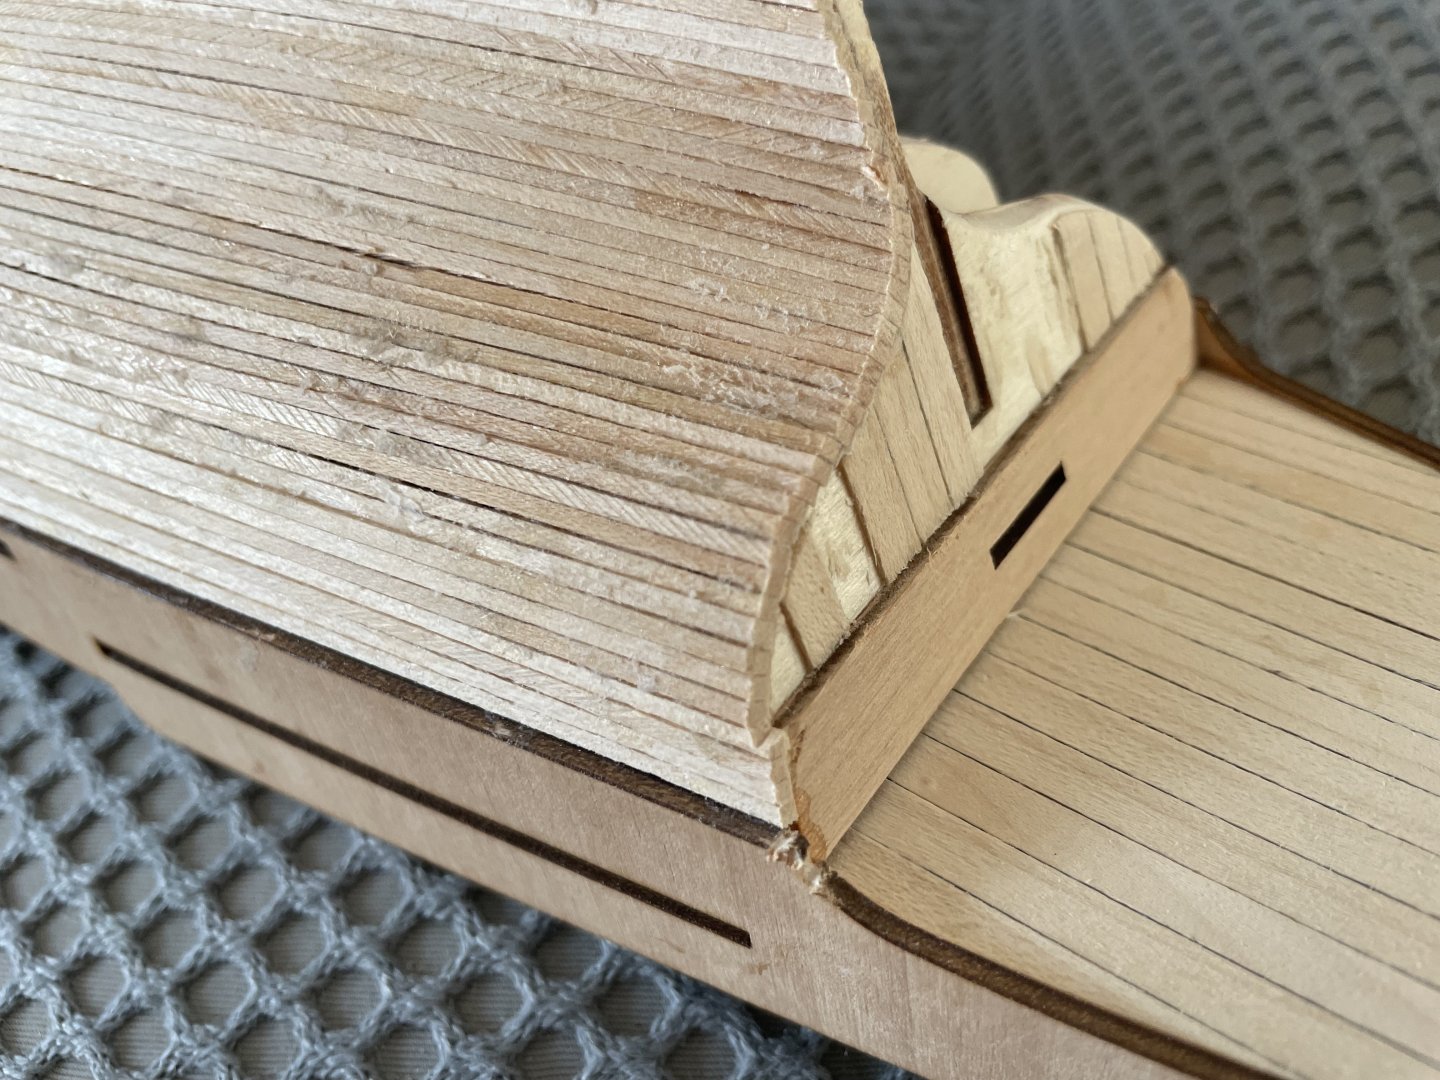
In the last two days, I attached the bulwark patterns - see pictures below. What you are seeing here is actually the result of my second attempt to attach the patterns, after my first one being a failure, despite the kit instructions clearly stating "We recommend that these parts are dry fitted several times to ensure correct positioning". In my first attempt, I left a gap at the bow, on both sides. This not only resulted in an offset between the bulkheads and the lines on the pattern indicating those bulkheads but, more importantly, it resulted in too blunt a shape at the bow. This in turn would have resulted in a bad fit with the planking running up to the bulwark patterns, as well as with the laser-cut gunwales. So, there was really no choice but to carefully remove the bulwark patterns, using isopropyl alcohol to weaken the PVA glue, and to try again. I decided to use medium viscosity cyanoacrylate at the bow, to ensure that I would have tight fit there this time. I have one slight worry: at the starboard side, there is a gap at the top between the the bulwark patterns and the (temporary) bulkhead 'tops' which are supposed to 'guide' them - see detail picture below. But I don't think that is going to cause any issues down the line, as these temporary tops are going to be removed later, and the shape of the bulwark patterns is still close enough to that of the laser-cut gunwales (I checked). So, I decided not to remove and re-fit the bulwark patterns a second time, also because I fear I will end up damaging them, as I already did some slight damage to them during the first removal.


-
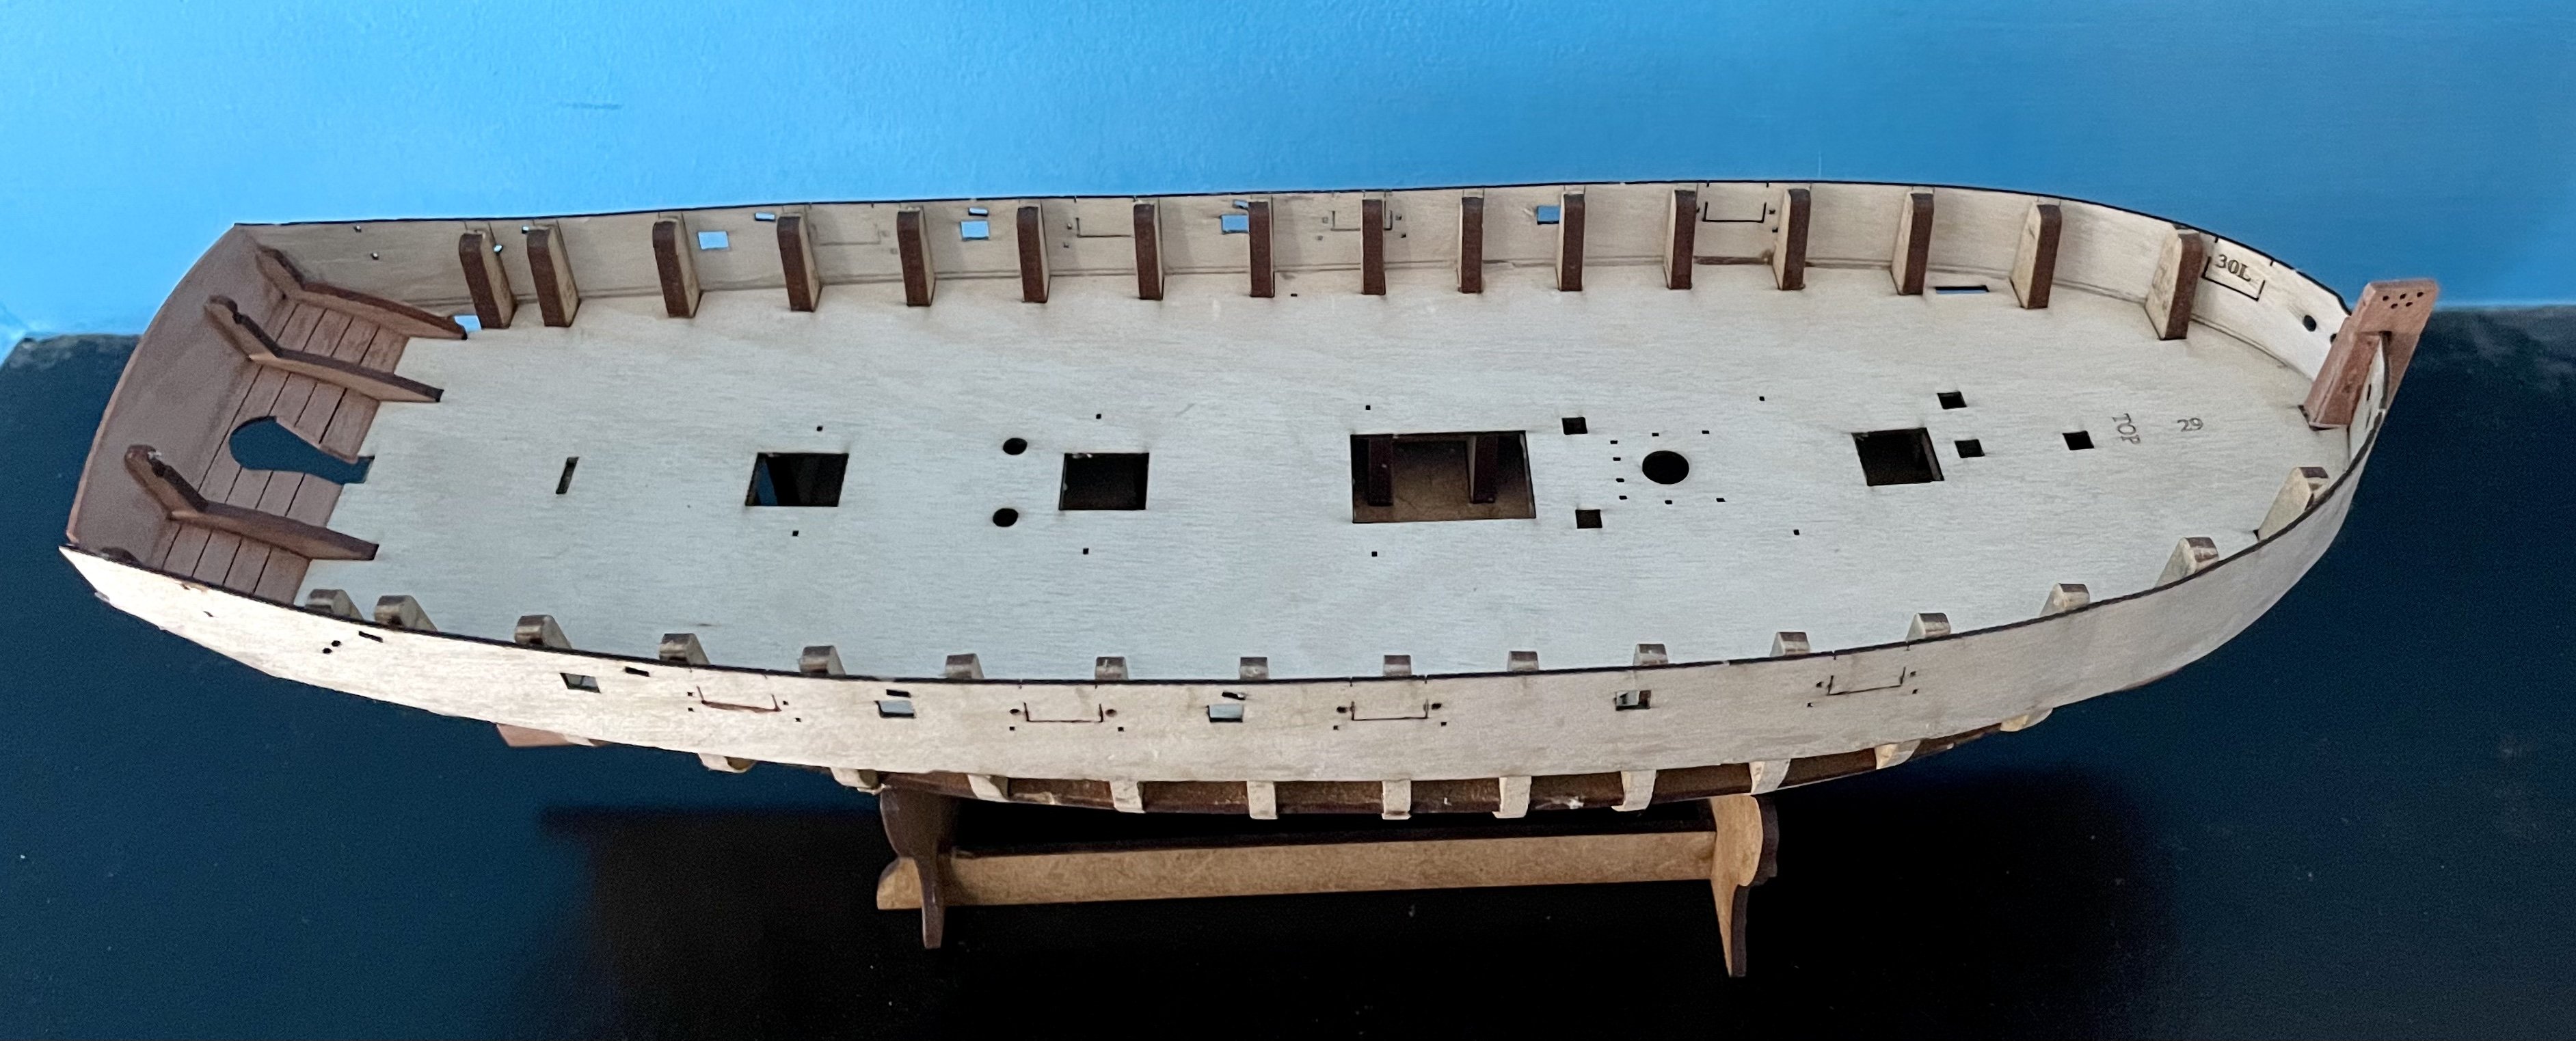
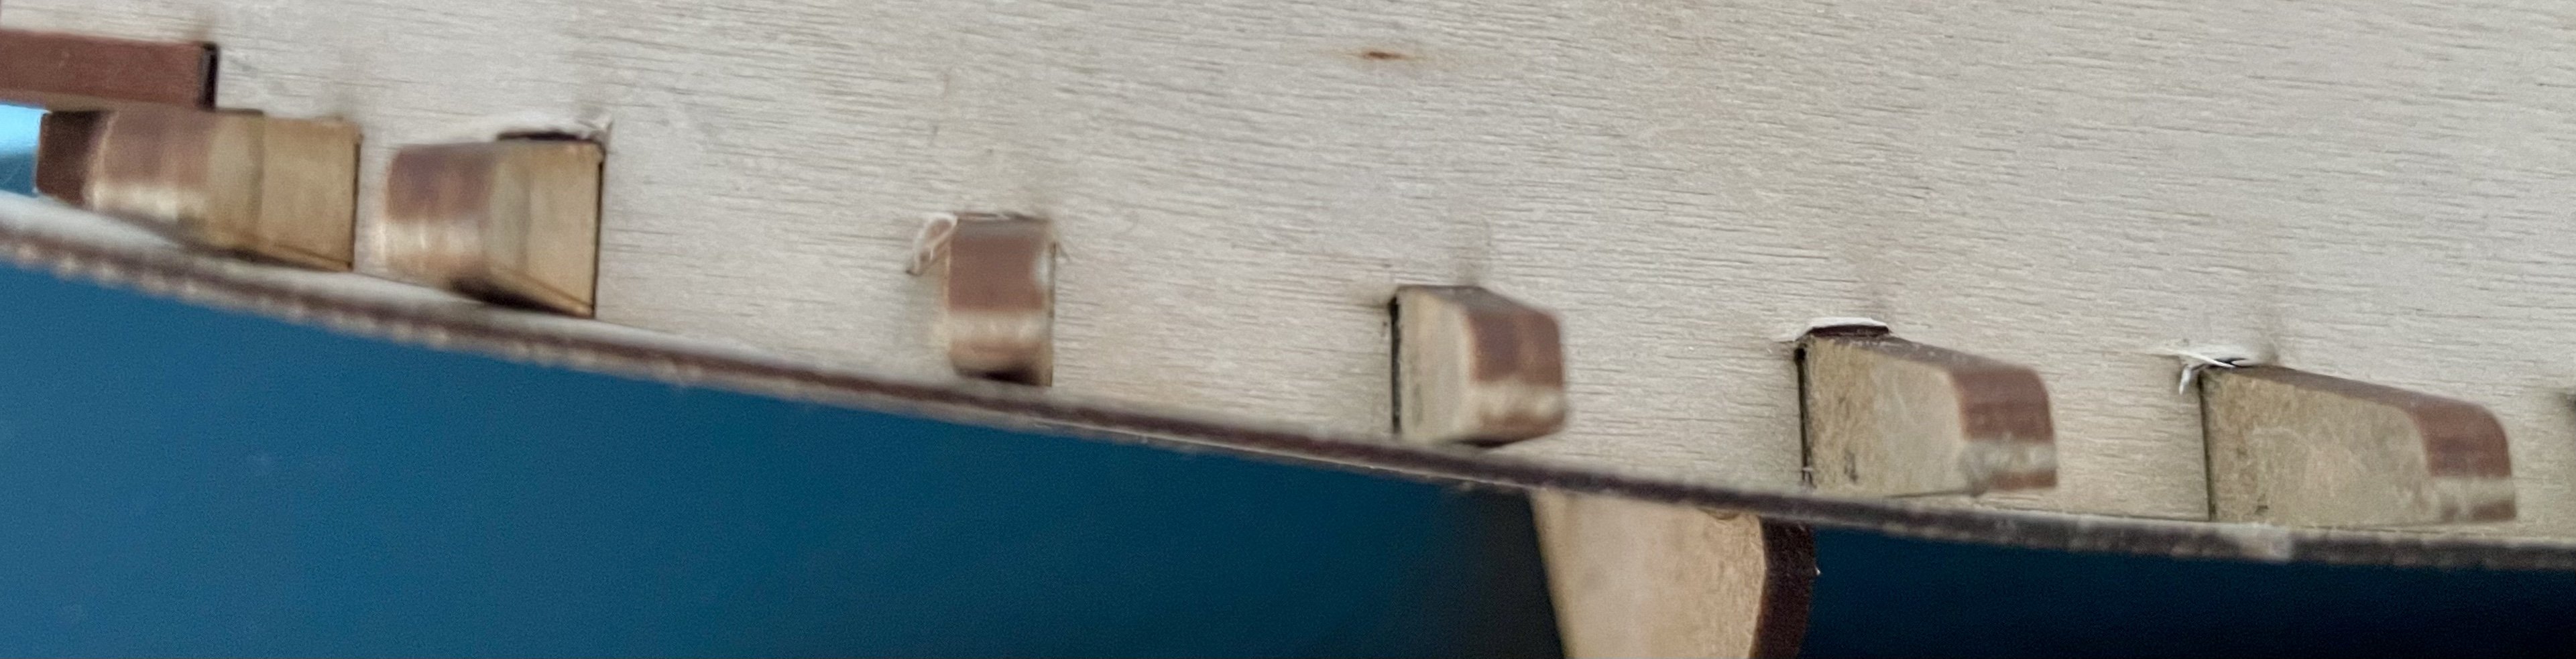
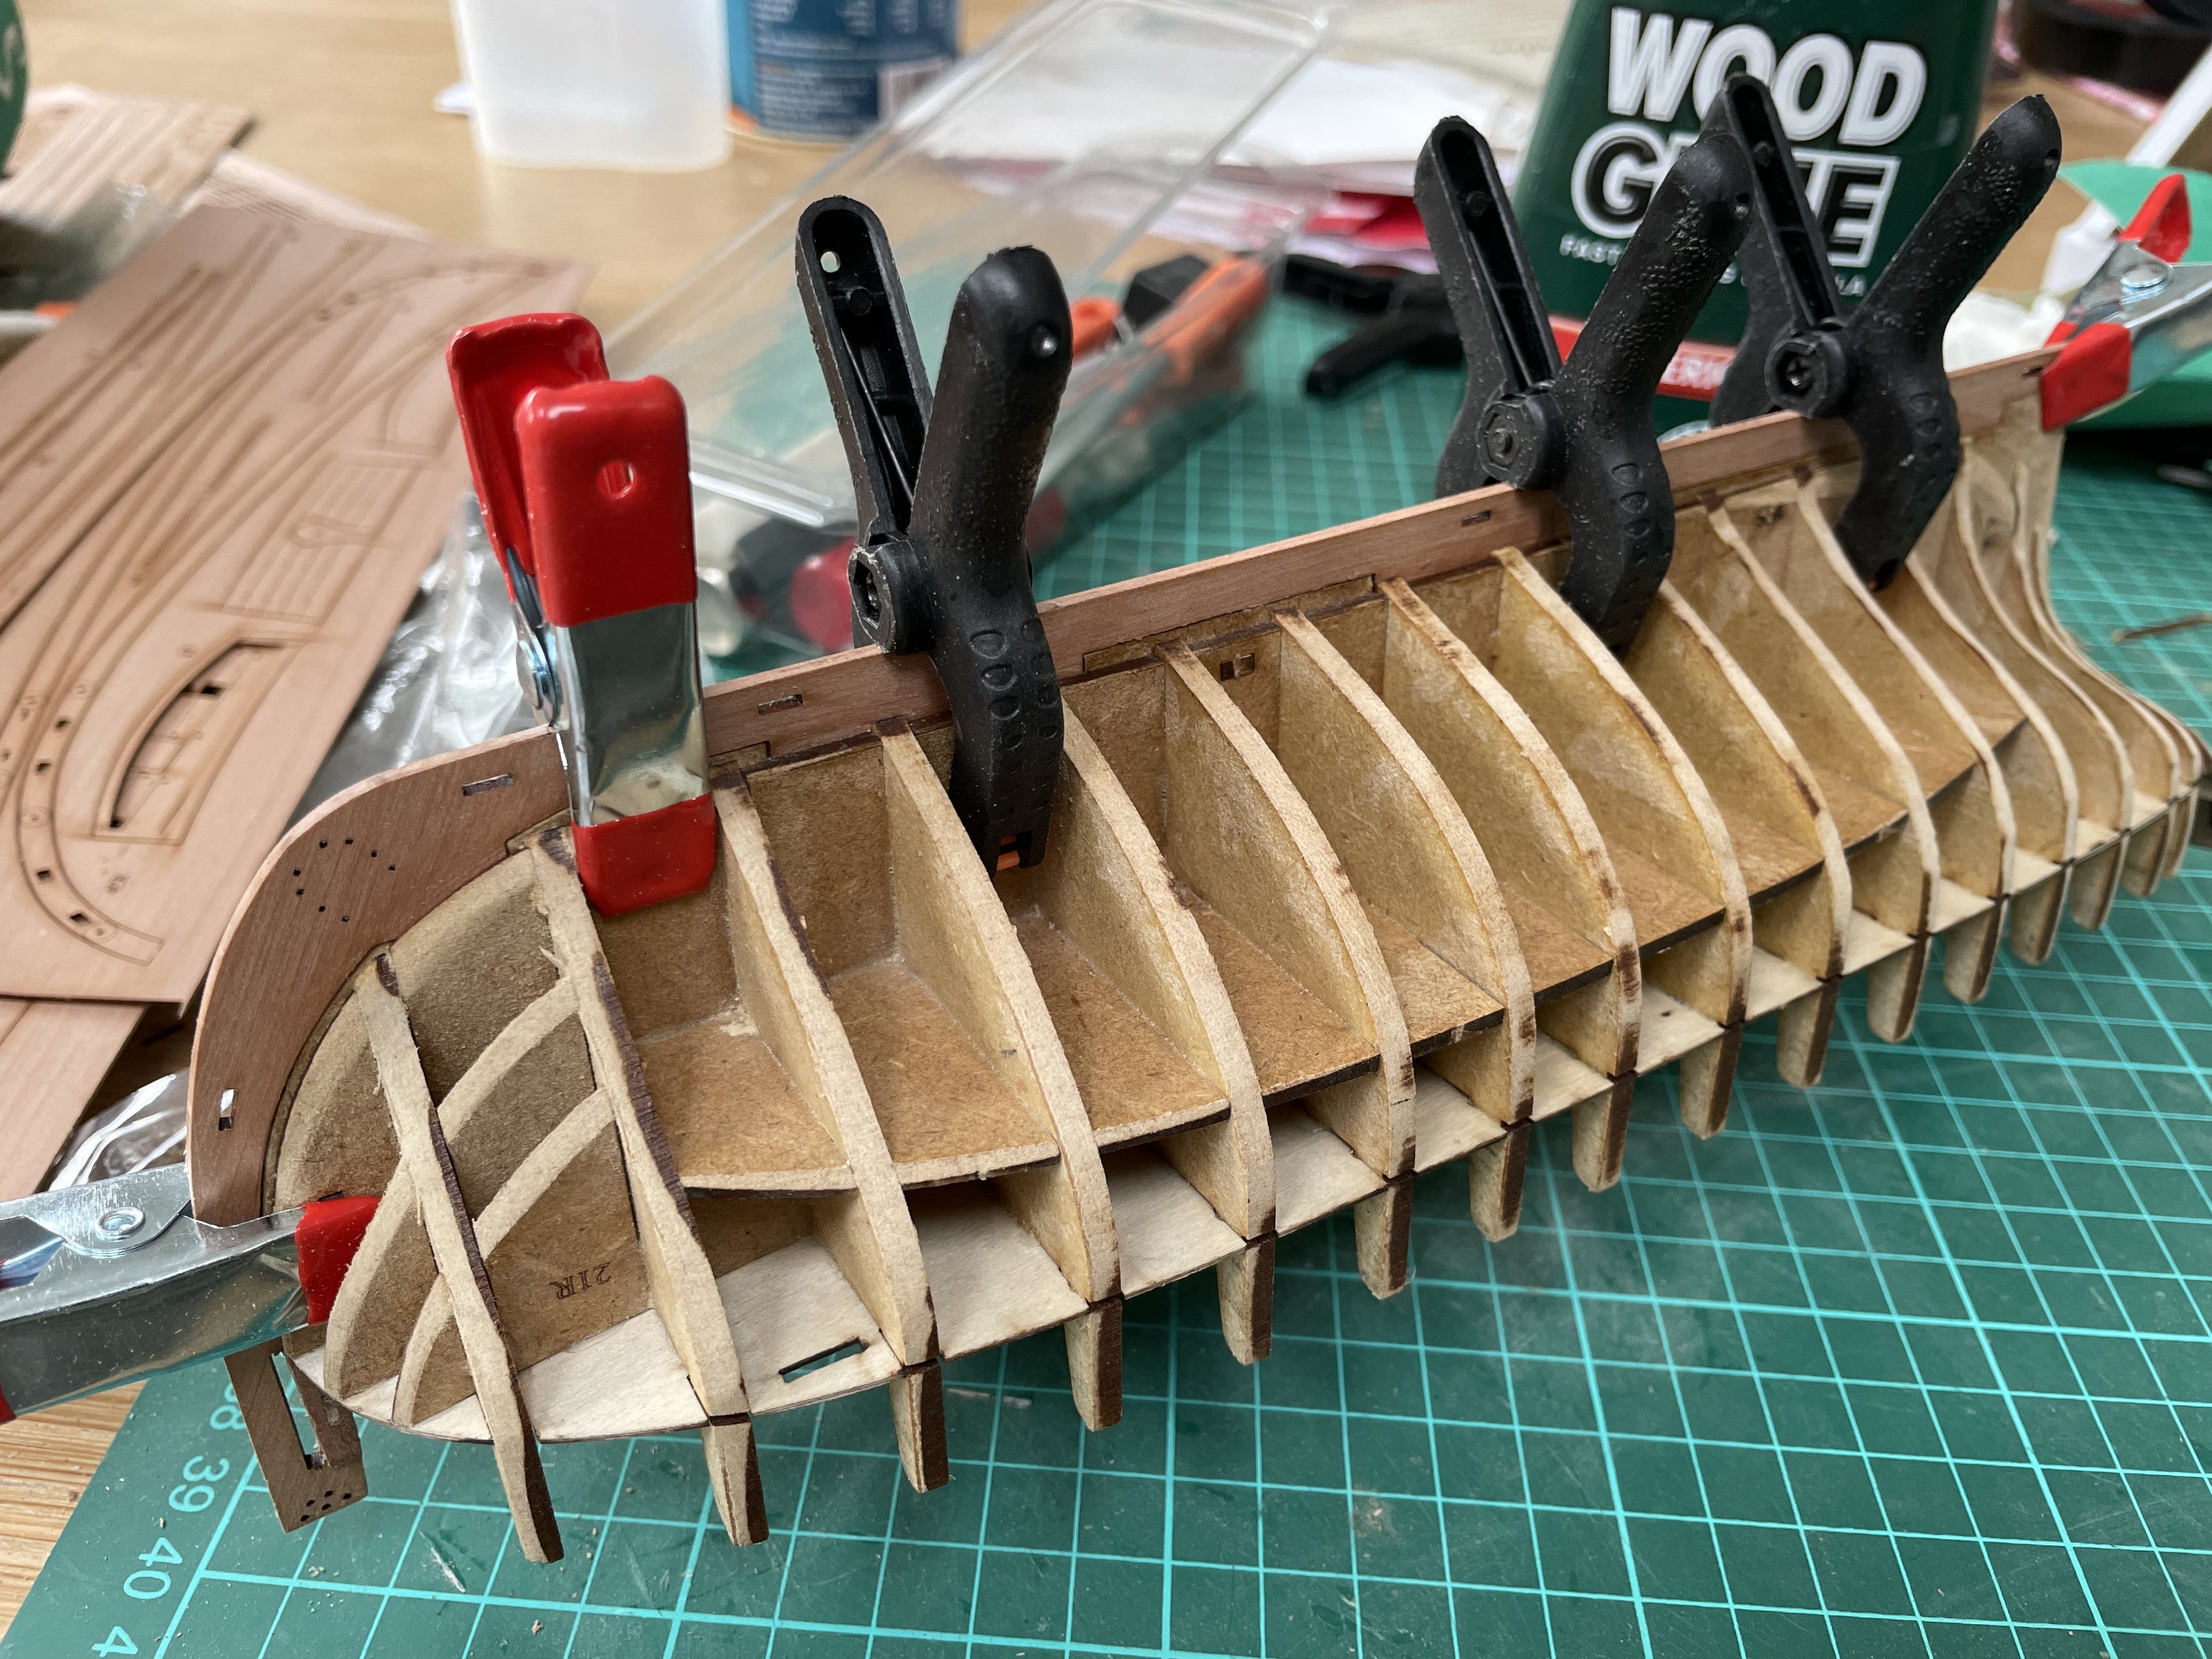
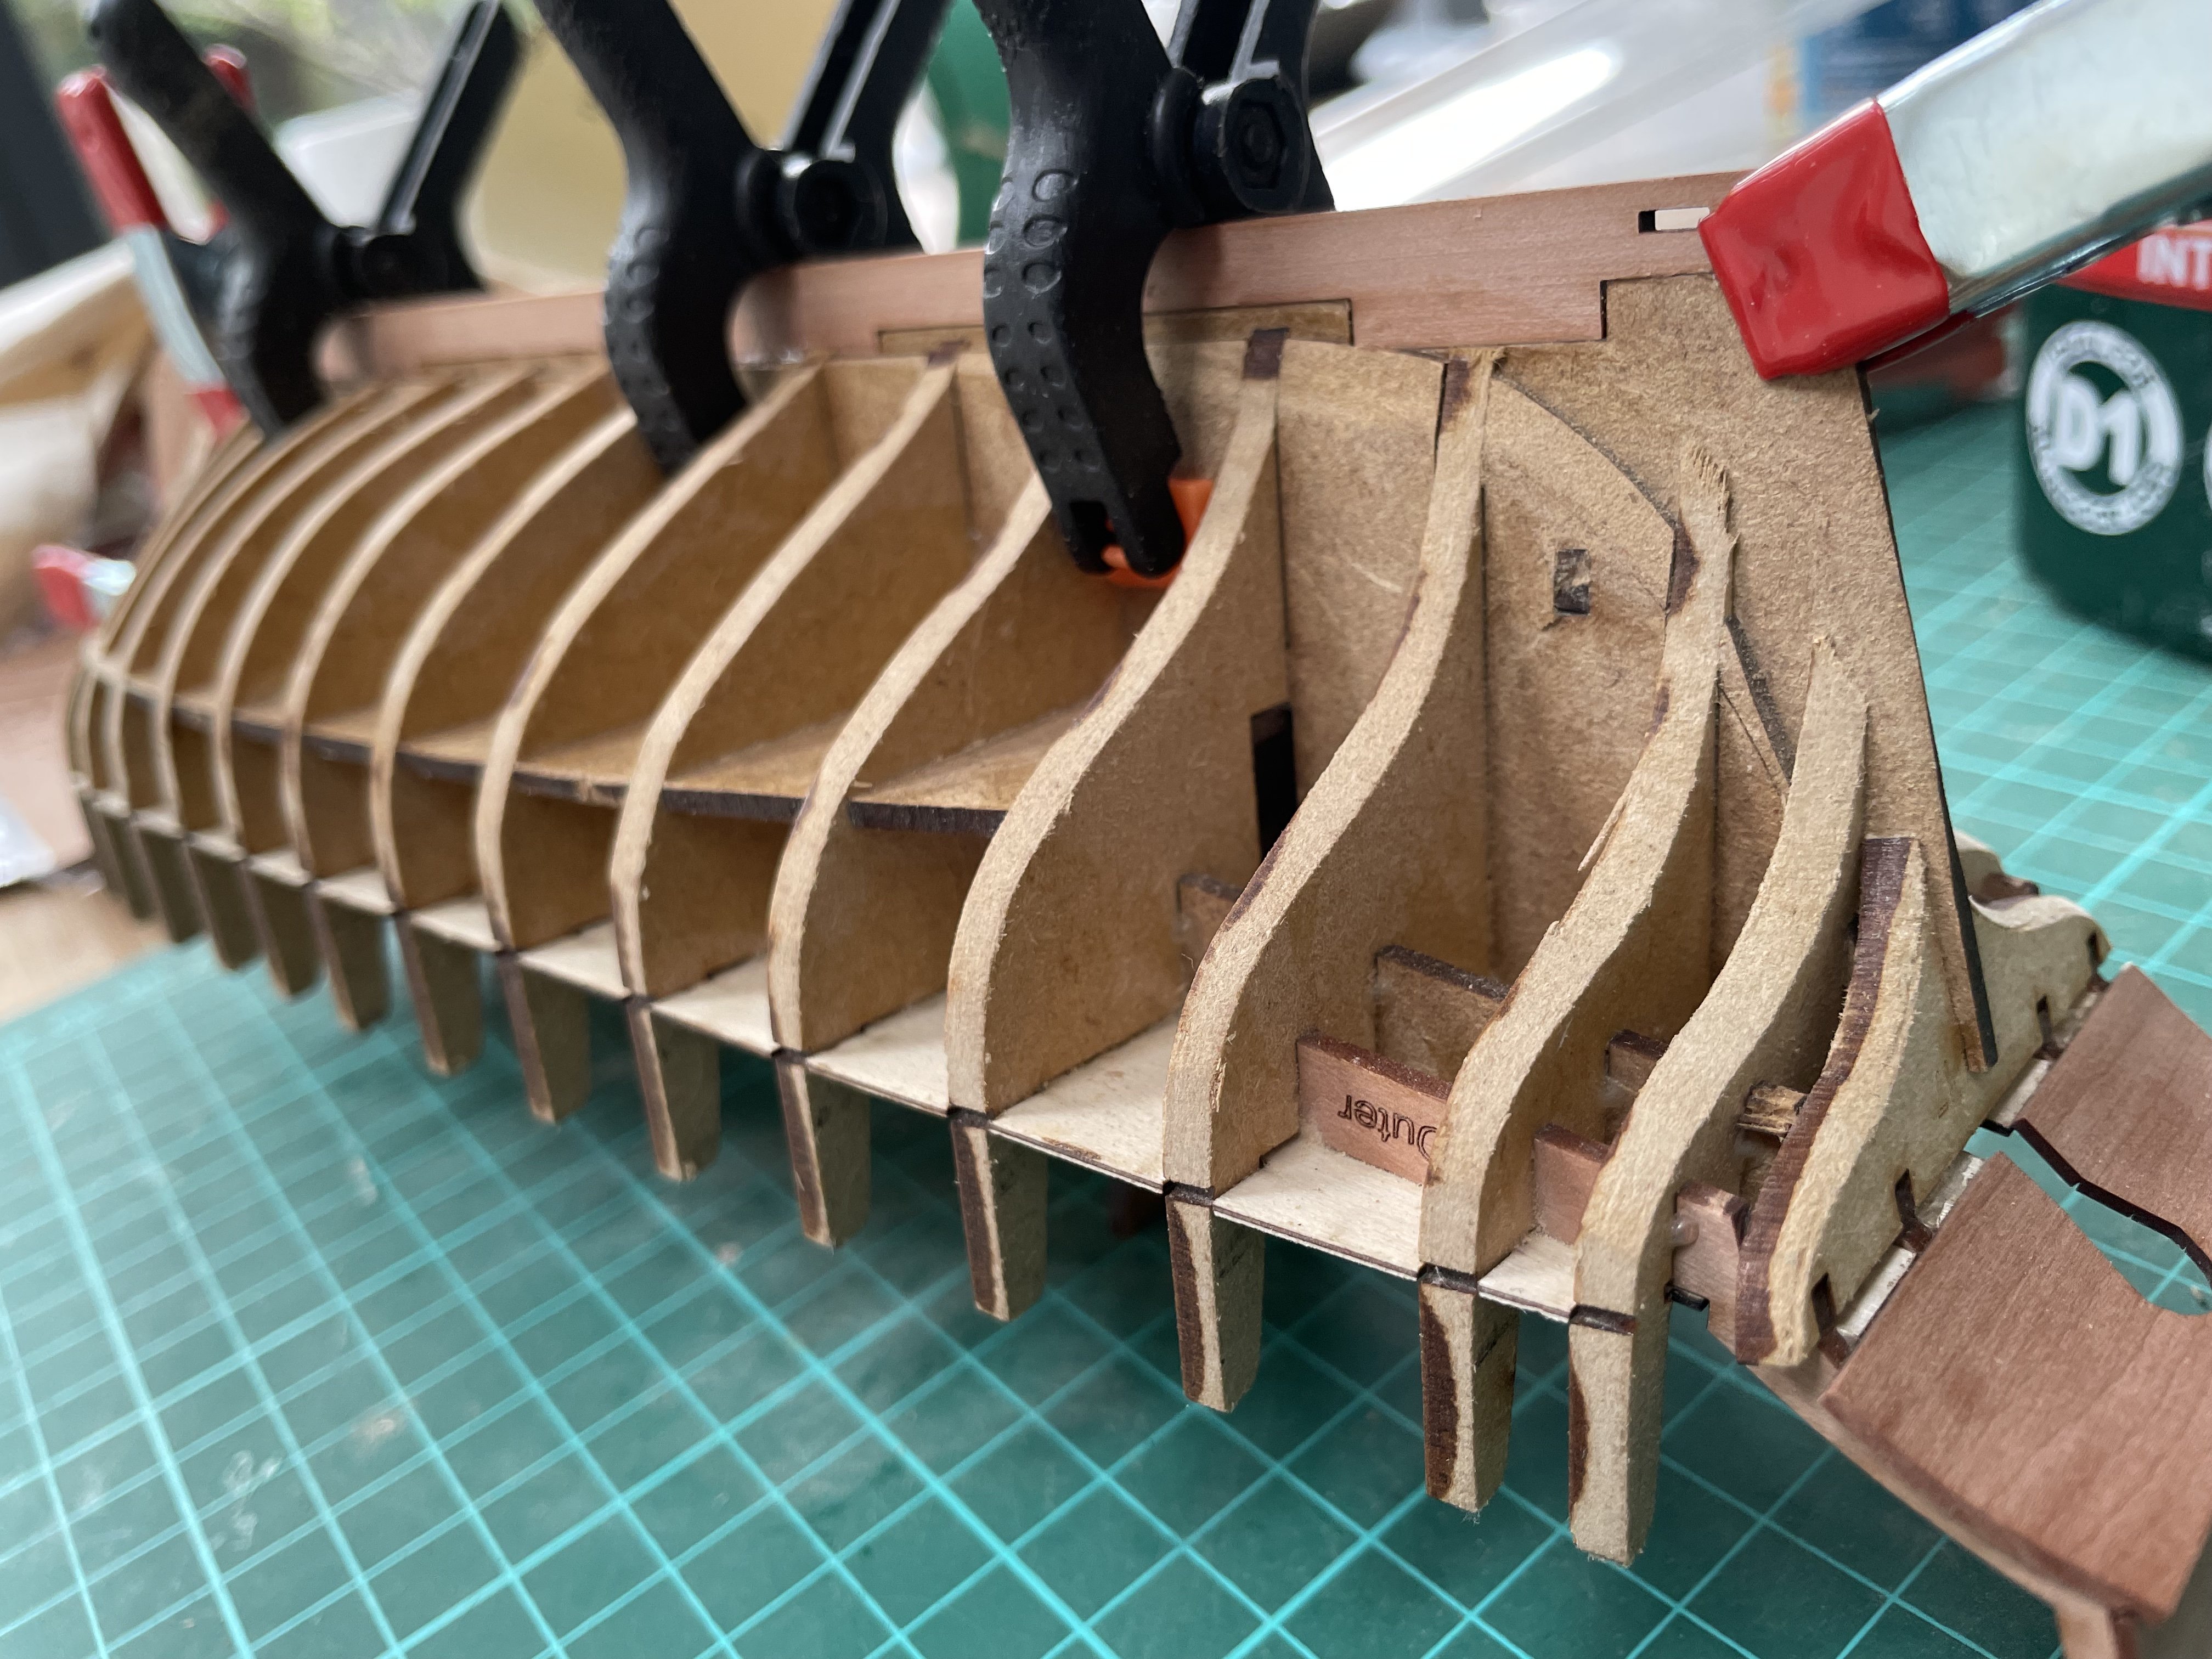
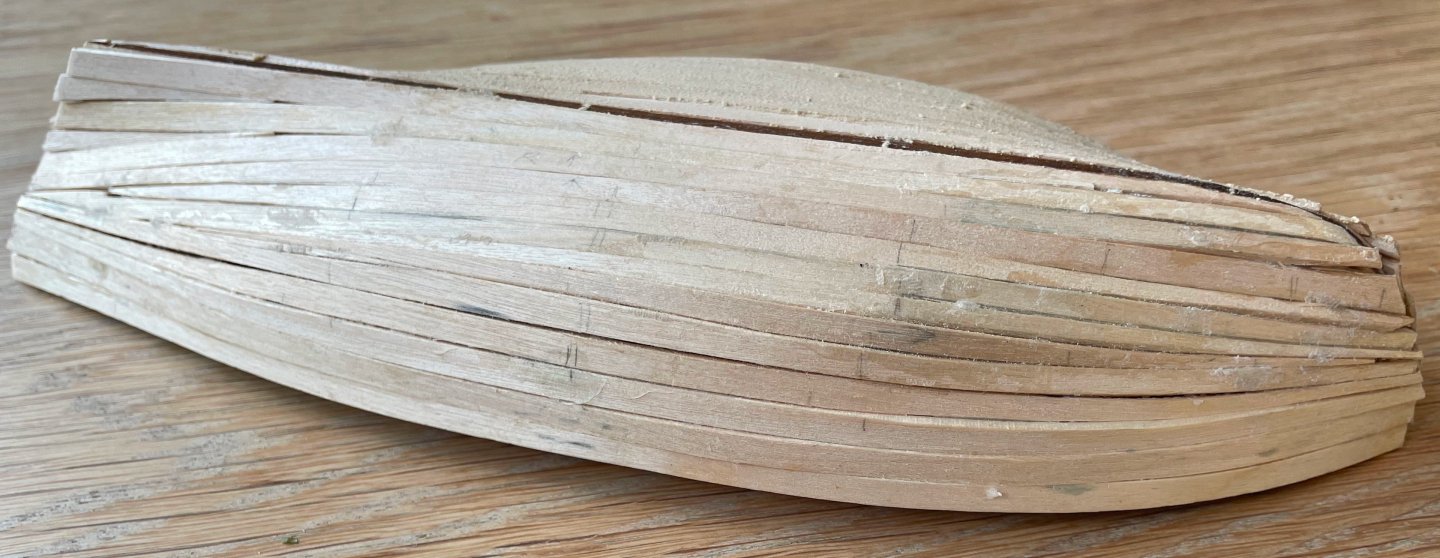
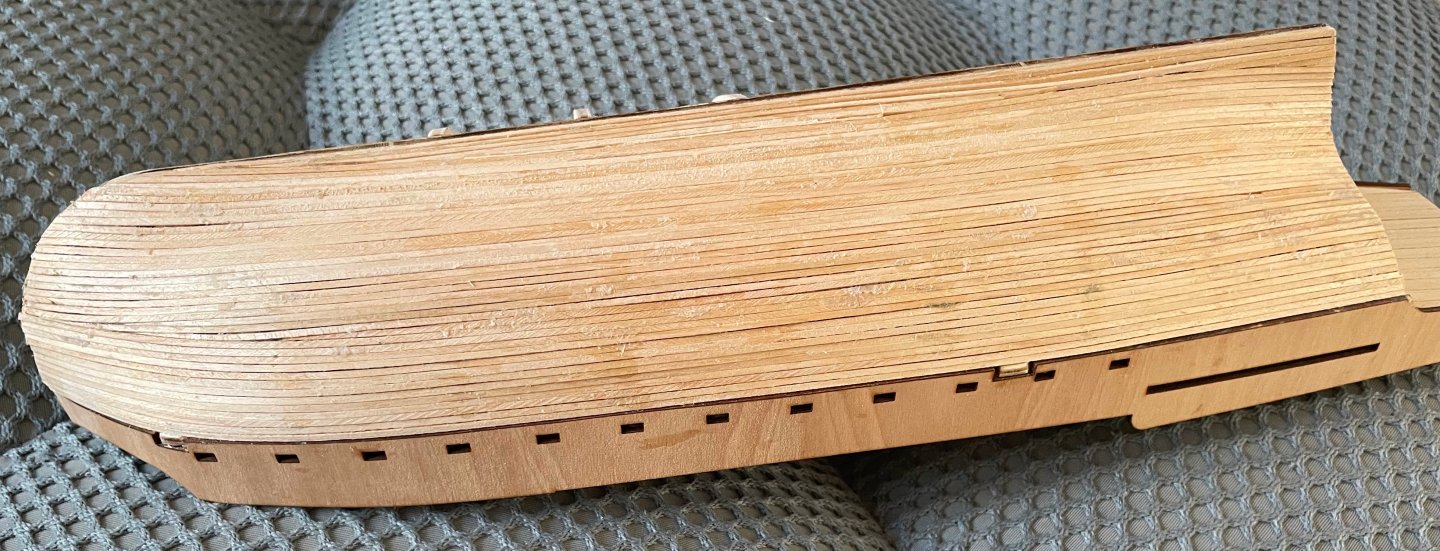
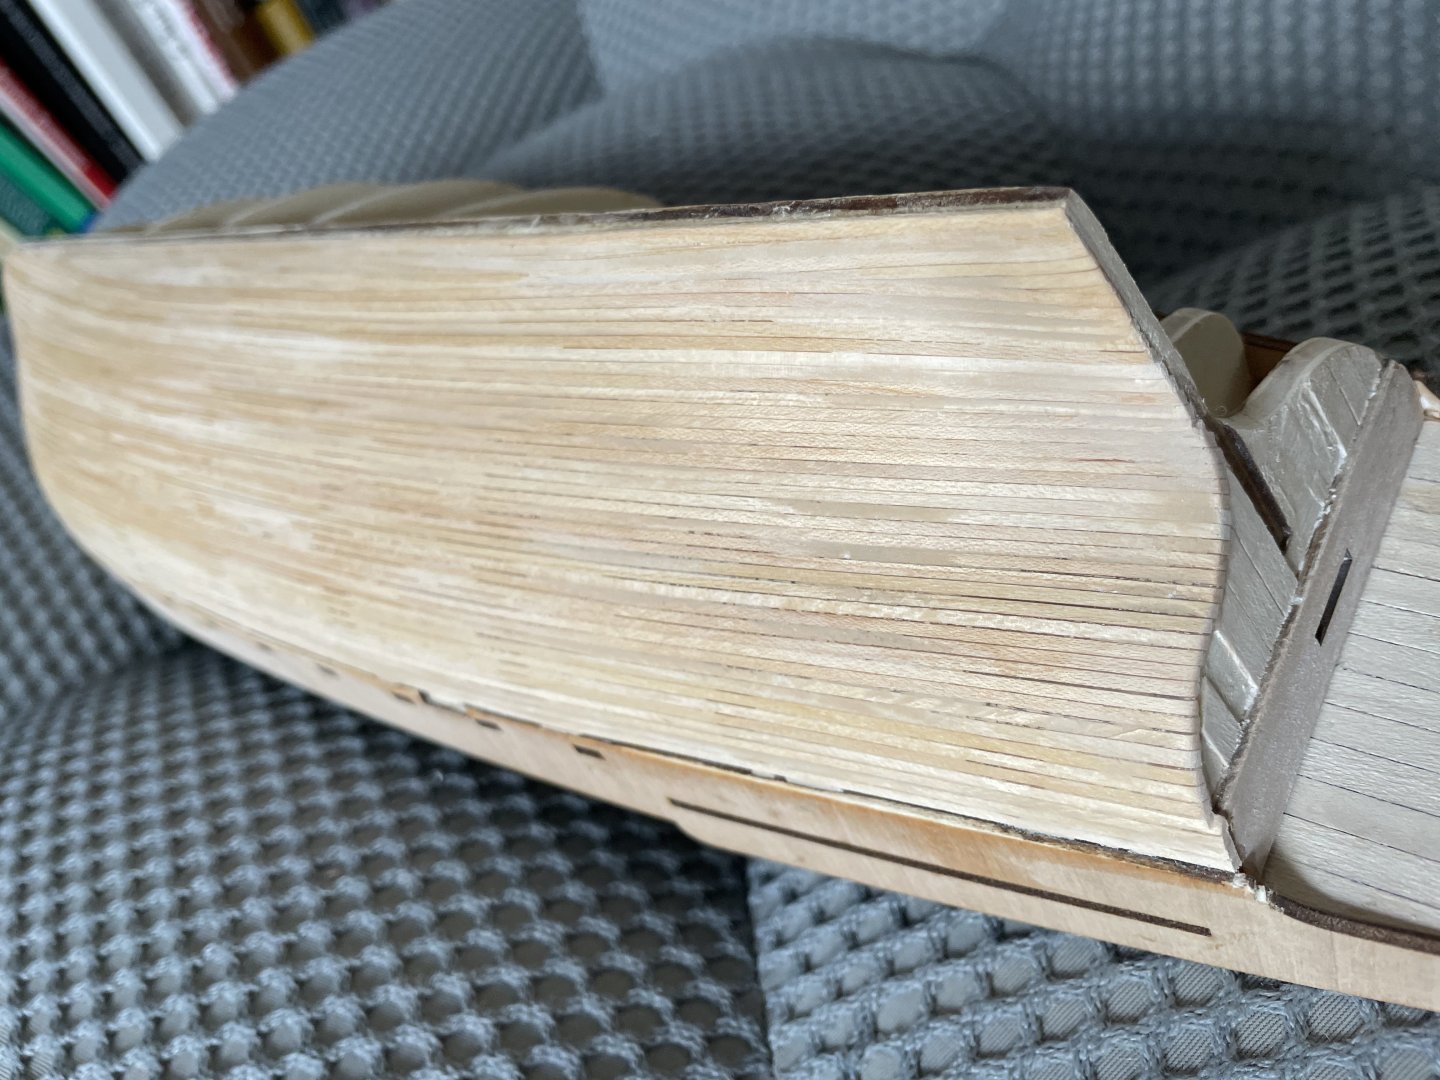
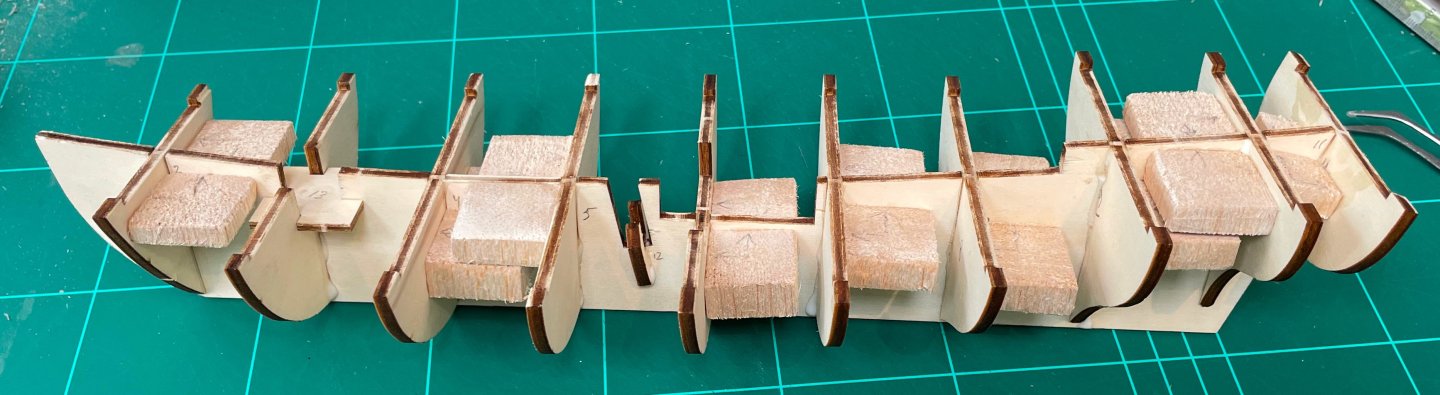
In my last post I wrote that I was now (physically, mentally perhaps less so) ready for first planking, but in my enthusiasme/dread I forgot that, of course, I needed to fair the frames and install the (central part of the) keel first. So I did that yesterday, resulting in the two pictures below. I hope i faired enough, because there is still some laser burn showing, particularly on the frame closest to the stern of the ship, as is clearly visible in the second picture. But I felt that if I took off more there, it would impair the natural run of the planks, and I would need to take off a lot more from the frames preceding it. So I think I will leave it as such. I really liked the way Chris designed the keel, as it slots nicely into a couple of strategically left-open slits in the hull frame assembly, thus allowing for secure glueing into place. In the only other true plank-on-frame model I made, the keel was only installed after all the planks had been fitted, making for (a) poor fit of the keel to the rest of the assembly and (b) difficulties in the planking, particularly at the bow, as it was difficult to secure the planks there, more so since it was a single-planked hull so I could not use any pins. In terms of planking, I am going to follow the instructions in the kit to the letter, which means I will be securing the first planking with temporary pins. I know that not everyone agrees this is good practice, some members of this forum prefering to use clamps only. But on my previous plank-on-frame build, which only had one level of planking as I wrote above, I could also only use clamps and that made the whole process quite slow, as I had to let every row of planks dry fully for a day or so, before being able to put on the next row. I hope that using pins will speed the process up. But if I am missing the mark here, I would be very happy to be corrected. As I have made clear, I am quite daunted by the planking stage of the build, and welcome any advice!


-
You are making very rapid progress. Looking good!