


marktiedens
-
Posts
1,737 -
Joined
-
Last visited
Reputation Activity
-
 marktiedens reacted to dragzz in wasa 490 by dragzz - billing boats /1.75 scale
here is the new build thats iam going to start i got this kit used for 300.00 cad i looked over the kit all of it is there this is the 50 anniversary kit that what thay say its comes with billing slip 397 with the kit poeple say not to use but its with the kit so not to sure what to do there here a pic
-
marktiedens reacted to JanV in Wasa 1628 by JanV - Corel - scale 1:75 - Vasa
a dry-fit for the canons
and already the blocks prepared
-
marktiedens reacted to Karleop in Vasa by Karleop - FINISHED – Billing Boats – reviving a poorly built model
A sunday update:
One of the main differences I saw between the BB plans and the Clayton´s and museum Vasa pictures are the top mizzen stay and the lines that hold the spars of the main mast topsail to the mizzen mast (braces). Unfortunately in the pictures is impossible to distinguish how are they fixed some of them. So, I figured out how to install them thinking in a logical form. Here you can see my solutions:
Saludos, Karl
-
 marktiedens got a reaction from tasmanian in Wasa by marktiedens - FINISHED - Corel - scale 1:75 (Vasa)
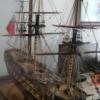
Update -
Upper hull planking finally done & the small windows made & installed - I hope I got them in the right place. I made them by gluing some fiberglass window screen to some clear acetate & just touching the screen material with some brown paint & a really small brush.Also had just enough decorative brass strip left over from my last build to make the surrounds for the companionways.then i made the doors from some 1 by 3mm strips.The hinges were from my spare parts box - a little short but they will do.Now I have started on the false top timbers for the railings.By the way - there is no finish applied to anything yet so some areas may look a little spotty.
Sorry about the picture quality - I don`t have a really good camera(I don`t think I could take a good picture with a good camera anyway).
/Mark
-
 marktiedens got a reaction from Karleop in Wasa by marktiedens - FINISHED - Corel - scale 1:75 (Vasa)
Update -
Upper hull planking finally done & the small windows made & installed - I hope I got them in the right place. I made them by gluing some fiberglass window screen to some clear acetate & just touching the screen material with some brown paint & a really small brush.Also had just enough decorative brass strip left over from my last build to make the surrounds for the companionways.then i made the doors from some 1 by 3mm strips.The hinges were from my spare parts box - a little short but they will do.Now I have started on the false top timbers for the railings.By the way - there is no finish applied to anything yet so some areas may look a little spotty.
Sorry about the picture quality - I don`t have a really good camera(I don`t think I could take a good picture with a good camera anyway).
/Mark
-
marktiedens got a reaction from tasmanian in Wasa by marktiedens - FINISHED - Corel - scale 1:75 (Vasa)
A small update - I decided to go ahead & build all 14 gun carriages.I didn`t like the generic kit carriages so I built some from scratch.The sides were built up from 1.5mm square strips.I simulated the reinforcements on the tops& fronts with black heavy paper.The pegs in the axles are made from .020 inch wire. The axle brackets were made from the same wire hammered flat & bent to shape.i have decided to use the kit cannon barrels.Each carriage will have 38 pieces when finished.In the last picture the kit carriage is on the left & mine on the right. Although they are a little taller than the kit ones would have been I am fairly happy how they turned out.
/Mark
-
 marktiedens got a reaction from fmodajr in Wasa by marktiedens - FINISHED - Corel - scale 1:75 (Vasa)
Update -
Upper hull planking finally done & the small windows made & installed - I hope I got them in the right place. I made them by gluing some fiberglass window screen to some clear acetate & just touching the screen material with some brown paint & a really small brush.Also had just enough decorative brass strip left over from my last build to make the surrounds for the companionways.then i made the doors from some 1 by 3mm strips.The hinges were from my spare parts box - a little short but they will do.Now I have started on the false top timbers for the railings.By the way - there is no finish applied to anything yet so some areas may look a little spotty.
Sorry about the picture quality - I don`t have a really good camera(I don`t think I could take a good picture with a good camera anyway).
/Mark
-
 marktiedens got a reaction from NMBROOK in Wasa by marktiedens - FINISHED - Corel - scale 1:75 (Vasa)
Update -
Upper hull planking finally done & the small windows made & installed - I hope I got them in the right place. I made them by gluing some fiberglass window screen to some clear acetate & just touching the screen material with some brown paint & a really small brush.Also had just enough decorative brass strip left over from my last build to make the surrounds for the companionways.then i made the doors from some 1 by 3mm strips.The hinges were from my spare parts box - a little short but they will do.Now I have started on the false top timbers for the railings.By the way - there is no finish applied to anything yet so some areas may look a little spotty.
Sorry about the picture quality - I don`t have a really good camera(I don`t think I could take a good picture with a good camera anyway).
/Mark
-
 marktiedens got a reaction from WackoWolf in Wasa by marktiedens - FINISHED - Corel - scale 1:75 (Vasa)
Update -
Upper hull planking finally done & the small windows made & installed - I hope I got them in the right place. I made them by gluing some fiberglass window screen to some clear acetate & just touching the screen material with some brown paint & a really small brush.Also had just enough decorative brass strip left over from my last build to make the surrounds for the companionways.then i made the doors from some 1 by 3mm strips.The hinges were from my spare parts box - a little short but they will do.Now I have started on the false top timbers for the railings.By the way - there is no finish applied to anything yet so some areas may look a little spotty.
Sorry about the picture quality - I don`t have a really good camera(I don`t think I could take a good picture with a good camera anyway).
/Mark
-
 marktiedens got a reaction from GuntherMT in Wasa by marktiedens - FINISHED - Corel - scale 1:75 (Vasa)
Update -
Upper hull planking finally done & the small windows made & installed - I hope I got them in the right place. I made them by gluing some fiberglass window screen to some clear acetate & just touching the screen material with some brown paint & a really small brush.Also had just enough decorative brass strip left over from my last build to make the surrounds for the companionways.then i made the doors from some 1 by 3mm strips.The hinges were from my spare parts box - a little short but they will do.Now I have started on the false top timbers for the railings.By the way - there is no finish applied to anything yet so some areas may look a little spotty.
Sorry about the picture quality - I don`t have a really good camera(I don`t think I could take a good picture with a good camera anyway).
/Mark
-
marktiedens reacted to Karleop in Vasa by Karleop - FINISHED – Billing Boats – reviving a poorly built model
Hola!
Now I finished the main course sail. In this case I select to have it partially folded for a more interesting view. At first, I didn t know how to do it because the material in BB for sails is a little stiff and even with water it is not very maneuverable but finally it seems OK. I also change some of the rigging of BB plans to the more logical 1:10 model in Vasa museum.
In behalf of the interested people I send some detailed pictures:
Thanks everyone for the likes.
Saludos, Karl
-
marktiedens reacted to Mirabell61 in HMS Pegasus 1776 by Mirabell61 - FINISHED - scale 1:64 - 16-gun sloop
After receiving the ordered blocks out of Chucks store today I put on the first sail (spanker). Except for the in- and outhauler tackle and the ensign that should be complete now.
There are some extra lines and belaying points for these at the base mizzen mast . Will rig the the ready stay sails next and their operating lines .
leave away the ratlines and the last backstays and ensign until later
the horizontal driver boom is about 3mm (scale 1:64) over the catains head / hat
Build log part 68 to follow
Nils
-
marktiedens reacted to Mirabell61 in HMS Pegasus 1776 by Mirabell61 - FINISHED - scale 1:64 - 16-gun sloop
Build log part 67
Sails, sails and sails......
currently I`m working on the sails, all 18 are sewn, the bolt ropes are on, and I´m continuing with the cringles ( for bowlines, reef- and buntlines, etc....) and the short reef lines on the appropriate sails and sail areas.
The two waterholes of the sprit sail required some Handsewing to prevent fringing out.
It took me round about a week for the sails, now I Need to order some additional blocks for their rigging
Nils
-
marktiedens reacted to fmodajr in Wasa by fmodajr - FINISHED - Corel - 1:75
Hello!
I cut up some wood to size and then notched them, for the different size crosstrees. I then ground the angles on the underside of the notches.
I test fit and assembled the crosstree pieces for the 3 lower masts I built (see above).
I will wait until I finish the upper masts before I assemble the rest.
Top:
Bottom:
So now I have to start working on the 2 large platforms and 4 smaller ones. (I might as well finish them all now!)
I will attempt to NOT use the metal rings that came with the kit and also to modify the platforms in order to make them look a little bit more authentic! We'll see how it goes
I worked on trying to create some rings (to replace the metal rings). Using a thickness sander, I ground up some sheets of wood to 1mm thick.
Then I used the oscillating grinding machine and tried to hollow out the inside diameter of the rings.
Then I sanded down the outside of the rings to create hoops that are stress free (no bending, but brittle).
I will also split some in half in order to create the second upper railing that goes halfway around the platform.
My goal is to build the wooden legs to support these rings. I hope this will work. I also need to cutout the inside of the 6 platforms and create a false deck.
Have a wonderful Thanksgiving everyone!
Frank
-
marktiedens reacted to fmodajr in Wasa by fmodajr - FINISHED - Corel - 1:75
Now I worked on making the straps on the masts. Woolings?
I started by making a loop with the rigging line
Starting with the lower end, I wrapped the line around the mast the correct amount for the width I wanted to achieve.
Then I threaded the top of the line thru the loop
Then from the end of the loop (at the bottom of the wrap), I pulled the loop down behind the wrap
Then I placed some glue at each end and trimmed the ends with a razor blade finishing the wrap.
Finished woolings (straps) on lower mainmast and lower foremast
Checking the lower masts on the ship
Added the metal fitting for the sheave support each side
Now onto the lower crosstrees!
Thanks,
Frank
-
marktiedens reacted to mar3kl in Vasa by mar3kl - Billing Boats - scale 1:75
Here's a photo of the curved triton where the beak meets the hull. They did a nice job on this one - it's got some good detail on it. I like the shell/fan on his head, for example.
And here's the base for the large triton on the top edge of the beak. You can see where I needed to section it to get it to match the curve of the sculpture properly.
After dry-fitting the sculpture to the base again, it still didn't fit quite properly, so I needed to remove some wood from the front and add some to the back for a better fit.
And the finished result. This was another nicely done sculpture, and I'm quite pleased with how the paint came out on it because it's so prominent. The curve of the triton below matches well too. All in all this part of the beak, with all its different curves and angles, came out nicely.
-
marktiedens reacted to Karleop in Vasa by Karleop - FINISHED – Billing Boats – reviving a poorly built model
Hi everyone:
After countless rigging I finished to place the sails on the foremast.
As you can see the lines are still not fixed because I expect to give them one last adjustment, and mainly because I changed some of the rigging following the pictures of the 1:10 model in Vasa´s museum. Doing this, it was necessary to change the order of the position of the lines to avoid crossing lines to the belaying pins, and this operation was easier made on progress.
Thanks for watching,
Saludos, Karl
-
marktiedens got a reaction from WackoWolf in Wasa by marktiedens - FINISHED - Corel - scale 1:75 (Vasa)
update -
Deck & inner bulwarks planked & holes cut for the upper deck guns.Found a nice darker red paint to use on this build - not as "in your face"as the previous red I used. In looking at the pictures of the ship in the museum I noticed the stem side braces - can`t remember the proper name - seem to each be made from two pieces fastened together so I made mine that way. Didn`t like Corel`s design. I also didn`t like the design of the decorative surrounds for the upper gun ports so I went shopping for something maybe a little better. I found some decorative rings at a Michaels craft store which I thought looked a little better - they have a flowery design fairly similar to the real ones & they were the same size as the kit decorations so after a little filing & paint i think they will look ok. The kit was short 2 decorations anyway.
Mark
-
marktiedens got a reaction from tasmanian in Wasa by marktiedens - FINISHED - Corel - scale 1:75 (Vasa)
A small update - finished the hull nailing.Hard to see the small nails unless you are close up. Also started planking the decks. After planking the decks I am going to make up one gun carriage to determine where to position the round gun ports & cut them out before finishing the planking on the outer hull to try & minimize splintering.
I am planking the deck with different length planks in no certain pattern as the original is.
/Mark
-
marktiedens got a reaction from NMBROOK in Wasa by marktiedens - FINISHED - Corel - scale 1:75 (Vasa)
update -
Deck & inner bulwarks planked & holes cut for the upper deck guns.Found a nice darker red paint to use on this build - not as "in your face"as the previous red I used. In looking at the pictures of the ship in the museum I noticed the stem side braces - can`t remember the proper name - seem to each be made from two pieces fastened together so I made mine that way. Didn`t like Corel`s design. I also didn`t like the design of the decorative surrounds for the upper gun ports so I went shopping for something maybe a little better. I found some decorative rings at a Michaels craft store which I thought looked a little better - they have a flowery design fairly similar to the real ones & they were the same size as the kit decorations so after a little filing & paint i think they will look ok. The kit was short 2 decorations anyway.
Mark
-
marktiedens reacted to mar3kl in Vasa by mar3kl - Billing Boats - scale 1:75
Here are some photos of the figurehead. It's composed of two flat plastic pieces that sandwich the wooden laser-cut prow. The plastic pieces matched the contours of the wood pretty well - some gaps needed building up with filler. For reasons that escape me, the port side piece has no tail, but the starboard side piece does. So I needed to trace the tail I had onto some scrap wood and try to shape it as best I could. You can see the result below.
The main problem was that the wooden prow is flat across its thickness, and it needs to be rounded so it looks like a 3D lion. Also there's no texture of the lion's mane. And in the front, again with the wood being flat there isn't any realistic facial detail.
I dealt with that by building up layers of wood filler and gently carving it into shape, blending it with the plastic on the sides. Here you can see the back of the lion's head, which looks pretty good now.
The face was much more challenging. I know nothing about carving/sculpting, so I just needed to try my best to make something vaguely face-like. It doesn't look too bad, I think. Here you can also see the Vasa coat of arms clutched in the lion's paws.
-
marktiedens got a reaction from Karleop in Wasa by marktiedens - FINISHED - Corel - scale 1:75 (Vasa)
update -
Deck & inner bulwarks planked & holes cut for the upper deck guns.Found a nice darker red paint to use on this build - not as "in your face"as the previous red I used. In looking at the pictures of the ship in the museum I noticed the stem side braces - can`t remember the proper name - seem to each be made from two pieces fastened together so I made mine that way. Didn`t like Corel`s design. I also didn`t like the design of the decorative surrounds for the upper gun ports so I went shopping for something maybe a little better. I found some decorative rings at a Michaels craft store which I thought looked a little better - they have a flowery design fairly similar to the real ones & they were the same size as the kit decorations so after a little filing & paint i think they will look ok. The kit was short 2 decorations anyway.
Mark
-
 marktiedens got a reaction from Lin Feng in Wasa by marktiedens - FINISHED - Corel - scale 1:75 (Vasa)
update -
Deck & inner bulwarks planked & holes cut for the upper deck guns.Found a nice darker red paint to use on this build - not as "in your face"as the previous red I used. In looking at the pictures of the ship in the museum I noticed the stem side braces - can`t remember the proper name - seem to each be made from two pieces fastened together so I made mine that way. Didn`t like Corel`s design. I also didn`t like the design of the decorative surrounds for the upper gun ports so I went shopping for something maybe a little better. I found some decorative rings at a Michaels craft store which I thought looked a little better - they have a flowery design fairly similar to the real ones & they were the same size as the kit decorations so after a little filing & paint i think they will look ok. The kit was short 2 decorations anyway.
Mark
-
marktiedens got a reaction from fmodajr in Wasa by marktiedens - FINISHED - Corel - scale 1:75 (Vasa)
A small update - I decided to go ahead & build all 14 gun carriages.I didn`t like the generic kit carriages so I built some from scratch.The sides were built up from 1.5mm square strips.I simulated the reinforcements on the tops& fronts with black heavy paper.The pegs in the axles are made from .020 inch wire. The axle brackets were made from the same wire hammered flat & bent to shape.i have decided to use the kit cannon barrels.Each carriage will have 38 pieces when finished.In the last picture the kit carriage is on the left & mine on the right. Although they are a little taller than the kit ones would have been I am fairly happy how they turned out.
/Mark
-
marktiedens reacted to CptNautilus in Vasa by Nautilus - Corel - 1628, scale 1:75
Chapter 18: Port hole doors and false canon
The larboard side is complete, all hands to starboard!