fifthace
-
Posts
498 -
Joined
-
Last visited
Content Type
Profiles
Forums
Gallery
Events
Everything posted by fifthace
-
 Much better. Garboard seems to have gone on ok? You need to work on where the planks meet the keel, doesn't matter so much this time but certainly when you come to do the second planking you will want to try and get as snug a fit as possible. This is constructive criticism. Remember the extra time and patience will be worth it at the end...even if you do end up wasting wood, it can easily be replaced Before you continue now though, those 6 planks you removed, replace them, but taper them, (make them thinner near the bow), and you will find they will lay much flatter against the frames and not clinker quite so much. Unless you get it spot on straight away they will still clinker a little, but this is first planking plus you will have some leeway with the thickness of the planks to be able to sand out the clinkers after the 1st planking is finished. That bow is still throwing me I must admit But after you've done that resume planking from the bottom up, allowing the planks to sweep upwards towards the bow, and eventually the small "edge" of a lower plank will butt up against the long lower "edge" of the upper planking, and so on, until the gap gradually gets smaller not only vertically but horizontally as well. Good work Mike, sometimes it's better to go back a few steps. With my Soveriegn build, I made a mistake, thinking I was clever, and I had to soak the rear of the keel/frame structure in hot water to soften the wood glue so I could remove what I hade made mistakes on and then clean it up and redo it...had I not dont that, I'd not have been able to get the stern to fit correctly. Keep going, it's all learning...and good fun!
 -
The problem you will have with those 6 planks is when it comes to sanding everything flush before the second planking will make those area's at the end very thin. You may end up inadvertantly putting a hole in that area whilst applying the 2nd planking. In your defence though, I think what has made life harder is that solid bow section. It's been throwing me in how best to fix the problem you have been having
-
You would need to remove the last 6 planks from the bottom up, as they at least would need to be tapered. Cut along the top edge and bevel that same edge so you don't create a gap.
-
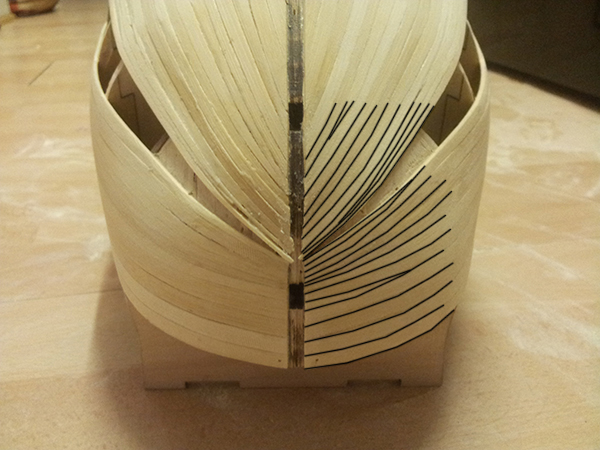
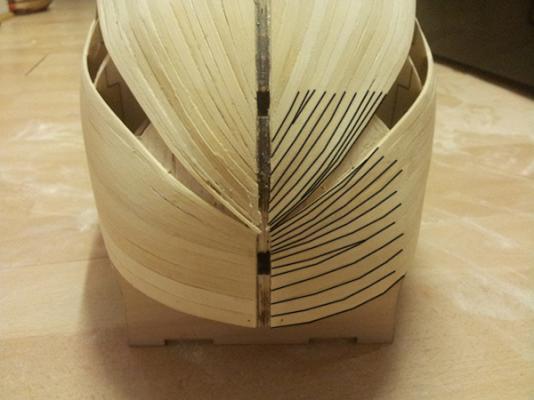
Mike this is a photo of the first planking on my Soveriegn, so the quality of the tapering etc isn't 100%, but it should give you the general idea. I've marked on the plank edges on one side to make it clearer to see...
-
You know...just because a kit is single planked, doesn't mean it has to stay that way... http://www.cornwallmodelboats.co.uk/acatalog/mahogany_strip.html Just saying...
-
Look forward to seeing how you represent the plants. I think when, IF, I build this one I might do her as she was prior to departure...it's easier Can't wait to see some more progress on this one, come on chop chop
- 265 replies
-
- 1
-

-
- finished
- artesania latina
- (and 1 more)
-
haha Al I was just jesting but thanks
-
Al I've not read through your entire post but just looking at the photo's things look great. Really looking forward to getting this kit myself now. Can I make one suggestion though? If you look at the second photo, you will see the wood has lots of fibres, almost looks like fluff...get yourself some really fine grade sandpaper and sand over the wood before fixing it in place. Reason being is when you come to paint or stain/varnish the wood, all that burr will show up, particularly with stains. It's a lesson I learned painfully some time ago Other than that, keep it up
- 265 replies
-
- 1
-
-
- finished
- artesania latina
- (and 1 more)
-
It was great for a while, I quite liked it. Then the other day came down to an almost frozen computer...took 40 minutes just to open the task manager! For some reason the hard disk was maxed at 100% usage. Then the PC refused to boot from my Windows 7 DVD because MS had some shadow UEFI BIOS rubbish so had to disable that...then still couldn't install because the partition table was the wrong type...had to make use of my other PC to try and rescue almost 1TB of "stuff" so I could wipe the drive completely and start again. Took me almost 2 days! Windows 98SE...best OS ever made, was solid! Anyway...back on topic lol Yes I would say start at the keel. Still don't like the "straight planking method" but as far as the job you have done it's great. Tried doing some rigging earlier...ended up having to undo an hours work because I did it wrong...focus not there today
-
Mind you gotta stick up for Mike a bit here...from what I saw of the photo's he sent me of the plans/instructions, especially where the planking is concerned...think I would have had a lot of pause before starting as well :mellow:
-
Hiya Mike. Sorry I've not looked in for a few days. Combination of a heavy cold and a massive PC failure, thanks in no small part to Windows 8...actually it was totally Windows 8 to blame! Anyway, just had a look at your planking so far...I am confused................... What is it you were worried about??? I see absolutely nothing wrong with what you've done so far, cracking job!
-
Was thinking about this earlier...I run my own business in web graphic design...if someone told me the exact dimensions they needed a pattern to be, including the dimensions of each cross hatch, I can knock up a transparent .png that will print quite nicely without that "step" effect...I could even add, if the scale allows, highlights and shadows to give it a more 3D appearance.
-
Hiya Al. Look forward to seeing some photo's of your progress. To answer your answer, it doesn't matter the width of the keel as when fitting mounting bolts you don't drill. You cut out a T shape in the hull and slot the bolt and head in that way, with the thread sticking out the bottom, and seal with epoxy.
-
He's taken a sabbatical Al, a question for you though when you are about...when I do this one I plan on mounting it on two brass mounts with threaded bolts recessed in the keel...how much of a pain is this going to be with regards to them being visible ?
-
Not sure then Mike. I've always used it dry, yes occasionally it causes a break but I've gotten quite adept at working with it so that doesn't happen very often. Has it just been with this kit that you've had this spread, or with others as well? Just wondering if it's the type of wood that might be the issue and not the method...
-
Mike, just to be clear we're talking about the same thing right? This: If you are finding it is spreading the wood width ways then you either need a new blade or you are applying too much pressure? Could you show me on a scrap of wood a before and after photo? I might be able to help work out what's going wrong...
-
Right HERE But to be honest, I've used mine twice since I bought it. Since then it gathers dust on a hook on the wall. You will need to have a shaver adaptor as well though, or cut the plug off and fit a UK one. I don't understand what you mean by the sideways spread?
-
A quick way to bend, and dry, planks is if you have an electric plank bender. Soak the planks until they are pliable enough to bend, put them into position and, using the plank bender to run over the plank pushing it around the curve you need. The heat and damp plank kinda steams it as well as dries it. The it will pretty much hold it's shape when dry. Not completely, it will still need something to hold it in position as the glue dries, but it won't be exerting so much opposite force and be a lot easier to work with. Another option, is again with an electric plank bender, is to pre-bend several planks in advance to the general curve you need. Yet another option, is a medium sized saucepan of hot water, soak the planks in the water until pliable, then clamp them around the edge of the saucepan to dry with modelling clamps or even clothes pegs. Again you can do several planks at once using this method. Even more crude...hold the plank above the steam from a boiling kettle and then clamp it around something once it is easy to bend. Bit of a pain this method though for obvious reasons. Final option, dry bending. Amati plank bender, which is like a pair of blunt clippers with only one side having a blade. You place several "nicks" on the inside of the plank, making it bend in that direction. By the way, me personally, with very few exceptions I always use the last option.
-
Soak, bend, apply and allow to dry. Don't glue while wet as wood expands and then shrinks again as it dries, so you could end up with gaps if you glue whilst wet.
-
I don't see anything wrong there Mike, nice job! Me personally, I would plank 2 or 3 more strakes, or until you reach the start of the curve at the stern...then start at the keel and work up.
-
When you are posting click on the little smiley face icon, (Click the light switch far left if it is greyed out), then click on "Show All".
-
You started the planking Seriously though, take your time, dry fit dry fit dry fit until you are happy...then dry fit some more just to be safe! Good luck