


captainbob
-
Posts
3,498 -
Joined
-
Last visited
Reputation Activity
-
 captainbob reacted to Timothy Wood in 80' ELCO PT Boat by Timothy Wood - FINISHED - BlueJacket Shipcrafters - Scale 1/4" = 1'
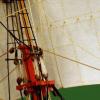
Popeye,
Here are two photos, the first an overall from above and the second a macro shot of the antenna base!
Cheers,
Tim
-
captainbob reacted to Timothy Wood in 80' ELCO PT Boat by Timothy Wood - FINISHED - BlueJacket Shipcrafters - Scale 1/4" = 1'
Greetings,
My next step was to cut the antenna base from a piece of 1/8" x 3/16" x 2" strip wood, then glue the actual antenna base to it's stand. After cutting the stand and fitting the antenna base I found the base was wider than the stand. I decided to cut and glue two strips of wood to the inboard and outboard sides of the antenna stand to make them the proper size.
Cheers,
Tim
-
captainbob reacted to Elia in Arethusa 1907 by Elia - Knockabout Banks Fishing Schooner
Small progress update Arethusa. I've been working more of the fiddly bits of ironwork for the deck. Following are chainplate assemblies.
I mentioned previously that I was 'stuck' on making the double stropped lower deadeyes. I had fashioned the strops from 0.015" diameter brass wire, looping it around two pins a given distance apart on a wood board. I pinched the wire adjacent to each pin, and soldered the overlap of the two free ends with Stay Brite solder. After trimming the excess, and sanding the soldered end into somewhat reasonable shape I used a drill bit which as about the same diameter as the deadeyes to create the strop shape. Pliers were used to straighten the 'lug' ends of the strop. Once those were all formed I painted the entire strop dull silver except for the non-soldered lug end.
Here is a photo of the some of the parts in manufacturing sequence. On the left is a straight strop after the one end was soldered and sanding/filed. Next to it is a formed hoop strop, the deadeye, the brass rivet, and the chainplate. Next is the soldered assembly. And last is the assembly with the rivet stem trimmed off.
Here is a photo of all of the parts prior to mass soldering production:
Here is a photo of my soldering pad and the assembly secured with wire and a pin:
I placed the manufactured 0.8mm head diameter rivet head at the end of the strop which had been soldered so that the other end, which would be soldered to the unpainted strop was as far away from the strop soldered joint as possible - to mitigate as much as possible the heat from the full assembly soldering from damaging the first soldered joint. This may have been overkill, as the second soldered joint was made using TIX, which has a melt temp of 270F, whereas Stay Brite has a melt temp of 450F or so. In any case the plan worked acceptably. There were variations in forming of the strop loops, and the soldered joints, resulting in more than I want, but all in all acceptable to proceed with.
The final parts assembled, trimmed, and touch up silver paint applied.
Soon I'll install them on the ship.
Cheers,
Elia
-
captainbob reacted to JerryTodd in Pride of Baltimore by JerryTodd - 1:20 scale - RADIO - as she appeared in Fall 1981
I was asked to bring the model to the Fell's Point Maritime Museum in Baltimore on July 22nd, 2012, for a one day display to commemorate the anniversary of the first 7 letter of marque vessels to sail out of Fell's Point for the War of 1812. It wasn't possible for me to fully complete the model in time, or even get it sailable, but I resolved to do as much as I could to make her presentable for display. The Pride of Baltimore II would be there, and I had sailed on Pride with her captain, Jon Miles, ie: someone intimately familiar with the boat I was modeling would see it, but hey, no pressure.
In preparation though, I bolt-roped all the sails, worked out a chart of what rigging blocks she would need, and began making them.
The sails are roped with a three-stranded nylon cord. The bolt rope is glued to the sail with fabric glue as well as sewn in an abbreviated version of the way real ones are sewn on. A bolt rope isn't sewn the the edge of a sail, but rather to one side of it right at the edge. Each stitch passes between two strands of the line, through the third, and into the sail, where it takes a turn back around and repeats in the next strand. Each turn is in the direction of the lay of the line sew the stitching disappears into the lay of the bolt rope. In stead of every strand, I stitched through every three or four strands. The stitching is somewhat visible at this scale, especially on the "back-side" of the sail from the bolt rope, but the glue makes up for the reduced structure.
Eyes, cringles, garnets, etc, along the edge of the sail were made with the bolt rope. grommets in the sail are burned with the pointed tip of a soldiering iron. This is a nice feature of using Supplex, holes can be made for reef-points, for example, that are heat sealed and require no further reenforcing. Eyes are formed around a round toothpick to maintain constant size and keep the from closing while sewing's in progress. Grommets are burned in near each eye for and the bolt rope is seized on either side, just as a real sail is constructed. Well, this IS a real sail, just a small one. By-the-way, did I mention I used to work at Ulmer Kolius sail makers near Annapolis? I didn't usually sew on bolt ropes there, that I learned working on boats such as Pride; at Ulmer I did things like putting ducks on Flashers (a genoa/spinnaker hybrid).
The yards got foot-ropes and I made some unsheaved blocks to cover for this display.
The sails were attached to their spars, the main and fores'l to the mast hoops, Halyards rove, and bit by but, Pride was dressed.
I was ready. I even cobbled together a slide show of the models construction and loaded it onto an e-frame, and made up some hand-outs with specs on the model and the real Pride.
Unfortunately, the events schedule was changed to a day I would be out of town for something else - so Pride didn't get publicly displayed.
Later, I made and attached fairleads to the fore tops'l for the bunt-lines which I made from a bamboo chopstick. I found the new information on the pump heads mentioned previously. And noted a sort of rub rail under the hawse pipes of the original boat and a difference in how the wale finished at the bow.
I took a shot at turning a gun barrel, one in pine, one in cherry - neither of which I'm satisfied with. The carriage was better, but I had to draw scaled plans as Gilmer's drawings of the guns were a bit cartoonish.
The model's been moved to my new residence, as I move out of my house. With no consistent income since being fired in January 2012, after 18 years, the house is being foreclosed on.
For the moment, Pride sits on top of a cabinet in the living room waiting for the new shop to come online.
-
captainbob reacted to JerryTodd in Maine three-masted schooner by Bedford - 1:54 - RADIO
On RC models you'll find a great many modelers don't want to deal with the mechanics of overlapping jibs; that is having to drag the heads'ls across the forestays.
One manner of dealing with this is the clubbed jib, as shown above. This may work well for your forestays'l, but the jib is another matter.
Some deal with this by raising the clew of the jib so it doesn't actually overlap the forstays'l and passes freely from side to side clear of the stay. This is sheeted through a ring made-off to the forestay where the clew crosses it and run down to the bowsprit and back to the servo in a way that doesn't interfere with the forestays'l. The jib then actually sheets to the forestay.
Another option that may work for you is a continuous loop type sheet that runs from a winch or shuttle set-up, through the clew of the jib, and back to the other side of the winch/shuttle. A pair of knots in the sheet on either side of the clew grab the sail and pull it over as the sheet in pulled. The knots are spaced so they sheet in the sail snug on either tack. This gives you a jib that overlaps per your sail plan and work better if the sheets go to the bulwarks/rails like the real vessel's instead of the centerline where modeler's tend to put them.
There are other ideas for dealing with overlapping jibs, but most require more mechanics to achieve, like two servos, etc. I've been playing with some ideas for my Pride because I not only have three overlapping heads'ls to contend with, but an overlapping fores'l, running main forestays, and running backstays - and darn little space in the hull to put a lot of mechanisms.
-
 captainbob got a reaction from popeye the sailor in Lettie G Howard by captainbob - FINISHED - 1:48 - POB - schooner
Thanks, Popeye. With you saying there’s no stopping me, how can I lose.
Alfons, welcome aboard. With all the nice detail on your schooner, you set me quite a challenge for me.
Bob
-
captainbob reacted to Chuck in Elsie by 4whelr - Model Shipways
To all who knew Eddie
I am very sad to report that Eddie passed away earlier in December. Please join me in sadly offering his family our condolences. Eddie was a wonderful model builder and will be missed on MSW.
Rest in Peace Eddie!!!
Chuck
-
captainbob got a reaction from popeye the sailor in Holiday Harbor by popeye the sailor - 1:20 scale - multi build
Looking good. You’ll be a planking expert by the time you finish all your boats.
Bob
-
captainbob reacted to fnkershner in Maine three-masted schooner by Bedford - 1:54 - RADIO
Well it is a holiday, so even you can take a break. Besides there is always something to work on even if you can't paint.
I find that one of the thing I enjoy the most about this hobby is the mental challenges. I often spend my free hours away from home trying to solve a problem. it is like a puzzle. I will even wake up with a new approach to something. And then the opportunity to talk it out with others just adds to the fun.
I know you have plenty of time before you will be rigging your sheets. I will take some pictures and find a detailed description of my workings. By the way what is your sail plan? I have found that here is where authenticity and function diverge. Let me explain.
When we build static models most of us strive for it to be as close a representation of the original as our skills and wallet allow. It is just a miniature of the original. But in R/C we are more interested in function, that is does she sail well. For an R/C craft it is hard to accomplish both. A good example is the modifications you will be making for the keel & ballast. Function does not always scale well. Another example you may already have thought of is the number of Jibs. On a schooner it is customary to have 3 or 4 jibs. On an R/C it is very difficult to Tack that many sails and it will have an effect on the performance of the ship. Also most period schooners had gaff rigged Foresails & Mainsails, and they also had a topsail on each mast. I am guessing here but I think you will find that the R/C topsail will give you fits and you will get better performance out of a full sail instead of a Gaff rig. It certainly will be easier to control.
-
captainbob reacted to fnkershner in Maine three-masted schooner by Bedford - 1:54 - RADIO
Oops, how could I forget. Since she is rigged fore and aft only then sailing here will be easy. May I suggest that all you need is 1 sailing servo. It will make it much easier to control. Also make sure all sails are club footed (have a boom), and then you are all set. Let me dig up a diagram of how we rig our boats to share with you. You will need a very high torque server. But you can run all the sheets to this servo and she will tack easily. I bet you will be flying wing on wing in a very short time. Do you have any parks with boat ponds near by?
Our club uses a city park that has a pond that is 1 meter deep and 35 meters in diameter. It is perfect for beginning sailing. we often have races on this pond.
-
captainbob reacted to shawn32671 in Gothenborg by Popeye the sailor - Billing Boats - 1:100 scale
To quoteth Popeye: ""There are so many ships that deserve to be modeled, I'm like a kid in a candy store. That's probably why I watch so many builds.....So many talented modelers here""
That's exactly how I feel...and so little time to do everything you would like to too.
-
captainbob reacted to popeye the sailor in Gothenborg by Popeye the sailor - Billing Boats - 1:100 scale
me too! I have enjoyed rigging plastic builds.........but this being my first major wood kit.......it's kick'in my butt! I am enjoying it though, but it will be a while though, before I can call it finished. my main goal is still to put as much as I can into her......even though she is a smaller scale, than other folks are building these at. I still have a desire to attempt a larger scale build of her. one of these days...if I can get out from under all these builds. that the beauty of this hobby.....there are so many ships that deserve to be modeled, I'm like a kid in a candy store. that's probably why I watch so many builds......so many talented modelers here
thanks for the thought Shawn........I appreciate your following along
-
captainbob reacted to popeye the sailor in Lettie G Howard by captainbob - FINISHED - 1:48 - POB - schooner
that's scratch building for ya Bob.........gotta be some tweaking here and there. still....you worked it through like a trooper! one of the most important assets, is the ability to roll over problems like a tank! there's no stopping you now Happy holidays BOB! enjoy!
-
captainbob reacted to molasses in OGALLALA by molasses - FINISHED - 1/96 scale - BOTTLE - Prairie Schooner
Thank you all for your comments and likes.
The wheels were outside my experience in ship modelling but easier than expected and fun to make. I'm glad I reduced the number and increased the size of the spokes from my initial drawing (24 spoke rear and 18 spoke front).
I almost forgot to verify that the rear wheel and axle assembly will pass through the bottle neck. I measured and calculated and measured again but hadn't physically tried it -- until now.
-
captainbob got a reaction from popeye the sailor in Lettie G Howard by captainbob - FINISHED - 1:48 - POB - schooner
John, it sure would be nice to get then all correct the first time, just once.
Pete, Popeye, Thank you both.
Bob
-
 captainbob got a reaction from pete48 in Lettie G Howard by captainbob - FINISHED - 1:48 - POB - schooner
John, it sure would be nice to get then all correct the first time, just once.
Pete, Popeye, Thank you both.
Bob
-
captainbob got a reaction from pete48 in Muscongus Bay Sloop by pete48 - FINISHED - SMALL
Watching the progression of these boats is fun. Hope it’s fun for you as well.
Bob
-
captainbob reacted to fnkershner in Maine three-masted schooner by Bedford - 1:54 - RADIO
I had assumed that the motors were just to ensure you don't loose her and that you intended to actually sail her as much as possible. Is this not true? I have seen R/C sailboats with 1 channel for sail control and I have also seen Square rigged with up to 7 channels. I would suggest that you will need separate controls for the square rigged and fore & aft sails.
-
captainbob reacted to pete48 in Muscongus Bay Lobster Smack by pete48 - FINISHED - Midwest Products - SMALL
I did some work on Keel # 2 ( Blue ) Today ,Unfortunatly I will not have it completed by Christmas. However I have an understanding Sis , so that works out well , I have made the hatch frame, and have started to make the rest of the cabin top . Then will come staining and varnish Here are the results
-
captainbob reacted to J Haines in Emma C Berry by J Haines - Model Shipways
Hello everyone!
Well, with the days really short and it getting a bit cooler outside its time to get back to it and get the shipyard rolling again.
I finished installing the clamps, this really stiffened up the frame and made it much easier to taper and shape the frames. I did steam bend the clamps, but it did suck in a frame or two during installation, to correct this I will laminate thin strips of wood to the outside frames and shape to the correct height.
Using a 5/32 x 3/16 piece of wood to allow the correct height for deck frames, I found that I under cut some of the tops of the ribs, I will correct this by glueing a piece of basswood to the top and sanding to the correct height. Plus it will give it a clean appearance.
Have a good holiday to everyone .
-
 captainbob got a reaction from molasses in OGALLALA by molasses - FINISHED - 1/96 scale - BOTTLE - Prairie Schooner
What a sweet wagon.
Bob
-
captainbob reacted to Micklen32 in Will Everard by Micklen32 - Billing Boats - 1:67
Just to keep you up to date
This is only fairly rough painting to get a base before doing it very carefully
That is roughly what the hull will look like
Just hopefully a lot neater
-
 captainbob got a reaction from canoe21 in Lettie G Howard by captainbob - FINISHED - 1:48 - POB - schooner
What a great time of the year, not only the holidays, but all the college football games. I’m not going to get much done on this build for the next three weeks. I did manage however to clean up the bulkheads and dry fit them, that’s when I found out #14 (third from end) was bad. You can see in the first picture #14 is not big enough. So it was back to the drawing board, so to speak, I use DraftSight, and I did find the error. Picture two shows both #14 bulkheads and then how the new part lines up.
And with that I’ll say Merry Christmas to all, with wishes for a great 2014.
Bob
-
 captainbob got a reaction from avsjerome2003 in Lettie G Howard by captainbob - FINISHED - 1:48 - POB - schooner
What a great time of the year, not only the holidays, but all the college football games. I’m not going to get much done on this build for the next three weeks. I did manage however to clean up the bulkheads and dry fit them, that’s when I found out #14 (third from end) was bad. You can see in the first picture #14 is not big enough. So it was back to the drawing board, so to speak, I use DraftSight, and I did find the error. Picture two shows both #14 bulkheads and then how the new part lines up.
And with that I’ll say Merry Christmas to all, with wishes for a great 2014.
Bob
-
 captainbob got a reaction from yvesvidal in Lettie G Howard by captainbob - FINISHED - 1:48 - POB - schooner
What a great time of the year, not only the holidays, but all the college football games. I’m not going to get much done on this build for the next three weeks. I did manage however to clean up the bulkheads and dry fit them, that’s when I found out #14 (third from end) was bad. You can see in the first picture #14 is not big enough. So it was back to the drawing board, so to speak, I use DraftSight, and I did find the error. Picture two shows both #14 bulkheads and then how the new part lines up.
And with that I’ll say Merry Christmas to all, with wishes for a great 2014.
Bob