

42rocker
-
Posts
504 -
Joined
-
Last visited
Reputation Activity
-


-
42rocker reacted to Jeronimo in LE BONHOMME RICHARD by Jeronimo - FINISHED
Hello,
capstan prepared for installation on the gun deck.
Karl
T e i l 42
-
42rocker reacted to usedtosail in USS Constitution by usedtosail - FINISHED - Model Shipways - scale 1/76
I faired the hull from the keel up to about the wale, then turned the hull over and faired the rest of the way up. I then started framing the bow. I first cut out the main frame pieces, after gluing up three strips of wood for the knightheads. The timberheads I could make out of a single piece of wood. One thing I did was to hold the pieces together to make sure the notches all lined up at the same height then sanded the bottoms flat.
When I was satisfied with these, I fit them into the bow filler block notches and cut out the stiffener pieces that go between them. This took a couple of tries because these pieces as shown on the plans are too short and don't reach all the way to the rabbet. I modified the new pieces to end at the rabbet, then glued them to the stem and the first bulkhead, using clothes pins and a binder clip to hold them at the right height.
I then added the upper piece that forms one side of the head entry. I clipped a batten between the adjacent pieces to get the correct location for the top of this piece.
If you look closely at the picture before the last one, you can see that the port knighthead was curved too far back at the top and didn't make a nice curve with the timberheads on this side. Instead of replacing it, I added some wood to the front and removed some from the back to get it into the right shape.
I added the side pieces for the bridle ports and the upper support pieces
Then the top and bottom of the bridle ports. I faired it all and here is how it came out.
I have some more design work to do before I can tackle the stern framing, but that is next.
-
42rocker reacted to usedtosail in USS Constitution by usedtosail - FINISHED - Model Shipways - scale 1/76
First, an update on the stern filler blocks. I ended up spending over an hour fairing these even more, once I started running a plank strip across them. They have a much nicer flow and a better transition from the rest of the stern bulkheads. The little shelf for the ends of the planks at the transom filler is now even on both sides. These are also now glued into place.
After making the stern filler blocks, it was time to make the bow filler blocks. Piece of cake, I thought. These have a much flatter profile than the stern so there shouldn't be so much sanding. Ha! I had not counted on the little notches, which made this a harder job than I thought.
OK, to start, I cut out the blanks for each filler block from the supplied block, cut out the rough shape with the hand saw, and sanded in the final shape using the disk and belt sander, just like the stern blocks. These both came out pretty well, so it was time to carve the slots. I marked them on the top of the blocks using the cut out piece from the plans as a template. I cut a slot on each side using a razor saw and started removing the material in the slots with some small chisels. Well, these came out pretty rough as you can see in these pictures:
I slept on this but decided the next day that they were not acceptable. I had bought a few end mill bits to use in the drill press, and I figured this was the job for them. I had to figure out how to hold these odd shaped pieces in the vice I had and then it hit me. I could reuse most of the pieces I already had by cutting off the top 1/4" and mill a 1/4" piece of basswood sheet to replace it. The sheet I could hold flat on the XY table that I have under the vice on the drill press. So that is what I did. I used the table saw to cut most of the tops off, then sanding the rest off in the disk sander. I milled two piece of 1/4" sheet, using a 1/8" end mill bit for most of the slot, and a 1 mm end mill bit to clean out the corners.
These came out so much better, I was rather excited. I carefully glued the milled pieces to the rest of the filler blocks, making sure the slots were in the right place in relation to the rest of the filler block.
The next day, I sanded one of them down and it fit like it was supposed to.
I started sanding down the second one and managed to round over the top so it was ruined. OK, I thought. If I can do this once I can do it again. So off came the top, another sheet was milled and glued on. When I sanded this one it looked good, but when I fit to the stem, it was too small. Apparently in all the sanding, I was removing little bits of the original section and in the end it came out too small. Another lesson learned.
So it was time to start over with the second bow filler block. I had a couple of scrap pieces that I glued together to form a blank. I sanded one end flat for the top and milled the slots first, while I still had a nice rectangular block that I could hold in the vice:
After that, it was just a matter to cut out the rough shape and sand it to the final shape. And here is the result of a week of work:
They are just glued on and there will be some fairing left to do, but I am relieved that they are finished.
While the glue was drying on various pieces this week, I also did some fairing of the bulkheads. I glued some sand paper to this sanding stick and used it to fair down the bulkheads. As I noted in a previous post, some of the bulkheads were not wide enough in some places, so in these areas I glued some thin basswood strips to build them up, then sand down to meet their neighbors.
After the bow filler blocks dry, I will do more fairing then start the bow and stern framing.
Thanks for watching.
-
42rocker reacted to usedtosail in USS Constitution by usedtosail - FINISHED - Model Shipways - scale 1/76
Besides the kit instructions, I plan to use the Anatomy of the Ship book for the Constitution as an additional guide. I used the AOS Beagle book to build that model and I really liked the extra information and details in these books.
I am going to try to build the Constitution in its 1812 configuration, as others have done on this site. In fact, those other build logs (Cookster, CaptainSteve, Jeff Toma, and others) have been a huge inspiration for me and I know the information in them will be a huge help.
I plan to add some sails to the build, and my first thought was to go with a look like in this picture, when see sailed in Boston Harbor in August 2012 for the 1812 anniversary. I believe our own popeye2sea (Henry) was on it when this picture was taken.
Now I am thinking of adding some fore and aft sails too, but I am not sure on that yet.
-
42rocker reacted to zeptraderUK in HMS Dreadnought by zeptraderUK - Digital Navy - 1/200 - CARD
I have loads of different types of thickness of card at my disposal.
-
42rocker reacted to zeptraderUK in HMS Dreadnought by zeptraderUK - Digital Navy - 1/200 - CARD
takes some time with the time I have but thats ok...
more to come...still some areas in need of cleaning up.
-
42rocker reacted to zeptraderUK in HMS Dreadnought by zeptraderUK - Digital Navy - 1/200 - CARD
This is my diary of HMS Dreadnought made from CARD, something I picked up to stop the boredom during my tea break (15mins) and lunch (30mins) at work, and belive me the people I work with a boring!!!!
So this cost me all of £6, took some tools in and while stuffin' me face I build this.
more in the next post....
-
42rocker reacted to ziled68 in H.M.S. Triton 1:48 scale cross section - FINISHED
Greetings to all,
Sadly there isn't much progress to report, but that only means that there is a little bit to report. I've managed to paint the wales black and am pretty glad at how the weight is evenly distributed along the cross section. If you notice the second picture, you can see that she is balancing herself on her keel. The last picture will show you the start of the lower deck being worked on. I've only just started filing away at the deck beam to accept the carlings.
-
42rocker reacted to Rustyj in Bomb Vessel Granado by Rustyj - FINISHED - 1:24 - cross-section
Thanks Ben and Floyd!
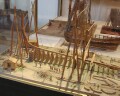
Putting aside the temptation to stick every piece of wood, plastic and metal in
the lathe and "turn it" I've placed the mortar in it's carriage.
Here she is set to be stowed.
And here it is set in firing position.
Now I can move on and attempt to turn some cannon barrels!!!!!!!
-
 42rocker got a reaction from dgbot in Licorne 1755 by mtaylor - 3/16" scale - French Frigate - from Hahn plans - Version 2.0 - TERMINATED
Mark
I don't know what type of mill or lathe that you have, but one of the better help sites that I've found is the Sherline site. Check out the following link and see if anything can help you.
http://sherline.com/hlpsheet.htm
Good Luck
Later Tim
-
 42rocker got a reaction from mtaylor in Licorne 1755 by mtaylor - 3/16" scale - French Frigate - from Hahn plans - Version 2.0 - TERMINATED
Mark
I don't know what type of mill or lathe that you have, but one of the better help sites that I've found is the Sherline site. Check out the following link and see if anything can help you.
http://sherline.com/hlpsheet.htm
Good Luck
Later Tim
-
42rocker reacted to garyshipwright in HMS Bellona 1760 by SJSoane - Scale 1:64 - English 74-gun - as designed
Hi Mark
Good drawing sir but I believe that the helm port transom would have intersected on the forward part of the stern post. Other then that sir I would say your drawing is right on. Not one of my better views of the stern Mark but should give you at least ideal's about how I approach this on my stern. Since these photo's, I didn't like my helm port transom and have taken it out. At the same time a few more items may come out and be replaced also. Guess items do have a way of coming back to haunt you untill you just have to change them out. Gary
-
42rocker reacted to mtaylor in Licorne 1755 by mtaylor - 3/16" scale - French Frigate - from Hahn plans - Version 2.0 - TERMINATED
Thanks for the nice comments and the "Likes".
The one thing (ok... one of the things) I've learned is not to trust tools. The mill was acting funny in that the tool/motor, etc. would sometimes drop slightly in the "Z" axis. Nothing is mentioned in what passes for a manual for this thing except in the parts list... there's a gib screw. Adjusted it and no more unwanted movement. I'm now going over the table saw... found some minor issues and the lathe also needs some attention.
By the way, the build board is finished. So... as soon as the tools are in good repair and pass inspection, I'll start the keel, stem, deadwood assembly. Now to decide on either cherry or boxwood for those and will look best with the swiss pear/ebony* planking. Hmm.... ???
*Yeah.. I'm going to go with the ebony again. Just because it's there and I want to master it.
-
42rocker reacted to ziled68 in H.M.S. Triton 1:48 scale cross section - FINISHED
Greetings to all,
Since I had to work today I was not able to get much done on the Triton. I was able to buy more timber and finish my jig for her reusing materials for the jig I made for my Vietnamese Junk. Since she is only a cross section, the jig seems small in comparison to jigs other people use while conducting full builds. The following photos will show you what it looks like and how the Triton fits within it.
-
 42rocker got a reaction from Mirabell61 in HMS Warrior by StuartC - Billing Boats - 1:100 - started 1/1/2014
Stuart
Well going to jump in on this one and tell a little story and share a few pics. I"m not posting a few pics off the outsides of the complete ship, HMS Warrior. I will another day if you want.
Time 2004 my wife and I went to Paris, France and saw a lot of stuff. Next stop was London where we rented a car and headed South to Portsmouth. Made a large mistake. We were hungry. Saw a Little Chef and thought can't be that bad, well it turned the stomach bad, more on that later. Checked into our B&B on Portsmouth Point. Nice Place, nice people. Had a morning appointment to tour the inside on the HMS Victory one on one with a guide. Special extra cost, yes. At that time you could not take pics inside or on the HMS Victory. This one on one tour allowed it as long as they were personal use pics.
Ok, back to the HMS Warrior part. Got our folding bikes out of the car biked over to the docks and such. Took a few pics of the HMS Warrior and HMS Victory. Went to the shop saw the HMS Warrior model that William Mowell had made. Super nice to see after you have read and reviewed his book, "Building a Working Model Warship". Like the real thing, working steam engines and such. Really need to review the book. I have not read it in around ten years of course. Well we saw a fish and chips store and got some and sat down at the docks to eat and look at the ships, etc. Well got to be time to head back and on the way back my wife got sick. A "light" case of food poisoning, we think. She was sitting and throwing till around 3:00 in the morning. I started in around 2:00 in the morning. Of course this canceled the HMS Victory tour that was very important to me. After we got up later that day we toured the HMS Warrior where the diesel fumes did not set well. Finally did get to take a regular tour of the HMS Victory towards the end of the day. After which we drove up to London for a few days. Got to see a lot of great ship models there also.
Any rate on with the picture show. If this is to much in your build thread let me know and I'll take it down.
Later Tim
myself and the HMS Warrior model
Decks that they were working on
my wife and the decks and mast (she was still under the weather)
Mast
gun deck
-
42rocker reacted to mtaylor in Mandatory for BUYERS - MUST READ!!!!!
Please please please..... DO NOT PUT Personal Info in a post to a seller. Use the PM's. Posts are visible by entire Internet. You're giving spammers and miscreants information that is useful to them.
Check out the sellers history of posts....are they well known? They must have a minimum of 25 posts to reply to a topic or post a topic in this forum. Look at their post history.
If paying a seller...Use PayPal. They have great buyer protections. Always select "paying for goods and services" If you dont get the goods or services...you have a good chance of getting your money back. Scammers usually insist you send it as "sending money for friends and family" because its less likely you can get your money back.
Personal information is things such as phone numbers, email addys, home addresses, etc.
-
42rocker reacted to ziled68 in H.M.S. Triton 1:48 scale cross section - FINISHED
I sincerely wish no one takes it to heart what I think necessary to get off my chest. When I first came across MSW, I thought it would be great to join a community that shared the love of model ship building like I do. When I came across the H.M.S. Triton I thought it would be fun and decided to give it a whirl, not so much for other people’s approval, but for the love of model ship building.
As the adage goes, “There is more than one way to skin a cat”. Keeping this in mind, I decided to build my model the way I felt comfortable doing it and decided to share my work with people that had similar interests as I do. No sooner had I posted my day’s work, when someone decided to judge me (and my methods) and leave me feeling disappointed, angry, and a sense that people were looking down their noses at me.
I decided that I would not finish the Triton, but the love of model ship building was too great and it overcame my anger and disappointment. Seeing how she was coming to life before my eyes, I thought, “I’ll build you the way I want” all the while singing Elvis Presley’s, “I did it my way”.
Now that being said, I was able to get five more frames done and upon dry fitting them to the keel, I was not able to help but smile to myself at how great she was starting to look. I still have to get more timber in order to complete the last six frames necessary in order to get started on the inside. I’ve downloaded, “Anatomy of the Ship, The 74-gun ship Bellona” and am currently referencing the items I want to incorporate into my build such as the mast step, shot lockers, pump well, pumps, and quarterdeck rail just to mention a few items. Since I will soon get the other frames completed, I will start on the jig that will support my build. Below are a few photos showing what I have so far.
-
42rocker reacted to ziled68 in H.M.S. Triton 1:48 scale cross section - FINISHED
Russ,
I thought I'd experiment and try something new in order to see if it would work. It is only my first frame and if it seems to cause more problems than it is worth, then I'll cut the individual pieces and and glue them together.
-
42rocker reacted to ziled68 in H.M.S. Triton 1:48 scale cross section - FINISHED
Hello to all,
I’ve made a little progress today on the Triton. I remade the keel, false keel, and keelson at the new correct scale and also made them longer to incorporate the additional three frames necessary to add the main mast. Upon completing the keel, I marked the areas that will receive the frames to ensure everything was on the up and up.
I decided to experiment making my first frame by following Gene’s explanation on the Eagle and it really seems straight forward. After cutting the 3/16 basswood to size, I marked my working sheet in order to get the correct angles needed to follow the frames contour. Once all the pieces were cut, I laid wax paper on my drawing and placed futtocks 1, 3, and the top timber followed by the floor timber and futtocks 2 and 4. After everything was glued and in place, I placed a board on top of the frame and a car jack to compress everything and hold it in place (please don’t judge me, that’s all I had on hand). I’ve decided that what I will do is cut patterns with correct angles of all futtocks from card stock and go to town and knock out the other 11 frames.
-
42rocker reacted to ziled68 in H.M.S. Triton 1:48 scale cross section - FINISHED
Greetings to all,
I've just taken a preliminary look at the plans and if you've already done so than you know it is quite extensive. As I was mulling everything over, I noticed the cross section does not coincide with the full build version. I only mention this is because the first time I saw a cross section back in '86, I fell in love with the idea of either owning one or making one. One of the appeals that did it for me was the main mast, main top mast, and main topgallant mast along with their main yard, main topsail yard, main topgallant yard, and main royal yardnot to mention its standing rigging. As such, I've taken the liberty to tweak the cross section plans by first, renaming the frames and second, adding three more frames aft of of the current drawing.
Since I am going the route of adding the mast, I am forced to go down in scale and build it at 1:48 scale rather than the 1:24 I originally planned. Attached you will see the alteration to the plans I made so far and I would appreciate it if someone much more knowledgeable then me can tell me if I hit the nail on the head or totally missed the mark.
On a side note, does anyone know if there are detailed drawings for the masts? Anxiously awaiting any and all information regarding this request.
-
42rocker reacted to mtaylor in H.M.S. Triton 1:48 scale cross section - FINISHED
Elvis sang that? I thought it was Frank Sinatra.... <sigh> Seriously.. you're the Captain, build it your way. That is one of our tenets here.
-
42rocker got a reaction from dgbot in Licorne 1755 by mtaylor - 3/16" scale - French Frigate - from Hahn plans - Version 2.0 - TERMINATED
At this point think long and think hard as to what you want at the very end. Thinking about the amount of work that you put in on your first build and how you did it. Do you really think that you would be happy in the end with doing anything less than another try at getting the Hahn method corrected and the way that you want it? I again say review what you want for your end project.
That said
GOOD LUCK in this as it's for sure your call.
Later Tim
-
42rocker reacted to ccoyle in Pt. IV: Tools & Other Supplies
The tools needed to get started in card modeling are ridiculously few. Basically, you need a cutting tool and some glue. Everything else is optional.
Here's some basic tools:
You'll need a self-healing cutting mat, available from most office supply or crafts stores. Next, you need something to cut with. Notice the lack of scissors in the picture. Most card modelers rarely use them. Instead, your garden-variety craft knife will do the job nicely and with more precision. Get a good supply of #11 blades -- card can be surprisingly hard on them. A steel rule is a must, not just for measuring, but more importantly for cutting straight lines.
Glue is, of course, essential. A variety of glues will do the job, and each has merits and drawbacks. Good ol' PVA glue, either white (such as Elmer's) or yellow (wood glue -- hey, paper is wood, you know) are good general purpose glues with one proviso: it must be remembered that PVA glues are water-based, and card or paper will absorb the glue and deform. Thus, PVA is not good for gluing large surfaces together.
Cyanoacrylate glue, or CA (commonly known as 'Super Glue', which is a brand name), has its uses in card modeling. Fast-cure CA can be wicked into card stock to stiffen it, and medium-cure CA is useful for gluing parts made of different media together, as well as for paper-to-paper bonds.
Contact cement (not to be confused with rubber cement) is a non-water-based glue and thus good for gluing large surfaces together where severe warping would occur with a PVA glue. Contact cement sets rapidly, so repositioning of parts once they come in contact with each other is iffy at best.
Modelers in Europe have access to UHU-brand glues that some modelers swear by. I haven't come across any myself, so I haven't had a chance to try them out. Polish modelers, who seem to be born with a master card modeler gene in their DNA, use something called 'butapren'; I'm not a chemist, so I'm not familiar with what exactly butapren glue is, and it doesn't seem to be easily available in the US, possibly because it is a favorite of glue sniffers. Perhaps someone with knowledge of this substance can fill us in.
Now, on to some optional stuff that you'll probably want to have on hand:
From left to right we have:
blackened, annealed wire - an assortment of diameters is useful for making gun barrels, railings, etc. styrene rod - card can be rolled into tubes, but for tiny tubes, styrene is often a better choice assorted paint brushes - for painting, but also for aids in rolling tubes tweezers paint, marking pens, or other media for coloring cut edges (more on this later) calipers - for measuring card stock thickness, especially when laminating sheets together hobby pliers (not pictured) - for cutting and forming wire (end nippers, needle nose, round nose)
Some other useful items to have are thin, flexible, clear acetate sheets (for glazing windows), matte clear spray varnish (for prepping parts sheets), and 3M spray adhesive (for laminating card and/or paper sheets together). 3M costs more than other brands, but take my advice, it's worth the money. Cheaper brands don't coat as evenly and produce clumpier spray patterns. Trust me -- I learned this the hard way.
I'm sure there's some other stuff I forgot to list, but I'll add those if and when I remember them. Now, go get your supplies, and we'll move on to the model!
Back to Part III: Shopping for Card Models On to Part V: Building V108 - The Hull
-
42rocker reacted to ccoyle in Pt. II: Start for FREE!
First of all, never download a model from a third party file sharing site. Always download models from the designer's own web site or a site authorized to host them. Second, never buy CD's claiming to have "hundreds of models" from auction sites like eBay -- these are inevitably scans of commercial kits. If you shop at eBay or somewhere similar on-line, make sure the seller displays a photo of the printed kit booklet; it should have an artwork cover with the publisher's name plainly visible.