Pete Jaquith
-
Posts
343 -
Joined
-
Last visited
Content Type
Profiles
Forums
Gallery
Events
Everything posted by Pete Jaquith
-
When I started out, I learned a great deal about rigging techniques from Robert Hunt's Freshman Practicum "Building the Armed Virginia Sloop". The techniques are generic and I still follow Bob's hints/techniques. I just posted pictures in the Completed Kit Built Models Gallery. With Bob Hunt's practicum, the MS's Armed Virginia Sloop is a great build and learning project (pictures attached). Pete Jaquith Shipbuilder
-
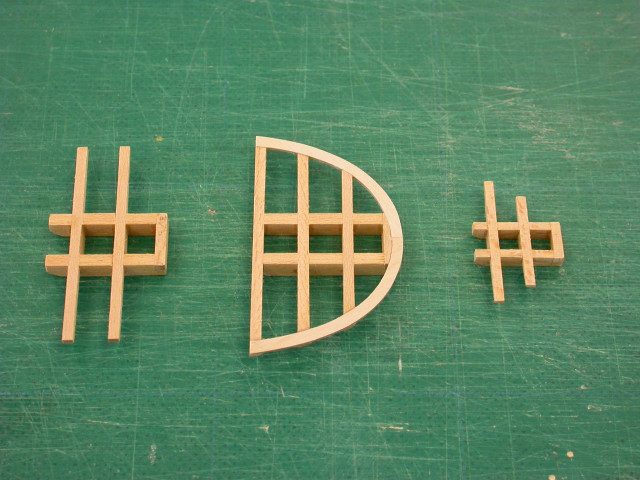
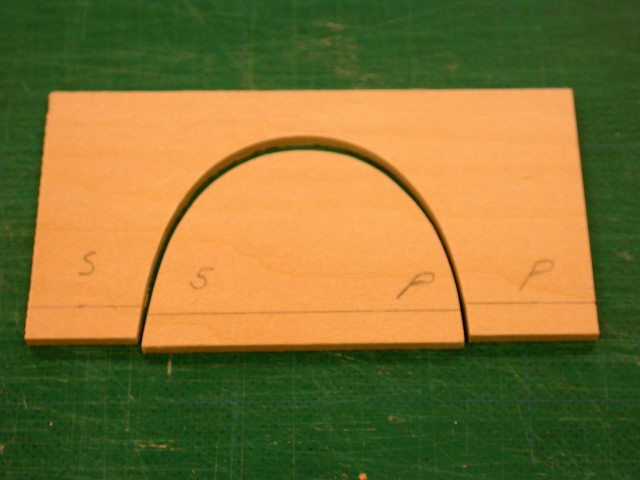
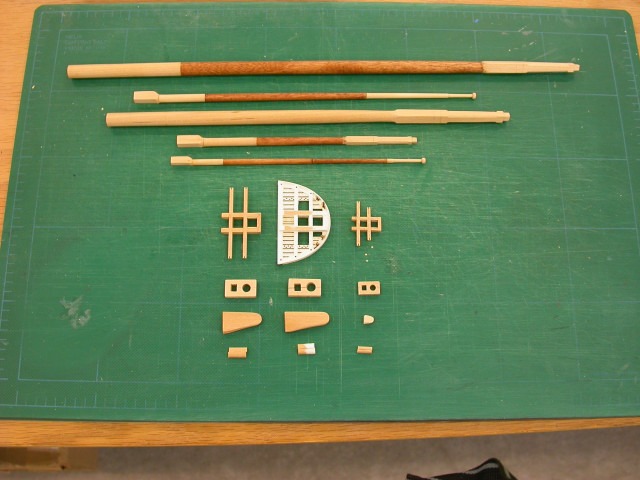
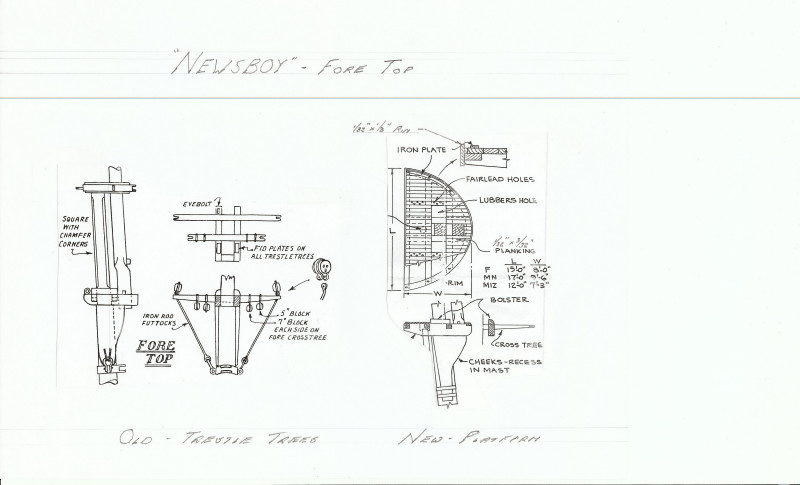
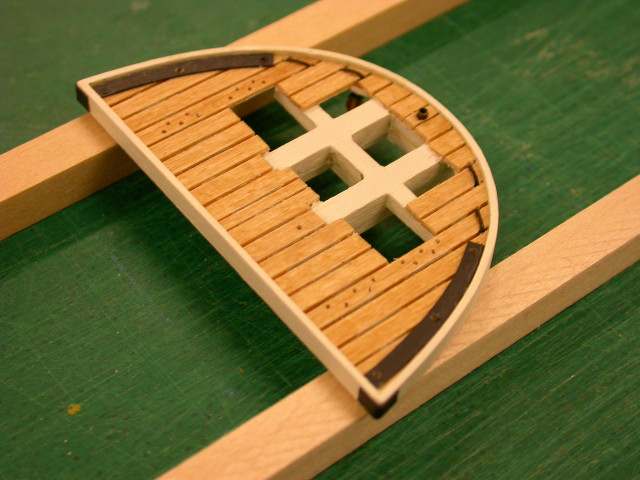
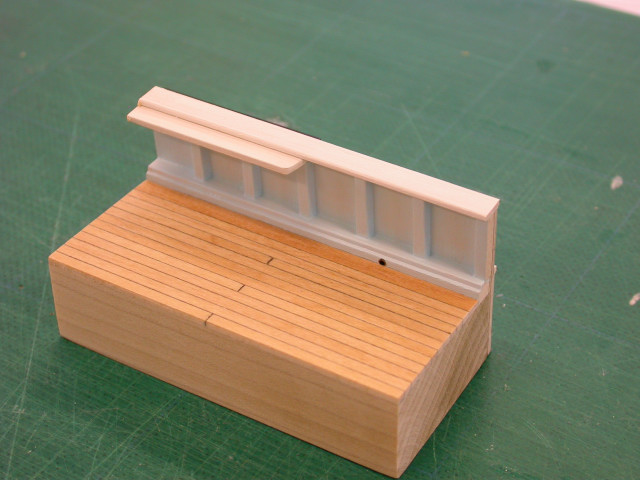
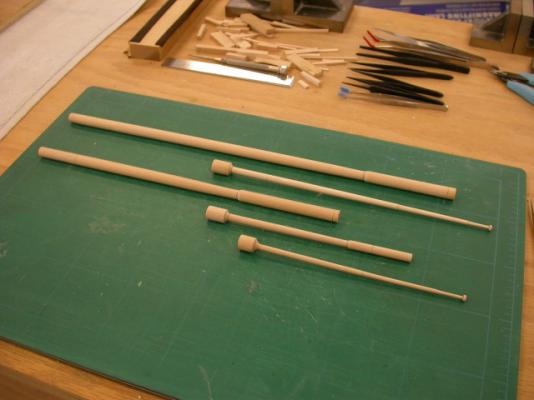
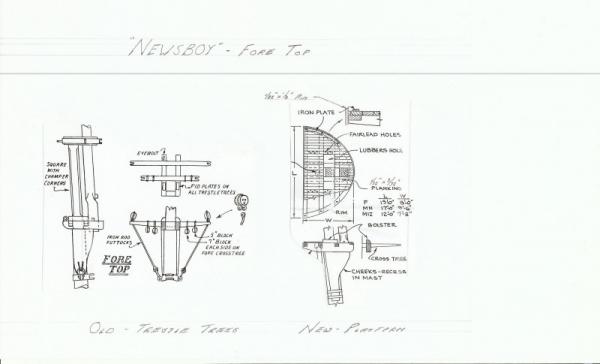
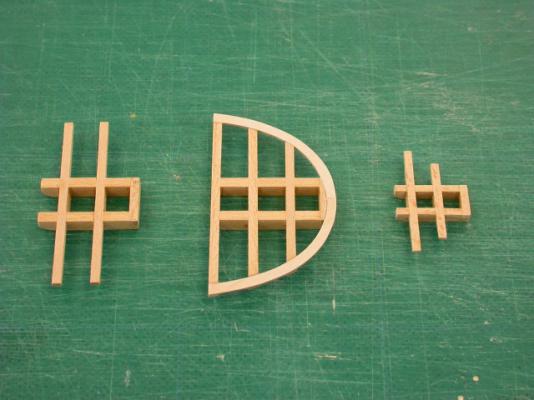
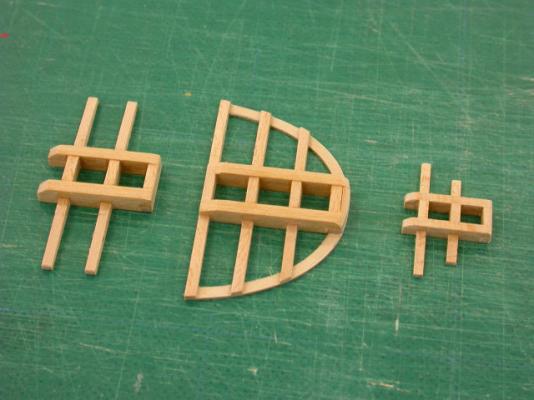
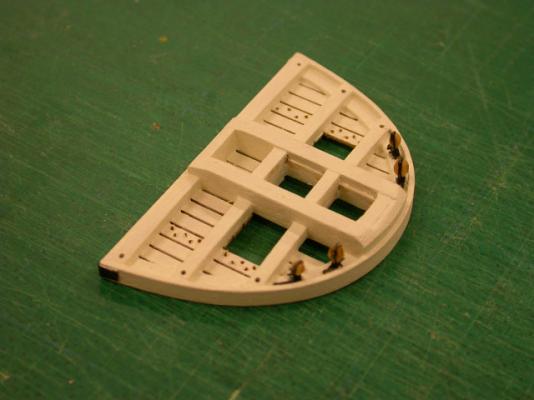
 Thank you for your interest in the "Newsboy" 1854 build log, Next steps are mast and top fabrication. Key points include: >>> Masts were turned from oversize dowels to provide material for the sq. sections at the tops >>> Upper mast sections were shaped using a disk sander/chisels >>> Cross trees and fore top framing were fabricated from laminated stripwood >>> Cross trees and fore top were dry fitted to upper mast sections during fabrication >>> Fore top coaming was formed from 1/32" x 1/8" basswood stripwood using a male/female former (illustrated) >>> Fore top fabrication based on design developed from contemporary ship model plans >>> Buntline blocks were fitted to the fore top per Rigging Set Up Lists >>> Base for fore lower topsail yard strut was fitted to the fore top per Rigging Set Up Lists Pete Jaquith Shipbuilder
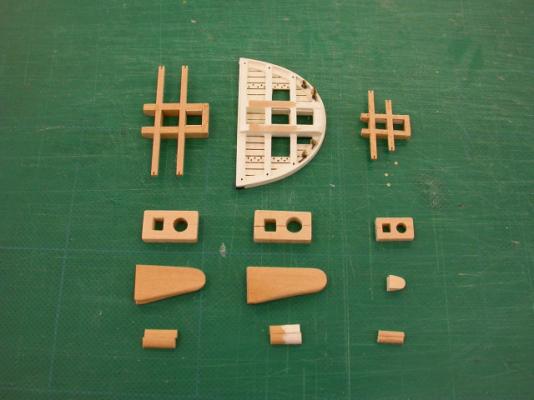


-
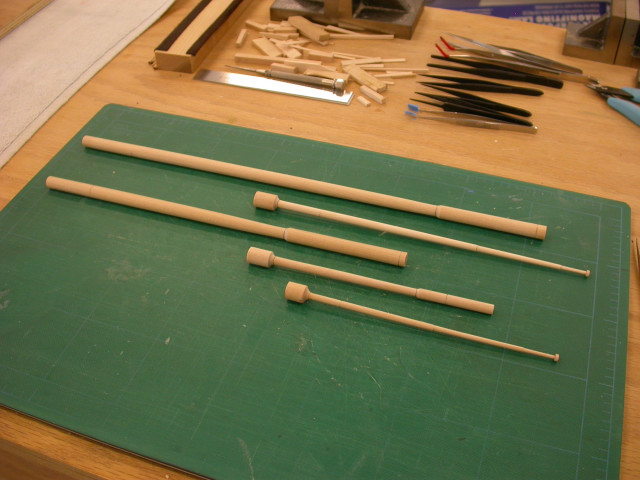
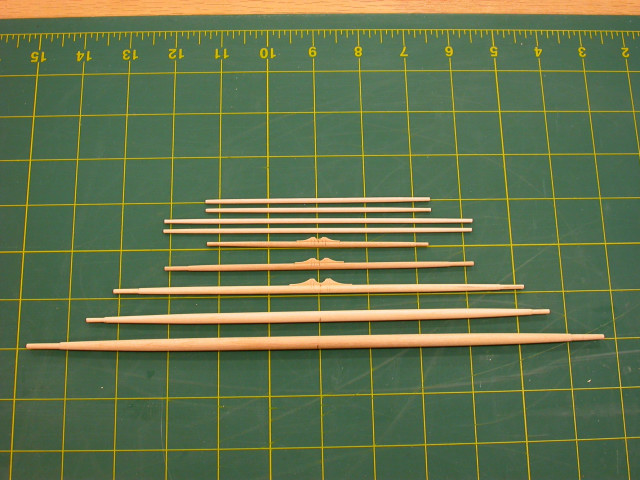
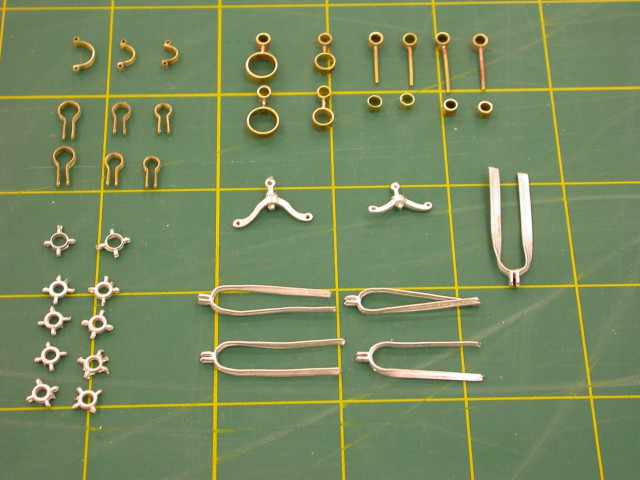
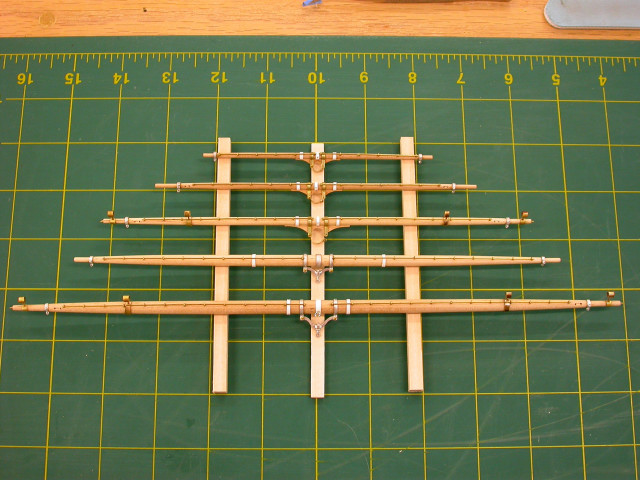
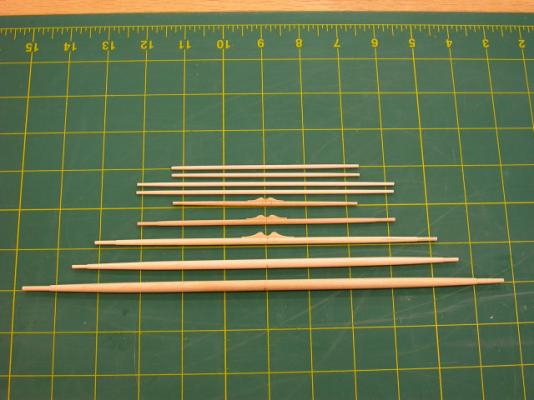
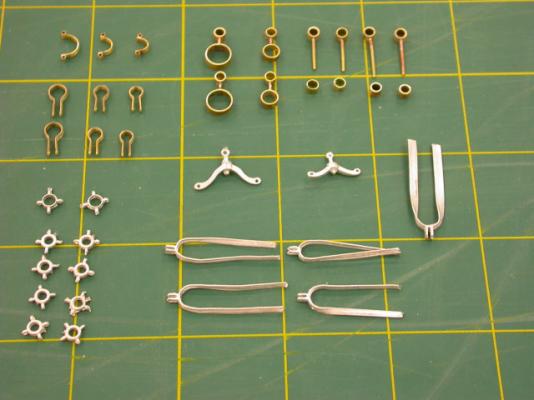
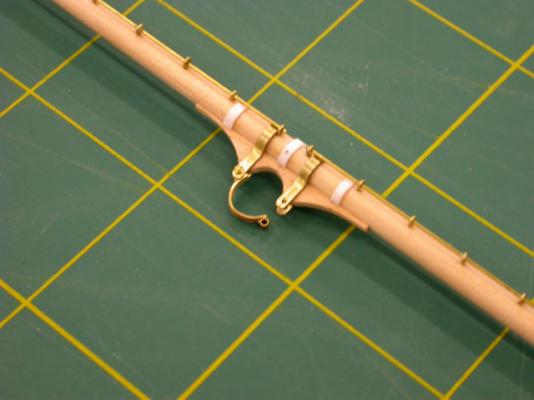
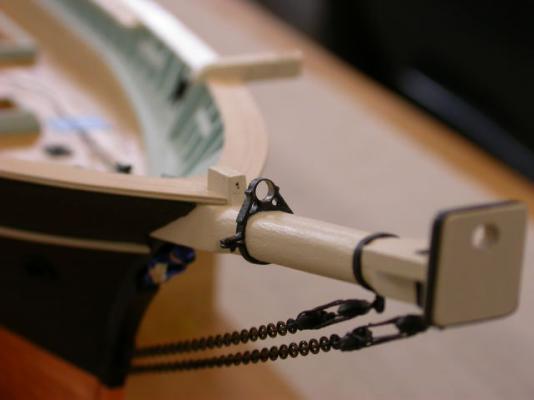
Welcome to the "Newsboy" 1854 build log, 1st the spars. Key points include: >>> Studding booms and studding irons were added (not shown on original plans) >>> Spar design sketches were prepared using parabolic camber >>> Spars were turned from birch dowels using a Jet mini-lathe >>> Spars were turned using fine sanding sticks >>> A digital caliper is a great tool for checking diameter during turning >>> Rigging ironwork was a combination of Britania castings (Bluejacket) and silver brazed brass fittings (see photo) >>> Design of rigging ironwork based on contemporary rigging plans >>> Initial spar outfit based on Rigging Setup Lists Pete Jaquith Shipbuilder


-
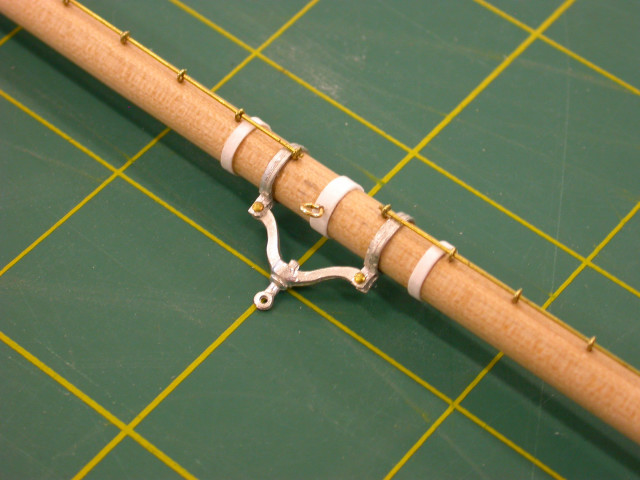
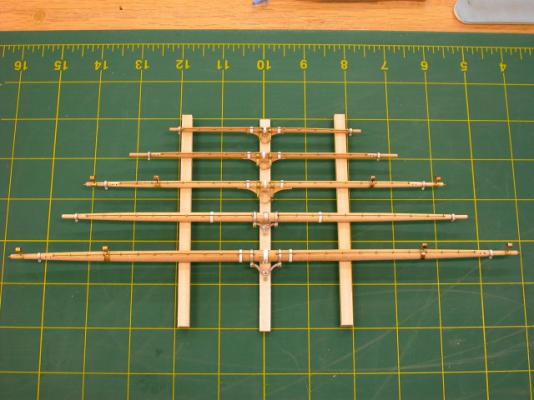
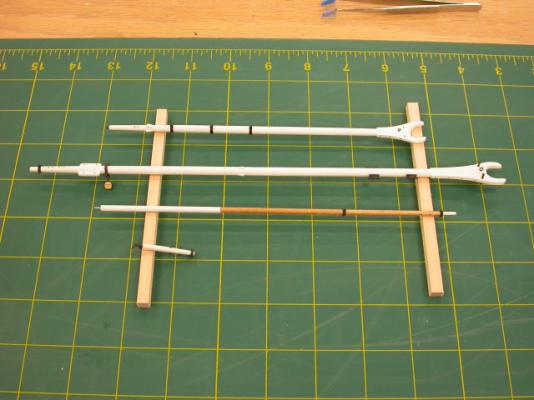
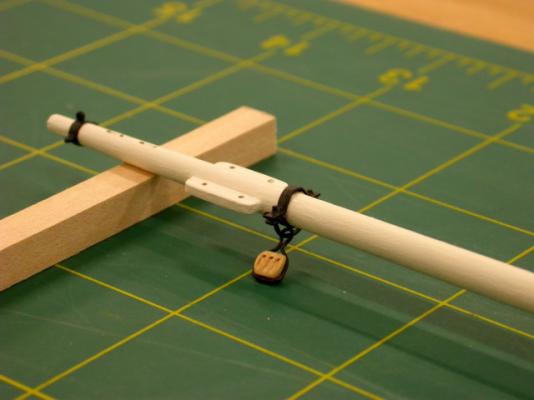
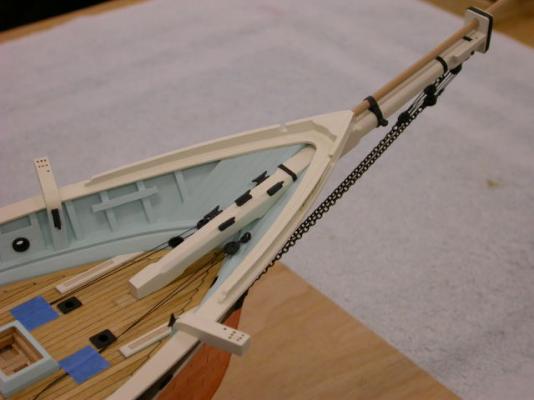
Thank you for your interest in "Newsboy" 1854, Next step is rigging planning / setup. 1st step is to develop a "Standing and Running Rigging Table" in a similar form to that found in Steel's Elements of Mastmaking, Sailmaking, and Rigging (1794). The table lists each rigging line, size, color, fittings, etc. Data is taken from the plans and compared to data from other ships. Rigging lines, chains, blocks, deadeyes, etc. are sized based on standard rigging materials I have in stock (note that I was unable to post a sample). 2nd step is developing rigging setup lists where rigging lines, blocks, and fittings are assigned to individual spars for pre outfit installation prior to mounting aloft. Lists are prepared for the hull, bullwarks, masts, and individual spars. A sample is shown below: Fore Upper Topsail Yard (2) .015” x 1/16” brass bands (parrel hinges) (1) .015” x 1/16” brass strip & 1/32” brass tube (parrel assembly) (3) 1/16” Bristol board yard bands (2) Drill holes for (2) yard sheaves (topgallant sheets) (2) Studding boom quarter iron (2) 3/32” Eyebands (2) Studding boom irons (20) Small eyebolts (jackstays) (2) .020” Brass rod (jackstays) (2) 3/32” Brass split rings w .015” black line (foot ropes) (2) Small eyebolts w .015” black line (Flemish horses) (2) Medium eyebolts w 3.5mm D blocks (topgallant sheets & upper topsail downhauls) (2) 3.5mm S blocks (upper topsail downhauls) (2) Medium eyebolts w .010” black line (loose servings) (upper topsail yard lifts) (2) .015” black line 2” w 4mm S blocks (upper topsail yard brace pendants) The following picture illustrates initial pre outfit based on these setup lists. Pete Jaquith Shipbuilder

-
Thank you for your interest in "Newsboy" 1854, As I completed the hull and hull outfit, I started to examine the masts, spars, and rigging. After consultation with a number of master builders at the USS Constitution Ship Modelers Guild; I decided to fit a full fore top in lieu of the cross trees shown on the original plans. Key points include: >>> Full fore top more typical on fully rigged ships >>> Cross trees more typical in schooner rigged vessels >>> Curved fore top provides improved clearance for rotating yards/sails when tacking >>> New fore top design based on drawings of other contemporary vessels >>> New fore top sized to suit original cross trees Pete Jaquith Shipbuilder


-
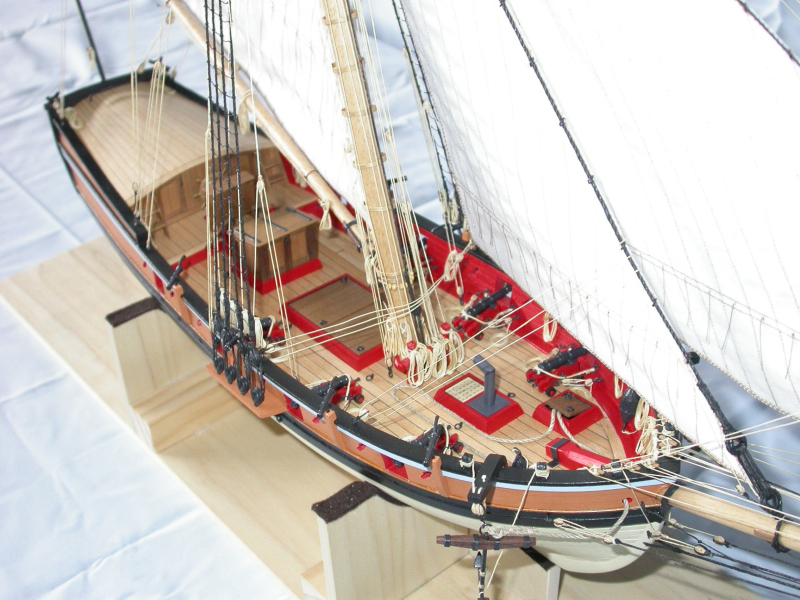
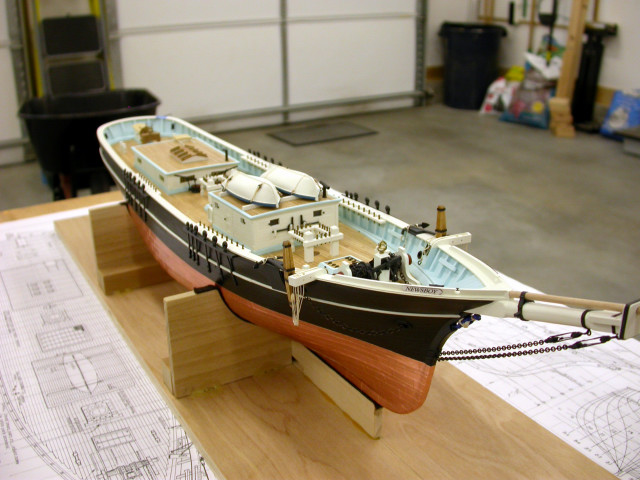
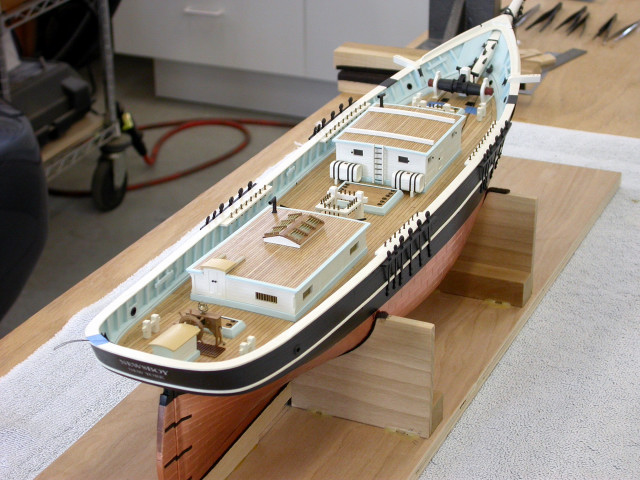
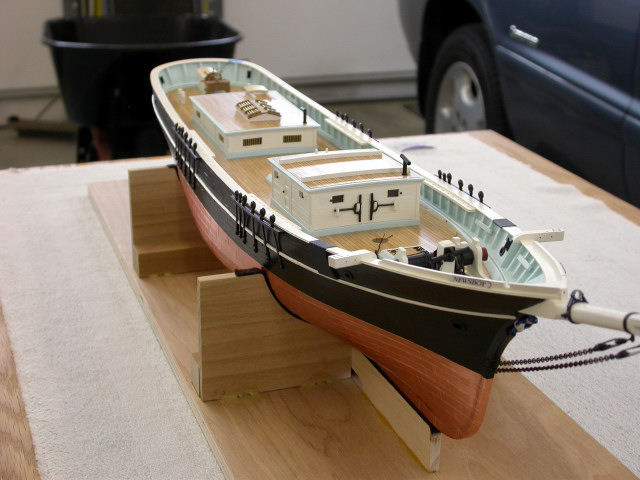
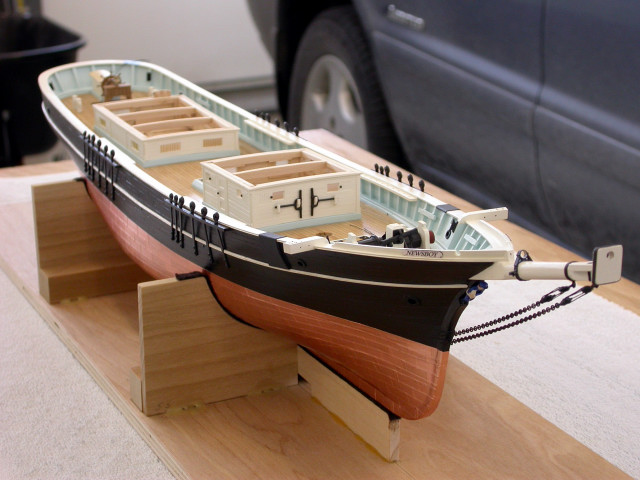
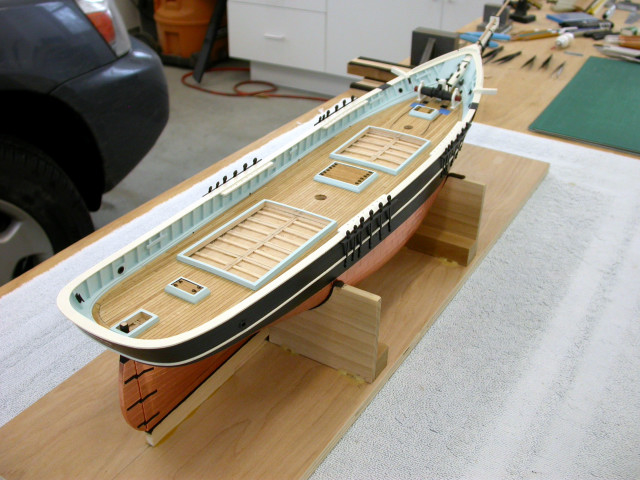
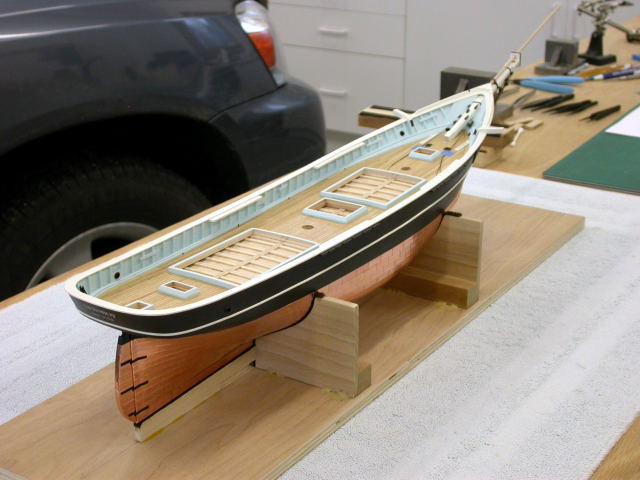
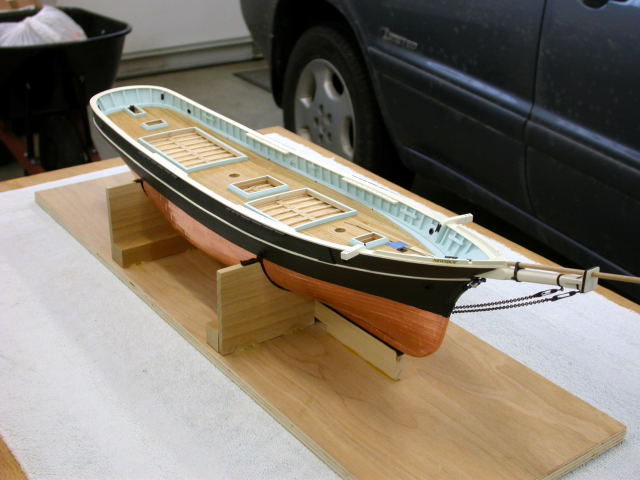
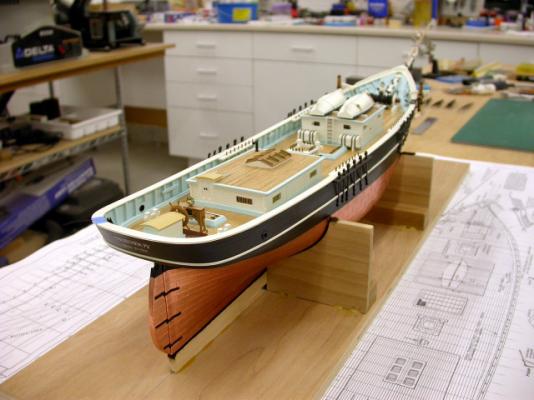
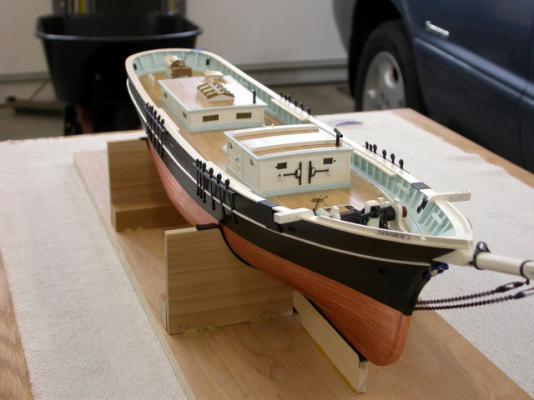
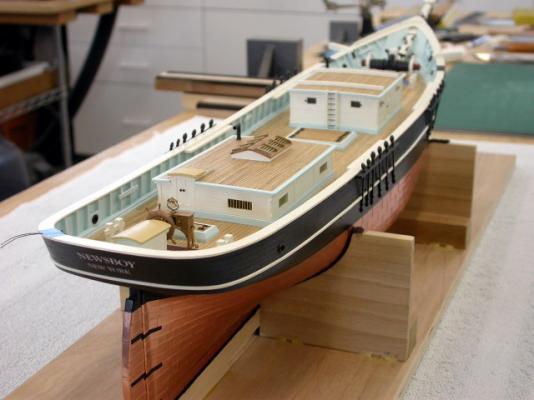
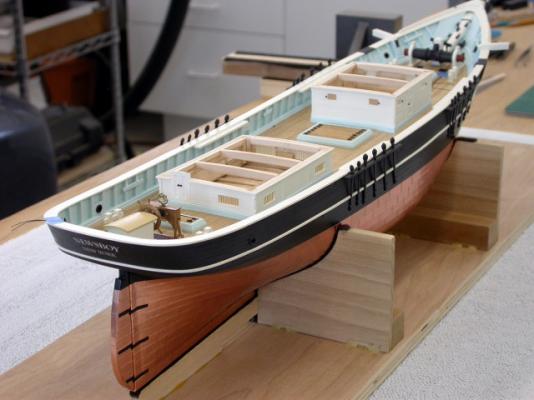
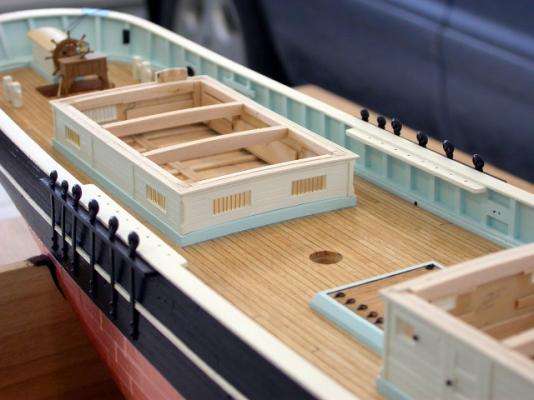
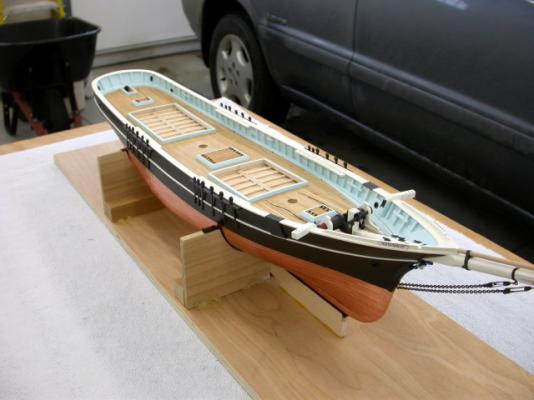
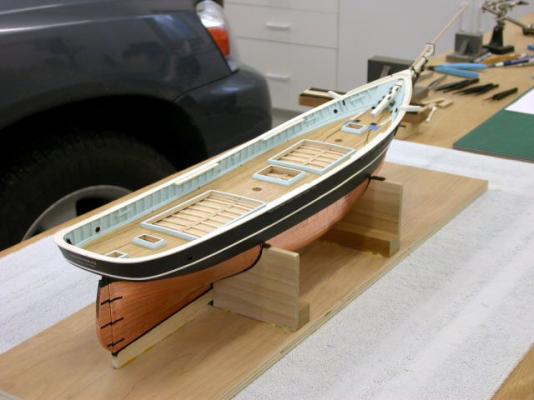
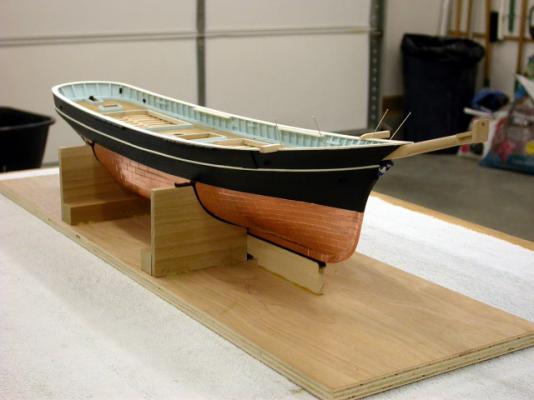
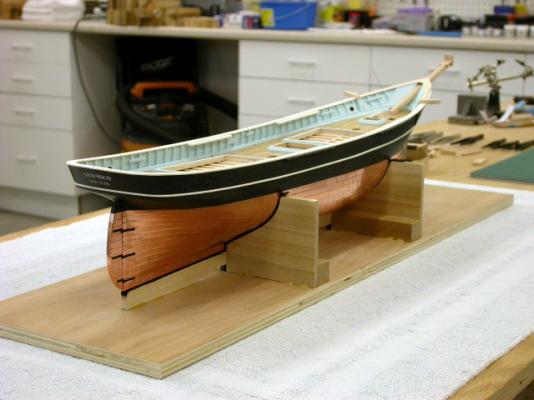
Welcome to the "Newsboy" 1854 build log, The following pictures document the completion of hull and deck outfit. Future posts will address planning, fabrication, rigging setup, and installation of masts, spars, standing and running rigging. Pete Jaquith Shipbuilder


-
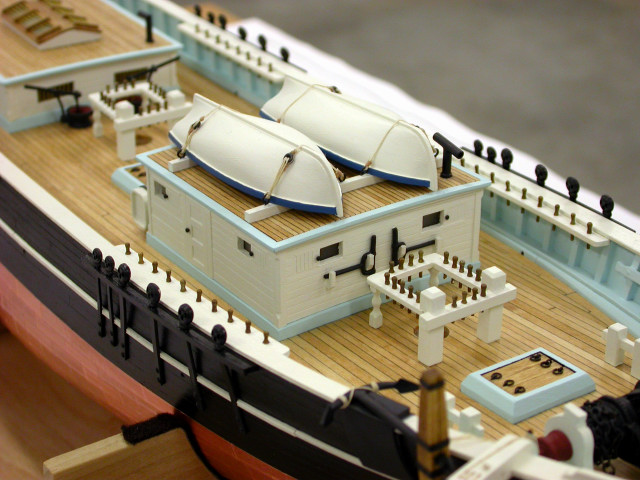
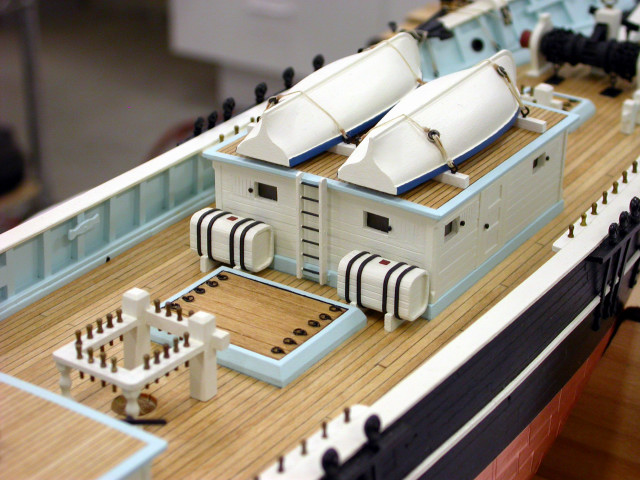
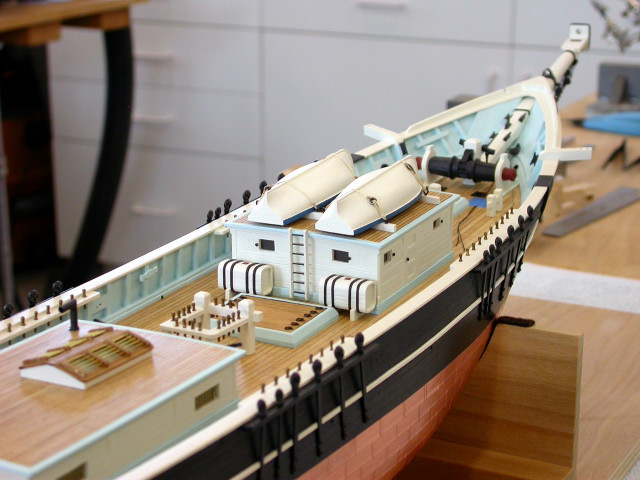
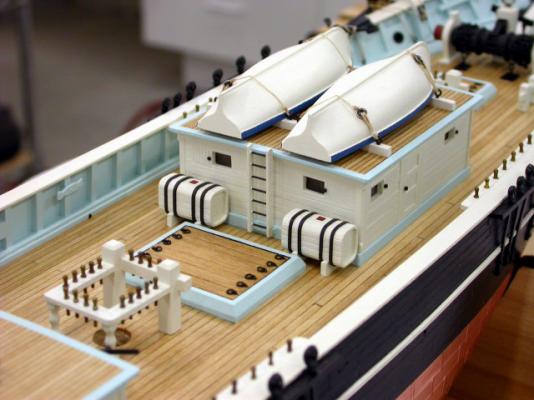
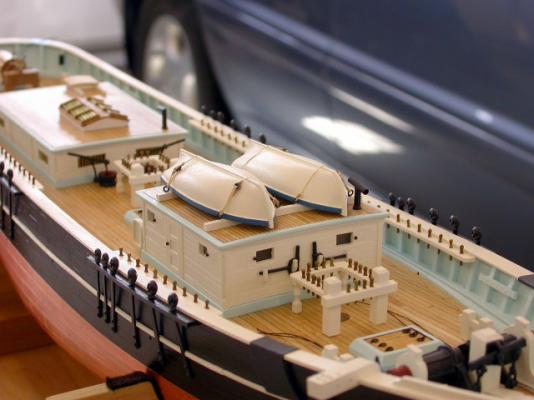
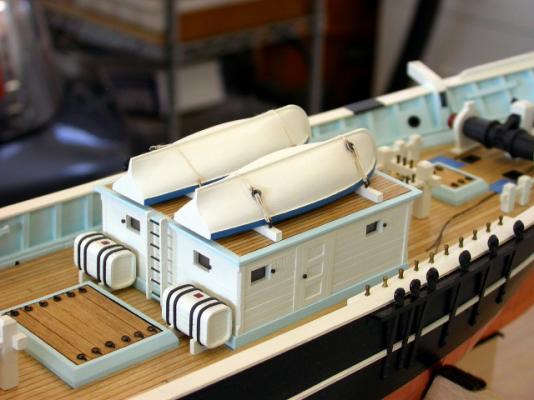
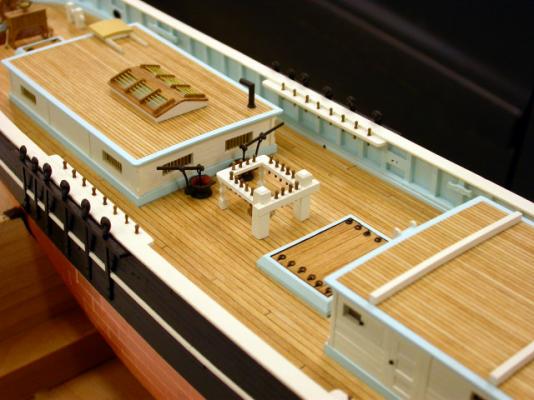
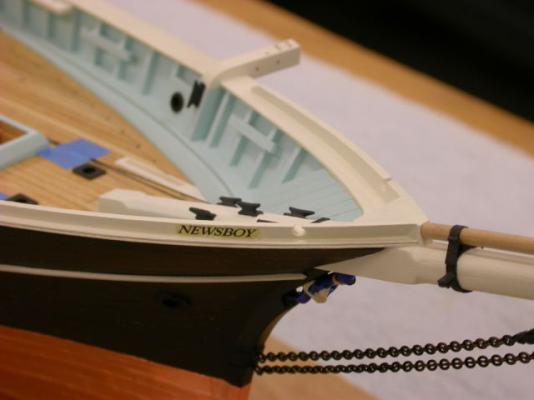
Welcome to the "Newsboy" 1854 build log, Work continues on completing the deck outfit. Key points include: >>> Two boats were fitted (my decision vs. one shown on the plans) >>> Boats were fabricated from laminated basswood around a CL bulkhead >>> Boat interiors were not hollowed out or detailed >>> After painting, boats were dowelled and lashed in place on the forward house >>> Anchors were fabricated and lashed in place >>> Anchor chains were fitted to the anchors and windlass >>> Forward and main house were glued in place >>> Forward bell was fitted to the Sampson post Pete Jaquith Shipbuilder

-
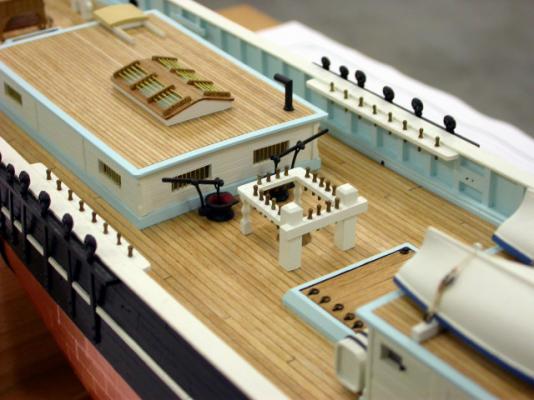
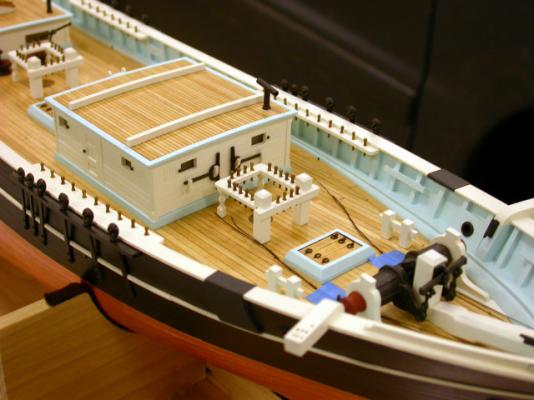
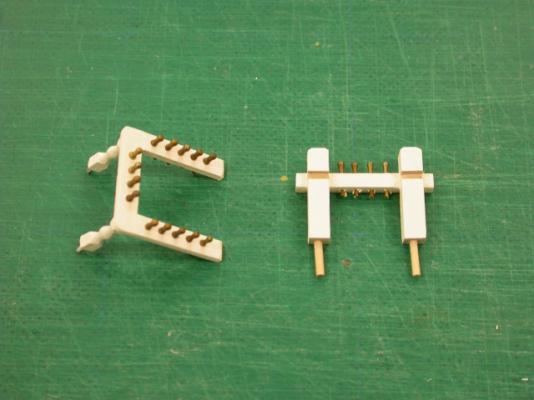
Welcome to to the "Newsboy" 1854 build log, With the deck houses complete, lets continue with the deck outfit. Key points include: >>> Fiferails were built up from stripwood >>> Fiferail stanctions were Bluejacket castings >>> Forward fiferail left loose (2 pieces) for installation after completion of fore lower yard lift and fore lower topsail sheet tackles >>> 2 deck pumps fitted to permit pumping out P/S of keel and for redundency (1 shown on plans) >>> 2 water casks fitted based on contemporary practice (not shown on plans) >>> Water casks were planked over basswood plugs >>> Belaying pins (brass) were chemically treated and installed As noted, I feel free to add to plan details based on contemporary practice where I see something missing. After all, most ship model plans are only reconstructions. Pete Jaquith Shipbuilder


-
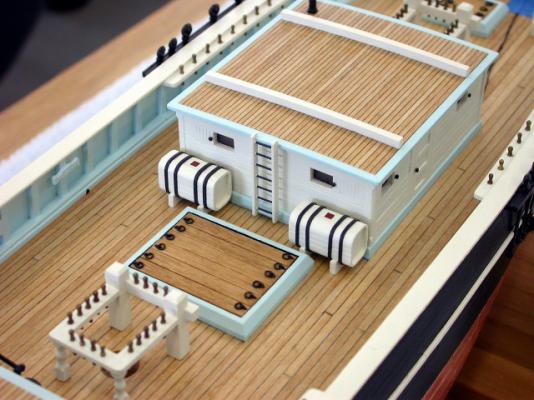
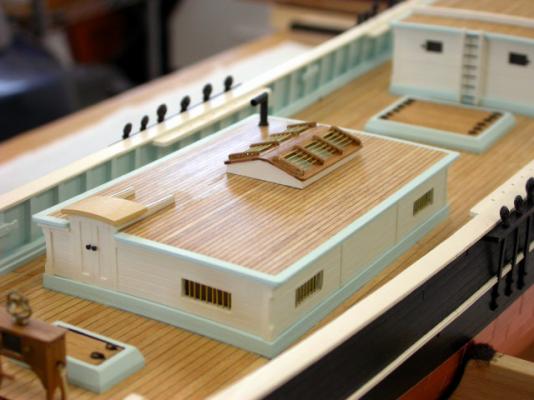
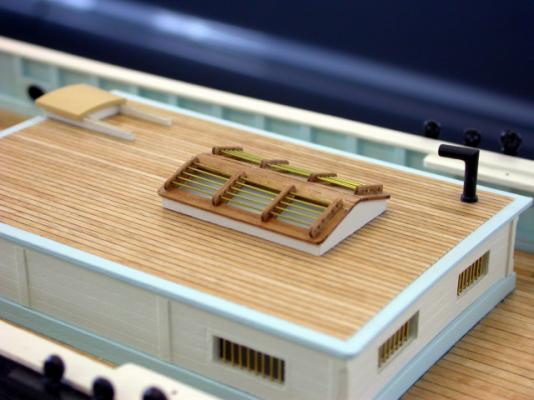
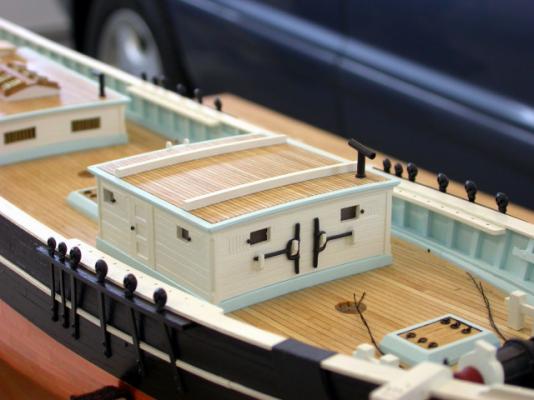
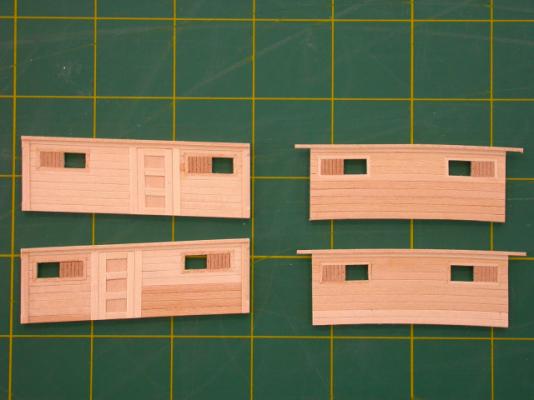
Thank you for your interest in "Newsboy" 1854 More deck house construction pictures are included. Key points include: >>> House top planking was fabricated from glued up plank sheet >>> House top margin planks were painted prior to installation >>> Companionway was fitted to the main house >>> Skylight was fitted to main house (lesson learned: on future builds I will fit this into the house top planking with a shallow coaming and leave it open to create depth >>> Smoke pipes were fitted to both houses >>> Access ladder was fitted to aft side of forward house >>> Boat rails were fitted to the forward house Pete Jaquith Shipbuilder
-
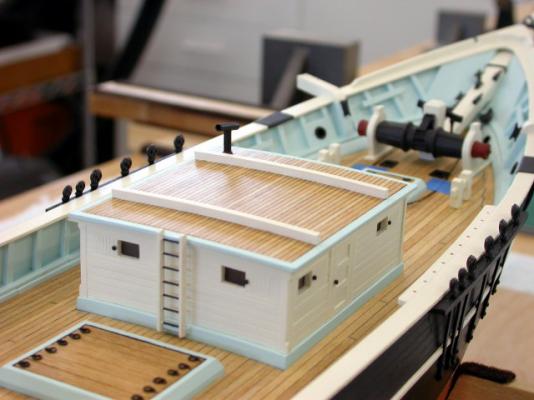
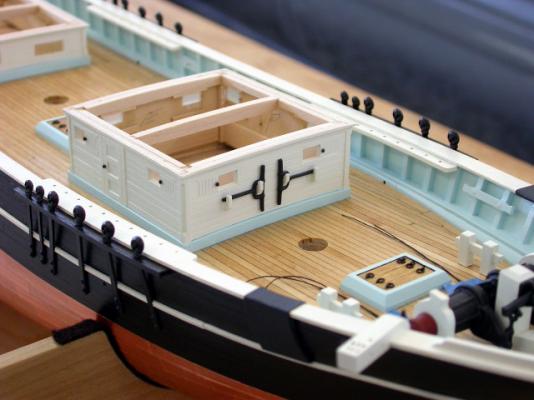
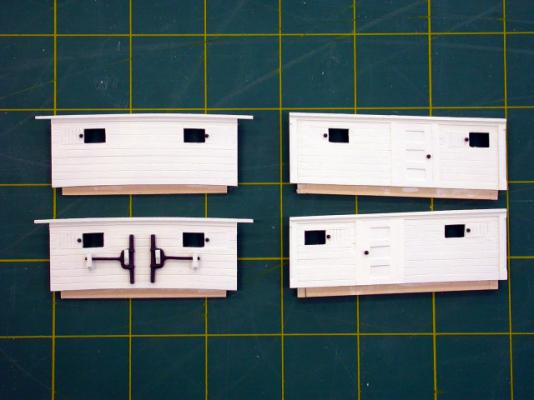
Welcome, Some more deckhouse pictures. Key points include: >>> Deck house bulkheads were glued to together and to their respective coamings using the deck cutout to ensure squareness >>> Deck beams were fitted >>> Note windlass pump handles stowed on the forward house front >>> Note that coamings will not be glued to the hull until all adjacent outfit has been fitted >>> Note this construction sequence gives a clean paint line between the house sides and coamings Pete Jaquith Shipbuilder

-
water way?
Pete Jaquith replied to jhl's topic in Planking Techniques's Click Here for Topics dedicated to planking!!!!
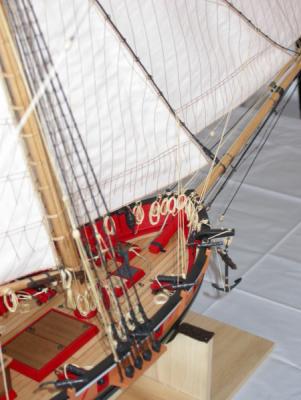
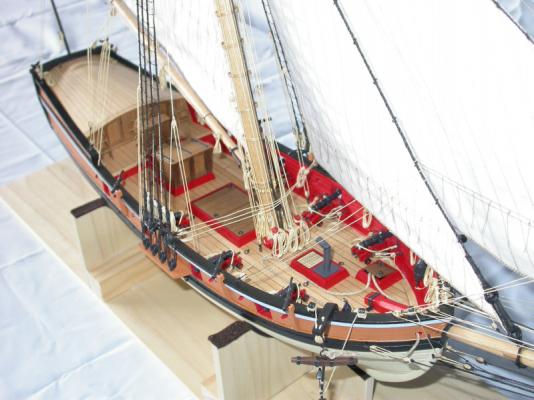
On old sailing ships, the waterway was a strong timber that formed the outer edge of the deck planking and formed a transition to the bulwark. Deck scuppers drilled through the waterways drained the water overboard; and where fitted freeports over the water ways drained any large quantities of water overboard. These ships had significant camber which drained deck water outboard if the ship was not heeled over. Note the attached thumbnails for examples from "Newsboy" 1854 and "Fair American" 1780. On modern steel ships the shell plating typically extends above the deck plating and deck scuppers are fitted in the outboard deck plate (stringer plate). Deck camber is typically not fitted due to modern mechanized steel assembly lines, and where fitted straight line camber is used vs. to older parabolic camber. Pete Jaquith Shipbuilder
-
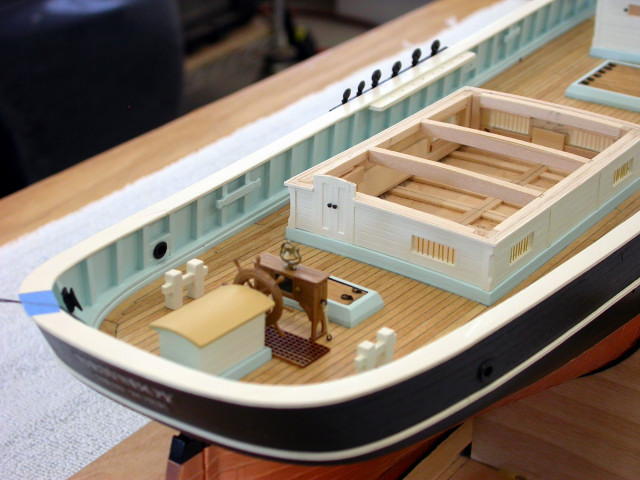
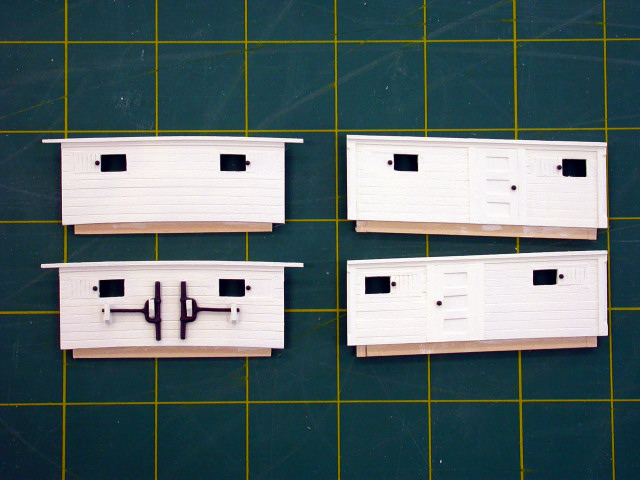
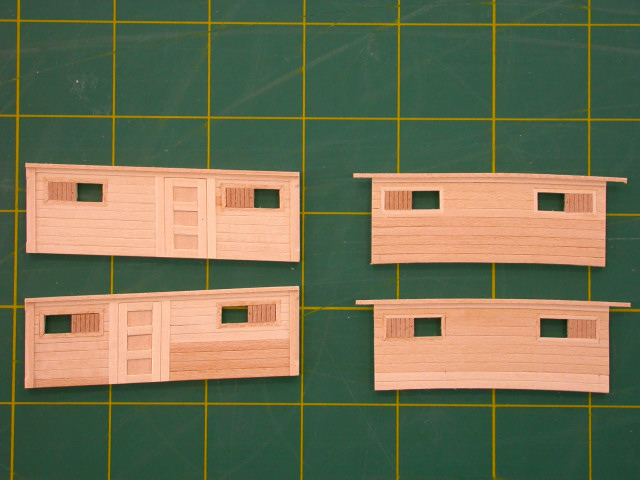
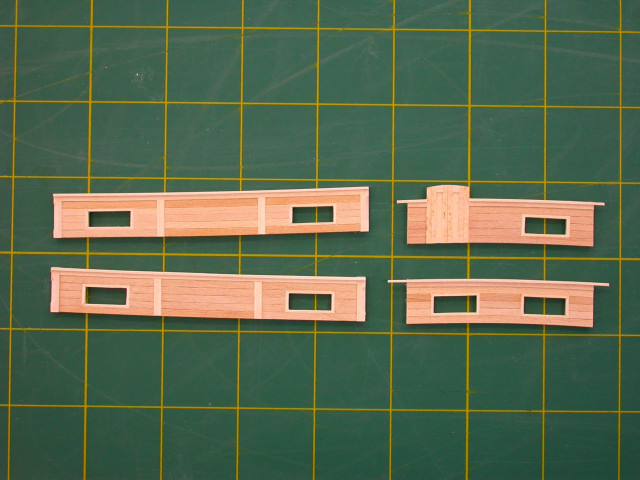
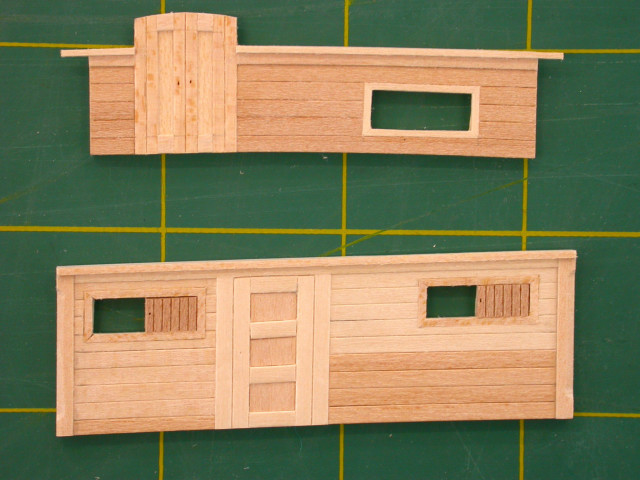
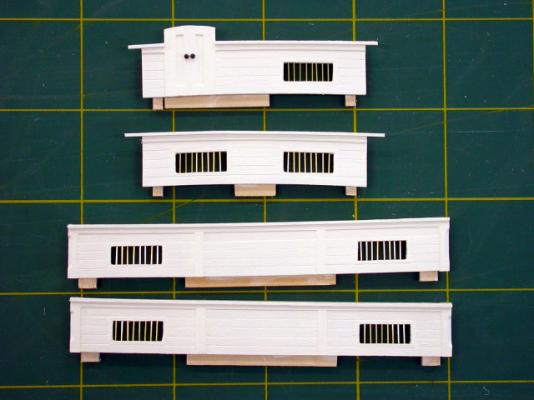
Thank you for your interest in "Newsboy" 1854, With respect to achieving clean paint lines, I try to consider painting in my assembly sequence. Where possible, pieces are painted prior to final installation to minimize the need for masking (e.g. spray rail, cap rails, catheads in 2 pieces, hatch coamings, etc.). Next steps include fabrication and installation of the deck houses. The house sides/ends are laminated over false bulkheads with planking and posts to simulate the prototype. Deckhouse panels are fitted to the respective coamings during construction, and the house assemblies are glued to the coamings before final installation on the model. For illustration the forward house scantlings/materials are listed below: Side/end backing – 3/64” sheet stock Coaming inserts & interior stiffening – 3/64” sheet stock & 3/32” sq. strip wood Corner posts – 3/32” sq. strip wood Side/end planking – 1/32” x 3/32” strip wood Side/end upper trim – 3/64” x 3/32” & 1/32” sq. strip wood Window trim – 1/32” sq. strip wood Window shutters – 1/32” x 3/64” grooved planking Door outer frames – 3/64” x 3/32” strip wood Door inner frames – 3/64” x 3/32” strip wood Door panels – 1/32” sheet stock Deck beams – 1/8” x 3/16” strip wood Deck planking – 1/16” x 3/64” glued up decking Deck margin planks – 3/64” x 3/32” strip wood (use 1/16” x 3/32” for future builds) Ladder rails – 1/32” x 3/32” strip wood Ladder steps - .020” brass wire Boat rails – 3/32” sq. strip wood Windlass brake handle stowage – 3/64” sq. strip wood Stovepipe – 3/32” brass tubing Coaming finish – Clipper Pearl Blue Cabin finish – Warm White Cabin deck finish – Ipswich Pine/Bartley Gel Varnish Cabin deck margin planks - Clipper Pearl Blue Ladder rails, boat rails, windlass brake handle stowage – Warm White Ladder steps – Floquil Engine Black Stovepipe finish – Floquil Engine Black Peter Jaquith Shipbuilder


-
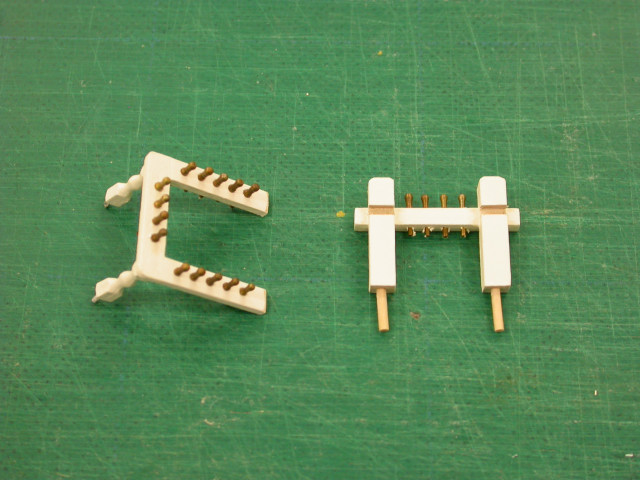
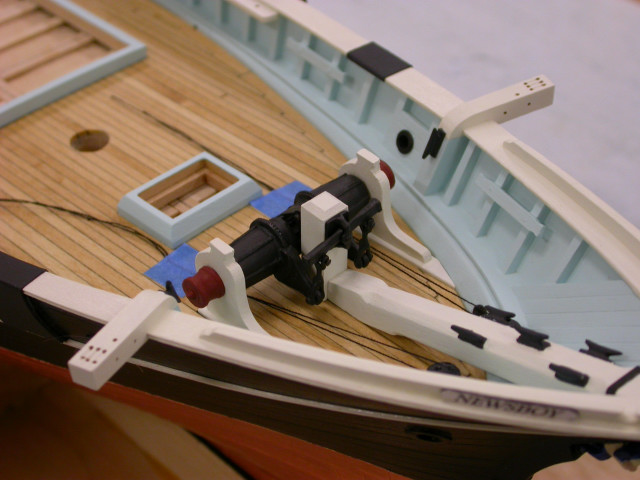
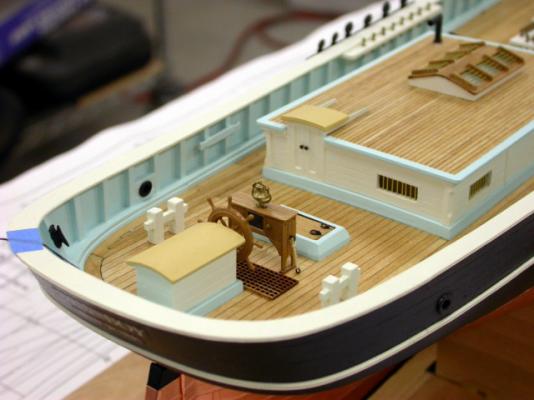
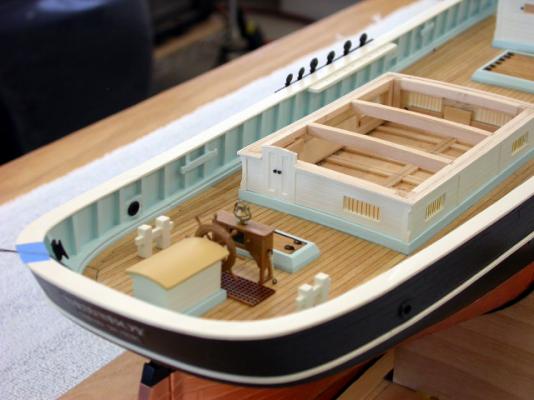
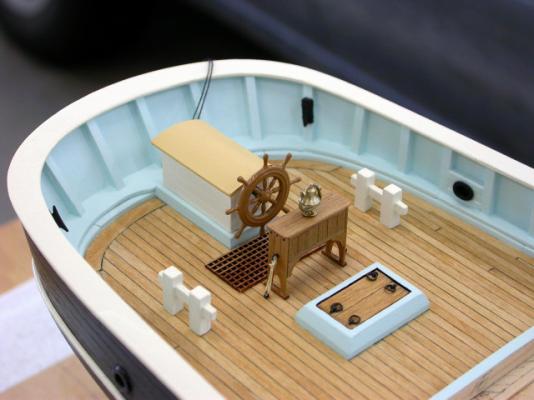
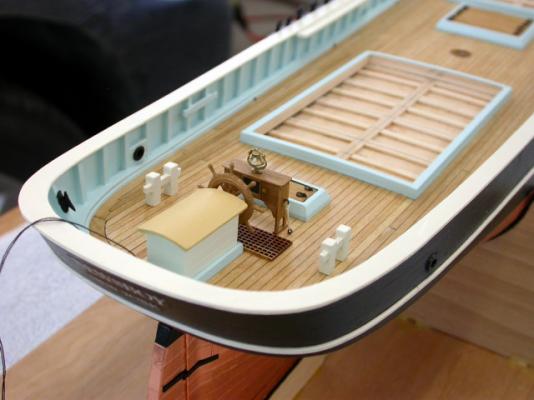
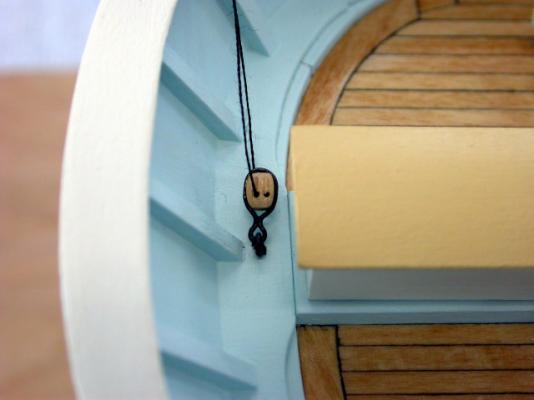
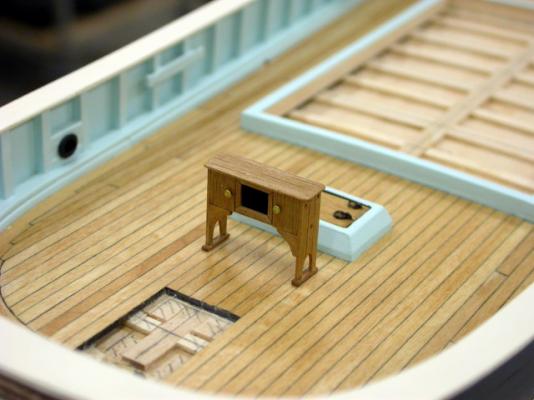
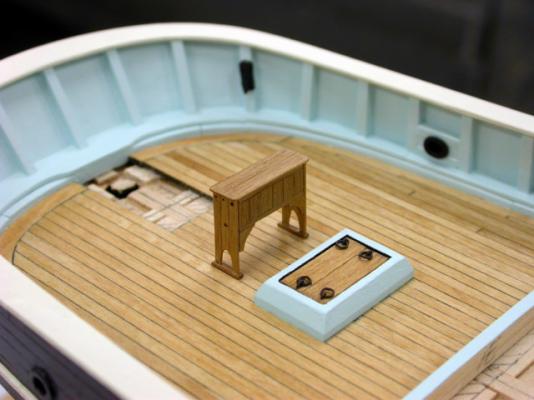
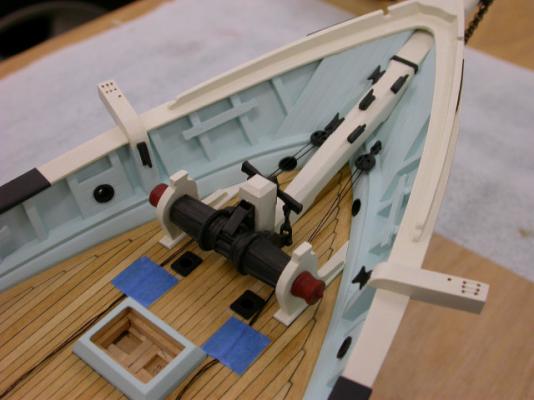
Thank you for your interest in "Newsboy" 1854, Next step is after deck outfit. Key points include: >>> Binacle redesigned based on contemporary ship model plans (original was undersized for 3/16" scale) >>> Binacle was sheathed with walnut veneer over a solid block >>> Ships bell HO scale fitting from Cale Scale >>> Main sheet block fitted to waterway (to avoid access issues) >>> Steering enclosure built up from laminated panels, install in coaming, and glued in place >>> Grating panels fitted for steering station >>> Mooring bitts built up from laminated stripwood and doweled in place Pete Jaquith Shipbuilder
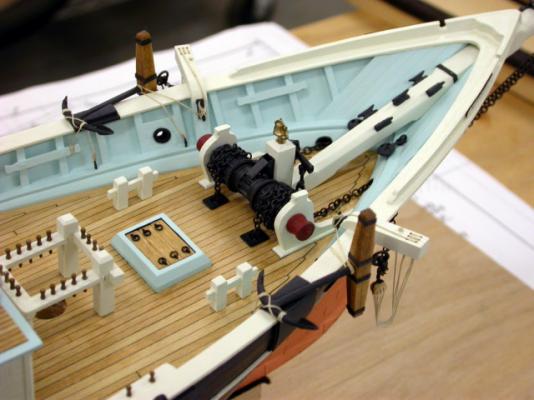
-
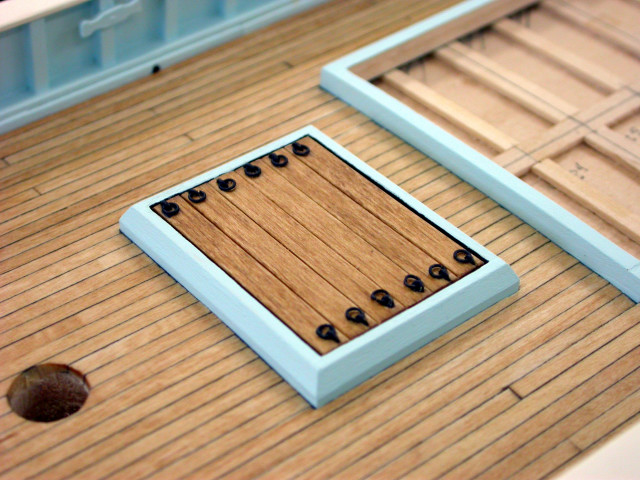
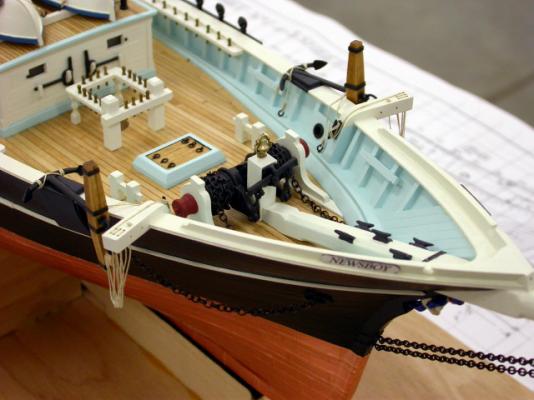
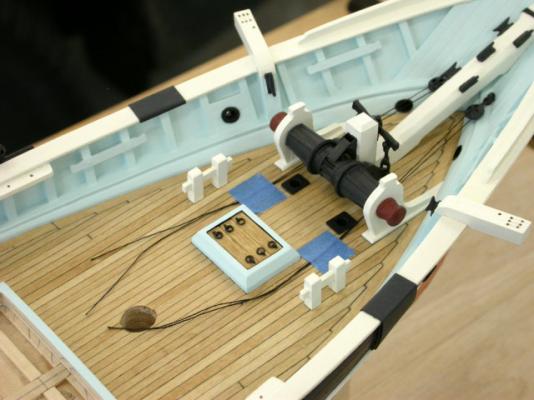
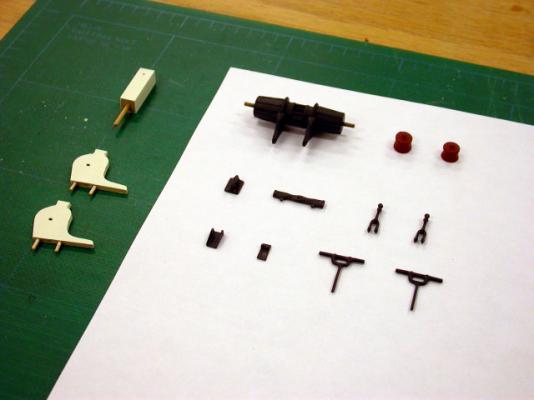
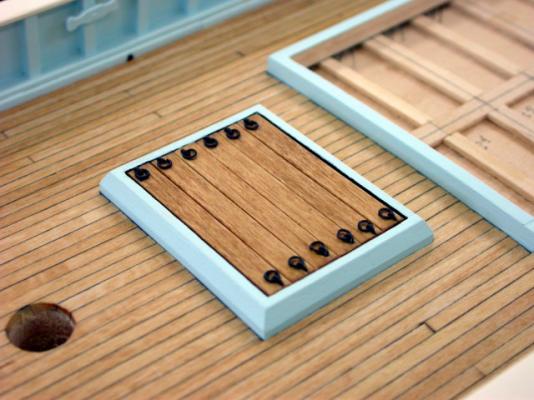
Thanks for your interest in "Newsboy" 1854 With exterior hull outfit complete, next step is the foredeck outfit. Key points include: >>> Anchor windlass redesigned based on contemporary ship model plans (original was undersized for 3/16" scale) >>> Anchor windlass kit bashed from Bluejacket casting kit >>> Anchor windlass previously dry fitted before deck planking installation (to locate thick pads) >>> Windlass pump handles will be stowed on the main house front >>> Cleats fitted to catheads >>> Hatch covers fitted to coamings & glued in place >>> Mooring bitts fabricaled from laminated strip wood & dowled in place Pete Jaquith Shipbuilder


-
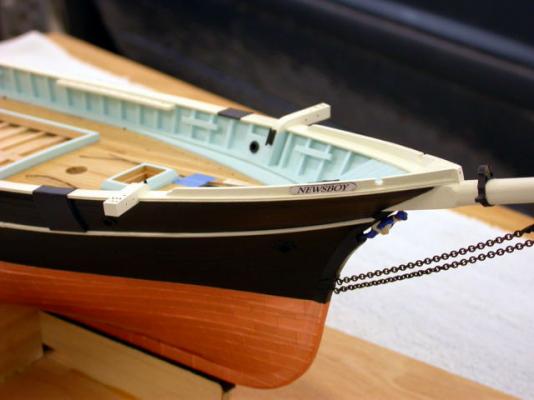
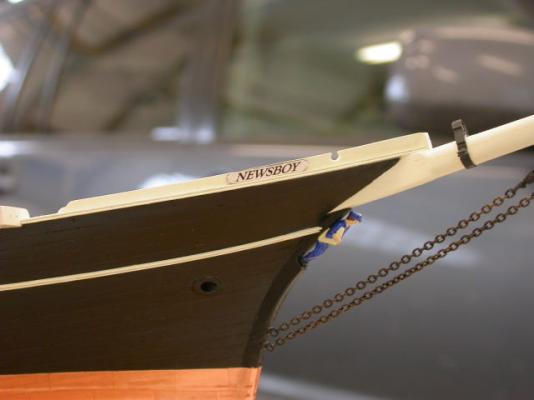
Thank you for your interest in "Newsboy", Next steps continue the installation od deck / hull outfit components. Key points include: >>> At this point, hatch / house coamings have not been glued in place >>> New nameboard installed on spray rails (to improve contrast against rails) >>> Anchor billboard sheathed with tectured Bristol board (goor representation of wought iron) >>> Lower deadeyes installed (previously fitted with temporary mast) Pete Jaquith Shipbuilder


-
Bob, I will try to make a SDSMG meeting when I am back in San Diego, CA. I am currently engaged in a full scale shipbuilding project in North Vancouver, BC Canada. Regards, Pete Jaquith
-
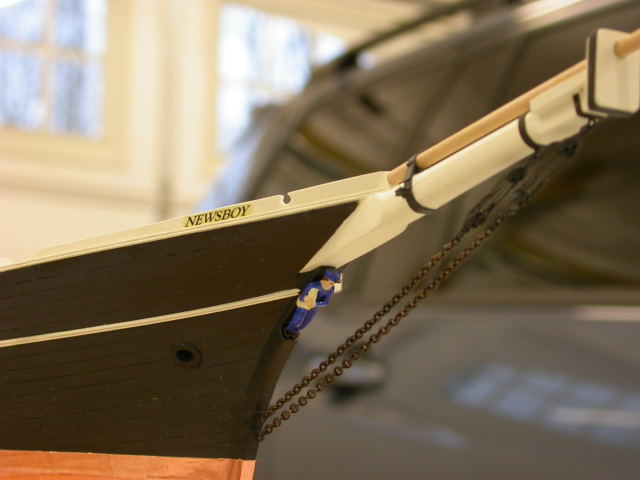
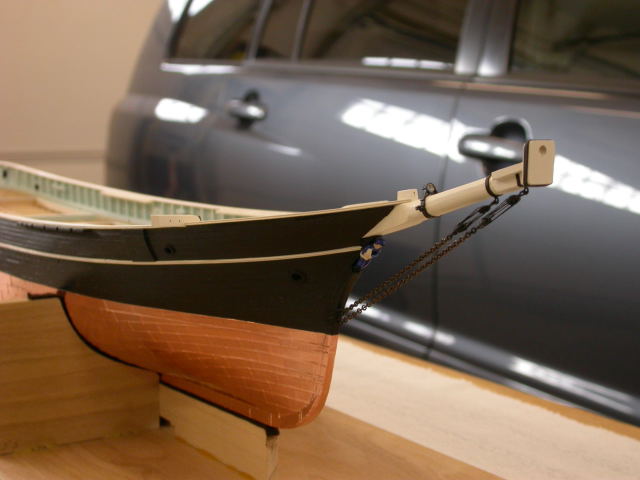
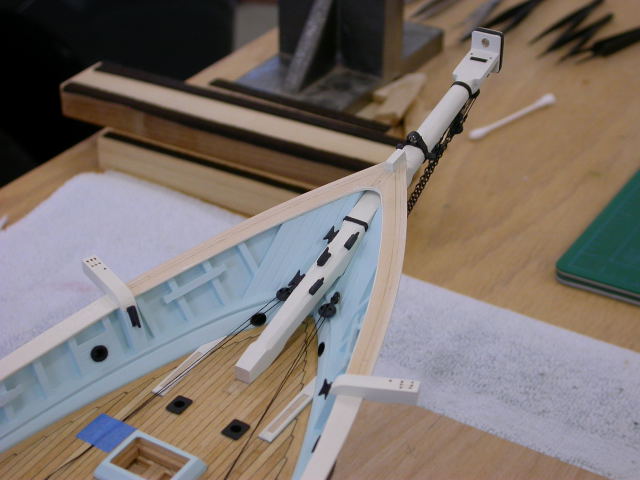
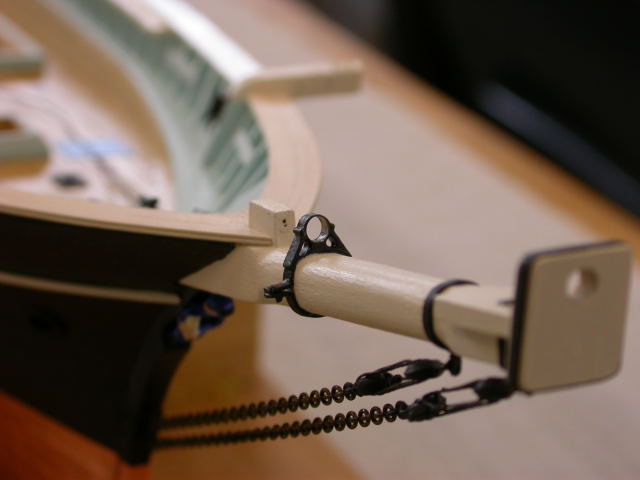
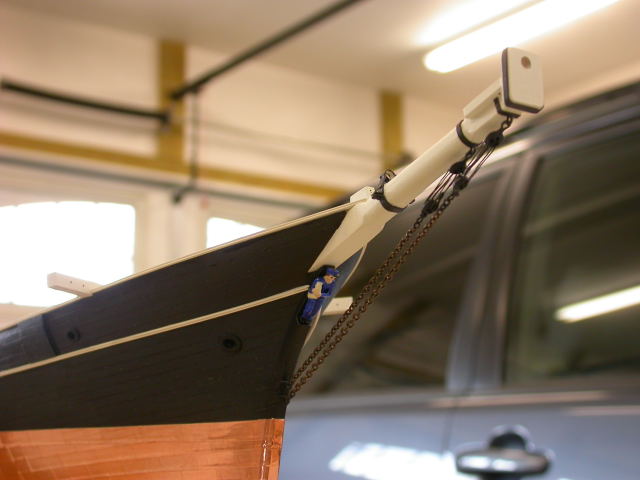
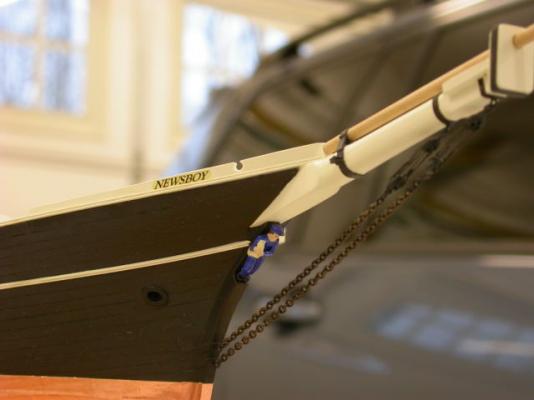
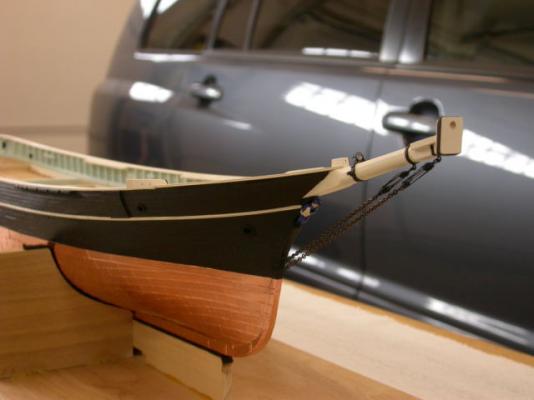
Ship Modelers, Next steps include installation of the bowsprit, bowsprit rigging, catheads, forward cap rails, spray rails, and ship's name. Key points include: >>> Bowsprit & jibboom dry fitted >>> Bowsprit painted & pre outfitted with rigging hardware >>> Forestay lower deadeyes installed (to avoid access issues later) >>> Bowsprit installed >>> Bobstays fitted and made up (4 1/2" 15 link chain w deadeyes) >>> Upper catheads painted & installed >>> Forward cap rail assemble painted and installed >>> Spray rail fitted, sanded to final shape, & painted >>> Ship's name plates installed (later replaced w improved name plates) These steps complete all outfit in the inverted position. Future posts will address completing the balance of hull and deck outfit. Pete Jaquith Shipbuilder


-
I believe you are dealing with sugar pine. A good carving wood that is still used for professional towing tank models. Pete Jaquith Shipbuilder
-
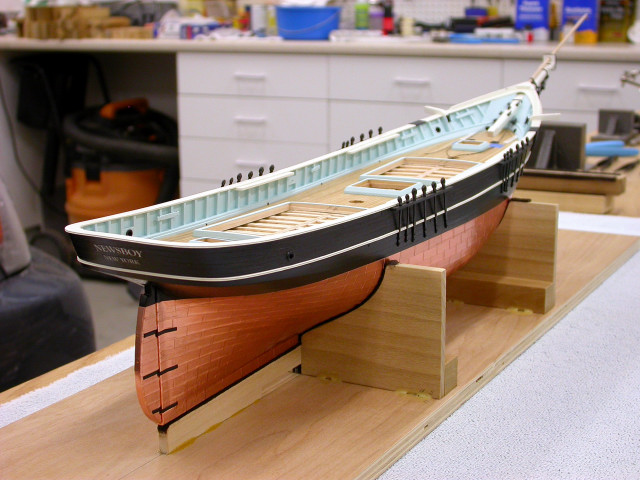
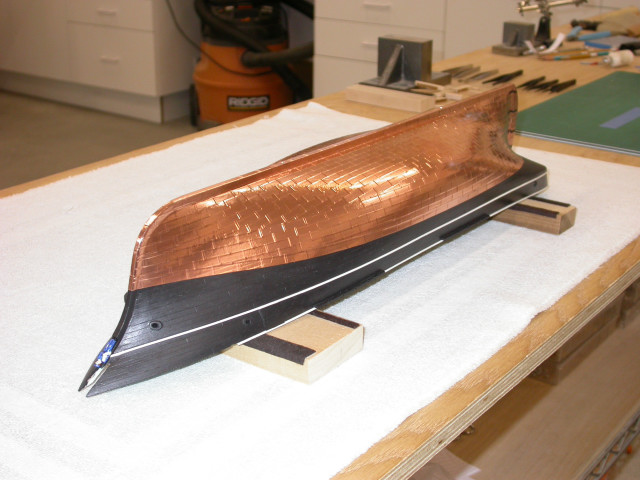
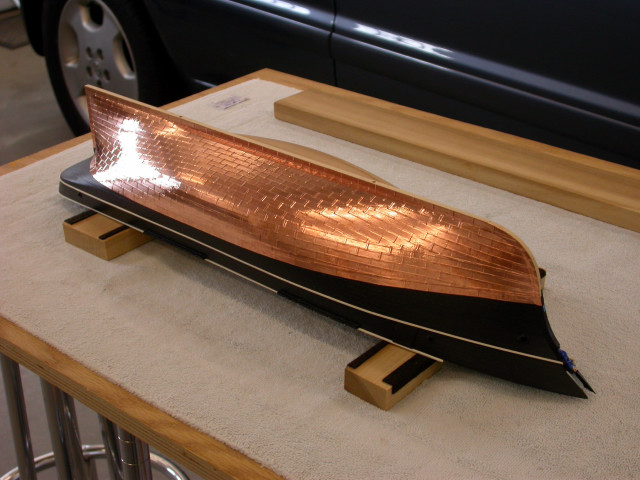
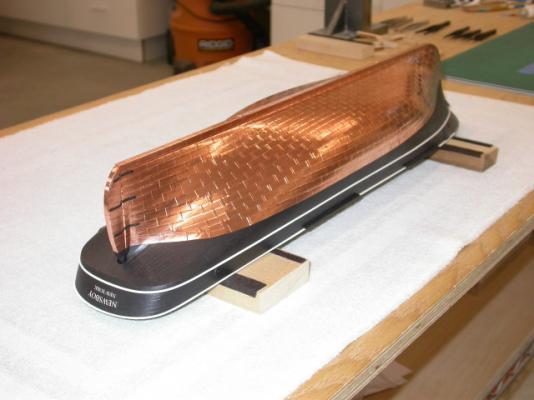
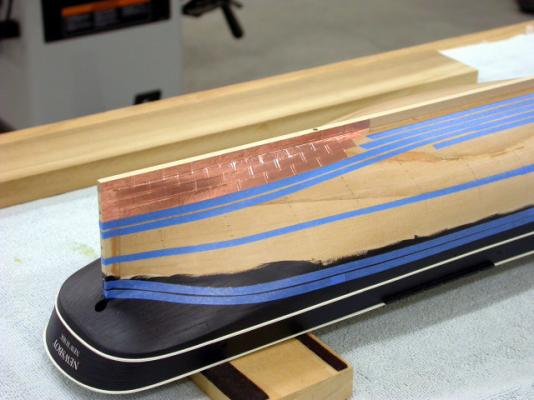
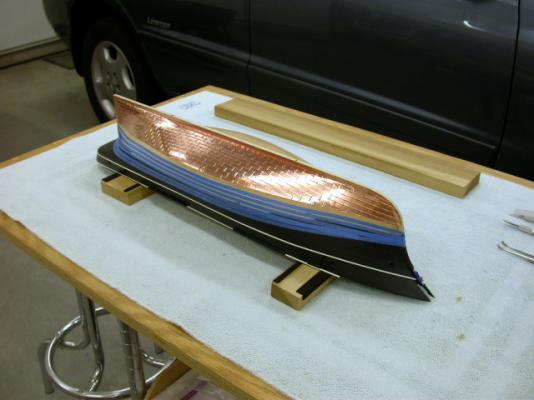
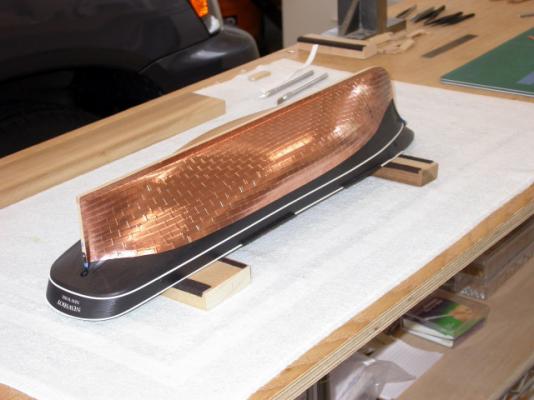
Additional pictures of copper sheathing. Pete Jaquith Shipbuilder

-
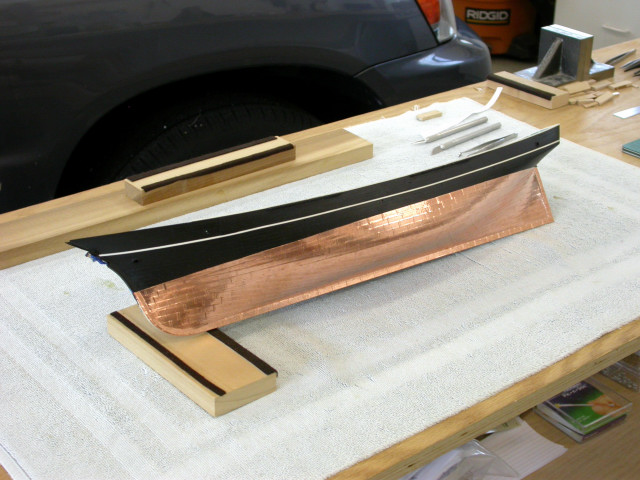
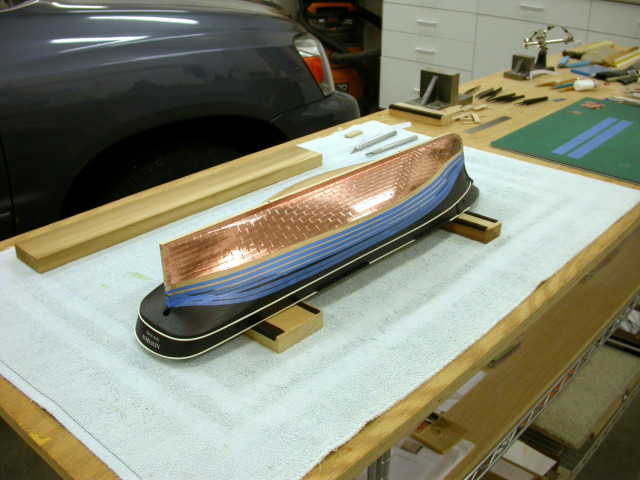
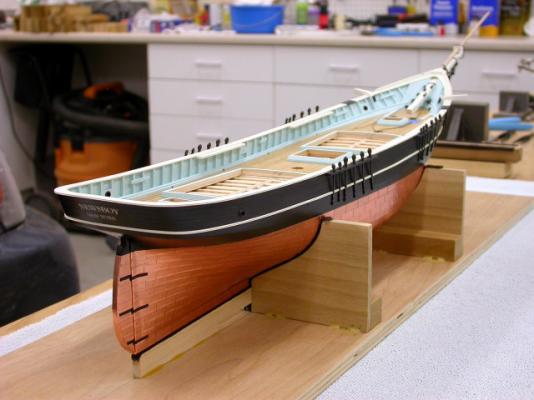
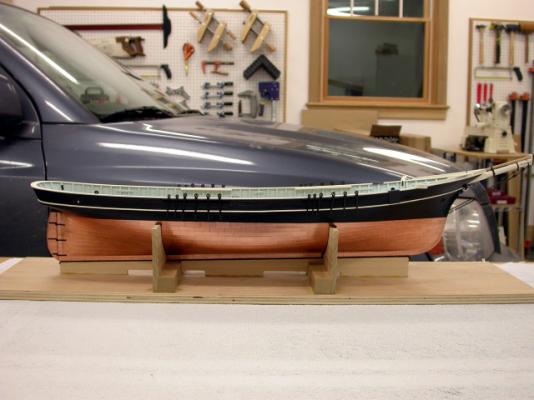
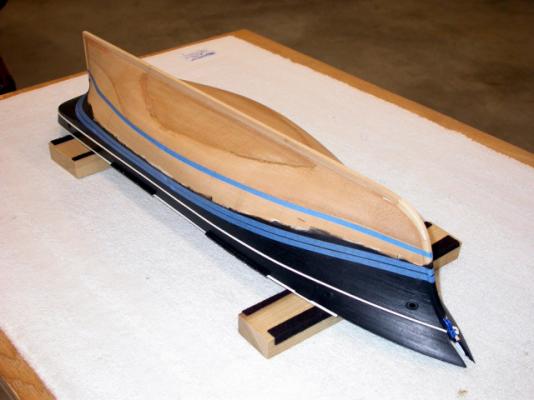
Next step is design and installation of copper sheathing. Key points include: >>> Layout designed similar to clipper ship "Flying Fish" >>> Copper design includes upper and lower gore strakes and a single cap row >>> Copper sheathing 1/4" self adhesive copper tape (from Bluejacket) >>> Plate size 1/4" x 3/4" (16" x 48") larger overlap results in scale width plates >>> Waterline established by use of surface guage >>> Installation guided by strips of blue painters tape >>> Installation starts from stern post and keel working up and forward >>> Rudder gudgens modeled with thin Bristol board >>> Final installation sealed with wiping varnish I always enjoy this portion of the build as it adds a lot of color to the model. Pete Jaquith Shipbuilder


-
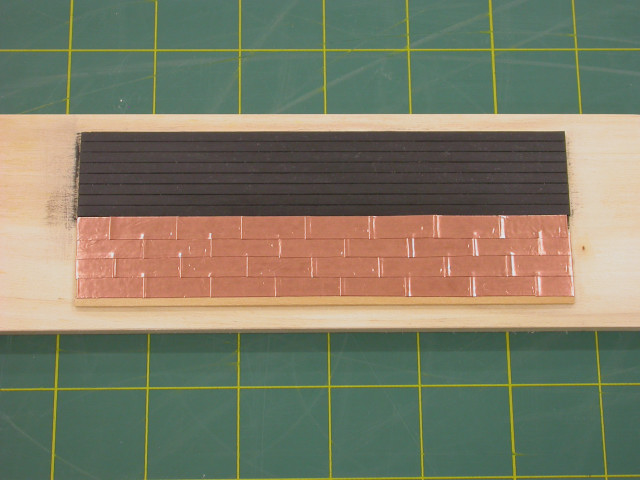
Thank you for your interest in "Newsboy" "Newsboy" 1854 has been underway for some time. The following are a few notes on my ship modeling techniques: Construction is sequenced to minimize interferences, rework, and need for paint masking Construction sequence standard across builds (e.g. mid-1800's merchant sail, solid hull; mid-1800's merchant sail, machine carved hull; and, late 1700's naval sail, plank on bulkhead, etc.) Construction sequence standardized across builds (to extent possible) Test pieces used to evaluate methods, design details, paint colors, etc. (see below) Standard material lists used for repetative construction (e.g. deckhouse construction, deck fittings, etc.) Standard purchased/fabricated parts used across builds Standard materials, fittings, etc. evaluated based on full scale dimensions Rigging setup lists used to plan rigging installation spar by spar Rigging setup lists based on previous builds Thickness differences matter (e.g. deckhouse bulkhead laminations, cap rails, plankshear, etc.) Fittings, details, and arrangements redesigned where neccessary based on contemporary practice (e.g. "Newsboy binnacle, anchor windlass, fore top, etc.) Construction plans, material lists, rigging lists, design details, suppliers, etc. used across builds Lessons learned and pier evaluations used to increase skills Some of the above are based on my modeling preferences and some are based on my professional approach to applying world class manufacturing techniques to shipbuilding (design rules, design standards, standard equipment, standard fittings, modular construction, standard processes, etc.). Note that these are my personal choice, and some may not be suitable for other shipmodelers. Pete Jaquith Shipbuilder


-
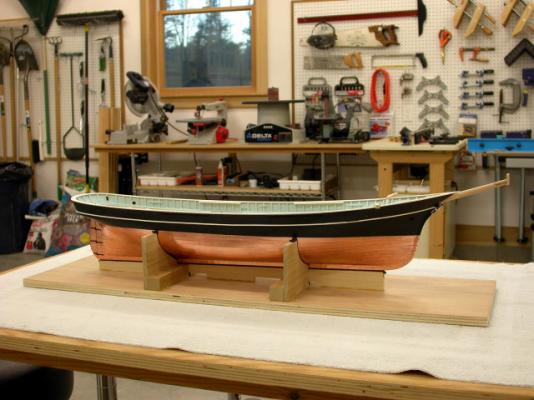
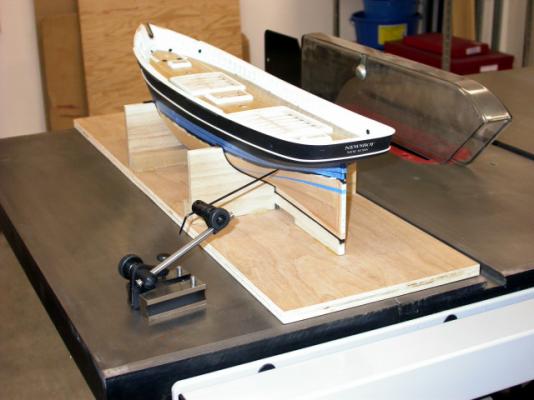
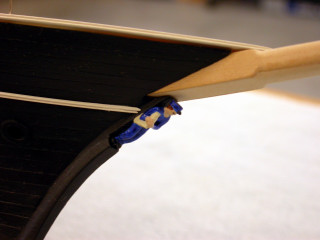
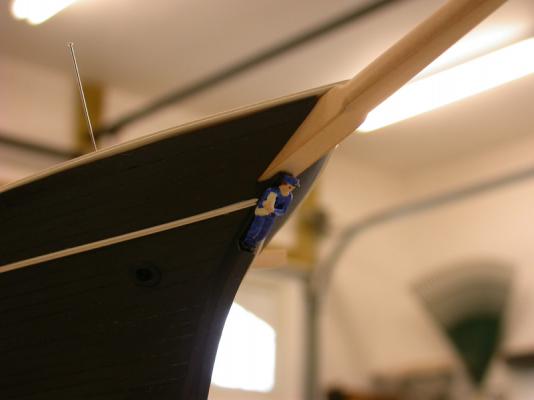
With the cap rails in place, the model can now be worked in the inverted position. This provides easy access for painting and installing the "Newsboy" figurehead: >>> Figurehead was a casting from the original kit >>> Painting was with Floquil lacquor and fine artest brushers >>> Figurehead was securred with a fine pin and epoxy glue My next postings will cover the design and installation of copper sheathing. Pete Jaquith Shipbuilder

-
Shipmodelers, As some may be aware, I am currently working at Vancouver Shipbuilding, North Vancouver, BC Canada. The shipbuilding program is Canada's National Shipbuilding Procurement Strategy non-combat vessels. Currently assigned ships include: (3) OFSV (fishery research vessels), (1) OOSV (oceangraphic research vessel), (2) JSS (underway replenishment ships), (1) Polar Icebreaker (large polar class 2 icebreaker), (5) MEMTV (mid-shore bouy tenders), and (5) Patrol (mid-shore patrol vessels). My current position is Mgr. Production Engineering with responsibility for shipbuilding strategy, program build strategy, facility layout and tooling, design rules, design standards, and application of lean design and design for production. As the shipyard has committed to implement world class design and construction processes, there is ample challenge here. The ships will be built in large 200-300 ton modules (called hull blocks) and integrated machinery modules with construction is based on manufacturing principals. Where possible, I try to apply similar principals in planning my ship model builds. Pete Jaquith Shipbuilder
-
Shipmodelers, I am currently in the early planning stages for the steam salvage tug "Foundation Franklin" 1918. Along with an interesting history and early 1900 design features, I thought it would be interesting to layout and install the lapped hull and deck plating. Brass or styrene are possibilities, but I am currently tinking of trying thin Bristol board. Current plans includes: >>> Lapped hull and deck plating >>> No rivets on the hull and deck plating as flush rivets were used here >>> Joggled plates with button head rivets for deckhouse bulkhead plating When I am back in the shop, I will try a few test pieces. I definitely have more planning and design work before starting this one. Pete Jaquith Shipbuilder
-
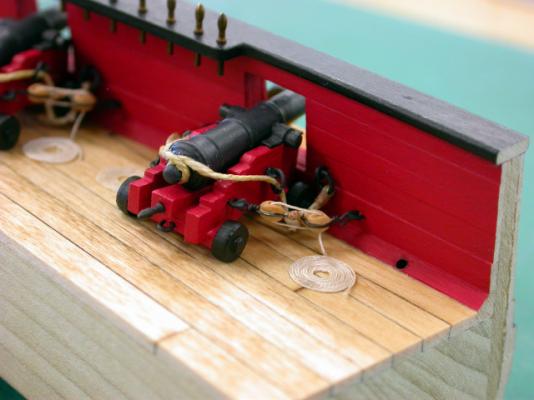
Thanks for your interest in "Newsboy" "Newsboy" 1854 and "Fair American" 1768 are currently in temporary storage as I work on a full scale shipbuilding project in North Vancouver, BC Canada. I have included pictures of the current status in my recent post "Return to MSW". Due to your interest, I plan to repost the Brigantine "Newsboy" 1854 pictures 1st. As time permits, I may also post the Topsail Schooner "Eagle" 1847 and 14 Gun Brig "Fair American" 1768. Pete Jaquith Shipbuilder