Pete Jaquith
-
Posts
343 -
Joined
-
Last visited
Content Type
Profiles
Forums
Gallery
Events
Everything posted by Pete Jaquith
-
 Thank you for your interest in the Maine Topsail Schooner "Eagle" 1847, Floyd: Still working here in North Vancouver, BC Canada. We are a few months away from starting construction on the 1st new construction ships. Contracts include (3) OFSV Fisheries Research vessels, (1) OOSV Oceanographic Research Vessel, (2) JSS Joint Support Ships, (1) Polar Icebreaker, (5) MEMTV Mid Shore Support Vessels, and (5) Mid Shore Patrol Vessels. Tony: I still have the Brigantine "Newsboy" 1854 and the 14 Gun Brig "Fair American" circa 1780 to complete. Following them I am looking at William Webb's Merchant Brig "Volante" 1853, the Whaling Brig 'Kate Cory" 1856, and the Steam Salvage Tug "Foundation Franklin" 1918. Greg: I am typically building for my own collection; however, "Eagle" went to a dear friend in Maine and "Fair American" will go to another dear friend with strong ties to the Navy. Regards, Pete
 -
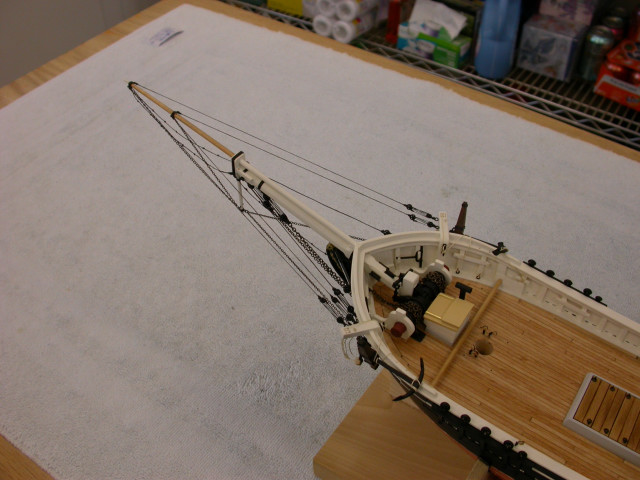
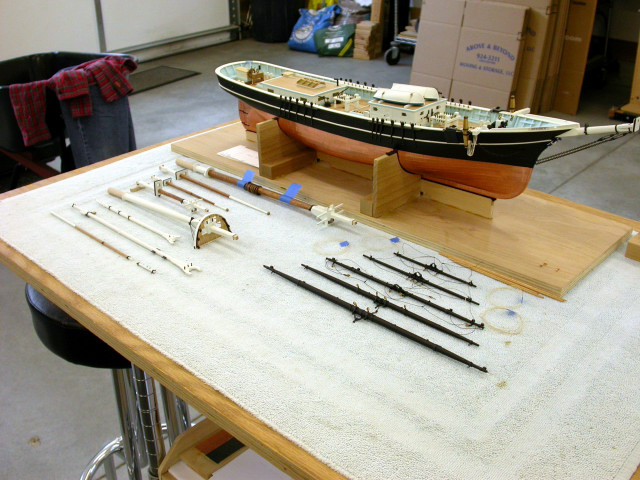
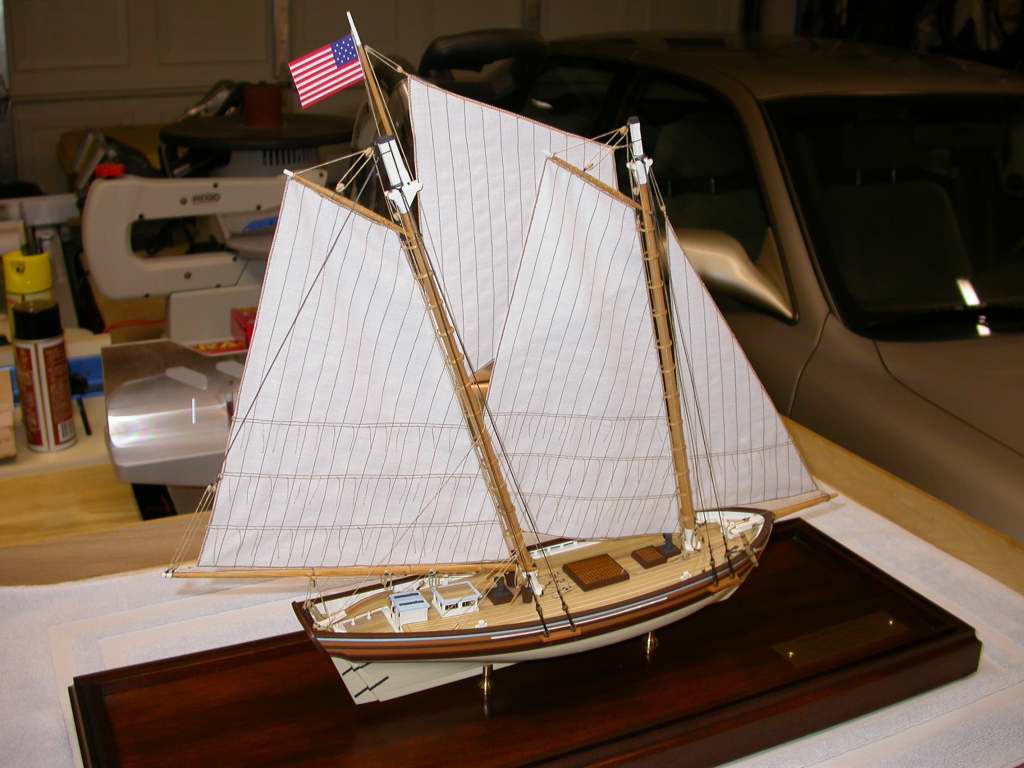
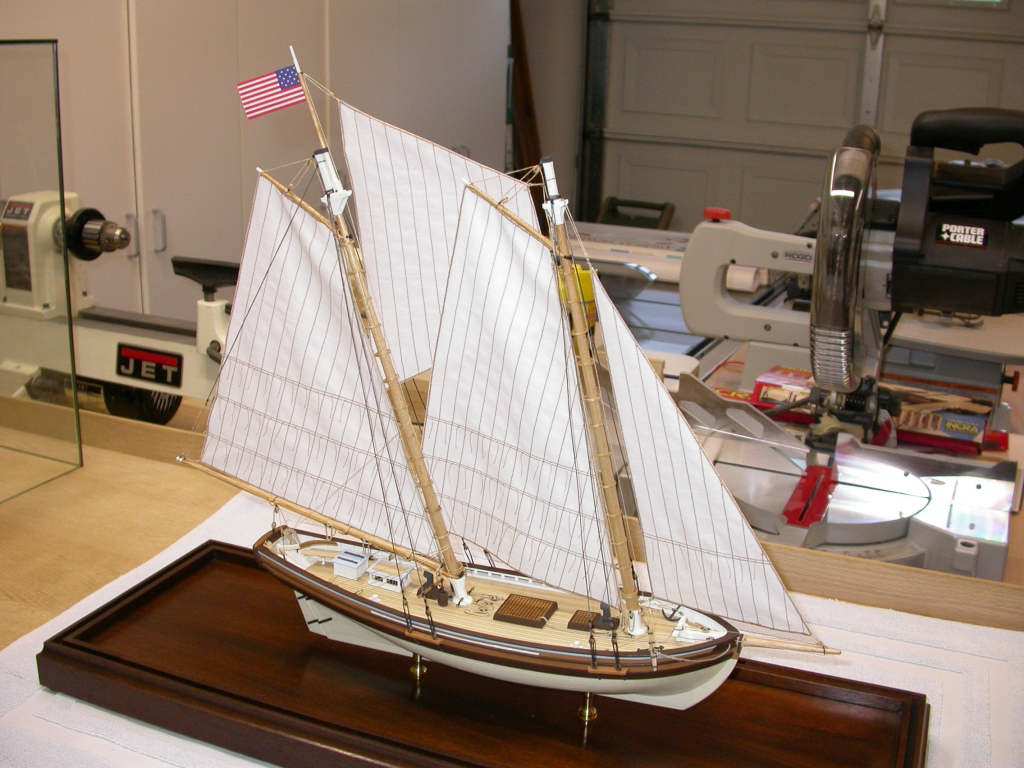
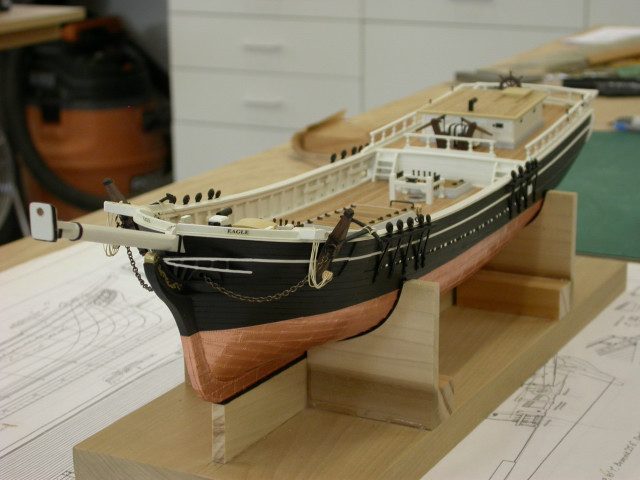
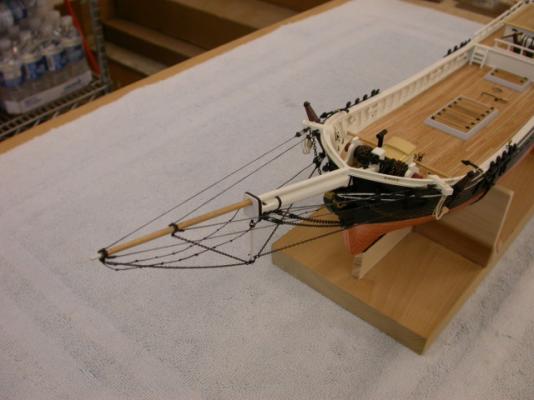
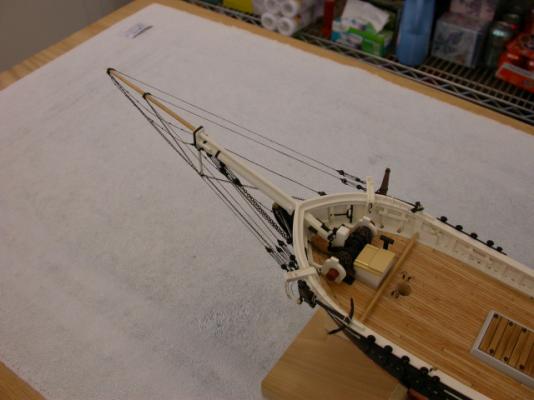
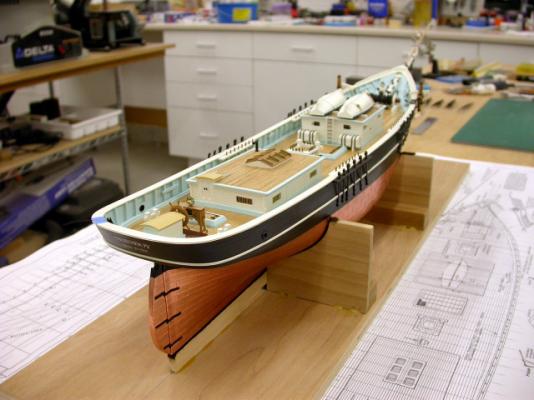
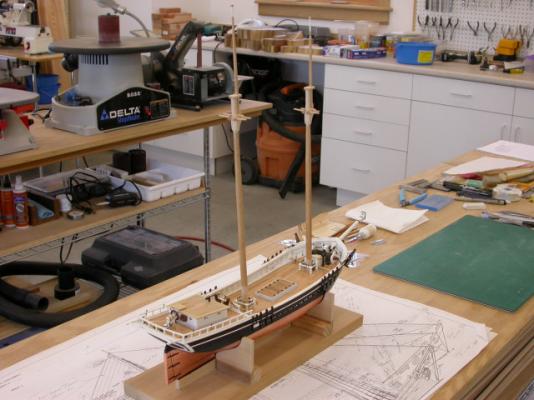
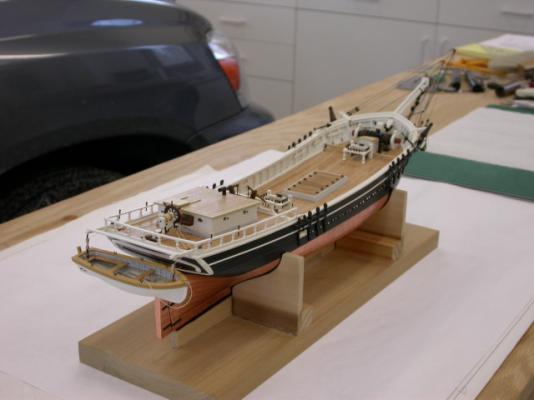
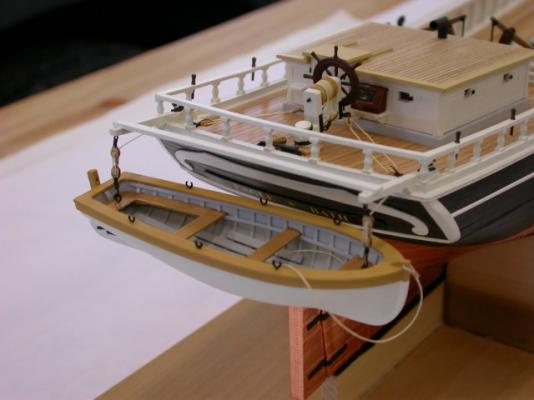
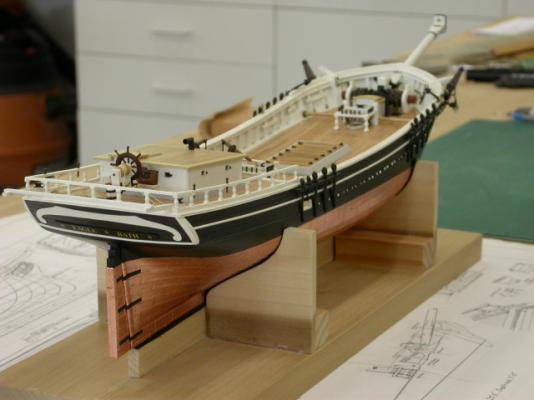
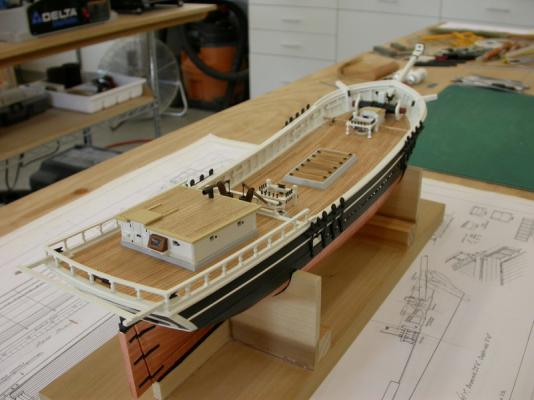
Welcome to the Topsail Schooner "Eagle" 1847 build log, With the masts, spars, and sails complete its time to bring all the pieces together. Key points include: Bowsprit & Jobboom: >>> Bowsprit set up >>> Jibboom and dolphan striker set up and fitted >>> Head rigging (bowsprit, dolphin striker, and jibboom rigging) fitted >>> Balance of head rigging will be completed when fore stays are rigged after fore mast installation >>> NOTE: HEAD RIGGING INCLUDES BOWSPRIT SHROUDS AND JIBBOOM GUYS NOT SHOWN ON THE ORIGINAL DRAWINGS; DETAILS WERE TAKEN FROM CONTEMPORARY SHIP MODEL PLANS Ship's Boat: >>> Falls for the ship's boat were fitted; final installation will follow rigging completion Pete Jaquith Shipbuilder


-
what is the ideal modelling table?
Pete Jaquith replied to AON's topic in Modeling tools and Workshop Equipment
Alan, These pictures were taken at my East Coast home in Hancock, NH. Linda and I have sinced moved back to San Diego, CA. I plan to set up a similar shop in San Diego when I complete my 1:1 scale shipbuilding assignment here in North Vancouver, BC Canada. Regards, Pete -
Welcome to the Brigantine "Newsboy" 1854 build log, As "Newsboy" is currently in storage awaiting my time to set masts and rig her, I have added a few summary pictures. Thank you for your interest. Pete Jaquith Shipbuilder

-
Nils, Thank you for your interest. "Eagle" 1847 was a very interesting and enjoyable build, and she builds into a beautiful model. As you may of noticed, many of the techniques described here were later applied to my "Newsboy" 1854 build. Pete Jaquith Shipbuilder
-
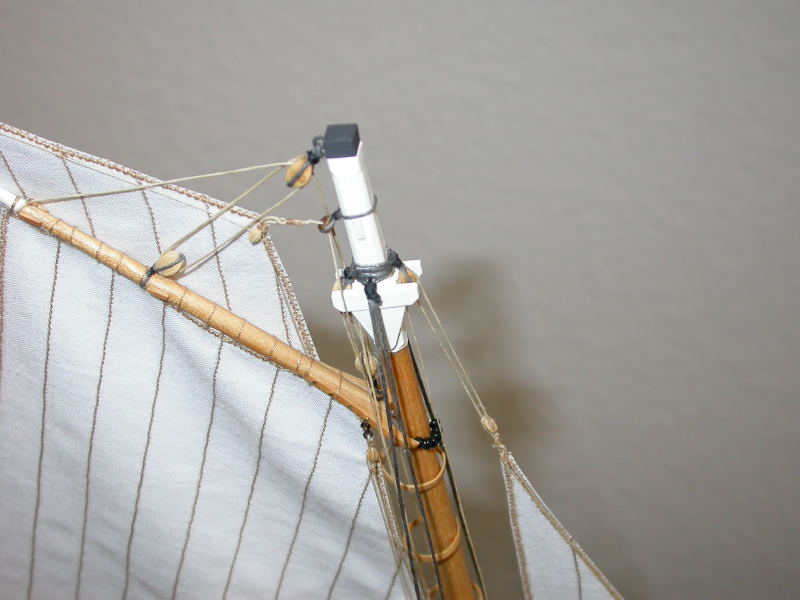
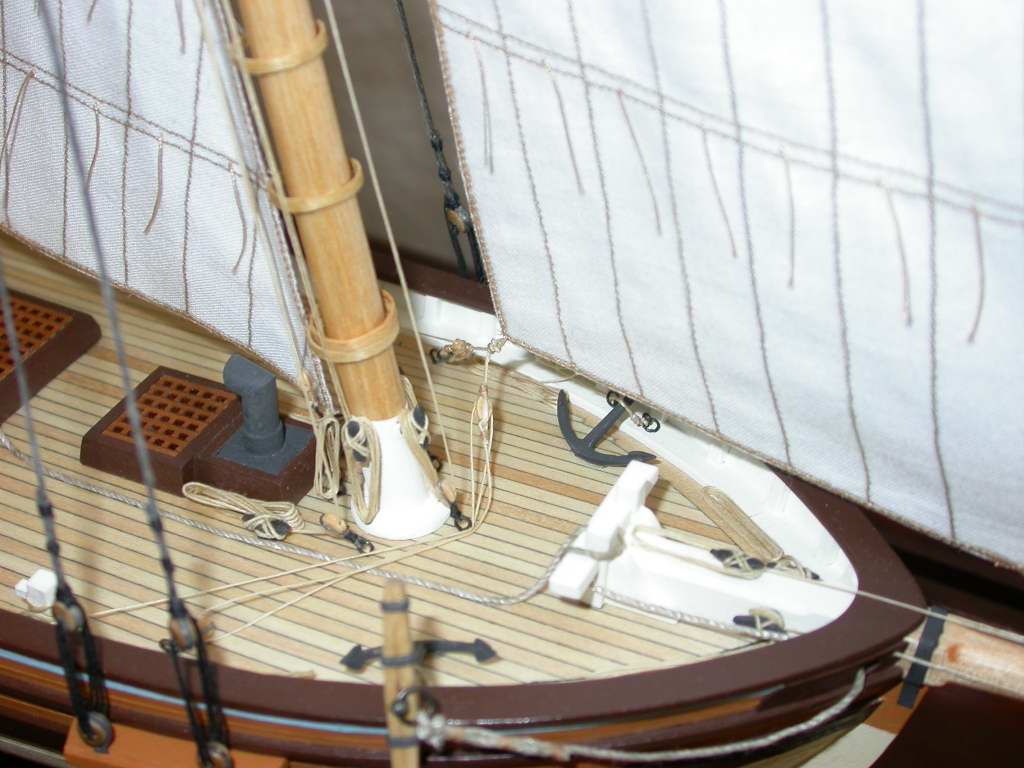
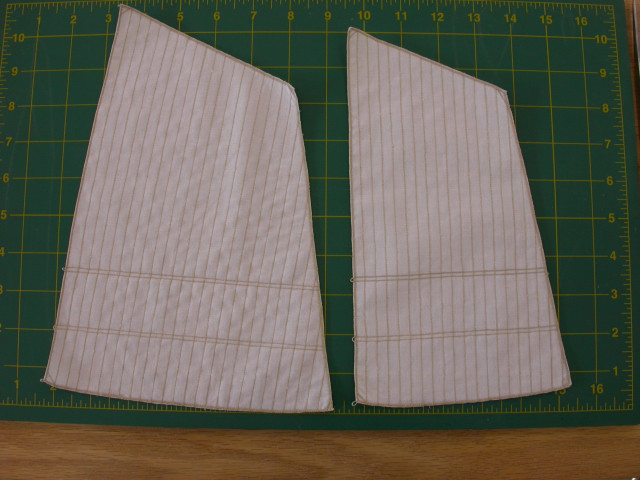
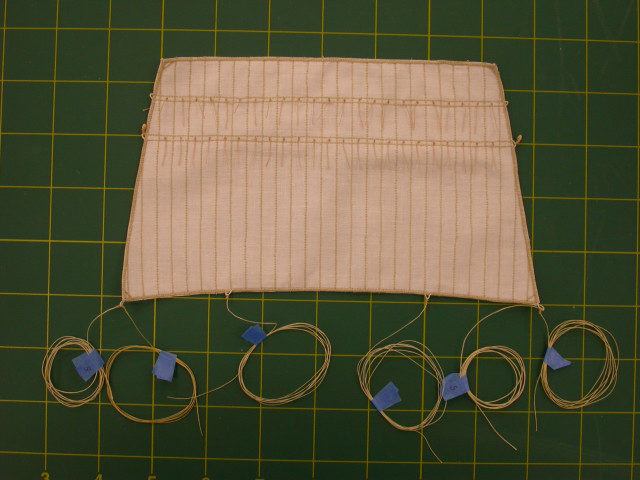
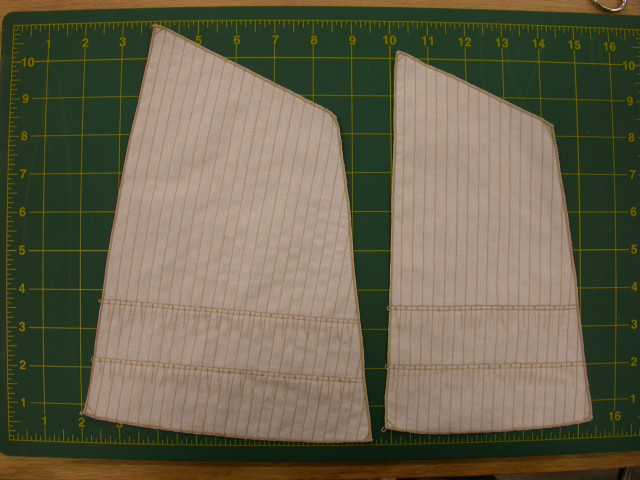
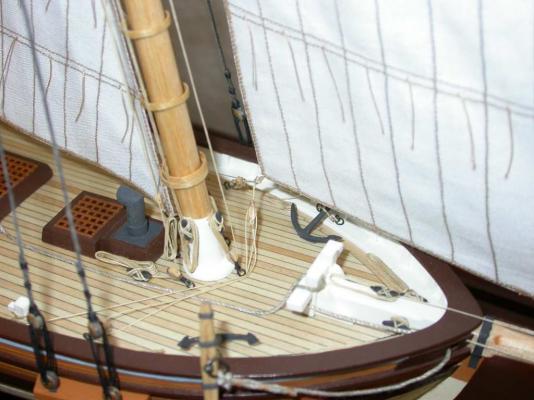
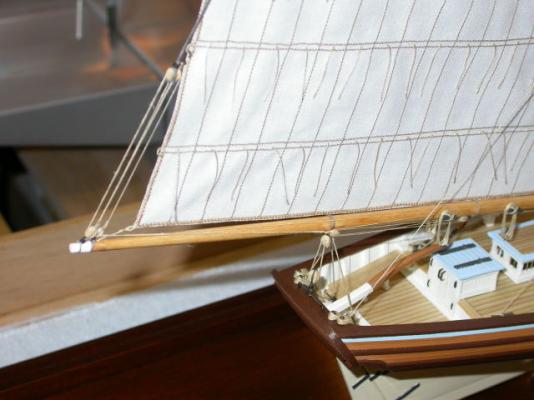
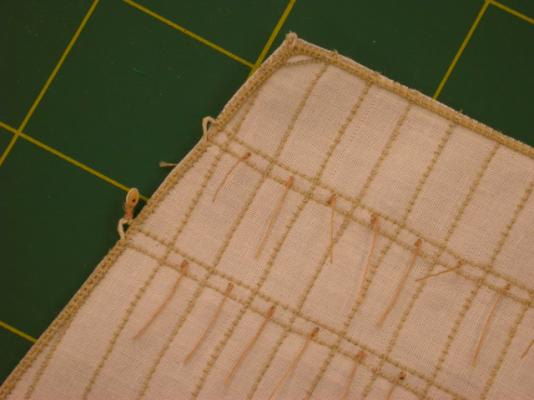
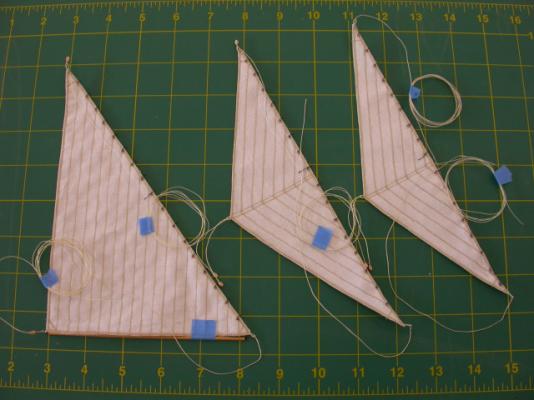
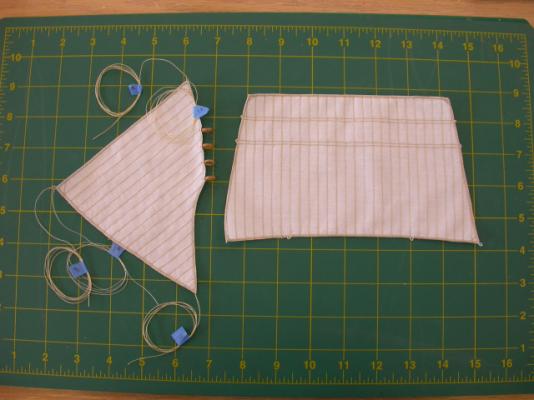
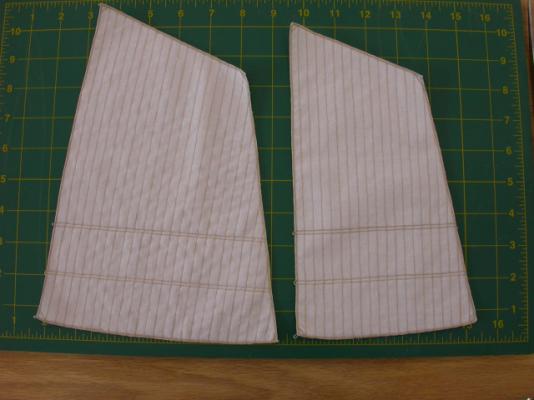
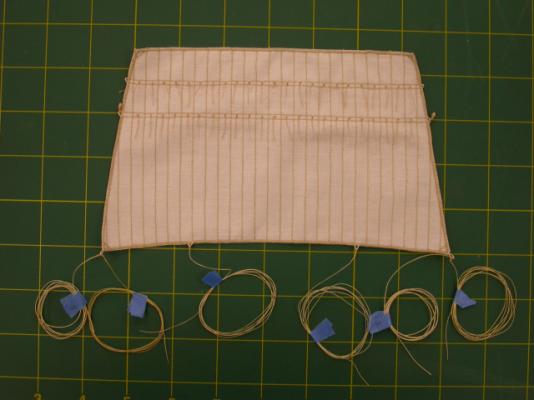
The following techniques were utilized in preparing sails for my circa 1800 Virginia pilot schooner model. Materials used in making sails included: sailcloth (thin cotton muslin, available at fabric stores), .020 linen line stained hemp color (BlueJacket Shipcrafters #R1682), all purpose sewing thread (Coats & Clark hemp colored #543), and Dritz Fray Check liquid (available at fabric stores). Special tools utilized included: 2nd hand home sewing machine and high quality sewing sears (4” and 8”). References utilized include: ship model plans; Making Sails, a mini-practicum by Robert Hunt; and Steel’s Elements of Mastmaking, Sailmaking, and Rigging of 1794 by David Steel. Prior to starting, the sailcloth was washed using a warm water cycle with several pairs of blue jeans for color. The sail outline, seams, and reef bands were then laid out on the sailcloth using fine drafting pencils. The sail design was based on the ships drawings and reference to Steel’s Elements of Mastmaking, Sailmaking, and Rigging. Final dimensions were checked and adjusted to suit the model’s masts and spars. The bottom edges and reef bands of all sails were curved and they were laid out using ships curves. Note that if the sail design is not shown on the model drawings, it can be laid out using the model’s rigging plan and data from Steel’s Elements of Mastmaking, Sailmaking, and Rigging. The seams and reef bands were sewn using hemp colored thread and a straight stitch (28-32 stitches per inch). The bolt rope (.020 linen line) was sewn along the sail outline using hemp colored thread and a narrow zigzag stitch (approximately 3/64” wide and 28-32 stitches per inch). Cringes were modeled by leaving small loops in the bolt rope at sail corners and reef points. Note that all sewing of seams, reef bands, and the bolt rope were accomplished prior to cutting out the sails. A thin line of Fray Check liquid was run over the zigzag stitching and bolt rope prior to cutting out the sails. After allowing the Fray Check liquid to dry, the sails were cut out using high quality sewing sears. Reef points were sewn on by hand and secured by Fray Check liquid using the same thread used for sewing the seams, reef bands, etc. After completion, the sails were ironed using a steam iron set on cotton. Halyards, tacks, downhauls, sheets, and the jib traveler were seized to the sails, and the fore and main sails were laced to the gaffs prior to mounting on the model. Mast hoops were lashed to the sails using hemp colored thread after mounting to the model. All sewn attachments to the sails were secured with Fray Check liquid. Details of the model sails are illustrated in the following photographs: Pete Jaquith Shipbuilder


-
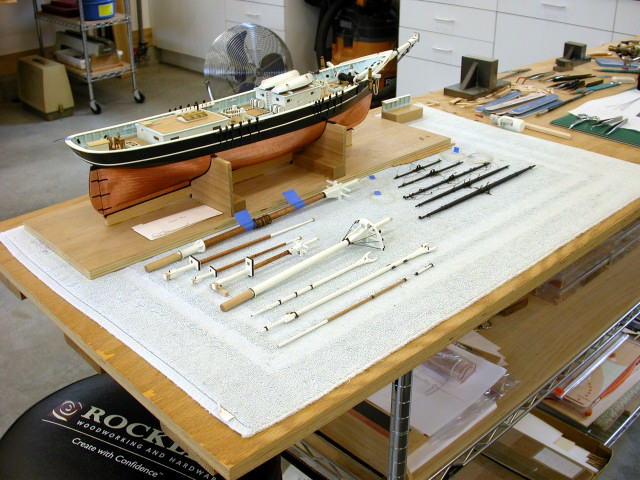
Welcome to the Topsail Schooner "Eagle" 1847 build log, With spars and masts complete, attention turned to sail making. Key points include: >>> Sail making was based on Robert Hunt's mini-practum Making Sails >>> Material was thin cotton muslin >>> Stitching was done on an old second hand Singer sewing machine >>> Sail design based on working plans with details from Steel's Elements of Mastmaking, Sailmaking, and Rigging 1794 >>> Rigging setup (blocks and rigging lines) per rigging setup lists Note that sails only approximate real sails, and they change the look of the model by shifting your eyes from the hull and deck furniture to the masts, sails, and rigging. I will post a separate set of notes on sailmaiking. Pete Jaquith Shipbuilder


-
what is the ideal modelling table?
Pete Jaquith replied to AON's topic in Modeling tools and Workshop Equipment
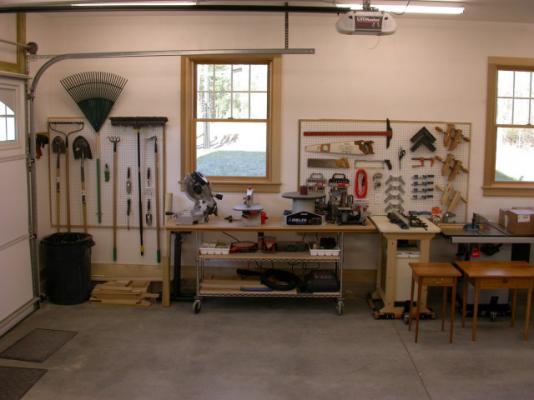
My work shop is located in the garage which I share with the family automobiles. This caused me to design mobile work tables based on industrial shelving components from the Container Store. As illustrated, this provides a solid work surface that will easly handle small shop tools. I currently use four such 2' x 8' mobile tables. Pete Jaquith Shipbuilder
-
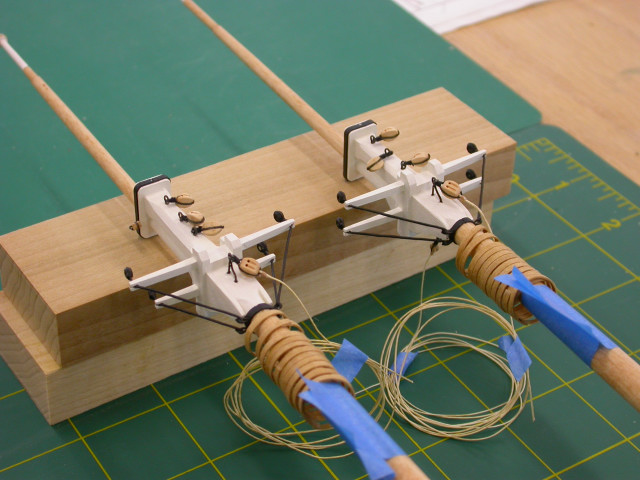
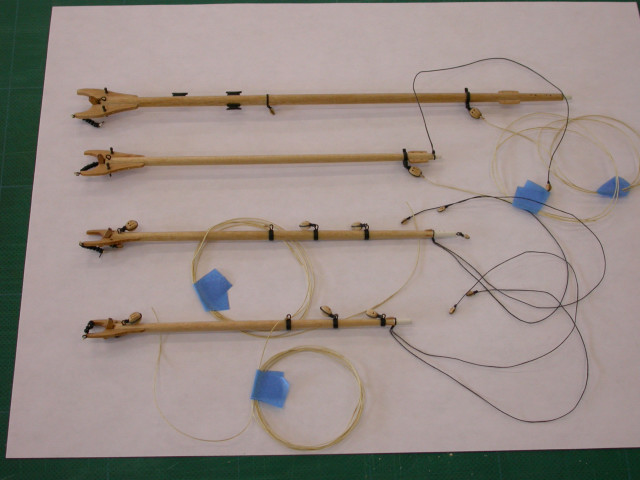
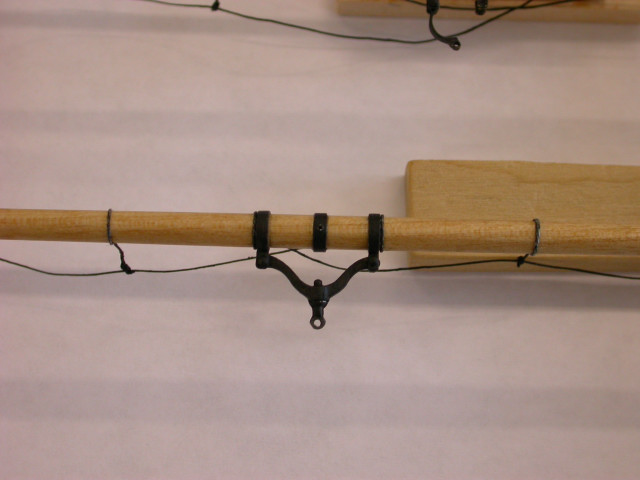
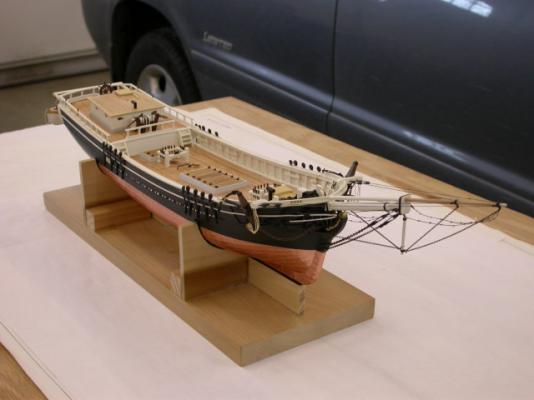
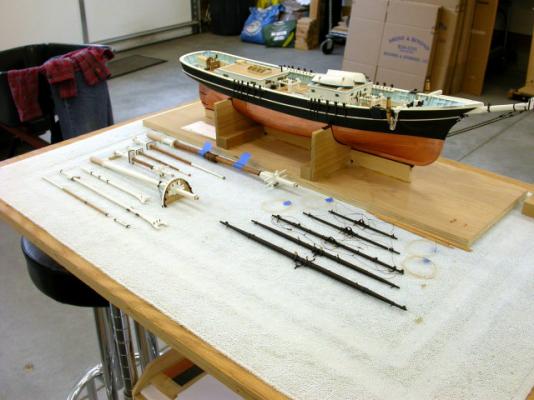
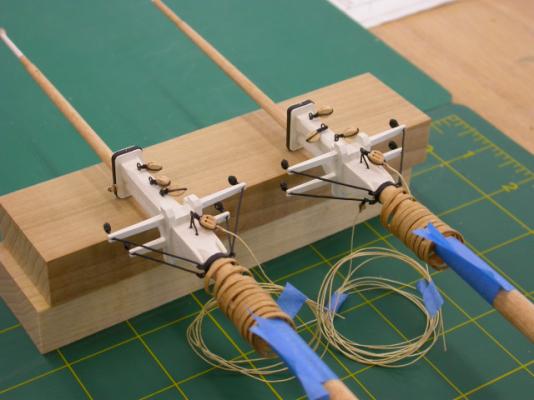
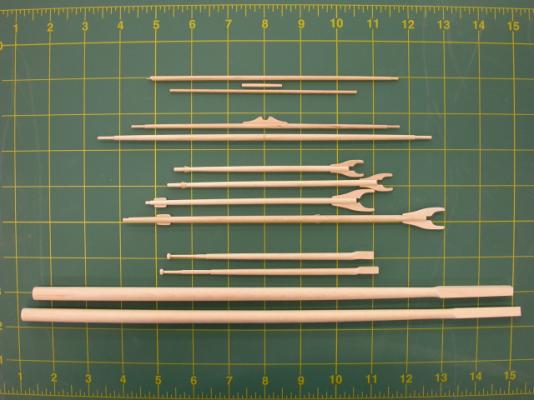
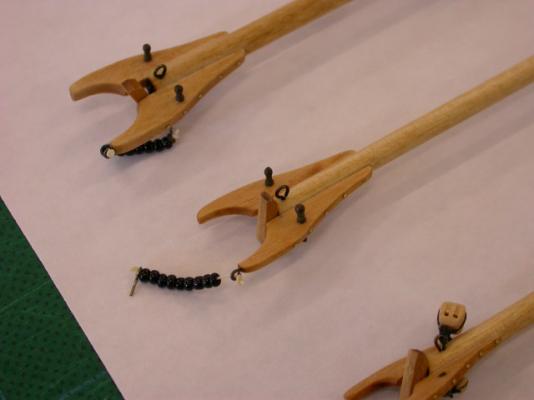
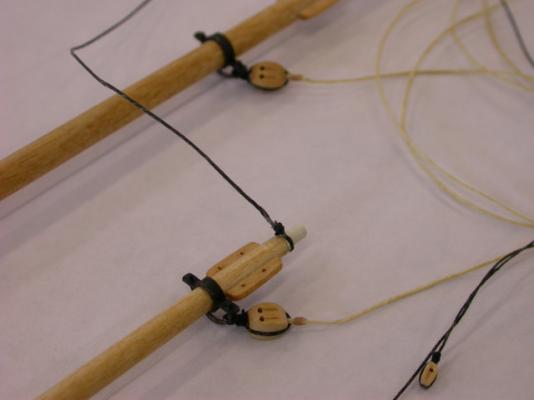
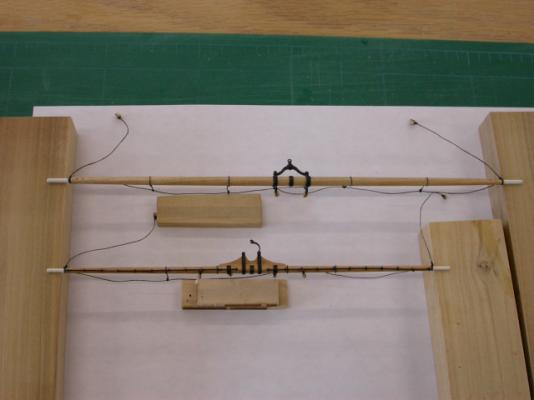
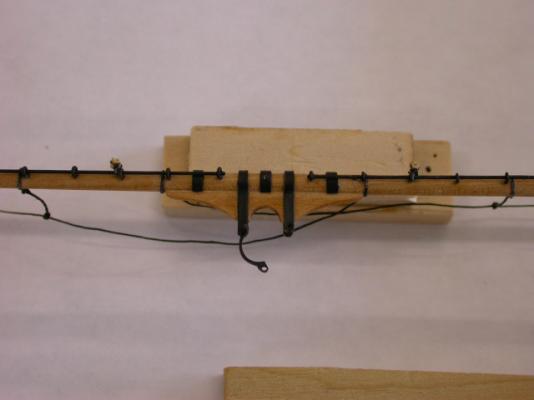
Welcome to the Topsail Schooner "Eagle" 1847 build log, Next step was mast fabrication. Key points include: >>> Mast and trestle tree construction details based on period practice >>> Rigging ironwork used Bluejacket castings, Bristol board mast bands, and silver soldered brass fittings >>> Lower foreyard and fore topsail yard use working yard truss and yard parrel fittings >>> Mast rigging setup per rigging setup lists >>> Tackle blocks fitted to fore deck before mast/fife rail installation (below fife rail) >>> Masts will be further outfitted prior to final installation Next posts will address sail making/installation Pete Jaquith Shipbuilder

-
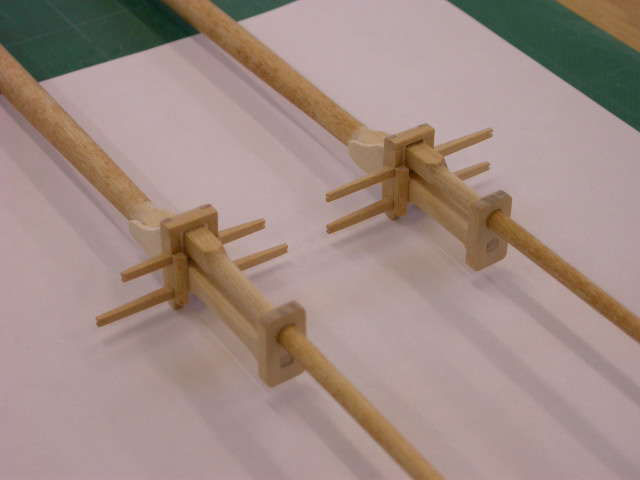
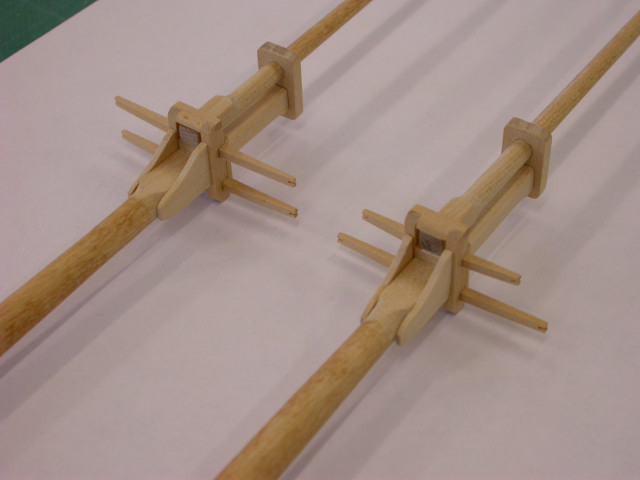
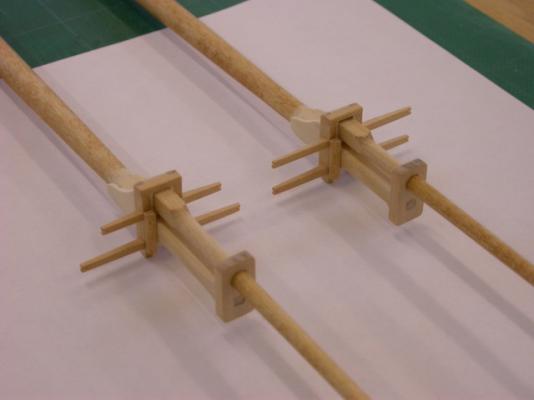
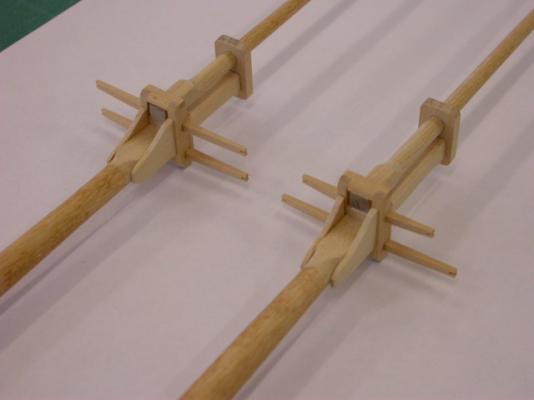
Welcome to the Topsail Schooner "Eagle" 1847 build log, With the deck furniture complete, I moved on to the "sticks and strings" building phase. Key points include: >>> Rigging setup lists identify fabrication/rigging setup steps >>> Spar fabrication sketches prepared from working drawings >>> Spar taper based on parabolic camber rules >>> Spars were birch dowels turned on a mini-lathe (often using sanding sticks) >>> Spar construction details typical of mid 1800's practice >>> Rigging ironwork combination of Bluejacket castings, Bristol board bands, and silver soldered brass fittings >>> Yard truss, topsail yard parell, and boom sheet assemblies are working fittings >>> Rigging setup (fitting of blocks and rigging lines) completed prior to installation Pete Jaquith Shipbuilder


-
Latestarter, Bob has summarized the process I have used. Working from the stern post forward and keel up is based on the copper plate overlap practice utilized in North America during the mid 1800's. I recall seeing material that some naval ships in the late 1700's were coppered from the waterline down, and this would change the plate layout and installation sequence. As Bob has noted, there is no such thing as a stupid question. Regards, Pete
-
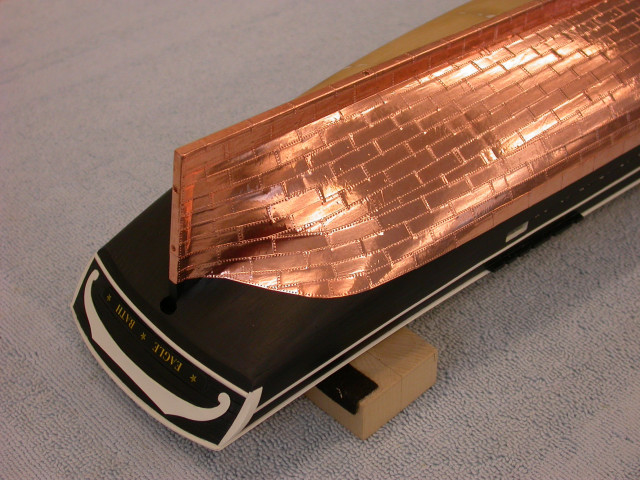
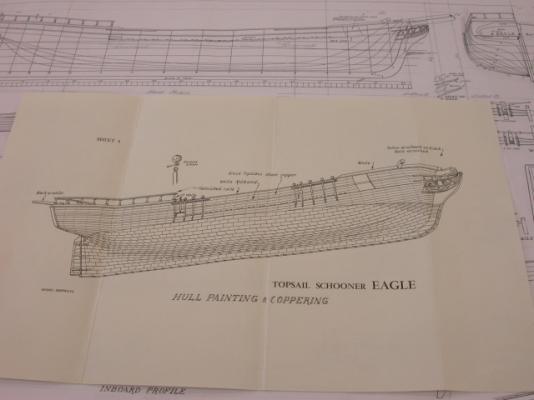
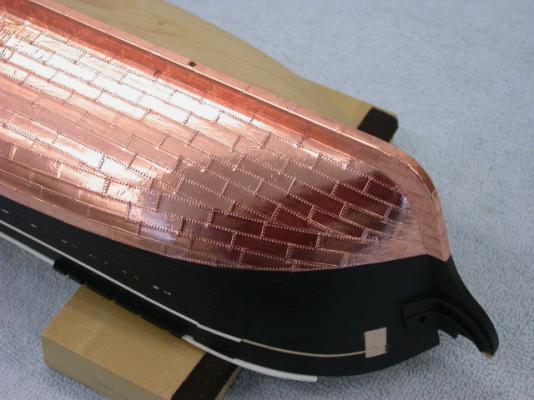
John, I don't have my drawings here, but I seem to recall a sketch in the Instruction Manual that shows the gore line. Also, maybe the museum plans will assist. I have attached pictures of my "Eagle" 1847 coppering plan and the model application as I coppied the "Kate Cory" in my interpertation. Regards, Pete

-
John, I will be watching your build log as "Kate Cory" is a fine looking vessel and she is definitely on my bucket list. With respect to coppering: >>> If you are using copper tape carefully finish your hull 1st as any blemish will show through the finished tape >>> As you noted, varnish or finish your wooden hull prior to coppering >>> You might consider completing and painting the upper hull prior to coppering to minimize handling damage >>> Your "Kate cory" drawings/instructions should show the gore line as I used it as an example for my "Eagle" 1847 build >>> I have posted my coppering process here on MSW; additionally, my "Newsboy" 1854 and "Eagle" 1847 show coppering pictures Best of luck on "Kate Cory", Pete Jaquith Shipbuilder
-
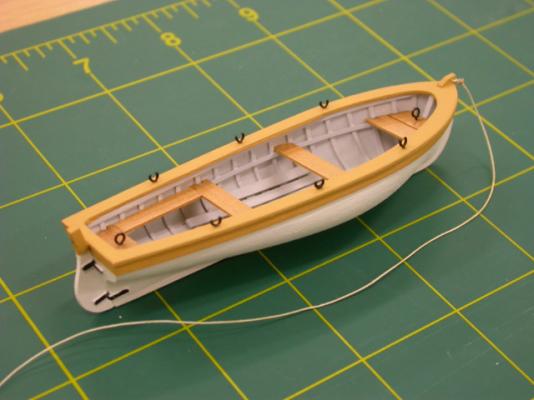
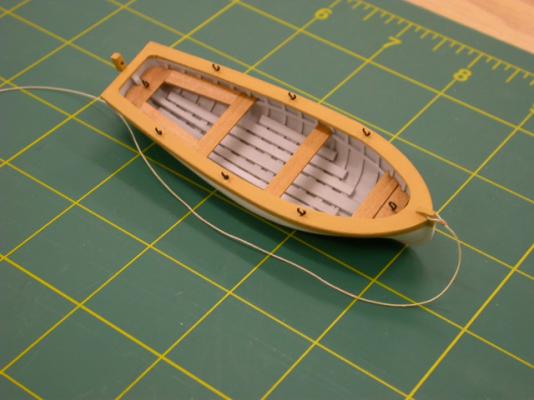
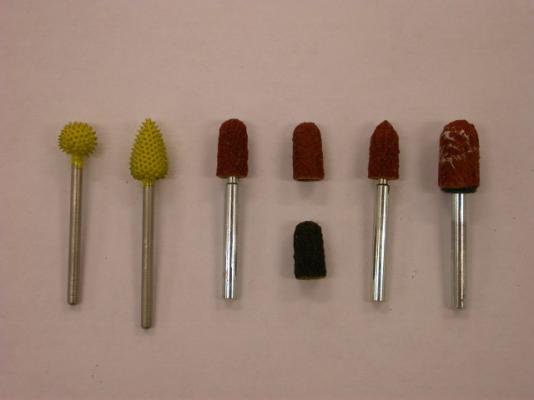
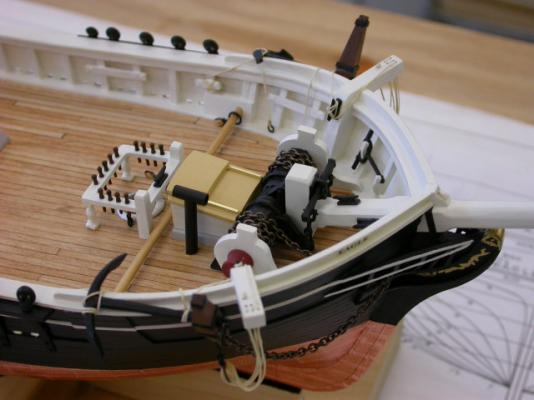
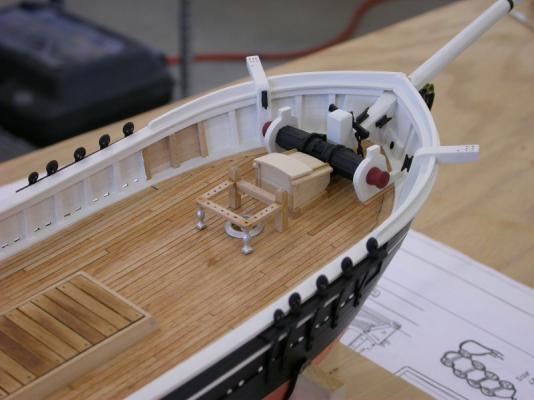
Thank you for your interest and comments on "Eagle" 1847, Before starting masts/rigging, I will cover fabrication and installation of the ship's boat. Key points include: >>> Ship's boat was fabricated using Bob Hunt's mini-practicum on Ship's Boats >>> Ship's boat was fabricated from laminated basswood sheet with a CL bulkhead >>> Boat interior was carved out using rotary tools (picture attached) >>> Oar locks were silver soldered >>> After painting, the ship's boat was rigged to the boat davits >>> Final installation and boat's outfit will follow rigging completion Following posts will address masting, rigging setup, sail making, and brining it all together. Pete Jaquith Shipbuilder
-
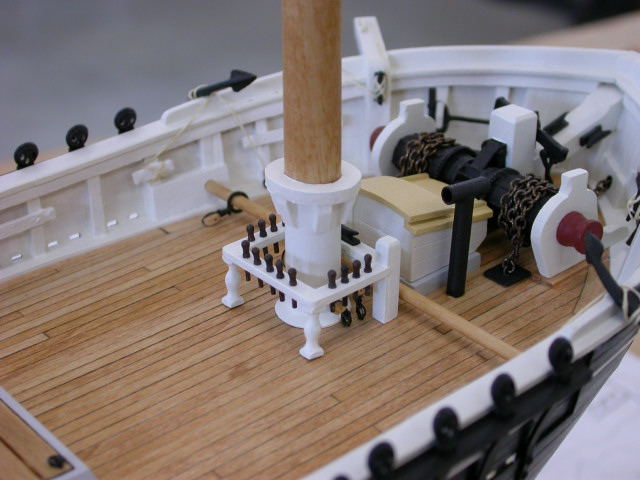
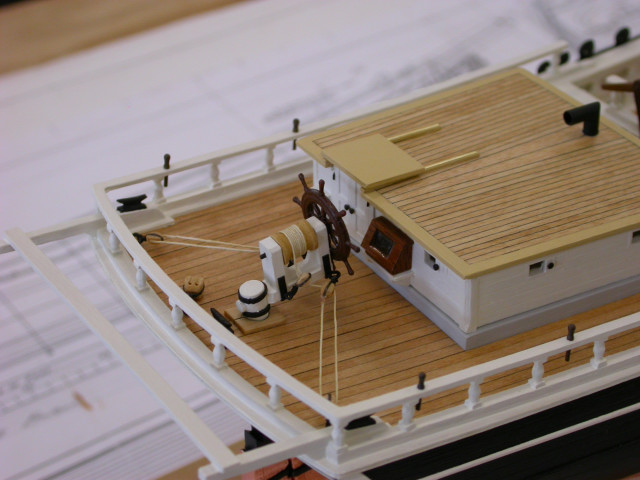
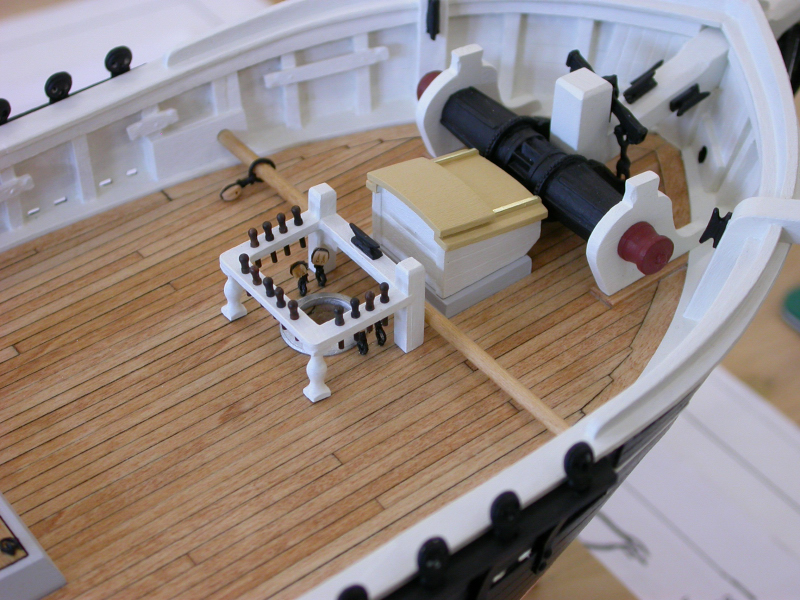
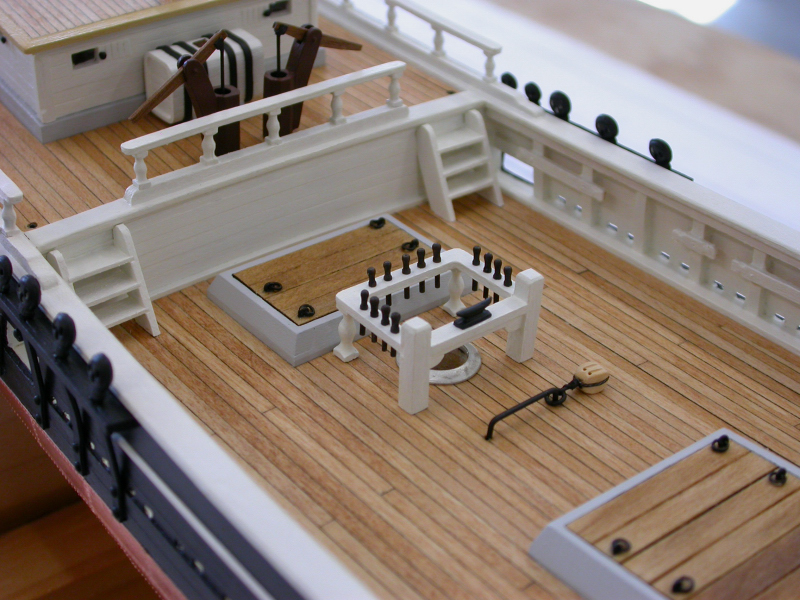
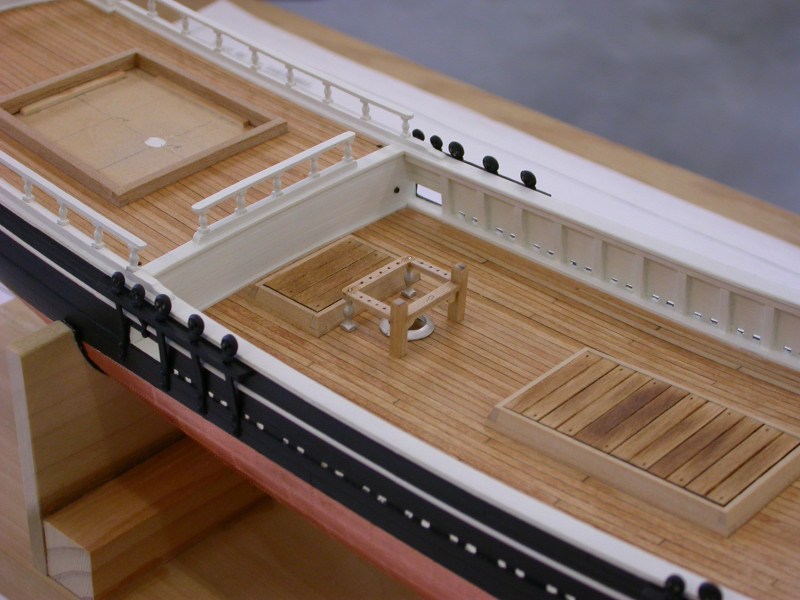
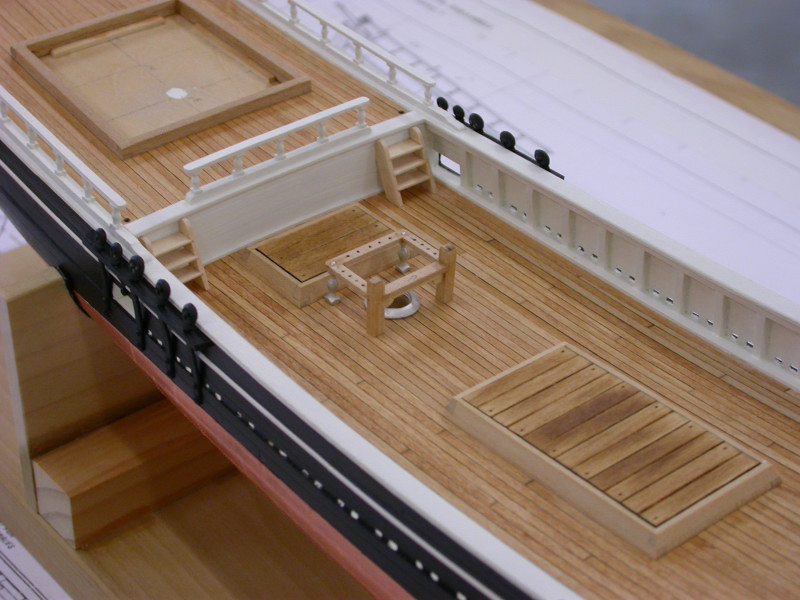
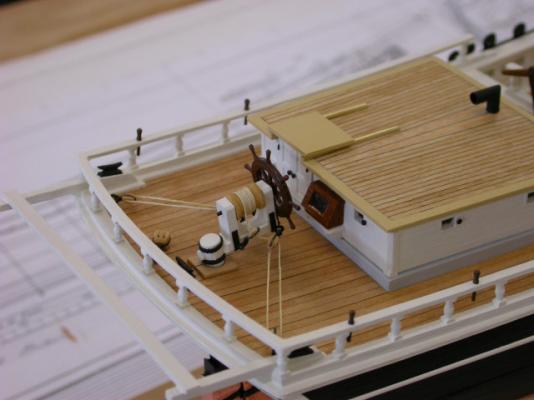
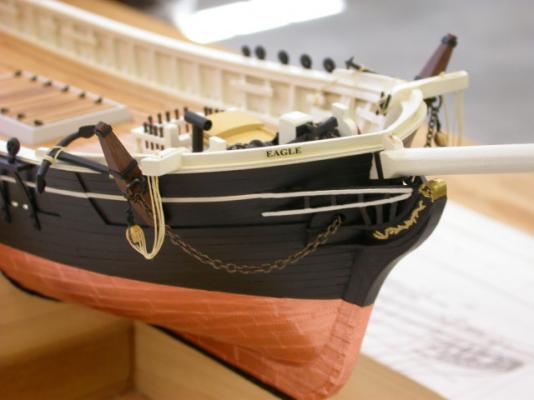
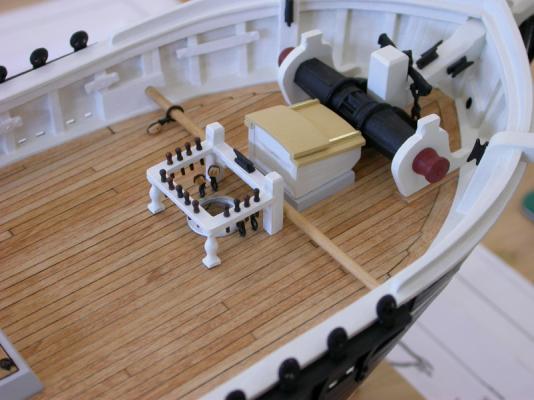
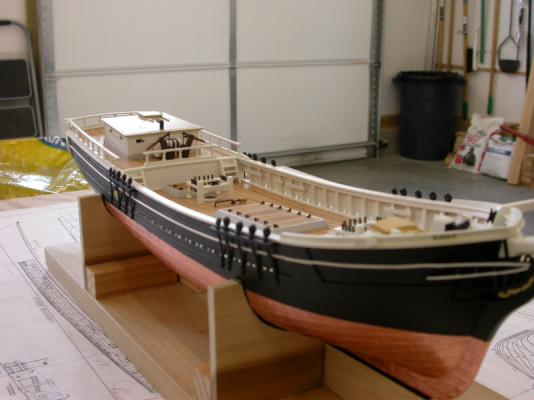
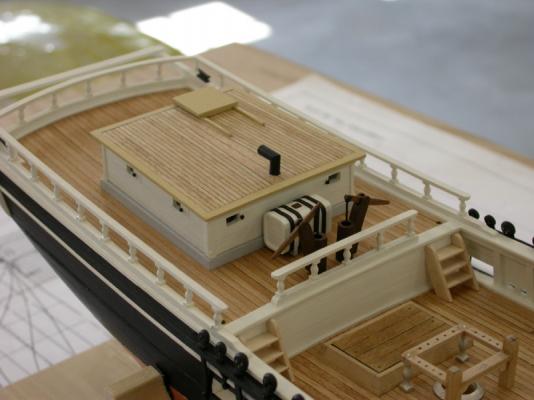
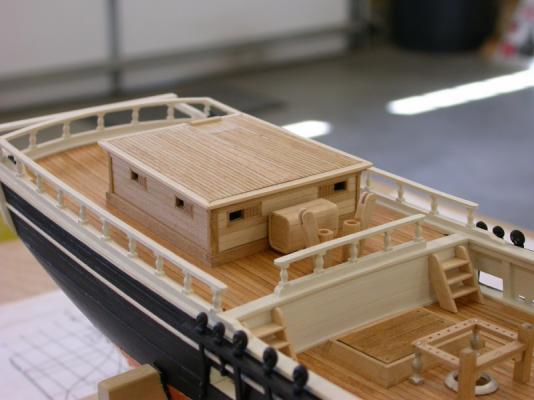
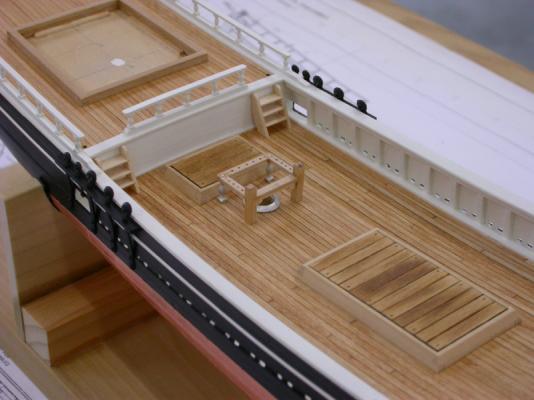
Welcome to the Topsail Schooner "Eagle" 1847 build log, Finishing up with the deck furniture, key points include: >>> Main sheet horse fitted >>> Shinkicker steering gear design/fabricated/painted/installed >>> Steering gear design based on "Eagle" 1847 and "Kate Cory" 1856 drawings >>> Belaying pins fitted to poop deck rails Pete Jaquith Shipbuilder


-
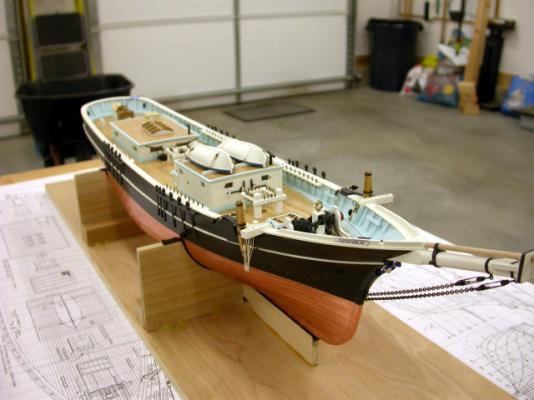
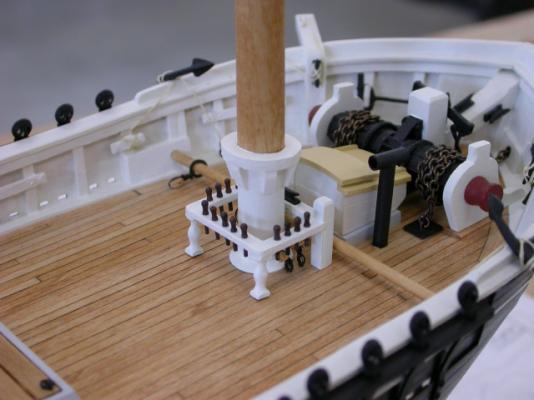
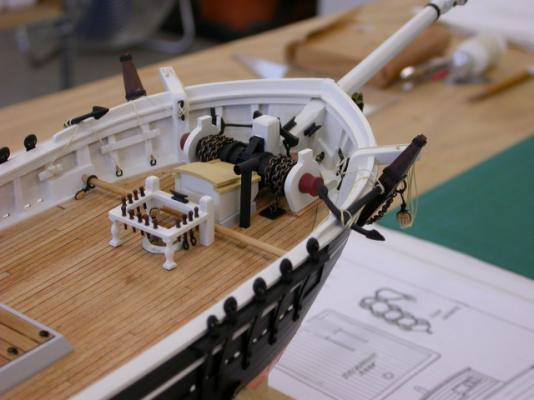
Welcome to the Topsail Schooner "Eagle" 1847 build log, More material on deck furniture. Key points include: >>> Hatch covers and coamings stained/painted >>> Ringbolts fitted to hatch covers >>> Hatch covers and coamings installed >>> Fore mast tackle blocks fitted prior to fitting fwd fife rails >>> Companionway, fife rails, and poop ladders painted and installed >>> Fwd smoke pipe fabricated/painted/fitted >>> Fore staysail and fore sail horses fitted >>> Windlass brake handles fitted in stowages inside fwd bulwarks (not shown on plans) >>> Anchors, chain pipes, and anchor chain fitted >>> LESSONS LEARNED - WHILE MANY SHIP MODELS SHOW RINGBOLTS FOR HATCH BOARD LIFTING POINTS, RECESSES WITH CROSSING STRAPS WOULD BE MORE APPROPRIATE - I WILL DEVELOP SUCH A DETAIL ON FUTURE MODELS Pete Jaquith Shipbuilder

-
I have not researched pre 1800 practice, but many ship models of that period do not have gore lines. Possible other MSW Members with experience in that time period could assist. Regards. Pete Jaquith Shipbuilder
-
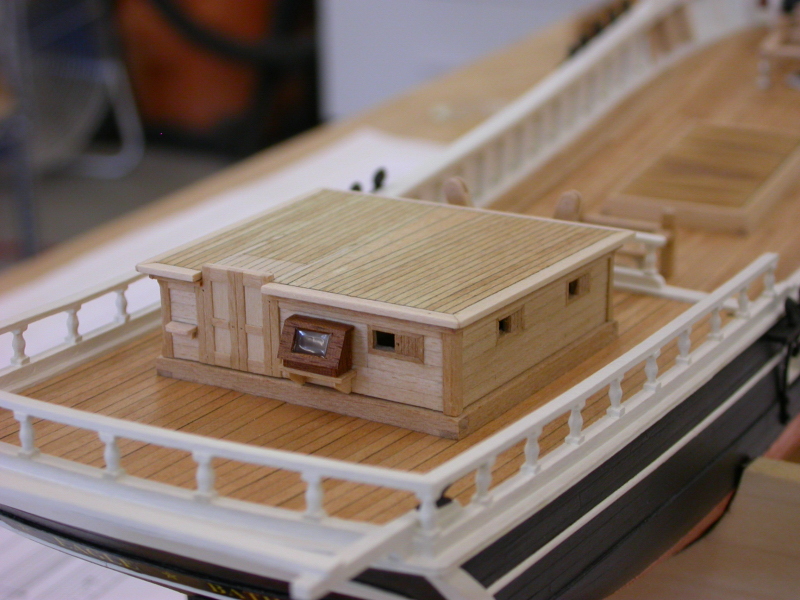
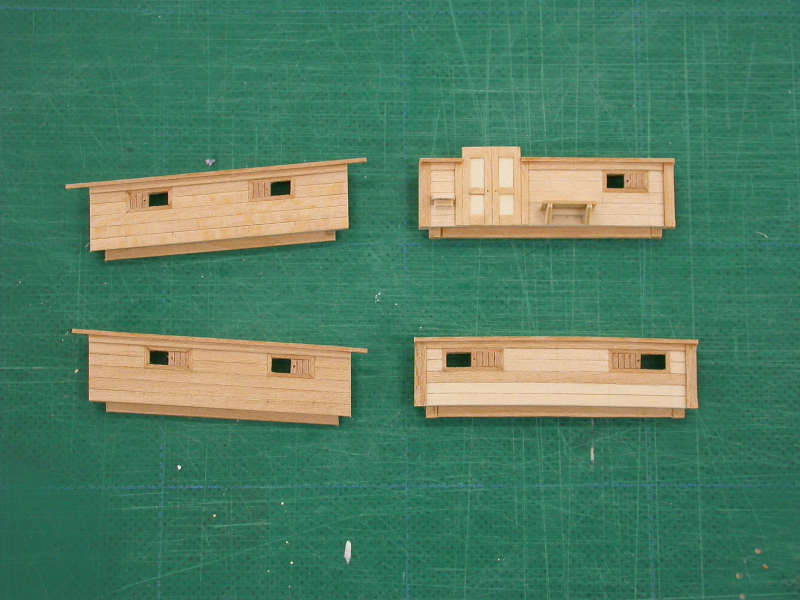
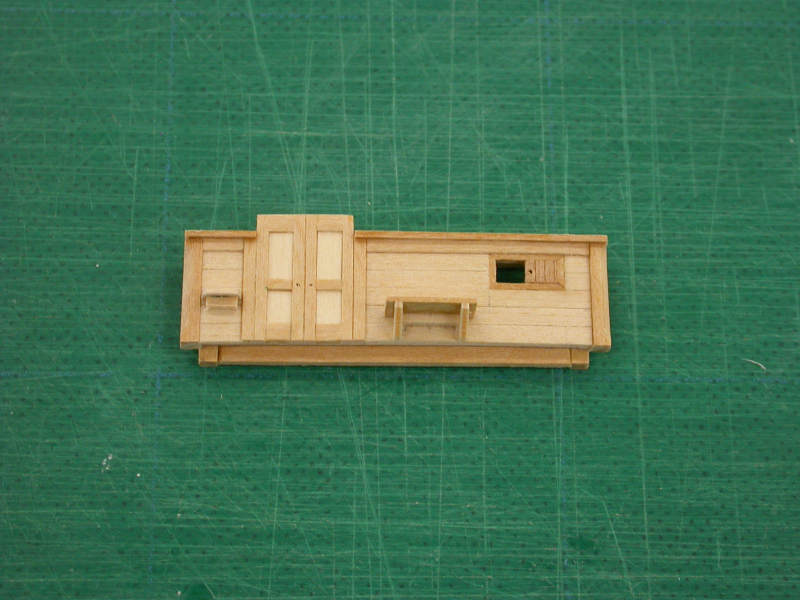
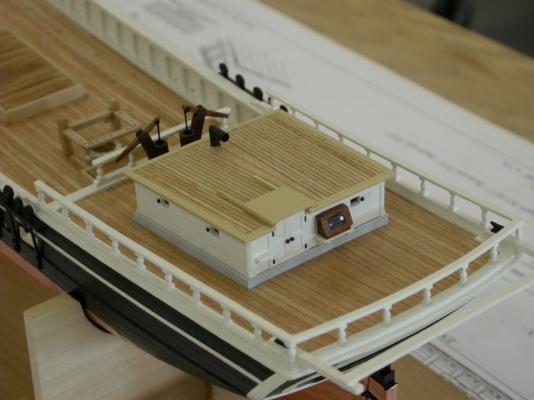
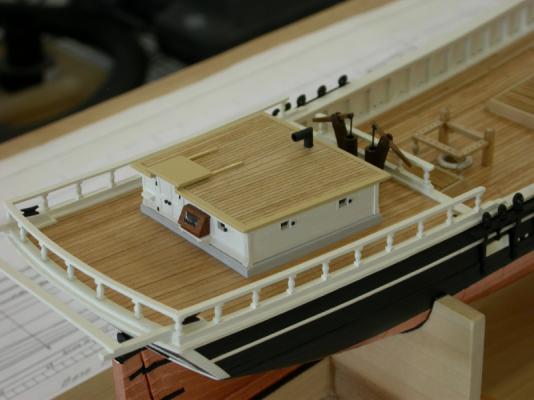
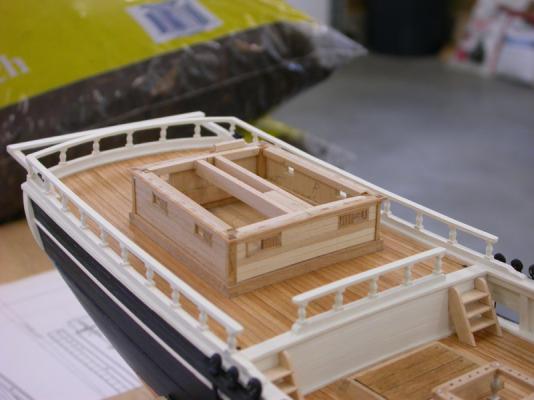
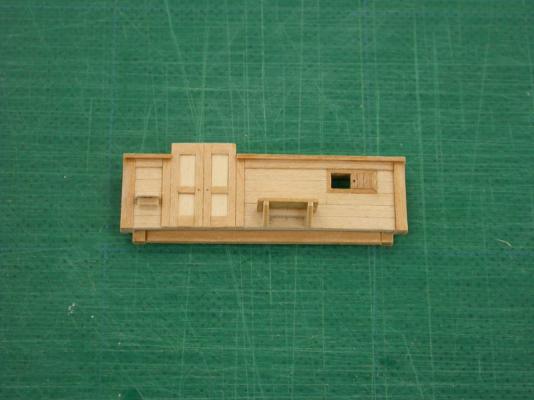
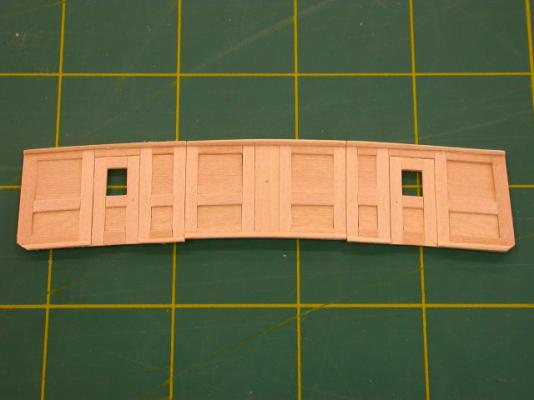
Welcome to the "Eagle" 1847 build log, Additional details on deck furniture include: >>> Coamings, house bulkhead assembly, house top, and companionway top left loose to facilate painting >>> House top planking run parallel to house sides (vs. parallel CL on original plans) >>> Stove pipe added (not on original plans) >>> Two elm tree pumps fitted (one shown on plans but it would not work effectively with CL keel assembly) >>> Water cask fitted on CL >>> Water cask planked over solid basswood plug >>> Mahogany binnacle fitted to aft house bulkhead Pete Jaquith Shipbuilder

-
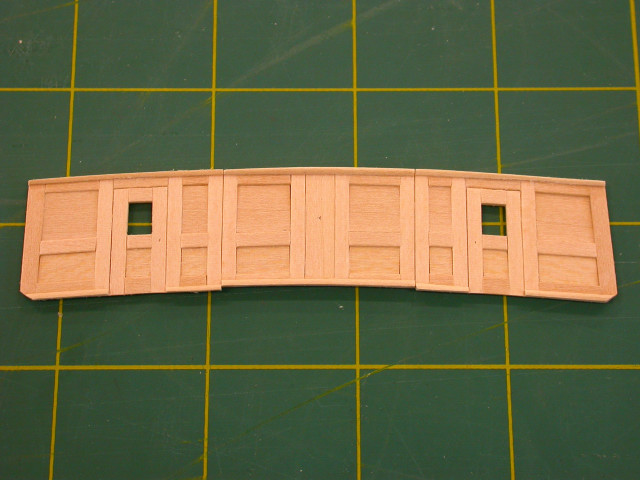
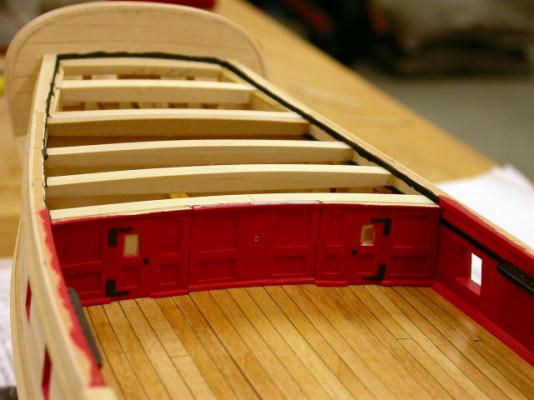
Welcome to the "Eagle" 1847 build log, Proceeding with the deck furniture. Key Points include: >>> Fwd companionway dimensions critical as it fitts between the anchor windlass and fore staysail sheet horse >>> Hatch boards fitted to sub bases set into coamings >>> Fife rails constructed from laminated stripwood >>> Fife rail stanctions Bluejacket castings >>> Aft house bulkheads laminated on sub bases (see separate notes on deckhouse construction, similar to "Newsboy" 1854) >>> Sub asemblies designed to fit together and left loose to facilate painting >>> Final assembly / installation after painting Pete Jaquith Shipbuilder


- 82 replies
-
- 12
-

-
Thank you for your interest in the "Eagle" 1847 build log, With the hull, bulwarks, rails, and hull outfit complete; the following posts will address deck furniture and associated deck outfit. These chapters of the build will work from the bow aft and include the following: >>> Fwd companionway & smokepipe >>> Hatch covers & coamings >>> Fife rails >>> Fore staysail, fore sail, and main horses >>> Poop ladders >>> Anchors, anchor chain & rigging, etc. >>> Main house >>> Elm tree pumps >>> Water cask >>> Steering gear Pete Jaquith Shipbuilder
-
Kurt, On the 3/16" model I felt both the fittings and drawing were small (binnacle & anchor windlass). It was my judjment they were just too small. In my modeling, I try to consider each part and assembly in terms of its full size dimension. When in doubt, I compare with other plans/books on period practice (e.g. bulwark timberheads, cap rails, plank width, etc.; also applies to rigging lines & blocks). With this approach, I try to keep all parts/assemblies in proportion. Regards, Pete
-
Kurt, As best I can recall, I made the following changes to the plans: >>> Anchor windlas increased in size ~30-50% >>> Binnacle increased in size ~30-50% >>> Fitted stowage for windlass brake handles on fore house front >>> Fitted (2) boats vs. (1) on plans >>> Boats increased in size ~30% >>> Fitted (2) water casks (not shown on plans) >>> Fitted (2) pumps vs. (1) on plans >>> Fitted smoke pipes to fore/main houses >>> Fitted ships bells fore/aft >>> Fitted fore top vs. cross trees shown on plans >>> Fitted studding booms and irons to fore yard and fore upper topsail yard Note that the size increases noted above may not apply to 1/8" scale plans as they may have used the same fittings on both the 1/8" and 3/16" scale kits. Regards, Pete
-
Welcome to the Topsail Schooner "Eagle" 1847 build log, In my Topsail Schooner "Eagle" 1847 and Brigantine "Newsboy" 1854 build logs you can observe my interest in mid 1800's merchant sail. I see these as beautiful ships and an excellent focus for my ship modeling. Time permitting, future plans for this series include: Topsail Schooner "Eagle" 1847 - scratch build, complete Brigantine "Newsboy" 1854 - kit bash, in process, ready to set up rigging Merchant Brig "Volante" 1853 - scratch build, future Whaling Brig "Kate Cory" 1856 - kit bash, future Clipper Ship "Flying Fish" 1851 - kit bash, future Pilot Schooner "Mary Taylor" 1851 - kit bash, future Pilot Schooner "Phantom" 1868 - scratch build, future Other competing build candidates include: 14 Gun Brig "Fair American" circa 1780 - kit bash, in process, hull planking working Steam Salvage Tug "Foundation Franklin" 1918 - scratch build, future Steam Tug "Seguin" 1884 - kit bash, future Pete Jaquith Shipbuilder
-
Gary, This is how I covered the poop bulkhead location: >>> Poop bulkhead was moved aft slightly >>> Poop bulkhead was designed as portable panels assuming they would be removed "when in action" (I believe this was typical practice during this period) >>> This layout will permit rigging the aft cannons My 14 Brig "Fair American" build is currently on hold as I complete my full scale shipbuilding project in North Vancouver, BC Canada. As time permits, I will post a "Fair American" build log once "Eagle 1847 is completed. Pete Jaquith Shipbuilder

-
Floyd, As best I can recall, the poop rails were constructed as follows: >>> Rail base sits on poop deck planksheer, a continuation of the cap rails >>> Caprails/planksheers were fabricated from 3/64" x 3/16" stripwood w 3/64" double bead trim (curved counter planksheer fabricated from 3/64" sheet wood) >>> Rail bases were fabricated from 3/32" x 3/32" stripwood (counter base fabricated from sheet wood) >>> Rail stanctions were Bluejacket castings >>> Upper rail were fabricated from 3/64" x 1/18" stripwood (counter rail fabricated from strip wood) >>> Corners were half lapped >>> Rooster tails (boat davits were integrated into the rail base) >>> Care should be taken to keep rail stanctions vertical although P/S rails lean inboard forward (to clear main shrouds) >>> I believe I drilled stanction holes in base using upper rails as a template >>> Poop rails were assembled in place Regards, Pete