Pete Jaquith
-
Posts
343 -
Joined
-
Last visited
Content Type
Profiles
Forums
Gallery
Events
Everything posted by Pete Jaquith
-
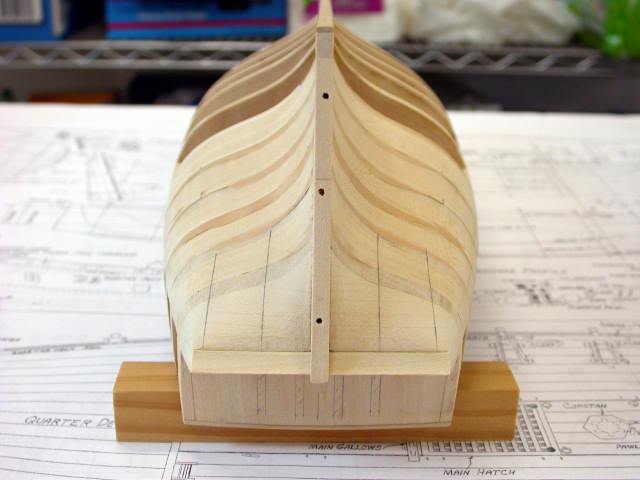
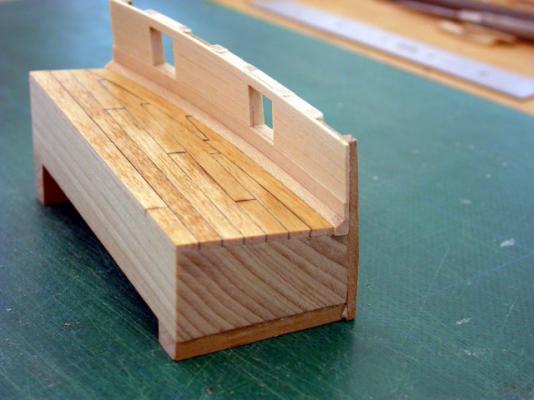
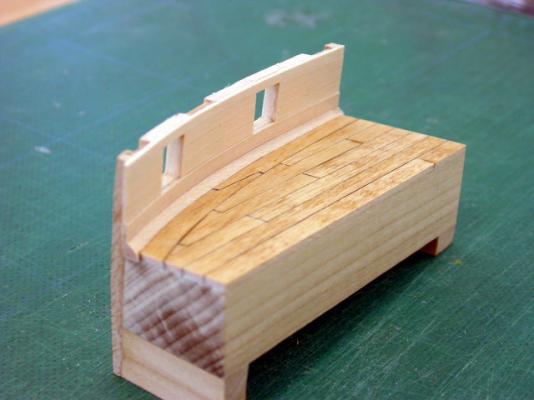
 Welcome to the Brig "Fair American" circa 1780 build log, With the transom complete, next step was deck planking. Key points include: >>> Thick planks were 3/32" x 3/16" basswood stripwood; PLAN DEPARTURE >>> Outboard planking 1/16" x 3/16" basswood stripwood; PLAN DEPARTURE >>> Curved/tapered planks with hooked scarfs outboard; PLAN DEPARTURE >>> Planking fitted around hatch coamings >>> Plank butts staggered per period practice >>> Construction sequenced to facilitate staining/finishing deck planking >>> These details are shown on the construction drawing posted below Pete Jaquith Shipbuilder
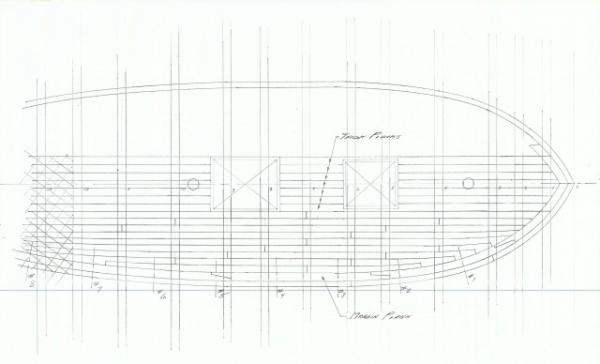
-
Welcome to the Brig "Fair American" circa 1780 build log, Rowan, Gary, Thank you for your interest and support. "Fair American" is a fine looking ship from the American War of Independance. Having had the opportunity to study the original model, I decided to model her as she would likely have been built. I will try to note major departures from the kit plans as I move forward with postings. Regards, Pete
-
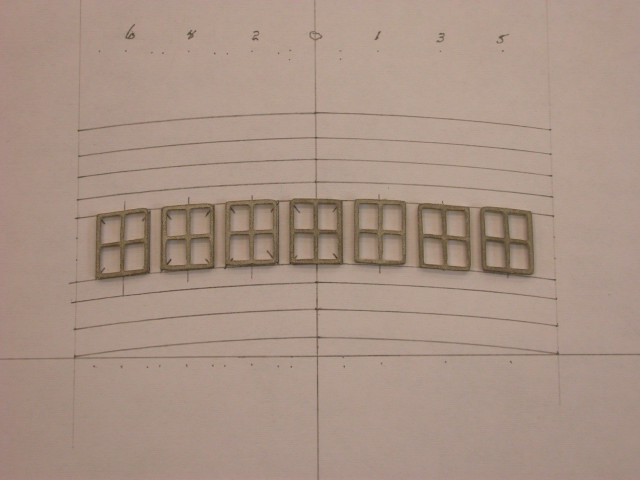
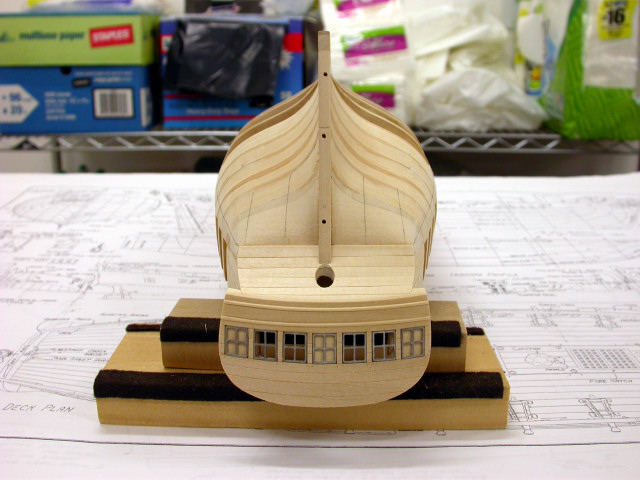
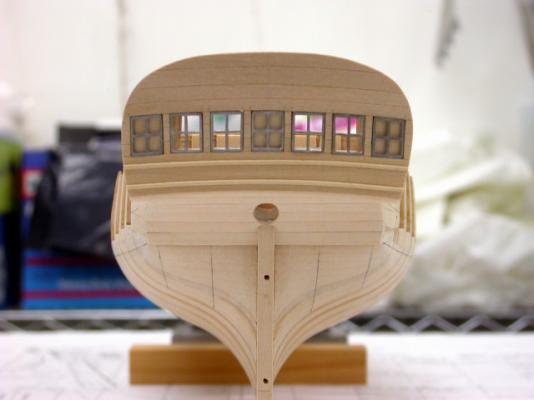
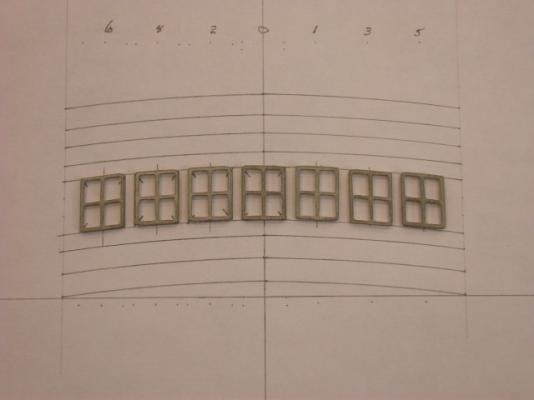
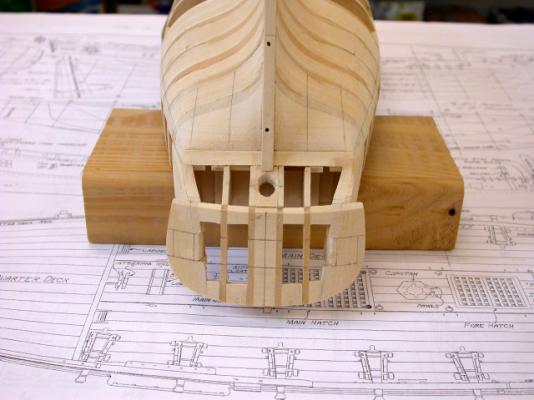
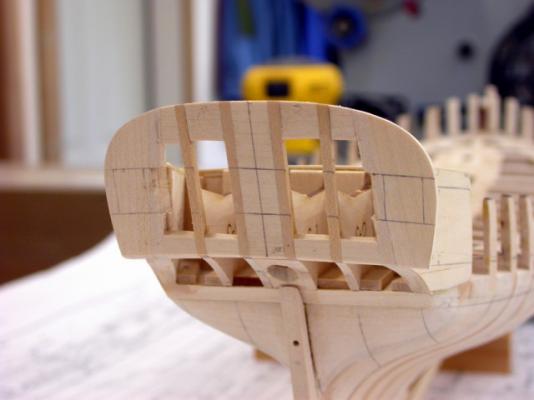
Welcome to the 14 Gun Brig "Fair American" circa 1780 build log, Continuing with the transom planking, key points include: >>> Counter planking was straight >>> Counter/transom plank widths to suit conditions >>> Transom planking laid out with cambered planks (by eye) >>> Transom planking cut from sheet stock >>> Transom planking cut with aid of ship's curves >>> Transom windows formed to follow curve of transom planking Pete Jaquith Shipbuilder


-
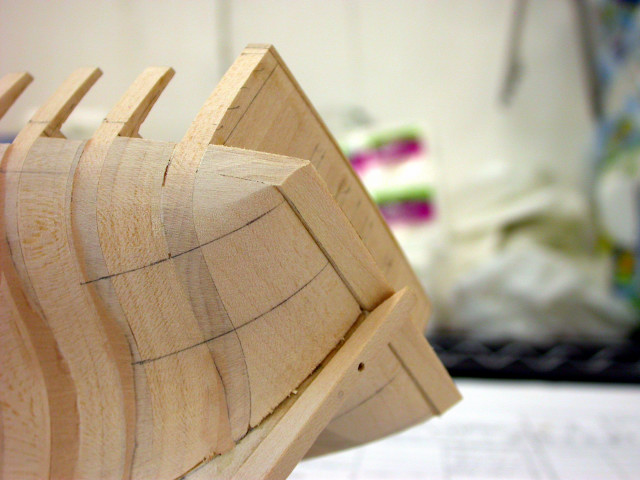
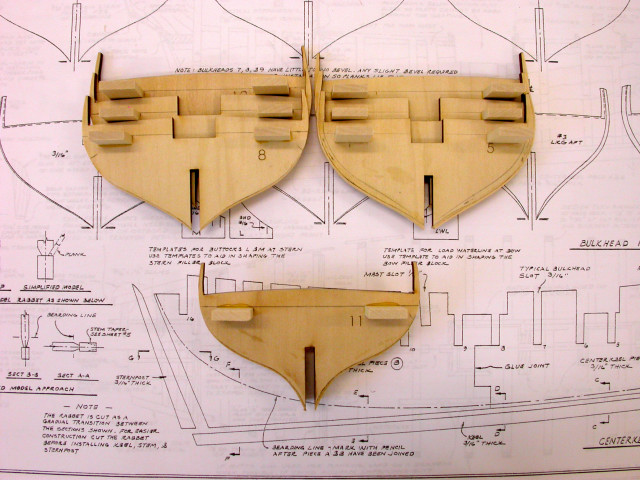
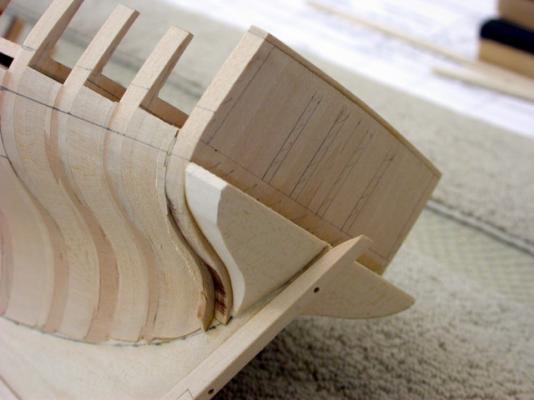
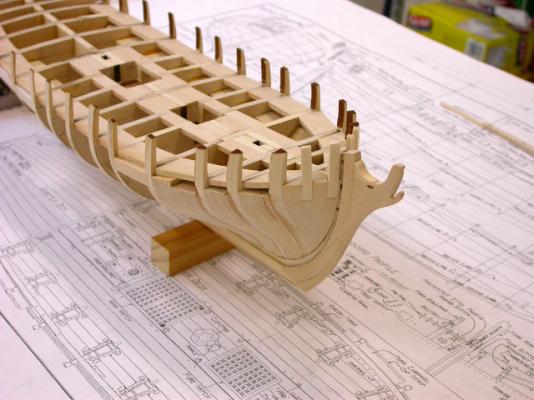
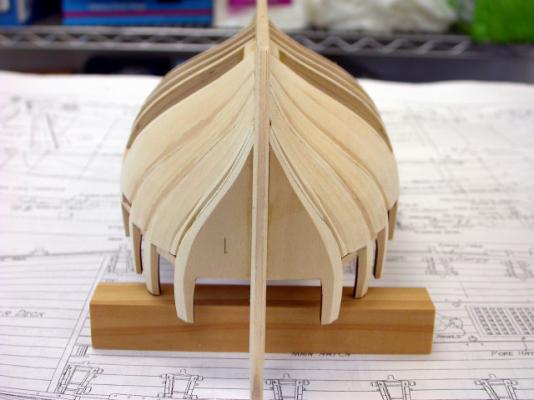
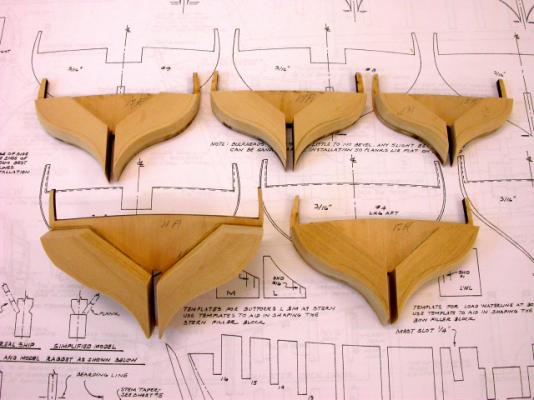
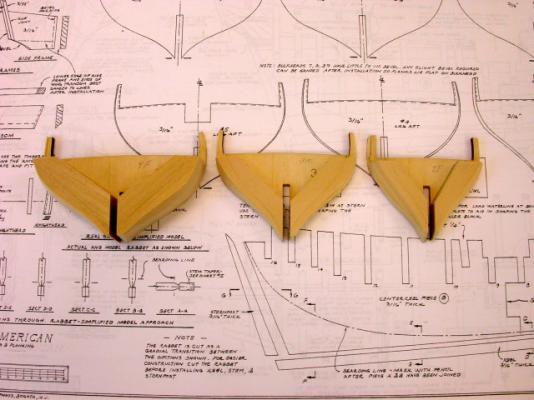
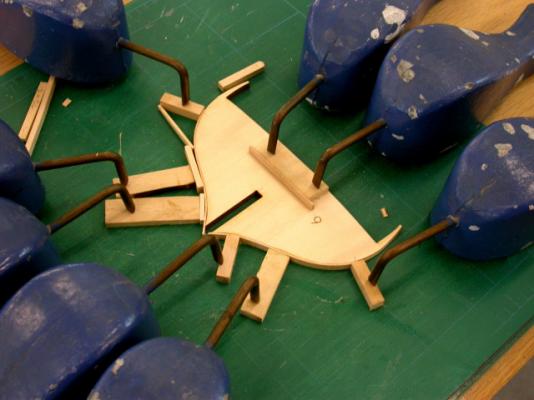
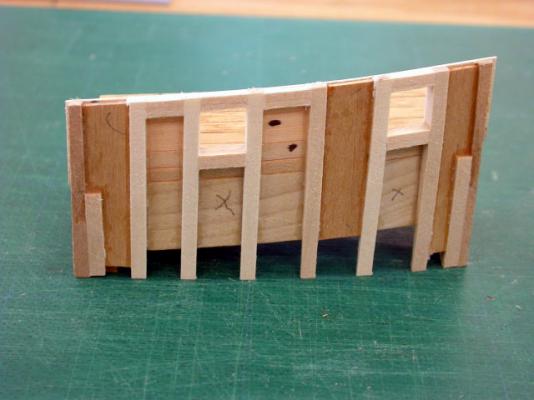
Welcome to the Brig "Fair American" circa 1780 build log, Continuing with hull construction, next steps are stern and transom construction. Key points include: >>> Stern filler blocks faired using buttock templates >>> Wales projected to counter to assist in shaping filler blocks; note that some bulkhead timberheads will require extension >>> Counter and transom construction followed plans and instruction sequence >>> Counter and transom construction required lots of plan work and a bit of judgement; curve of transom and transom profile shaped by eye; final transom shaping performed in place >>> This work gives one great respect for the craftsmen who built these vessels Pete Jaquith Shipbuilder


-
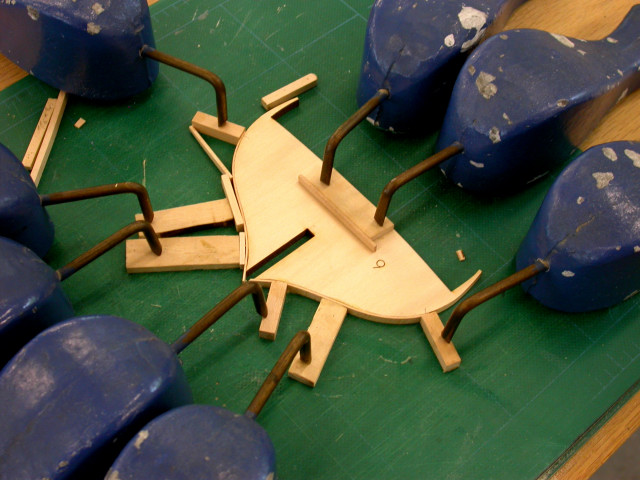
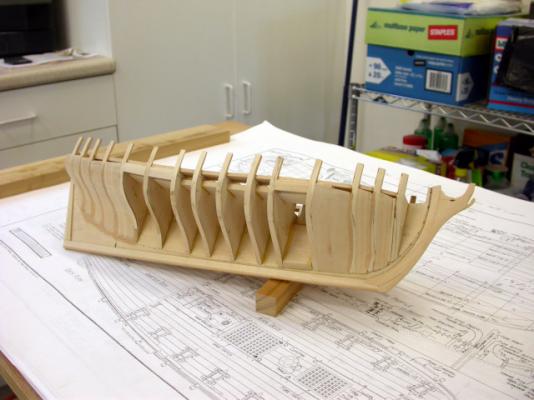
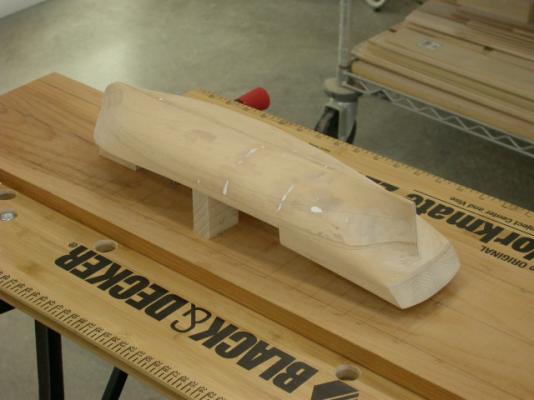
Floyd, Nils, Thank you for your interest in my Brig "Fair American" circa 1780 build. Preliminary dry fit of hull framing showed that the kit had significant accuracy issues and that hull fairing could become an issue. As a result, I added the filler blocks so the bow/stern are essentially solid hull. Although it looks like a lot of material to remove, initial or rough fairing took less than four hours per quarter (total 12-15 hours). The #80 open grit paper really removes a lot of material when wrapped around a large piece of wooden dowel. Regards, Pete
-
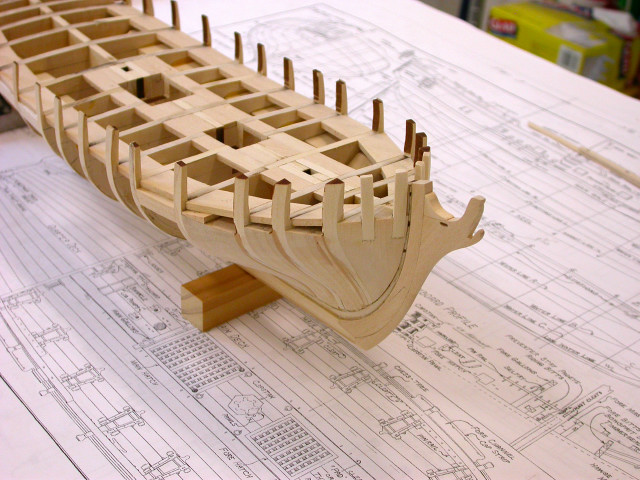
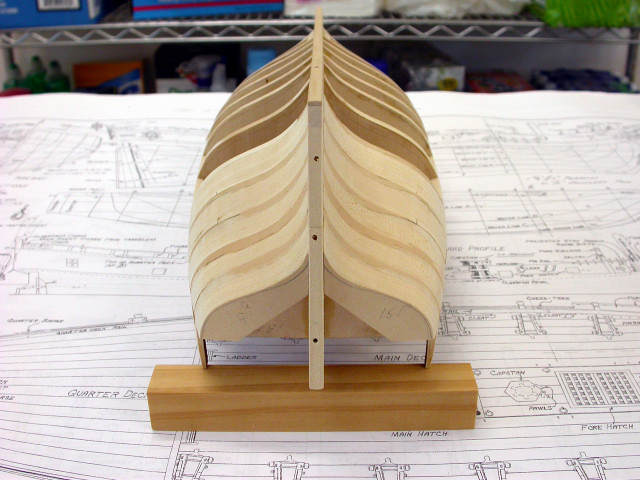
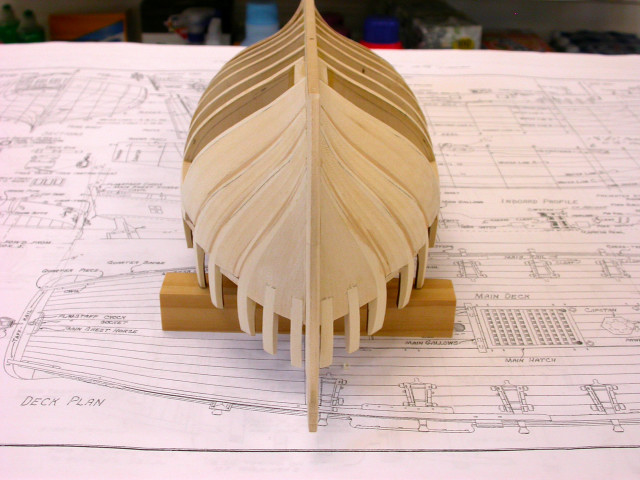
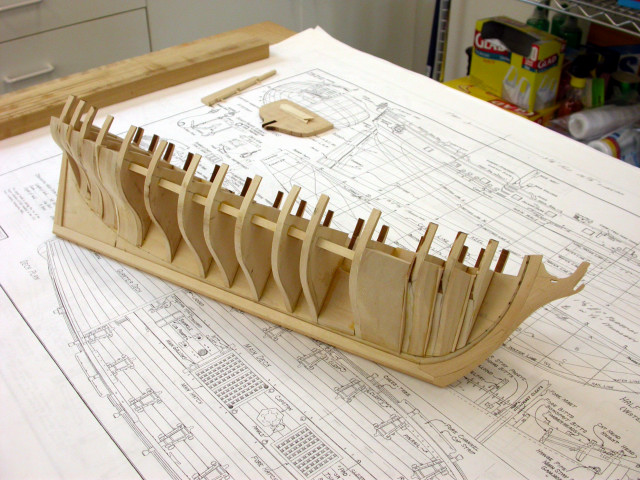
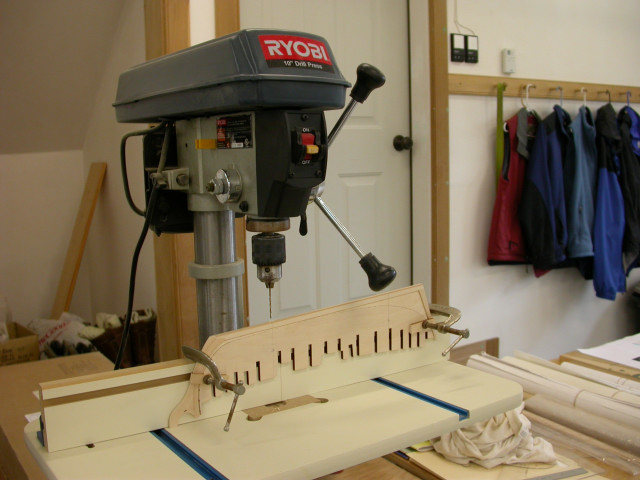
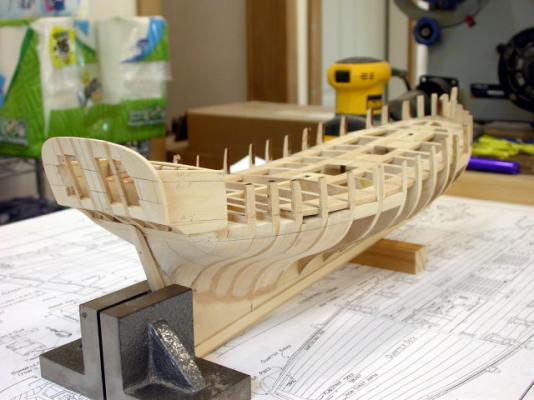
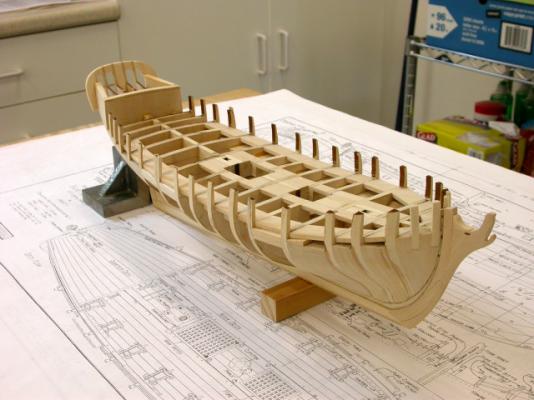
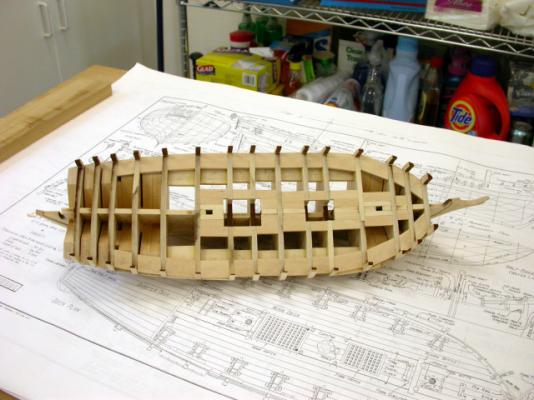
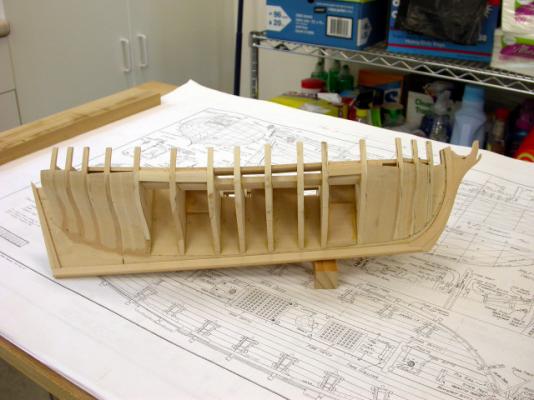
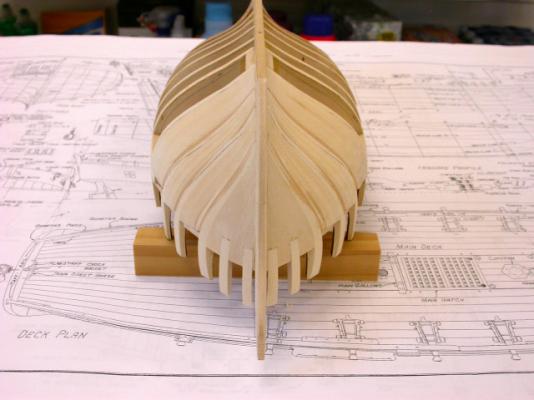
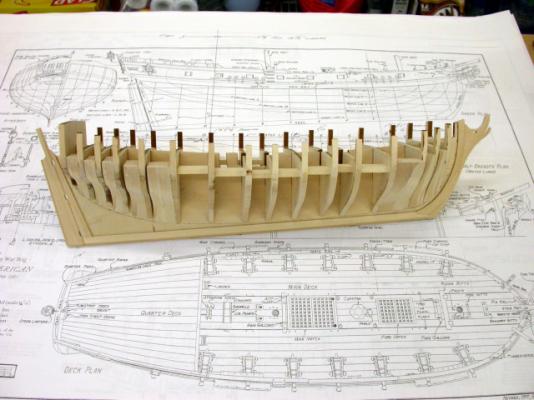
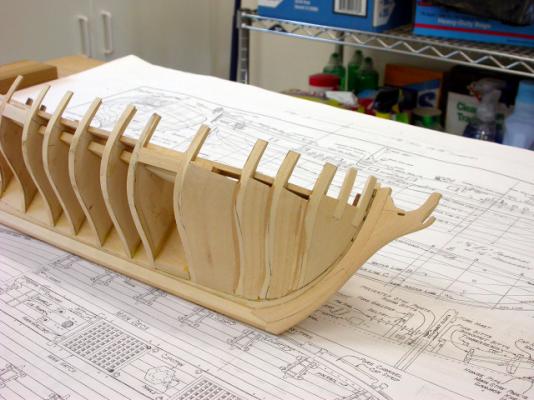
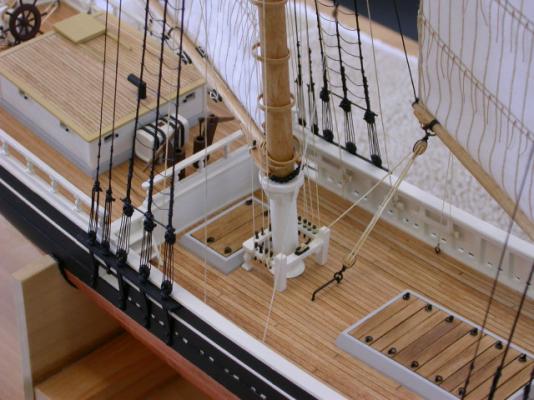
Welcome to the Brig "Fair American" circa 1780 build log, Continuing with hull assembly and fairing, key points include: >>> Keel reinforcing pieces were added in way of pedestal holes >>> Keel reinforcing pieces were added in way of mast steps >>> Deck fillers were added to support plank ends outboard >>> Deck fillers were added to support plank ends in way of hatches >>> Hull planking reinforcing pieces were added in way of chain plates >>> Bow/stern filler blocks were fitted after initial hull fairing >>> Knight heads/timberheads fwd were fitted after initial hull fairing >>> Initial hull fairing was accomplished with #80 grit sand paper wrapped around 1 1/4" and 1 1/2" dowels >>> Final hull fairing was accomplished with #120 & #150 sand paper wrapped around 1 1/4" and 1 1/2" dowels >>> Hull fairing was checked with flexible battens (1/16" & 3/32" strip wood) >>> Waterline templates were used in hull fairing fwd >>> Buttock templates were used in hull fairing aft >>> During fairing process; stem, keel, and stern post were protected with blue painters tape >>> Deck surface was faired with flexible sanding sticks Pete Jaquith Shipbuilder


-
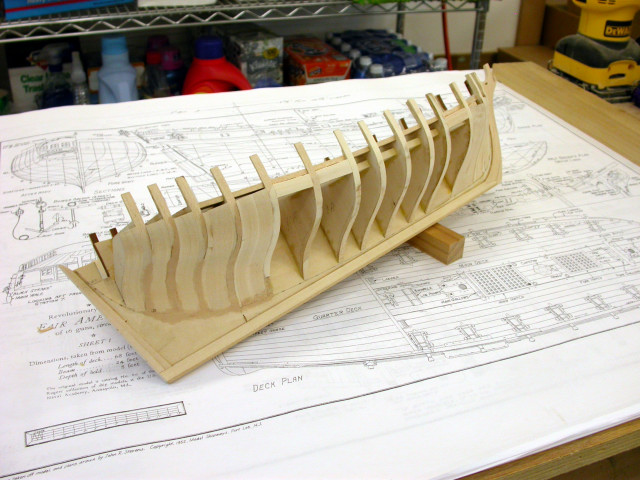
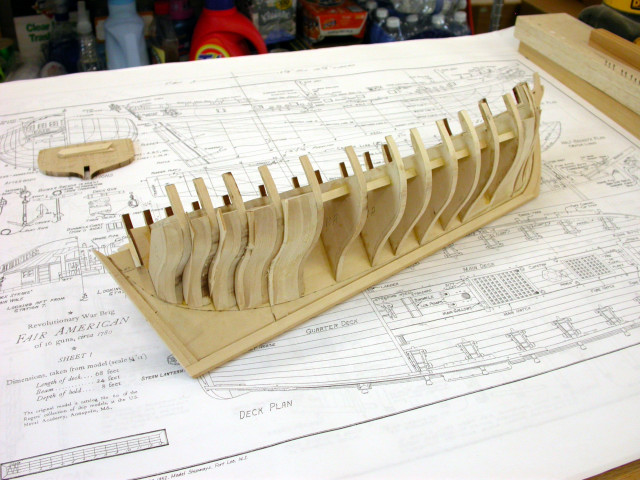
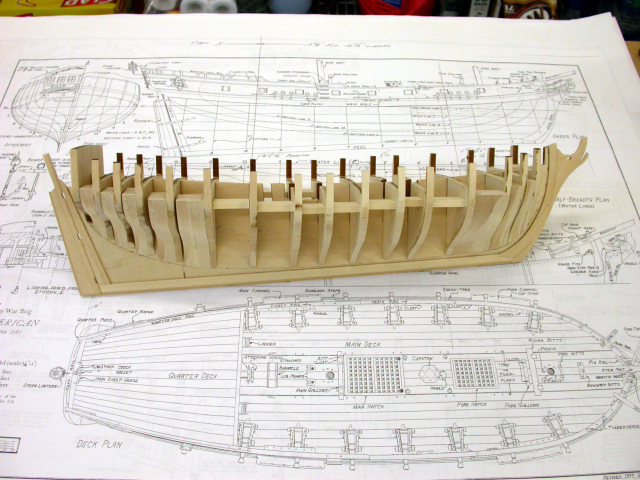
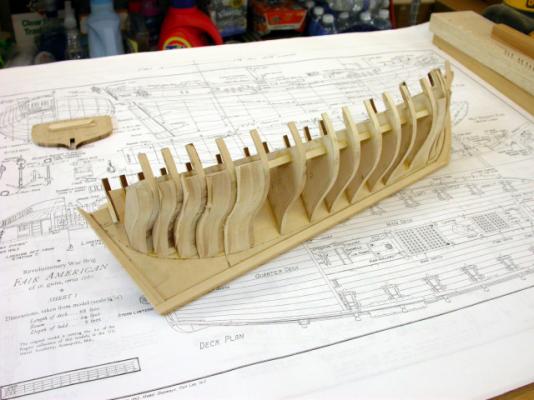
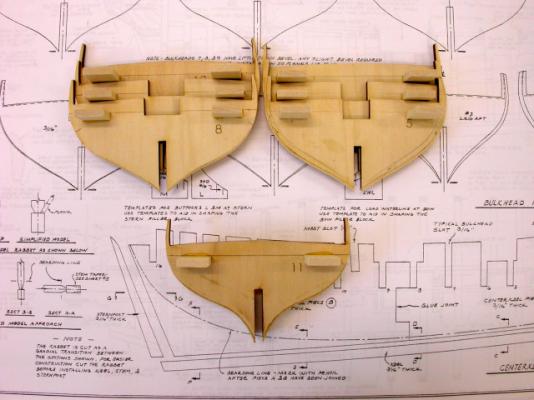
Welcome to the Brig "Fair American" circa 1780 build log, Next step was preparing the bulkheads and assembling the hull assemply. Key points include: >>> Undersize bulkheads were built up prior to assembly >>> Spacers were added to midship bulkheads before assembly >>> Filler pieces were added to fwd/aft bulkheads before assembly >>> All subassemblies were dry fitted before final assembly >>> LESSONS LEARNED: I DECIDED TO ADD FILLER BLOCKS (BASSWOOD) BETWEEN THE FWD/AFT BULKHEADS IN ORDER TO ASSIST IN FAIRING AND ADD SUPPORT TO HULL PLANKING: ALTHOUGH IT LOOKED LIKE A LOT OF MATERIAL TO REMOVE IT WENT WELL AND I WOULD DEFINITELY USE THIS TECHNIQUE IN THE FUTURE >>> Future posts will cover the hull fairing process Pete Jaquith Shipbuilder

-
Welcome to the Brig "Fair American" circa 1780 build log, Floyd and Robert, thank you for your supportive comments. Moving ahead with construction, the center keel assembly was prepared. Key points include: >>> Centerline bulkhead beveled for planking rabbet prior to assembly >>> Stem, keel, stern post, and rudder built up per period practice >>> Rudder fitted to center keel assembly >>> Figure head fitted to center keel assembly >>> Stem and rudder tapered >>> Center keel assembly drilled for pedestal mounting holes >>> Note: pedestals were located to maintain waterline level, a 1/4" mahogany pad will be fitted under forward pedestal to maintain rake Pete Jaquith Shipbuilder

-
Jon, Bulkhead fairing is critical to successful hull planking. Depending on your kit, you may need more or less fairing. Attached are pictures of my "Fair American" build showing my approach to dealing with bulkhead fairing problems. The filler blocks are bass wood but clear pine would also work. Fairing was done with #80 grit paper using an 1 1/2" dowel. Cheers, Pete
-
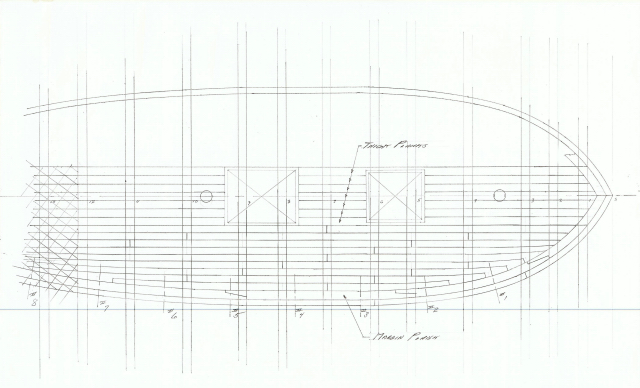
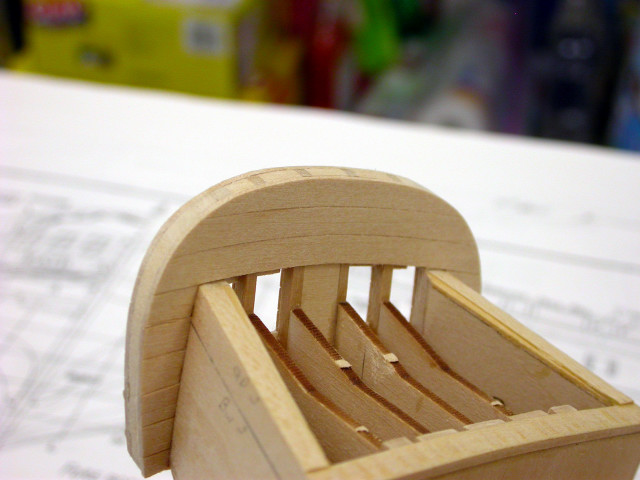
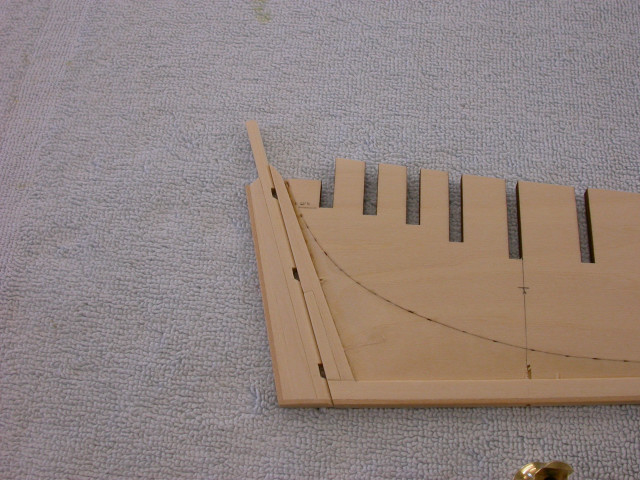
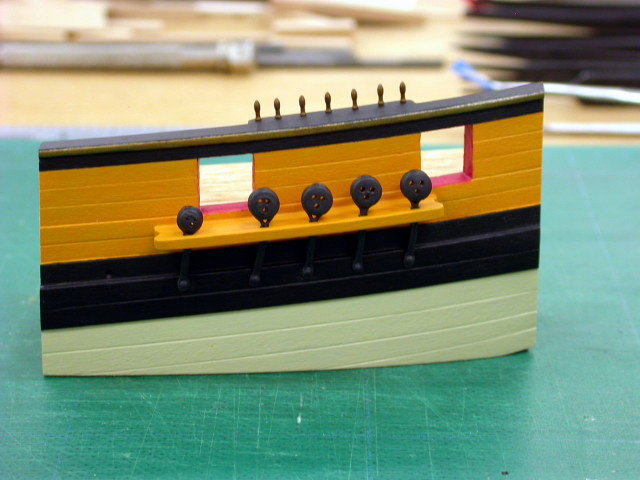
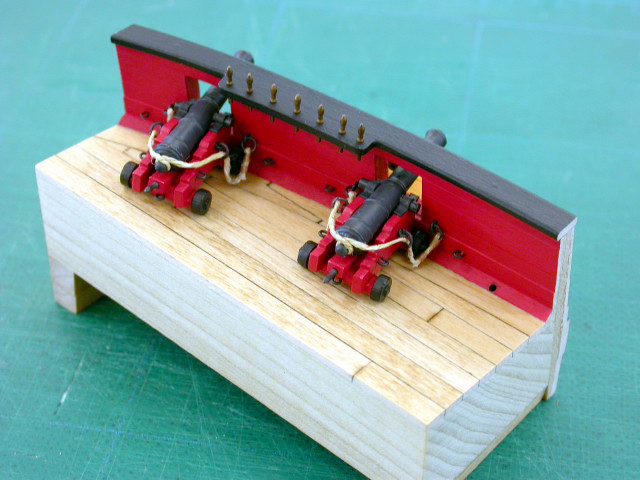
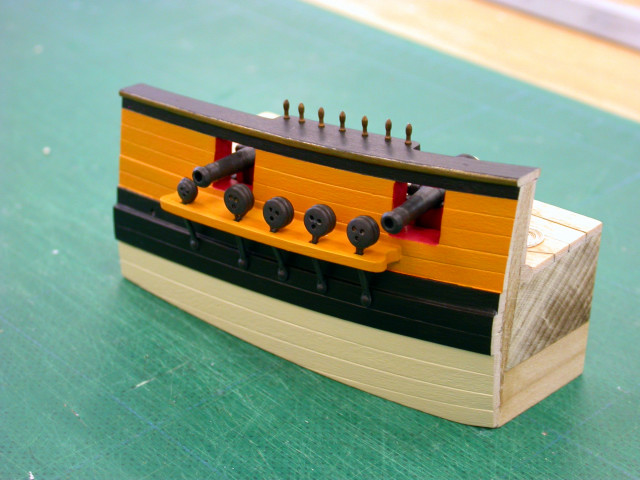
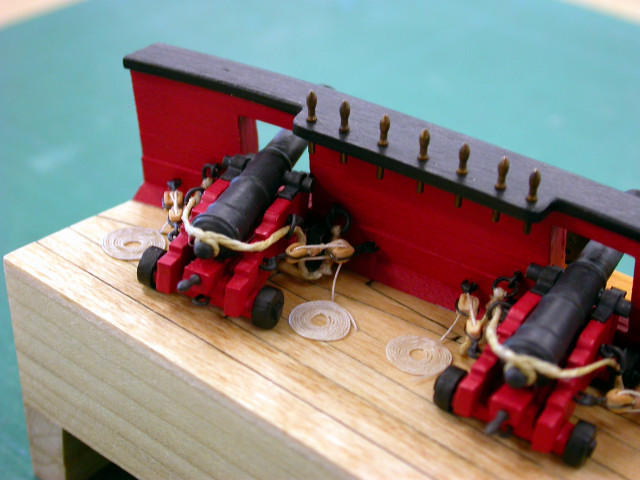
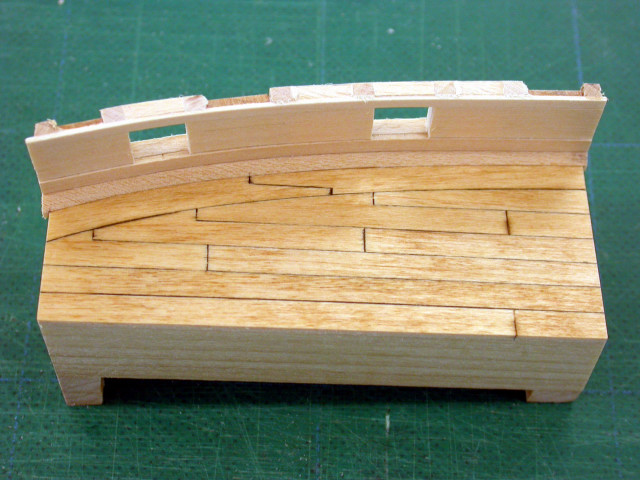
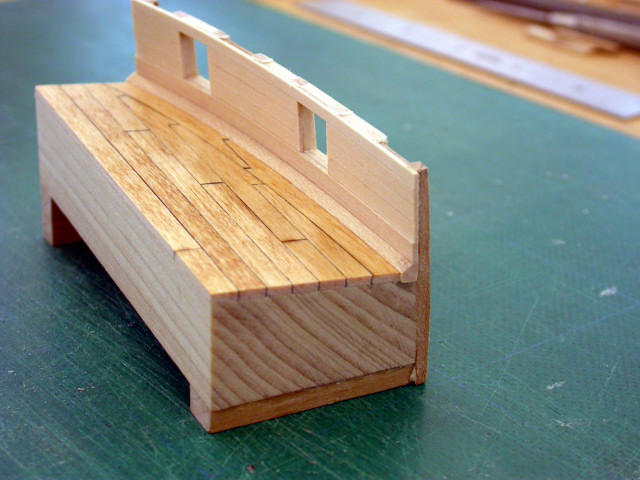
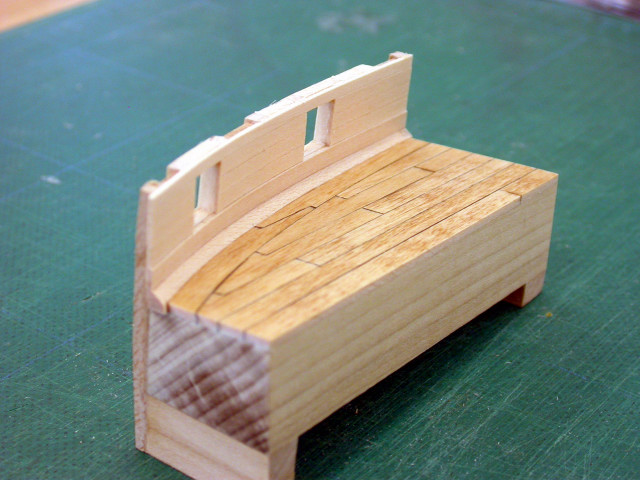
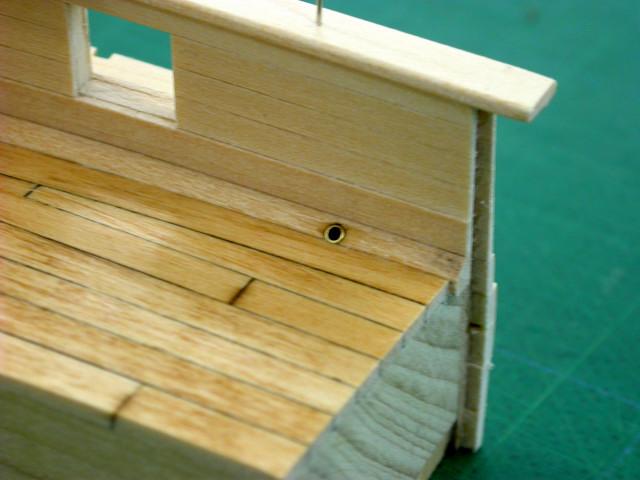
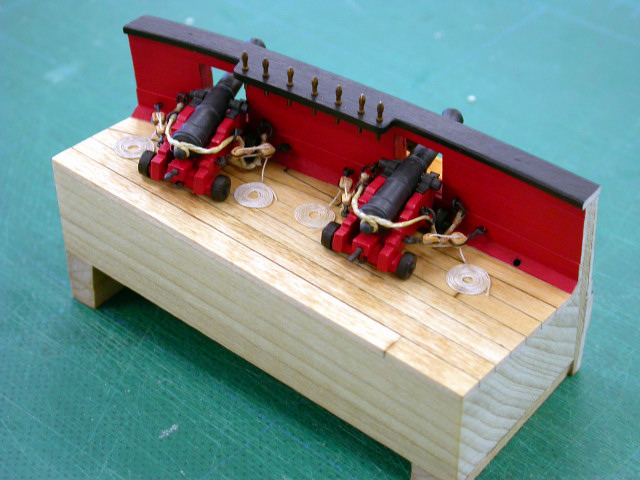
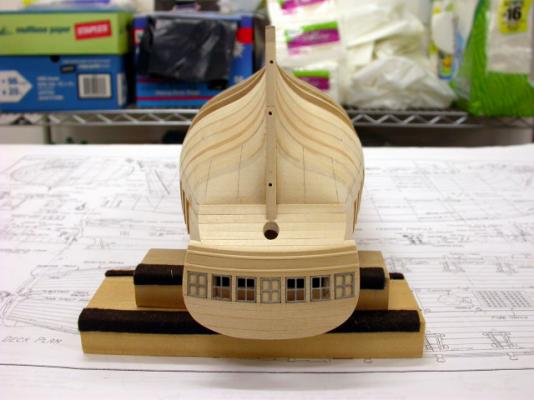
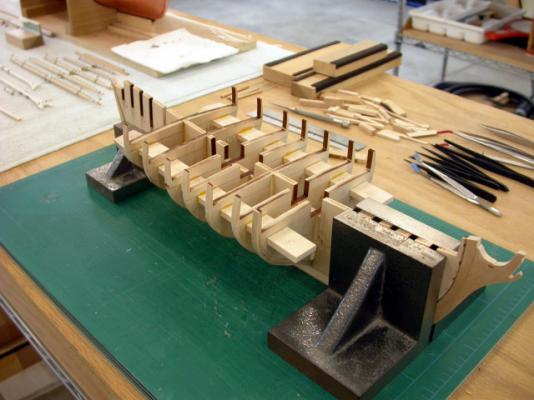
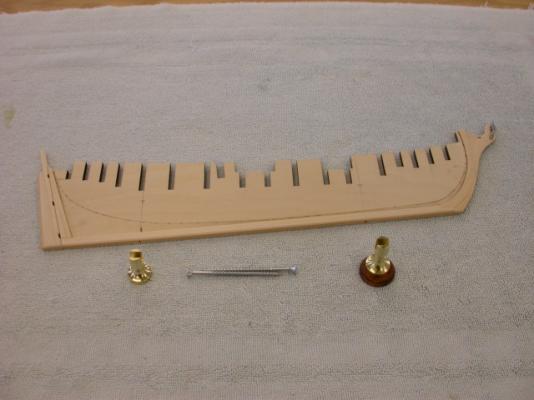
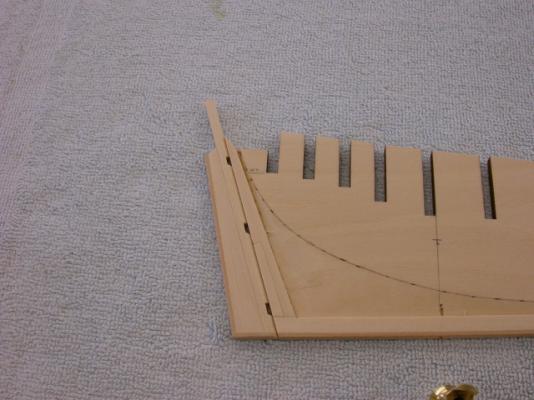
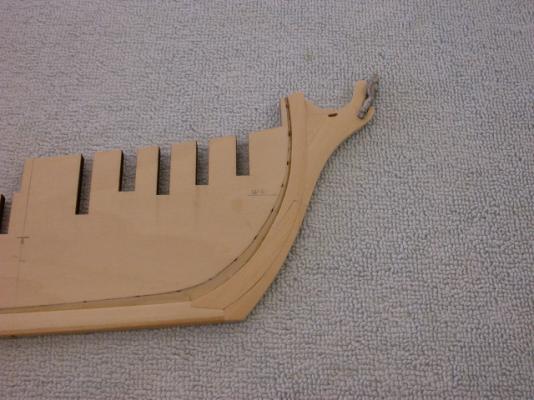
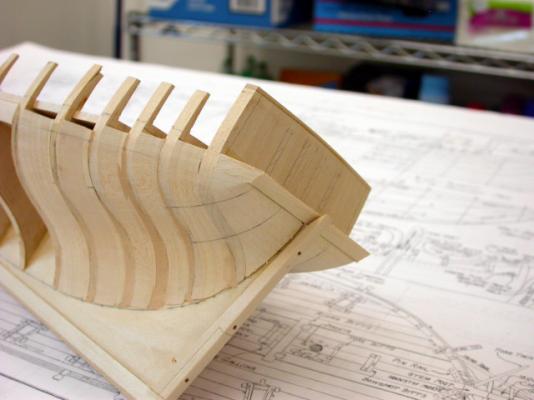
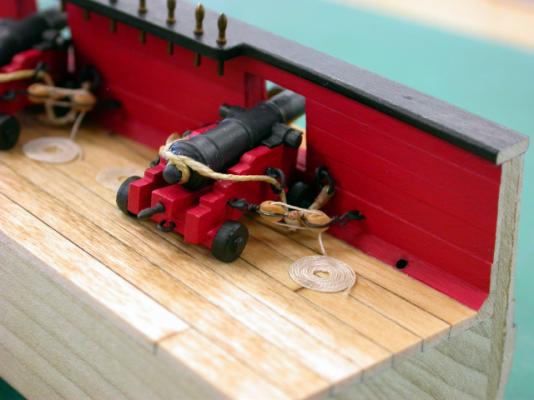
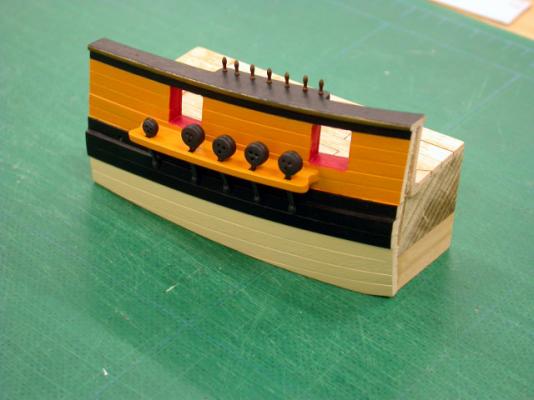
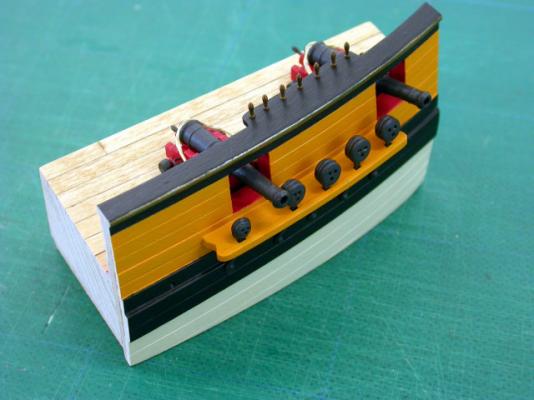
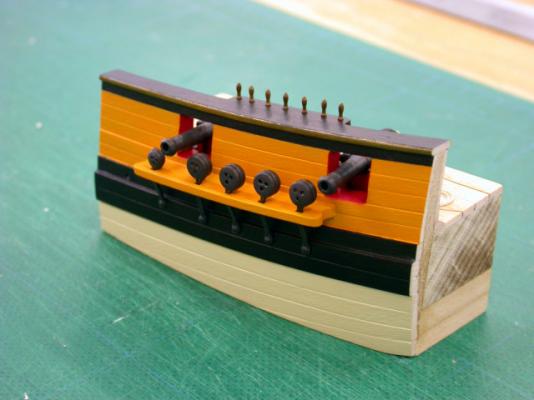
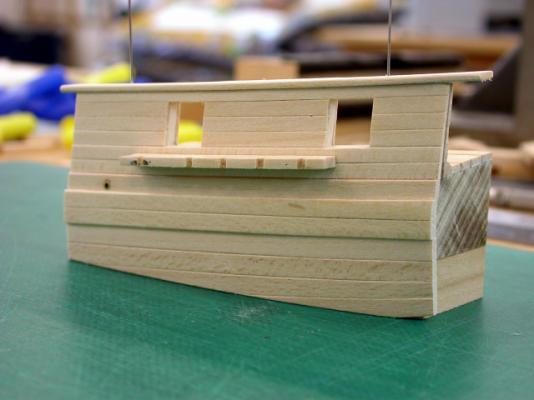
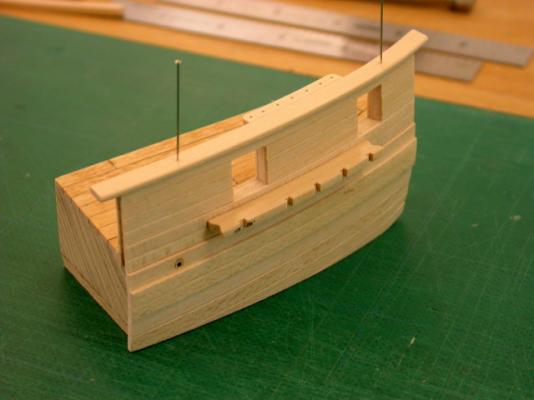
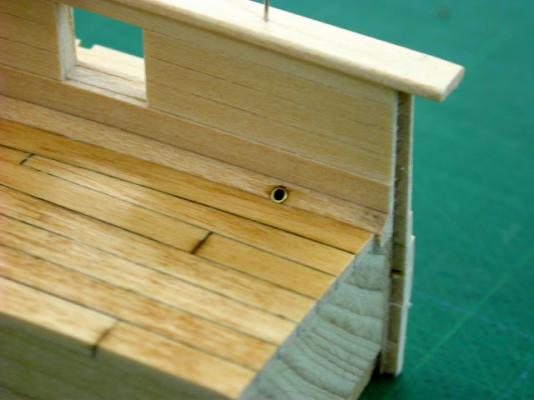
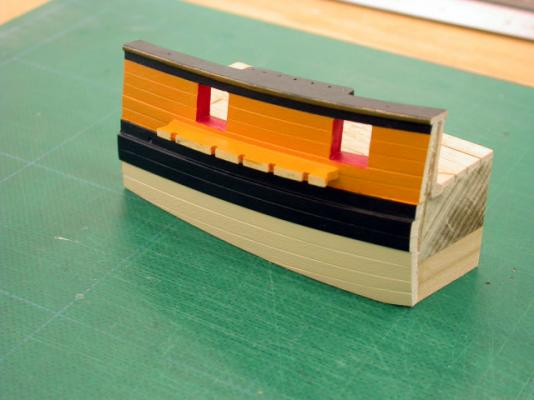
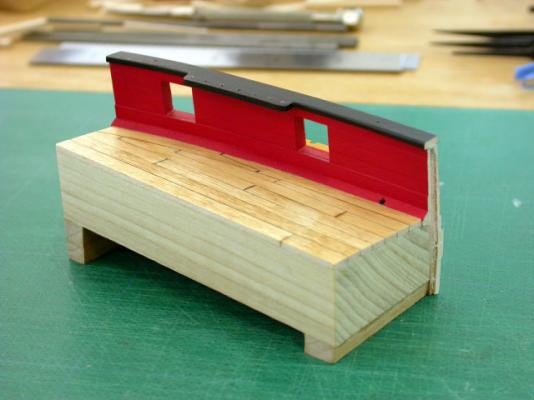
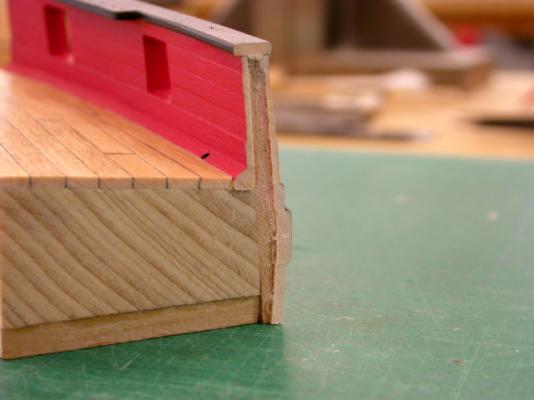
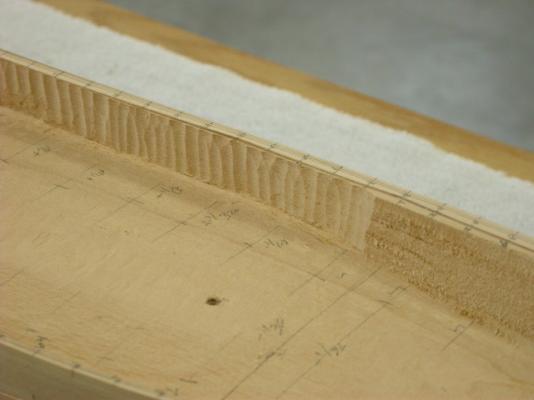
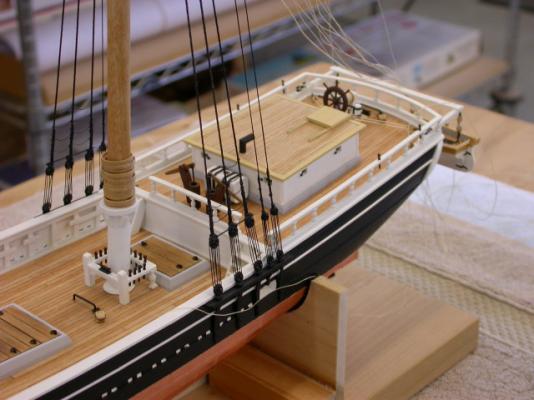
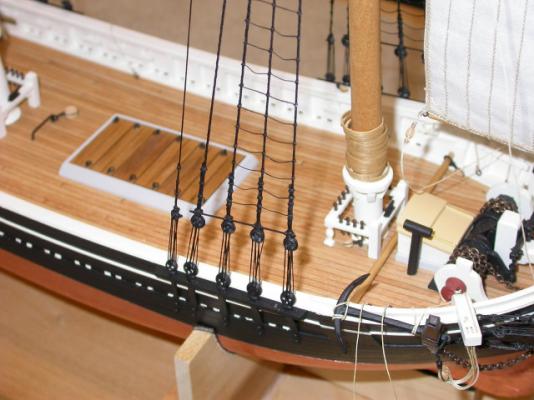
Continuing with the "Fair American" bulwark test piece. Key points include: >>> Chain plates were silver soldered brass wire rings formed around deadeyes >>> Test piece confirms need to add ~3/32" to bulwark height >>> Deck, bulwark, and hull planking widths will be per test piece >>> Deck will be planked 1/16" x 3/16" curved planks with hooked scarfs >>> Paint and color selection confirmed through test piece When starting a new model or applying new modeling techniques, I often use test pieces for evaluation vs the model Pete Jaquith Shipbuilder


-
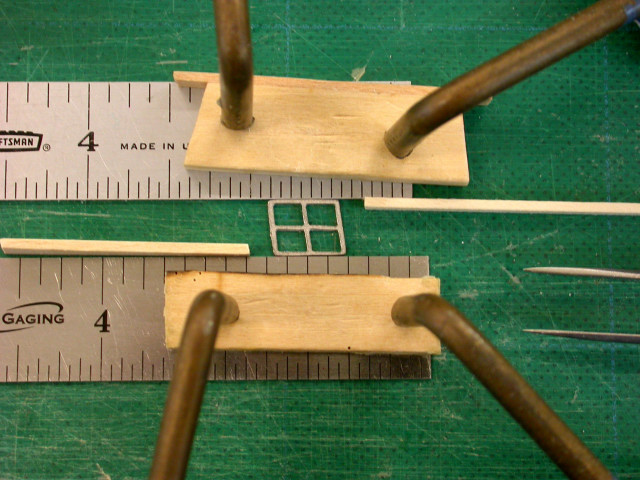
Welcome to the Brig "Fair American" circa 1780 build log, To evaluate construction details, bulwark height, and paint collors I decided to build a test piece of the main deck and bulwark from Station 2 to 4.8 starboard. Key points include: >>> Test piece includes deck, bulwark, and hull planking Station 2 to 4.8 starboard >>> Test piece includes (2) cannons and cannon tackle >>> Deck planking 1/16" x 3/16" (9" planks) with hooked scarfs >>> Deck, bulwark, and hull planking widths representative of period practice >>> Deck scupper 5/64" thin wall brass tubing >>> Paint is Floquil model railroad acrylic colors >>> Bulwark height increased ~3/32" to accomodate cannon assemblies Pete Jaquith Shipbuilder

-
Welcome to the Brig "Fair American" circa 1780 build log, "Fair American" is a fine looking war ship from the American War of Independence. I have long admired her, and fine looks are behind my decision to model her. One note of caution: The plans for Model Shipways kit appear to be various scales (e.g. plans, elevations, sections, and details are +/- from 1:48 scale. I tried to compensate by printing individual plan sheets at different scales, and eventually decided to print each drawing section at the appropriate scale. Even with this approach, I found it necessary to measure each component from adjacent structure. Pete Jaquith Shipbuilder
-
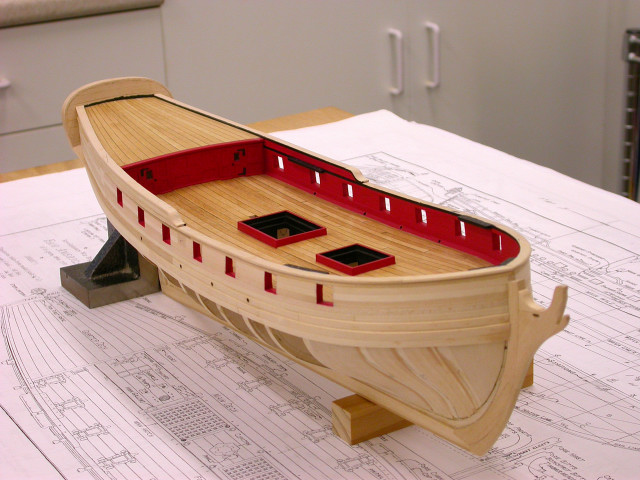
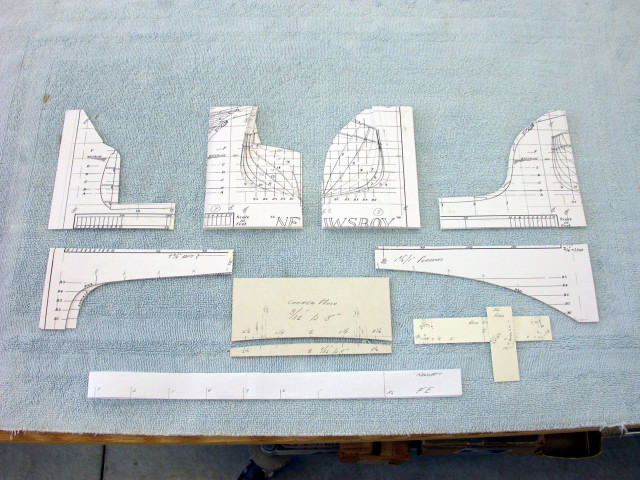
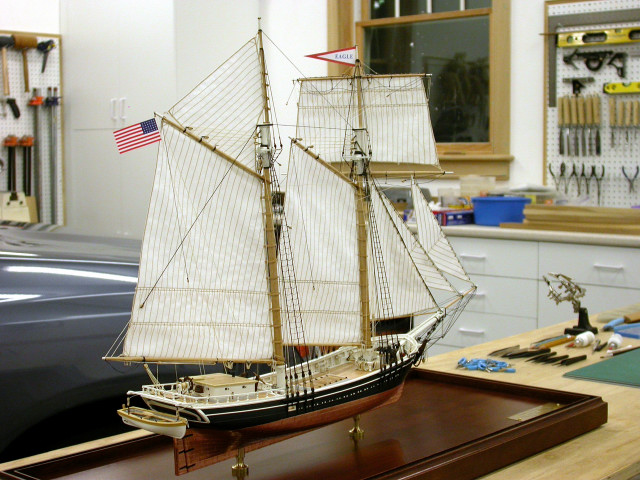
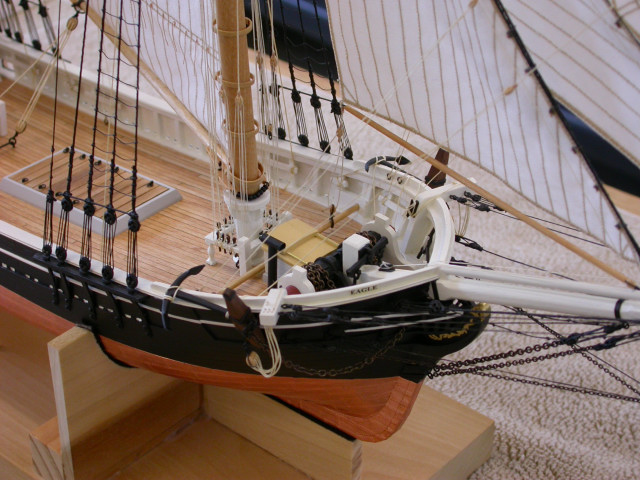
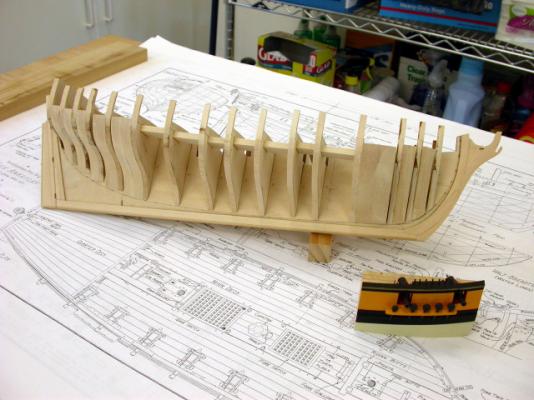
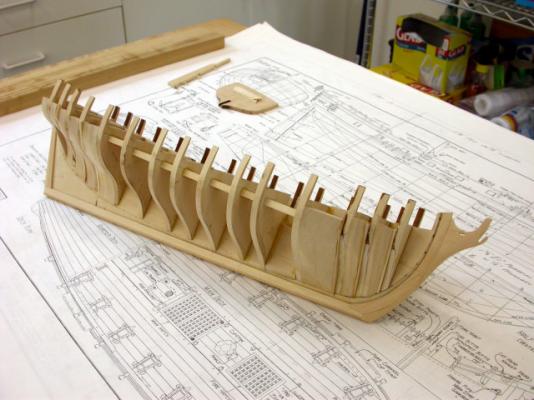
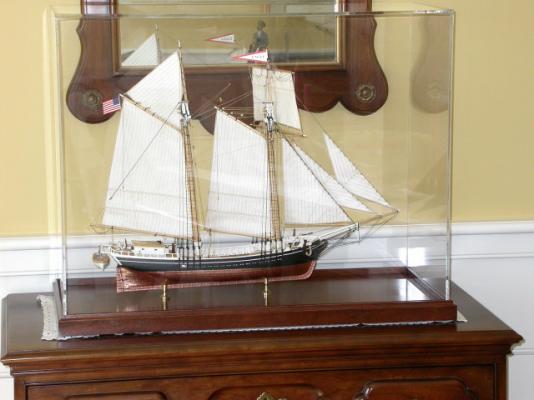
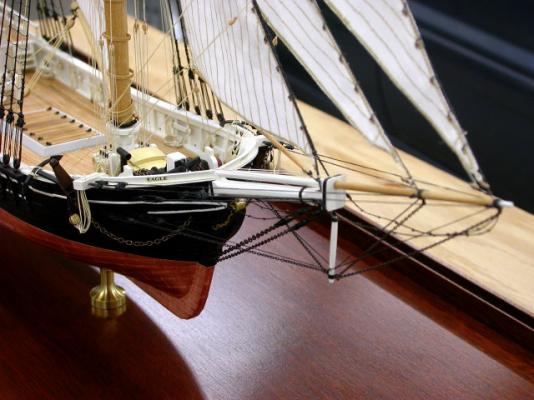
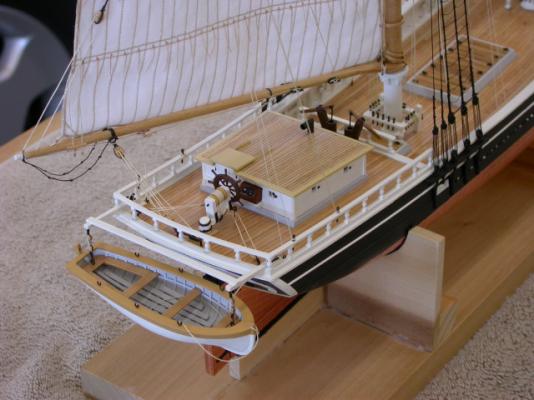
14 Gun Brig “Fair American”, Circa 1780 The 14 Gun Brig Fair American, circa 1780 is based on Model No. 60 of the Henry Huddleston Rodgers ship model collection at the U.S. Naval Academy Museum, Annapolis, Maryland. Due to the number of vessels named Fair American that participated in the American Revolution and the amount of conflicting data pertaining to these names, it has not been possible to identify the specific vessel the model represents. However, the model is representative of many of the small ships used as privateers during the American War of Independence. The brig Fair American had a length of 68’ 0”, beam of 24’ 0”, depth of 8’ 0”, and tonnage of 130 tons. The model is based on the Model Shipways Fair American kit developed by Erik A. Ronnberg, Jr. and updated by Ben Lankford. Additional research was conducted using Steel’s Elements of Mastmaking, Sailmaking, and Rigging (1794) and by examining the original Fair American model at the U.S. Naval Academy. The model is plank on bulkhead construction at 1/4” to the foot scale (1:48) with single planking and scratch built details/fittings. Paint colors are based on examination of the original Model No. 60 and contemporary practice. Planned enhancements to the Model Shipways kit include: (a) main deck planking will incorporate hooked scarphs outboard; ( quarter deck planking will utilize curved/tapered planks; © cannons/carriages will be from Kingshouse Cannons and the Lumberyard; (d) the stern lantern will be from Caldercraft Scale Ship Models; (e) proportional linen rigging line will be from Bluejacket Ship Crafters and Warner Woods West; and, (f) rigging blocks will be from Warner Woods West. In order to more fully evaluate these changes, cannon port clearances, bulwark, and hull straking; a Bulwark and Deck at Side mockup was constructed from frame 2 to frame 4.8 starboard. Pete Jaquith Shipbuilder


-
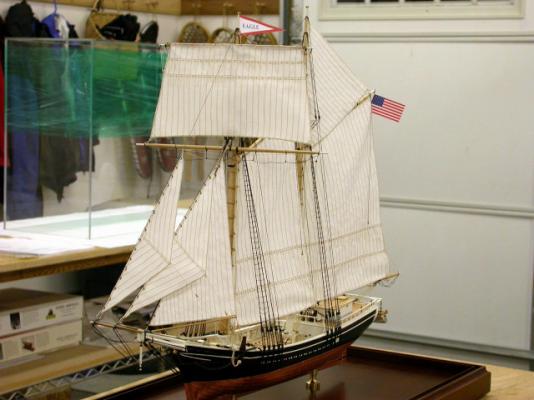
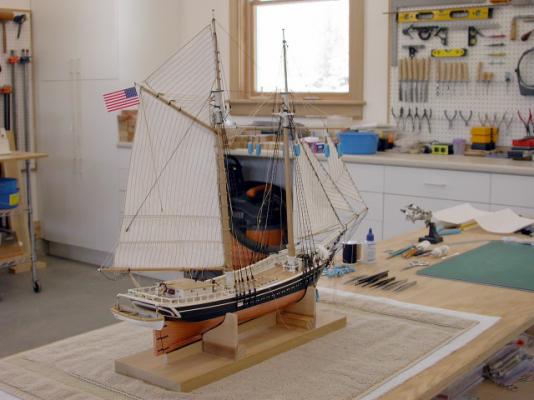
Mischief, I have recently posted build logs for the Topsail Schooner "Eagle" 1847 (scratch builds) and the Brigantine "Newsboy" 1854 (kit builds). Pete Jaquith Shipbuilder
-
Thank you for your interest and complements. I enjoy studying these ships and in particular these examples of merchant sail from the mid 1800's. It is also a joy to reproduce a likeness of these beautiful ships with my own hands. Regards, Pete
-
Ed, Very fine work there. I enjoy tall ships of the mid 1800's and have a special connection with William H. Webb as he founded Webb Institute of Naval Architecture, a unique university where I obtained my degree and entered the shipbuilding industry. Pete Jaquith Shipbuilder
-
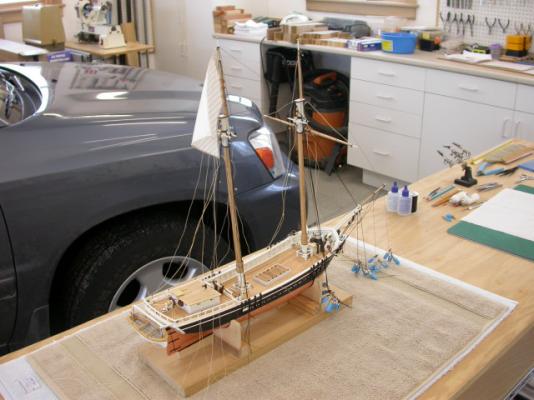
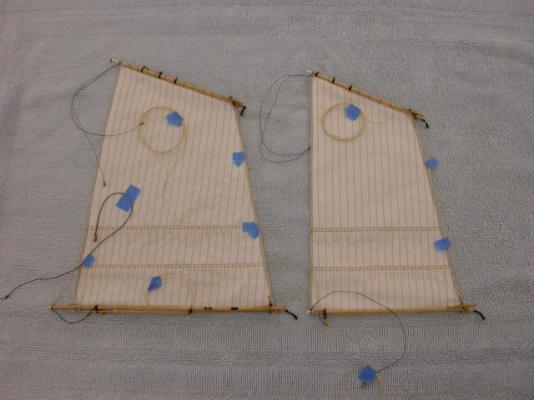
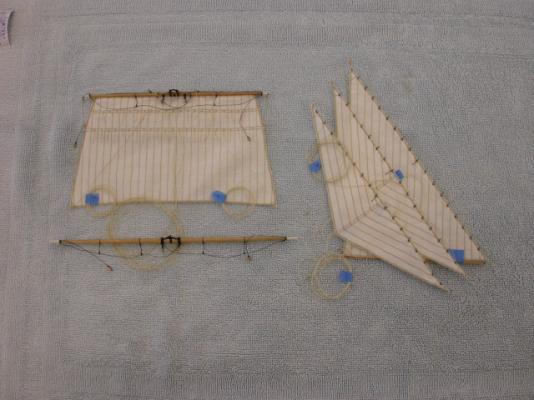
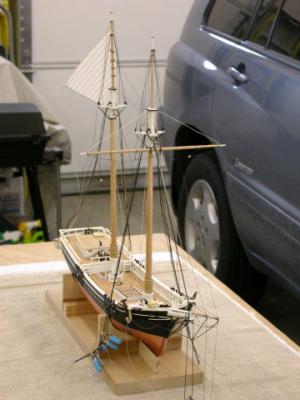
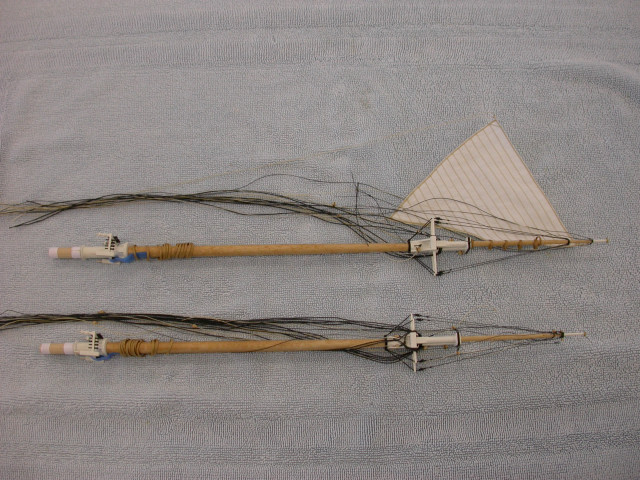
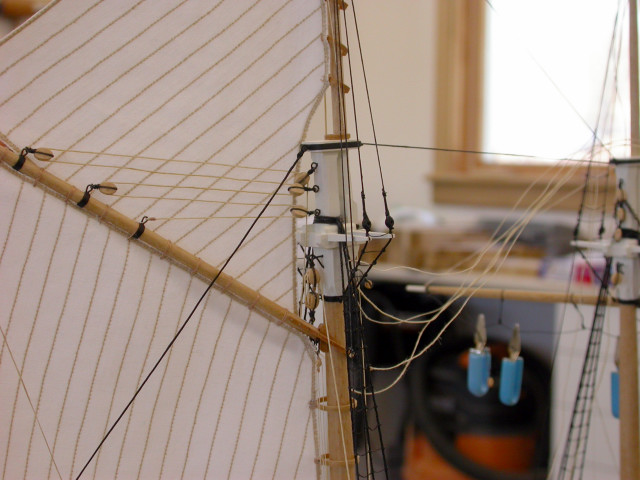
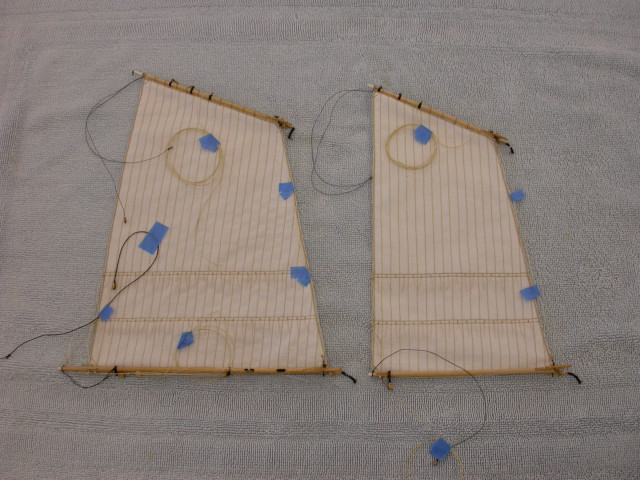
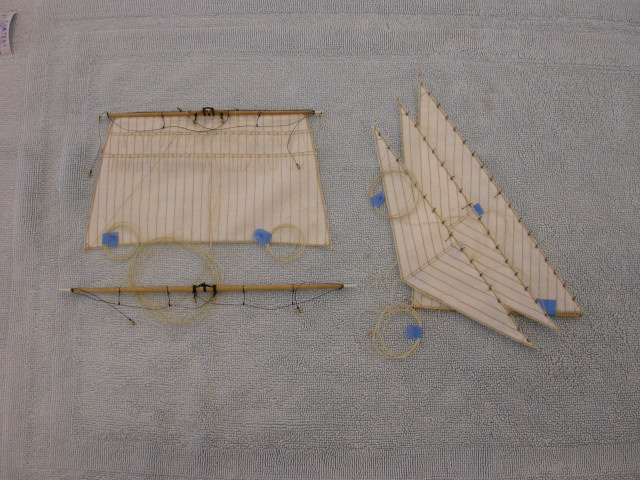
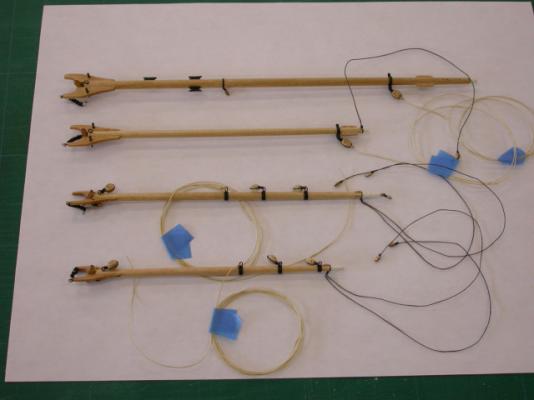
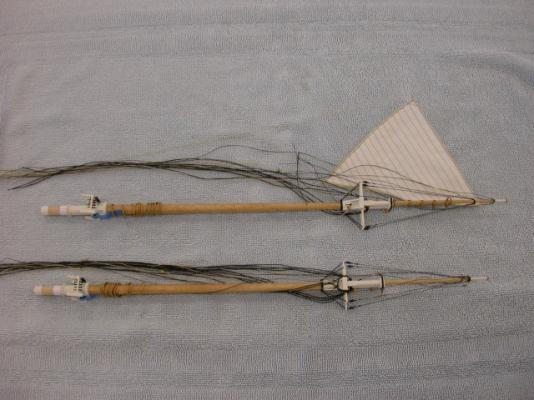
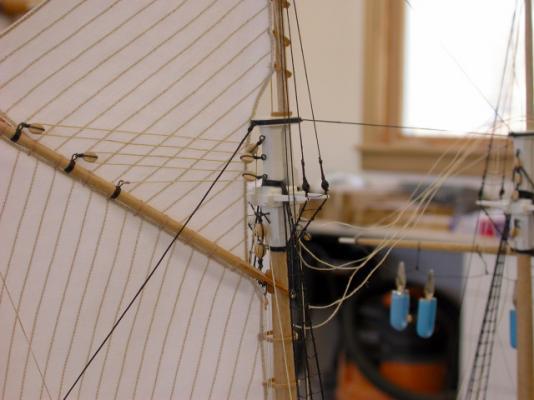
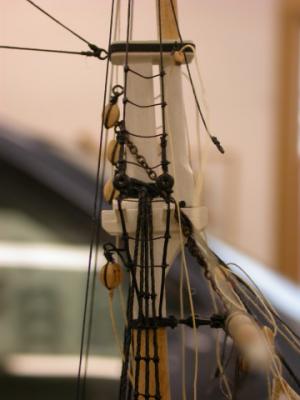
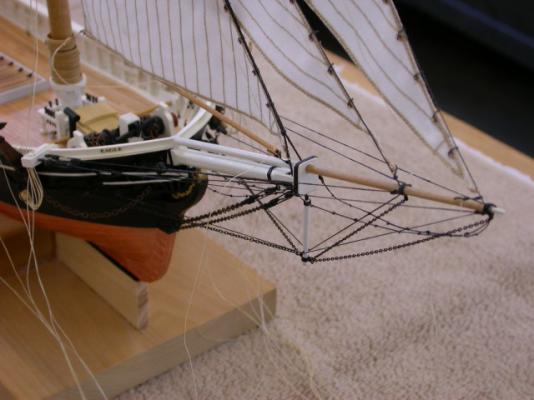
Pre-Rigging the Tall Ship Model By Peter Jaquith Some ship modelers prefer to erect the masts, spars, and rigging in much the same sequence period ships were rigged (e.g. lower masts, lower shrouds, top masts, topmast shrouds, etc.). Other ship modelers pre-rig the masts, spars, and sails with blocks and standing/running rigging components before final installation on the model. The following notes describe the pre-rigging process as applied to the construction of my Topsail Schooner “Eagle” of 1847 build: Rigging Strategy – My rigging strategy for the Topsail Schooner “Eagle” build was to install all possible eyebolts, blocks, standing/running rigging lines and components on the masts, spars, and sails prior to erection onboard the model. Where appropriate, I constructed sail/spar assemblies to further complete rigging work on the bench prior to erection onboard the model. Rigging Planning – Using a markup of the ship’s rigging plans, each rigging component/rigging line was identified and assigned to its installation stage with due consideration given to maintaining flexibility for onboard adjustment. Once the plan review was completed, check lists were prepared by mast, spar, sail, and sail/spar assembly to track these installations. Pre-Rigging the Gaffs & Booms – Boom and gaff pre-rigging included yard bands, eyebolts, parrel assemblies, blocks, and standing/running rigging lines associated with the respective spar. Examples include boom sheet assemblies, boom sheet, boom topping lift, boom footropes, gaff throat and peak halyards, gaff vangs, and gaff topsail eyebolts and blocks. Pre-Rigging the Topsail & Lower Yards – Topsail and lower yard pre-rigging included yard bands, eyebolts, parrel assemblies, blocks, and standing/running rigging lines associated with the respective spar. Examples include yard trusses assembly; parrel assembly; jackstays; footropes; brace pendants; halyards; clewline, reef tackle, sheet, and bunt line blocks. Pre-Rigging the Sails – Sail pre-rigging included running rigging blocks and lines associated with the respective sail. Examples include sail hanks, mast hoops, halyards, downhauls, outhauls, inhauls, tacks, sheets, clewlines, bunt lines, and reef tackle. Pre-Rigging the Masts – Mast pre-rigging included mast/cap bands, futtock shrouds, mast hoops, boom rest assemblies, mast coats, eyebolts, blocks, and the standing/running rigging associated with the respective mast. Examples include lower yard clevis assembly, lower shrouds, futtock shrouds, topmast shrouds, backstays, main and fore stays, throat and peak halyard blocks/runners, boom topping lift, yard lifts, yard brace blocks/runners, halyards, and buntline blocks. Sail & Spar Assemblies – The fore and main sails were assembled with their respective booms/gaffs, the fore topsail was assembled on its topsail yard, and the main gaff topsail was added to the aft mast assembly. These assemblies allowed further completion of the running rigging on the bench top vs. onboard the model. Rigging the Bowsprit & Jibboom – Head rigging (including bobstays, martingale stays, bowsprit guys, jibboom guys, and the bowsprit/jibboom footropes) was installed onboard the model prior to mast installation. Tie in of the fore stay, jib stay, and fore topmast stay will be accomplished after fore mast installation. Mast Erection & Standing Rigging Completion – Following mast erection on the model; the main triatic and topmast stays were tied off to the fore mast and the lower shrouds, backstays, and fore stays were tied off and secured with deadeyes and lanyards. The head sails were fitted to the fore stays prior to their connection to the bowsprit/jibboom. Additionally, ratlines were installed onboard the model. Spar, Sail, & Running Rigging Completion – The remaining sails and sail/spar assemblies were installed onboard the model working from aft forward. All the remaining running rigging associated with the sails and spars were tied off and completed in the same sequence. Flags and rigging coils were added after completion of other rigging tasks. While the pre-rigging strategy described above does require some up front planning; it significantly reduces onboard rigging work resulting in improved access and reduced risk of damage to the model during the rigging process. I find that pre-rigging makes the rigging process far more manageable, although I admit that at one point it seemed as though I would never ever finish all the pre-rigging check list items preceding mast erection. Pete Jaquith Shipbuilder


- 1 reply
-
- 9
-

-
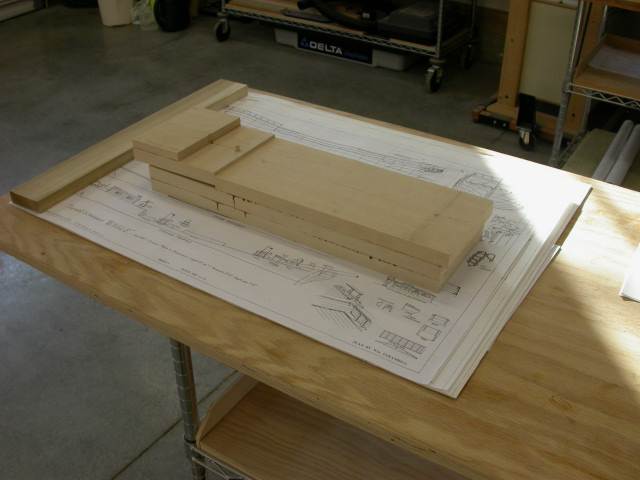
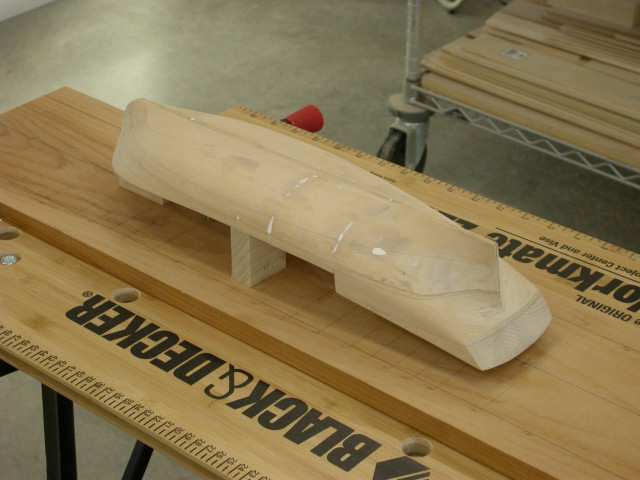
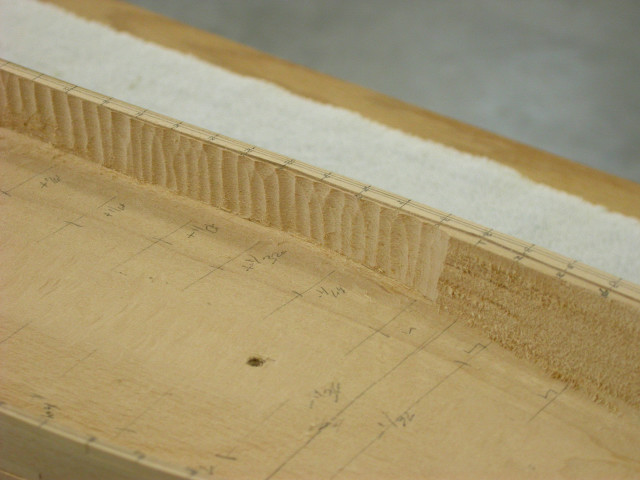
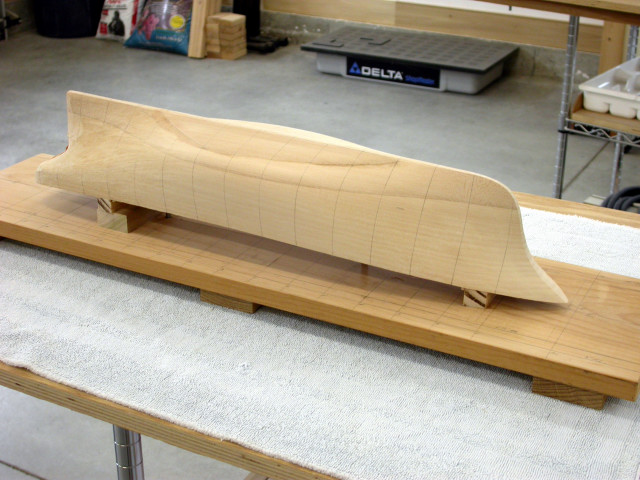
Shaping the Solid Hull By Peter Jaquith Recent internet posts have identified problems/concerns relative to shaping solid hulls. The following notes outline the process and techniques I have used with success to shape both kit and scratch built solid hulls. Note that I prefer to plank over the solid hull and these notes are based on that approach. Rough Carved Kit Hulls: Templates – Prepare station, deck camber, deadrise (if applicable), fore/aft deck endings, fore/aft cap rail endings, and stem & stern frame profile templates. I prepare templates by pasting copies of the hull lines to firm card stock or matt board. Reference Lines – Establish hull & deck reference lines. I recommend transferring the deck lines to the exterior hull and then clamping the hull in the inverted position to layout the centerline, station lines, and deck & bulwark shear lines. Deck Shear & Camber – Shape the deck shear & camber. If the carved bulwarks have been removed, a draw knife is useful here. If the carved bulwarks are retained, than flat chisels and small sanding blocks will work here. Bulwark Shear & Camber – Shape the bulwark (or deck at side) shear & molded breadth. If the bulwarks are retained, use a flat chisel to carve the upper bulwark edge to the shear line. After layout of the bulwark (or deck at side) molded breadth, use a flat chisel to carve the bulwark upper (or deck at side) edge to the molded breadth using a downward sloping cut to allow for tumblehome. Keel, Stem, & Stern Profile – Shape the keel, stem, & stern profile. If material needs to come off the keel line, I recommend a draw knife or block plane. I use a flat chisel, mill file, and round sanding drums to shape the stem & stern profile. Hull Exterior Surface – Shape the hull to the hull lines. I prefer to carve the hull lines with the hull secured in the inverted position on a building/reference board. First I carve the deadrise using a draw knife. I then rough out the stations using a sharp gouge and then fair between stations. For fairing between stations, I use gouges to remove the majority of material followed by a #49 Pattern Making file. The #49 Pattern Making file leaves a good surface on both convex and concave surfaces, and with a minimum of sanding with sanding sticks the surface is ready for planking or copper application. Bulwark Inner Surface – After layout of the bulwark inner surface, I use sharp gouges cutting vertically to remove the majority of the material, followed by a flat chisel and wedge shaped sanding blocks. Option #1, Remove the Carved Bulwarks – Many modelers prefer to remove the carved bulwarks. The bulwarks can then be fitted by recessing a piece of 1/32” ply (I have not tried this method) or by building up the bulwark framing with the timberheads slotted into the hull block. Option #2, Recess Upper Hull – For vessels with copper sheathing, I prefer to recess the solid hull and plank only the bulwarks and upper hull. Scratch Built Solid Hulls: Material – For scratch built solid hulls I prefer to work with basswood or sugar pine. Templates - Prepare station, deck camber, deadrise (if applicable), fore/aft deck endings, fore/aft cap rail endings, and stem & stern frame profile templates (see notes above). Fabricating the Solid Hull – I fabricate the hull laminations using a table saw. I prefer to laminate the hull block while in rectangular form. I glue up the laminations using brown carpenters glue as the glue lines provide useful reference lines. Where appropriate, I laminate the poop deck as a separate assembly. Reference Lines – Establish hull & deck reference lines. With the hull block still in rectangular form, it is easy to accurately layout the centerline, station, deck shear & camber lines. Transom Assembly - Shape the transom assembly. If the hull lines permit, I use a disk sander to shape the transom or counter. Deck Shear & Camber - Shape the deck shear & camber. I use a draw knife to shape the deck shear and camber. If a poop deck is involved, I shape the main deck prior to installing the poop deck assembly. Deck at Side – After layout of the deck at side molded breadth, I use a band saw to rough out the deck at side (leaving adequate material for tumblehome). I then use a flat chisel to carve the deck edge to the molded breadth using a downward sloping cut to allow for tumblehome. Keel, Stem, and Stern Profile – (see notes above). Hull Exterior Surface – Shape the hull to the hull lines (see notes above). Using the above techniques, I have been able to accurately ship model hulls from both rough carved kit hulls and scratch built solid hulls. I should note that the above approach generates a limited amount of sanding dust but a lot of wood chips (most of the material is removed by draw knife, gouges, and chisels). A good shop vacuum is a critical tool here. I have attached pictures of “Newsboy” 1854 (machine carved hull, kit) and “Eagle” 1847 (laminated solid hull, scratch) illustrating the process. Pete Jaquith Shipbuilder


- 2 replies
-
- 10
-
-
Gerald, Very fine work. I enjoy ships of this period and your work does them justice. Keep the pictures coming, as we can all learn from watching your build develop. Pete Jaquith Shipbuilder
-
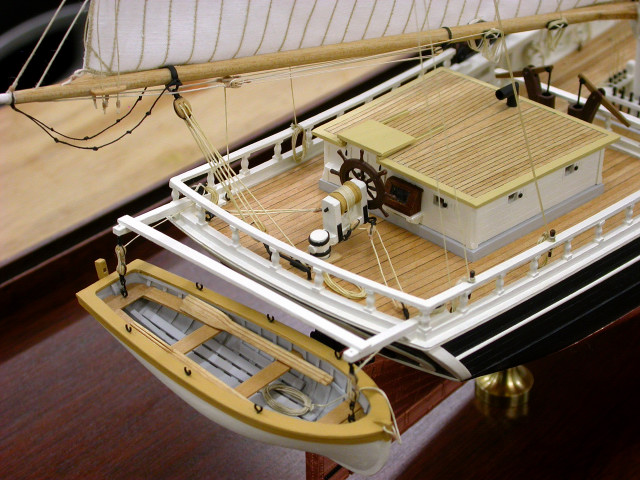
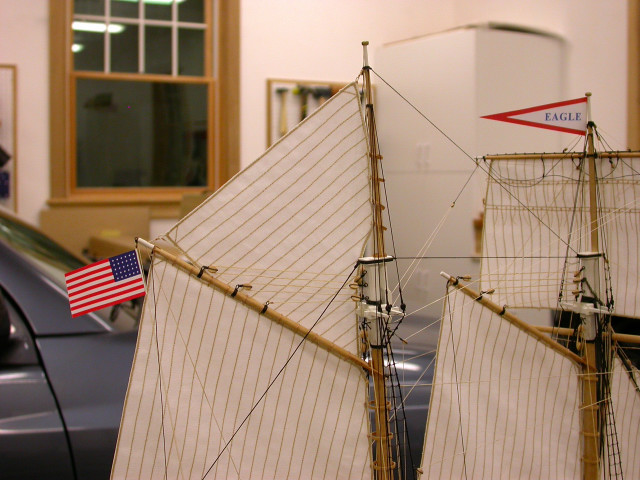
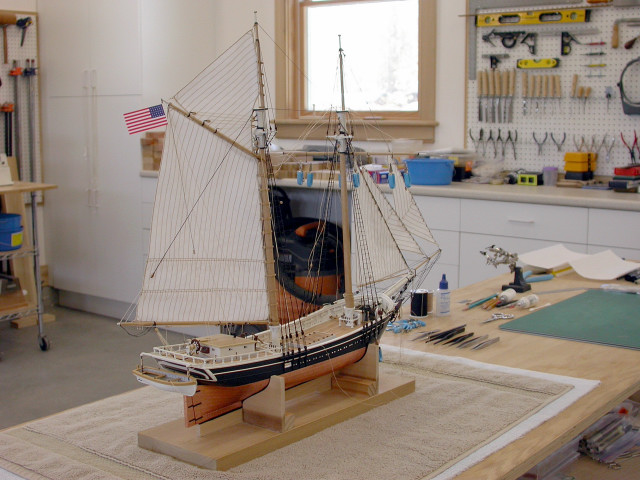
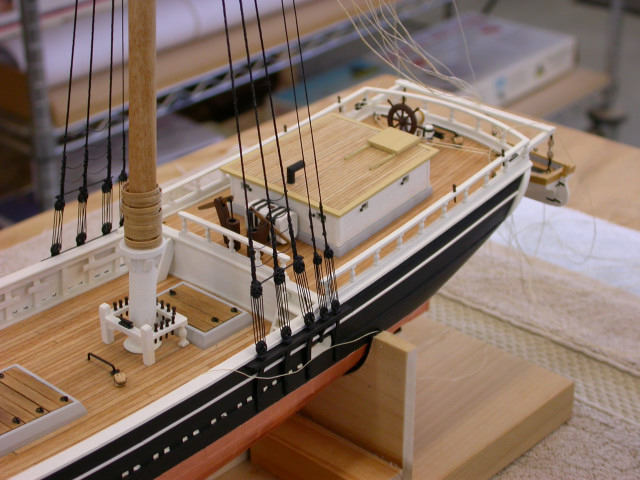
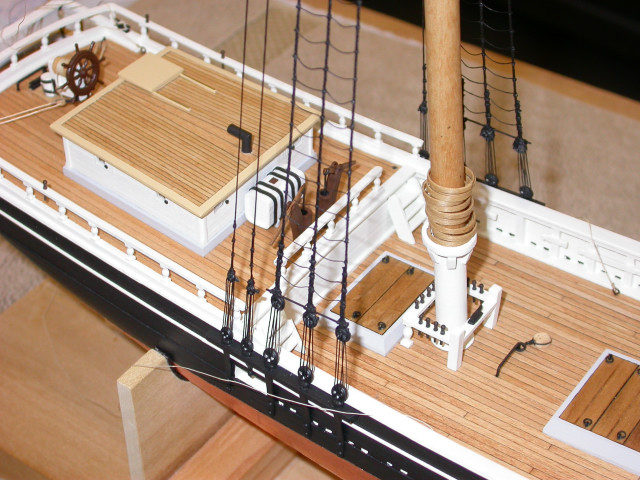
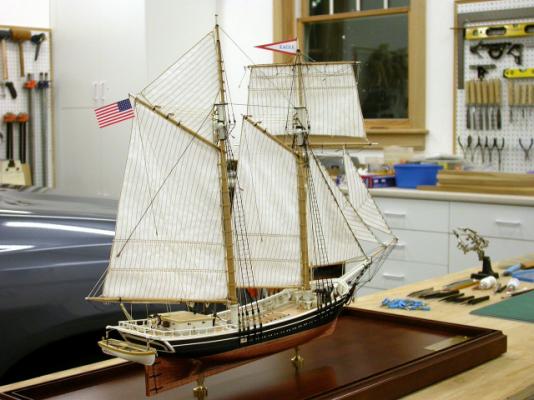
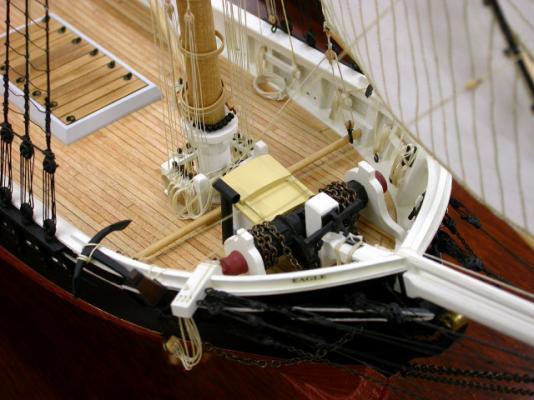
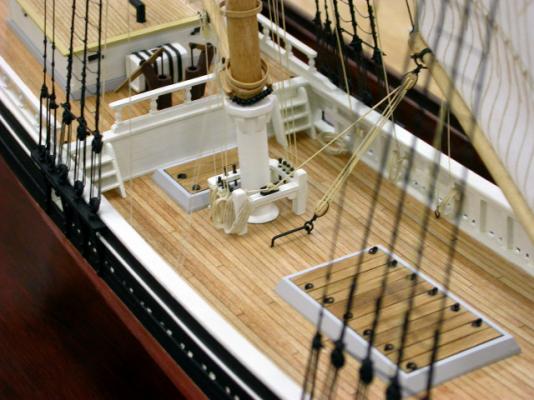
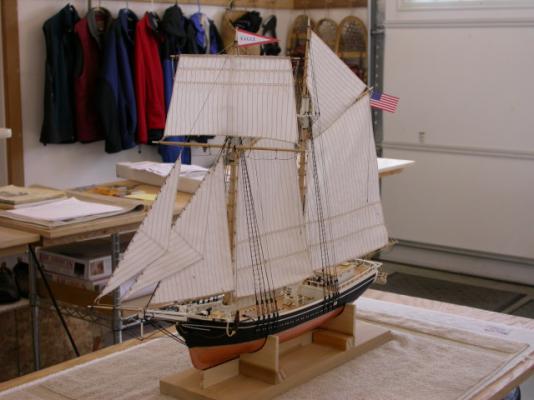
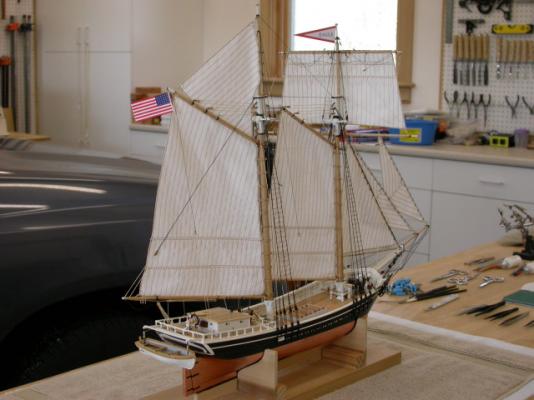
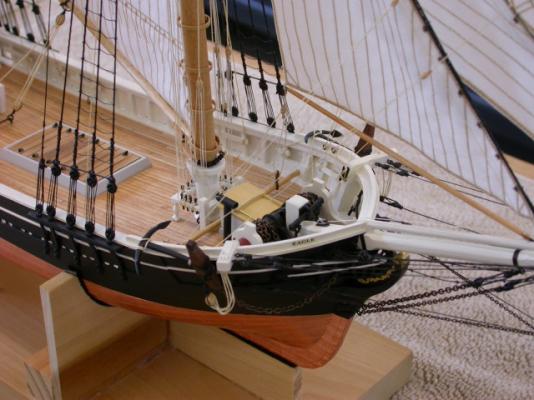
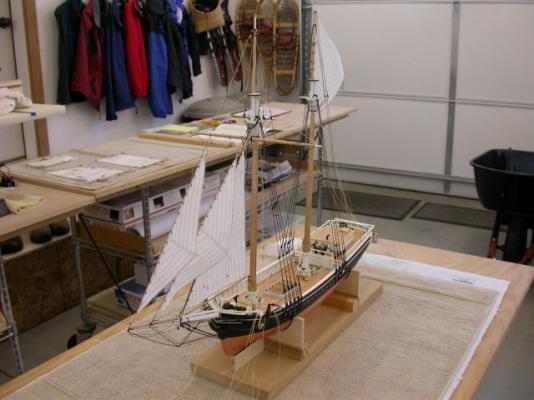
Welcome to the Topsail Schooner "Eagle" 1847 build log, Finishing up the running rigging and final pick up, key points include: >>> Final drops of thinned white glue to secure rigging lines >>> Rigging coils installed >>> Ship's boat secured >>> Final paint touchup >>> Model cased and mounted in brass pedestals The model now rests in the home of a dear friends in the State of Maine. They are Maine natives, which is appropriate for this ship is typical of Maine coastal traders of the mid 1800's. Pete Jaquith Shipbuilder


- 82 replies
-
- 21
-
-

-
Mike, Thank you for your interest. "Eagle" was an interesting and enjoyable build. Regards, Pete
-
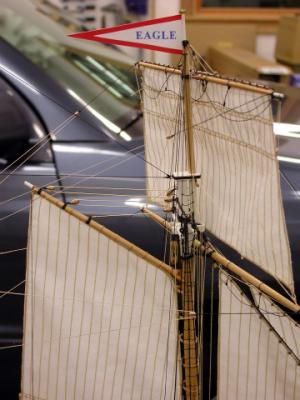
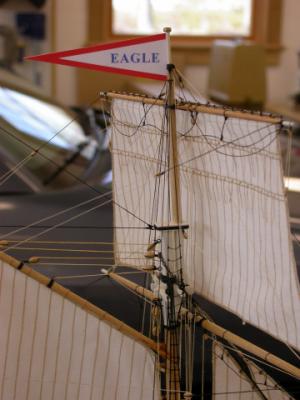
Welcome to the Topsail Schooner "Eagle" 1847 build log, Moving ahead with the spars, sails, and running rigging, key points include: Sail & spar installation sequence: >>> Jibs and fore staysail (with fore stays) >>> Main sail, main gaff topsail, 34 star ensign >>> Fore sail >>> Fore top sail and Eagle pendant Rigging setup: >>> Standing rigging (fore stays, main stays, shrouds, backstays, and ratlines) >>> Jobs and fore staysail >>> Main sail, main gaff topsail, 34 star ensign >>> Fore sail, fore topsail, and Eagle pendent Pete Jaquith Shipbuilder
- 82 replies
-
- 17
-
-
Welcome to the Topsail Schooner "Eagle" 1847 build log, Continuing with the masts and final rigging, key points include: Mast installation: >>> Fife rails were fitted following mast installation >>> LESSONS LEARNED FOR FUTURE BUILDS - INSTALL FWD FIFE RAIL IN TWO PIECES AFTER RIGGING FORE LOWER YARD LIFT AND FORE TOPSAIL SHEET TACKLES Stays, shrouds, backstays, and ratlines: >>> Fore stays, main stays, shrouds, and back stays setup >>> Stays, shrouds, backstays tensioned and head rigging completed >>> Fore & aft ratlines fitted Sails and running rigging: >>> Jibs and forestay sail fitted as the fore stays were set up "Eagle" 1847 is almost complete now; remaing posts will cover fitting the remaining spars, sails, running rigging, and final outfit details. Pete Jaquith Shipbuilder

- 82 replies
-
- 11
-
-
Welcome to the Topsail Schooner "Eagle" 1847 build log, Continuing with final rigging, key points include: Final Setup: >>> Topmasts fitted to main & fore masts >>> Shrouds, topmast shrouds, and stays fitted to mast assemblies >>> Main gaff topsail fitted to the main mast assembly >>> Main and fore sail fitted to gaffs & booms >>> Fore topsail fitted to fore topsail yard >>> Fore staysail fitted to fore staysail boom >>> Fore lower yard fitted to fore mast assembly Setting the Masts: >>> Main and fore mast fitted >>> Shroud and stay setup commenced Pete Jaquith Shipbuilder