


SkerryAmp
-
Posts
809 -
Joined
-
Last visited
Content Type
Profiles
Forums
Gallery
Events
Posts posted by SkerryAmp
-
-
Frank, corny is just fine!! The number of times my lovely wife has looked at me with "that look" followed by "there is something wrong with you" pretty much cinches it that I too am quite corny at times! I feel I am good company.
The Willie is sitting patiently, currently moving forward on the Mayflower but plan to switch back to the willie once I get the decking done on the flower.
-Adam
-
Just double checked the one on my desk and it is wider than tall. so 1H 3W =)
-
Yeah, there is always a little trimming to be done

I will confirm that measurement when I get home. I will also dig up my phantom pics from my old build log and re-post them here (I thought I had done that when the site first came back up but I can't seem to find it - so will chalk it up to really wanting to and thus thinking I did
 )
) -
Ah, another member of the phantom club! Welcome Gulf! I used the phantom as my first build and it was a joy pretty much from beginning to end!!!
That mid-deck step comes in all of the kits just like yours did. You just need to carefully square it off and clean it up some. You will find that a good deal of your beginning time will be on shaping and working the hull. There are many ways you can do that step. Some people had great luck with carving bits. I did mine with the #11 and just sliced vertically then horizontally until I got it squared up rough then sanded it smooth.
To answer your other question: I will double check when I get home but I believe it was 1.5 wide, 3 high.
Good luck and Enjoy it!
-Adam
-
Morning Frank!
Catching up a bit myself; glad to hear your surgery went well and you are back in action! And love the video - I have thought many times about doing it, but I would have to be a bit better at building for it to work; right now anything I did would only be appropriate with the benny hill theme behind it!
You on the other hand; now that is a video i would love to watch!! Especially your weathering!
-Adam
-
Randy, your ship is really coming together nicely . Your modifications are top notch - surely be a sight to see when it is all together and ready to sail.
Nice job!!!

-Adam
-
Nice recovery on the masts and enjoy your black fly feeding expedition!!!
(and +5 points to Mark for making me look up sesquipedalians
 )
)-Adam
-
Those sails look incredible! Very nicely done. Those are what are stressing me about the Willie I have going - I am so NOT a sewing master. I will be lucky if I don't sew my fingers to them!
I may just live vicariously through yours!! =)
-Adam
-
Russ: I am planning to, if I can figure out how to do it successfully. It looks easy enough, but being only my second run at working with wood I am not sure what the gap is between looking easy and reality =)
I started working on the decking last night and will have updates tonight once I get the stain laid down. Of course I have run into another issue which will be coming up. I had decided to work with the alternate woods a little bit into the project. The effects of that decision hit me last night where I have decided to use the boxwood for the second planking, however on the stern I have already laid the basswood.
So now I get to experiment with stain mixing to try to get a stain color that matches the boxwood so it doesn't look horribly out of whack.
sigh.
-Adam
-
Thanks all for the warm welcome backs
Augie: I am really excited about using the alternate wood, although hit my first snag/disappointment which I will explain in a minute.
Sjors: Thank you sir! And I will do my best not to let time pass like that again. I think I have a schedule worked out (fingers crossed) to keep my hobby/obsession going forward as well as keep up with the pesky side projects
Popeye: Trust me, underneath is very hush hush!! But you reminded me, I have to MOW this coming weekend!! ack!

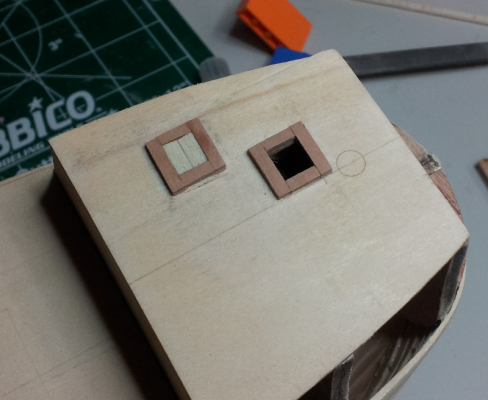
Russ: Thanks! I like the look of the pear so far. I have a pic below of just two of the hatches, i was going to have more but..well... on to that story I guess....
So, I got home last night ready and raging to go to town on the decks. I used pear for the hatch frames and I like the look. Once they are oiled or poly'd they will look really good. Nice color.
But alas, tragedy/disappointment fell.
I was just test fitting some of the holly for the deck planks and something just seemed wrong. They were as thick as the hatch frames. So I said to myself: self? did you use the wrong wood for the frames? Nope, I used the right pieces there. So what is wrong with the holly.
 :o :o Ordered the wrong thickness :o :o
 So, some may be saying - well didn't you check it when you got the wood? Well - sort of. I had ordered it just before the chaos hit and it arrived mid chaos. So I gave it a quick scan over to make sure everything looked in order, and it did. However, I had requested the wrong size for the holly.
So I tried several things last night, I don't own a thickness sander so I tried to improvise. Dremel, disc sander, belt sander all with various rigs and gadgets to try to thin down the holly. Alas, i just do not have the parts necessary to do a good job of it. So after fighting the good fight for a while I decided to just chalk it up to experience and the holly sits patiently awaiting either someplace it can be used OR.... when I get a thickness sander.
Was really looking forward to it, but will have to settle with pear for the frameworks and other doodads and boxwood for the planking.
Anyway, I had planned to have at least some decking done by the experimentation took up most of the night. So all I have today is pic of the two framings on the foredeck. Both are done with pear. They need a bit of clean up still but I like the look of them so far. I did use a piece of holly for the hatch cover on the one. So some holly DID find a home

Once they are oiled or poly'd the color will really pop. I did a test piece with some Tung Oil and it looked really nice.
Until later all - Enjoy!!
-Adam
-
Wow, my apologies for the longer than expected hiatus. Feels like forever since I was at my workbench and longer since I stopped in at MSW - was hoping I didn't loose my spot in the club for abandoning ship!!
It is amazing what can happen in such a short amount of time, 1 remodel turned into 2. a week of the flu, a week in Virginia, and then the Admiral couldn't help notice the nice weather and the lack of attention to the gardens..... whew!
But I finally managed to struggle out of the chaos and back to the bench and back onto MSW!! =)
I have been spending time on the Mayflower, unfortunately because it was very spotty - a board here, board there, I didn't take pictures along the way. So i don't have any grand updates for my return post.
But I do have an update!
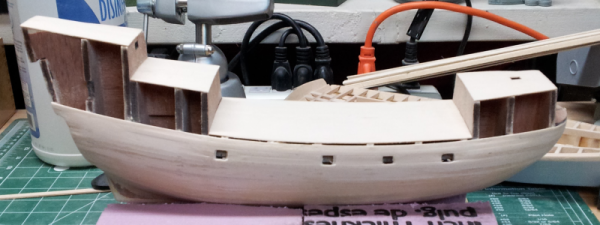
I have managed to get the first planking done on the hull. You may notice what would appear to be an exorbitant amount of filler. This would be due to the exorbitant amount of errors, mistakes, damn-its and sighs that went into that hull. I think it came out okay for a first time at planking a hull like this, but boy oh boy was it not a cakewalk. Plenty of errors - however that just meant plenty of lessons learned for the next one. Hopefully.
I still have a few spots that need attention as well as some sanding to do on the gun ports to clean them up, but most likely will move onto the decking next just to move things along a little bit. I will also try to get a better pic later, this one didn't come out as well as I thought it would, but wanted to get back in the saddle so here it is for now =)
I had been reading several logs where aftermarket wood was used (holly, box etc) and got the urge to try it out for myself and see what it was all about. So I did pick up some holly for the deck, some box for the second planking and some pear for the structures.
This should be interesting
Will lay some decking tonight and update accordingly.
Thanks all!!
Until next time - enjoy!!!
-Adam
- trippwj, Adrieke and DCIronfist
-
 3
3
-
-
I know I am late coming back to the party, but just have to say...
Popeye!! Those sails look awesome!!!!
She looks really nice all dressed up and ready to go!!
=)
-Adam
-
Well colour me impressed (how's that, did I do good?)
The pegasus is terrific!!! Spent a good portion of the last hour catching up on the threads and really liking the looks of things. You guys and some of these magnificent boats are awesome to follow!!!!
Sorry about the break though =( Am sure you will overcome and adapt!! (well, you did.. toothpick.. nice!!)
-Adam
-
Still loving the ship build Augie. Now that I am finally caught up (Important thing I learned being pulled away by life for the past 2 months... at least TRY to keep up with MSW.... 400+ updates, and a third of them HERE
). The main problem I have with popping by your Syren is that it is the reason it is on my list of ships to do! (Not sure where I will put it though).(I think we need a spin off...or maybe even a sitcom series - Groundhogs and Lumberjacks!! - you guys are cracking me up)
Loving it!! Can't wait for more!
-
Hey there Wayen, boy did I have a lot to catch up on!!
Just got done catching up on your log and very nicely moving along! The heads look great (they are so tiny!!)
-
 Loving the Build Sarah! Between you and Wayne mine may come off the shelf earlier than expected due to wanting to join the party!!
-Adam
-
Very nice Wayne!!! Have really enjoyed watching you and Sarah go at this vessel. Mine is still on the shelf waiting it's turn at the table. Love the pic of the 3 builds!! I have 2 at the moment, not sure if I could go at 3 or not (tempting for sure) pretty sure the Admiral would have a field day with me if I did =)
-Adam
-
So very cool looking Augie. My favorite part of these ships are the rigging, such artisticness in them when they are done; and yours is really fantastic to look at!!!
-
YAY! Another Phantom - I loved building mine and credit it (and blame it) for my new addiction!!! Awesome start, so nice and clean - and that rudder looks fantastic. (mine looked like a paddle with a nub
)Can't wait to see more!!
-Adam
-
Alrighty PopEye - Where DO You come up with these things, It has become a little game of mine, what will he do next; and wham! A cooler and prep table?!?!?! Well done Popeye, Well done.
And the weathering. Nice job! Weather always used to scare me when I was into the plastic armor stuff and took me a good while to really get comfortable doing it, you did quite well - looks nice and dirty
-Adam
-
Augie - wow, miss a few days and holy posting explosion batman - all caught up now. The standing rigging - SUPERB.... now, if you could just undo it and take us through each knot one by one; with photographs of course - so when I fall to temptation and get this kit I will have a leg up
Too much? okay =(Seriously though Augie - that is one incredible looking vessel!
-Adam
-
Richard, love what you are doing with this. I opted away from detailing the inside due to where it will be housed when done; but am really impressed with the work you put into it!! Can't wait to see it lit!!
Very nice, very nice indeed!!
-Adam
-


Mayflower by SkerryAmp - Model Shipways - 5/32" = 1'
in - Kit build logs for subjects built from 1501 - 1750
Posted
Wayny - ambitious is probobly the word for it, this being my second build I am not sure exactly what I am getting myself into but am looking forward to the ride!!
Popeye - Agree!! just hoping how I do it falls into the quite nice category once I figure that out that is.
-Adam