


SkerryAmp
-
Posts
809 -
Joined
-
Last visited
Content Type
Profiles
Forums
Gallery
Events
Posts posted by SkerryAmp
-
-
And here we wrap up the trifecta of ship builds for the night. Each of my three builds getting some attention!!
(This new scheduling experiment is working like a charm)
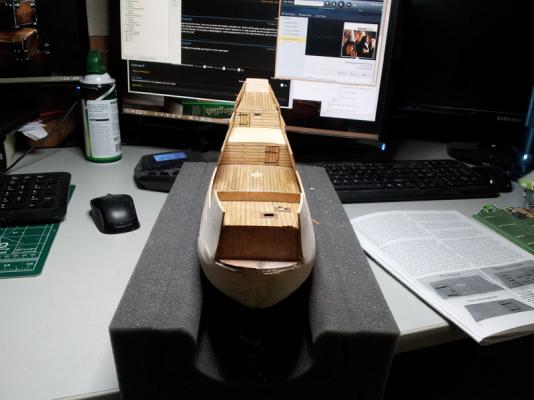
Tonight we just finished up the Stern and bow. Everything went according to plan except for the windows on the stern. I am not sure if it was the humidity or what but the tape kept losing it's "stick" and was just not cooperating. I started running out, I started panicking and then thought - let's try it. I copied the tape pattern from the instruction book, cut out the window "glass" from the acetate and mounted the copy to the glass and trimmed to shape.
You know what - I personally do not think it came out that bad at all. (I could be wrong, and please let me know if I was just soothing myself from frustration) but, I was very worried it would look aweful, but I think it came out okay.
So, the stern is all done up, windows, trim and knees and all planking. All that is left there is to let it all dry so I can do the nails and then the final conditioner and stain.
The bow is a little more behind but not much. All the planking is in and the filler in place. All that is left there is sanding the bow, adding nails and door decorations and then final stain. It is funny, just like the other door on the main deck bulkhead, the doors on this one look off. I am more convinced than ever it is something to do with the camera, lighting and lines of the ship. In person everything is nice and square. Driving me nuts though!

Getting there, inch by inch, step by step, but getting there!!


More to come! Got a groove thing going on =)
ENJOY!!!
-Adam
-
So, in keeping with the spirit of moving things along; my wife and I have actually worked out some schedule issues at night so we both get to spend more time with our hobbies

So far it is working out well and I am able to keep the builds moving along!!
The latest installment for the Willie is a minor one, but actually adds to the look and makes it start to look more like a boat with each addition.
All I did for this one was add the wales and cutwater. Both very straightforward and went according to the plans. Although I am doubting the need to cut the cutwater in three sections as the plans shows rather than just one, since it will be painted. But, I did so. /shrug
Thank you all for stopping in, more to come - oh yes, more to come!!!


Until next time!
ENJOY
-Adam
-
Thank you all, thank you!
@ Richard: Thank you Richard - far cry from the work you are putting but I am doing my best to make at least good showing!! =)
@ John: Welcome! And thanks for joining the adventure =)
@Popeye: Hmm, wonder what it would take to push you over the edge
(KIDDING, kidding - need you in one piece!!)@Rich: Welcome to the WIllie Bennett Club!!
@Time and ZyXuz: Thank you for stopping in, and thank you for the compliments - much appreciated!!
-Adam
-
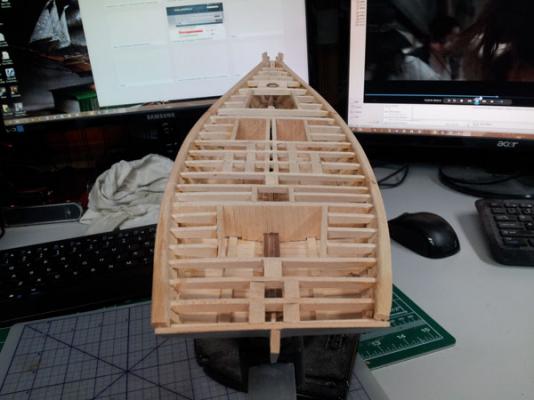
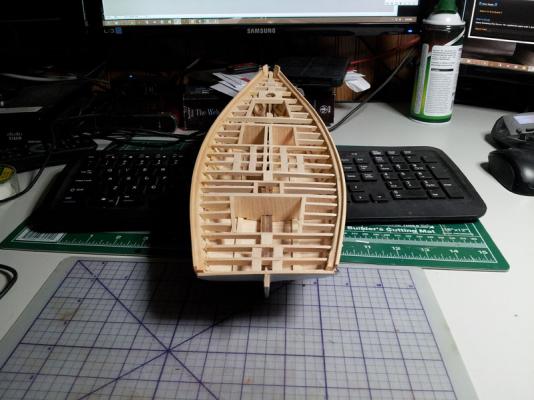
So, not a huge bit of progress on this one. Am taking different approaches with it and experimenting with things. Reading more on the site with regards to planking etc etc. Also taking into consideration the advice of you guys here.
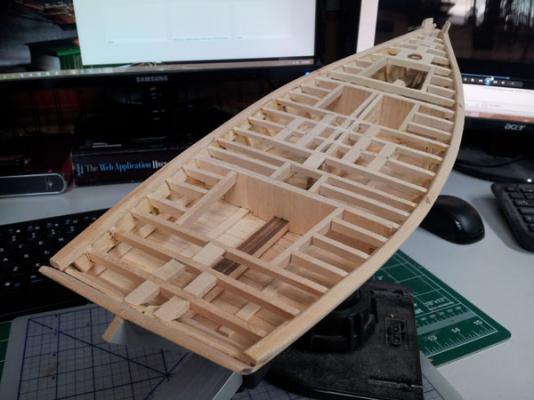
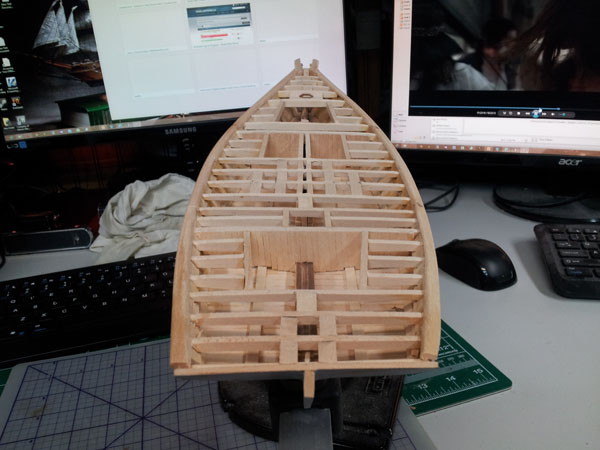
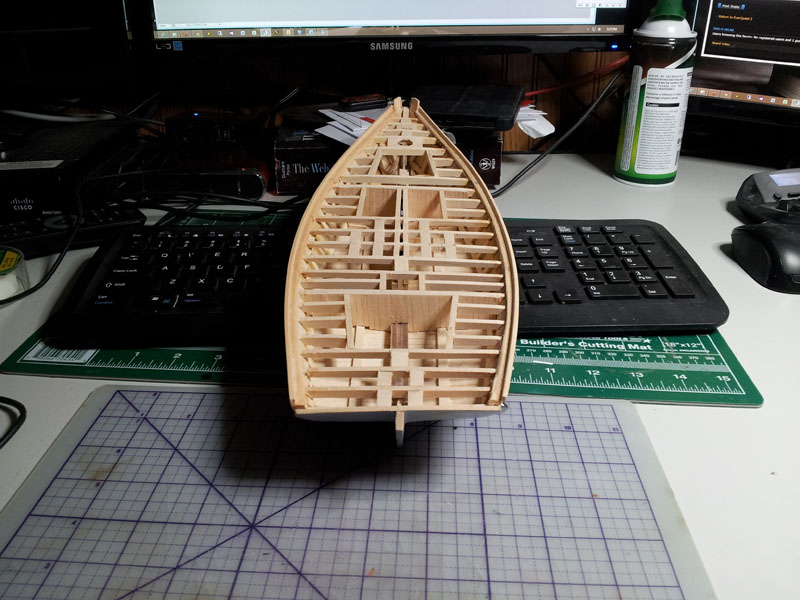
The filler blocks! YES, yes indeed. In fact, I did some filler blocks at stem and stern, not enough, stripped off the planks that went south and added more filler blocks . I think I have good fillers in there now. I am trying not only applying the blocks but also filling in around the block to give as much of a solid slope as I can.
We shall see how that turns out.
Here are the blocks as they stand now, still need to sand out the filler, but they are on their way!
Thank you VERY much for the advice, and thanks all for stopping by!!


As always! ENJOY!!
-Adam
-
Ohhh, sorry - yes the dummy strip sets back right down the middle against the back. It won't be seen at all just provides a back drop of solid black so if you model it with the ports open and the light catchs just right you won't see structural stuff inside. So the fitting isn't super important.
-Adam
-
Bowsprit looks fantastic Popeye!
(And thanks for reminding me, I have to run next door and get some more superglue myself before heading home tonight!)
-Adam
-
-
-
a banner across an overpass would suffice.............."welcome to the land of Ice and Snow" kind of a 'Zep' theme, don'tcha know

heheh, now you are thinking!! Heck I see banners up on the overpasses all the time; wonder if I could get away with it....hmmmmmm....
-Adam
-
@ Augie: Next set of pics coming soon, worked on the Transom tonight and got that all squared away will be finishing up the bow and then get some pics up just before i try the (shudder) final planking!!
@Wayne: Thank you sir - and you have a SAFE drive back up this way. Maybe I will find a spot along 95 with a big ole sign =) (Course, not knowing exactly what time you were going by could make that a challenge)
-Adam
-
HI there Rick!!
The should be notches along where the gun ports would be which the strips will set into a bit. They stick out a smidgen but they run along the bulkheads in those little groves. Then of course you have to frame the vertical struts and should be good to go!
You are a crew member on the MFII. How cool is that. My wife and I wanted to come down there this year, we wanted to make a stop at Connie and the MF but we had heard that the MF was getting restored. Definitely want to get down there at some point this year!!
-Adam
-
Fishing eh... hmm, not sure where you are but if you are fresh water; I could use a couple of rainbow's for a cookout coming up. If Saltwater - some Stripers or maybe a nice Cod will suffice. I will be eagerly awaiting delivery. Oh, and you are free to stay and have some btw, is the least I could do

-Adam
-
Jack, that is outstanding work! Beautiful colors and you can tell you spent some time on that and it was well worth the results!
-Adam
-
Bob, that is absolutly fantastic!!
And from scratch!! (You guys are killing me with the talent around here - of course, inspring to a newb like myself as well!)
Lovin it!
-Adam
-
Hey there stranger, good to see you back in action!!
Looking forward to the updates!!
-Adam
-
Wow! Sails look fantastic.
One of the two things I am very intimidated by at the moment, the sails and the metal work. You did great on both!! Kudos sir, kudos!!
-Adam
-
Planking looks really really good Popeye!! I have yet grasped the whole idea of planking and much of mine is faked with plenty of putty and sandpaper!! Yours however, very very nice!!
-Adam
-
Really good start Rich, so much depends on those hull frames being square and solid; and yours appear to be really well done..
Welcome to the Willie Bennett Club!!
-Adam
-
Hi Guys, thanks for the pop in!
Sjors: Thank you sir! I do have a bit of clean up at the bow, once the sides went on there is a bump that is very noticeable - and am very much hoping the second planking lays well - the hull feels smooth even though the lighting makes it look otherwise in places; playing tricks on my eyes I hope.
Mark: Very true, very true - live and learn! Heck - if I learn how to cover mistakes well that is a part of the battle I guess!
Popeye: Hadn't though of molding... hmmmmm, now ya gave me something to think about. Love your half moon by the way!!
More in progress. Last night finished the deck work up to where it needs to be and attached the stem, keel and stern. Tonight will be working on on the backside of the stern and hopefully have something to show for it soon!
-Adam
-
Thanks all for stopping in and for the good words; they are appreciated.
Slowly but surely the Willie takes shape.
Augie: The keyboard was the product of necessity since the Blue Shadow is in the panavise and, well . . . something else is in the keel clamp (but I figured 3 build logs is enough to keep up with at the moment) and the Mayflower is in the foam cradle. I am out of things to hold my ships!!
Popeye: Thanks!! The deck framing was a lot of fun on this one, very different from anything I had done plastic, wood or otherwise. A visible ship would be very cool; this one actually has plenty of things to do on the inside - I am just not quite yet up to the task on it. A couple of the other willie builds are doing it though. I will get there - heck, look who i am talking to - YOU should do one!

Bob:
 Thanks for stopping in, the more the merrier!!
Gerty: YAY! There's Gerty! using yours as some inspiration my friend!!
-Adam
- popeye the sailor and augie
-
 2
2
-
-
Wow Pop, sorry to hear about all the bad luck - sounds like Murphy has set up camp on your shoulder - you should maybe charge him rent or something!!
Can't go on forever though.. right? maybe?
=)
-Adam
-
Thanks for the good words!!
My apologies for the long delays between updates - I really have to find a way to get organized and budget out time for this that the other and building!! It is driving me NUTS!!!! =)
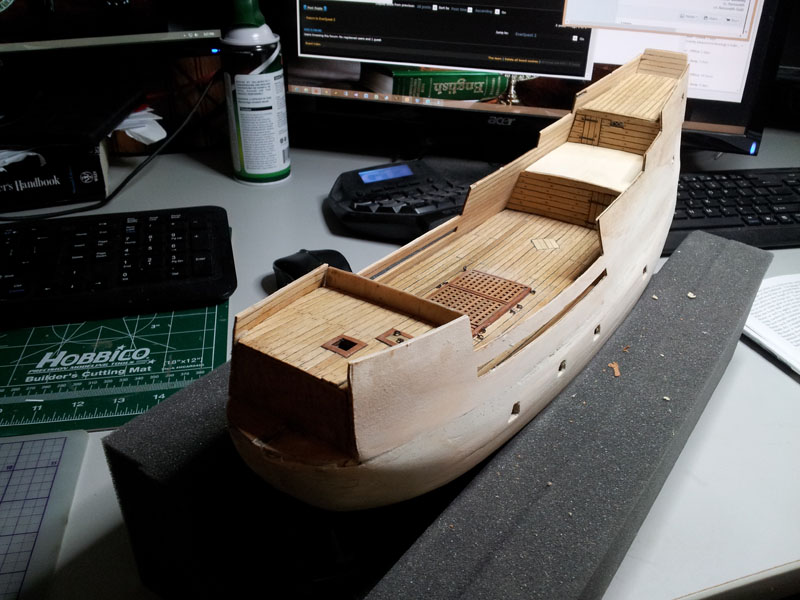
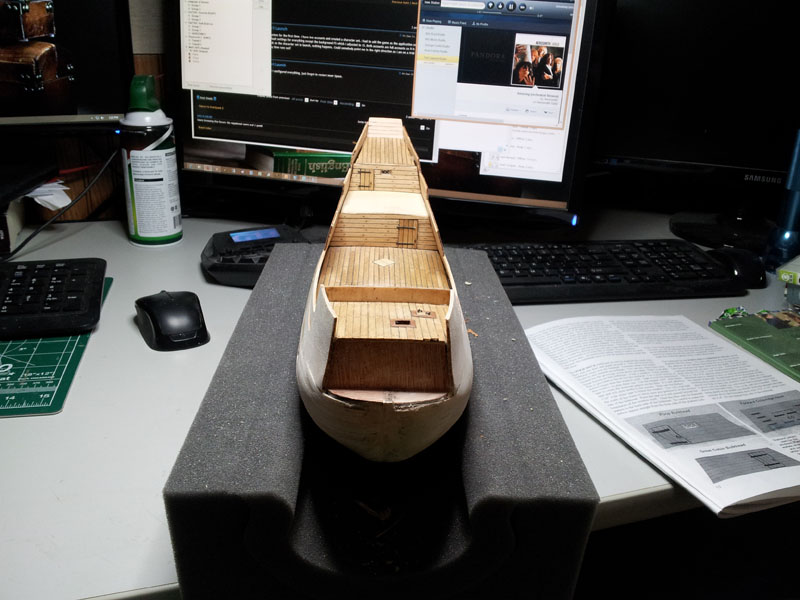
But, with that. set to work on the Mayflower a bit more, sort of got caught up in it and didn't get good pics along the way =( however..
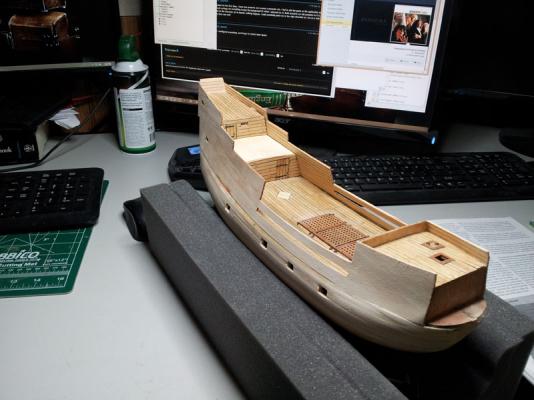
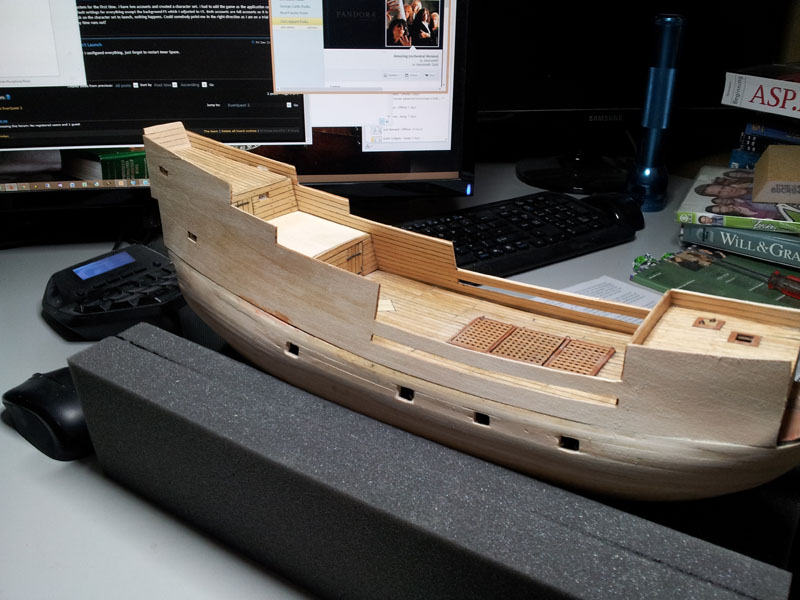
Next up was the sides, grabbed the laser cut forms and went to planking the insides using the bass strips so I can sand and stain them to match the rest of the interior. The windows were done using the trim tape supplied with the kit and THANKS to chucks template for the cross pattern!
Once those were done just mounted them onto the ship! They went on pretty well I think, although now that it is all together I can see a few flaws in the hull that need tending too before I do the final planking. There is also a gap along the edge of the poop deck, I think once the beams are in and with some judicious use of barrels, netting and ropes I should be able to decorate it to hide them well. Can't wait for the day that I don't have to hide the mistakes but rather don't make them in the first place!!!
Well, to the PICS!!

Thanks again for stopping by!
Until later! ENJOY!
-Adam
-
Hidey Ho Good Neighbors!
Hard to find time lately to even post let alone build - but doing my best!!
Did a couple quick additions to the willie to keep it moving forward - nothing grand unfortunately compared to the others around here but getting there!!
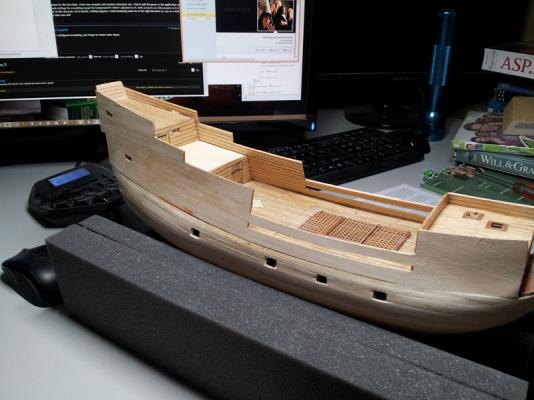
First, went ahead and added the plankshears, trimmed them up and sanded to shape as per the plans / instruction book.
Then to wrap up that part mounted the log rails and sanded them out.
That is set aside to dry and am starting to get the other hull pieces ready to go so I can give it a final fill, sand, prime and paint and then ON TO THE DECKING!! (kind of excited about that part )
As always, thanks for peeking and Enjoy!!
(And yes, flemish coils would look snazzy!!!!
)-Adam


Mayflower by SkerryAmp - Model Shipways - 5/32" = 1'
in - Kit build logs for subjects built from 1501 - 1750
Posted · Edited by SkerryAmp
Thak you gentlemen for popping in and the good words, greatly appreciated!!
Popeye, Below are some close up pictures - mind you I am way out of my comfort zone with close ups (I still havn't figured out how you guys get such awesome close up clean work, mine is all arms length work so far) but figured what the heck.
So pardon the quality of the close up (am a bit embarassed by it to be honest)
I can see on the close up where I actually need to do a weeeee bit of touch up on the white caulking frame on the inside of the center window so that was good I guess
A blown up view of the back (still doesn't look bad)
Close up of the windows (OMG at this close up what the heck!!! How you guys do such awesome close up work is escaping me to no end)
-Adam