


SkerryAmp
-
Posts
809 -
Joined
-
Last visited
Content Type
Profiles
Forums
Gallery
Events
Posts posted by SkerryAmp
-
-
It all depends on what it is you are after as far as the final product.
Ultimately you are the one who has to look at it all day so do it as you like and as you see fit

-Adam
-
Okay, so ran into one of the parts of the hobby I DON'T care for: the redo!!
Of course this was because of me and my lack of paying attention.
Had half the main deck planked and realized my "pattern" was horrid!!! So, have to rip up all those little pesky deck planks, clean up the deck and re-drop them with more care paid to the pattern.
But, is worth it - I guess

-Adam
-
Just when I get to the point where I think I'm doing pretty well....I come to your log and realize just how far I still have to go! As always...beautiful workmanship!
Don't sell yourself short, that is exactly what I am thinking looking at your Mayflower then looking at my own!!

Danny, love following along with this. I remember doing plastic models and watching the pro's work cars, armor and air to this kind of level. Now am finding you doing the same with ships! Amazing and as I am sure I have said, inspiring. Thanks!!!
-Adam
-
-
There definately is something calming about working with wood (most of the time that is).
Enjoy the day off Sjors - of course with a day off I would imagine there should be a fair amount of new pictures.. hmmm.. huh huh hmmm?
-Adam
-
Excellent Robbyn, this one keeps popping up on my "that's cool" radar so will be fun to follow along with your build!!
I will grab a seat a few rows back from Augie,Anja and Sjors. Not because I don't want front row, but from back here I can throw JuJu-Be's (the black ones) at them during down time

Good Luck (not that you need it I have seen your other work) and Enjoy!!
-Adam
-
Compromises? You call those compromises? egads man....
Augie my friend, all I see is outstanding work and inspiration for noobies like myself. I aspire to have "compromises" like you have
-Adam
- Salty Sea Dog and Shazmira
-
 2
2
-
Really sharp paint job, and with a brush
 !! Very impressed !!
Looks really good, will be referencing quite a bit when I get back to working on mine shortly.
-Adam
-
My wife actually picked up this kit for me last year, she thinks this ship building thing is cool and wanted to support it.
It is indeed a fictitious ship but I will be building it into a fictitious brigantine named after my wife (heck, she got it - I will christin it after her
).I have 2 ships going at the moment, but she has been asking when I plan to get to that one so I may just start up a third and get hers done. I will do a build log of it as I go.
-Adam
-
Love the plans for the bounty!! They look great!
I have my eye on a wall piece that is at our local consignment store. A decorative piece of the Ranger with some sample rigging knots and other seafairing related knick knacks. I may have to grab it, been resisting it.
How are you likeing POF??
-Adam
-
Wayne, I completely understand and share the irrational fear of planking. I have tried to solve it by just diving in on the Mayflower and trying to knock it out.
Nope - still have it!!!
Maybe we should start a planking therapy group!
-Adam
- trippwj and mattsayers148
-
2
-
Well, Sjors, the ship looks fantastic.
-Adam
-
The half moon looks great!!!
And an upcoming scratch build!! Egads - just the thought of scratchbuilding a boat gives me shivers; kudos to you for dabbling in the darkside!!
-Adam
-
Hi Mario,
I echo the sentiments that this looks like it will be quite interesting to follow! I know the toils of a demanding job so hope yours eases up a bit if for nothing else than piece of mind
-Adam
-
Richard, wonderful job on your Bennett!! I really like how your dredges came out, time consuming but well worth the results!!!
-Adam
-
Thanks all! I was pleased with how it came out - wasn't sure, but am happy with the results. Am working the rest of the deck currently and should have another update soon. Once I get the decks all laid in I will definitely be oiling and sealing to make it pop a bit.
The mix was nice, looks even better in person so not only did I jot down the ratio but also made up a "batch" that should last a while

As for having fun? A B S O F R I G G I N L U T E L Y
Love this stuff!
Will love it more when I get a bit more skill under my belt
 but in time, oh yes - in time
 -Adam
-
Better be careful there Popeye, after catching up may be adding rope coils to that popeye signal as well!!
-
Loving it! So much to go through and use as inspiration (and so much to go through and learn from). I have tried a few rope coils but they always come out looking like rope piles (would definitely get keelhauled for them that is for sure).
Dunno how ya do it - but keep on keeping on my friend; the adventure is fantastic!!
-Adam
-
Popeye my friend, another build and another exciting saga to watch for sure. Especially since it seems to be moving right along. However, I must say, being one who has 2 builds on the table and an incredible urge to and daily struggle NOT to start another one - you are not setting a good example. I am trying to stay good and focused but you are showing the benefits to not doing so
.-Adam
-
Hi Scott,
Coming along nicely on that Phantom. You are going to have one very nice looking vessel when all said and done. I used the Phantom to cut my teeth on the hobby myself and now am hooked!
As for your POB/POF question.
POB is plank on bulkhead. Those models you use an inner skeleton made up of the bulkheads which give you the shape of your ship. The planks are laid on the bulkhead with the deck laid atop the skeleton. The ship is built up around the skeleton with it hidden once finished.
POF is plank of frame. Similar in that you build a skeleton to lay the planks on, however when the planks are done where you either pop the skeleton (frame) out (but not always) or build up and around.
-Adam
-
-
Danny that is some absolutely amazing work. All I can say is wow, and thanks for sharing this.
Really spectacular.
-Adam
-
I'd be willing to do them for you.........send me the stuff
You know, just knowing that is a possibility adds to the comfort level. I will give them a shot (can't say I cannot do them without even trying ) but oh, trust me - if it goes how I think it will, I will send out the popeye signal!!!
That there America really does look spectacular!!
We going to have an official launch party?
-
So, just wrapped up an evening of work so an update we have!!
Broke some new ground on building and techniques with this one, so here's hoping it passes muster!!
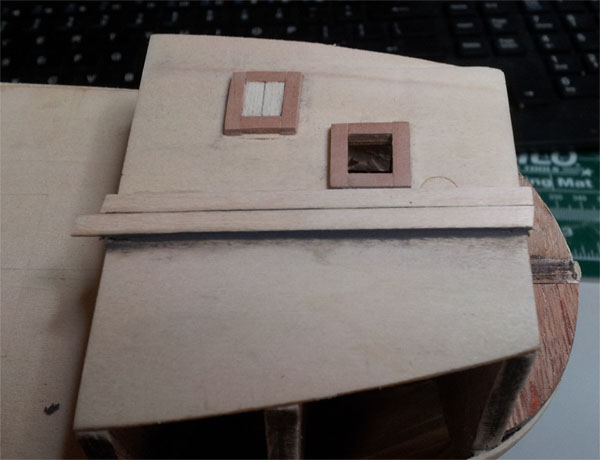
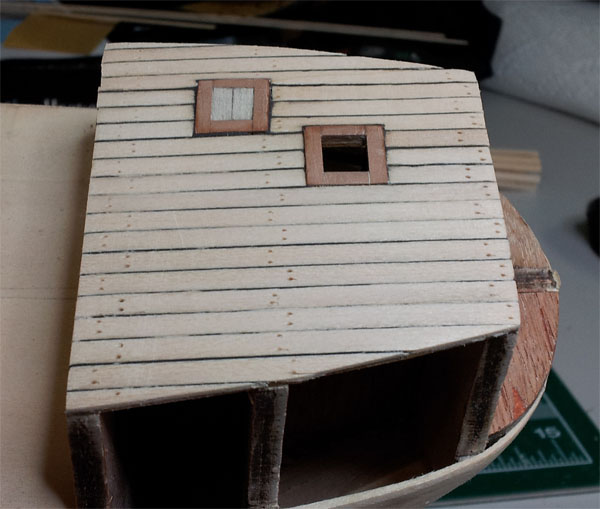
When we last left our hero we had laid down the basics of the hatches. Russ, I fear i did cheat on these and just flush butt them - I just couldnt get the L to come out, however am bound and determined to get it on the grate on the main deck!! I will, oh yes I will. Luckily it doesn't show much on the foredeck, mainly because while they are raised, they are not raised that much... not sure what happened

With the hatches in place I started laying the planks. I started with the archive pen adding the caulk lines because I really liked that approach, but board after board I could not get a nice even color to them. It was quite frustrating. Then the pen started drying out
 ....egads!!
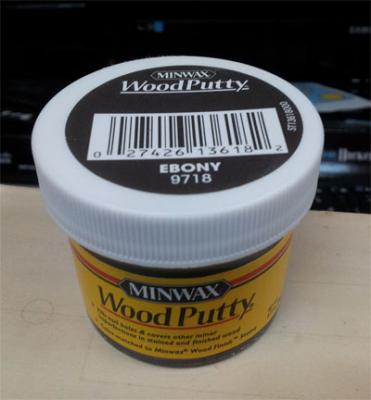
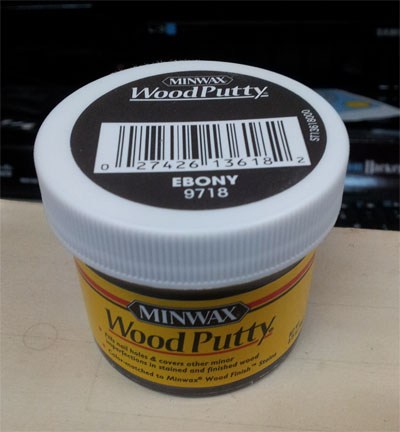
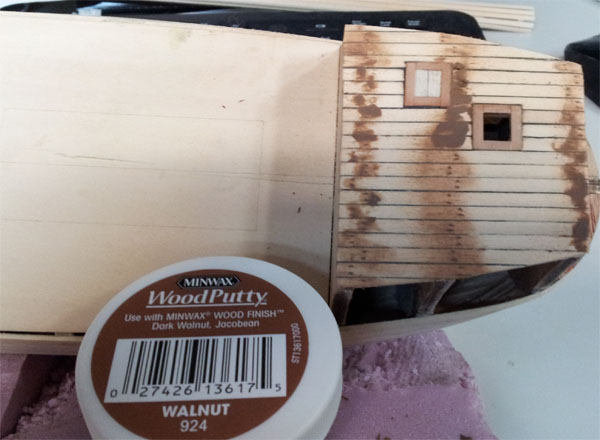
What to do! Well, I then got a little creative (I think). I have some colored putties from minwax and realized the ebony putty has a very nice black/gray color to it. I applied a little to the edge of the board laying on the deck. I then cut the neighboring board, applied a little glue and slid it against the seated board. Well - what do you know, I think it worked. It made a nice subtle but noticable caulk line. A quick wipe with some alcohol on a rag and I was surprised (it doesn't take much to excite me I guess).
The putty....
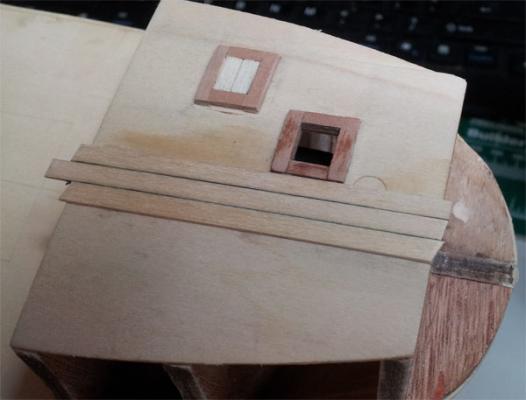
Applying the putty "caulking"

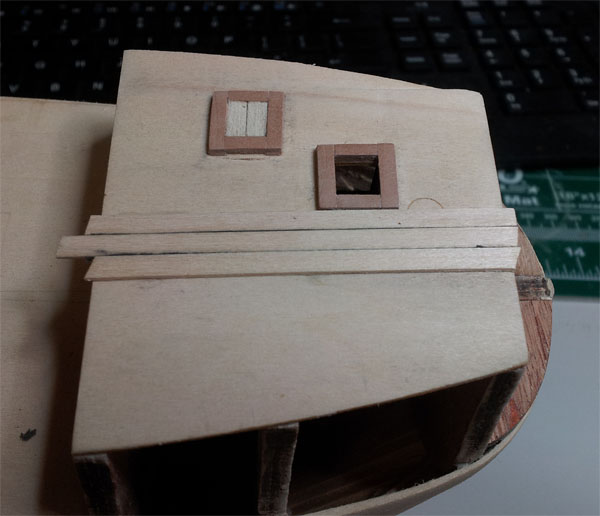
The planks set in
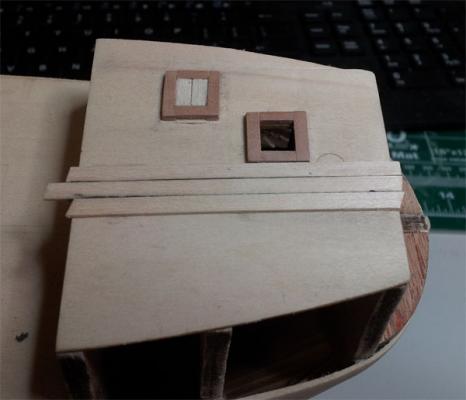
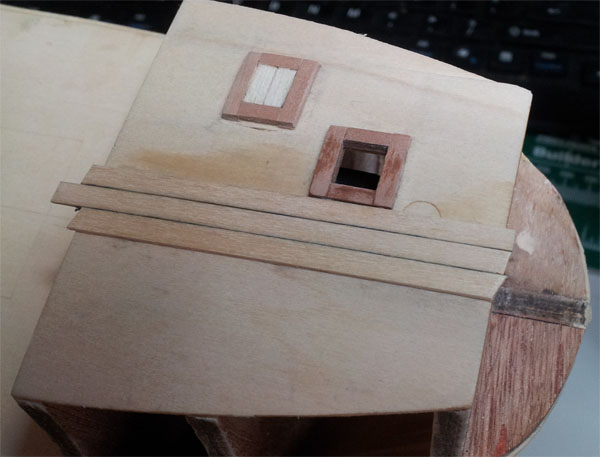
Cleaned up
I think it worked, so I plodded onward.
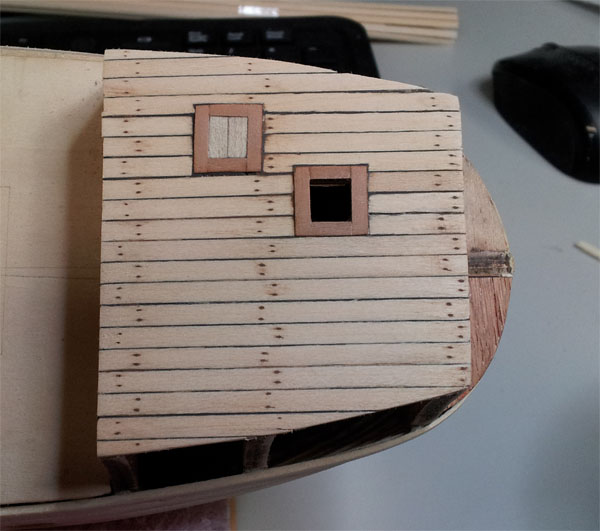
Next up was to get the holes in place for the treenails. They were so small I ended up using a dental pick and poked the holes in.
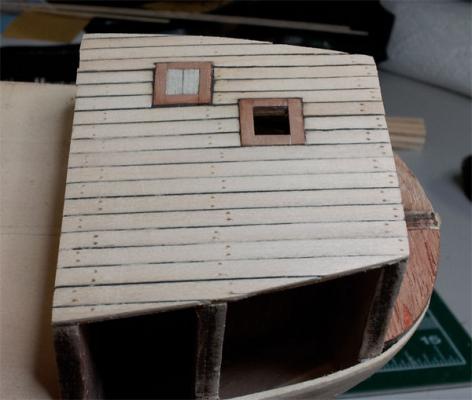
Not too too bad I think for my first every attempt at tree nails
I then (on the colored putty craze) decided to use some Minwax Walnut putty and fill the little poked holes..

Little scared now, hoping like heck I didn't stain the wood with the putty. I used a bit of alcohol on a rag and rubbed out the deck. WHEW - very minimal staining, definately happy so far....

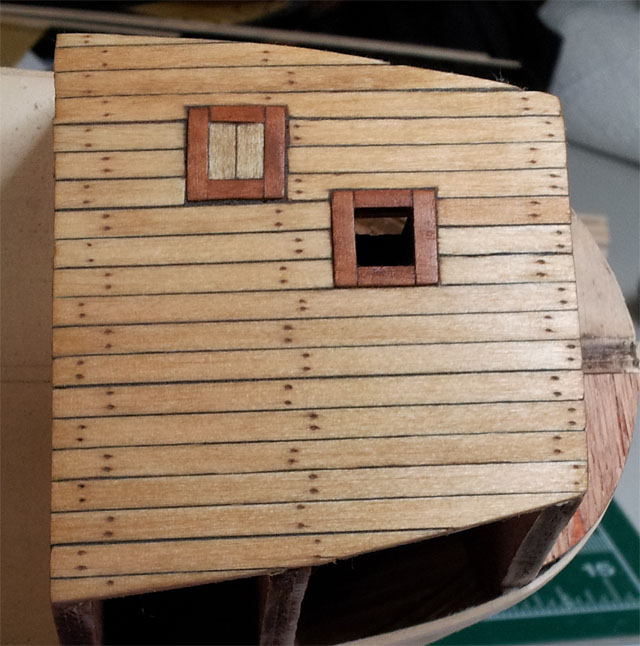
So I then decided to finish her off with a light stain. I was going to just do the tung oil but since I couldn't use the holly and had to stay with the basswood I figuerd staining was the way to go. I learned from my phantom that straight Golden Oak is a bit dark. So I played with some mixtures and came up with a pleasant golden oak that looks good on the deck.
It is a mix of roughly 2 parts Natural Stain to 1 part Golden oak.

So there she sits, drying overnight. I am not sure if Tung oil does anything spectacular over stained wood so most likely will end up giving it a coat of poly to seal it up. That, however , is a decision for tomorrow. Any suggestions are more than welcome.
I did notice in the pictures a little clean up still needed on the edge of the deck so will tackle that before I do the main deck. That is the goal of this weekend. Getting the decks all done up.
Thanks for stopping in folks!
As always - ENJOY!!
-Adam
- trippwj and Salty Sea Dog
-
2
America by popeye the sailor - FINISHED - Billing Boats - 1:72 scale
in - Kit build logs for subjects built from 1851 - 1900
Posted
WONDERFUL job Popeye - really looks fantastic!!!
Congratulations!
Let's sail!
-Adam