


SkerryAmp
-
Posts
809 -
Joined
-
Last visited
Content Type
Profiles
Forums
Gallery
Events
Posts posted by SkerryAmp
-
-
I definately found (for me) the POB was more enjoyable than the Solid Hull.
-
I don't even want to talk political....but I think our fore fathers are turning over in their graves, over here. what I'd like to say, no one wants to hear

I hear ya.
-Adam
-
-
Jack, this is a very cool looking ship so far as it builds up. Interesting in how the pieces are assembled up and so clean!!
Nice work so far
-Adam
-
Absolutely Sjors! Popcorn for everyone!
-Adam
- FrankWouts and Sjors
-
 2
2
-
-
Yeah, I am not sure what happened with the doors. 2 of them don't look bad, but the one - the Grand Cabin looks like a strong wind hit it and bent it over. They looked okay in person on the desk, but once they went on
 .
.Wayne, I had thought about it actually. I saw a couple of others here who detailed the interiors and thought it would be kind of cool, but then realized I am still a noobie and probobly best not to step TOO far over the line (yet that is
 )
)Thanks guys for stopping in. Will be doing some more tonight when I get home from work and will see if I can do anything with that door.
-Adam
-
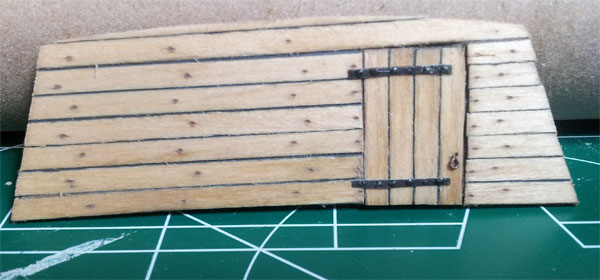
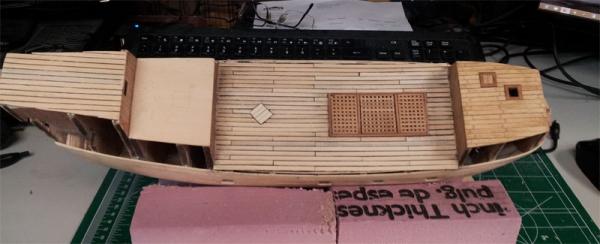
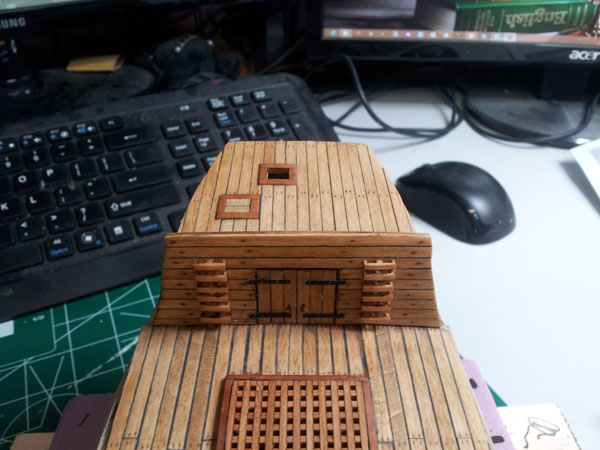
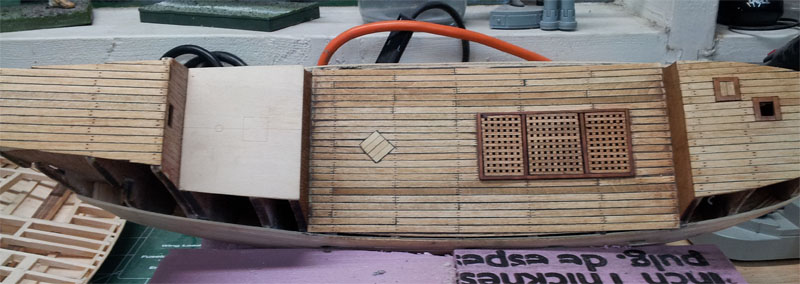
Evening folks, finished up with some of the deck heads so decided I woudl throw up an update before moving on to other things.
I so far have done the Poop Deck Bulkhead, the Forward Cubbridge Head and the Great Cabin
Nothing really spectacular as far as techniques here, I just made sure to do what I did for the rest of the ship in order to maintain consistency. I used the Ebony wood putty for caulking and used a dental pick and walnut putty for treenails. For the doors I used the eyebolts with the kit bent at an angle for the door handles, and pactra trim tape cut in half for the door hinges. I followed Chuck's tip for creating bolt heads and whalla - we have doors!
Poop Deck Head
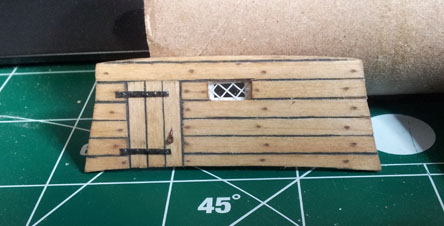
Forward Cubbridge Head
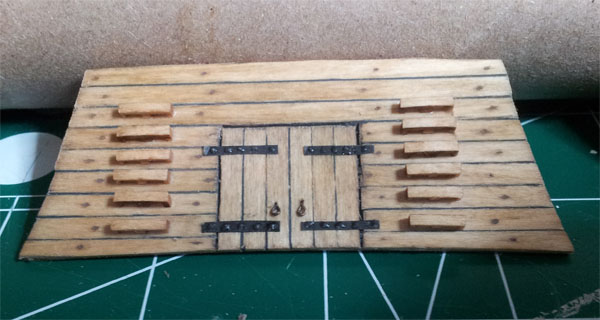
Great Cabin Head
Deck Shot
Poop Deck
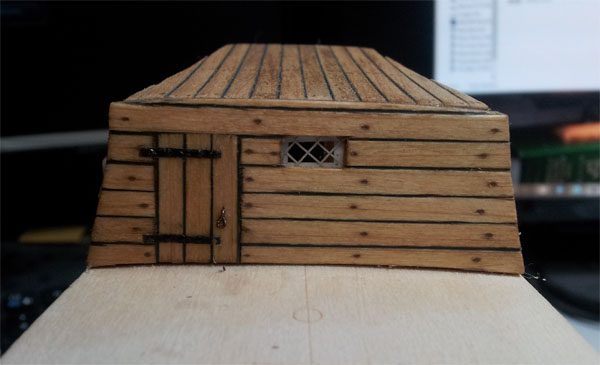
Cubbridge View
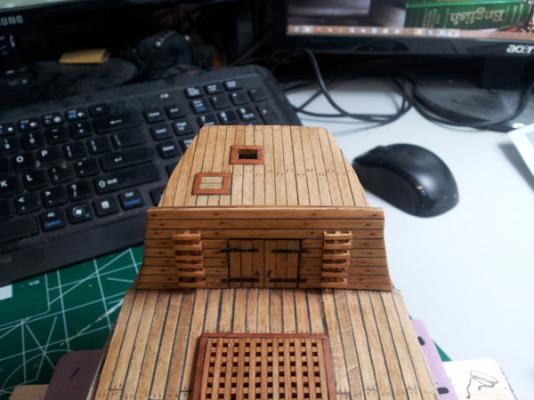
Side Shot

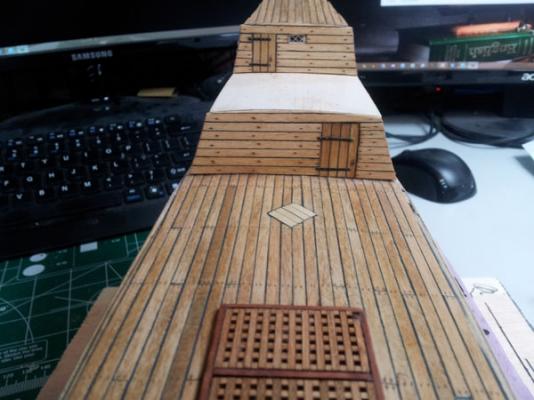
Once everything was affixed I went over it with Formby's Tung Oil Finish. It really helped to bring out the color and clean up some of the lines on it. I will probobly do another coat once this is dry to deepen it a little but.
So, while this dries I am off to something else wonderful and funatstic!!
Thanks all for stopping in
Enjoy!!!
-Adam
-
Thanks all!!
Currently working on the deck bulkheads; hopefully will have something to post later tonight. They were stained and drying overnight so just have to figure out how to add the hinges and stuff and then mount them.
After working outside yesterday for the better part of the day (ugh, was hot for around here this time of year) today is another hot day for working in the yard so will be holed up in the workshop

-Adam
-
I picked up the Balsa yesterday and will be adding the filler this afternoon after I am done with some of the deck bulkheads on the Mayflower. Thanks you two, for the suggestion!
Augie - trust me sir, there is absolutely no concern for Supremecy; I am far too behind the curve for that

Maybe someday though

Thank you Sport - This one will be a bit interesting since I am going to be trying to recreate some of the parts - we will see how that goes
-Adam
- popeye the sailor, FrankWouts, augie and 1 other
-
4
-
Great discussion folks, and much appreciated! hehe Mark I do like the idea of confidence levels (funny how the Midwest model was the one to shake mine though
but the MS ones build them back up again!!)I greatly appreciated this.
Thanks folks of MSW
-Adam
-
Really nice Sjors, coming along very nicely - love the shots of the ship, the point of view really shows her off nicely!!
Good Sunday to you too!
-Adam
-
Nice work so far! The planking seems to be coming along nicely - nice and tidy too!
-Adam
-
Looking good Popeye!!!
-Adam
-
Andy all of that work on the lines and serviings and eyes and - omg, VERY neat and clean. Very cool to look at!!!
-Adam
-
Ready when you are.
Pop corn, soda, ju ju be's, good seat, nice lighting.
On with the show!!
 :dancetl6: :dancetl6: :dancetl6: :dancetl6:
(that's your opening act btw)
-Adam
-
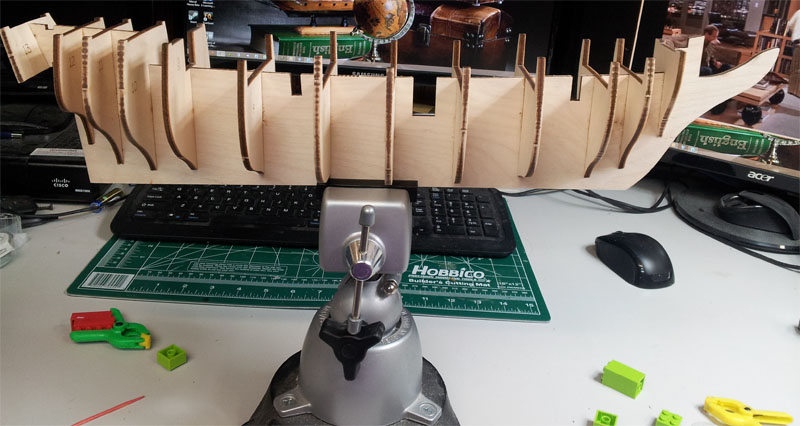
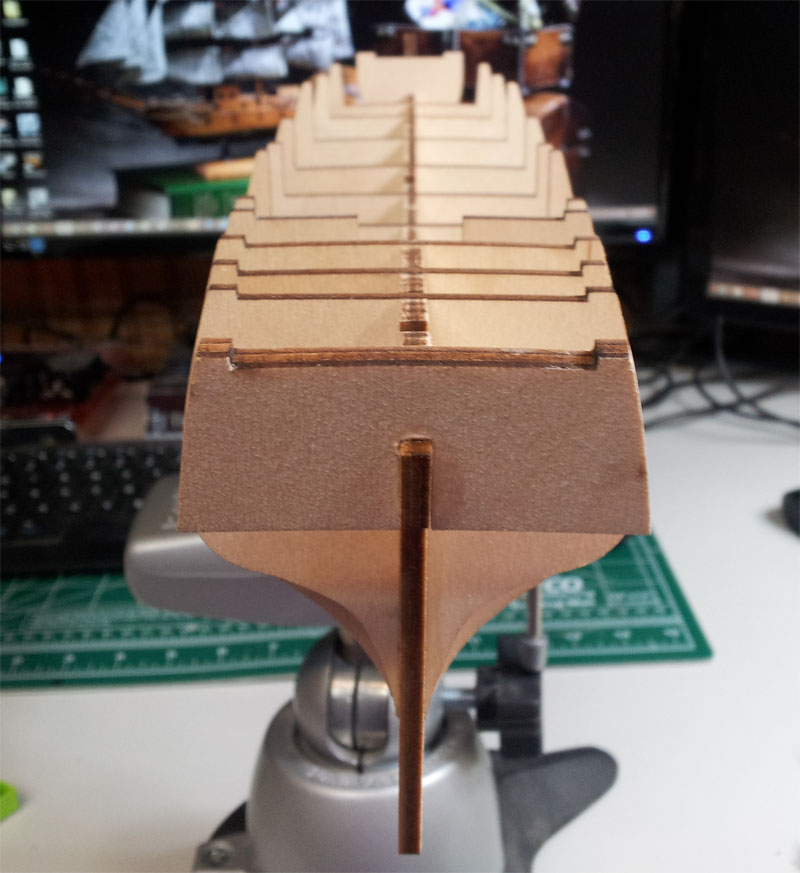
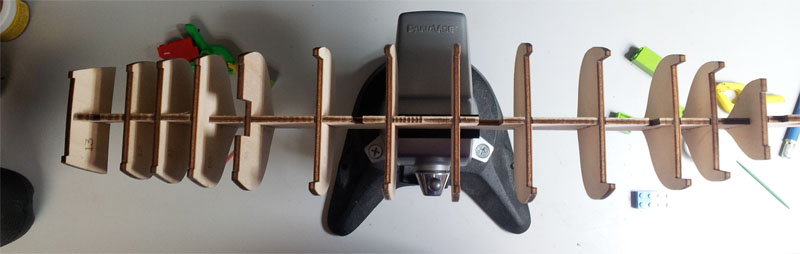
Once I had finished the decking for the night and set it aside to let the stain set in and dry, I made good on my promise to start on the Blue Shadow "Kara June".
Started with the false keel and bulkheads. I was pleasantly surprised
 . The bulkheads fit in quite nicely, not much modification was needed and they set in place without much issue at all. I used my high tech lego system to square them up and we were off to a great start!

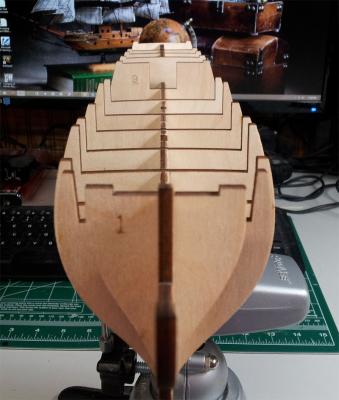

The kit came with what they called stern fillers so I glued them in place. Once everything is dry and solid I will fair the bulkheads and fillers at once. I think it will be easier to get a consistent contour that way.
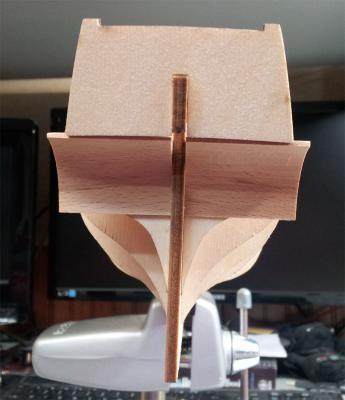
Additionally, they had bow fillers (how convenient). Although I wouldn't call them "fillers" as much as extensions, but they will do the trick.
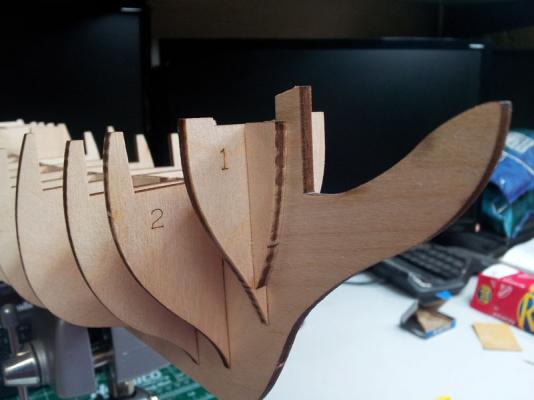
With all that in place, glued up and looking good I figured I would end the night by getting the falkse decks in place. That way after I get more done on the Mayflower and Willie I can take some time to fair theh bulkheads, shape the fillers and get this vessel ready for the planks!

So far this one isn't to bad to do. Everything has a nice fit and the instructions (the plans anyway) are easy to follow. We shall see if it holds throughout, I will stay optimistic!!
Until later....
As always, enjoy!!!
-Adam
-
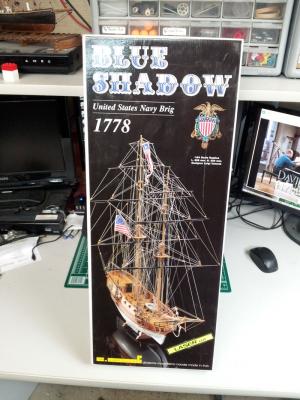
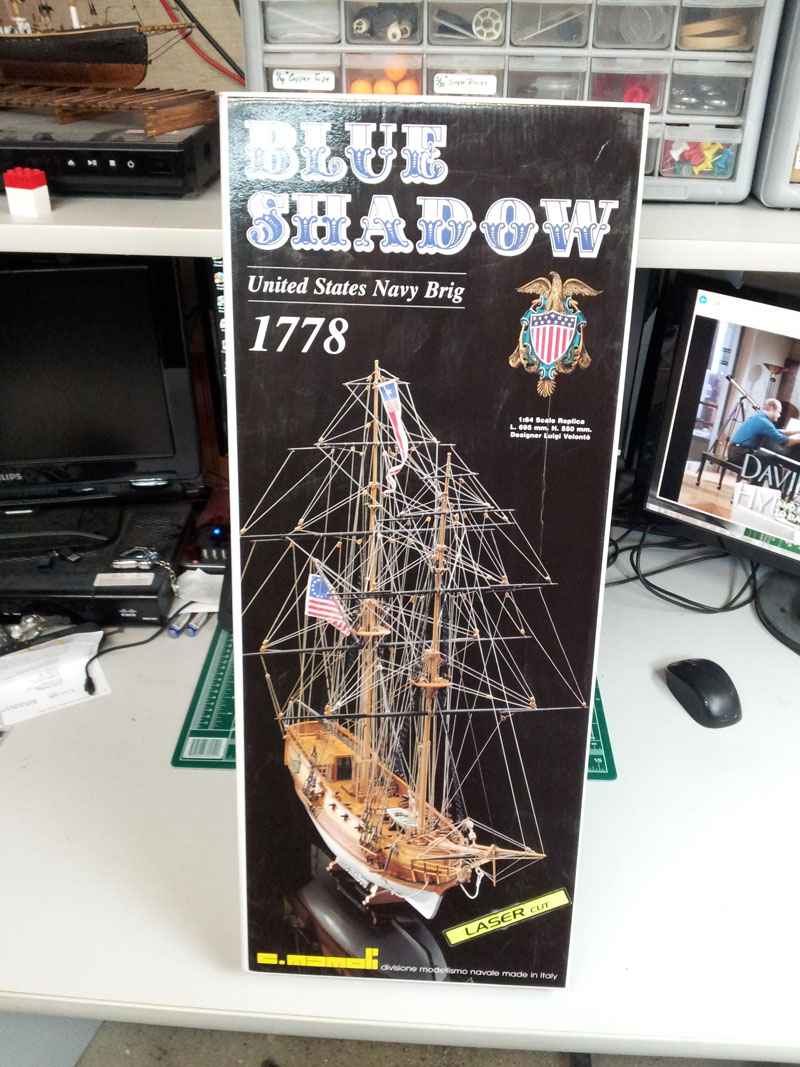
Good Evening folks.
This one has a bit of a backstory to explain why this kit and
 why a 3rd build log.
This kit was purchased by my wife back while I was building the Phantom. She thought it was cool that I was taking up this hobby and decided to surprise me with a kit she thought looked "really cool". It was on sale from Model Expo and sitting on my desk when I woke up one morning, wrapped like a christmas present (in summer).
It has sat on the shelf, not out of neglect, but other builds were in progress so it was queued. She asked me a little bit ago when I was going to get to it, so I told her I would start it up as soon as I got the decking done on the Mayflower. So here it is.
It is not a real ship, it is a fictional vessel put out by Mamoli under the guise of a real one. It even has a history and everything. However, despite being a fictional ship it still seems to be an interesting looking one. Since it is already a fictional one I decided to build it but recommision and name it after my wife. So, while the box says Blue Shadow, it will be the Kara June when finished.
I have read many comments from all over regarding the quality of the Mamoli kits and have even read a few questions regarding this particular one. So let's get to it and see where this one goes!
First: The customary Unboxing.
The box itself is actually not to shabby, glossy packaging with the ship well presented.
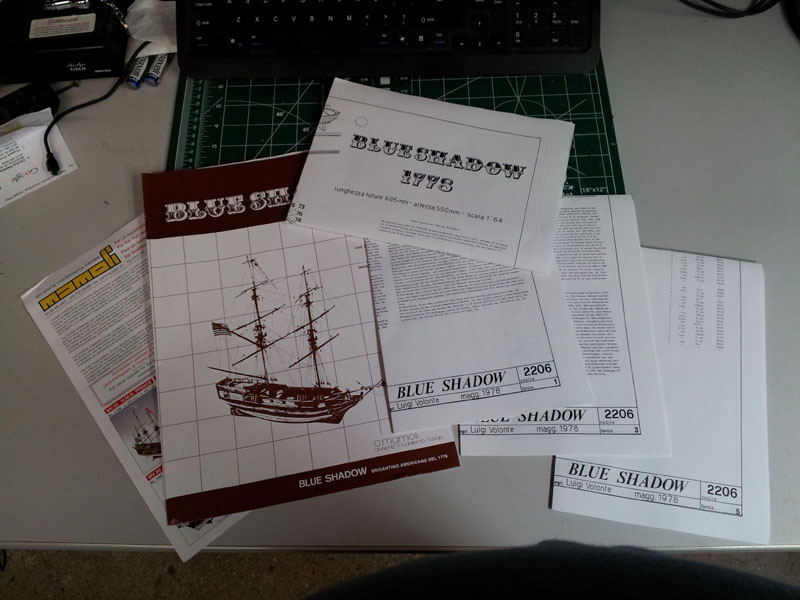
The documentation is interesting to me. The written part is in some places a little rough to understand but they get the gist across. The "plans" are more like giant pictoral step by steps which at first glance at least seem to make it easier to follow via the plans than the written documentation.
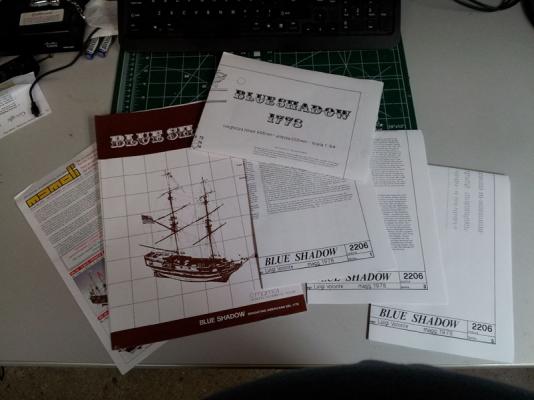
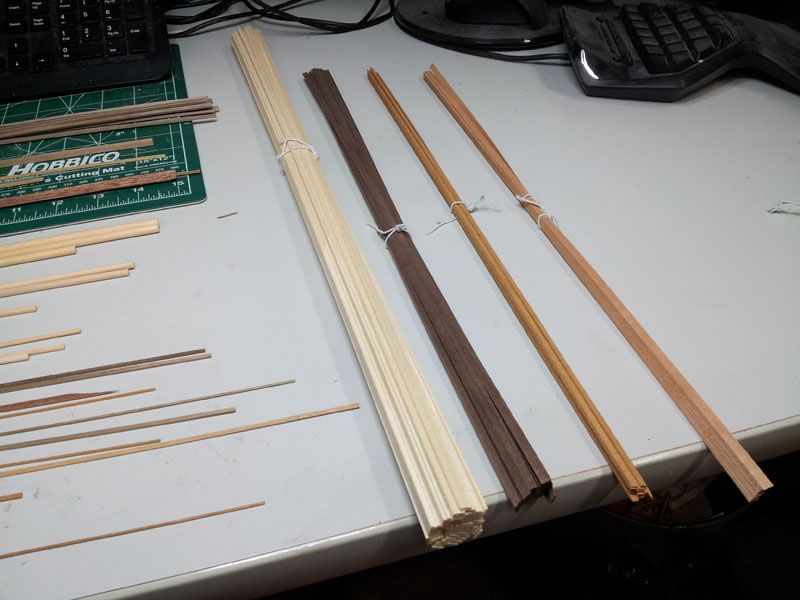
It does come packaged with some decent variations of wood, well bundled and organized. This will be interesting as I am mainly used to basswood so will have to learn to distinguish between the several varieties included.

Oddly, in contrast it also comes with an assortment of various odd lengths and sizes of a variety of woods. This will get even more interesting I think.
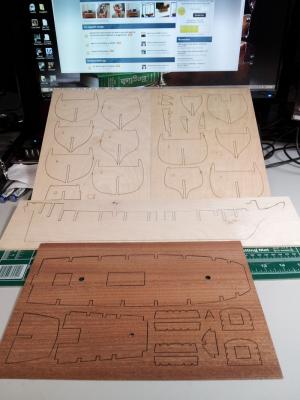
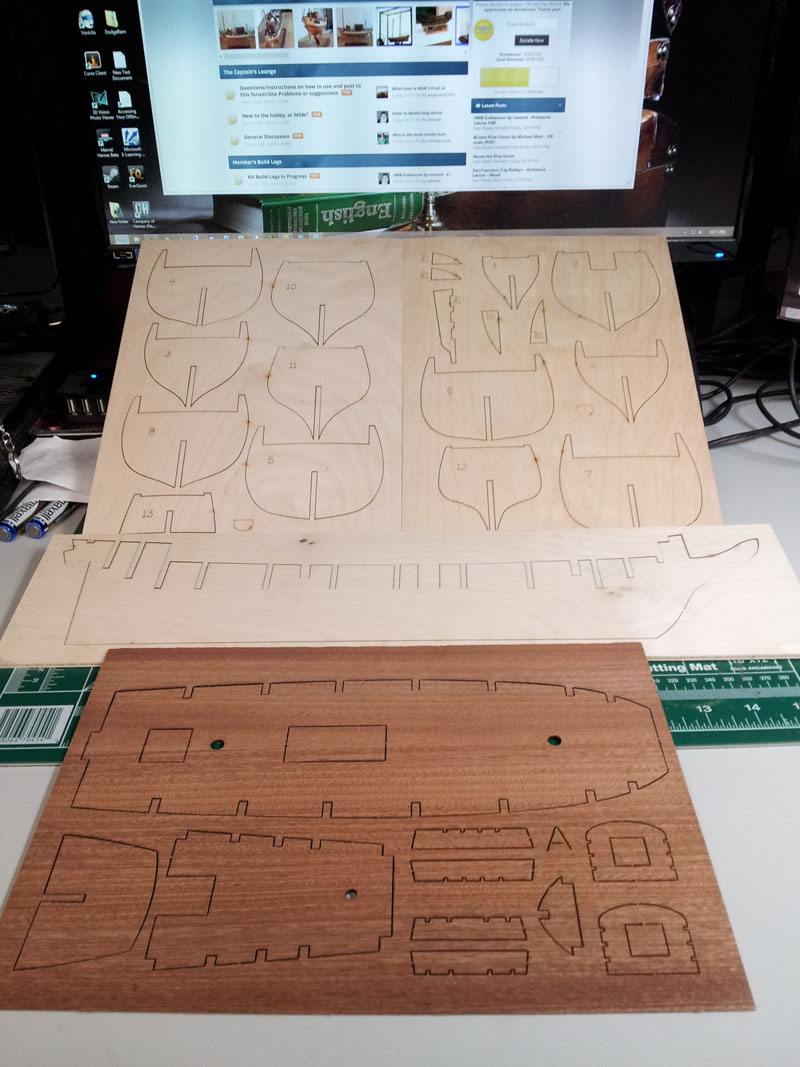
The plywood parts are pretty familiar looking. They are of good quality, nice and solid and well marked so that is good.
A random bag of parts, with one that looked like it is either scrap wood or a part that didn't quite make it. Hmmmmm.
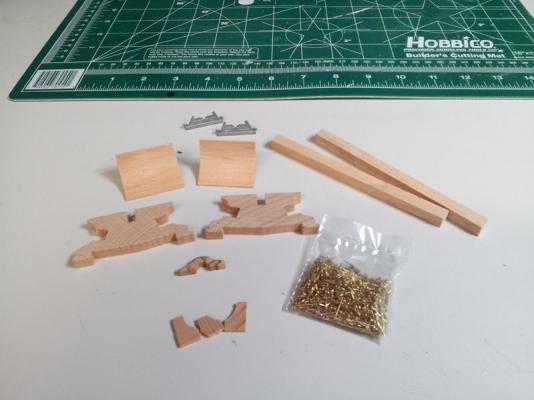
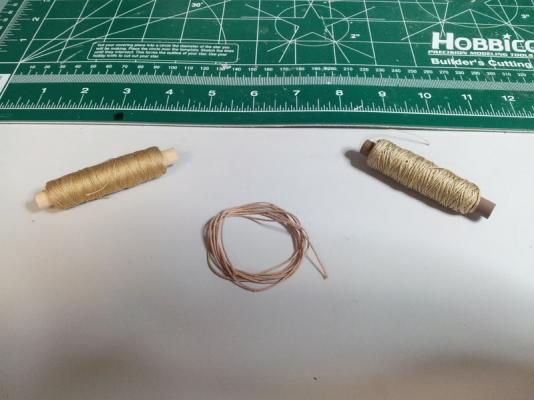
Rigging! Nothing much to say here.
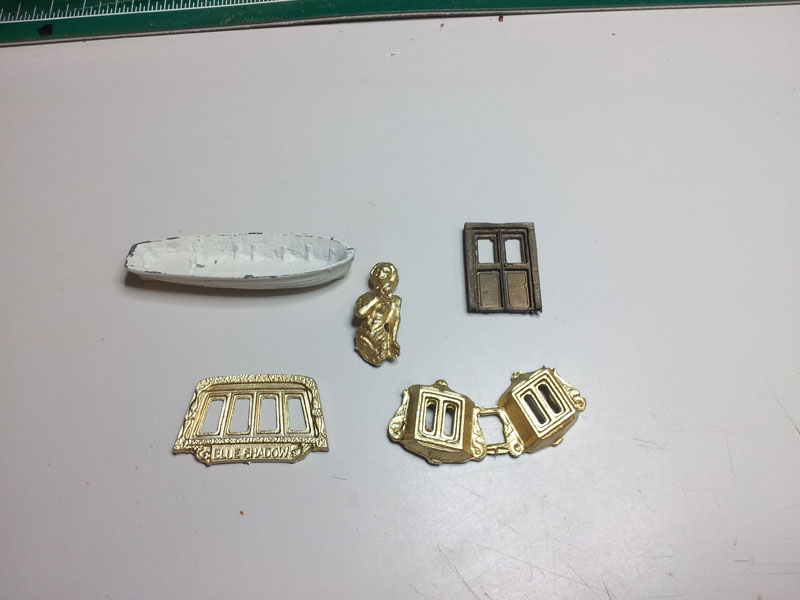
Here are what I consider the "standard" parts. Some grating, cannons, deadeyes and blocks etc.
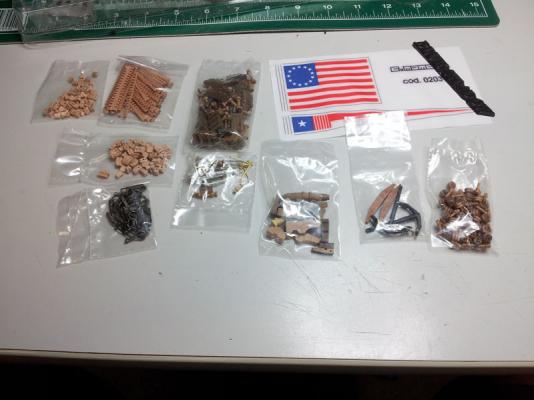
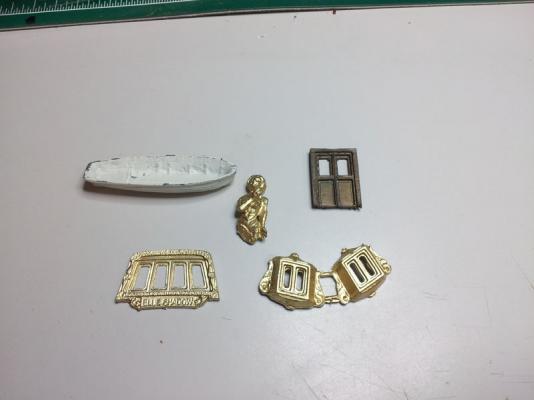
And here, lastly are the parts which, well. Okay - I don't like these. I have looked at them on the ship and in the box and I just don't care for them. They seem out of place to me. So, I will (deep breath) most likely be remaking them from scratch
 to make them fit in place a bit better.
So overall this doesn't look too too bad.
I hope
-Adam
- FrankWouts and JesseLee
-
2
-
Thank you all, great to hear the input and helps me wrap my head around it a bit better. Definately helps to answer that question when asked

-Adam
-
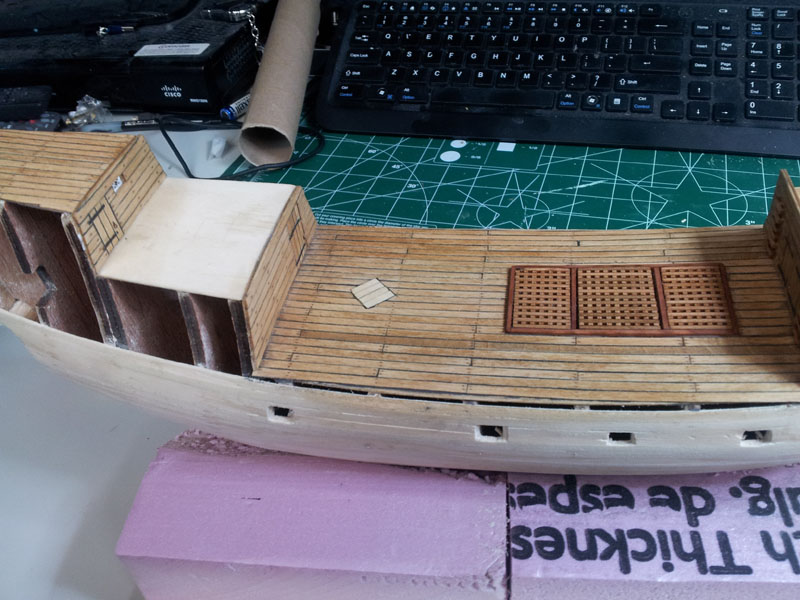
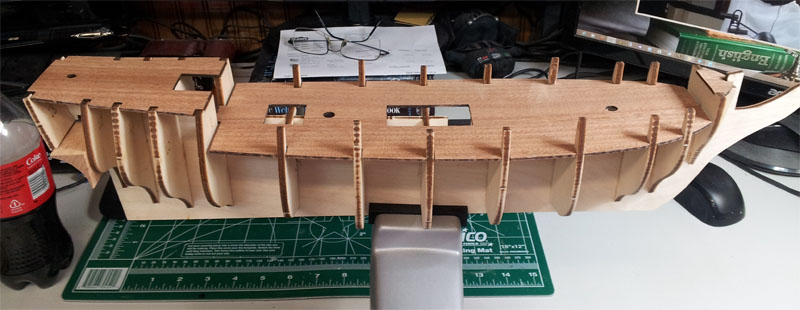
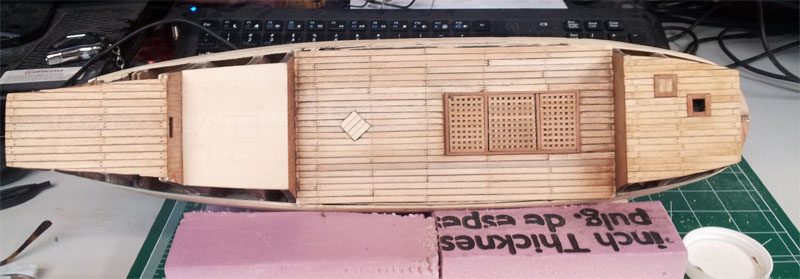
So, after tearing up the main deck I went ahead and layed the new one down. Much better - still not "perfect" but I think it came out alright, especially once all the fittings and doodads are installed to blend it all together.
I did the same thing as i did with the foredeck. I used Minwax ebony putty for caulking lines, a dental pick to pick out the nail holes, minwax Walnut putty for the tree nails then a diluted golden oak over the whole thing to blend it together.
Overall I liked that the boards have different tones, although in one corner of the deck is a "blemish" It wasn't there (I swear) while working the deck but oh did it appear once the stain was applied.
Not sure what is going to happen with it, I will have to see how much of it shows once the rest of the deck is together etc. One thing I do know, it is workable/fixable, I just need to get creative
. Hopefully I am not making Chuck cringe too much
Poop and Main Deck Planked
Poop and Main Deck: Tree Nails added

Poop and Main Deck stained, awaiting poly finish.
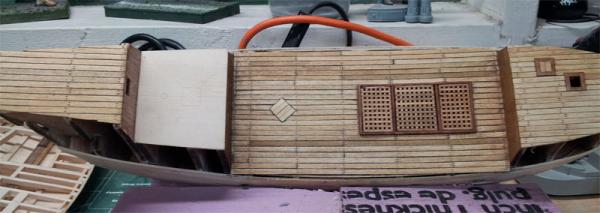
It is now currently set aside to dry so I can finish it off and then add the remaining deck and doors etc as well as the iron rings on the hatches and grates.
Thanks for following along
As always - Enjoy!!!
-Adam
-
Thanks guys, yeah it was necessary to tear it up because I knew if I left it I would be thinking about it the whole time. So UP it went.
Simon: Good luck with the whitehall my friend, I actually have the 3rd kit of that sitting under my desk. I am determined to get that thing built and looking good; it just aggravated me so much I moved on for a bit!!
-Adam
-
So after much debate with myself, ultimately losing I decided to go out on a limb and throw this out to the masses.
I have seen many people ask here on the forums, and I personally have been asked by friends of mine, some variation of - what is a good entry level wooden ship?
When I worked in the hobby store, the answer was easy – not personally having built them myself I had to go by the marketing materials and the word of the ship builders who came through. When I got into the hobby myself last spring I leveraged that information as well as the write ups of various ships to decide ultimately on the Phantom.
However, after building the phantom and now working on a few other models I find myself sometimes wondering myself, when that question is asked, what is a good starter ship model?
I had been debating on bringing this up here, just for general conversation as I don’t think there truly is a “correct” answer, but the opinions would be interesting I think.
Where I kind of found myself drifting towards is that there really isn’t an easy answer to that question. After answering it to some degree in another thread earlier today I decided what the heck, let’s bring it up and see what sticks!
Here is where my thoughts on the matter tend to circulate.
In the plastic world you have a box of parts and those parts, with zero modification, create a rough model of the box art. You can in some cases (snap together) create something with zero tools and zero experience. You can, of course, get more expensive detailed kits but still in most cases the parts in the box will assemble as is to create what it is you are after. The difficulty of plastic comes in when you start adding glue or when you decide to go for it and craft aftermarket parts etc. to add to the existing model. So there is a curve, but in many ways it is a voluntary one.
Wooden ship models are very much not the case. You cannot (as far as I can tell) open a wooden ship kit and create a model of the ship on the box with the parts in the box as is. It isn’t even an option. I remember joking about it when I opened up that Phantom. I was staring at a bunch of wood with a handful of prefabbed parts.
So this is where my thinking that there really isn’t such a thing as “entry level” model ship kits. By default, the model ship world starts you at advanced. I have seen people marvel at scratch building, and oh my there are some incredible masters of it that scratch build from front to back and top to bottom
 . However, I think some people do themselves an injustice in not believing that they themselves have scratch built something on their ship. Whether it is a door way, a hatch, a wheel house or a mast; everything about model ship building is about taking one thing and making it into something else so as to fit the rest of the things to make a ship.
I think with wooden ships you start at advanced and go up from there. I think when we talk about “difficulty” in wooden ships it isn’t so much what you have to do, but how much of it you have to do. The skills come with the practice of what is done; learning how to plank properly, learning how to lay a deck, rig a mast, mount a cannon etc. The difficulty and challenge is how much planking has to be done, how much detail is in place, how many lines have to be rigged and the pattern or how many tree nails have to be done, sails etc.
Please do not get me wrong, I am not in any way saying that everyone who builds wooden ships are at the same skill level, trust me I look at my work and then at others and it is painfully obvious I have a way to go.
What I am suggesting is that newcomers to the hobby should not steer away from things because they are “advanced” looking or complicated because in reality whether it is a small boat like the phantom or a huge boat like the MS Constitution, you are using the same sets of skills and doing the same activities just more of it on one than on the other?
I can see the phantom being beginner due to quicker turnaround time, easier to “get one under the belt” maybe. But after building the phantom and realizing it may be smaller but there was a lot more to it than what I expected. The Harriet Lane, also listed as an entry level, seems to have a level of complexity that may initially shock someone who picked it up thinking entry level in a different way than the model ship world does.
I have done the Phantom (a solid hull) and worked on the hull of the Willie L Bennett (planked) and the Mayflower (planked) and I personally think planking was easier than the solid hull!
I truly hope I am getting this question out correctly, as I have said I have debated it back and forth so many times in my head because I think it is a more complex answer than – This one or That one.
Now, this does not include built from plans type ship building, which is a whole different ball game.
This is primarily in regards to kits.
Maybe a lot of this comes from what my expectations were of “Starter” versus advanced. The Phantom was a challenge, again coming from the world of pre-formed parts.
Having only been at this just over a year just has me philosophizing over wooden ship building in general. Looking at the builds and the people around here just got me to thinking; there really isn’t an entry level wooden ship builder.
By default it is an advanced hobby.
Is the advancedness of a particular model in the kit?
Or in the builder?
Or in both?What do you guys think? (And if you think I am just out of control, feel free to say so – I can take it; sometimes my mind goes weird places and the Admiral has to reel me back in)
Thanks for taking the time to indulge my random rambling.
Enjoy!!
-Adam
-
I am big on using protective finishes on just about everything. Regardless of the paint itself, the finish just does a nice job of sealing it all in and evening out the overall look.
I have used many kinds but lately have been big on minwax poly's. They wipe on or brush on, self level and look really good. You can build up coats if you like to deepen the finish quite easily.
-Adam
-
Welcome Enderwiggen!!
I have only been doing this for about a year now, one ship under my belt, 3 on the table and 1 set aside like a bad memory. I come from a background of plastic/resin kits, which I did for many many years on several levels.
As it turns out I have been thinking about this very topic lately, even debated opening up a thread for discussion on it. Here are my 2 cents.
When you are in the plastic world, skill level means a lot! Snap Tites are easier than preformed glue togethers easier than built up glue togethers easier than casting and molding parts and scratch building. However, it is odd, but I don't see that correlation in the wooden ship world, at least not that granular.
From what I can see kits are easier than scratchbuilding from plans, and that is about as far as it goes. Within the kits there are mentions of skill levels etc but from what I can see they seem to be more in relation to how much has to be done and not with what has to be done.
Each kit I have looked at or seen built here have the same tasks. Cutting, shaping, measuring, finishing of wood. Solid hulls (which I was told was entry level) require shaping and sanding of the hull, finishing, measuring etc. I started a planked ship and actually found planking to be easier than solid however more time consuming. I guess what I am going on about (and I can be longwinded sometimes I apologize) is that I am starting to feel it is more that wooden ships are advanced modeling - period. They are totally unlike plastic, there is always some level of scratch building involved and you are working the model more than assembling. I think what seperates kit from kit is the amount of work involved. Some will take longer than others due to more parts, more lines etc but they are all "advanced" as far as the skills you will need/learn and the time.
So with that, I think it is more about the subject matter and less about the kit itself. (Granted some kits are better when it comes to instructions and quality of materials).
This is a simpification of what to me is an larger and quite interesting topic, and I could be completely off base, but this is just how it "feels" I guess to me.
Regardless of what you take on, make sure the subject is interesting to you and enjoy it!!!
-Adam


Licorne by mtaylor - 3/16" scale - POF - TERMINATED LOG
in - Build logs for subjects built 1751 - 1800
Posted
Terrific and inspring work Mark!!
(Unlike others, when I see a full scratch built I get ascared and retreat to the safety of my kit and practicums )
)
-Adam