


SkerryAmp
-
Posts
809 -
Joined
-
Last visited
Reputation Activity
-

 SkerryAmp reacted to Louie da fly in Santa Maria by SkerryAmp - Artesania Latina - 1:65 - PoF
Looking good, Adam
-
 SkerryAmp got a reaction from Geowolf in New danish member
Hmmm, something tells me you have done this modeling thing before
Nice work!
-
 SkerryAmp got a reaction from mtaylor in Polacca by Slowhand - Scale 1:32 - 18th century ship of Venetian Fleet
Scratchbuild - just the thought intimidates me to no end.
You have an awesome run going - looks great!
-
SkerryAmp got a reaction from mtaylor in New Member from North West Wales
Welcome Guy! You came to the right place - no shortage of good advice and encouragement around here. As for your first build, a lot of good advice so far the only thing I would say is make sure it is something that interests you, that will keep you engaged! Looking forward to whatever you start with!
-
 SkerryAmp got a reaction from bruce d in Polacca by Slowhand - Scale 1:32 - 18th century ship of Venetian Fleet
Scratchbuild - just the thought intimidates me to no end.
You have an awesome run going - looks great!
-
 SkerryAmp got a reaction from Ryland Craze in New Member from North West Wales
Welcome Guy! You came to the right place - no shortage of good advice and encouragement around here. As for your first build, a lot of good advice so far the only thing I would say is make sure it is something that interests you, that will keep you engaged! Looking forward to whatever you start with!
-
SkerryAmp reacted to Baker in Golden Hind (ex-Pelican) by Baker - FINISHED - scale 1/45 - Galleon late 16th century
Update,
The outside of the forecastle is ready. The doors will be made later and a ladder will be provided later in the castle itself .
A tricky part
Tricky part is ready, painting
Saw at the right height (and dust prevention with tape)
Work in progress
Ready
There is a proper tool for every job.
A file is not a chisel (I learned this in the technical school when I was 12years old...)
revenge part removed the hard way
Thanks for following
-
SkerryAmp reacted to Baker in Golden Hind (ex-Pelican) by Baker - FINISHED - scale 1/45 - Galleon late 16th century
The balcony is finished (Finally)
I had underestimated the time and work required for this work...
I made a crown in plastic to place above the rose
And did not like this. So, the crown was removed again.
Supports for awnings are also provided.
Suppo
Thanks for following and likes,
Build index on page one
-
SkerryAmp reacted to Baker in Golden Hind (ex-Pelican) by Baker - FINISHED - scale 1/45 - Galleon late 16th century
Balcony, work in progress.
One opening of the balcony is too narrow for 2 planks and and too wide for one plank.
so why not do something special here and add a Tudor rose (Historically probably totally wrong, but a nice challenge to do )
https://en.wikipedia.org/wiki/Tudor_rose
So far so good, and now i am trying to make a crown for on top of the rose
Thanks for following
-
SkerryAmp reacted to Baker in Golden Hind (ex-Pelican) by Baker - FINISHED - scale 1/45 - Galleon late 16th century
Thanks Geert,
The bottom of the balcony is painted and provided with bolts.
The side of the balcony could be open with pillars or closed with planks.
With me it becomes open with pillars. It looks that this was the most common at that time. An example is made as a template.
4 pillars can be made together with a simple holder.
A first test (not yet glued)
Start gluing
Backside "work in progress" Planks are provided between the pillars. The question: 2 planks or 3 planks?
My wife says :I want 3 planks
I think 2 is better, compared to the drawing (2nd photo)
Does anyone have an idea ??
Thanks for following
-
SkerryAmp reacted to Baker in Golden Hind (ex-Pelican) by Baker - FINISHED - scale 1/45 - Galleon late 16th century
The door is more detailed.
Windows are made of clear plastic (PVC). And it is the intention to become glass in lead.
First i make grooves with a needle in the plastic.
Then the "lead" insert is made with stretched sprue (light gray sprue has been used and is not painted)
the clear plastic and wood fittings are glued and colored.
ready
Thanks for following
-
SkerryAmp reacted to Baker in Golden Hind (ex-Pelican) by Baker - FINISHED - scale 1/45 - Galleon late 16th century
The sidewalls below deck,
All of these objects have been previously installed during construction. But not yet explained
Apparently there were 2 ways. With planking on the inner sides or with the frames remain visible.
It was decided to leave the frames / futtocks visible. This detail could be done better. But later this part is only visible through the gun ports and possibly an open hatch, so this is good enough.
Historically correct for an English ship ?? who knows, this example is Spanish (San Juan)
Traces of the standing knees have been found on an english shipwreck (Gresham). And yes they also effectively hindered the free firing field of some cannons.
Hanging knees and beams for the upper deck will be applied later.
Water that came on this deck was drained through holes to the lower cargo space ( source Gresham ship)
A breast hook and the construction for the anchor cable are also made (source : vasa ship and the Batavia replica)
The photos speak for themselves.
Work on the balcony has also been started up again.
Thanks for following
-
SkerryAmp reacted to Baker in Golden Hind (ex-Pelican) by Baker - FINISHED - scale 1/45 - Galleon late 16th century
Time for an update of the canon deck / orlop deck.
This deck will be little visible later.The intention is to detail as much as possible as an exercise for building the higher decks.
The deck planks are a mix of the decks of the Mary rose and the Vasa
Side walls such as the San Juan wale ship
Standing knees like the Gesham ship.
This is the current status.
The construction method will come in different posts.
Spring has begun and there is a lot of work in the garden and the spring clean up
Thanks for following
Buildlog index see post 1
-
SkerryAmp reacted to Baker in Golden Hind (ex-Pelican) by Baker - FINISHED - scale 1/45 - Galleon late 16th century
Finished the bolts in the wales, keel, stern and stempost (the bolts below the waterline will be painted white later).
Thanks for following
-
SkerryAmp reacted to Baker in Golden Hind (ex-Pelican) by Baker - FINISHED - scale 1/45 - Galleon late 16th century
After I started on the balcony. I new i had forgotten something
Bolts.
So first apply bolts to the wales and to the places where the knees are
Info about the bolts. Source: the Gresham ship.
To scale I must therefore have bolts whose head is 1.1 to 1.2 mm. The spacing between the bolts on the wales is 2 to 3 cm.
Small nails of 1 cm "without head" are suitable for this. The heads vary between 1.1 and 1.2 mm in diameter. Right size it can not be better.
Method used :
The nails are first degreased in acetone and dryed. Then the heads are made black with Perma Bleu and cut to length with a pair of pliers
Predrilling a hole where a nail should come. Nail and ready.
Work in progres
Thanks for following
-
SkerryAmp reacted to Baker in Golden Hind (ex-Pelican) by Baker - FINISHED - scale 1/45 - Galleon late 16th century
Hallo,
The filler blocks are placed on the starboard side.
Because sanding with the sanding machine is faster the blocks are not made in advance in to the proper shape.
This is now probably the most ugly hull ever shown MSW…..
A few minutes of sanding and the shape is already better.
If you want to do this in the same way
Do this outside. This makes a lot of dust ....
Now further filling and sanding until the desired shape has been achieved.
The lower part of the hull is ready for planking.
My first goal was to try to build a hull that has probably the right shape
Below the waterline it looks to be in order
next update : frames and gunports on the cannondeck
index
-
SkerryAmp reacted to Baker in Golden Hind (ex-Pelican) by Baker - FINISHED - scale 1/45 - Galleon late 16th century
Hello
The upper ends of the frames are provided with supports.
So that they can be less easily damaged.
I started with the filling of the lower space of the frames ( i think "fillerbloks" is the correct word).
Wooden pieces are sawn to length.
These pieces are then made at approximately the right shape.
And glued between the frames
A few frames also had to be adjusted.
One side is filled up, and can be sanded.
One side is sanded
I used this machine to sand the rough shape
Some test planking is attached (looks ok)
The frame of the stern has been modified and should now have better shape (thanks druxey).
One side is done and seems to have the proper shape below the waterline
One side to go.
Ps,
I had picture uploade problems, see :
http://modelshipworld.com/index.php?/topic/15445-images-size-fixed-at-12-px/
Groetjes
Greetings
-
SkerryAmp reacted to Slowhand in Polacca by Slowhand - Scale 1:32 - 18th century ship of Venetian Fleet
Surprisingly difficult to produce two identical pieces for the bottom of stern windows still got there. Some work to do on those top planks curvature not right.
-
SkerryAmp reacted to Slowhand in Polacca by Slowhand - Scale 1:32 - 18th century ship of Venetian Fleet
Long awaited wood arrived, pear for stem, keel and stern post. Lime, beech for planking etc. The plan was to cut the pieces with my bandsaw, Just don’t know whats wrong With it. The rubber tyre flew off the upper wheel twice despite checking position and tension of the blade very carefully before running. So it’s back to manual work, my trusty Stanley knife and Hacksaw gave by far the best cleanest cuts. What does everyone else use, table saws.
Used gouges to carve a bearding line in the stem. Pinned the wales in place to check curves. Bulkhead 4 on far right needs building up other than that OK, oh and the bow blocks might need more sanding - that’s been the hardest part so far and still not quite right.
-
SkerryAmp reacted to Slowhand in Polacca by Slowhand - Scale 1:32 - 18th century ship of Venetian Fleet
Quite pleased with what I’ve done so far got a solid base for the hull, straight keel and in fill blocks in profile with bulkheads.
Decision point, spent ~ £5 on ply, pine infill blocks nil, only cost so far Is my time. If I’d made a dogs dinner would have cut my losses. Happy to go ahead and buy lime strips for Wales, 1st planking layer, and pear or cherry for stem, keel and stern post. Now for the fun laying the decks, planking the hull.
-
SkerryAmp reacted to Slowhand in Polacca by Slowhand - Scale 1:32 - 18th century ship of Venetian Fleet
Lots of sanding by hand the fill ins and tapering adjusting bulkheads, still to add final in fills at stern.
Loosely pinned a stringer to check curve of hull. Then noted rear part of false keel had warped so added to two wedges either side between bulkhead and keel. Fingers crossed.
Added two blocks of lime and carved sanded them to fill in between last bulkhead and stern
-
SkerryAmp reacted to Slowhand in Polacca by Slowhand - Scale 1:32 - 18th century ship of Venetian Fleet
Thanks Tony, the hardest part of cutting the bulkheads was getting the slots which fit into the false keel perpendicular, had to redo one bulkhead. Bandsaw blade had a tendency to wander.
Because of the length of the hull and relatively few bulkheads decided to infill the spaces with blocks to give strength and stop the keel warping.
Pine 6 x 4“ left over from a raised garden bed cut into lengths with a bow saw then shaped with the bandsaw. Everything’s just loose at this stage. Cut out the stem to replace with some nice wood. Any similarity with Backer’s wonderful build of the Golden Hind merely coincidental.
-
SkerryAmp reacted to Slowhand in Polacca by Slowhand - Scale 1:32 - 18th century ship of Venetian Fleet
First steps scaling up the plans before copying across onto the plywood. No expense spared here mind, this 5mm 3 ply from B&Q a few months ago cost all of £ 3/4.
Did a dummy run with a coping saw but as it happened got much better results with my Scheppach bandsaw which I finally seemed to have mastered. The dummy keel was laid on the 11th May. The mouse police looked typically distainful.
-
SkerryAmp reacted to Slowhand in Polacca by Slowhand - Scale 1:32 - 18th century ship of Venetian Fleet
I finally decided to start my first scratch build project after lots and lots of deliberation, I didn’t want something too complex/ ambitious so the starting point was the Amati plans of a kit which is quite small hence the scaling up from 1:50 to 1:25. The Polacca was used by Venetian Fleet to protect the shipping routes of Venice from the Dalmatian, Greek and Turkish Pirates. That lateen sail at the front must have been useful for sailing to windward and perhaps downwind as a primitive gennaker or spinnaker! Expect I’ve a lot to learn but guess I’ll have plenty of time with this Corona virus thing. My version will be over 24” not including the bowsprit so the original would be about 50’ which looks about right. Intend to open up the rear cabin for lights and put a lower deck midships partly visible through the grating.
-
 SkerryAmp got a reaction from popeye the sailor in Junkers Ju 87G-2 Stuka 'Kanonenvogel' by popeye the sailor - Fujimi - 1:72 scale
Oh, fear not you have certainly gained some experience - your work is awesome! One thing this little hiatus has given me is patience - a lot! So it is with a new look on life in general I re-approach the hobby! Let's see if it pays off.
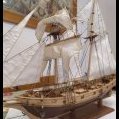
I have added to the Santa Maria for now. The Harriet Lane and Willie are DOA. Time was not good to them at all and neither kit was in a state to recover from with any form of grace - very sad really. The Santa Maria is the most open to picking back up on once I cleaned it up a bit - had a spider living in the hold of all things! The mayflower is near done but I can't find the instructions or the parts I had for it, so will need to figure out what to do there and the mamoli will also be picked back up once I get the SM chugging along!
And of course I will follow along! 😃
Trying to get caught up on all the work and all the crafters I was following and the new ones is quite the challenge!