
HOLIDAY DONATION DRIVE - SUPPORT MSW - DO YOUR PART TO KEEP THIS GREAT FORUM GOING! (89 donations so far out of 49,000 members - C'mon guys!)
×


kruginmi
-
Posts
629 -
Joined
-
Last visited
Content Type
Profiles
Forums
Gallery
Events
Everything posted by kruginmi
-
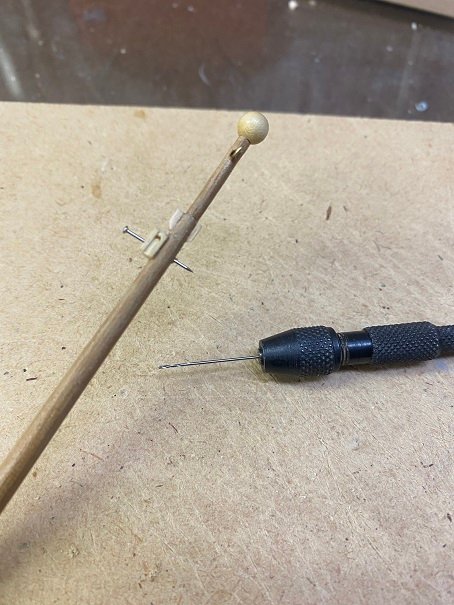
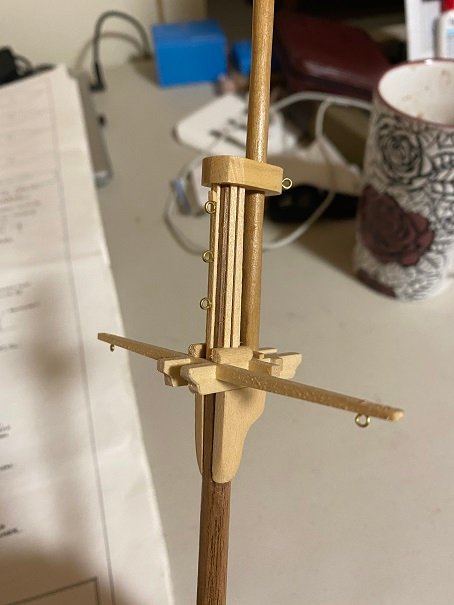
 Hey, I actually did something (queue fanfare) (and the peasants rejoiced). First up was the supports for the boom shelf on the main mast. Since this was at an angle, I used some old business cards (hated that company) to define the angle required at four points (the sides ended up being 90 degrees, which was actually a good thing). Then a simple matter to pull out some basswood and cut to length, cut to angle and cut the beveled outer edge. I am not going to say I messed up and cut the same angle twice (but I did). Put this into it's place and now my twitch can go away. I possibly could have done more than four, but when the rigging is complete and boom installed this will be hard to see anyway. (and yes I scraped away the sanding sealer to insure the piece will stay put when glued). Finally I need to add a cheek block way up at the tippity top (technical term). I modified a block I had laying around from the kit and glued on. Given that the main gaff topsail line runs through this I thought it prudent to add some reinforcement so I drilled through both the block and mast and ran a section of brad nail through to insure it stays where it was. Once snipped and super glued it was ready to go. So......I can actually start putting the shrouds in place and descend into ratline purgatory. It will at least get my knot tying skills back up. Three shrouds per side. Something for this weekend (and the next, and the next, and....you get the picture). Stay Building My Friends, Mark Edit: I should add the mast cap and trestle trees are not parallel to the deck, which is an issue. However, this mast was (originally) constructed a long time ago in a house far far away. While I have done major reconstruction to make it more attuned with the Pride of Baltimore, I decided to leave the mast cap and trestle trees as originally assembled since it would require much surgery. It is what it is.
.JPG.e09d41fa8314cae5e32fc0fb367cd0de.JPG)
.JPG.d571b94fc683063c704a68f1b829207c.JPG)
- 128 replies
-
- 6
-

-
- artesania latina
- Finished
- (and 2 more)
-
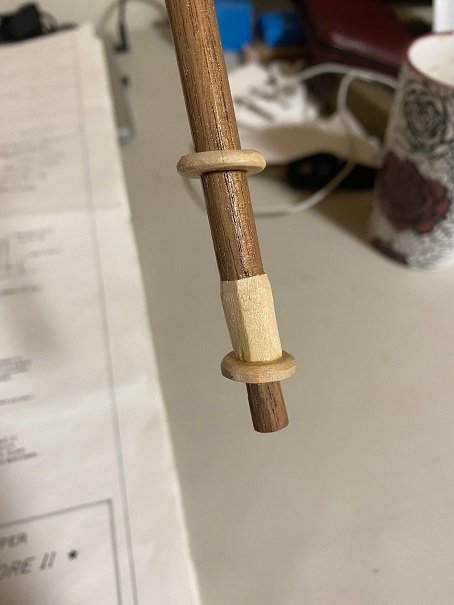
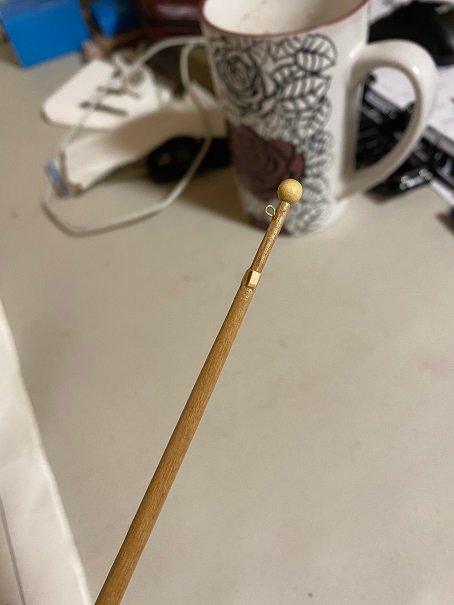
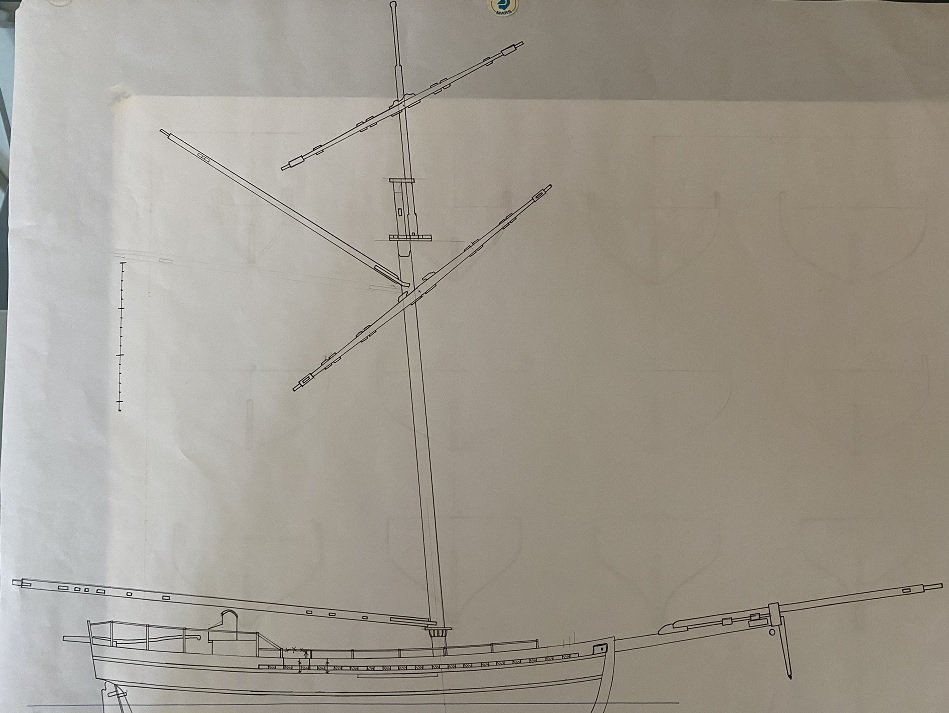
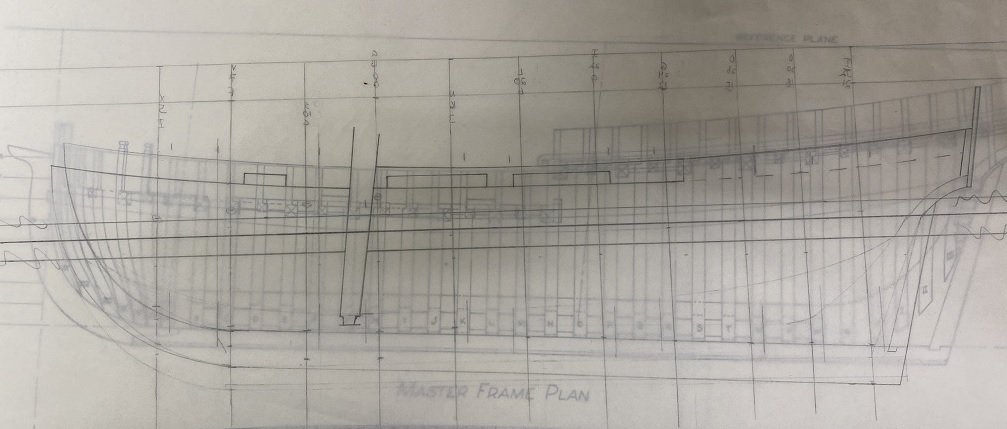
Again, the hull form is from the Harvey and as such, I do not feel compelled to make everything absolutely perfect. The goal is to have some fun and focus on rigging. First step is to take stock of my main mast and see what is left before I can get the really fun task of ratlines. The mast I have made (proportional to the hull) is larger than the Pride of Baltimore II, from which I am replicating the rigging. The as built against the plans bears this out: I re-acquainted myself with the main mast details and found a few things I have to do, but not too bad. On the mast cap I am actually good. I have re-used the eye bolts that came with the kit as the basis for attaching the requisite blocks. At the mast bottom the first thing that jumped to my attention is the need for the supports under the boom shelf. That should do it. I have already sealed everything, so will need to scrape and figure out what I used for sealing..... Last but not least is the tippity top. Here I am missing a portside cheek block for the main gaff topsail. I already have the Krug eye poker protection in place. With those additions I should be able to affix the mast in place and add the main shrouds. Stay Building My Friends, Mark

- 128 replies
-
- 7
-
-
- artesania latina
- Finished
- (and 2 more)
-
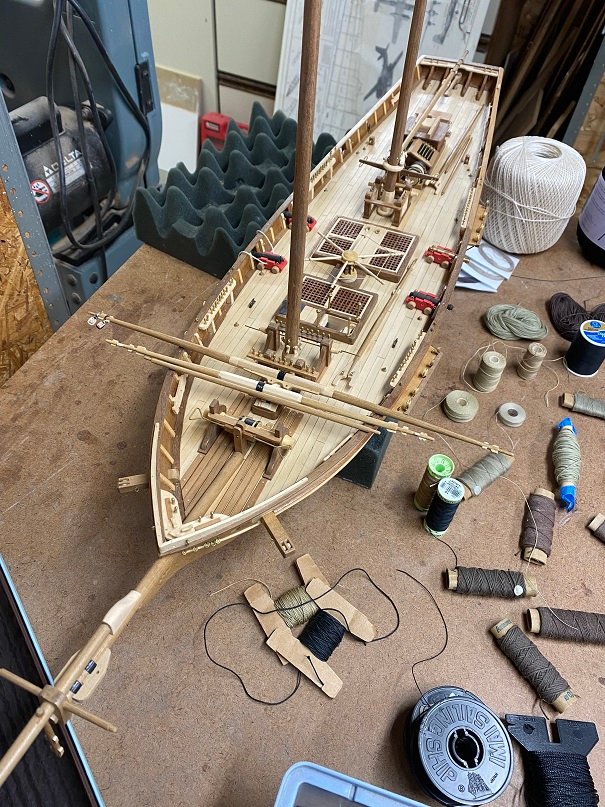
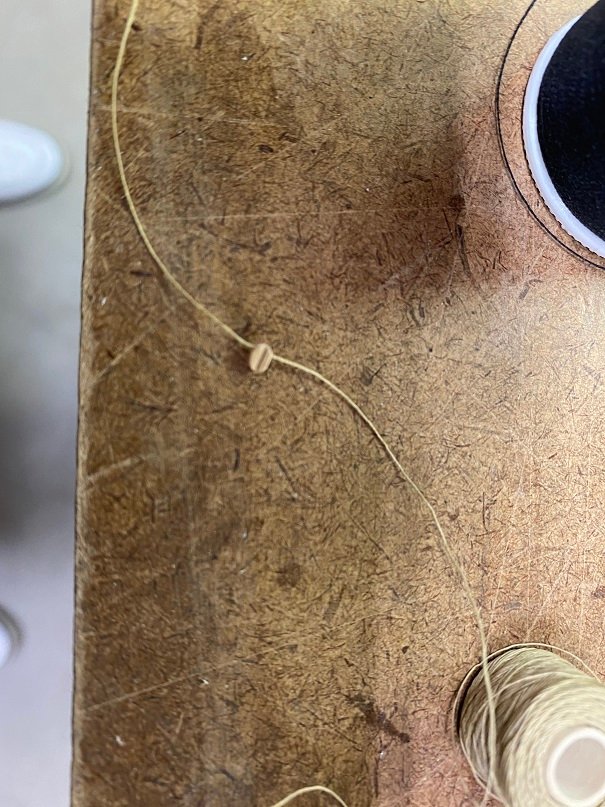
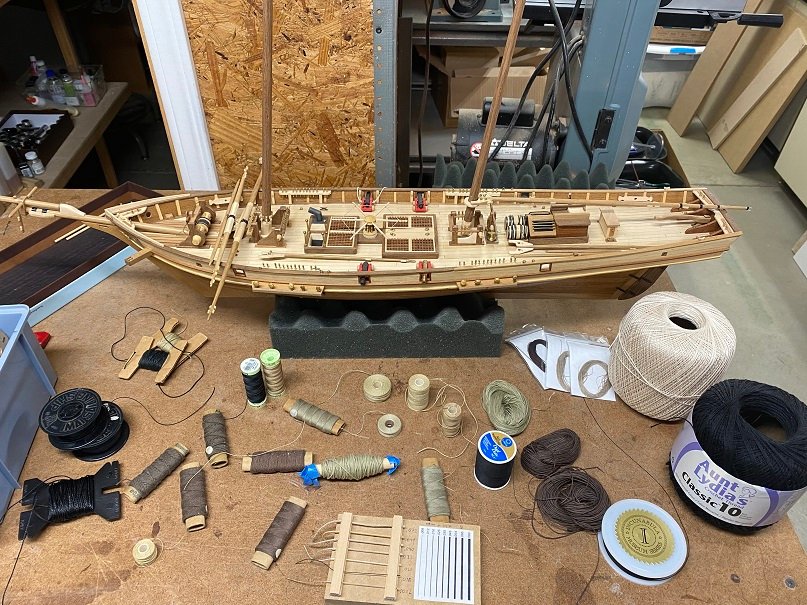
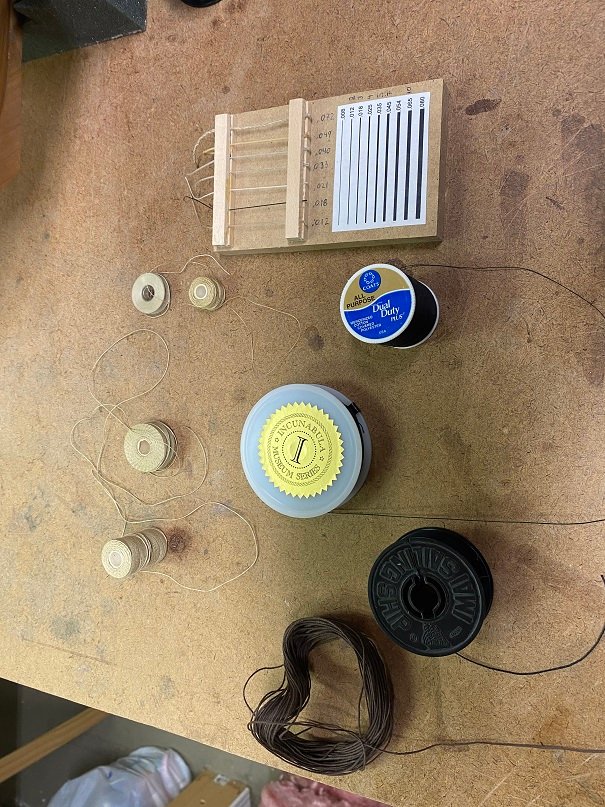
Alright, the Lady Anne is the project for the Winter. Time to put it in the done column. Pulled it out of storage, found the Pride of Baltimore plans, and actually found all the masting and sparring I had completed. I have a ropewalk but I am okay with using stuff at hand. Plus this is a work boat so I don't even need all the rigging matching in color. I pulled out all of the prospective 'rope' I had stuffed here and there. Four sizes from .008 to .025 should do the job, in both tanish and blackish (though I like brown for the shrouds). Using my thread sorter I think I found the threads that I will use: The key test (I did pick up blocks from Syren of course) was would the fine thread fit through the 1/8" blocks: Success! Now to get the workspace organized, make sure the the masts are totally setup then getting onto those ratlines (everyone's favorite part). Stay Building My Friends, Mark
- 128 replies
-
- 7
-
-
- artesania latina
- Finished
- (and 2 more)
-
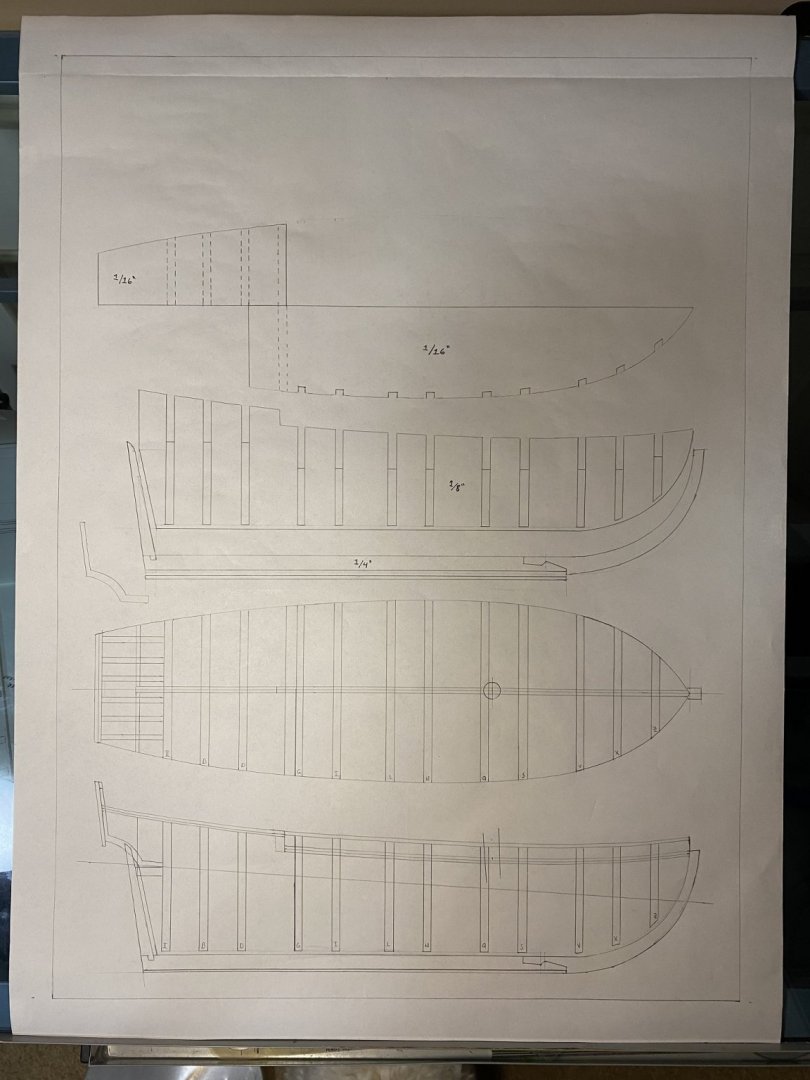
Still have some time on my hands (haha) so worked up the detail page for the hull innards. Still a few notations to make but the pieces, dimensions and how they fit together should make sense. The only other page I 'have' to make is one showing the outside / finished details in both profile and deck. I have already worked these up on separate drawings. These four pages and the rigging book should document my build adequately. Hopefully highlight the last page in a couple of days. Also need to ponder the imponderables and think what I could add. Like I just thought a good rear design drawing is needed. Stay Building My Friends - Mark
-
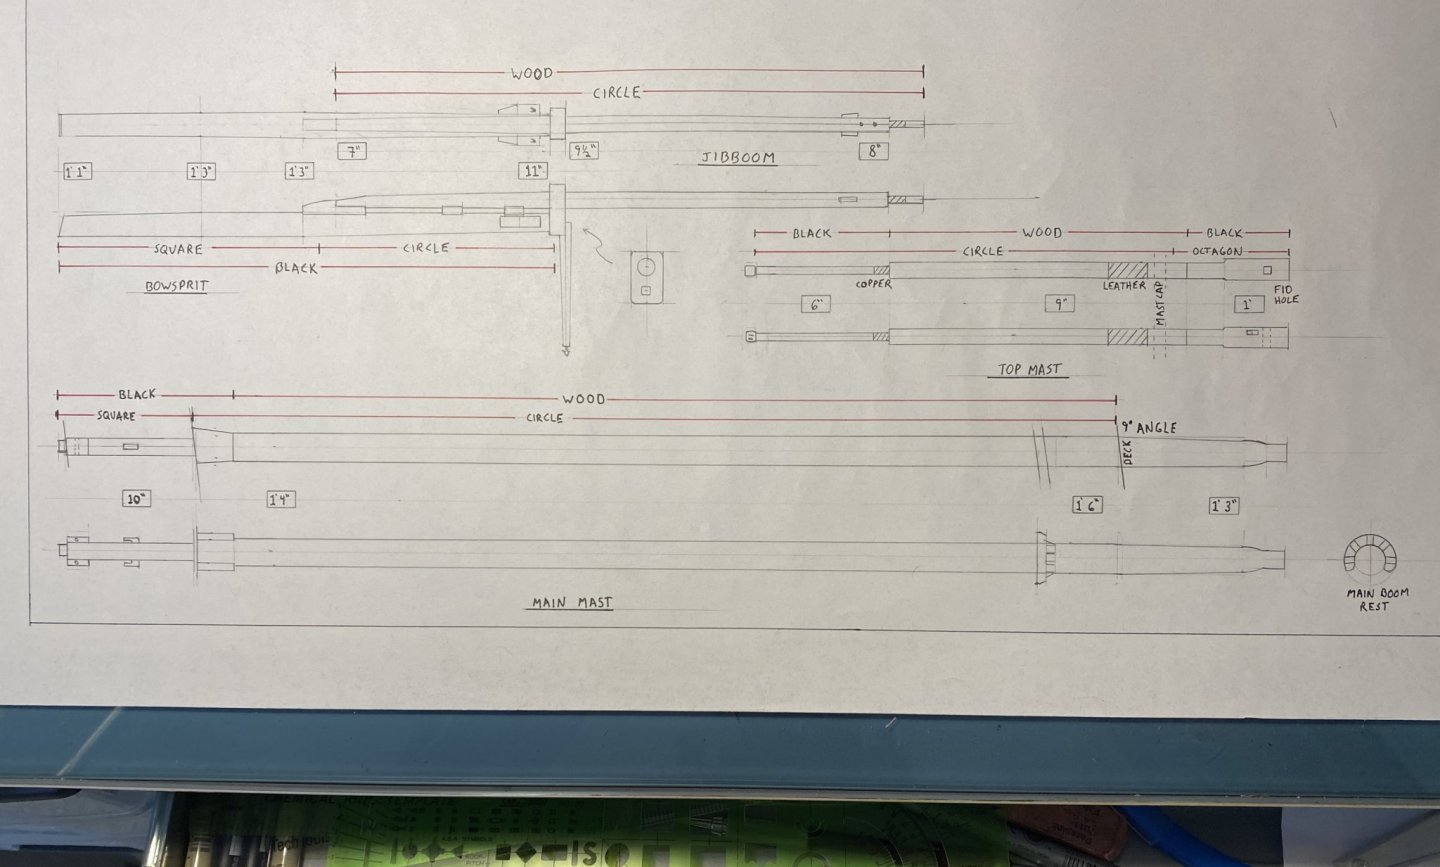
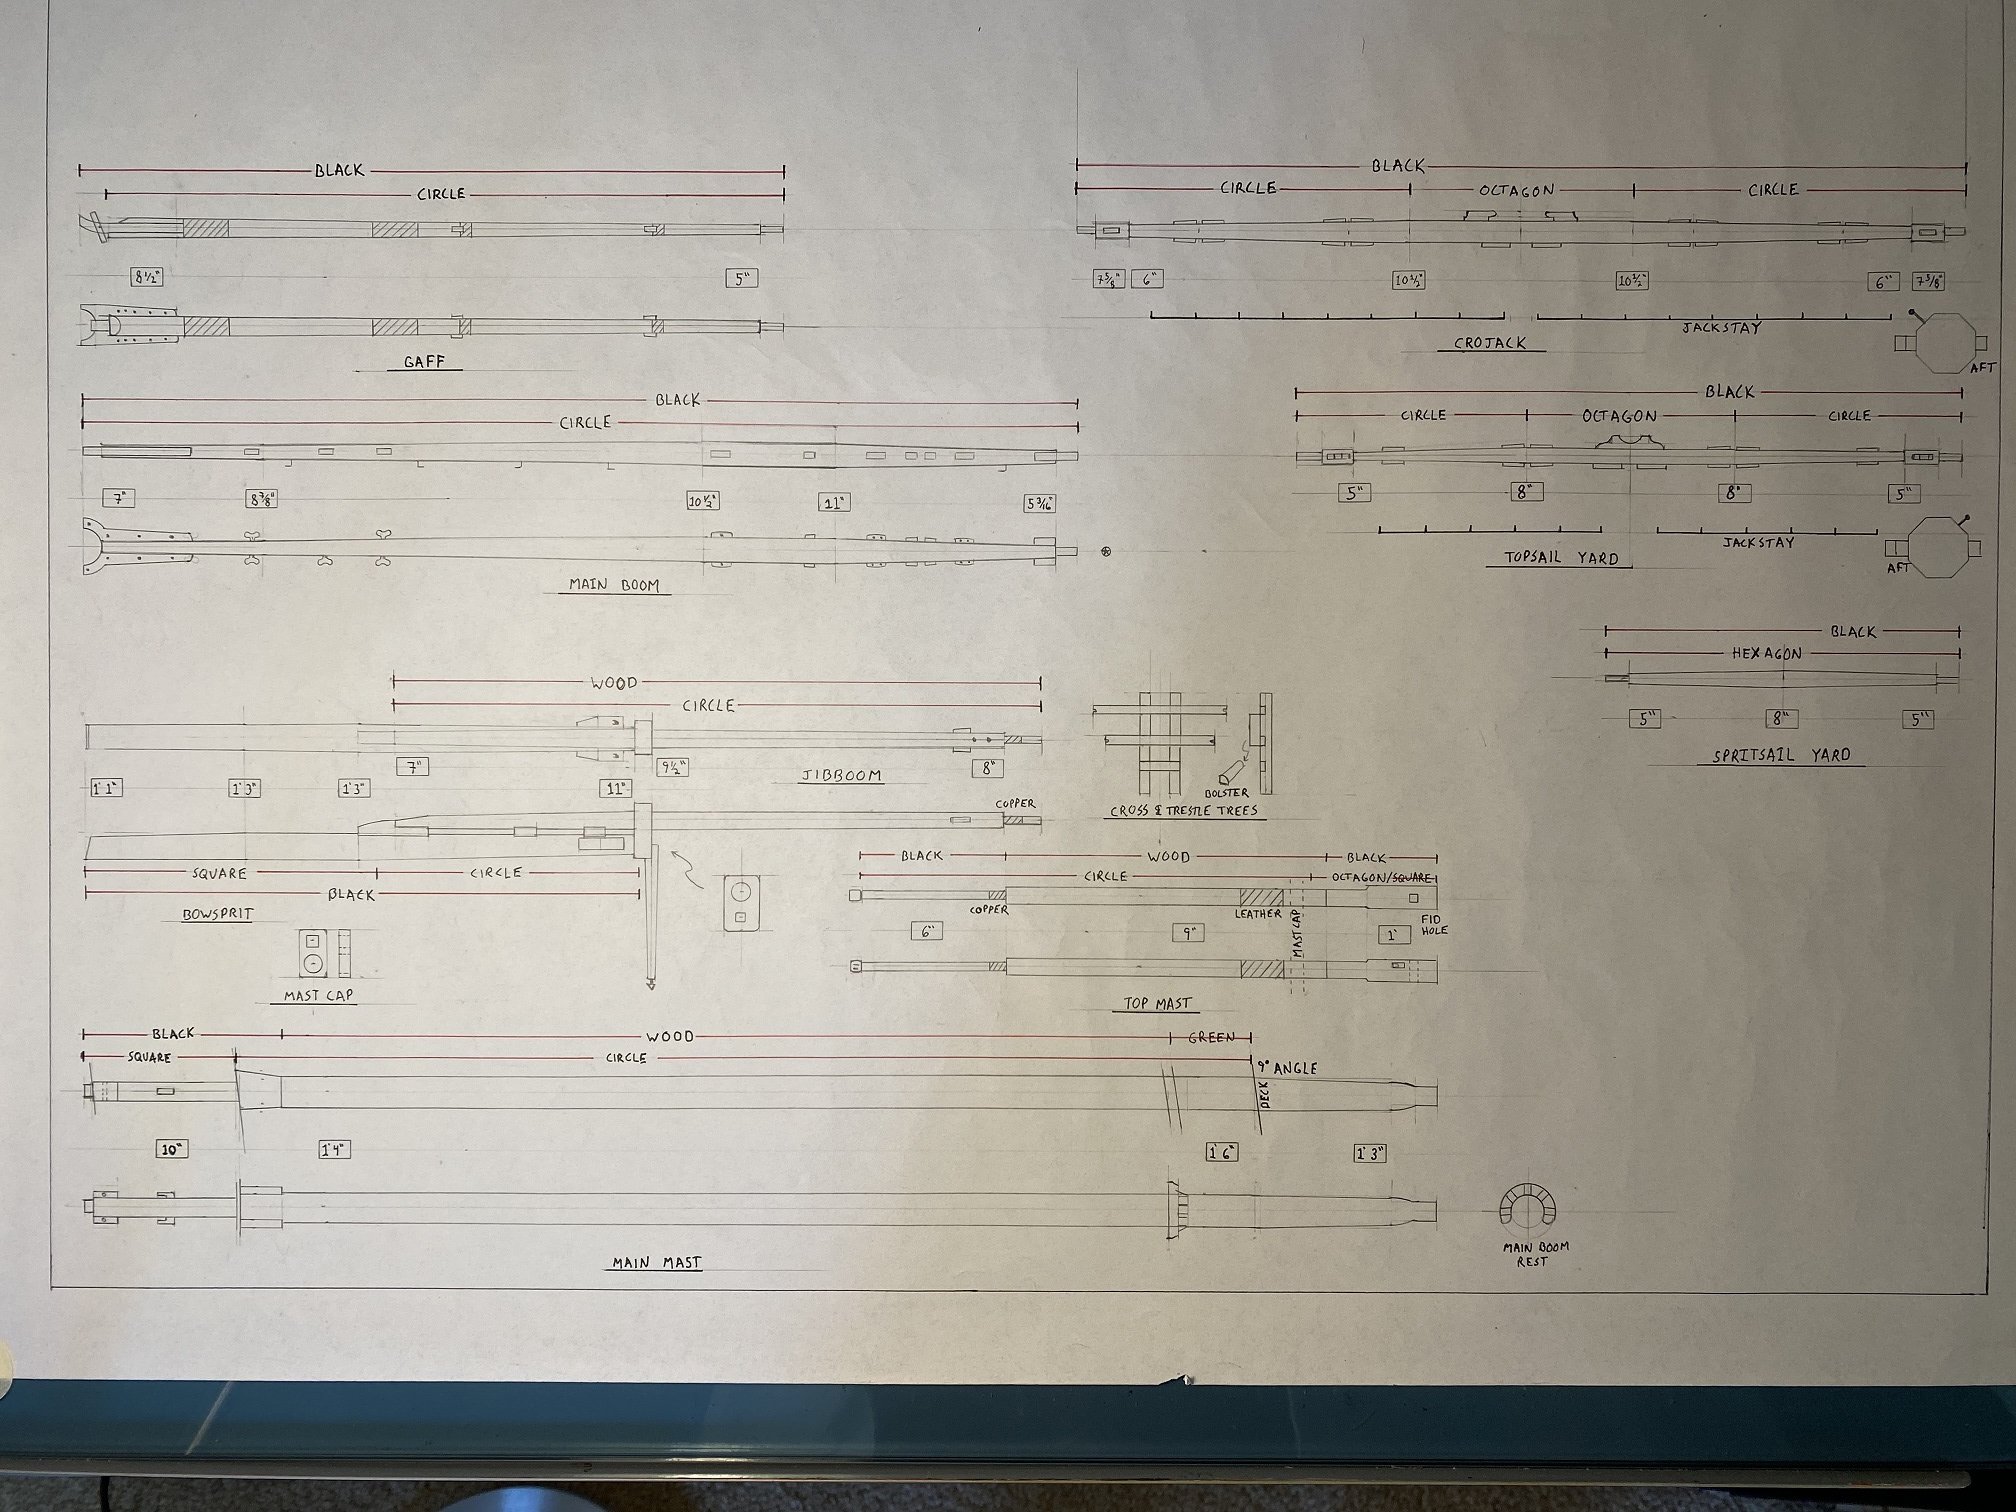
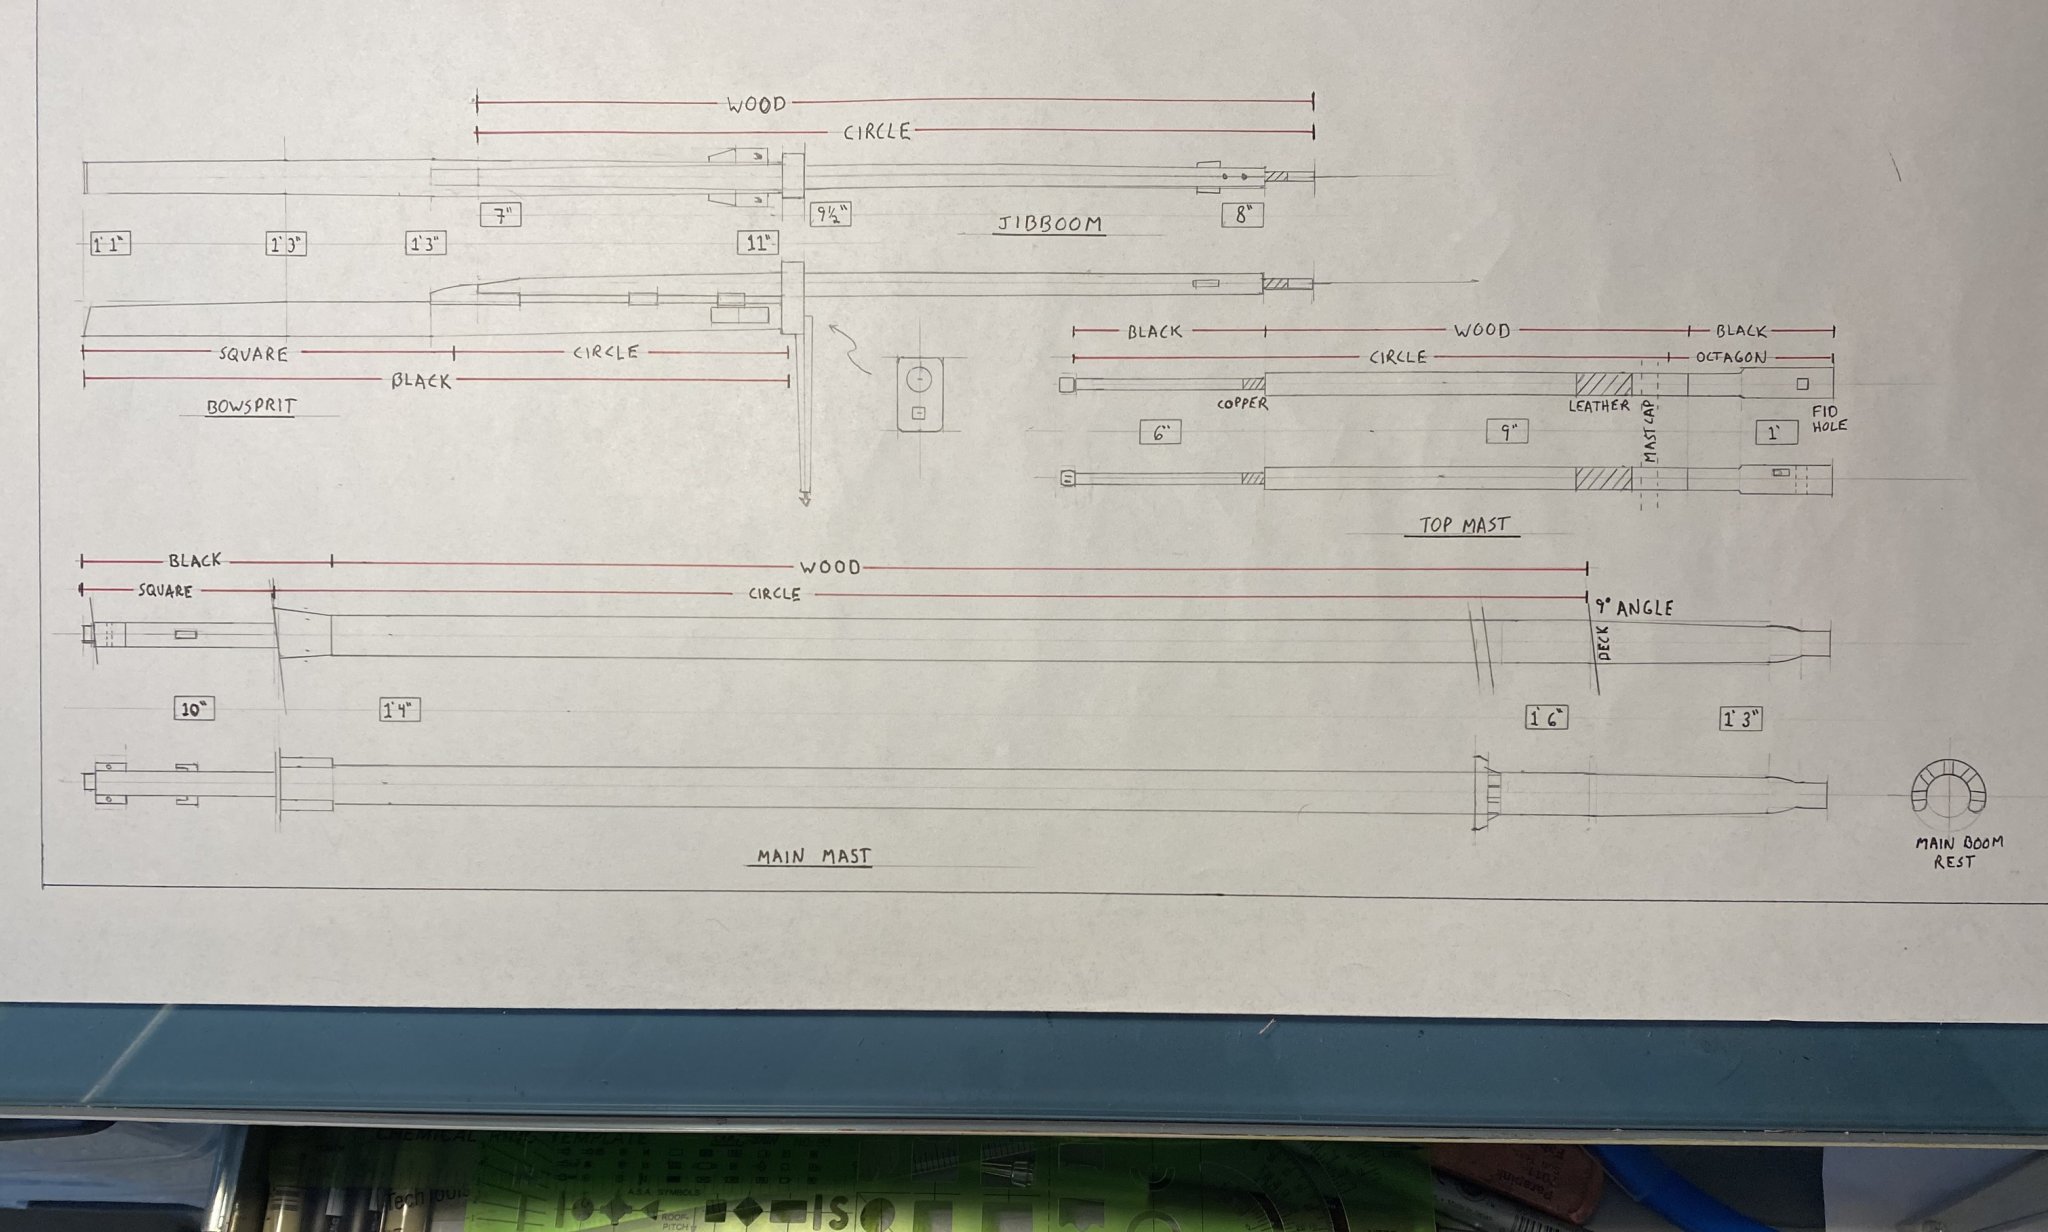
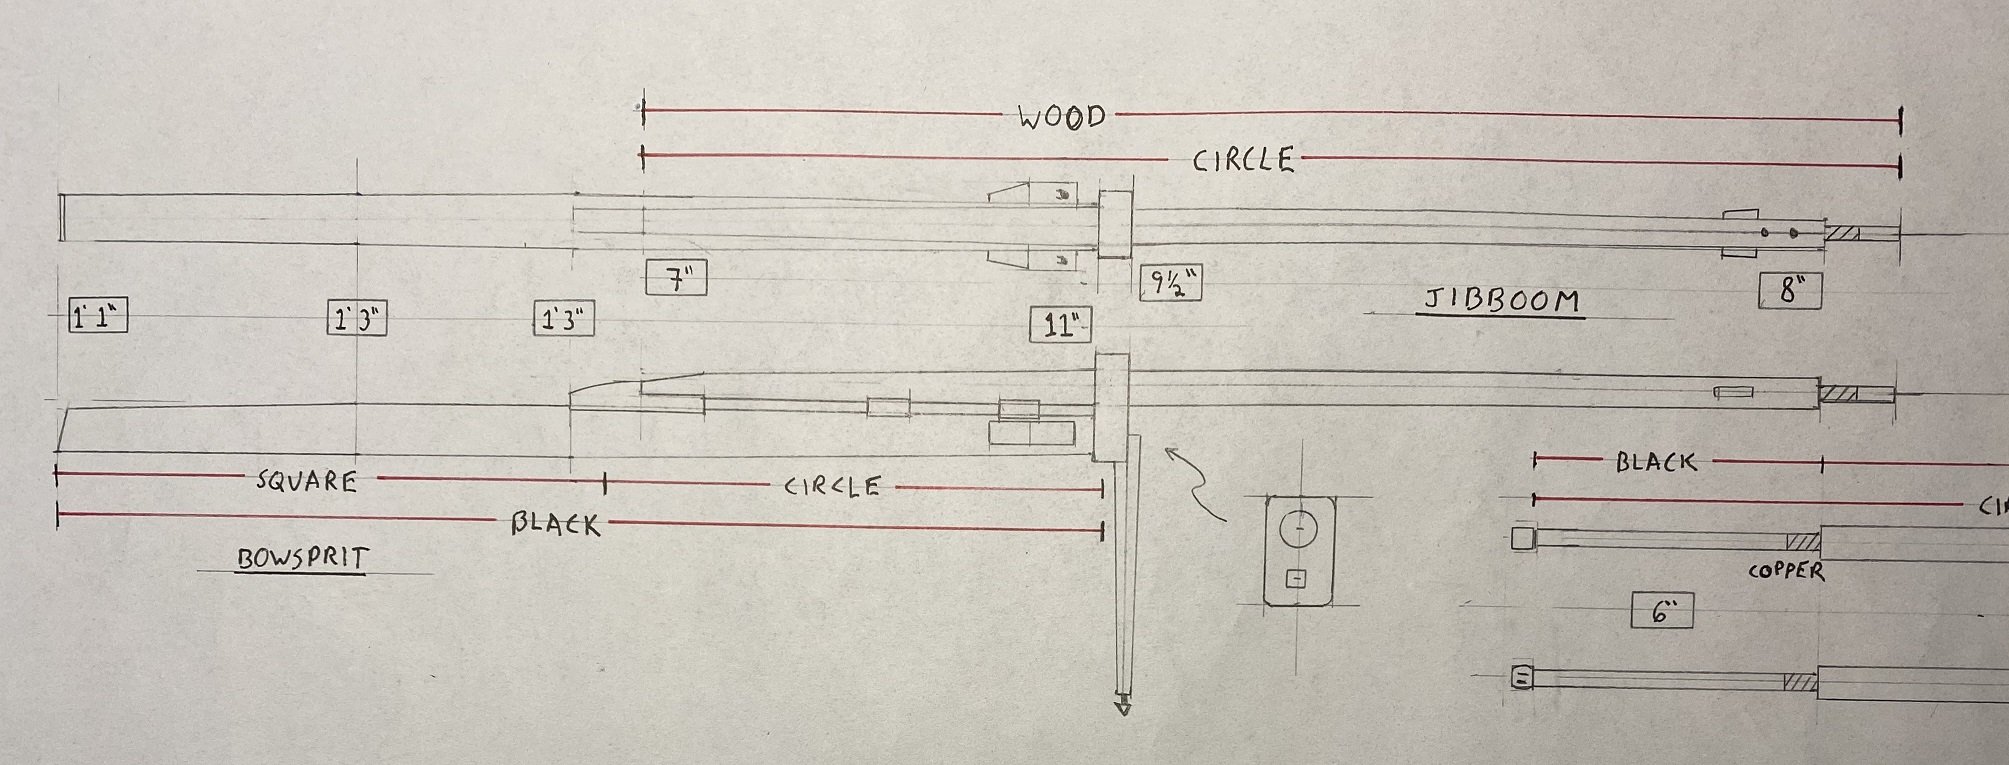
After some very focused effort I have reached a good conclusion (until I start seeing all the errors LOL). Still have some annotation to do (copper wraps and such) but pretty happy right now. The GAFF and Main Boom: The Yards: Finally a look at the whole thing: And yes, Eamonn, will be looking for making some copies and probably hang one at work at least. After putting in a title block. Mark
.JPG.ddc40f08f3ba7f5e9bff22cfd8e32ab0.JPG)
.JPG.0a0bc6ff2ae0ba2a17d90af3307969a3.JPG)

-
Current updated plan status. Advice / comments welcome. The big issue I had was the inability to properly give diameters correctly. Lengths are easier to show at this scale. So I tried to draw them better (within the tolerance available) but also provided the full size dimensions at key areas. There are also areas that they use alternate methods to build (such as the yard arms) that yield discrepancies with 1800 build practices. For each case I weight the pros and cons. Most of the time I tweek to look more original (I have changed the whole lower hull for Pete's sake LOL). Cheers - Mark
-
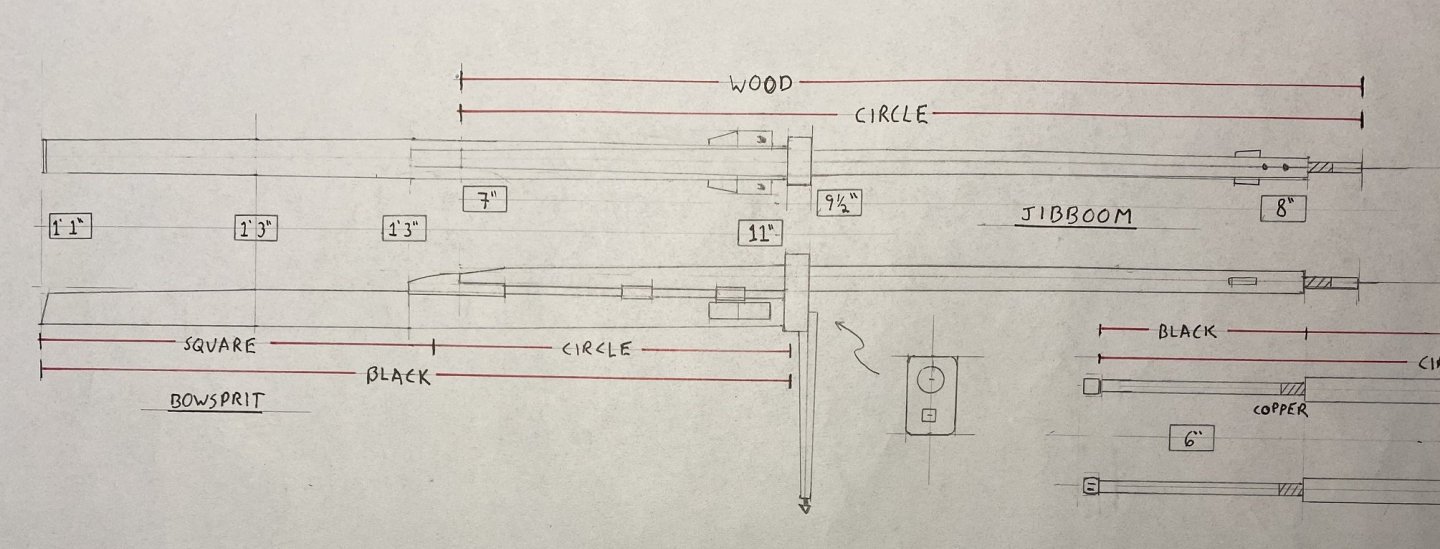
I have been doing some quality control checks. First issue is how to capture the correct diameter dimensions. In 1:48 scale 3" is 1/16 inch. So I decided to add a table per masting piece defining key actual dimensions. This does impact the drawn sheet - where and how to put. Secondly some of the added information looks confusing to me at first glance. Now that it is in front of me I have a bunch of "Wish that I had done it another way." Third, looking at the actual pics of the ship I see additional details that contradict the actual plans that I didn't see before. For instance, where the yard arms transition from octagonal to circular. So....on to version 2, I am going to redraw this sheet. No wasted effort, it is a process. It will be worth it in the end.
-
Working through the data. I have the original ship plans but a number of things have been replaced / upgraded and/or changed. So you use the original data as a start, then figure out everything else. I still discover things seemingly every time I look at a photo I have taken. Biggest a-ha for me is the amount of wrap (copper and leather) used to keep chaffing and wear to a minimum. Never had thought about it in depth before. Makes a lot of sense, but most buried under rigging and never seen. The masting will definitely fit on a 18 x 24 inch piece of paper. This will make duplication pretty straightforward. Still need further work on the main mast, main boom and gaff. And now that I look at them, probably need titles for each component (for people not as sophisticated as us - haha).
.thumb.JPG.72fc888cd1ec9b233d2a2e925f94d1c9.JPG)
.thumb.JPG.3c41e33f75d371717f2e662ccf7e3e43.JPG)
.thumb.JPG.dc68cd2f053be736e8649416f65bec56.JPG)
-
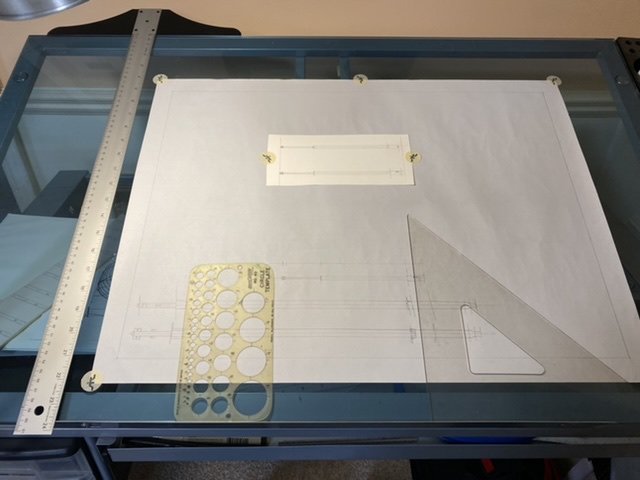
It is getting real people. How many find drafting relaxing? I really enjoy this part.
-
Thanks Mark. Really hoping some places around here will be open by the weekend. Time will tell. Enough work to do on other things in the meantime. -Mark
-
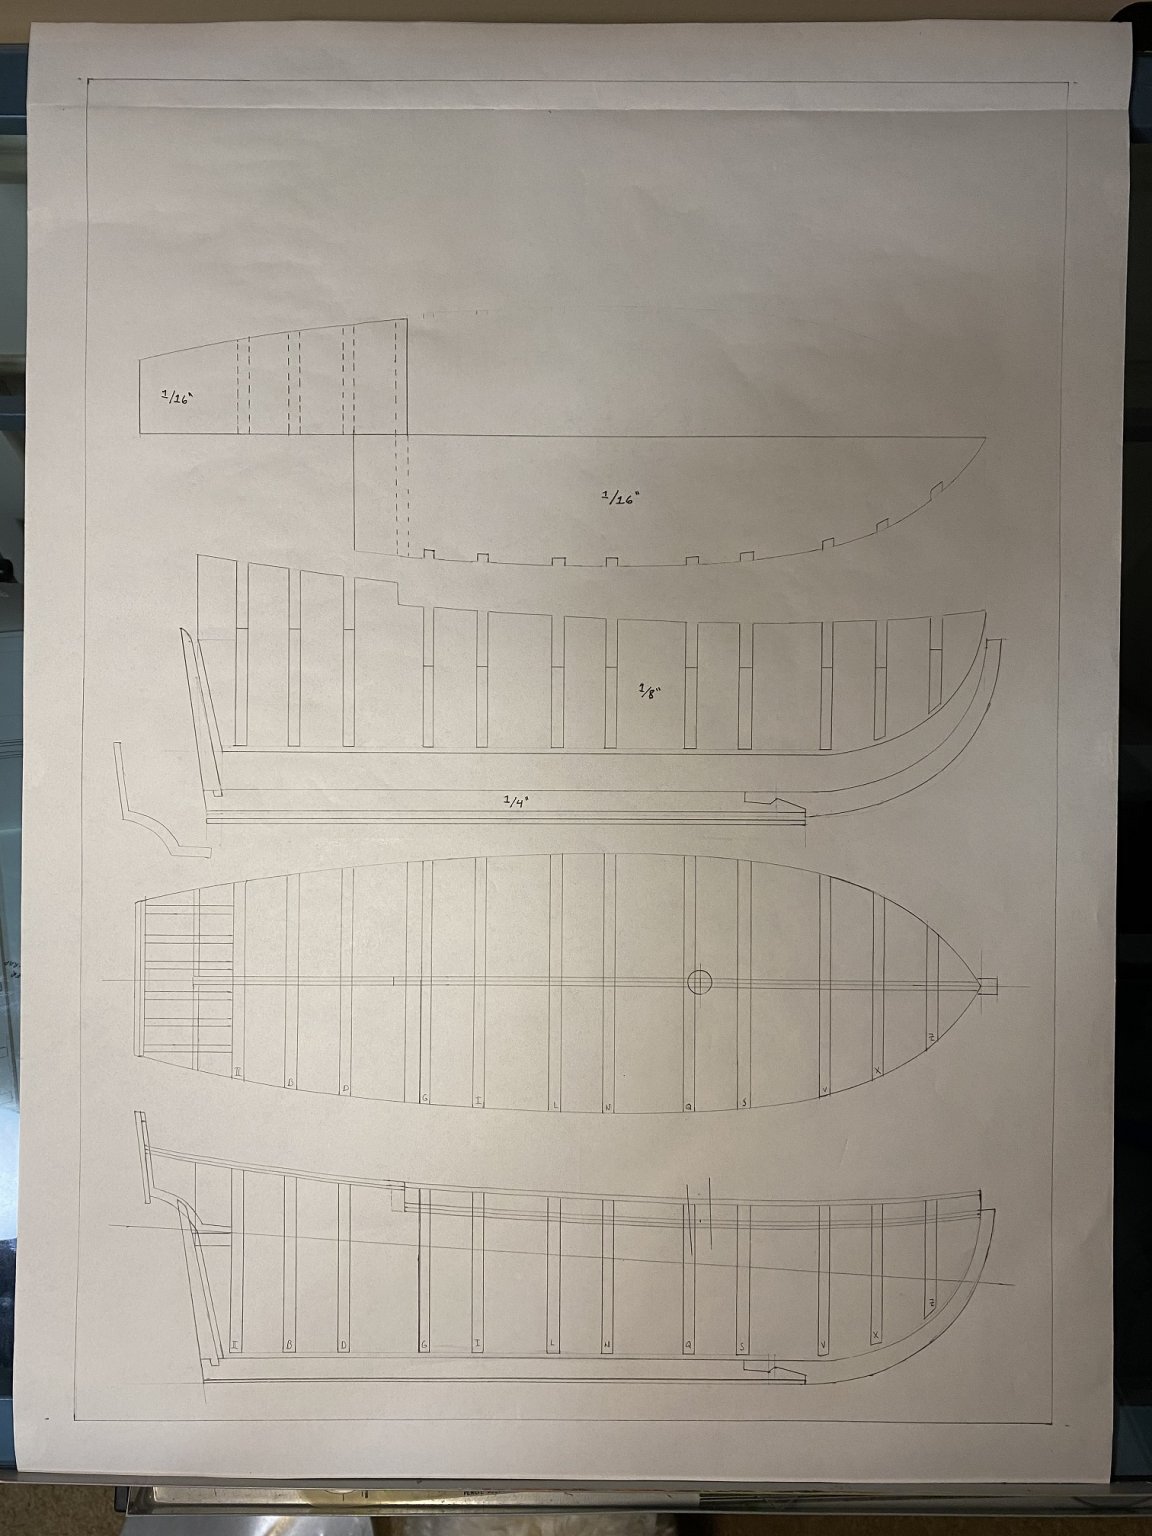
Well, if I didn't know better I would think I know what I am doing LOL. I finally have a sheet of bulkhead plans that I am confident with for posterity. I cleaned up my drafting table prior and filed quite a stack of previous designs getting to this point. Pretty happy with that. Also uncovered my early on profile shot. The masting is all drawn out and triple checked on a separate drawing. What is seen here is pretty close. A pretty good day on my day 'off'. Found out my supply of 3/16" wood is only good for a couple of full bulkheads and currently have no way to get more easily. I might work on consolidating the masting designs onto a similar sized sheet for copying in the future. I also need to create a good Title Block for each page. Stay Safe, Mark
-
Well, it has been a long time coming, but I think I have the outer hull dimensions complete with good tracings to use. Now to forge ahead and start getting these full bulkheads cut out. Also, on the off time, make up a good set of plans for the future.
-
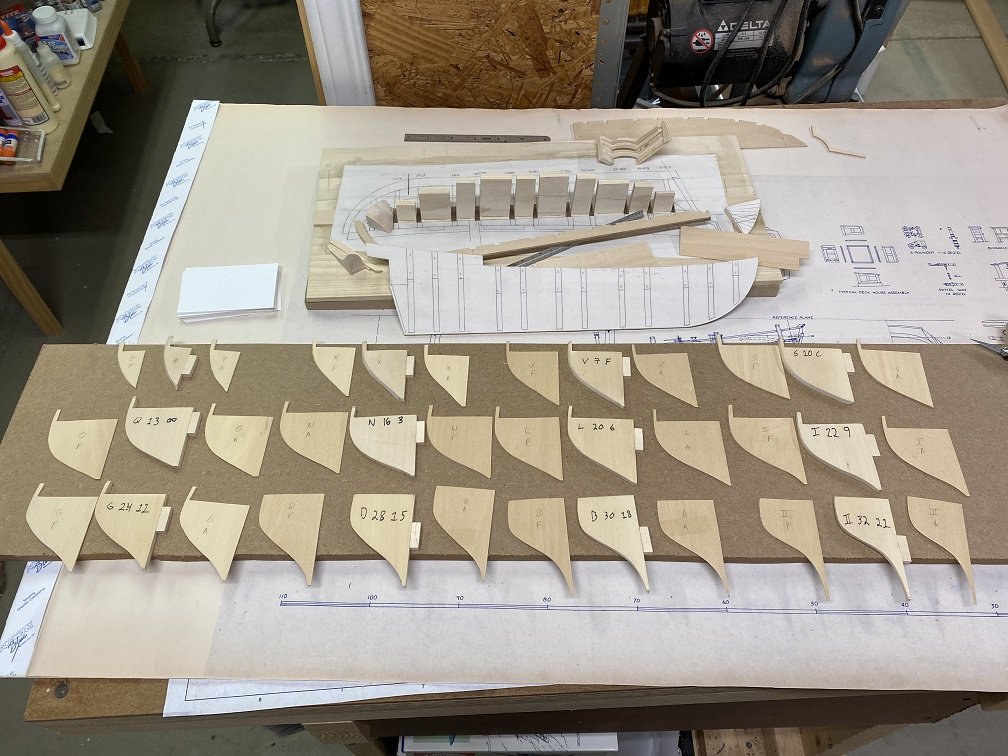
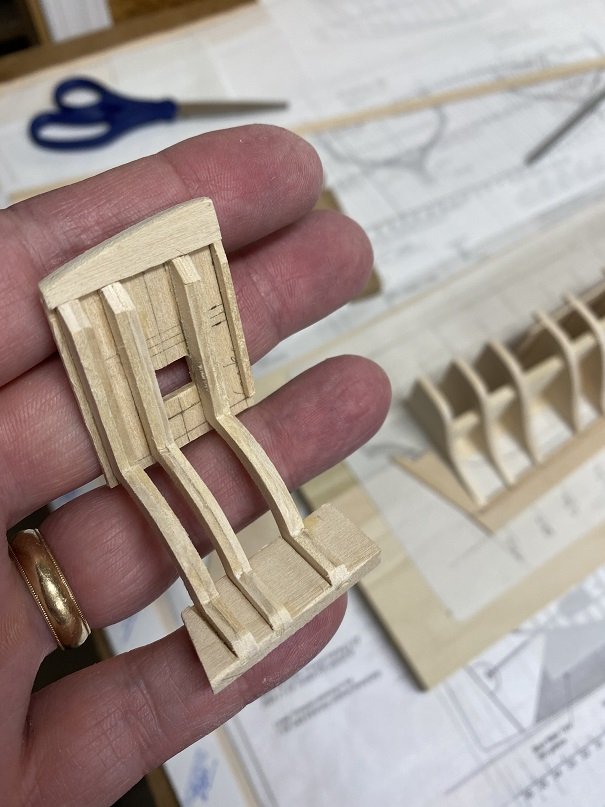
On to the next step of actually building a full hull (though POB). I need to use the frames on the 1/2 hull as templates for the full hull. However, they only show half a frame. Can't flip them over because they are beveled. You could do a bunch of drawing and meticulous duplication or.......make templates. Templates make sense for a number of reasons - need an accurate portrayal of what was built, need to transfer to plans, need to transfer to at least one build, need to remake bulkheads that are screwed up (highly likely). So I took some 1/32" basswood and traced both the forward and aft of each frame onto it. Then I cut close to the line. To finish, I affixed to the frame itself and sanded to shape. For the purists, yes, this introduces a 'small' inaccuracy, however it is well within the tolerances I find acceptable. The reason the deck side was not beveled was to allow these two templates to be aligned exactly in the ‘y’ direction. When you overlay these two templates the bevel introduced is readily seen: This gives you a great indication of what will be required sanding wise. Each frame will be handled this way, then the biggest template for each frame can be used on both sides of a centerline to truly mirror image the frame. The power of my 1/2 hull construction can be seen in its deconstruction: Using the designed bulkhead spine I have also rubber cemented the requirements onto the 1/8" board: It will take a little time to get all these templates knocked out but using 1/32" basswood is pretty fast. Hoping in the next day or two to start getting some full bulkheads cut out and slotted. -Mark
.JPG.feefe927828e33c66f3be6af3cd7336e.JPG)
.JPG.fcfef7471413c67069bab1b94e5d60c1.JPG)
.JPG.fe8f9aec58ea3d22863406669b61afff.JPG)

-
All basswood Eamonn. Wood frowned upon by many people for this hobby but it can be found (milled) in a few stores around here (in normal times). Knowing its strengths (and weaknesses) can lead to successful use. I pick up a piece here and there to spread out the cost over time, only way I could do this hobby. Druid is 96% basswood. I do have a limited supply of boxwood for the more detailed carving pieces (trim, figures, etc). It is nice to be able to run out if you are short a piece or two I agree. Mark
-
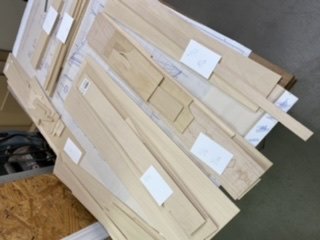
Realizing you have no idea what is in the basswood stash. So pulled out the big pieces and organized. this does not include the containers of smaller pieces.
-
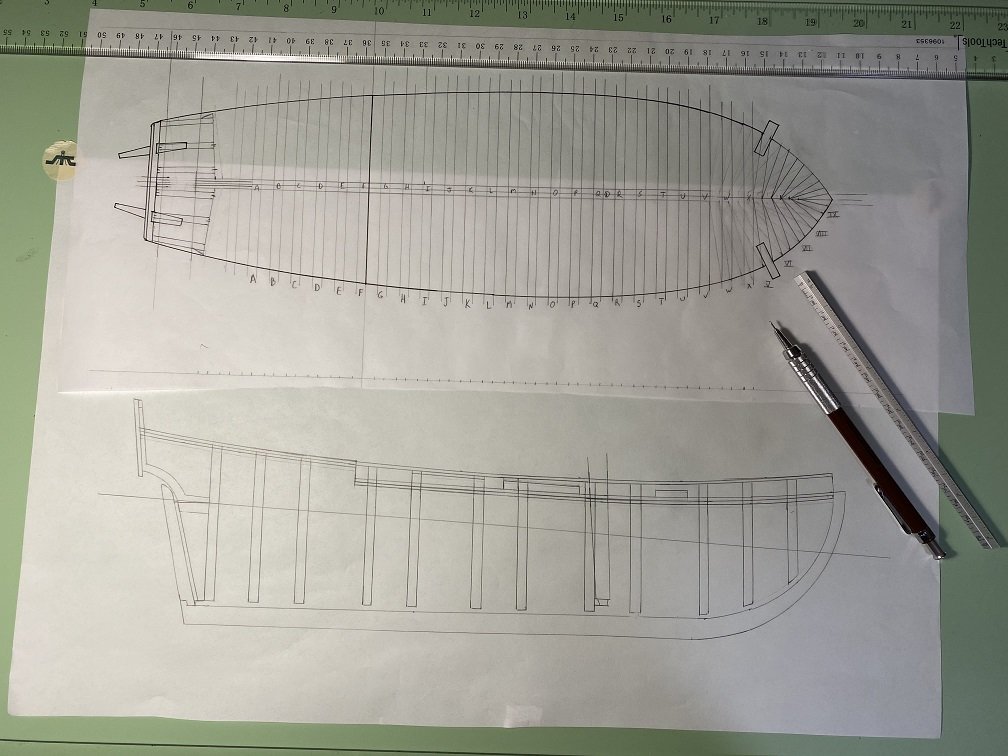
Interesting question I had was how to draw this profile. I basically considered it a slice right through the middle of the boat. However, a side effect of this (with the deck camber) is that the railings shown should be reduced in height by about a planks height. If you look at the top of the quarterdeck you can see the delineation of the planking, then the false deck, then the underlying fore and aft bulkhead. By lowering the railings it would look like the railings are not on the same level with the quarterdeck which would be in error. Interesting. An option would be to omit the railing entirely but that might lead you to think the main deck was just like the quarterdeck (just flush). Just as the top down view shows a width to the widest point, which depending on the tumblehome, can be in a variety of locations. Drawing a set of plans for the first time has been very enlightening and I have a greater respect for the process. I think this reliance on just one view sometimes led to the issues I identified (and fixed) with the prototype. To jump start the bearding line I drew the main keel a plank's width below the lowest part of the bulkheads. The primary bulkhead will be an 1/8" while the keel will be 1/4" thick. My thought is that this will make planking cleaner. In fact, all planking can be done prior to the affixing of the keel itself (remember POB). Question: Should I keep it like this or move the thickness of the keel up to the bulkheads to allow the bulkhead to have the bearding line custom cut?
-
Next step is to capture all the deltas in a new profile drawing (to include false deck and planking). It is important that all the prototype measurements align with this capture (as much as possible - there is a deck slope port and starboard). Once satisfied, I will start capturing the bulkhead profiles. These will include fore and aft profiles per (capturing bevel amounts). This will be the master to create the exploded component view - keel, fore&aft bulkhead, and eventually slot depths. Whoops - Forgot to add the false keel. Probably raise the height of the aft stem more into the hull (specific name escapes me at the moment).
-
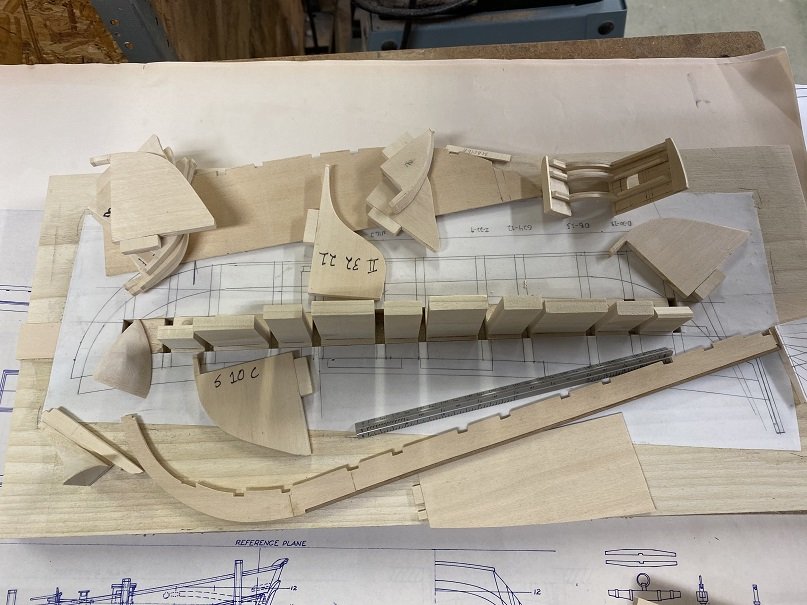
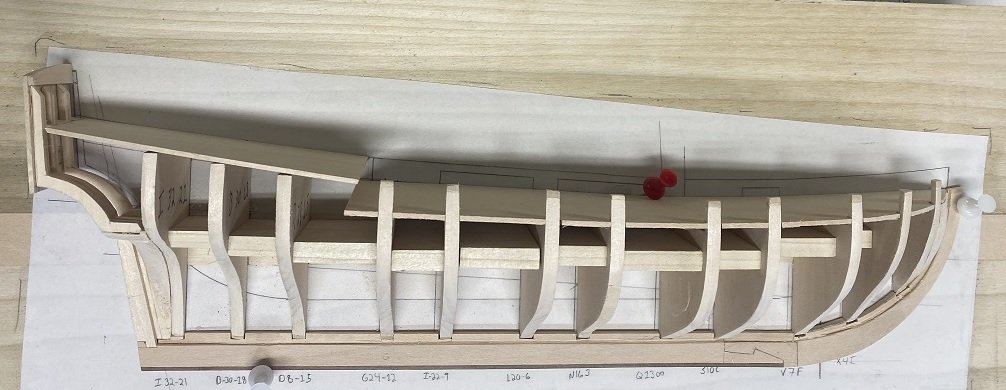
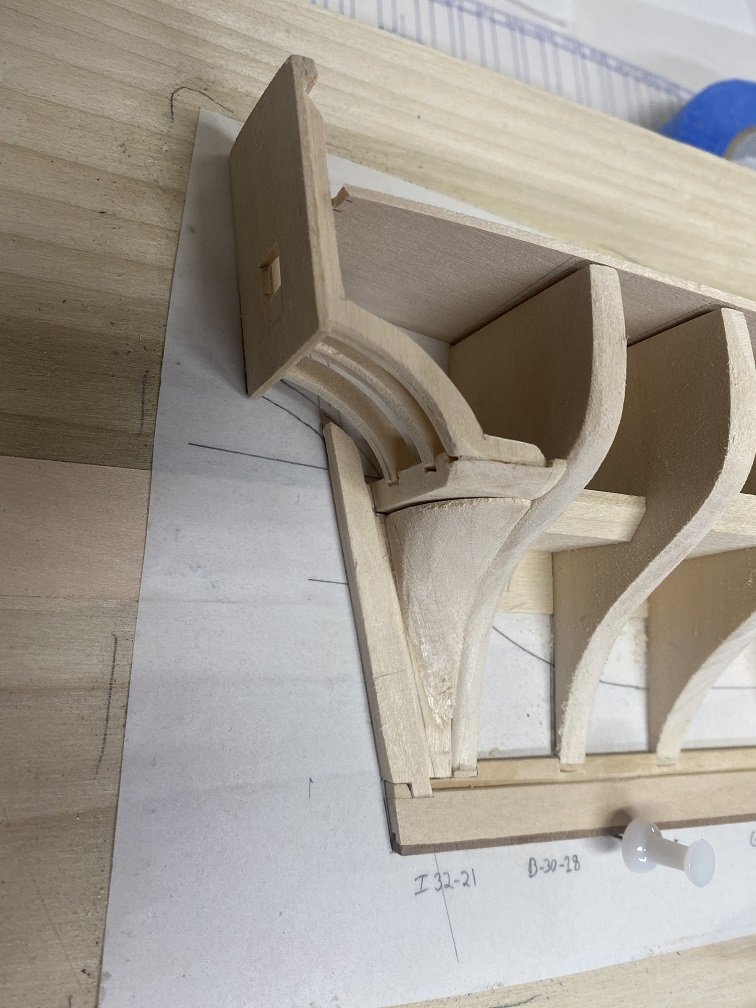
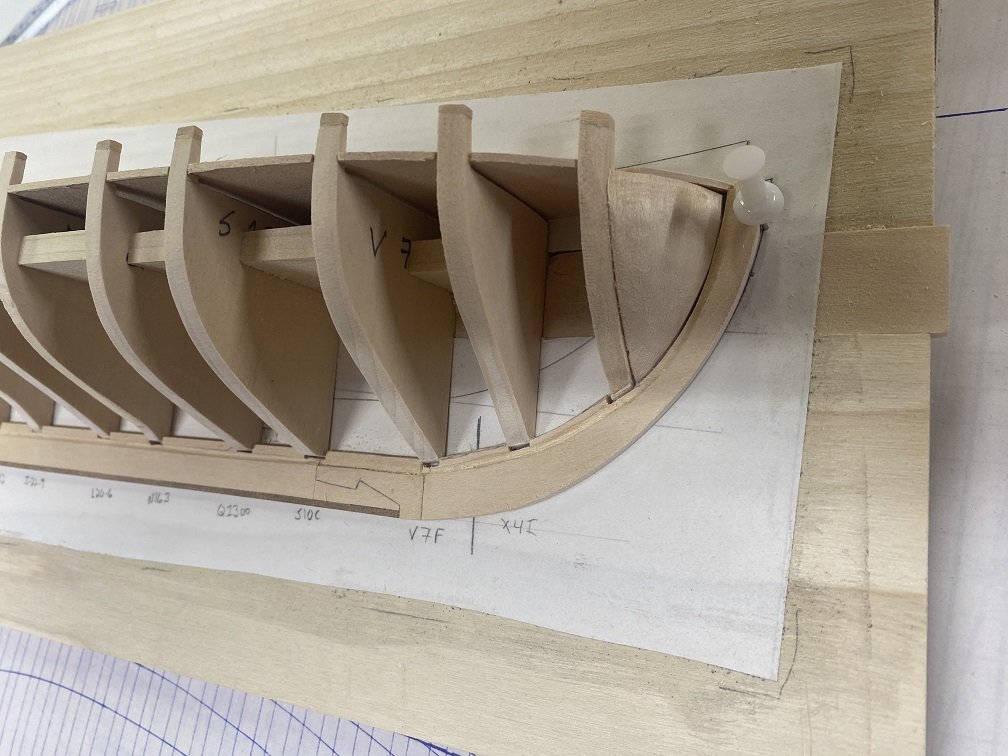
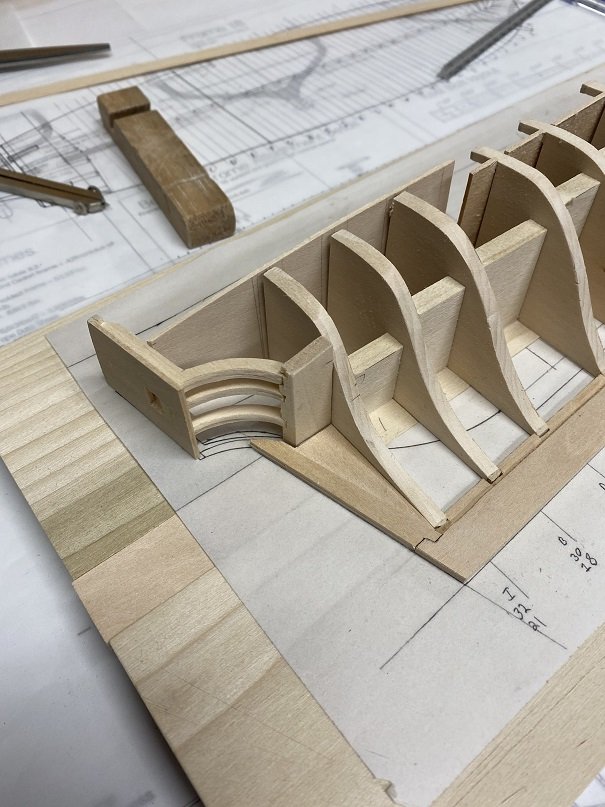
Alright, think I am at the end of the road for this prototype. All outer bulkhead bevels added and the blocks shaped fore and aft. I am not beveling the deck portion on this build. I did have to add a 1/16" skin to a section of one bulkhead but other than that, everything worked out. The blocks I kept putting off thinking they will require lots of carving, sanding and other. In my mind they had grown into 1" by 3" by 5" monsters. The truth very different. Pretty straightforward. I might add some dowels through the keel to keep it in place. -Mark
-
I think I am left with beveling the lower frames, and adding a block at the extreme fore and aft for plank affixing. Maybe this afternoon. Added a false keel. Had to cleave off the keel forward of the scarph joint (don't ask) so vertical line at V7F frame is this fix (ignore). Everything appears ship shape and to plan. Making templates coming up.....
-
Come on In Eamonn - the water's fine! I don't know about that 'league' comment - given the number of missteps and do overs I have done HaHa. I came out of the initial draw up phase pretty confident I had knocked it out of the park - boy that is funny. Here's hoping that when I do the full POB the same voyage of discovery won't be retaken LOL. When you do a Frankenstein build though, no one can 'really' criticize you since you are doing a what if. Well, they can criticize but you don't have to listen! Thanks for the kind comments, I will buy you a beverage of your choice should ever we meet. -Mark
-
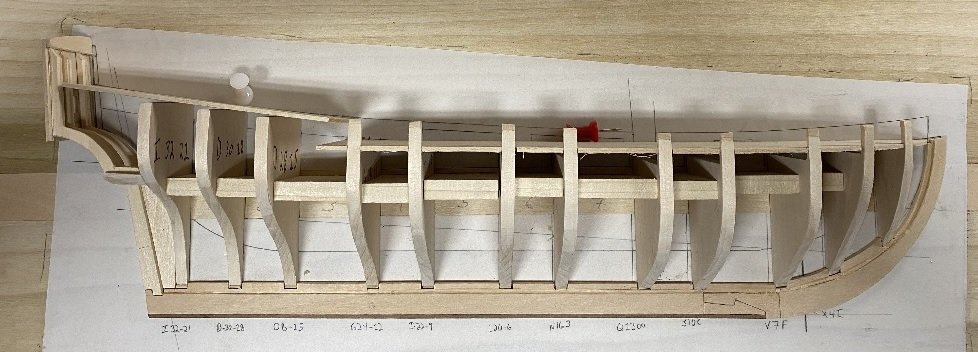
I feel like I am posting the same pics over and over again but there are HOURS of work in between. This series is called 'Almost There' haha. I am thinking another solid day and this just may be. Did some sculpting of the stern (again) but pretty complete. I still need to add a block below the wing transom to allow shaping of the stern and better attachment for planking. The bow is pretty set, with the exception of the bow block (same purpose) and a few other minor details. I (of course) got messed up with the railing height (my template meant for above the false deck, started to apply without it so......some 'repairs' are required. Final shaping of the bulkhead bevels are soon to come. This process has been very educational (and frustrating) but getting back into the groove needed some re-education. I am looking forward to the next step of a good set of drawn plans and then a full POB build to validate. Stay Building My Friends, Mark
.JPG.0cc176a56aba8bf3fe6d4bdb9ed6aa4c.JPG)
.JPG.17866d94148711b31892eba655e37338.JPG)
-
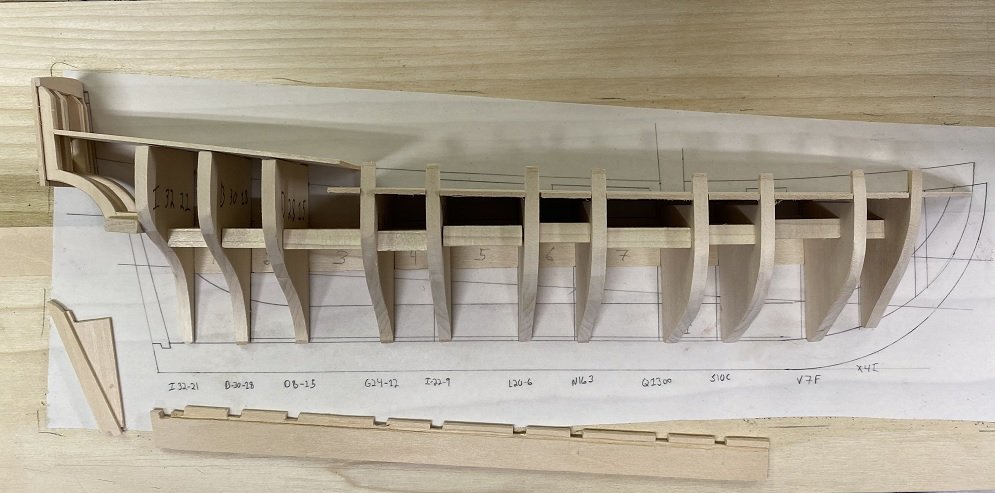
No time like the present. Got'r done. (well, keel assembly still has to be redone, but that is easy). The pivot point to rotate the bulkheads was easy after all - the reference point I used to locate the bulkheads originally was the step up from the deck to the quarterdeck, so the pivot used was the deck so this alignment remained. The plans overlayed with the Hannah sure look a lot more alike. Finally, transferred to the building board. I had to take off and reset the locating blocks but that was no big deal. Some frames show a bit off because of some drawing issues, I was in a bit of a hurry to get this done. Never Give Up, Never Surrender -Mark

-
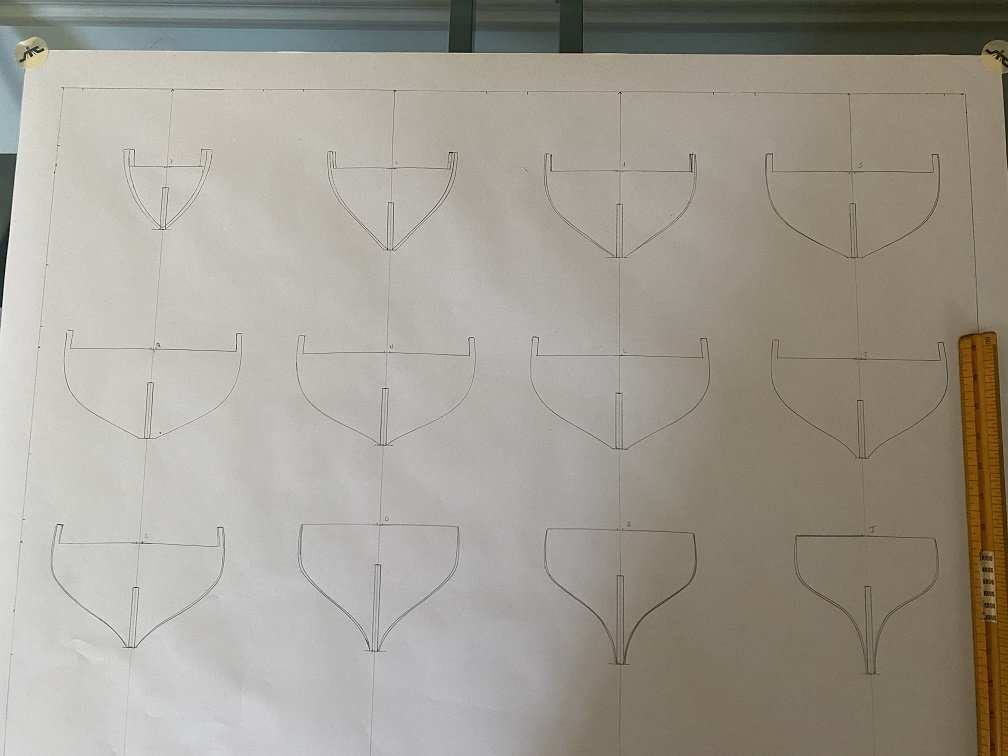
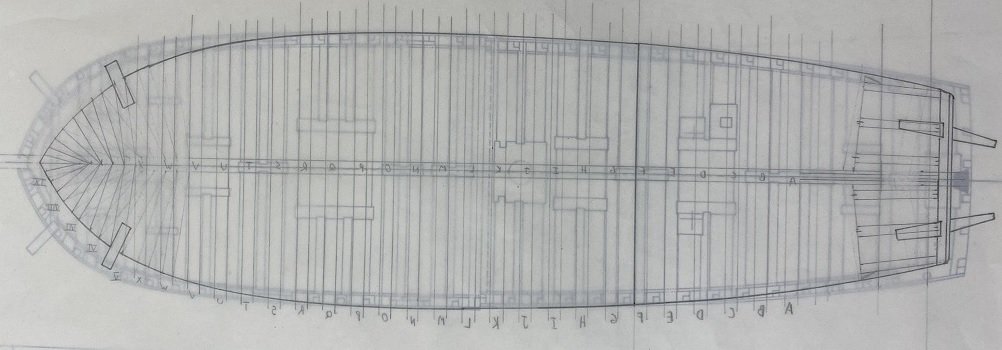
Oh boy, big changes coming (I blame Druxey LOL). Cleaning up the work area today and decided to do some comparing against Harold Hahn's Hannah plans. From an above view pretty happy the comparison is pretty close and there is close alignment (frame width and spacing the same, etc). The same can also be true from the side view: The deck profile is almost scary on how close it is (I aligned at the keel). The difference in the slope of the frames is readily apparent. What I didn't think was that for the distance of the step up to the quarterdeck and for the railing posts, the difference really isn't that much. The keel depth will be re-verified but is much deeper on the Chapman plans. So.......I am going to redo the ship to have frames vertical to the keel. This isn't as bad as it sounds. I will redraw the profile and figure out the point for the bulkheads to pivot at (deck, waterline or keel). I will then figure out how to mount to board so the bulkheads are still perpendicular to the slot cut in the board. The existing bulkheads will be modified as necessary (shouldn't be much) to conform to the new design. At the bow may need to recut one or two but time will tell. Sometimes you just have to do what you have to do LOL. (again, thanks Druxey). It will be a better model in the end. Mark
-
Yea, I redid the stern. Every just say 'not good enough'? It is for a prototype and was 'good enough' for measurements, but I could refine a few things so I put on the good tunes and started over. Now I am content. -Mark
-
Druxey, the conundrum is that I need the above waterline version to reflect that seen at the museum. This will include the addition of gun on the centerline of the boat, which can be rotated port or starboard - though this feature will be removable. It is for their public excursions (pirates, for the kids/adults). They sail/motor 3 - 4 times a day 1-2 hours. The railing supports, but more specifically the step up found to the stern are all perpendicular to the waterline. It did push me to the enclosed POB version. Who knows, might create a second one that is more accurate, I will have all the data to do so. It is an interesting exercise. -Mark
.JPG.f8c0c750c8d76e619639b851a428f110.JPG)
.JPG.f34a67505b16bd7e8940214ce46d8141.JPG)
.JPG.f25456a651e96739cc8cebdc9b881651.JPG)