


popeye the sailor
-
Posts
15,993 -
Joined
-
Last visited
Content Type
Profiles
Forums
Gallery
Events
Everything posted by popeye the sailor
-
 this will catch the progress up on the build so far. it's starting to look like a jet more to come. drat...........it's snowing this wet gunky stuff! might be a tough drive to work tomorrow
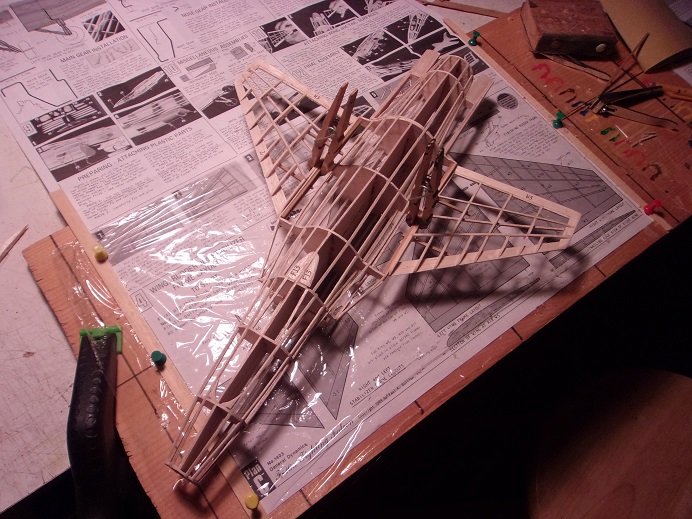
-
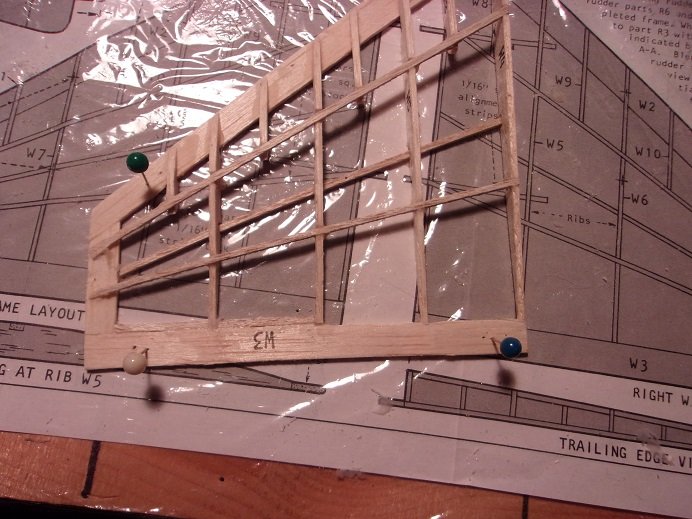
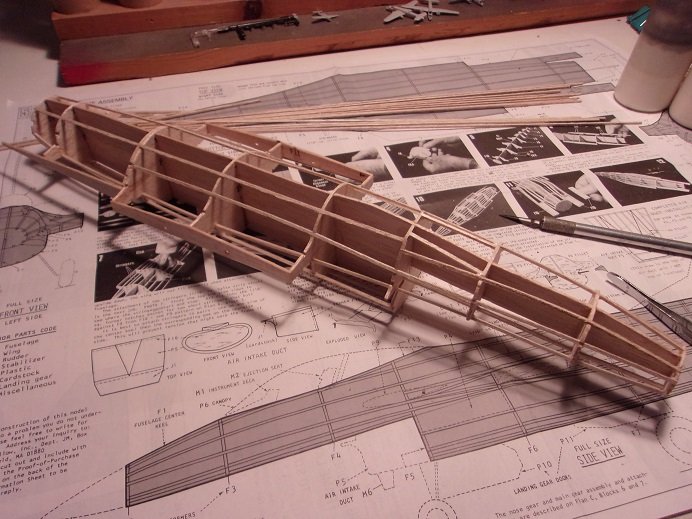
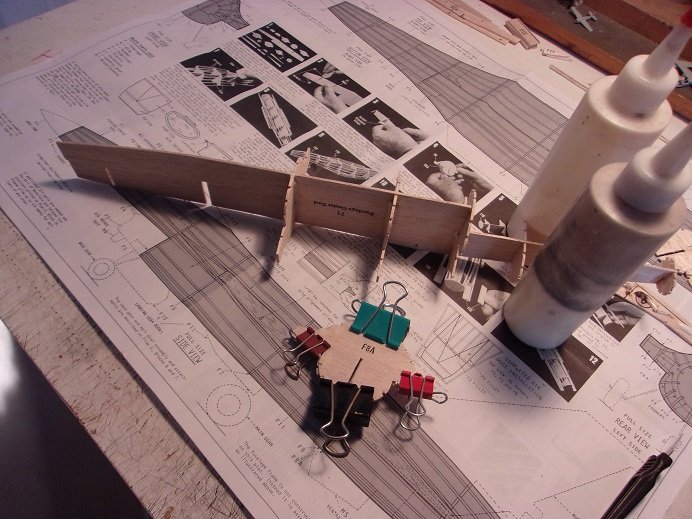
I've started on the starboard wing here........the main ribs are in place. the stringers were added, but I didn't box in the trailing end of the ribs until later {I hadn't thought of it at this time}. I only put in one of the wing tabs.........I used the harder wood for it and will use it for the others. I'll add the others later when the wings are complete. the reason behind it is ease of sanding, to eliminate stringer stubbles. the port side here's where I boxed in the trailing end of the ribs
-
hello Yves ........welcome! one reason why tissue is used, is weight. for planes that fly, the added weight might disable it, especially if it is rubber powered. if equipped with a gas engine, this might be enough thrust to give the plane the lift it needs. now..........there are other types of coverings that can be used. the plastic that is used for mylar balloons could likely be used. tissue is shrinkable........once the model is covered, a light spray of water will cause the tissue to shrink when dry, leaving a smooth appearance. most folks use a product called 'dope' to glue on the tissue. the stuff smells the high heavens, and if done in a closed room, can get you high as well. I don't like to use it.........instead, I use a 50/50 mix of white glue and water to start. I go 60/40 with the second and third coat {if it needs it}. now it can be sprayed with paint...........it may go limp again, but it will stiffen up when dry. I have a story on how I got turned on to this medium.........it involves an English teacher and a book report. Mr. Miller was a cool guy.........he was also the boys Basketball coach. in class, he gave us our assignment, a book report on a favorite book. a few days later, I guess he noticed that I wasn't engrossed in a book, cuz he wanted to see me after class. home life.........heck, I didn't have time to read........I was too busy doing chores and farm stuff. besides......someone else was reading the book I would have chosen. I don't know how he thought of it, but he told me to see him tomorrow. the next day, he handed me a brown paper bag. in it was a Comet Piper Cub plane kit, and a bottle of white glue. he wanted me to build it..........writing down every step to make it. I was to fly it and describe everything it did, how far it flew, along with any other aspect of the experience. well sir...........I did it.........I built it. it was blue and yellow tissue, and I actually had fun building it. it lasted for several flights..........of course there were the repairs and tissue patches. the day the book report was due, I brought him the report and the plane.......unflyable, but proof that I did it. I got a passing grade I built a few others but only achieved limited success. I didn't pick it back up till I moved to Florida. my best one was a Fokker D VIII. it seems I've picked it back up again, but I haven't flown one. we have quite a few open areas here at Medville..........I may try it one day.
-
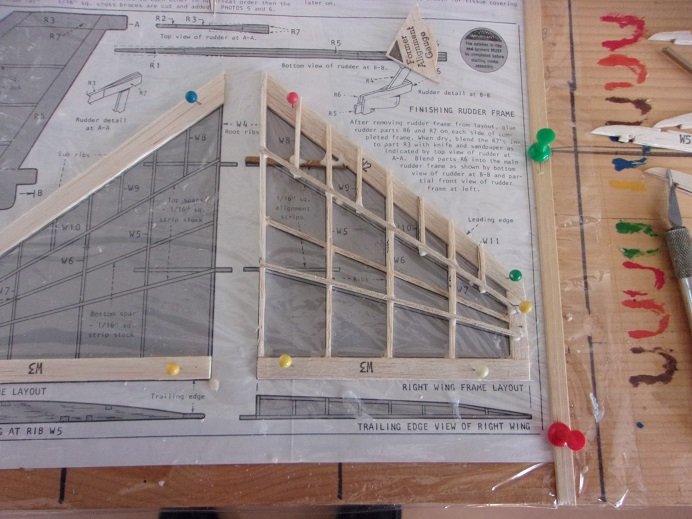
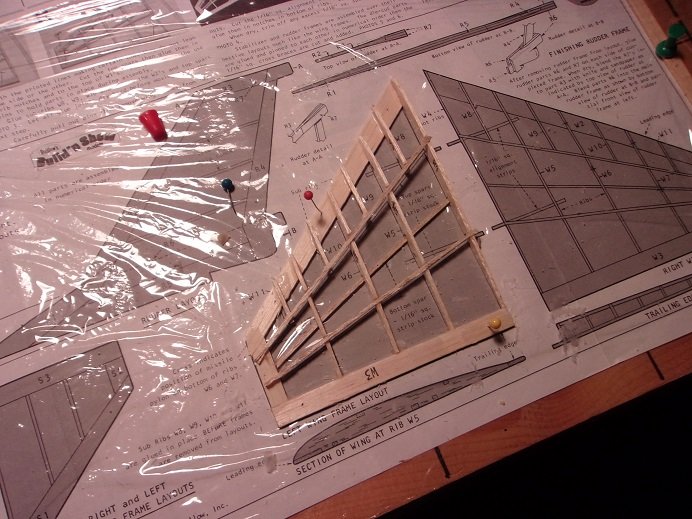
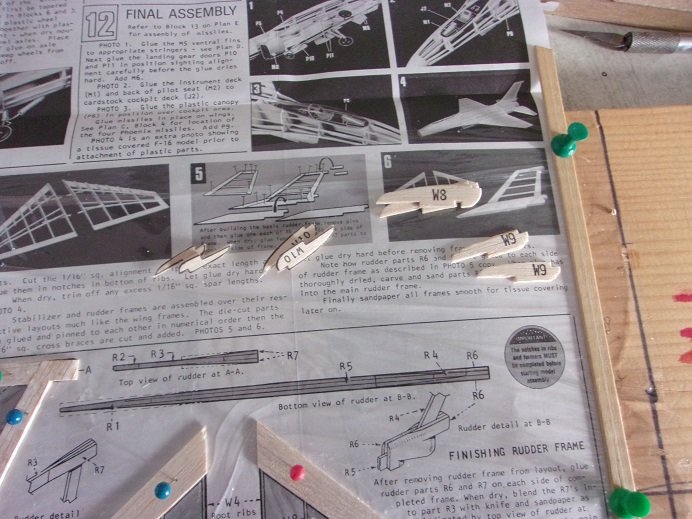
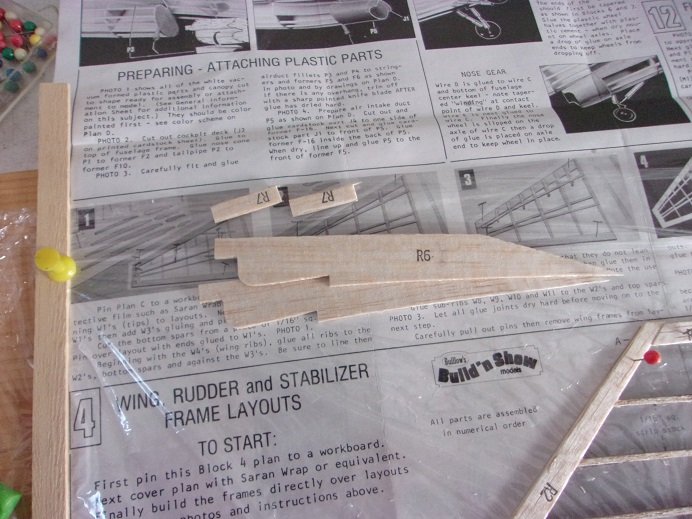
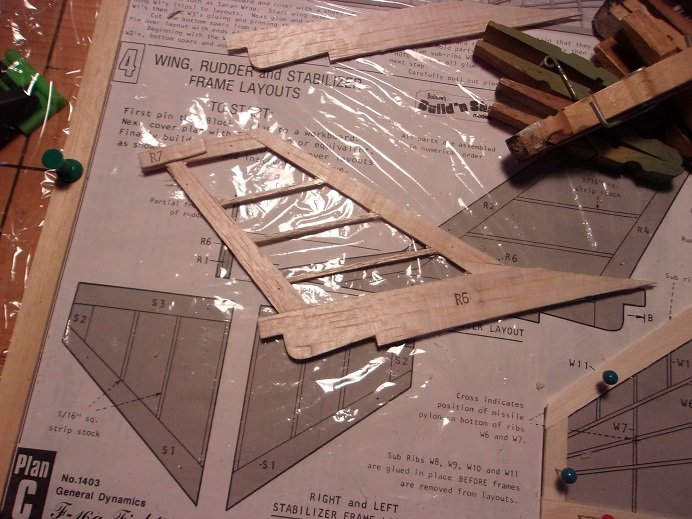
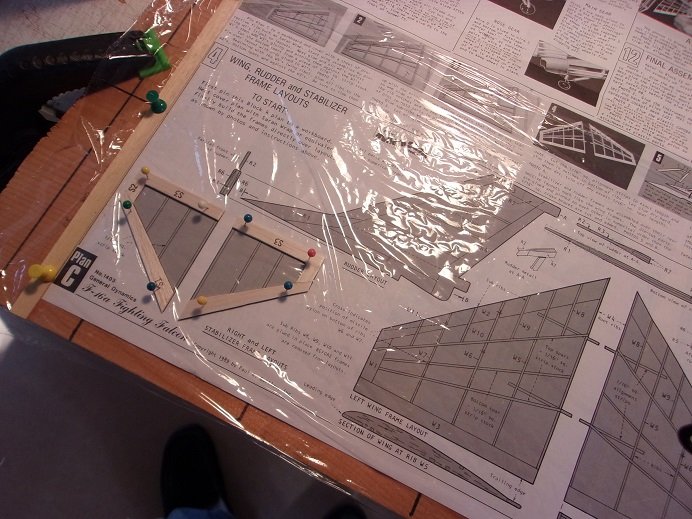
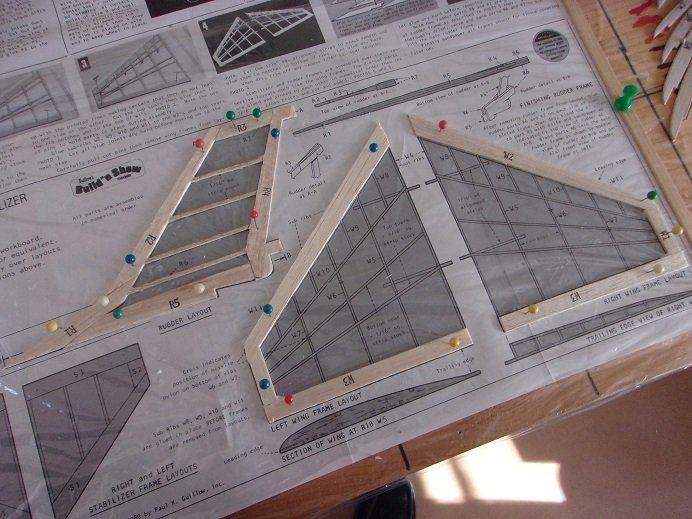
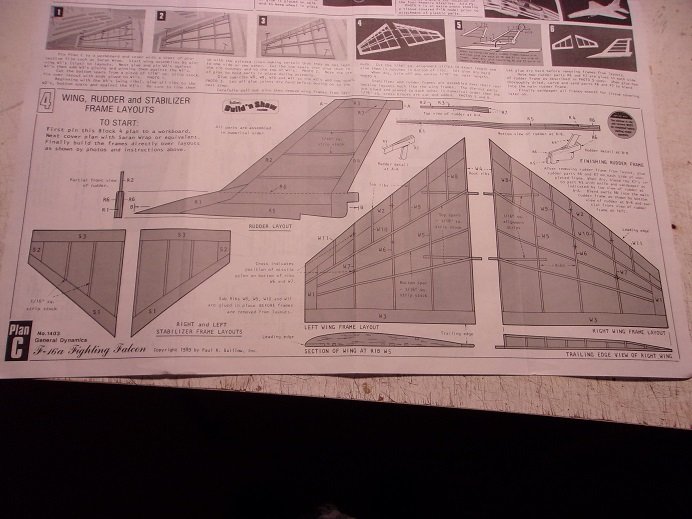
these are the smaller parts for the leading edge of the wings. the small diagrams left and right of the rudder profiles, are the added parts of the rudder, and what areas need to be tapered. these are the additional parts for the rudder. once the rudder is dry, I can add them. with this drying, I can start on the wings.

-
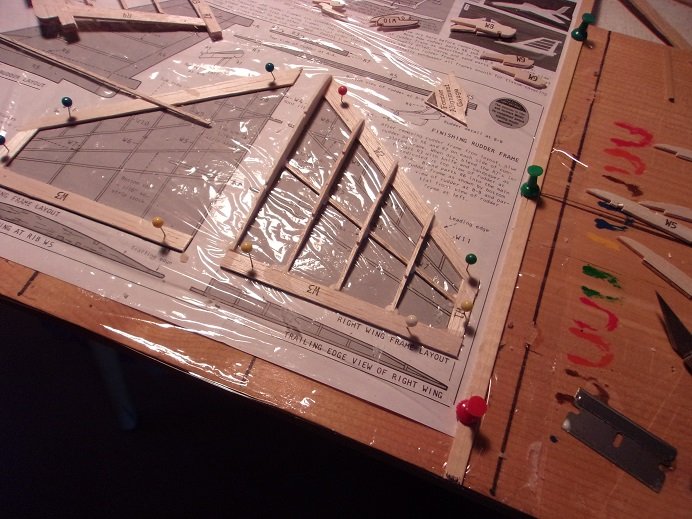
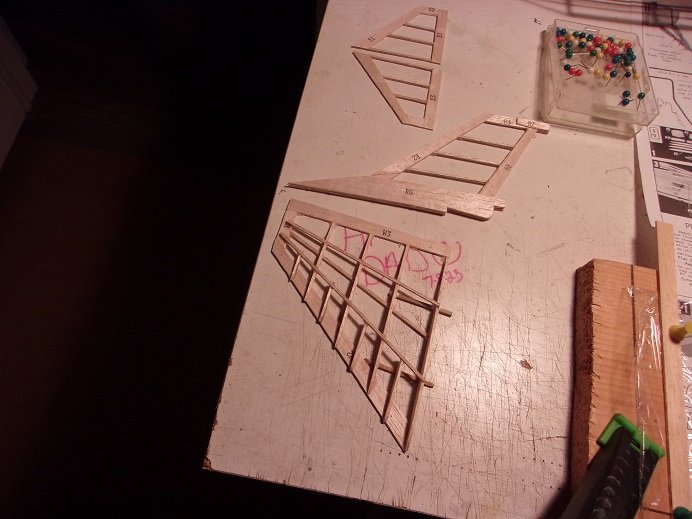
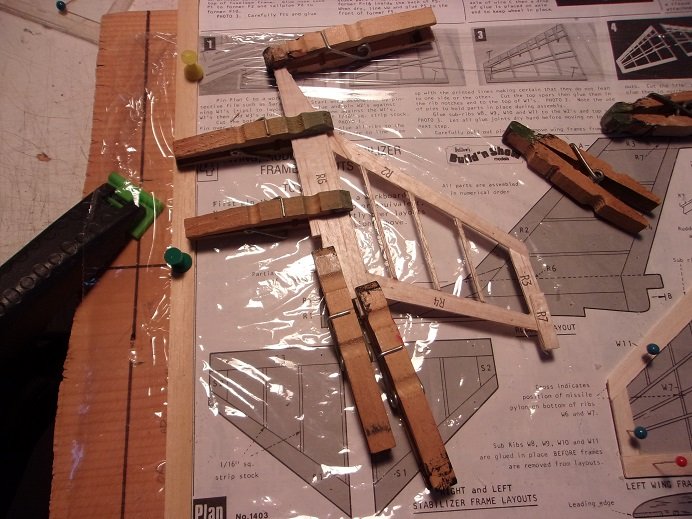
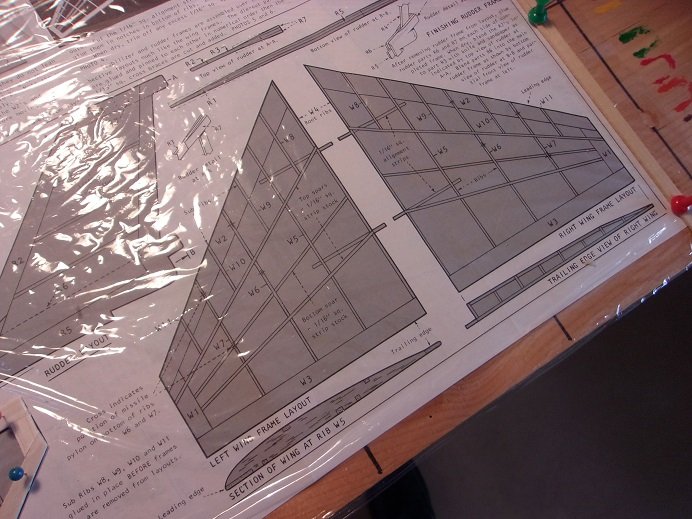
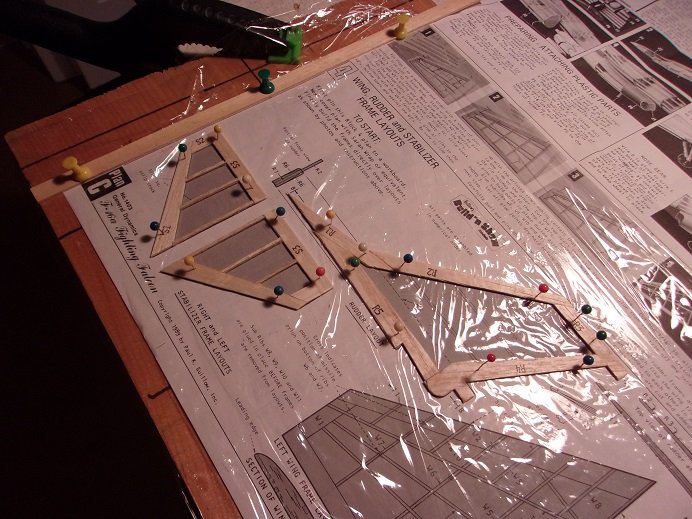
I don't have the build board any more........don't know what happened to it. it likely got thrown in the dumpster the guys were using for the apartment renovation. that's alright.........I still have this one once clamped to the table, the wing section instructions were laid down, and clear plastic wrap was laid over it. parts were punched out for the stabilizers and the rudder, and cemented in position over the templates. the next concern I had was the ribs in the wings. in most planes I've built, the ribs usually lap over the trailing edge, later to be tapered down with sanding. these do not.........they butt up against it and that's it. I will add short pieces of stripping to box in the ribs, giving them a stronger anchor. the stabilizers are done, and the rudder is laid down. the stabs are out of there. the wings were framed out at this point. the rudder stringers were added as well, with a small addition. the stringer near the base is an added part. there is a dotted line there that shows where the tops of the left and right bottom rudder root part go. they make the bottom of the rudder appear thicker........I'll show you what they look like. to not put this stringer in place, would leave a gap............it will fill it in and give it something to cement to. time to notch out the wing ribs.

- 17 replies
-
- 10
-

-
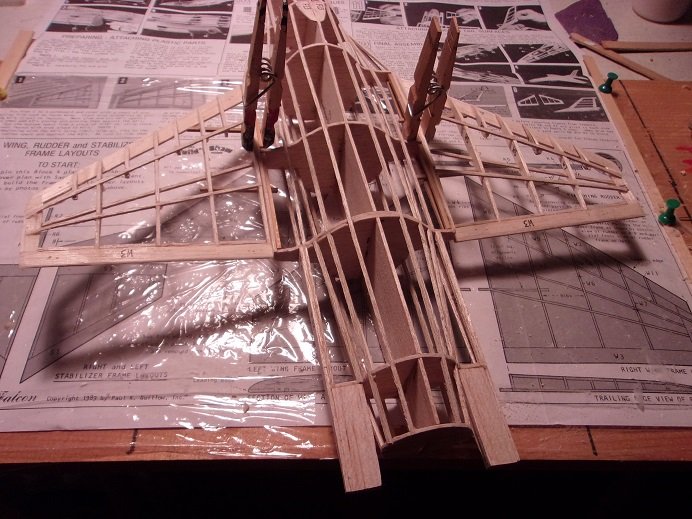
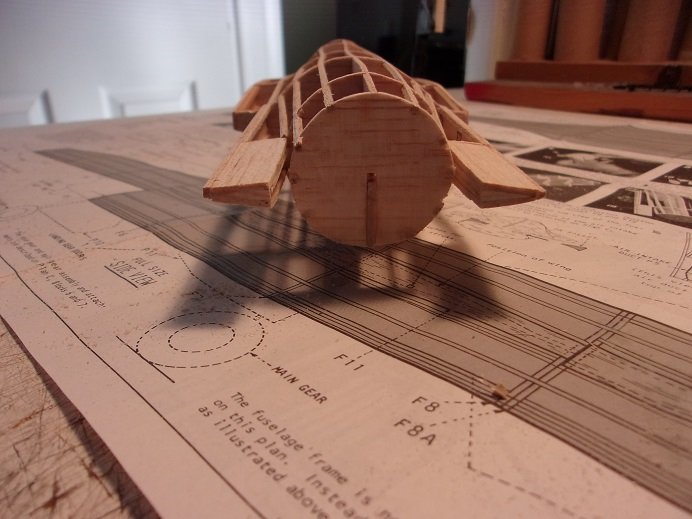
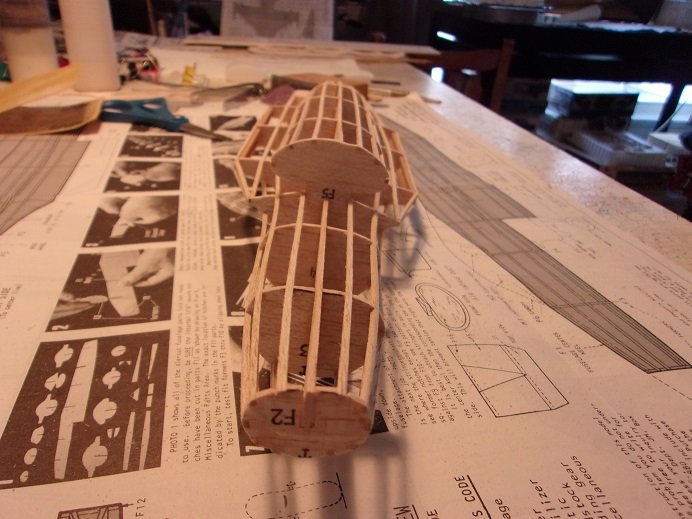
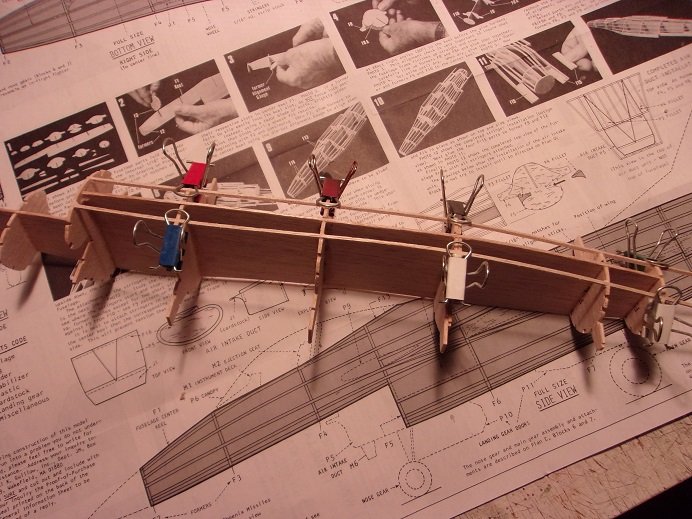
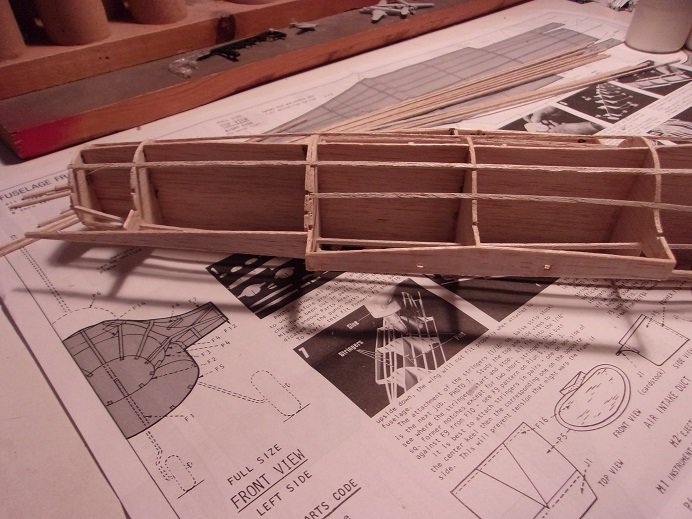
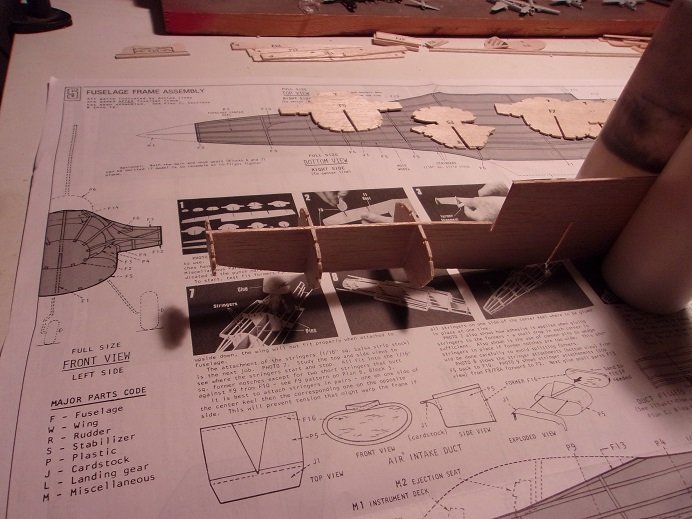
once the rear part of the fuselage was framed out, the two plates that the stabilizers are attached to, were reinforced with the parts that will box them in. I saw a gap along the ends and the inner sides facing the thruster nozzle, so I filled them in with some cast off wood. I did some sanding in this area as well. the added strips can be seen here in this picture. it stiffened them up quite nicely the front and rear cockpit shims were added here. I did some sanding to smooth out the frame. I may need to do more to the forward wing root. better shot of the reinforcements for the wing plates. here's looking under the nose where the intake will be. I had cut out the intake, but I see it was one of the pictures I lost. here is an overall shot of the fuselage

- 17 replies
-
- 10
-
-
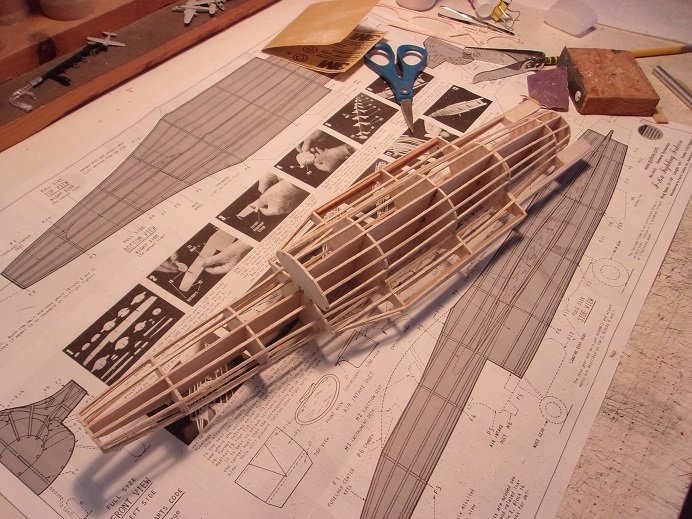
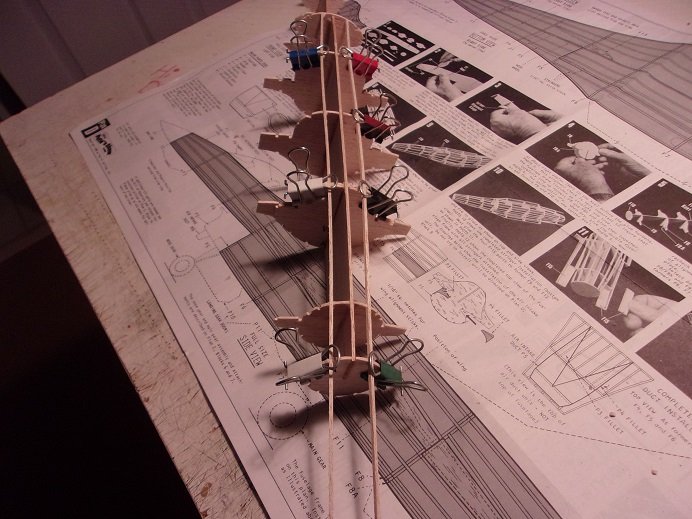
there is more to go. I just loaded up more pictures from the camera, and I seem to have deleted some by accident. I also made a couple of changes to a few of the weaker areas. here is one last picture of the wing plates. the change I made to these plates, was to add short strips of strip to the inner surfaces of the front and rear sections. the strips are 1/16x1/16 and are of a harder wood, like beech or walnut. I will point them out in future pictures. I made sure that they will not interfere with the wing installation.
-
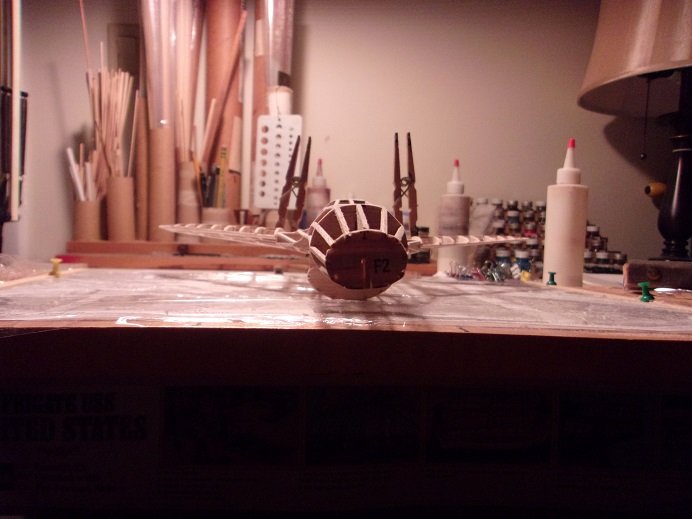
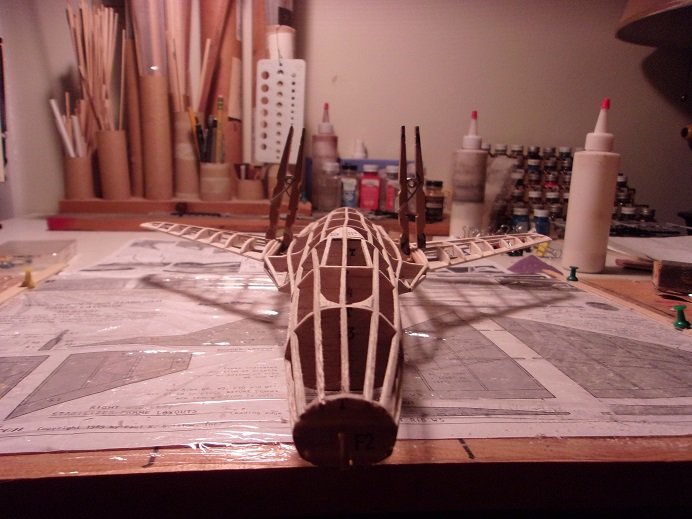
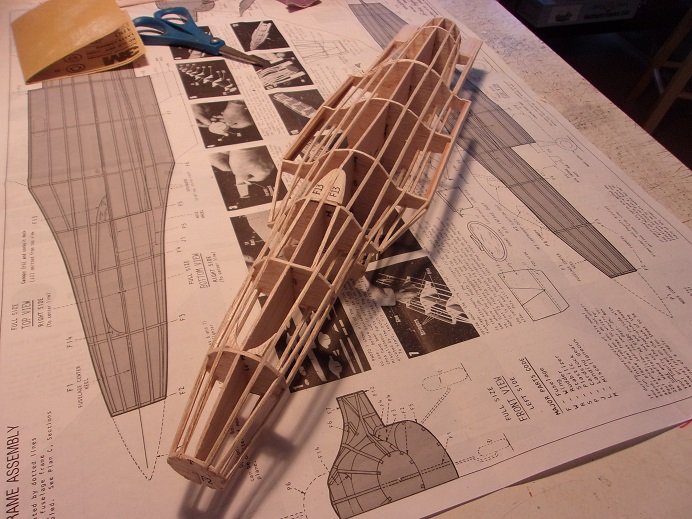
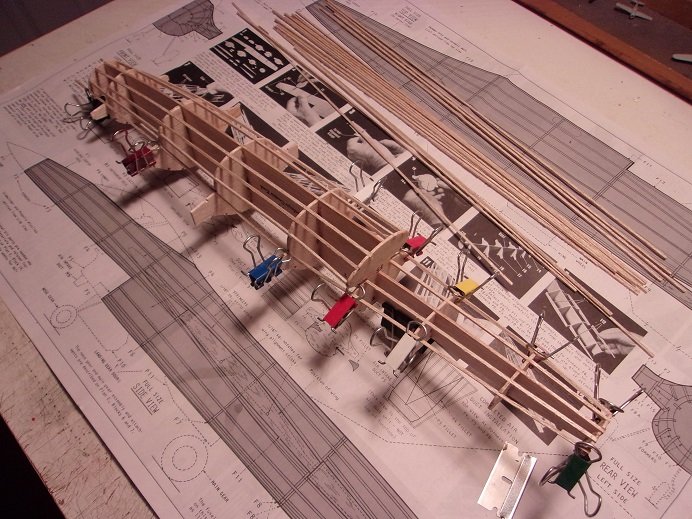
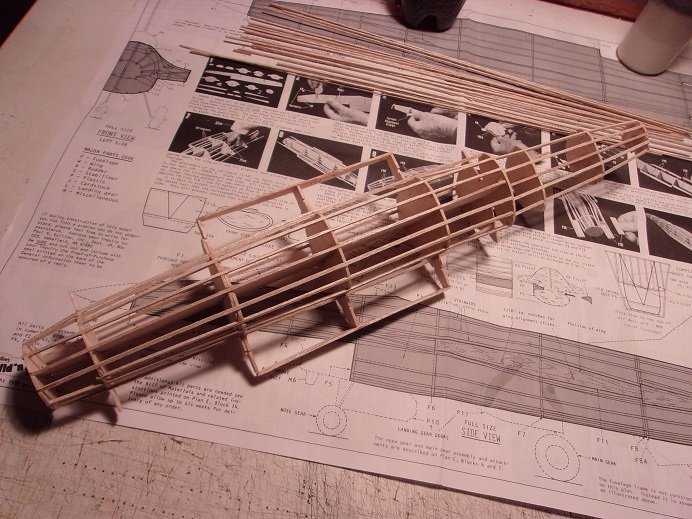
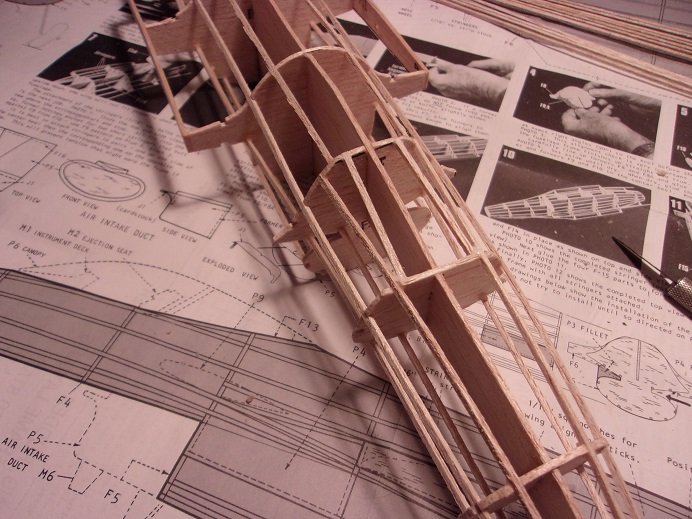
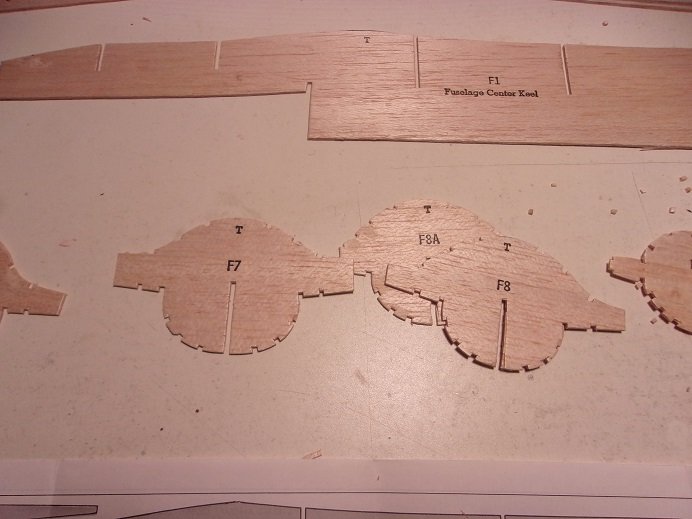
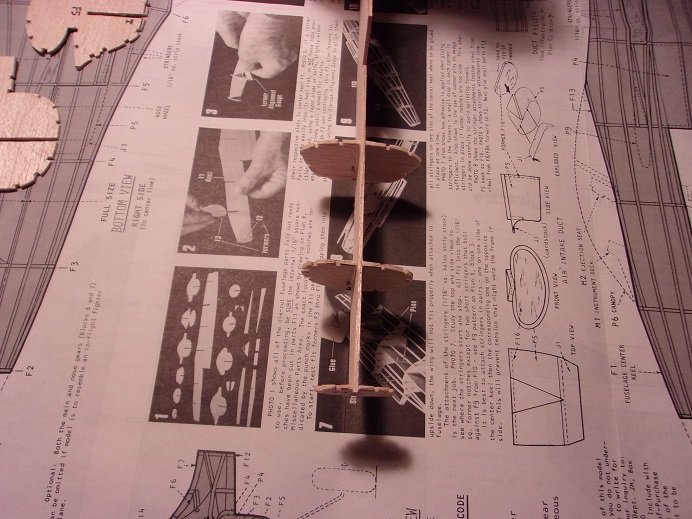
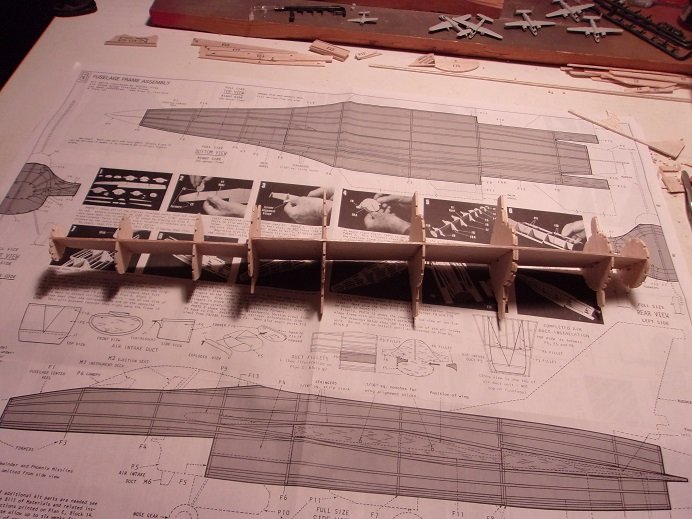
the stringers are 1/16x1/16.......I try to make them a tiny bit longer, by cutting off most of the uncut ends and separate them {the end cuts are uneven}. bulkhead #8 is made up of two bulkheads, glued together........the stringers make it easily to this junction. I started at the bottom from the intake, back. more were added...... it got a little confusing here..........the stringer notches were not lining up. the black squares on bulkhead #5 are termination points for those stringers so, that's what I did in that case. it can be seen where I ended that run and then continued it the rest of the way to the nose. the wing plates were added at the ends of #6, #7, and #8. later on, the more I handled the fuselage, the more fragile these wing plates seemed to be. for fear of breaking them, after knocking one loose, I began thinking of a solution to make them stronger. as I finally got a grasp on this, I found that this is where the cockpit will be. other parts are going to be added later. the wings are to have two 'tabs' that will go into these holes on the wing plates. from the backside of bulkhead #8, the tail section will be framed. more to come

- 17 replies
-
- 10
-
-
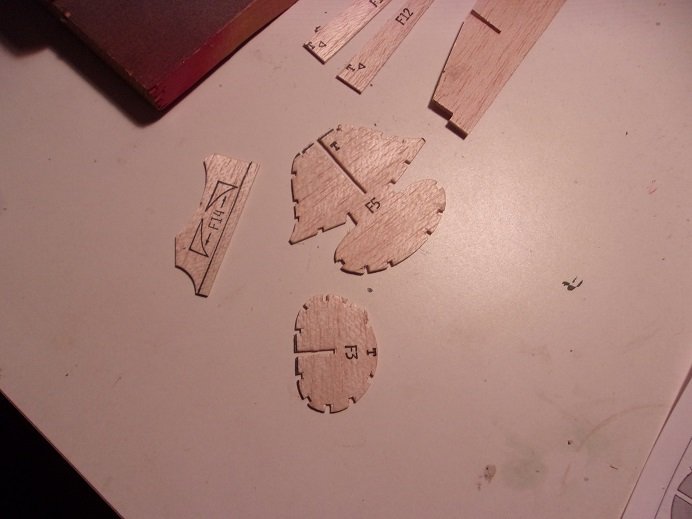
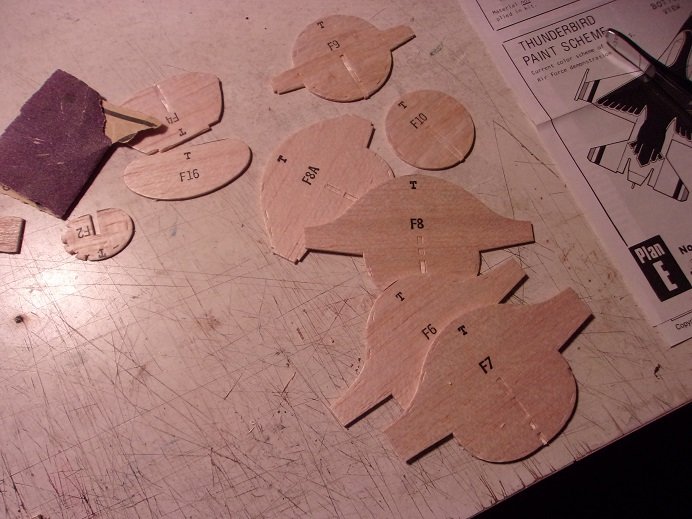
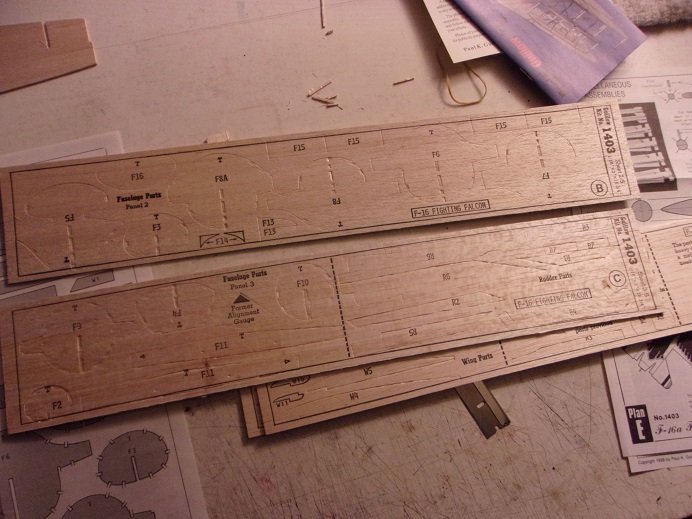
thanks for the comment, OC. it's been a strange hiatus; I can tell ya that! while I wasn't in the position of posting or modeling, I was able to acquire a few more kits. never a dull moment thanks also for those who hit the like button punching out and cutting the notches is well under way at this time. as mentioned, a worn die cutter does not leave clean cuts. I used a new razor blade for this work. the instructions direct you to use an xactor knife, but take it from me.......the thinner the cutting blade, the better. still quite a few to do yet. I continued to do as I had mentioned earlier...........if a piece broke off, it was quickly glued back on, and another part was put into play. the bottom flaps of the bulkheads were evened out.........some fit tight and caused them to look crooked. the mis ship came next. soon, the rest of the bulkheads were in place. more to come.
-
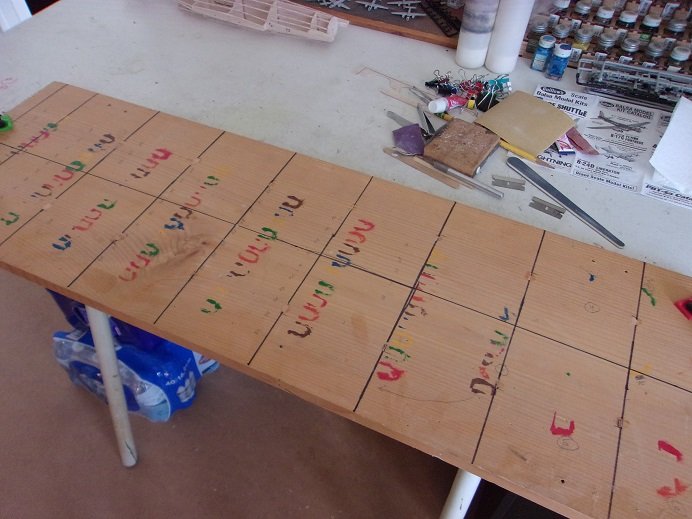
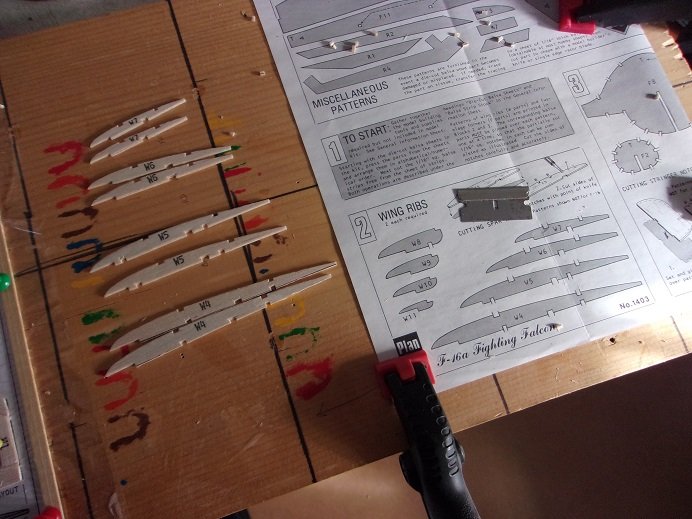
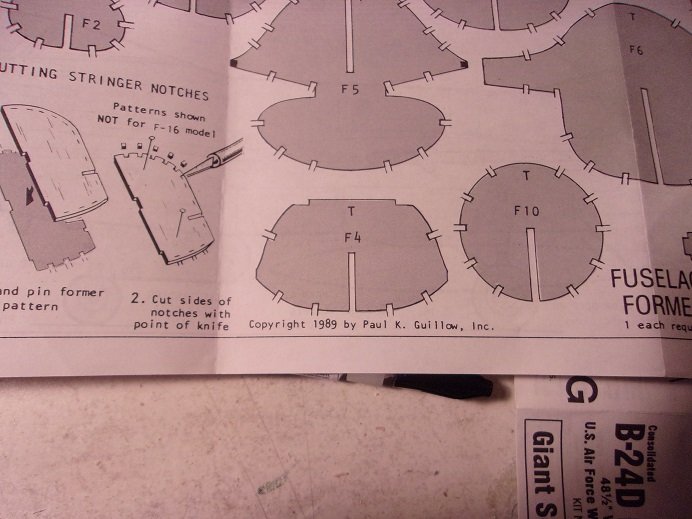
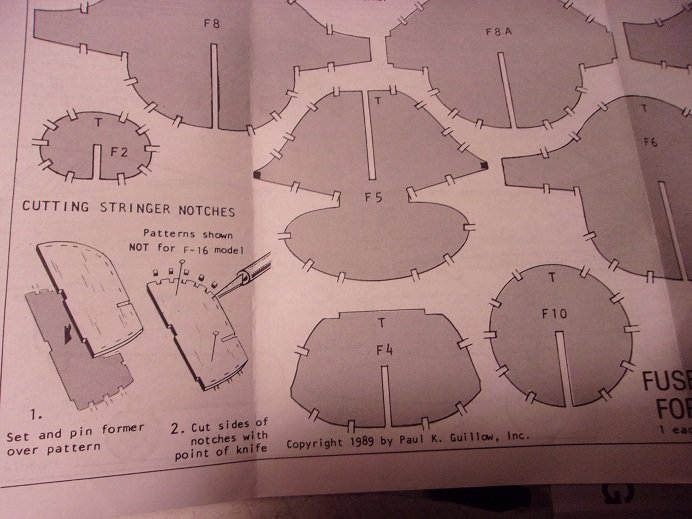
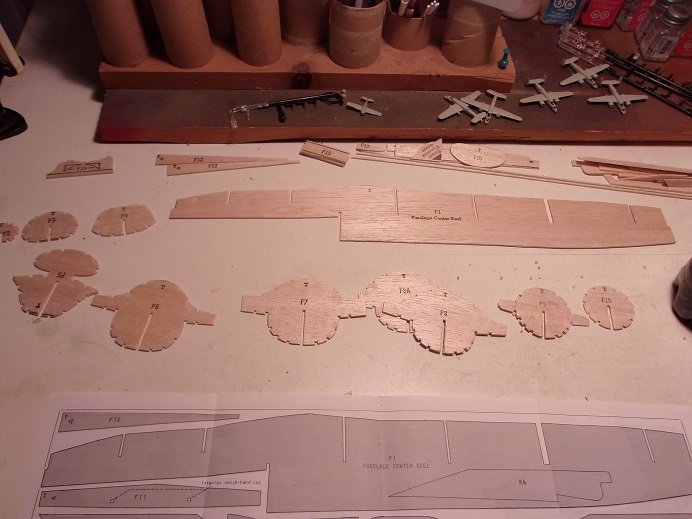
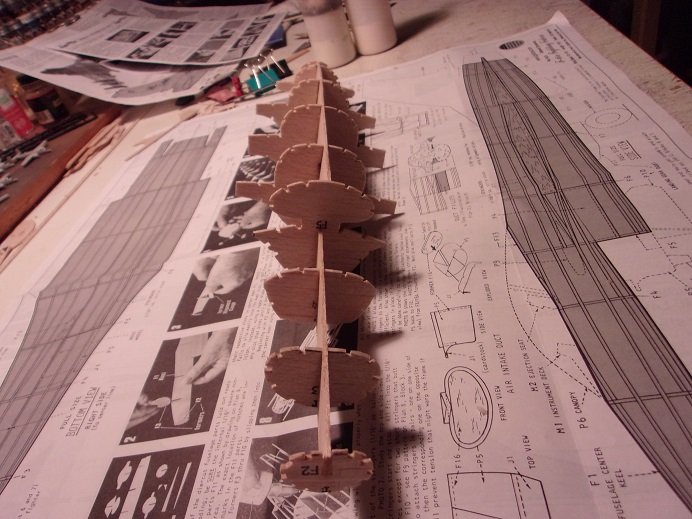
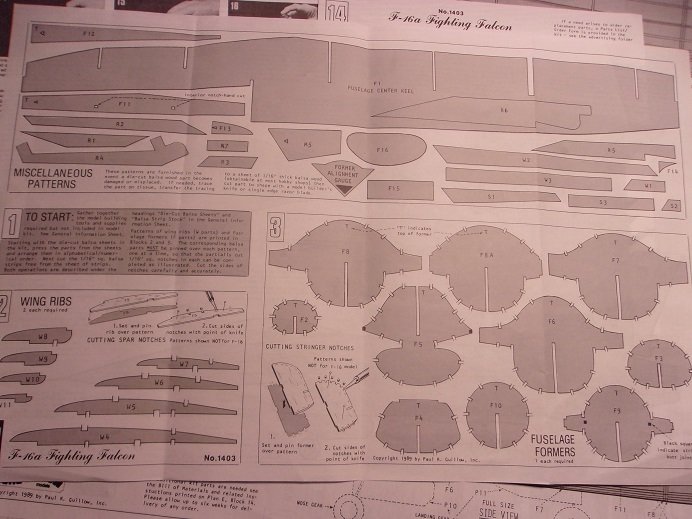
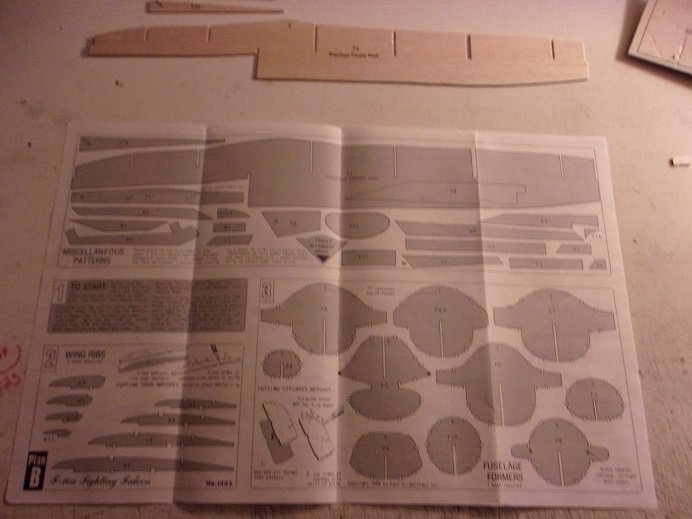
yep.........the parts prep is slow and tedious. the trick is keeping an eye on the bits and edges that break off, and glue them back on before they get lost. it gets put aside till it dries........picking up another part for the time being, until it happens to that part. it just becomes a vicious circle until they are all trimmed out. while I'm doing this, here are what other aspects of the instruction sheets look like. the parts above are 1:1 in the event that a part gets damaged. a new one can be made from cast off wood or 1/16 flat stock that is included in the kit. Balsa modelers expect that sort of thing something that is different about the kit, is that the fuselage is a bulkhead frame. there is no need for a build board. it has a center keel, just like a plank on frame ship model. the stringer notches can clearly be seen in this last photo. with most Guillow's planes, the bulkheads are in halves and fitted on a flat framework...........port and starboard sides, later to be joined together to create the full fuselage. the only parts that will need a build board will be the wings, stabilizers, and rudder. should be ready for glue soon

- 17 replies
-
- 10
-
-

-
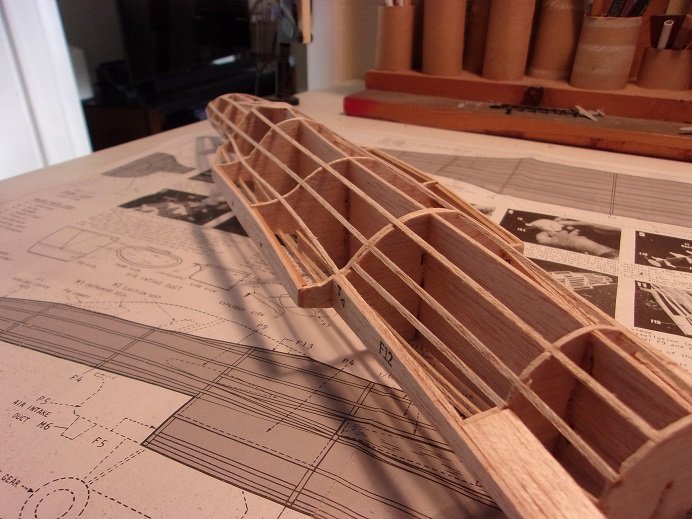
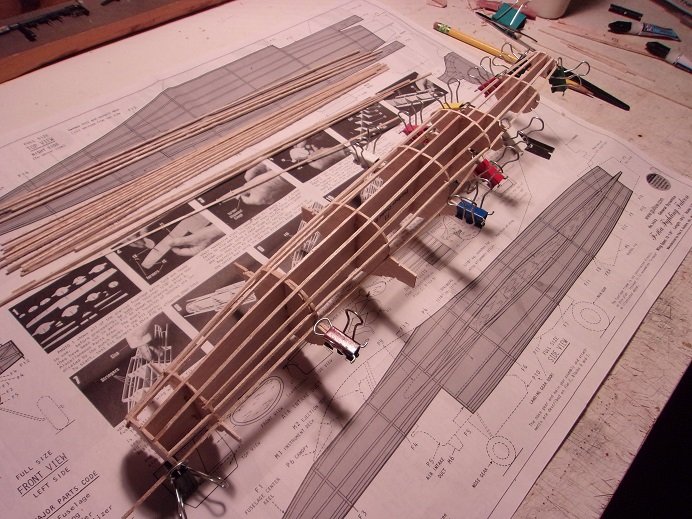
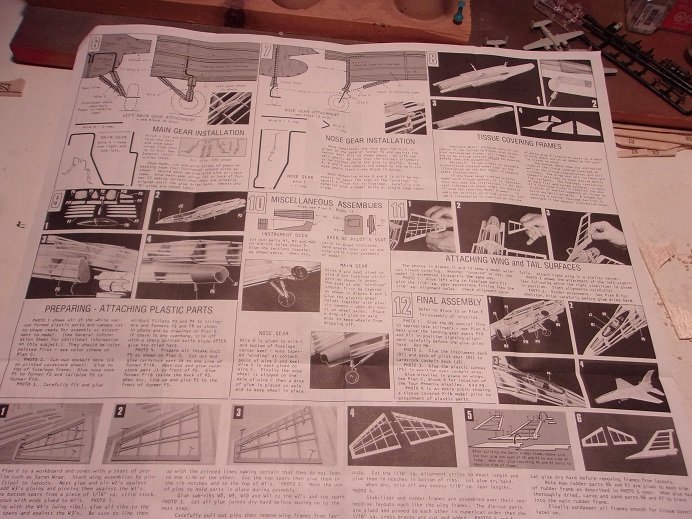
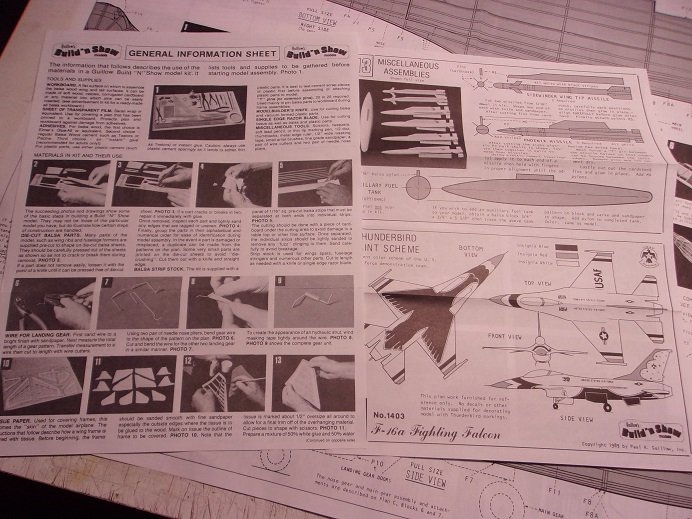
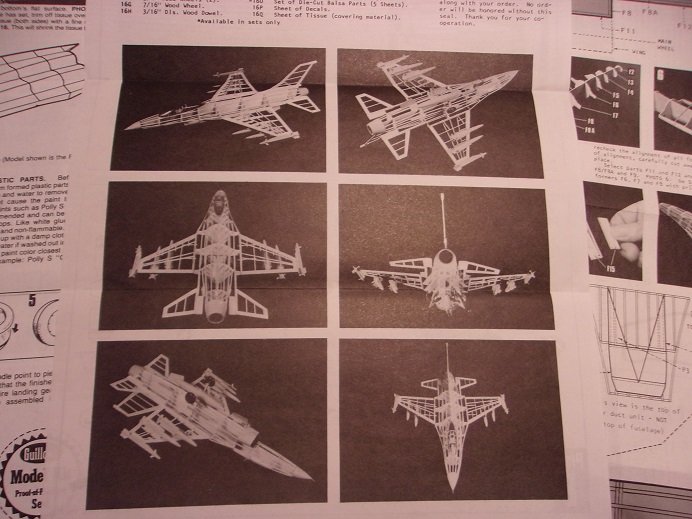
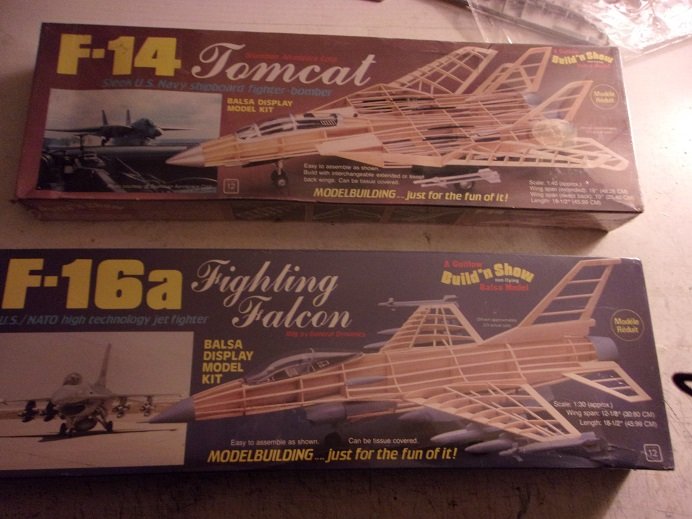
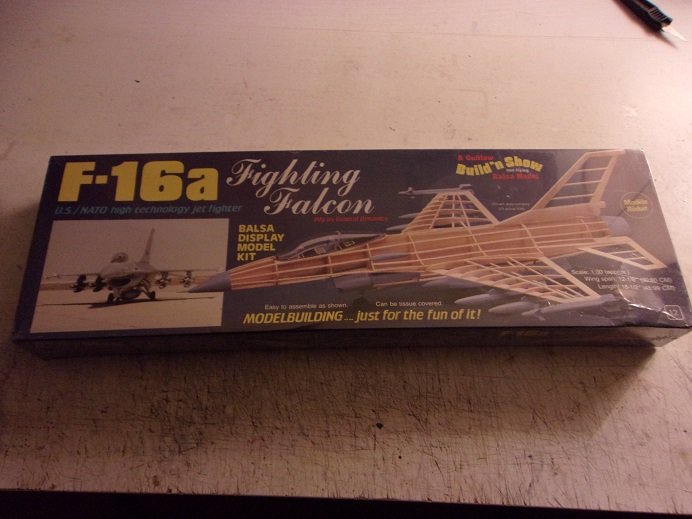
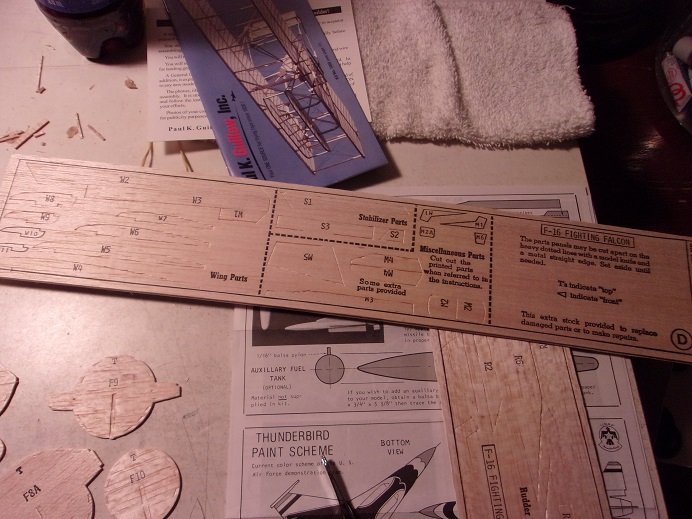
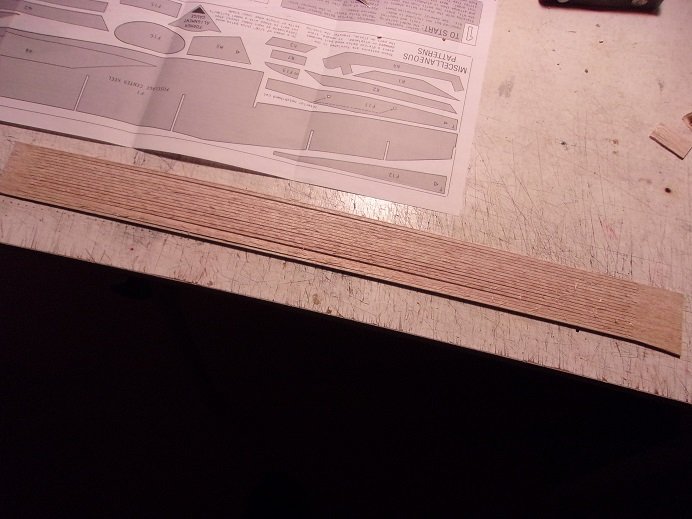
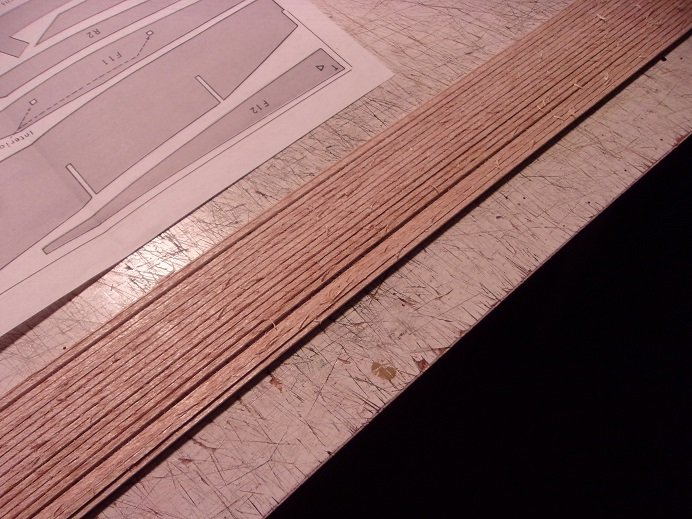
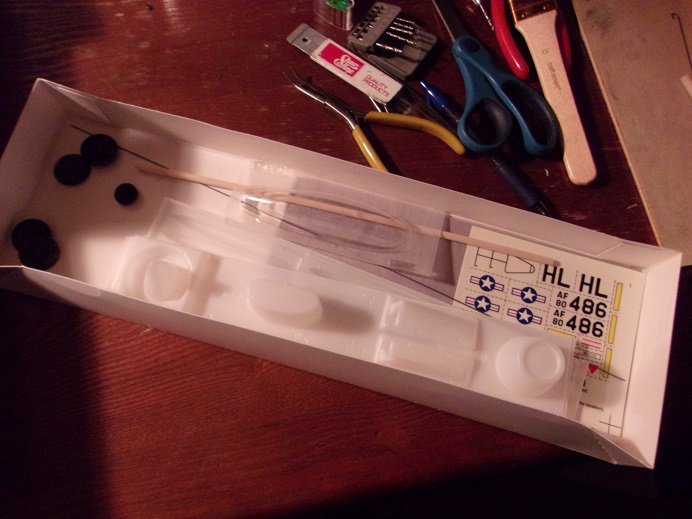
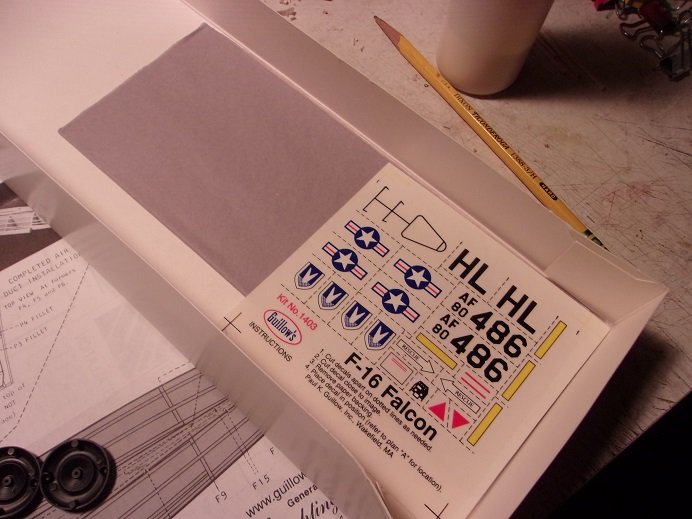
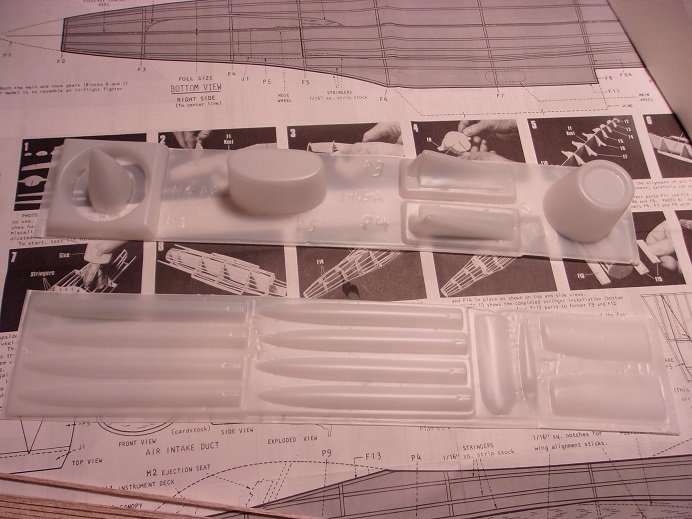
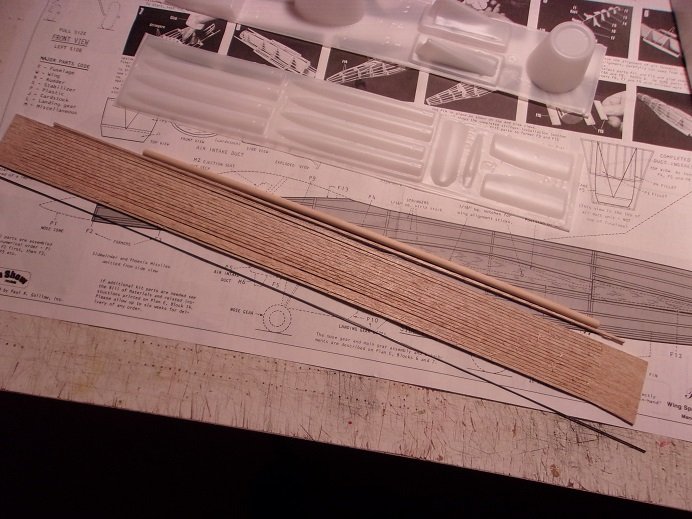
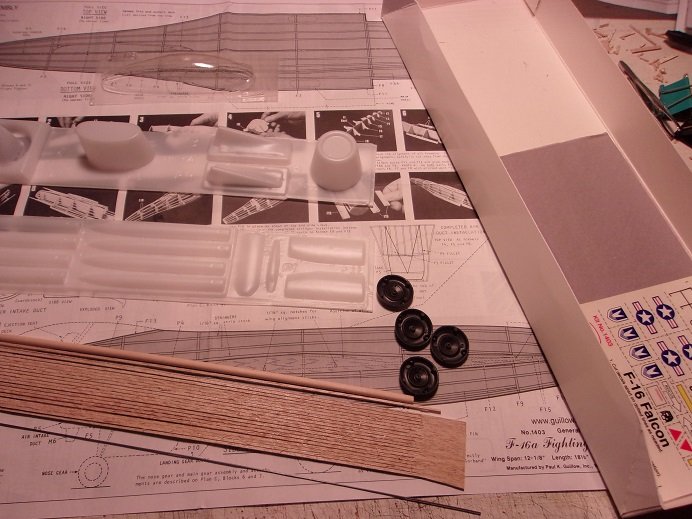
hey there everyone! I'm finally back to the point where I can get back to work it's been a crazy hiatus...........getting flooded out of our apartment {end result} in 12/23.......spending most of the summer of 24 in a hotel........ending this nightmare by buying a home. the rents were just too expensive to continue as renters. we had renter's insurance.......they were supposed to help us in finding another place, but they merely dragged their feet with that endeavor. we also found that Gibbs, our dog, had a mass in his abdomen, later to be diagnosed as cancer. we ended up having him put down in August, almost a month after moving into the new house. then came the series of 'firsts'........first Halloween, first Thanksgiving, first Christmas, and first New Years. even the first Tax season............ retirement will be the next big hurdle............I hope I can get to it. anyway.............Christmas is where this log starts. I was looking up some possible gift ideas, when I saw these two kits. both of these kits are sealed...........never opened! they looked to be an intriguing build, never building a jet before.....and seeing that they are static kits, I thought I'd give them a go. I'm no stranger to flying models, having built many in my younger days. I do have one in progress.........that's the Fokker Dr 1...........I had to shelve it due to the flooding. I will post that one when I get back to it........quite a lot of sanding needs to be done. so, for the first one, I chose to do the F 16a. tearing off the plastic.......opening the box.........everything had been untouched by human hands {other than the person who boxed it}. I was hoping that this kit was laser cut.........I had heard that Guillow's was making changes towards laser cutting their kits, but I saw that die cutting was still being done. these kits were produced around 1989. I can see that removing these parts will require some prep work. I removed some of the fuselage parts, to begin cutting out the rest of the notches for the stringers. Balsa is a very soft wood.........if the die cutter is in any degree worn, the cuts may not be so good. it tends to crush the wood surrounding the cuts, making the trimming a bit harder. there will be repairs. some of the parts are not cut, requiring you to do it yourself. the stringer wood is rough..........light sanding is required {right photo} there is tissue, if you decide to cover the model. there are also decals, tires, plastic detail parts and a clear plastic cockpit. printed card stock in also in the box.........rocket fins and added cockpit detail. the instruction sheets are very detailed outlined step by step. the build starts.................it's good to be back
- 17 replies
-
- 13
-
-
-
hey there Chris! I'm finally getting back to the table, and a return to the site. I was about to start my log when I saw your build. I'm a big fan of the Focke Wolfes, but the meshies are a big draw for me. again, your work with paper amazes me............a fine looking model indeed! superb model!
-
nice job so far Jack........I don't do enough armor. am I rubbing off on you?...........see.....it's kinda fun to research the production dates of older models. it can get interesting when you can trace the same kit from company to company.........the 1:72 Stuka kits I built has been produced by at least three different companies! I've seen this kit on oldmodelkits..........Alan has quite a selection to choose from I look on scale Hobbist to check out the time lines. it shows how many time the molds changed hands look'in good !
-
that is a splendid model Jack! very well done I do believe there is a site where you can get 'eye decals'..............I recall seeing them, but I can't place where {no pun}. a good place to start would be military figures.
-
Scalehobbist is in Nashua.........they have a pretty good selection. I was just looking at your new build, and I saw the others on the site, but did not see the guy with the cart. perhaps he's shown in another section. I'll bookmark the site.....thanks!
-
nice work! gee, you could do a 'Walking Dead' scenario with these guys. very nice work indeed!
-
I've seen the old Aurora figures around..........and Atlantis is beginning to reproduce some of the old animal kits. but I've never heard of these kits..........truly off the beaten path very nice job !
-
hi all.........thank you for the interest I also want to thank whoever changed the title, but I have to get a few things for it before I start. I thought this to be a method too juicy to ignore. this scheme has been done before.......I'm not uncovering something new. I want to go over the directions.......answering your comments as I go. for starters Egilman......correct sir, there are multiple camo patterns used. there are kits out there that even supply the covering {not sure what they are made of} to add the authenticity to the model. decals can be purchased and companies like Eduards, Roden and Wingnut, even include them in their kits. I've seen some of these kits.........a bit expensive for my taste {but the subjects are beautiful}. as is mentioned in the Aurora directions, the upper surfaces and the lower surfaces are two different planes. the upper plane is the darker surface. in a four-color camo scheme, the base color is medium tan, with the following colors greenish orchid, light olive, and dark blue/gray. for the lower plane, which is done in lighter colors, the base color is light mustard, followed by forest green, pale green/pink, and dark green/purple. keen to note is that there was no rhyme or reason........if they ran out of a roll, another roll was used, they didn't bother to match up the colors, creating a visible seam. adding a primer color under decals sounds like a very good idea. I'm not sure how I'm going to do this. thanks for the head's up believe it or not Ken........that is the method Aurora directs the modeler to use. only the lower plane needs to be done for this model. so, this will be the underwings, the underside of the stabilizer, and the underside of the fuselage. trapping carbon paper between the model parts and the template, the designs are traced onto the parts and painted by hand afterwards. one would need a fine point for the tracing........would transfer the lines to the parts, but not damage the template. for an added bit of detail, the directions mention that the wing and stabilizer ailerons would be installed after the wings were built, so alteration of the pattern position should be considered. I might try and import the template into the decal maker I have. I can also try photo shop. one hurdle I see would be the color spectrum that each one of these programs use. the colors might not be exactly what the directions specified. an alter though I have, is that the dark blue/gray, pale green/pink, and dark green/purple are either/or colors....could be one or the other. this definitely would open the door to a camo scheme consisting of several colors..........but I'm not a color counter, and to say that I've seen it, I cannot say. for those who have done this, my hat's off to you.........I have been wanting to try this, seeing that this camo is quite prominent in all the pictures I've seen. one does not need to be a Picaso, the directions state. the overall look of the camo will hide small goofs thank you, folks, for your well wishes and concerns over our recent setback here at the homestead. out of eight rooms {including the bathroom}, six of them have been affected in one way or another. I haven't seen it, but I hear that the third floor is in pretty tough shape! I gave the gent on second floor credit for lessening the damage to our apartment...........that guy {even though he is an avid pot smoker}, was like a one-armed paper hanger in his efforts to catch the water onslaught with buckets and whatever would hold water. third floor did absolutely nothing....they just sat back and watched! they were moving anyway, and they did so the day the demo work began in their apartment. second floor have no recourse, being section eight.........their rent is shared by the state, and they have no renter's insurance. we on the other hands are limited as well. even though we have renter's insurance, we would end up paying out more to relocate, and to remain here, we would have to pay the rent here to keep it. then I heard that he told his insurance company about the vacancy on third floor, and they are going to pay him two months' rent for 'loss of use'. he has been urging us to relocate, and this makes me suspicious that he would try and do the same to us. we are not going to pay one dollar more on something that we did not cause, nor will we sit back and watch him make money over it either. while he states that it's not his fault either, he is the landlord and should have control on the Maintenace of his property. preventative maintenance is important too! there is so much I can go into, but I don't want to cause retaliation at this point, so we will stay for the time being and see what happens. I fondly refer to the place as Kruger's funhouse
-
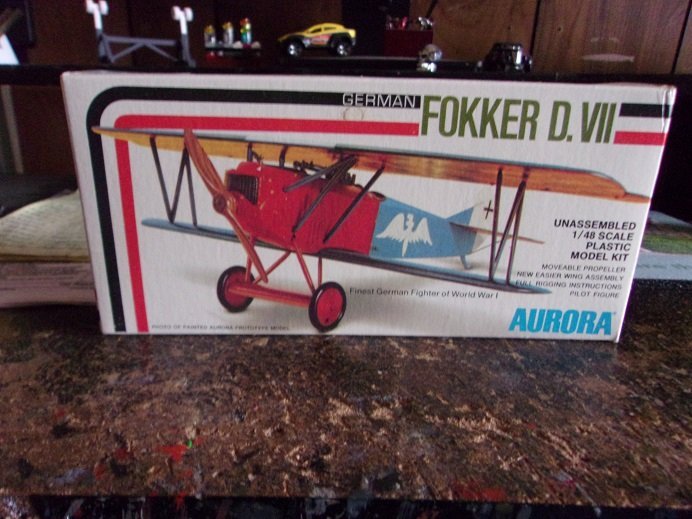
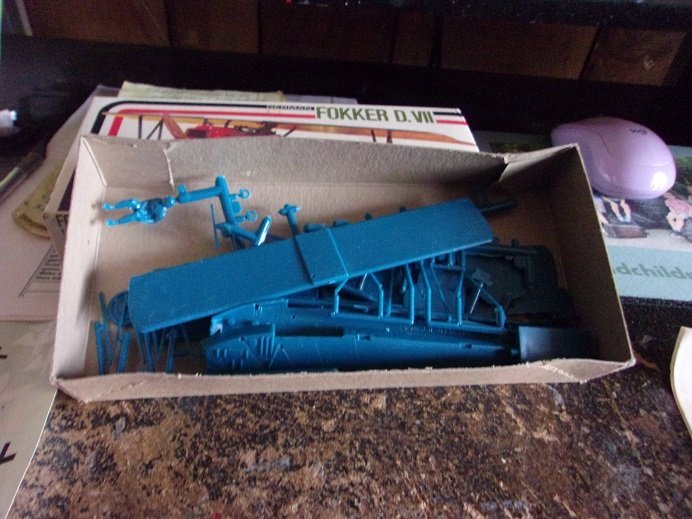
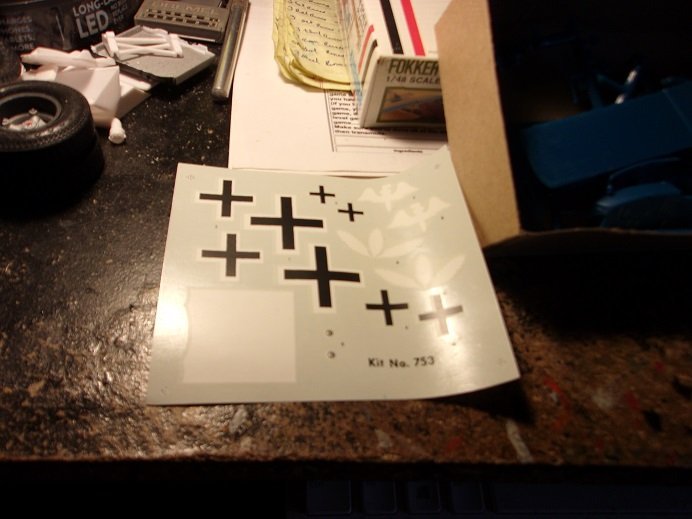
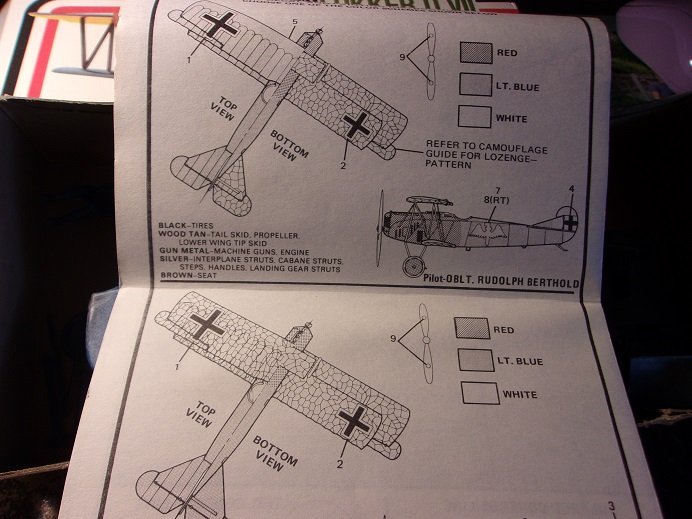
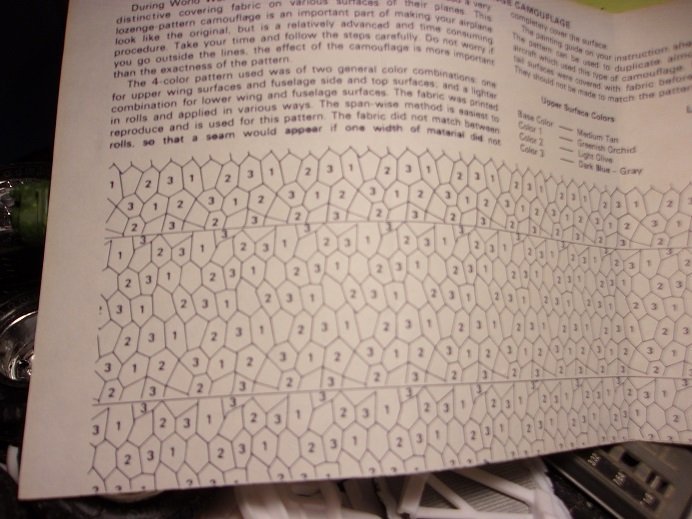
hi all........it's been a while since I last contributed anything. the apartment is still in disarray since we got flooded in December. for those just tuning in, we had a huge rainstorm in December........the roof peeled in the wind and sent water into all three floors of the apartment house. we are on the first floor, so we suffered a lot less than the other floors. so at this time, wall are torn open.......the hobby room is empty. I even had to put away the table in the computer room. leading up to this, I was slowly working on another ship.........of course it got put on hold, but I hope to start posting on that one soon {quite a journey to go on it}. my desk seems to be the only surface I have to work with..........nothing new about that I got a few models this past Christmas.........a Japanese war ship, couple of cars.....another B 25 {monogram}........and this little ditty, an old Aurora kit {my love for these old German birds proceeds me}. the kit was produced back in 1976. it depicts Rudolph Berthold's plane, likely when he was in Jasta 18. he and a comrade named Hans Muller came from Jasta 15 - 1917.........Berthold was promoted to commander. by 1918, he transferred and August Raben took over. interesting turn of events over there........I would need to find the rest of my notes. both of these commanders adopted the raven as their insignia. anyway........the subject here is the lozenge camo that these planes wore when they rolled off the assembly line. when they got to the field, they were painted in the squadron colors. Berthold's Boys {what they called their squadron} was painted in blue and red. Rabin's Ravens, as August called his squad, was done in red and white. also, each pilot could add a bit of artwork to designate their identity. what didn't get decorated or painted over, usually remained in the lozenge camo. the kit is molded in blue plastic.......likely a move by the manufacturer to aide the modeler along with the painting. nice, but I would have been happier if the model was molded in white.........gonna be tough to cover over this blue......let alone the shade of blue the decals..... I have a photo from Pheon decals covering both squadrons. the crust of the biscuit lies here.......the diagram for the lozenge camo pattern......... the sheet is about ten inches long.......the wing span of the model is 7 1/2 inches. I found it interesting that older kits, this level of detail was explored. I will get into the directions a bit later........fot the moment, gotta go

- 6 replies
-
- 13
-
-
that looks to be one busy model! I have a small collection of Billings catalogs and I've not seen one pictured. {you've peaked my interest } where did you find the drawings? look'in forward in seeing your progress!
- 300 replies
-
- 6
-
-
- lightship
- Feuerschiff Elbe 1
- (and 1 more)
-
hey there Andy........your diorama is coming along nicely reading your ideas with the figures, I had the thought about just embedding the bases in the foam. but after seeing how rough the foam was after sculpting out the mud holes, I see now it would be a terrible idea. look'in forward in seeing this all come together great job thus far!
-
one thing I forgot to mention.........once you print the decals, they need to be sprayed with a product called decal bonder, which is sold by Testor's as well.
-
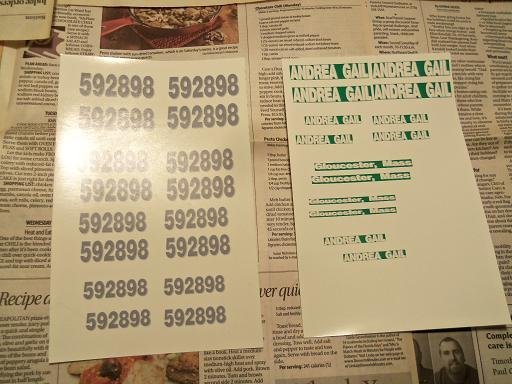
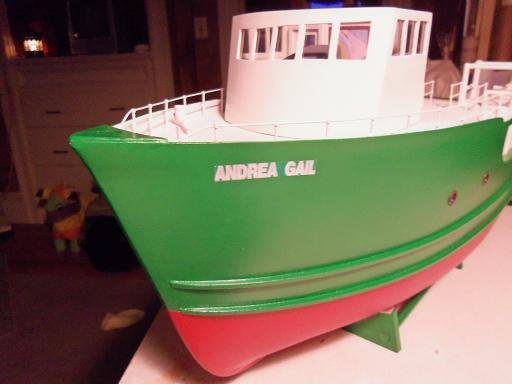
I ran into the same thing when I built the Andrea Gail. I had bought the Testor's 'Decal it' program: DECAL-SYSTEM with this program, you can make decals from the list they supply, but with the add on for it, you can import graphics and print them. using white decal paper, I made up the name and transom decals. since the A.G. was painted in Emerald Green, I was able to change the background color to blend in with the hull. colors can be changed to anything in the spectrum, as long as your printer can handle it. at the time I did this, the only printers I knew of that could do white, were the alps printers. very few printers on the market were non cartridge printers. many new ones have come out since then. paint shop can do this as well.........I'm not sure of the color spectrum though, but it is a little harder to gauge the sizing of the decal. metallic colors can't be done with either program hope this helps you.......black isn't too hard to deal with
-
other builds in the same ship configuration and type may also give you ideas. if your new to the medium, ideas are the basis for creativity. you'll find that in some kits, the way they show to assemble aspects of the model may not be the best way to accomplish the task........I have found this in kits I've built in the past. starting a build log on your project is a good thing too.........other folk will get a visual of your progress and issues, and may be able to suggest and share ideas they might have used.
- 28 replies
-
- 1
-
-
- artesania latina
- constellation
- (and 1 more)
-
hi there I've not built this model, but I've done a few like it. you would use the thicker strips to plank the hull. the thinner strips would be for the outer hull.......you must need to double plank the hull. are the darker strips thin as well.....if so, they are likely what you must use for the hull. the light colored thin stuff would be for planking the deck. after laying it, you can stain it to whatever color you prefer.
- 28 replies
-
- 1
-
-
- artesania latina
- constellation
- (and 1 more)

