
HOLIDAY DONATION DRIVE - SUPPORT MSW - DO YOUR PART TO KEEP THIS GREAT FORUM GOING! (Only 75 donations so far out of 49,000 members - C'mon guys!)
×


popeye the sailor
-
Posts
16,007 -
Joined
-
Last visited
Content Type
Profiles
Forums
Gallery
Events
Everything posted by popeye the sailor
-
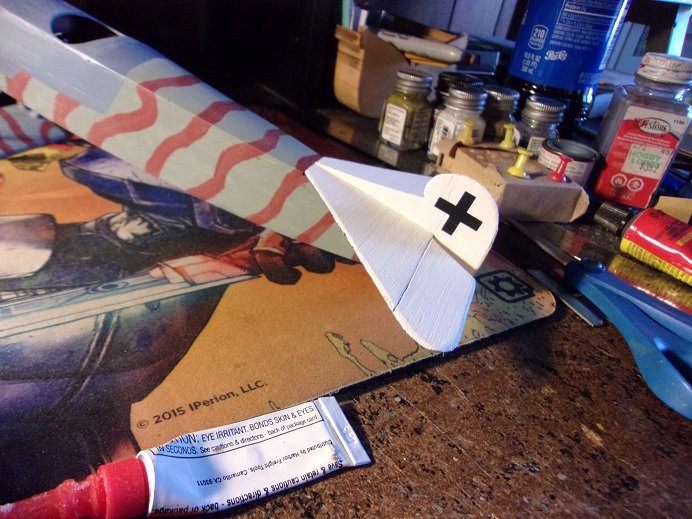
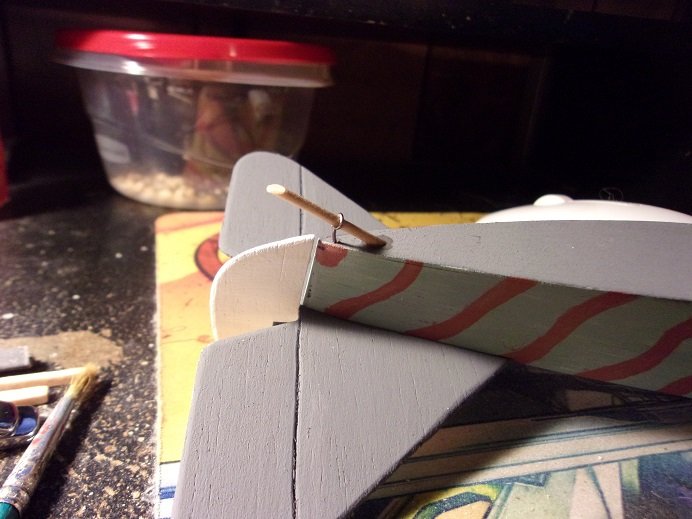
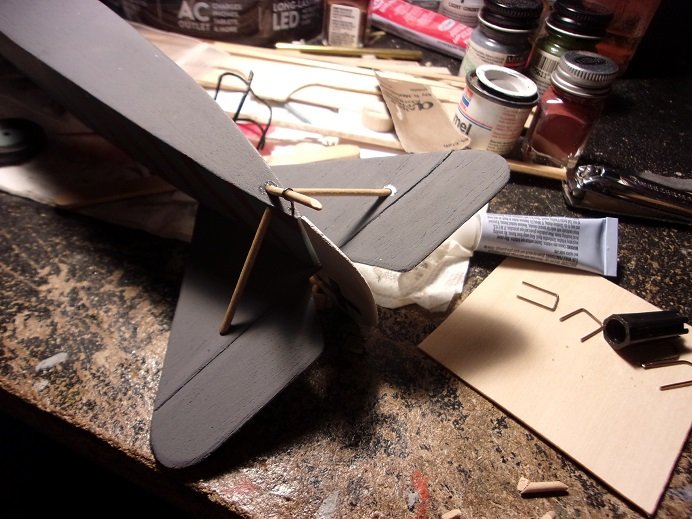
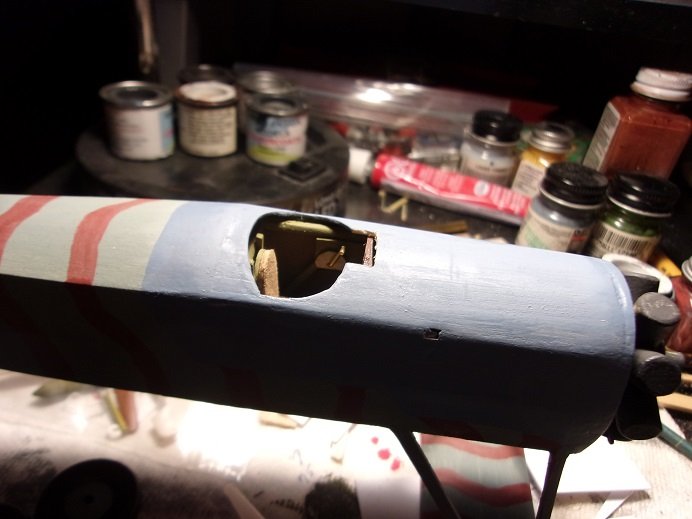
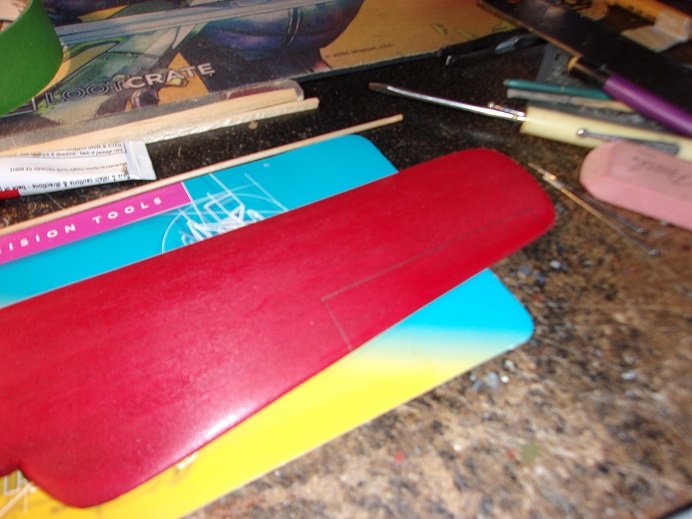
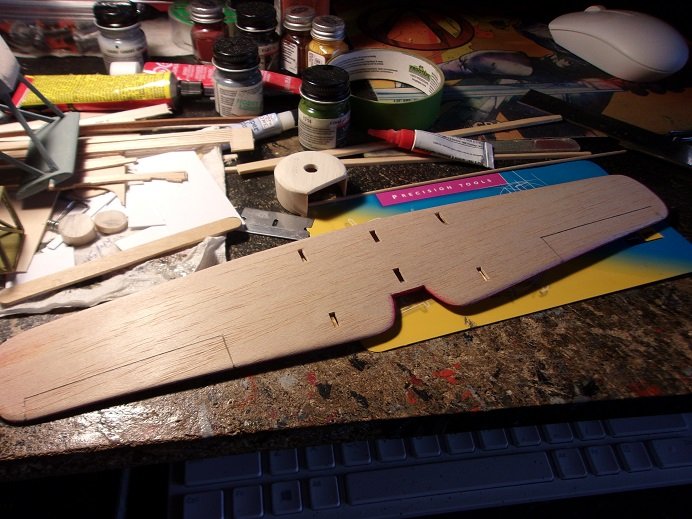
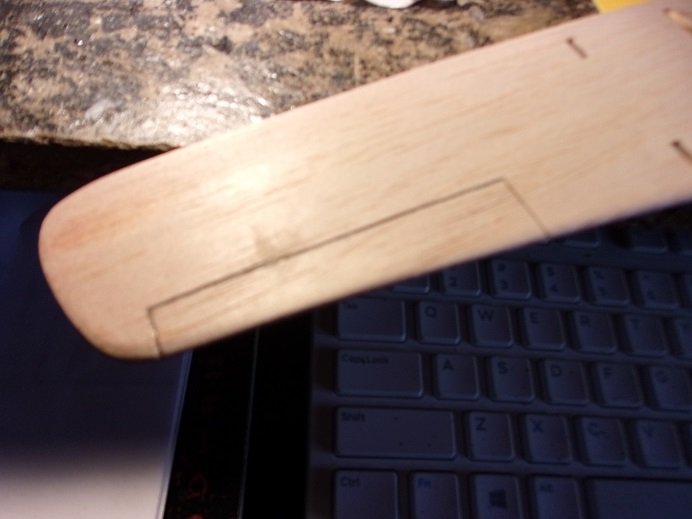
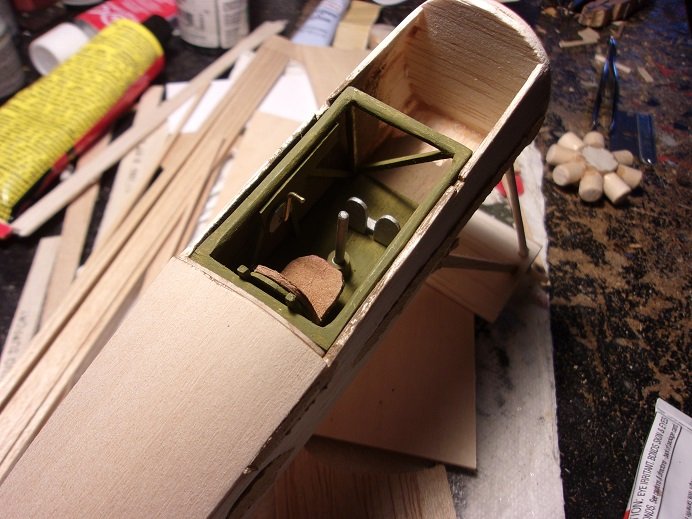
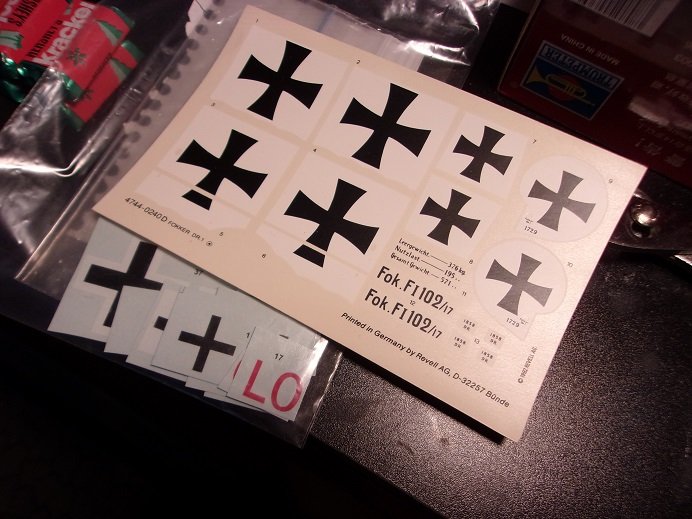
 the Christmas rush.........who came up with that? they must not have heard about the check out line it's been crazy 'round here..........barely time to breathe. we've gotten our first snow as well.........1.2 inches 'round here and maybe a foot for the north. we got a bit more for today, but it got knocked down by the rain that was sandwiched in between. I managed to get some done last week, but pictures are scant due to how broken up the session was. yesterday was the big one.......I got more done. to recap the steps taken last week........the cockpit was cemented into place..........which led to the nose to get closed up. that was a bit of a compound step because I had to finish shaping the cowl. on the exposed cylinders of the engine, I added exhaust tubes, and the nose for the prop was added. I also got to do some painting.......hard to say what the base color is.......wait.......{get out the Humbrol color chart}........OK...#87 is a steel gray. I just did some simple camo wavy pattern........closest I can come to the color is a red/brown {it is a bottle of 'oops' paint I made up some time ago}. when I got to the point of finishing the fuselage paint, I found that the can had jelled. I only had the single can. so I painted the nose section with a blue/gray from the White Ensign collection I have. I was curious how it would cover wood, as opposed to plastic, and I found that it is better suited for wood. makes me very happy the engine is in place, as well as the stabilizer and rudder. the only decals so far.......I really wanted to do the Iron Cross. I'm not sure if it is correct to mix them, but then again, I'm not modeling this to any specific plane. most of the pictures I found were in black n white. the insignias are timeline specific, and since I added a bottom surface to the wing, I want to be able to add insignias there too. I have a full set of the Iron Crosses, but odd sets {collection} of the simplified crosses. I might have mentioned that I painted the tire rims. I also added the two holes in the cowl ...a little more work on the machine guns the tail skid, the steps {one for each side }, and the grab handles were shaped out. with the additional part made up, I thought to add some at this point. the tail skid was cut to shape and added in the beginning, the D VIII didn't have the stabilizer braces. these were added a bit later in their production as I was working on the machine guns, I thought about the cut out that they were nestled in. the ammo boxes were located under them. to help in their placement, I cut out the recess to fit them there will be some sort of batten around the cockpit opening....not sure whether to use leather or thick thread. the gun butts were shortened a little and handles were added on the ends. a bit of plastic gives it a little more detail. I did the same for the Fokker Dr 1 that I have in the closet......they are bigger though
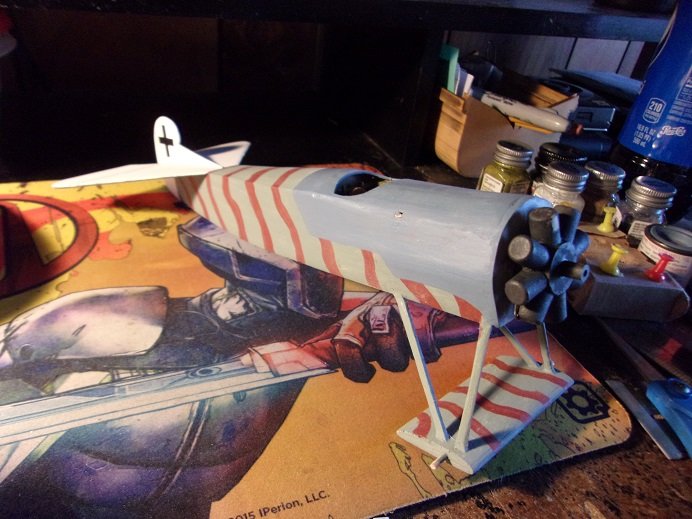
- 79 replies
-
- 13
-

-
it use to be that some could only be done with rubber...........the larger kits were the R/C only. but now with electric motors as small as they are, even the smaller kits can be modified. the gas engines can still be found. I never got into it though
-
what caused problems with the Fokker planes was deficiencies and deterioration of the wing joints. wings back then were not as thick as they are today and possessed a curvature in the wing surfaces that you don't see in today's planes.
-
the French biplanes also had small rudders. looking at the makeup of the Fokker rudder shows that they utilized the air channeled over both planes - top and bottom. it shows that looking at different planes of this era, each manufacturer had their own distinct design. the earliest design thought was based on the kite.......without a tail, it flew erratic........but with a tail added, it flew straight. I believe it was the Chinese who firs came out with the box kite.....this design was used for the Wright Bros. plane, as well as the early bombers......the Vickers Vimy and the Hadley Page. Junkers had their ideas.......even with the Junkers JU187 with the rudder inverted. the Beechcraft Bonanza utilized the stabilizers to perform both functions....there were a couple other planes that were configured like this. some even had multiple rudders. the stabilizer performs the horizontal aspect and the rudder performed the straight ahead aspects........in some planes, it depended how they were fixed to give the best performance. I'm certainly not a whiz with this, but the base aspect was the overall weight of the plane and what it would take to get it and keep it aloft. the Me 262 is a good example of high stabilizer placement....rate of climb and maneuverability were greatly improved. most jets have tall rudders.....with air speed they could go, they needed more rudder surface to be as nimble as they are. note that on some, the stabilizers are almost, or level with the trailing edges of the wings.......this streamlined the horizontal aspects. but yes, the amount of surface guided how they handled in the air........in spite of this, the D VII, the D VIII, and the Dr 1 flew very well. if the Dr1 and the D VIII hadn't suffered from wing fatigue, they would have been great planes.
-
WOW! she's quite a looker Ed! you did a great job! too bad about the folding wings, ........either way though, you would still have a great looking model
-
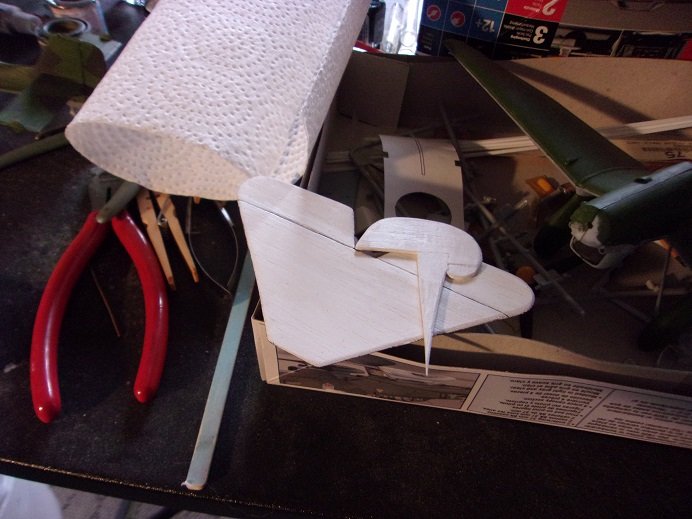
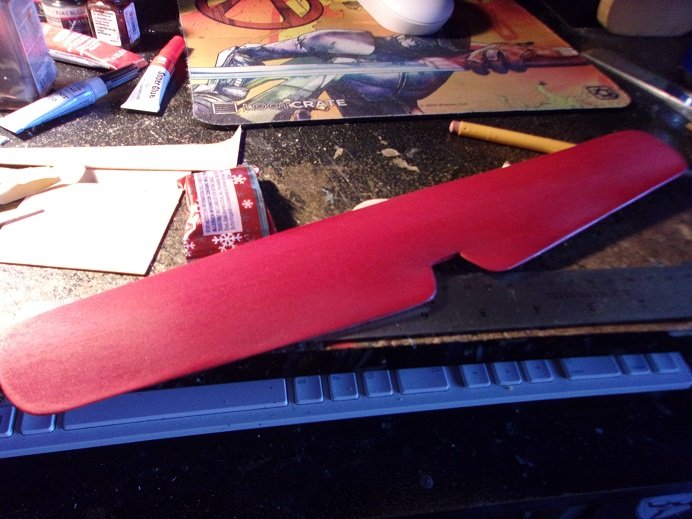
the top of the stabilizer was painted flat white, as well as the rudder {the most well known color of Fokker tails doing the stab ailerons in marker pen was kinda futile.......it highlights, but very little. I have a scriber I'm going to try.......first time using it. it can be purchased at Billing USA, or wherever they sell Model Craft tools. not so good either.......it had diamond bits, so it tears the balsa, rather than grooving it......so I stopped using it and resorted to using the back spine of a single edge razor blade. worked just as well the underside of the stabilizer was done in a dark German Gray. cleaning up the groove a bit and running a pencil along them, they were touched up with paint. after sanding the fuselage, it was painted with Humbrol matt 87 - Steel Gray. it looks the perfect base color for what I have in mind. the undersides of the fuselage and landing gear was done in the flat dark German Gray. looking in on Chris's log gave me enough insight as for the shape of the ailerons on the wing. I drew them in pencil, and grooved them with the razor blade. the balsa side was a little less forgiving...had to fix a couple of pho-pars. the two slots in the center still need to be filled in....I later did that too. a bit of filler and some sanding should do them nicely. the wheel hubs were painted and a little more was done on the guns. the prop needs work.......I'll get to that soon......engine too. it can be seen where I added a wafer to the center of the engine....need to cut another wafer for the front, to give it proper spacing inside the cowl. the last picture is the top of the stabilizer and the rudder.......need to decide what decals I'm gonna use. more soon


- 79 replies
-
- 16
-
-
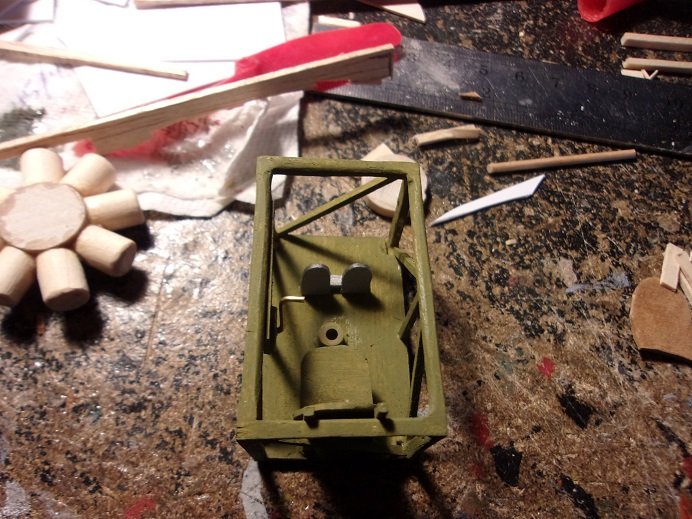
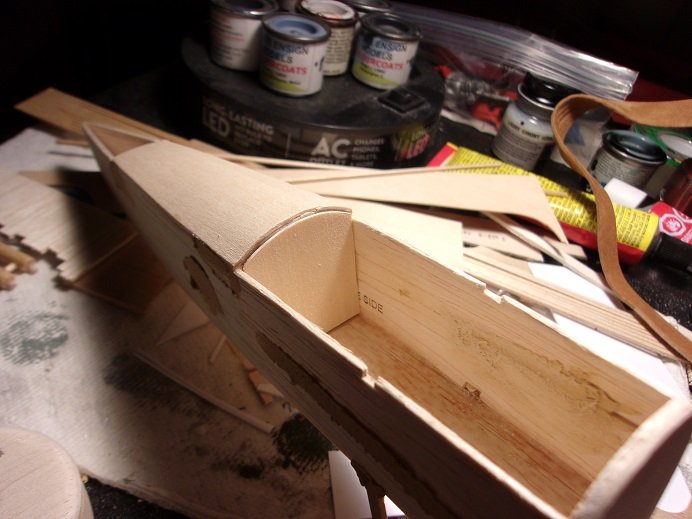
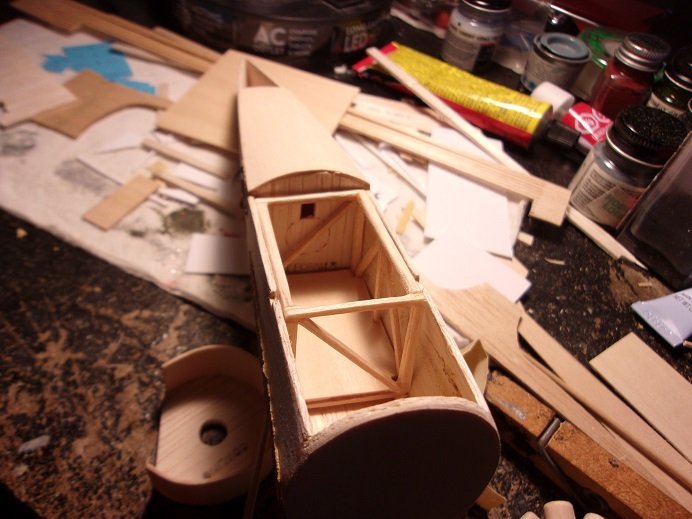
that was done on the 29th.........this is the 30th......more sanding on the cockpit box to get it to fit better. now it slides in perfectly. the seat was cemented in place, since it will be the same color as the box........this is that chromate green I mixed a while ago....... added is a panel....a lever of sorts will be added later. I felt bad for the pilot, so I'm making some leather pads for the seat and back rest. I have the template traced out for the instrument panel......just haven't made it yet. I later added the lever, the foot pedals {painted flat steel}, and the base for the stick. I tried to make a decent stick......with the hand grip, but I kept botching it, so a simple stick it is. the leather pads have been added to the seat. I did some more painting, which will highlight the next update. lucky for you folks {or maybe not}.......it's ready for presentation coming right up!

- 79 replies
-
- 11
-
-
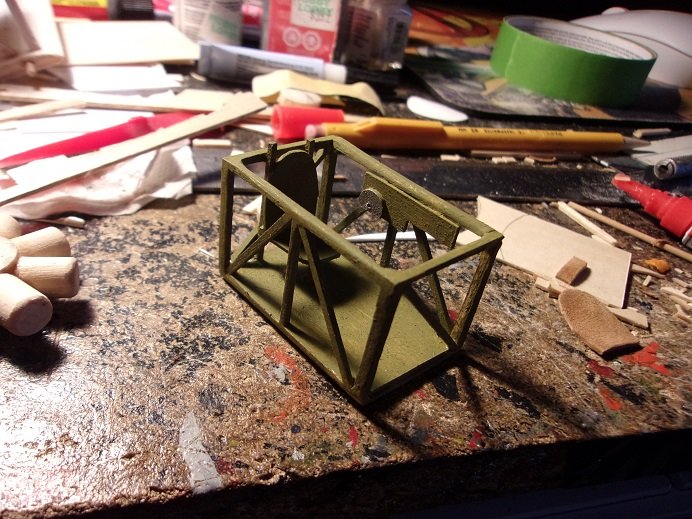
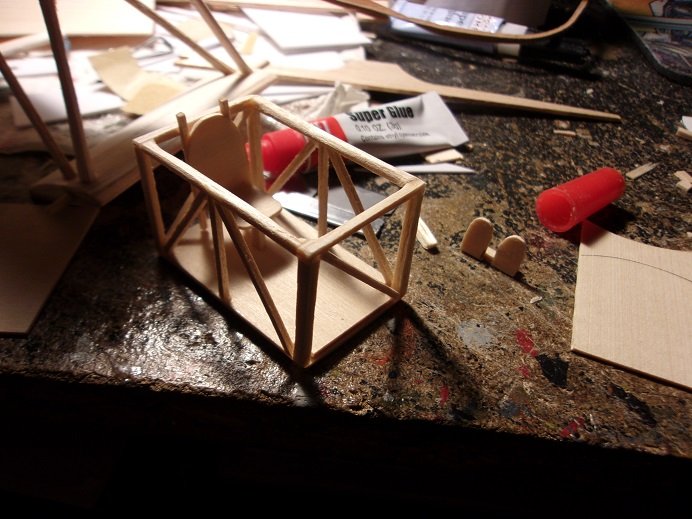
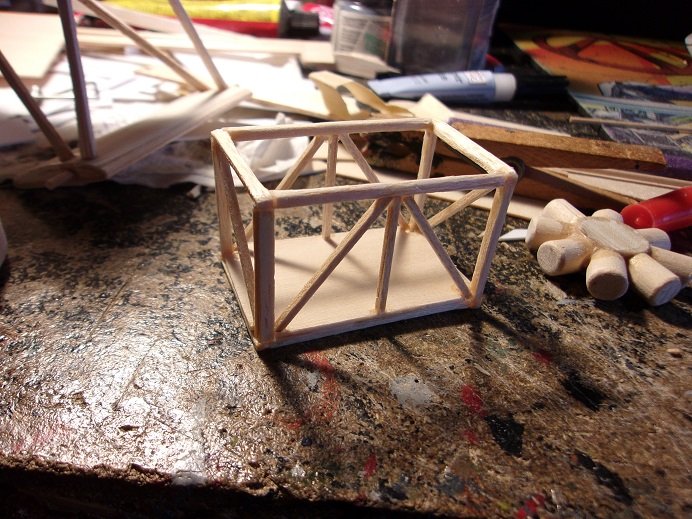
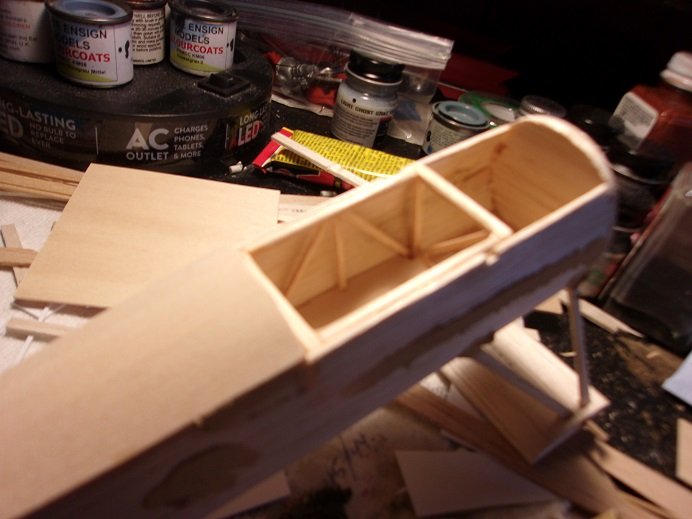
damn those dreaded obstacles! I see a lot of that at work.......apparently, there are drivers that can't navigate the yellow poles! they cut it too close and rub the side rails.......I'd love to show you pictures of the damage! I didn't do it long enough........with enough experience, you can get these planes to do some pretty neat things. I might get back into it......today.........Dec 1st.......I got a letter from social security informing me that as of today, I can formally file for retirement! 66 and four months........I made it! reality check...........it's still a pipe dream maybe in another couple of years {sympathetic pat on the back.......there, there} but........there is an update........so onward stout! 🆕 I had left off with the cockpit box......strengthening it with support bars. I ended up having to shorten it because I had made it too long and it was hitting the tabs from the landing gear struts. I tried to remove the stubbles, but I realized that I could possibly weaken them, so I gave up and altered the box. it wasn't too hard to make up the seat.......I gave it a pair of braces and a single leg for under the fanny area. the goal is to get it so it fits flush in the fuselage, and give it some sort of detail. I'm going to try and do as much as I can. oh....and I also made up the foot pedals. when it's time to put on the top fuselage panel, I need to make formers that will give me something to glue to, and help me give the panel the correct curvature, flush to the aft section and the cowl {which still needs to be refined}. I did a trace of the curvature and trimmed the part to do the job. ....and then finally.......a splash of paint! using some Humbrol and Monogram flat paints, the interior walls was done in a flat wood brown. I got the few parts that were in the spare room together, here at my desk, so I wouldn't lose them. I also filled in the rest of the imperfections and gaps. sanding never ends
- 79 replies
-
- 12
-
-
Wow Jack....sorry to hear of your eye problems. none still, you managed to pull off a very interesting model! ! looks great!
-
I read an article about the camo. early planes had it painted on, but with the concern that the added paint might put more weight on the plane, it was decided to make the canvas with the camo printed on. they would roll off the assembly line with that camo design.......either a four or five color pattern. Lozenge camouflage pattern | The Aerofile nice job Chris. I've been researching the shape of the ailerons........your picture is a huge help! looking really good!
- 46 replies
-
- 10
-
-
thanks for the picture Doc.......if you look in the link I posted earlier, picture #33 shows Ernst Udet in a D VIII. it doesn't look like it has the machine guns on it either, but it has the lozenge camo. do I dare try it? I do have some of his decals in 1:48.......maybe not the same configuration, but it could be done { after all, it is a static model}. the decals I plan to use are from a Dr 1..........I can pretty much use them all except for the plane production numbers. the decals are for an F1 flown by Richthofen in the final test flights. he took the plane out on Sept 1, 1917 and shot down two planes. he came back very happy with the way the plane handled........the plane he flew, F1 102/17 was awarded to Kurt Wolff, along with F1 103/17 to Werner Voss. both died in the same month.........Wolff on the 15th, and Voss on the 23rd. as you can see.....I have other decals as well. so if these don't pan out, I'm not stuck I've only had a couple of good flyers out of all the planes I've built. a P40...........I built the Guillow's P40.........had a nasty run in with a palm tree. received an impacted cowl if I remember right dihedral and balance are the two important things to remember....they are a lot of fun to build. the only thing I don't like about balsa, is that it is so easy to dent the wood.......even finger nail marks.. I almost have enough to post another update.....the cockpit see you soon!
-
old research meets the new research!........that is the biggest thing about older kits. so much now is known about what subjects looked like back then....there is a lot more info out there. there is a bit of nostalgia that goes along with it. I think back to when I was younger.....nice to get a second chance every once in a while really nice job on the chassis!
- 97 replies
-
- 10
-
-
no dispute intended........I've seen it before as well basically, it's a production number and the additional 'artwork' was put on after it was delivered. I've also seen it on decal sheets thinking it was a misprint. it's a small bit of detail that I sometimes didn't follow. my thinking for the obscure, even though I think it would look better the other way around, turns out to be detail missed. I'll keep that in mind I still think you produced a fine looking model..........that needs no adjustment at all!
-
looking very good!
-
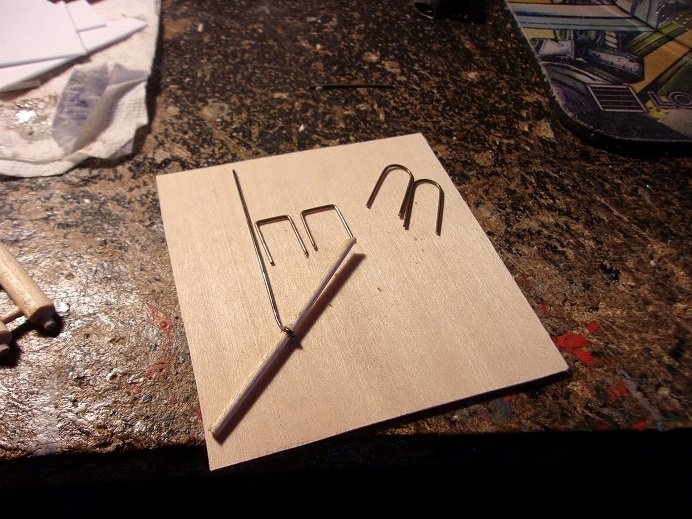
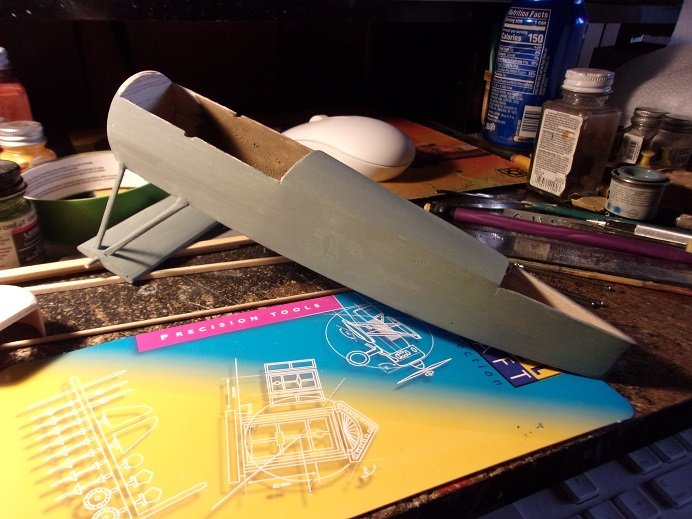
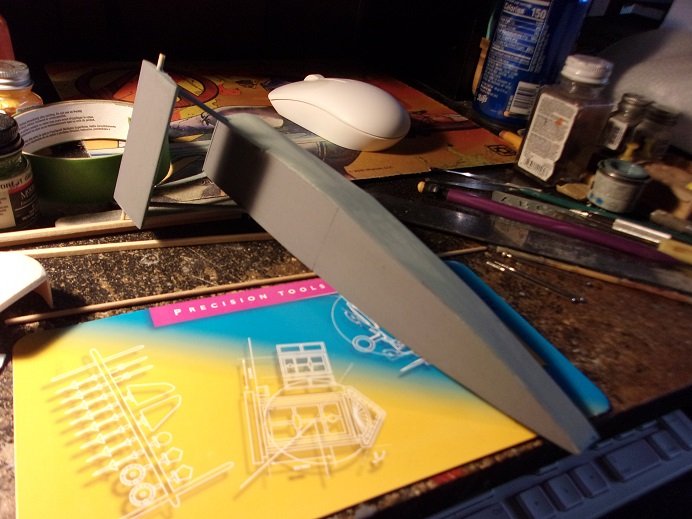
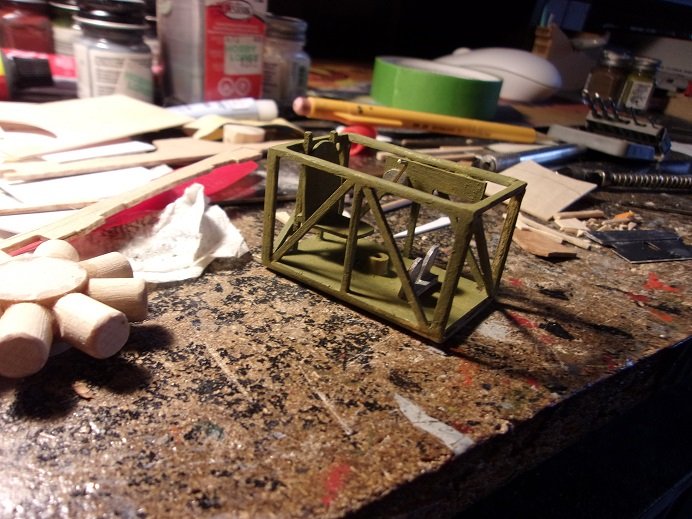
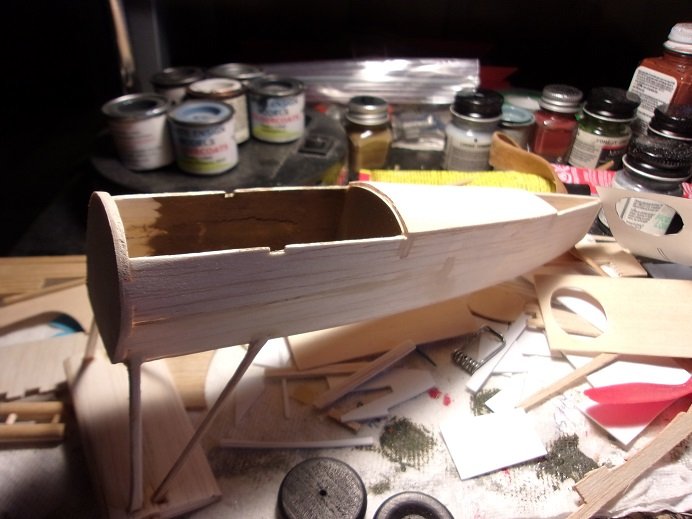
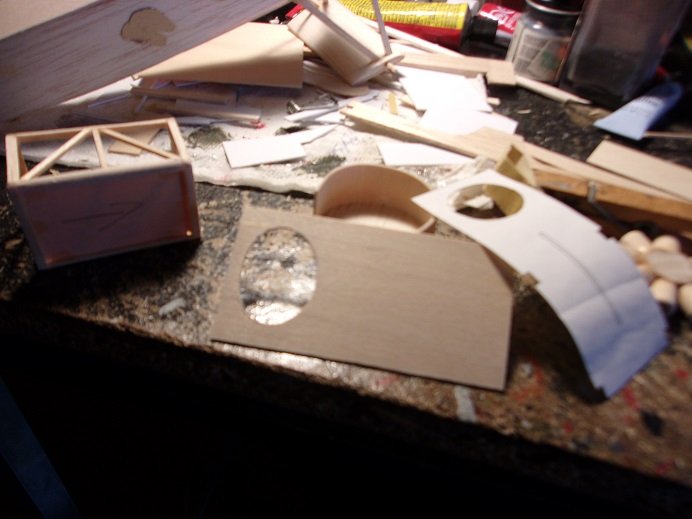
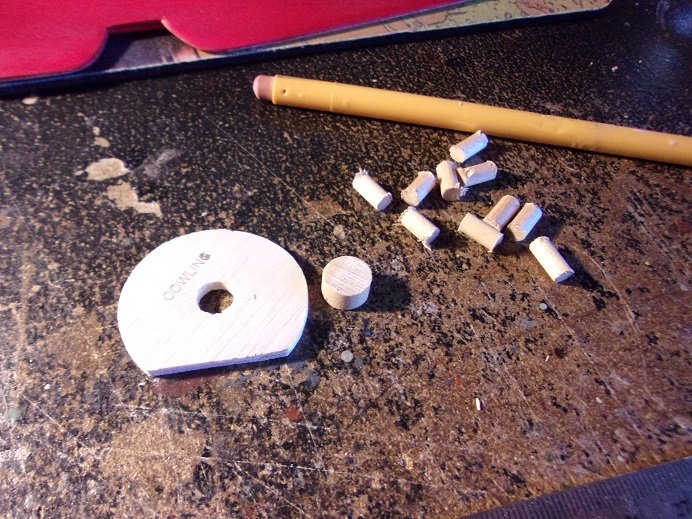
Hi all........finally put together another update.........I'm looking into three facets at this point, as well as getting the fuselage to the point of painting. I'm still juggling a design in my head. the engine being too small was a minor set back......but definitely not a deterrent. I did make the crankcase larger........and with that, the sleeves needed to be enlarged as well. debating how much detail to put into it, since only a couple of the sleeves will be seen. I do have to properly space it, given that I have ample room in the cowl. with hardly any room and how short the sleeves are, it doesn't give much for cylinder heads {I'm throwing ideas around}. another aspect are the machine guns........I made up a pair of cooling chambers now.......I have a nice pair of 1:48 machine guns, but they just don't seem to catch the scale of the model I think they need to be a bit heftier......your thoughts? the third aspect is the cockpit..........I wish I had round stock that small. I do but limited on what I have on hand.......so I created the box from balsa stock and will round off the corners. I did a little sanding......still fragile at this point in time. I need to beef up the frame. using smaller size balsa strip, I fleshed out the supports. more sanding was done after it had set enough to do so, and it was fitted into the fuselage. there is more to add. the nose former is out of round........I left it that way until I made the cowl. now that I have a good idea what needs to be trimmed off, I can start to make up the top cover to the fuselage. there is a template on the instructions that I cut out, and used it to cut the panel. the cockpit hole was cut out and it will give me a sense of where the instrument panel locates. you see the long slot that was to be cut out of the panel for the wing support....these are the parts that I eliminated to produce a more accurate model. more to come
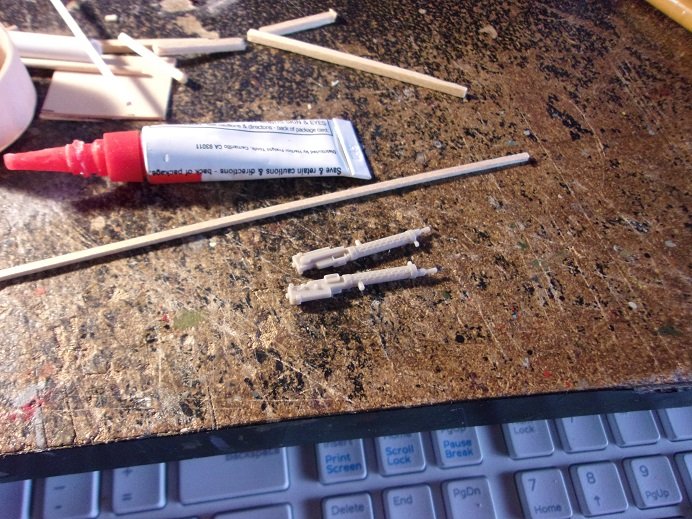
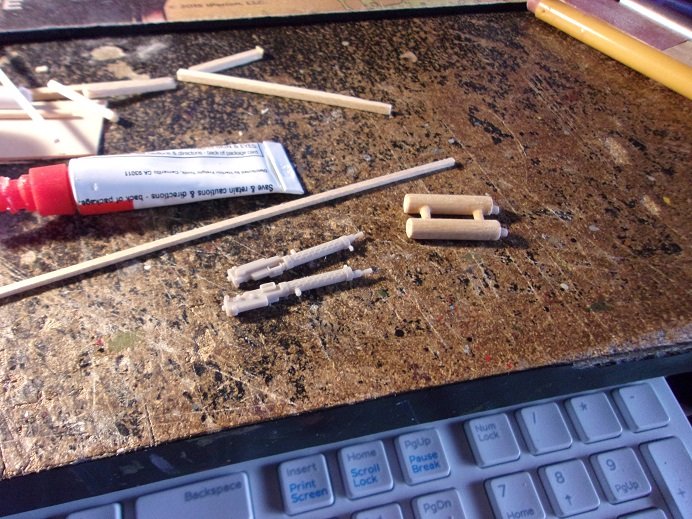
- 79 replies
-
- 15
-
-
looks really nice
-
the only thing I see are the anchors on the side.......I feel the lettering should have been over them. all 'n all though, the camo is really good....nice streaking. I think it's why I love this era of planes so much.......especially the German planes. each jasta had their individual camo and art work..........flying canvas you need another one to keep it company
-
superb model Patrick! beautifully weathered!
-
very nice........the camo looks especially good
-
OMG!!!! you didn't go to bed and dream about me did you?!?!?! poor man..........must have woke up in a cold sweat! yep.......I am aware that there are decals for this camo. I'd be concerned about time.......cracking shrinkage and peeling.......I wonder if there's a way to paint it on. something to think about really spiffy progress........she's look'in super!
-
I've never done a Wellington.........Lancasters and spitfires are the only British planes I built in the past. any plane can be it's own rabbit hole ...just depends how far you wanna go.
-
found a fairly good reference site on the D VIII........too bad that the pictures are all in black n white. Fokker D.VIII (English) now that the feasting and napping is over....................on with the Christmas rush!
-
hi Andy....such a superb job your doing! your log is quite informative also.......being an American bomber nut, it's amazing how much info is out there! really cool upgrades too!
-
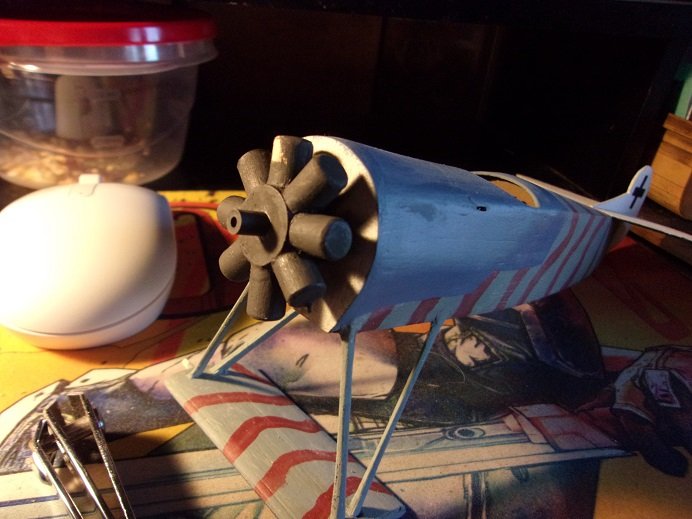
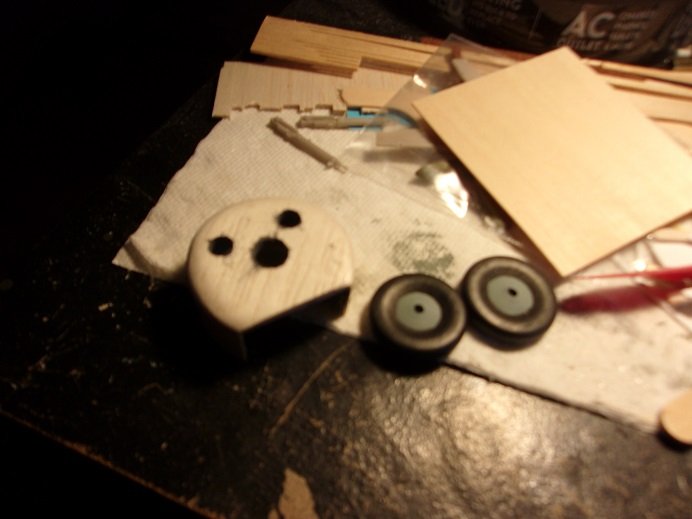
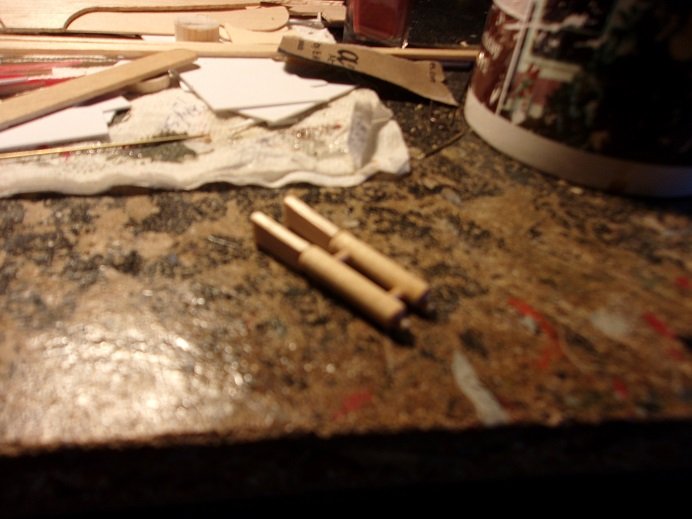
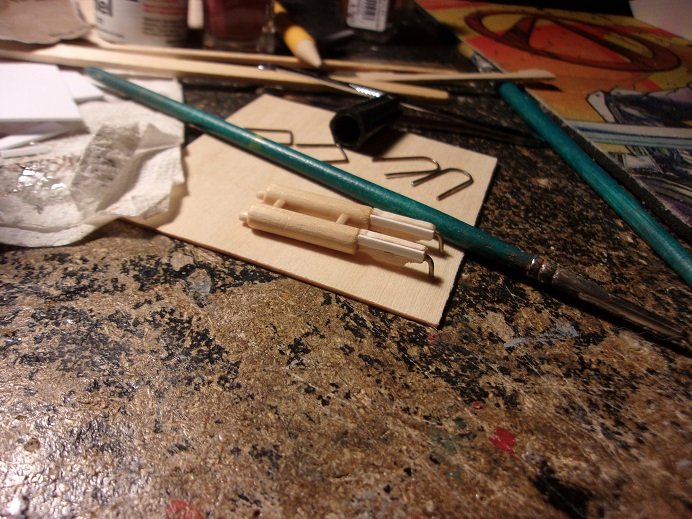
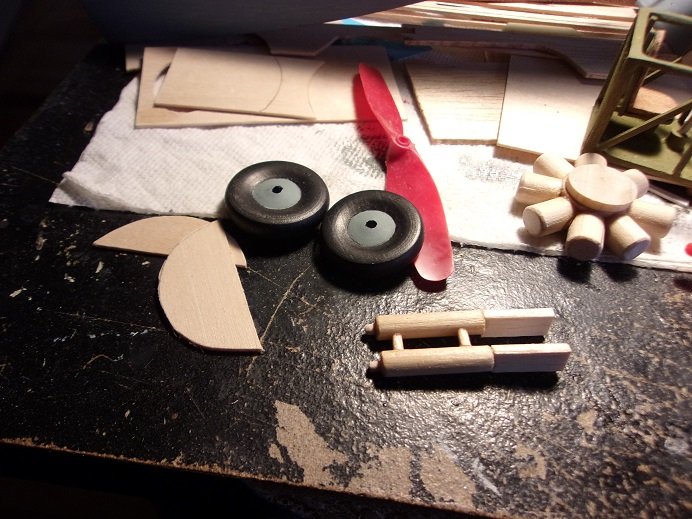
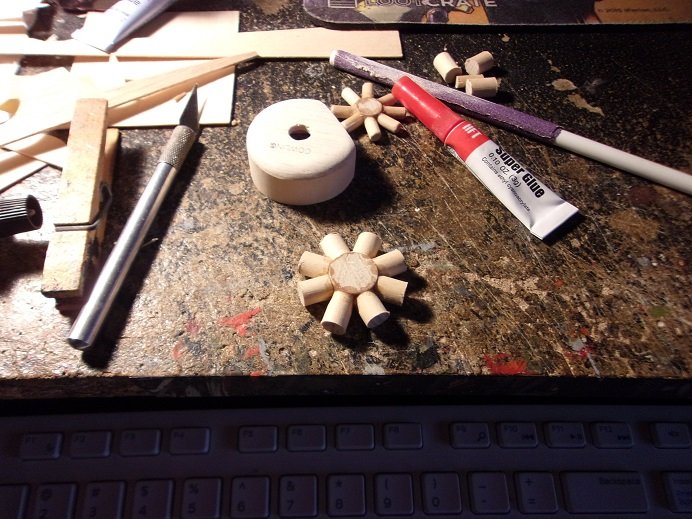
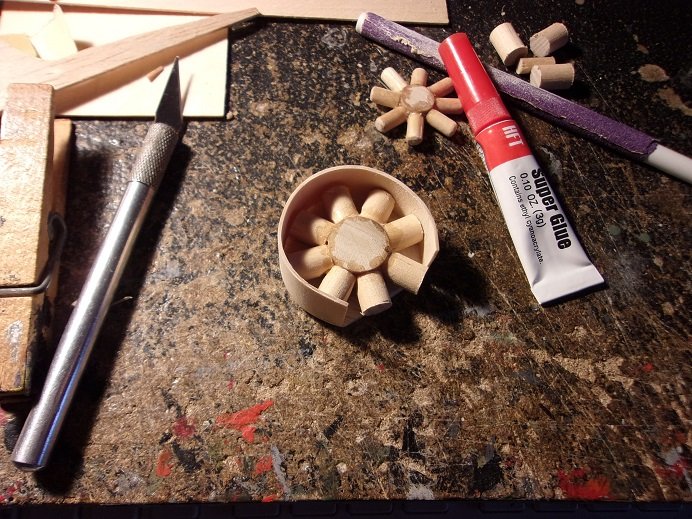
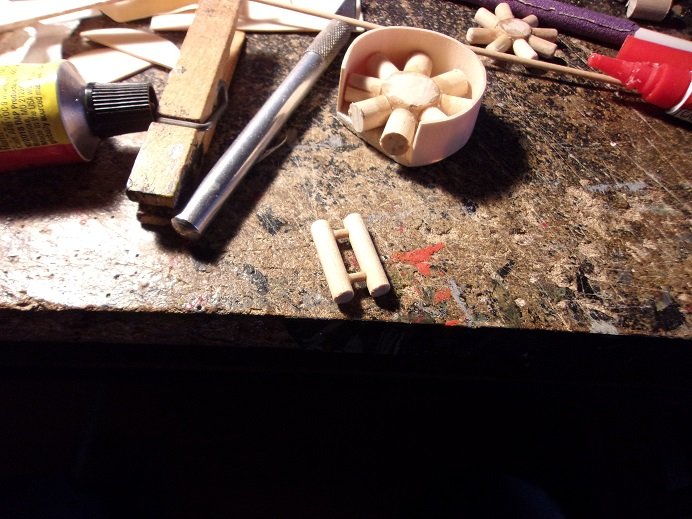
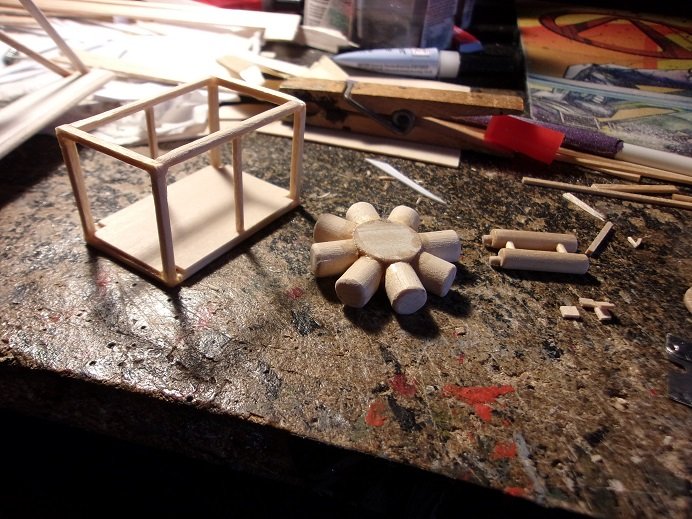
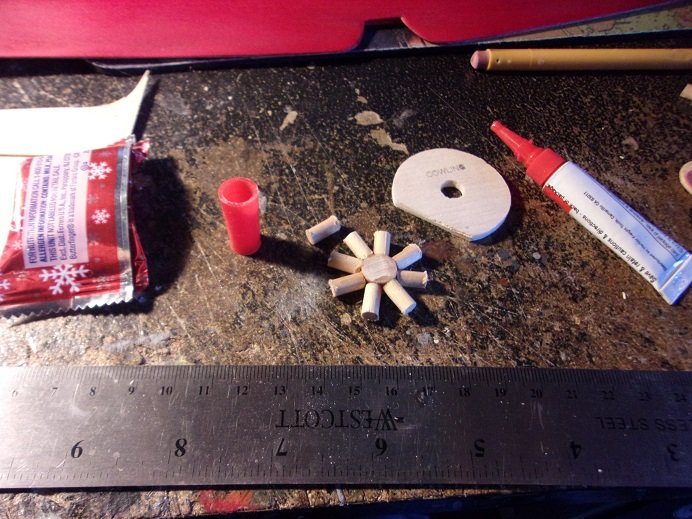
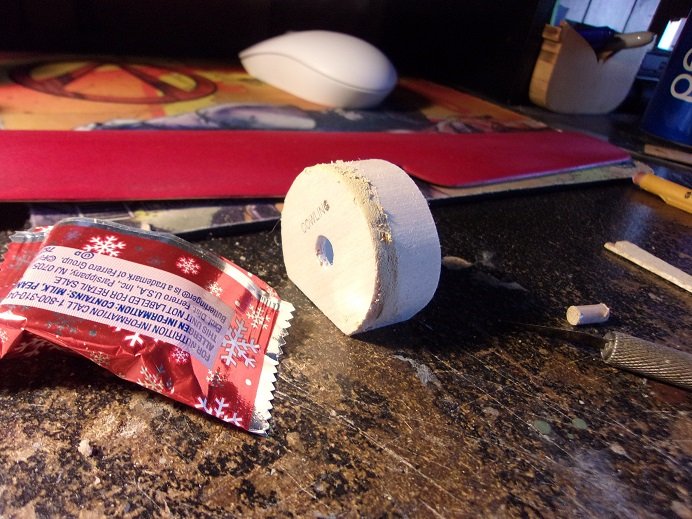
the landing gear was done about a week ago.........I did manage to get some wood putty in the meantime. I bought a couple different types.......the water soluble type and what they call plastic wood. I prefer the water based type mainly because it can easily be diluted to a more malleable cream, rather than a paste. done smooth enough, it can reduce sanding, and does stretch it out to cover more surface. I did a little on the fuselage, but I tried the plastic wood.......smelly stuff, but it works well enough. still needs a little more sanding and finish the rest of the fuselage. I hadn't checked on the wing either........that was also about a week ago. it should be totally dry by now. today, I had some time to putt around. I started to think about the engine. the Fokker Dr 1 has a wingspan of 20 inches.......1:14 scale. it features a vacuum form radial engine, to replicate the Oberursel Ur.III. the D VIII was equipped with the same engine, and had the same result as the Dr 1.......poor engine performance. there were experimental engines used in these aircraft, and was later fitted with either the Goebel or Siemens / Halske engines. unfortunately for the D VIII, only 380 were ever produced during the war, and around 85 actually saw combat. most were destroyed after the war, except for the handful that got snuck out of the country. I gathered the parts to start this little task the outer cowl part, the crank case button, and the piston sleeves that were cut from dowel. the sleeves were cemented to the button......of course, I could only get eight of them on, since nine is an odd number for the pie fraction. all I need are the ones that poke out from the bottom cutaway, so it will do. if I had beveled the base of the sleeves in two places, it could be done. now to sand it circular, and round off the sleeve heads a little.......clean the mess up. I may add some tubes on it to further detail it. next was to cut a length of basswood across the grain long enough to go around the cowl face. cutting it in this fashion will make it flexible.......even more so after getting it wet {dried and left damp}. the CA will adhere even when wet, which is a great property for a cement to have the seam was filled with plastic wood filler. the filler doesn't take long to dry.......being made up with Acetone and N-butyl acetate. it appears to sand fairly well.....I think I'll stick to the good 'ole water base though.......less smell and it don't have cancer written all over it before long, the outer edge of the cowl was nicely rounded off. ....and now for the bad part........the engine is too small I think going for a larger button, will allow me to glue on all nine sleeves without having to bevel them. so back to the drawing board for the engine.......but I'm on the right track. hope you all had a great day

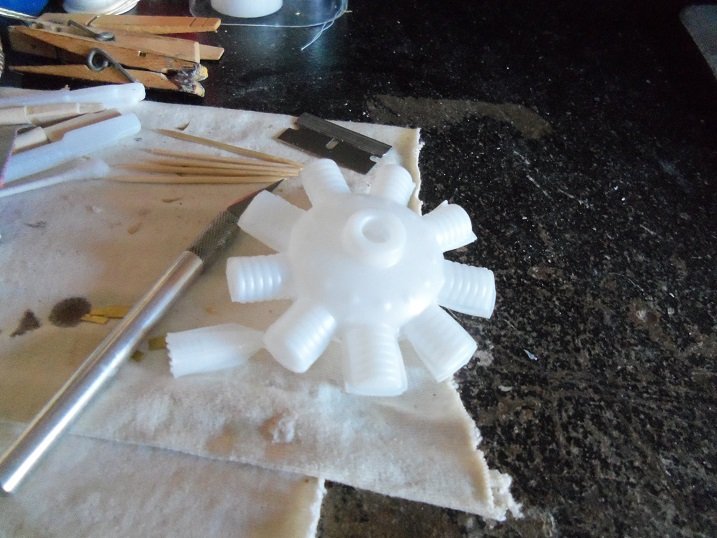
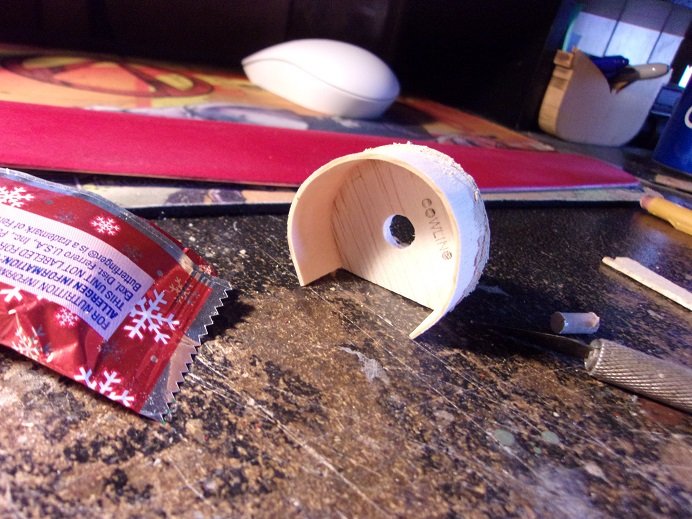
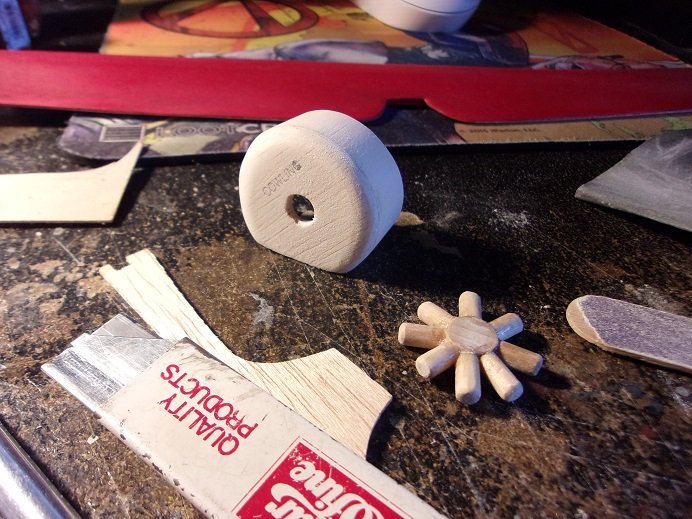
- 79 replies
-
- 14
-
