
HOLIDAY DONATION DRIVE - SUPPORT MSW - DO YOUR PART TO KEEP THIS GREAT FORUM GOING! (Only 75 donations so far out of 49,000 members - C'mon guys!)
×


popeye the sailor
-
Posts
16,007 -
Joined
-
Last visited
Content Type
Profiles
Forums
Gallery
Events
Everything posted by popeye the sailor
-

Billing Boats Zwarte Zee - rare find
popeye the sailor replied to popeye the sailor's topic in Wood ship model kits
I did some checking on the Atlantic..........I've seen only prebuilt three masted schooners in wood.........no kits so far. you may have to lay in wait for one to come along. in regards to wood kits.......you sound a bit like me when I was young..........I can safety bet that there are folks here who are building a model that is above their level. how else does one gain knowledge and experience, if no chances are taken? I had to have one dropped in my lap to give it a try.........and 'Ole Nordie sits on the shelf in our living room as testament. now, I wouldn't suggest to you to go out and buy a Billing Boats kit as you first, but there are kits that could give you a decent introduction. there are small kits, like dingies, whale boats.......or even a sail boat that could get you started..........single masted boats. the hardest part to master is planking.......and there are a plethora of tutorials and books that can help you there..........there are also folks on this site that can and will help you along the way...some really good people every new comer to the medium has something to offer, and sharing knowledge is one of the core principles that we follow here. you have yet to find yours ..........and you will, one day. -
Billing Boats Zwarte Zee - rare find
popeye the sailor replied to popeye the sailor's topic in Wood ship model kits
thank you Peter.......funny....that's how I met Tom Richards, the fellow that had a Billing's franchise in Hayward Wisconsin I had a super time back then........I was kind of working with him and his site, but I was supplying him with build logs of the Nordkap and the Cux 87. I became such a blog nut........I now have blogs on three sites! I did try to correspond with the Billing's home site at one time, but I never got a response. I might try to contact Roger @ Ages of Sails about it, since they were the folks who bought out the Billing USA site. it's still a functioning site........used to have condensed blogs of the logs I sent Tom, but I think the last time I looked, they were gone {I still have a copy of them to enjoy } so far, I haven't seen one in my searches.....I am still trying. I will have to check in on where you are with your Cutty........I have a catalog with the Billing's Cutty in it. a truely old kit...........mahogany wood and such hello Ferrus..........I believe I saw a Revell Kearsarge on the old model kits site. it's over $300.00 though.....not for the faint of heart {cost wise}. there are the wood kits........off the top of my head, I forget who makes it.........just in cast you want to get sawdust under your nails I used to be daunted looking at those kits........but after building my first, I don't know why I was so apprehensive the Atlantic sounds like a Lindberg {Lindberg lines] kit.......I'd have to do some checking -
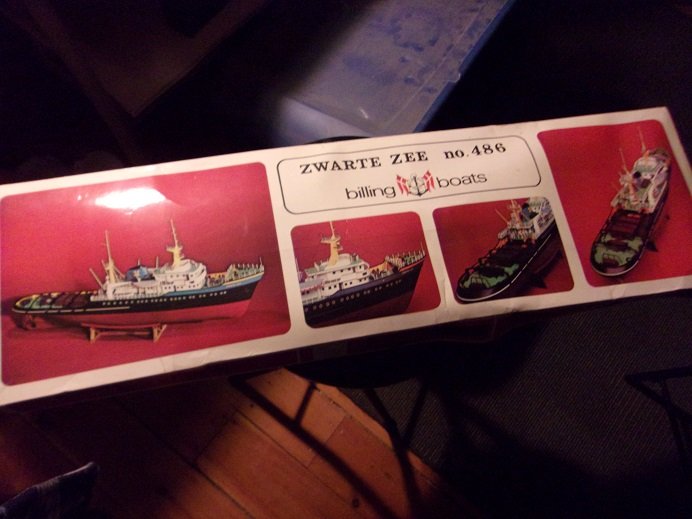
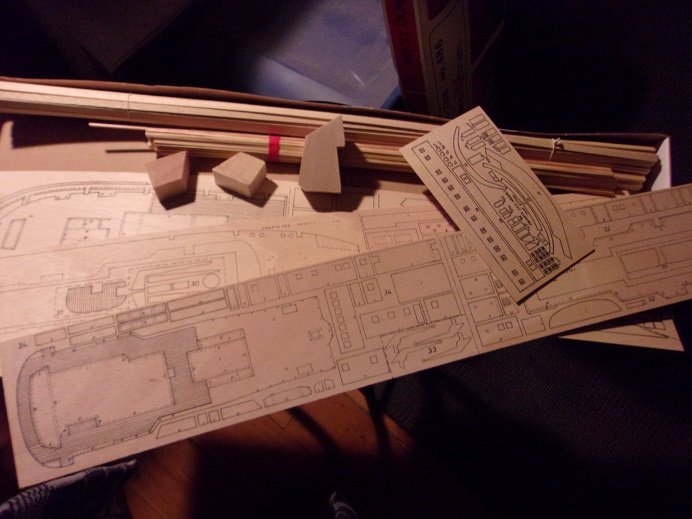
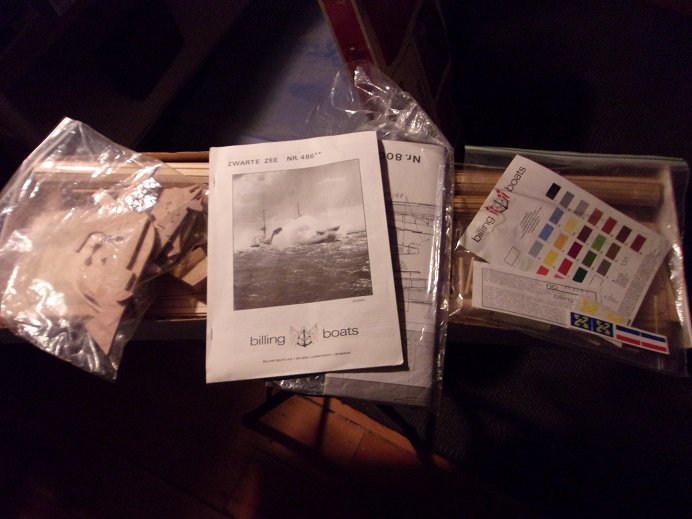
I was browsing through my favorite web site a couple of weeks ago, and I saw a kit of the Zwarte Zee offered for the ridiculous price of $89.00.............naw....must be an error. figuring that they might correct it on their own, I looked into it again last week..........they did not I turned to my budget director and told her about it, and after a brief discussion, I was ok'd to order it. snail mail came through better than expected in receiving the package sooner than it was said to arrive. even though there is a bit of a let down, I'm very happy with the kit! this is the Zwarte Zee #486, an older kit of the model that Billing Boats offers today. being an avid Billing Boats modeler, it was easy to see that this is an older kit, and even though there are a few bits of hardware, it is missing the fittings. with older kits, these parts were sold separately. in the past, I have acquired two kits of the Nordkap..........the first being the first wood kit I've ever built {along with the Cux 87}, and the second one being older that the first, the use of mahogany wood being the big give away. I have begun some research to locate the fitting kit, and so far I haven't seen any available. the furthest back I have been able to go with this kit is around 1963.........these kits were not laser cut, and the parts were printed on basswood billets. all parts need to be cut out by hand.........they are a lot more work, but so much more fun to work with, since having a couple of these kits under my belt. the kit also went through a few kit number changes since it was first produced............#486 {I'm thinking the fitting kit was #487}........per a 1977 catalog - #422 with #423 being the fitting kit............and per a 2005 catalog - #592, the fitting were included in the kit by this time {likely, it was also laser cut}. I'm not sure if at this time it had an ABS hull, but the kits offered today do. it also went through scale changes.......the #486 kit is 1:50 scale and the newer kits are 1:90 scale. I arrived with this due to the older Nordkap kits being 1:50 scale, having an overall length of 32 inches long. there is no scale listed on this kit at all, but has an overall length of 30 inches long. considering the estimated age of the kit, what makes me happy is the overall condition of the parts.......they look very good the wood doesn't look like it's been subjected to dank cellars or musty attics......darn thing looks as fresh as a daisy. I'm going to continue the search for a fitting kit........Billing has expanded their selection of fitting kits.......only the one for the Smit Rotterdam is shown. I'd have to weigh out the pros and cons using it.
-
hello Rob! I was so happy to see you put the finish on the Glory of the Seas.....very impressed on how she came out the rigging is so stunning and the sails look awesome and very life like! huge congratz on a beautiful model! I love the display stand.....very original..........by all means, a case is in order!
-
play'in catch up Chris.......amazed with what I'm seeing drop dead gorgeous model ! well done!
-
hello Eric...my apologies in not seeing this in a timely manner. the flattie is still in it's box, waiting for me to get back to her. as you read, I tried a few methods in making the hoops for the sails, but none of them panned out for me........I just wasn't happy with 'em. so I figured I'd shelve it for the time being and look for some that I liked.......as you can see, this hasn't gone well for me. sometimes, being 'scratch happy' doesn't work the way one would like it's nothing new for me.......I've always tried to put the little extras in my models. added to this, a very active mind has created somewhat of a backlog.......anyone who knows me will attest. at the moment, I've been in a plastic frame of mind........but I have been working towards breaking away and get back to my boats { I think they miss me greatly......so does the admiral}. I appreciate your asking about the model, and thanks for looking in....I do hope to finish her one day
-
back in the early days of model kits, there were companies that produced all wood model planes. during war time, Guillow's and Comet even resorted to the use of card stock. Strombecker was another.
-
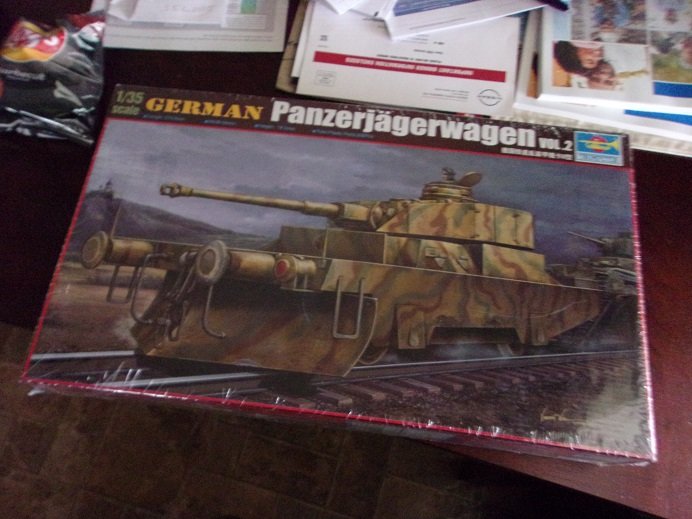
hey there........kind of an update, but no. I haven't made any progress on either fronts....even the Stukas haven't seen any movement. basically, I need to find a way not to let life get me down. I'm just bogged I did make a purchase though a week ago. I was skimming through my regular haunt, and I happened onto a kit that was pretty reasonably priced. it follows the subject and my current musing, and that's what I think caught my eye. I picked it up for $24.00........with shipping it ended up being around $42.00. I just saw on Amazon that the same kit goes for $47.99, so I still feel I got a deal I was curious about the Vol 2 thing..........I found out that this model is the second variant and sports a Pz. Kpfw. IV turret. the first variant sported a T 34 turret and had an ammo box on the aft end. it is a fairly large model...the picture doesn't show the true size of the box. it's still wrapped in plastic, so it is virgin.....produced in 2007. more on it when the time comes.......the two albatrosses come first
-
I'll have to catch up on your England too
-
my word Chris........usually I can follow along.....but lately, I find myself bringing up the rear. I really enjoyed reading the progress though........you handled the tough points wonderfully! and bro......you've turned out one hell of a model here.........you've done an awesome job! it looks so good! you handled the nay sayer well too...........reminds me of the reason why I don't visit >a certain site< anymore.........folks who thing they know it all. I simply replied that I followed the info from the Wiki, and it has the ability to be updated, so if they are so all-knowing, perhaps they should go there and update it this is why I love it her so much........we are all of constructive minds, and THAT is how we post our observations. from what I see.......it appears that you've accepted the torch that Dan carried. that's pretty honorable...and as it appears, the right man for the task great looking plane.........what's next?
-
awesome model Greg! the paint work is outstanding.........so much fire power! WOW!
- 203 replies
-
- 4
-

-

-
- Roma
- Micromaster
- (and 4 more)
-
been a while since I last popped in.........and I must say, you've made quite a bit of progress! super job on your deck mods and room additions......the lighting is well done also. your question of why you are on this site should be obvious...........you are with other like minded folk who dare venture into what has never been done, and share with others. I think you are in good company
-
you've done a superb job on this one Greg! very well done and the display really makes it a conversation piece huge thumbs up !
-
hey there Mike.........such a great looking model! very nicely done and the diorama adds to it. well done putting it all together!
-
makes me want to get the 'Bluenose Project' started...........I have the hull frames already built. three boats....the Bluenose, the Bluenose II, and the America, all in 1:65 scale. it will equate to quite a few sails
- 27 replies
-
- 2
-
-
- David Lewandowski
- Pyro
- (and 1 more)
-
fantastic build Greg......the weathering really makes her come alive! superbly done! the deck gun looks cool as well........is that rod along the top of the barrel broken?
-
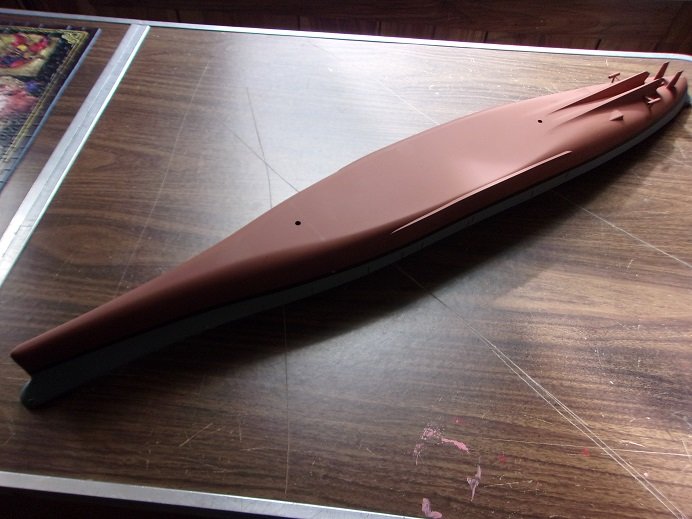
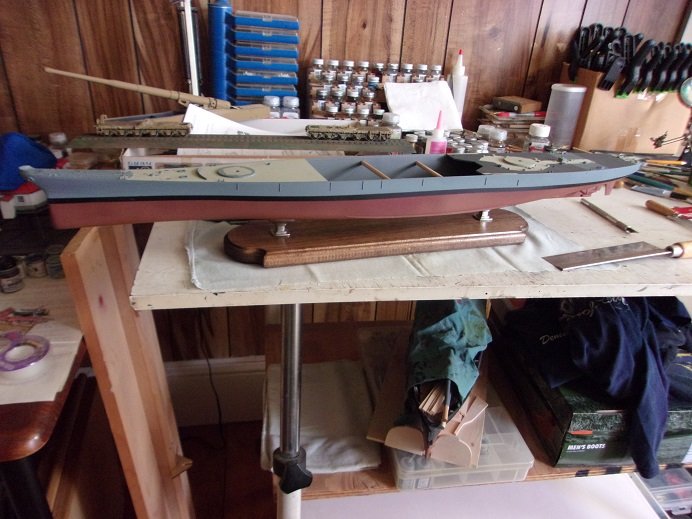
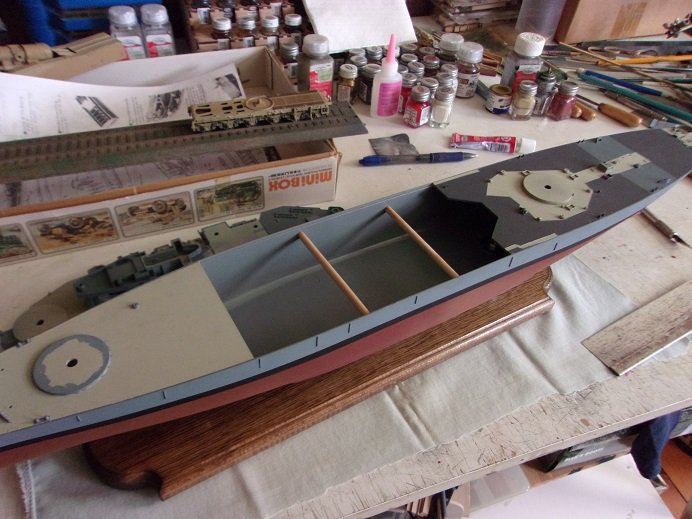
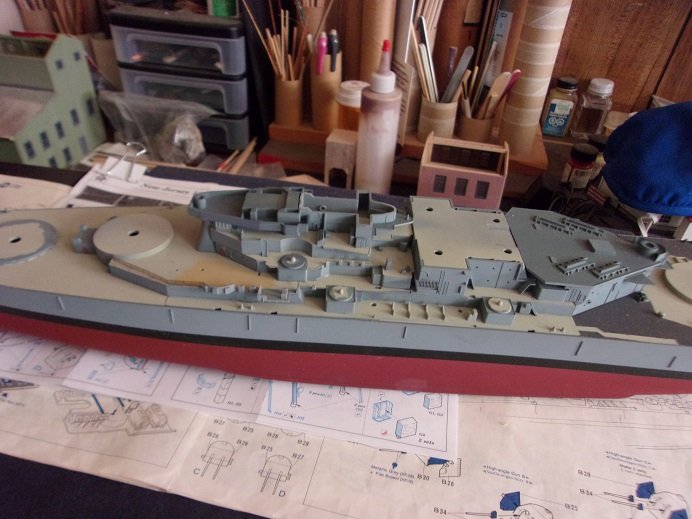
hi Sam.......yes, there is a slimming down towards the bow. it's too bad that the bow section was already cemented in place...........I don't want to remove it for fear of damaging it, and it would have looked nicer if the chain detail was addressed. I thought about how to do it, but I might just scratch it and leave it as is.......just touching it up in paint. so........the base has been clear coated with lacquer....I gave it two coats. I probably should have gone over it with steel wool, but it wasn't too bad so I didn't. I turned around and got another can of red primer to do the bottom paint. it's not as perfect as I would have liked, but it renewed the paint and got rid of all the scratches and chipping. there is some degree of fading along the sides....not intentional and I left it 'cuz it adds to the aging aspect. the next step was to mount it on the base.........that went well, so you will likely see me do this again I still need to touch up the waterline and the upper section of the hull, but these are minor and won't be hampered with it being mounted. I put CA on the nuts inside so they won't back off as I work on it. I did make a adjustments to the spreaders, ending up with only using two. the deck fits on there much better, and that will be the next step. Ca will be used here so they don't move. this is where she sits now......it's a big relief that I was able to pull it off with the decks already on the model. a couple of bollards have a 'horn' broken off {I noticed}....shouldn't be too big a deal to fix them. more soon!
- 48 replies
-
- 8
-
-
- New Jersey
- Tamiya
- (and 1 more)
-
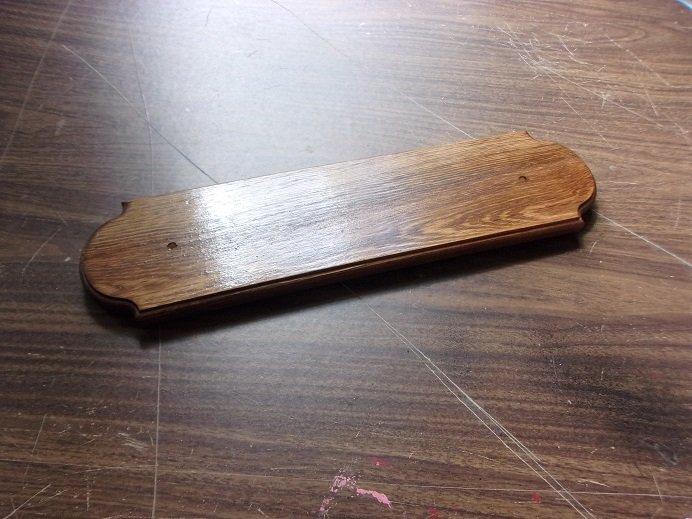
hello all........I made a bit more progress. it would have been larger, but I hit a snag and had to resolve it. firstly.......I did finally stain the base, right after augering out the holes to allow for washers. I'm even going the next size up for the machine screws. rather than cut the ones I have down, I bought a bag of 2 inch long machine screws. I got some stainless steel washers from work, courtesy of a trailer I was working on. done in a dark walnut......... last week, I found the time to give it two coats of clear lacquer. I'll be sure to post a picture in the next session. I did mess around with the hull earlier.......fitting the center section of the deck in place, but not really concerned with the way it fit. toying with it at this time, I began to notice things..........the hull seems to be warped, not allowing it to fall into place. the bow and stern section have already been cemented into place when I got the model........it may be a contributing factor to the problem. it may also be in how the hull is picked up too.........one hand holding it in the center of the hull {I'm guilty of it}. I have heard how some folks are lucky enough to have bulkheads supplied in their kits, for support of the hull...........I envy you. so, I will have to make up some spreaders for the center section of the hull. I measured and cut some dowel to spread the hull. they are not perfect........some fine tuning is still needed, but they do help out. I also trimmed the structure flanges at the front of the section.......the two structure 'ears' on both sides of the bottom level to get it to fit better. as mentioned....it still needs some fine tuning I will have to mount the base before tis section can be cemented into place. I began to try and touch up the bottom of the hull with the paint I zeroed in as the color used........just getting an air brush to work was a project. as a last resort, I brought out my gravity feed air brush and did a fairly reasonable job. this was compounded by the fact that I didn't want to thin down the paint too much, and likely cause the original color to 'wrinkle'. in the end, it was all in vain.......the color does not match. today I went out and bought a can of red primer.........I'm just going to redo it. the hull is all masked up and ready to dance, so it's all ready to shoot. I should have some more for you soon

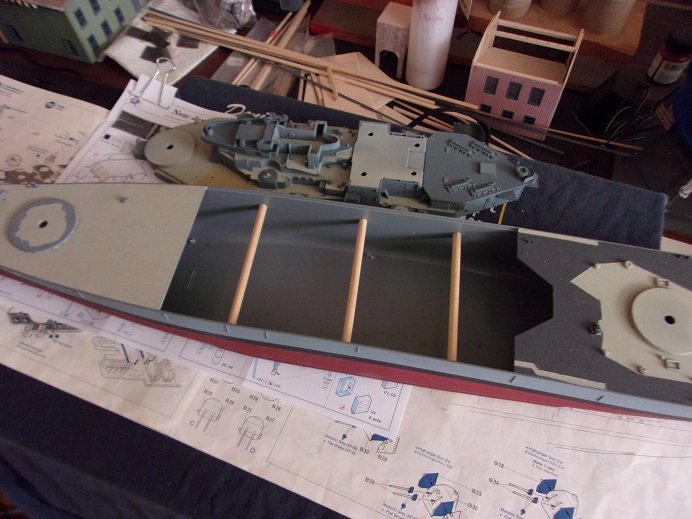
- 48 replies
-
- 9
-
-
- New Jersey
- Tamiya
- (and 1 more)
-
hey there! glad to see your posting your projects.........is the United States in progress as well? Pyro is an old kit.........for how long I've been building models, I don't recall ever trying one. is there to be a forestay at the first step of the main mast? the shrouds and back stays counter the tension of the fore stays. super job so far
- 27 replies
-
- 1
-
-
- David Lewandowski
- Pyro
- (and 1 more)
-
thank you good sir. I'm not opposed to anyone posting pictures of their work, so if you have a picture of yours.........love to see it
-
thank you Steffen. these smaller Billing's offerings are fun to build. I had never dealt with that particular net hoist before.......definitely something to research. always here to help
-
it would be a sure bet that no one would be near them .....at least, no without ear protection there are battle ships that have a machine gun battery on top of the turret. it is a fact that the guns can be individually elevated....most modelers keep them even. it's a nice touch.
-
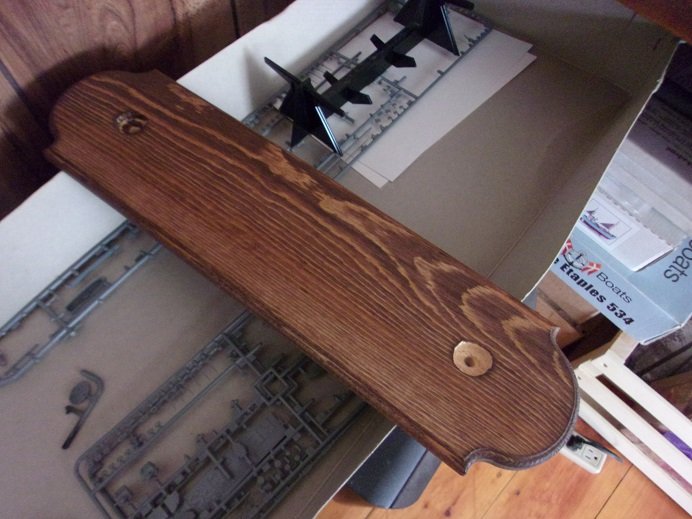
thanks to all who replied and liked there is something I may change, adding a washer to the screw head. since I drilled the hole larger to accept the screw head, I'm concerned that over time the head will go deeper causing it to become loose. should have something to report soon
- 48 replies
-
- 8
-
-
- New Jersey
- Tamiya
- (and 1 more)