HOLIDAY DONATION DRIVE - SUPPORT MSW - DO YOUR PART TO KEEP THIS GREAT FORUM GOING! (83 donations so far out of 49,000 members - C'mon guys!)
×

Omega1234
-
Posts
6,060 -
Joined
-
Last visited
Content Type
Profiles
Forums
Gallery
Events
Everything posted by Omega1234
-
 Thanks Michael. Yep. It's tiny. To be honest, I've spent more time building large RC ships over the years, that my house has ran out of room. I've really had to down size to a smaller scale (hence building miniatures), just to be able to fit them in. Not only that, but I always think that there's a particular satisfaction that building at this scale brings. Thanks for your compliments and all the best.
 -
Thanks JesseLee!! Much appreciated.
-
Hi Kim Ladd, ccoyle, hexnut, Cap'n' Bob, mtaylor, Aussie048 and all others. Thanks for your likes and words of encouragement. Greatly appreciated.
-
Hi JMaitri Thanks for your "like". Greatly appreciated and all the best!
-
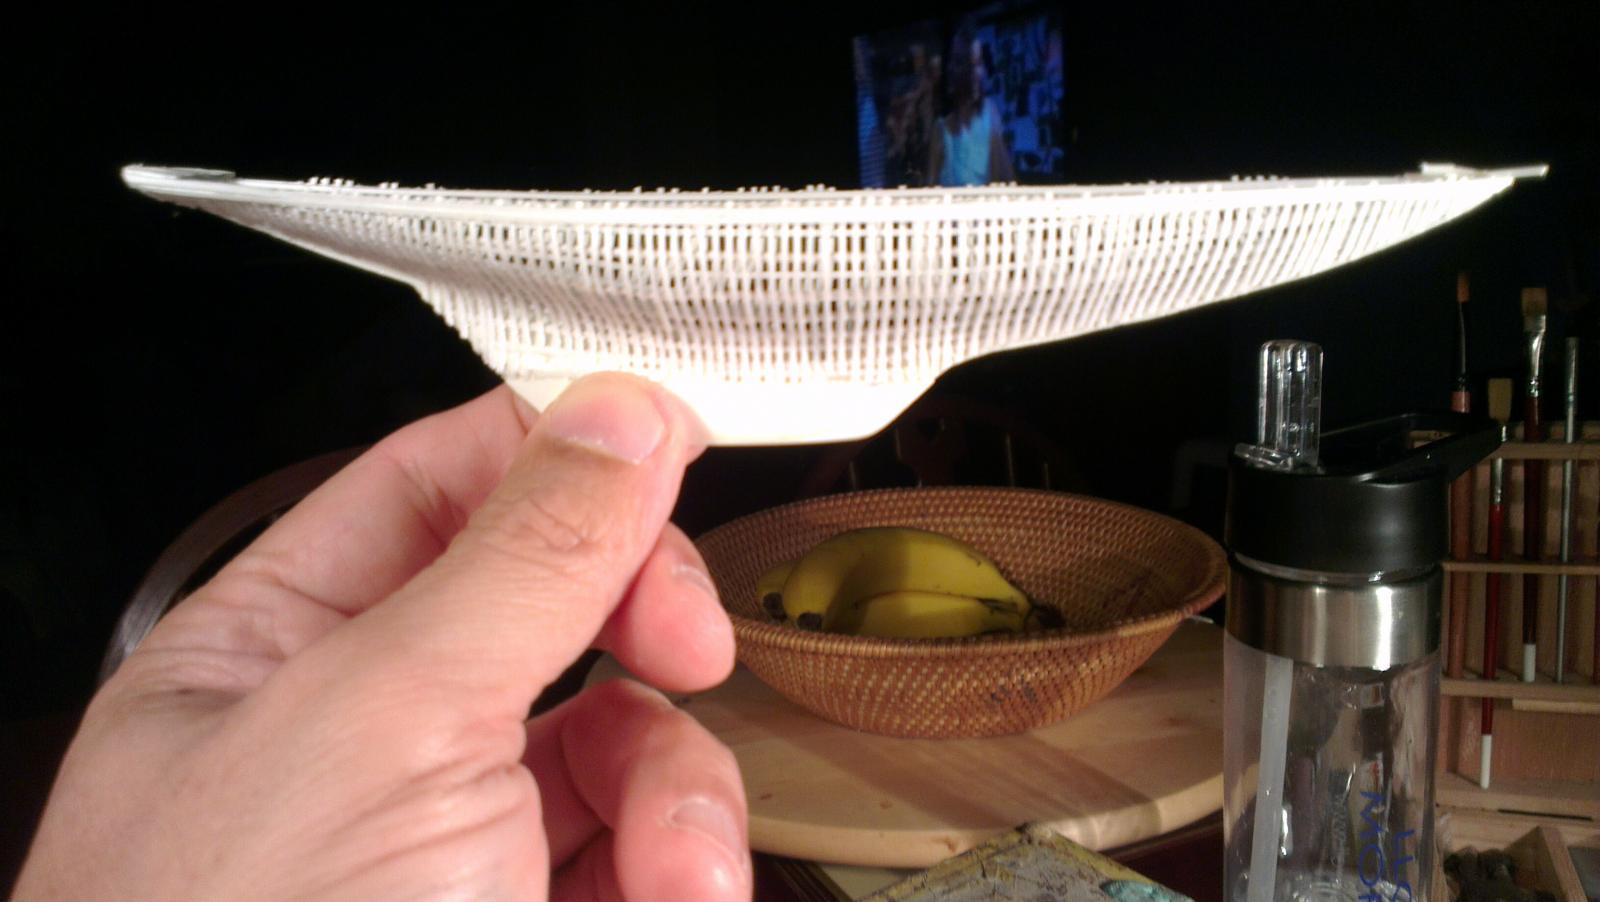
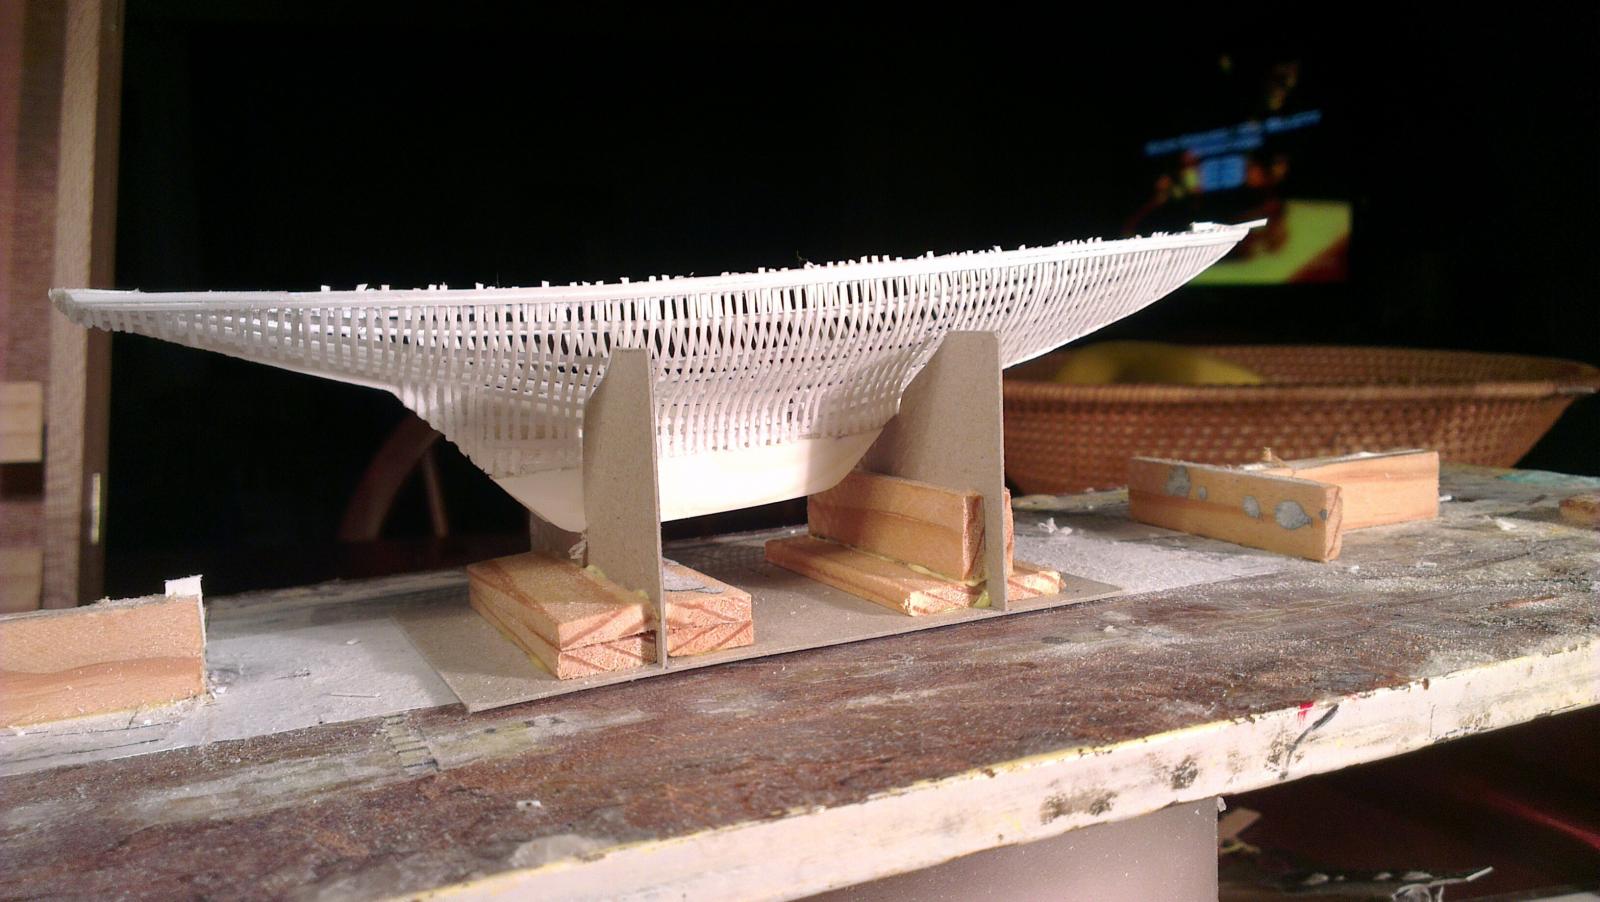
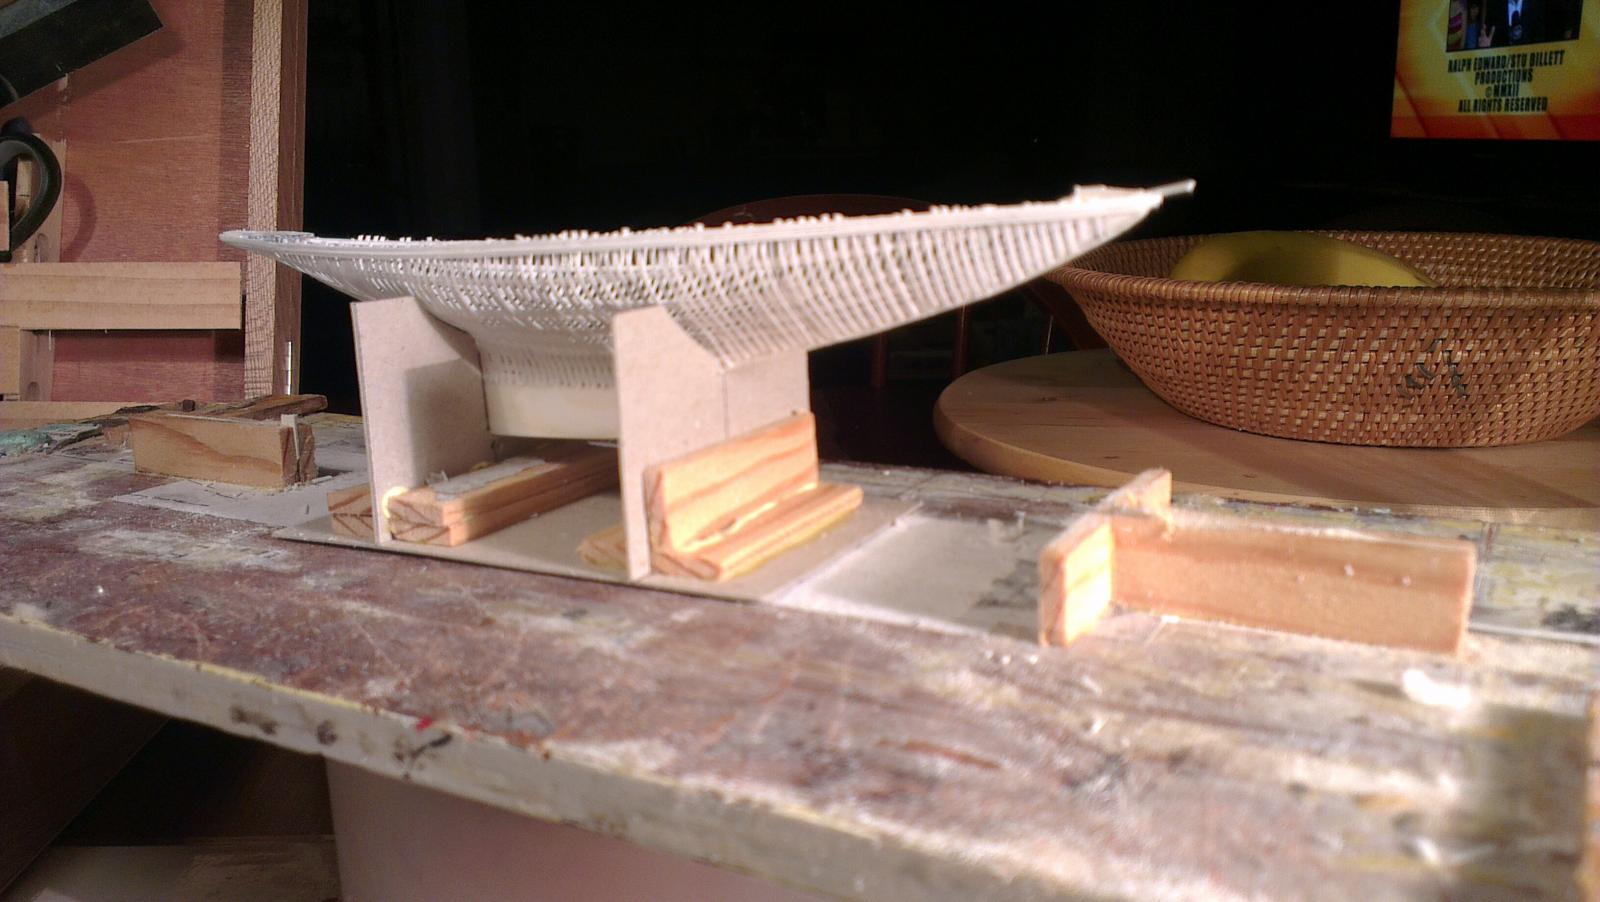
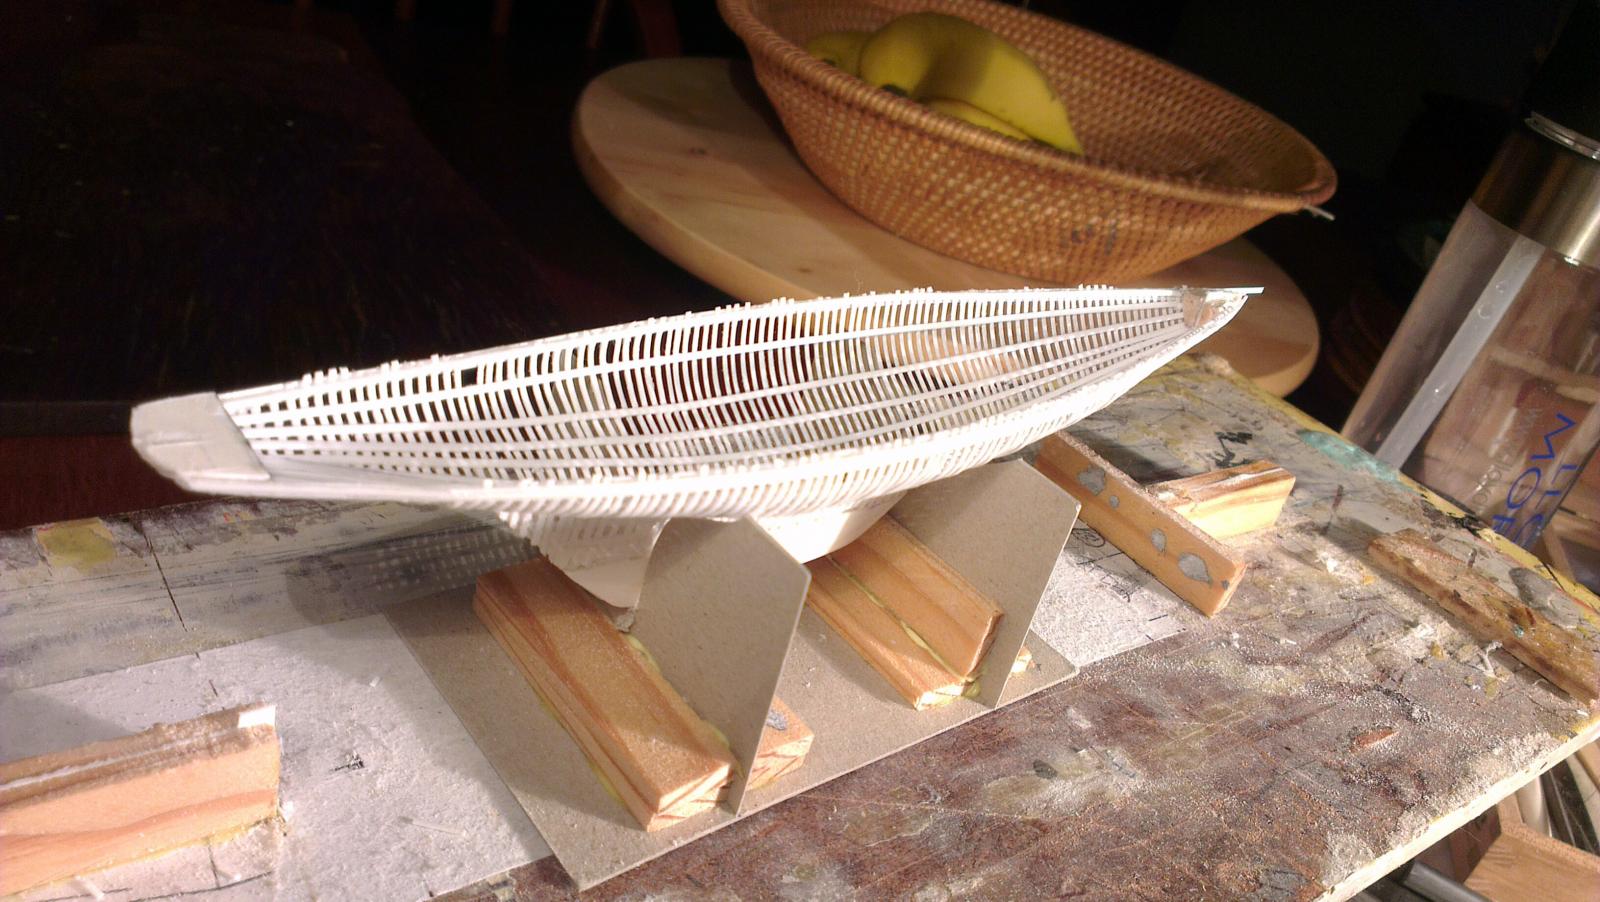
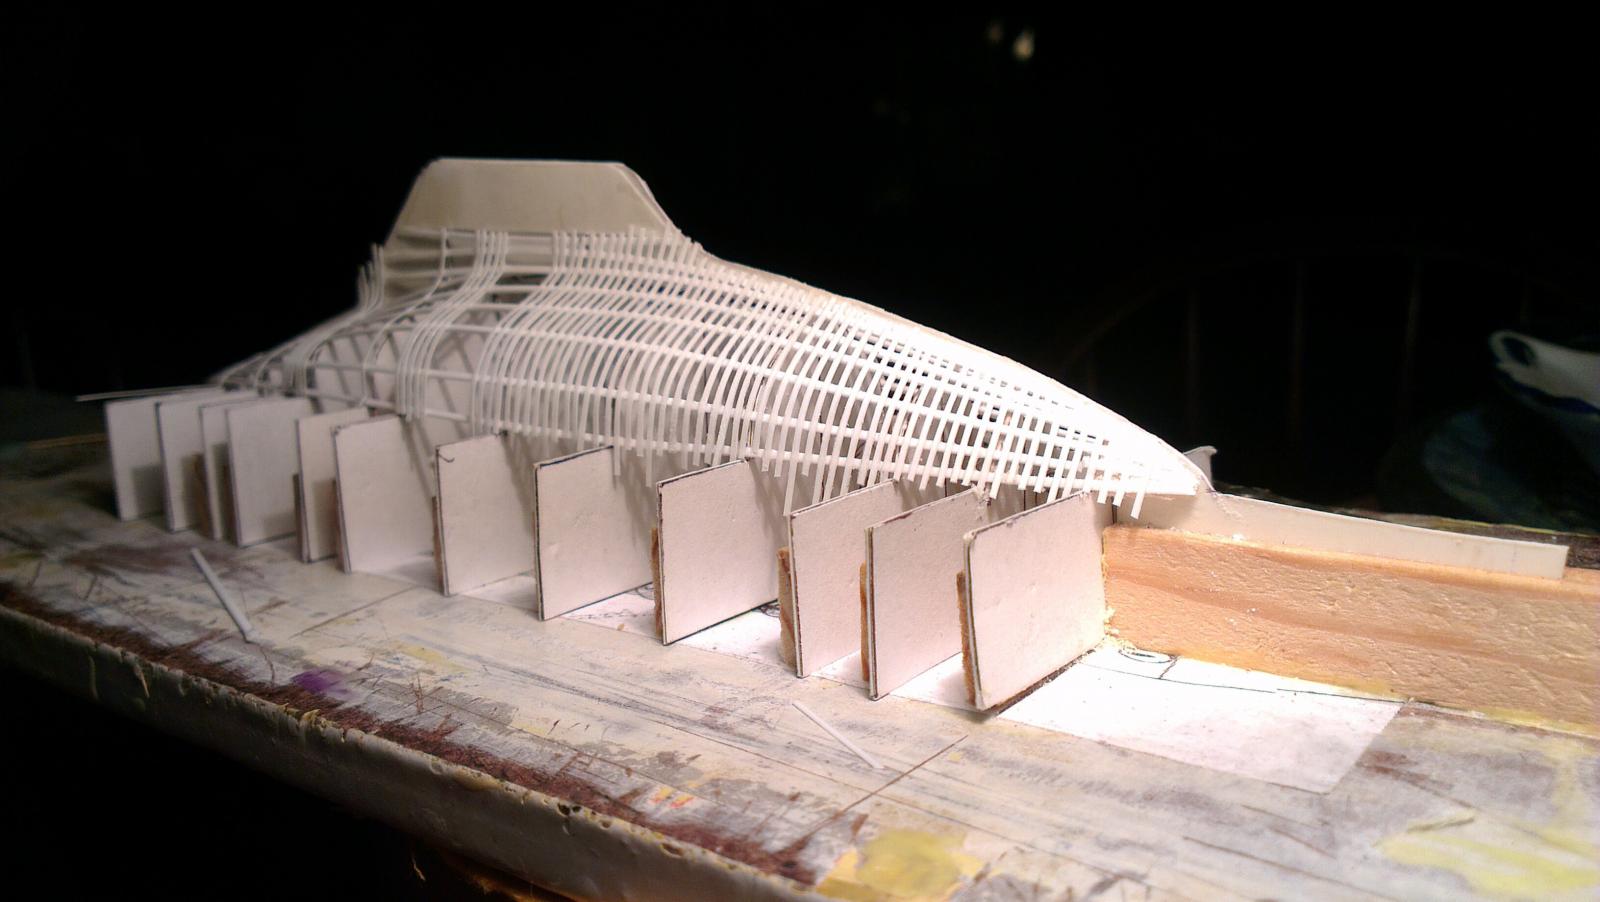
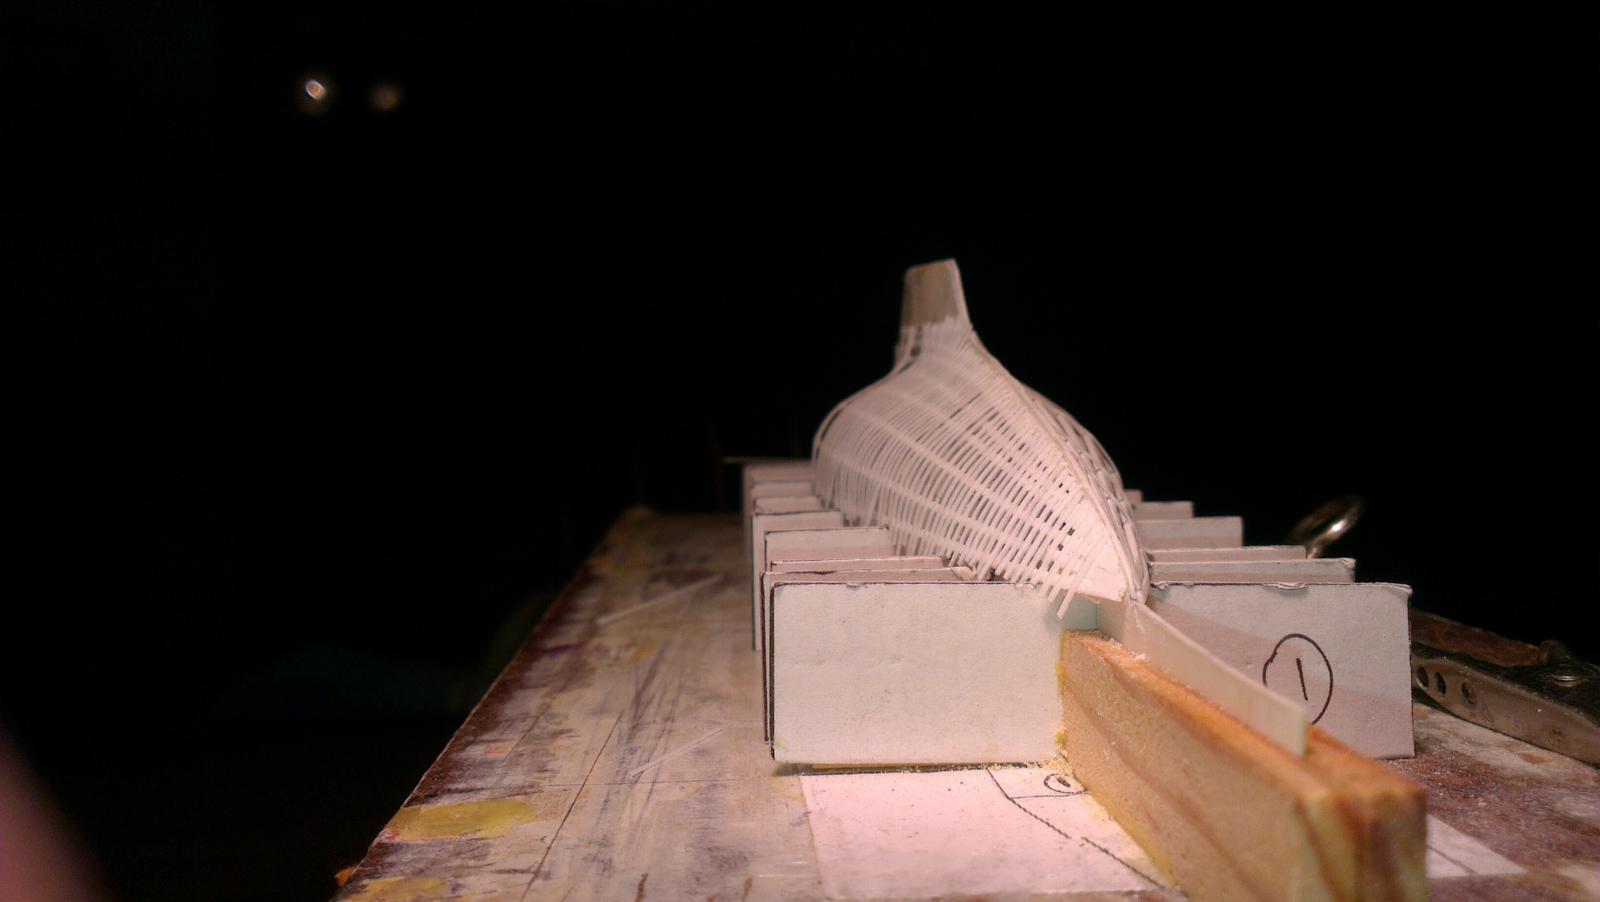
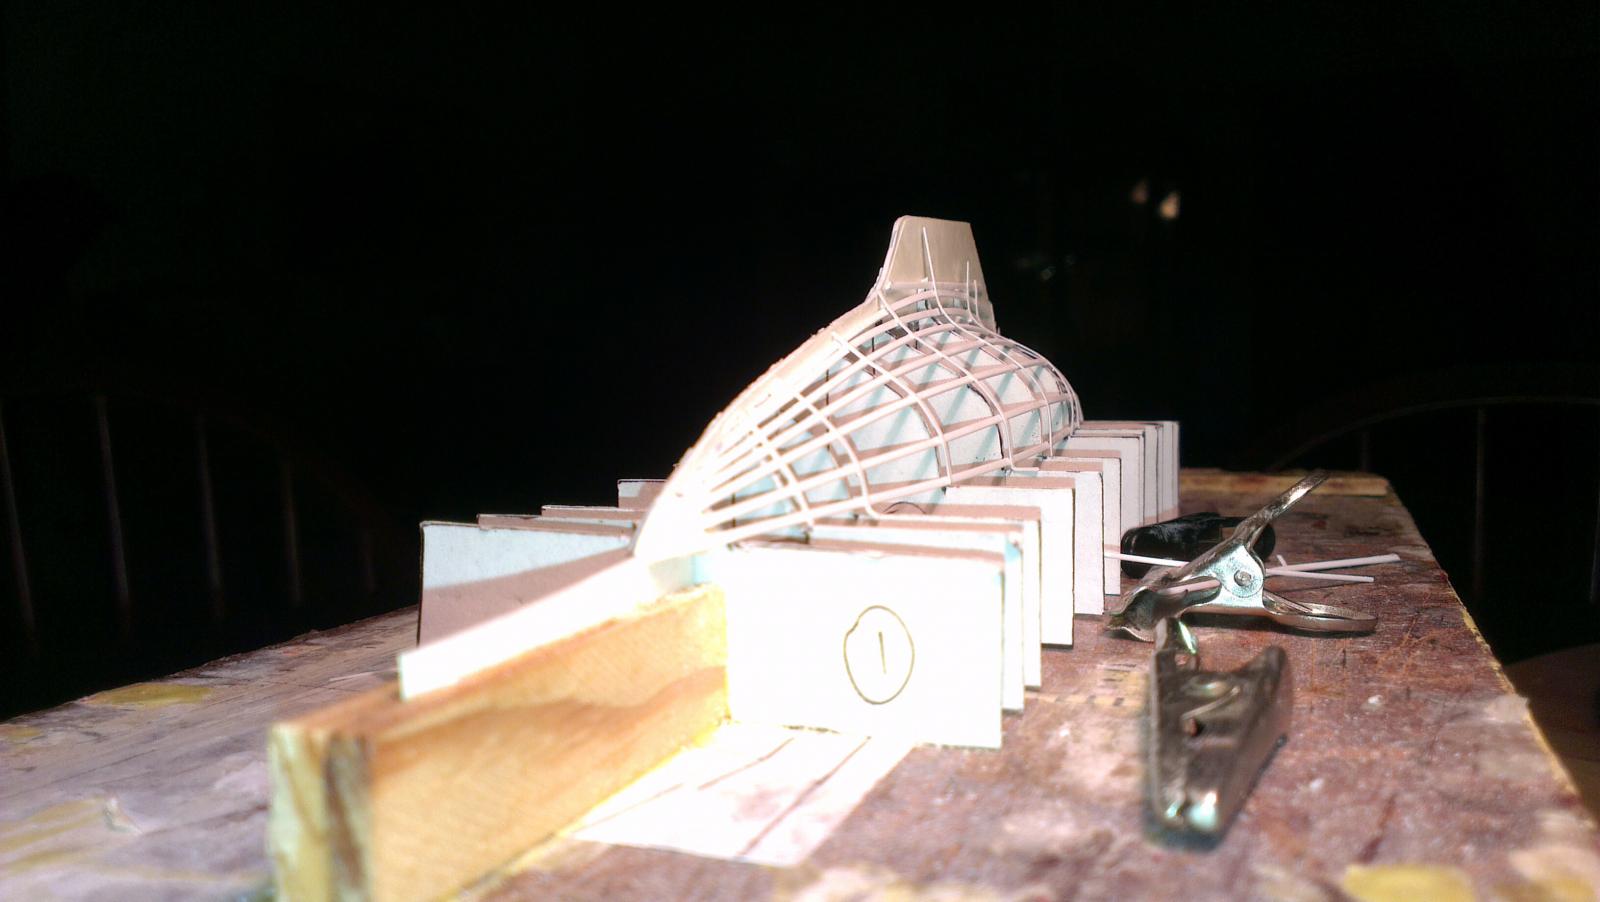
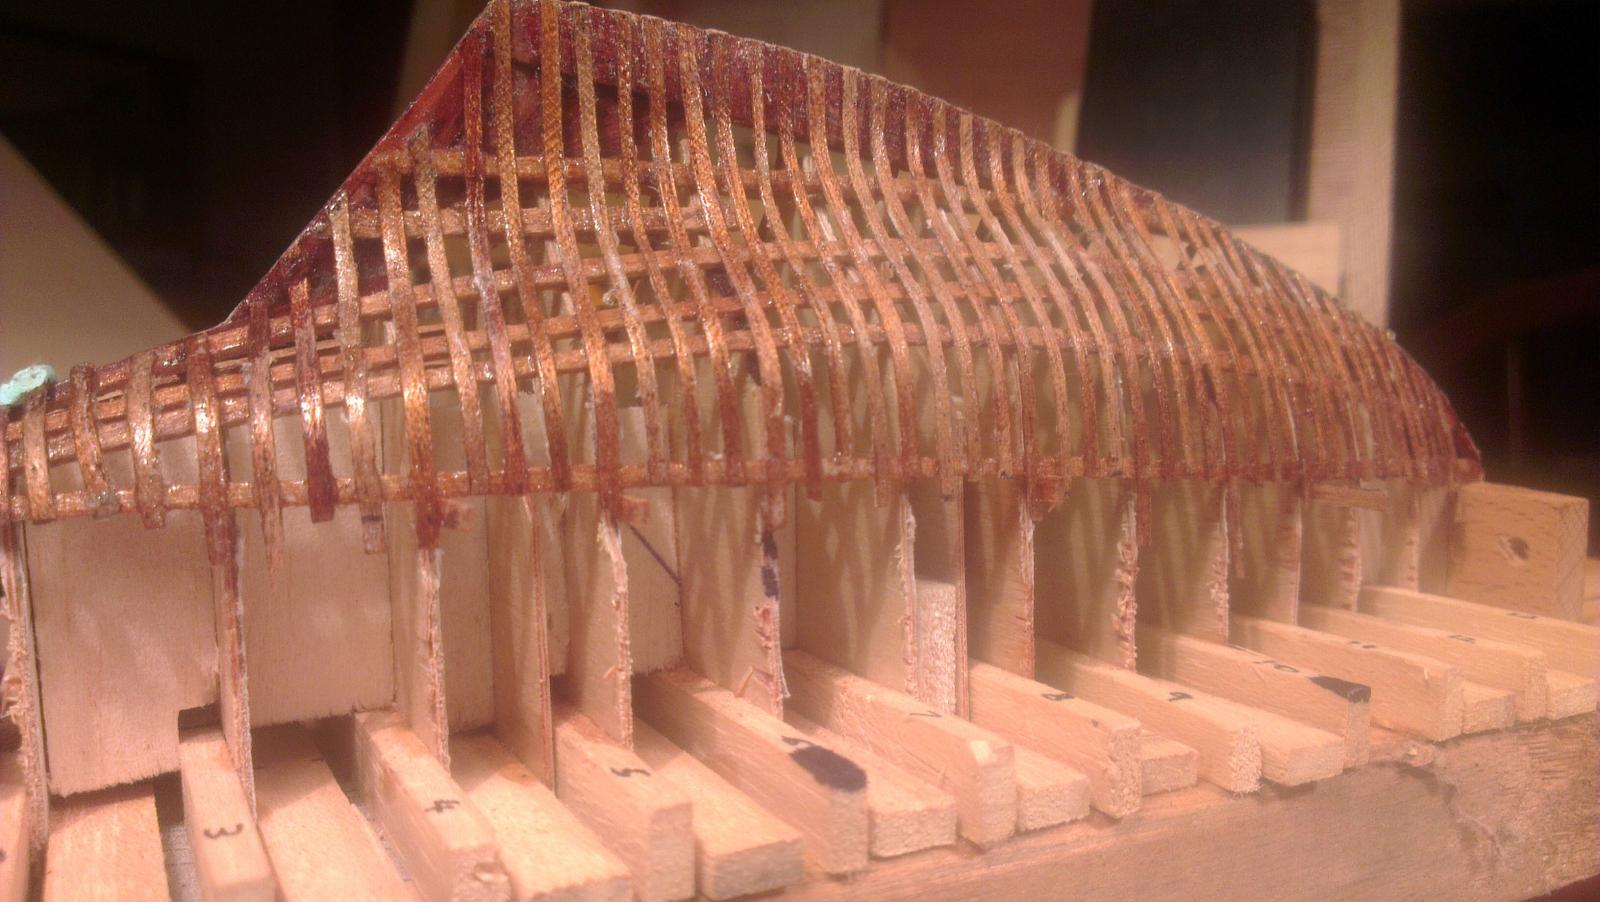
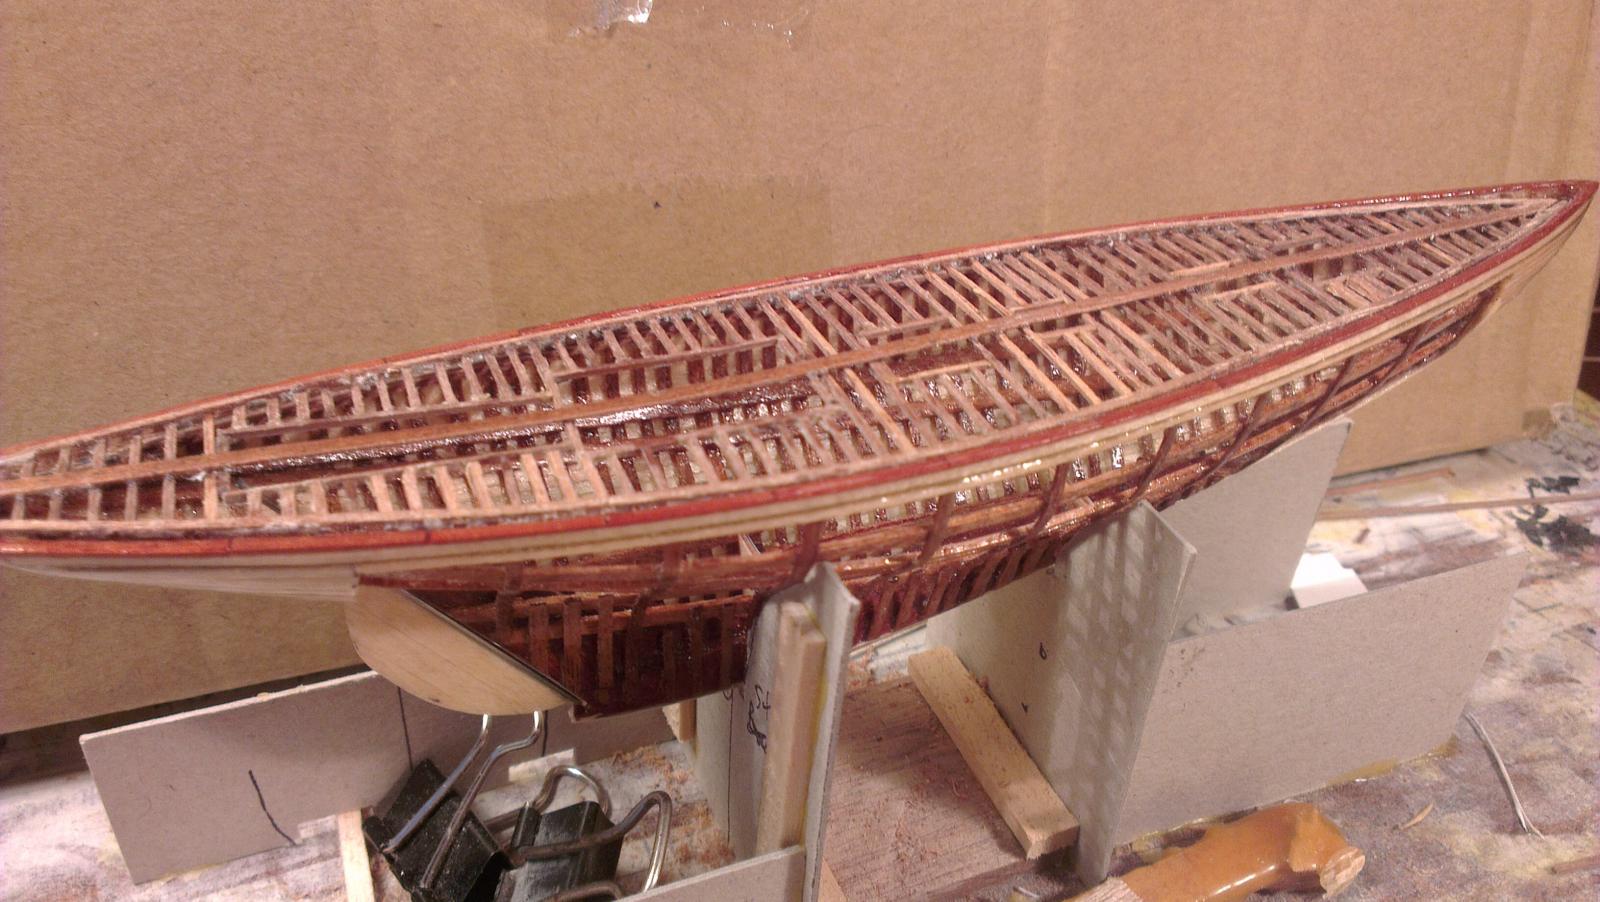
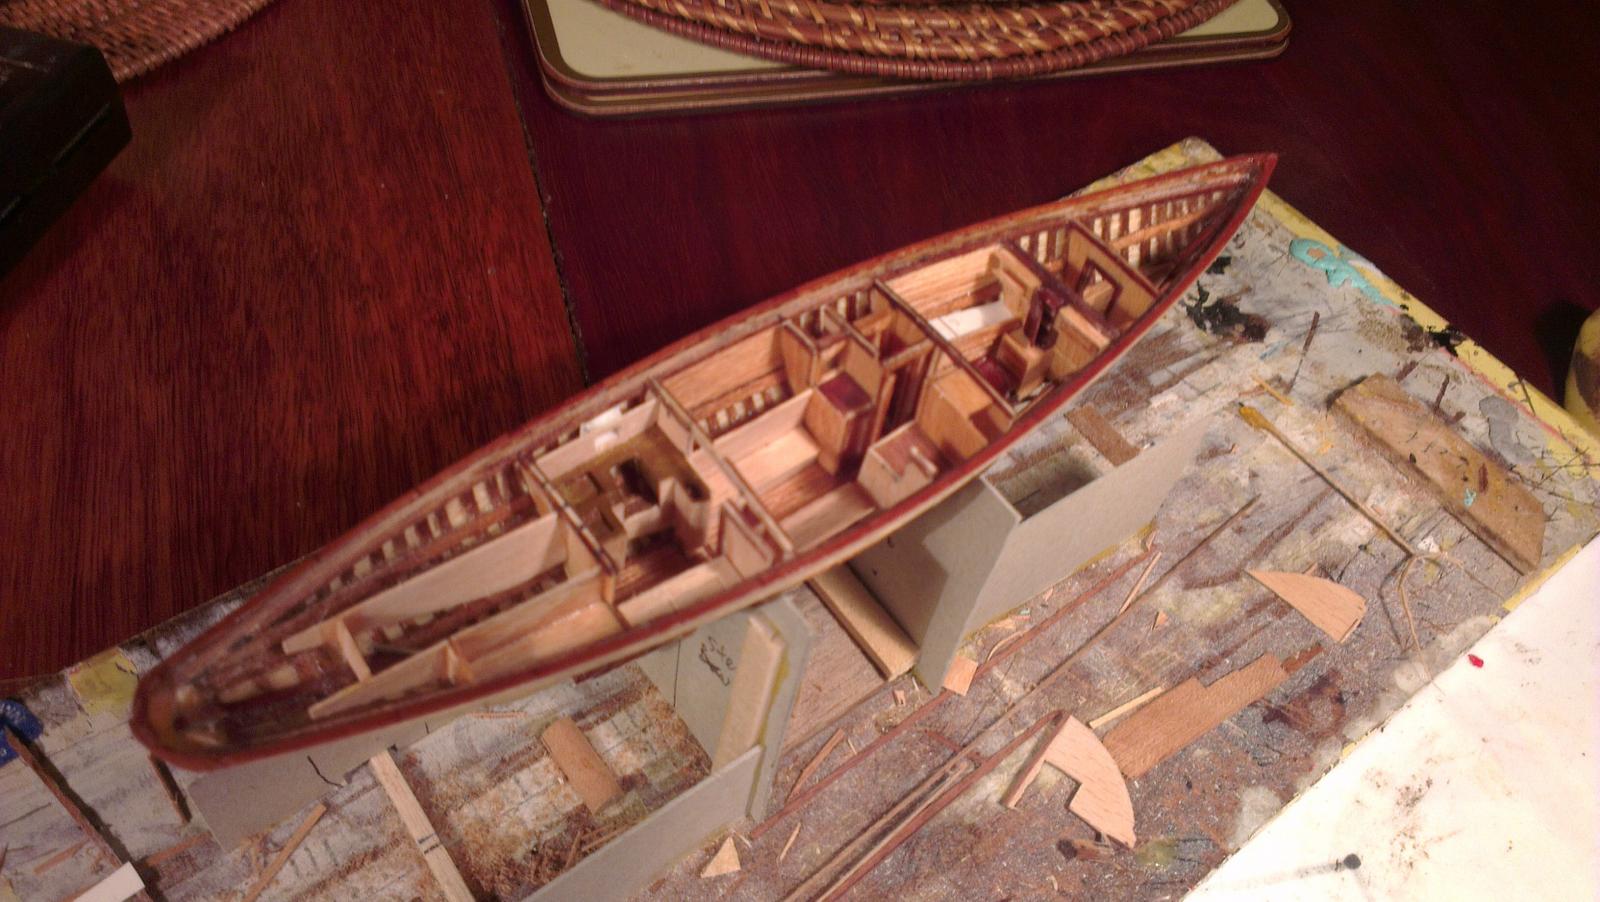
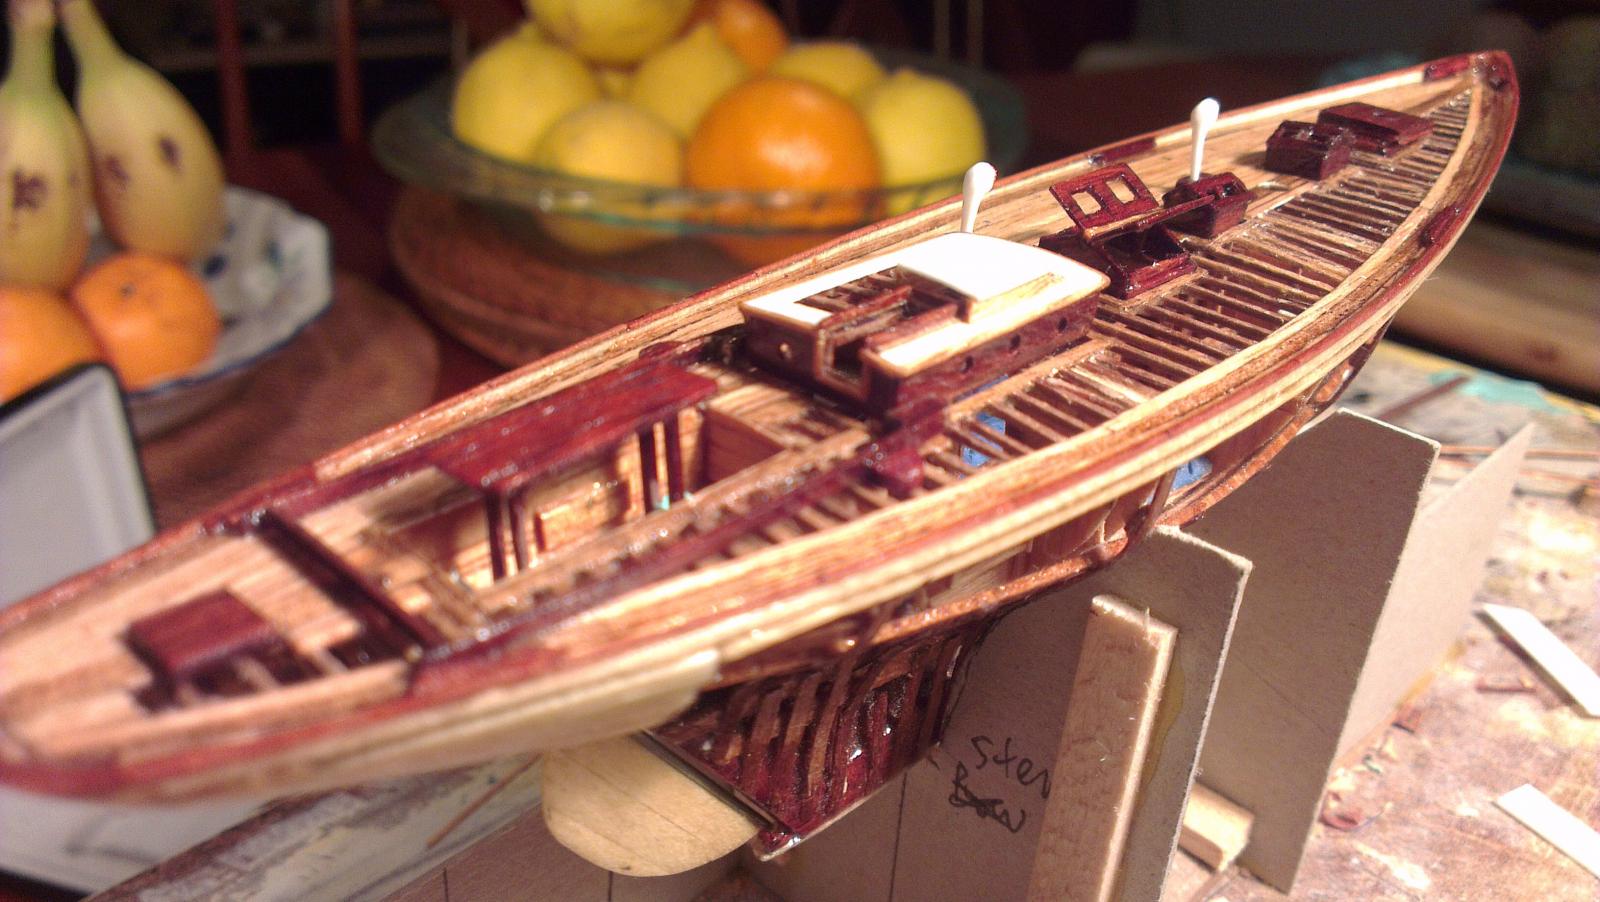
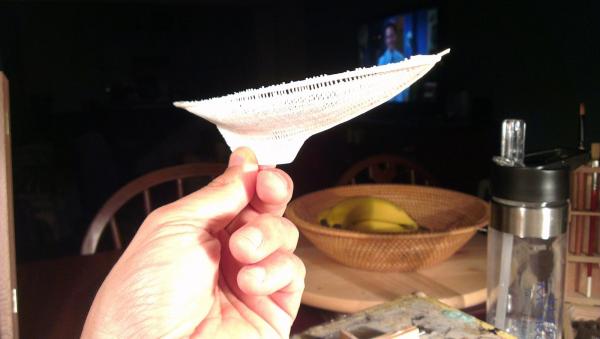
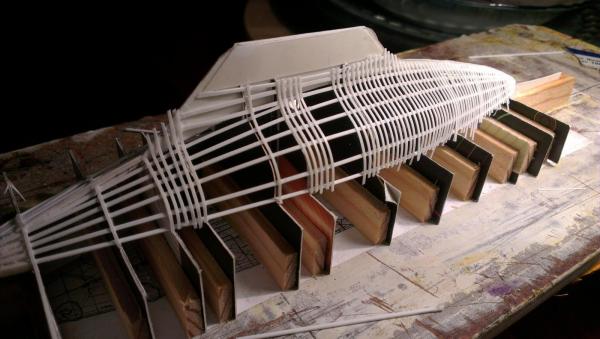
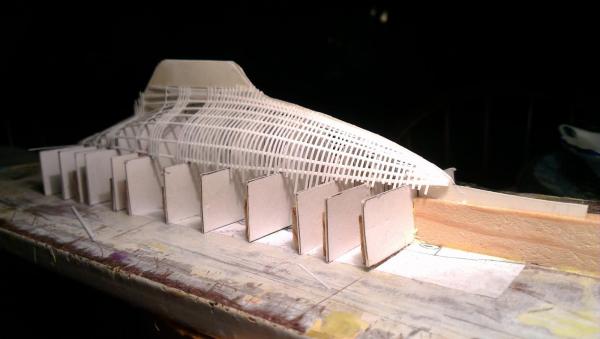
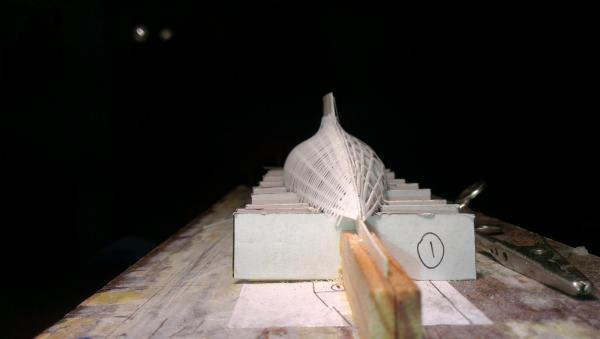
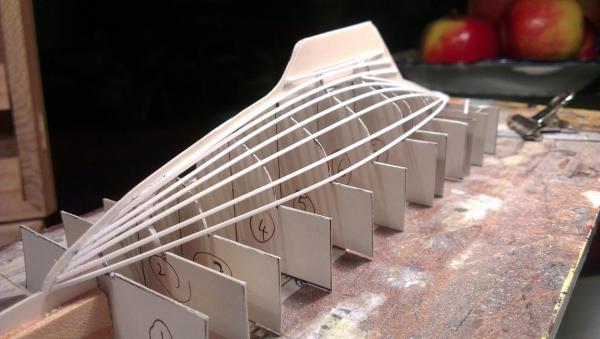
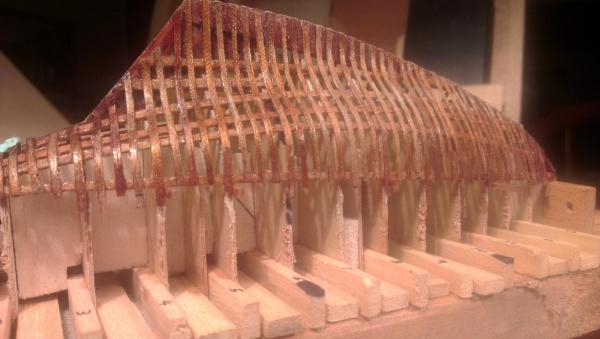
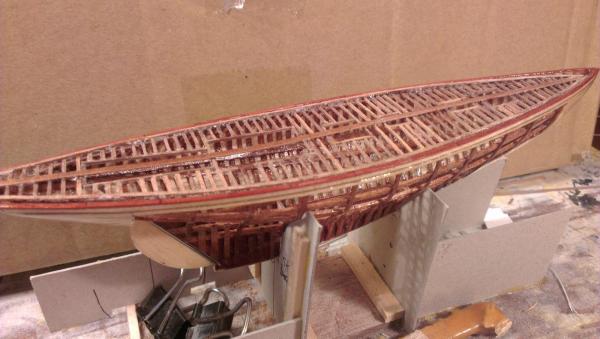
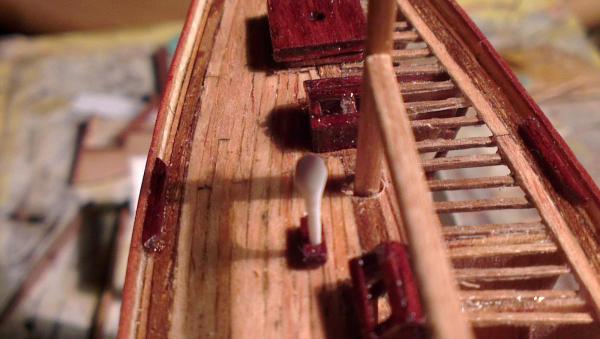
Hi everyone Well, tonight I finished building the bent frames! It's a tedious job, but the effect is worth it in the end. At least now, Ingomar's hull finally looks like it's taking shape. What's even more important is the fact that I was able to remove the hull from the building jig and build a working stand for her to sit upright in. The hull looks a bit rough around the sheer line, but that's only because it requires trimmimg, sanding etc. The next job will be to do the planking and then cut out the sides of the hull so that the interior accommodation can be viewed. Long way to go, no doubt. I hope you enjoy the photos.


- 309 replies
-
- 23
-

-
Hi Pete48 Many thanks for your compliments. She was a very enjoyable ship to build; that's for sure. All the best!
-
Hi Russkramer That is one amazing painting you've done, as are all the other paintings on your website! It's one thing to draw, but it's totally another thing to create a painting with such charm and realism, as you've been able to do. A great talent! Thanks also for your comments. All the very best. Cheers
-
Hi Chief From a fellow miniature scale builder to another - beautiful work! Looks like she's going to be a beautiful model. Well done.
-
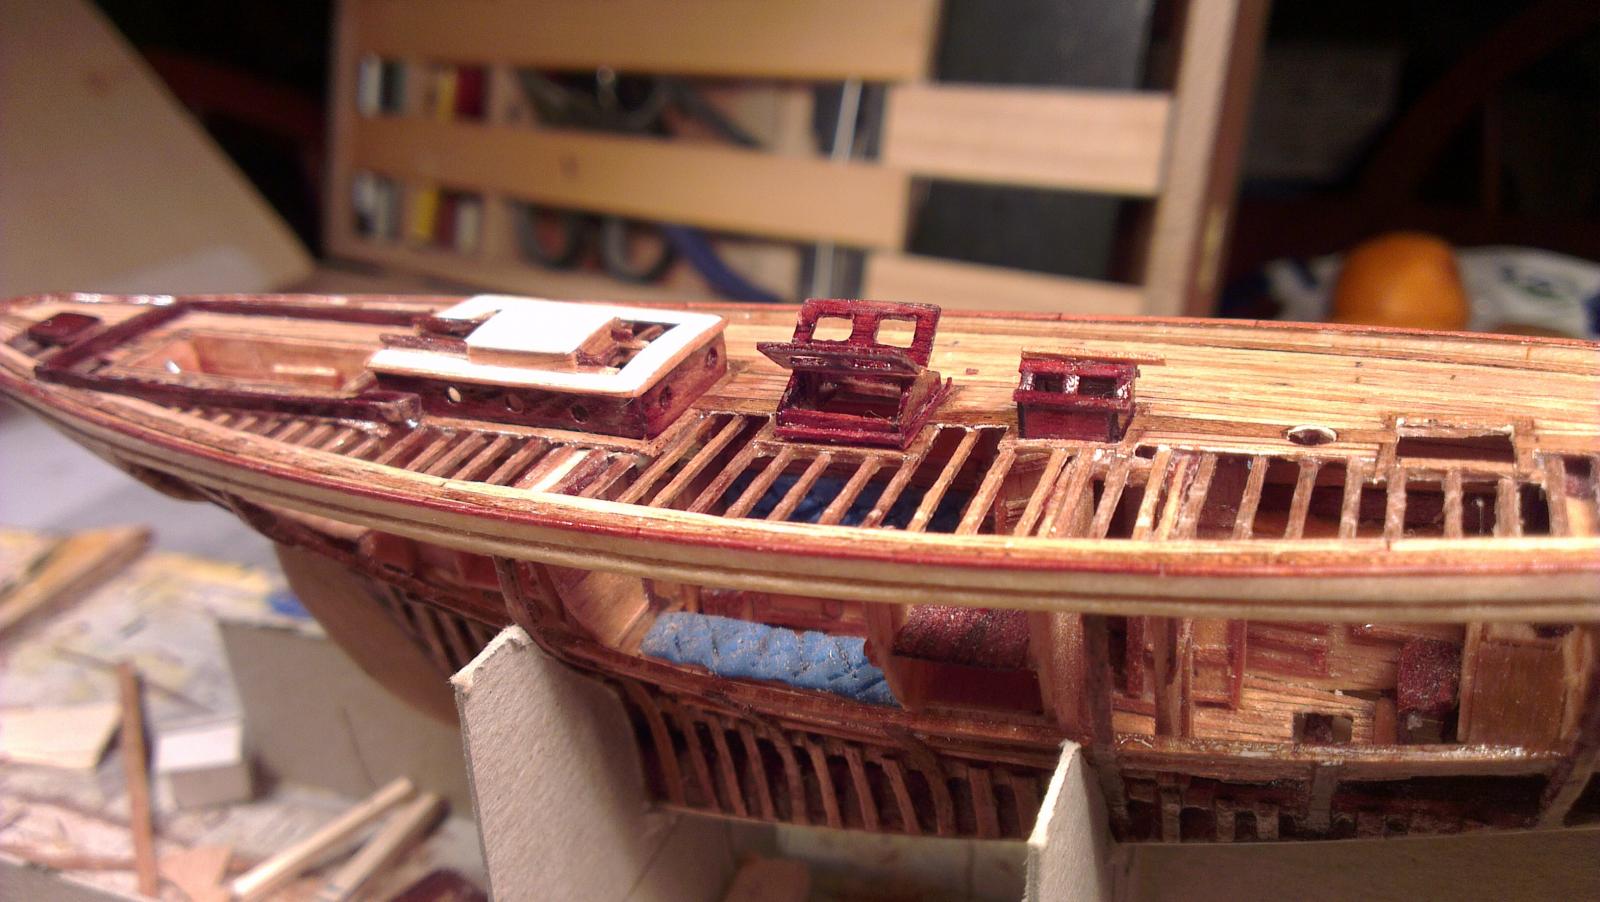
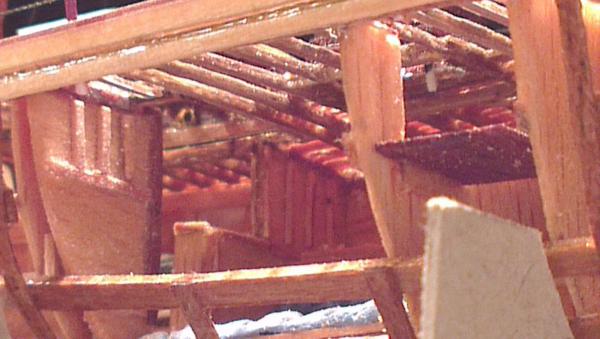
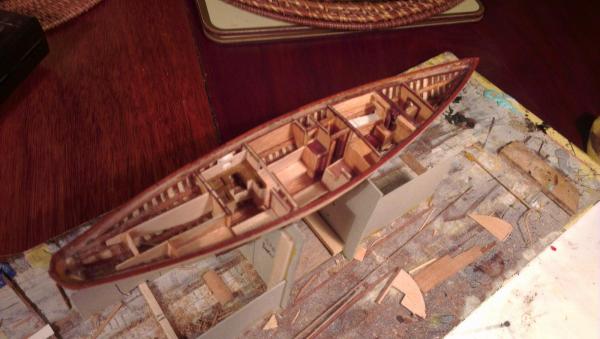
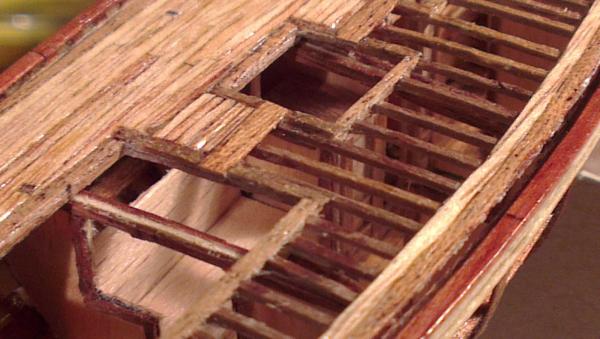
Happy Easter everyone!!!! I hope all of you that celebrate Easter have a wonderful festive season. To everyone else, have a great day, too. Here are the latest photos of Ingomar. I've used platicard strips to simulate the frames, which, as you can see, look reasonably convincing. Once the side of the hull is completely "framed" using this method, I'll then set about selectively framing up the other side of the hull, whilst leaving large parts of that side of the hull unframed; thereby resulting in large open areas to view the internal accommodation. The trick is to make sure that the hull remains structurally rigid once it is removed from the jig. Afterall, leaving too much open on one side of the hull could result in a warped hull. So, it's always a balancing act, but the rewards are worthwhile. Anyhow, hope you enjoy the photos. Comments and feedback are always welcomed. Cheers!

- 309 replies
-
- 14
-
-
Hi everyone Thanks for all your comments and likes. Happy Easter and Happy Building!!! Cheers
-
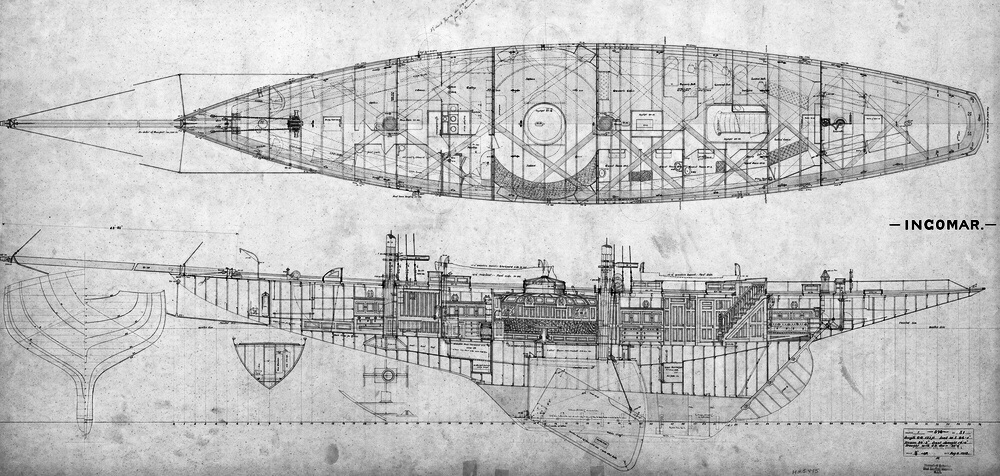
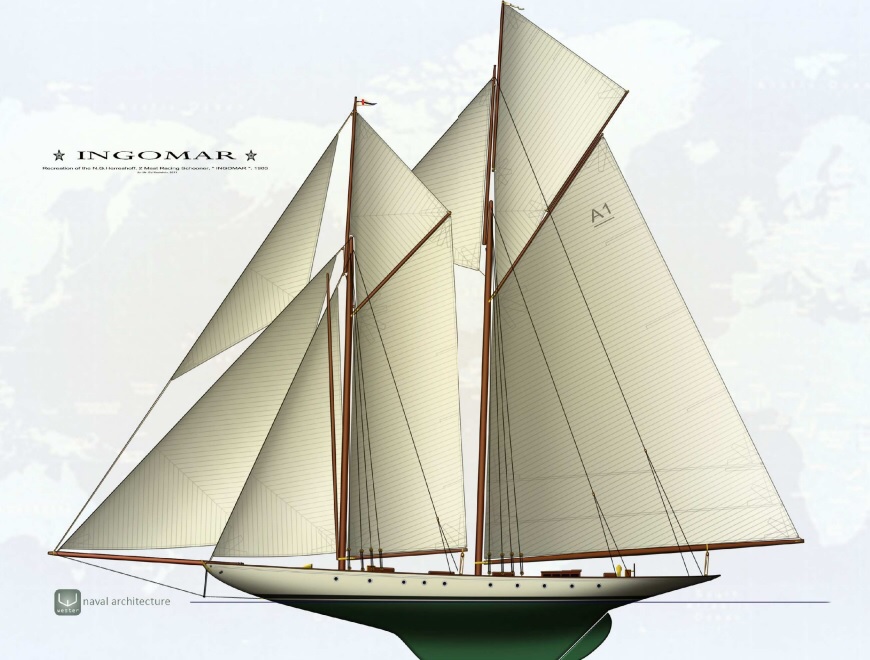
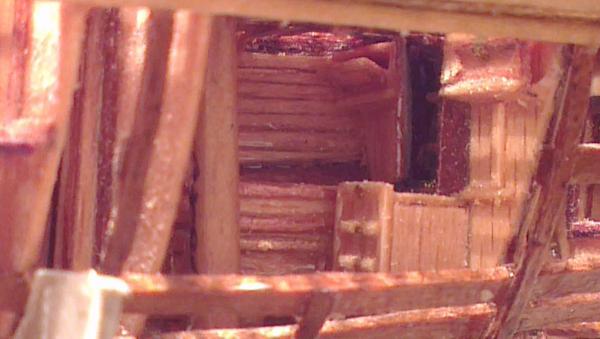
Hi all. Recently, after finishing my miniature model of "Dorade" I started on my new model, a 1/192 scale model of the 54m long schooner "Ingomar". Built in 1903 and designed by Nathaniel Herreshoff, Ingomar was one of the fastest and most successful racing schooners of its day. Such is the beauty of this boat, that it has been recreated now by Graafships; the only problem being that the person funding the project, unfortunately ran out of money and only the hull has been built. The hull is currently for sale. Hopefully someone rich enough will buy the hull and complete the project; thereby creating a modern full size version of this beautiful ship. Any rich people out there? Anyhow, back to my model! Given the small size of the hull (13 cms approx), I agonised about what sort of material the hull should be built from. Whatever I chose had to be structurally strong enough to be cut into small enough strips to simulate the frames, etc. Also, the fact that the full sized ship was steel framed, basically meant that I couldn't use wood. Much to my distaste, I reluctantly settled on plasticard to build the keel and hull! I've always shied away from plasticard, but this time, it was the only logical choice. I will paint the hull's frames and keel later to make it look like it authentic. The hull will be built with as much of the internal accommodation as possible installed in the hull and visible through large cutaways of the hull and exposed deck beams. I hope you enjoy the photos. More photos will follow as work progresses.


- 309 replies
-
- 23
-
-
Thanks for your photos. Very nice work there! Love the fact that you're building it in 1/96 scale. It just adds to the challenge of building when it's a miniature, like yours. I"m also intrigued by the method of hull construction and planking that you're using. Is it cardboard? Look forward to seeing the finished products!
-
Thanks Bob and Snr Ole Salt. Much appreciated! I hadn't thought about adding some figures, but that definitely gives me some food for thought. Mmmm....
-
Hi Bob. Absolutely love your work on this schooner as well as your other miniatures. Working at these small sizes is always challenging, but you make it look damn easy!! Fantastic workmanship. Cheers Peetee
-
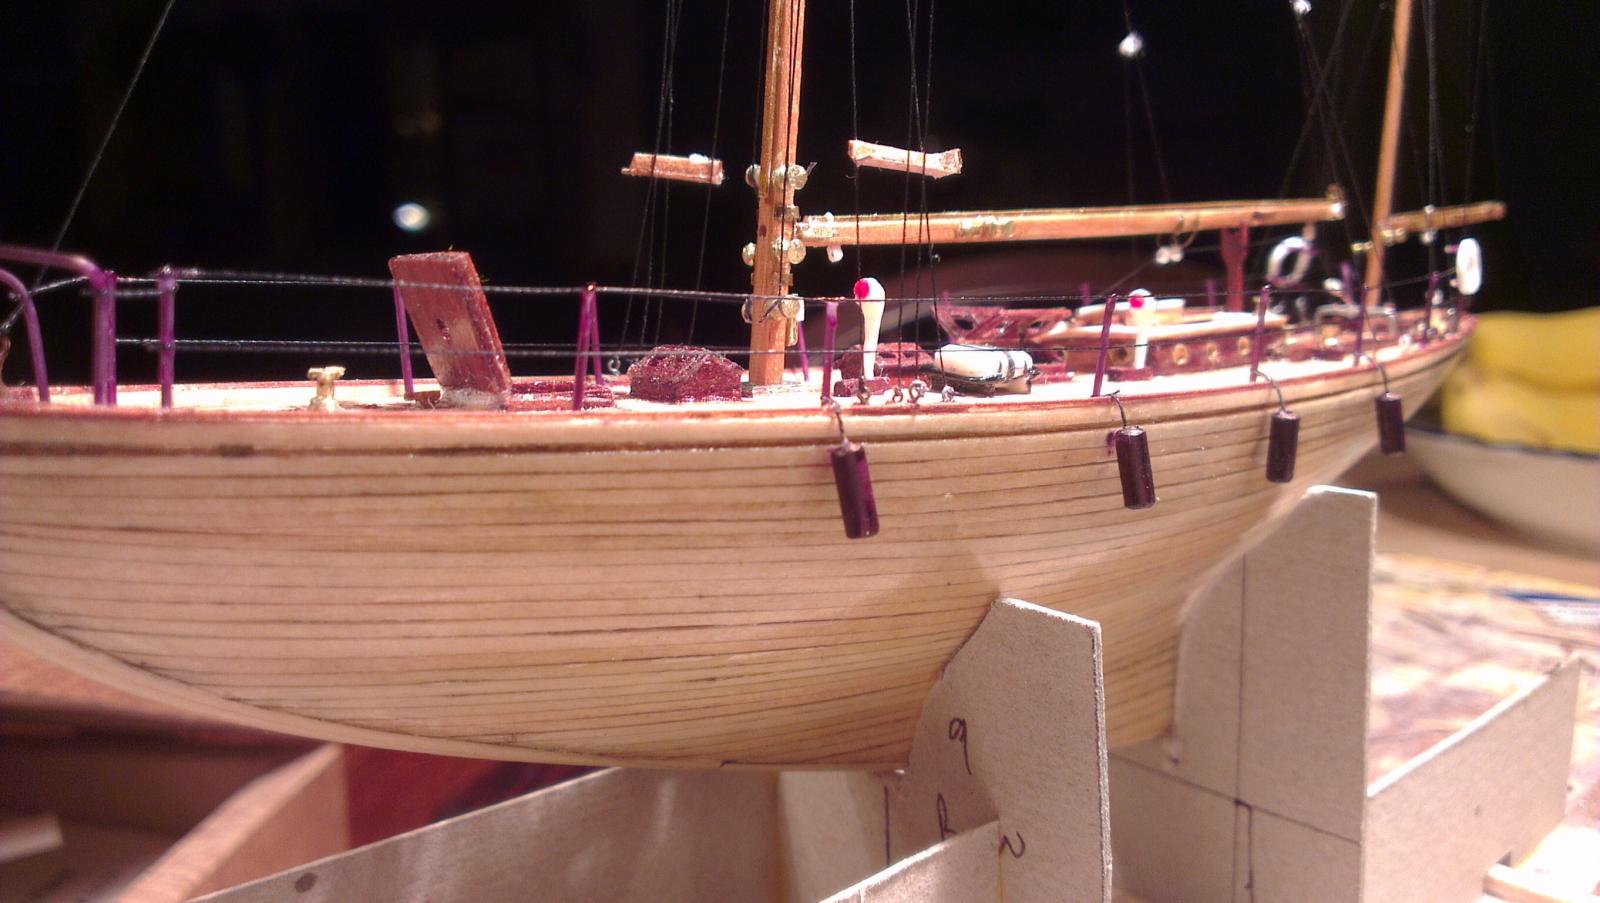
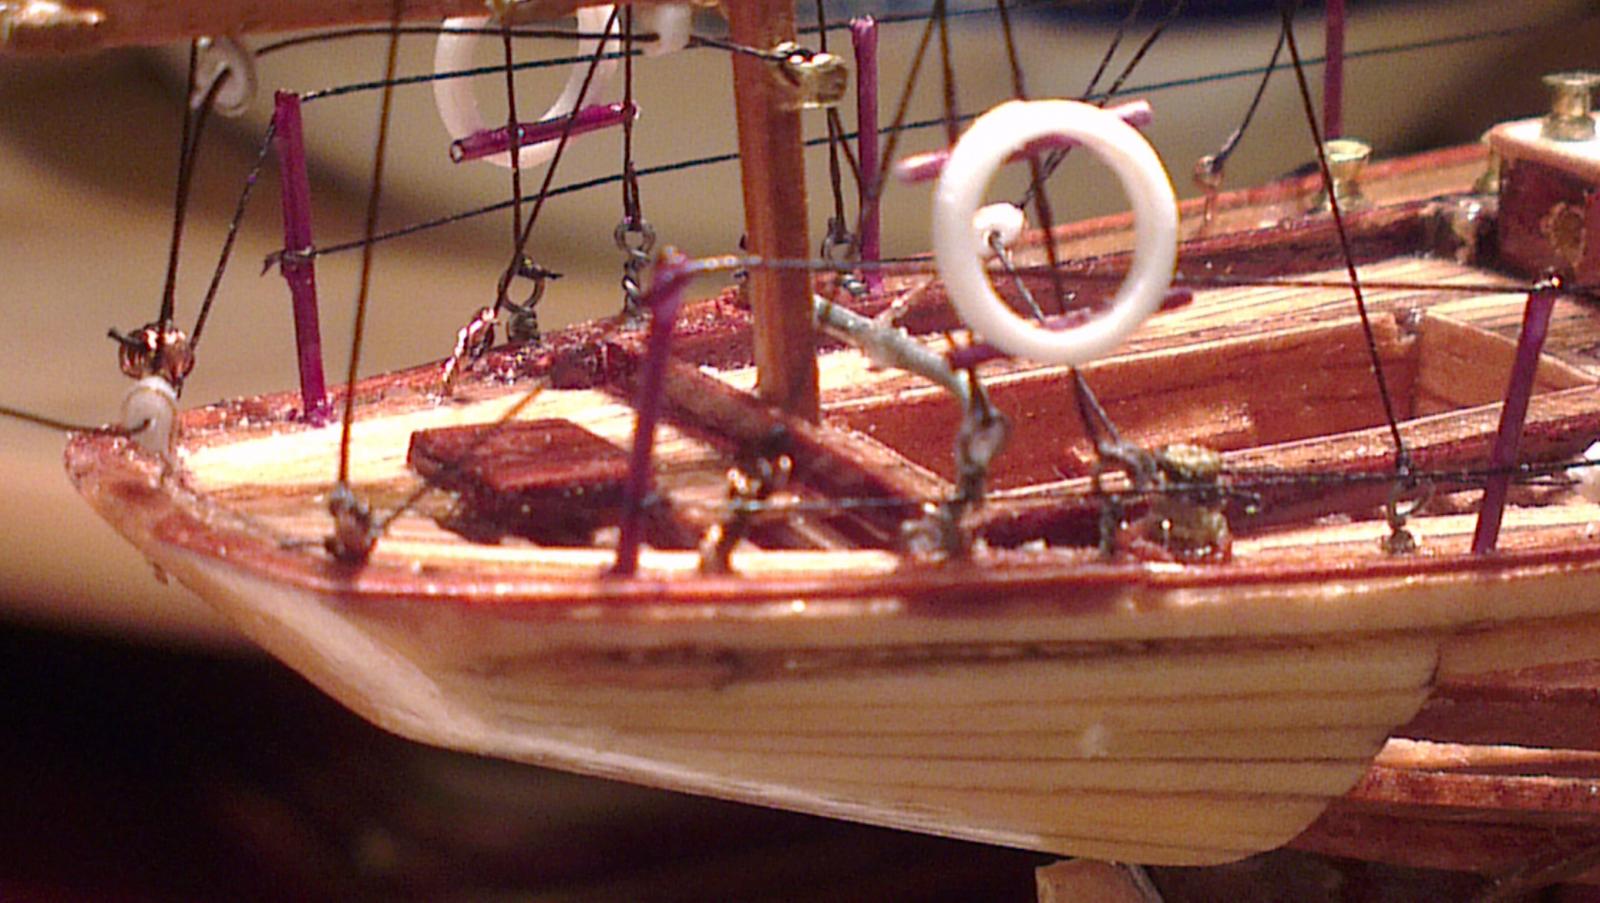
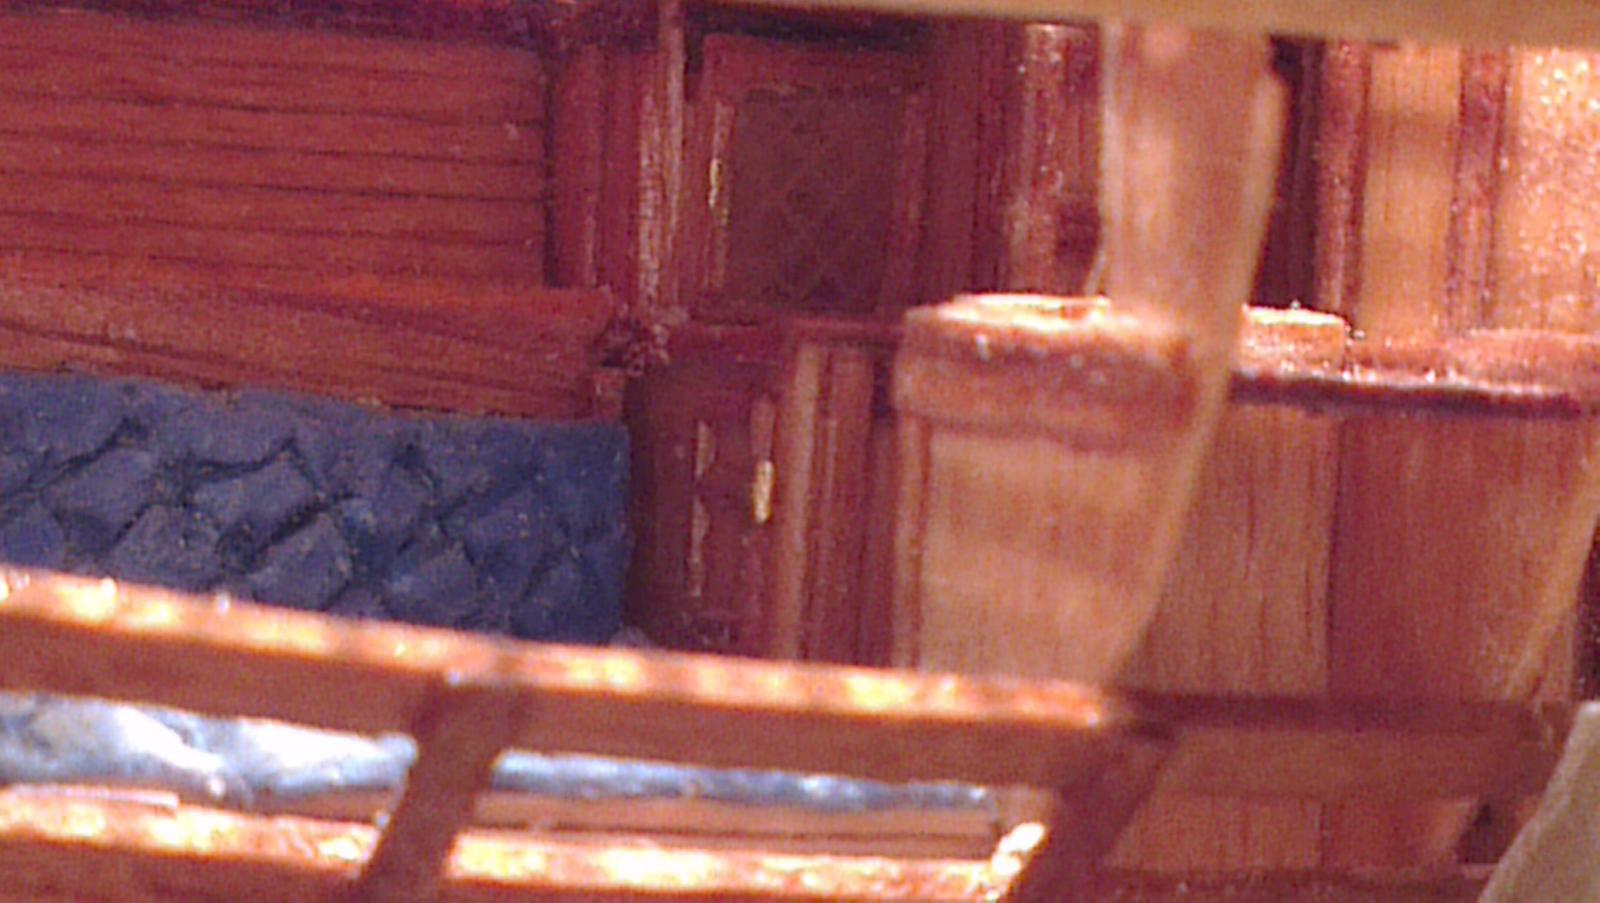
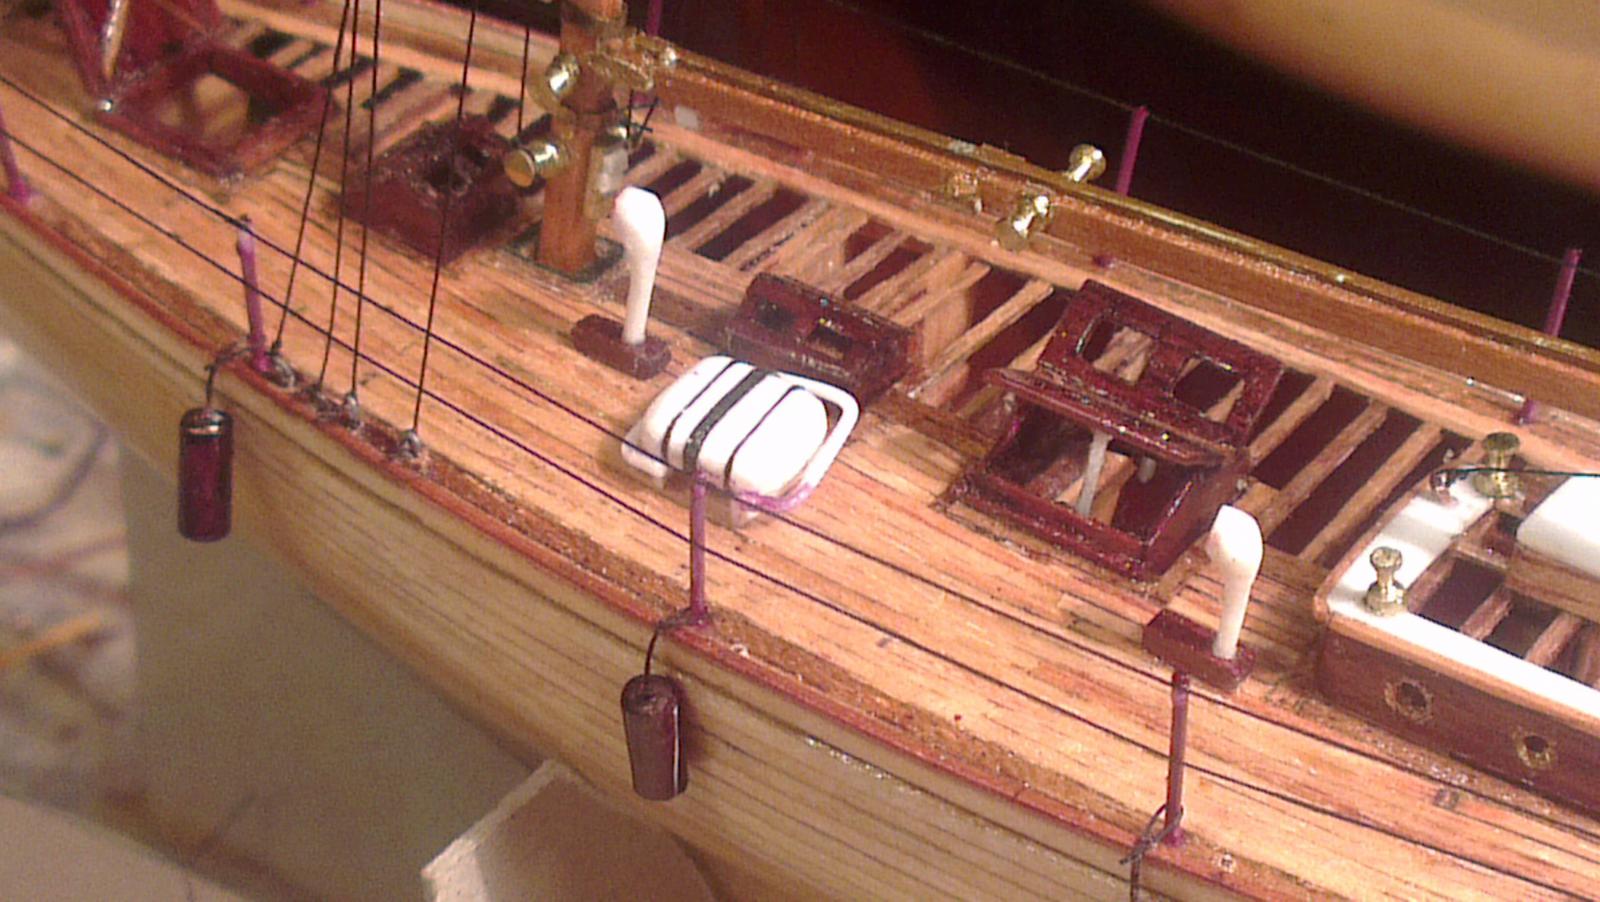
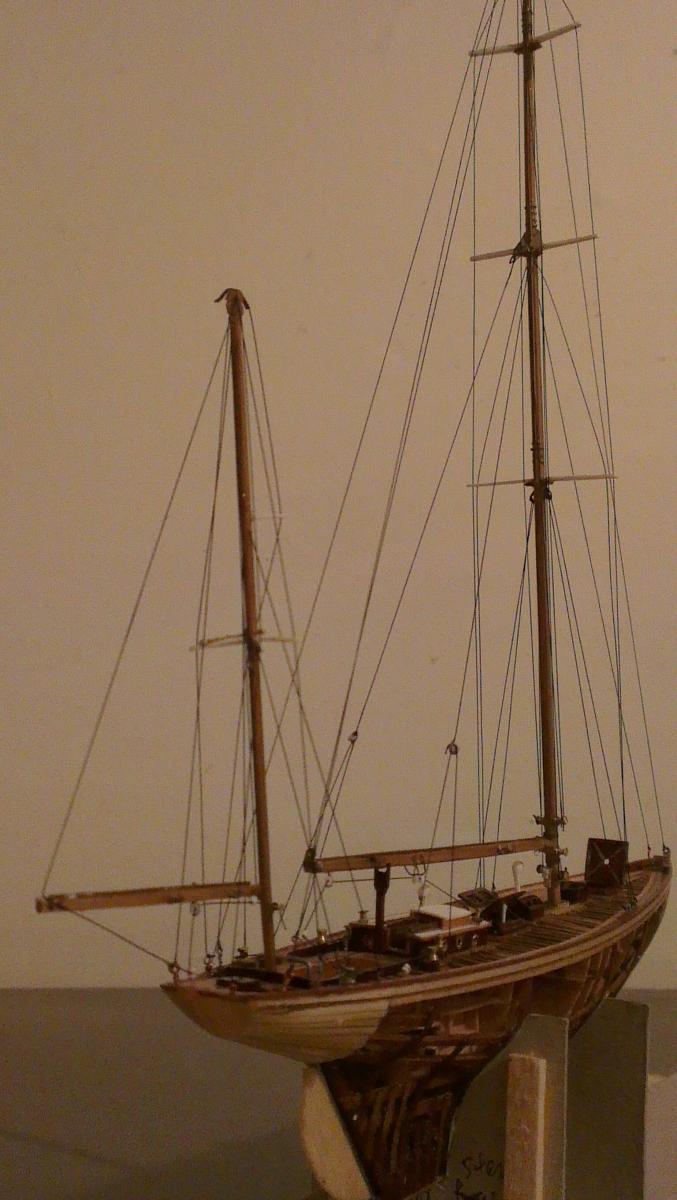
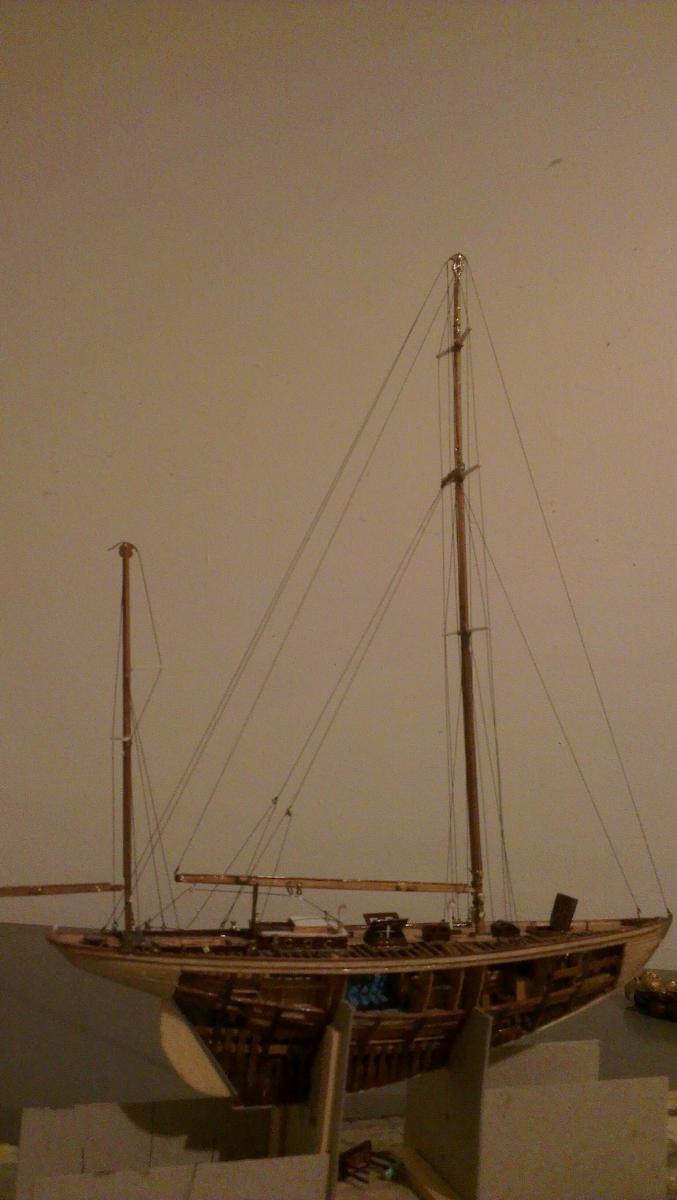
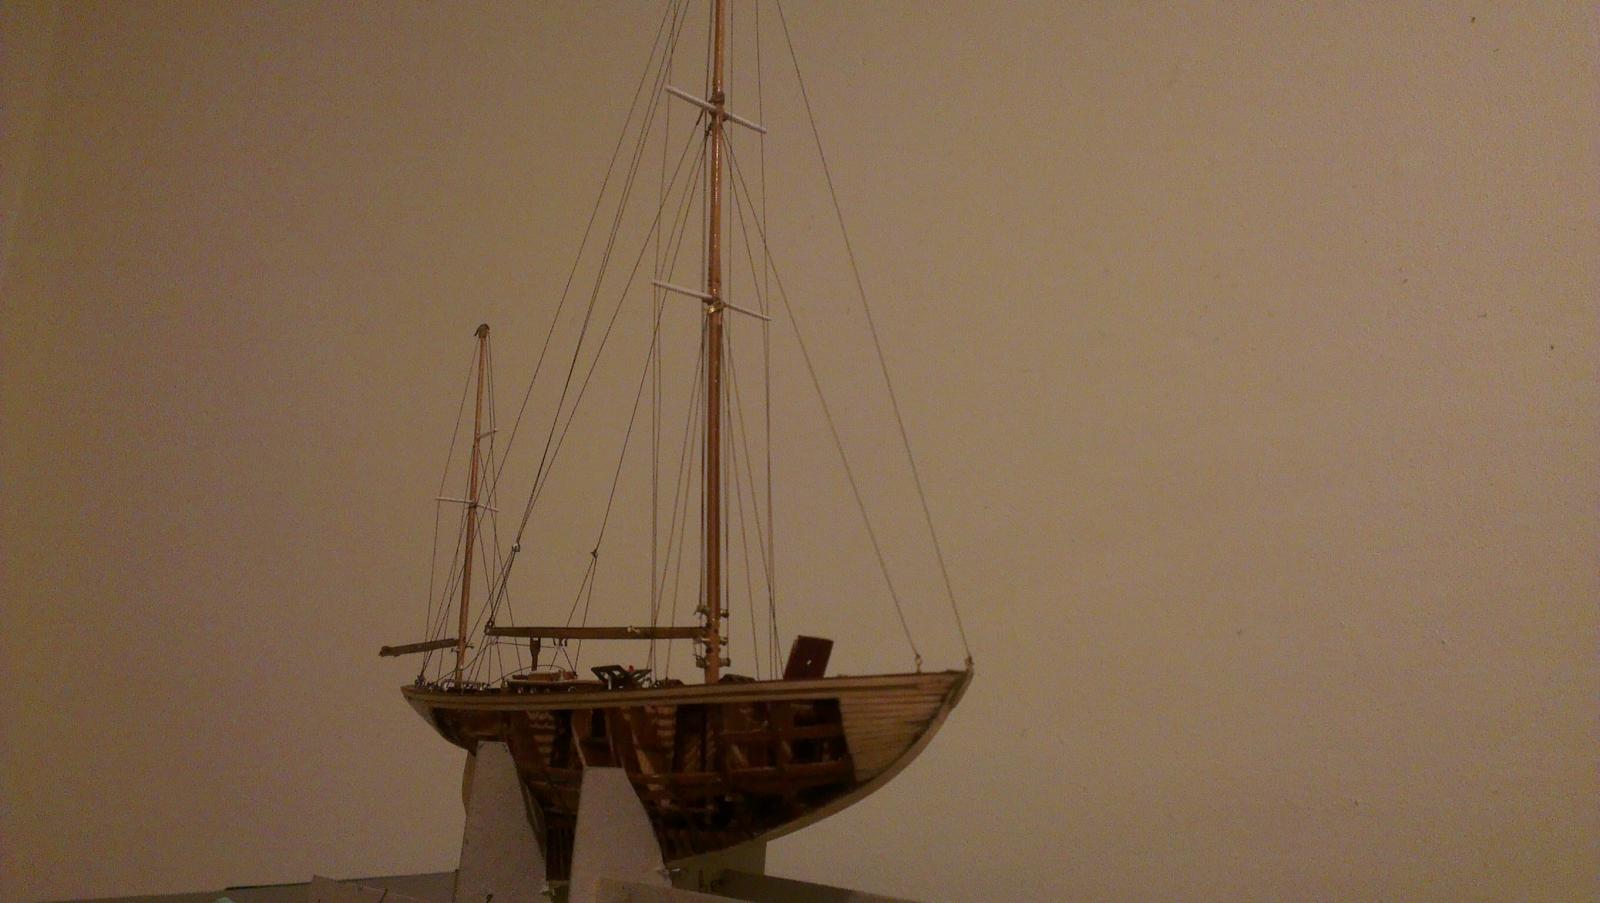
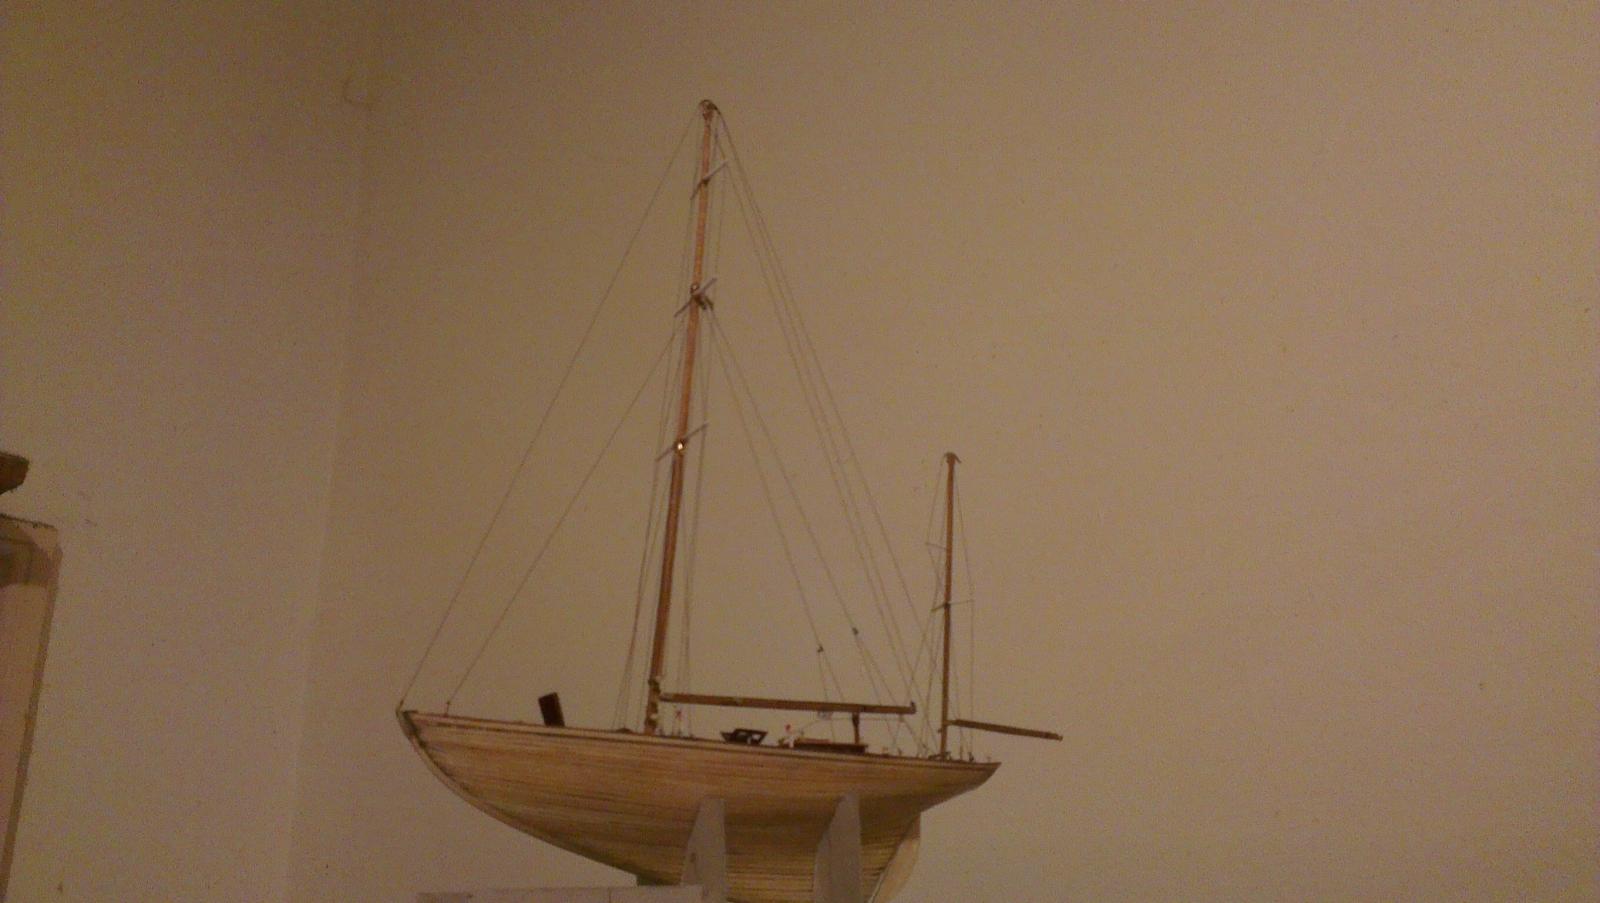
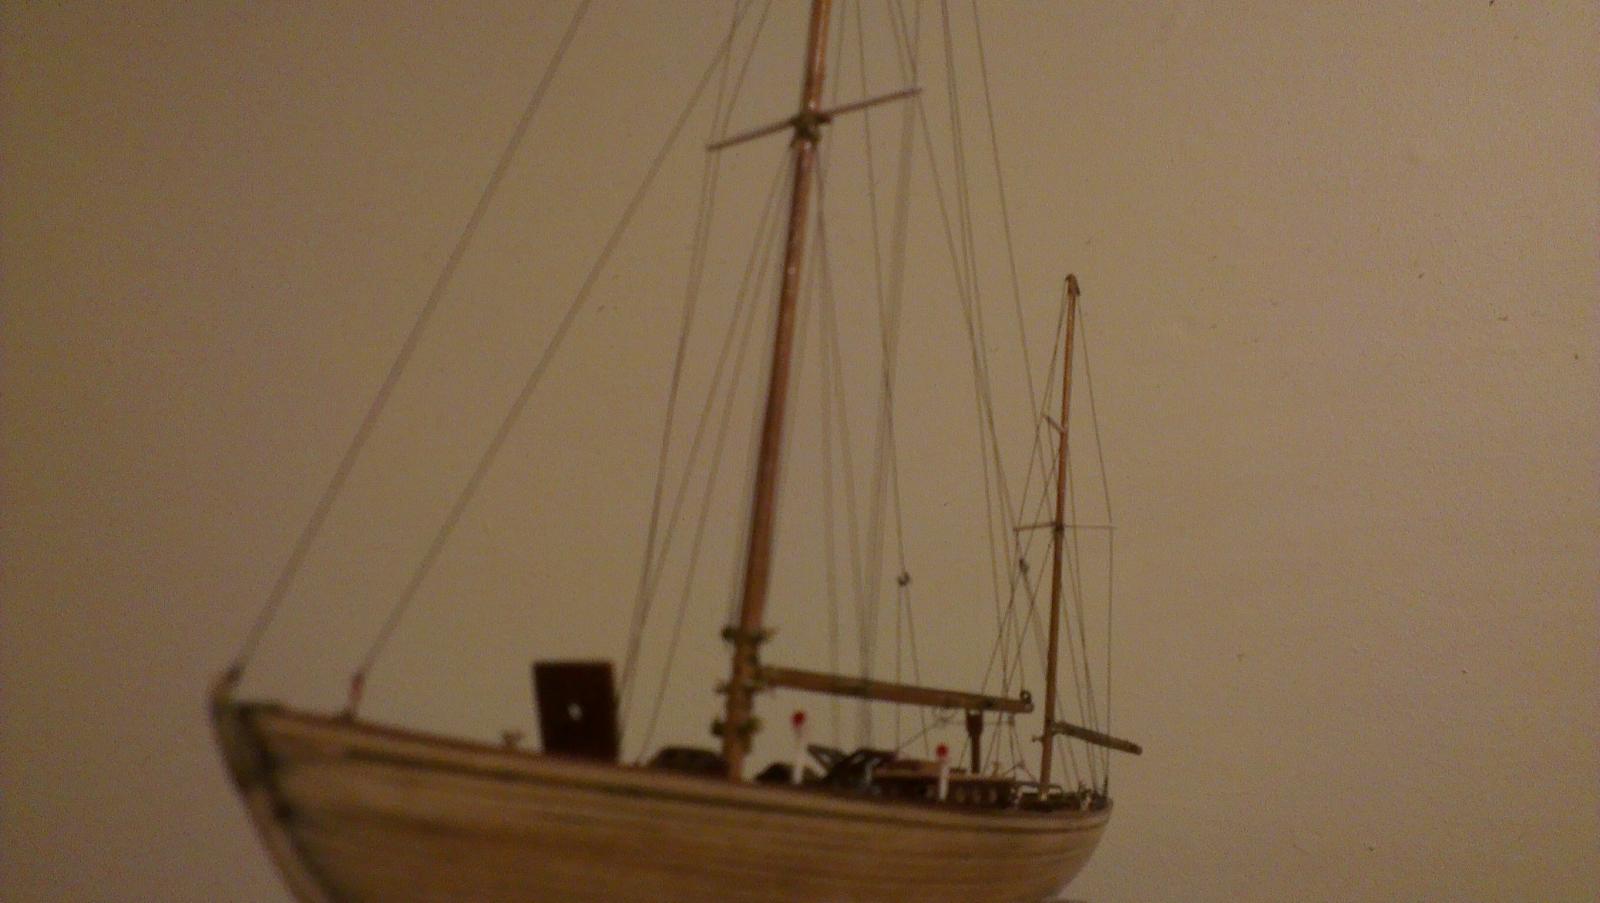
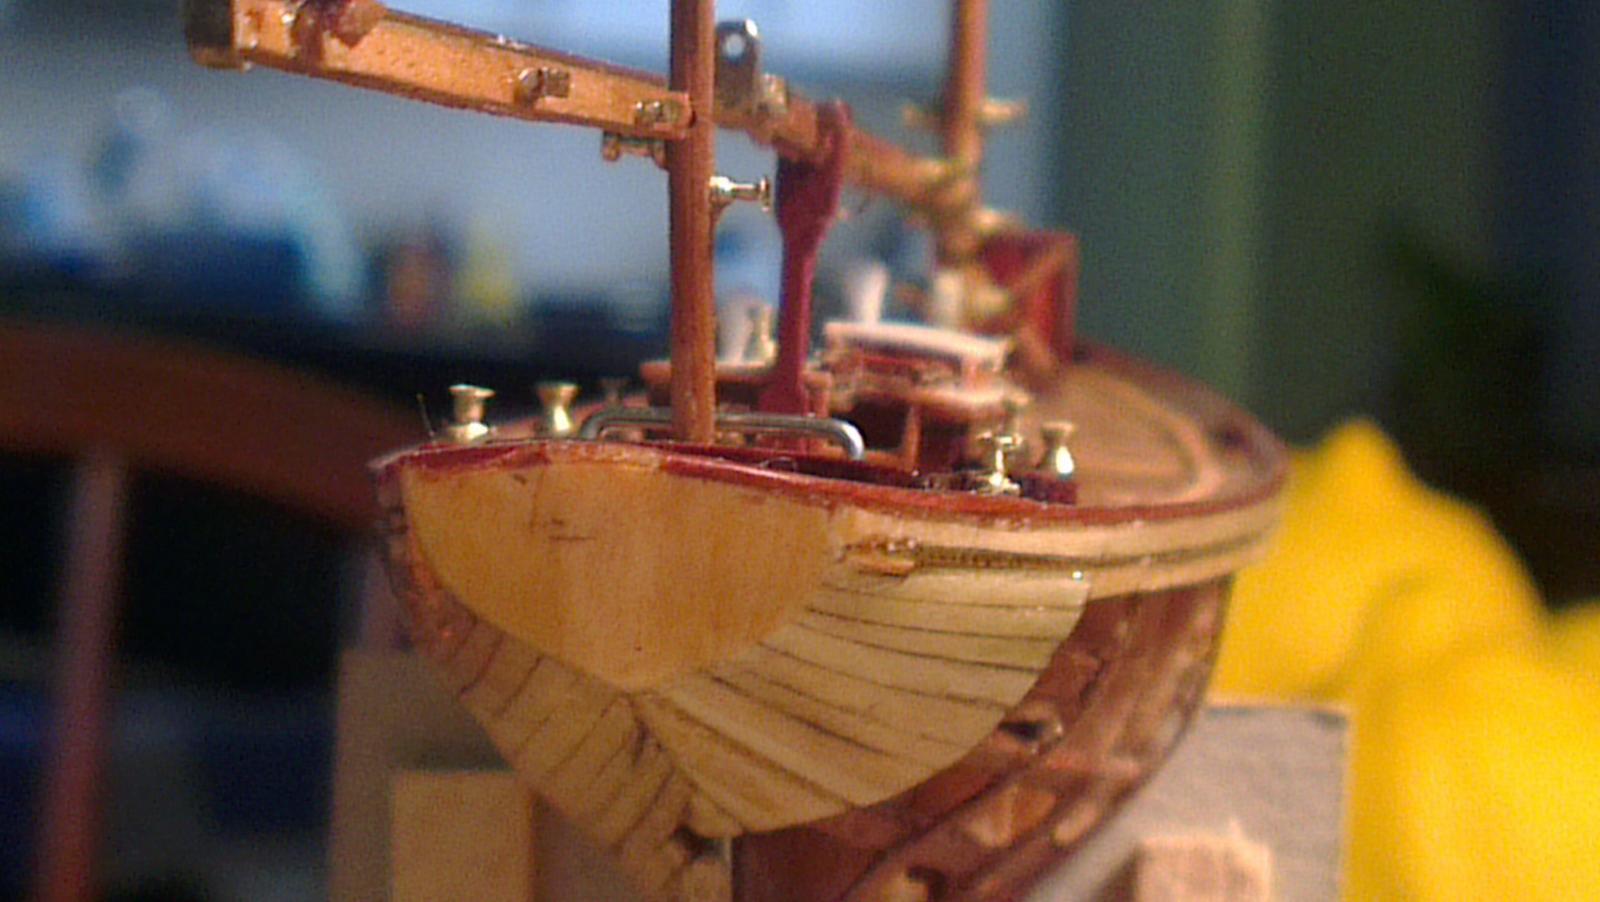
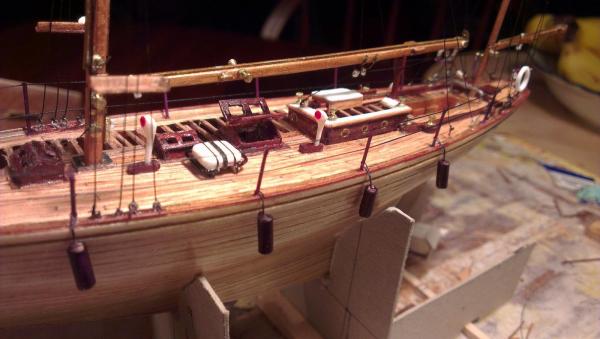
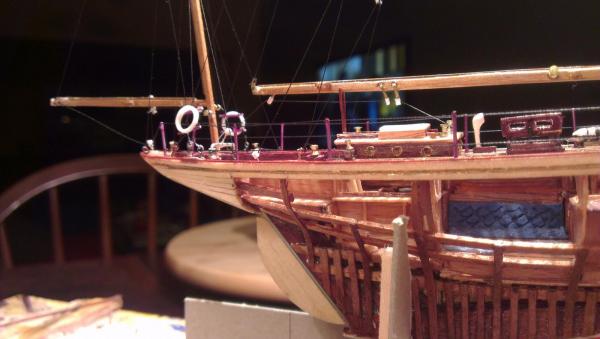
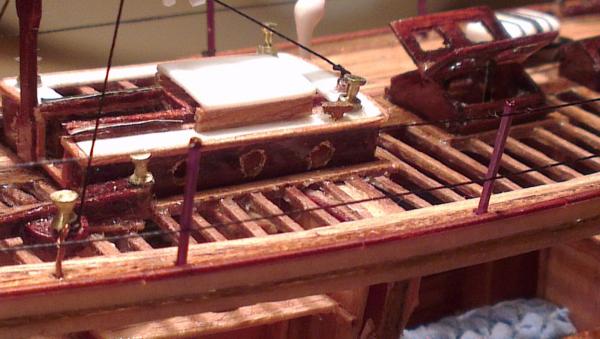
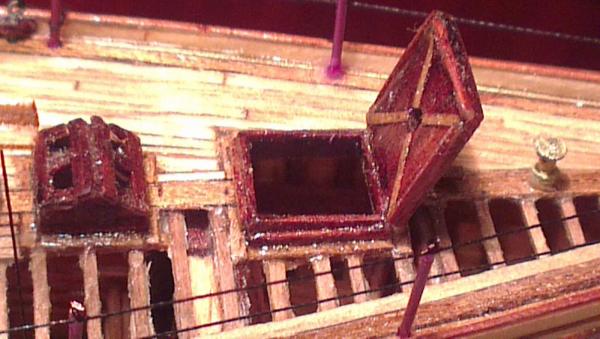
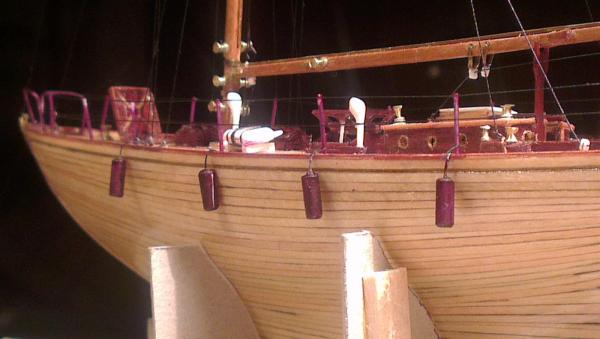
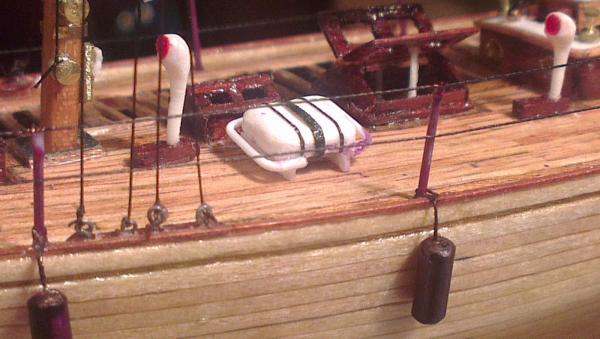
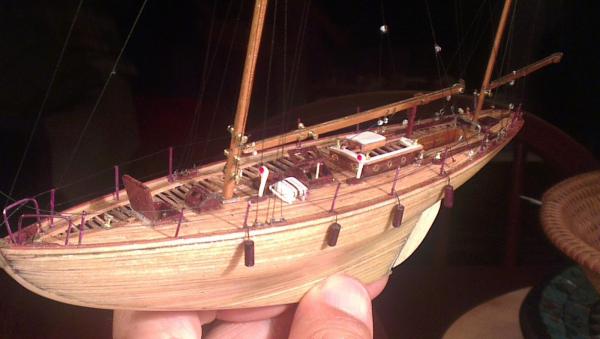
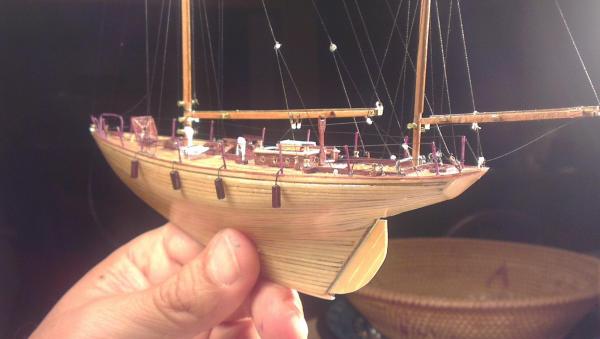
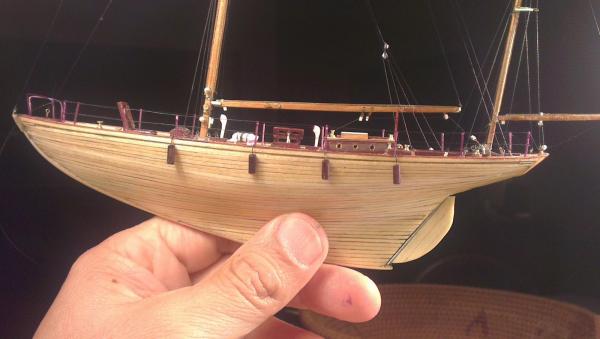
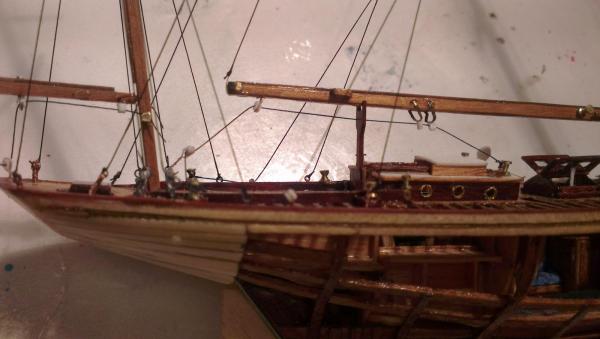
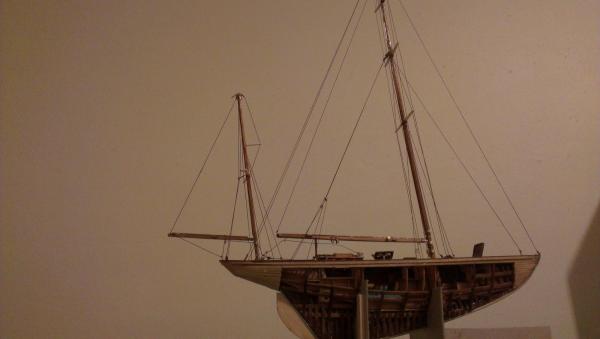
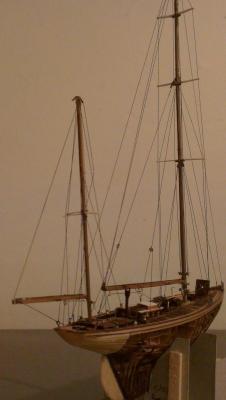
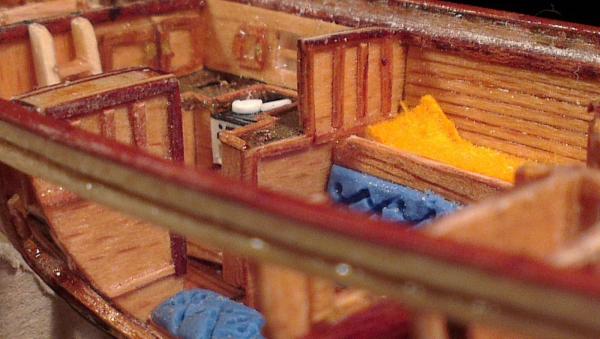
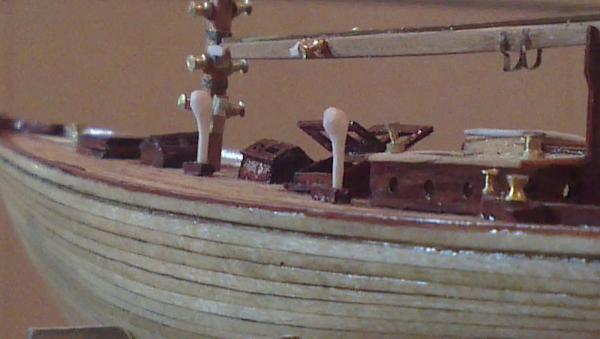
Hi everyone Almost finished. I've added the life guard rings (I can't think of their proper name!) onto the mizzen mast's rigging, a radar dome on the mizzen mast ( as per the real ship), navigation lights and a completed liferaft. I've also inluded some interior shots, just for the sake of it! All that's left to be done is to do the display stand, put coils of rigging on the winch drums and perform a general clean up. Hope you all enjoy the photos!


-
Thanks, Michael and all the others for your comments and Likes. All greatly appreciated!
-
Hi Sherry Brilliant work and great attention to detail. Really look forward to following your progress. Cheers and all the best!
-
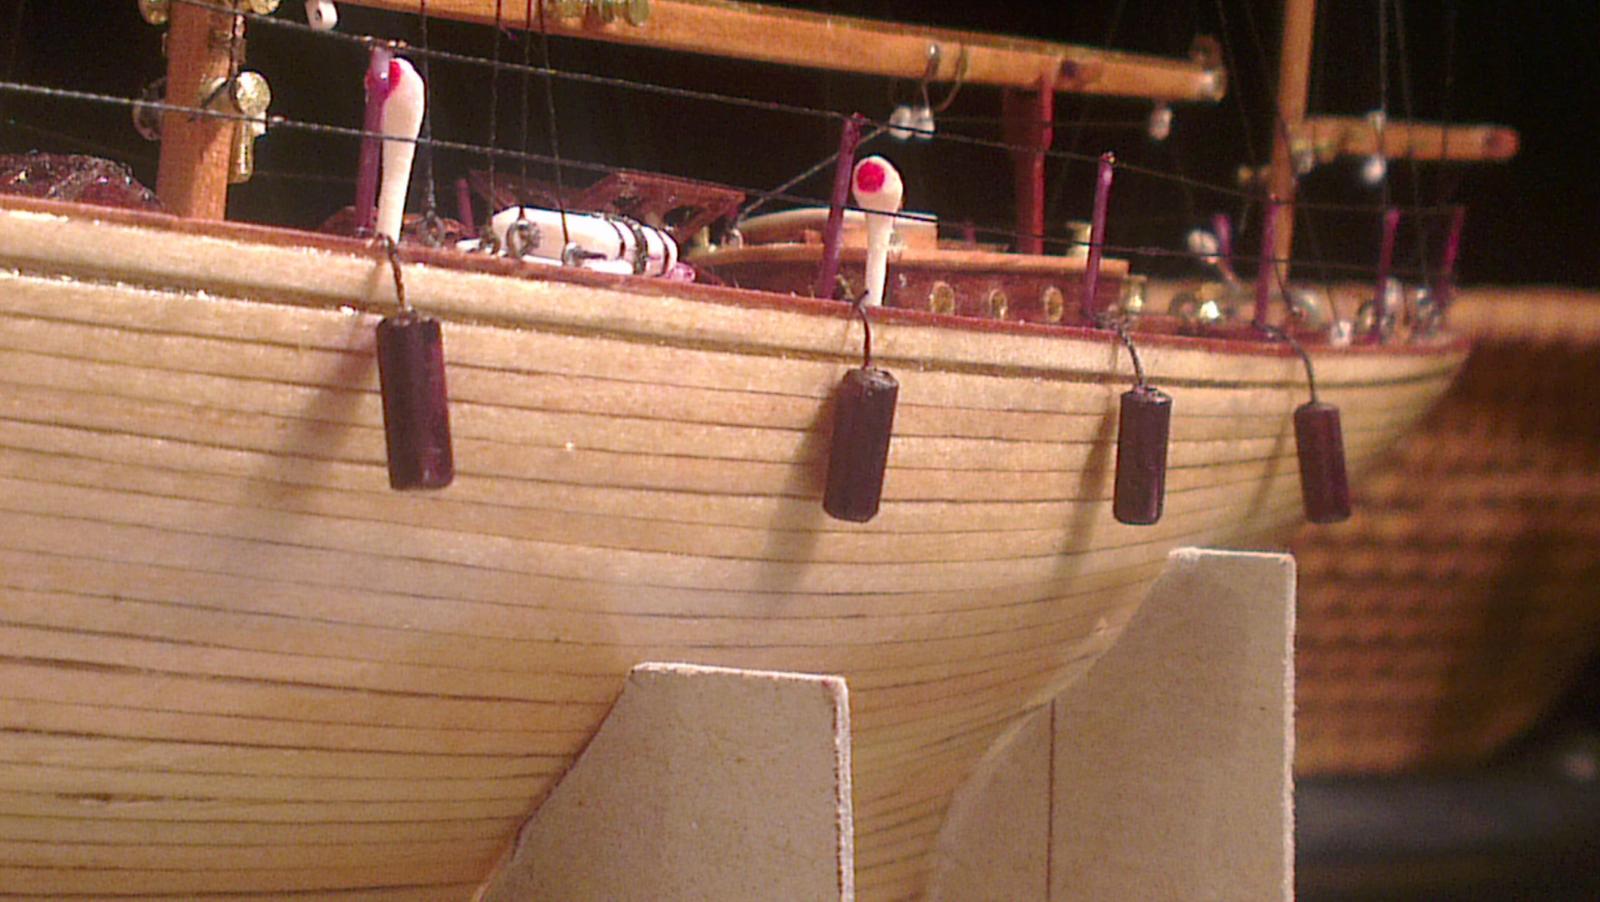
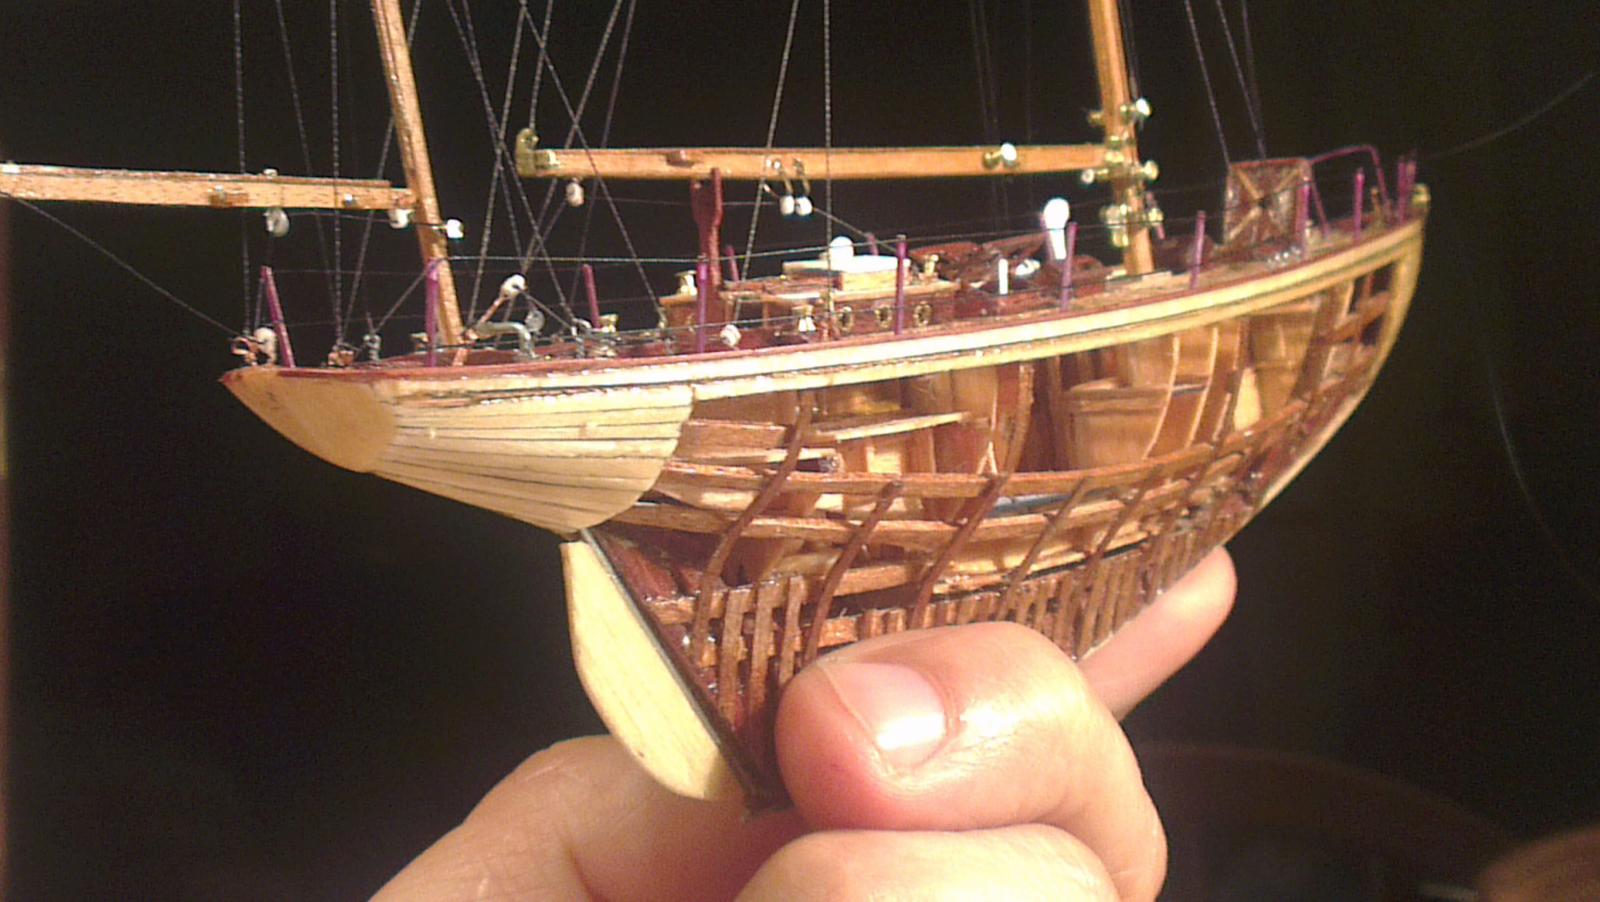
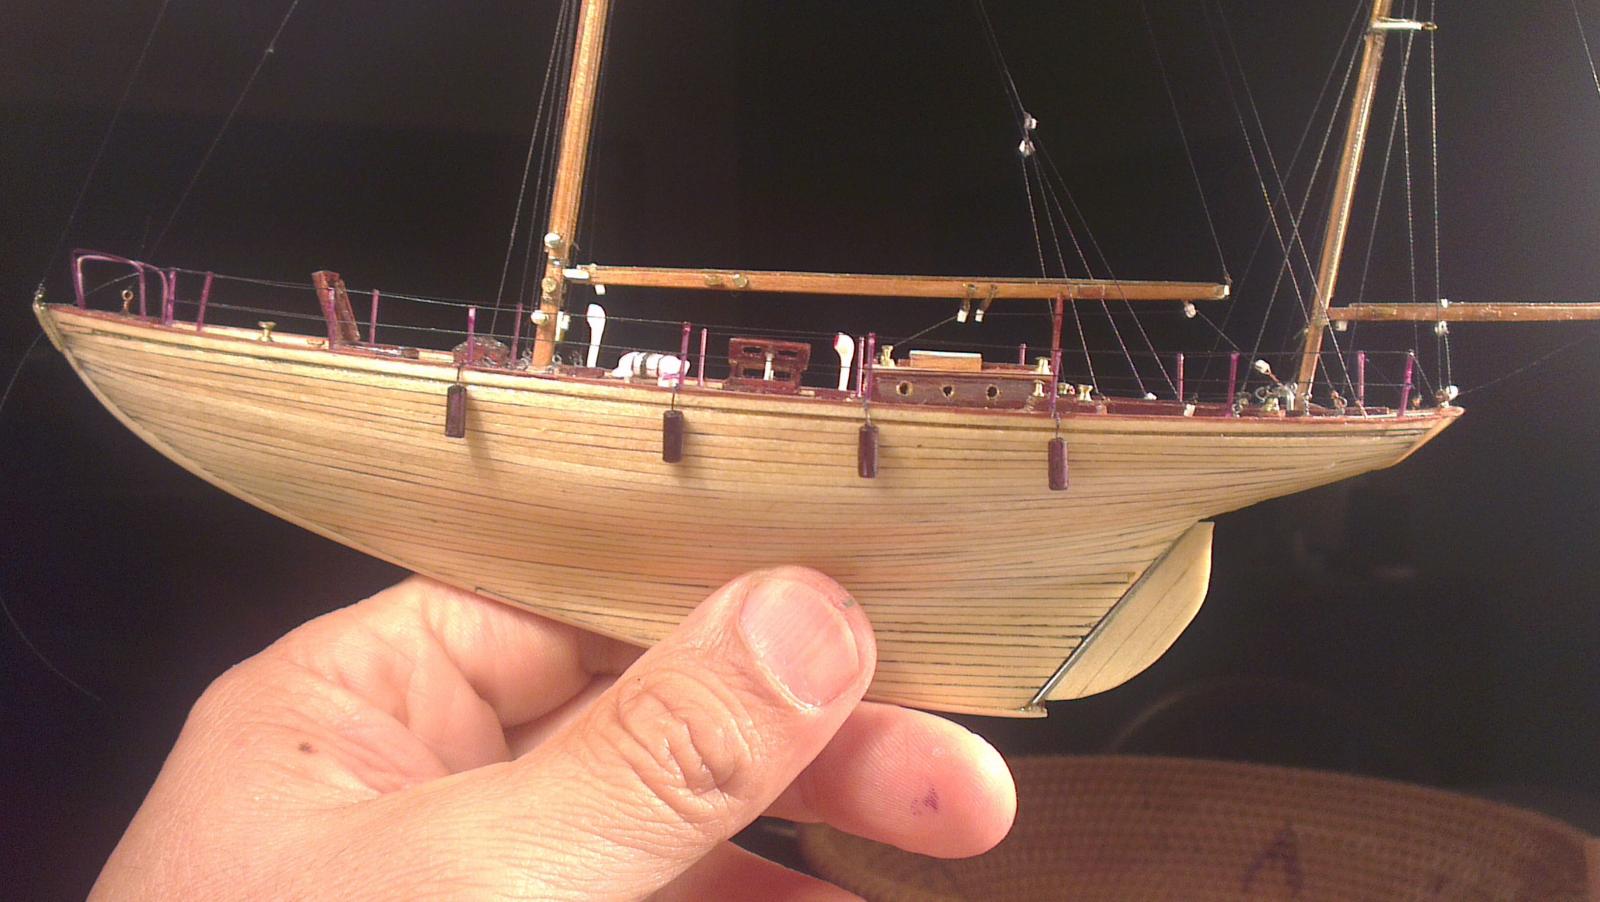
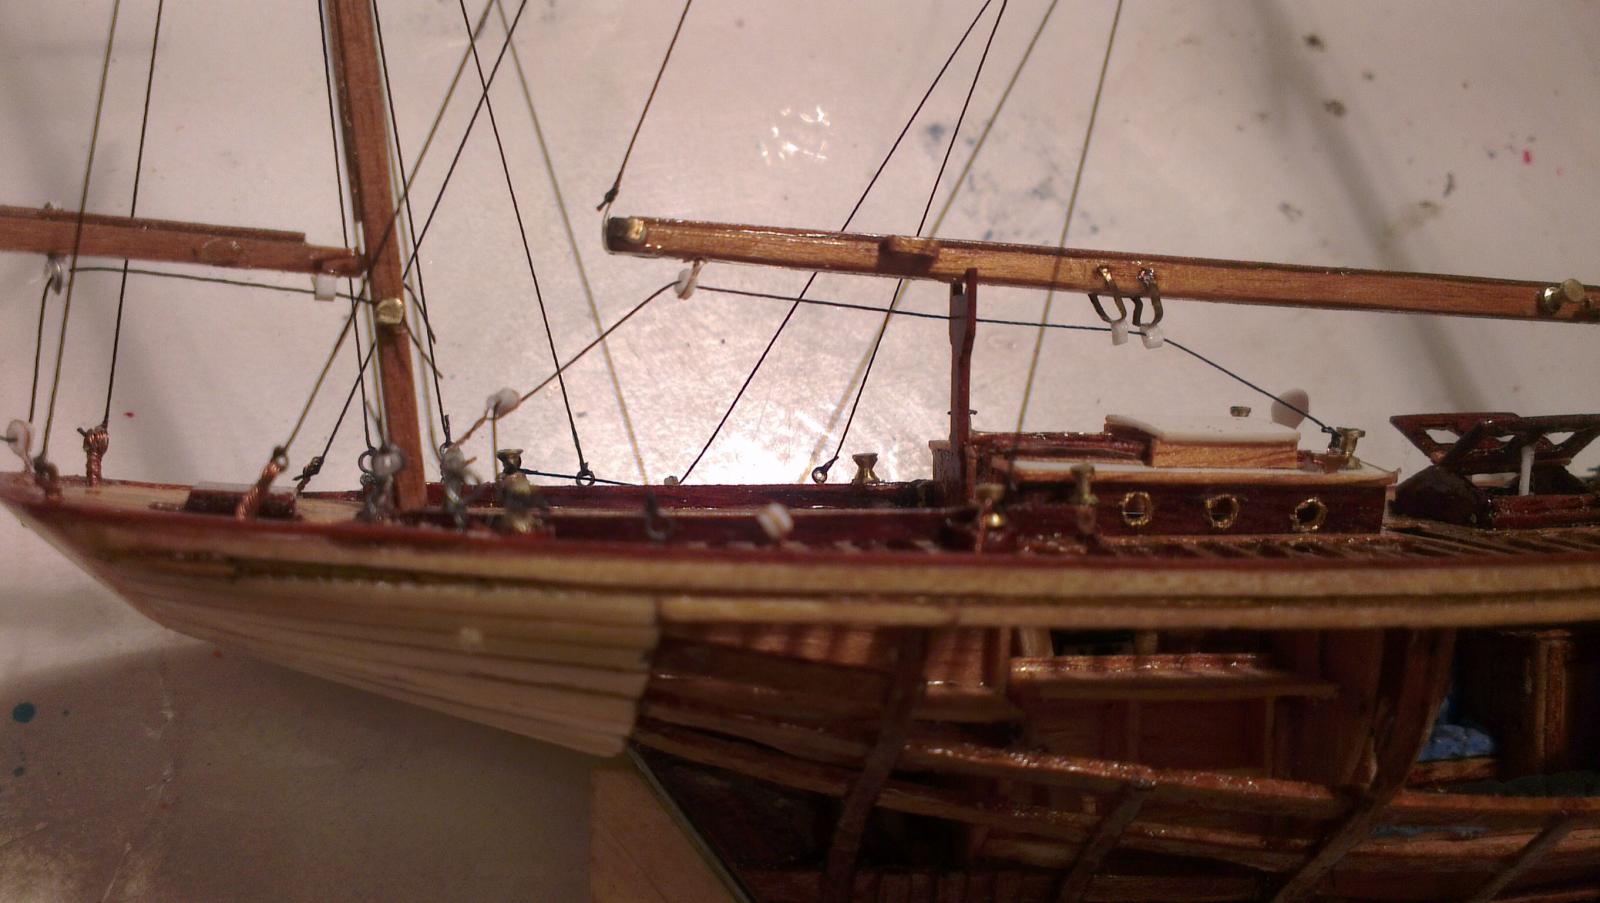
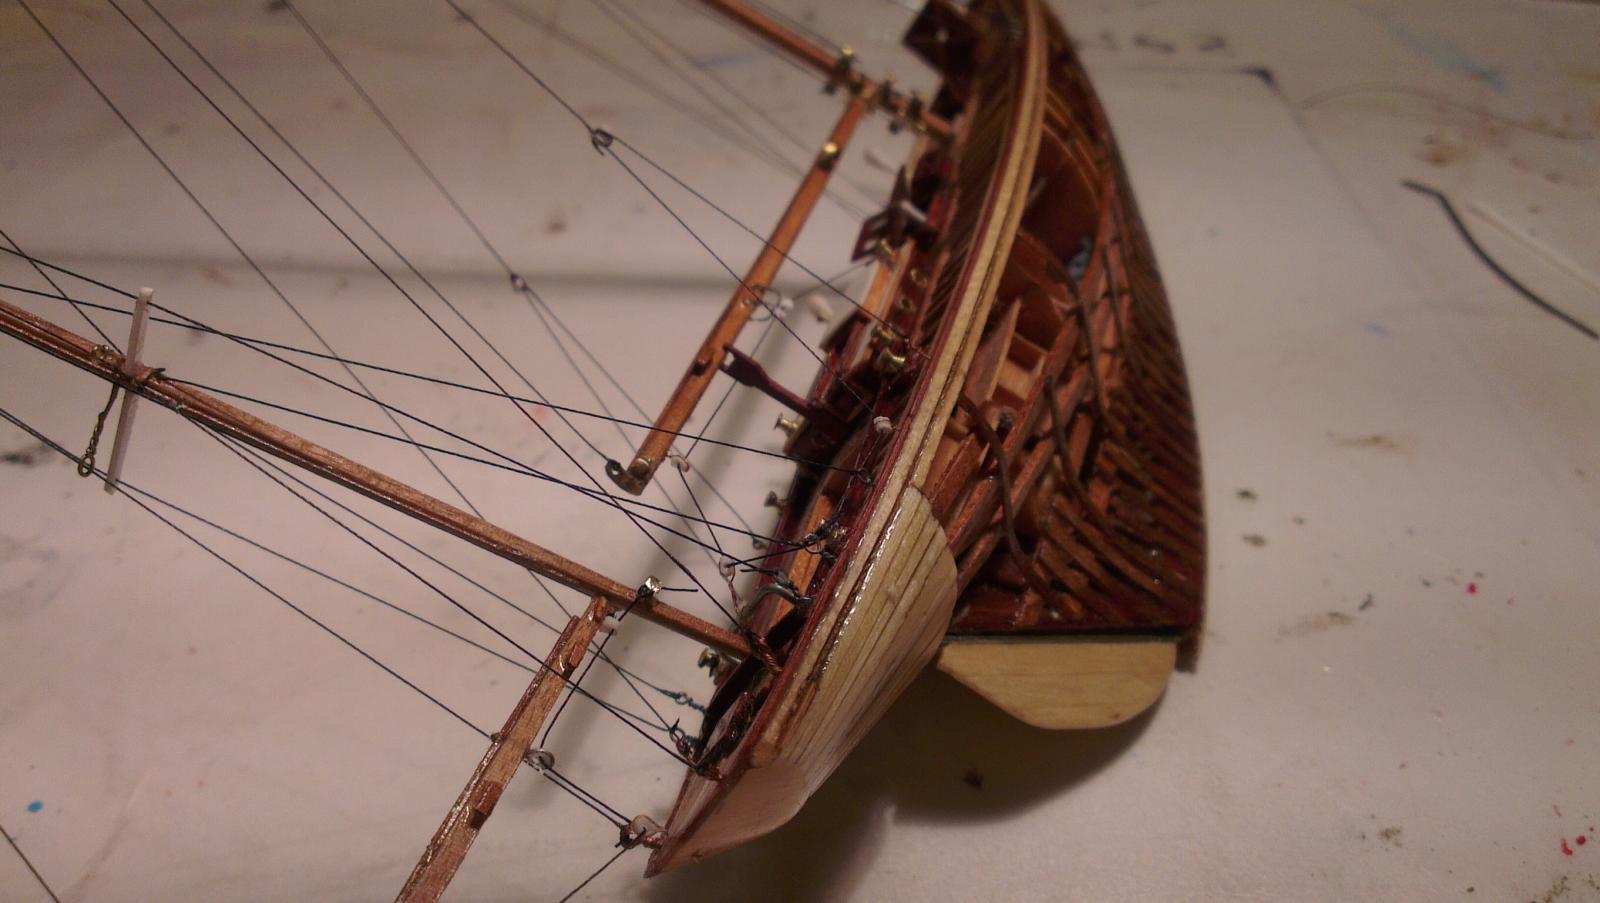
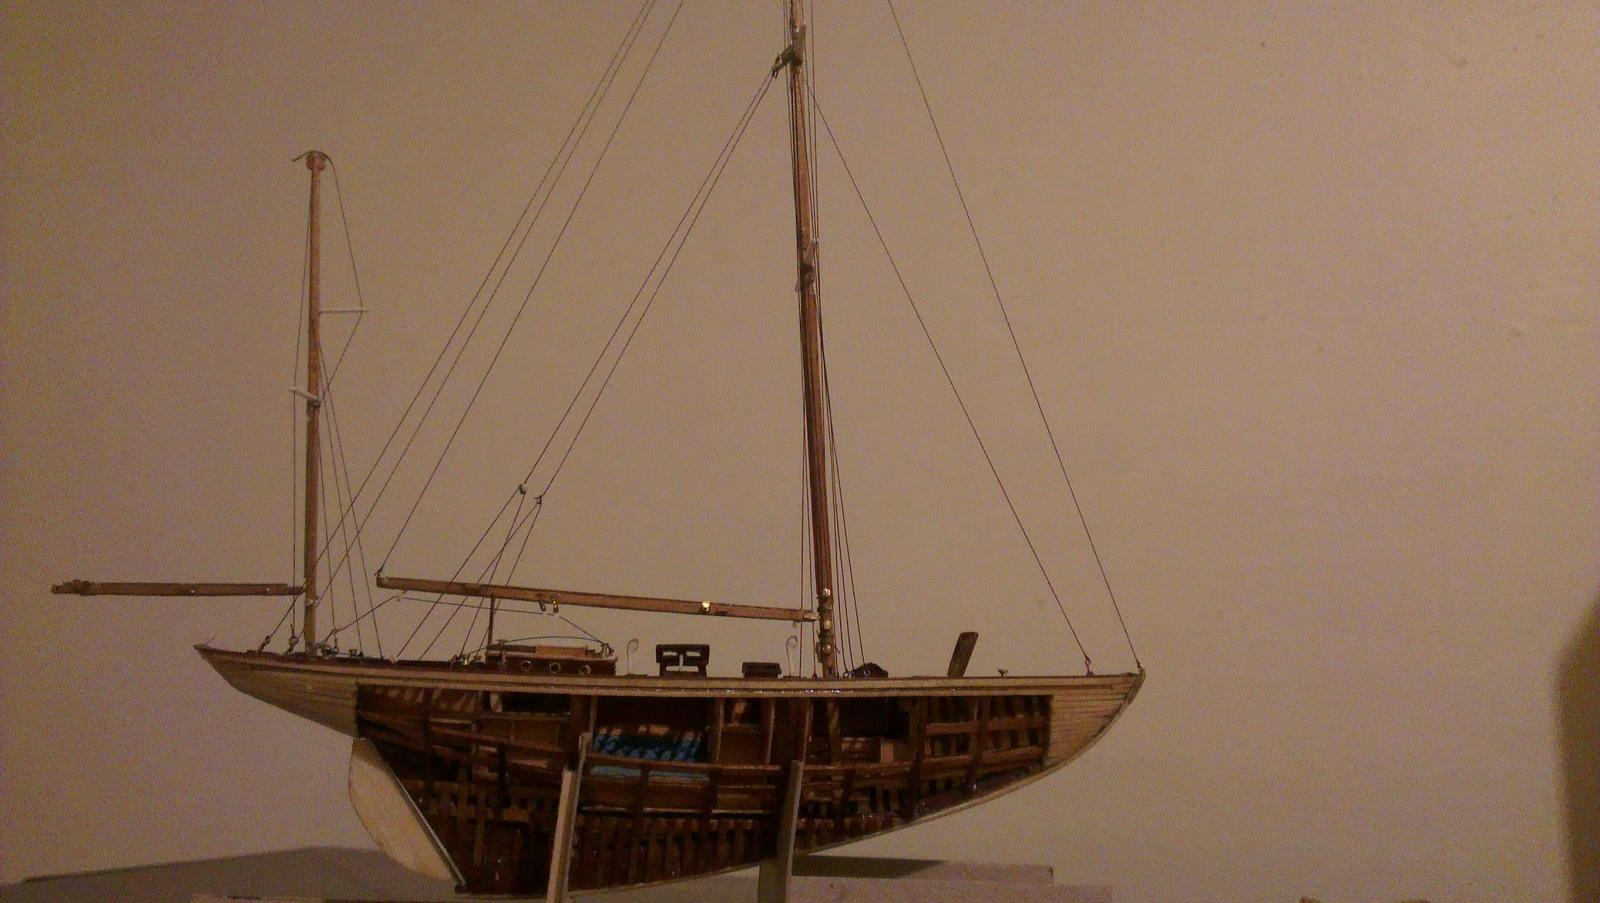
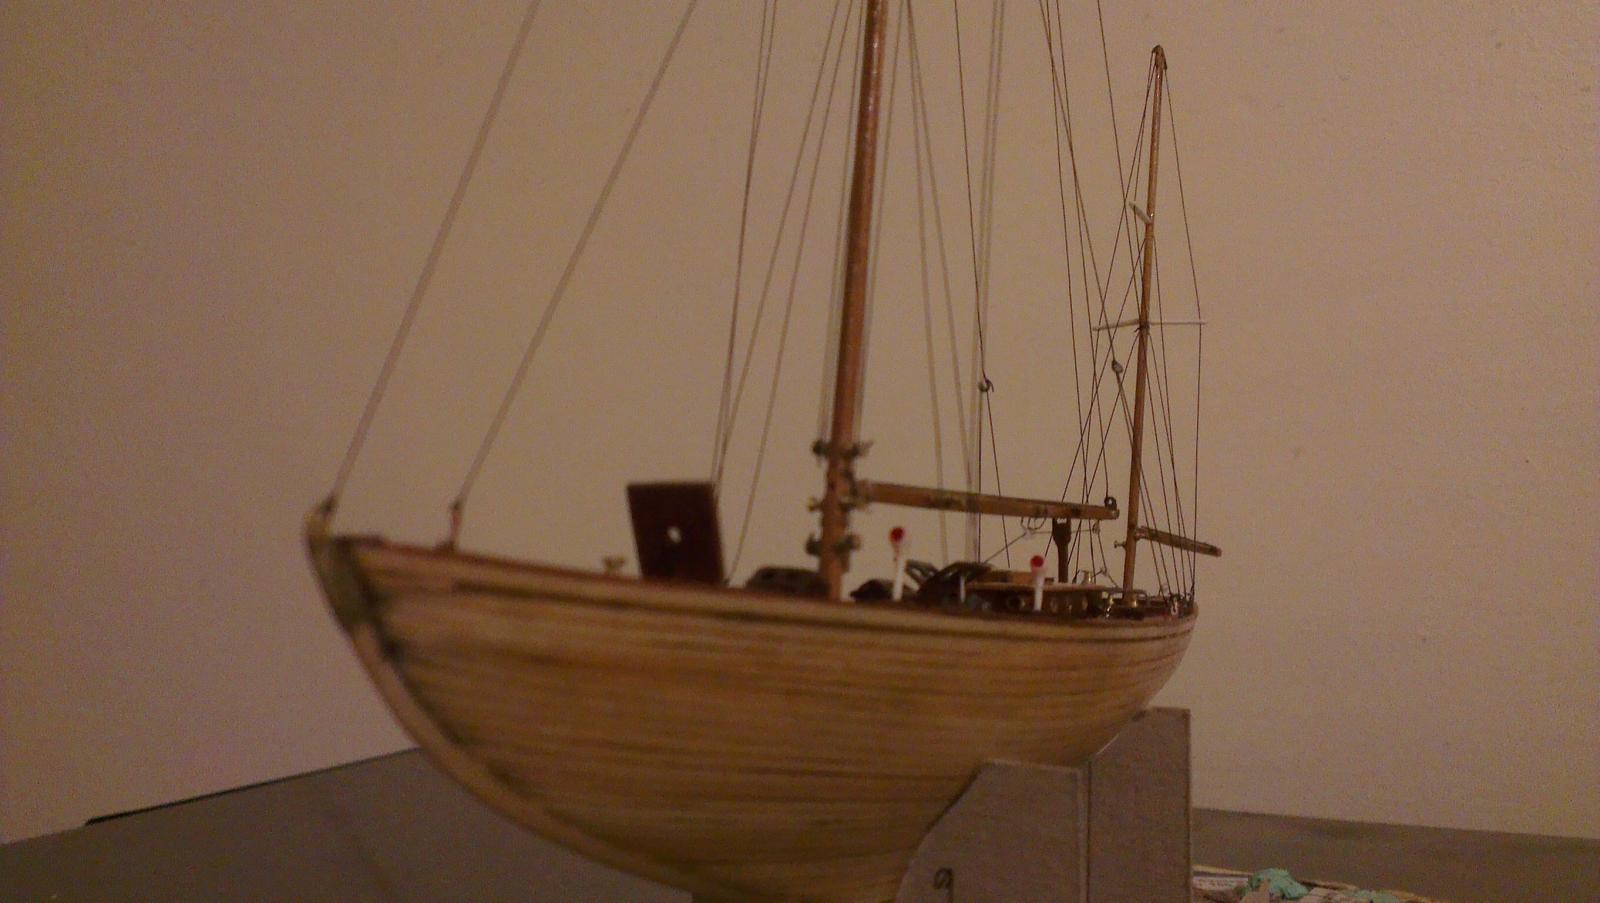
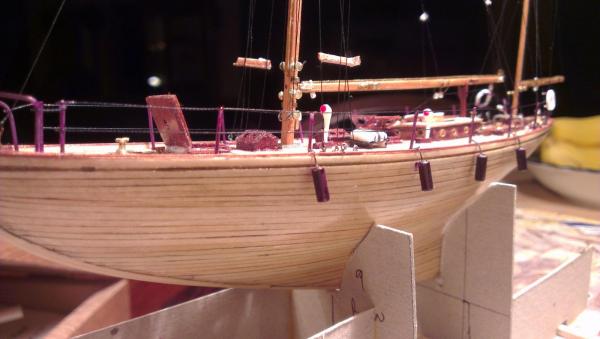
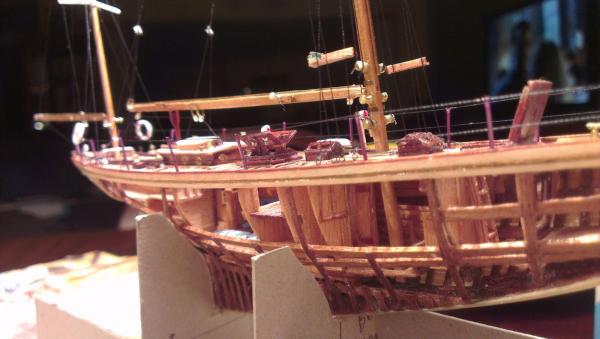
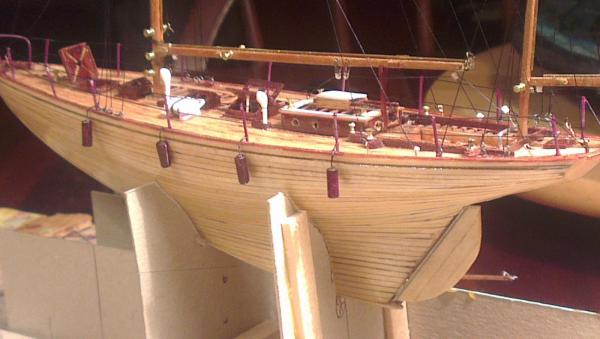
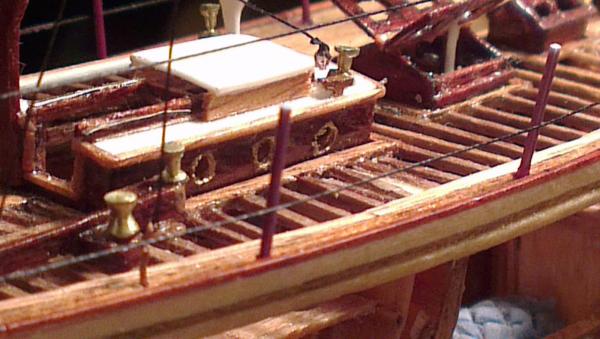
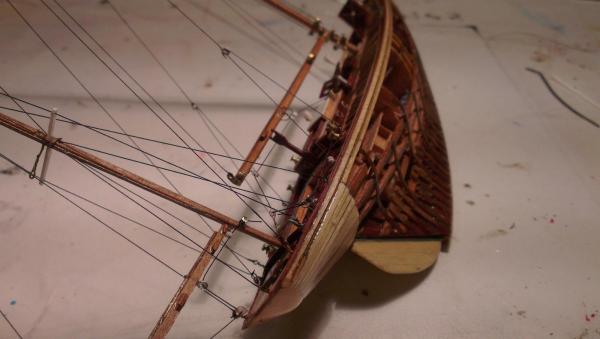
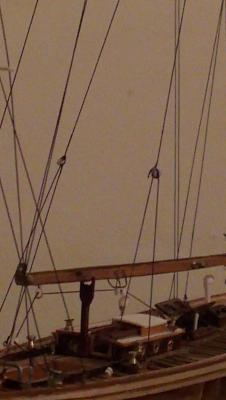
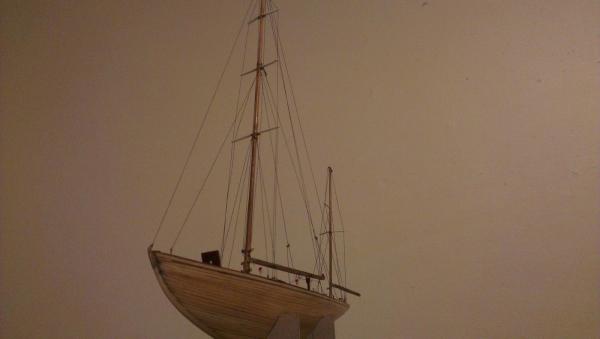
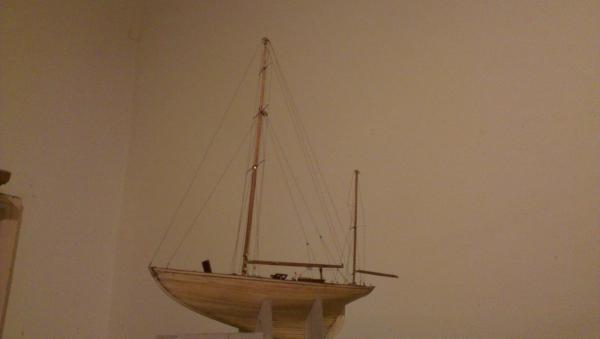
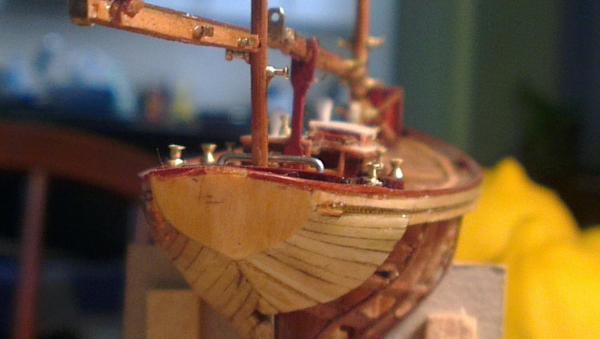
Hi everyone Almost nearing the end of the scratch build of this miniature Dorade. I've added some more rigging, lifelines and a lifreaft (which still needs some cleaning up and final detail work) and also black hull fenders. Hope you enjoy the photos! Cheers


- 36 replies
-
- 14
-
-
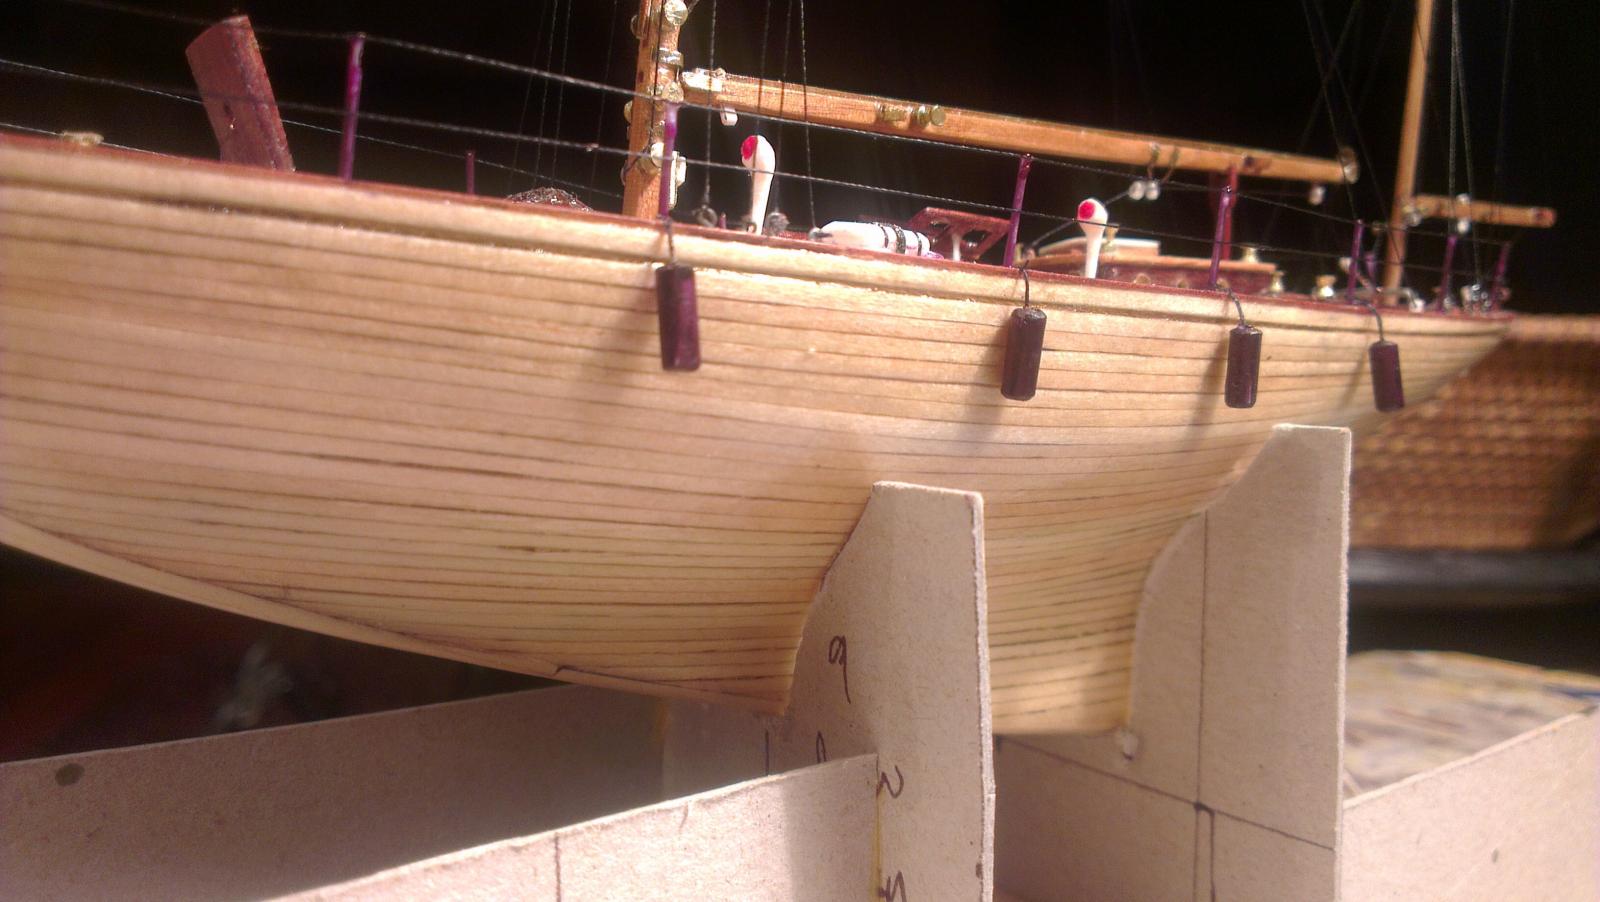
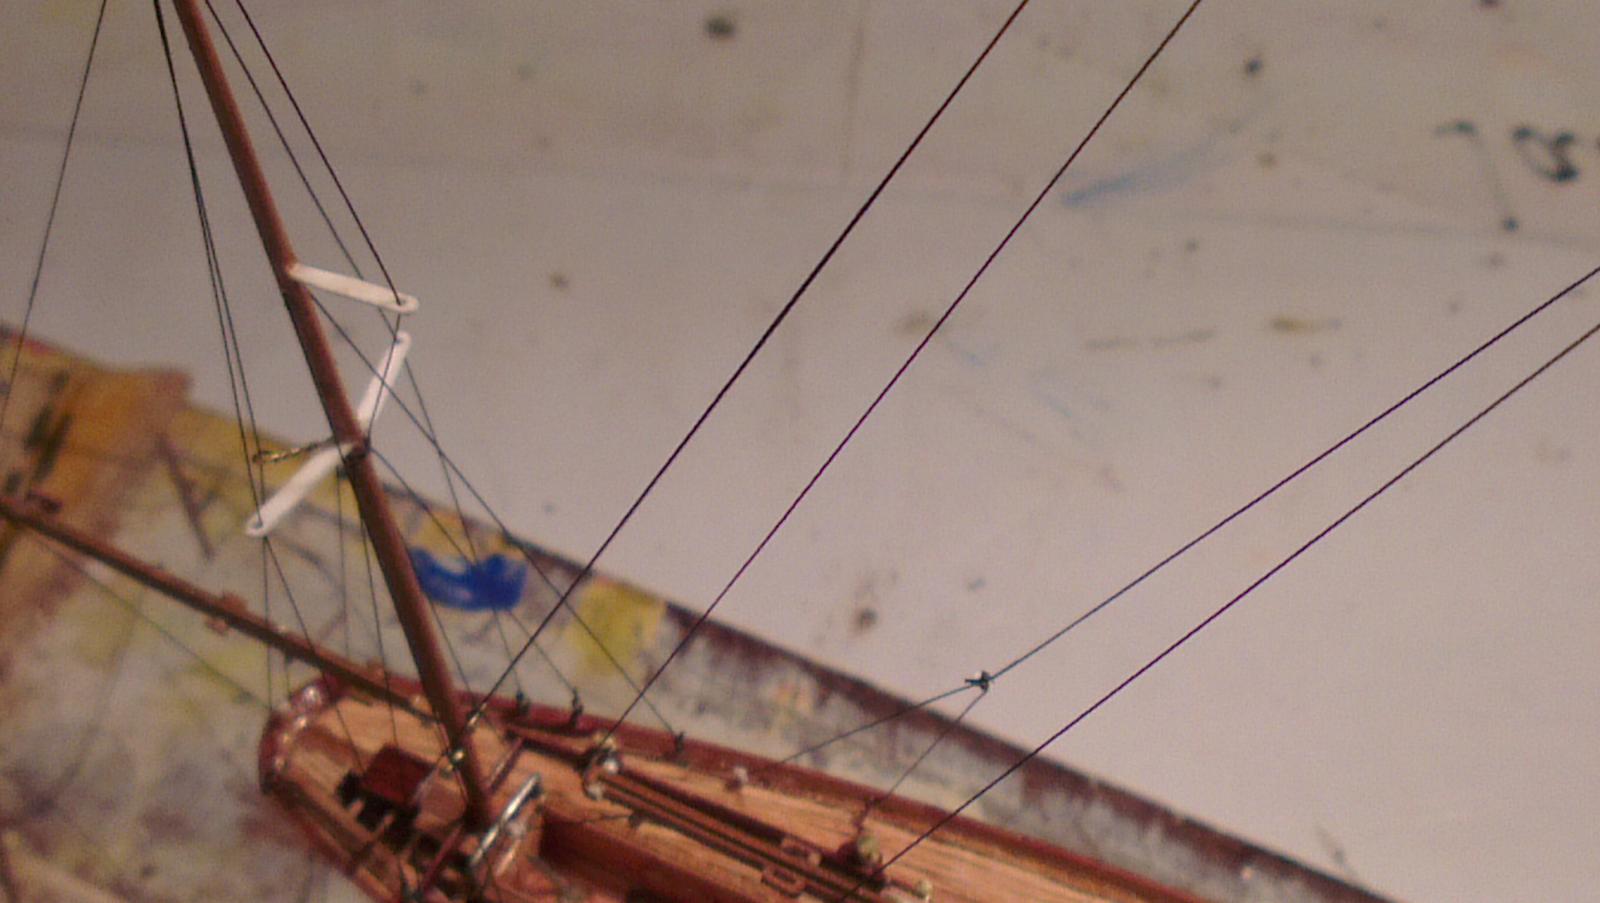
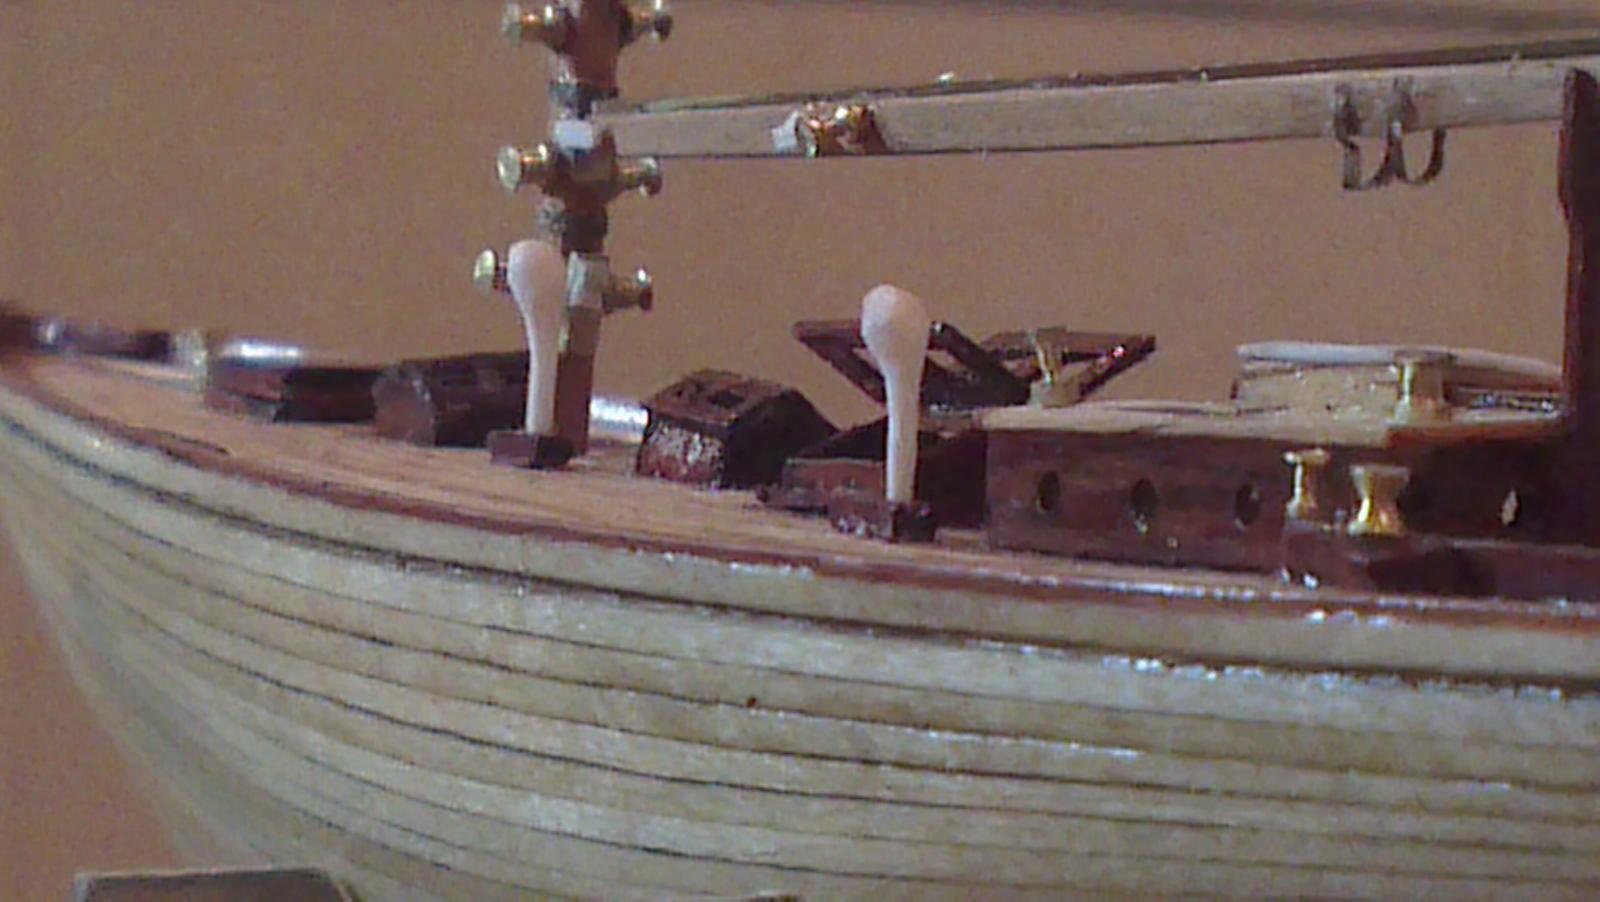
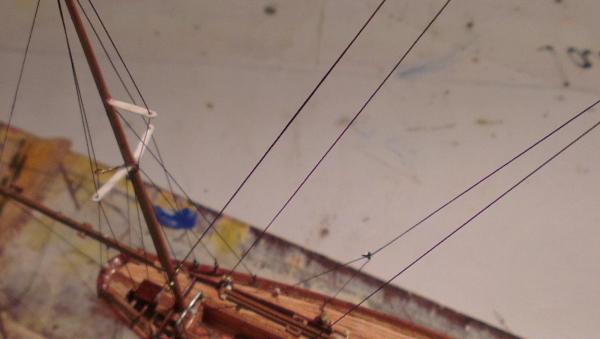
Hi all. Many thanks for your likes and words of encouragement! They're all greatly appreciated. I've done a little bit more work on my Dorade, particularly to the rigging. It may not be as accurate as it could be on a larger model, but, at this tiny scale, some allowances must be made. Well, that's my excuse anyway! The rigging still needs cleaning up, but i'll attend to that next. Anyhow, i hope you enjoy the photos. Cheers

-
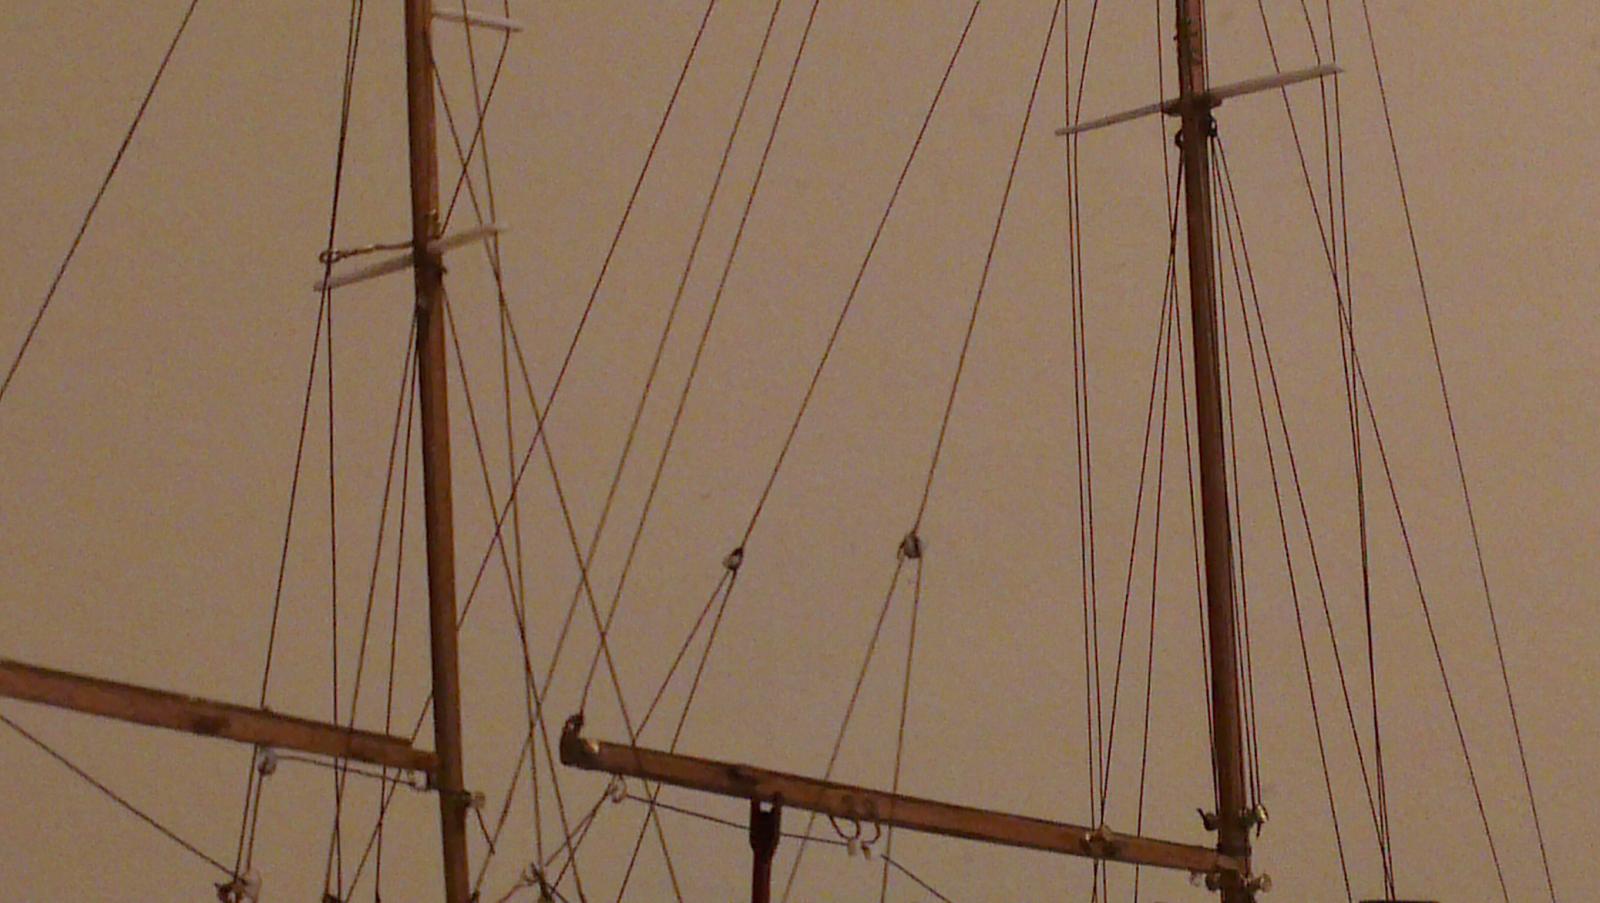
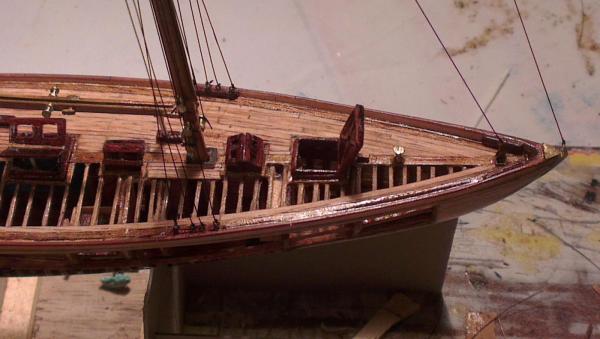
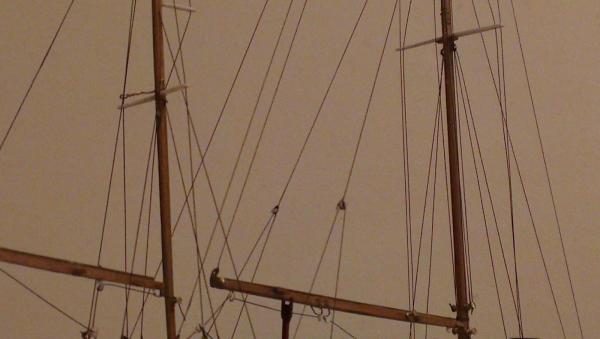
Hi everyone It's been a while since I last posted some progress photos, but, here are some of the latest photos of the rigging. I try to take better photos later, but, at least they give you an idea of where things are at. Hope you all enjoy them, but there's still more work to go. Cheers!


- 36 replies
-
- 10
-
-
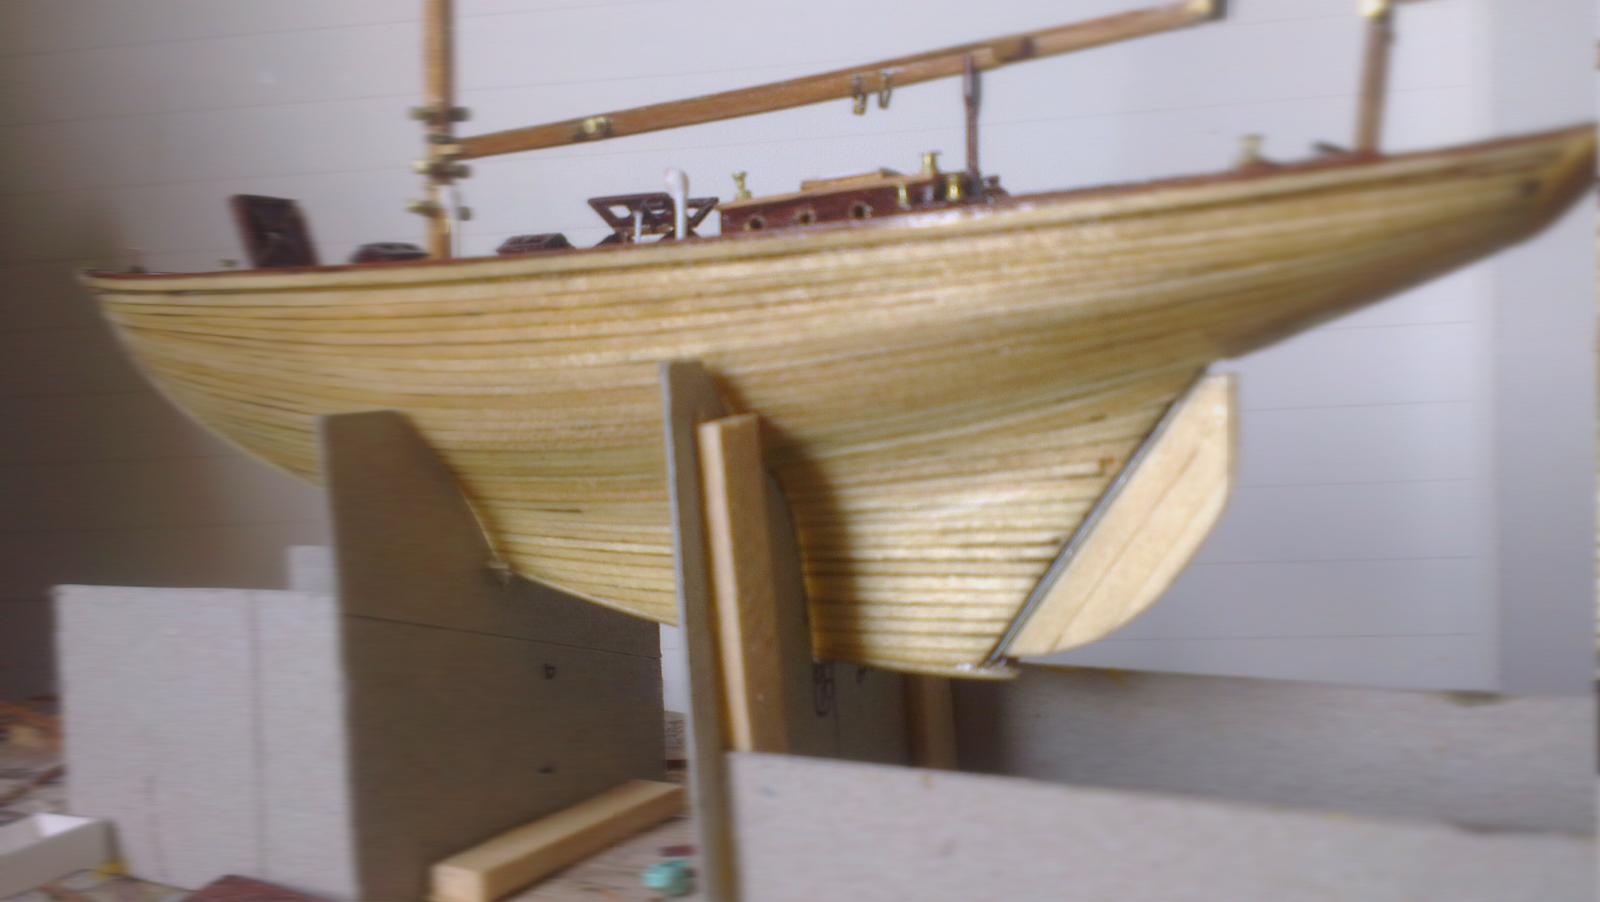
Hi everyone. Many thanks for the great feedback and for the photo above. If you're not aware, the Dorade website is also a great refrence for the ship, with many detailed photos of the ship - http://dorade.org. As for the deck, well, it has been glued permanently on. The reason being that there is a considerable amount of the hull that has been cut away to expose the interior, as well as being viewable through the open deck, that, I thought that would suffice. Well, I hope that's the case, anyway. Thanks for the comment about the winches. There was no easy way for me to do them, so I did them by hand. Twirling them in my finger with a file. Slow, but brass is pretty soft and once you get into a rhythm, it's pretty easy. I am also definitely an admirer of Donald McNarry! I can only dream of reaching his standard of workmanship. Phil Reed and Llyod Mc Caffrey are also people I admire. I'll definitely post more photos as the build progresses!
-
Hi Anja. Many thanks for the tip. I only joined the forum yesterday, so, I'm still finding my way. Is it too late to do as you've suggested, or should I delete my post and create a new topic in the completed forum? Cheers Patrick
-
Hi Edward Great build so far and I definitely admire your craftsmanship and attention to detail. Al the best and happy building!
-
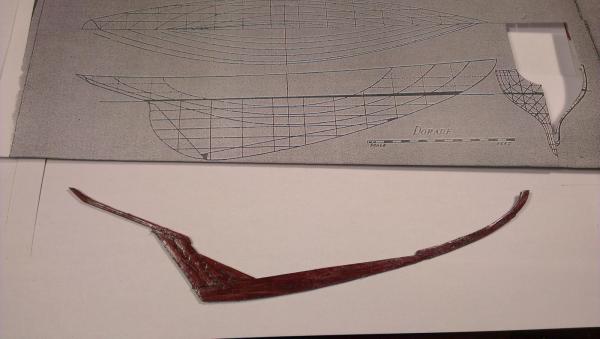
Hi all. Thanks for your comments. I didn't work to an exact scale for this model. Instead, i simply based them on plans which were feeely available on the net and simply reduced to a miniature size that I felt comfortable building at. The full sized boat is 52 ft LOA and my model is only 7.5 inches from stem to transom. I have no idea what scale that actually works out, but I bet it'd be pretty wierd! Does anyone have any idea how to easily build blocks at such a small size, ie approximately .75mm in length? I have my own methods, but I'm always open to ideas. Any thoughts?
-
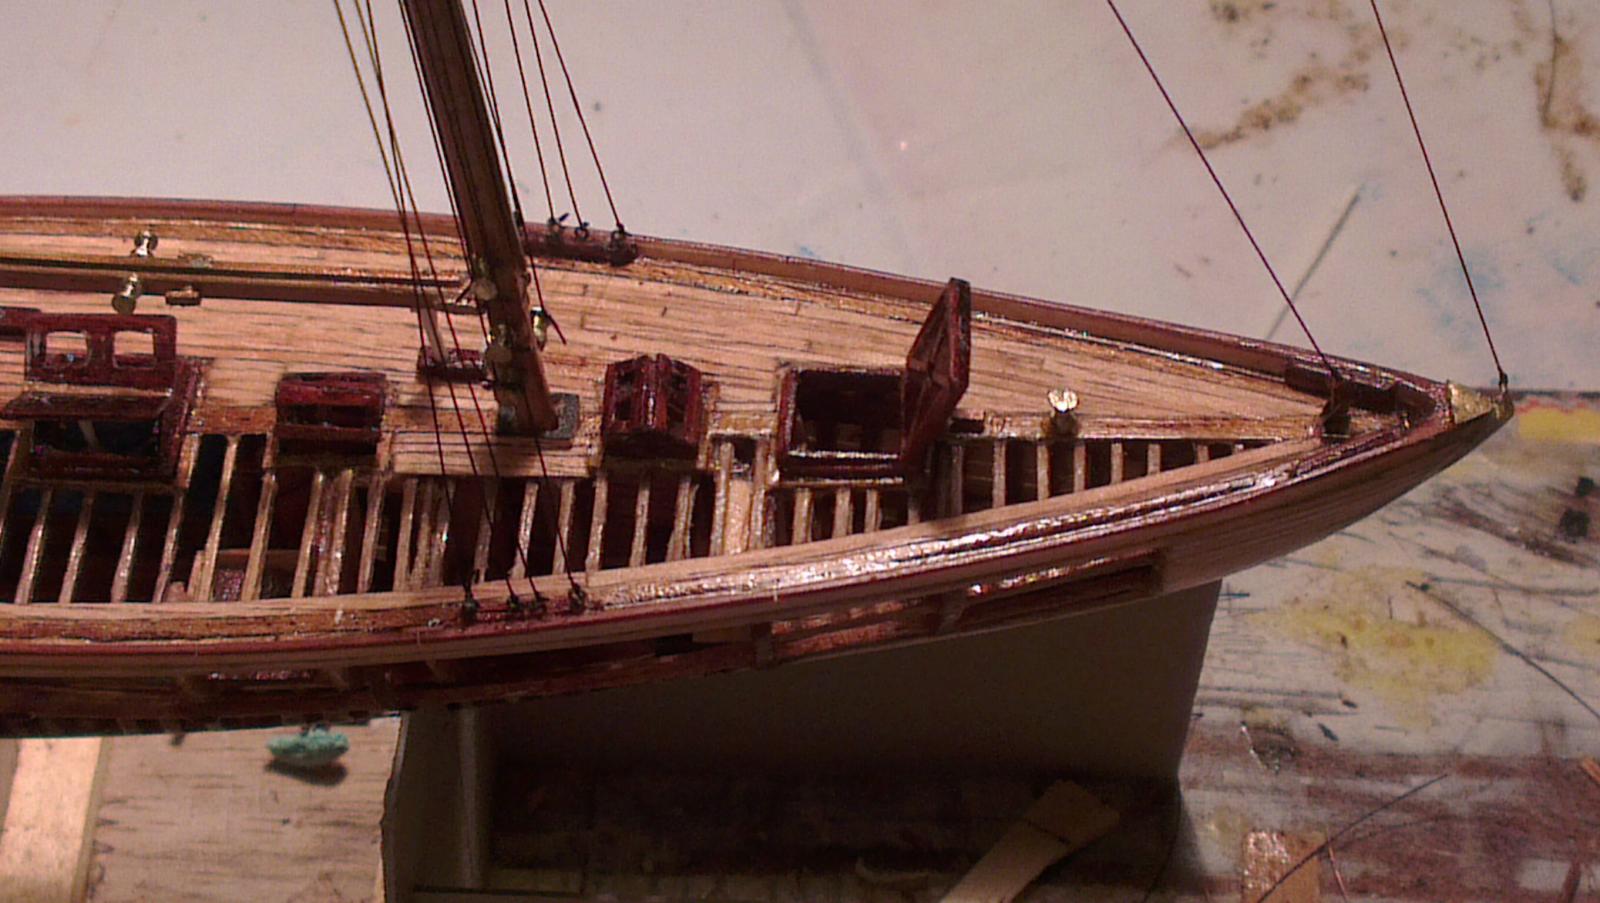
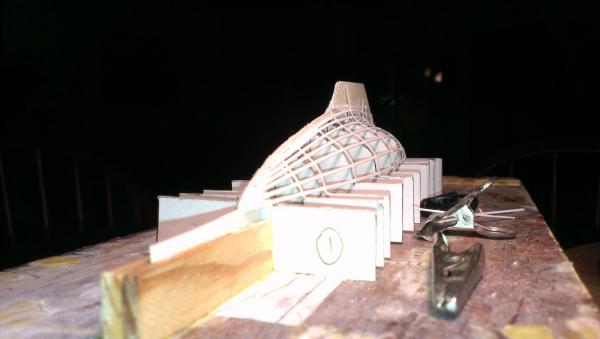
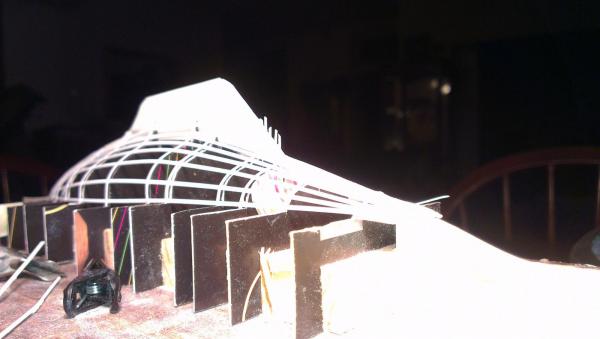
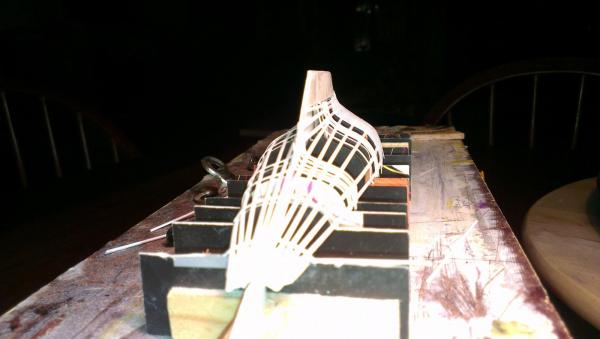
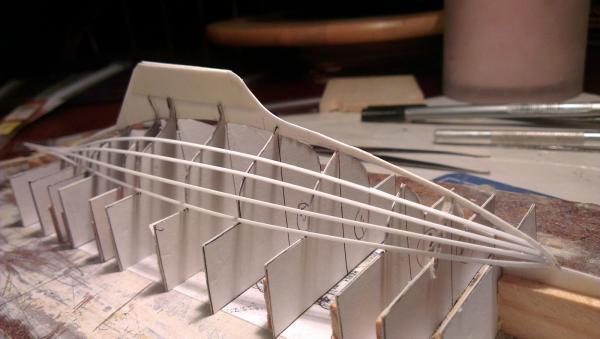
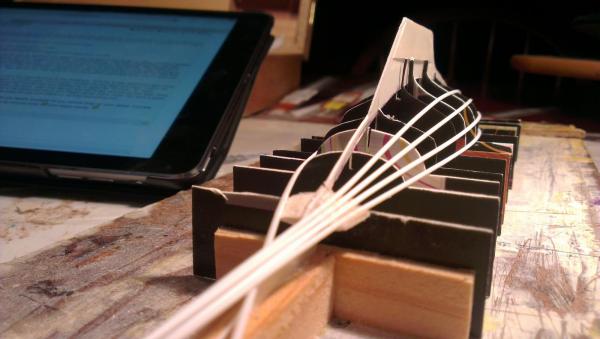
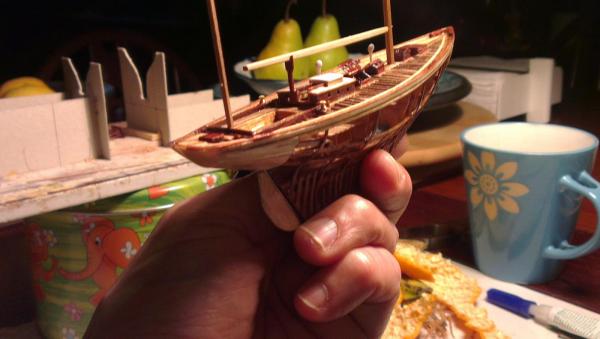
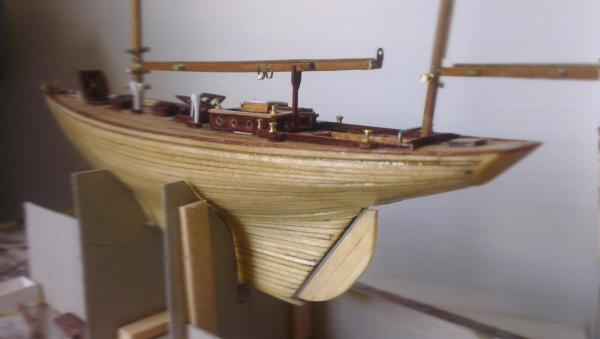
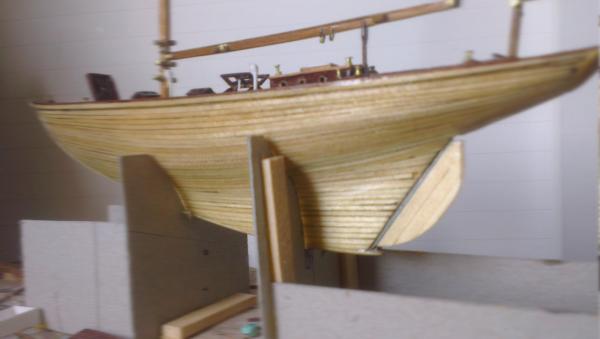
Hi everyone. Ever since I first read about the famous Sparkman and Stevens' designed yawl (built over 80 yrs ago snd she's still racing), I've wanted to build a model of her. So, after thirty years of dreaming, I've now started to build a scratch built, miniature, fully detailed model, complete with interior accommodation, etc. The model is a true miniature, ie only 15 cms approx in hull length. As you can see, I have tried to adhere to full sized construction practices by using a built up keel and bent frames. All the wood was cut using my miniature table saw, which, is a lot of fun and satisfying, not to mention, cost effective. I still have a long way to go before I finish the masts, winches, blocks and rigging, but it's been a hell of a lotta fun so far. I hope you enjoy the model and photos. I will post more pics as work progresses. Comments, feedback and suggestions are most welcomed!


- 36 replies
-
- 15
-