DONATION DRIVE - SUPPORT MSW - DO YOUR PART TO KEEP THIS GREAT FORUM GOING! (91 donations so far out of 49,000 members - C'mon guys!)
×

Cap'n Jack
-
Posts
20 -
Joined
-
Last visited
Recent Profile Visitors
524 profile views


-
 Gil. I have missed my train stop. I have read this post from the beginning and I am speechless. Your craftsmanship and depth of underpinning knowledge leave me blown away. As for the precision your ship demonstrates - wow. If I can achieve a fraction of what you do I will be a very happy modeller. You're a one off fella - and I would love to see something of this standard in my mess!
 -
 StuartC reacted to a post in a topic:
President by Cap'n Jack - Sergal/Mantua
StuartC reacted to a post in a topic:
President by Cap'n Jack - Sergal/Mantua
-
So, I had a brain fart. Trying to get the hull as smooth as possible so that the outer planking goes on as easily and neatly as possible. I decided - as this is a learning thing right - to try two methods of filling the minor gaps that existed between the planks, often resultant from the ears (is that even the right term!) Any how - I filed the port side gaps with minimal filler and starboard got, you guessed it, caked on. Once sanded though the results were similar so I think that the better method was minimal approach - lesson learned!
-
popeye the sailor reacted to a post in a topic:
President by Cap'n Jack - Sergal/Mantua
-
Cap'n Jack reacted to a post in a topic:
President by Cap'n Jack - Sergal/Mantua
-
Cap'n Jack reacted to a post in a topic:
President by Cap'n Jack - Sergal/Mantua
-
Popeye - top tips about the rounding of the bulwark and stern contours. I am using a block and have been quite conscious of those areas! Jonny - you're too kind!! I've started using filler to create the smooth hull that I've been told to aim for - you'll see soon, I'm sure, the volume of filler that I need! Craig - thanks for the direction. I'll check the forum posts on bearding line (quote as I don't know what one is!). And I'll also have a look at the rudder attachments to figure the future challenges! Cheers all. I'm off for an evening of light sanding!!
-
Cap'n Jack reacted to a post in a topic:
President by Cap'n Jack - Sergal/Mantua
-
Craigie65 reacted to a post in a topic:
President by Cap'n Jack - Sergal/Mantua
-
popeye the sailor reacted to a post in a topic:
President by Cap'n Jack - Sergal/Mantua
-
popeye the sailor reacted to a post in a topic:
President by Cap'n Jack - Sergal/Mantua
-
jonny.amy reacted to a post in a topic:
HMS President by jonny.amy - Sergal - 1:60 - circa 1760
-
Lets see if this one goes turtle.
-
The hull is now watertight and firm as!!!!!! Though for some reason the thumbnail is upside down!

-
Has it really been 2 months? I've spent a while sanding the hull and working the planks to try for a smoother line - I've also tried to remove the problems at the Bow. Hull is now covered in a 3:1 PVA/ water mix to try and firm up some of the planking a give the 2nd layer more chance of a cleaner finish. Picture to follow.
-
Cheers for the feedback Craig. Some of the terminology loses me but I'm sure ill get it! I'll keep updating my build log - perhaps you can remind me when I get near!
-
Wow Stuart. I was looking for someone to follow and replicate! Finished so soon! She looks fabulous.
-
Jerry, She is breathtaking. You have done the immortal memory proud Sir. I only hope to emulate. BZ.
-
Fellow new guy - hello! I'm also building the President though not to the same attention to detail as you! I like the idea of replacing the cannons and looking for the other "attributes" that you mention but for me I'm going to learn doing this model: the techniques and methods to be used and then look to find a better kit for the second effort! Mantua isn't renowned for its kits and had I read the forum that existed before, I wouldn't have started with one! My kit had dried out wood and I had to ring to distributor for instructions. That said the planking has proven fun - I've just coated the outer layer with a PVA/water combo to firm up the inner hull prior to applying the outer hull. Given the free time that I have I'd think that you'll be a little quicker than I but ill look forward to keeping n eye on your progress! Good luck.
-
So here the trail dries up. I have had a computer rebuild and my images appear to have been lost - the log from this site were also lost. So I'm now here. The hull first layer is complete. I learned that when glueing strips it is best to run a strip of glue along the full length - it adds so much strength to the hull. There are a few cracks and weakness' here and there. I intend (and have already) to fill some of the larger holes left as I have NO idea how else to deal with them. I am then going to use a waterede down PVA glue to work in between the planks and firm up the inner hull before looking at sanding down to remove the ears (where they exist). I will post a question but here goes for anyone looking at this build. How "sheer" does the hull need to be to get a good finish with the second layer? Perfect?? Nearly perfect. 0.5mm thickness doesnt buy much tolerance and I'd rather not rush!! Cheers for looking folks.


-
And here's one last one showing the repaired damage to the main gun deck - resultant from my heavy handed removal of the first few planks. Tit.

-
Meanwhile the Stern was taking on a nice shape - though I think that I did start to shape it too early and should have let it be for a while longer!

-
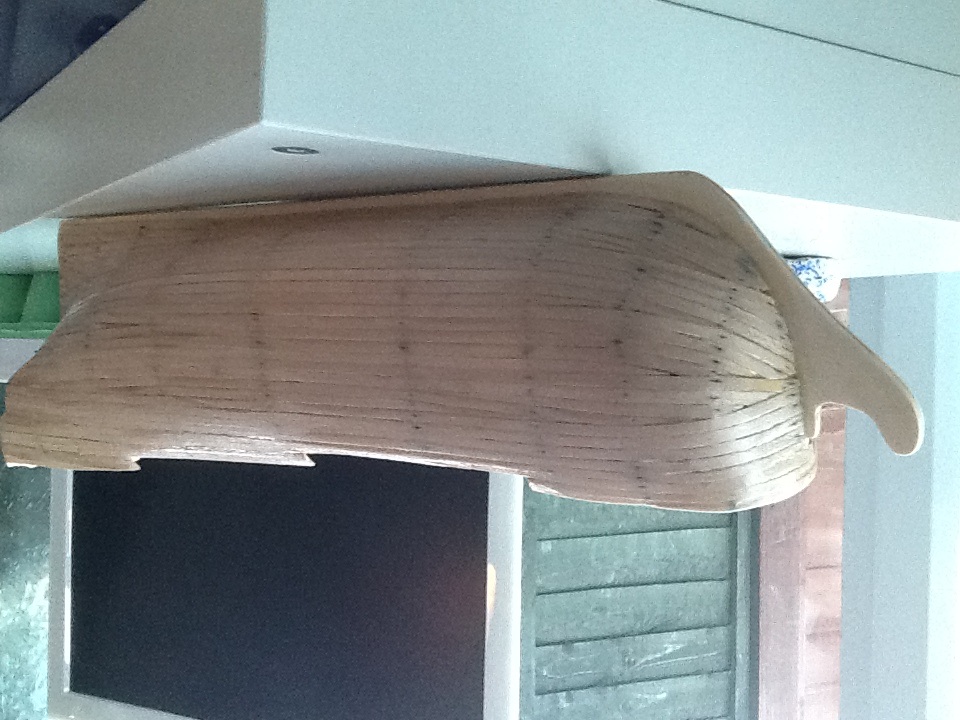
The result was, for a first attempt , pretty reasonable - I think!!

-
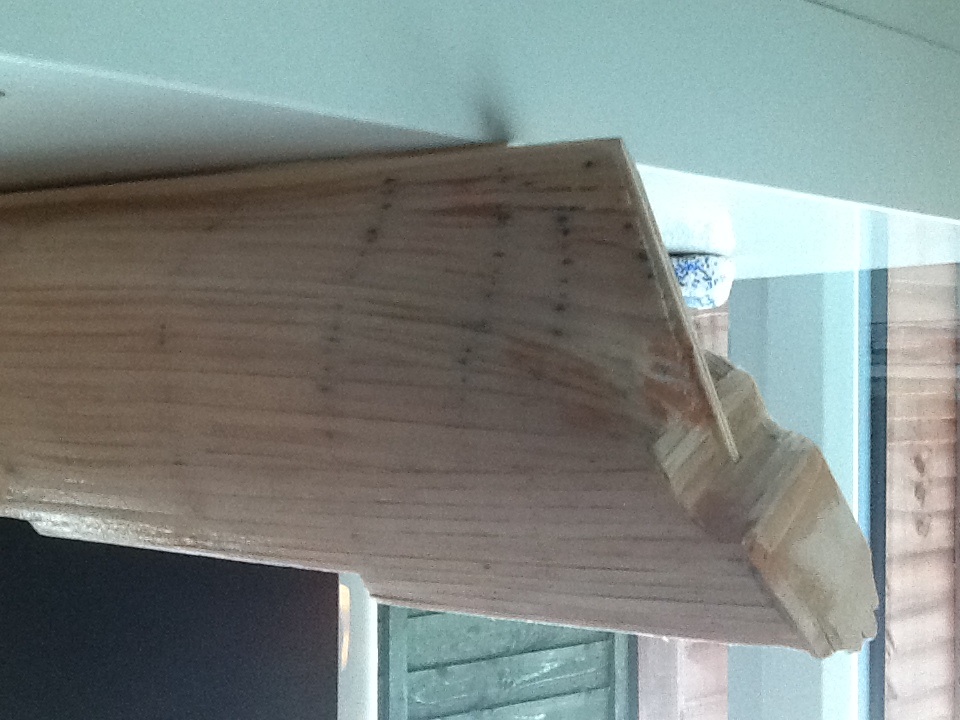
The building of the hull took ages - I couldnt get to grips with the falring edges of the planks and the need to cut in etc. The biggest single challenge was the bow - seen here. I elected to bend the wood in situ - having put it through a bending tool having left it in very hot water for a few minutes to soften - and hold it in place.