


rvchima
-
Posts
651 -
Joined
-
Last visited
Reputation Activity
-

 rvchima reacted to jpalmer1970 in HM Cutter Alert by Thukydides - Vanguard Models - 1:64 - first build
Looking very good. I find a rotary fly tying vice is very handy for this sort of work. It is probably not worth buying one if you don't already have one but luckily for me fly tying is another hobby
-
rvchima reacted to Thukydides in HM Cutter Alert by Thukydides - Vanguard Models - 1:64 - first build
Log #39: Rigging the Guns Part I
I have finally started on rigging the guns. The first thing I have been doing is getting the breaching ropes ready.
The breaching line should be 0.54mm in diameter and 114mm long. I used 0.5mm line from ropes of scale. I had considered shortening the line as per blue ensign’s log, but I decided I would go for an arrangement where I used the full length and lay them similar to the illustration from Goodwin’s Alert book.
Seizing the loop which attaches to the ring bolt was a very fiddle process and I was forced to come up with some creative ways to hold everything steady. I put a set of reverse tweezers (the kind you pinch to open) in my vice and used that to hold things steady while I used a needle and the thread from the kit to do the seizing. To hold everything in place I used ultra matt varnish as it doesn’t leave a shiny residue like super glue.
Here was my first attempt. It leaves a bit to be desired, but the other side turned out much better and I figured I wouldn’t bother to redo.
To attach the breaching rope to the back of the gun simply looped it around and used varnish to secure it while holding it in place with tweezers. Though I suspect that there should be seizing around the top of this, I thought it would be too tangly to do and you wouldn’t really be able to see it very much.
And here is the final result. I will have to use varnish to make the rope lay a bit flatter when I attach it to the ship, but all in all I feel it looks good enough for a first try. I have some ideas about how to do it a bit better next time and ff after I finish all the rest of them I feel that this one does not hold up well enough I can go back and redo it at that point.
-
 rvchima got a reaction from mtaylor in HMS Sphinx 1775 by rvchima - FINISHED - Vanguard Models - 1:64 - 20 Gun Sixth Rate Frigate
Eclipse
We had a solar eclipse today, 87 percent coverage where I live but only briefly visible through the clouds. I managed to get one decent photo with my old Celestron 90mm spotting scope with a solar filter and an iPhone holder.
-
 rvchima got a reaction from mugje in HMS Sphinx 1775 by rvchima - FINISHED - Vanguard Models - 1:64 - 20 Gun Sixth Rate Frigate
Eclipse
We had a solar eclipse today, 87 percent coverage where I live but only briefly visible through the clouds. I managed to get one decent photo with my old Celestron 90mm spotting scope with a solar filter and an iPhone holder.
-
 rvchima got a reaction from DonSangria in HMS Sphinx 1775 by rvchima - FINISHED - Vanguard Models - 1:64 - 20 Gun Sixth Rate Frigate
Eclipse
We had a solar eclipse today, 87 percent coverage where I live but only briefly visible through the clouds. I managed to get one decent photo with my old Celestron 90mm spotting scope with a solar filter and an iPhone holder.
-
 rvchima got a reaction from DavidG in HMS Sphinx 1775 by rvchima - FINISHED - Vanguard Models - 1:64 - 20 Gun Sixth Rate Frigate
Eclipse
We had a solar eclipse today, 87 percent coverage where I live but only briefly visible through the clouds. I managed to get one decent photo with my old Celestron 90mm spotting scope with a solar filter and an iPhone holder.
-
 rvchima reacted to wvdhee in HMS Sphinx 1775 by rvchima - FINISHED - Vanguard Models - 1:64 - 20 Gun Sixth Rate Frigate
You know what my opinion is 😉
-
 rvchima got a reaction from Scottish Guy in HMS Sphinx 1775 by rvchima - FINISHED - Vanguard Models - 1:64 - 20 Gun Sixth Rate Frigate
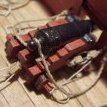
Cannons
In my last post I wrote how much I was enjoying this build but I'm not looking forward to this next part. At least she's not a first rate.
-
rvchima got a reaction from mtaylor in HMS Sphinx 1775 by rvchima - FINISHED - Vanguard Models - 1:64 - 20 Gun Sixth Rate Frigate
Cannons
In my last post I wrote how much I was enjoying this build but I'm not looking forward to this next part. At least she's not a first rate.
-
 rvchima got a reaction from Thukydides in HMS Sphinx 1775 by rvchima - FINISHED - Vanguard Models - 1:64 - 20 Gun Sixth Rate Frigate
Cannons
In my last post I wrote how much I was enjoying this build but I'm not looking forward to this next part. At least she's not a first rate.
-
rvchima reacted to Tomculb in Endurance by Tomculb - OcCre - 1:70
OcCre supplies at least a couple dozen tiny photo etched pieces to make Endurance’s ladders. I detached a few of those pieces and tried working with them, then like @theoracle09 decided I would make my own ladders out of wood. Over 40 steps had to be cut, but that was easy, much easier than cutting them out of the brass plate they came in and then filing down the attachment tabs. I also decided to make my steps (or treads) about 30% shorter, making the assembled piece narrower and looking more like a ladder than a staircase.
The photo below shows the jig I made from pieces of scrap I had lying around. Although it can't be seen in the photo, the slide in the middle is sloped at the front, so that the individual steps will be glued in place at the correct angle.
The first ladders I made were the short ones at the stern. Once glued together and I pulled the first one out of the jig, I realized that I hadn’t slid one of the rails all the way forward in the jig, resulting in rails that were misaligned by about a millimeter. But I also saw that the plans I so often refer to, and the cutaway drawing I have posted previously, show only one ladder back there, just to the starboard of the companionway. It was my good fortune to make my big mistake on a ladder I wouldn’t need!
OcCre’s rails are parallelograms, meaning that the top of the ladder meets the wall it rests against at a sharp point. I cut the top of each rail so that that juncture was a short flat surface. I then rounded the opposite point at the top, all with a goal of making the tops of these ladders look a bit more realistic. Somewhat difficult to describe, but should be evident from the one close-up photo below. The ladders to the roof of the deck house are not glued in place yet since the deck house isn’t glued in place yet.
-
rvchima reacted to wvdhee in HMS Flirt by wvdhee - FINISHED - Vanguard Models - 1:64
Shrouds and ratlines done. It took me a few attempts to get the ratlines right and to get into the groove of hitches and cloves 😉 But once I knew how it went rather quickly. I feared the ratlines tbh, but bring on that big 3 master 😃
It's not perfect imo, so I really need another ship to improve...
I started rigging the bowsprit. Once that's done I'll allow myself a little woodworking interlude, still haven't done the yards and all, it'll be good to do something else than rigging.
-
rvchima reacted to Thukydides in HM Cutter Trial 1790 by BrochBoating - Vanguard Models - 1:64
Just as a note though my gun tackle process was fine, I would not recommend following my method for the breeching ropes. I realized after I was done that it would have been much easier to rig the breaching ropes not on the cannons themselves. So don't attach the ring bolts to the carriages, just slip them on the breeching ropes while rigging them and then glue them on the carriages after the fact. That way you can easily do the seizing to the bulwark ring bolts and make sure they are all the same length. I did not do this and regretted it. You could make a jig to do this, see the below drawing illustrating what I mean.
-
rvchima reacted to BrochBoating in HM Cutter Trial 1790 by BrochBoating - Vanguard Models - 1:64
I think that's the deck nearly done! Just anchors to do before it's time for masts and rigging. Gulp.
Will have to scope round and see how everyone has done rigging the cannon to the deck. Need to get more eyelets.
-
rvchima got a reaction from mugje in HMS Sphinx 1775 by rvchima - FINISHED - Vanguard Models - 1:64 - 20 Gun Sixth Rate Frigate
Cannons
In my last post I wrote how much I was enjoying this build but I'm not looking forward to this next part. At least she's not a first rate.
-
.jpg.d84ec4dad1d7791e855dca06210ab6f3.thumb.jpg.f45209242e851d4409eca1a09293165b.jpg) rvchima got a reaction from hollowneck in HMS Sphinx 1775 by rvchima - FINISHED - Vanguard Models - 1:64 - 20 Gun Sixth Rate Frigate
rvchima got a reaction from hollowneck in HMS Sphinx 1775 by rvchima - FINISHED - Vanguard Models - 1:64 - 20 Gun Sixth Rate Frigate
Chain Pumps, Hand Pumps, Grates and Finally the Stove
This part of the build is quite enjoyable. Each little component adds something interesting to the model. I built the stove almost two months ago and finally got to install it, and to jump ahead three pages in the manual past those instructions.
-
rvchima got a reaction from Scottish Guy in HMS Sphinx 1775 by rvchima - FINISHED - Vanguard Models - 1:64 - 20 Gun Sixth Rate Frigate
Thank you Thukydides. The patina is more intense than I ever imagined but I like it. I was hoping for a visually striking model (even if not quite historically accurate) and it is certainly turning out that way.
By the way, do you have another name besides Thukydides?
Two Ladders - Never to Be Seen Again
Chain Pumps and Supports
-
rvchima got a reaction from Scottish Guy in HMS Sphinx 1775 by rvchima - FINISHED - Vanguard Models - 1:64 - 20 Gun Sixth Rate Frigate
4 Hatch Coamings and 88 Cannon Balls
I figured it would be easier to place the cannon balls before the coamings were installed.
-
rvchima got a reaction from Scottish Guy in HMS Sphinx 1775 by rvchima - FINISHED - Vanguard Models - 1:64 - 20 Gun Sixth Rate Frigate
Outside of the Hull (Finally) Complete
The rudder, displacement numerals, and random reinforcing plates are now attached.
The rudder was hard because of about 120 nails holding the gudgeons and pintles. Those parts are non-functional - the rudder is actually held in place by 5 PE pins. A while ago I mentioned that my rudder wouldn't fit past the rudder post so I removed 1/4" at the top. Now the top pin has nowhere to attach. And with the pins the rudder was now a few mm wider and wouldn't tip in place. I had to use my trusty rotary tool to enlarge the hole in the hull, which is what I should have done in the first place.
I glued the displacement numerals with CA. The plans showed the starboard side so I did that first using a cutout copy of the plans for placement. For the port side I made a mirror image of the pattern with Photoshop and started gluing. After a while I realized that Roman numerals look the same forwards and backwards, but XI is not the same as IX. So I had to remove and reverse a few numerals. That removed the patina, which turns out to be fairly delicate. I touched it up with random green and black acrylic.
When I attached the copper plates I covered up the holes for the horseshoe and keel plates. I laid the paper cutouts in place, poked a pin through a marked hole, and hit the corresponding hole through the copper on the first try. Amazing!
-

 rvchima got a reaction from PvG Aussie in HMS Sphinx 1775 by rvchima - FINISHED - Vanguard Models - 1:64 - 20 Gun Sixth Rate Frigate
Now the Copper is Green!
I experimented with high-test vinegar and ammonia, salt and Miracle grow, cleaning the foil with alcohol and, lacquer thinner. (I did not try peeing on my ship.) Nothing had much of an effect until I tried the Novacan black patina that I use for stained glass and to darken the photo etched parts. It made the foil look like a tarnished penny, dark brown, almost black. I wanted green so I took a chance on a large bottle of Jax Green patina from Amazon. It didn't do much by itself and it tended to rub off. But over top of the Novacan black - wow! The patina seemed durable but I air-brushed several coats of acrylic floor wax over it just in case.
Here is a photo of all the samples I tried. No point in identifying the losers, but the Novacan + Jax + acrylic is at bottom right.
Here's a shot of the chemicals.
Novacan black starts to darken immediately and unevenly, but I brushed it continuously with a stiff 1" paint brush until it evened out (15-20 minutes per side.) I rinsed the hull with a sponge and water.
Jax green patina paints on like water, one wet coat, and turns green as it dries. I let it dry overnight.
Halloway Quick Shine is an acrylic floor wax that plastic modelers use for a clear coat. I masked above the water line and applied three light coats with an a air brush.
I doubt if I used more than 1/2 ounce of anything.
Before
After
There were gaps between the stamped plates on the copper tape that I neglected to remove towards the bottom of the hull. They are pretty well camouflaged now.
The green patina is not at all what I was planning on - it's even better.
I built the cabin walls while I was waiting for chemistry experiments to react.
Now to attach the rudder.
-
 rvchima got a reaction from KARAVOKIRIS in HMS Sphinx 1775 by rvchima - FINISHED - Vanguard Models - 1:64 - 20 Gun Sixth Rate Frigate
Chains are Done, on to the Interior - Temporarily
One of the first tasks on the interior is to place 6 eye bolts around each gun port, 120 in all. As Walter says,
My curved hemostat was perfect for inserting the tiny eye bolts.
Four more bolts with tiny rings go in the floor, and a wooden ring surrounds the mizzen mast. I was getting excited about working on the cabins, but today my extra copper foil finally arrived from China. So back to the hull and rudder.
-
rvchima got a reaction from KARAVOKIRIS in HMS Sphinx 1775 by rvchima - FINISHED - Vanguard Models - 1:64 - 20 Gun Sixth Rate Frigate
Chain Gang
The chains comprise a zillion PE parts that have to be darkened somehow. The manual suggests paint but I blackened the entire sheet using Novacan Black Patina for Solder. One of my other hobbies is stained glass and I use this product to darken the solder. I set the PE sheet in a plastic tray, brushed on a little patina liquid, rinsed, patted dry, and sprayed with Lemon Pledge. The blakening can rub off here and there, but not back to shiny brass so it leaves a rustic appearance. The bit where the parts attached to the sheet can be touched up with a black marker.
The rings for the deadeyes must be expanded quite a bit for the deadeyes to fit. I butchered a few trying to open them with pliers, but found another way. I drilled holes in a scrap of wood slightly larger than the ID of the rings. 13/64" works well for the large deadeyes, 11/64" for the small. I placed the ring over the hole, and used a center punch to open the ring symmetrically. One tap with a small hammer and the deadeyes open right up. Drop the deadeye in, then use needle nosed pliers to tighten the rings back up.
UPDATE - I've found that I don't need the drilled wood at all. I can push the rings over the center punch by hand easily.
10 chains done, 42 more or less to go.
-
 rvchima got a reaction from Erdict in HMS Sphinx 1775 by rvchima - FINISHED - Vanguard Models - 1:64 - 20 Gun Sixth Rate Frigate
External Filigree Complete, 189 Hours, 87 days
All the external photo-etched filigree took up most of a sheet of PE, so I masked off what wasn't supposed to be gold and painted the rest in place. That was the only way to keep track of everything. Sorry about the blurry image.
The manual recommends attaching the parts with Pledge Future acrylic floor wax. Paint the area first, let it dry, put the filigree in place, then run more polish underneath to hold the part in place. Future is no longer available but the plastic modeling sites recommend Holloway Quick Shine. I got some and tried it on the first piece. It worked, but it was hard to hold the piece in place and the polish left shiny brush marks everywhere. So that didn't work well for me. Does anyone want a quart of floor polish?
I ended up cutting the filigree into manageable sections, holding each piece with my double-sided tape sticks (see previous post,) and using a glue looper to wet the back with thin CA. Then I held the piece in place for a few seconds and it was done. In a few places on the starboard side my gun ports were too close to the upper rails and I had to omit some filigree. It took about 10 hours to do all the filigree.
-
rvchima got a reaction from KARAVOKIRIS in HMS Sphinx 1775 by rvchima - FINISHED - Vanguard Models - 1:64 - 20 Gun Sixth Rate Frigate
Channels, Knees, and Bow Trim
The channels are all attached with multiple brass pins. The laser markings show exactly where to put those pins. There are 26 knees to cut, sand, and paint, so it all took awhile.
Fore channels. The stove is temporary for now.
Main channels
Mizzen channels
I put some blue on the bow and added the bow grating and some trim. I have a little more work to do up front, then on to the stern.
-
rvchima got a reaction from KARAVOKIRIS in HMS Sphinx 1775 by rvchima - FINISHED - Vanguard Models - 1:64 - 20 Gun Sixth Rate Frigate
Minor Problem with the Rudder
After assembling the rudder I realized that the top with the tiller would not fit into the hole in the hull. The manual shows the top of the rudder post ending a bit lower, at the juncture between the planking and stern piece, so I cut about 1/4" off of the rudder post and everything fits now. I don't know why the rudder post was too high - everything else fit together perfectly.
I ran out of copper foil and had to order more from China, so it will be 3 weeks before I can complete the rudder.