


RMC
-
Posts
933 -
Joined
-
Last visited
Content Type
Profiles
Forums
Gallery
Events
Posts posted by RMC
-
-
Thanks Alistair. I just went to the website - -it looks the goods. I'll order as soon as I finish this.
Bob
-
Alistair and Jason: using a Letraset had not occurred to me. In fact I hadn't heard of one since I left school - a very long time ago. It seems both more forgiving and probably more authentic. I have no idea where to get such a thing, but I guess the internet will solve that problem. I'll give it a go - at least if it doesn't come out, I still have the letters supplied in the kit. By the way, what fonts do you thing would be appropriate? I will try to get an idea if I can find a photo of the Victory's stern.
Len: thanks for your kind comment. Regarding your suggestion about spacing etc - while awake at 3 o'clock in the morning, I had come to similar solution.
Regards to all
Bob
-
Thanks very much to you all. I will experiment now to find which suits best for my application. I have been worried about this as a mistake - even a small one -would be really obvious. I now have something to go on.
Kind regards
Bob (RMC)
-
Thank you both for your replies. It has given me an idea that I will play with over the next day or two. I will get back to you.
In the meantime, if anyone else has suggestions, I would be grateful.
RMC
-
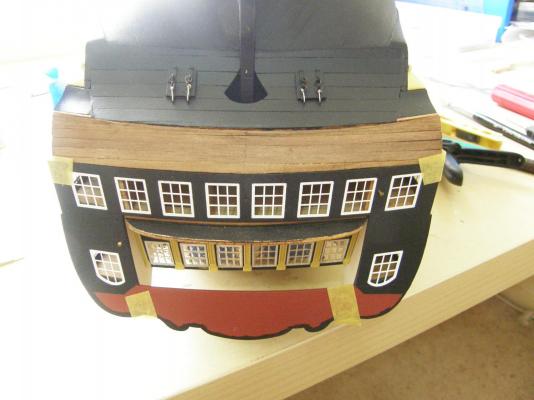
I will soon be putting on the name of the ship (VANGUARD) on the stern of my model. I am concerned to get the correct spacing of the letters and the correct curvature of the name.
Can anyone help please?
RMC
-
I have just lost a whole bunch of stuff - which is really annoying.
It turns out the 2X clear matte cannot be taken in passenger baggage, so my friend will post it when he gets back to the US .... in 3weeks. The copper problem seems to have gone away however. After 3 weeks or so it shows very slight 'normal' weathering.
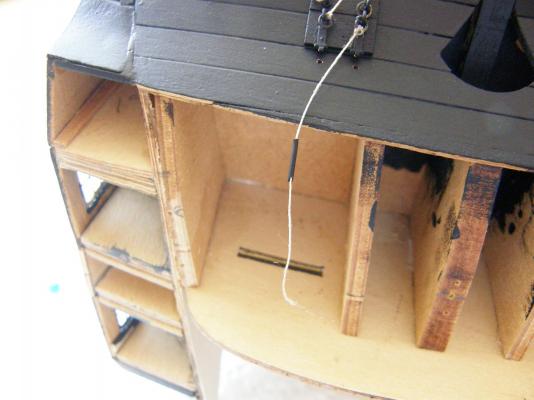
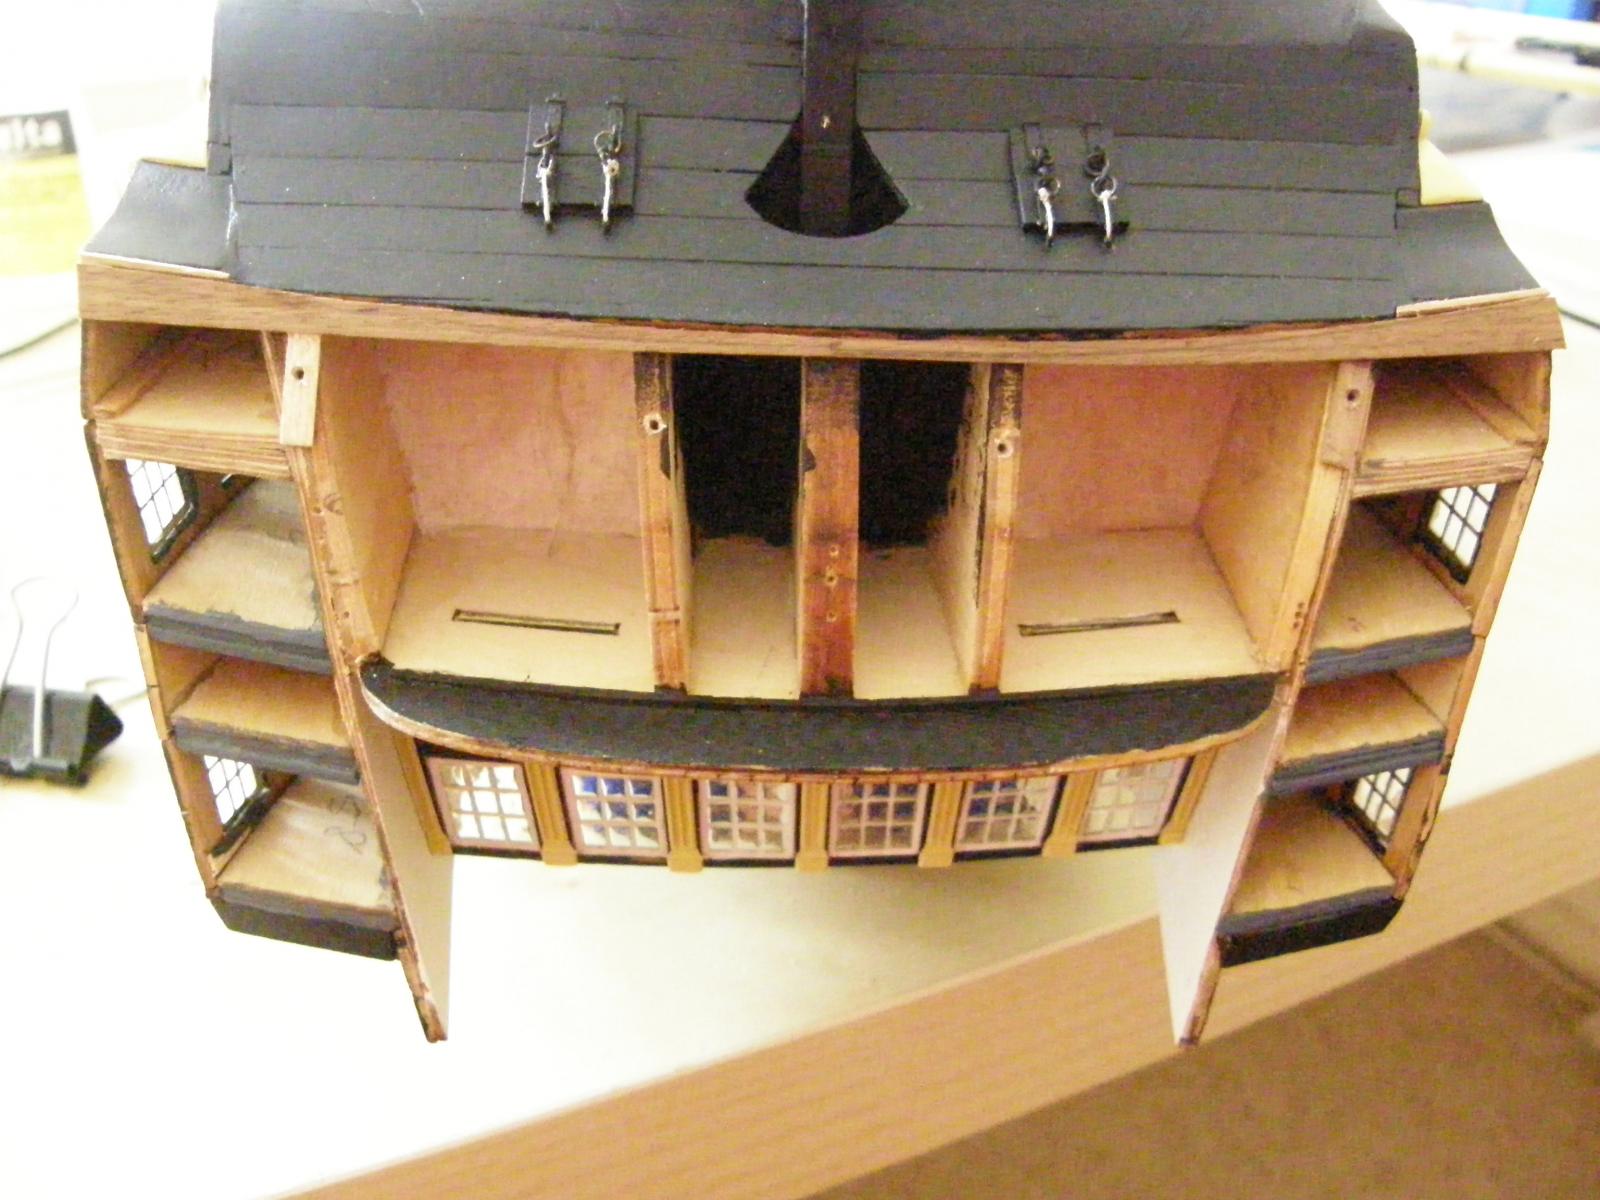
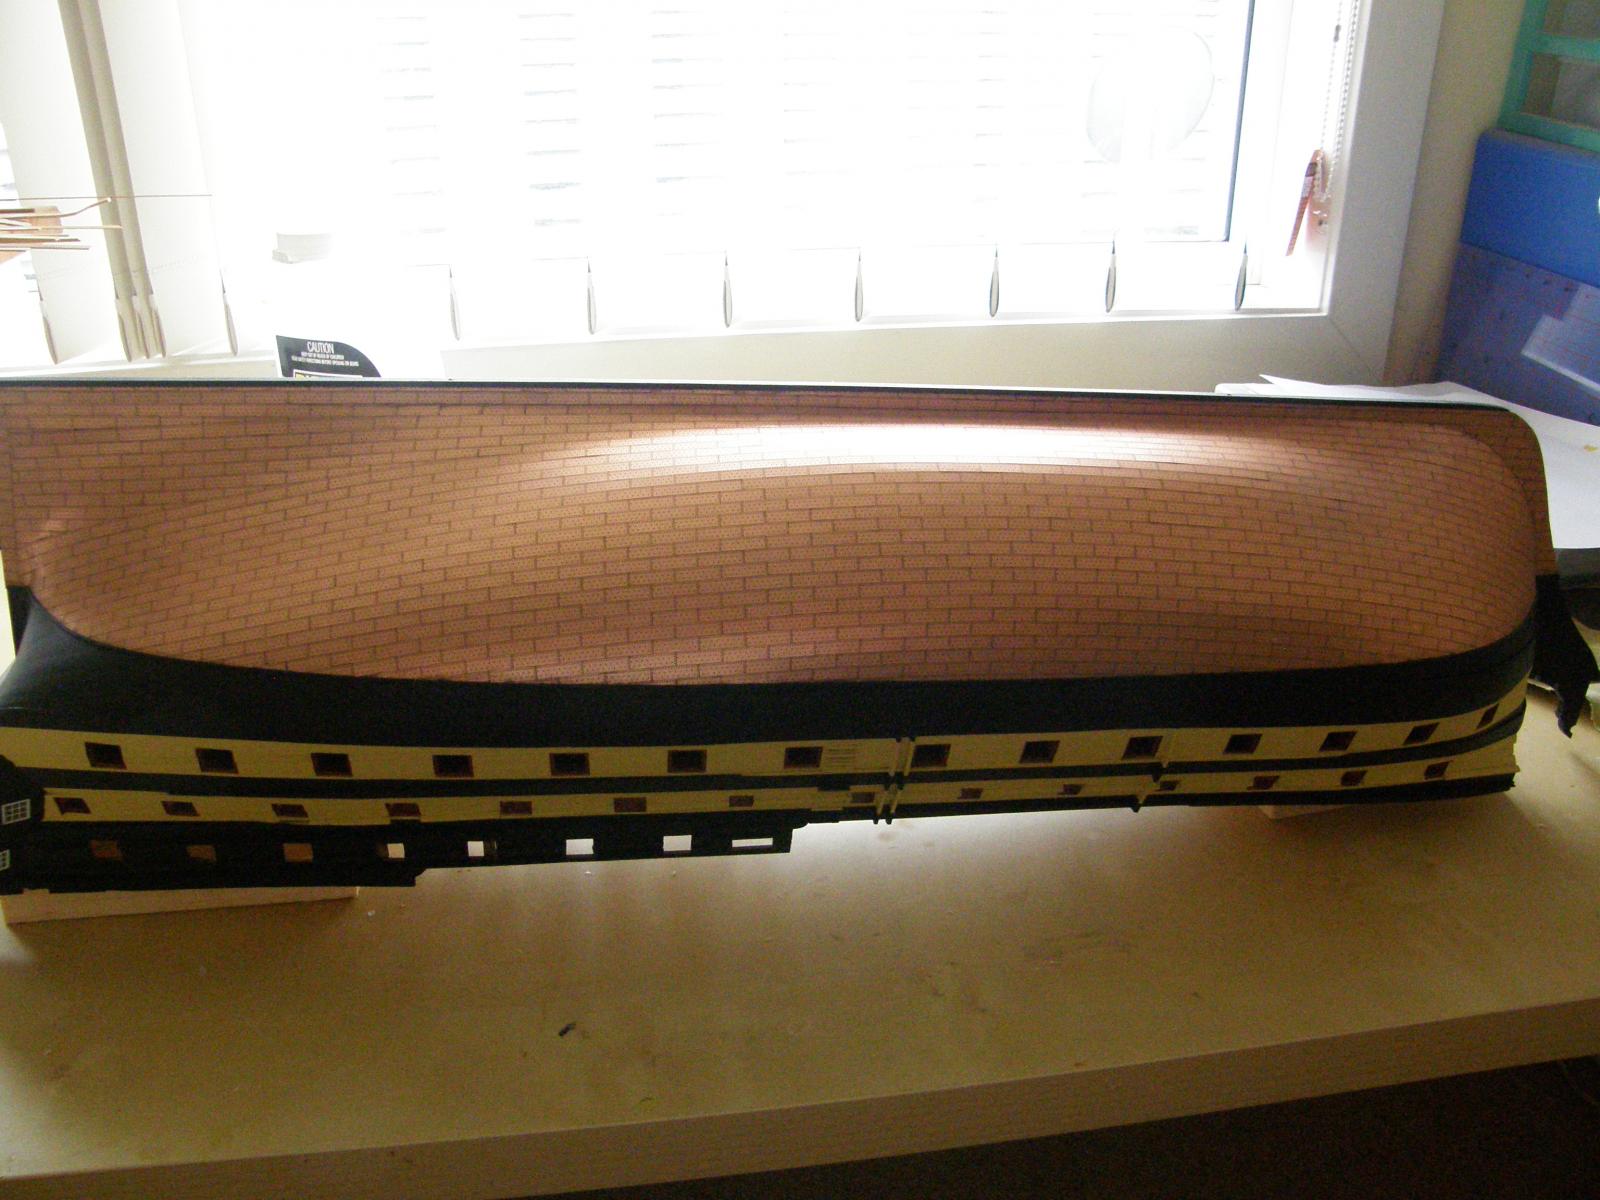
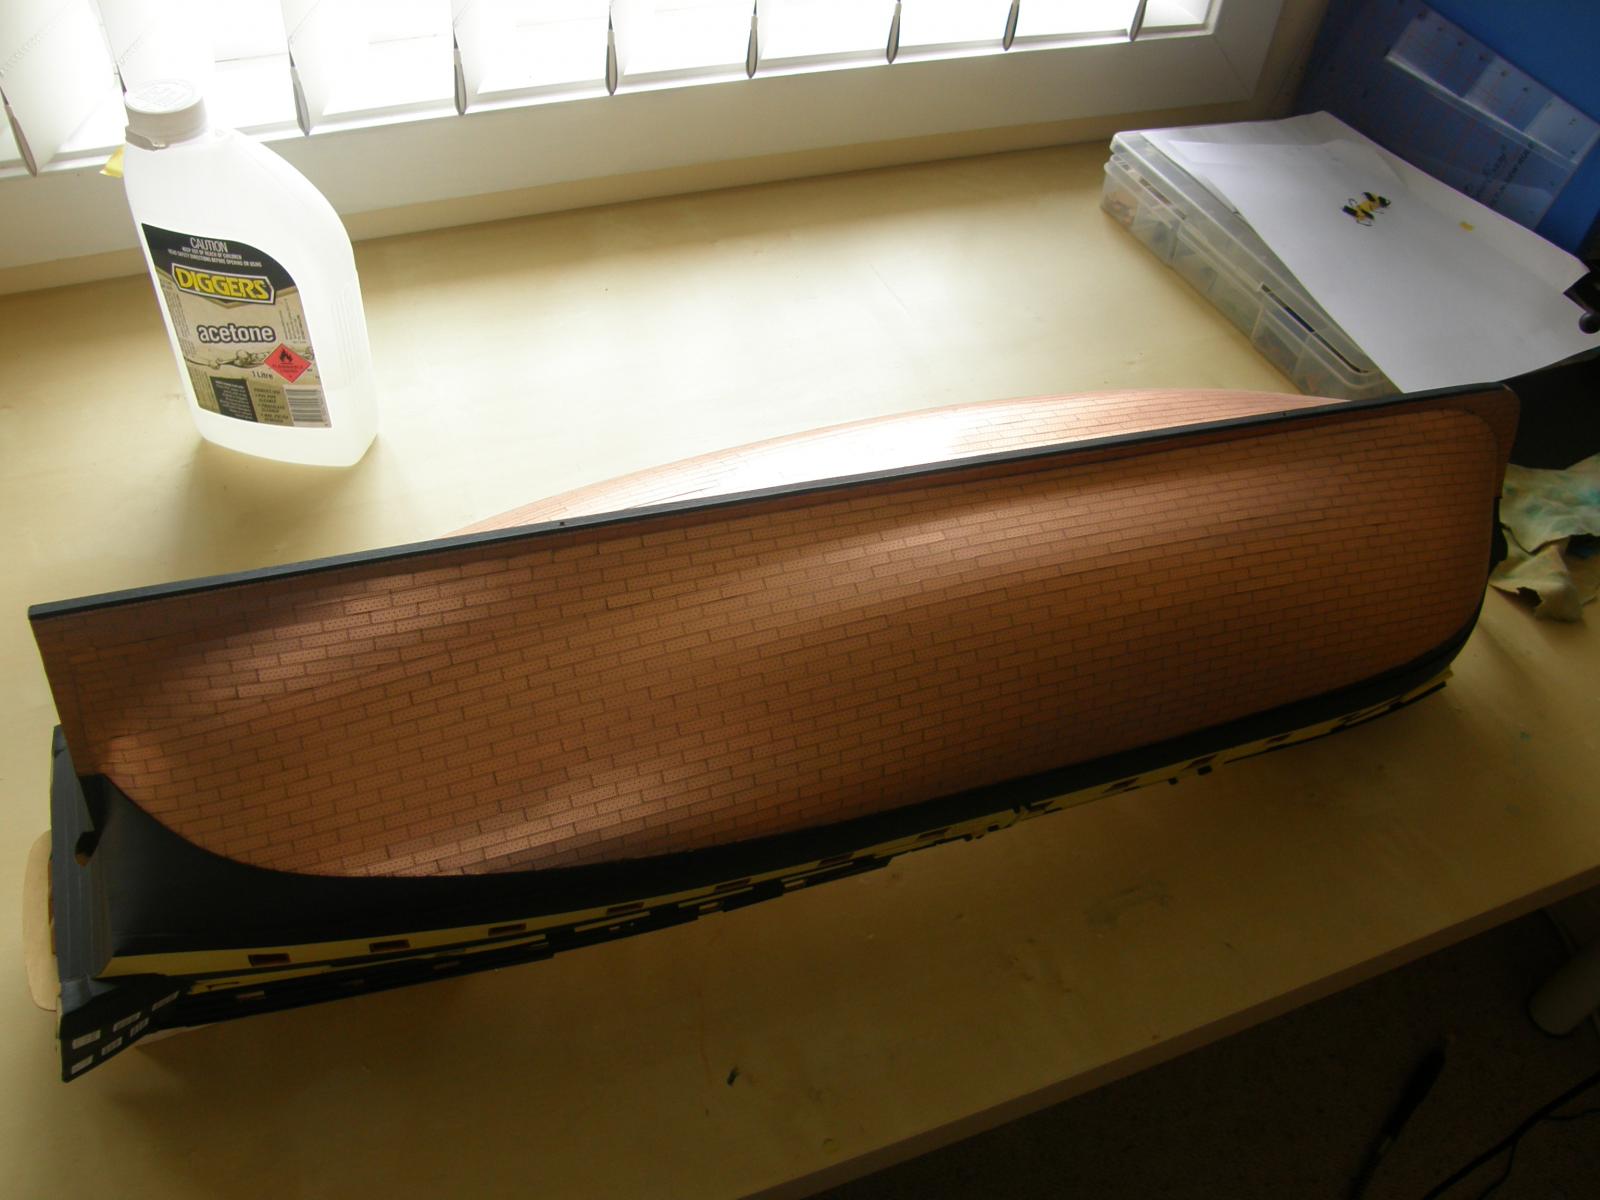
In the meantime I will work on the stern. It seems best to do it while the model is upside down anyway.
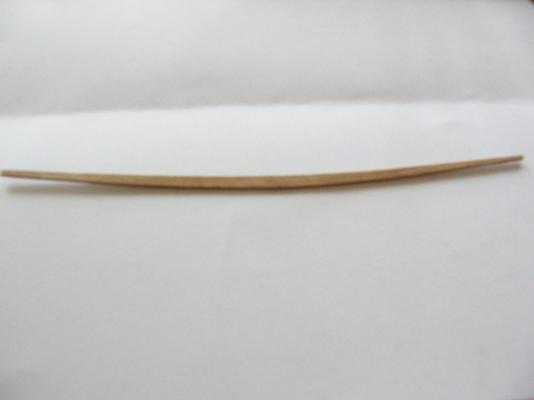
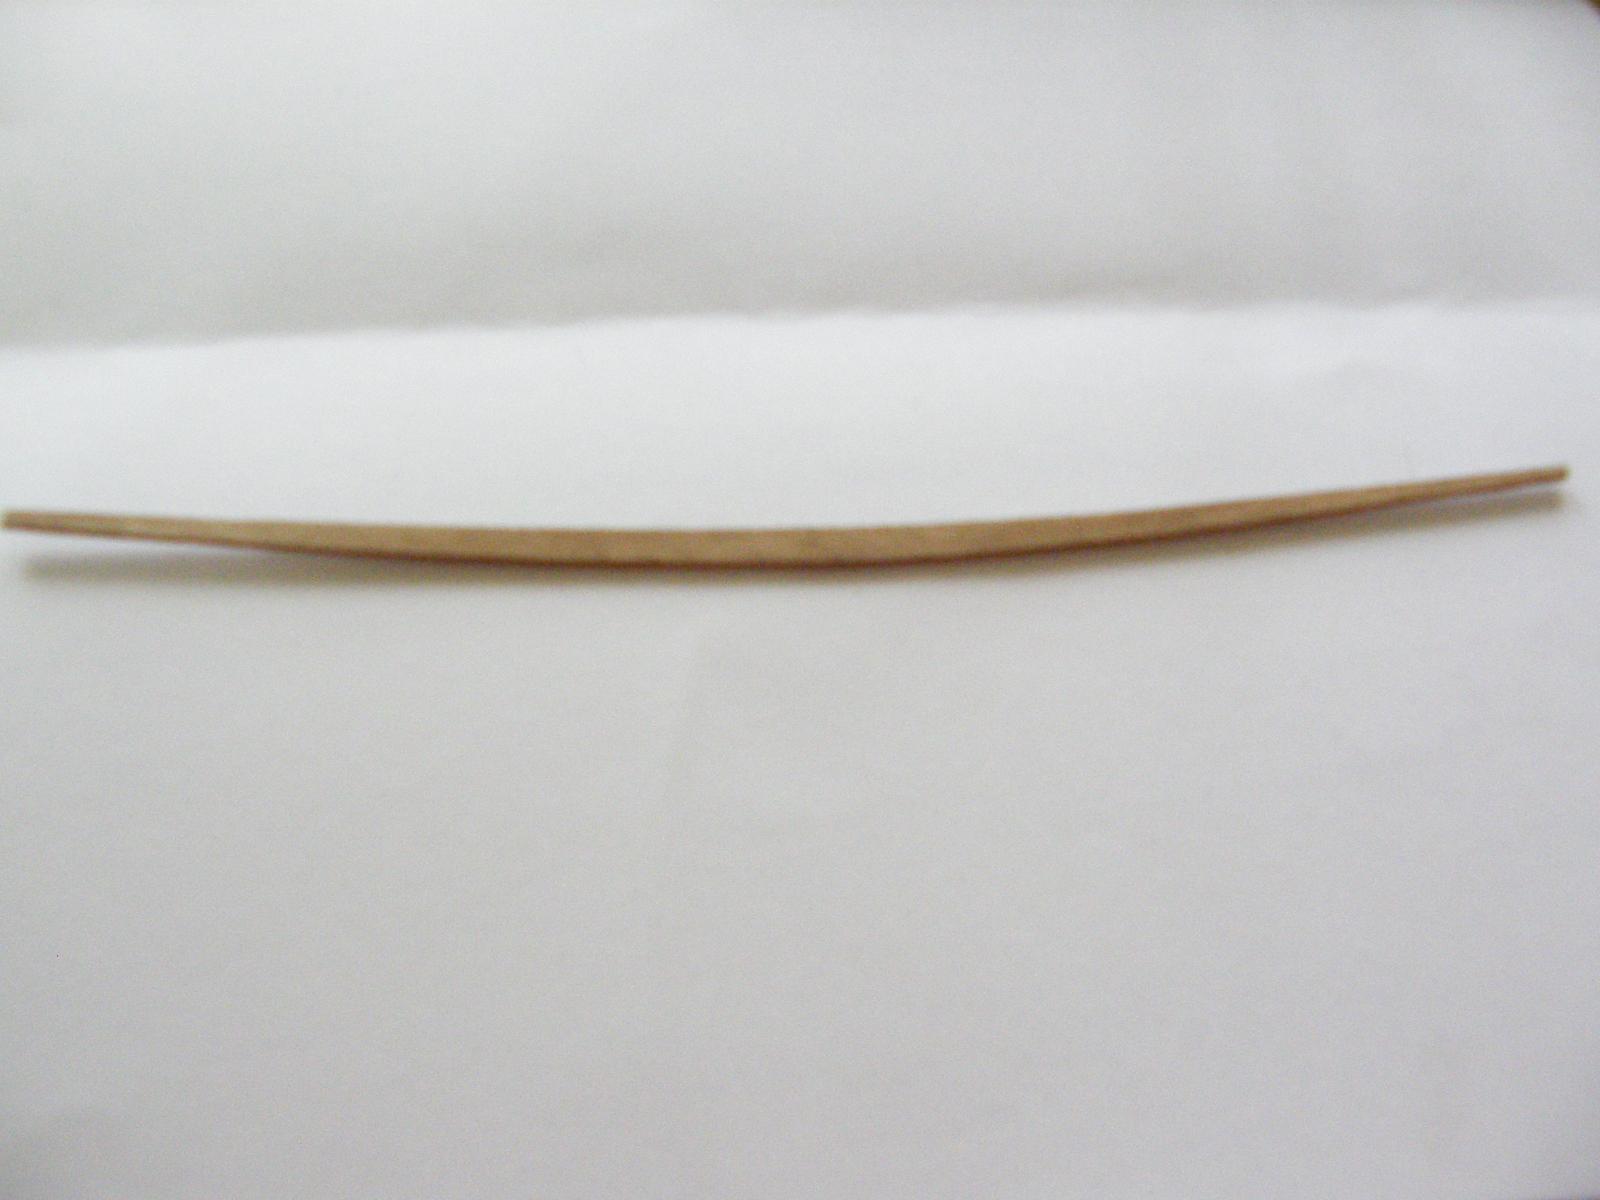
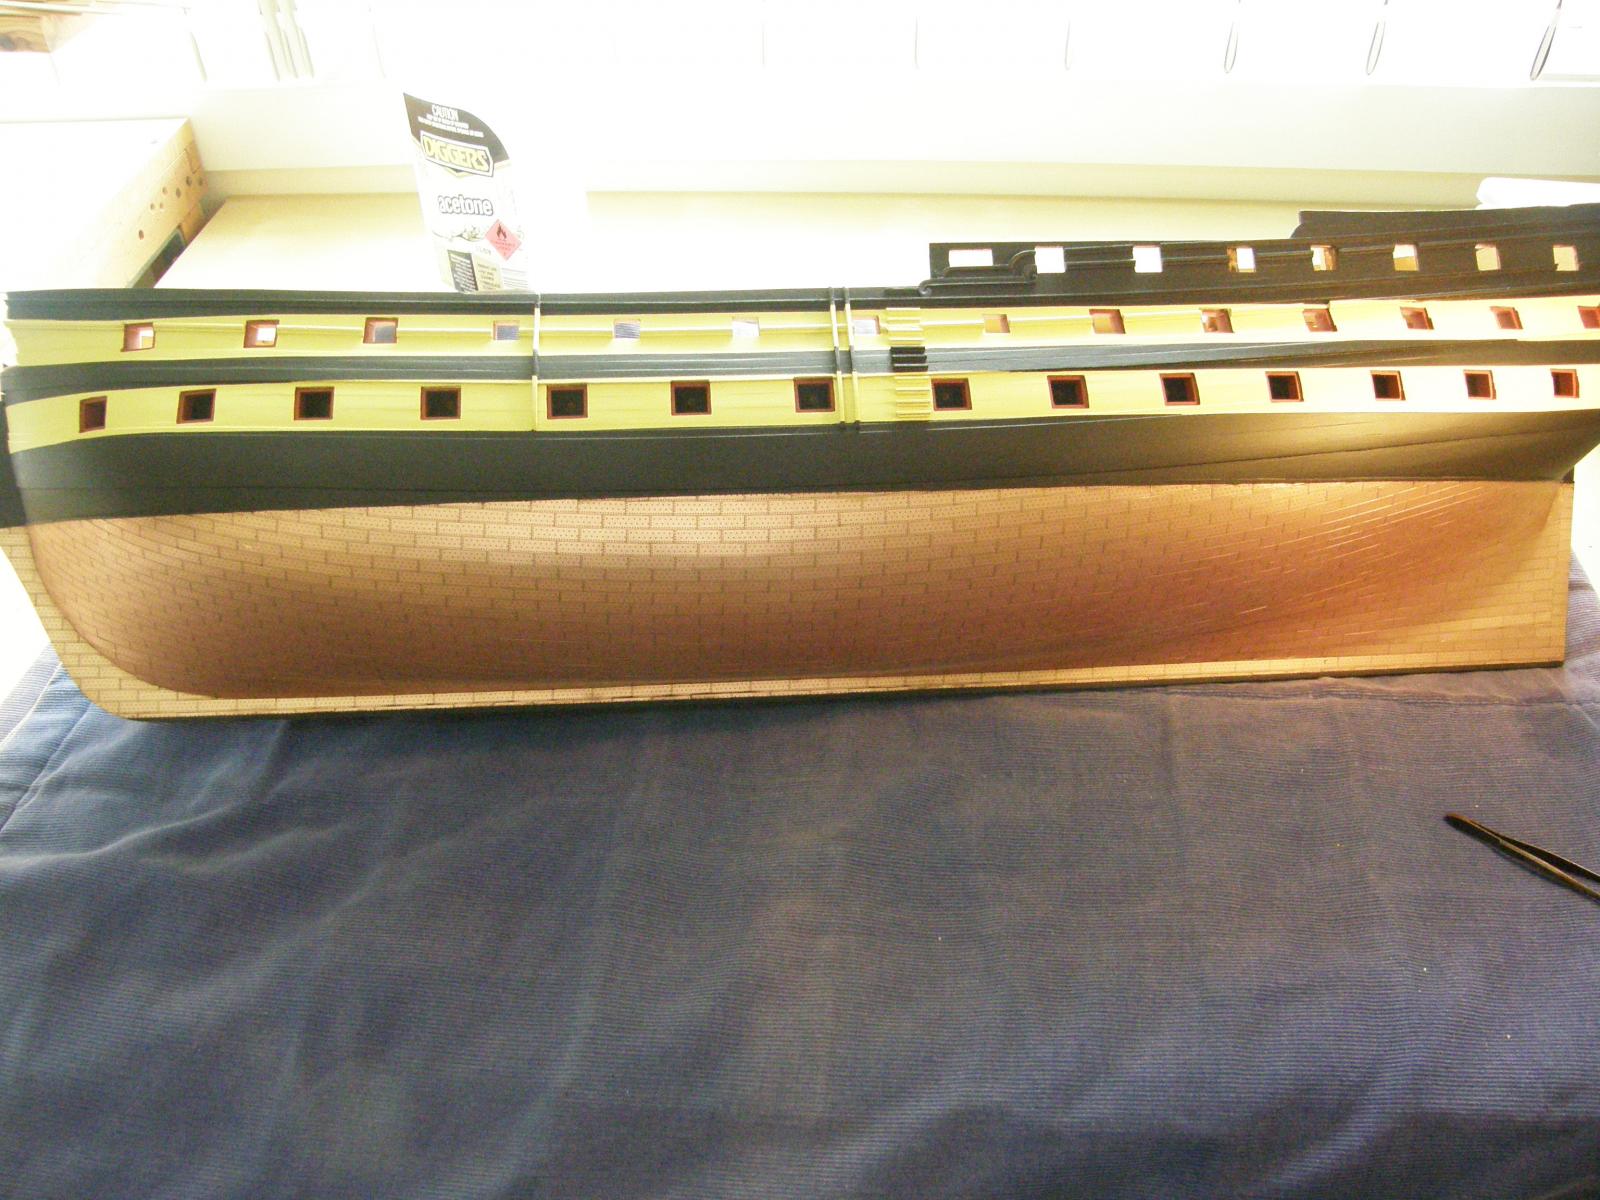
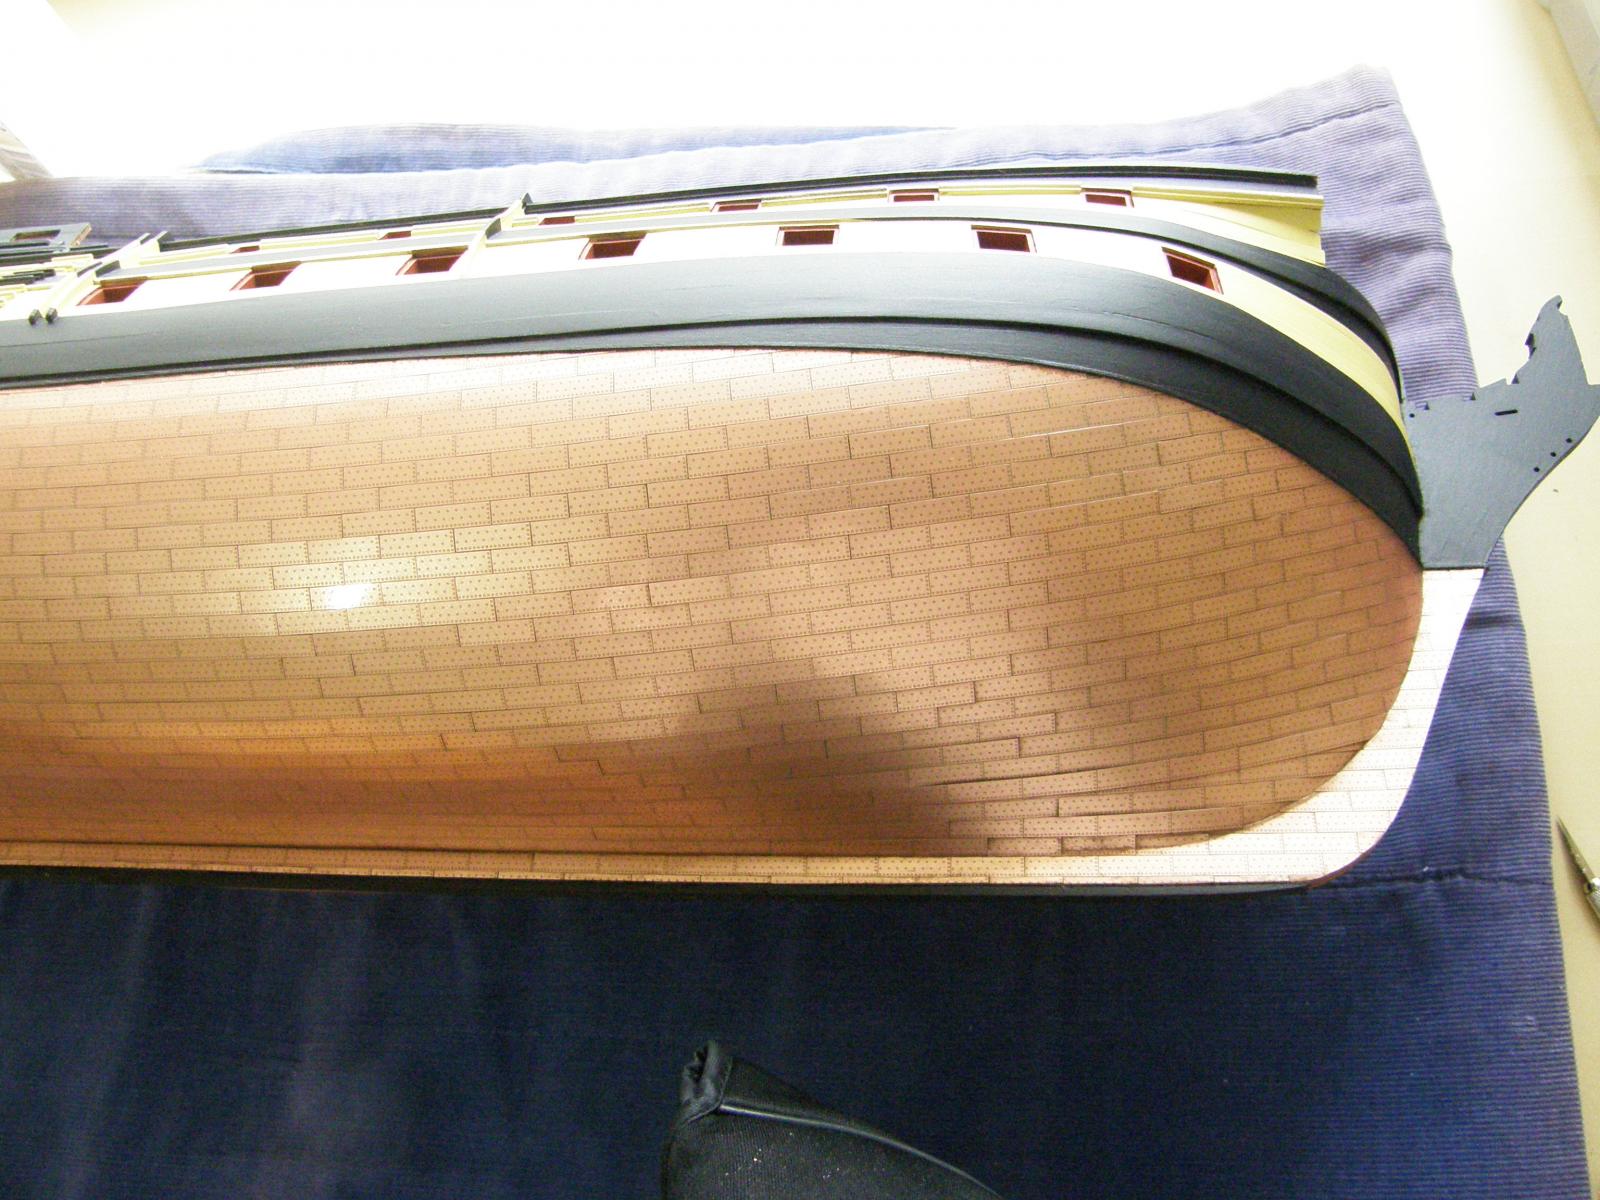
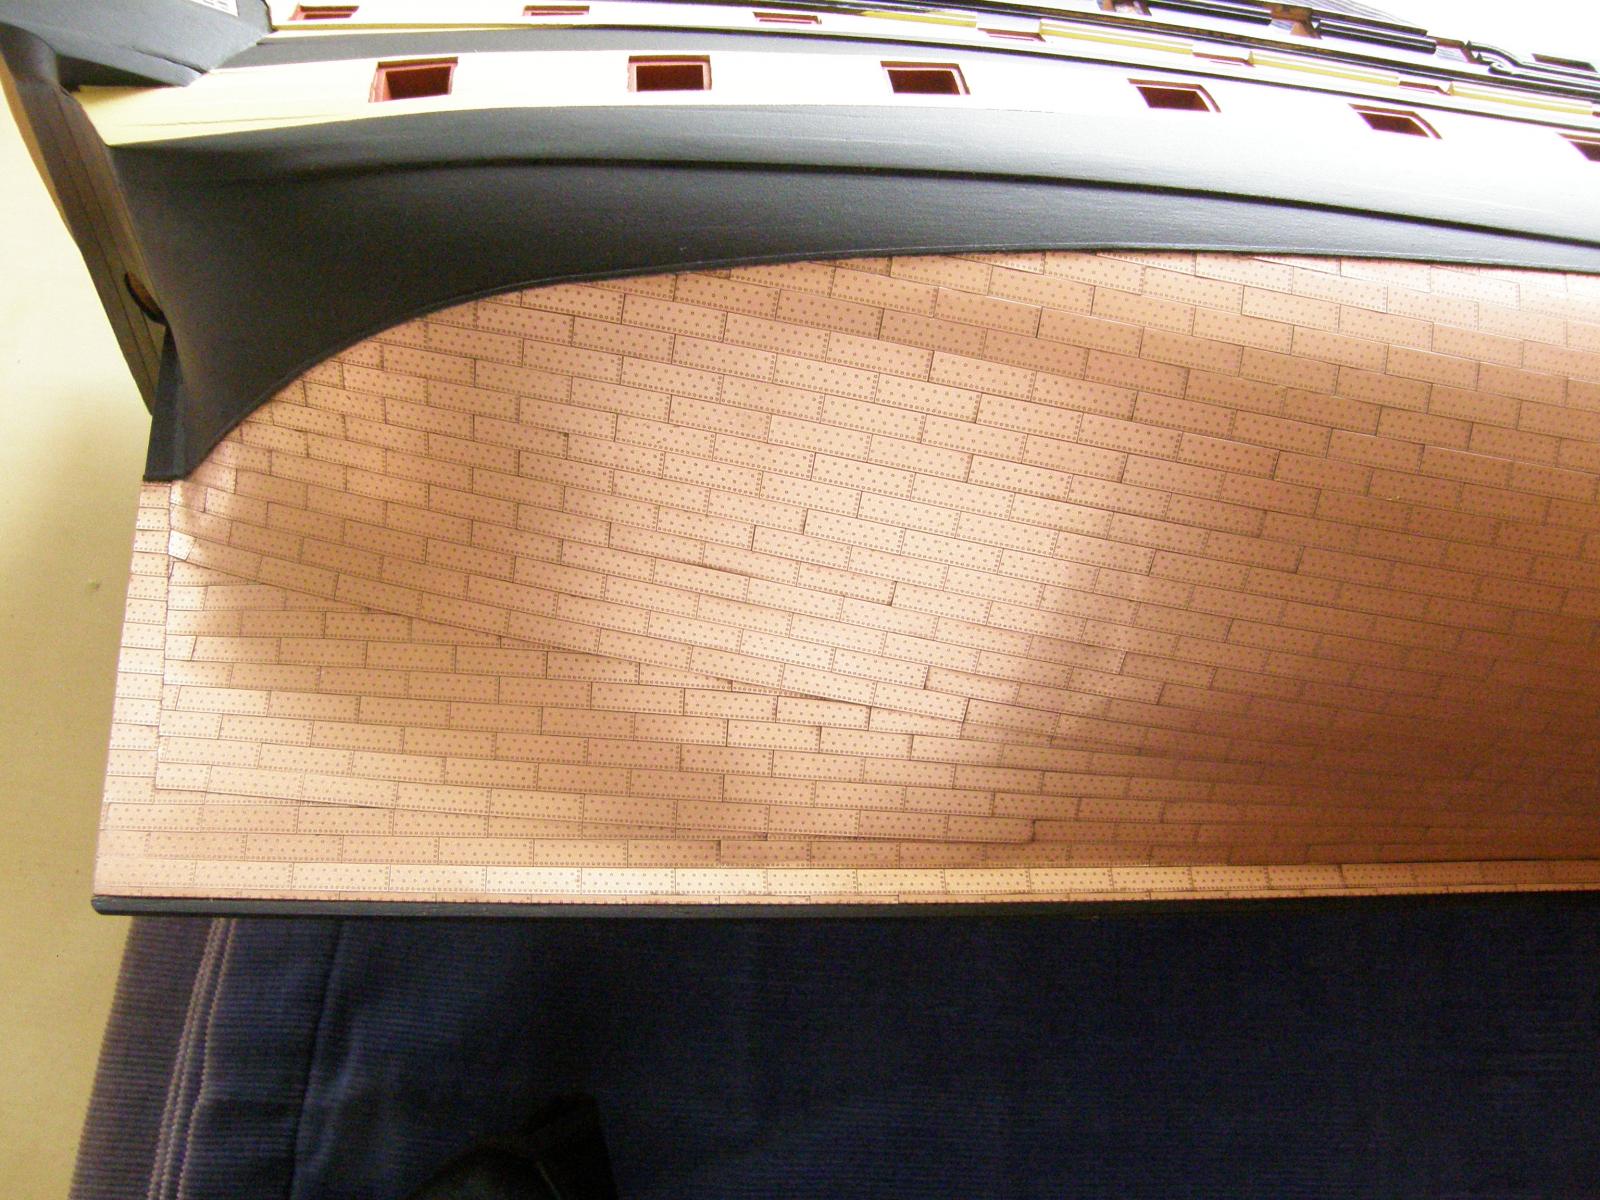
I found that the stern facia did no quite fit the curve of the platform above it. I fitted a piece of 1x1mm strip to fill the gap and filed it to shape - later another was added to make the facia slightly lower so that the top windows would not be obscured.
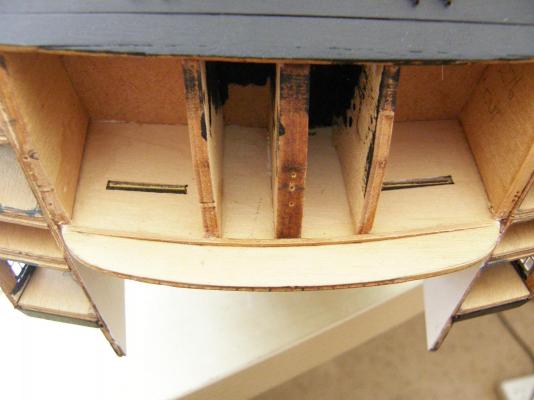
I found the 3mm strip would not easily bend to the degree required. A 5mm strip was shaped to accommodate the bend and allow a lesser bend for the 3mm strip.
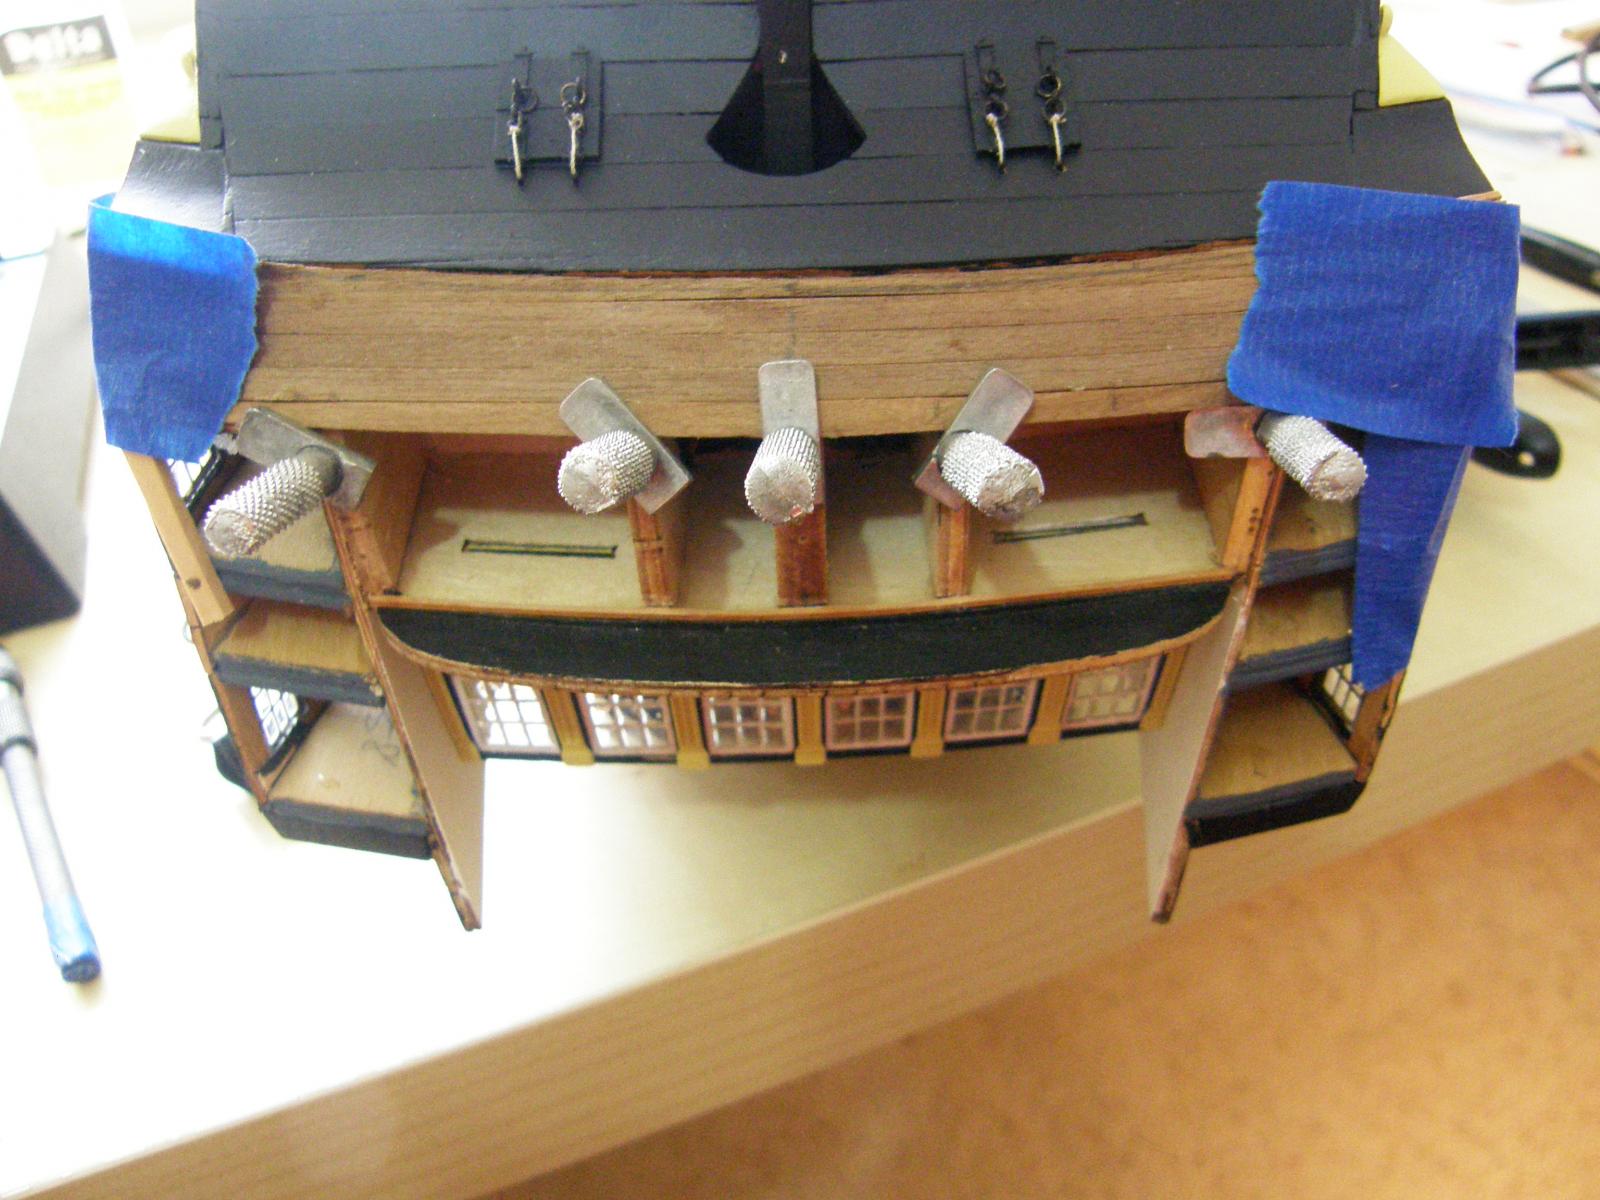
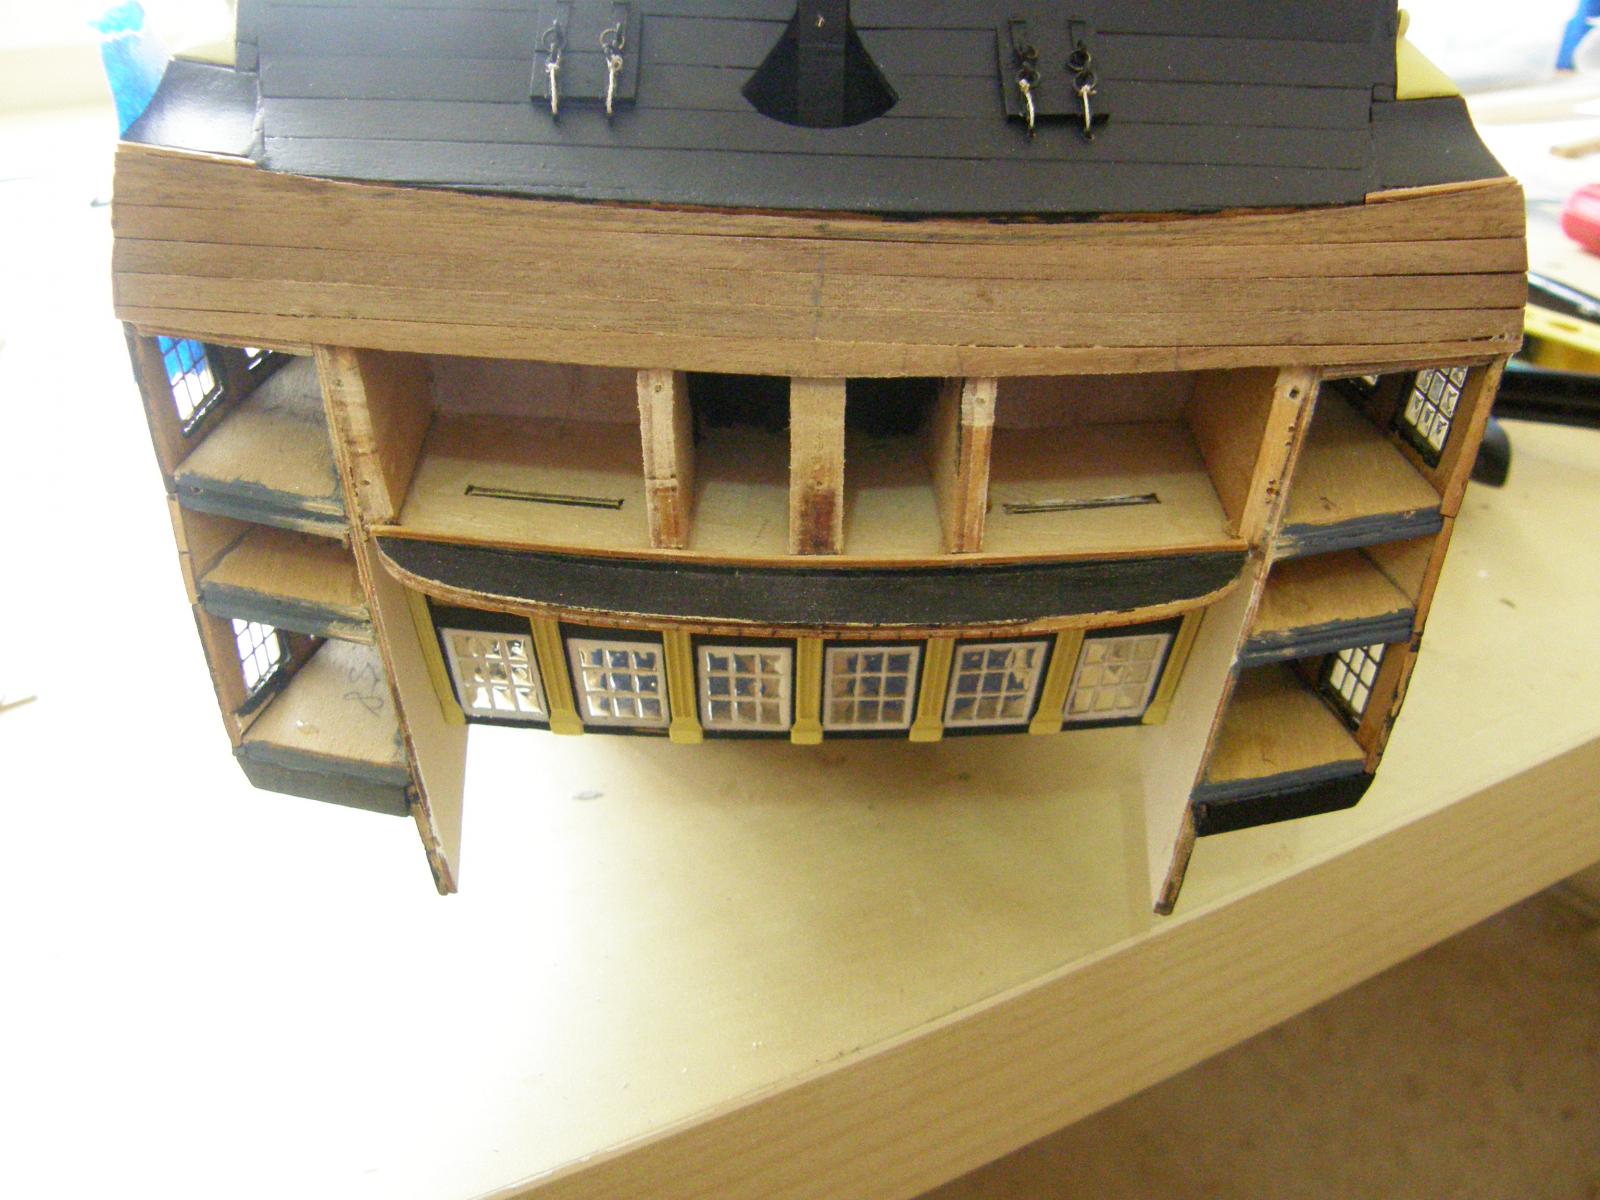
I then planked the stern until it was almost to the facia. The facia was dry-fitted and the final piece of the planking shaped to fit the gap between it and the penultimate plank. I'm afraid the following photos are a bit out of order, but I hope the procedure is clear.
Here is the filler used to close the gap.
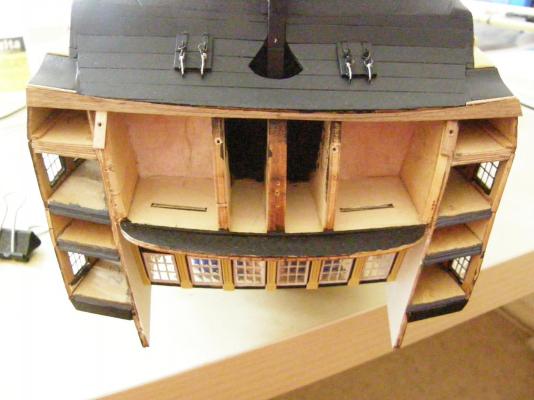
The extra 1mm strip added and shaped.
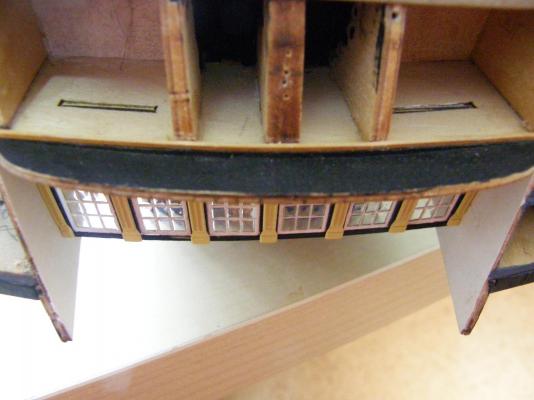

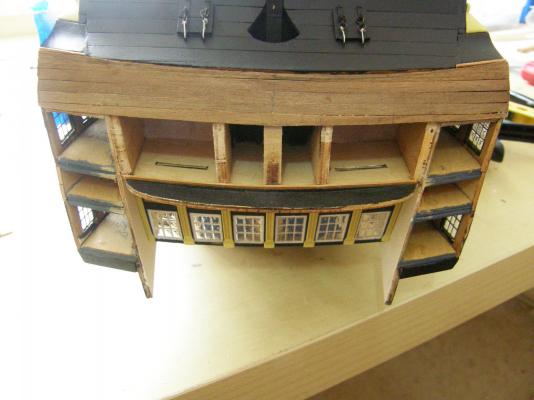
Here is the stern planked and the facia dry-fitted. The fit is very snug and I have just put a first coat of black paint on the planking
In fitting the facia I will use 5 minute epoxy. Using gel CA is a bit risky as the CA may fog the windows fitted at the side of the model (I haven't yet glazed the windows of the Facia - will use Kristal Klear again). Have others found epoxy suitable for this? Suggestions?
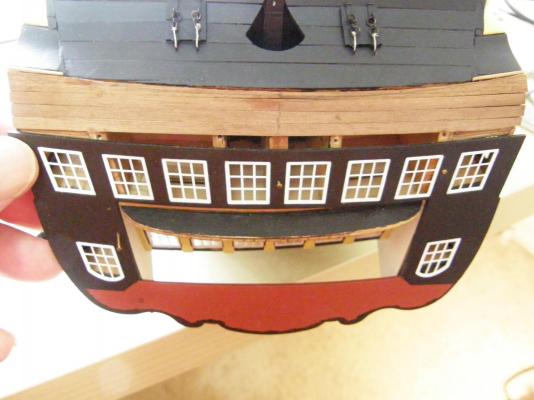
I am concerned about fitting the lettering 'VANGUARD' on the stern. I have read how Arthur did it in his log, and will probably adopt his method, but I would like to know if there is a way that is a little less fraught. Suggestions are very welcome. I will also put out a general query.
- Kevin, WackoWolf, fake johnbull and 4 others
-
 7
7
-
Thanks Alistair for the comment.
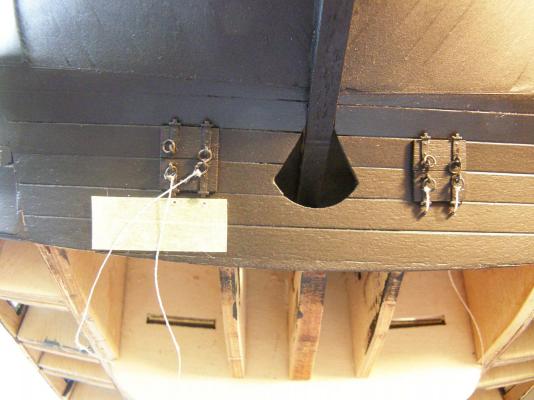
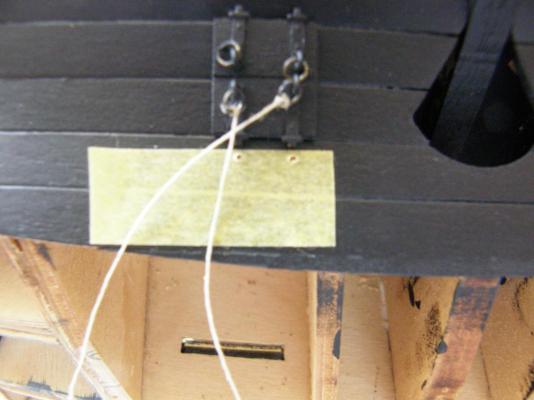
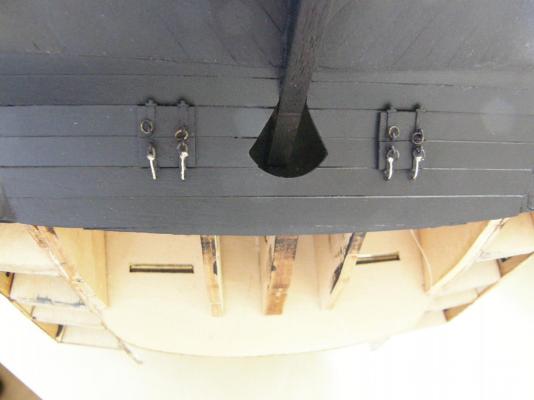
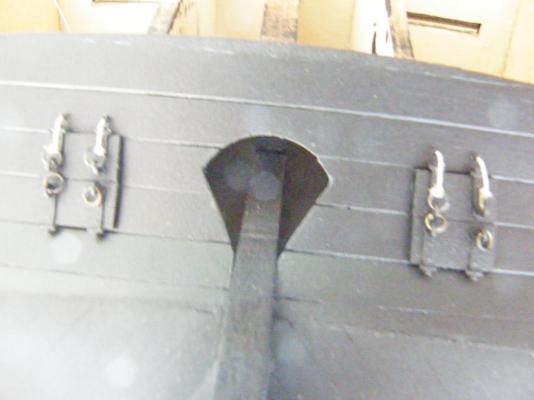
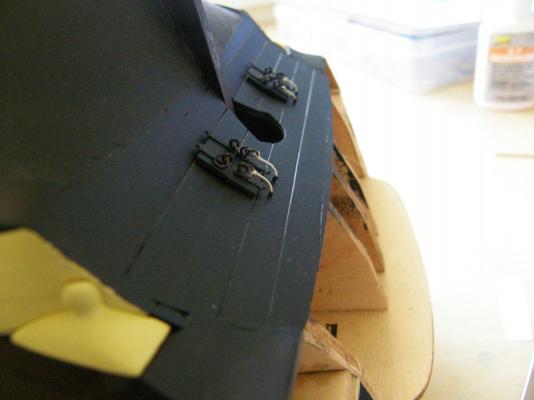
Arthur: Yes, my main concern has been lifting the rudder on and off - getting seven attachments lined up. The way I have done it has made it quite easy, though it is more accident than design. I think the main point is to initially hang the rudder off the very top and bottom gudgeons/pintles with the appropriate spacing between the stern post and the rudder and then adjust all the rest to fit. The eyelet holes for the pintles are a little larger than the the nails, so there is a little bit of 'give' and consequently there is not the need for complete precision.
I will fit the straps but will experiment to see which - the etchings or paper - seem to be best. At the moment I'm leaning toward paper and copper paint.
The whole coppering thing has been a bit of a nightmare. It has cost me about 2 months, though things here have been disrupted for various reasons - mostly good. I have done all the deck/stern fittings, gunport lids, the guns are prepared and the masts are pretty well complete. It's been very frustrating. Once the copper sage is over i'm hoping for some quick progress.
-
Steve: take Bindy's advice. Tamiya tape is wonderful stuff.
RMC
-
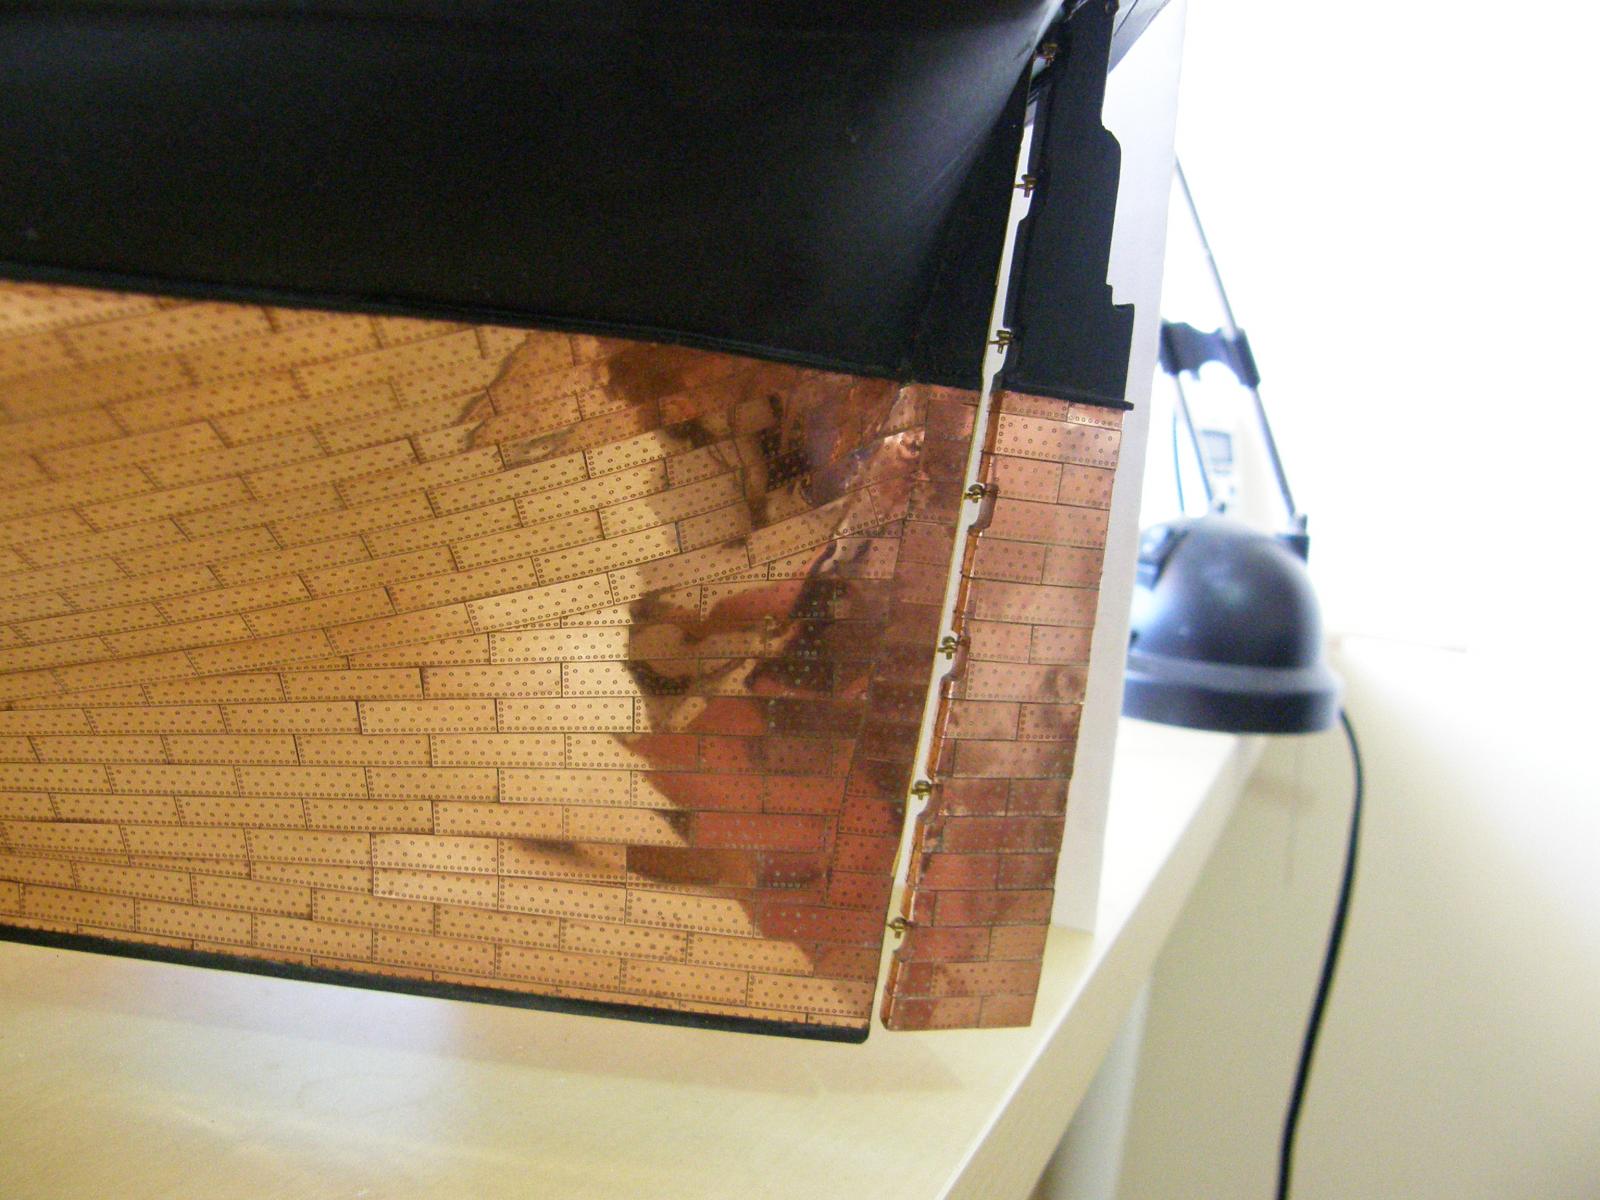
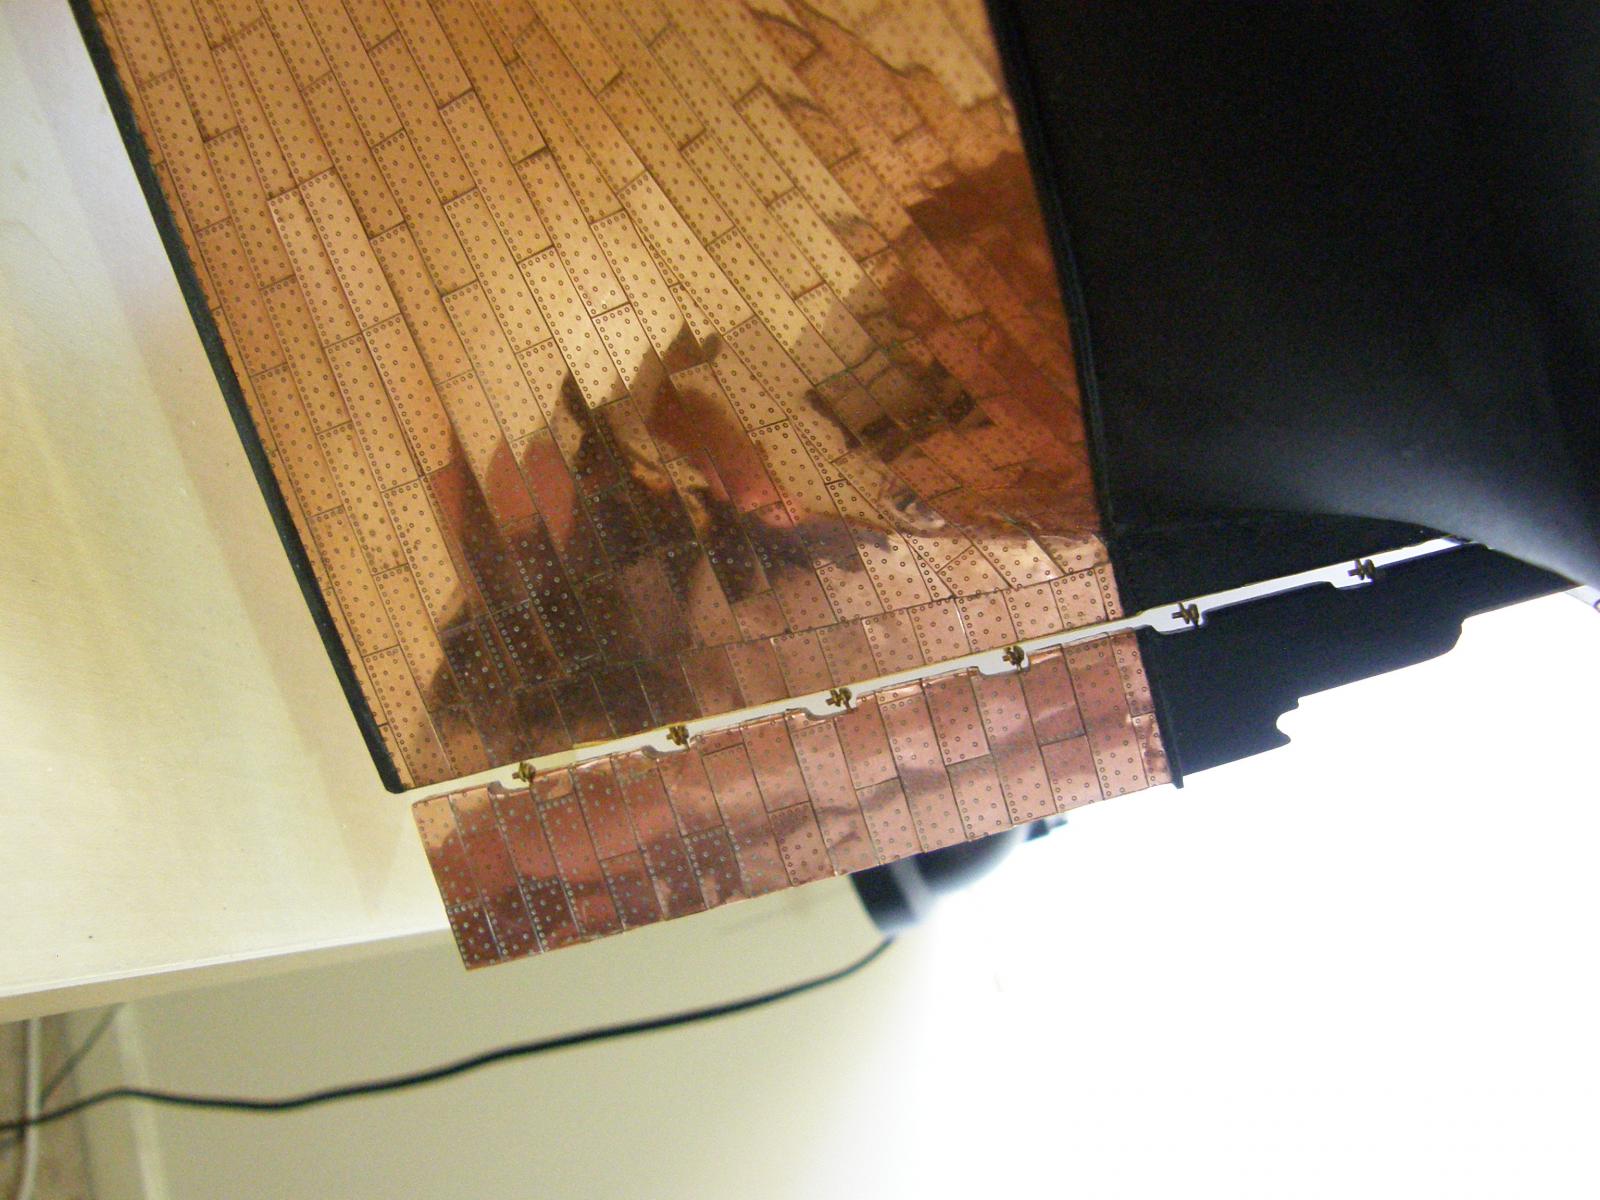
While waiting for the copper problem to resolve itself, I decided to test fit the rudder. It's something that has worried me for a while and something I have been postponing as a consequence.
As gudgeons,I have used a brass nail inserted into the eye of an eyelet, glued with gel superglue. I let the glue set for a couple of days to make sure it was completely set. It worked a treat. (Thanks Arthur for the idea.) I also used eyelets for the pintles. The result seems to be quite sturdy. The gel CA, once really set is really hard and durable. I'm afraid soldering things would have been beyond me.
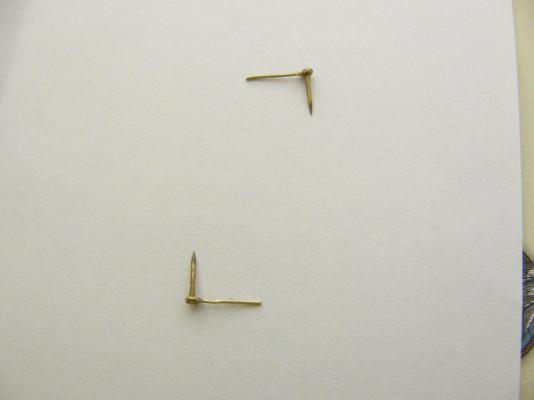
Having placed the rudder to the correct level against the waterline I fixed the pintles/gudgeons at the top and the bottom. This gave the spacing for all the intermediate fixtures. Unfortunately the following picture does not show it all that well.

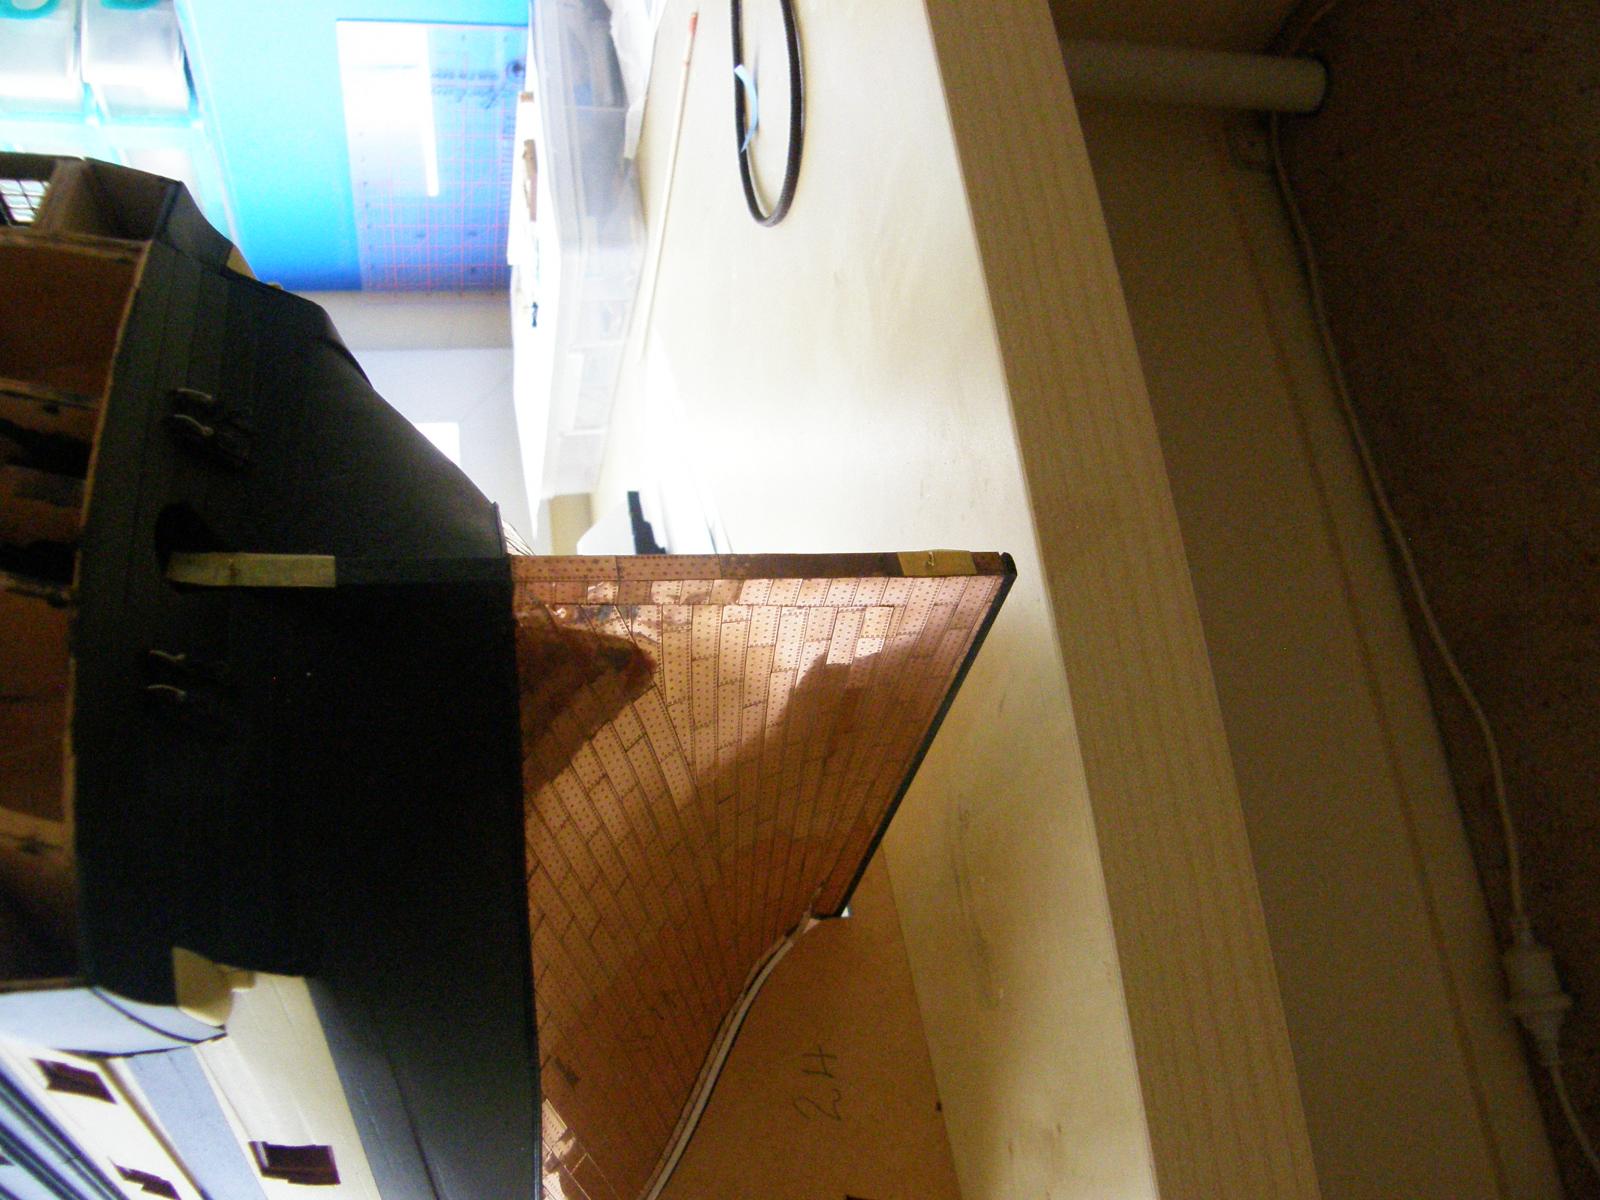
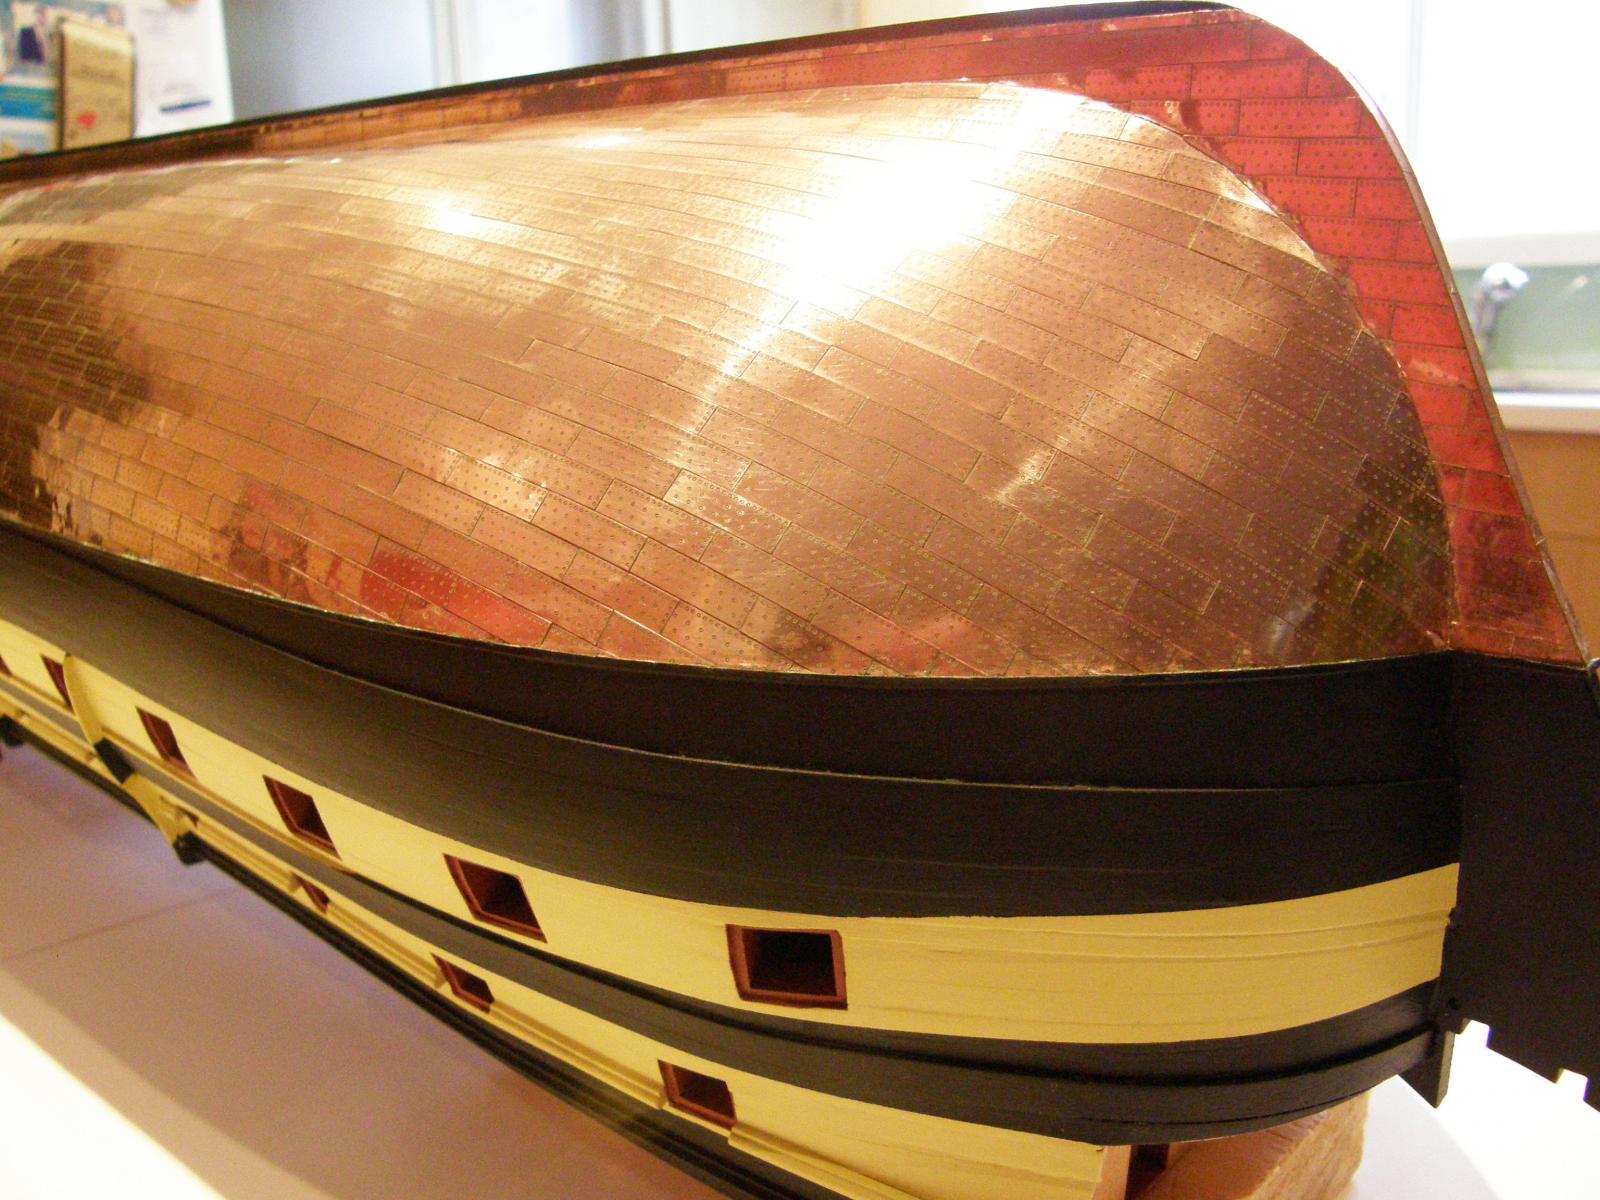
Here is the rudder with top and bottom gudgeons. I followed instructions to taper the rudder which made coppering the front and back difficult. This is the front of the rudder with top and bottom gudgeons. The coppering here is obviously not neat but once the rudder is attached (to my relief), any imperfections are completely hidden (The rear of the rudder is OK thankfully.) The gap between stern post and rudder is 1.5mm, and when I finally fix the rudder, the gap could be made a fraction smaller.
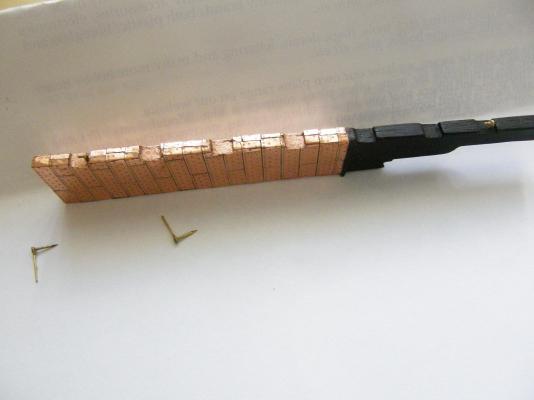
When drill into the copper plates on the stern post used Tamiya tape to prevent the drill bit slipping.

Here is the rudder fiitted. All of the gudgeons/pintles are dry fitted at the moment. I will attach it finally once the copper finish is done.

- Kevin, fake johnbull, dafi and 2 others
-
5
-
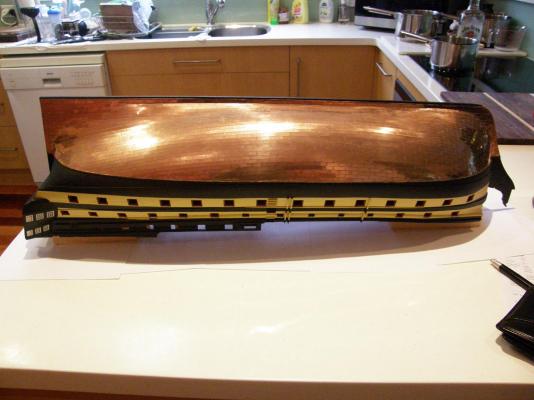
I have returned after 10 days of playing some very bad golf to find that leaving the copper seems to have done the trick. There are a couple of small areas that were affected by the problem (easily cleaned) and the rest of the copper was just fine. I will wait for the 2x matte to arrive next week and hope that by that time the copper problem will be over.
-
Thank you all for your thoughts. My problem has been not with "normal" aging/tarnishing, but really unsightly streaks and blobs which appear very, very quickly after very thorough cleaning, and which even appears under a coating of polyurethane. I suspect it is a reaction of some kind which, having cleaned off a poly coating twice, now seems to be dissipating. I have never seen anything like this before.
Bob (RMC)
-
Sorry, rather than wading though all of my log, the problems are shown on page 13.
-
Does anyone have suggestions for solving problems I have encountered in trying to seal copper plates on my Vanguard. The saga is described in painful detail in my Vanguard log in kits in progress.
Advice/ experience gratefully received.
RMC
-
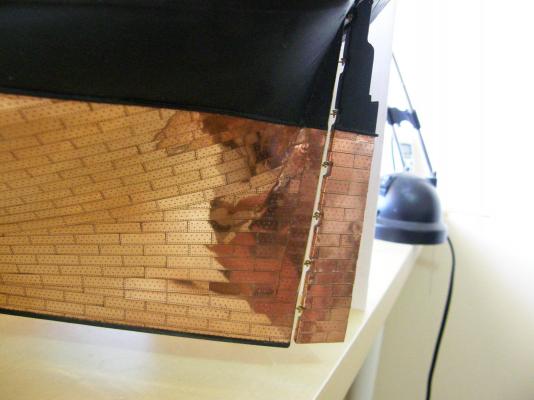
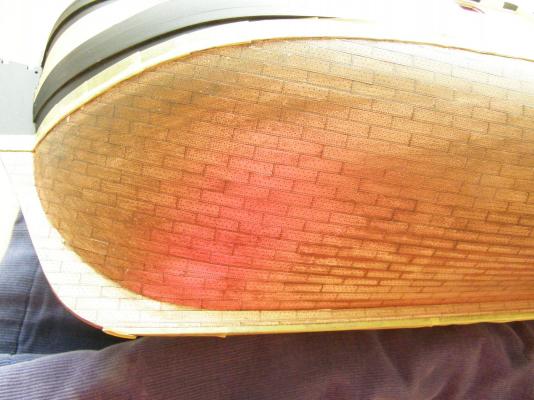
The cleaning is complete, however there is still a problem. While the vast majority of plates are unaffected by the heavy and unsightly (almost black) tarnish there are a few, mainly around their edges that are. It happens very quickly, and from previous, painful experience can occur while 'protected' by polyurethane.
I have now decided to leave the plates without a protective coating for the time being and clean off the affected plates as they appear. I am hoping that whatever is causing the problem will gradually dissipate over time. I will be away for a couple of weeks or so from next weekend and will make some sort of decision about what to do when I return.
Assuming all goes well, I now have three alternative protective coatings suggested to me:
1. the 2X clear matte mentioned above;
2. Tamiya clear metal primer followed by Tamiya acrylic spray paint Flat clear; and
3. GoddardsLong Term Brass and Copper polish followed by Polish Up Glass, Metal ... Surface Protector.
Of the last, I was advised that a matt acrylic or pol urathane "should" be OK over it. (?)
Advice is welcome.
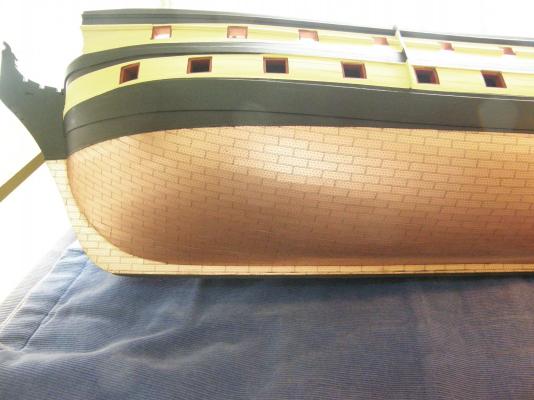
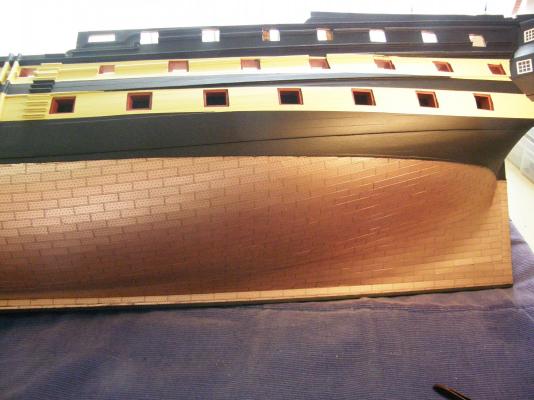
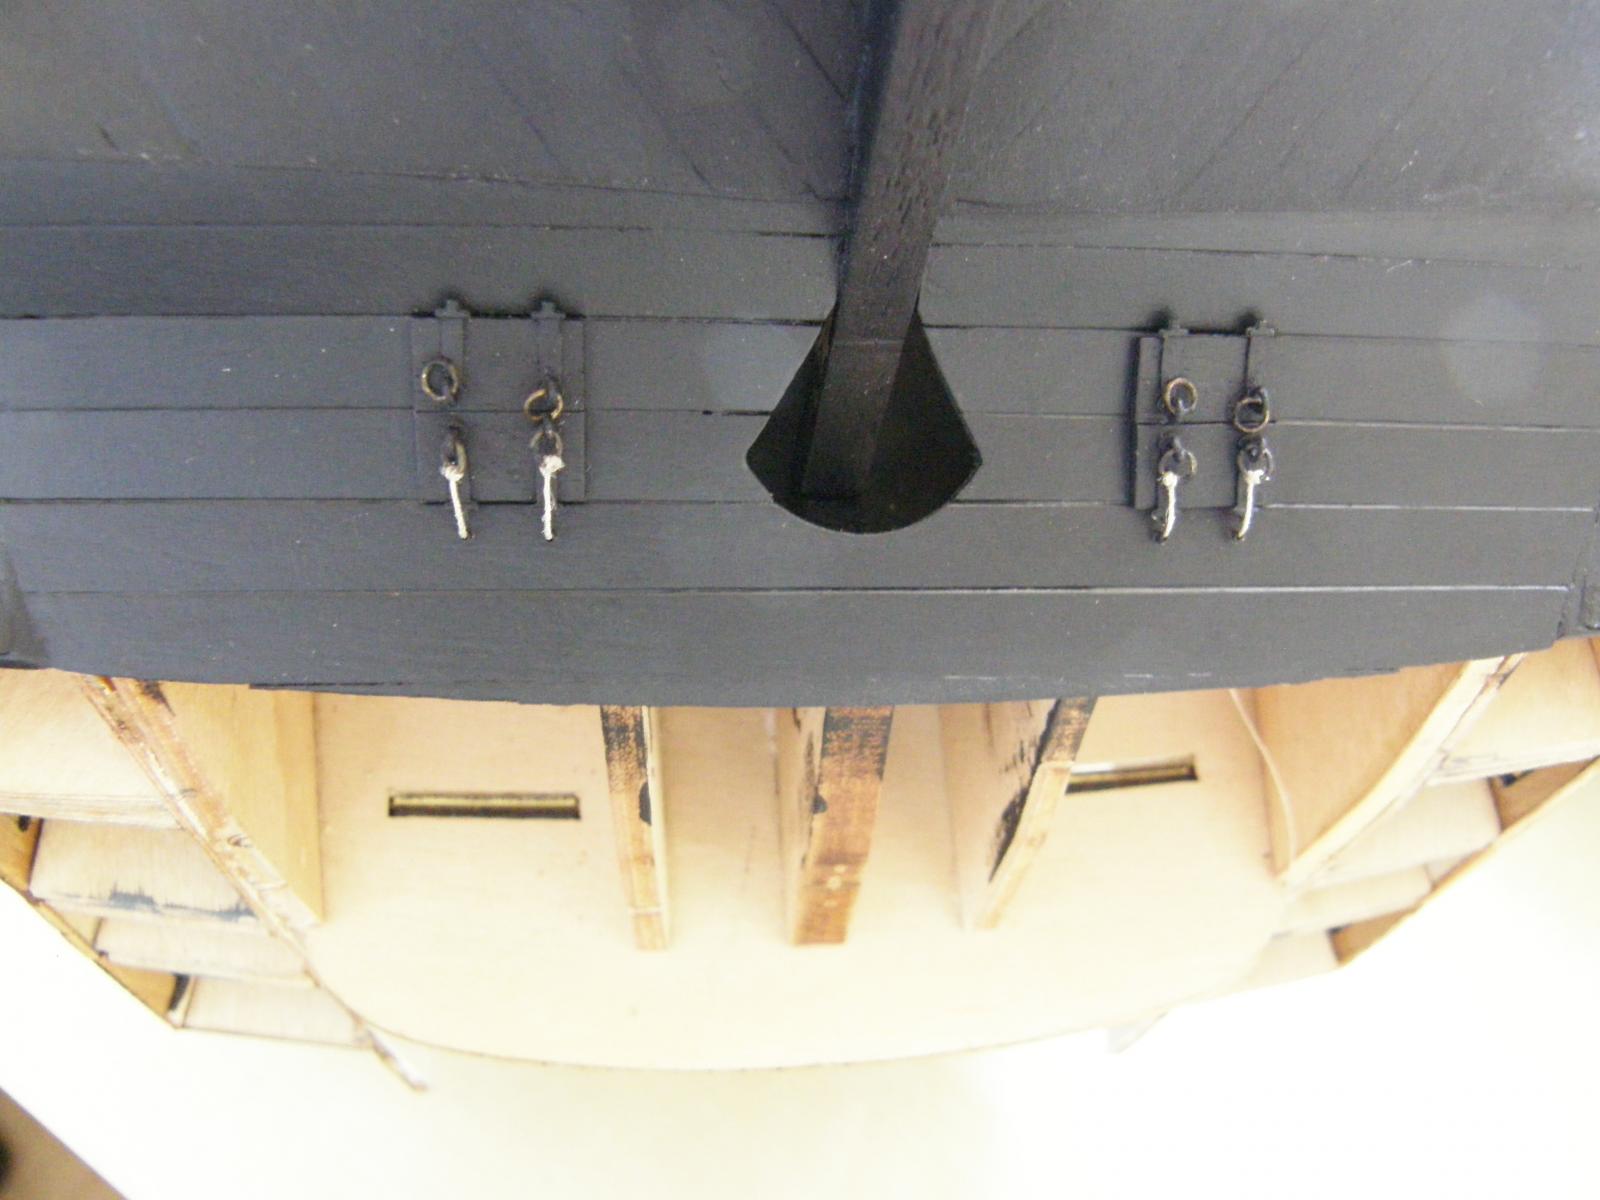
In the meantime I have put on the gun doors for the stern chasers.
In drilling the holes for the ropes I have drilled though Tamiya masking tape - there is less chance of the drill bit slipping. Unlike Arthur (AEW), I did not provide a recess for the doors as I thought I would probably damage the stern. The doors are simply 5x1mm strip glued on, but I think 5x0.5mm would probably have been better.
I followed Len's and Arthur's examples in using plastic tube to finish off the holes, ready to insert the rope- In my case electrical shrink tubing, which I was able to reduce in size to 0.8mm in diameter.
The following shows the nice finish the tubing provides.
- fake johnbull, Bettina, kier and 5 others
-
8
-
I have found the supplier of Dullcote and they have replied to my email inquiry.
They have a new product which will adhere to copper and should do the job.
It is Rustoleum Painter's Touch Ultracover 2X Clear Spray Matte.
I'm not sure if is available in countries other than the US, but a friend is coming to Australia to visit us in a couple of weeks and I have asked him to bring a can. I shall report back.
In the meantime I have cleaned up one side of the copper again and fortunately it has come up well. Practice really does make perfect. I hope the other side comes up just as well.
-
Thanks Alistair
I'll see if I can find it. I have never seen it here, but then I guess I haven't been looking. I'll let you know how it goes.
Regards Bob
-
Hi Jason
Well now I know. The Estapol has caused the reaction. It is not suitable for copper. The episode has turned out to be not one of my finest efforts. I would prefer to seal the copper, though I may end up letting nature take its course as you have.
I will make one more attempt to seal the copper - this time with an acrylic. I have Humbrol spray matt acrylic varnish. The note on the can says it is suitable for metal (I hope including copper - this time I'll check) and a locally made clear acrylic satin which I know is suitable for copper. I would greatly prefer to have a matt finish though.
At least I know what I'll be doing over the next week or so. I'd started to miss the acetone.
-
Another disaster. Again the coppering has apparently reacted to something and turned dark in places, mainly around the edges of some plates. I have no idea at all what could be causing it. I will wait a few days to see if the reaction goes further, then strip off the polyurethane...again. I will then leave it for a week or so to see what happens. In the meantime I will see if I can get some technical advice from the manufacturers of the products I have used. It's very depressing.
Any suggestions are welcome.
-
Ah. Thanks Arthur.
All of that is a fair way in the future for me. The rudder is my immediate concern. The pintles/gudgeons and whatnot look rather forbidding. I don't think my soldering skill is up to duplicating your effort (in fact it's non-existent). I've bought some very small screw-in eyes (whatever they're called) and will try these for the gudgeons.
Once the rudder is done I'm hoping for fairly quick progress as I have done nearly all of the fittings and made the ship's boats.
-
I appear to have have been short-changed by Amati again. There is no 1mm copper wire. I presume it is to make the pintles., though 2 metres worth for this alone seems excessive. Does anyone have any idea what the remainder is to be used for?
I have almost finished coppering the rudder. It has prover to be far more difficult than I expected and the result so far has been just so so. The sides are fine, but leading edge of the rudder is not as good as I would like. However with luck it will not show once the rudder is mounted. I will try to post pictures on the weekend.
-
Hi Chris
I'm hoping that by the time I finish the Vanguard in about 18 months or so, Bellonna will be on the market. So add me to the list of potential sales.
Bob (RMC)
-
Thanks for the kind comment Alistair. I hope you don't make the same mistakes I did. Cleaning CA is best done with acetone and there is a special acetone remover (very odd stuff) which with some effort will remove stubborn CA. Generally acetone will not remove stains but vinegar with some salt will do it remarkably quickly BUT you need to wash it off almost immediately or IT will stain.. Then apply Brasso which is the best polishing medium that I have found.
Good luck.
Bob
-
Thank you for the likes etc.
rpetera: No I haven't seen the Jullier article - do you have a reference? All help is gratefully received.
-
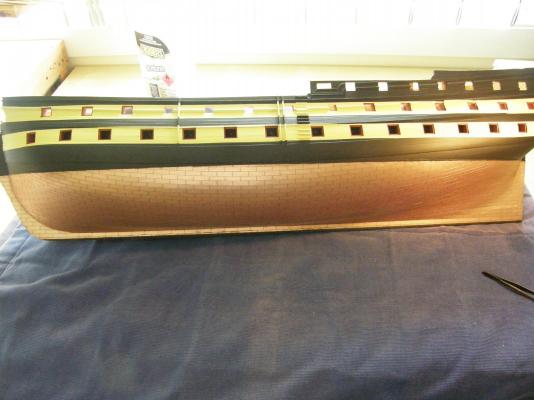
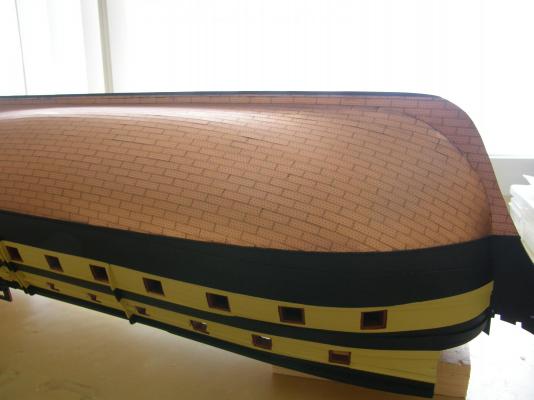
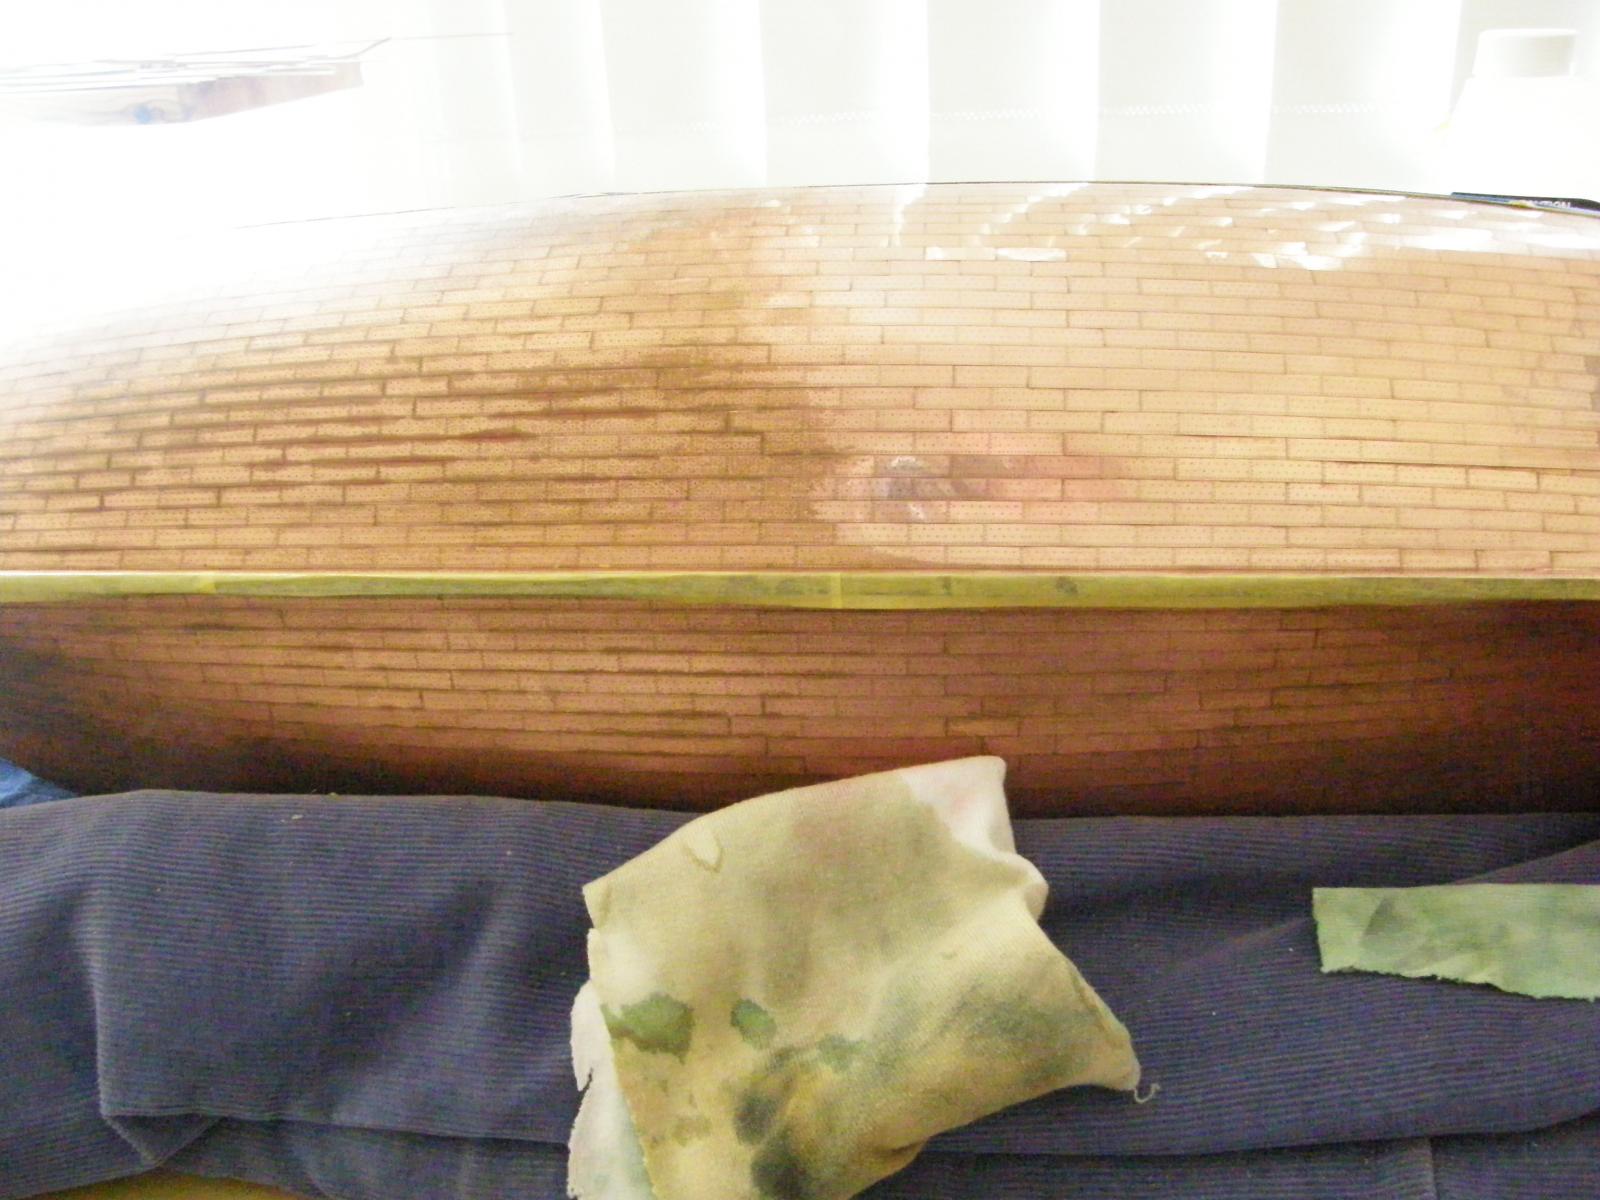
Here are some pictures of the copper cleanup.
The first three provide a good idea of the original disaster: the second and third showing the difference after stripping the polyurethane with acetone.
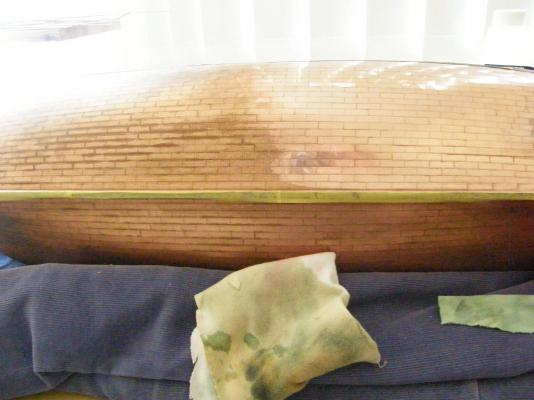
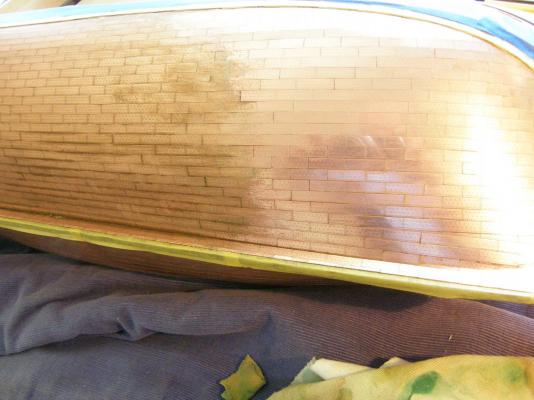
The next four show the complete cleanup.
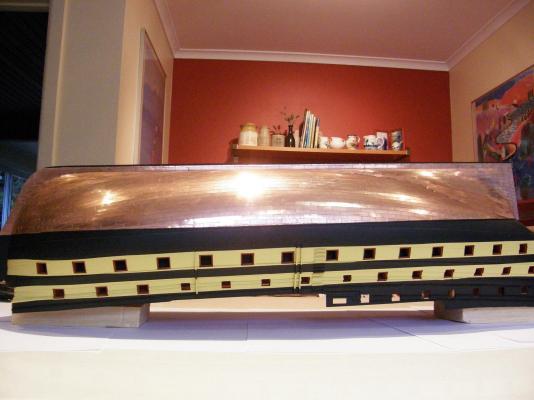
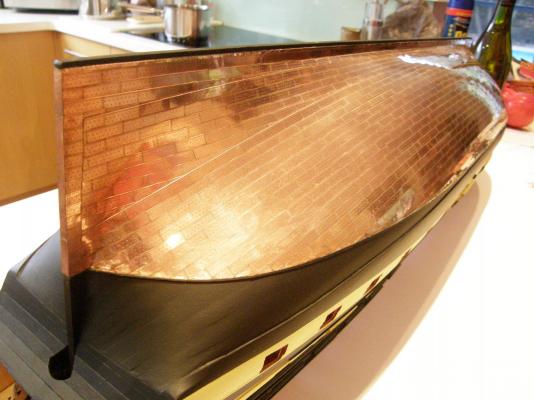

Having spent nearly 20 hours cleaning, I then reached for the spray can of poly - the stuff in the blue can.
One should read the label of course. Having given the (blue) can a good shake I proceeded to spray the copper matt black. This was obviously not a good idea, and having said, "Oh, how unfortunate" (or words to that effect) I spent the next 2 hours taking the paint off with mineral turps. But fate had more in store. Having brought the finish back to its pristine cleanliness, I again tried the poly - this time, having read the label. After making a couple of passes the can was empty, and to show its displeasure, sent, what I can best describe as a sploop of poly onto the copper surface. Back to the acetone for which I have now probably acquired a sniffing addiction, then to what I hope is a final and successful spraying.


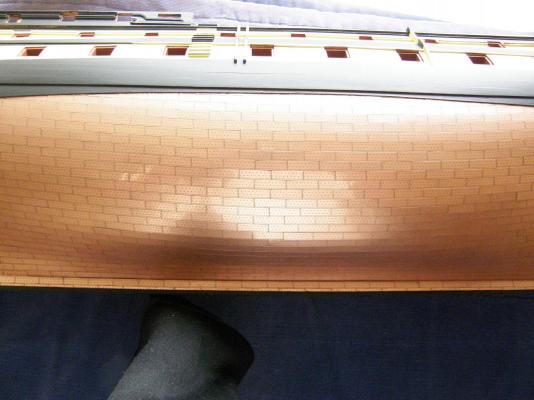


One positive came out of the black paint episode. The cleaning left a tiny residual in the rivets which now shows them up very nicely. However I do NOT recommend trying this at home.
- Beef Wellington, Bettina, kier and 6 others
-
9


HMS Vanguard by RMC - FINISHED - Amati/Victory Models - scale 1:72
in - Kit build logs for subjects built from 1751 - 1800
Posted
Woops - just checked the size of the letters on the plan - 8mm. Unfortunately there is no gold times roman in 8mm in the letraset. I'll think about 5mm and do a bit of playing around to see what the smaller letters would look like.