

mij
-
Posts
224 -
Joined
-
Last visited
Reputation Activity
-

 mij reacted to Auvergne in Xebec by mij - FINISHED - 1:60 scale
I saw how you did your grating. Superior craftsmanship and I like the way you used exotics. Did you use the kit parts as a template to cut out in exotic woods? That is what it looks like to me. You taught me so much on this vessel. Since my grating is set to high at the stern and already glued I am not sure what to do. I will have to correct somehow....any advice??
You did very well and I am pleased you have taken your valued time to assist in my build.
John E
-

 mij got a reaction from ccoyle in Xebec by mij - FINISHED - 1:60 scale
I used Bisley gun blue for the swivel guns
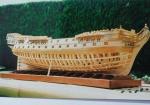
The model I started the beginning of January this year has now been completed.
The planking of the hull is Cherry and all the carvings are from Box.
Here are some photos of her
-
 mij got a reaction from GrandpaPhil in Xebec by mij - FINISHED - 1:60 scale
Milling the sides of the gun carriages
Drilling the holes for the 4mm blocks for the carriages
Turning a step suport
New carving of a rabbit
Model so far
-
mij got a reaction from GrandpaPhil in Xebec by mij - FINISHED - 1:60 scale
I was not happy with the carving of the first eagle, so I carved another one from Boxwood.
I cut out the shape of the eagle first, then started the carving.
I took Antony`s advice in putting a light stain on the carving to bring out the detail.
I used French polish and linseed oil.
Carving with the stain on.
Eagle fitted to the stern of the ship.
-
mij got a reaction from GrandpaPhil in Xebec by mij - FINISHED - 1:60 scale
Port and Starboard Dolphins fitted.
Eagle fitted to stern.
I`m not certain if the carving of the Eagle is good enough.
I might take this one off, and re-carve another one.
mij
-
 mij got a reaction from Archi in Xebec by mij - FINISHED - 1:60 scale
Blank piece of Boxwood cut out for figurehead.
Carved Eagle`s head for figurehead.
-
mij got a reaction from Archi in Xebec by mij - FINISHED - 1:60 scale
Planking from Cerry
Port and Starboard Serpents carved from Boxwood
mij
-
-
mij got a reaction from Archi in Xebec by mij - FINISHED - 1:60 scale
The rudder is cut from Cherry, all other items are cut from Box.
All items fitted to the decks.
-
mij got a reaction from Archi in Xebec by mij - FINISHED - 1:60 scale
Done a bit more to the Xebec.
Cutting out the stern
completed items cut out
I don`t normally paint my models, but as these ships were colourful, I decided to give it a bit of colour.
mij
-
mij got a reaction from Archi in Xebec by mij - FINISHED - 1:60 scale
Hi Antony
Thanks for your kind comments, I`m doing all the main cutting of the timber in my workshop (garage) and all the fine cutting with a razor-saw and all the gluing in the conservatoy,
Her in doors said NO DUST?
MIJ
-
mij got a reaction from Archi in Xebec by mij - FINISHED - 1:60 scale
I was going to use sycamore for the deck planking, but decided to use maple instead.
The size of the deck planking is 4x1mm and I used my plank bender to curve the planks.
Deck planking fitted
Smoothing the deck
The deck after smoothing
mij
-
mij got a reaction from Archi in Xebec by mij - FINISHED - 1:60 scale
I shall be using cherry for the hull planking (single plank), sycamore for the decks and pear for the gratings.
Cutting the 6x1.5mm cherry hull planking.
Cutting the pear for the gratings
Grating complete
-
mij got a reaction from Archi in Xebec by mij - FINISHED - 1:60 scale
The bulkheads have all been fitted.
-
 mij got a reaction from Auvergne in Xebec by Auvergne - Amati - 1:60 - C. 1753
Hi John
If you look on my Xebec log, you will see how I done my grating.
Kind Regards
mij
-
mij reacted to bensid54 in Greek Bireme by bensid54 - FINISHED - RADIO
Picture of the oars in their completed state and what they should look like when being in operation. The end on picture of the stick end is actually one of the racks the oars will be screwed on to there will be one rack per side. I cut the racks on an angle so the oars will be able to move without binding.
-
mij got a reaction from Auvergne in Xebec by Auvergne - Amati - 1:60 - C. 1753
Hi John
How is your model of your Xebec coming along.
mij
-
mij reacted to Auvergne in Xebec by Auvergne - Amati - 1:60 - C. 1753
So sorry folks I have been delayed and away for some time since my last post....had 3 surgeries in one year.....I am back on the Xebec though...I would be very interested in Le Requin's plans for a scratch build myself. Never have tried one but definitely wish to give her a go....here are some of the latest pics.
-
mij got a reaction from Auvergne in Xebec by Auvergne - Amati - 1:60 - C. 1753
Hi John
The Xebec kit you are building looks great, I like it that much I went on line to Cornwall Models last Monday and ordered the plans, they arrived the following day.
This kit I`ll be building from scratch with sone alterations.
mij
-
mij reacted to shipmodel in Queen Anne's Revenge 1710 by shipmodel - FINISHED - 1/36 scale
Hello again –
I have just completed the construction of the stern, which was complicated enough to merit its own log entry.
The design is a bit of an exercise in imagination, without any hard facts to go on. The Advice Prize draught has no information at all; the stern outline is shown as part of the station lines plan, but without any decorations or indications of the shape of the counter, transom or even the top of the taffrail. Budriot’s drawing of the stern of Le Mercure is excessively florid, with lots of carvings, an intricate nameplate, and even flaming finnials at the upper corners of the taffrail.
Not only is this much too ornate for the QAR (and for Le Mercure, which was a merchant ship), but the heights of the windows do not match the deck heights taken from the Admiralty draught.
After playing around in Photoshop for a while a simplified layout was designed with many of the same elements that went into the quarter badges. This was passed before my masters and approved.
The first section worked on was the lower transom just above the counter. The wide moldings were set matching the locations of the similar ones on the sides of the hull and the field between them was painted blue. The decorative boxes were taken from the plans and cut from cherry veneer. Wood glue was sparingly applied and they were taped down until solidly attached.
The light colored ‘flowers’ were carved from 1mm boxwood. They do not appear to be fleur-de-lis, but I could not make out any further details in Budriot’s drawing.
Above the top molding were the windows in the captain’s cabin. There is no false light in the center because the rudder head ends in the gun deck below the cabin. The field was painted grey and the moldings, fluted columns, and capitals were cut and applied using the same techniques as for those on the quarter badges.
There are six columns framing five windows. I did the two outermost ones first because they have the biggest angle to vertical. Then the remaining area was divided into five equal spaces and the central two columns were mounted vertically. The last two were fit by trial and error to sit halfway between the inner and outer columns. They were cut and recut several times until I was happy with the look of the windows that were formed. As before, the windows were glazed with white glue that was painted on. While it was tacky the mullions were cut from birch and laid in.
At the top of the taffrail you can see the added piece of basswood that was cut and fitted to give it the double recurved shape from the plans. The joint was filled and sanded and the field was painted blue
Moldings were pieced together above the windows and along the sides. At the top, sections of molding were steam bent to the curves and attached. Ribbons of cherry veneer were shaped to the curves of the moldings and edged with a thin molding strip. In the center a pair of volutes (similar to fiddleheads) were carved and applied.
The volutes are a little intricate, but I got a lot of help from the illustrations in “Carving Figureheads & Other Nautical Designs” by Alan & Gill Bridgewater. If you can picture a snail shell seen from the side, that’s what they look like.
The stern was now complete, but the upper area cried out for some sort of contrasting decoration.
I could have made simple circles, like those on the Mercure drawing, but I decided to get a little fancy and carve a pair of laurel wreaths, symbolizing victory. I got a simplified image of a wreath off the internet, resized it and duplicated it a number of times before printing.
The paper image was cut out and spray glued to a piece of 1mm boxwood, which was itself glued to a piece of dark contrasting scrapwood. Using a sharp cornered bitt, the outline of the wreath was cut through the box until the dark wood showed all around.
This left the paper and boxwood standing up from the background ready for detail carving.
Using a medium sized bitt, notches were cut to indicated the locations of the leaves, and the paper was removed with a drop of mineral spirits.
A smaller bitt was used to define the leaves and cut the indication for the central stems.
A pointed diamond burr was used to further refine the leaves and to slope the lower edges so there was some depth to the carving.
The burr left some soft and fuzzy edges, so once the piece was separated from the backing piece with a drop of acetone, it was cleaned up with a knife, needle files and a fine sanding stick.
Here are the pair of wreaths attached to the model. With them, the stern is now complete.
The headrails will be the next area to be tackled. Until then . . .
Be well
Dan
-
mij reacted to pete48 in Herreshoff Buzzards Bay 14' by pete48 - FINISHED - 3/4" = 1' - SMALL
Thank you Rick , Here is what she looks like after the Final coat, for a total of 4 coats of Epiphanes Varnish
Best Regards,
Pete
-
mij reacted to SawdustDave in Mayflower by SawdustDave - Finished
This is exactly what I was afraid of. The 5/32 scale (1:77) simply will not allow me the detail I feel like I should be looking at.
Just finished installing the shrouds to the fore mast top..... used 3.5mm dead eyes and the scale doesn't work to my eye.
Been wrestling with this from the beginning....now, as much as I hate it, I know what I must do.
-
mij reacted to popeye the sailor in Syborn by popeye the sailor - FINISHED - 1:33 - trawler
now on with the aft deck. I gave it the same stanchion border, as I did the fore deck. soaking the strips, it was hard to get that curvature at the stern........but I got it. to set up for the helm structure, I used a compass to draw out the arch. I did the same to mark off the dash board.
I'll need to fix the port side curve........but I have it all down, as well as the outline for the helm.
the front wall will have four windows. these window frames are part of the Nordkap fittings that I have on hand. the fittings I got from Billings, didn't have them in it.....I went ahead and built the Nordkap with what I had. Harold found his set much later in the build.
center line.......the windows were marked out and cut out.
when they were finished, I cut out the two side walls and the dash, which will be trimmed to fit later on
now silly me........I should have marked off the separation lines for the paint, but I was in too big a hurry. I can always do it later, I suppose. the side windows were cut out........only one per side would fit.
I know.......this picture is very misleading........I even had to do a double take I'm not following any plans....just what I have in the old nogg'in.........it is centered though
it kind of hard to see with the glare.......but after some sanding, I gave it a coat of paint. I'm going to give everything another go over, before I give it another coat of paint.......with a better brush than the one I used the first time
the dash isn't cemented in yet......it's just laying in there. the sills for the windows are the same thickness as the wood I used to make the walls. now to figure the arrangement for the back parts of the structure.........one work day down........and the admiral's trying to talk me into taking Monday off.
does she really think she has to do that...........!?
-
mij reacted to Gahm in US Brig Syren by Gahm - Model Shipways
I finished another little detail - the rudder coat. Image one shows the jig and process which I used to make this piece. The finished rudder coat mounted on the stern of the Syren model can be seen in images 2, 3 and 4.
Thomas
Image 1 Jig and process for making the rudder coat
Image 2
Image 3
Image 4
-
mij reacted to Shipyard sid in HMS Victory by Shipyard sid - FINISHED - Caldercraft
Greeting all
Well I have backtracked on myself. I found two davits I did not know I had made so decided to fit them. As I said I had messed up on my first attempt . I decided to paint them yellow ochre, as I thought there was to much black about and they looked a lot better. Thanks for viewing and your comments. Here's some photos. DAVID