HOLIDAY DONATION DRIVE - SUPPORT MSW - DO YOUR PART TO KEEP THIS GREAT FORUM GOING! (Only 13 donations so far - C'mon guys!)
×


GaryKap
-
Posts
276 -
Joined
-
Last visited
Content Type
Profiles
Forums
Gallery
Events
Everything posted by GaryKap
-
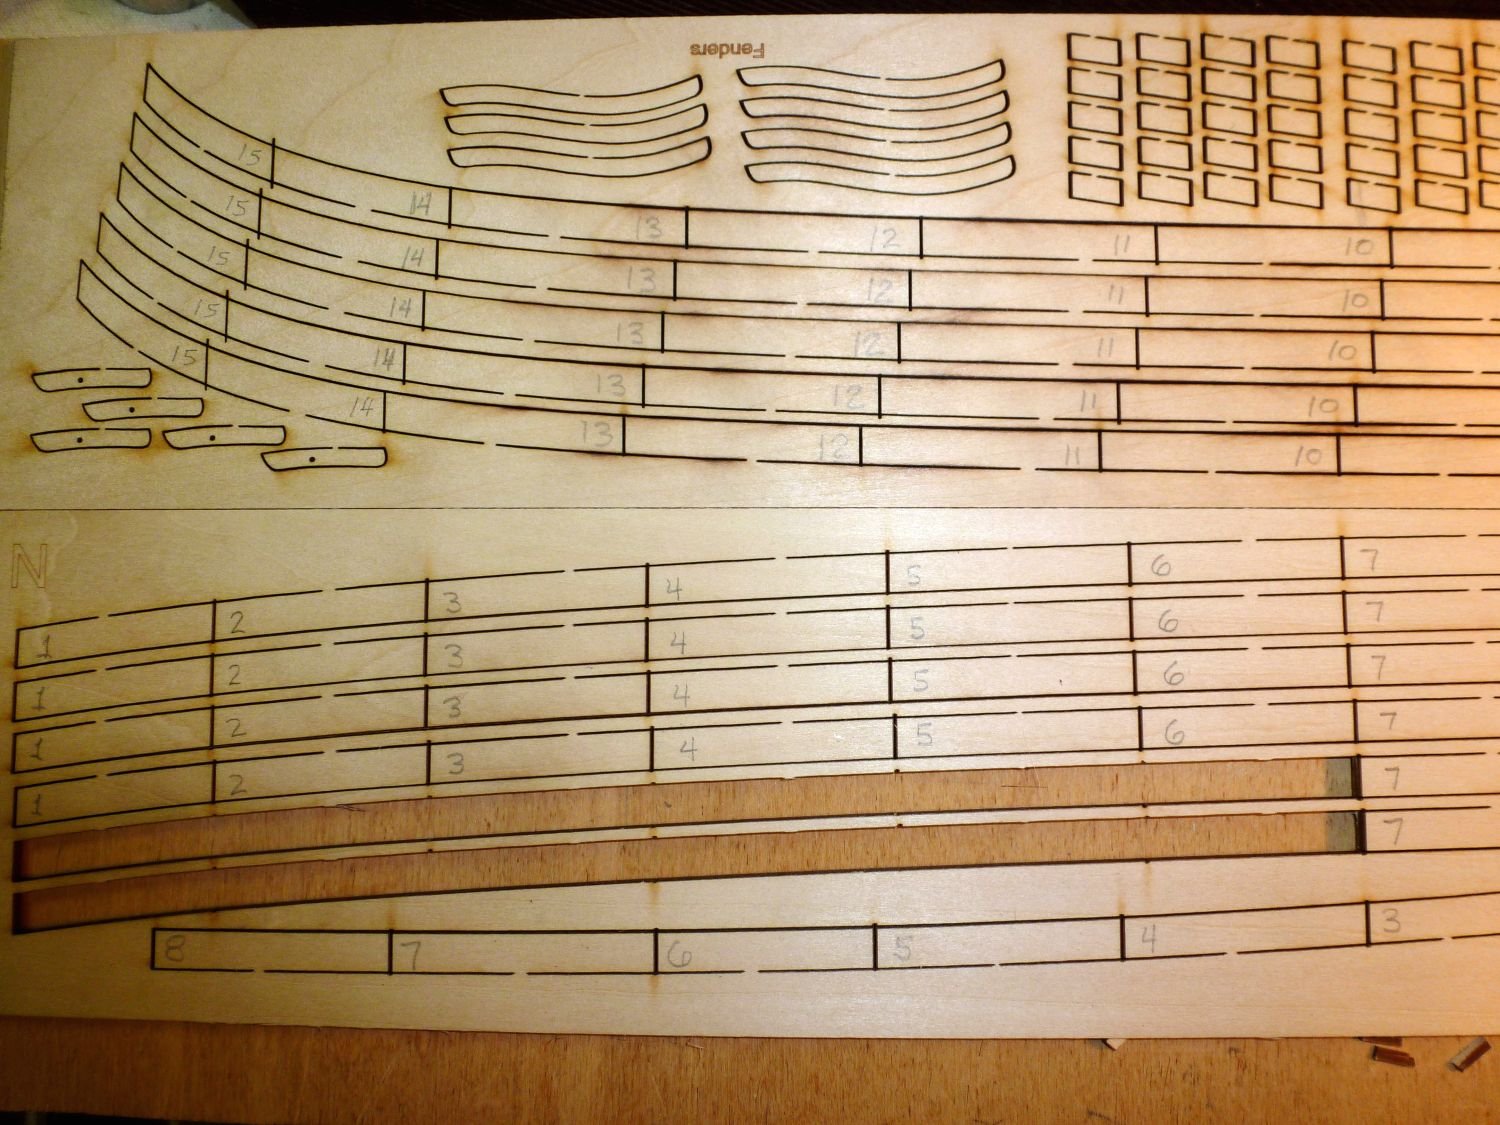
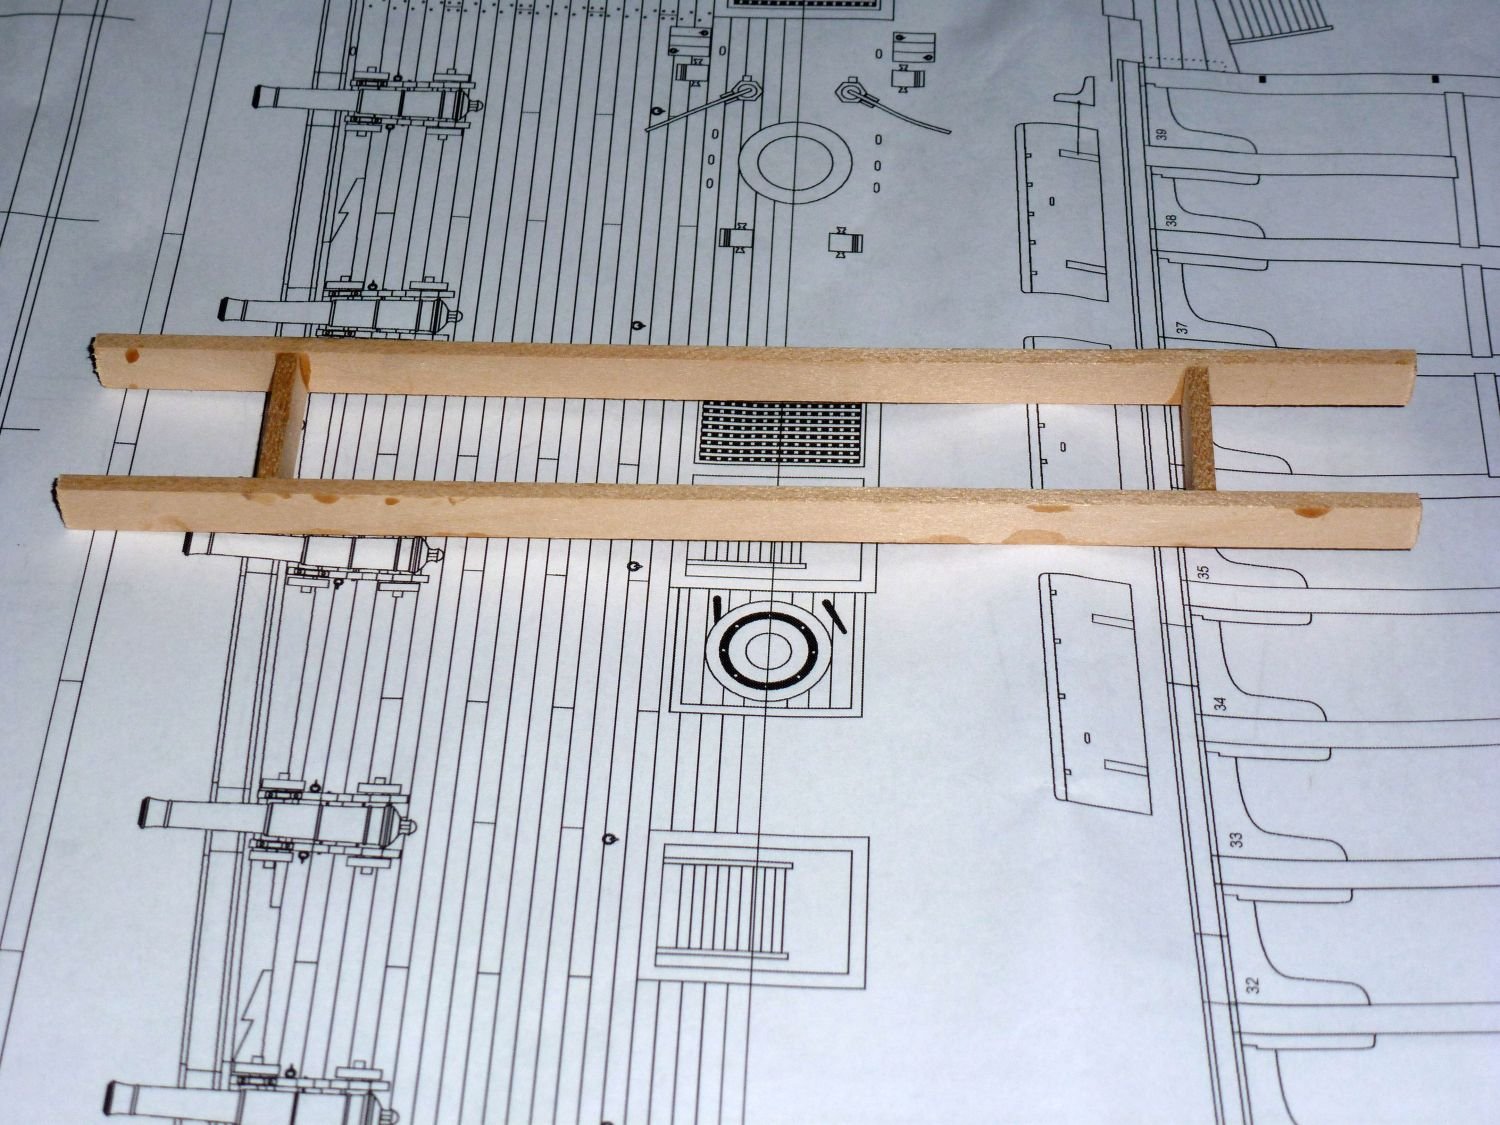
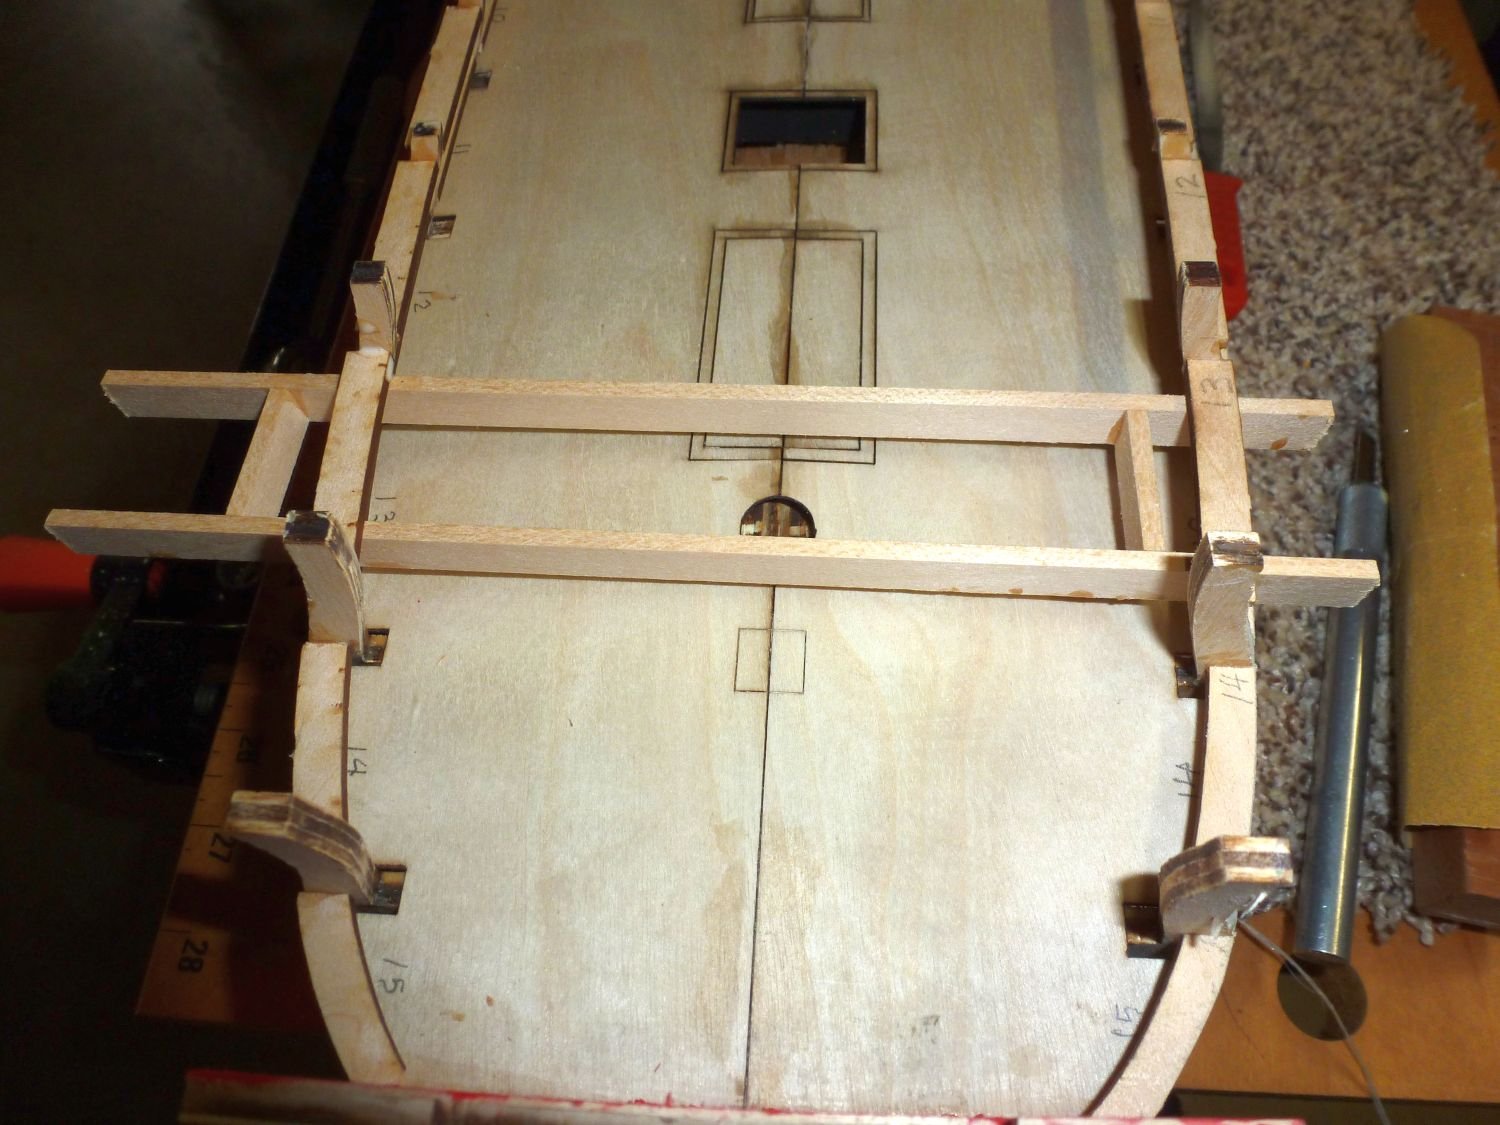
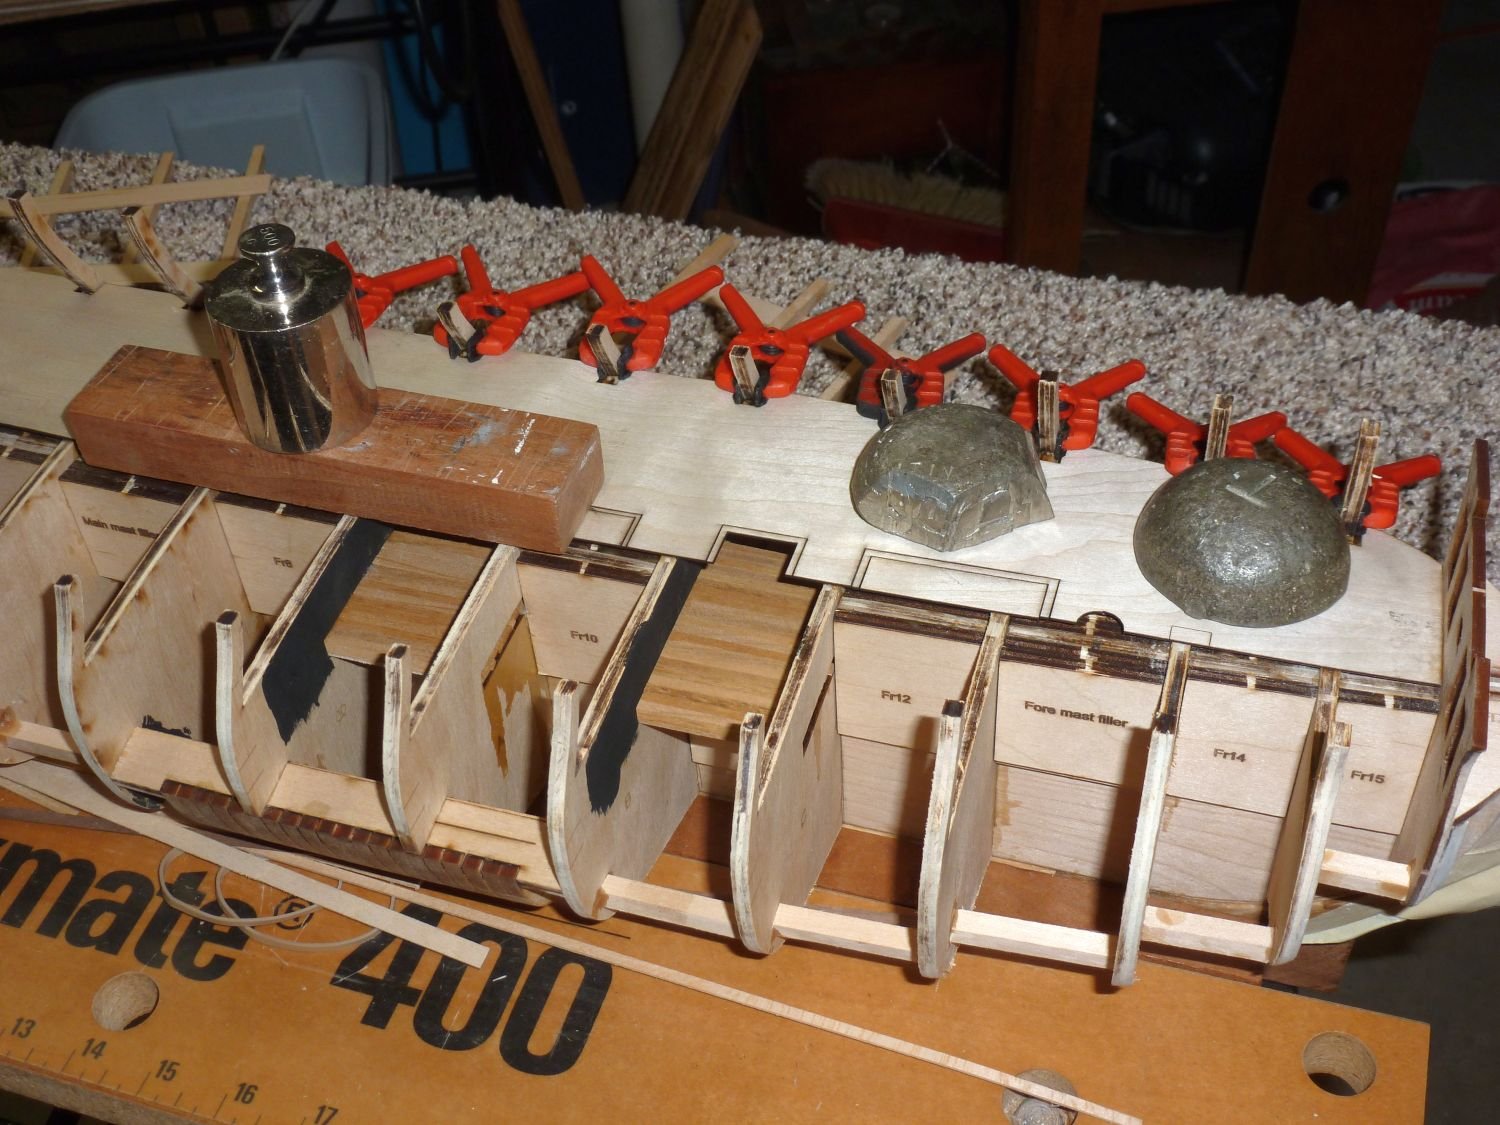
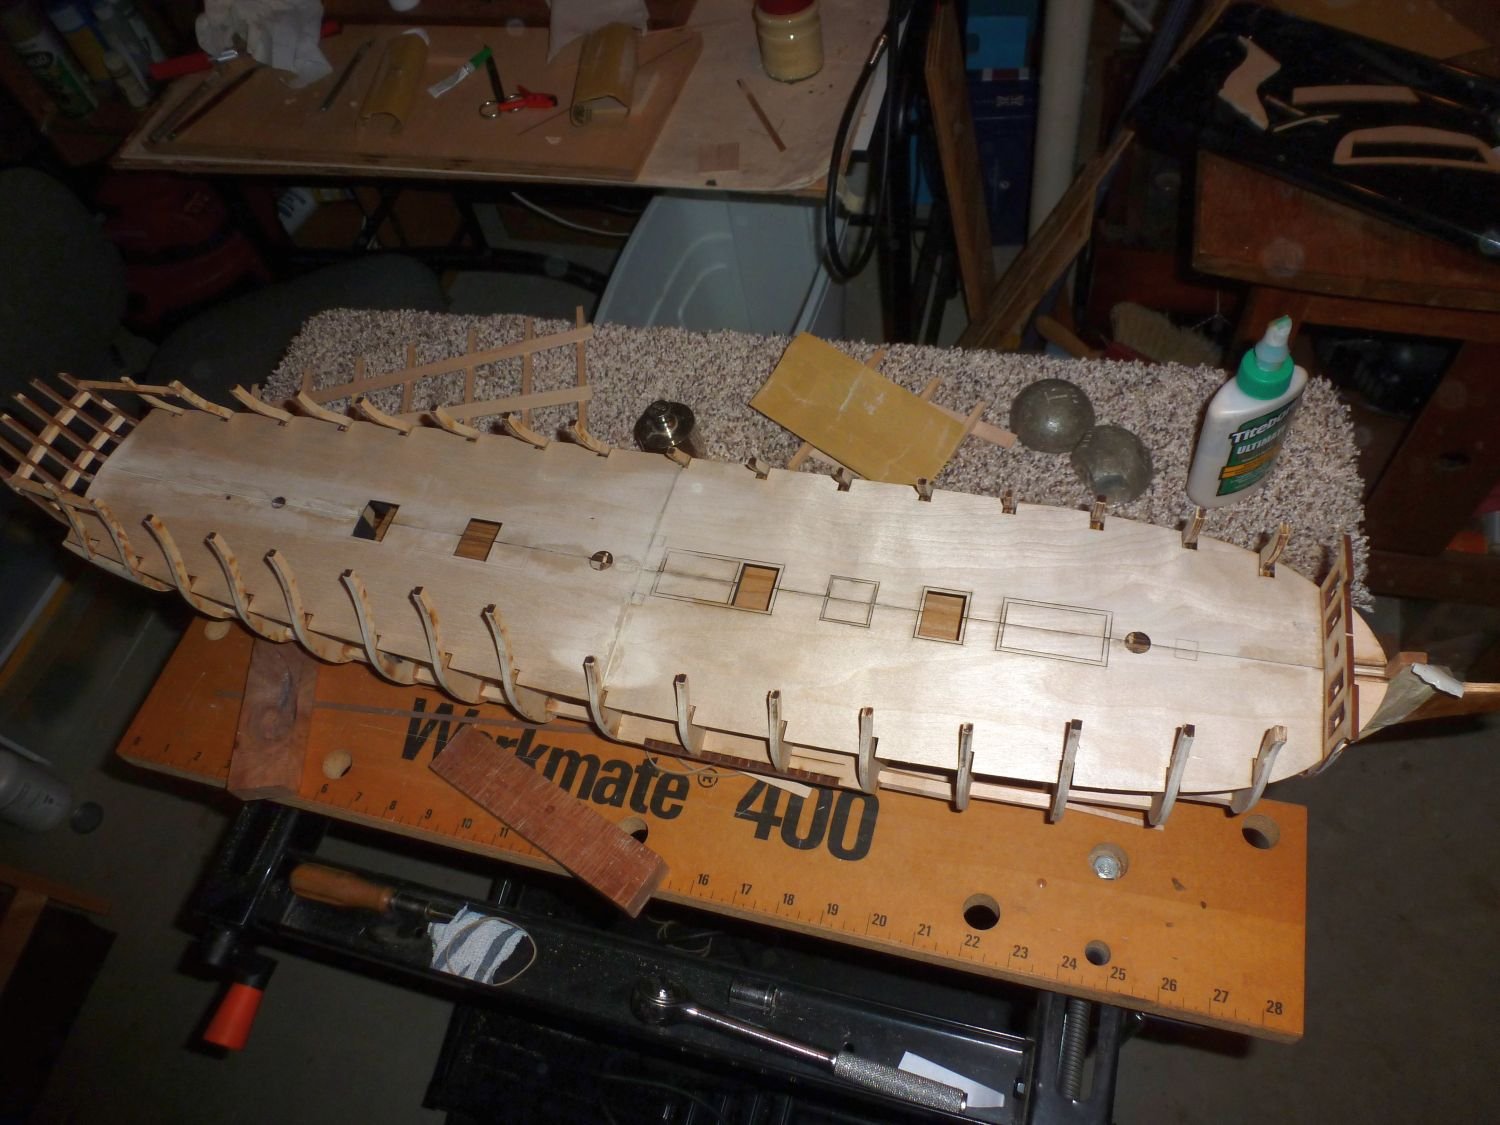
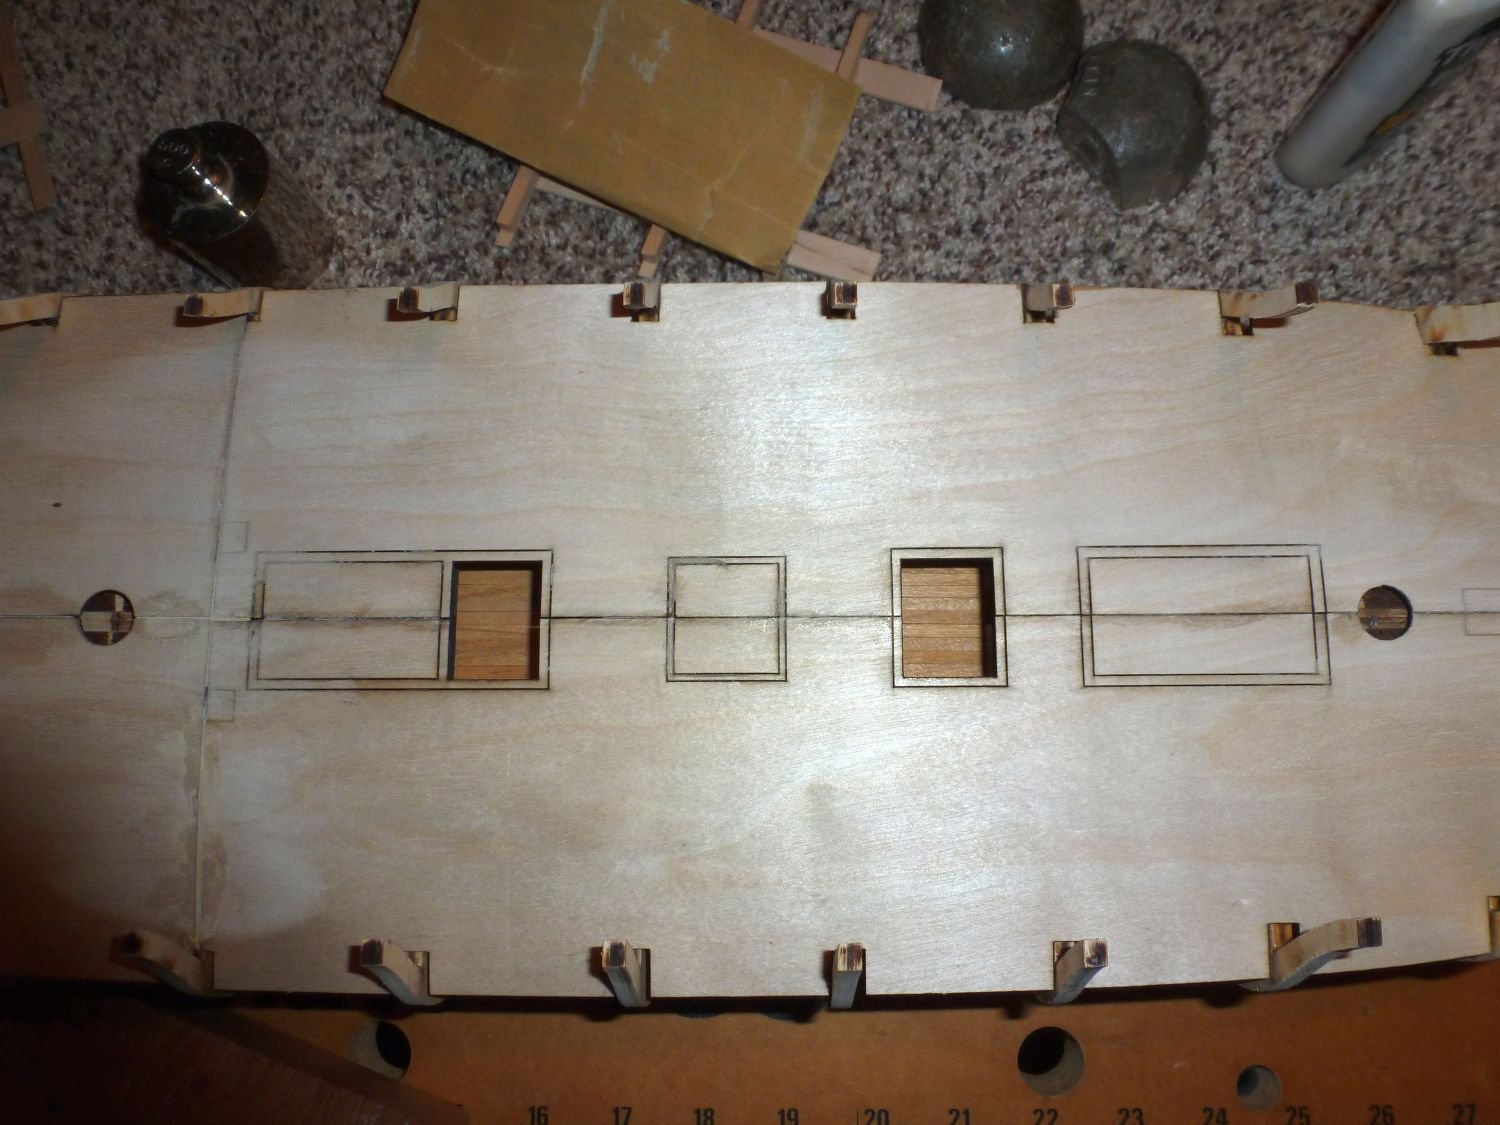
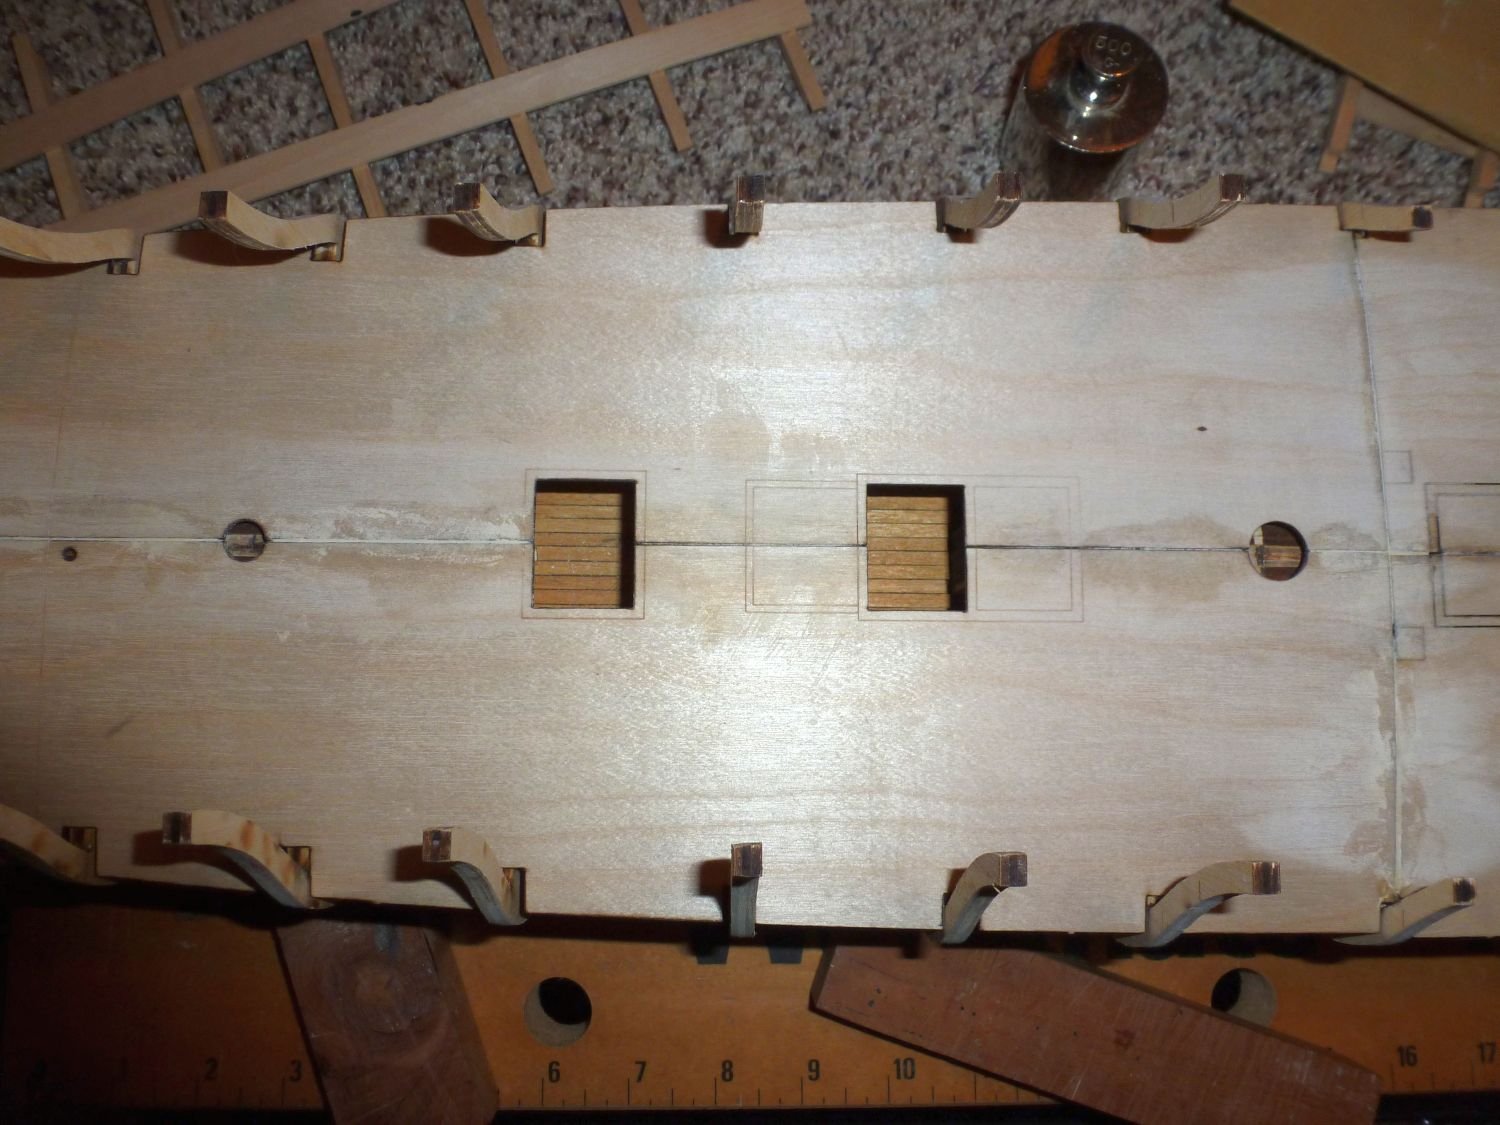
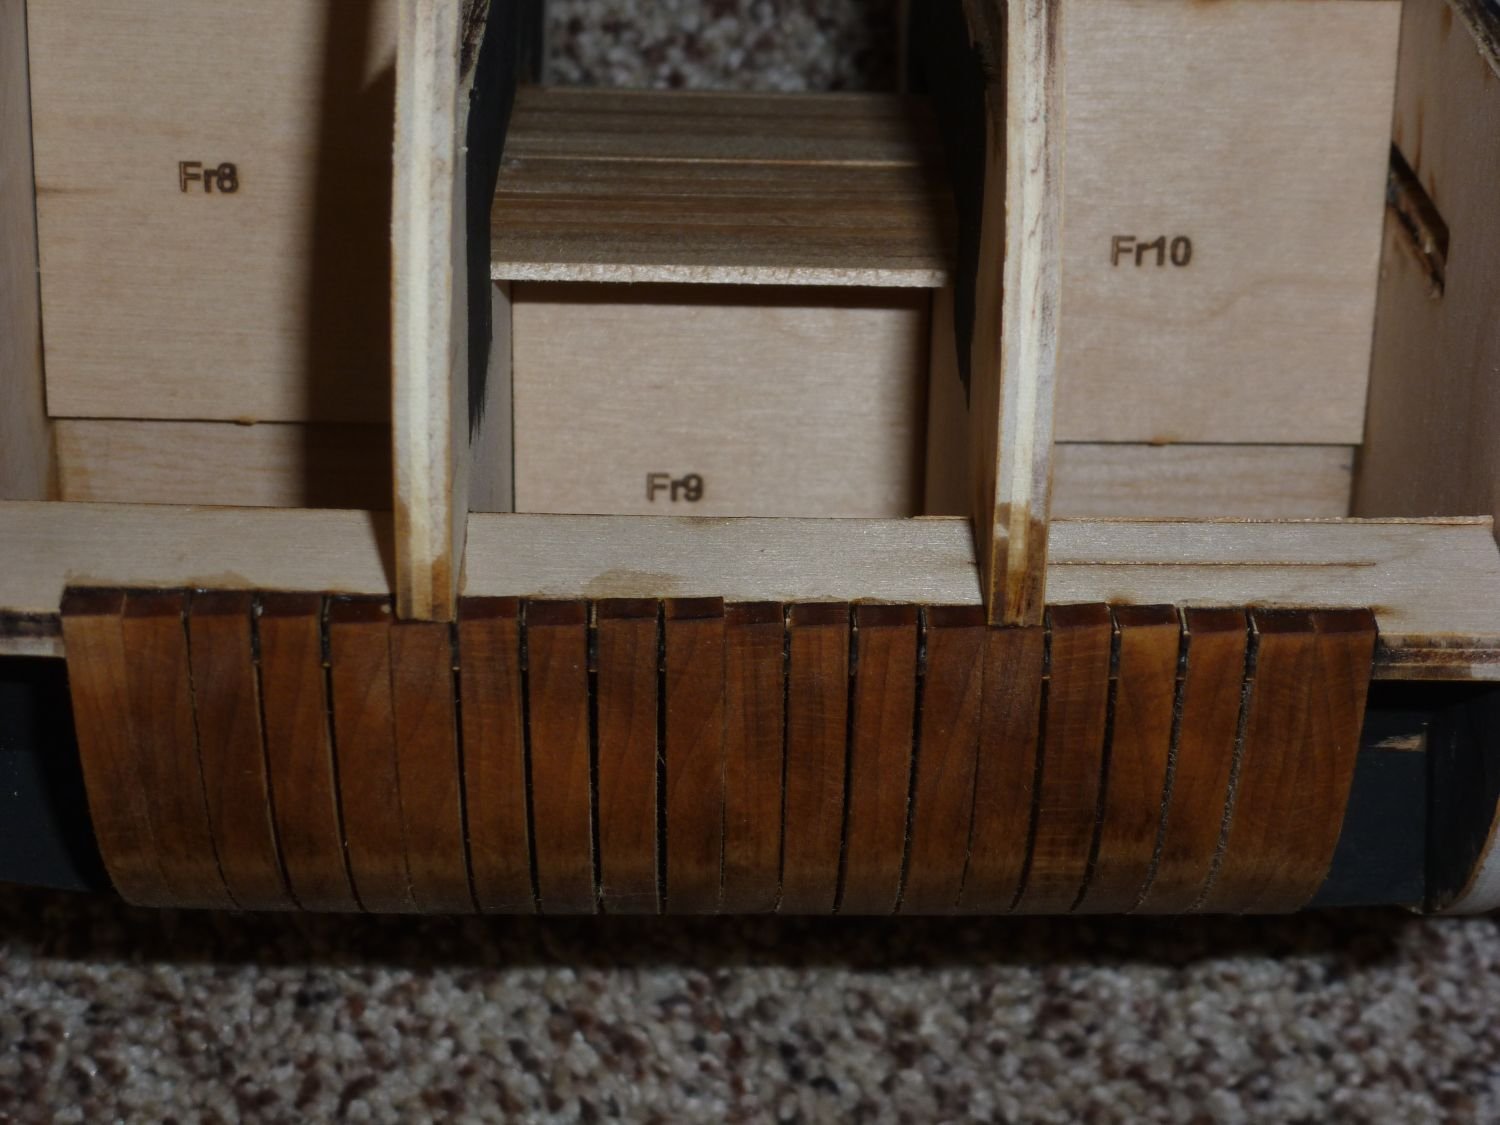
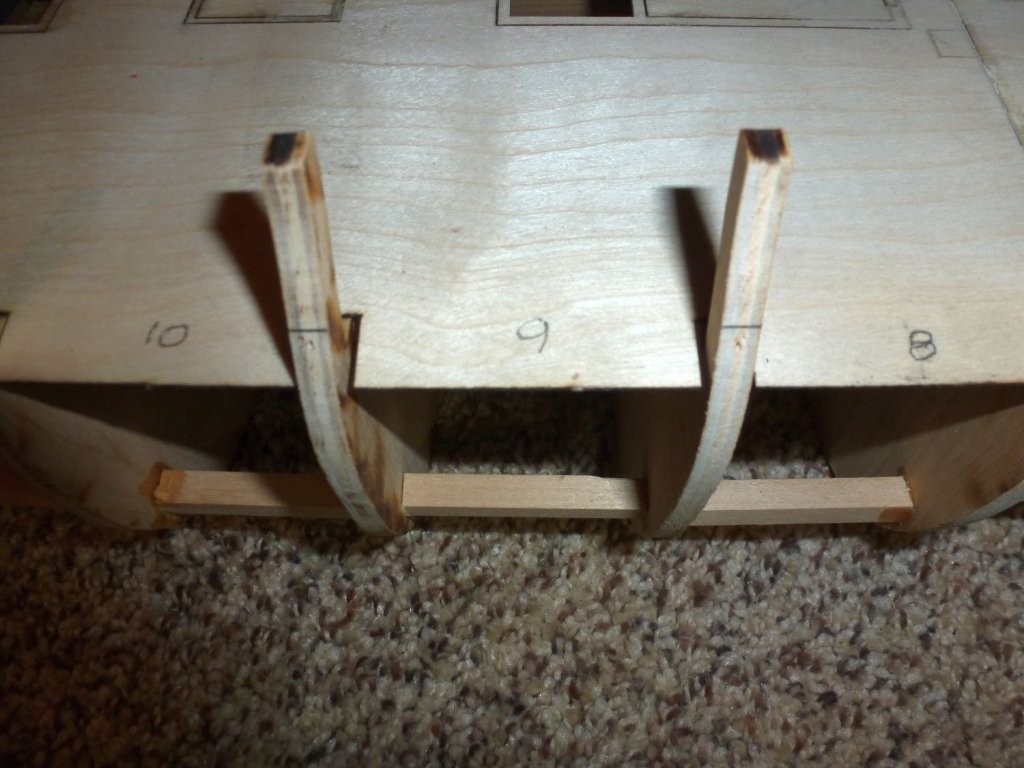
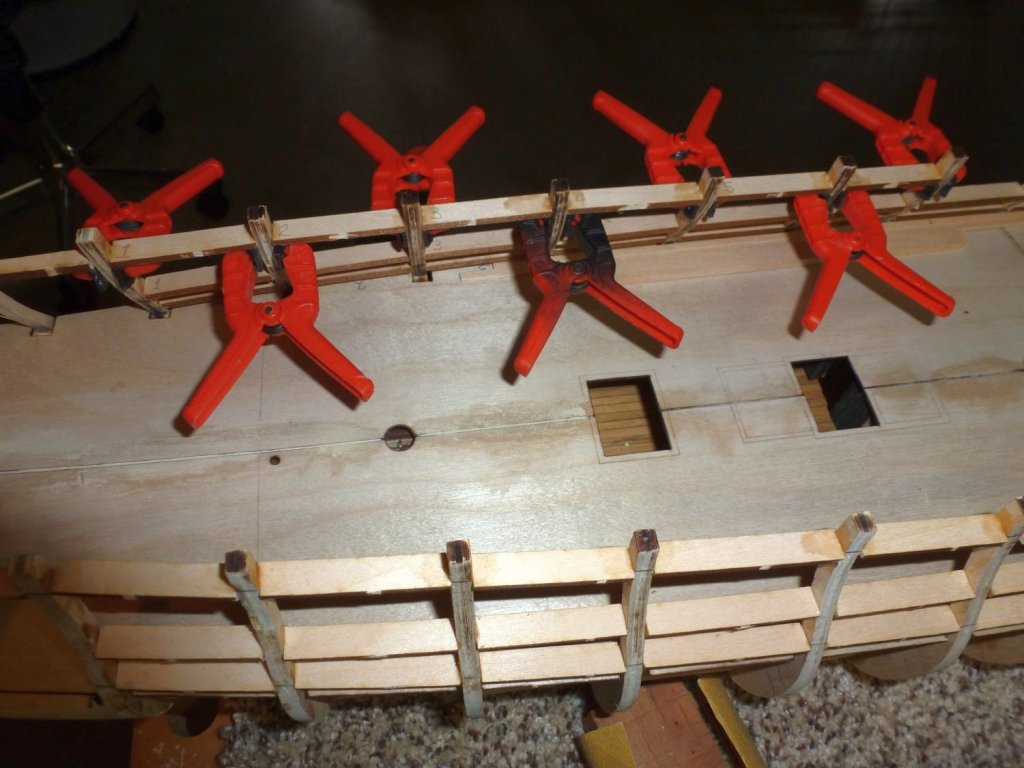
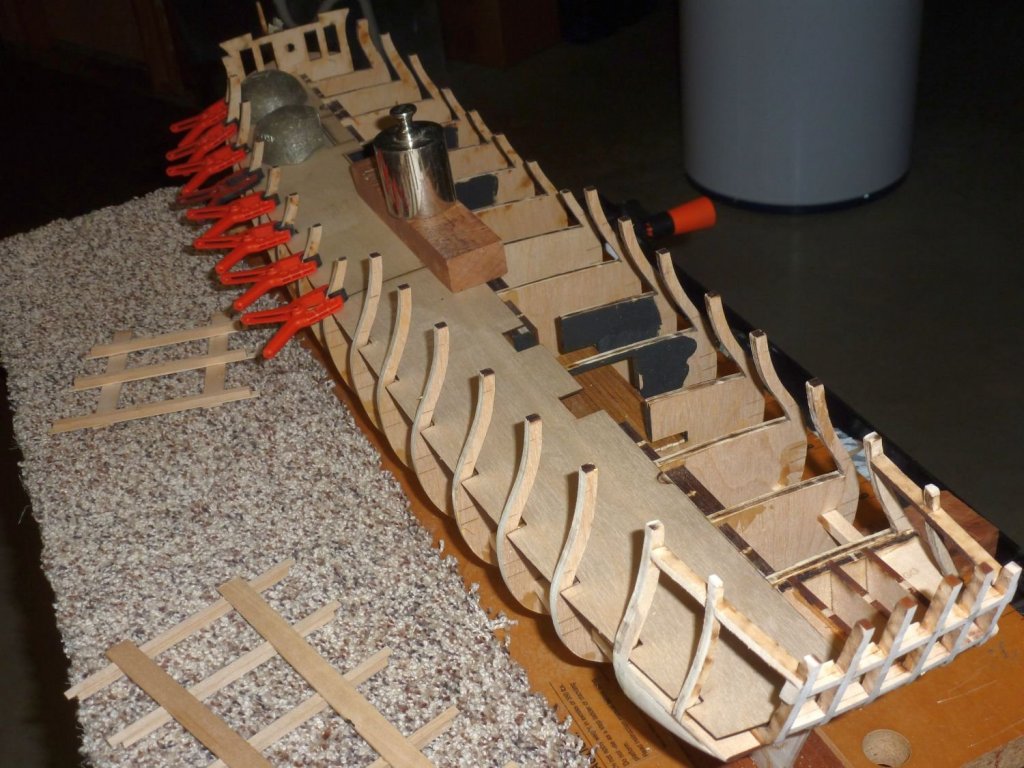
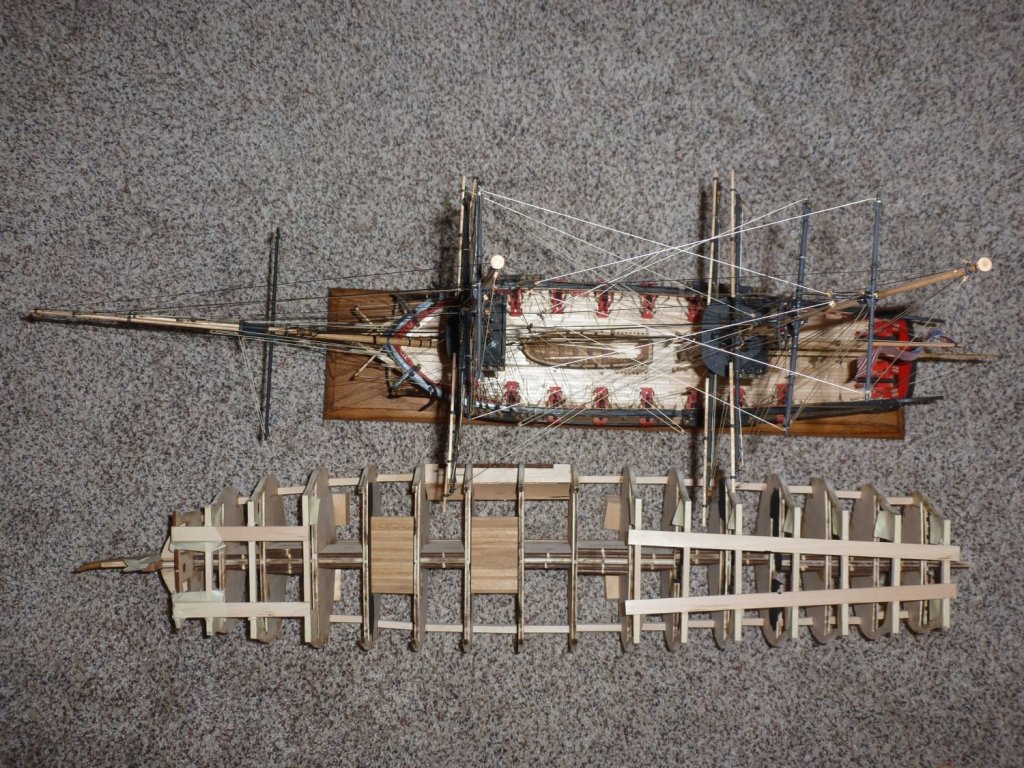
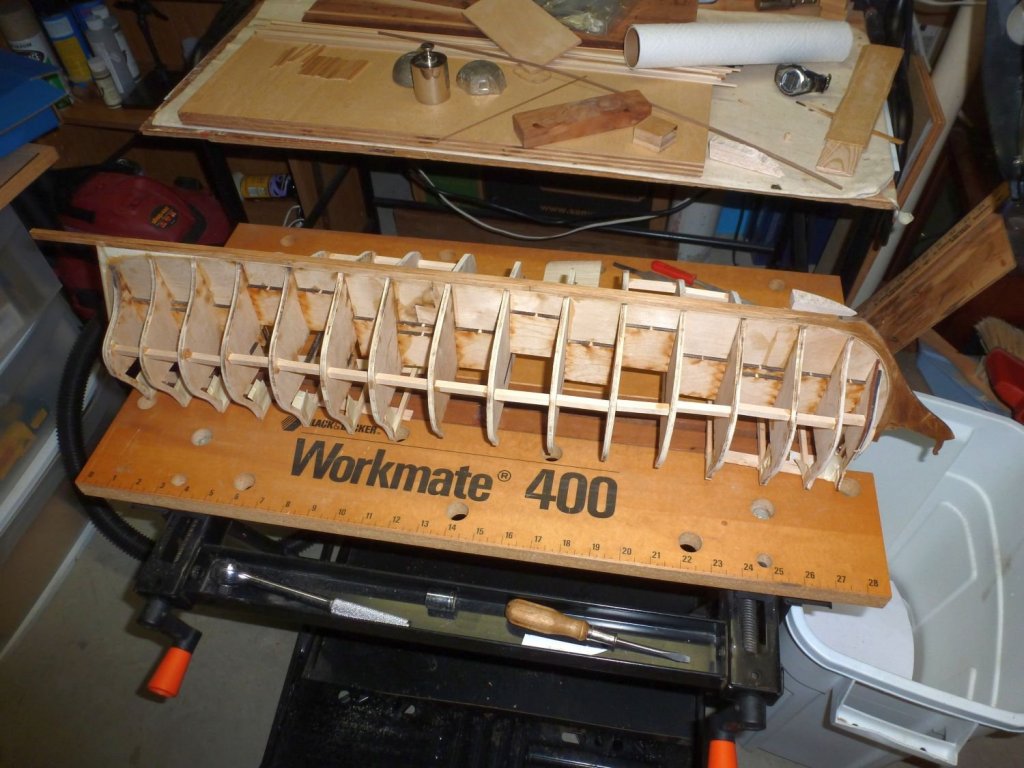
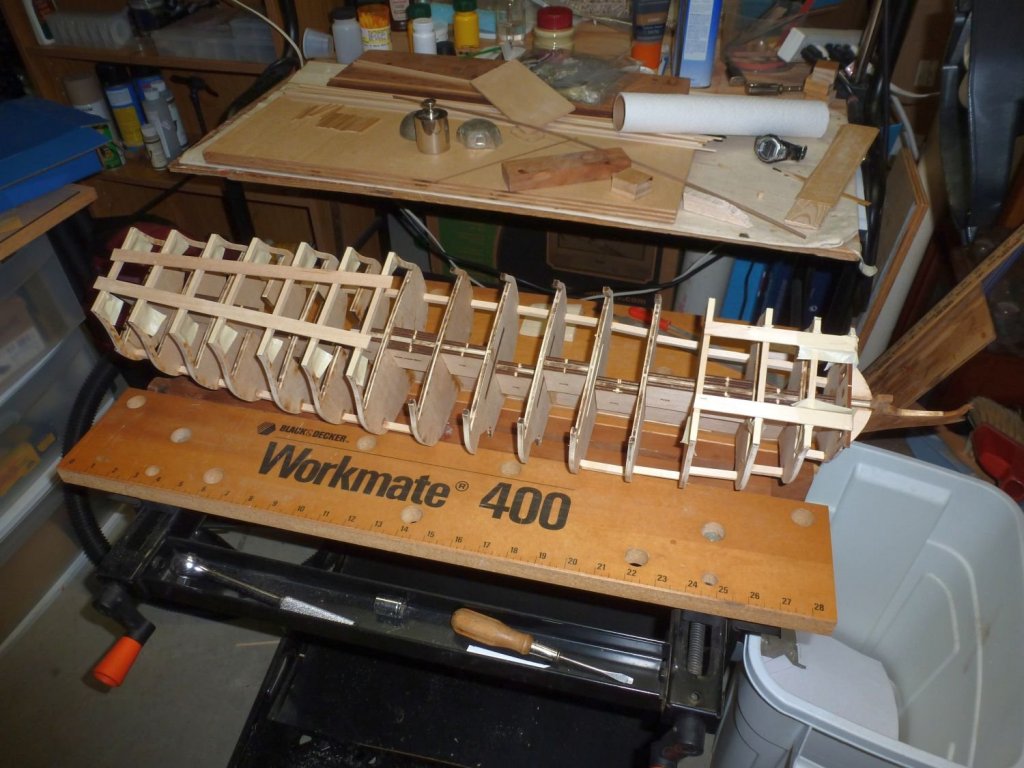
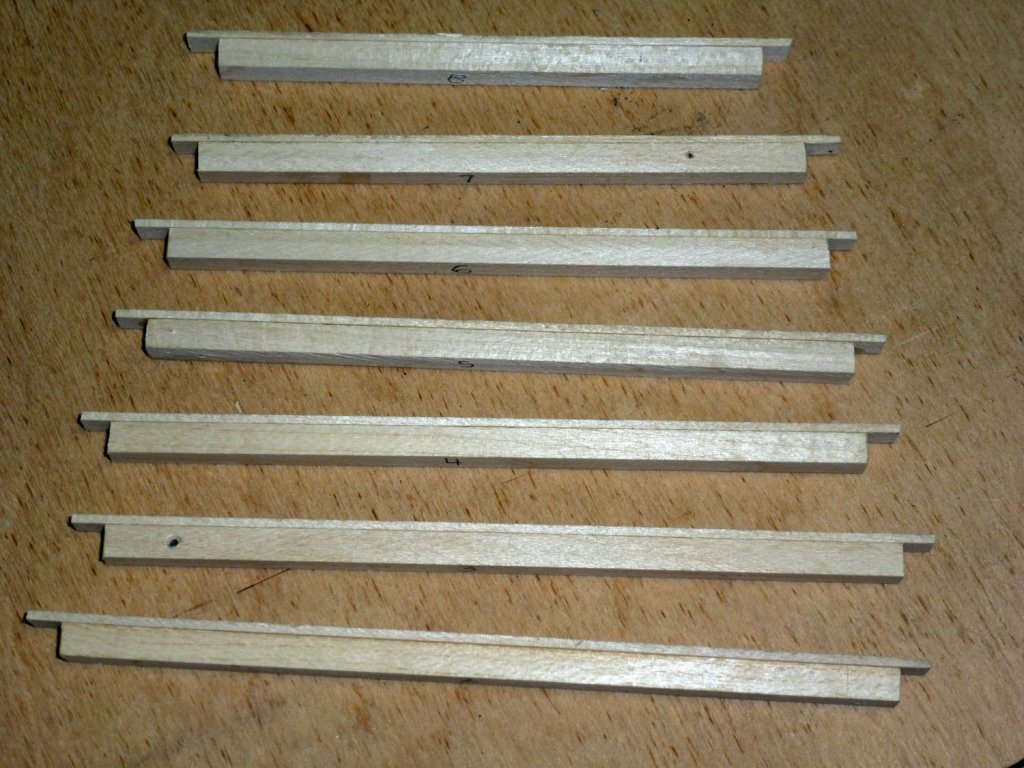
 Today I worked on the gunport sills and lintels for the gun deck and quarterdeck. These have been laser cut, so a specific piece will go in a specific place between two of the bulkhead extensions. To keep things straight, I numbered each sill and lintel segment starting aft and working forward. Similarly, I numbered each space between bulkheads the same. This proved to be a real help. The gunports are 3/8 inch high, and the kit supplies a bundle of 3/8 x 1/8 inch wood. I used these to construct a spacer to maintain the correct distance between sill and lintel for each segment. The spacer I made is 1 ¼ inch wide and fit across all bulkhead spaces except the very forward one. The sills and lintels are all slightly too long, allowing for bulkheads that are not quite square. Each must be trimmed to size. This is a bit tricky. If the sill or lintel is slightly long, it will force the bulkhead extension out of alignment. If it is slightly short, it will not stay in place. I used a wood file to make final adjustments so each piece was snug but not too tight. I discovered that those little orange clamps were perfect for holding the pieces in correct alignment while the glue dried. I put a clamp on each bulkhead extension where it could support the ends of two pieces. The pictures may help explain this.


-
Hi scasey88 - I recently built SYREN and am currently working on CONFEDERACY. The short answer to your question is yes, you probably could...but it would not be historically accurate. SYREN carried 16 carronades. Chuck sells cannons. Google the difference. Carronades were short cast iron cannon mounted on "sleds" and required a smaller gun crew. Chuck's cannon are "long guns" that would have been mounted on gun carriages. If you were to replace the carronades, you would need to buy the barrels and the carriages as well. And yes, I agree...the cast metal carronade barrels that are supplied with the kit are pretty crappy. I kept hoping that Chuck would opt to sell carronade barrels specifically for SYREN because it is such a popular kit, but it hasn't happened yet. I wound up using the kit barrels and afterwards wished I had gone with Caldercraft. Another option is to make your own. Check out Jesse Lee's build log. He did a great job making them out of wood. Probably not what you wanted to hear, but I hope it helps. No doubt others will be chiming in on this as well. <<Gary>>
-
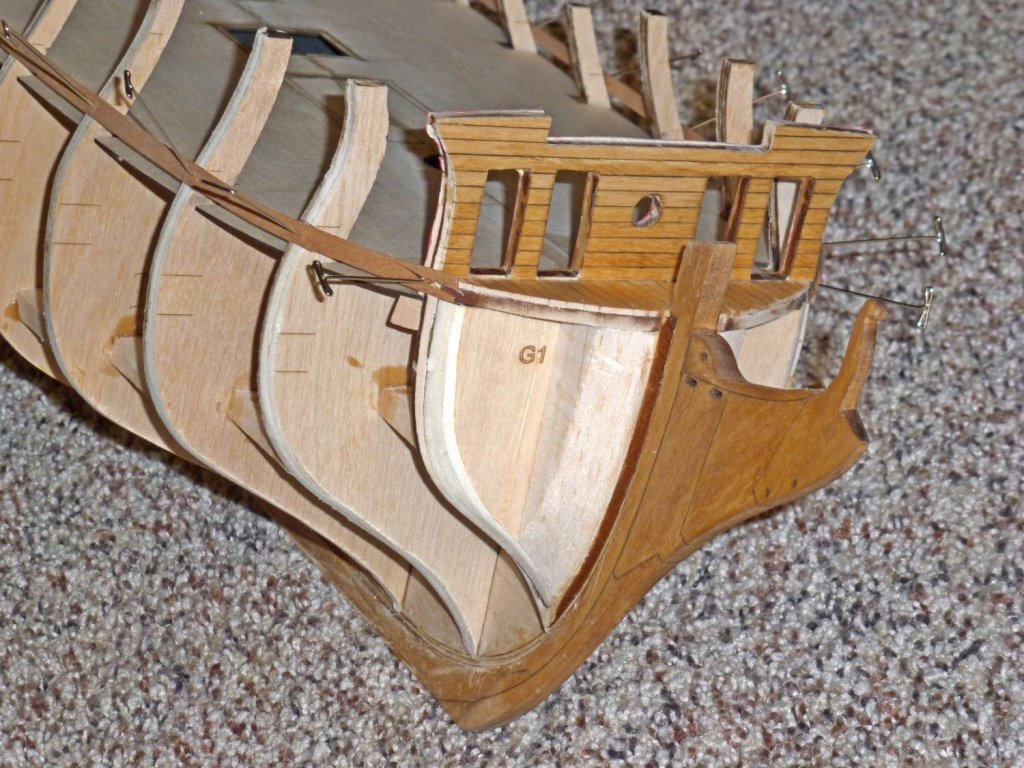
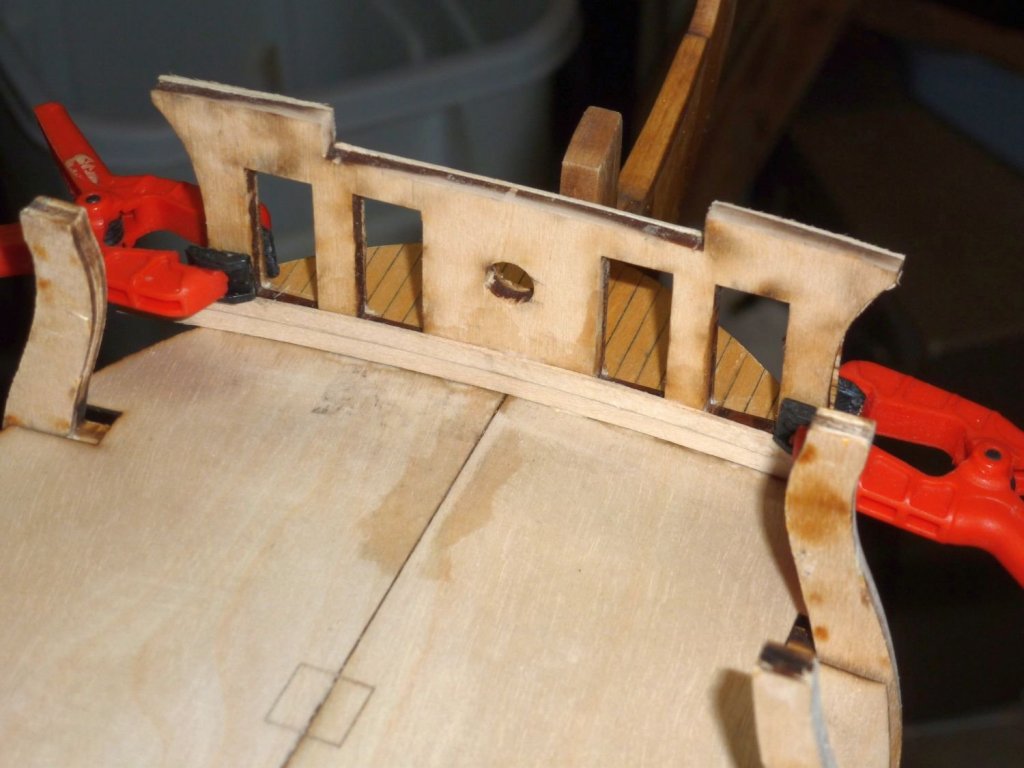
Hi Eric - Thanks for dropping by. There is a lot of progress yet to come. Beginning Chapter 4 of the Instruction Manual – beakhead bulkhead, gun ports, hance pieces, and sweep ports. Here is the link: http://modelshipworldforum.com/resources/Confed/chapter4.pdf So far I have completed the beakhead bulkhead and run the batten to mark the location of the gun port sills. The bulkhead planking is interesting, with two alternatives. Either it can be planked with straight planks, or with curved planks that follow the curve of the deck. I decided to use straight planks on the forward side and curved planks on the aft side. I used the piece of wood from the bulkheads to get the correct curve. After soaking the 1/32” x 1/8” strips, I edge bent them with my fingers and used the small clamps to hold them to the bulkhead sheet with the right curvature. Running the temporary batten was pretty straightforward. Instead of the 1/8 x 1/16 inch strip, I used thinner strips left over from another kit that were intended for a second planking. The laser lines on the bulkheads worked very well for me; but then the bulkheads were all is good relative locations as evidenced by the smooth run of the false deck. The distance from the false deck to the top of the batten was the best confirmation for me that all was good. Here are the pictures:

-
Hi Bob - Glad to hear that you are safe. You owe that son in law one or two of your beautiful ship models... I know there are several people on this web site from Florida, and my thoughts and prayers are with all of them. I have been watching the news this morning as Irma makes her way towards Florida's west coast and it looks really bad. If nothing else, I hope these storms will help to bring us back together as a nation of people helping and caring for one another. <<Gary>>
- 682 replies
-
- 6
-

-
- halifax
- lumberyard
- (and 1 more)
-
Hi Harley - I noticed that you live in south Florida. I hope Hurricane Irma doesn't cause you problems. Stay safe. <<Gary>>
-
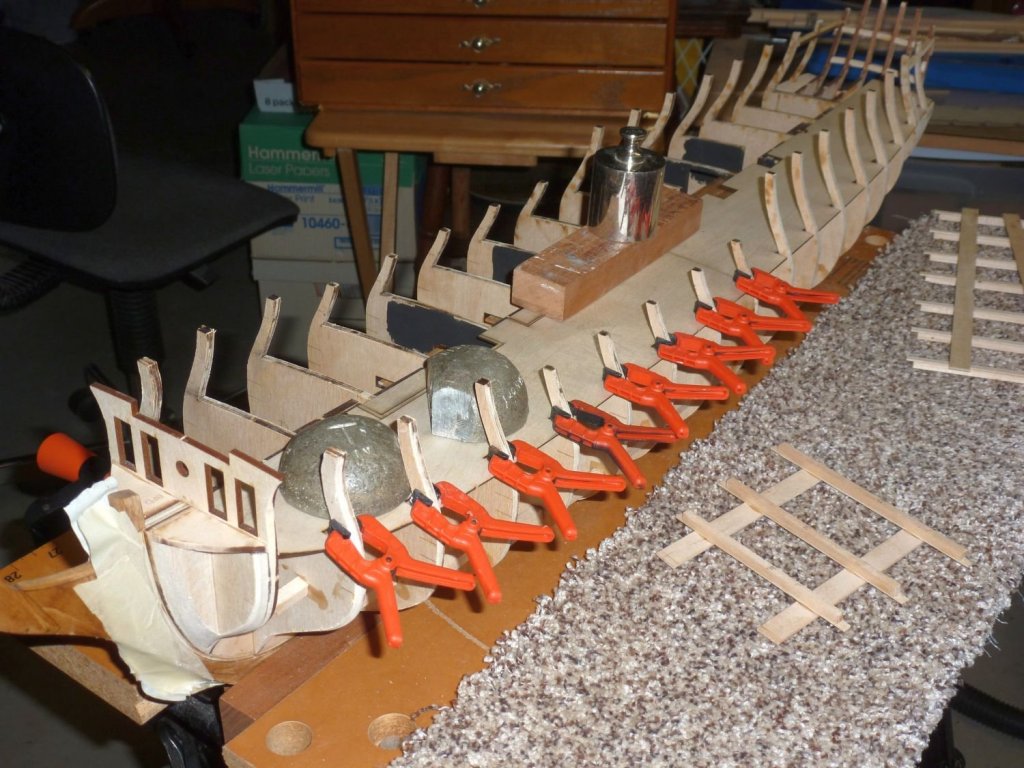
Hi Zappto and welcome aboard. Harley, those little orange clamps are Bora 1 Inch Mini Spring Clamps and come in a 20-pack (BORA 540520). I got mine from Amazon for $11.00. And you can always find other stuff you can buy to get you to the $25 for free shipping. Here is the link: https://www.amazon.com/20-pack-540520-yourself-polymer-clamps/dp/B008FLNECW/ref=sr_1_2?ie=UTF8&qid=1504460750&sr=8-2&keywords=bora+mini+spring+clamps I use them a lot and find them handy to have. Its nice to have 20 available when you need to do things like secure down the false deck, or when planking to get the planks tight together. They have held up well. I did lose the pad from one side of one clamp, but otherwise OK. This morning I noticed that I never faired the inboard side of the transom so that was my project for today. I found that sandpaper folded and hand-held did a much better job than wood files or sanding sticks. It is a complex concave curved surface so flat surfaces like files or sanding sticks don't work as well here. More advice - don't skimp on the sandpaper - buy the "good stuff". It works better and lasts longer. <<Gary>>
-
Hi John - Yup, we need all the help we can get when it comes to eyeballing bulkheads and other ship's parts. But also, keep the bulkheads as FLAT as you can until you are ready to glue them in. They might have a tendency to warp just a bit. I did everything I could, and yet when I installed the false deck, I discovered that a couple of the bulkheads were "off" by just a little. But I don't think it will make much difference in the end. <<Gary>>
-
I have finished installing the false decking consisting of four laser cut sections of 1/32 inch thick plywood. The deck pieces additionally have laser reference lines showing the locations of hatches, etc. Some of these were “burned” too heavily, and the plywood was nearly cut through. I soaked super glue into these cuts to strengthen them and avoid portions of the deck coming off. I did this before and after gluing the sections. I also painted Titebond glue into the seams betweeen the pieces, and sanded these after the glue had dried. (this shows in the photos) Additionally, I glued ¼ inch square wood pieces to support the false deck where it joins the beakhead bulkhead. When I glued each section, I used small clamps to hold down the false deck at each bulkhead extension, and put heavy weights amidships. Here are the pictures:


-
Hi Douglas - You are certainly welcome. Glad I could help. That's one of the nice things about this web site - people helping other people without the "snarky" remarks so often seen on web sites. All things considered, you are doing an admirable job; especially for your first build. <<Gary>>
- 55 replies
-
- 1
-
-
- confederacy
- model shipways
- (and 1 more)
-
Hi Dirk - Thanks for your input and your advice. I will at least continue to check the hull for "fairness". Today I will be gluing on the false deck. I have already dry fit all four sections in position, and would strongly recommend to future Confederacy builders that you do this. As careful as I thought I was when squaring the bulkheads, some minor trimming was still needed to make it fit properly. Photos will follow in a later post. <<Gary>>
-
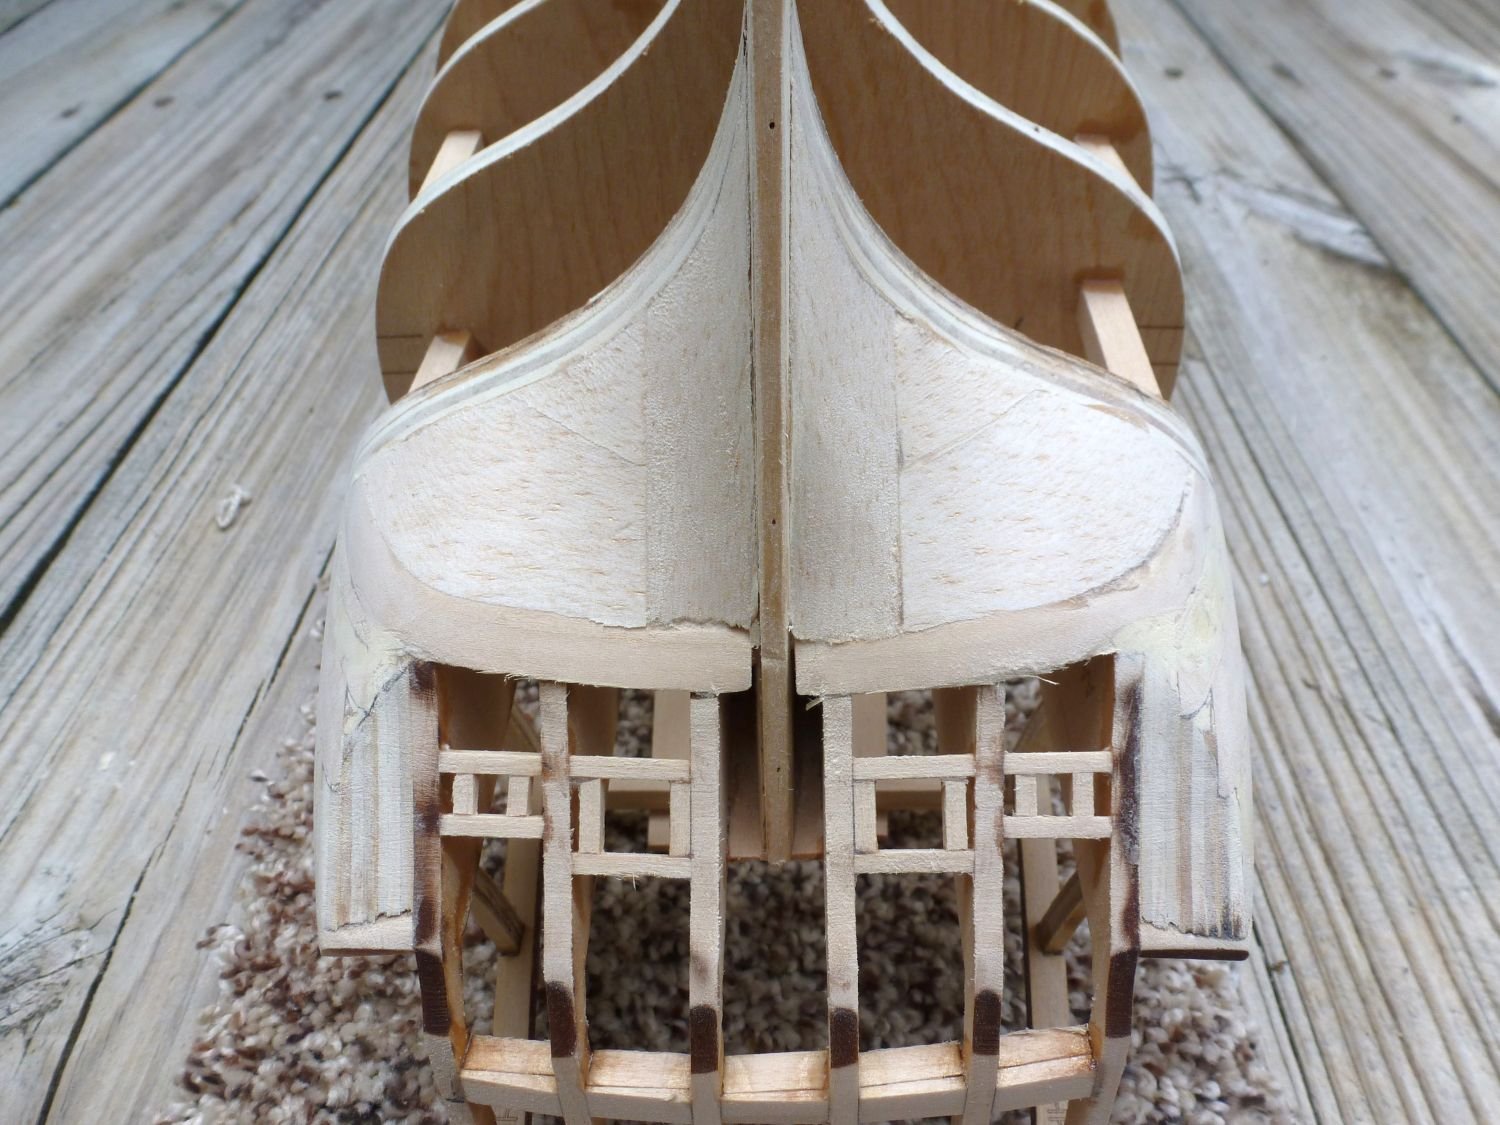
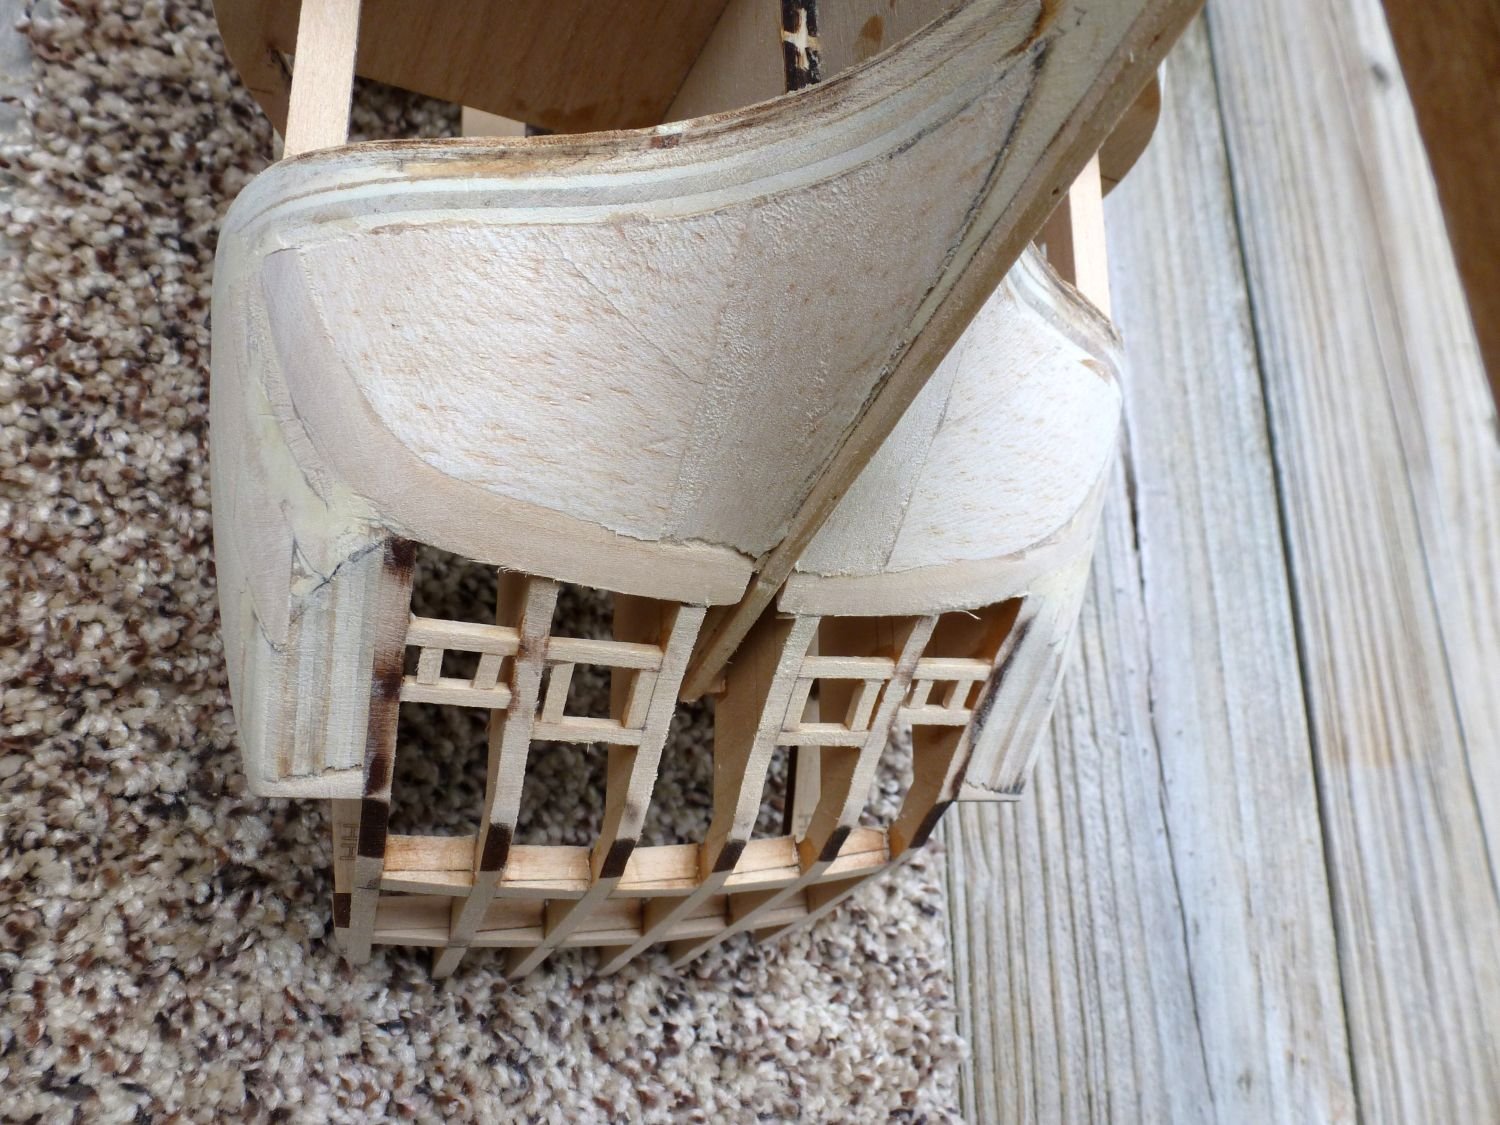
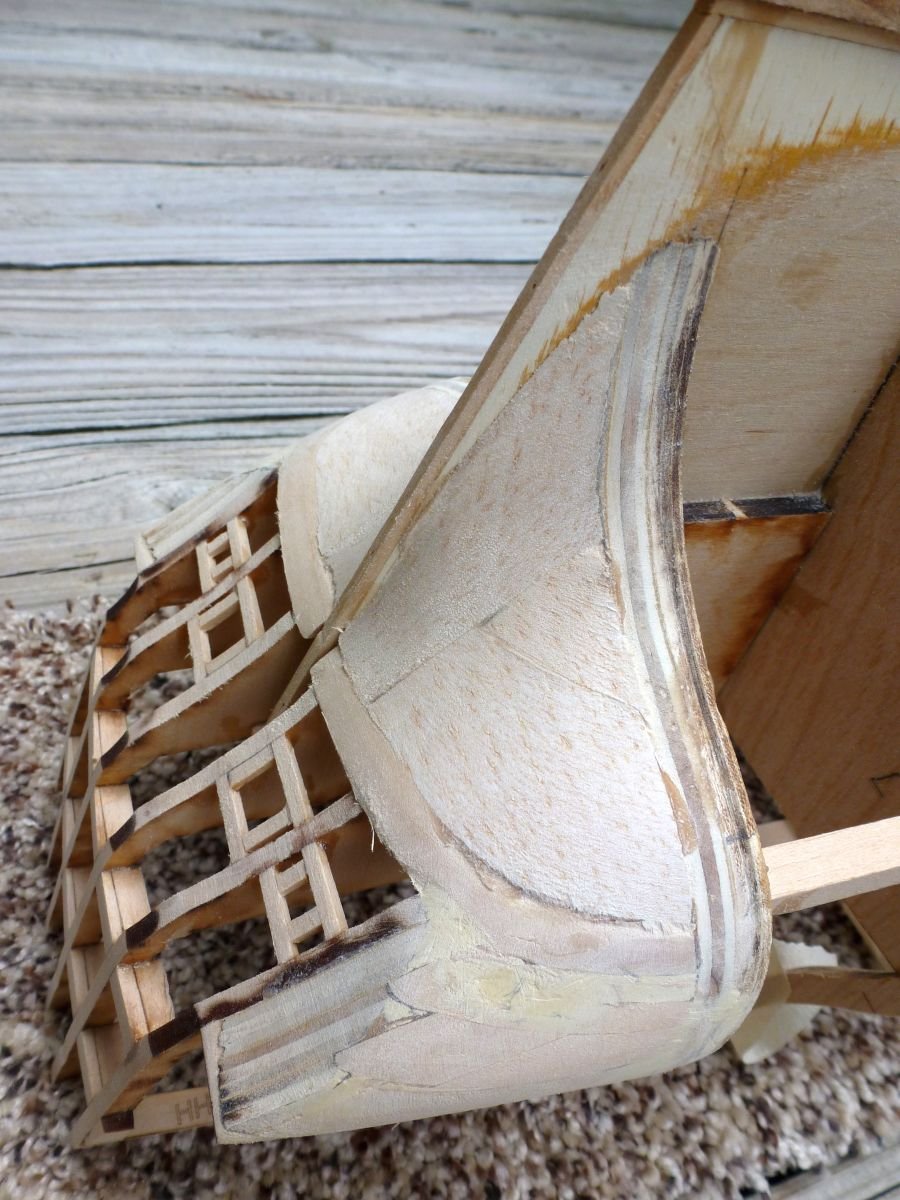
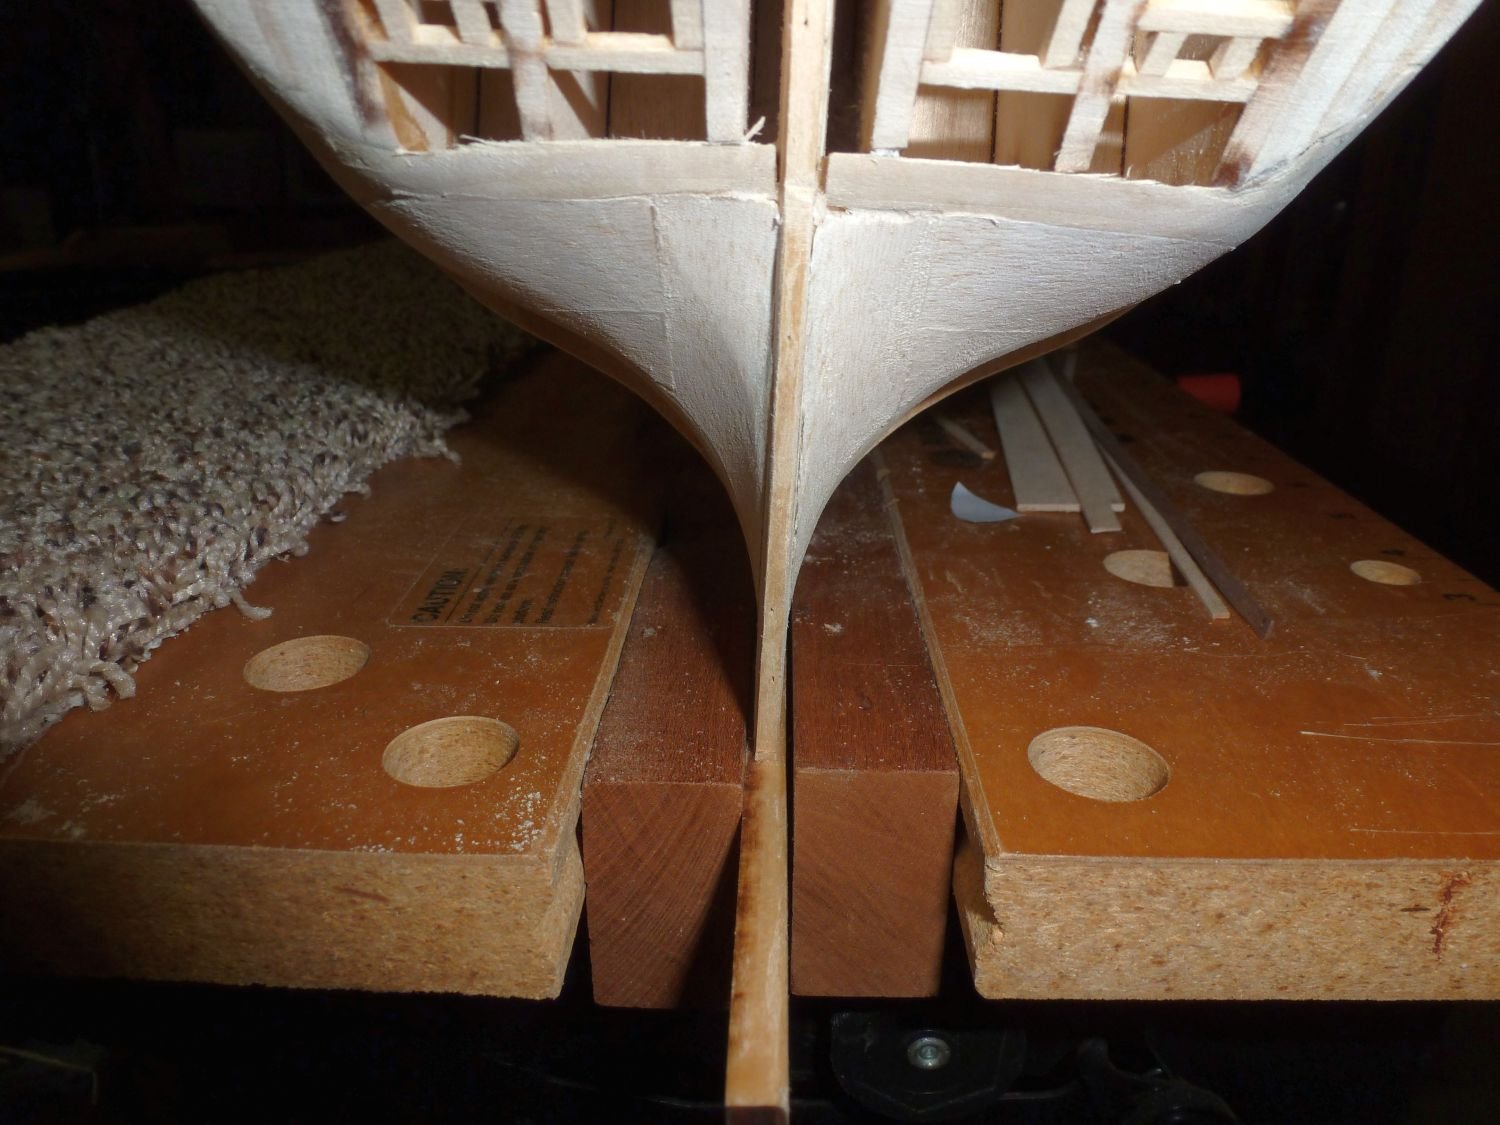
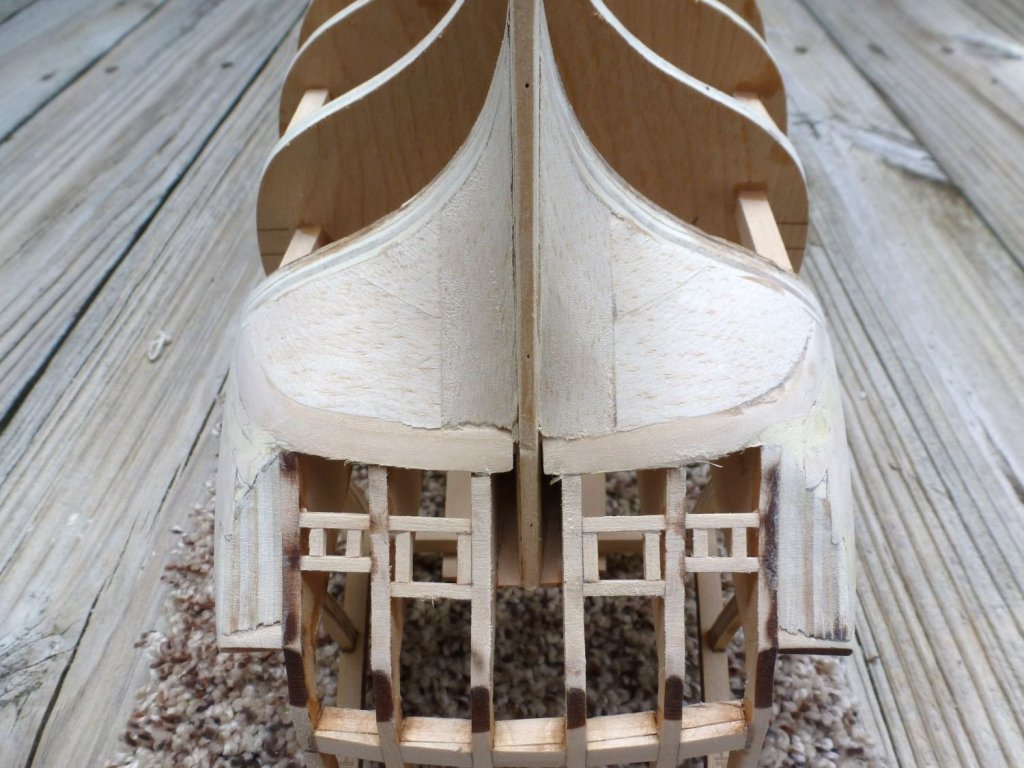
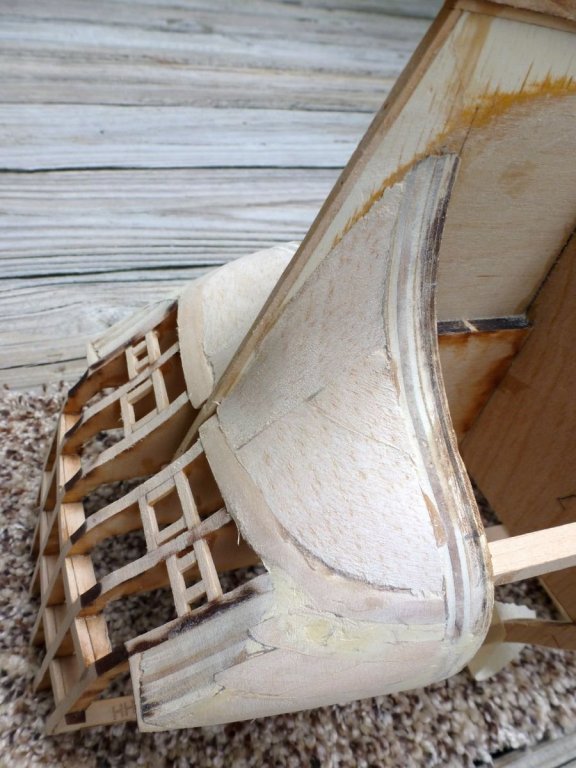
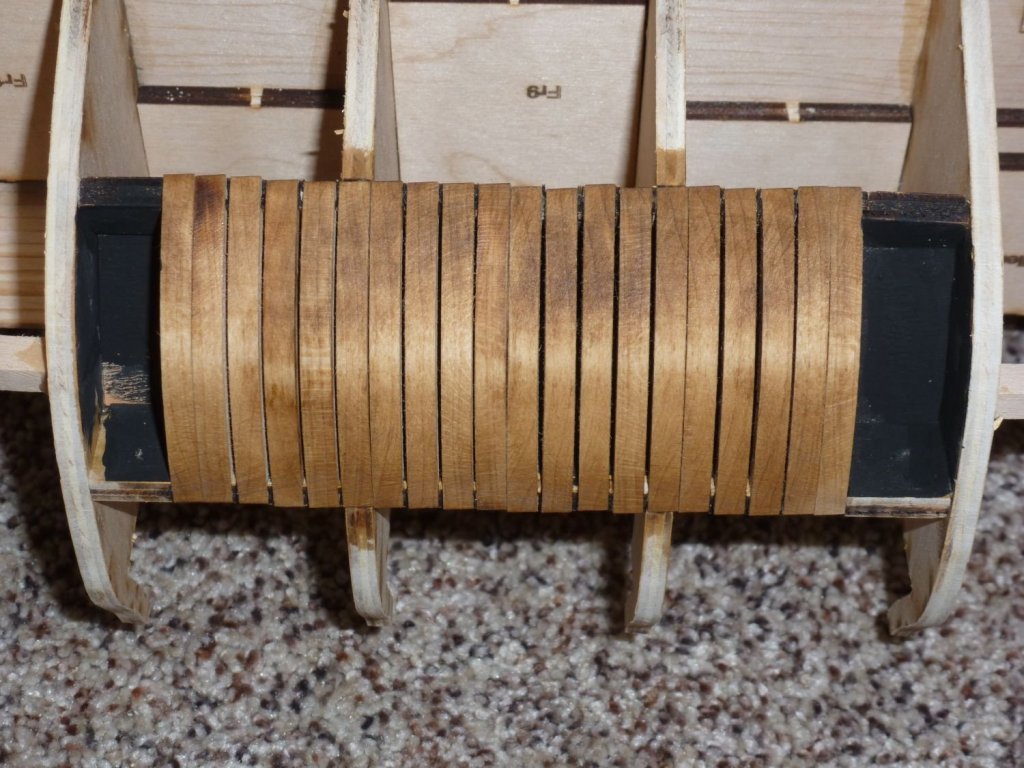
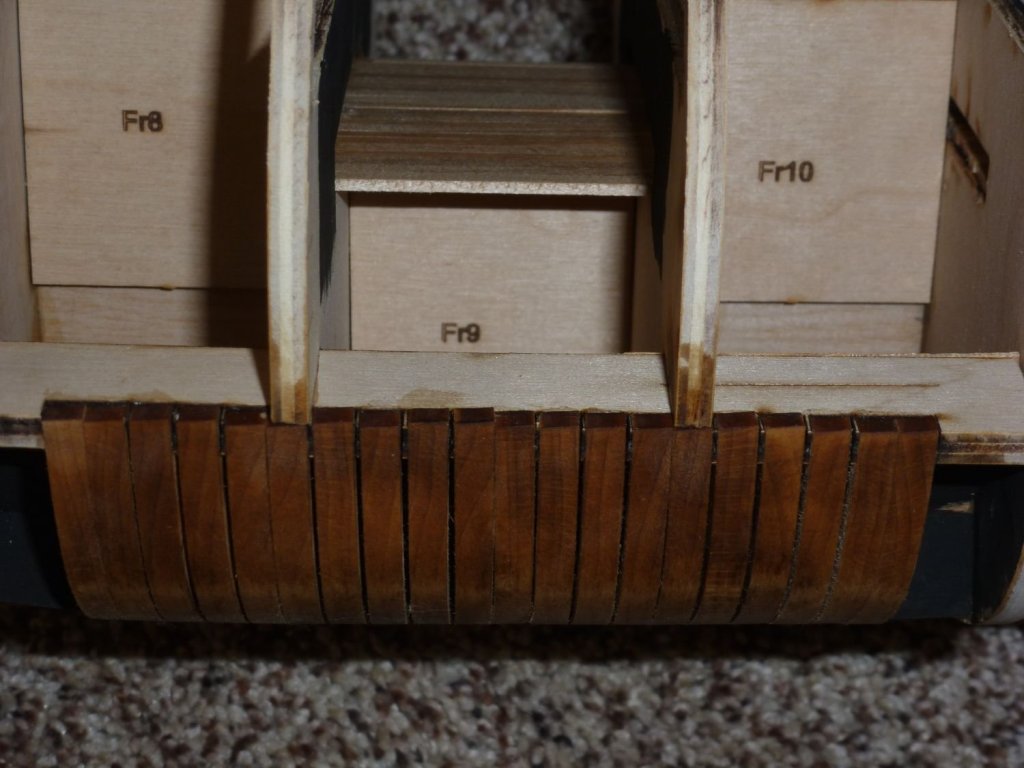
Hi CDW, and welcome aboard. I have spent a lot of time agonizing over the filler strips under the stern counter. I read and re-read the instructions and studied all of the Confederacy build logs that I could find (of course, as usual, Dubz was the most helpful). I decided to completely fill this area to make sure I had the right curves and shape. I used the basswood for areas where the planking would end, like the underside of the counter. Where just "filler" was needed, I used balsa because it is much easier to work with sandpaper and wood files. I checked for "fair" using the same 1/8 x 1/16 inch strips that will be used for planking. The dry strip easily followed the curve from keel up on both sides. Here is how they look right now. I welcome any thoughts or suggestions; especially by other Confederacy builders. Dubz?? Chuck??


-
Hello Douglas - I am also building Confederacy and am working on the filler strips under the stern counter. I have been looking at other build logs to try and understand how the final shape should look. I hate to say it, but I don't think yours are quite right. Check the instructions on page 19: "The outer edge of the strip should be flush with the edge of the lower counter (as defined by the stern frames)" and take a look at the picture. Dubz' build log illustrates how this should look: Click on the arrow at the upper right to go to the correct entry. With your current filler block, I don't think the planking will turn out very well. <<Gary>>
-
Thanks for the kind words, captgino, John, and Mike. Yes, it is a well designed kit with a lot of nice things that will contribute to beautiful result...unless the builder really screws it up... And, as always, thanks for the "likes". I am still finishing off the stern and the fairing. As other build logs attest, there is a LOT of sanding to be done here. Augie said it best: " This turned out to be an exercise in Olympic-level Freestyle Sanding " No pictures this time but I will try to post some soon. <<Gary>>
-
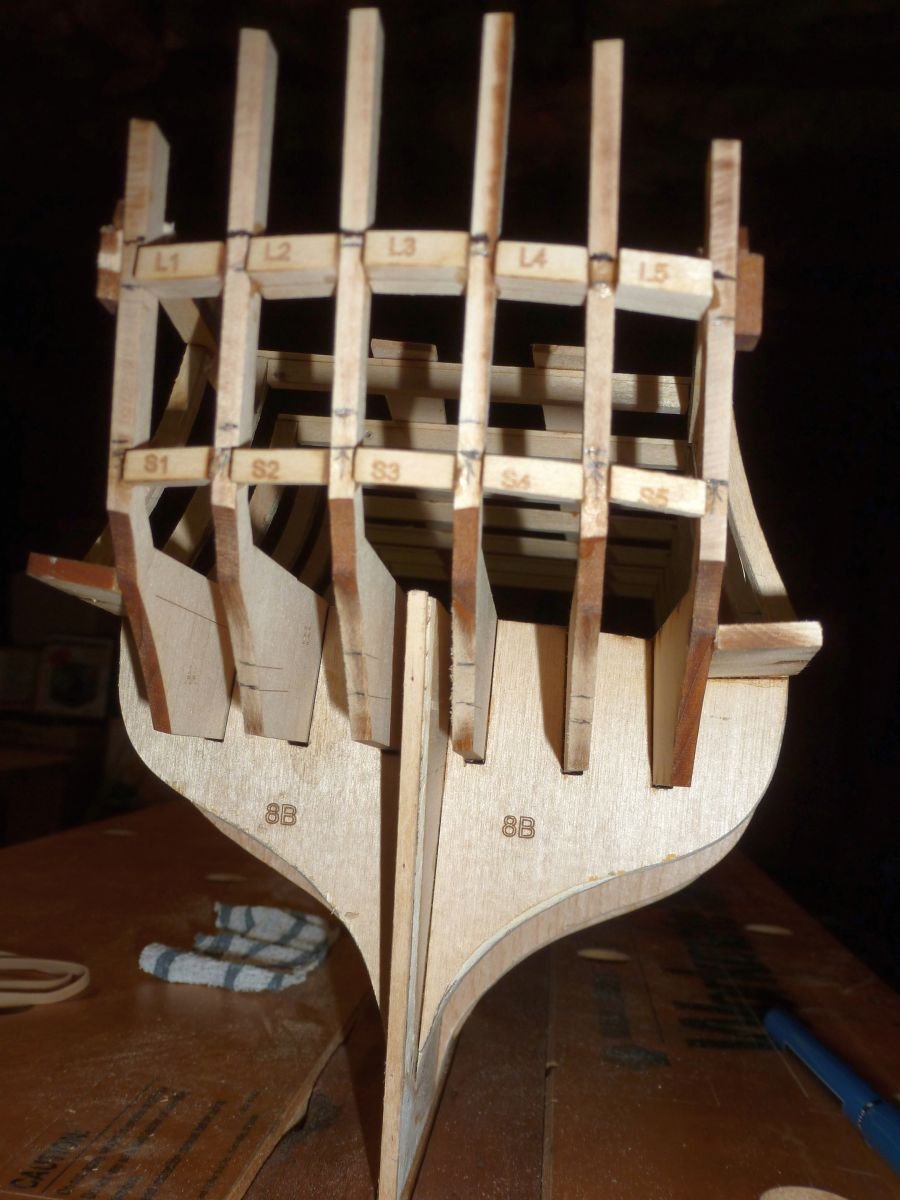
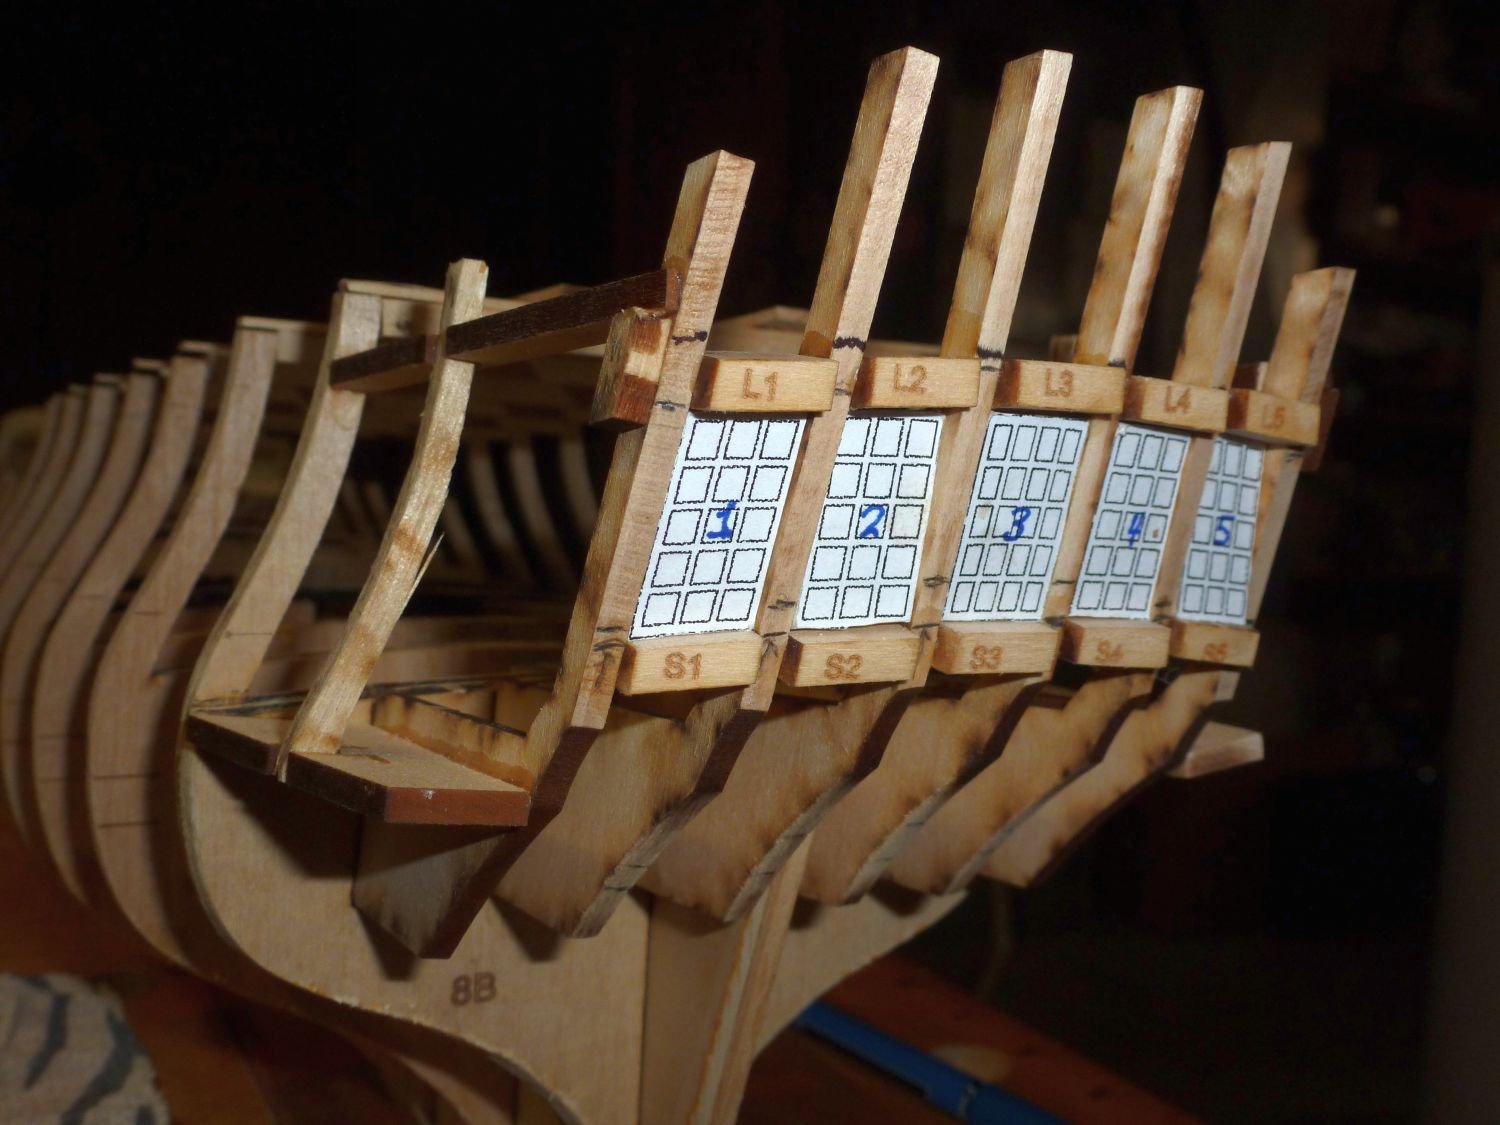
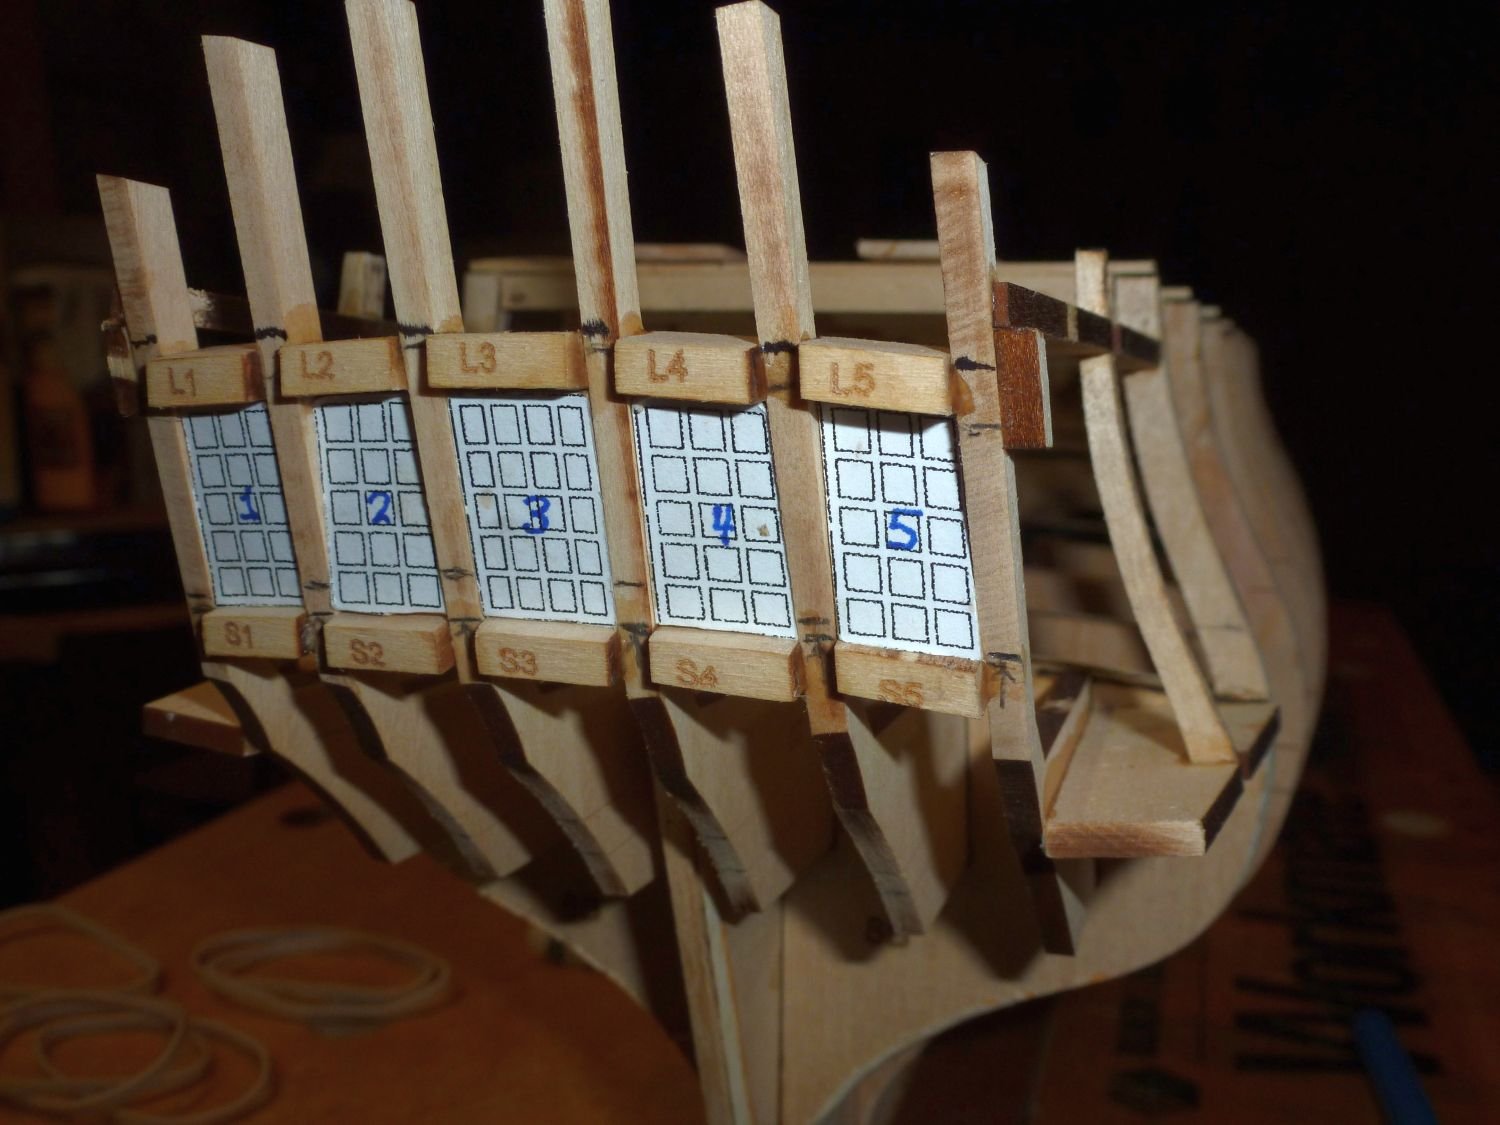
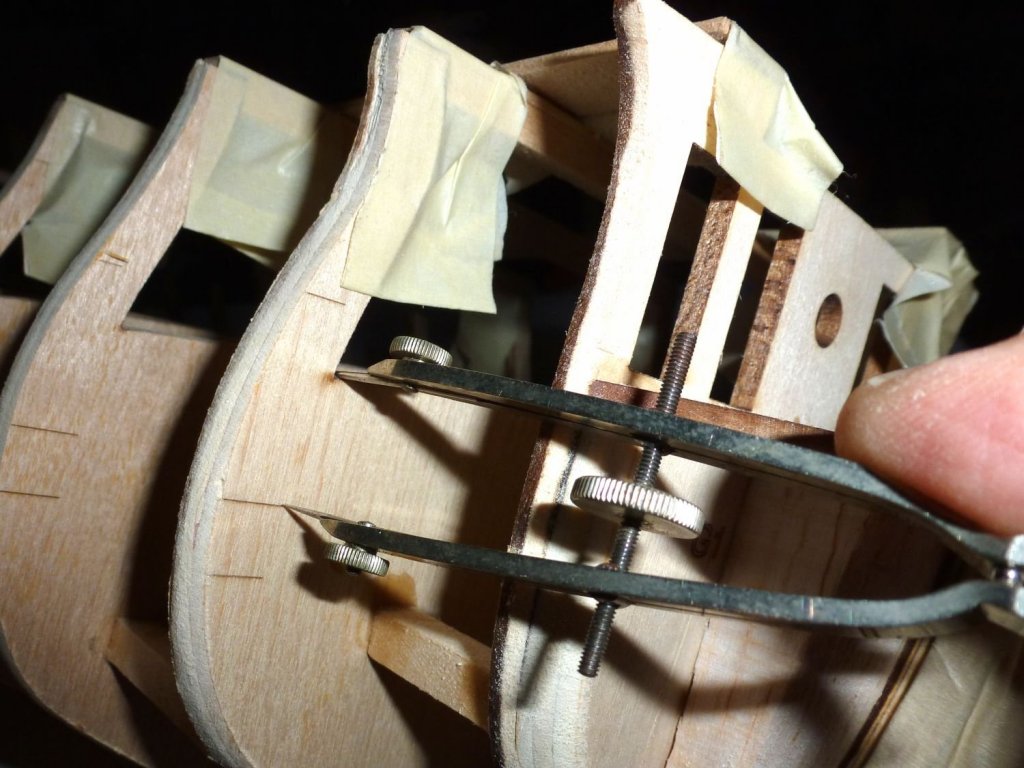
I am still working from Chapter 3 of the Instruction Manual. I completed the stern framing and installed the stern window sills and lintels. I made templates of each window and used these to insure a correct fit. Gotta say...this was one nerve-wracking operation.


-
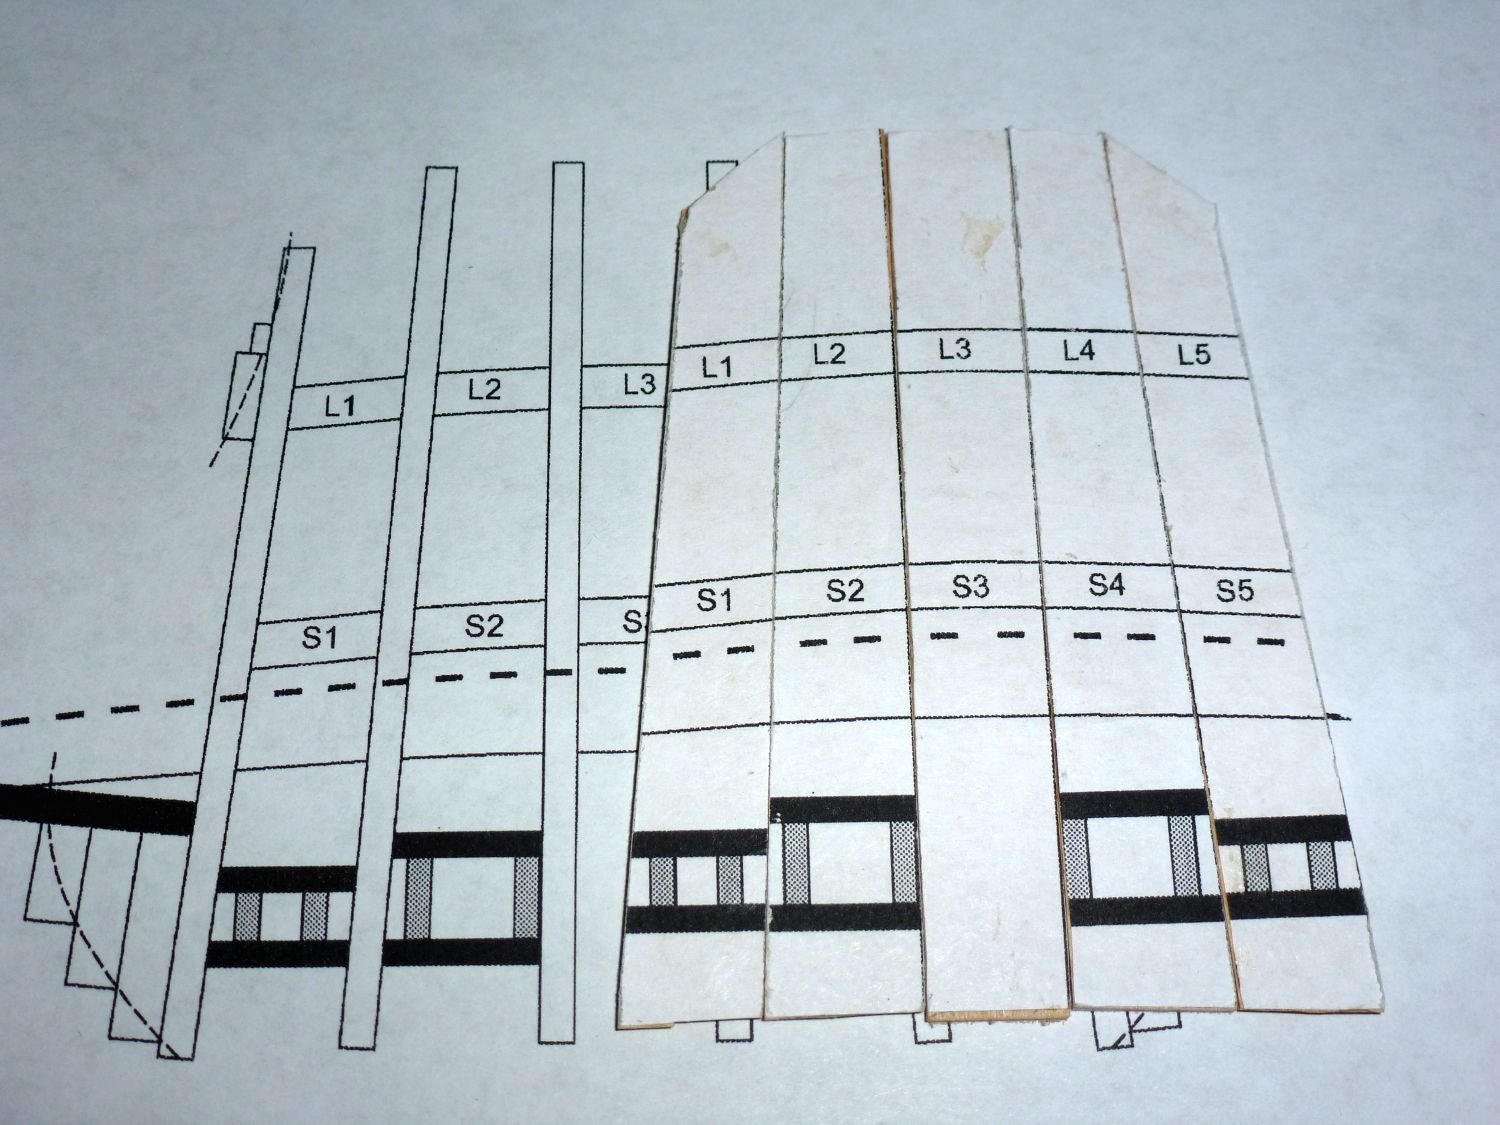
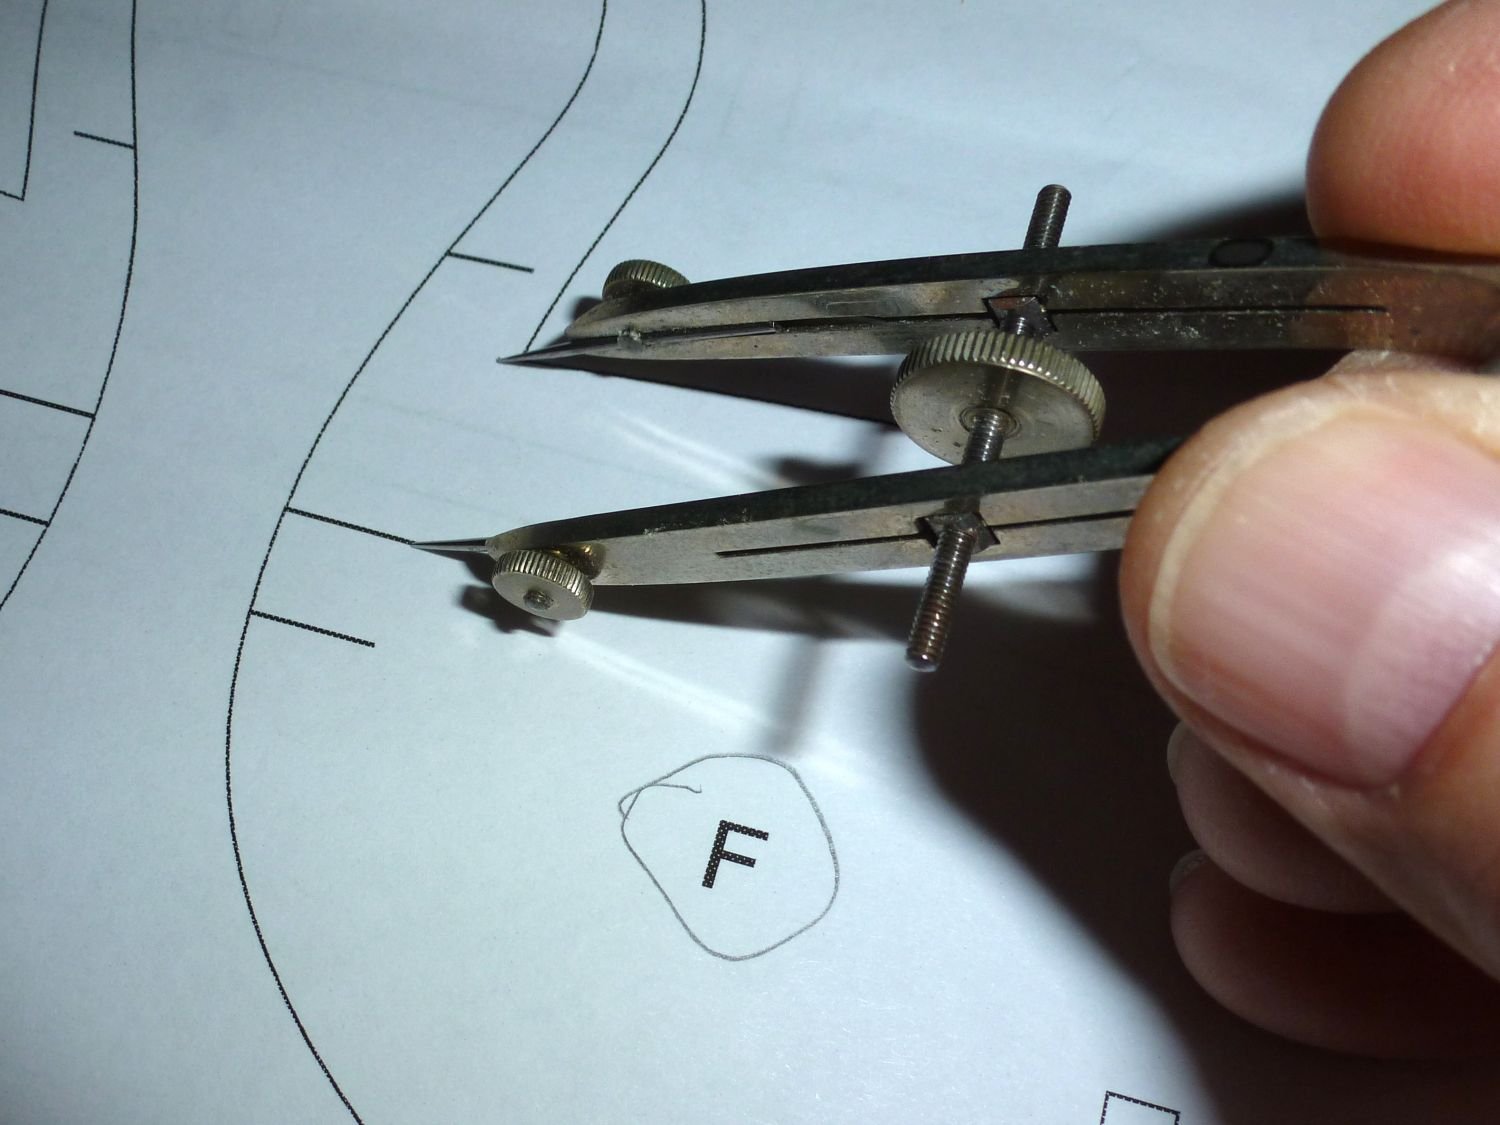
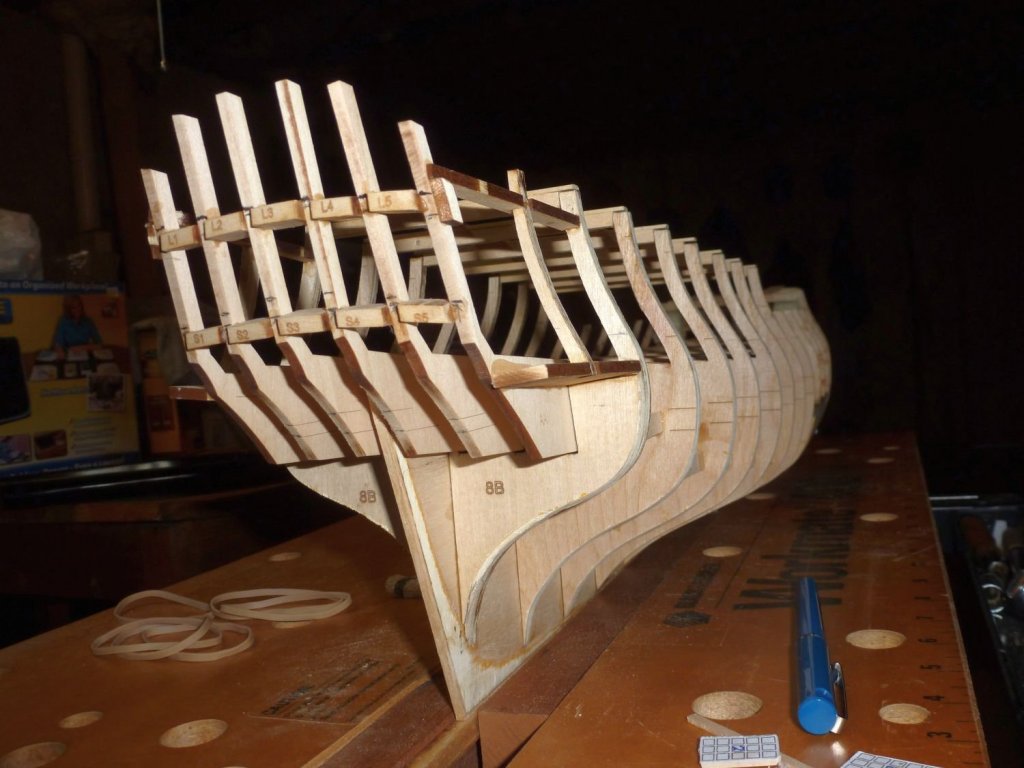
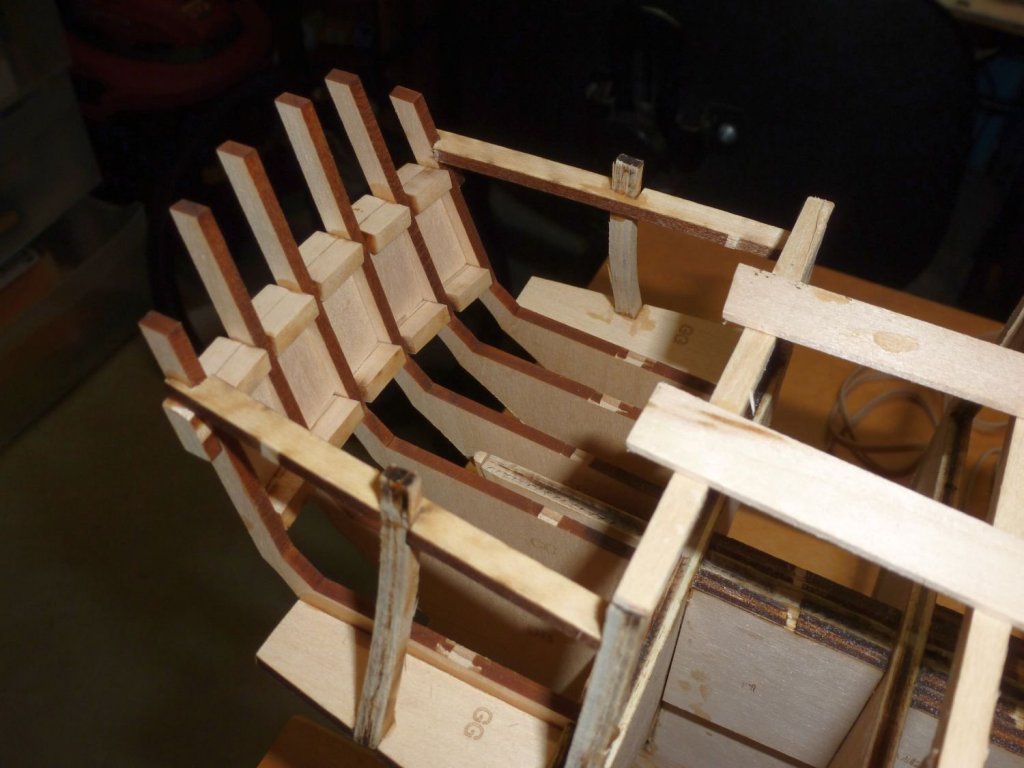
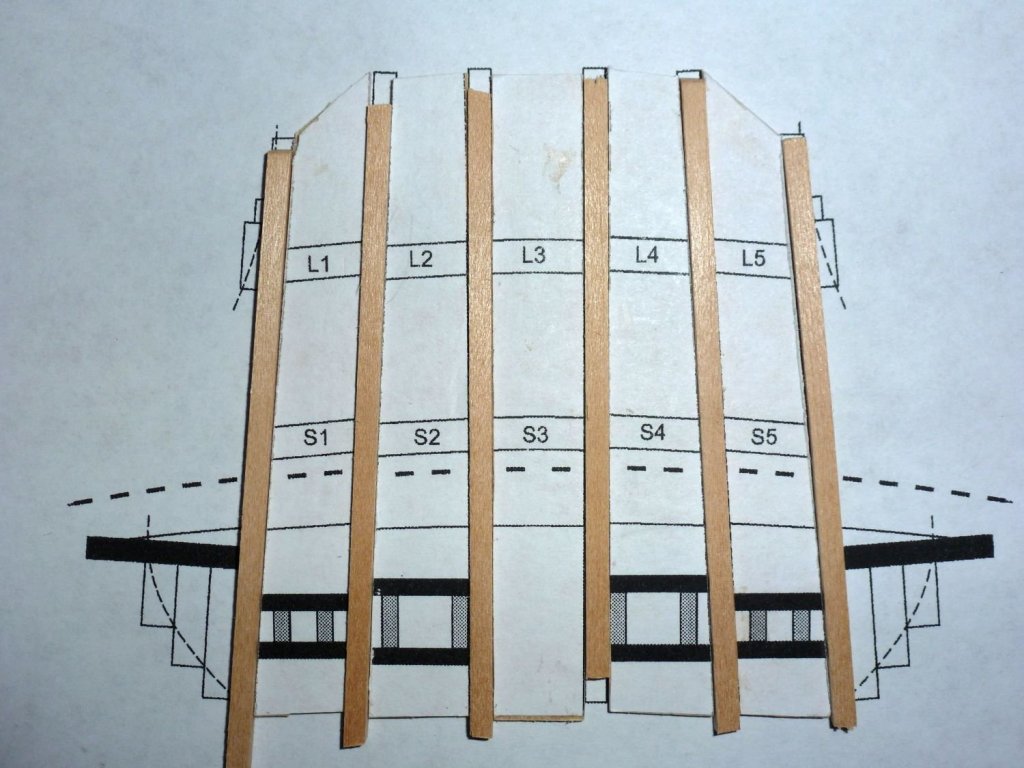
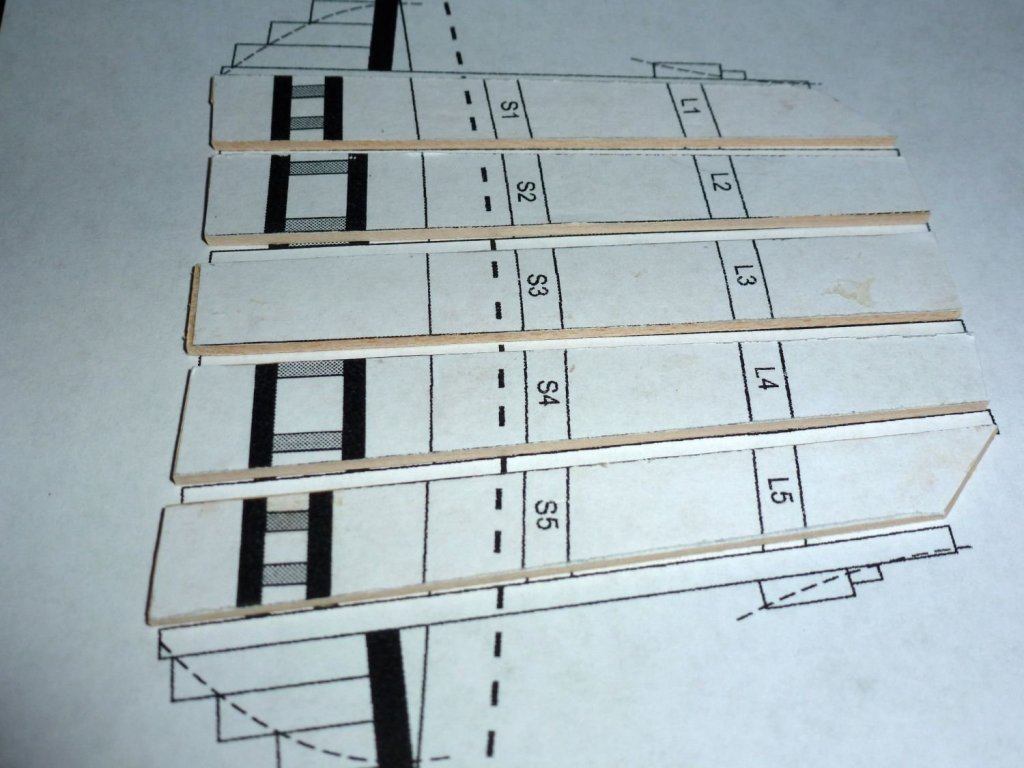
I am both fairing the hull (still) and starting to work on Chapter 3 Framing the Stern. Here is the link: http://modelshipworldforum.com/resources/Confed/chapter3.pdf Most folks will agree that this step is one of the most difficult and complicated parts of model ship building. I think this is especially true for Confederacy because all of those laser cut windows need to fit, and the many pieces / parts must come together with precision. The first step in this is to glue in the six basswood stern frames. The slots that were laser cut into the most aft bulkhead help with this, but there is still wiggle room. To help precisely position them, I made a copy of the stern template and carefully cut out the five “spacers” that fit between the stern frames. I glued them onto 1/16” basswood and then trimmed the basswood to exact dimensions. I will use these to help define the correct vertical attitude of each stern frame as I glue it into place. These spacers will also help me locate where the sills and lintels for the stern windows will go. The stern frames are 1/8 inch thick, so I found a 1/8 X 1/8 strip of wood (leftover from previous builds) and superimposed these and the spacers I created over the stern template to make sure the fit was EXACT. I also checked measurements against the actual windows in the kit. The pictures are below. I have given some thought to the issue of laser guidelines on the bulkheads maybe not matching Chuck's plans. I have been using a drafting compass to compare dimensions between bulkheads and plans and all seem to match. Dirk – which laser guidelines should I check most?


-
Hi Chuck - I found the section you mention on Dubz' build log page 4 near the bottom continuing on the top of page 5. I had seen it before, but will be sure to pay attention when I get to this stage. As I understand the problem, I need to check the location of the laser marks on each bulkhead against their locations on Chuck's plans. Chuck's plans are correct...the laser marks may not be. Thanks for looking out for me. One of the things I appreciate about this web site is the friendly helpful advice and support from other builders. And one of the things I appreciate about this hobby is that it keeps my mind active - I need to keep thinking things through and not just blindly following directions and gluing parts together. Thanks again for your help. <<Gary>>
-
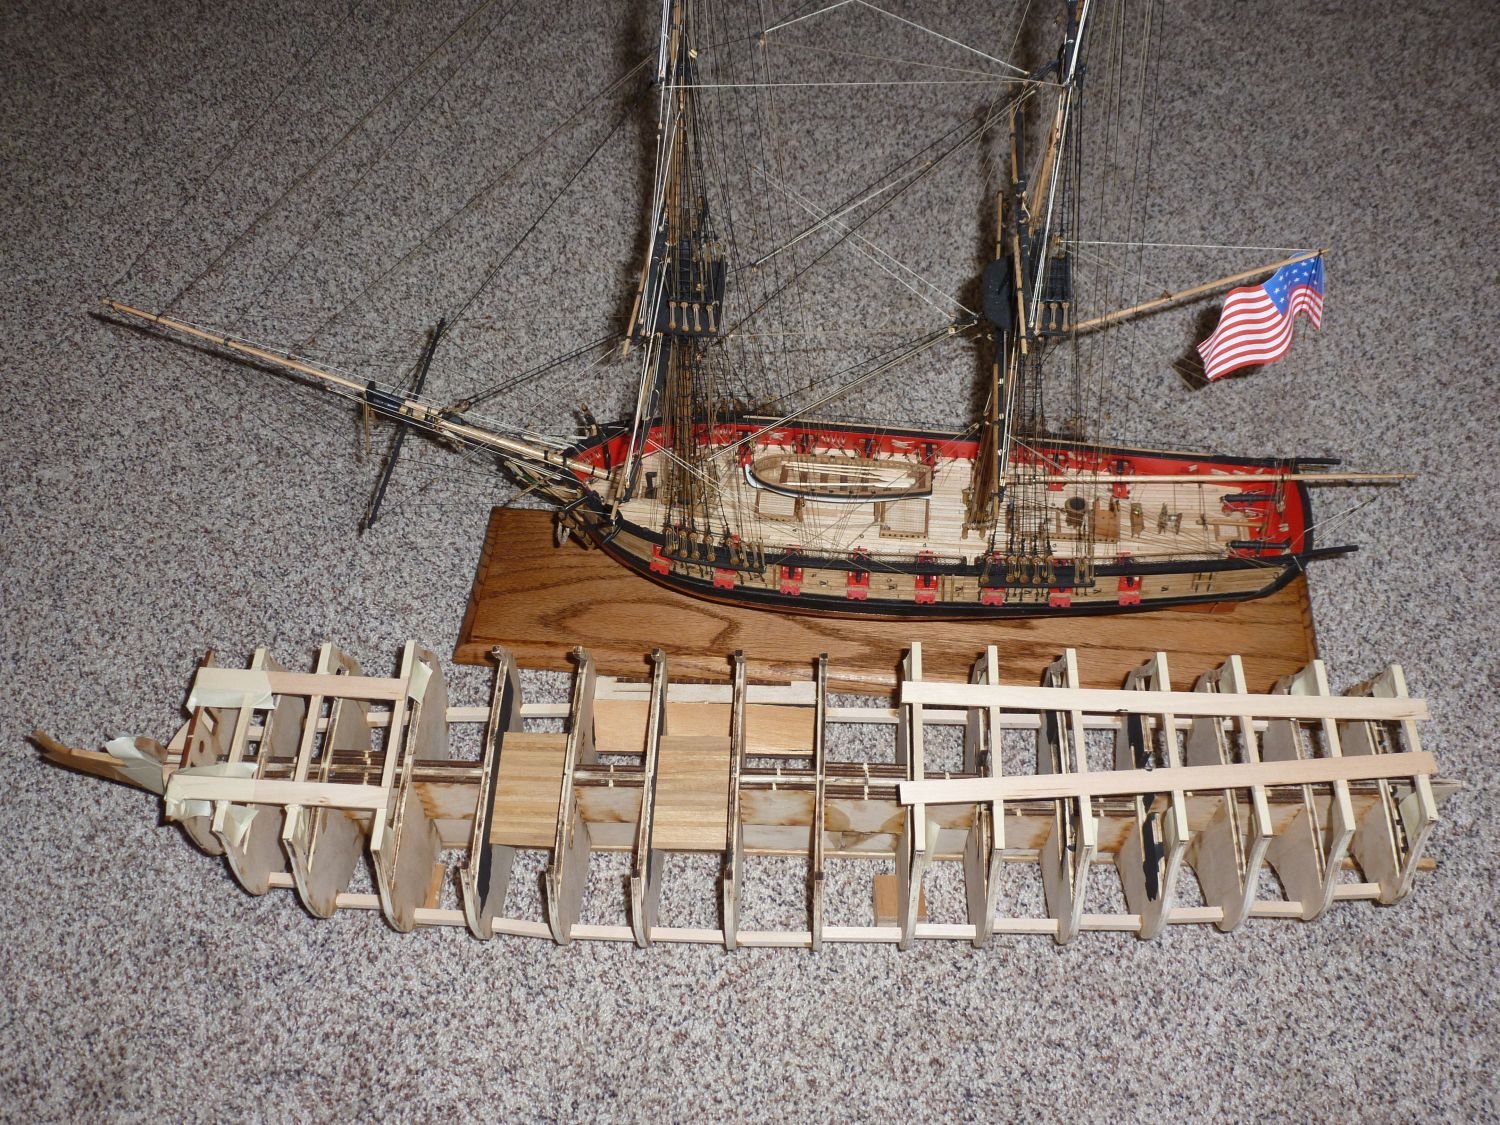
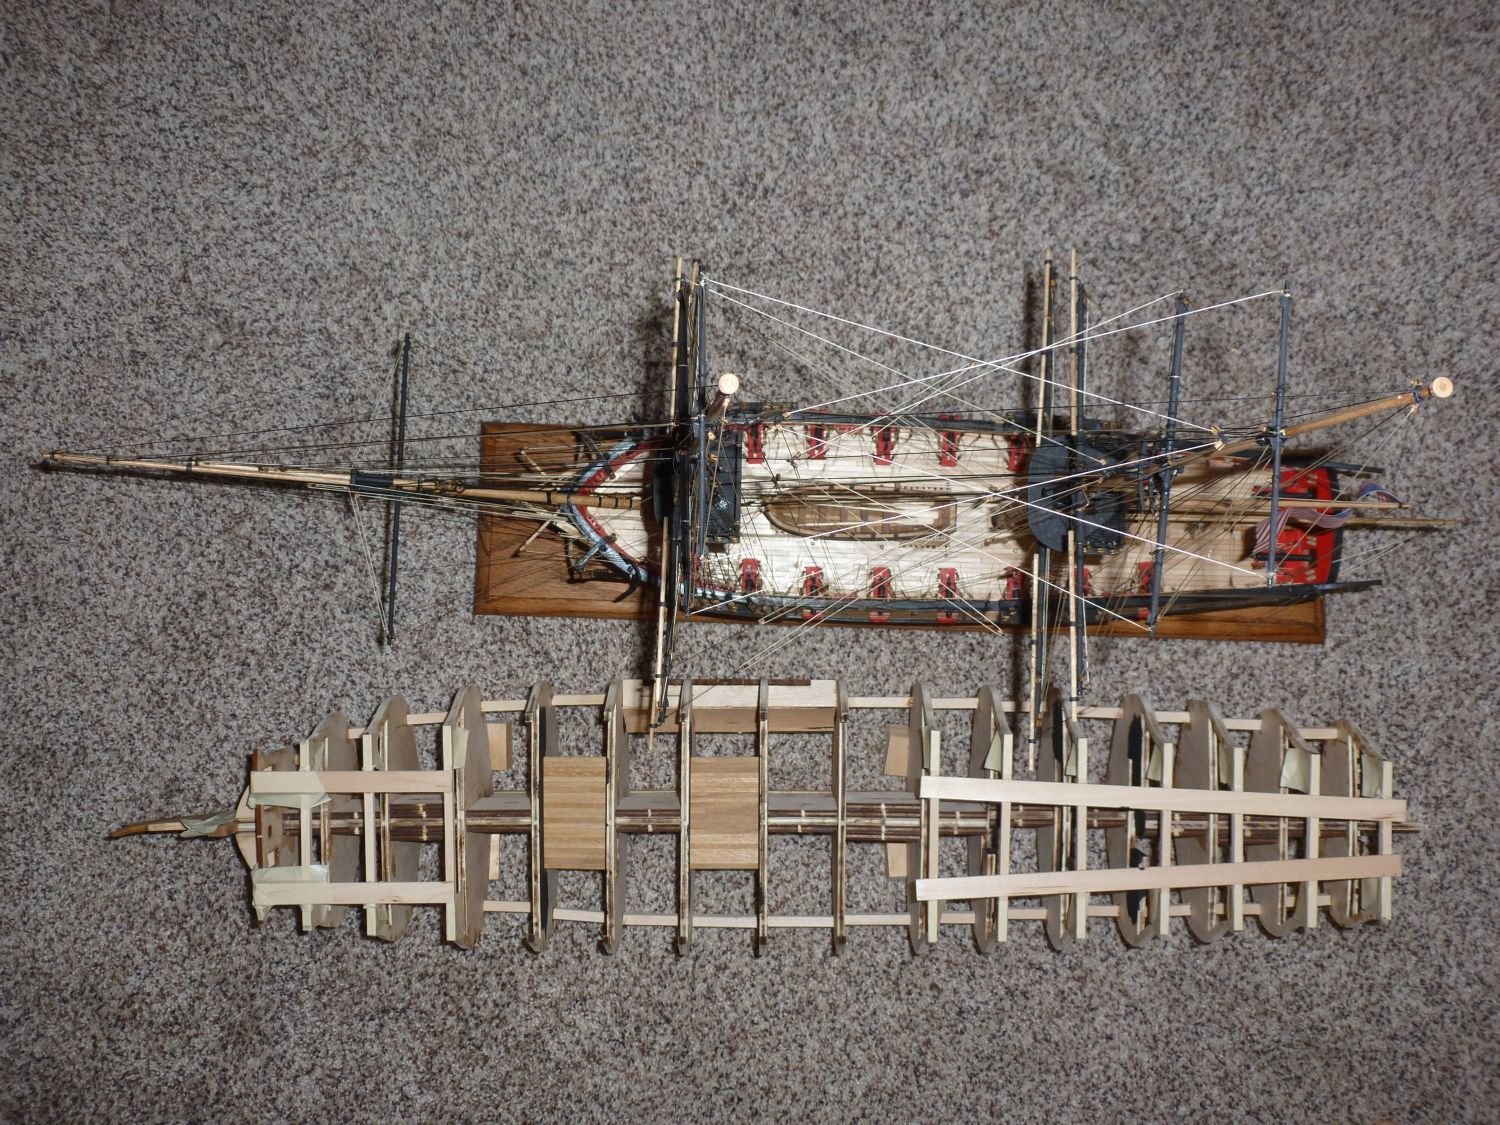
Hi Jim - There are pluses and minuses to her large size. Much more work constructing her...but isn't that our hobby? ( I discovered that I gain more pleasure from BUILDING model ships than I do from OWNING them once they are finished) And - the finished Confederacy model demands less space than the finished Syren. They are about the same length, but the Admiralty style Confederacy is not as wide as the spars on Syren, and with no masts or rigging, Confederacy will fit on a shelf. In my case she will go on a window seat. Thanks to all for the "likes" on my last post. Always nice to get. Also nice to get was the package that came in today's mail from Model Expo with the parts that were missing from the kit. It restores my faith in them and in John Garcia especially. The missing parts were three "bundles" of strip wood of various dimensions. The replacements arrived with labels on each bundle with the part number and number of pieces in each. I am still working on fairing the hull. I found that a piece of one inch diameter dowel with 120 grit sandpaper wrapped around it is perfect for sanding the curves - bow, stern, and tumble home. I have also spent time strategising on how to construct the stern framing. I will share my ideas in a future post. <<Gary>>
-
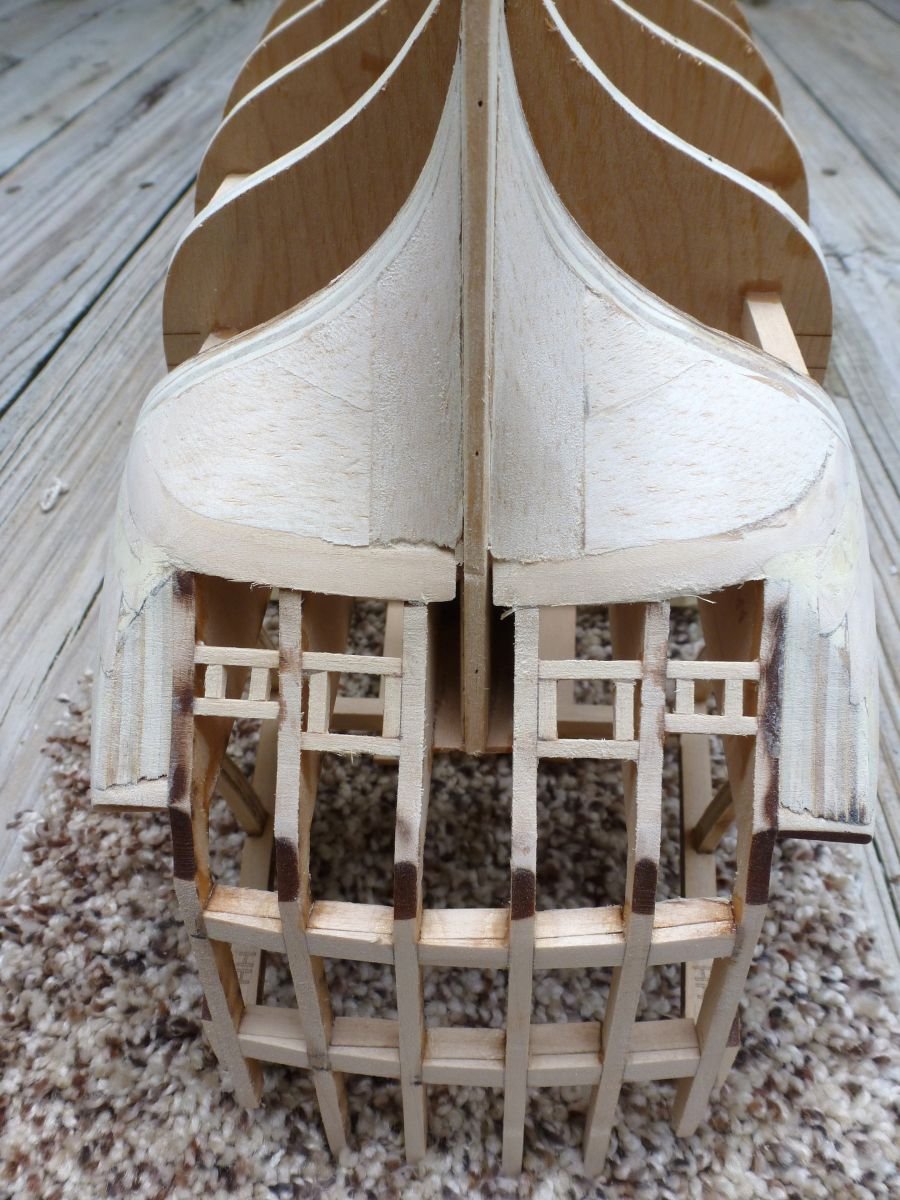
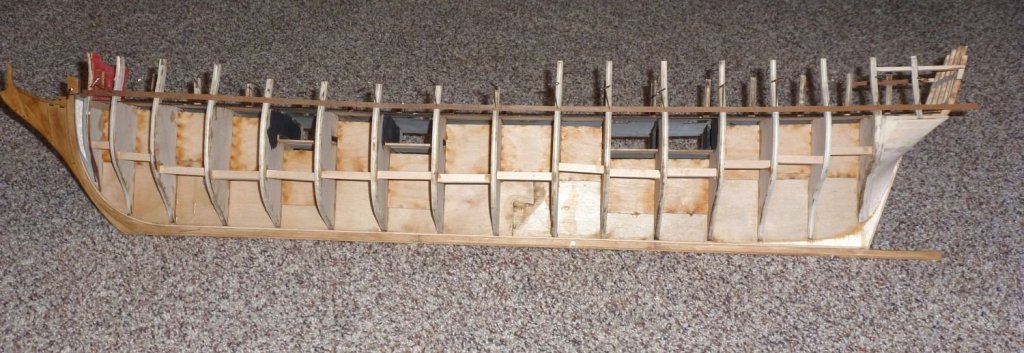
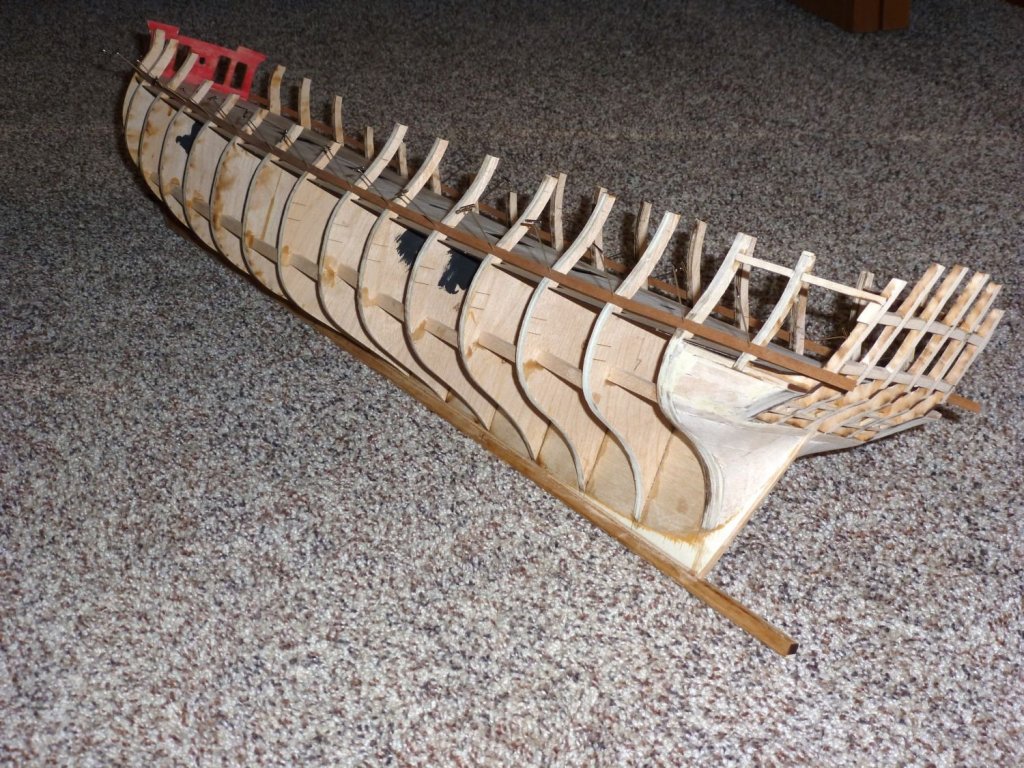
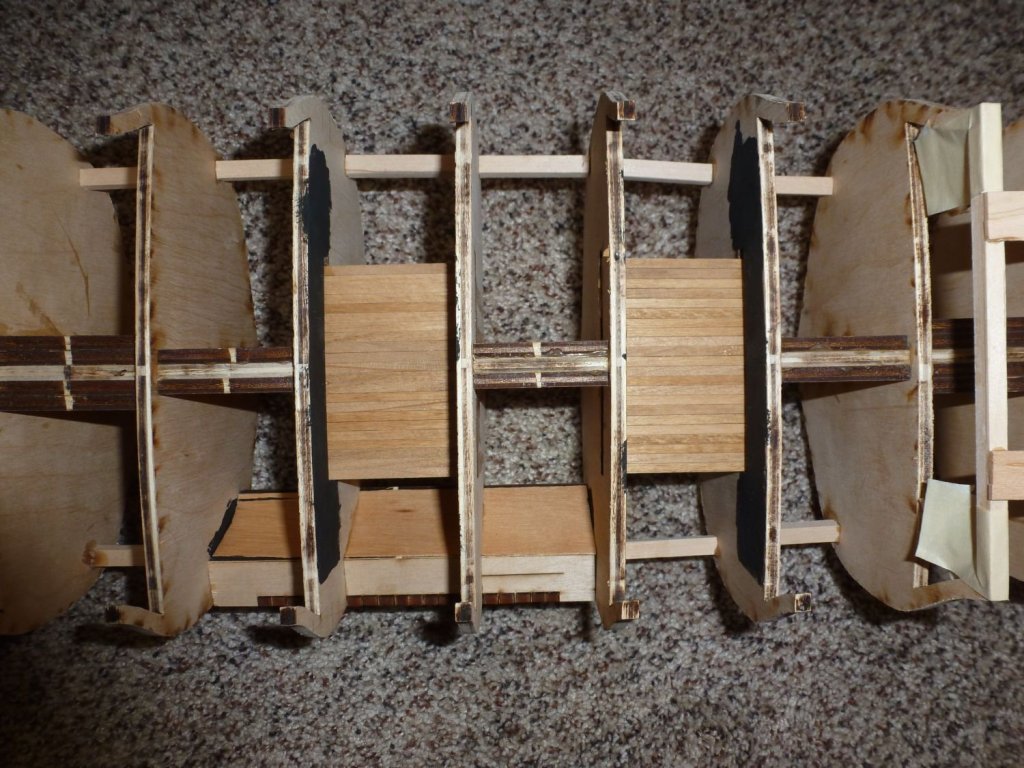
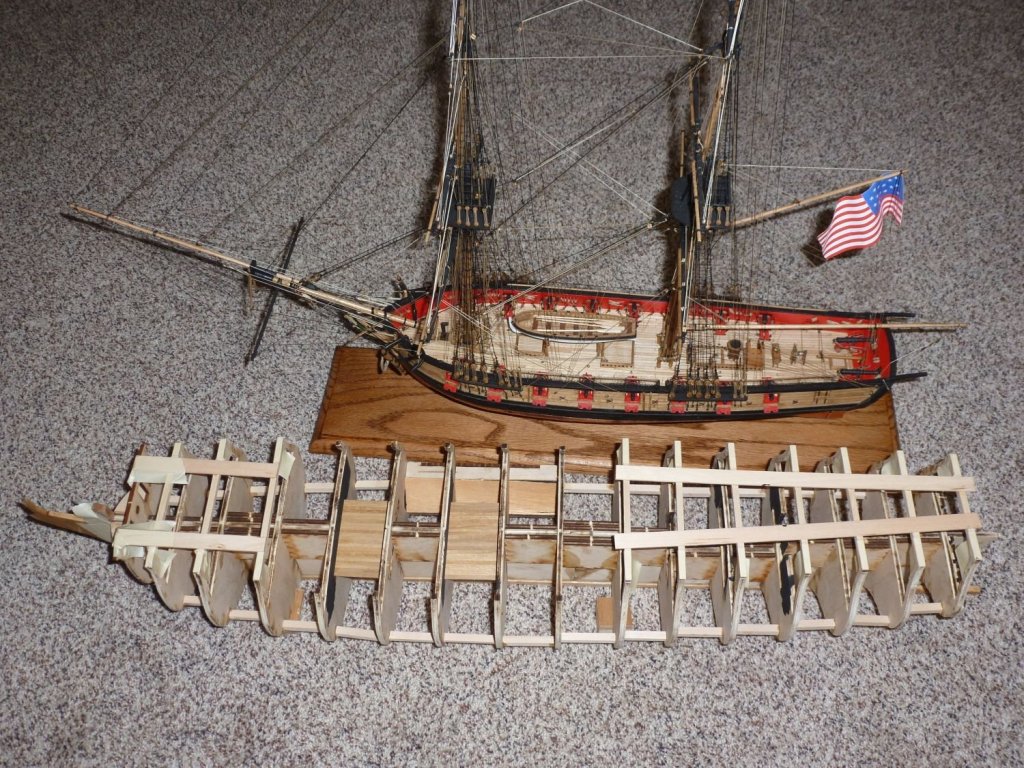
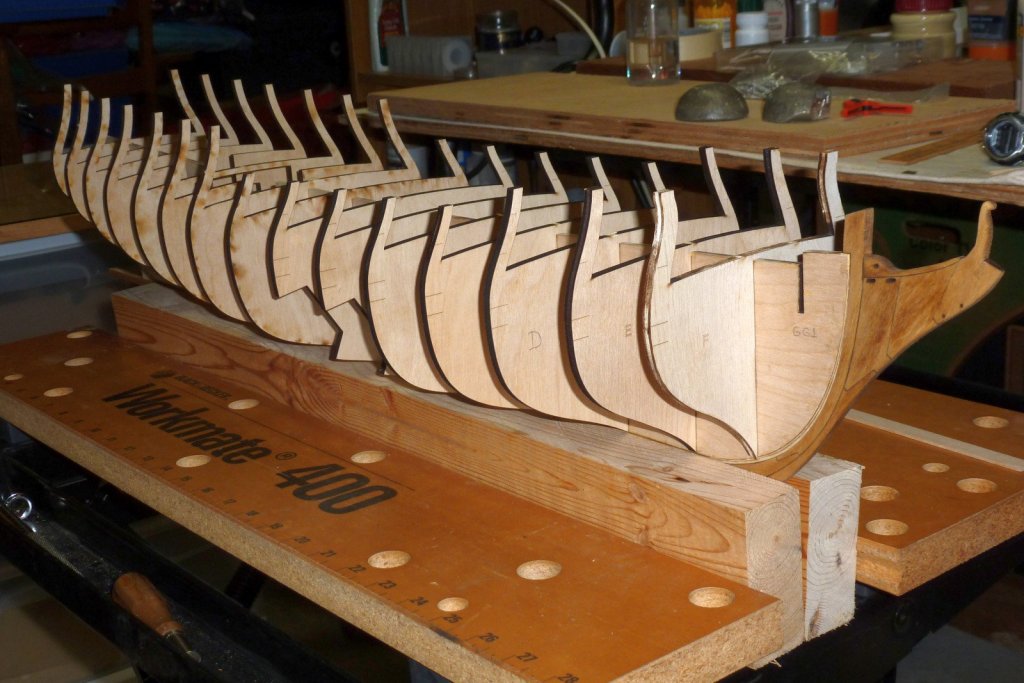
Still working from Chapter 2. I have been fairing the hull but am not yet satisfied – especially at the bow and stern. I did take note of Dubz' warning about fairing bulkheads 8 and 7 on the bottom of page one of his build log. He did such a great job documenting how he framed the stern that I would recommend all Confederacy builders study it carefully. I did do the easy things; planking the sub-gun deck platforms and assembling the ship's frames for the cut-away. I plan to continue working on fairing the hull until I work up the courage to start framing the stern. Harley, thank you for vote of confidence. The brass cannon and ship's wheel that I ordered from Syren Model Ship Company arrived in the mail, but the Admiral confiscated them immediately for something to give me for my birthday. I am STILL waiting on Model Expo to send the wood strips that were missing from the kit. I first requested the missing parts on July 29th. I noticed that some other build logs report frustration as well. What's the difference between a brig and a frigate? See the pictures below - especially you SYREN builders.
-
I am working on fairing the hull. I glued wood pieces ¼ inch square between each of the bulkheads to provide more stability and firmness. Without these the bulkheads would move slightly as I sanded them. I know some folks use larger pieces but the quarter inch square does the job, and it was easier to cut to the exact length between bulkheads so they could be installed without pushing bulkheads out of “square”. If I find that I need more stability, I will add more of these. This build will require a LOT of sanding – not just to fair the hull, but also to reduce the thickness of the bulwarks from the inside and much more. I am using 3M 120 grit and find that it works very well. Also, I splurged and purchased the brass cannon from Syren Ship Model Company, as well as the ships wheel (two). They are in the mail but have not yet been delivered. When they do, I will take some pictures comparing the Syren stuff with that provided in the kit.

-
Hello Doc, and welcome aboard. It is going to be a long voyage. John, I'm glad that John Garcia was able to help you out. By the way, be sure to inventory the parts of your kit. I found that three of the different sizes of wood strips were missing from mine. I have been communicating with John but have not been told they have shipped yet. Thanks for your kind words, but the credit goes to Chuck Passaro - it is in his instruction manual - but I just modified it a bit. I recently acquired a copy of the book "Ships of the American Revolution and their models" by Harold Hahn. Chapter 5 is devoted to the Confederacy with a lot of historical information and also Hahn's insight into constructing the model. I would highly recommend it to any Confederacy modeler. I suspect that Chuck drew heavily from it when designing the Model Shipways kit...plus of course the original Admiralty Draughts. <<Gary>>
-
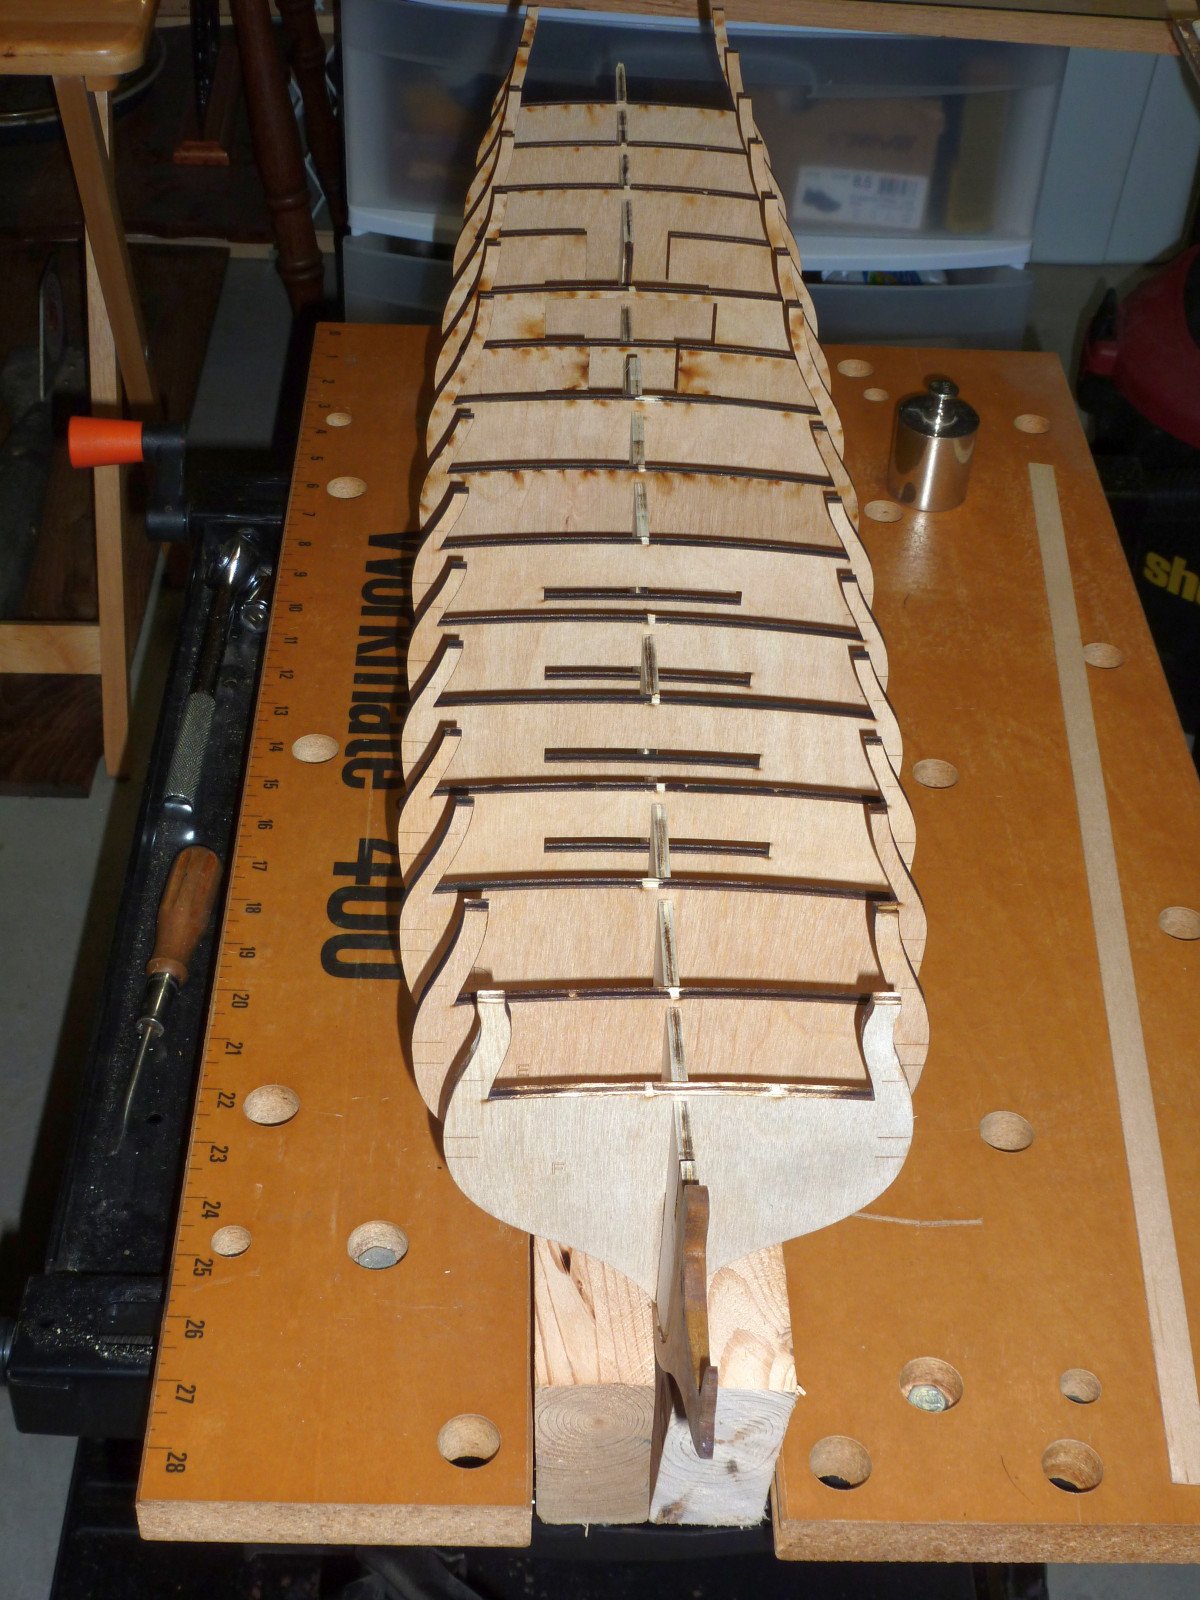
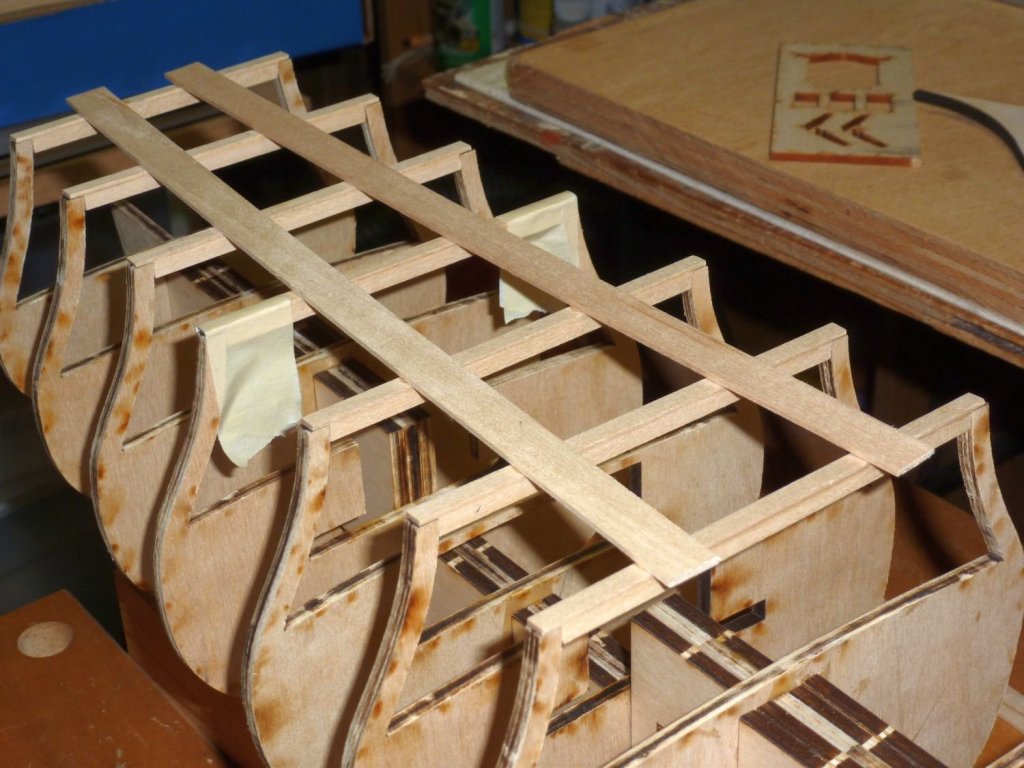
I am now working from Chapter 2 of the Instruction Manual. Here is the link: http://modelshipworldforum.com/resources/Confed/chapter2.pdf I glued the bulkheads and fillers, and also the bow fillers. I also made and installed the “optional safety timbers” for the bulkhead extensions. The plywood for the bulkheads appears to be of very good quality and quite strong, but my clumsy hands can make a mess...might as well be safe. I made mine from two pieces each – a 3/16 x 3x16 to fit between the bulkhead extensions and a 1/16 x 3/16 piece to fit on top. For me, this was easier than notching the one piece. With these sitting on the bulkheads, I glued two 1/16 x 3/4 strips on top to provide stability fore to aft. When I fair the hull, each of the bulkhead extensions will be fixed to the safety timbers with masking tape. This should make for a nice solid unit that will sand and fair well. <<Gary>>

-
Hello Ben and Harley. Harley, you are several months ahead of me. Your build looks very good - I hope I can do nearly as well. I will most likely use Chuck's kit for my ship's wheel too. I used the cast wheel provided in the SYREN kit and had just installed it when Chuck announced his wheel kits. In hindsight I wish I had gone to the trouble of removing the cast wheel and going with the kit. I think small details like this make a big difference in the finished model. And when so many hours are invested, why not make it as good as you can? Thanks for your kind words and please drop by often and feel free to offer suggestions. <<Gary>>
-
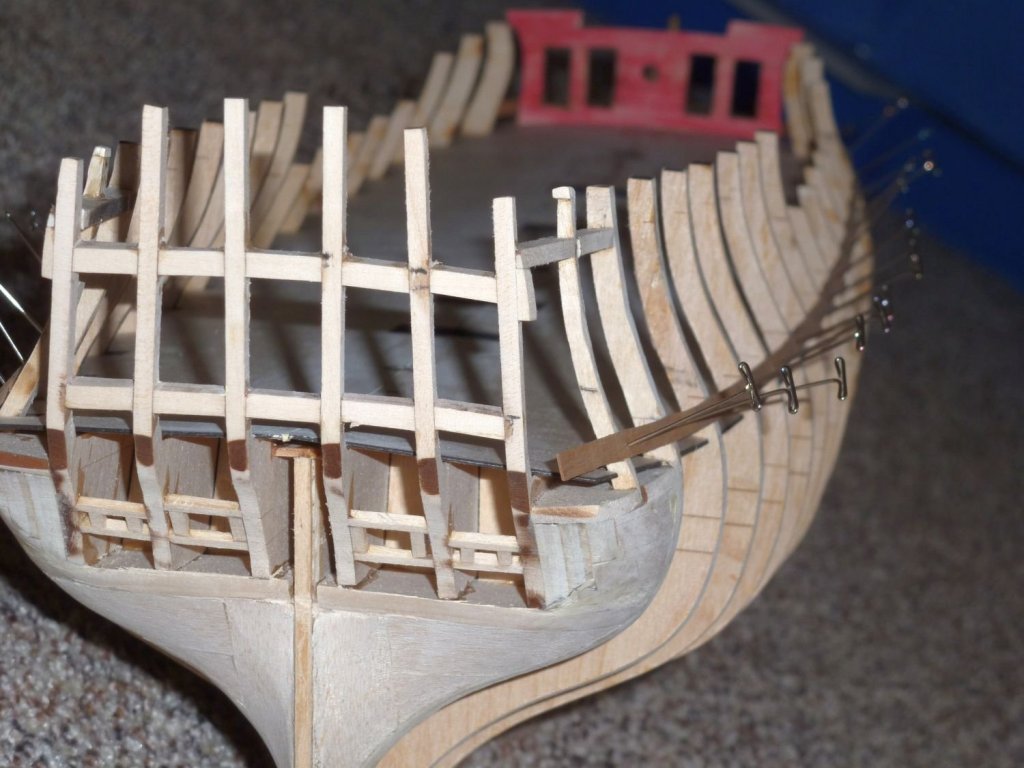
Hi Antony, and welcome. The cutouts you mention will represent a cut-away section of the hull to show how a ship from this time period was framed. Eventually there will be exposed frames or "ribs" here with a shadow box effect behind them...but that will happen in the next chapter. Thanks all for the "likes". They are appreciated and give me encouragement. <<Gary>>
-
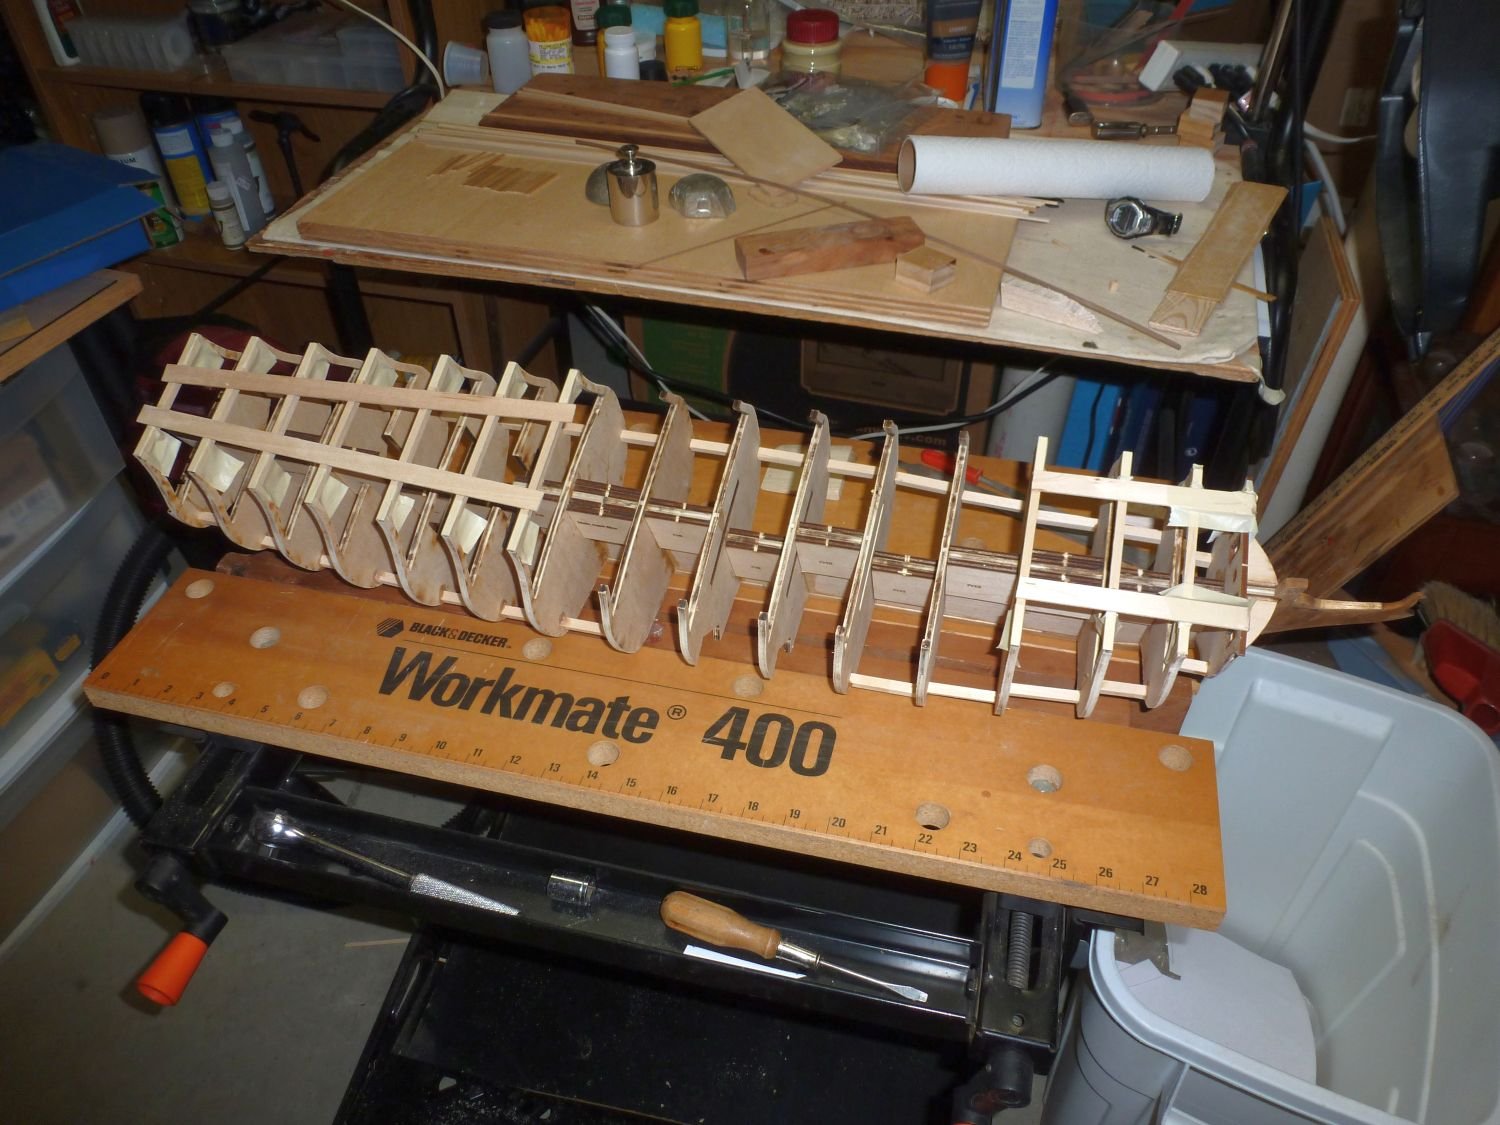
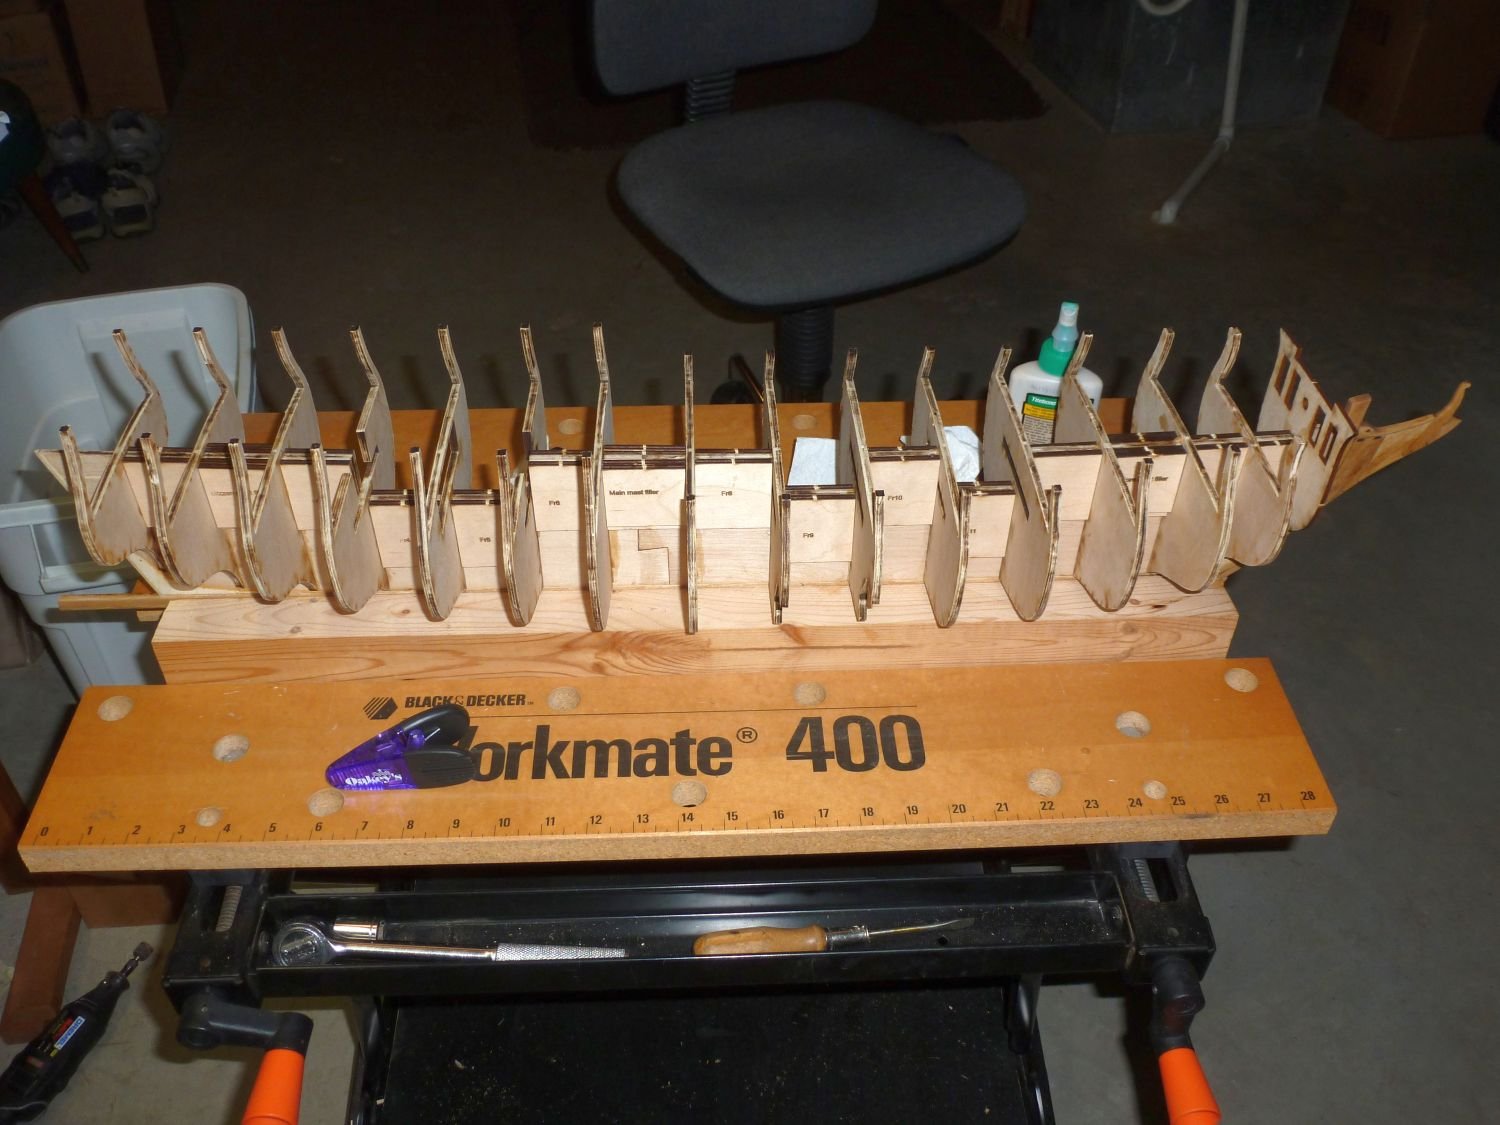
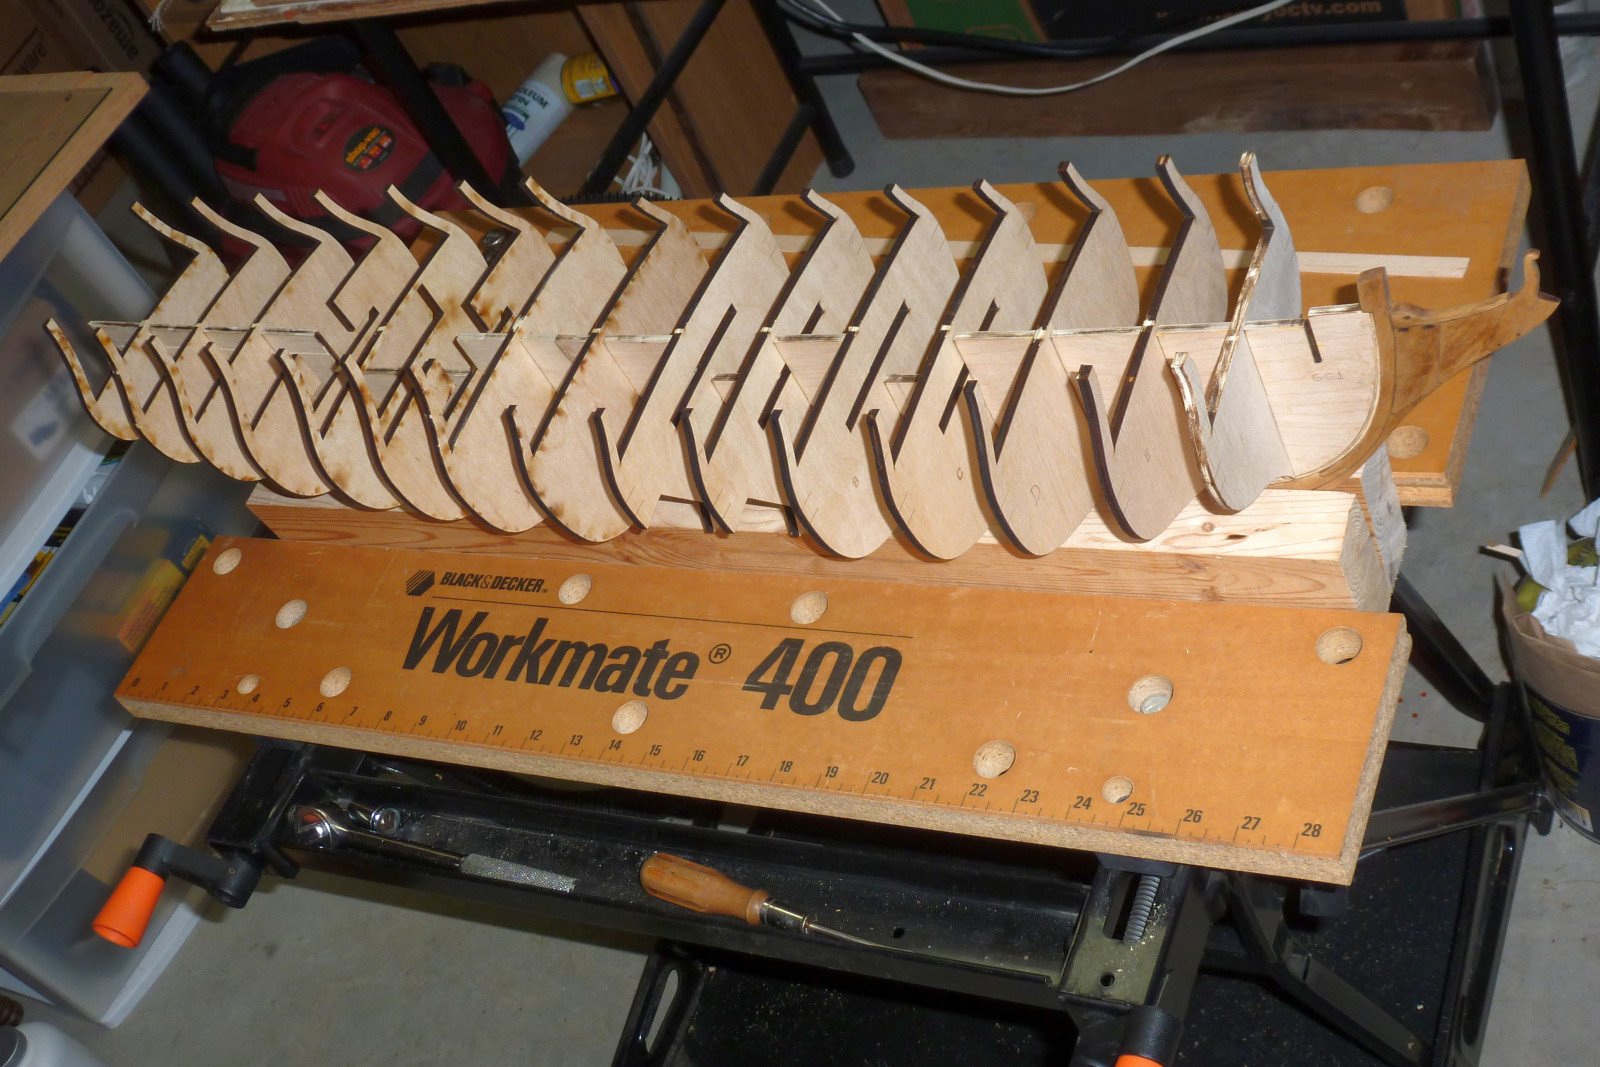
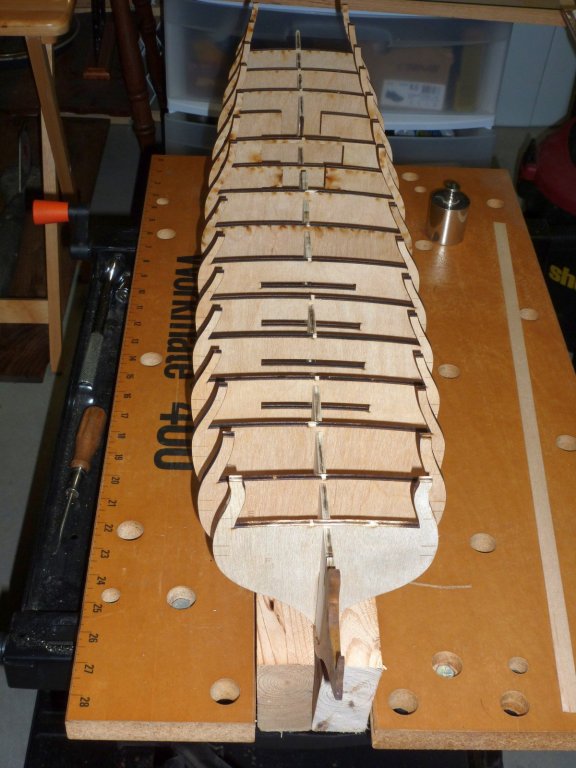
I added the stem assembly and the keel to the bulkhead former. I did some fractional arithmetic: the bulkhead former is 3/8” thick and the keel & stem are ¼ inch thick. To position the stem and keel exactly in the center of the bulkhead former requires a spacing of 1/32” on either side. And I just happened to have a sheet of 1/32” thick wood left over from another kit. I used my glass sheet to do the gluing. Laid the bulkhead former on top of the 1/32 sheet and positioned the stem and keel parts against it. Used masking tape to hold the parts tight together while the glue set up. And voila!!! When the glue had cured, I dry-fitted the bulkheads into the slots in the former. Every bulkhead slid snugly into place with no “fitting” needed. And then with all the bulkheads in place, it HIT me – this is a REALLY BIG ship model! I had worried unnecessarily about the vertical alignment of the bulkheads. Apparently the laser cuts were precise enough that the alignment was perfect. I checked this with a ¼” x 1/16” x 24” strip of wood laid across the deck and confirmed a smooth run from bow to stern.

-
Hi Mark - Thanks for joining in, and welcome. I appreciate your kind words. One nice thing about doing a build log is that it forces me to do a more careful job, what with others looking over my shoulder. Left to my own devices I can get pretty sloppy... <<Gary>>