HOLIDAY DONATION DRIVE - SUPPORT MSW - DO YOUR PART TO KEEP THIS GREAT FORUM GOING! (Only 13 donations so far - C'mon guys!)
×


GaryKap
-
Posts
276 -
Joined
-
Last visited
Content Type
Profiles
Forums
Gallery
Events
Everything posted by GaryKap
-
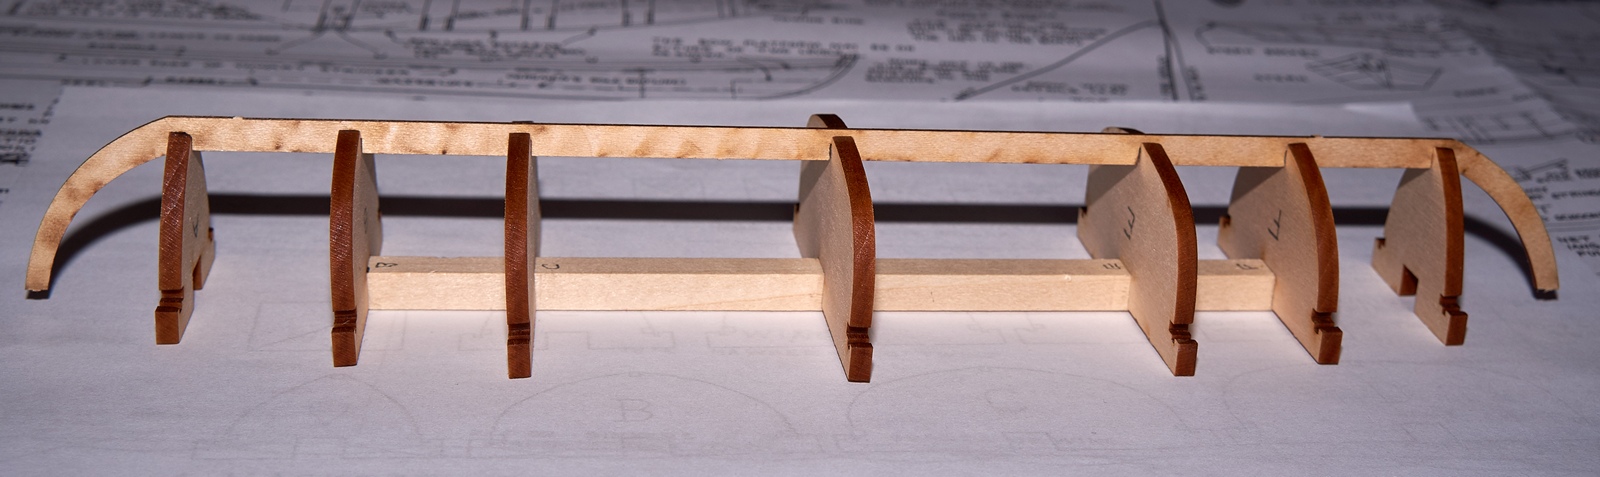
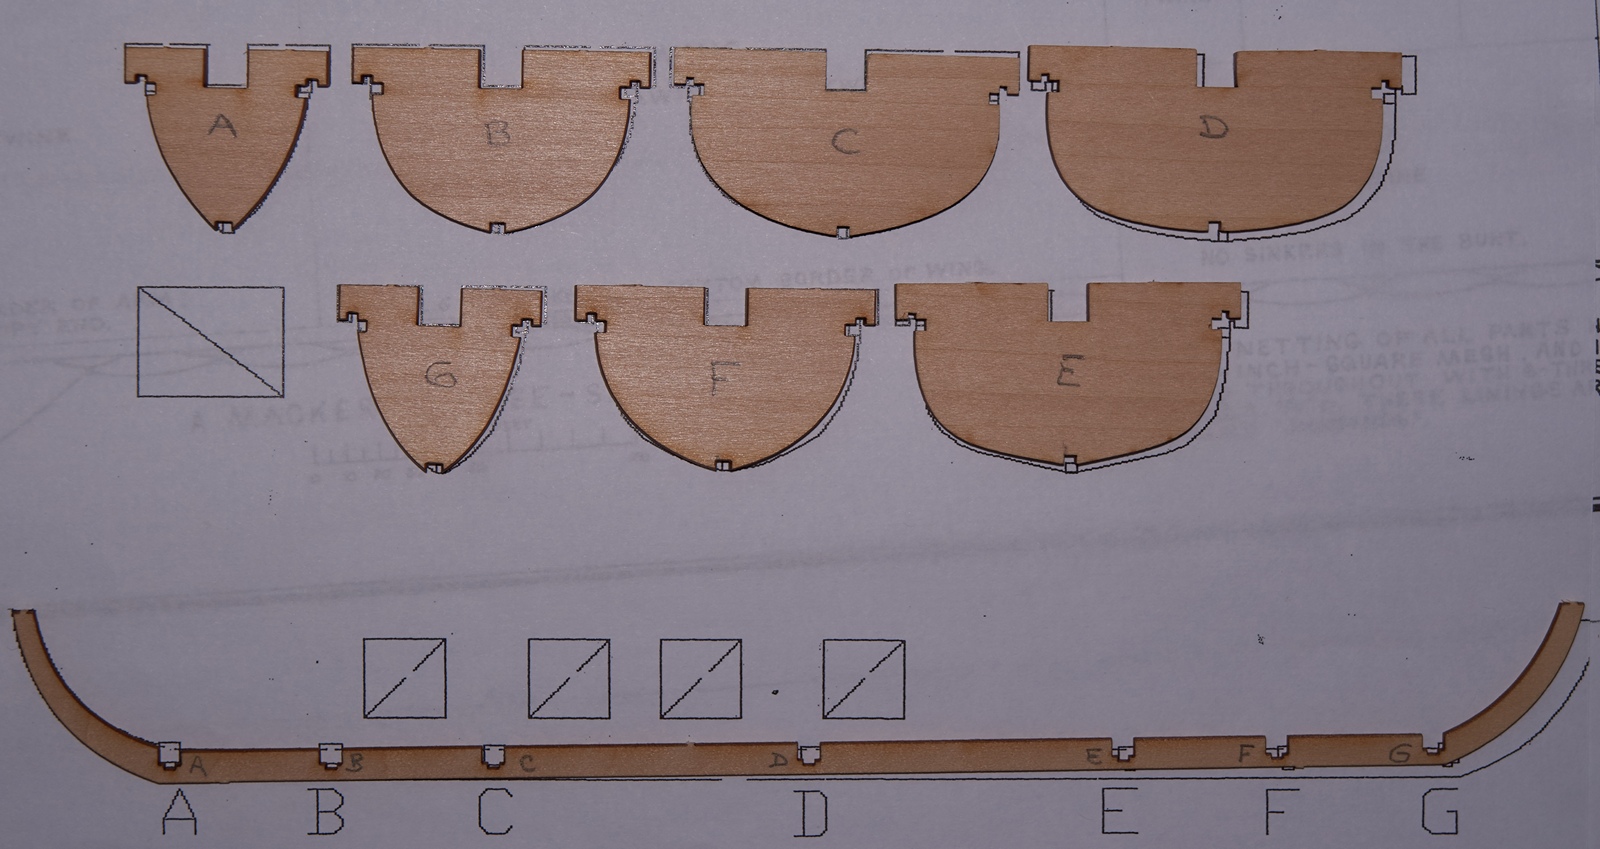
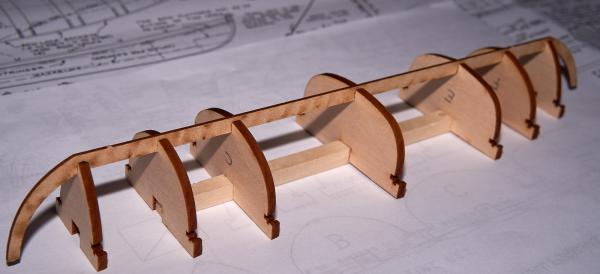
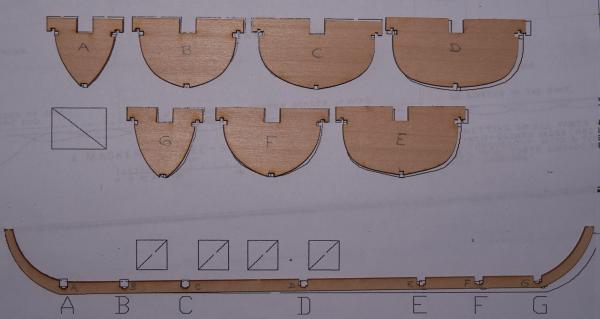
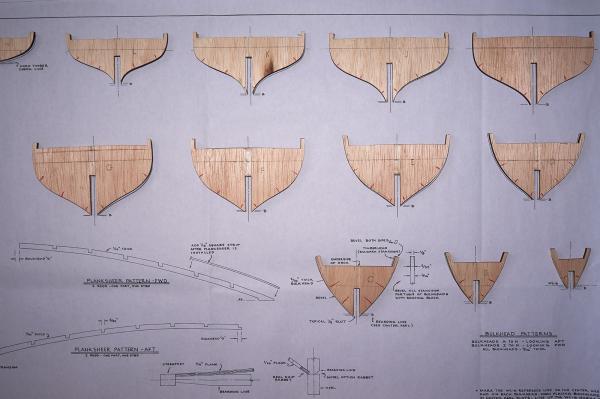
 David and Ken - Thank you for your input, but this seine boat is NOT the same as the Model Shipways ship's boat. Compare the pictures of my bulkheads with those shown in JSGerson's build log. His bulkheads are flat on the (boat's) bottom and do not have a notch. The seine boat bulkheads all have a notch on the bottom that the keel fits into, as shown in my photos. Now imagine that all of my bulkheads are glued down to a piece of wood. The next step (#4) is to "insert a 1/16" square piece of basswood into the side slots on the bulkhead formers. The stringer will run from stem to stern and will have to be tapered slightly where it attaches to the keel. Glue it only to the stem and stern". OK, so this secures the keel to the bulkheads. Now the next step is to construct the ribs (step #5). The directions say to "cover each of the hull formers with a piece of the 1/32" X 1/16" basswood. Make sure that each strip is locked into the former by placing it in the small notch at the baseboard edge of the former". Doing this, the ribs must be outboard of the keel. And the ribs are also outboard of the 1/16" square gunwale that is now firmly locked into those notches on either side of the bulkheads. This would produce a round bottom boat with no exterior keel and that does not look very much like the drawings on Sheet 4. But even if I was successful at planking this hull, the greater problem would come when I tried to remove the hull from the bulkhead "mold". The hull is sitting upside down and to remove it, I would pull UP. This would be stopped by that 1/16" square stringer or gunwale that is firmly wedged into the side notch of each bulkhead. Now the directions (step # 7) say to "remove the hull from the formers by cutting away the TABS that hold the stringers. This is a MAJOR flaw - the tabs aren't holding the stringers down - the shoulders of the formers or bulkheads are!! Because the grain of the 1/8" thick bulkheads runs horizontal, it would be difficult to break them away without severely damaging the hull that I just constructed. The stringer or gunwale should probably be constructed outboard of the ribs and glued in after the ribs are in place. So that's the story. I know this is a lot of verbage to wade through, but give it some thought. My inclination at this point is to simply forget about including the seine boat as part of the model. I am guessing that these design flaws are the reason that NOBODY seems to be building the seine boat as part of their Benjamin W. Latham kit assembly. On the other hand, someone must have because the model on display at Model Expo has one: http://imageshack.us/a/img16/6817/benjamin5.jpg Then again, the model on display at Model Expo could well be an earlier version of the kit with a solid wood hull and a very different approach for constructing the seine boat. Aargh!!! <<Gary>>
- 50 replies
-
- 2
-

-
- benjamin w latham
- model shipways
- (and 1 more)
-
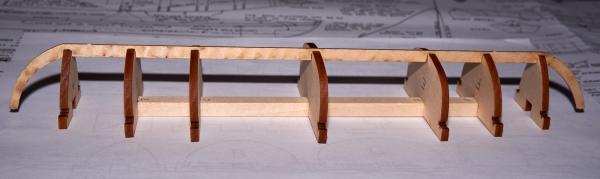
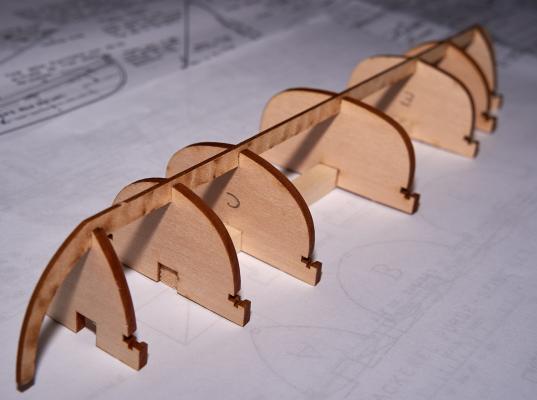
HELP! HELP!! I wanted to construct the 40 ft seine boat while still in early construction stages of B W Latham. I dry - assembled the seven bulkhead formers onto the keel. According to the directions, during actual assembly the next step (#4) would be to construct stringers or gunwales from 1/16" square strips running from stem to stern and INSERTED INTO THE SIDE SLOTS ON THE BULKHEAD FORMERS. Then I should cover each of the hull formers with a piece of the 1/32" X 1/16" basswood, making sure that each strip is locked into the former by placing it in the small notch at the baseboard edge of the former. Then I should wrap it over the top so that it follows the contour of the former and end it in the notch on the other side. As written, these instructions present two major concerns. First, the strips covering the bulkhead formers would need to go over the keel. At bulkhead formers A and G on the at the stem and stern, the bend angle is so acute that the covering strips would certainly break. Second, step # 7 says to remove the hull from the formers by cutting away the tabs that hold the stringers. Problem is that with the hull upside down, the entire shoulder of each side of the bulkhead formers would need to be removed. Think about it. I honestly don't believe the boat can be constructed following these instructions. If anyone sees it differently, your input would be greatly appreciated. <<Gary>>

- 50 replies
-
- 5
-
-
- benjamin w latham
- model shipways
- (and 1 more)
-
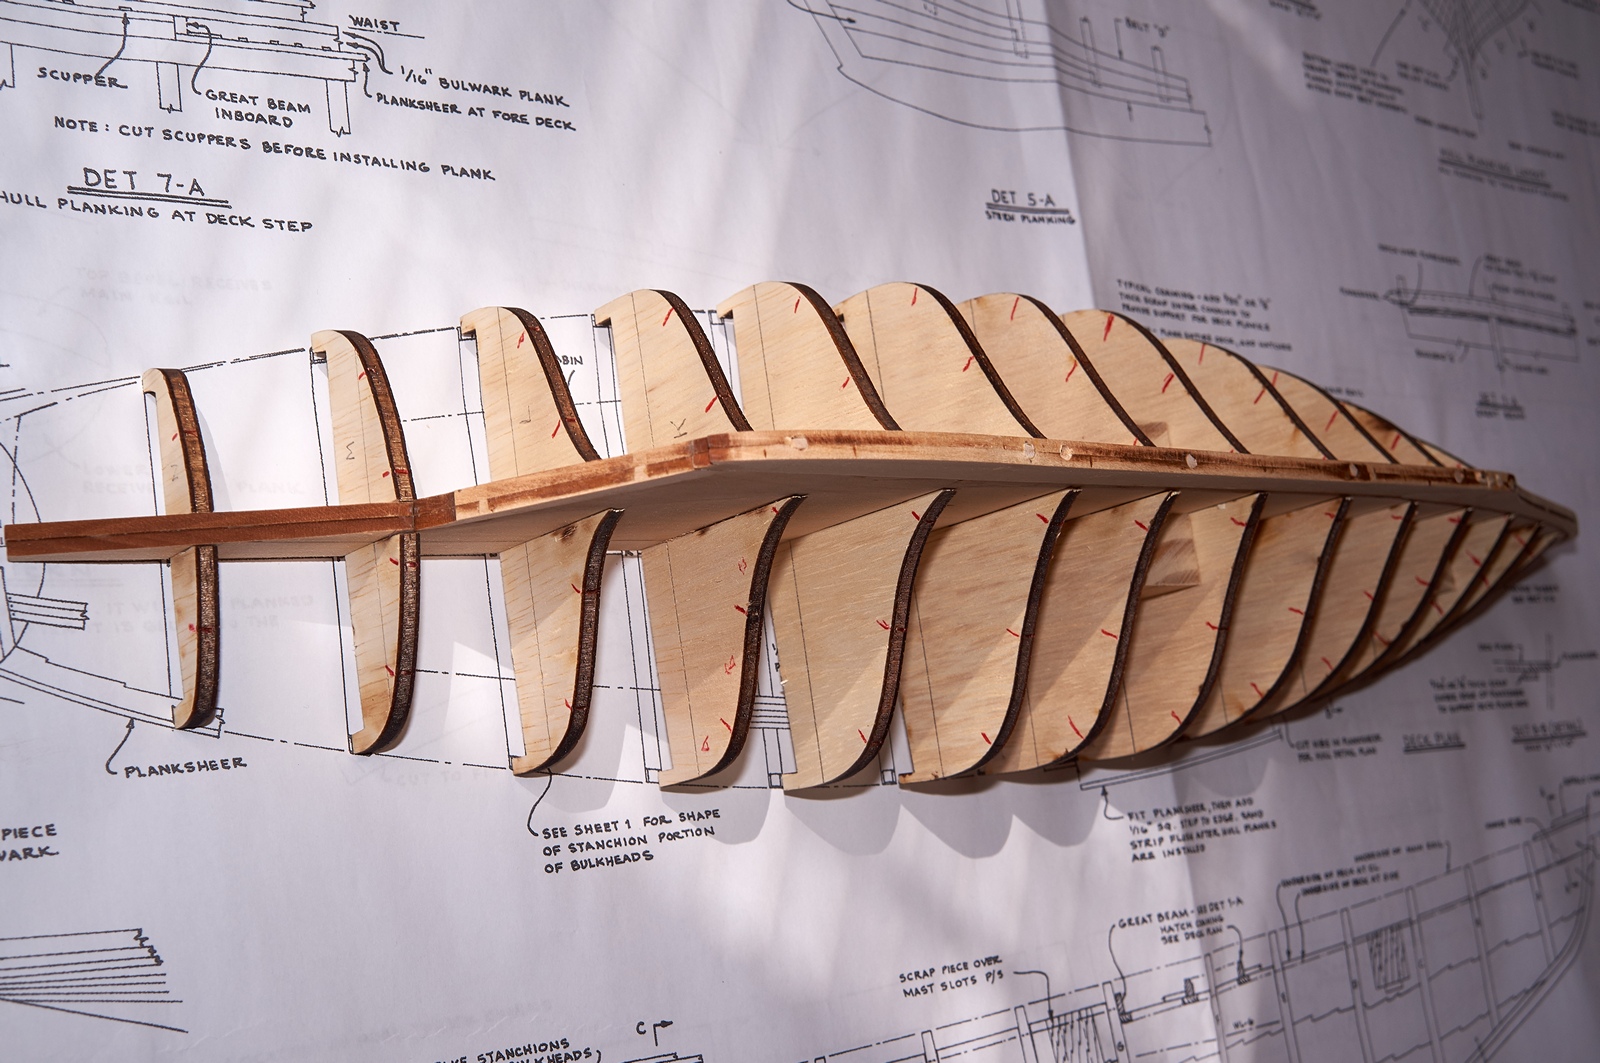
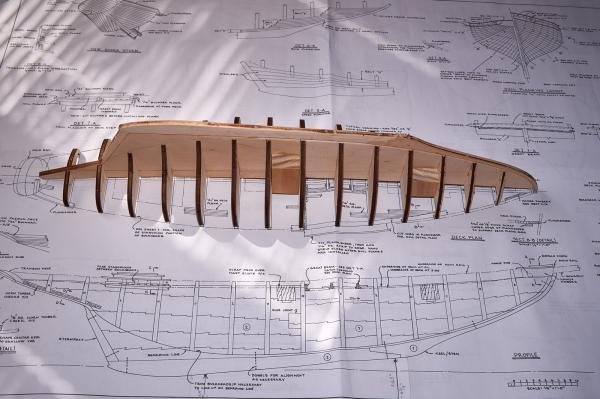
David - Thank you for your email and your concern. I looked at photo #2 and I see what you mean. But then I checked the center keel top and bottom with a steel ruler and found the hull to be perfectly straight ( I had done this many times in the last few days during construction. I don't think you need a new pair of glasses - I think that the camera was not directly over the hull and the photo is an oblique rather than a perpendicular...its an optical illusion that we see in photo #2. The other "proof of the pudding" is that the slots in the planksheer line up perfectly with the bulwark stanchions, which can only happen if the center keel is straight. Elia - Thanks for the "like"...I like your build log for Arethusa; especially the pictures that show how the transom and horn timbers are mounted on the center keel. Those pictures explain things much more clearly than the instructions. <<Gary>>
- 50 replies
-
- 1
-
-
- benjamin w latham
- model shipways
- (and 1 more)
-
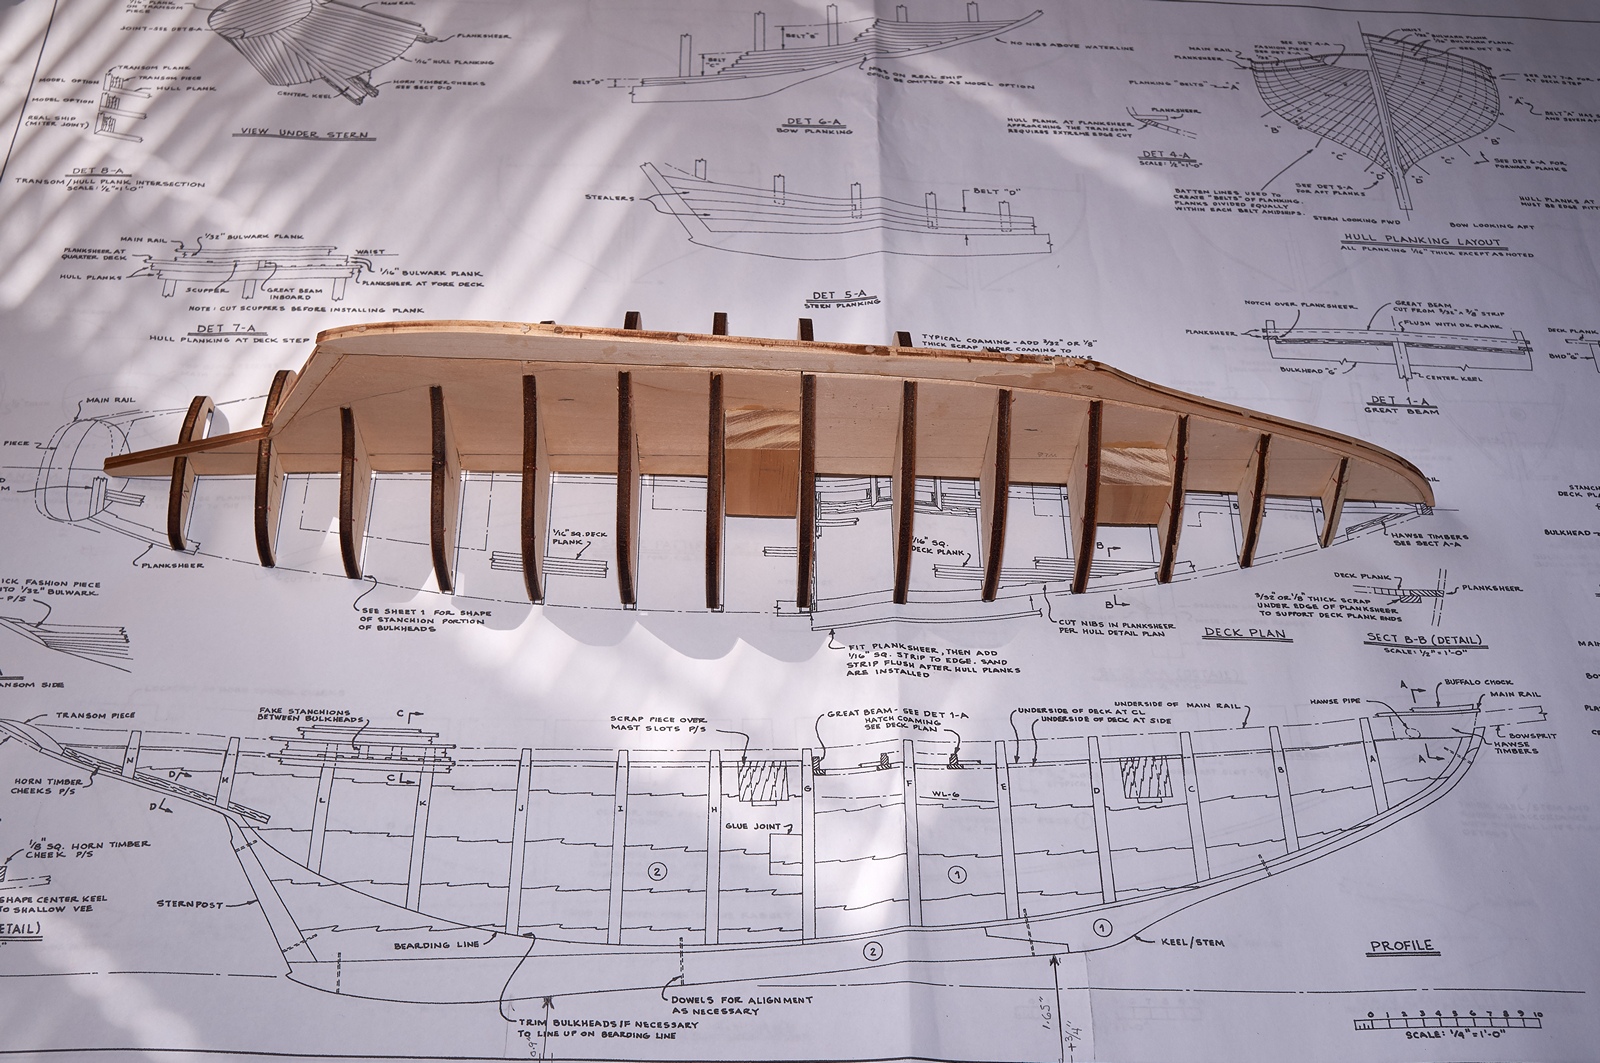
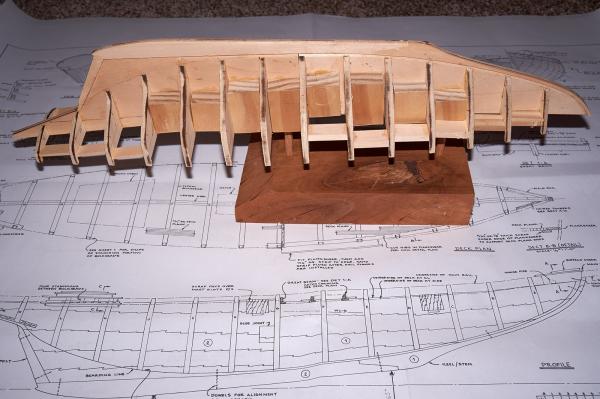
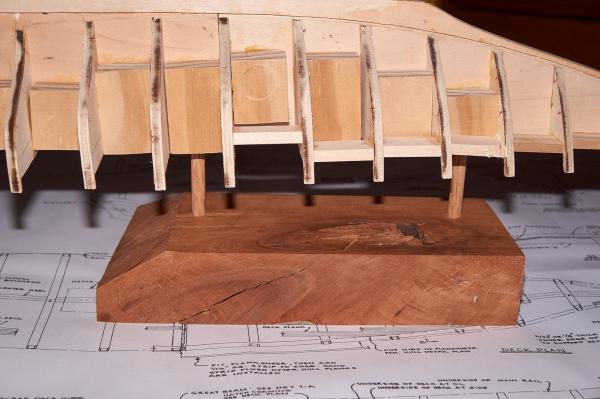
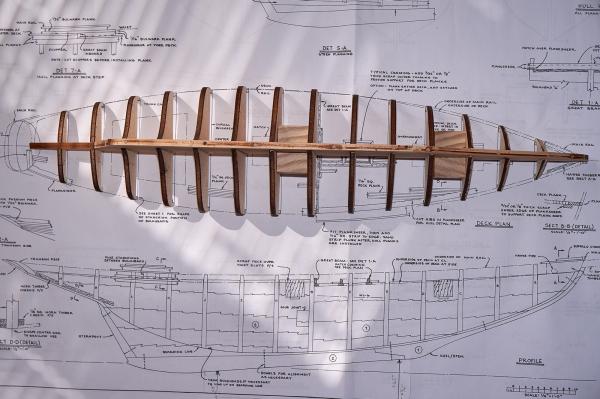
Hello cg451 and David. Your advice on Chapelle's "American Fishing Schooners" is right on for this build. I was able to get a copy used in great condition online. The man's attention to detail is astounding. The glue cured overnight and today I started fairing the hull. Also, note the stand that I constructed to hold the hull upside down. I took advantage of the holes for the mast steps and used dowels of the appropriate diameter that I secured into a piece of scrap wood. This will provide me with a stable platform to use when planking the hull. Obviously I am not done "fairing" yet but did want to provide a progress report. <<Gary>>

- 50 replies
-
- 9
-
-
- benjamin w latham
- model shipways
- (and 1 more)
-
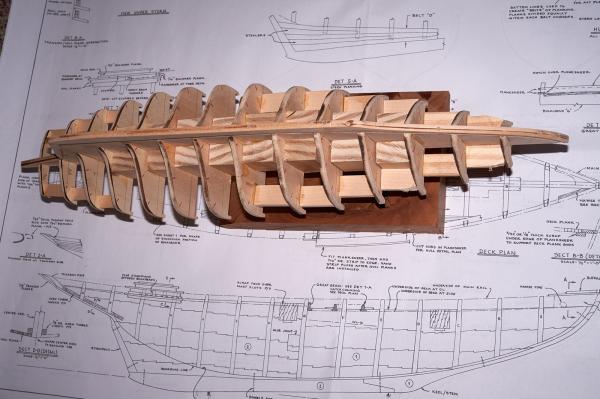
Hi Ken - Thanks for dropping by. Today I glued in the bulwarks and blocks of wood between them for reinforcement. In addition to using my draftsman triangle, the kit has laser cut planksheer - waterway parts with slots for the bulwark stanchions that I could use to verify that the bulwarks were all properly aligned. The planksheer is shown in picture 3 of my first post. So far, everything is going together with no problems. I will let the glue set overnight and start fairing the hull tomorrow. I expect that process to take a few days. Like you, I want to get it right. <<Gary>>
- 50 replies
-
- 1
-
-
- benjamin w latham
- model shipways
- (and 1 more)
-
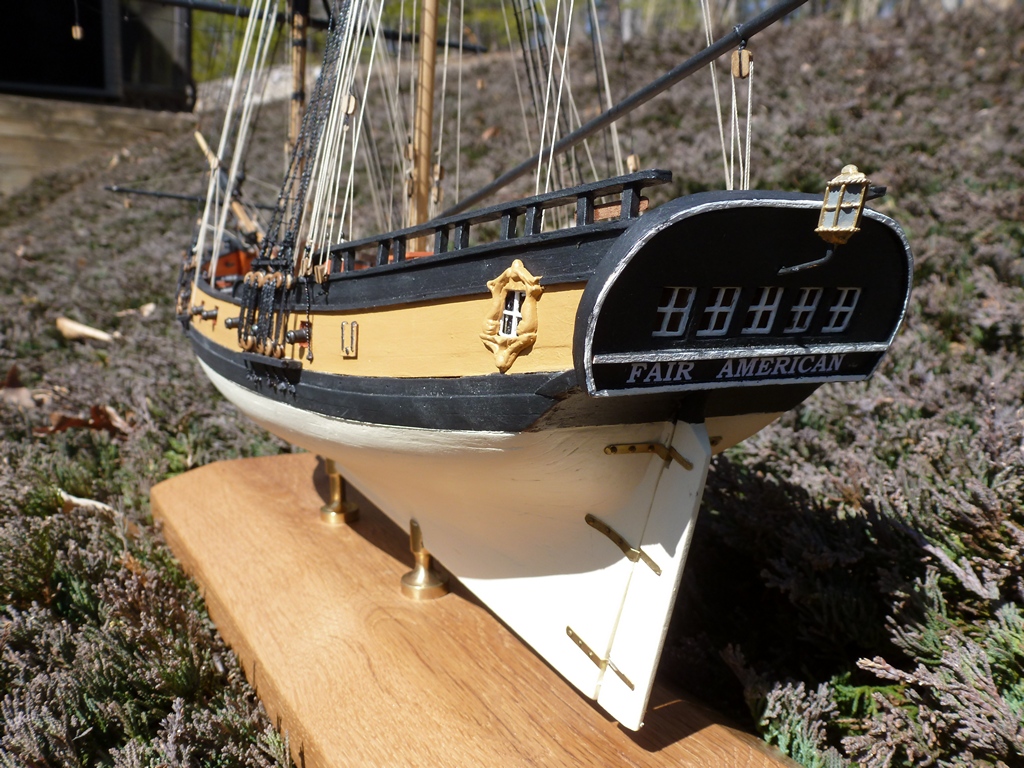
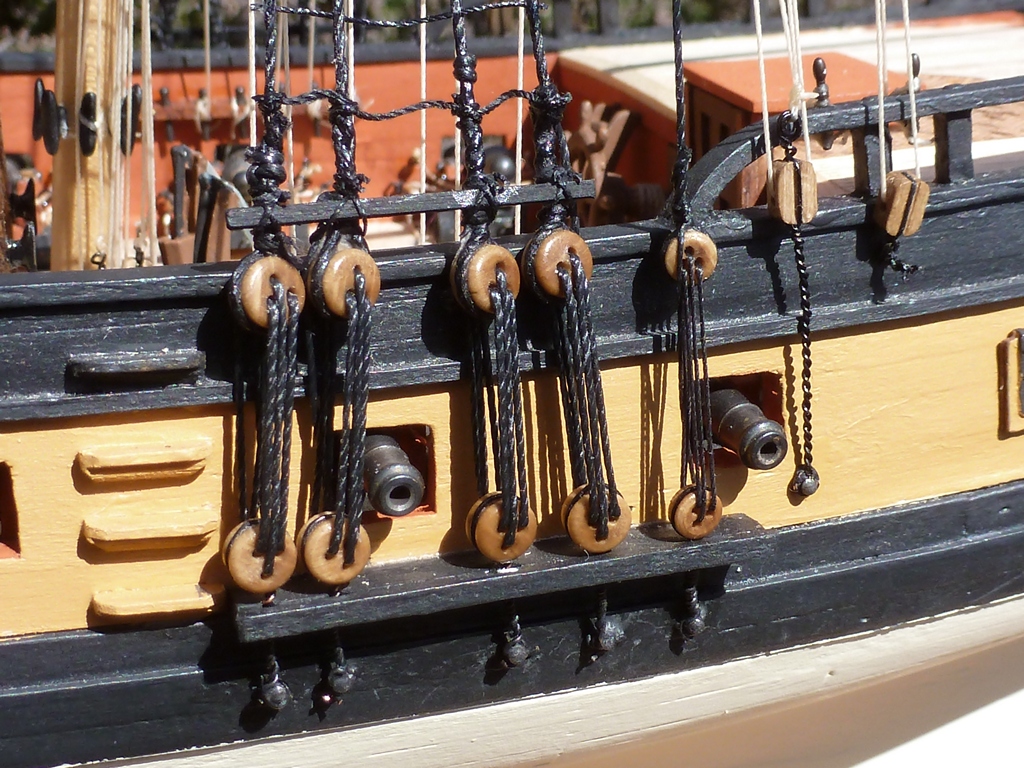
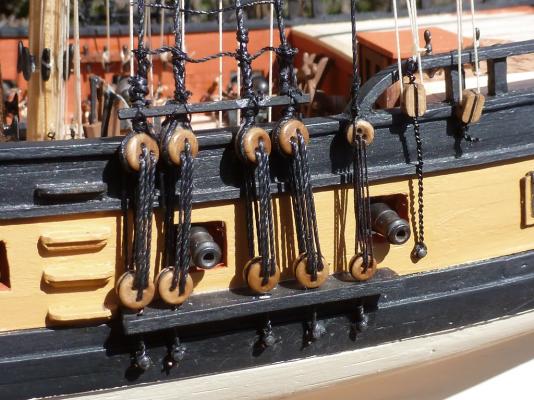
Hi wq3296 - thanks for your kind words. When you do the standing rigging on your FAIR AMERICAN, I would strongly encourage you to include the shroud cleats. The Syren Ship Model Company now offers them as laser cut wood with 40 per pack at a very reasonable price: http://www.syrenshipmodelcompany.com/laser-cut-ship-model-fittings.php I wish I had done that with my build, especially when I was looking for places to belay the running rigging. And of course, they would have been historically accurate. <<Gary>>
- 206 replies
-
- 1
-
-
- fair american
- model shipways
- (and 1 more)
-
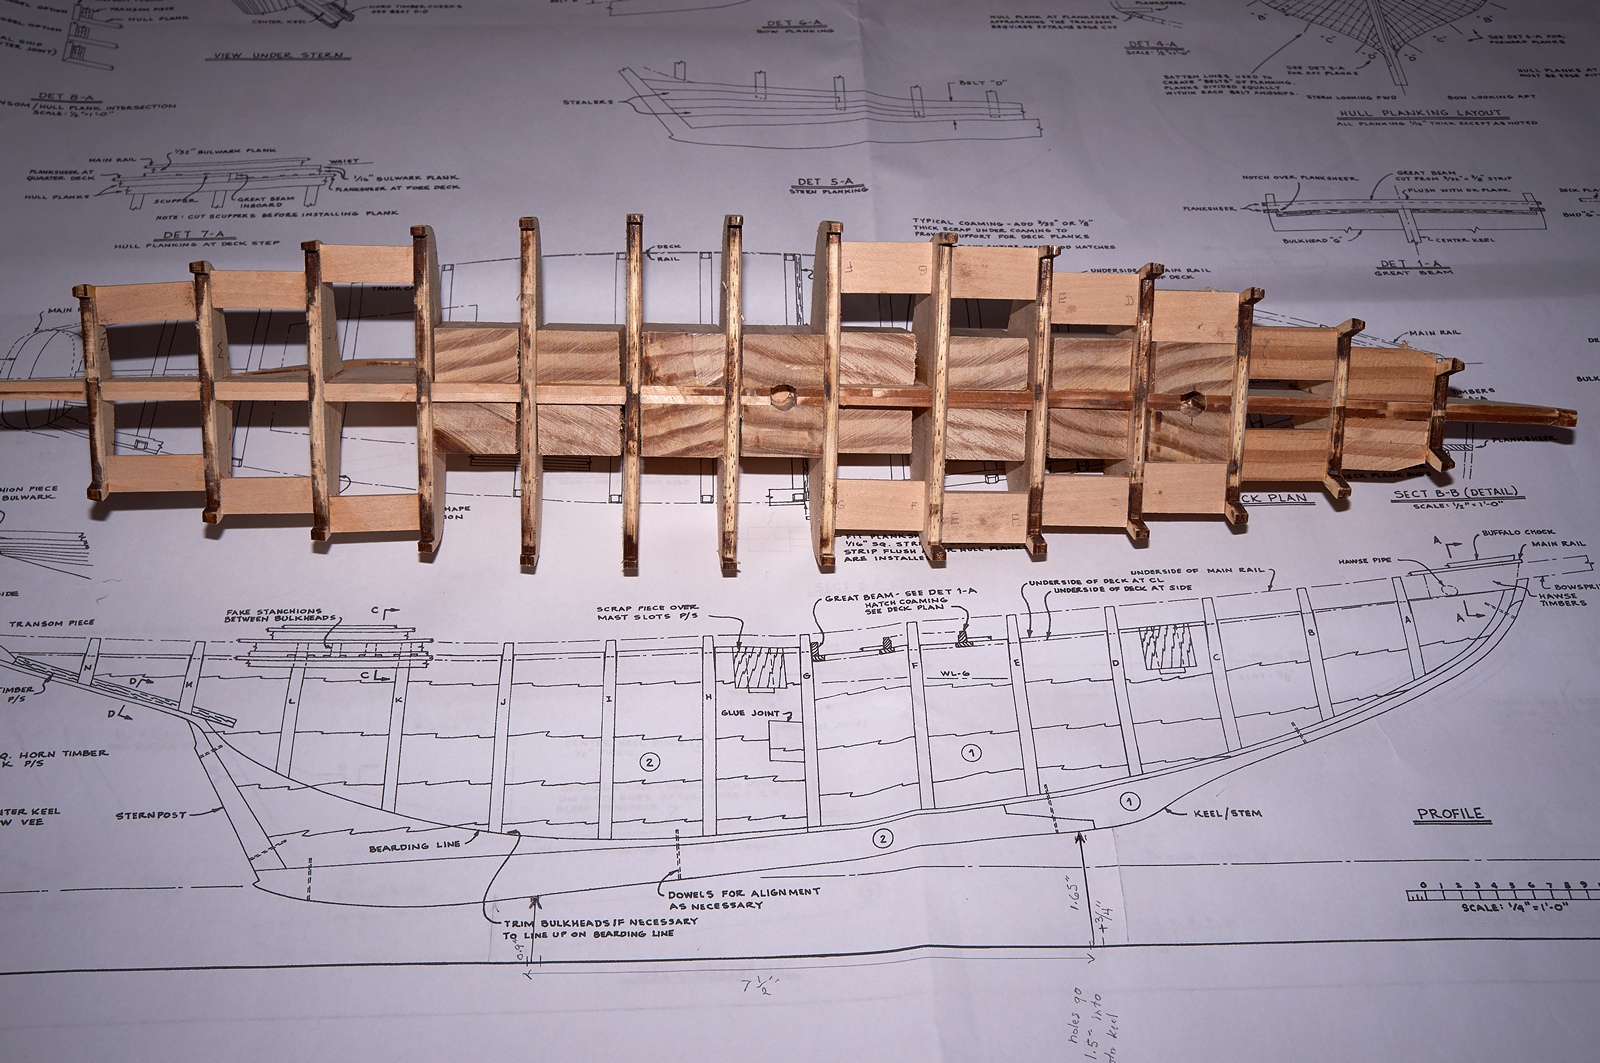
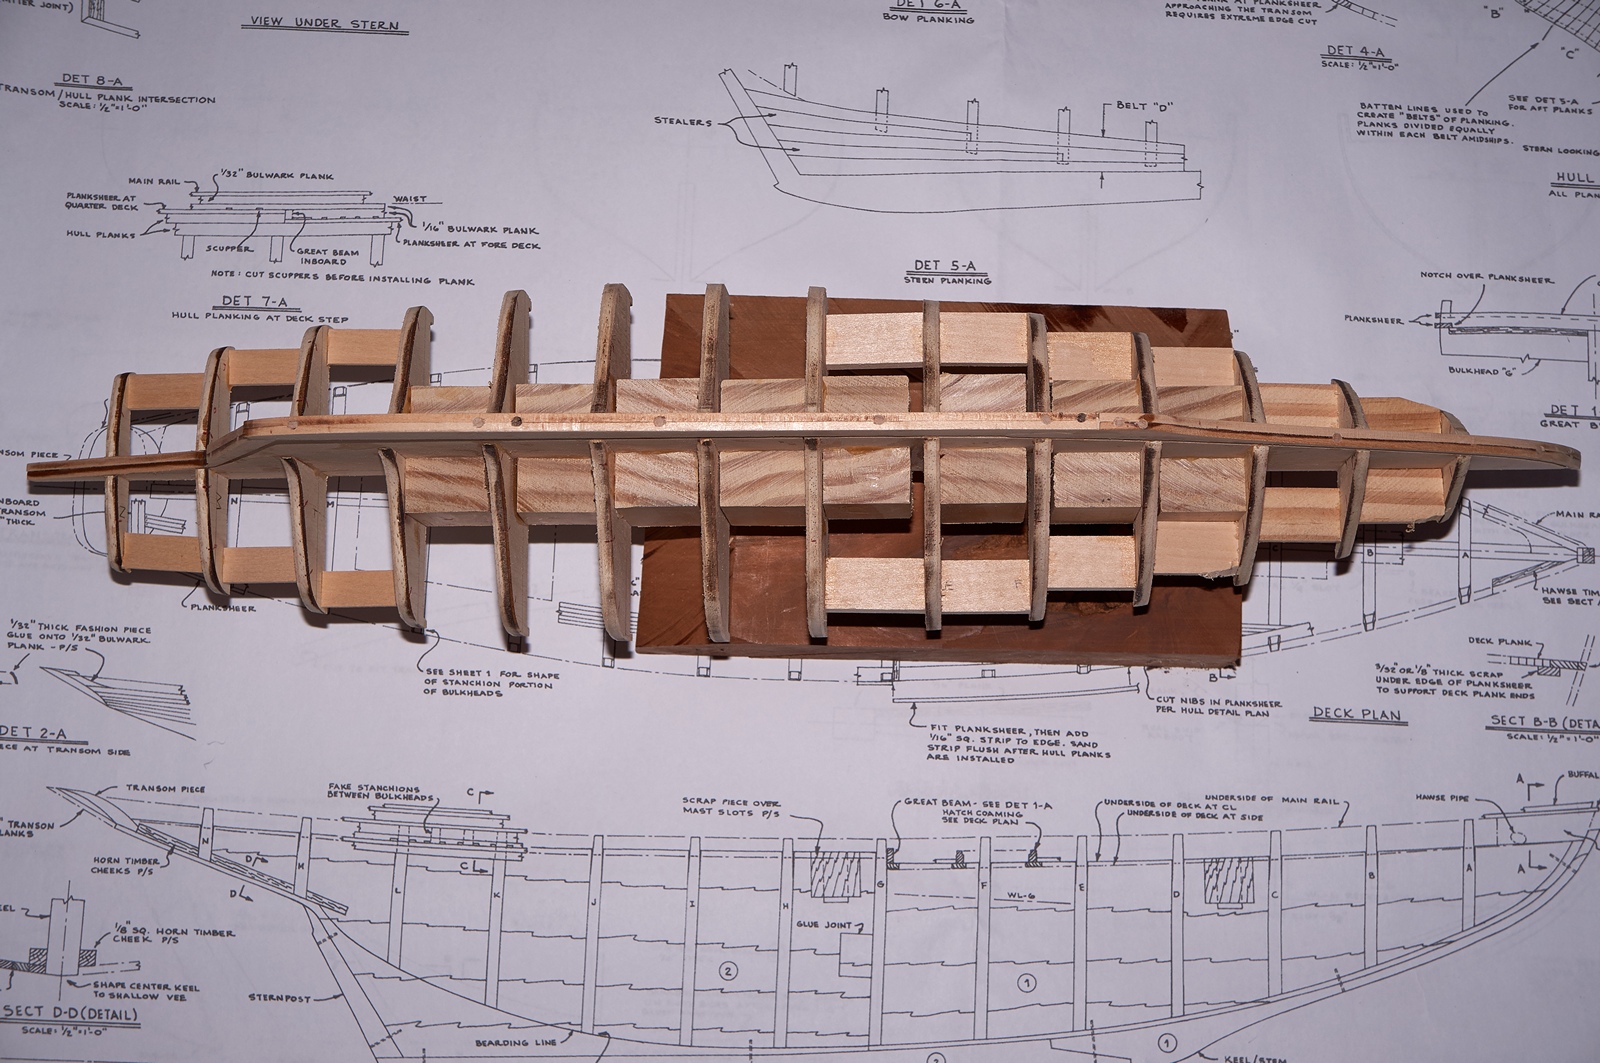
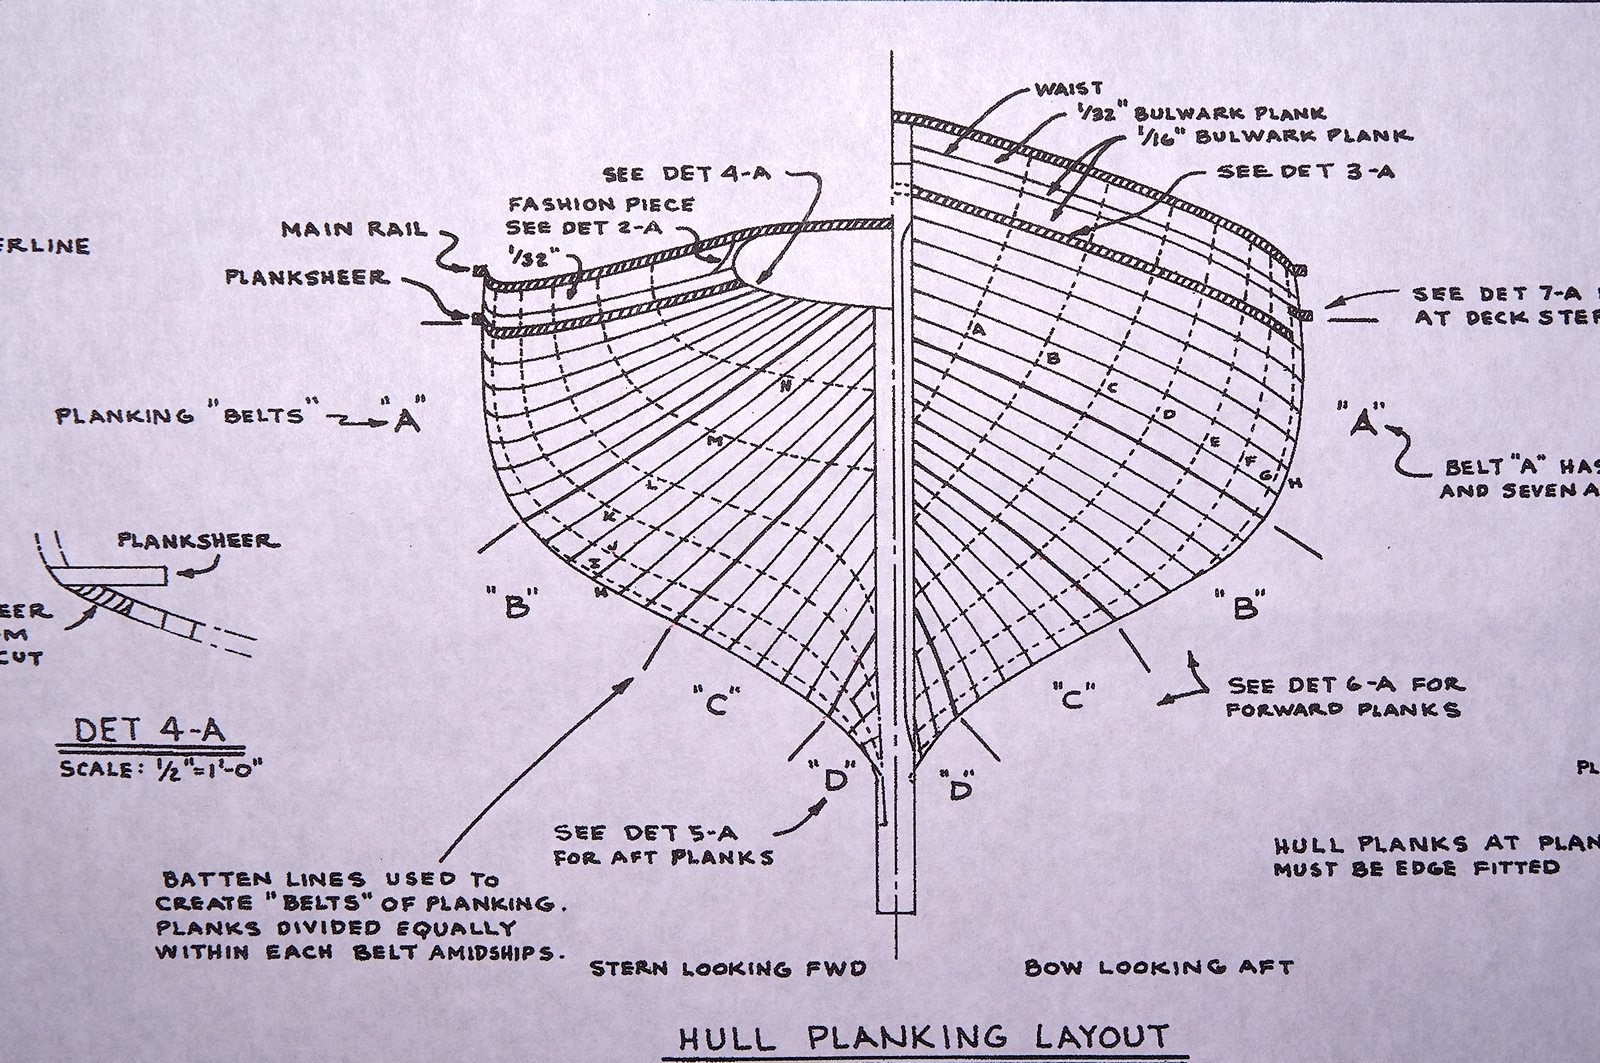
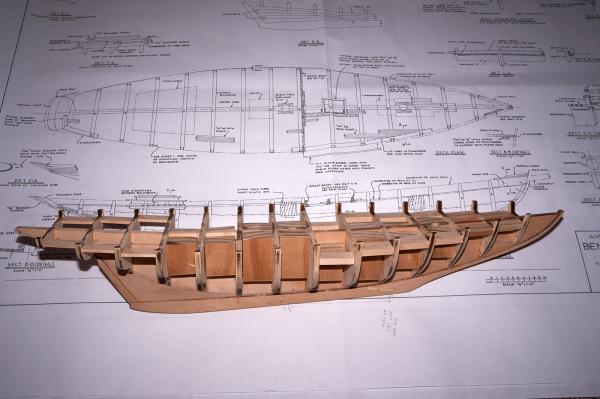
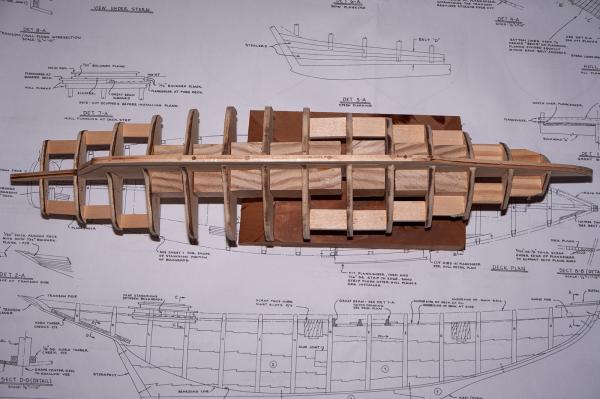
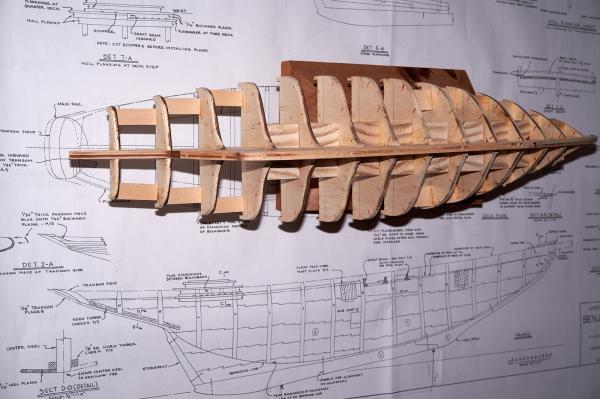
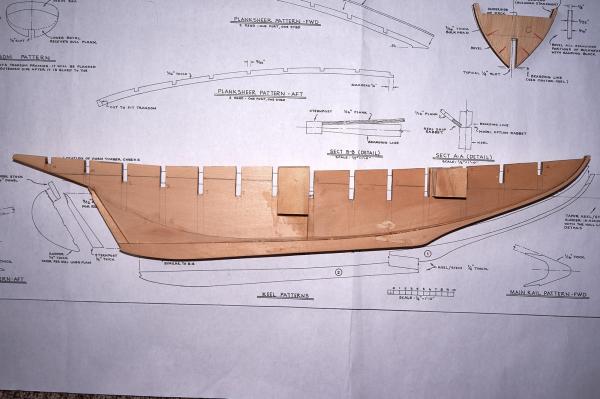
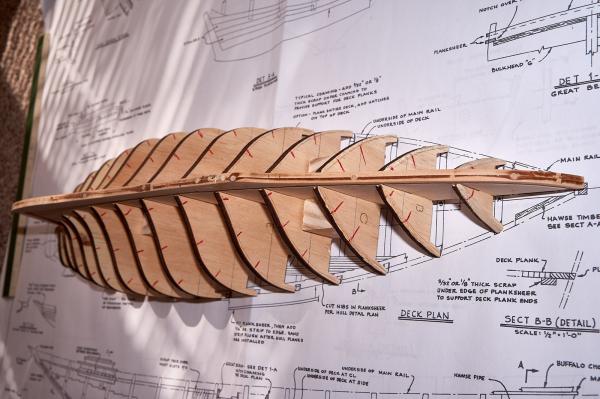
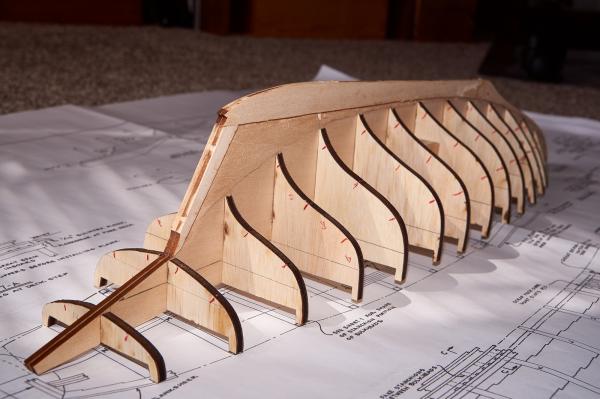
I decided to build BENJAMIN W. LATHAM for a couple of reasons. I like the lines and the history of the New England fishing schooners. I like the 1/4" = 1 ft scale. I like that this kit has more hull and less rigging...and no cannons to rig . And of course, I got the kit at a great price on an eBay auction. The center keel / bulwark former came in four pieces of 1/8' thick laser cut wood - two forward and two aft. This sandwich construction resulted in a center keel less prone to warping and stronger than a single thickness of wood. It also provides a nice center line when cutting the rabbet. Further, when I attached the keel and stem to the center keel, I secured them with nine 1/8 inch wooden dowels spaced along the keel. The center line helped me to center the drill holes for these. The first picture below shows the assembled center keel with supports for the mast steps, and the keel and stem attached. This kit also provides a very nice diagram of the locations of the planking belts along each of the bulkheads (shown in the second picture). I decided to use this and marked the location of each of the belts in red on both sides of all bulkheads (picture 3). I fitted the bulkheads to the center keel without gluing to make sure everything lined up. I placed the frame on top of the plan to help verify that all bulkheads are properly aligned. When I glue the bulkheads to the center keel, I will use blocks of hard pine with precise 90 degree corners to help make sure the bulkheads are in alignment. <<Gary>>


- 50 replies
-
- 16
-
-
- benjamin w latham
- model shipways
- (and 1 more)
-
John - Thank you for your very kind remarks. I hope you also visit the build logs of Rafine (Bob), Pete Jaquith and KenW. All three are excellent, and go way beyond just building the kit from the box. I would also encourage you to create your own build log for your "Fair American". You will have many people looking over your shoulder to help you out as you construct her. <<Gary>>
-
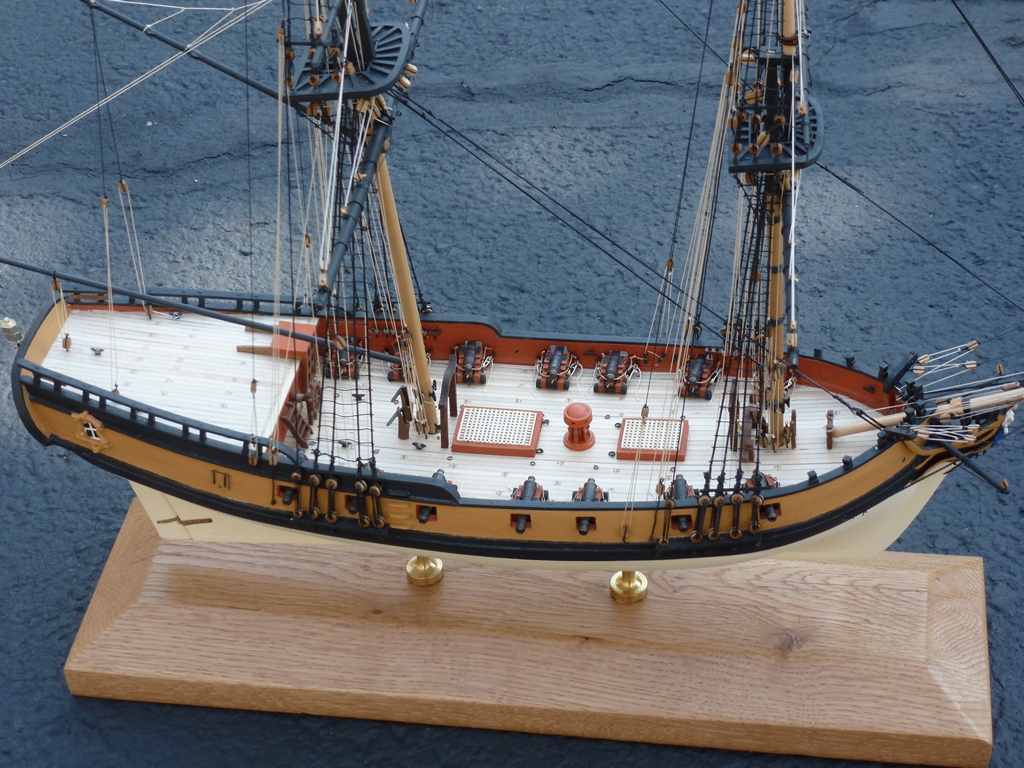
Thank you to Ken, David, JesseLee, Mirabell61, and Bob for your kind words. And thank you to the folks for the "likes" too They are appreciated. The paints used in the color scheme are mostly Model Expo stuff - MS4803-H Tallow for the hull, MS4830 Hull Spar Black and MS4829-Y Ochre. The red is from an old bottle of Floquil Polly S 110135 SP Daylight Red. I really like the quality of the old floquil paints, and wish they were still available. They go on very thin but cover well - almost like a stain. And Ken, yes, I know I have to do the rope coils. But I have started working on "Benjamin W. Latham" and it feels so GOOD to be working in wood once again. Those coils might have to wait until Autumn . I'm debating with myself whether to start a build log for Latham. <<Gary>>
- 206 replies
-
- 1
-
-
- fair american
- model shipways
- (and 1 more)
-
A book not yet mentioned and one that I find especially useful is "Seamanship in the Age of Sail" by John Harland. It has helped me to understand more of the "whys" and "hows" than most others. It is well written and illustrated. Here is a link to portions of it on Google Books: http://books.google.com/books?id=g7Jd_o6_s90C&printsec=frontcover&source=gbs_ge_summary_r&cad=0#v=onepage&q&f=true If you scroll down you can look at several good chapters. <<Gary>>
-
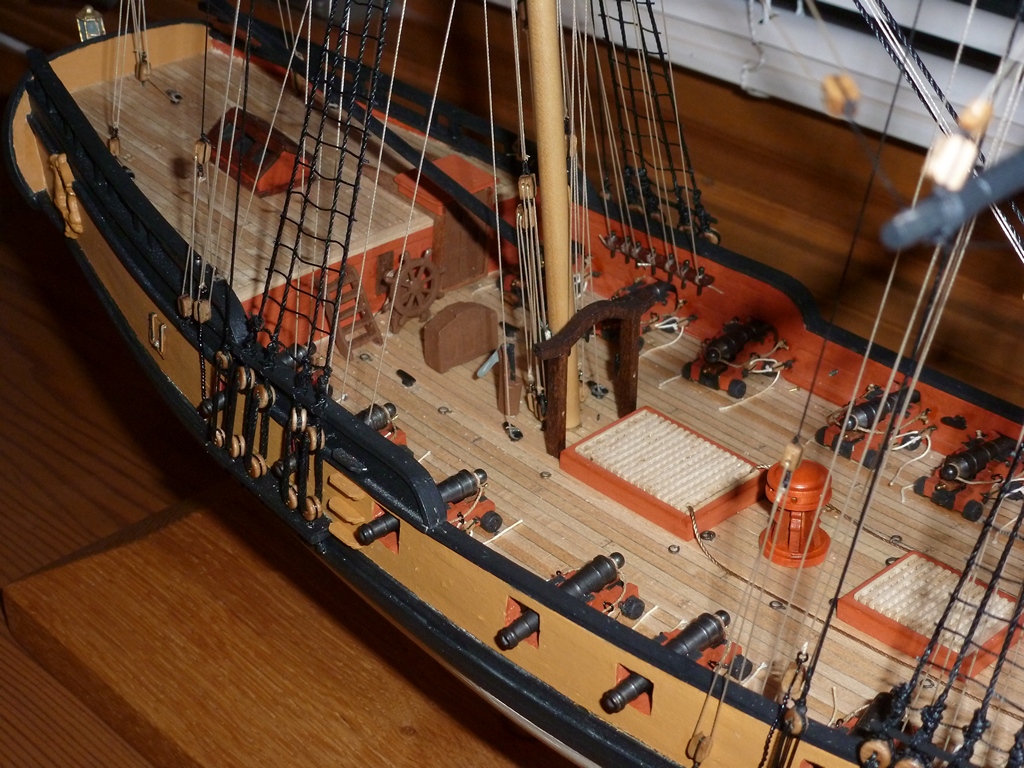
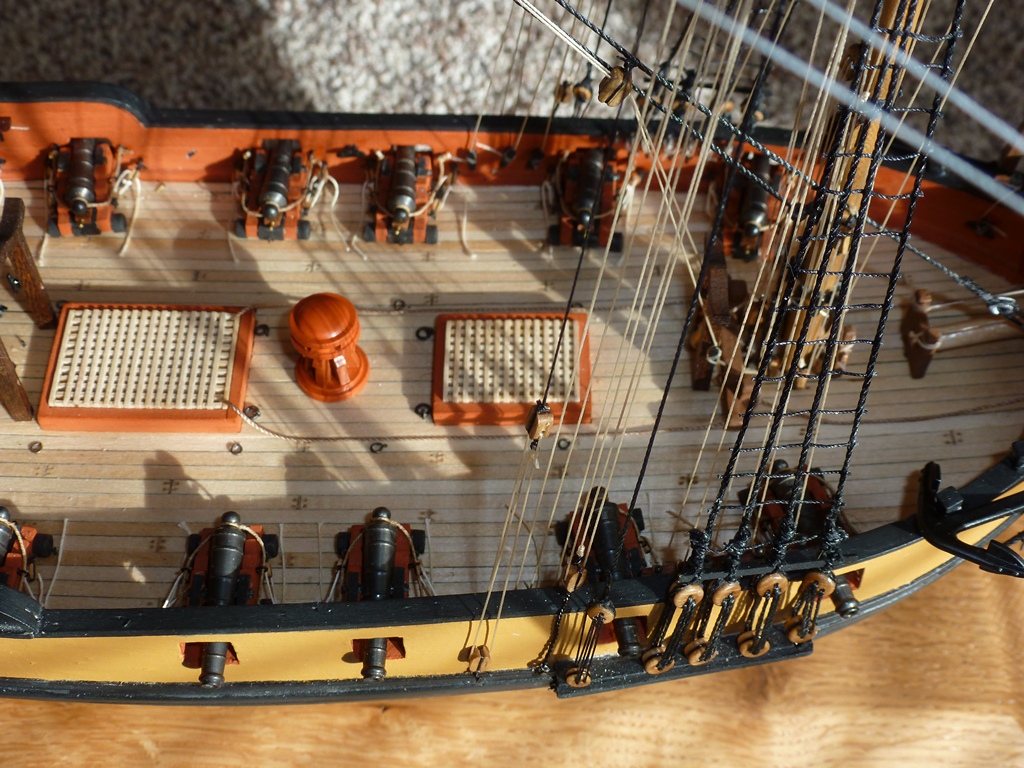
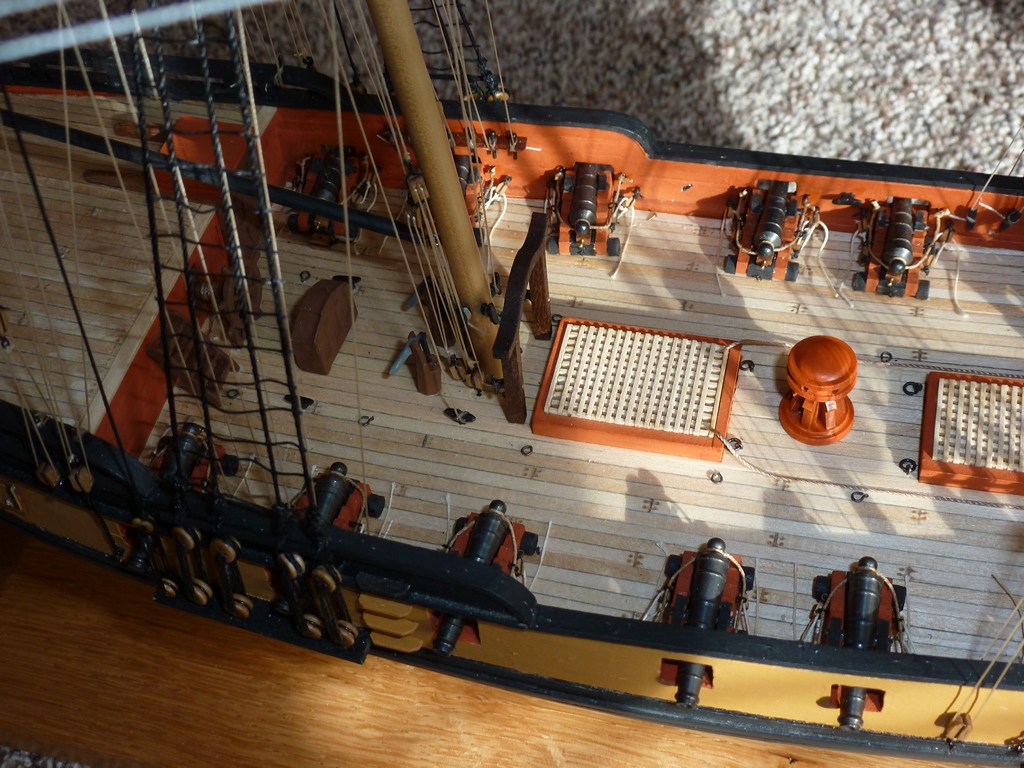
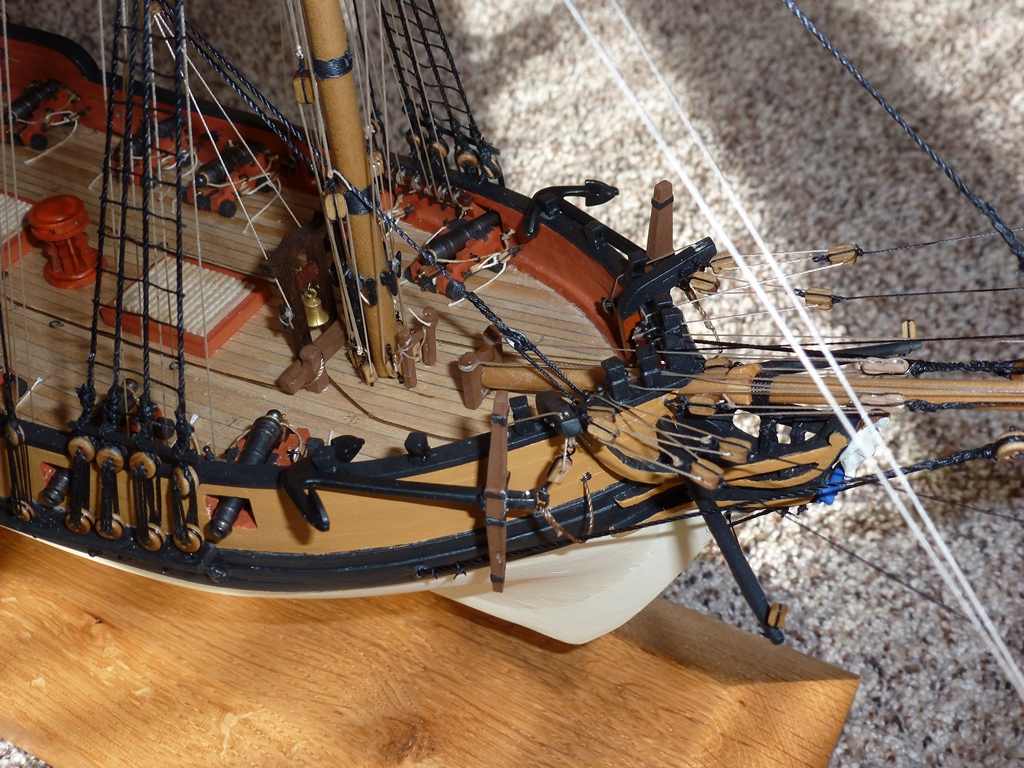
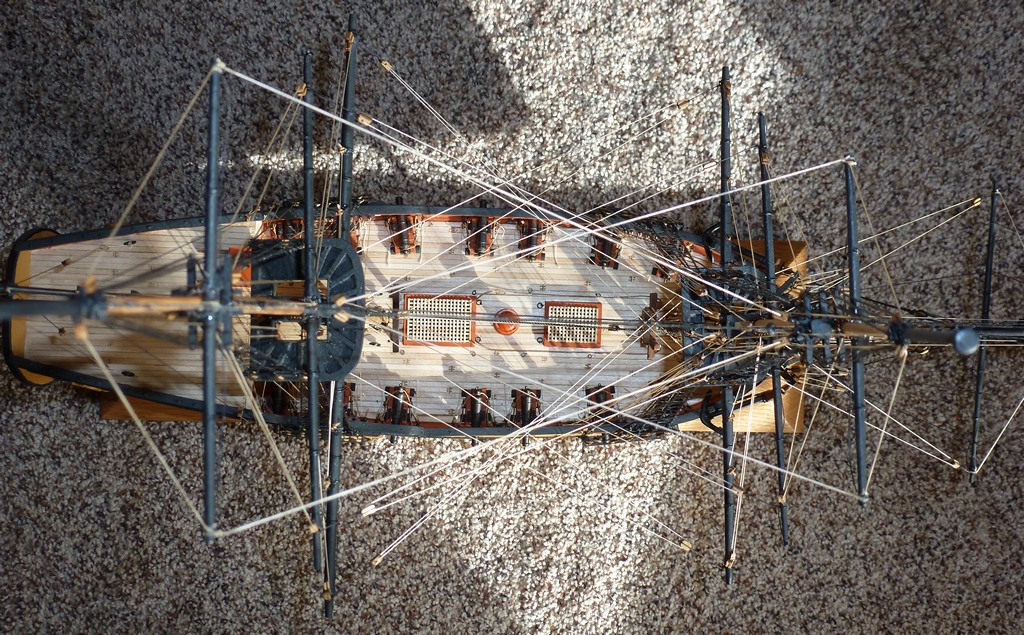
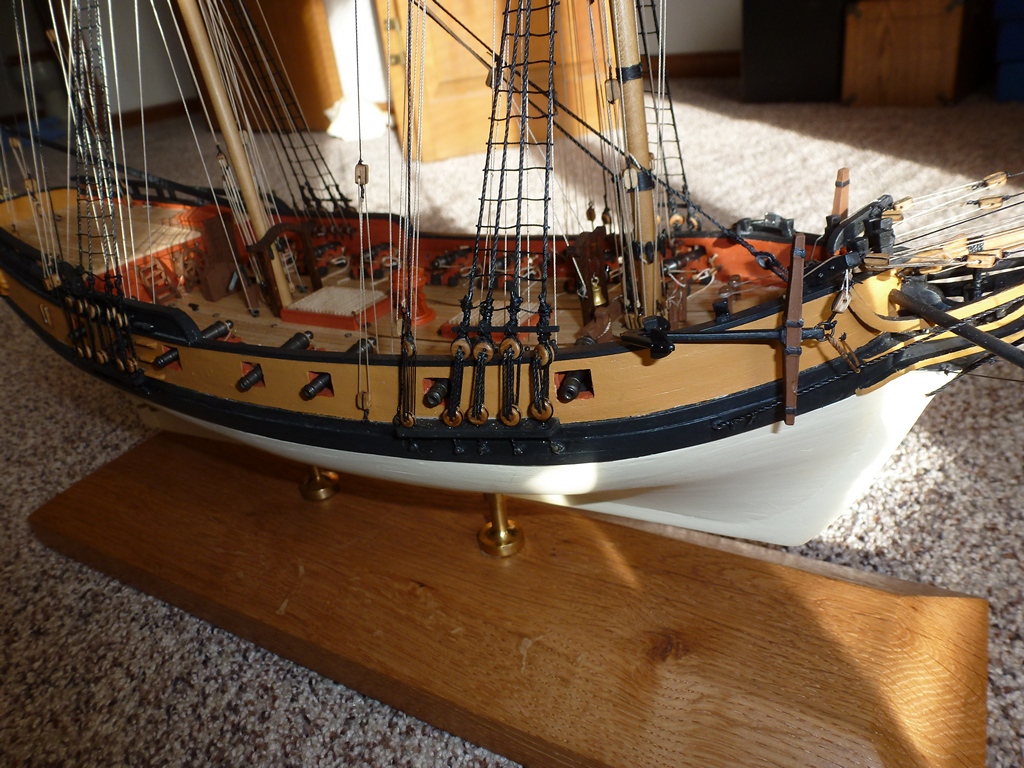
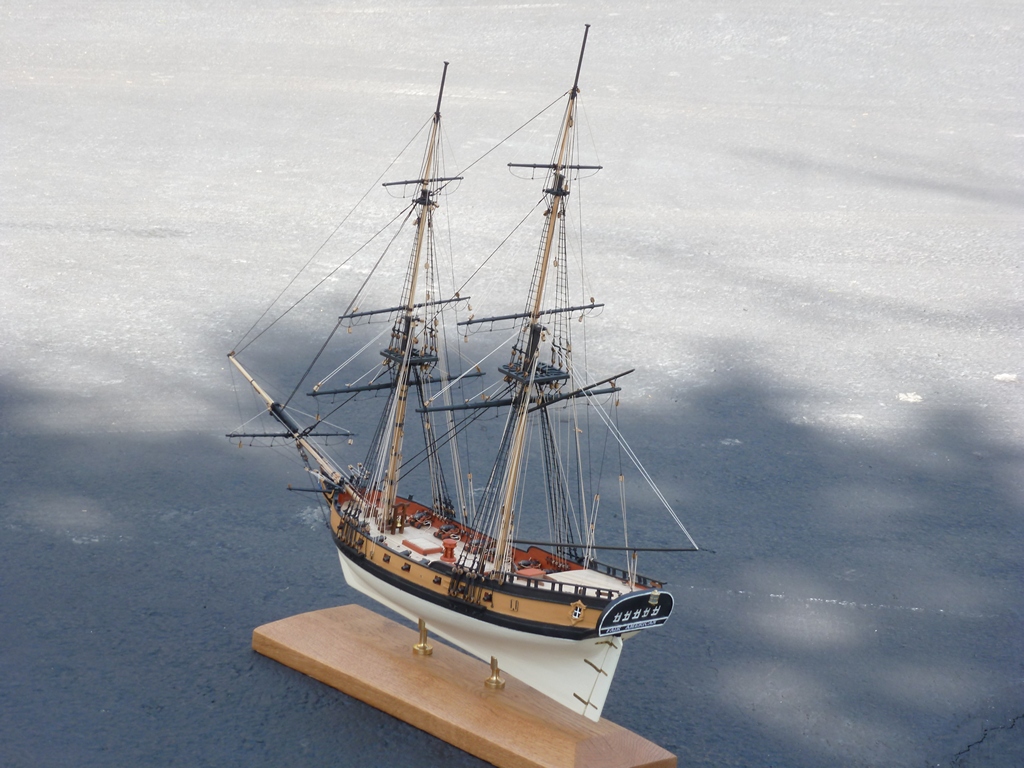
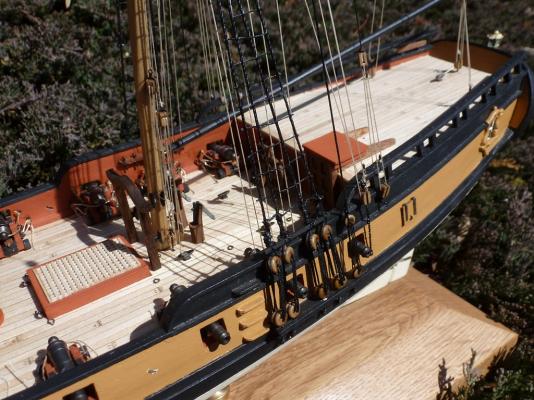
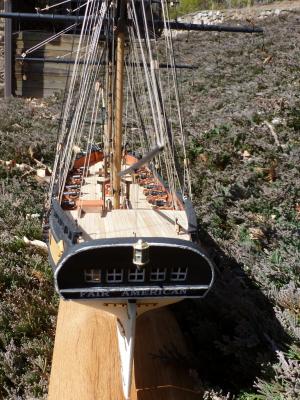
Hello all - Here are the pictures that I promised. Remember..I'm not quite done yet . <<Gary>>


- 206 replies
-
- 12
-
-
- fair american
- model shipways
- (and 1 more)
-
Hi Vince - Thank you for the suggestions. I will have to try them out. And I look forward to your blog with photos. Truth be told, I am itching to start on my Benjamin W. Latham and do some work in wood. Rigging makes me crazy after a while. I just got my copy of Chapelle's "The American Fishing Schooners 1825-1935", which is giving me even more inspiration. I have taken more photos of my "Fair American" as finished to date, and hope to post them soon. <<Gary>>
-
Thank you to yvesvidal and victorpapa for your kind remarks. I too benefited from the build logs and advice of other posters on this site. I know for sure that my ship model is MUCH better as a result. And I learned about cap squares, boomkins, and many other things nautical in the process. I recently purchased my own copy of Harland's book "Seamanship in the Age of Sail" ($45 used online) with its wealth of information to draw from. I strongly recommend this book to anyone modeling ships from 1600 - 1860. You can view portions online at Google Books" http://books.google.com/books?id=g7Jd_o6_s90C&printsec=frontcover#v=onepage&q&f=true Progress update: I rigged the braces and the anchors. The only big thing left is the rope coils on the belaying pins. I was successful in doing this on my MS "Rattlesnake" so I know I can do it...but my fumbling fingers don't seem to be making it happen this time. I'm thinking of putting this on hold for the time being and jumping into either "Emma C. Berry" or "Benjamin W. Latham". The weather is turning warm here in Virginia and it would be a good time to start working on a hull. <<Gary>>
-
Thank you to Gerty, Ken, David, PineTar, Greg, Nils, and Bob for your kind words. And thank you to GuntherMT, Walter, Russ, JesseLee, PineTar, and Bob for your "likes". Your support and encouragement is always appreciated. I think we are almost always our harshest critics (sometimes the Admiral is harsher... ). I think I even remember Bob fretting about his ratlines recently. People on other posts have wondered about building the same ship model twice - once to learn it and then again to improve on the effort. What would I do differently "next time"? I would order higher quality wood strips for the planking, and use scraps from that to "kitbash" and construct my own deck furniture. I would not paint the hull, but leave it natural wood. Where painting is required, I would apply several THIN coats, perhaps using Winsor & Newton acrylics like Chuck Passaro does, instead of using the thick goopy Model Expo stuff. And I would buy and use much finer sandpaper to sand between coats. In building, I would be more willing to re-do something that did not come out quite right the first time, instead of accepting it as-is. When rigging, I would purchase better quality and less stiff "rope", and also smaller and better blocks. I would include the shroud cleats that I omitted this time because they became so difficult. I might even try tying all of the clove hitches in the ratlines . But I have kits for BENJAMIN W. LATHAM and EMMA C. BERRY waiting to be build, so I will try to apply some of these resolutions when building them. And then maybe I will think about another FAIR AMERICAN...
- 206 replies
-
- 6
-
-
- fair american
- model shipways
- (and 1 more)
-
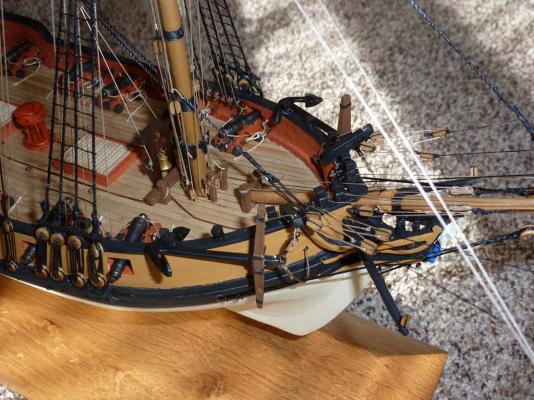
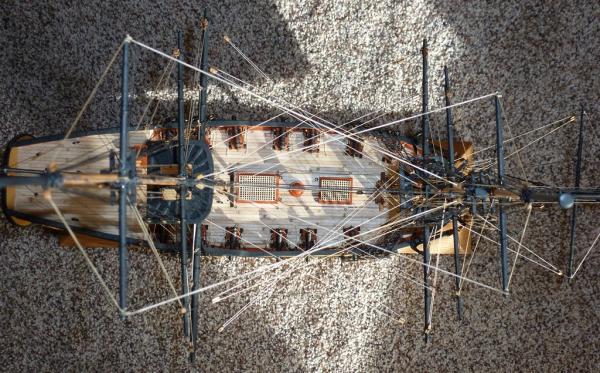
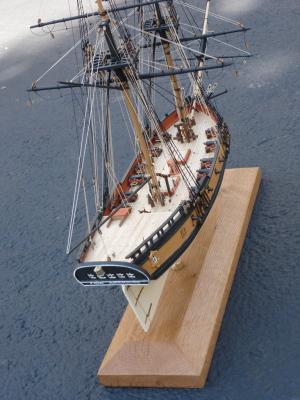
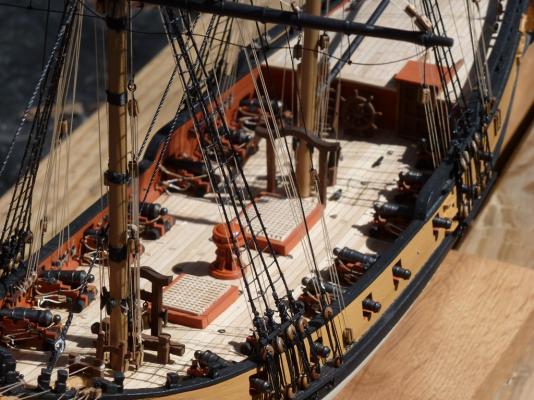
OK - time for a long overdue progress report. I am almost finished with the standing and running rigging, with only the braces to add. I still have to add the anchors and their gear, the coils of line over the belaying pins, glue down the deck furniture, and add the flags and pennants. She's not "museum quality" and there are MANY things I would do differently, but I had many enjoyable hours building her, and I learned a lot about eighteenth century ships and sailing (mostly from others on this forum). In reality, friends and relatives will see her as a nice ship model without identifying the errors and omissions . And hopefully my next ship model will benefit from the experience that I gained. <<Gary>>


- 206 replies
-
- 14
-
-
- fair american
- model shipways
- (and 1 more)
-
Why no jibboom guys on Fair American?
GaryKap replied to GaryKap's topic in Masting, rigging and sails
Yes, and I abbreviated what I intend to rig - the two jibboom guys...just like the drawing. Fair American does not have a flying jibboom. update 2/5/15 It was not as difficult as I feared to put the eyebolts into the catheads. I have rigged the jibboom guys and other normal rigging. <<Gary>> -
Why no jibboom guys on Fair American?
GaryKap replied to GaryKap's topic in Masting, rigging and sails
Thank you figuerres, Pete, and wq3296 for replying to my question. And thank you wq3296 for your offer regarding the plans. I have decided to attempt to add the jibboom guys. This is another one of those things that would have been better done earlier in the construction. It would have been nice to add the eye bolts in the catheads before putting them on the ship. Live and learn... <<Gary>> -
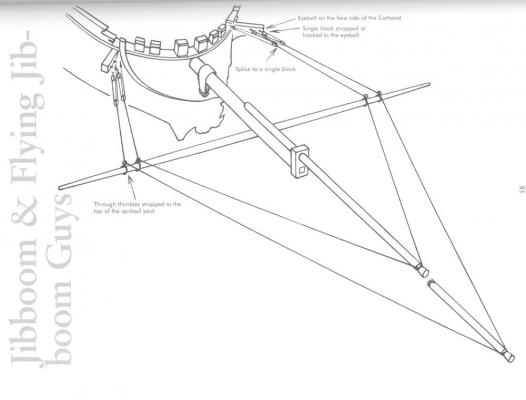
Why would there not be jibboom guys on a 1780 brig like "Fair American"? I am asking because none are shown on the rigging plan nor do I see any on the recent build logs? But "Rattlesnake" has them (same era) and "Syren" has them. Here is a diagram from Petersson (p. 58) to show what I am talking about. Harland implies that prior to 1800 they were used each time the ship came about (p. 23). I am thinking of adding them to my "Fair American" build. Would I be incorrect to do so? <<Gary>>
-
Len - You are doing a very nice job on your FAIR AMERICAN. You appear to have learned from Bob's and Ken's build logs ( I did too...). I will continue to follow your build log and will be happy to offer any advice that might be helpful. <<Gary>> p.s. Read the other build logs carefully. There are some really good observations embedded in the text that can be of help.
-
Ken - Thanks for the tip on the source for thin wire. I will look into it. The standing rigging on my FAIR AMERICAN is mostly completed. I have not installed the topgallant backstays yet. It appears to me that they will get in the way of my clumsy hands when I attach the yards and do the running rigging. i am considering deferring rigging them until the yards are on. What was your experience with this? From your build log, it looks like you rigged the topgallant backstays before you did any of the yards and running rigging. Did they get in your way? <<Gary>>
-
Hi Figuerres- Wow! those are significant changes to the hull that you are contemplating. You need to be aware that your changes will also require alterations in the channels, chainplates, deadeyes, and etc. That is what KenW discovered with his FAIR AMERICAN when he made only minor changes to the gunport size and location. I found the same to be true on my FAIR AMERICAN. I have nearly completed the standing rigging at this point. I have found the main topmast backstays to be too close to the main lower top as a result of my modification. Just a "heads up" if you do make the modifications. You will need to pay careful attention to the locations of the channels and chain plates. Think it through carefully. <<Gary>>
- 206 replies
-
- 2
-
-
- fair american
- model shipways
- (and 1 more)
-
Well done...a beautiful job! Thanks once more for sharing your thoughts and photos through the process. You have helped a bunch of current and future "Fair American" ship builders. Now what's next? <<Gary>>
-
Tadeusz - Thank you for taking the time to research this and to share it with the forum. Your information is excellent and will certainly help me and other forum members to correctly model the boomkins on our vessels. <<Gary>> p.s. I visited your beautiful city of Gdansk in 2010 and remember a nice old square rigger in Gdynia harbor.
-
Russ and Druxey - Thank you for your helpful responses to my questions. I think I have the picture now. Your input is appreciated. <<Gary>>
-
Thank you to Jerry, Bill, Druxey,Allen, and Danny for your information. OK, so the boomkins were permanently attached, and held with cap squares on the false rails. But how were they attached to the hull of the ship? Were they stepped into sockets like the masts, or attached with some kind of iron fixture, or somehow else? Or do we know...? <<Gary>>