


GaryKap
-
Posts
276 -
Joined
-
Last visited
Content Type
Profiles
Forums
Gallery
Events
Posts posted by GaryKap
-
-
Ken -
Thank you for taking the time to add the photos looking under the tops. They are MUCH better than the instruction booklet - larger, clearer, and in color. They will be of help to me in doing my rigging...and I need all the help I can get.
<<Gary>>
-
Ken and Ed -
Merry Christmas! I have been following your dialogue and have a suggestion that may help Ed. I am also into rigging and struggling with rigging and block placement. I study Kens's and Bob's build log, the plans, and etc but then can't quite remember everything. I found that I can use Sheet 2 of the plans - the mast and spar diagrams - to make notes on the location and size/type of block that needs to be attached. Then as I am working attaching the blocks etc I can refer to Sheet 2. I am finding it big help and hope that you might as well.
<<Gary>>
p.s. Ken, your "Fair American" will be treasured by your son and his descendants for generations to come. It is beautiful.
-
Eddie -
Thank you for providing this build log with several LARGE pictures of your progress. I have a Benjamin Latham kit in my closet as my next project. Your photos help me visualize the assembly steps and finished ship model much better than the plans and directions. Keep up the good work and keep the pictures coming...and please share any insight or tips that will help future Benjamin Latham modelers.
<<Gary>>
-
Hey Ken -
She's lookin' great!! Any detailed closeup shots of the top mast, fore topmast, and topgallant masts showing the locations of blocks is greatly appreciated. And yes, I know...obtaining those closeup pictures is not easy.
I am curious though - what are you going to do for a display stand for the finished model?
<<Gary>>
-
Ken and Ed -
Another great source of information on sails and rigging is John Harland's excellent book "Seamanship in the Age of Sail". A portion of it is available online:
Chapter 2, pages 29-34 talk about sails and the lines needed to control them. Page 34 has a diagram of the positions of blocks on the yards. I know this is a bit late for Ken but I hope it will help Ed and others who may be following this build log.
And Ken, I can only echo all of the other commenters to say that you are doing a superb job and to thank you for allowing us to look over your shoulder as you work.
<<Gary>>
-
Hi Bob, Ken, victorpapa and Walt -
Thanks for dropping by and your words of encouragement. Walt, I see you have Emma C. Berry on your future list. Me too - the kit is sitting in my closet. Building a plank on frame hull is going to be a real challenge. We need to have parallel build logs for them.
I wonder if the Fair American control lines (if it were a real ship) went under the cabin deck with blocks and then back up again near the rudder post. Just a thought...
I will be away on vacation until mid-October. Then I will start the standing rigging. And by then, KenW will have identified all those blocks for the running rigging that should have been attached to the masts before they were stepped.
<<Gary>>
-
Hello Claire -
Thank you for your input. We also chased this topic a bit in KenW's "Fair American" build log. The upshot is that the rigging plans and diagram provided with the Model Shipways kit probably reflect the model in the Rogers Collection at Annapolis that the kit is attempting to duplicate. As Russ pointed out, an actual ship would have had blocks and references Lees on page 69 of The Masting and Rigging of English Ships of War, 1625-1860.
You must have misread my original post. where I say the plans call for slings. I simply never mentioned them again in subsequent comments.
<<Gary>>
-
Ken, Russ, David B. and others -
I think that was a worthwhile discussion that will result in better ship models. I know I learned a bit about 18th century ship rigging in the process...with a LOT more left to learn. And we are reminded once again that the Model Shipways "Fair American" kit is a model of a model, with a rigging plan that is not always easy to follow - or believe.
<<Gary>>
-
-
Hi Russ -
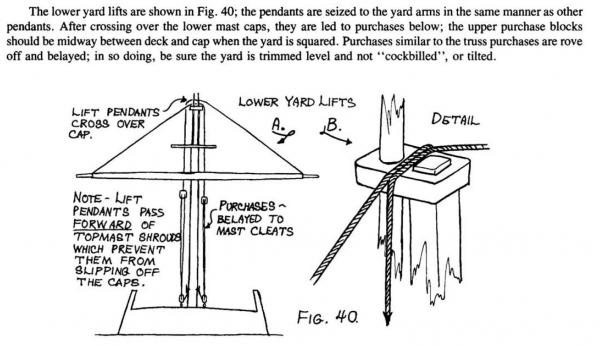
Thank you for your response. There are two problems. First is the way the lifts are rigged as shown in Figure 40 page 35, and on my recent post
http://modelshipworld.com/index.php/topic/7974-trusses-and-lifts-and-jeers-oh-my-fair-american/
Would the lifts really have been draped over the lower mast caps as shown? Without blocks, it seems to me that the ropes would fray and fail in a hurry.
The second problem / question is basically, would the lower yards on a brig from 1780 been raised and lowered with some frequency, or were they fixed and static? This would help determine whether jeers would have been rigged.
I will freely confess to an imperfect understanding of eighteenth century ship rigging. Any information you or other posters might provide will be appreciated.
<<Gary>>
p.s. The trusses and slings are fine by me. No problems there.
-
Ken -
I was hoping that someone following your post (like Russ or Aliluke) would be able to shed some light on this. Specifically, would "Fair American" lower yards have been rigged in the same way or similar manner as "Syren" with jeers, lifts, and trusses. Lennarth Petersson's book (pages 34-37) show rigging similar to the Syren practicum. I am trying to get this sorted out before I permanently step the masts and while I can still easily access the underside of the tops if needed.
I am posting this on your build log and not mine because you have more "followers" who might see it. Another way of phrasing the question might be as you have above - were the lower yards on a brig from 1780 lowered very often or not? Hopefully someone will read this and be able to answer.
<<Gary>>
-
Ken -
I posted a question to the Masting, Rigging, and Sails forum
http://modelshipworld.com/index.php/topic/7974-trusses-and-lifts-and-jeers-oh-my-fair-american/
asking about rigging the lower yards. You might want to take a look.
<<Gary>>
-
Henry and Ron -
Thank you for your responses. I think I will use the Model Shipways "Syren" practicum (Chapter 20, page 115) and rig trusses, jeers, and lifts for the lower yards as shown there.
<<Gary>>
-
Hi Ron -
Thank you for your offer. I don't have fax capability, but I do have Petersson's book. And I have checked out page 24. Yes, that is what I would expect to see.
Regarding your Swift question, Russ has been very helpful to me with my past questions and always correct in his responses. If you are building a Virginia pilot boat, you made the right decision. Interestingly, the AL kit also included two cannons...not found on pilot boats.
<<Gary>>
-
Hey Ron -
I have the plans for the Artesania Latina "Swift" Virginia Pilot boat 1805 in front of me as I am writing this. The plans are from around 1985, and they show two shrouds on each mast, and a stay running from the tip of the bowsprit to the top of the foremast, and then to the main mast. Might not be historically accurate, but that's what they show. Its your ship. I would be happy to take a photo of the plan if you would like, but won't be able to do it until tomorrow.
<<Gary>>
-
I am starting to rig my Model Shipways "Fair American" and have been studying the rigging diagram, belaying pin plan, and instruction manual. As best I can figure for the lower yards, the plans call for slings and trusses but only lifts to raise the yards...and not jeers. The instructions for the llifts are shown below. I am puzzled by the lift pendants crossing over the cap as shown. This does not look right to me. Shouldn't there be blocks there instead? And why didn't they utilize jeers on this vessel? Any insight from you 18th century guys will be appreciated. Thanks
<<Gary>>
-
Hi Altalena 18
I am enjoying your build log and look forward to progress reports. As a teenager more than a half century ago, I was fortunate to have sailed on a Hudson River sandbagger that was built in the 1850's. She was 20 feet long and carried 404 square feet of sail. The hull shape was similar to yours but with a finer stern and transom reminiscent of the schooner yacht "America". The owner had two lovely college age daughters, and their several boyfriends were the human "sandbags" of moveable ballast. So for a case of beer and some pretzels, the owner could keep an eye of his girls and at the same time enjoy his sailing. She was a lovely thing (the boat) with a natural finish and beautiful woodwork. The wood was cypress or cedar - can't remember which. She had a cockpit coaming that was perhaps eight inches high, with holes for oarlocks on each side. And that lovely long curved bowsprit...
So I am eagerly looking forward to see how your sandbagger evolves.
<<Gary>>
-
Hi Ken -
Well...when in doubt, read the directions. Sure enough, the trusses and lifts have "purchases" with the lower purchase blocks as "wire-strapped single-becket blocks should be hooked to the deck" and the purchases rove and belayed. This is on pages 34 and 35, Figures 39 and 40 of the instruction manual.
Enjoy Block Island.
<<Gary>>
-
Ken -
The belaying pin plan shows three deck eyebolts on each side of the main and fore masts. The Instruction Manual on page 41 has a photo (bottom) showing blocks attached to these eyebolts and labels B, C and D with no caption to explain. Am I correct in assuming that these are for the lower yard lifts and trusses, which are belayed on adjacent mast cleats? (and for the foremast, the third eyebolt and cleat are for the spritsail braces) If so, I will strop the blocks to these eyebolts before permanently stepping the mast. Any of you guys looking over Ken's shoulder have any thoughts?
Thanks for any help you can provide.
<<Gary>>
-
Ken -
The bosun should be very pleased with your rigging. It's looking great. And I appreciate any tips you might offer regarding blocks or sheaves that need to be installed on the masts before they are permanently stepped. "Rattlesnake" was easier for me to rig because it had better diagrams. I seem to struggle more with this one. However. "Fair American" does have a better belaying diagram, and that helps some. Like you, I am relying on the "Syren" practicum for much of the rigging details.
Keep up the good work.
<<Gary>>
-
Hi all -
Walt, I think I have restored the missing photos. Stuntflyer, thanks for dropping by and for your kind words. I would encourage you to start a build log for your project. You will get lots of helpful advice and encouragement. And you should also check out the build logs from KenW and Rafine. Both are excellent. They use better quality wood with natural finish and their results look great.
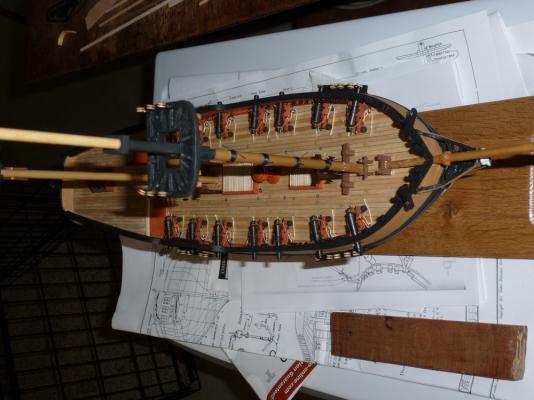
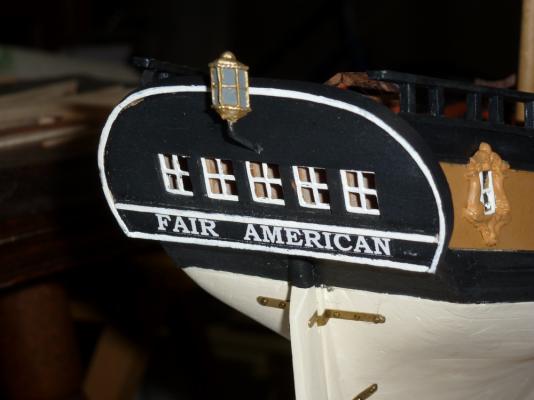
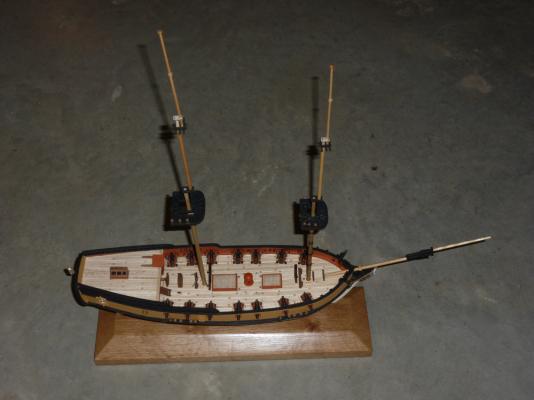
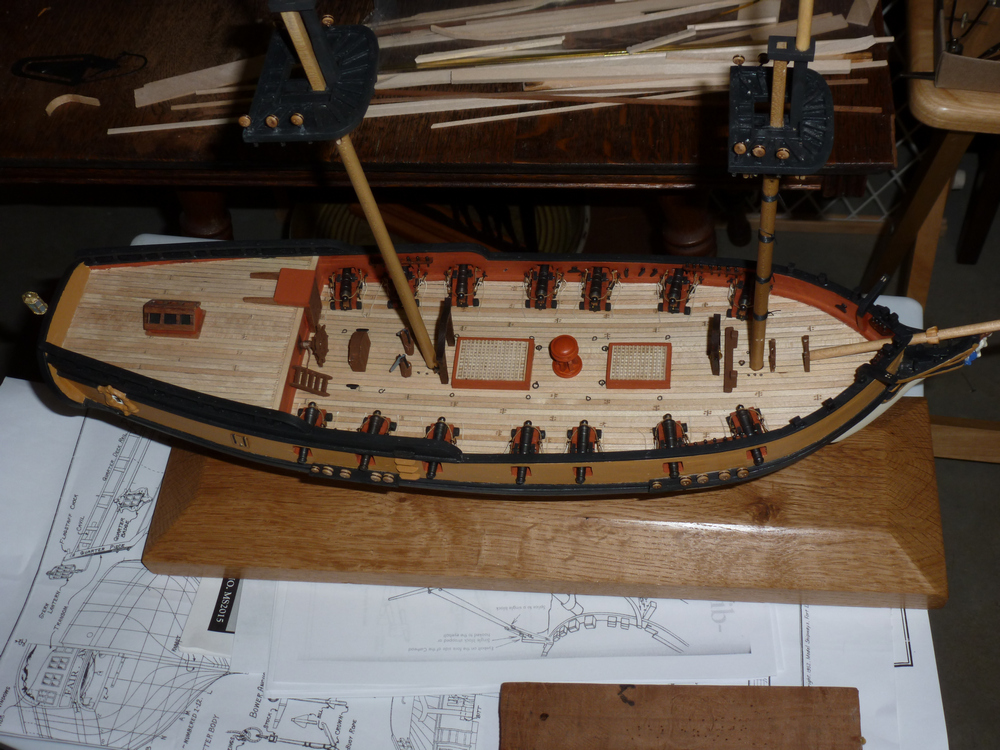
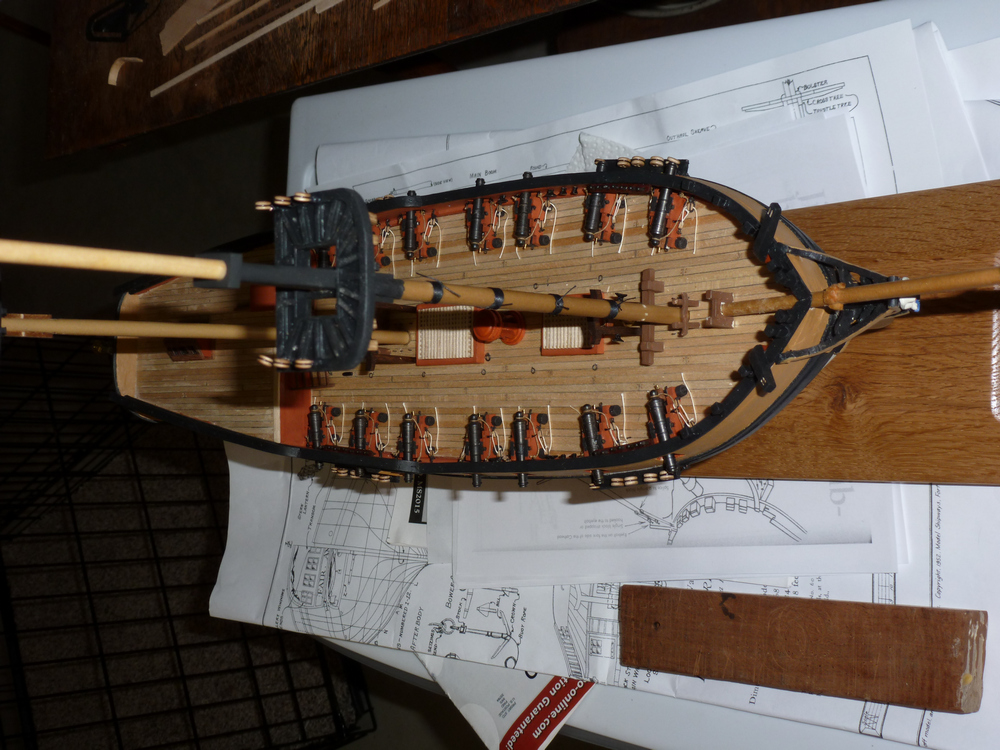
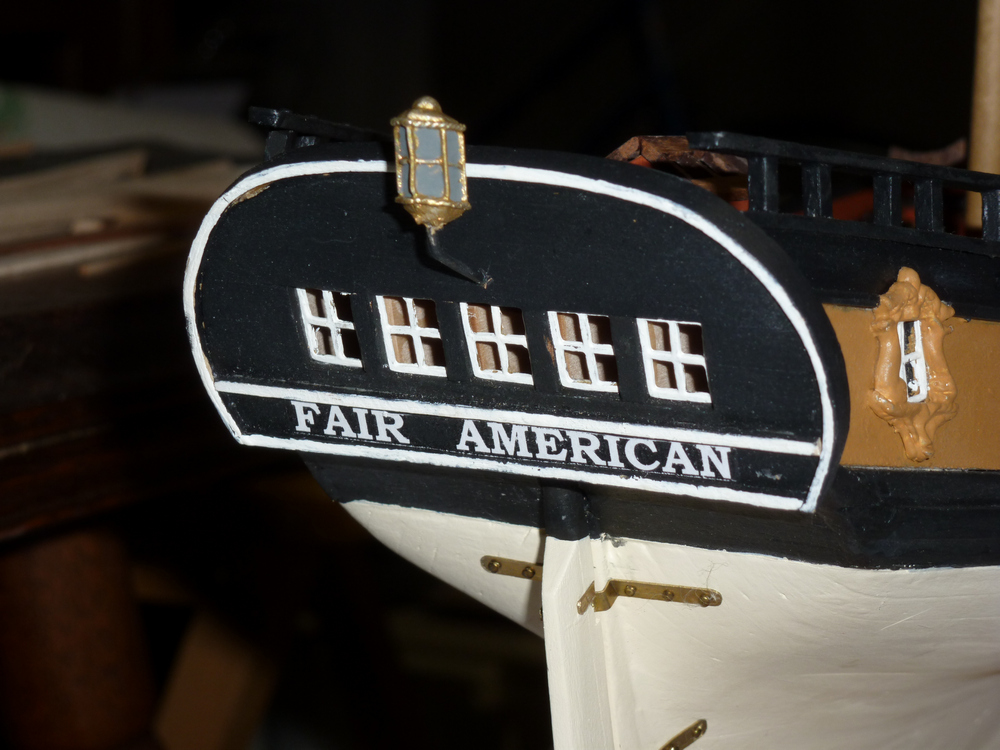
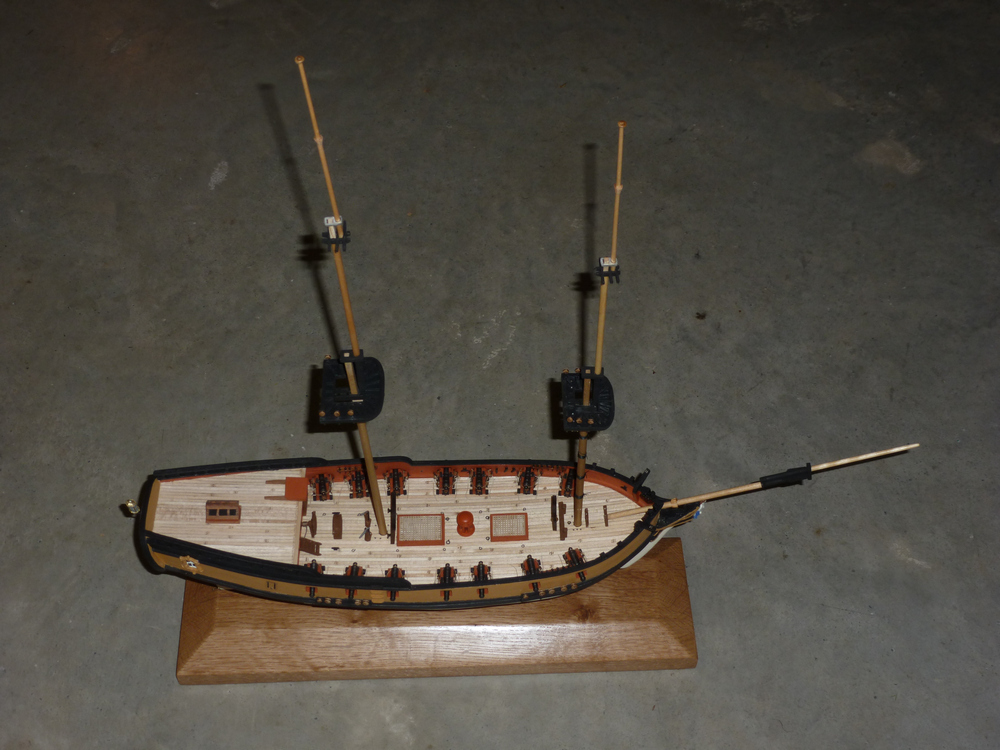
Its probably time for a progress report, although there has not been much progress. I have been dealing with a carpal tunnel kind of wrist problem that limits what I can do. In addition, I used a very old bottle of Floquil "Swedish Oil" to varnish the masts... and it has taken WEEKS to dry. I have attached some pictures. The masts are stepped but not glued in. They are not completed yet. I need to do some painting and hang some blocks under the main top as well as other places. The deck furniture is not glued on either. I just placed it to give myself an idea of how she's looking. The skylight is a "prototype" and will be replaced with something better in final. I think the quartrdeck looks naked without it. The stern lantern is just stuck on for now. You get the idea. But that's the progress to date.
<<Gary>>

-
Vince and Walt -
Thanks for dropping by, and for your kind words. Vince, I sometimes think about building a "second" of Fair American or perhaps of Rattlesnake. But then again, there are always so many NEW mistakes I can make... Walt, thanks for letting me know about the missing pictures. I'll see if I can replace them.
By the way, two minor discoveries I have made. Toenail clippers are great for neatly cutting brass strips or wire. Emory boards from the Dollar Store are handy as sanding sticks to get into tight places.
<<Gary>>
-
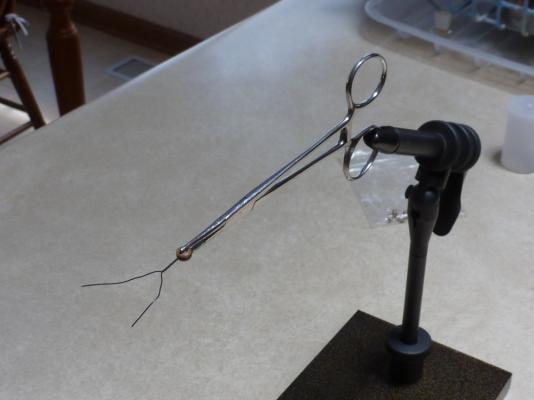
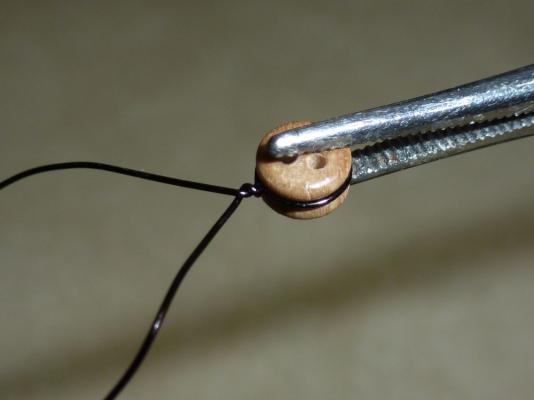
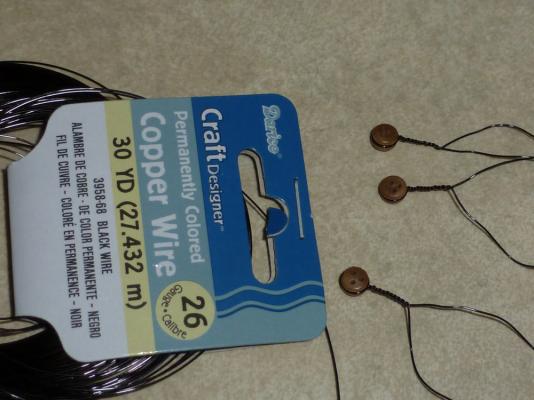
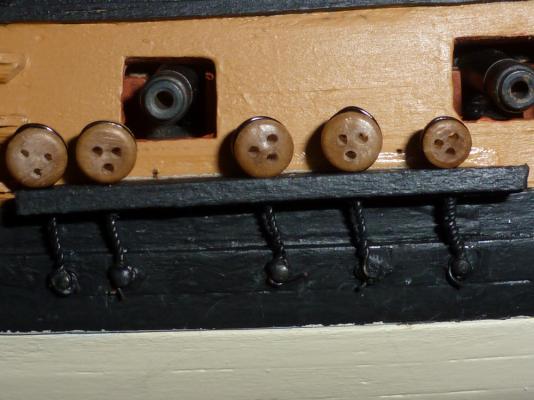
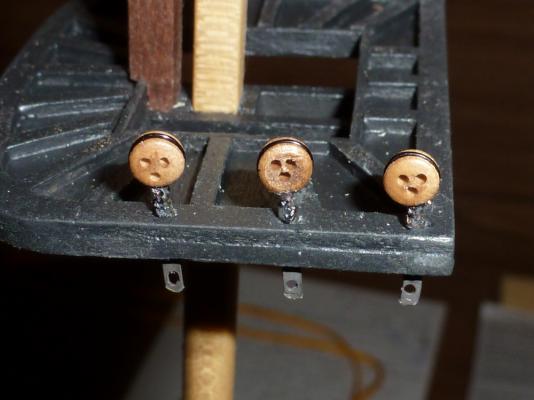
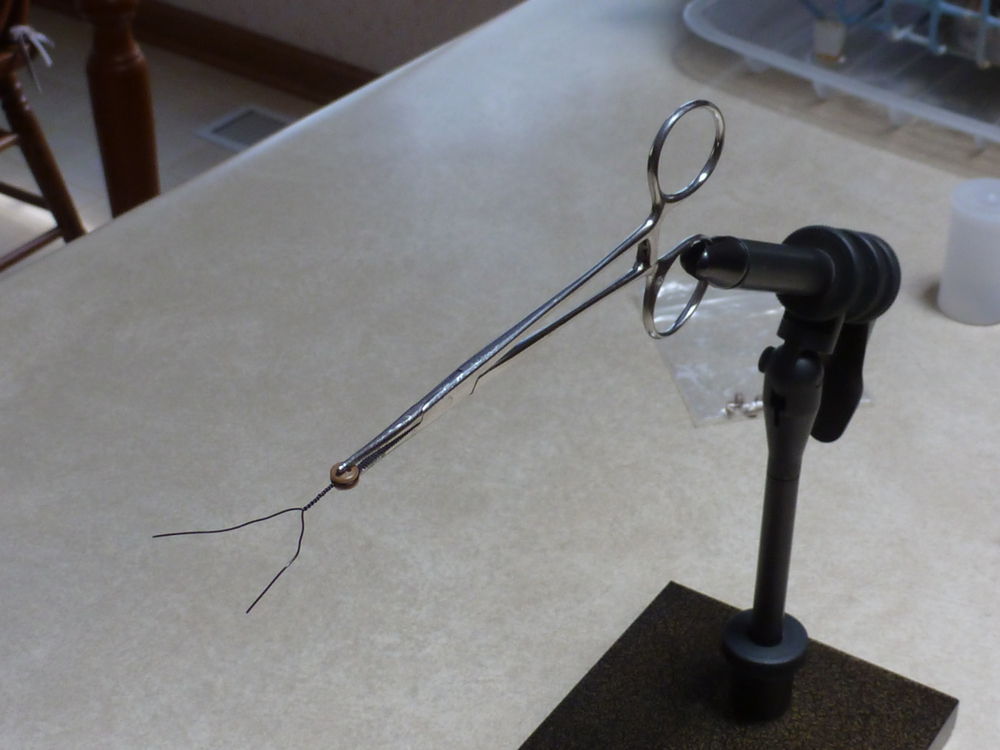
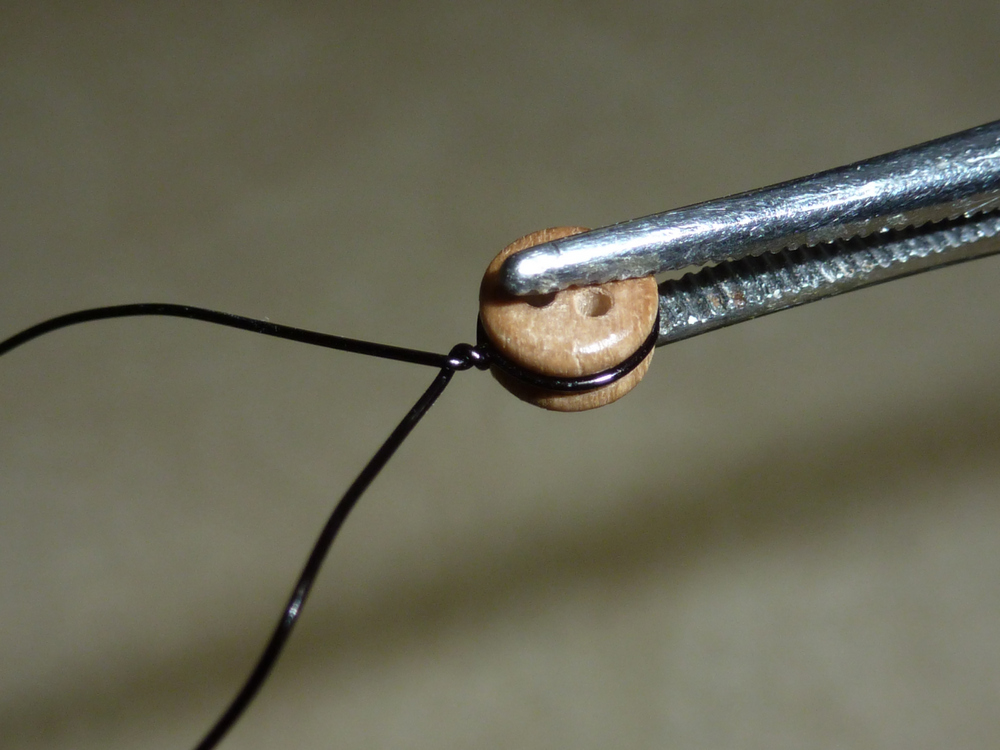
Progress Report - I have been agonizing over the channels and chain plates. I REALLY wanted to do a good job here, and spent a lot of time with thin brass strips and tiny drill bits. I felt that the most important thing was to have the deadeyes snug to the channels. Finally I went to "Plan B"..."good enough". The accompanying pictures show how I did it. I used 26 gauge black copper wire to strop the deadeyes, then manufactured the chain plate by twisting the wire until it was the correct length to reach through the channel and attach to a blackened brass pin in the hull. These will hold the shrouds securely and don't look too bad. The middle deadeye shown in the fifth photo will be rotated to its correct alignment before rigging the shrouds.
I did use the brass strips for the lower deadeyes in the tops, though. I have the masts pieces/parts assembled but not yet painted. I plan to put the wooldings on the foremast just because I think they look good.
<<Gary>>

-
Hi Ken -
Thanks for posting the update. She's lookin' good! I'm not far behind you. And I am having the same problems with the deadeyes on the channels; especially for the main mast. They seem to be too close to the gun barrels. I have lowered the channels so they are touching the top of the black strake, but am not convinced this will solve the problem. So I keep procratinating. I did the basic mast construction, and when I stepped the masts, I was surprised at how TALL they look on the vessel. I have not constructed the hounds yet. I will likely paint similar to you and Bob Rafine. It is worth studying his build log (page 2) to identify all of the blocks and rings need to be attached to the masts. Also be aware of "sheaves" that are embedded in the masts.
Do you know the purpose of those fid holes in the masts?
<<Gary>>


Boomkin Bumkin Bumpkin Question
in Masting, rigging and sails
Posted
A boomkin is defined as a short boom projecting at either side of the bow, used to extend the lower windward corner of the foresail. This is done by passing a tack through a large block at the end of the boom.
My question is: were the boomkins permanently attached to the bow, or were they set out when needed and taken down when they were not needed? Or does it depend on the type of ship and the year? I am particularly interested in this relative to the brig FAIR AMERICAN (1778).
Any thoughts from you knowledgable forum members? Thanks
<<Gary>>