


GaryKap
-
Posts
276 -
Joined
-
Last visited
Content Type
Profiles
Forums
Gallery
Events
Posts posted by GaryKap
-
-
Thank you all for your kind remarks. I feel a bit like a first time parent with a newborn baby. I keep holding the hull, looking at it and thinking - Wow! I can't believe I created that. Wq3296 asked about a finish. I am not going to attempt a second layer of planking with the walnut. Originally I was simply going to paint it, but now I am not sure... Back to sanding and figuring out the quarterdeck framing.
<<Gary>>
-
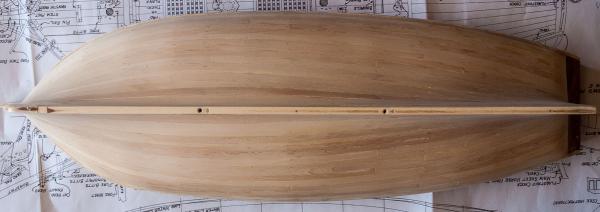
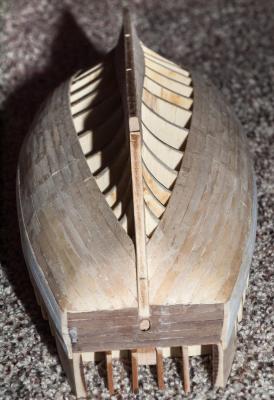
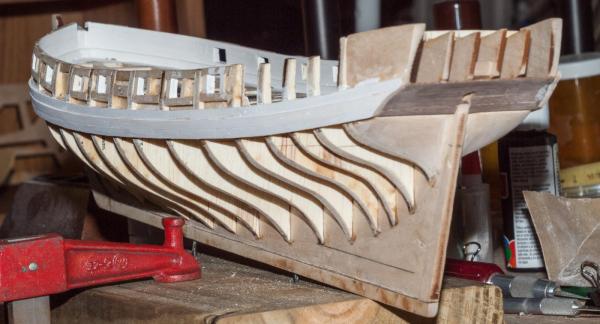
Planked!!! The lower hull planking is finished. I have done some sanding but need to do more. I am very pleased with the way it turned out.
<<Gary>>
- riverboat, trippwj, jdbradford and 6 others
-
 9
9
-
Hello wq3296 - Thanks for the suggestion, but that's just not going to happen. The yellow carpenters glue that I am using is stonger than the basswood planks. And each plank is not just glued to the bulkheads and bulkhead former, but also to the adjacent planks along its entire length (my version of oakum). So it would really botch the job to attempt to rip out parts of planks. I will simply accept the inaccuracy and move forward.
<<Gary>>
-
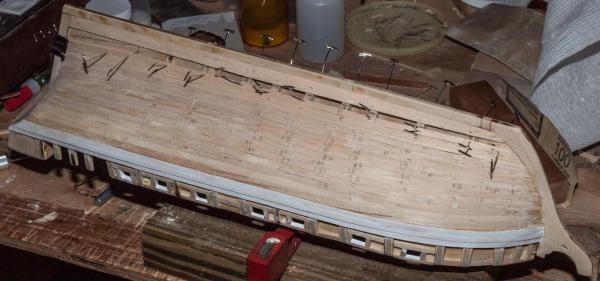
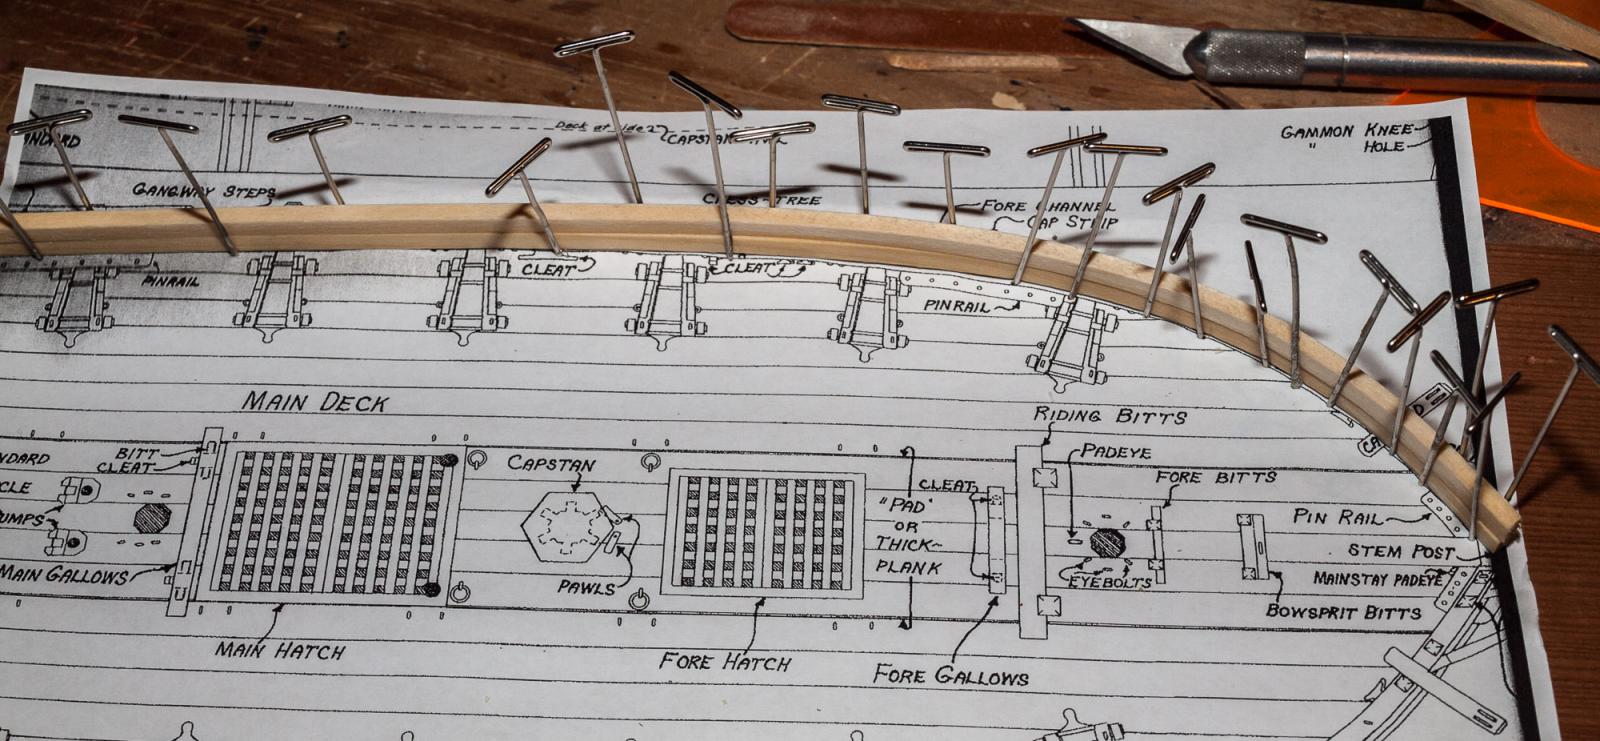
Hi Nils. Thanks for your kind words. One more strake and a stealer, and the lower hull will be planked. How do you like my "trenails"? Those are a smaller version of a T-pin made for quilters that I found in a crafts store. They work great for holding the strakes against the bulkheads until the carpenter's glue dries. <<Gary>>

- jdbradford and dgbot
-
2
-
Thank you all for your kind comments and support. Ken, I am sure your bow will look just fine after sanding. And I think the contrast between your holly planking and the basswood keel / stem/ skeg will enhance the appearance of the ship - not detract from it. David, I have to wonder where the walnut comes from in the kit. I have worked with American walnut, and it has always cut and shaped very nicely. I think this is some foreign variety with very different characteristics. Wq3296, I am glad that you urged me to start planking at the wales and work towards the keel. I am sure this started the planking along that nice bend and allowed me to do what I did. And Bob, your excellent pictures in your build log continued to guide me along the way.
<<Gary>>
-
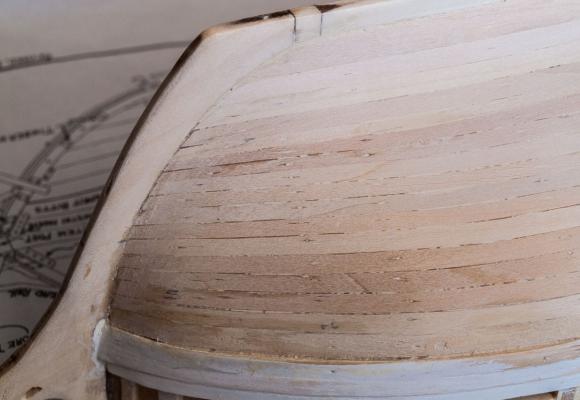
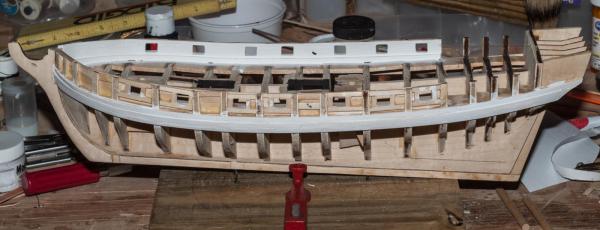
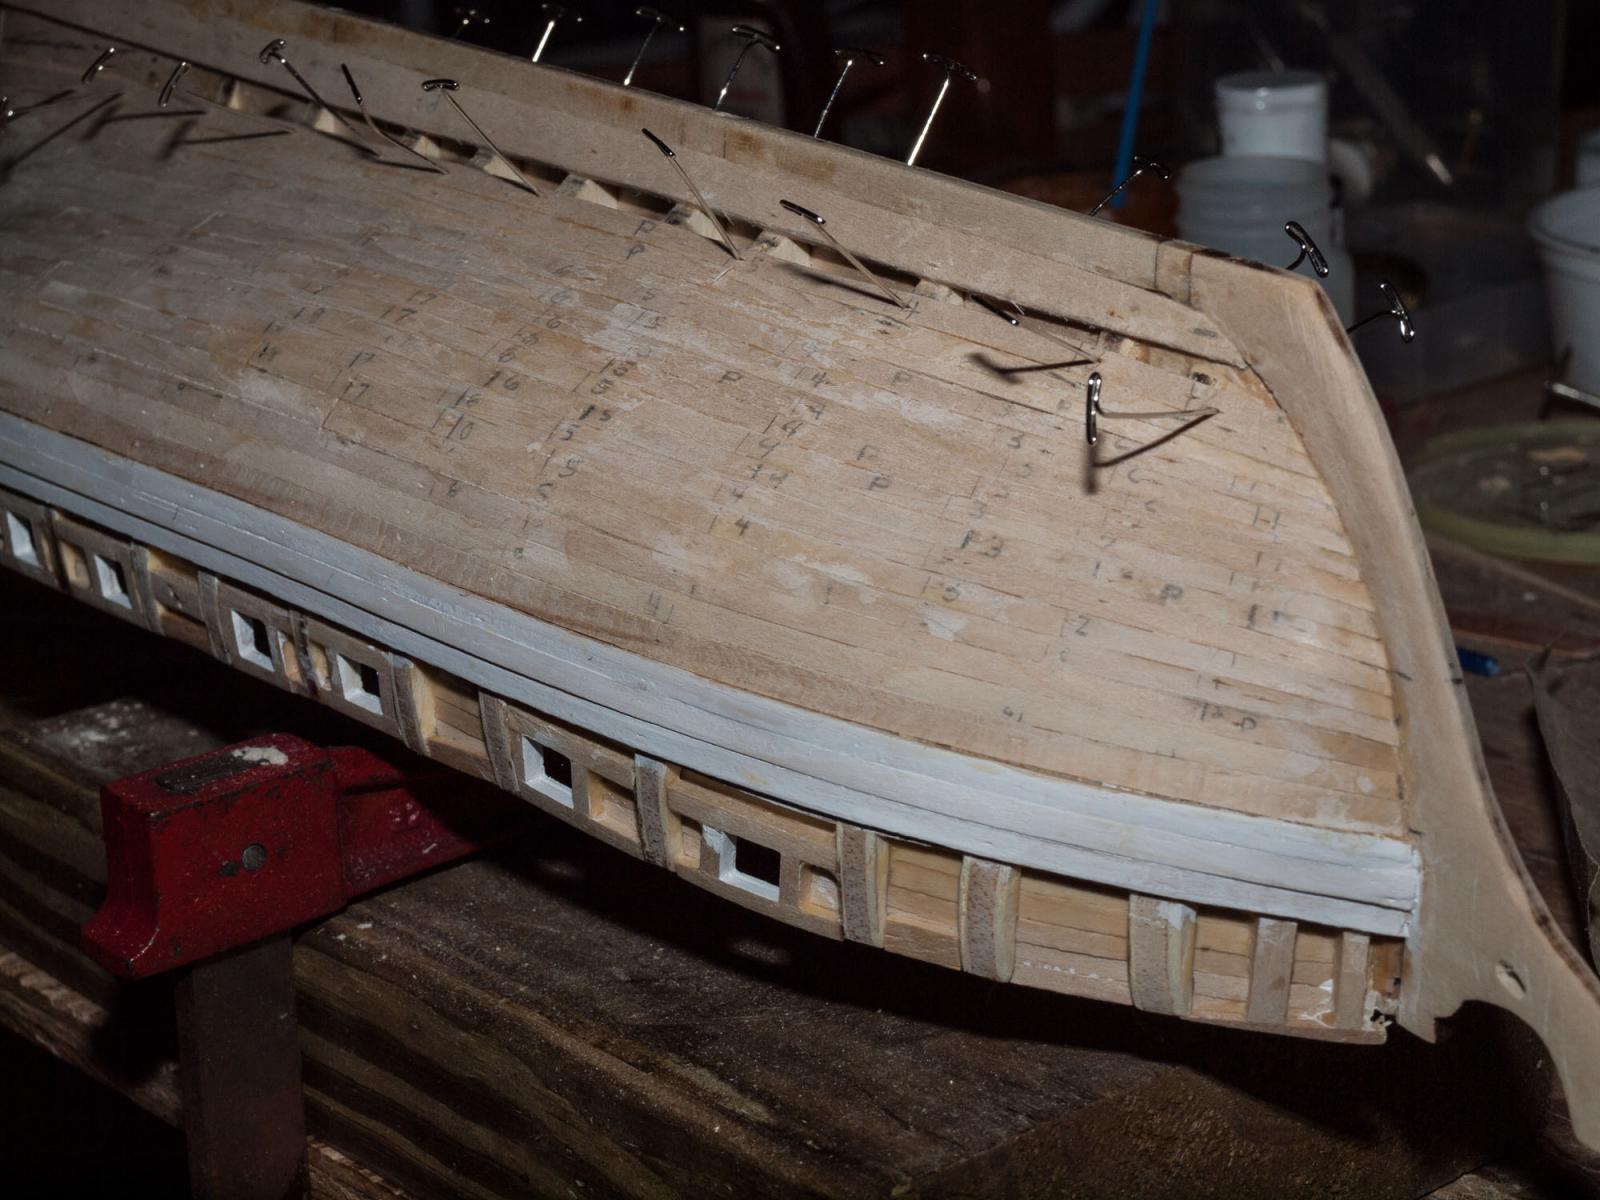
Here is a progress update after installing nine strakes down from the wales. The planks are laying nicely on the bulkheads.
I have done some light sanding but obviously will have to do more when all the planks are on. So far my approach to planking the hull seems to be working out OK. I estimate that six more strakes and some stealers will finish the job.
<<Gary>>


-
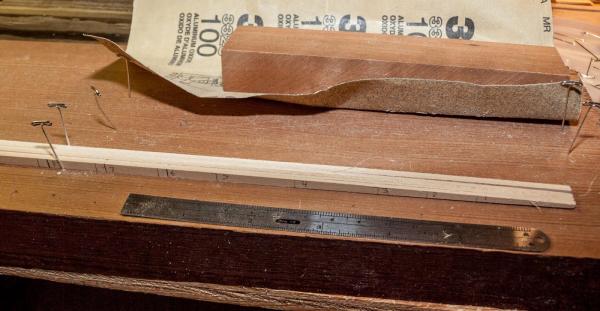
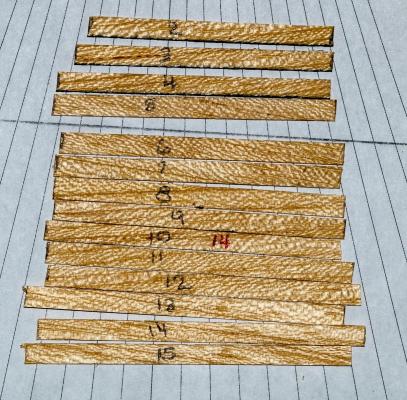
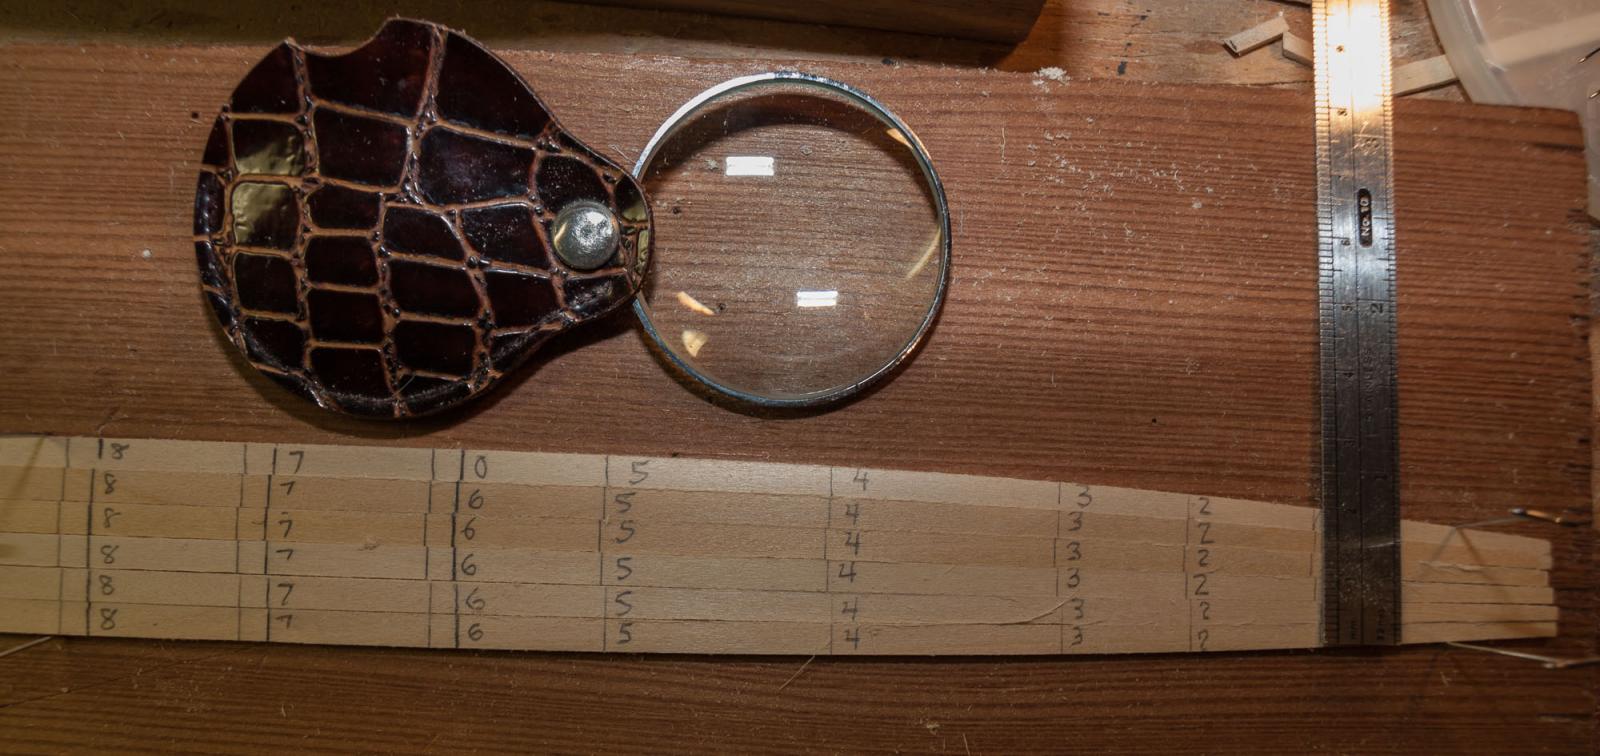
Here are the photos showing my procedure for making a long smooth taper in the planks to get the widths shown in the spreadsheet above at each bulkhead.
I marked the bulkhead locations on six planks and clamped them together vertically. I used 100 grit (coarse) sandpaper on a long sanding block to taper the six planks, using a metric ruler and a magnifying glass to check my dimensions. When I thought I was close, I removed the planks and laid them flat, clamping them together again. You can see the result in the second photo. I could then measure the width of the six planks at any bulkhead and compare this width with the desired width. For example, at bulkhead 2, I want each plank to be 3.8 mm wide. 3.8 X 6 = 22.8 mm. And that's the check. When I measured the six bundled planks at the bulkead two mark, the width came out to be slightly under 23 millimeters. Close enough! I repeated this at each bulkhead mark to make sure the taper was correct.
When these planks are fitted to the hull, I will have six strakes installed below the wale. When I have eight strakes installed, I will repeat my basic procedure described in post # 50 and adjust as needed.
<<Gary>>

-
Thanks to wq3296 and Russ for your comments and suggestions. This is what is really great about the Model Ship World forum - I feel like I have experienced people looking over my shoulder and offering helpful tips as I work on my project.
I have decided to go ahead with the approach I outlined above. Partly because it makes the most sense to me. I have read and re-read the various planking manuals, and could not relate to bands and battons. And I am not attempting the beautiful holly wood planking that rafine shows in his build log. Just plain old basswood that can handle a bunch of sanding. And I will be painting the hull anyway. I do want this to be a learning experience, however. So I will strive to do as good a planking job as I can.
I have found that clamping a group of planks on end and coarse sanding them with a long sanding block is a workable way to achieve a long smooth taper. I will provide some photos soon. Ken, I will be looking for photos of your progress on your build log. By the way, a hot curling iron works great for bending planks to fit around those curvacious buttocks.
<<Gary>>
-
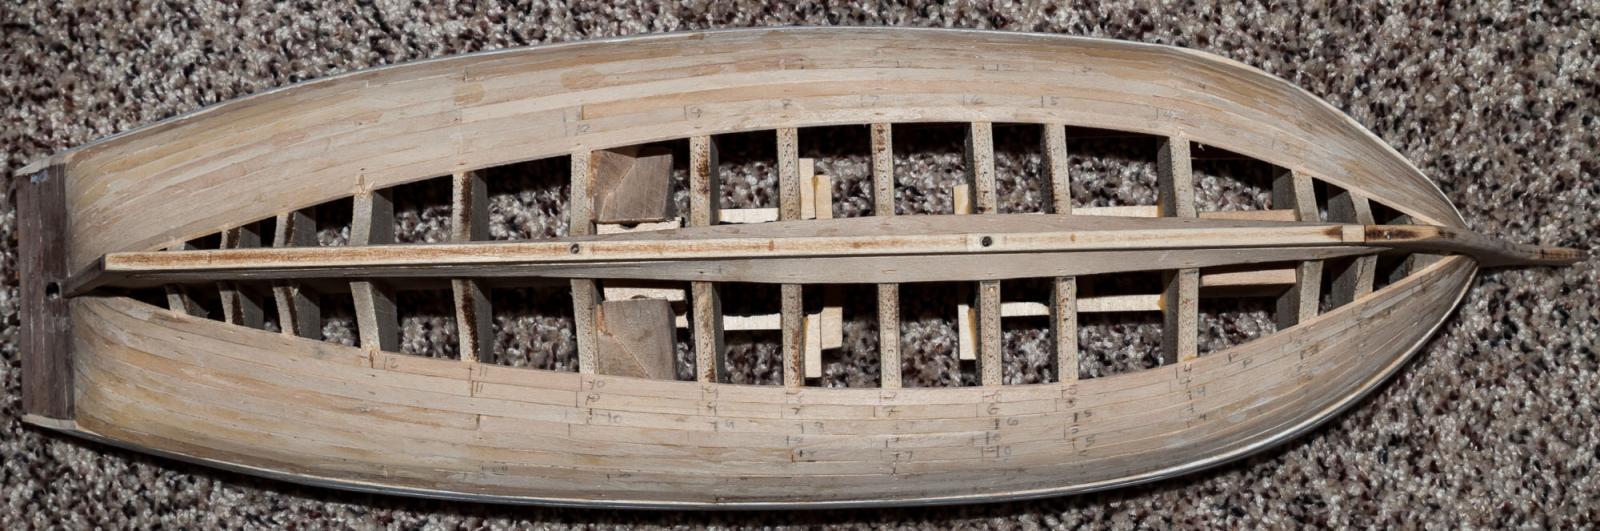
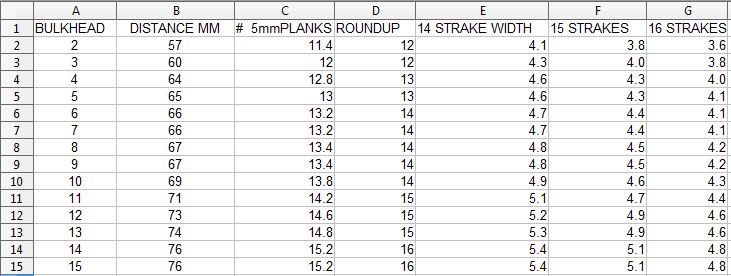
OK - I have installed the garboard strake and one full strake below the wales. Here is my plan for the rest of the planking. Firstoff, I decided to do the calculations in millimeters as they are MUCH easier for me than fractions. The supplied planks are 3/16 inch and that equals 5 millimeters. I measured the distance along each bulwark from the garboard strake up to to one recently installed using a strip of thin wood and cutting it to length. I did this for bulwarks 2 - 15. Then I measured the length of each strip in milimeters. See photo below. I recorded this information on a spreadsheet. (column B ). Notice that the lengths decrease progressively from stern to bow. Then I divided each total length by 5 (width of each plank) to determine how many planks would be needed at each bulkhead. In column D I rounded the number in column C up to the next whole number. Examining the results, it appeared that using either 14, 15, or 16 strakes to fill the space would be workable. Columns E, F, and G caculate the strake width in millimeters at each bulkhead for values of 14, 15, or 16 strakes respectively. If I used 16 tapered strakes, I could theoretically do the whole thing with no stealers. I chose to do 15 strakes. This would let me fully plank back to bulkhead 13 with no stealers. I expect that because of the complex curves of the buttocks, some fancy additional work will be needed here anyway.
To taper the planks, I will lay one out along the bulkheads and mark the center of each bulkhead on the plank. Then using a metric ruler, I will mark the plank width at each bulkhead location. To achieve the long smooth taper, I will clamp four or six planks together and use coarse sandpaper and a long sanding block, sanding until I have the correct plank widths. I plan to do half of the planking and then repeat this process to insure a good result.
Sound like a plan?

-
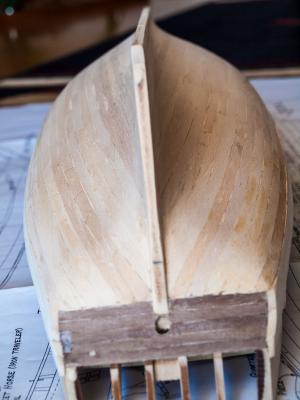
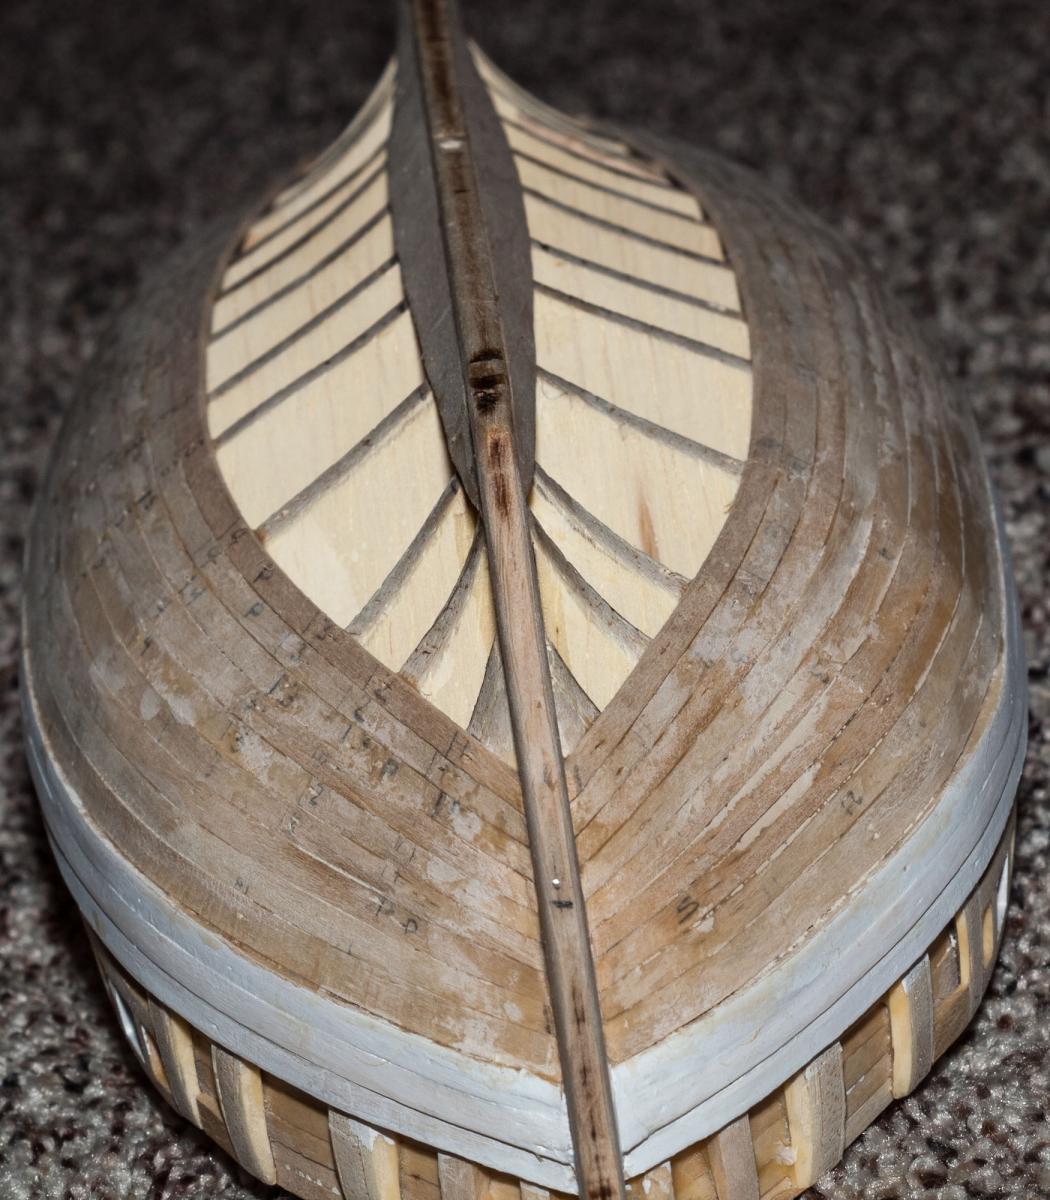
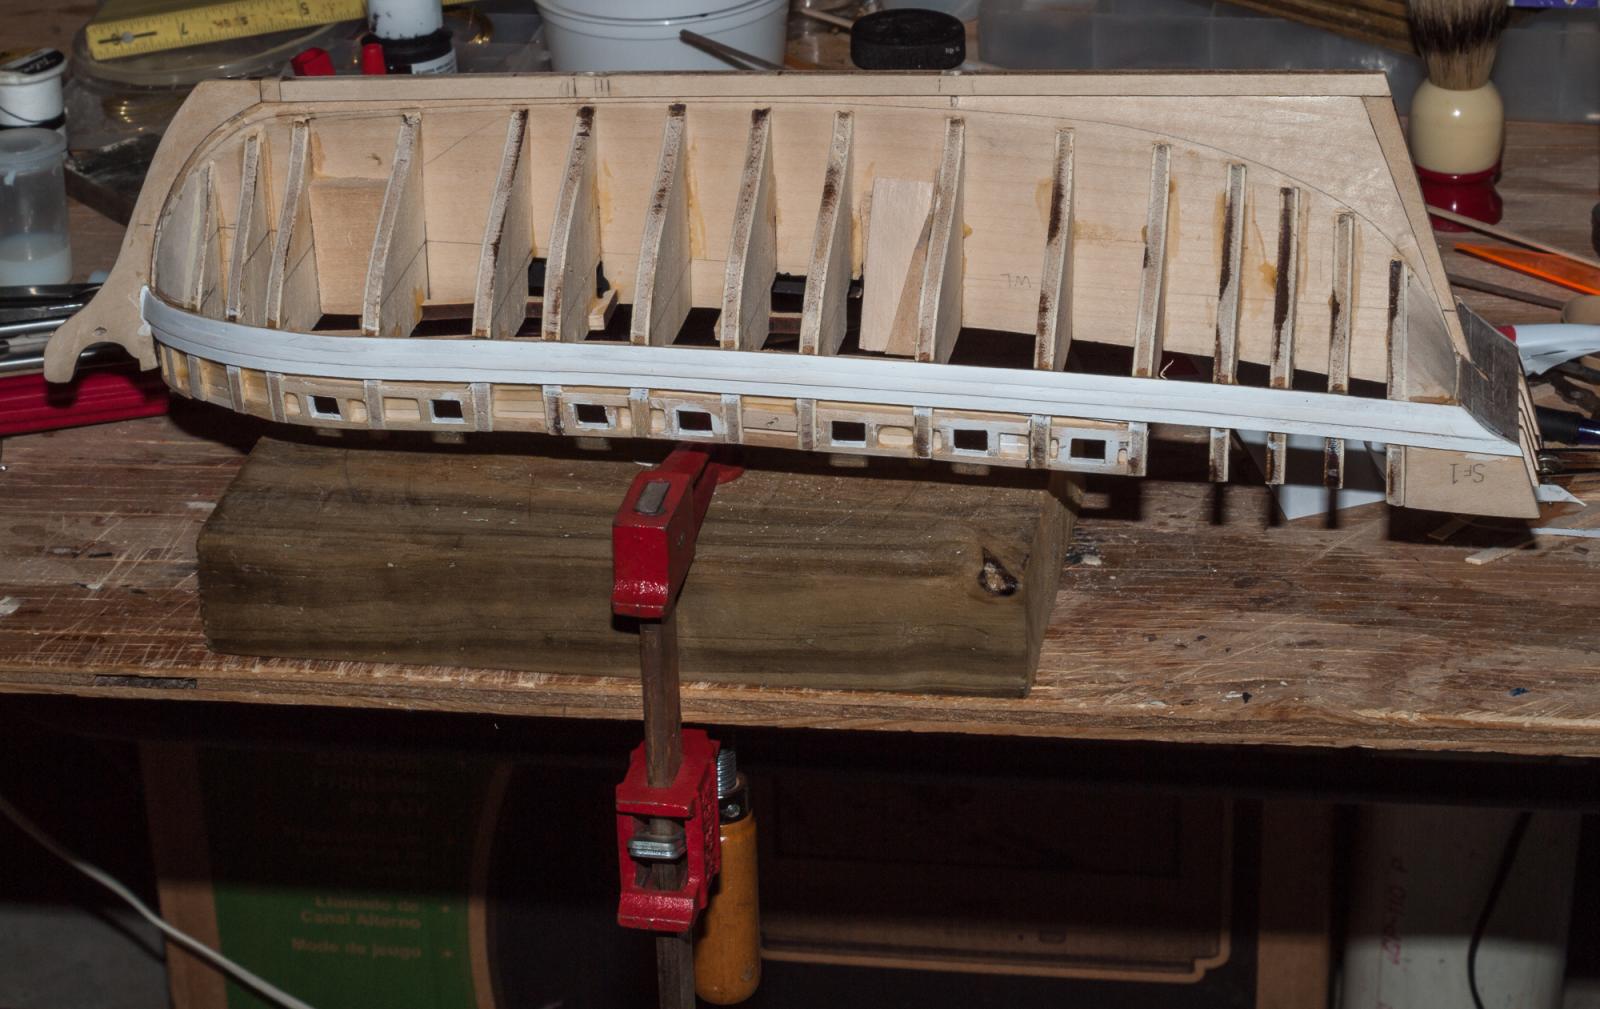
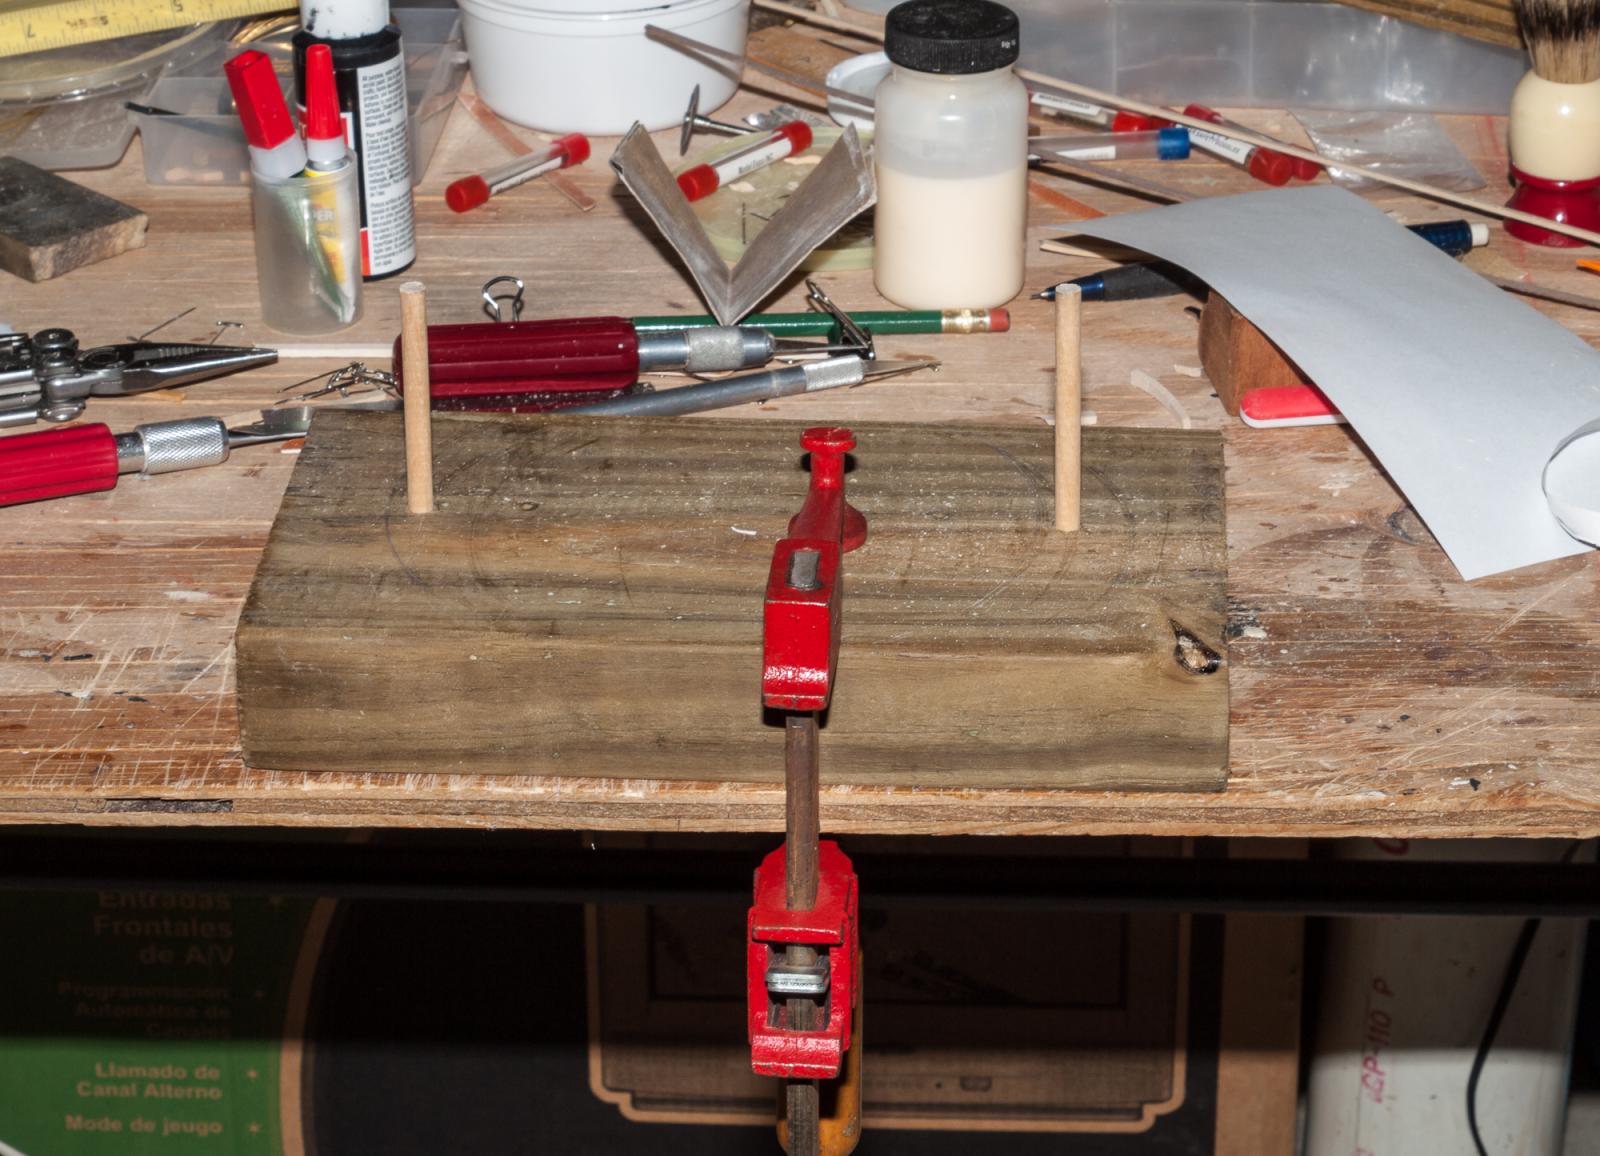
Hello wq3296, Ken, Russ, Bob, and others. Well, I finally made a decison. I am going to plank the lower hull first and use the basswood. I found the walnut to be difficult to cut with an Xacto knife and also it is very brittle and splits easily. Not good. I shaped the garboard strakes and have them soaking now so they can be bent to the shape I need.
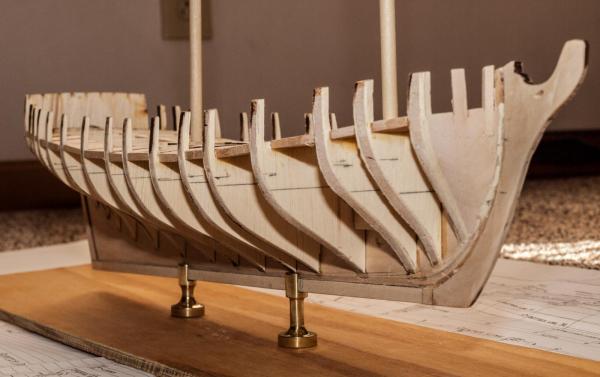
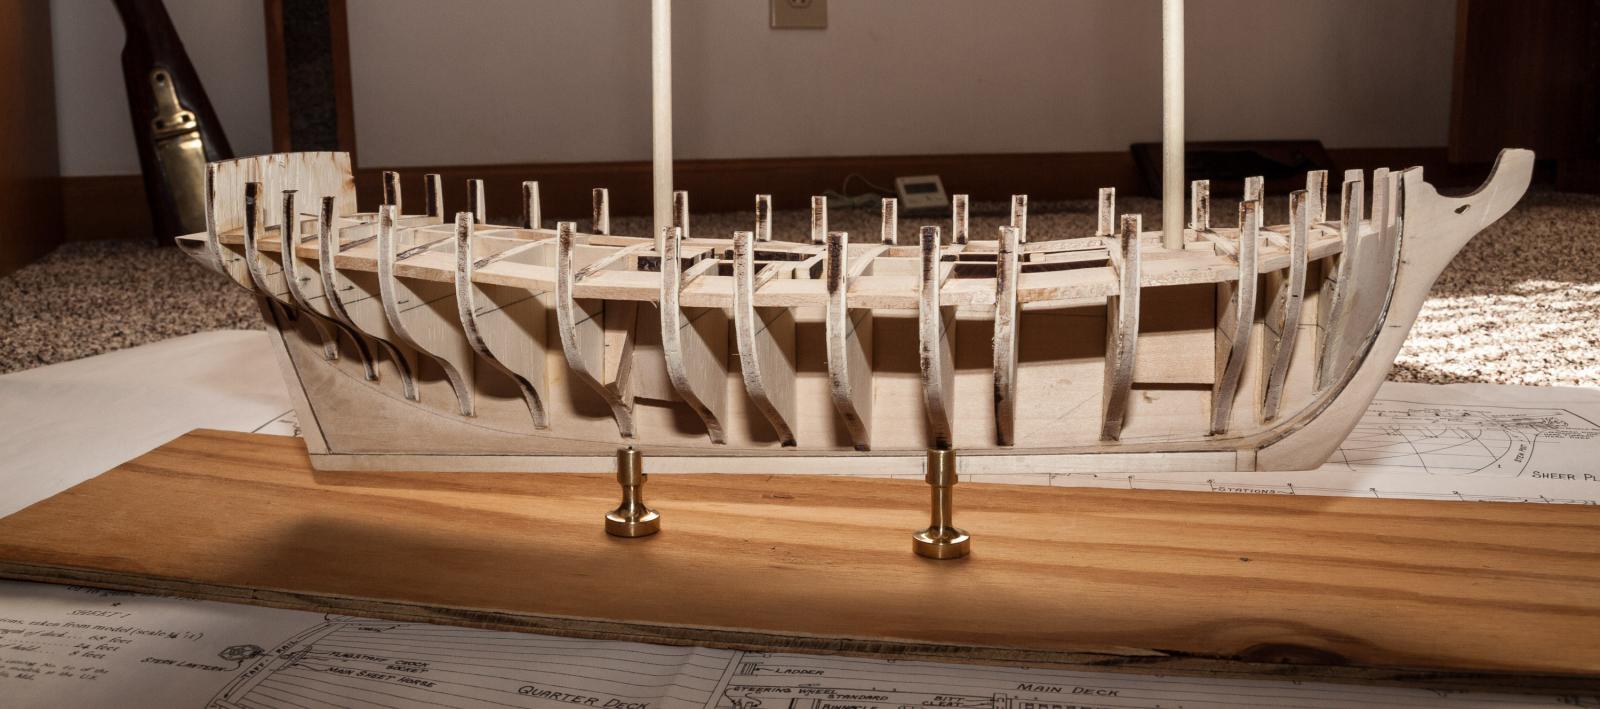
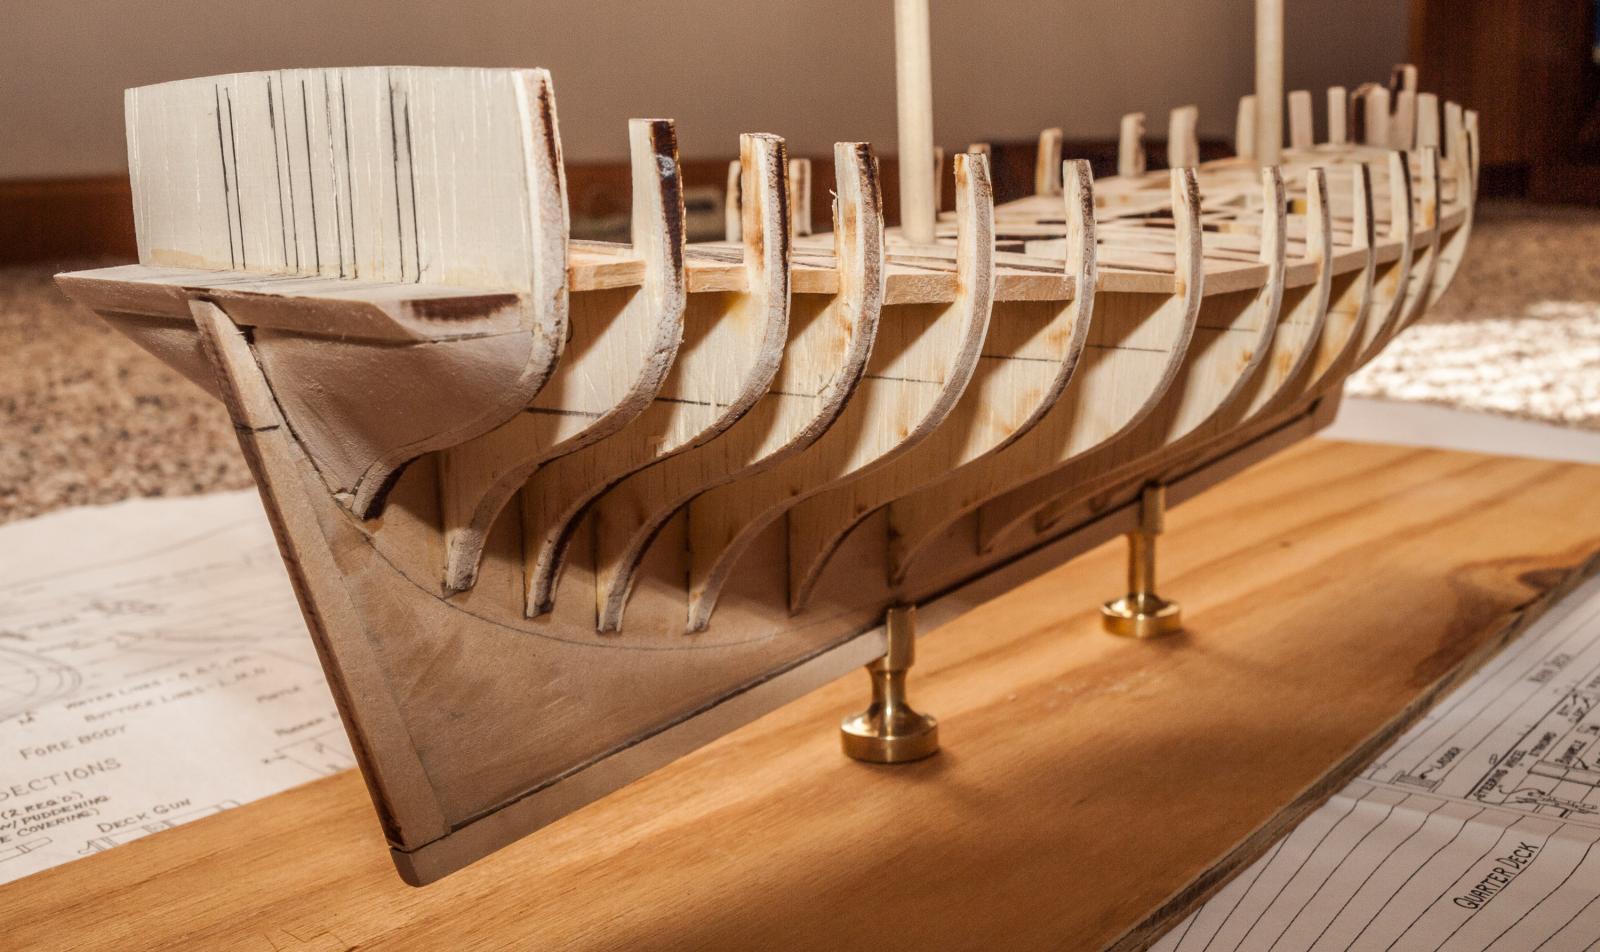
I am enclosing photos that may offer an idea. I needed a way to hold the hull firmly without breaking parts off. I did not want to clamp the keel because I think with the rabbits on either side, only a narrow strip of glue joins it to the bulwark former. Again inspired by Bob, I discovered that I could mount two short lengths of quarter inch diameter dowel on a 2 X 6 spaced so they would go into the mast sockets on the hull. (see pix). With the 2x6 clamped to the work bench, this provides a stable secure way for me to work on the lower hull. In addition, I mounted two pins on the 2x6 that go into the holes in the keel drilled for the pedistal screws. This lets me work on the hull right side up.
From the pictures, you can see that I have the wales and black strake in place and have applied a coat of primer.


-
Hi Ken - I am watching your progress with keen interest. I too am beginning the process of planking the lower hull. I have pretty much decided to go with the 1/16" basswood to do this. The walnut is far too hard and brittle, and splits easily. I measured every bulkhead distance from the keel to the bottom of the wale. As you said, this distance is largest at bulkhead 16 and steadily decreases forward. The distance at bulkhead 2 is 1 3/16" less than at bulkhead 16. i am getting plank withs that are similar to yours from bulkheads 15 to 2. Could you please post a larger closeup photo of the garboard shape at the bow? It would be a help to me.
Your headrails are beautiful!! On my recent RATTLESNAKE build, I found the headrails to be one of the more difficult tasks as well. You did a great job.
Keep the progress reports coming.
<<Gary>>
-
OK - the reference to double planking FAIR AMERICAN is on the Model Expo web site in their description of the kit: Model Shipways’ Fair American kit contains over 60 cut or shaped wooden parts, plus 120 extra wood strips for a second layer of planking, should you wish to build your model with a double planked hull. And I am still undecided about using either walnut or basswood planks. As an experiment, I took one of the walnut strips, soaked it for a couple of hours, and the was able to wrap it right around my wife's hot curling iron. So that removes my concern about the tight bends at the stern. Also, the 1/32 walnut fits more comfortably into the rabbit slot along the keel than does the 1/16 basswood plank. The edges of the walnut planks are a bit rough tough, and it might be difficult to snug them tight against each other. Gaps between the planks would greatly detract from the appearance of the final model.
I did get the black strakes on today. Might put up some photos soon.
<<Gary>>
-
Hi Guys - I have just completed the wales and will add the black strake tomorrow, and maybe some of the bulwarks as well. I still can't decide whether to use the basswood or the walnut. When I get to planking the bottom, I am inclined to use the basswood. As Ken points out, it is the correct thickness. This being my first attempt at a planked ship model, I will likely wind up painting the bottom. Paint and wood filler can hide a multitude of errors...
 . I will add photos when I get to a good point.
<<Gary>>
p.s. I changed the order of planking from the instructions and the planking manual. I wanted to wait until the wales, black strake, and bulwark planks were on before I attached the transom. This way I should get a nice tight joining of the planks and the transom. Hopefully you'll see what I mean in the photos.
-
Thank you Russ, wq3296, and Bob for your thoughts and replies. I did some math, and if I use all of the 1/32 inch thick basswood, I SHOULD be able to plank the bulwarks with the basswood. On the other hand, the walnut does look nice so I could use that as well. At least now I know my options. And thanks to Russ, I also know what the "quick work" is. I wonder how that term came to be...
<<gary>>
-
Bob, Ken, wq3296 and others - I need HELP figuring out the planking scheme. I have completed the bulwark ceiling (inboard) and used five of the ten supplied planks 1/32 x 1/8 x 24 inches. But now looking at my remaining parts, I am concerned that I do not have enough of these planks to complete the bulwarks on the outside of the ship. The parts list shows the following:
1/32 x 3/16 x 24 (2) Transom plank outboard, counter plank
1/32 x 5/32 x 24 (3) Topsides plank
1/32 x 1/8 x 24 (10) Bulwark plank, quick work
and then under WALNUT it lists
5/52 x .030 x 19 (16) bulwark plank note: .030 inches equals 1/32 inch
OK - so what should I have done and what do I do now? I"m a bit frustrated by some of the undefined terms. What do they mean by "quick work"?
And when I hear "topsides" I think of the outside of the hull between the waterline and the deck. But virtually all of this is taken up by the wales and black strake - all thicker timbers than 1/32. And why THREE pieces? I could use the walnut to plank the bulwarks, but I don't see where anyone else has done this. Your thoughts and suggestions are appreciated.
Thanks
<<Gary>>
-
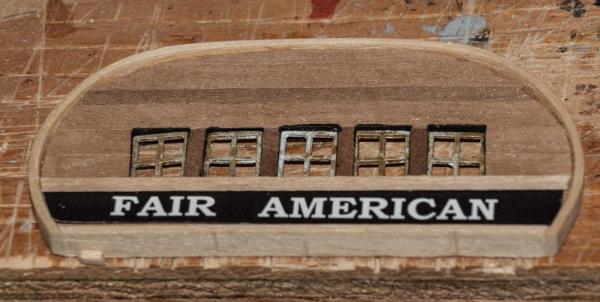
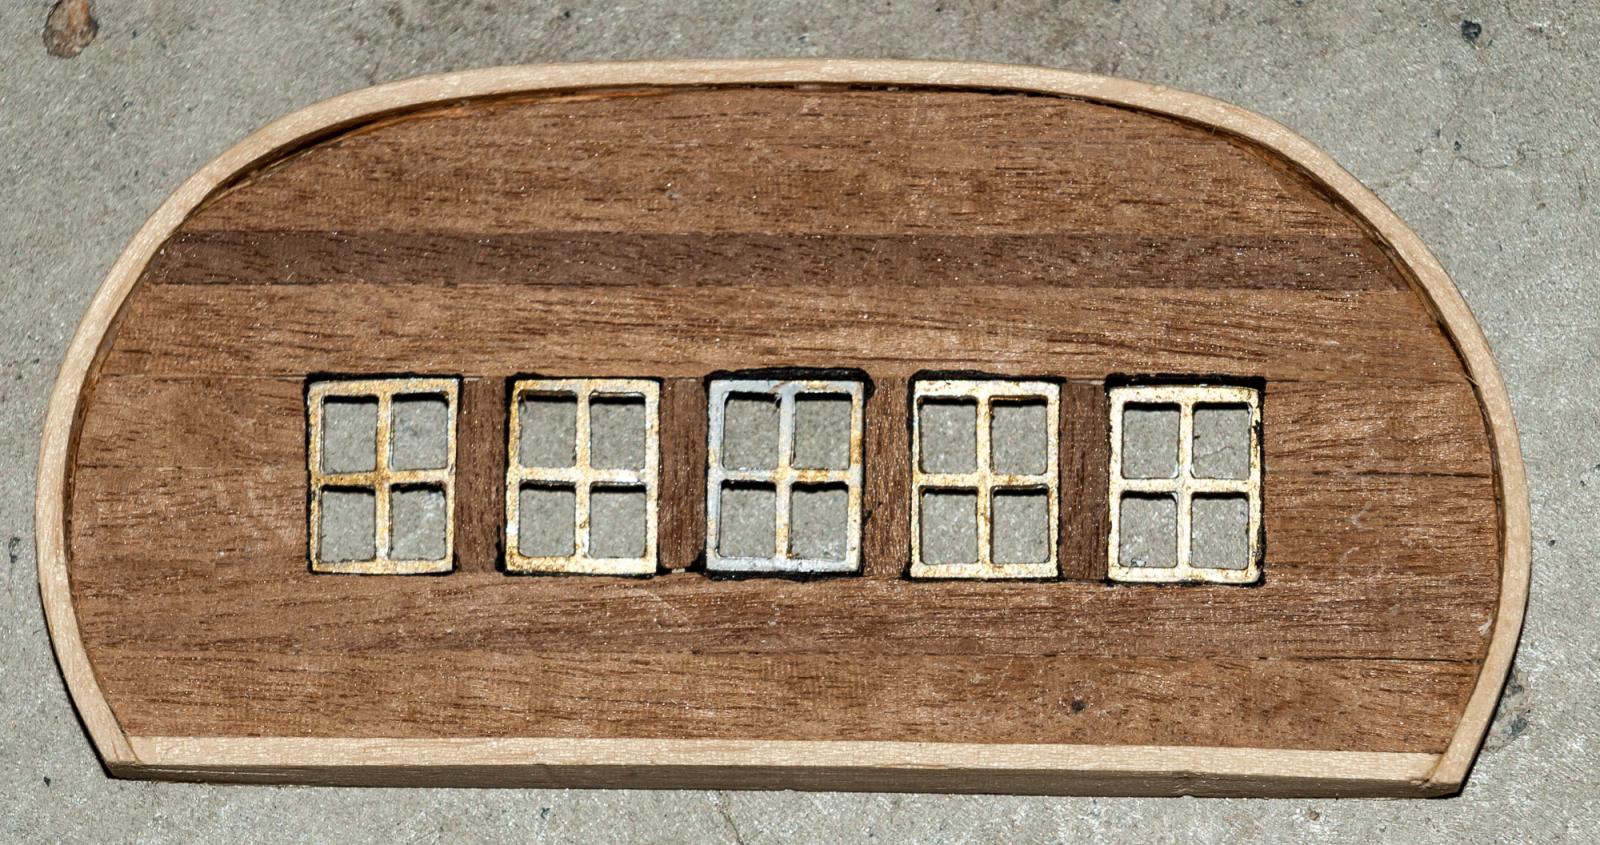
Here is a small progress report. I "faced" the transom with very thin walnut planking, and was able to bend the cap rail in one piece, thanks to the help of my wife's hair curler. Ken W inspired me to think about how I could create a nameplate using my laser printer. I did it with the spreadsheet program, putting the name in one cell and formatting the background to black. I have not glued it in yet, still thinking about possibilities... The windows and moulding strip are not glued in either.
Also I pre-bent the waterway using the curling iron and a template copied from the plan sheet one. Turns out it would not sit nicely against the bulwark stanchions and bulwarks because of the compound bend of the deck and hull. I had to cut the waterway strips and add scarf joints to make it work. Sometimes the instruction manual knows best.
Currently I am in the process of planking the bulwark ceiling. So far, everything is going smoothly.
<<Gary>>


-
-
Hey, wq3296 - You raise an intersting point. I checked, and you are correct! That sure is a small door. Quoting from the plans (p. 12) "It is believed the house and quarter deck as per the Rogers model may have been added later and at the same time the main deck under the house was lowered to give more headroom". In that case, a companionway would make sense. I also like your idea of a skylight. That quarter deck as is looks as naked as a jaybird.
I guess it all comes down to whether we are attempting to build a copy of the model at Anapolis, or a representation of an eighteenth century brig. I am increasingly leaning towards the latter...
<<Gary>>
-
Hi WQ3296 -
Thanks for the "heads up". I did check frame 16, and mine is as shown on the plans - 7/8 inch from the keel former to the top of the frame. And the bottom of frame 16 is touching the bearding line as it should. So I think my kit is OK...at least this time.
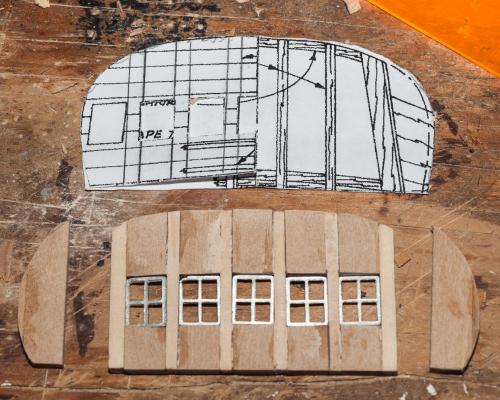
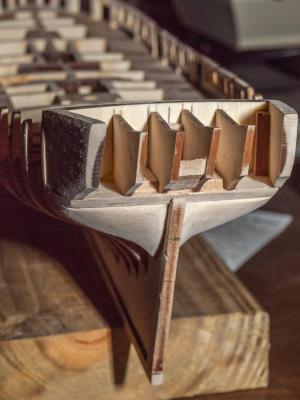
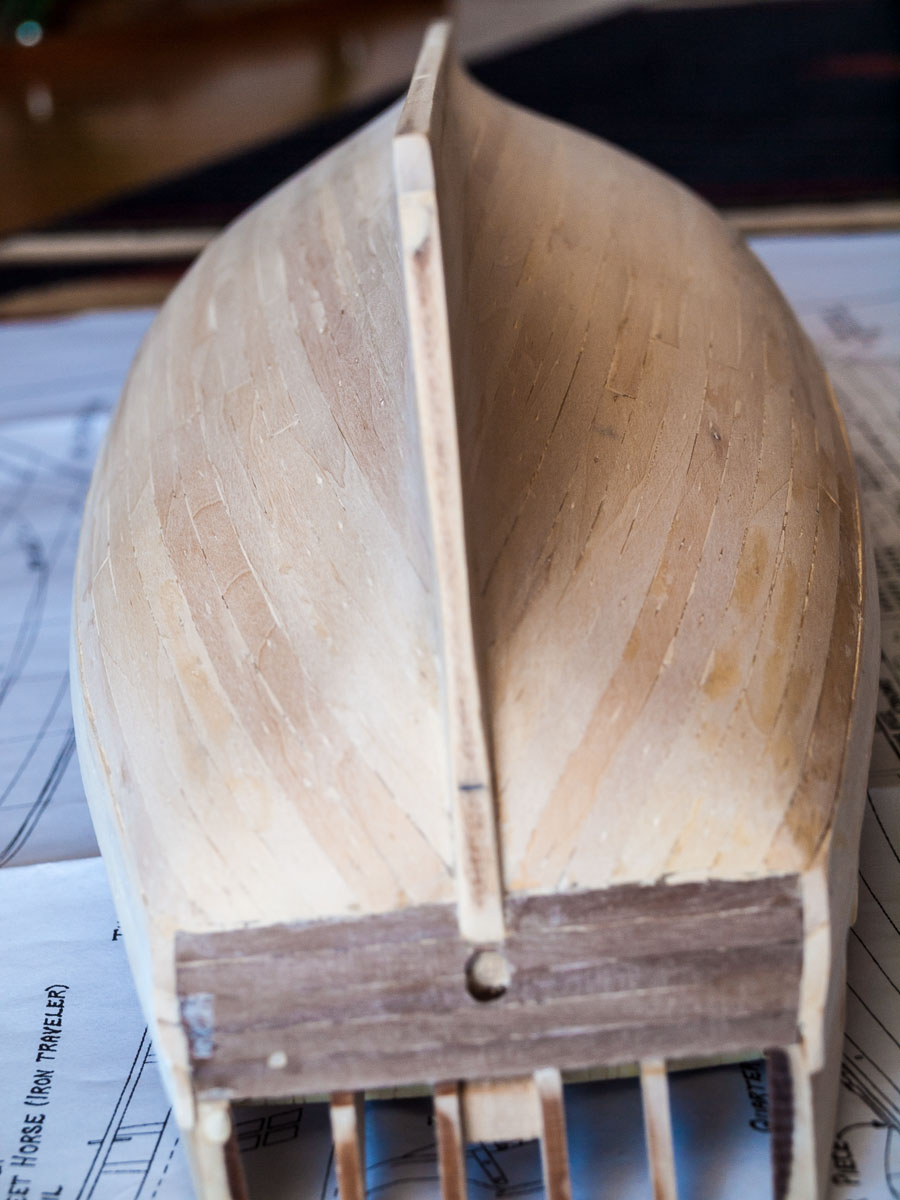
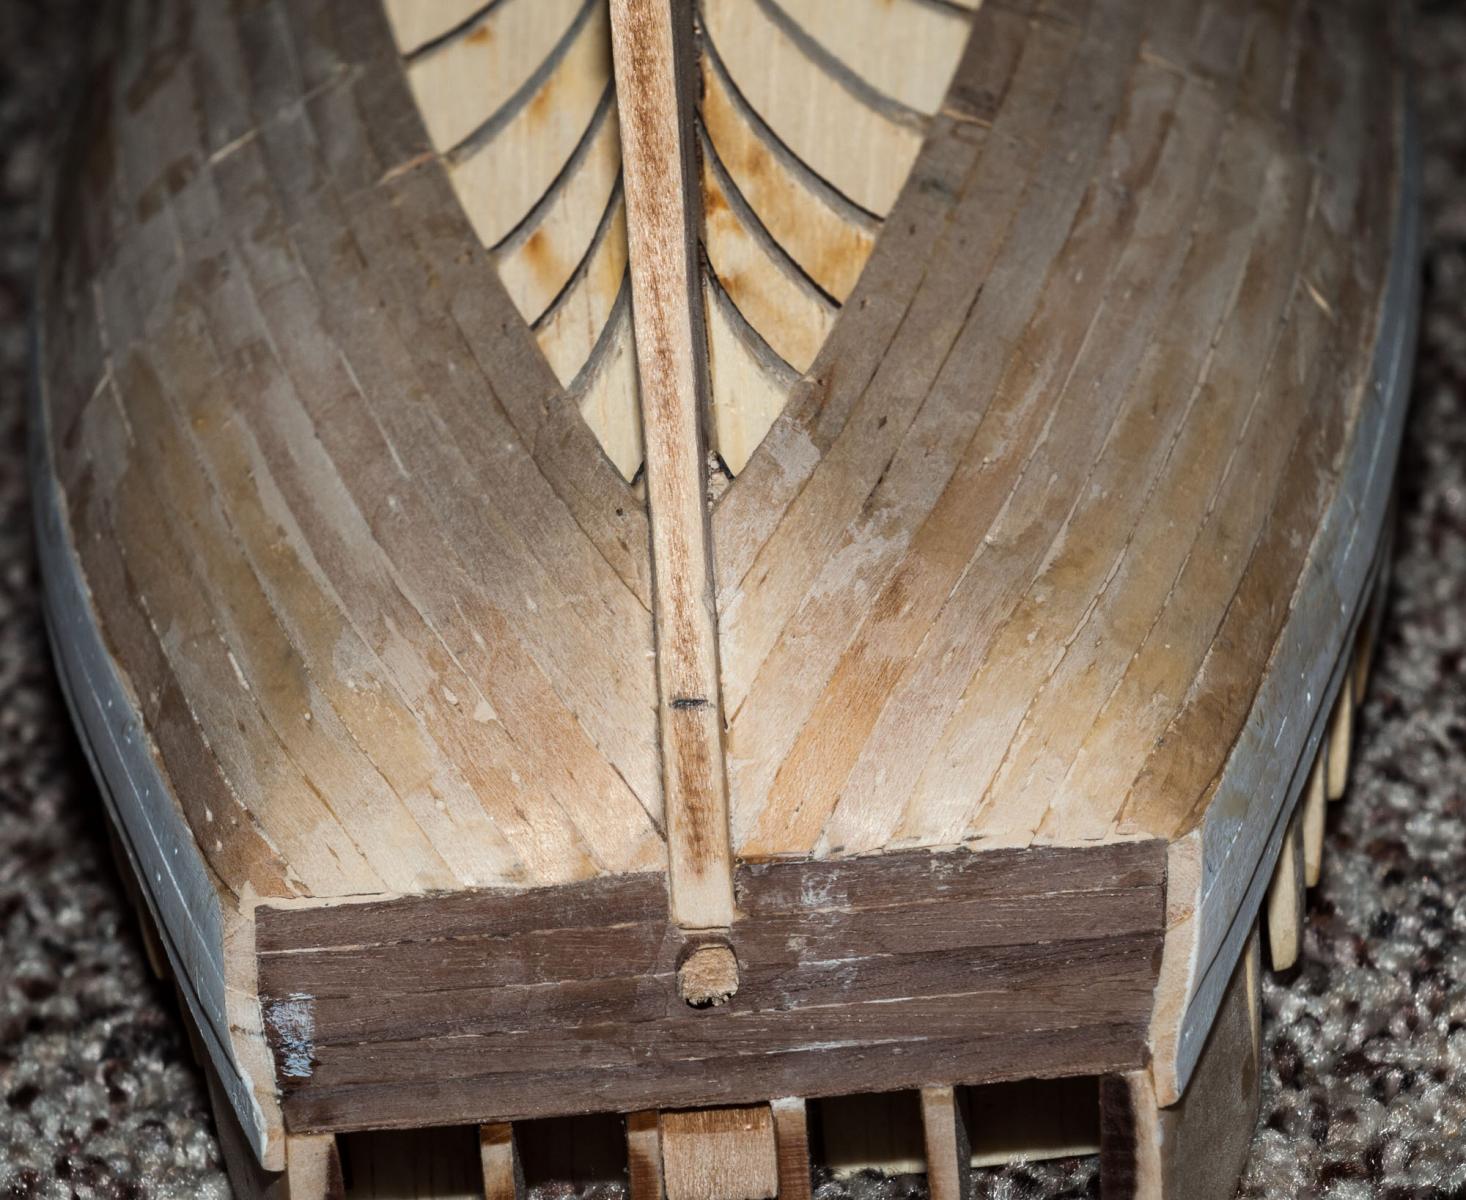
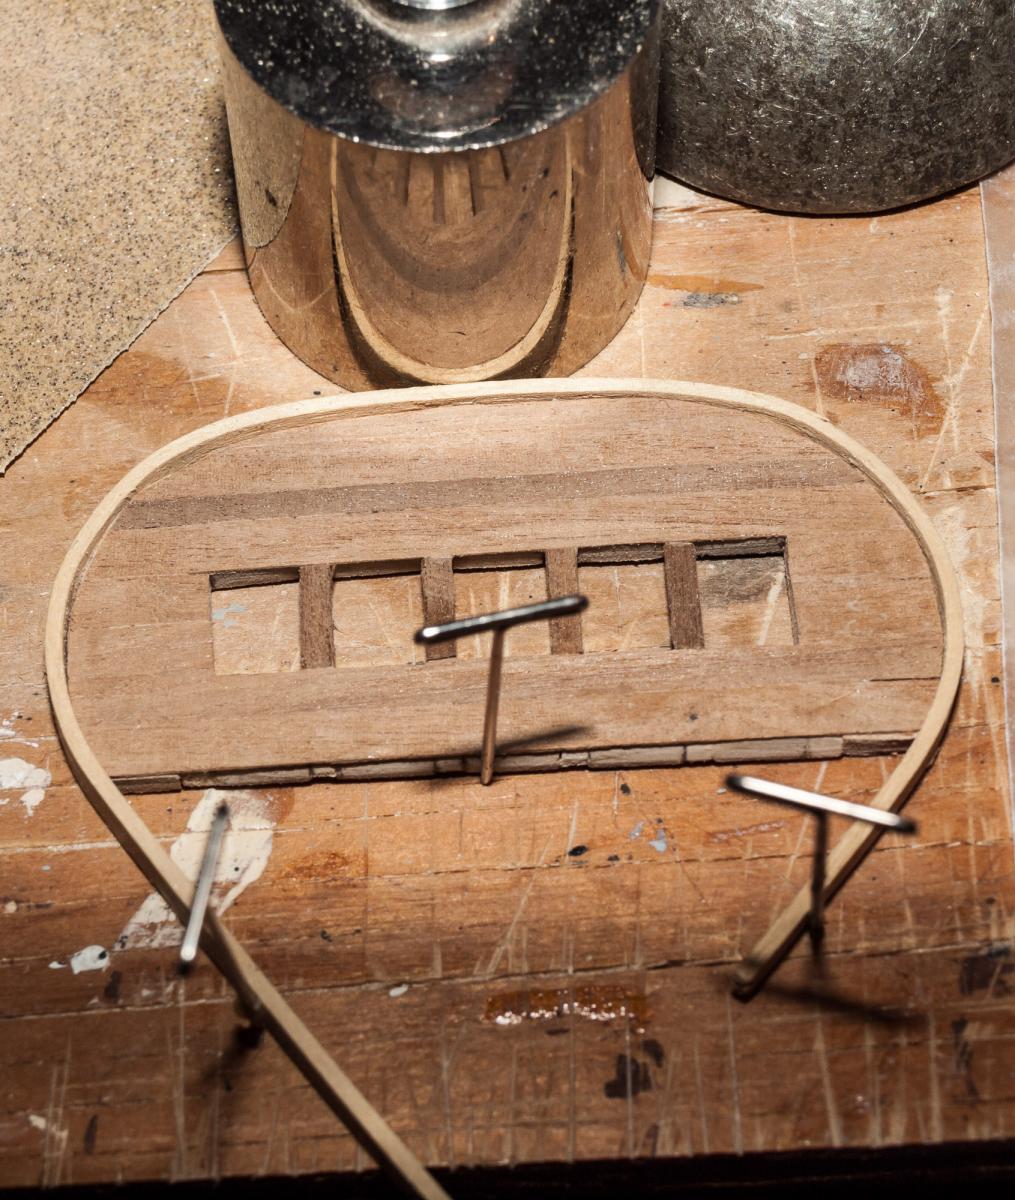
I did build the transom. As usual, I did not follow instructions. I built it off the hull. I had some stock that is the exact width of the windows, so I used that between the 3/32" square stock and glued it all together. The photos explain it better. When completed, the window frames snugly fit into the spaces. And the transom will fit snugly against the stern frames. After I glue the transom to the stern frames, I will attach the end pieces and sand the whole thing.
I chose not to include the false outboard window frames, again inspired by rafine. It is becoming clear to me that although I am building a model of a model, it is NOT the one in the Rogers Collection at Anapolis that I am trying to copy. It is the model that rafine documents in his build log...and I wil be happy if mine turns out half as good!
<<Gary>>
-
Thanks for the tips. These and Rafine's build log http://modelshipworld.com/index.php?/topic/1114-fair-american-by-rafine-model-shipways-kitbashed/
should keep me on track to do this correctly. My problem right now is that it is so darn cold in my (unheated) basement workspace that I keep procrastinating. But I'll post the photos after I get 'er done.
<<Gary>>
-
Hi Bob -
I like your idea of a brass pin mount. Elegant in its simplicity! And your workmanship on the model is simply amazing.
Keep up the good work...and keep the pictures coming.
<<Gary>>
-
Hi there...WQ3296
Thank you for your email and your suggestions. You are correct - the stern frames are not exactly as shown in the instruction manual. Yup, I have studied those plans and notes and am ALMOST ready to construct that puppy. Right now I am doing the gunport frames. To me, it makes much more sense to put them in and "fair" them to the hull before installing the waterway.
I hope you do a build log as well so I can follow your progress.
<<Gary>>
-
Bob - Thanks once more.
I fitted the brass pedestals to the hull and temporarily mounted it on a piece of plywood. Then I inserted the mast dowels in their holes and took a couple of photos:


- JesseLee, Mirabell61, rafine and 2 others
-
5
-
Hi Bob -
In your build log you said that your gun carriages came from "The Lumberyard". I went to their site and see that for 1/4 inch scale, they offer carriage kits in 4, 6, and 9 pound size. Which one did you get that is the correct size for FAIR AMERICAN?I need to give some thought to this because I need to do the first one right, as I want all 14 to look the same. It looks like you and Ken went with the "square" carriage cheeks and did not try to taper them. I will likely do the same as tapering the cheeks looks like a lot of effort on tiny pieces with a huge risk of botching the job. Your "lumberyard" carriages do look better than those supplied with the kit.
After struggling with math fractions, I figured out that I could increase the size of the gun ports to 5/16 inch and this would place the top of the frame close to the level of the bulwark stanchions. So I will go with that. Doing all the math fractions makes me appreciate the metric system and the decimal system.
Thanks as always for your help.
<Gary>


Fair American by GaryKap - FINISHED - Model Shipways - Scale 1:48
in - Kit build logs for subjects built from 1751 - 1800
Posted
Thank you Mark and Frank. The technique worked so well that for the final strake, I only had to reduce the plank width from bulkhead 4 forward. The rest of the length it was a nice snug fit for the plank in its original width. In the case of planking the hull, I believe that there is more than one correct way to do it. The important thing is the result.
I am attempting to go into some detail in my build log in places where it might help someone following me; either because something worked or because it did not. When others have done this, it has certainly helped me.
<<Gary>>