HOLIDAY DONATION DRIVE - SUPPORT MSW - DO YOUR PART TO KEEP THIS GREAT FORUM GOING! (Only 13 donations so far - C'mon guys!)
×


GaryKap
-
Posts
276 -
Joined
-
Last visited
Content Type
Profiles
Forums
Gallery
Events
Everything posted by GaryKap
-
 Hi Ken Years ago, while I was sailing in a small sloop in high seas, the boom cracked under strong winds. With an experienced skipper, we were able to splice the boom and return safely to port. Booms crack. Masts crack. Wooldings reduce the probability of a mast cracking. If I were the captain of Fair American, I would want the wooldings to help prevent losing a mast at sea. They are period appropriate, and you like the way they look. You made the right decision. <<Gary>>
 -
Hi Vince - Thanks for visiting the build log and for your kind words. I honestly don't have any information about a flint lock firing mechanism ( perhaps others looking over my shoulder might?) but it seems to me that at this scale it would be difficult to include. On the other hand, I have seen where others (Rafine, for example) can do wonders with tiny bits of detail. Heck, I was happy that I was able to do the outhaul tackle and cap squares. It all depends on your skill level. On another subject, I recently acquired a 48 inch fluorescent shop light to go over my work space. That has made a HUGE difference for me. So now I am working on masts, and will (hopefully) have something to show pretty soon. Another helpful addition was a shop-vac with a suction hose to take away the wood chips and sawdust. <<Gary>>
-
Hi Pete - Nicely done!!! I am beginning to think that I should delay any more work on my Fair American build...and wait to see how you do it. So far you have made some excellent modifications to the "kit". Please keep the progress reports and photos coming. <<Gary>>
-
Ken - Thanks for putting up the pictures of your fore mast and top. The wooldings look really good. Are the mast cleats from scratch, or cast parts from Model Expo? And I see you have installed the two pairs of double blocks for the leech lines, buntlines, and spritsail braces as you discussed in entry #240. Good job! Please keep the photos coming. <<Gary>>
-
Hi Pete - Your workmanship is impressive, and the quality of your build log equally so. You have provided much valuable information for future builders of "Fair American". For someone starting out, it is very useful to envision what the build should look like during various stages of assembly. Your photos and narration are clear and concise, and sharing the lessons you have learned makes the information doubly valuable. Please continue to share your great work. <<Gary>> p.s. Please see our recent discussion on KenW's buildlog regarding blocks under the tops. Any thoughts there?
-
Ken - The belaying pin plan (Sheet 4) is of some help. Note that the fore braces belay to the first pin in the aft pin rail, and the spritsail braces belay to mast cleats on the fore mast. Many of the buntlines and clew lines belay to shroud cleats. So it is not just a question of how many blocks under the tops...it is also the locations of each; placed such that running rigging lines are not chafing against standing or other running rigging, or against the yards. The blocks for the buntlines, leech lines and clew lines need to be aft of the yards, and positioned such that the lines can drop through the shrouds and ratlines to belay on shroud cleats. In some cases, two blocks may be needed for one line to get it properly positioned. Lennarth Petersson is good, but by illustrating only component parts, he does not show how the parts relate to each other. The kind of thought process we are going through now is absolutely necessary in order to have a good model at the end. And its a lot easier to figure it out now than it would be to rip out a partially rigged mast and start over... So hopefully we can work back and forth and get 'er done right proper. ( with help from other Model Ship World members coaching us) <<Gary>>
-
Hi Ken - I am looking forward to seeing the photos of your masts with rope wooldings. Part of my reason for bringing up the blocks under the tops is a frustration with trying to figure out the rigging diagram, and also my experience building Rattlesnake where I did not have enough blocks under the tops. From the diagram, I can see that the spritsail yard braces to to a block under the fore top, and the fore braces go to a block under the main top. But I know there must be more... Take a look at the Syren Practicum Ch. 17, pp. 85-90. And of course, if you want to rig the buntlines, leechlines, and clewlines you will need blocks for these too. Rafine, if you see this, would you please take a closeup picture of the undersides of your tops and let us see what you did? That would be a big help for sure. Or maybe one of the other visitors to your buildlog could offer some help... <<Gary>>
-
Hi Russ - After some Internet research, I see your point. It seems that around 1800, rope wooldings were being replaced with iron mast rings. As Fair American dates to 1780, wooldings would be more appropriate. Could you please elaborate on why you think their presence is debatable? Also, any information you can provide on blocks under the tops is appreciated. Also, if anyone wonders why I have not been posting on my build log, I am going through one of those periods where nothing is turning out as good as I hoped (model ship building wise) so I thought I would give it a rest. Also, house painting and landscaping are at the top of the Admiral's list right now. <<Gary>>
- 455 replies
-
- 1
-

-
- fair american
- model shipways
- (and 1 more)
-
Hi Ken - You are progressing very nicely. I have a couple of thoughts re. masting and rigging. Have you considered iron mast rings around the main and fore masts? Maybe others on this forum can tell us if they are "period appropriate" but I suspect they are. Check out the Syren practicum. Also, as you build the main and fore tops, remember that the underside of the tops had all kinds of blocks hanging from them, for buntlines, braces, and other stuff. Again, take a look at the Syren practicum. It would be great if one of your "watchers" could provide some guidance on how many, size and location of blocks under the tops. Keep up the good work <<Gary>>
- 455 replies
-
- 1
-
-
- fair american
- model shipways
- (and 1 more)
-
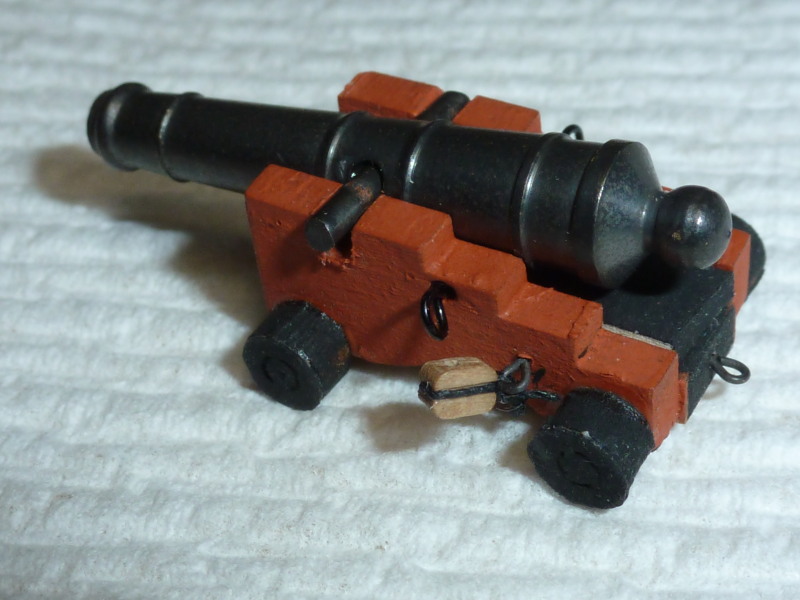
Victorpapa - I used "brass ager" to blacken my cannons. Sometimes labelled as "brass darkening solution", it is commonly sold at antique malls and similar places where people are into refinishing etc. My eight ounce bottle was $6.75. The contents are listed as Phosphoric Acid, Copper Sulfate, Muriatic Acid, and Selenium Dioxide. The acids likely micro-pit the brass and the selenium dioxide darkens it. I have also used it on the brass belaying pins and the eye bolts to good effect. Use only a small amount of solution at a time, as it is "spent" by the chemical reaction. I use a saucer and swirl the metal parts and solution around in it, then rinse a few times in clear water. <<Gary>>
- 455 replies
-
- 1
-
-
- fair american
- model shipways
- (and 1 more)
-
Hi Victorpapa - Thanks for dropping by. I am glad that my buildlog is helpful to you. Your kind words encourage me to post more...and more often. We all learn from one another on this site either directly or indirectly. I know that my finished model will be much better because of tips and helpful suggestions from others. <<Gary>>
- 206 replies
-
- 1
-
-
- fair american
- model shipways
- (and 1 more)
-
Cap Squares!!! Thanks to Alistair for suggesting them and to everyone for your helpful hints on how best to do them. And a special thanks to Russ for taking the time to tell me what a cap square is. <<Gary>>
- 206 replies
-
- 4
-
-
- fair american
- model shipways
- (and 1 more)
-
Hi Alistair - Thanks for explaining your technique. You make it sound so easy... . And yes, it will be trickier for me as the carriages are already pinned to the deck and all of the rigging is in place. But I do have plenty of manila folder material and black paint!! My first attempt was to cut the strip into 1/4" segments, soak them in water, and shape them over a piece of brass rod the same diameter as the trunnions. That hasn't been working as well as I hoped. I'll keep working with it. <<Gary>>
-
HI Ken - Thanks for dropping by. Yes, the barrels and carriages are from the kit. The barrels were chemically blackened. It sounds like heavy paper is the preferred material for making "cap squares". I experimented with brass strips but they turned out to be too difficult. I am wondering if I could simply use black paint to achieve a reasonable effect.
-
Russ - Thanks, that makes sense. I will look into it. And I learned something new... . <<Gary>>
-
Russ and Alistair - Thank you both for your kind words and your suggestions for dealing with the outhaul tackle line coils. I am following up on your suggestion and testing different coil diameters. One quarter inch (one scale foot) seems correct for coiling a line, but looks a bit big on deck. One eighth inch (half foot scale) coils are unrealistic but fit better between the gun carriages... Alistair, this is what they call a "teachable moment". I have NO idea what a cap square is. Any information you could provide will be appreciated. <<Gary>> p.s. I envy you guys with the skill and tenacity to do the gun carriage rigging properly with hooks and etc. I am simply not there yet, and old age will undoubtedly outpace any increases in skill I might acquire over time...
-
Pete - Nicely done!!! Thanks for sharing. Real quality work there. At this stage of the build, I am very pleased that I selected "Fair American". She is a beautiful little ship with great lines, and at a scale that allows more detail to be added with less frustration on my part. I think that overall Model Shipways did a great job developing this kit. <<Gary>>
-
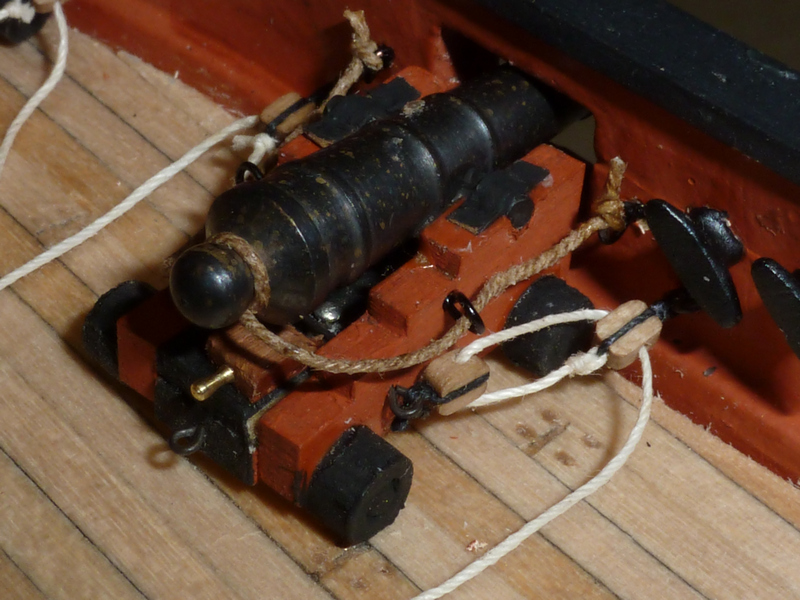
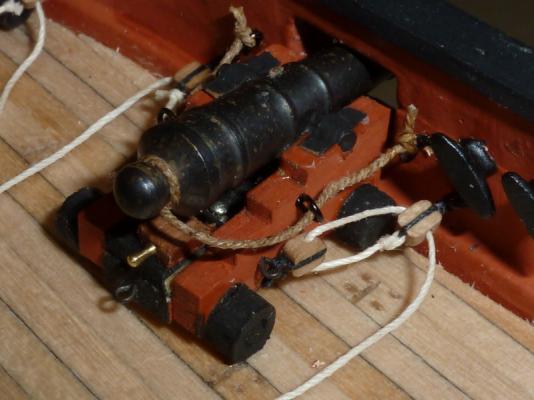
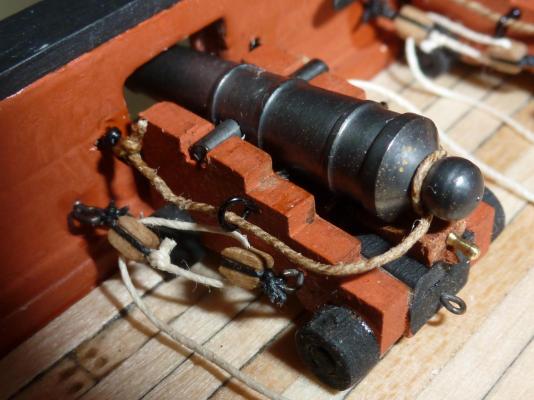
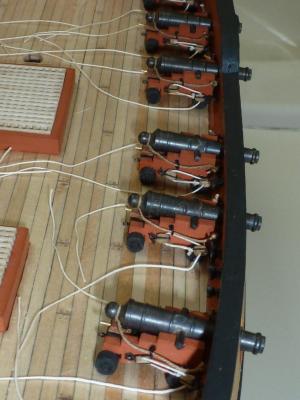
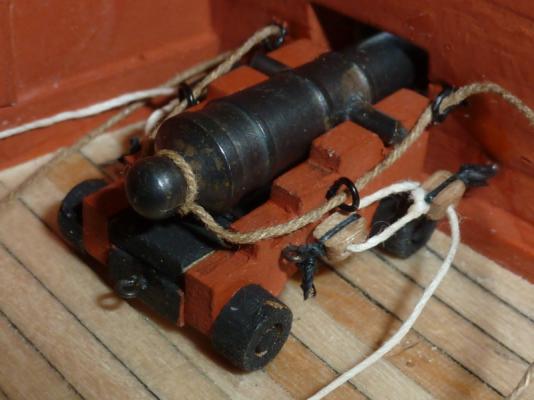
Progress Report - All of the cannons are now rigged and pinned to the deck. The breech lines, outhaul tackle, and quoins are in place. The outhaul tackle lines are just laying on the deck - I haven't decided how to finish these yet, but will probably go with Ken W's coils because they look so good. For anyone following this build log and beginning this stage, I stropped the blocks using the small diameter black rigging from old Model Shipways kits. I then tied all of the blocks to the rings on the gun carriages and the bulwarks. Then I rigged the outhaul tackle. After that, I pinned the carriages to the deck. Then I rigged the breech lines. Finally I added the quoins, gluing them in place. I have not yet glued the barrels to the carriages. There are other - maybe better - ways of doing this (see KenW's buildlog for Fair American) but this worked for me. <<Gary>>
- 206 replies
-
- 5
-
-
- fair american
- model shipways
- (and 1 more)
-
Hello victorpapa - You are exactly correct. Remember that the kit is attempting to copy a MODEL of the ship. Various buildlogs on this site show different ways to address the lack of space between the cannon and the "quarter deck face". I moved the "face" to the aft end of bulkhead 12, and moved the gunport forward. You might check KenW's and rafine's buildlogs to see exactly what they did. And I see that you are new to the forum. You might consider starting your own buildlog. There are many benefits to having other modelers with skill and experience looking over your shoulder. <<Gary>>
- 206 replies
-
- 1
-
-
- fair american
- model shipways
- (and 1 more)
-
Hi Ken - Thanks for sharing your method for making those coils. From your pictures, I thought the coil and outhaul rigging lines were one single piece. On your buildlog, I see that you are evaluating the capstan. You might check out the photos and drawings on the forum titled "Discussion for a Ship's Deck Furniture, Guns, boats and other Fittings" and the thread "capstan for merchant ship". Also, take a look at what Rafine did on his buildlog, and also Chuck Passaro's practicum for SYREN Chapter Twelve Starting the Deck Fittings (http://www.modelexpo-online.com/images/docs/MS2260/MS2260-Syren-Instructions-Chapter-12.pdf) <<Gary>>
-
Hi Alistair - Thanks for dropping by. Yes, I understand your approach. My fear was that I would poke a hole through the bulkhead, making a mess of the operation. I do use superglue to make the last half inch of the outhaul tackle line stiff so it goes through the hole in the block easily. It also helps that the gun carriage can be moved about as needed to get the job done. The brand new fine pointed tweezers that I bought from Model Expo are another big help. And as you say..there is more than one right way to do it. <<Gary>>
-
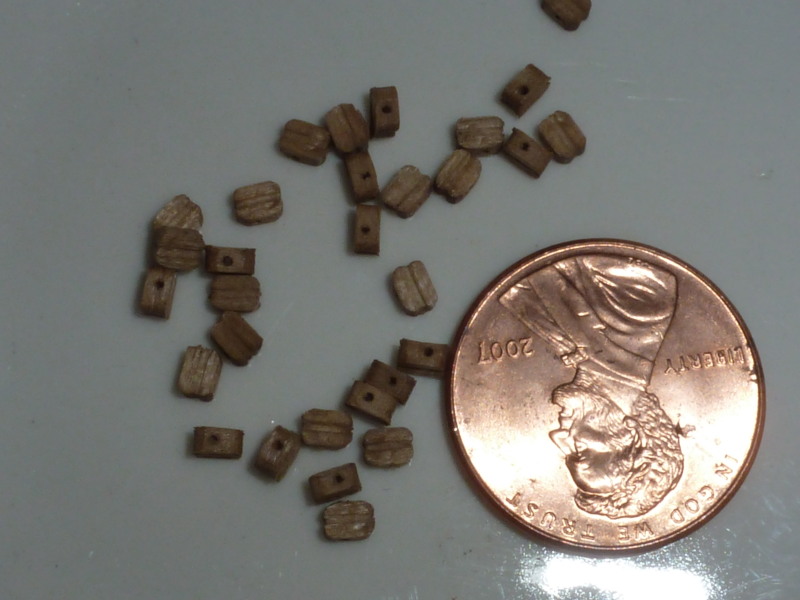
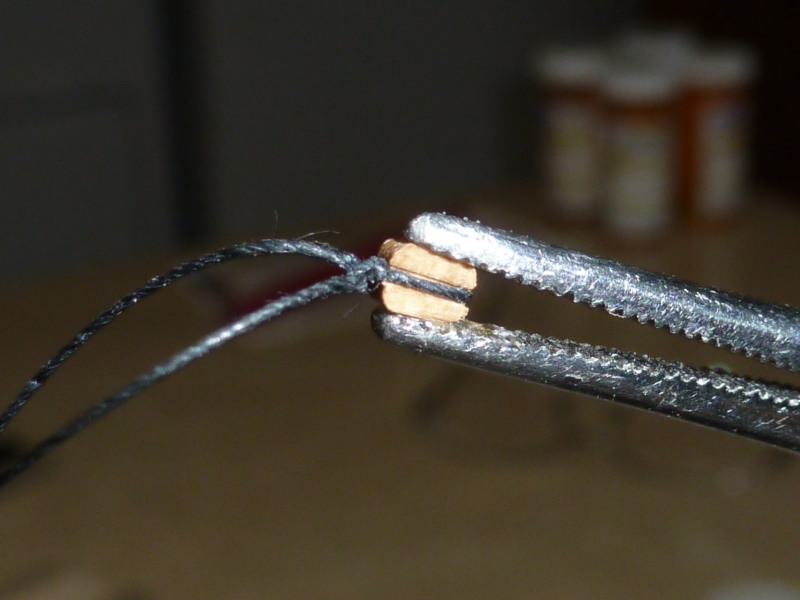
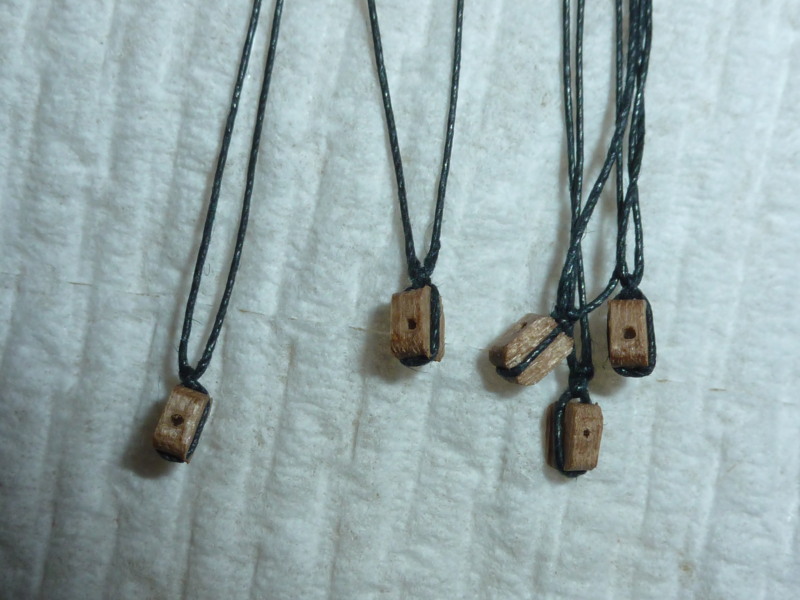
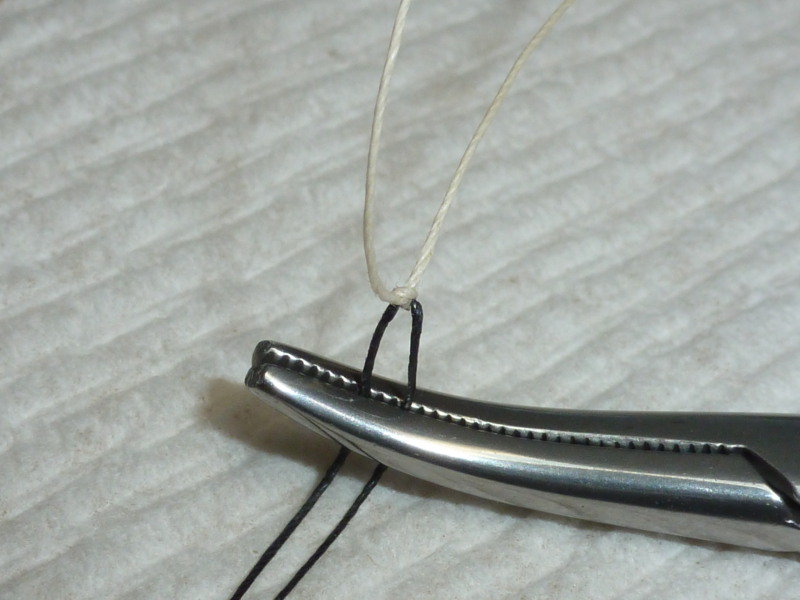
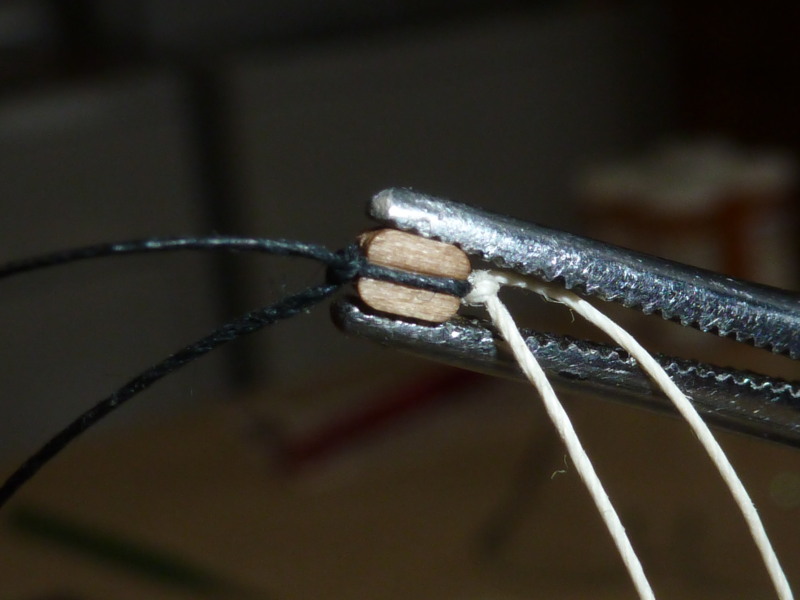
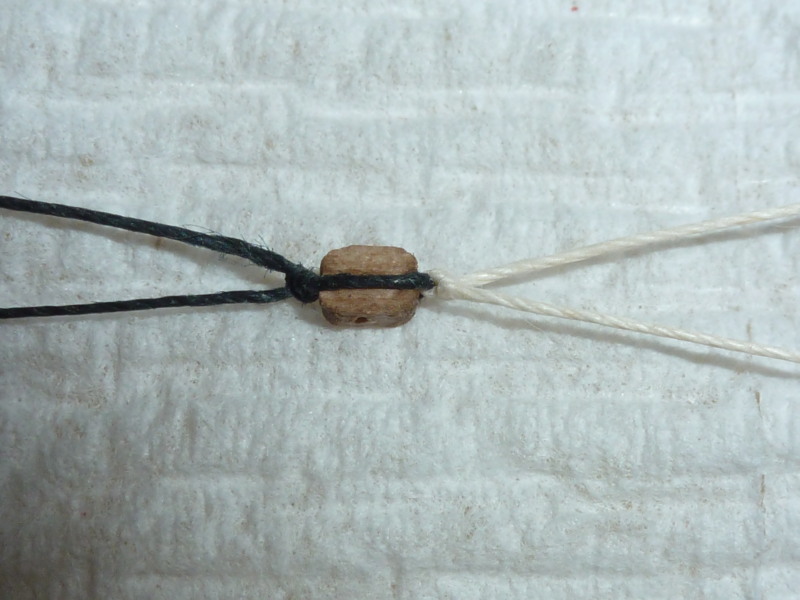
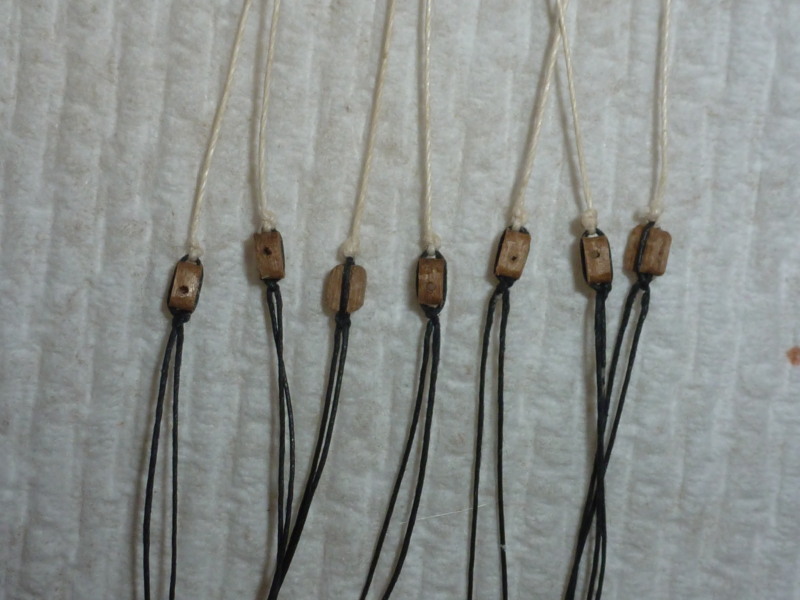
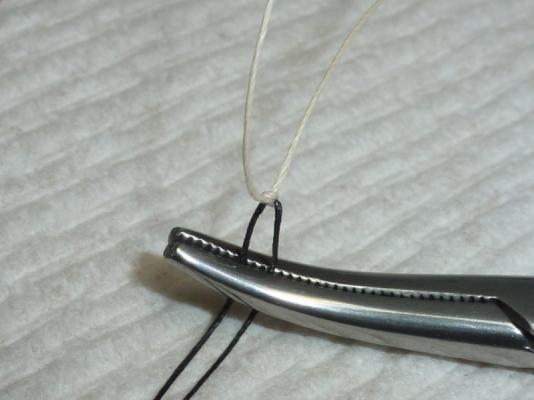
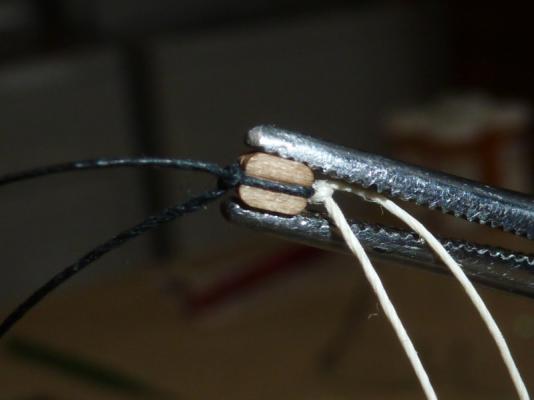
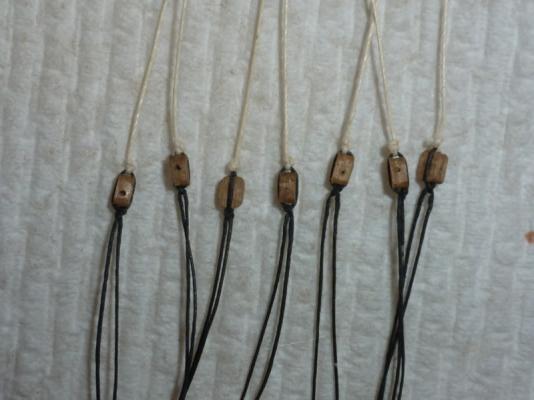
I finally decided to rig the gun carriages with the breech line and outhaul tackle, after seeing how nice they looked in photos and buildlogs by KenW, Alistair, and Rafine. I opted for the 3/32” blocks and ordered them (bulk) from Model Expo. I was pleasantly surprised by their quality – much better than blocks supplied in Model Shipyard kits from 40 years ago. They are nicely drilled and grooved to accept the stropping. I am finding them very easy to work with. I am using the smaller diameter rigging material from old Model Shipway kits to strop the blocks, and I'm tying them to the eye rings instead of attempting to fasten them with metal hooks. For tiny blocks and my skill level, this works fine for me. I use a hemostat clamped into a fly tying vice to hold the block while I am stropping it. I use diluted white glue to secure the knot. Then I tie the blocks to the gun carriage and the bulkhead. And for once, I am actually following the directions. With the barrel off the carriage, I rig the outhaul tackle and then secure the carriage to the deck with a pin. Then I mount the barrel, rig the breech line, and install the quoin to adjust the barrel so it is centered in the gun port. I have tested this approach with one cannon and it seems to work just fine. <<Gary>>


- 206 replies
-
- 5
-
-
- fair american
- model shipways
- (and 1 more)
-
Hi Ken - If I were you, I would continue to rig the remaining guns exactly as you did the first six. You clearly have the skill to do it, and your results thus far look great. Your family likes the deck coils, and most important, it is YOUR ship. The finished result can only enhance the appearance of your Fair American. The rest of us looking over your shoulder can continue to jawbone about other rigging alternatives, and learn fine points of nautical history from each other... Keep up the good work!!! <<Gary>>
-
Ken - Thanks for the update. Your work looks very good. I believe Russ is exactly correct about the function of the breeching and the outhaul tackle. My understanding is that the outhaul tackle (attached by hooks) would be removed and stowed when the gun was not in action; especially for guns on weather decks (like Fair American's). The inhaul tackle would not normally be needed because cannon recoil would move the gun inboard. Here is a link that described how the guns would be fired: http://www.navyandmarine.org/ondeck/1800gundrill.htm I am still undecided about how to rig the guns on my model. I'm not sure that I am at your skill level. <<Gary>>
-
Ken - OK - please keep the progress reports and pictures coming. I am looking forward to seeing how you do. And please pass along any tips and tricks that you learn along the way. I am assembling the gun carriages now and will put in all of the eyebolts. I am keeping my options open...but those TINY blocks in tight spaces for the outhaul tackle really freak me out. (note that the instruction manual calls for 3/32 inch blocks). One suggestion for you. When I was doing all of the loops of line around the belaying pins on Rattlesnake, I found that beeswax was a great help in forming coils that would stay put and look realistic. I have never done deck coils, but you might experiment with beeswax and see if it does the trick. The admiral has me spreading mulch, trimming bushes, and painting trim these days, so work in my shipyard has slowed down. <<Gary>>