HOLIDAY DONATION DRIVE - SUPPORT MSW - DO YOUR PART TO KEEP THIS GREAT FORUM GOING! (Only 13 donations so far - C'mon guys!)
×


GaryKap
-
Posts
276 -
Joined
-
Last visited
Content Type
Profiles
Forums
Gallery
Events
Everything posted by GaryKap
-
 Hey Ken - There is an interesting thread in the Ship Modeling Tips Forum under "Discussion for a Ship's Deck Furniture, Guns Boats, etc." and the thread "Gun Tackel Coiling-perfect coils vers some variations Questions". The information there gives us model ship builders more latitude in how much rigging we put on the gun carriages. If I read it correctly, the outhaul tackle would not normally be stored in place on the gun carriage, but only rigged for combat (Jud and Stockholm Tar). If that's the case, I am considering only rigging the breech lines, and I would STILL be correct. I would put on the eyebolts for the outhaul tackle but not rig them. Consider that most people put on the deck eyebolts for the inhaul tackle, but nobody ever rigs the inhaul tackle on their models . <<Gary>>
- 455 replies
-
- 1
-

-
- fair american
- model shipways
- (and 1 more)
-
Here is another suggestion. I used to be into fly tying (as in fly fishing). Fly tying materials included some very thin (usually copper) wire. I looked online and Cabelas carries what they all "ultra wire". It comes in colors including black. Here is a link: http://www.cabelas.com/catalog/product.jsp?productId=743795&destination=%2Fcatalog%2Fproduct.jsp%3FparentCategoryId%3D104793480%26categoryId%3D104721480%26subCategoryId%3D104340780%26indexId%3D103886280%26productId%3D741424%26type%3Dproduct%26destination%3D%252Fcatalog%252Fbrowse%252Fthread-beads-eyes%252F_%252FN-1100440%252FNo-48%252FNs-CATEGORY_SEQ_103886280%253FWTz_l%253DSBC%25253BMMcat104793480%25253Bcat104721480%25253Bcat104340780%2526WTz_st%253DGuidedNav%2526WTz_stype%253DGNP%2526recordsPerPage%253D48%26WTz_l%3DSBC%253BMMcat104793480%253Bcat104721480%253Bcat104340780%253Bcat103886280&WTz_l=YMAL%3BIK-310670 (I hope this works). I don't know anything about it, but it might be worth a look. Anyway, if you have a store that sells fly tying materials nearby, you might want to check them out as a source. <<Gary>> p.s. If this works, you might also consider purchasing a fly tying bobbin - a device that holds the spool of wire and lets you control how the wire pays out of it. This might allow you to control small lengths of fine wire more effectively, and might also be helpful if you wanted to strop blocks with it.
-
Hi Ken - Thank you for posting this. I am approaching this stage in my Fair American build, and will also need to deal with it one way or the other. One alternative that I used on my Rattlesnake build was to strop the blocks with black thread and simply tie them to the eyebolts, because I was having the same problems with 28 gauge wire. I'll probably get "dissed" for even suggesting this, but it doesn't look bad and preserves one's sanity. As we said earlier, it depends on who you are building the model for... One other thought. Take a look at the sketch of the gun carriage rigging on page 21 of the instructions. Seems to me that the outhaul tackle eyebolts are attached to the bulwarks on a wider spacing from the gunports than the breech line eyebolts. It looks like you have both eyebolts close to the edge of the gunport. For the model, a wider separation of the outhaul tackle eyebolts would provide more spacing between the blocks on each side of the carriage and might approve the appearance. You have only done the two guns, so this would be an easy modification. Maybe others can comment on this. You are doing great work and I certainly appreciate your sharing it on this build log. Keep it coming! <<Gary>>
-
WOW!!! Bob, I continue to be amazed by the quality of your work. What size blocks did you use for your carriage tackle? They look GREAT. <<Gary>>
-
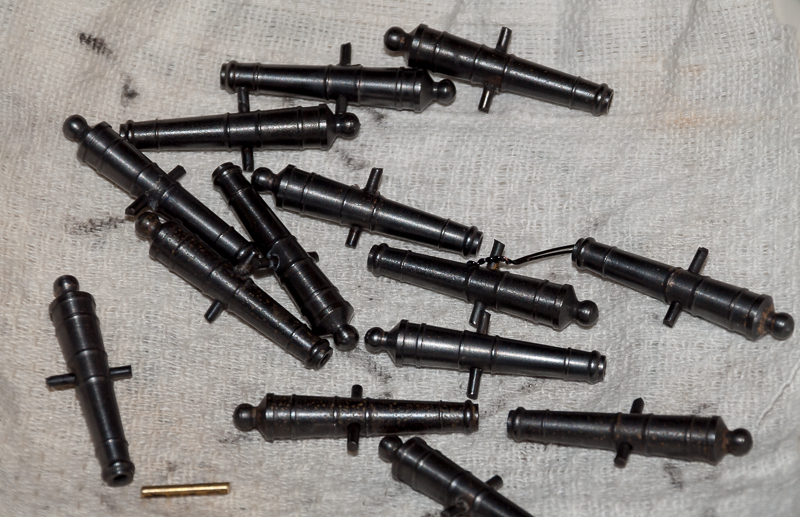
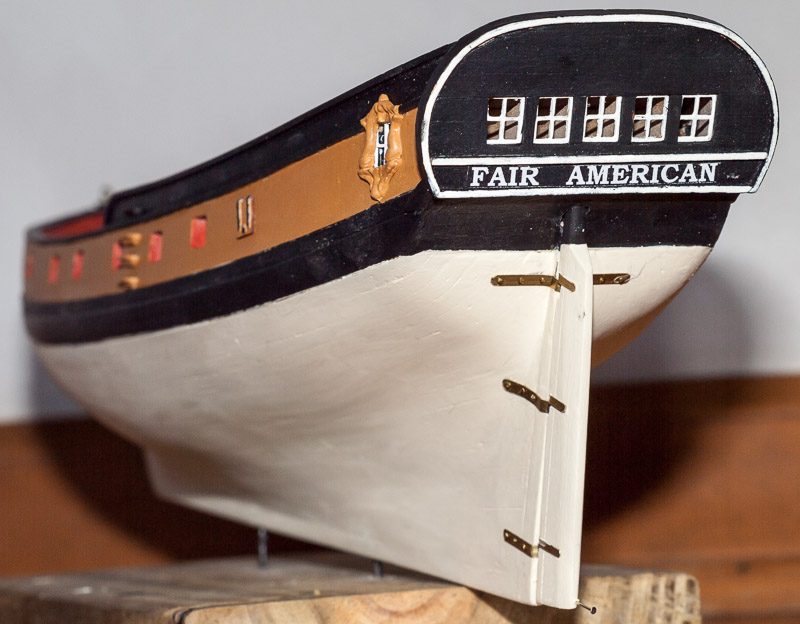
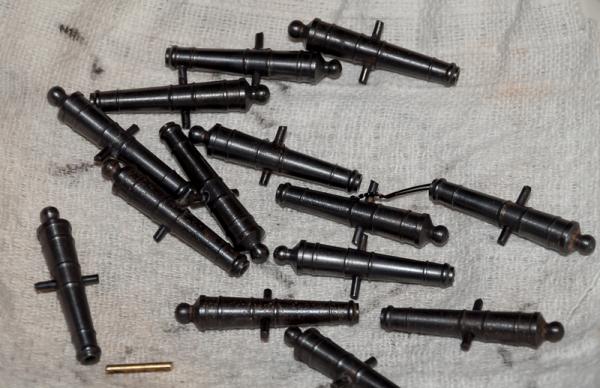
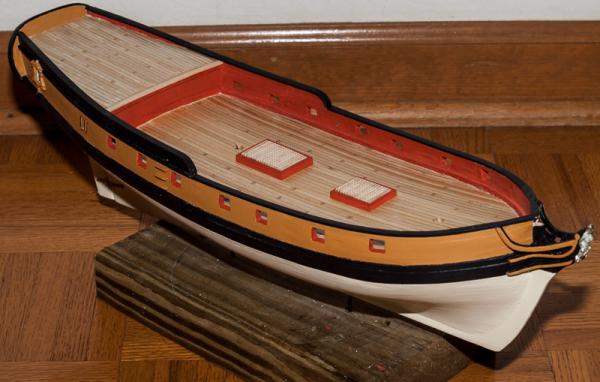
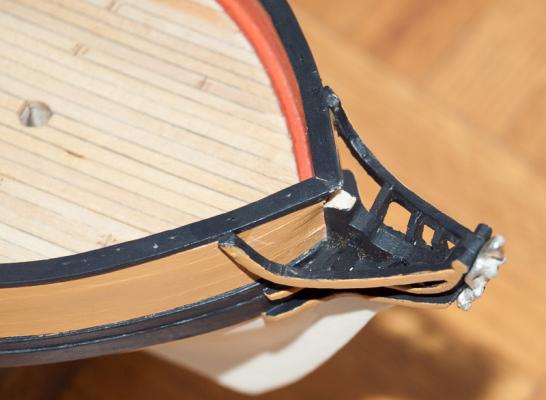
Bigcreekdad, thanks for dropping by. And here is a progress report for everyone. I thought it was time to mount the hull on its permanent display stand. I found the lovely, dense piece of white oak at Black Dog Salvage in Roanoke, Virginia (seen on DIY TV as "salvage dawgs"). It was part of an old timber, and I like to think the tree that produced it was growing at the time that Fair American was sailing. No stain - just a couple coats of tung oil and I am happy with the way that it looks. Notice that there is a companionway at the quarterdeck now. It is not glued in yet, but you get the idea. I have started on the cannons. I took those lovely 14 shiny brass cannon barrels and turned them gunmetal grey with a brass darkening solution. I used the heavy brass wire supplied in the kit to make the trunnions. I cut them to length, darkened them with the solution, and then glued them into the barrels with superglue. (this sequence is important - if you glue them in before darkening them, the inevitable blob of glue will not darken and will stand out boldly) I am using the technique demonstrated by Modeler12 in his video to make the eyebolts and rings for the gun carriage rigging. That's all for now. <<Gary>>


- 206 replies
-
- 7
-
-
- fair american
- model shipways
- (and 1 more)
-
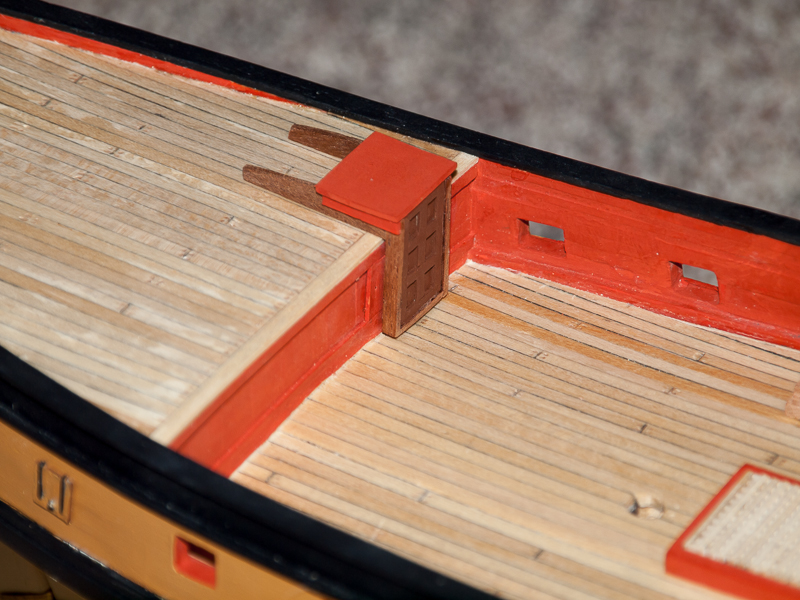
Mark, Russ, David, and Ken - Thank you all for your words of encouragement. You guys are right. Sometimes all I see is the sum of my mistakes and not the accomplishments. When I started this project, I was not even sure I could plank the hull. And (hopefully) I keep improving as I move forward. So I will just keep trying to do the best I can and proceed. I am currently working on the quarterdeck door/hatch and will post some pictures when I am done. Happy Easter to everyone. <<Gary>>
-
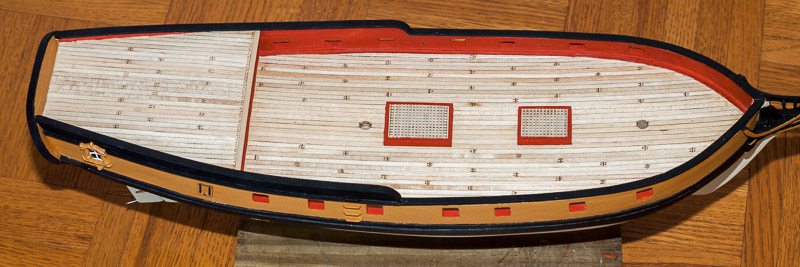
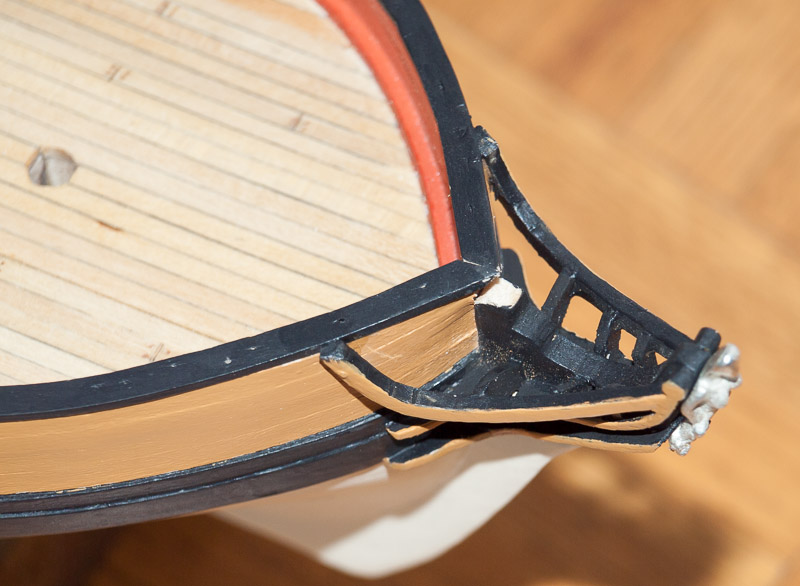
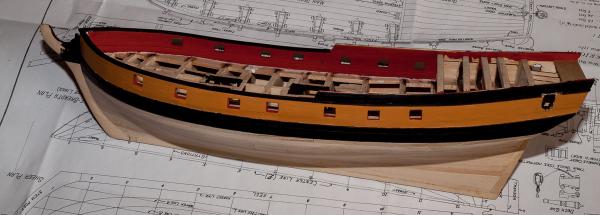
Progress Report - Its been a while since my last post, and I have done some things. I planked the decks, added the quarter panels, completed the "beak" and added the rudder and hatches. I still have to do the quarterdeck companionway, quarterdeck rail and skylight...and everything else. But that is my progress to date. I can never seem to achieve the nice finished look that I see on some other posters on this site, so I guess this is my "unabashed" build. Some photos are below. <<Gary>>


- 206 replies
-
- 6
-
-
- fair american
- model shipways
- (and 1 more)
-
Jay - Thank you for sharing your skill and expertise in this video. I learned a lot that will help me in assembling and fitting out the cannons for my FAIR AMERICAN. I have been puzzling over how to make the small rings and eye bolts on the sides of the cannon carriages, and you nicely solved this for me. Well done. <<Gary>>
-
Hey Bob - Your work is amazing. I learn valuable techniques every time I visit your build log. I only wish I could do a tenth as good... Thanks for sharing. <<Gary>>
-
Hi Ken - More very nice work. I like the way you did the gangway steps...very "finished" looking. A suggestion - if you intend to use the kit figurehead, you might want to make sure it sits well at the head of the "beak" with some spacing between the top of the head and the bottom of the bowsprit. If not, this would be a good time to do the fitting. <<Gary>>
-
Thanks for the updates. You are doing great work. I am especially impressed by your attention to detail. I like the rings for the gun carriage tackle. And the rudder...you and Ken both put a piece on the aft end that the MS instructions call a "chatter groove". Can you tell me any more about this? Anyway, as others have said - keep the pictures coming. <<Gary>>
-
Russ, Modeler12, Bill, and Wally - thank you all for your helpful suggestions and information. The rigging for the tackles and the breech lines are optional with the MS Fair American kit, and the blocks etc need to be purchased separately. The instructions suggest 3/32" size for both single and double blocks. Russ, thank you for confirming my math, and pointing out the need for additional blocks just in case... I can't recall how many tiny blocks have slipped from my fingers never to be found again. Modeler 12, you have convinced me not to use some larger blocks that I already have on hand. Bill, I like your suggestion to get the blocks from Syren Ship Model Co. And Wally, thanks for pointing me to the Syren Chapter 11. Good information! And I promise to update my build log SOON. The ship has been "in irons" too long. <<Gary>>
-
I am trying to figure out the diagram for rigging the carriage guns for my MS Fair American, and estimate how many single and double blocks I will need to order. The directions say 5 dozen single blocks and 3 dozen double blocks. But for the 14 cannon, the numbers do not compute. From the diagram, it appears that the outhaul tackle requires one single and one double block on each side of the gun carriage. The inhaul tackle shows one single block attached to the rear of the carriage, and I assume one double block secured to the deck. That adds up to three single blocks and three double blocks per gun, or 42 single and 42 double blocks for all of the 14 guns. (3x14=42). But those numbers do not square with the directions. Does anyone have a good diagram for rigging a gun carriage, or do you see a math error here? Thanks in advance for any help you may provide. <<Gary>>
-
Hi Ken - Very nicely done!!! Your hull planking and trenailing look great. I bet you are glad you didn't paint the hull like I did... . But then again, I had more to "cover up". So what's next? <<Gary>>
-
HI Ken - I think your planking job looks much better than you give yourself credit for. I also think it would look good either way...its up to you. One option would be to put a clear finish of your choice on it and see how it looks and how you feel about it. If you don't like it, you can still paint it. Certainly another consideration is why you are making the model and who you are making it for. Only you can answer that. Whichever you decide, it will be a beautiful model. <<Gary>>
-
David, thank you for sharing the photo of Fair American. The clearer vision I have of the final product, the better I can do. Your picture helps. Ken, after seeing David's picture, I decided to go for it and paint the lower hull in Model Expo "tallow" color. So far I have a coat of primer and one coat of tallow on the hull. I will give it some time to cure, sand it, and then apply a final coat. It looks pretty good but it was kinda sad to see all of that careful planking disappear under a coat of paint. Another question on treenails for the deck planking. Posters commonly use the term "putty" so that's what I bought - a small jar of Minwax wood putty. But after I got it home, I read the fine print on the back telling me that it does not harden and is not sandable. Is that what I want? I did some experimenting and discovered that after I drill a hole, I need to smooth it with an awl or similar instrument to get a nice round hole. Also, it looks cleaner if I give the plank a coat of finish prior to drilling the hole and filling with putty. Any tips that would help on this? Also, I started working on the cannons. Like you, I am using those that came in the kit. I got the parts punched out of the lazer cut board with only one casualty. I will post pictures in the near future. <<Gary>>
-
Hi Ken - Regarding long boats. For my MS Rattlesnake, I tried building a Model Expo plank-on-frame lifeboat kit (http://www.modelexpo-online.com/product.asp?ITEMNO=MS0109) and failed miserably with it. The rib former kept breaking and the ribs did not come out evenly, making the planking even worse. I wound up chucking the whole thing and carving the longboat from a piece of basswood...and it turned out OK. I think other posters on this forum have related their experience with the kit, so you may want to check. I like the skylight simply because the quarterdeck looks so NAKED and it needs something in that space. And I'm sure the captain would like it too... I installed the deck pad today. My pencil "caulking" looks OK, but where the planks touch the waterway not so much. Tomorrow I may shop for pine or honey oak colored plastic wood, if the weather allows. <<Gary>>
-
Hi Ken - Here are two thoughts for our Fair American builds. Both are illustrated in the attached photo. First, a skylight and second, a ship's longboat. A ship of her size certainly would have needed one. Something around 5 - 6 inches (20 - 24 scale feet) would be about right. What do you think? Also, what did you use for the trenails? Your end result looks great. From this forum, I gather that folks use either dark wood putty or small bits of wood, or bristles from a brush or broom. <<Gary>>

- 455 replies
-
- 5
-
-
- fair american
- model shipways
- (and 1 more)
-
Russ, Bob, and Scott, thank you for your kind words. Scott, I am still undecided about how to finish the lower hull. It looks pretty good the way it is, and the color is not too far off the tallow color that I might paint it. One option I am considering is to dilute the tallow colored paint and simply give the lower hull a "wash" that would allow most of the detail and plank color differences to show through. But it seems most times I put a paint brush to a ship model, I wind up making things worse... On the plus side, I have been very pleased with the paint brush set from ModelExpo. The brushes allow me to put paint where I want it, and if my hand was steady enough, I could paint a waterline without using masking tape. I put together the hatch grates yesterday, and today I will build the coamings around them. Then I will start planking the deck, and thinking about trenails. <<Gary>> p.s. I just noticed that with this post, I have been promoted to "Midshipman". Too bad that doesn't include a pay raise .
-
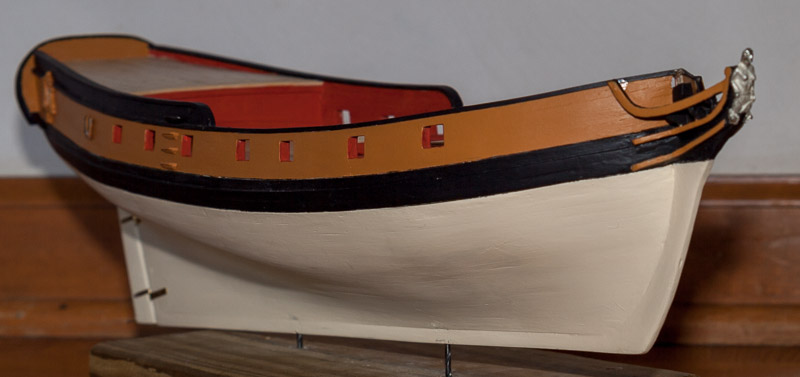
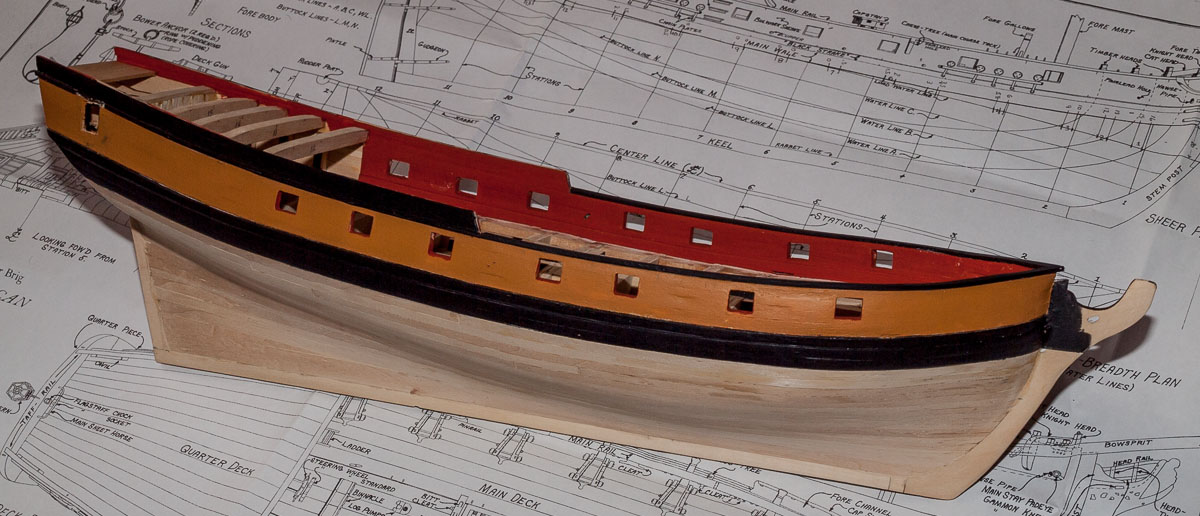
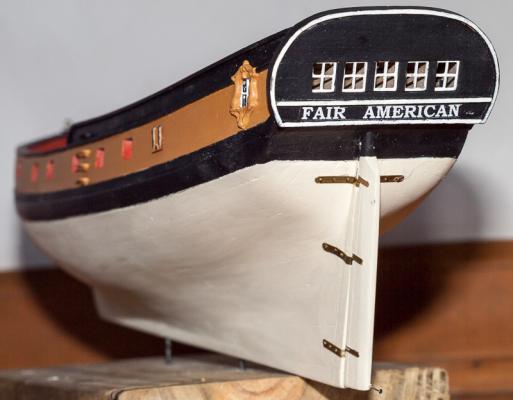
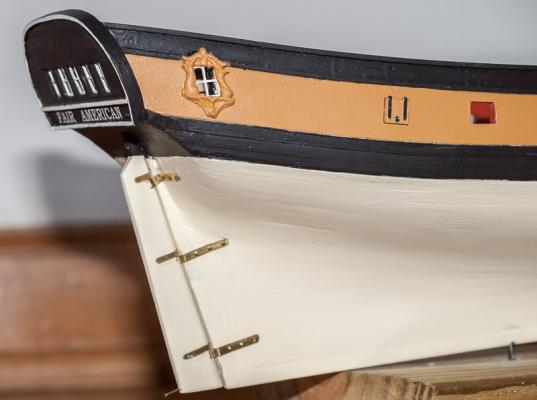
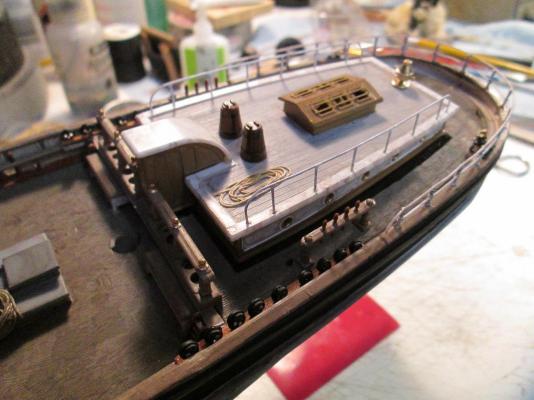
Progress Report - I have planked the outer bulwarks and framed the quarterdeck. Also, I have added the cap rails and cut the holes for the quarter badges. I will use the two remaining window frames in these. As you can see from the pictures, I have done some painting too, but don't consider it to be "final". At a later time I will masking tape and neatly paint the junction between the ochre topsides and the black strake. <<Gary>>

- 206 replies
-
- 6
-
-
- fair american
- model shipways
- (and 1 more)
-
Hi Ken - Thank you for your reply. I have decided to go with white - i think it looks good and is period correct. And thanks for the picture of your solution to the three foot cabin door. Looks great! And the captain would like it too... . I used the same hull planking method as you - soaking each plank, drying in place, and the glueing with yellow carpenter's glue. I used small diameter T - pins to hold the planks in place while drying and also after glueing. I used a T - pin at each bulkhead to keep the newly glued plank tight to the adjacent plank already in place. But my job went faster because I am retired and have more free time to devote to the shipyard than you probably do. I will soon be posting some photos on my build log showing my progress. I was glad to get the cap rails in place and looking OK. Now I KNOW there will be a ship model at the end of this process. I just hope we don't get too much snow in the storm coming tomorrow. <<Gary>>
-
Hi Ken - Your build is looking great. I wish I did as good as you did with the topsides. But here is my question for you and all of the "followers". What color would have been appropriate and accurate for the quarter badges...those fancy windows on both sides at the stern. The Rogers model has them gold, of course. And rafine looks to have them tan or light brown. My MS Ratlesnake has them in white, so that's an option, as is ochre. Anyone have any other ideas? <<Gary>>
-
Hi Ken - Thanks for dropping by. I am in the process of planking the outer bulwarks, or topsides. It's not turning out as well as I had hoped. Part my fault and part Model Shipways. When I did the gunport frames, they were all measured against the top of the bulkheads, allowing for the deck planking. I wanted to insure that the cannon barrels would all be in good position. Not sure what I did wrong, but some are slightly higher than others relative to the topside strakes. That made it more complicated to trim the gunports. The other problem is the wood material supplied with the kit. The walnut was unacceptable because it was too brittle - even after soaking - and the basswood too soft. I went with the basswood, but am now wishing I had opted for something better. Like your holly maybe. Now I understand why you guys told me the higher quality wood is worth it. I will likely not attempt the 1/32" seat around the gun ports that look so lovely on yours and Bob's models. <<Gary>>
-
Hi Ken - Thanks for the picture. That helped me make my decision - I'm going with the red like everyone else. I still have some old Floquil paint in that color. I was amazed how nice and smooth it went on compared with the thick acrilic paints from Model Expo. However, I am thinking of deviating on the color of the window frames in the stern. I think white would stand out more than the gold, and would certainly be in keeping with the period. <<Gary>>
-
OK - now I am working on the quarterdeck framing and companion way. Wq3296, could you provide us with a photo of the companion way that you constructed for your Fair American? You gave the dimensions but I can't quite picture it. I am very familiar with a sliding hatch over a door as on the pilot boat "Katy" and also a "doghouse" style as seen on "Cutty Sark". (pictures below). Also, you suggest green as a suitable color for the bulwarks inboard. What shade of green? And would the gun carriages still be red? Thanks <<Gary>>

- 206 replies
-
- 1
-
-
- fair american
- model shipways
- (and 1 more)