


scott larkins
-
Posts
489 -
Joined
-
Last visited
Content Type
Profiles
Forums
Gallery
Events
Posts posted by scott larkins
-
-
If you reference some of the other rattlesnake pages you will see how the rest of us did it. Not that you have to go that route. All natural is fine too but you'll be spending a lot of money to purchase the other woods to use.
-
-
Looking good. Looks like you'll need to give that decrative piece on the transom a little bending. Just like the rest of us. Keep working on it.
-
-
Yes, look at all of the alignments. As was told to me, all of that stuff lining up is key to a good looking hull planking job. I did end up doing a little sanding on the top / middle of the bulkheads once my water lines matched up. You will find, as I and others have, that the laser cutting is not always that precise. I would not work on tapering the sides until you dry fit the pieces. Also make sure that the slots into the bulkheads are centered. I and others have found that a few of the slot cuts are not centered. I have a technique on my post that worked pretty well for helping determine that. I used a copier and my glass door wall. See my site somewhere around page 2 or 3. I strongly suggest you look at other's build sites as you go. Everyone does the steps a little differently and some will work for you and others won't. But all of them put together is a wealth of knowlege. Don't just look at my site as I made errors, and others did too. We want the people coming up behind us to learn from our mistakes, which are still happening to me even today, so that you don't have to.
Others will tell you not to rush, it's not a race. I still find myself at times rushing and I have to stop myself because I just want to get this exciting experience moving. Double measure and cut once still works here. Hell, triple measure. And by all means remember this, the plans do not always match up to reality. That's why you double and triple check.
I don't know what kid of tools you have but I have found that a well marked metal 6 inch ruler is spectacular. The knd with both inches and cm. If you can find one that has 1/32 marks and cm, great. Probably the most used tool I have, beside emery boards and a sharp exacto knife.
I ramble on, anyways, enjoy and we all look forward to your progress.
-
Watch how those bulkheads line up on the top of the Keel. It's very important that they line up as well as the water lines that you have marked.
-
Welcome to the rattlesnake club. Keep reviewing the other snake posts to get good ideas.
-
That is some really nice work you've done there.
-
Nice work you've got there.
-
-
I bow to your skills.
-
Man that's a lot of ribbing.
-
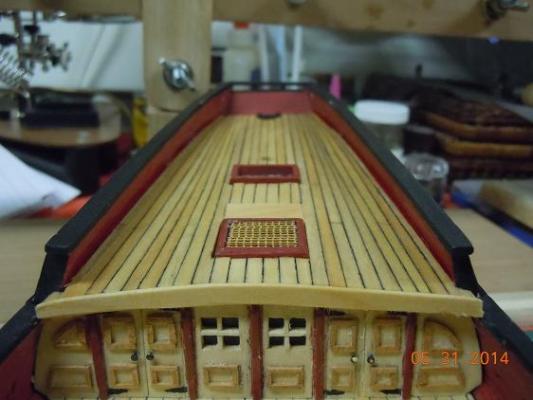
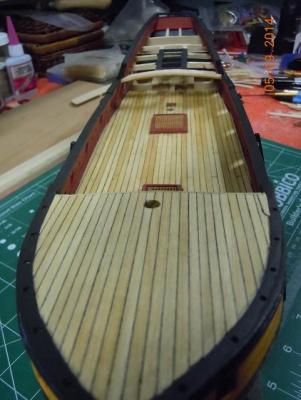
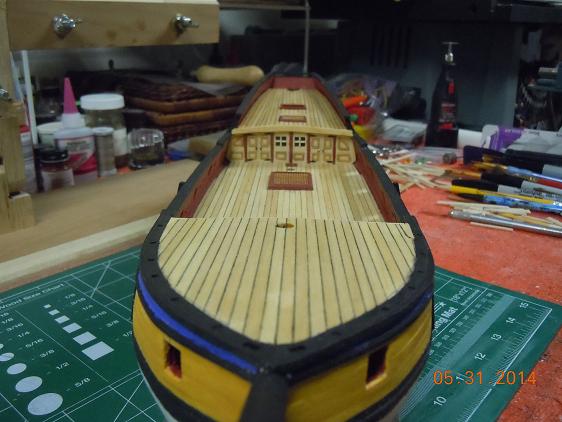
Okay, the next big step is done. All of the decking is done. I certainly can see how my skills improved over time when I look at the poop deck planks as I tappered them off towards the back as per plan. Pics follow with comments.
I'm sure I'm giving away secretes here but if you compare the right side decking with the left side decking you can probably tell with side I started on and which side I finished. Yep, you can say my skills improved over time.

Here's the whole deck from the front.
Here is the whole ship. I like the way the staining came out. Shows the cauling and plank joints really well. Sure, there are a few flaws like so many others that proceeded this step but I can say my skills are improving over time. Do I have any words of advise for this section? Besides the usual "take your time" I have found that for me at least, as I'm tapering down the wood, I actually close my eyes and "feel" the wood as I place the wood between my thumb and index finger and "feel" the wood as I drag it between my fingers. I've found that sometimes I can feel the wood better than my old eyes can see it. Perhaps I'm just weird that way but I used that idea more on the starboard side of the poop deck and I think, if you look close enough, that the taperings are better than in the port side.
-
Congrats on graduation. What's next for you? I too started the little boat while waiting for some wood to come in. The wood is in so the boat went back into the box.
-
-
Coming along really well. Nice job creating your own capstan. That is some tiny work.
-
Boy, I never realized the stern of the Mayflower was so high until I see it from these shots.
-
Nice work so far. Cannons look really nice.
-
Okay ship's build log. Things are slowing down due to the summer outdoor work that needs to be done but I am still making progress when I can. Got the forecastle deck on and stained and the wall that goes to the officers quarters done. Notes on each step will follow with the pics.
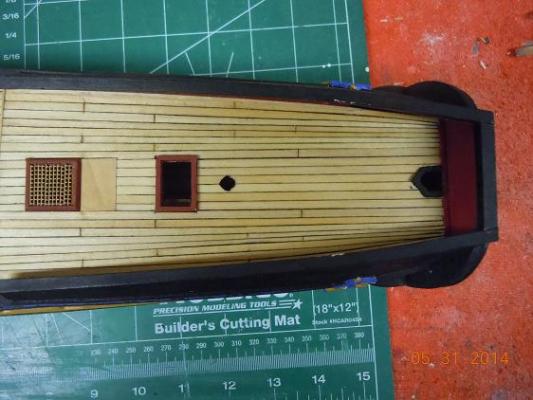
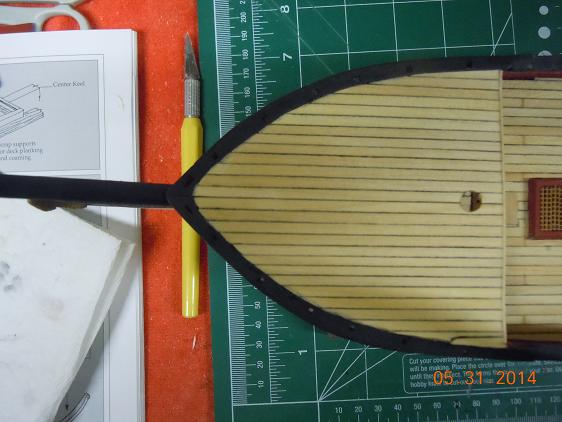
Here is the forecastle decking completed. It is not as symetrical as I had hoped. Somewhere when I put on the plank floor edgeing, I must not have put it on evenly to the center. One may notice that the port side decking has an extra piece of wood off there on the back edge. Not sure how that happened of course, since had I known, I would have fixed it. So word of warning when putting on this edge piece, find a way to measure it from the center. I put the bow pieces together so they would line up right, which did work, but the back did not. Oh well. Oh, one last thing. I put the bow sprit on before I planked the deck. I was thinking about this and trying to think ahead and I realized that if I put the forecastle decking on before I put the lower part of the bow sprit, how would I make sure it fit well, let alone be able to glue it. So for those following, put in the bow sprit before decking the forecastle.

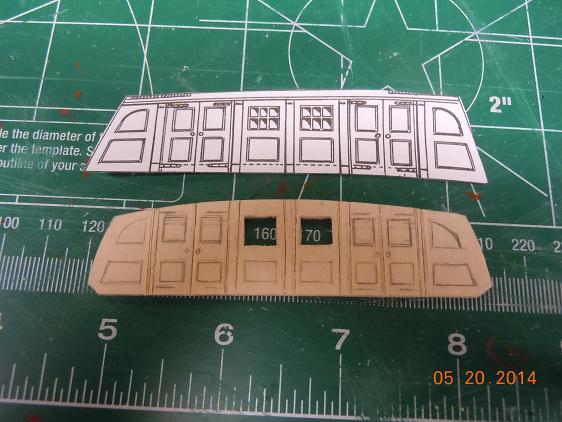
Next came the wall to the officers quarters. This step isn't even in the instructions. Again, IMO, very important to do this wall before planking the back upper deck. Why, because you have to be able to take this wall in and out of position as you are trying to fit it. Of course, the drawing from the plans did not fit my ship so I had to cut, sand, fit, sand, fit and repeat until the wall fit properly in it's spot. Had I decked the upper level I would have had a hell of a time trying to push out the wall between fittings. Here is the first step, and as you can see, the drawing and actual wall are not the same size. The fun/challenge of a wood model/kit.
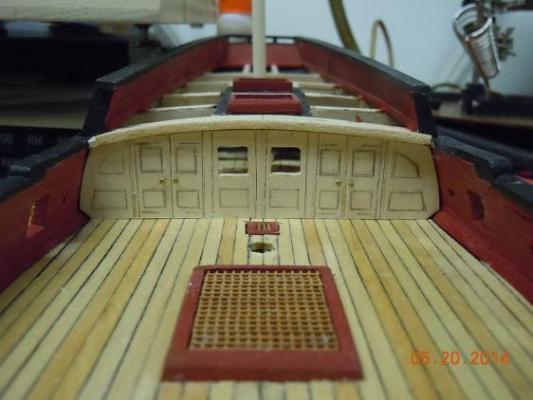
Here is how the wall will fit after a long time of fiting and sanding. Make sure to cut out the bottom corner to allow for the decking edge.
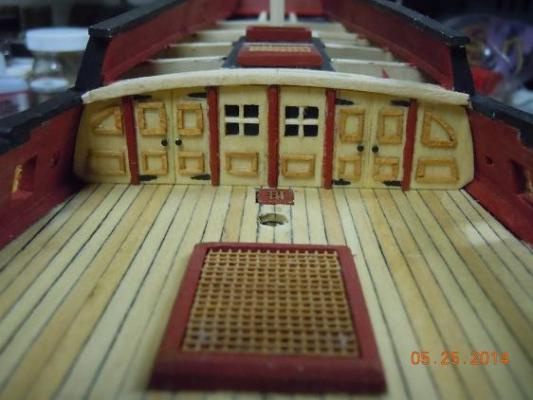
And here is the finished wall. I used cherry molding instead of cutting into the wall. My preference. Since this step is not in the instructions I don't think anyone's method is "the right" method. I just like the look of stained wood. You will notice that I put red support beams in there. Using my imagination again, I figured the removable wall pieces had to hook into something stable and what else would one use to hold up the beam that arches over the top, making the poop deck stable. Not sure if it is historically accurate, but I like the way it turned out. Now that this is done and glued in, it is time to start on the poop deck's flooring.
- russ, MarisStella.hr, WackoWolf and 3 others
-
 6
6
-
Russ, you are so right. When I make my Niagara, I will be doing the decking first. Thanks guys.
-
HwereDear log,
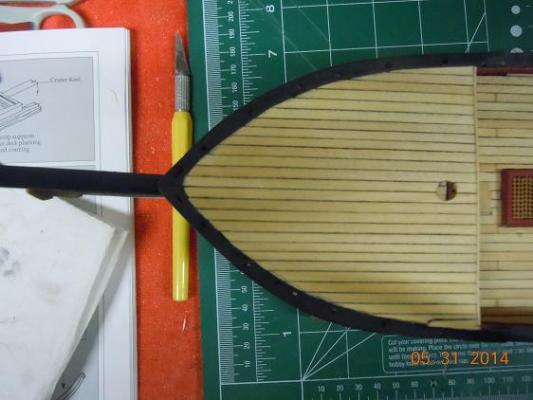
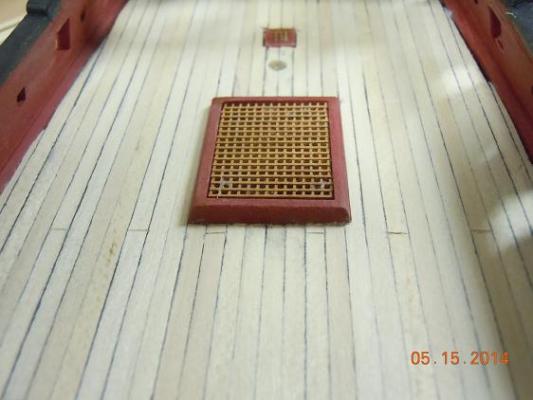
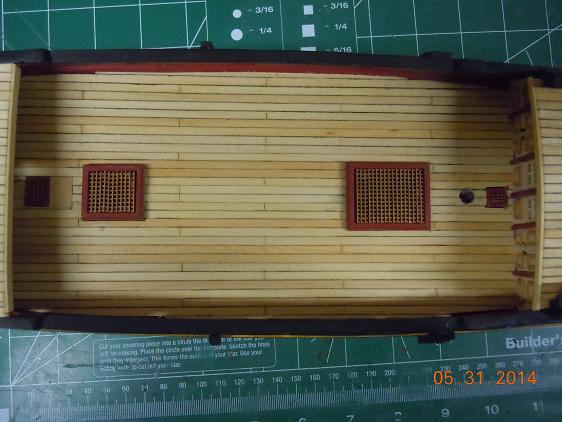
The following is the work done so far for the decking. Decking was so much easier than the planking but it still had a few challenges. Though I opted to put in the hatches before the decking, that choice did cause a few problems. First, the plans' drawings of the hatches were not right on. If I was to do this again I would do all of the decking first and then put on the hatches. The problem was that the hatches were not sized to the planks, thus I had to do a little fitting of the planks "around" the hatches. This caused a little bit of a problem laying the planks up by the bow. Granted most people probably won't see this, I know it's there. For those of you following, I would suggest that you measure out or lay out planks on a flat surface first and then make you hatches fit withing the decking planks. Go the full width of the deck planking, not half way. It will just make the lines cleaner.
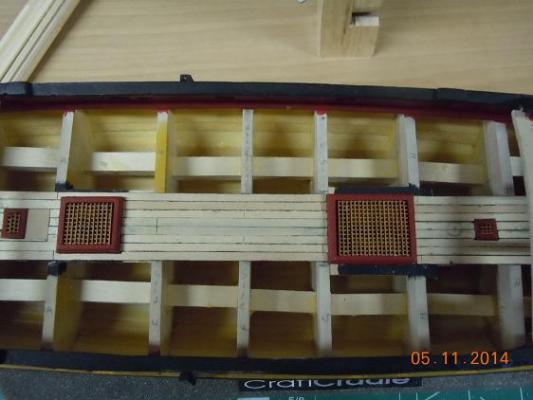
Here is what I am talking about for the hatches and deck planking.
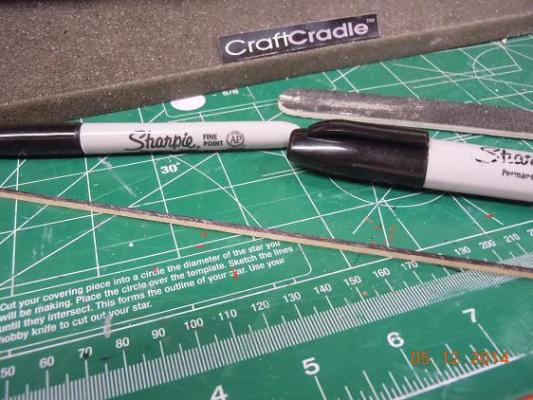
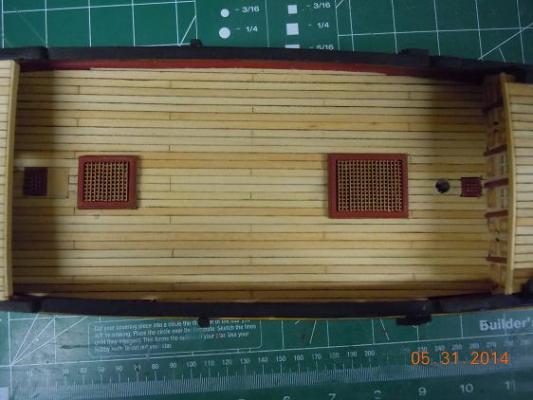
Some people use pencils, some use colored glue, some use artists charcoal. I first tried the charcoal but I found that it often rubbed off on my fingers and I ended up chalking the top of the deck. So I used sharpies to color the side. I used the finer point sharpied to color the top edge of the wood and the fatter one to color the sides. If you follow this, pay attention to just ink the edge of the plank, right were the horizontal and verticle sides meet.
I'm pretty happy with the decking. The sharpie seemed to work pretty well for me. I even managed to put in the deck section cuts. I used a flat edge exacto blade as I did each plank. I don't suggest you try to cut the pieces after you put in all of the planks. You could end up cutting into the plank next to it.
- MarisStella.hr, sport29652, MEDDO and 2 others
-
5
-
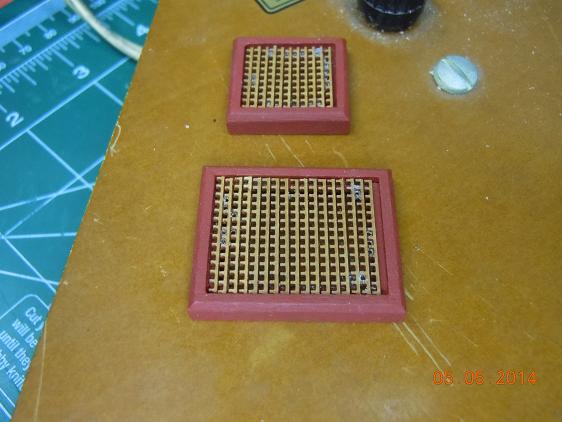
I'm just going to purchase some more gratings. No biggy. The edges I simply used a large emery board and files it down to the size I wanted.
-
Moving on to the next step, the decking. First was to make the grating covers and other covers and doors. Below was my progress. The worst part about this step was the lack of instructions and suggested wood sizes to use. The instructions said to use scrap wood, which was not a problem, except, which size scap? So I took my best guess and went for it. Hopefully I won't regret it. The other sad part. I ran out of pre-cut grating before I got to my last one. Now I have to order more

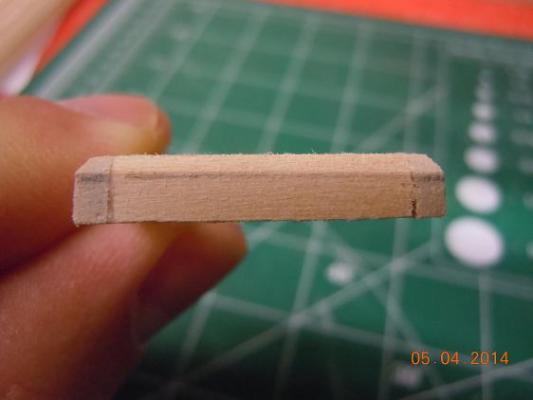
I added a little angle to the top side of the grate walls. I thought it would look better than a simple cut piece of wood.
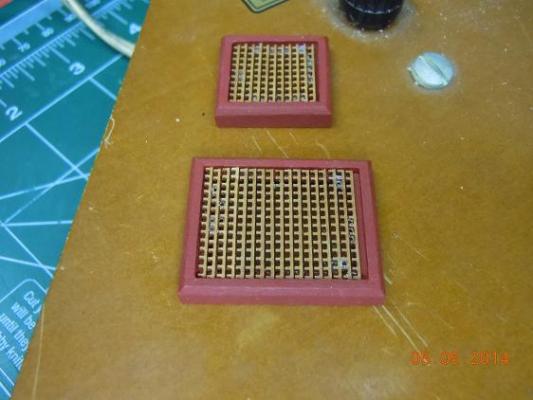
And finished with two of the three grates. Yeah, I have a little super glue cleaning up to do.
-
Brian,
I had to purchase a cutting wheel for my drummel and straight blades for my X-acto knife. On my last page I showed the cut out. Then I simply ran the cut out portion of the blade over the wood several times until I got the cut.


Frigate Essex by Rafine - FINISHED - Model Shipways - Kitbashed
in - Kit build logs for subjects built from 1751 - 1800
Posted
Very well done. Nice sharp lines and staining of that wood.