


Captain Al
-
Posts
613 -
Joined
-
Last visited
Reputation Activity
-

 Captain Al got a reaction from RichieG in Mayflower by RichieG - Model Shipways MS2020
Thanks RG. You've pretty much confirmed that if I've been doing anything wrong its been trying to get through the cut in too few passes and maybe with an old "dull" blade. They never seem dull to the touch. Like you I have #11s cause they are the most common and I keep them in the holder til I can pick my teeth with them safely. I just saw them for sale on Micro Mark.com 100 for $21. For this next build I'm going to invest in these and leave no doubt that my blades are sharp.
-
Captain Al got a reaction from RichieG in Mayflower by RichieG - Model Shipways MS2020
What type of blade (for exacto type knife) do you think is best for getting laser cut parts off of their sheets? For me this is the most trying of exercises. Maybe my blades haven't been sharp enough? Its really frustrating to break one of those tiny pieces that seem to have more tab left on them then they are in size.
-
Captain Al got a reaction from RichieG in Mayflower by RichieG - Model Shipways MS2020
Well no harm no foul as they say.
Way back when I was making Bounty's launch I experimented with making some fast and simple oar locks..... I snipped off the end of a Starbucks wooden stirrer which is a half round, and used a round file to file the inside of the half circle into a horseshoe shape. I stopped short of figuring out how to get this oarlock on to the boat's gunwales. Instead I filed notches into the bulwarks. But the half rounds looked good albeit probably way out of scale.
-
 Captain Al got a reaction from Captain Poison in HMS Bounty by Captain Al - FINISHED - Artesania Latina - Scale 1:48
So here I am almost 4 years into this project and 2 1/2 since I posted last. Lots of water under the keel so to speak, including long dry spells (working on the model) during which time I was either not inspired, very confused or doing chemotherapy. To be honest, the chemo was the least of my hurdles in so far as progress on the model was concerned.
I reached the masting and rigging point and found that I was spending much more time doing research and looking at pictures in books and on the net. It was then that I learned two things: (1) when it comes to masting and rigging it pays to know what you're doing before you start. By this I mean you should be thoroughly grounded in the terminology and be able to read the rigging plans so that you know when you strop on a block what line its for and where it will start and end. Clearly on a ship like Bounty that would take alot of experience and reading and that wasn't what I signed up for. (2) For the first time I really understood what some people meant when they said this kit was too advanced for a first time builder. I had muddled through everything up to this point, making adjustments and masking over mistakes in the woodworking phases. I really enjoyed doing that and worried little about mistakes. Even the hull planking, which some others dred, came out pretty well, albeit with tons of time and lots of glue and clamps.
Anyway, to make a long story short, when I realized I was in over my head with the masts and rigging I decided to build just far enough that the model would look nautical (though not precisely so) and (to the inexperienced eye) kind of complicated. I was looking for ways do more by doing less. I didn't want to leave it with just bare poles sticking up from the finished deck. So I've done all the lower shrouds, ratlines, platforms etc. Then I did most of the standing rigging. But I found of course that without upper masts there was no place for some of the stays to start or to end. So I began really to improvise. As I progressed I used my own sailing knowledge for some of the lines. In the end I accomplished what I set out to -- I finished the masts and rigging to a point where it looks visually like masts and rigging that are in process. I never did expect to put sails on so that's as far as I needed to go to feel I had finished the job.
I've spent the last month working on details and here's where the fun comes. I used up most of the stuff A.L. provided (barrels, cotton bales, etc.) but there was still lots of room down below. So I began to sort of paint a picture of what would be going on down there. I added ballast rock, wood and chain bins, rolled hammocks, a ship's wright compartment with a yard being prepared for install, along with a set of trestle and cross trees and a mast cap that the carpenter would have been fitting out (or repairing). A sea chest for tools and a bench rounded out that cabin.
Above deck I did alot of little things that hopefully give life and authenticity to the build. Coiled ropes, water barrels (lashed to stanchions), a hanging bucket and mop. Fun things; many of which were just done spontaneously and simply.
Nothing left but to build a stand for it. The pedestal type fittings that came in the kit need to be prepped for when the hull can be turned upside down. At this stage in my build that isn't going to happen (I hope). So I'll probably build a cradle type stand. Then a plexiglass case (I can't believe the cost of plexiglass -- another reason that this will be the last of this size I build and another reason why not finishing the masts etc. was probably a good thing). Tip to all the A.L. Bounty builders: make sure you have some where to put the darn thing when its done.
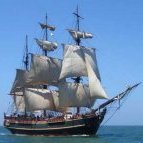
Here's a couple sample pictures to end this build log. A full set of pix can be found in the Gallery section.
-
 Captain Al got a reaction from thomaslambo in HMS Bounty by Captain Al - FINISHED - Artesania Latina - Scale 1:48
Thanks guys for the kudos. I was really a learning process from start to "finish." Often times I just went on the theory that if there's a will there's a way. Planking the hull as a good example.
-
Captain Al got a reaction from RichieG in Mayflower by RichieG - Model Shipways MS2020
Quick comment on oar locks. Some possibilties are: 1. notches filed into the bulwarks, 2. eyebolts, 3. (better -- eyebolts with the tops snipped off. You can get more sophisticated especially if you want to solder. These must be pretty tiny. Were they brass (bronze?) on the real thing?
Are you a medical professional RG? I've wanted to get a hold of a real syringe for some time but can't find one. They do come in handy here and there.
-
Captain Al got a reaction from RichieG in Mayflower by RichieG - Model Shipways MS2020
Have you considered just a finish to the natural wood? I like a couple coats of lacquer when all I want to do is bring out the natural color of whatever wood I'm using.
BTW, on a more theoretical or hypothetical question....when you are building a model, are you envisioning the ship as it would really be (for example, out at sea doing its thing) or is it more an artist's rendition of the ship as it was designed? I like to think of models as working models not as museum pieces in absolute pristine condition. This may be my rationalization for not always cleaning things up and leaving "salt deposits" on the deck. But sometimes those little defects can be quite life like. There was a model of the longboat from Old Man and the Sea that really captured the feel of the skiff after the beating it had taken. I guess this topic then takes us to the various techniques of aging wood and metal to obtain that desired worn in look. I didn't do any of that on my last build but on Mayflower I don't want shiny brass fittings so I'm intending to start working on this aspect. Have you found a technique you like for darkening brass?
-
 Captain Al got a reaction from cristikc in HMS Bounty by Captain Al - FINISHED - Artesania Latina - Scale 1:48
So here I am almost 4 years into this project and 2 1/2 since I posted last. Lots of water under the keel so to speak, including long dry spells (working on the model) during which time I was either not inspired, very confused or doing chemotherapy. To be honest, the chemo was the least of my hurdles in so far as progress on the model was concerned.
I reached the masting and rigging point and found that I was spending much more time doing research and looking at pictures in books and on the net. It was then that I learned two things: (1) when it comes to masting and rigging it pays to know what you're doing before you start. By this I mean you should be thoroughly grounded in the terminology and be able to read the rigging plans so that you know when you strop on a block what line its for and where it will start and end. Clearly on a ship like Bounty that would take alot of experience and reading and that wasn't what I signed up for. (2) For the first time I really understood what some people meant when they said this kit was too advanced for a first time builder. I had muddled through everything up to this point, making adjustments and masking over mistakes in the woodworking phases. I really enjoyed doing that and worried little about mistakes. Even the hull planking, which some others dred, came out pretty well, albeit with tons of time and lots of glue and clamps.
Anyway, to make a long story short, when I realized I was in over my head with the masts and rigging I decided to build just far enough that the model would look nautical (though not precisely so) and (to the inexperienced eye) kind of complicated. I was looking for ways do more by doing less. I didn't want to leave it with just bare poles sticking up from the finished deck. So I've done all the lower shrouds, ratlines, platforms etc. Then I did most of the standing rigging. But I found of course that without upper masts there was no place for some of the stays to start or to end. So I began really to improvise. As I progressed I used my own sailing knowledge for some of the lines. In the end I accomplished what I set out to -- I finished the masts and rigging to a point where it looks visually like masts and rigging that are in process. I never did expect to put sails on so that's as far as I needed to go to feel I had finished the job.
I've spent the last month working on details and here's where the fun comes. I used up most of the stuff A.L. provided (barrels, cotton bales, etc.) but there was still lots of room down below. So I began to sort of paint a picture of what would be going on down there. I added ballast rock, wood and chain bins, rolled hammocks, a ship's wright compartment with a yard being prepared for install, along with a set of trestle and cross trees and a mast cap that the carpenter would have been fitting out (or repairing). A sea chest for tools and a bench rounded out that cabin.
Above deck I did alot of little things that hopefully give life and authenticity to the build. Coiled ropes, water barrels (lashed to stanchions), a hanging bucket and mop. Fun things; many of which were just done spontaneously and simply.
Nothing left but to build a stand for it. The pedestal type fittings that came in the kit need to be prepped for when the hull can be turned upside down. At this stage in my build that isn't going to happen (I hope). So I'll probably build a cradle type stand. Then a plexiglass case (I can't believe the cost of plexiglass -- another reason that this will be the last of this size I build and another reason why not finishing the masts etc. was probably a good thing). Tip to all the A.L. Bounty builders: make sure you have some where to put the darn thing when its done.
Here's a couple sample pictures to end this build log. A full set of pix can be found in the Gallery section.
-
 Captain Al got a reaction from Grendel in HMS Bounty by Captain Al - FINISHED - Artesania Latina - Scale 1:48
Thanks guys for the kudos. I was really a learning process from start to "finish." Often times I just went on the theory that if there's a will there's a way. Planking the hull as a good example.
-
Captain Al got a reaction from cristikc in HMS Bounty by Captain Al - FINISHED - Artesania Latina - Scale 1:48
Thinking forward a bit I realize I probably need to change course and work on getting my channels in order and make up some deadeye chain arrangement. There isn't much more to put on this mizzen lower mast before I fit it to the boat, and I'll need to do that so I can loop the shrouds over them and put the chains in the proper angle. So I'll set aside the mast until I have the chains made up and the channel fixed.
Recall that I already drilled holes in the channels for the deadeye chain plates. But having drilled them too far inboard, I'm faced with either filling and redrilling holes, or filling the holes and cutting slots in the channel edges to slip the chain into. I've decided to do the slots as I don't like the size of the holes that would be needed to insert the chains that I want to make. Besides, slots are more authentic. They'll be covered with a closure strip of 1.5mm x 5. The process of cutting these slots is pretty straightforward other than lining them up with the angle the shrouds will take up to the mast head. I'll get that angle and then use a razor saw to cut the opening (maybe have to sand or file them a bit wider than the saw blade kerf, but I don't know that yet).
I've been worried about knocking the channels off as I sawed the slots, so I've rigged up a bit of a bracing system to hold the channels rigid while I make the cuts. Much better I think than my fingers. See pix below.
-
 Captain Al got a reaction from Mike Dowling in HMS Bounty by Captain Al - FINISHED - Artesania Latina - Scale 1:48
Thanks guys for the kudos. I was really a learning process from start to "finish." Often times I just went on the theory that if there's a will there's a way. Planking the hull as a good example.
-
Captain Al got a reaction from Grendel in HMS Bounty by Captain Al - FINISHED - Artesania Latina - Scale 1:48
I think I labeled the build (in the Gallery at least) as 3/4 complete. Never said it was complete. No offense taken by any commentary.
-
Captain Al got a reaction from Grendel in HMS Bounty by Grendel - Artesania Latina - Scale 1:48
I just posted my pix under Gallery. Much easier than posting under a build log. I never have learned how to caption a photo in the build log. As for tips on planking, I'll be happy to help but it will be coming from a strict amateur. For real technique see thomaslambo's work. I'm not sure if he's posted pix of his planking work yet but it is exquisite and done the right way.
-
Captain Al got a reaction from RichieG in Mayflower by RichieG - Model Shipways MS2020
Building the Bounty launch and jolly boat were definitely unique projects each with their own unique wants and needs. I did them while other pieces and parts were drying. I'm looking forward to this little one as well.
Regarding CA glue... yeah there are definitely some good uses for it but I agree that its best avoided. I found that the best use (and from here on possibly the only use) was to put a tiny drop on a knot when it was imperative that tension remained and there was no time for white glue to dry. I see where Chuck P. (easier than trying to remember how not to spell it; ) suggests the same use in this Mayflower practicum. But I also learned from Danny Vadas that a mess of diluted white glue is much better for securing coils and such. It dries totally clear no matter how much you apply and leaves the "ropes" looking very nautical and nice. And like Johnny Bench says, "it won't make you stink."
Quick note on technique for dropping a wee tiny bit of CA where you need it. I use a sawed off sewing needle (saw through the eye to make a two prong hayfork) and I put a drop of the CA onto a piece of aluminium foil. The I touch the fork to the drop and touch the wet fork to the part or knot.
-
 Captain Al got a reaction from Tigersteve in Mayflower by RichieG - Model Shipways MS2020
Hi Richie, this is Capt. Al calling....I just bought the Mayflower MS2020 kit from Model Expo. It should arrive soon as John said it would be shipped out today. I'm praying that I don't have all those warped pieces of ply that you did, but just in case may I ask if the email you wrote to (jgarcia etc etc) is John who I talked to on the phone this morning? Are the people at Model Expo the same as those at Model Shipworld who I believe are the actual manufacturers of this kit.
You haven't specifically mentioned using the instructions written by Chuck Pissaro. Did your kit come with those? This was a big reason I went with this kit as I've seen the "practicum" on line and its alot more complete and understandable than any instructions I've seen. So I wonder if you have those and plan to follow along with them pretty closely.
I'll be following your build closely. So far it appears your doing a great job.
-
Captain Al got a reaction from RichieG in Mayflower by RichieG - Model Shipways MS2020
Two further questions I forgot to include in my last post....
Would it be very difficult to cut new pieces on a scroll saw rather than rely on replacement parts to be good?
Second question relates to building up the small boat from lifts. This is the same process I used on my Bounty's launch. When it came down to the lowest lift, the keel basically, the bottom was completely flat except for the edges that were faired into the upper hull or lifts. Some people on this site when they saw it thought it was wrong to be a flat bottomed boat. I couldn't think of any way around that. I added a keel strip and that's how it remains to this day. Is that how you envision the Mayflower launch? As a flat bottom? Or do you have a way to sand/curve the bottom into a more U or V shape bottom? That last lift would have to be pretty thick to do that and if I'm not mistaken (from what I see above) its no thicker than all the other lifts.
-
Captain Al got a reaction from RichieG in Mayflower by RichieG - Model Shipways MS2020
Thanks Richie. You've answered all my Qs for the time being. I do have a scroll saw and do pretty good work on it so maybe (if necessary) I will go that route. Let's see how your replacements come and how long it takes. I've not dealt with Model Shipways except for ordering small stuff on-line so its new to me. My first and only kit was Artisiana Latina in Spain and forget any customer service from them.
I agree that the bottom of the rowboat is pretty flat. Its just like the one I did on Bounty. I was just curious seeing as I had rec'd some commentary to the contrary. My chocks on the Bounty launch also matched the flat bottom so that's all the proof i need.
Now, as far as going slow and me getting ahead of you....that's not going to happen. My Bounty build took 3 1/2 years to "complete" and I didn't really finish it properly. Alot of the issues I had with that build at the start were caused by my impatience to get things done. I wasn't aware enough of how a mm here and there can affect things downstream. And I totally made due with tools I'd collected over the years. So this time around my plan is to go really slow and do it right and not have to do alot of fixing and adjusting. But we will be close and it should be alot of fun. I have several other Mayflower build logs to look over before my kit arrives. I've also read the Chuck Pissaro instructions on-line already. Other than cleaning out my work space and storing excess Bounty materials, I'm ready to go.
-
 Captain Al got a reaction from Ryland Craze in HMS Bounty by Captain Al - FINISHED - Artesania Latina - Scale 1:48
So here I am almost 4 years into this project and 2 1/2 since I posted last. Lots of water under the keel so to speak, including long dry spells (working on the model) during which time I was either not inspired, very confused or doing chemotherapy. To be honest, the chemo was the least of my hurdles in so far as progress on the model was concerned.
I reached the masting and rigging point and found that I was spending much more time doing research and looking at pictures in books and on the net. It was then that I learned two things: (1) when it comes to masting and rigging it pays to know what you're doing before you start. By this I mean you should be thoroughly grounded in the terminology and be able to read the rigging plans so that you know when you strop on a block what line its for and where it will start and end. Clearly on a ship like Bounty that would take alot of experience and reading and that wasn't what I signed up for. (2) For the first time I really understood what some people meant when they said this kit was too advanced for a first time builder. I had muddled through everything up to this point, making adjustments and masking over mistakes in the woodworking phases. I really enjoyed doing that and worried little about mistakes. Even the hull planking, which some others dred, came out pretty well, albeit with tons of time and lots of glue and clamps.
Anyway, to make a long story short, when I realized I was in over my head with the masts and rigging I decided to build just far enough that the model would look nautical (though not precisely so) and (to the inexperienced eye) kind of complicated. I was looking for ways do more by doing less. I didn't want to leave it with just bare poles sticking up from the finished deck. So I've done all the lower shrouds, ratlines, platforms etc. Then I did most of the standing rigging. But I found of course that without upper masts there was no place for some of the stays to start or to end. So I began really to improvise. As I progressed I used my own sailing knowledge for some of the lines. In the end I accomplished what I set out to -- I finished the masts and rigging to a point where it looks visually like masts and rigging that are in process. I never did expect to put sails on so that's as far as I needed to go to feel I had finished the job.
I've spent the last month working on details and here's where the fun comes. I used up most of the stuff A.L. provided (barrels, cotton bales, etc.) but there was still lots of room down below. So I began to sort of paint a picture of what would be going on down there. I added ballast rock, wood and chain bins, rolled hammocks, a ship's wright compartment with a yard being prepared for install, along with a set of trestle and cross trees and a mast cap that the carpenter would have been fitting out (or repairing). A sea chest for tools and a bench rounded out that cabin.
Above deck I did alot of little things that hopefully give life and authenticity to the build. Coiled ropes, water barrels (lashed to stanchions), a hanging bucket and mop. Fun things; many of which were just done spontaneously and simply.
Nothing left but to build a stand for it. The pedestal type fittings that came in the kit need to be prepped for when the hull can be turned upside down. At this stage in my build that isn't going to happen (I hope). So I'll probably build a cradle type stand. Then a plexiglass case (I can't believe the cost of plexiglass -- another reason that this will be the last of this size I build and another reason why not finishing the masts etc. was probably a good thing). Tip to all the A.L. Bounty builders: make sure you have some where to put the darn thing when its done.
Here's a couple sample pictures to end this build log. A full set of pix can be found in the Gallery section.
-
 Captain Al got a reaction from Steve 12345 in HMS Bounty by Captain Al - FINISHED - Artesania Latina - Scale 1:48
I think I labeled the build (in the Gallery at least) as 3/4 complete. Never said it was complete. No offense taken by any commentary.
-
 Captain Al got a reaction from AntonyUK in HMS Bounty by Captain Al - FINISHED - Artesania Latina - Scale 1:48
So here I am almost 4 years into this project and 2 1/2 since I posted last. Lots of water under the keel so to speak, including long dry spells (working on the model) during which time I was either not inspired, very confused or doing chemotherapy. To be honest, the chemo was the least of my hurdles in so far as progress on the model was concerned.
I reached the masting and rigging point and found that I was spending much more time doing research and looking at pictures in books and on the net. It was then that I learned two things: (1) when it comes to masting and rigging it pays to know what you're doing before you start. By this I mean you should be thoroughly grounded in the terminology and be able to read the rigging plans so that you know when you strop on a block what line its for and where it will start and end. Clearly on a ship like Bounty that would take alot of experience and reading and that wasn't what I signed up for. (2) For the first time I really understood what some people meant when they said this kit was too advanced for a first time builder. I had muddled through everything up to this point, making adjustments and masking over mistakes in the woodworking phases. I really enjoyed doing that and worried little about mistakes. Even the hull planking, which some others dred, came out pretty well, albeit with tons of time and lots of glue and clamps.
Anyway, to make a long story short, when I realized I was in over my head with the masts and rigging I decided to build just far enough that the model would look nautical (though not precisely so) and (to the inexperienced eye) kind of complicated. I was looking for ways do more by doing less. I didn't want to leave it with just bare poles sticking up from the finished deck. So I've done all the lower shrouds, ratlines, platforms etc. Then I did most of the standing rigging. But I found of course that without upper masts there was no place for some of the stays to start or to end. So I began really to improvise. As I progressed I used my own sailing knowledge for some of the lines. In the end I accomplished what I set out to -- I finished the masts and rigging to a point where it looks visually like masts and rigging that are in process. I never did expect to put sails on so that's as far as I needed to go to feel I had finished the job.
I've spent the last month working on details and here's where the fun comes. I used up most of the stuff A.L. provided (barrels, cotton bales, etc.) but there was still lots of room down below. So I began to sort of paint a picture of what would be going on down there. I added ballast rock, wood and chain bins, rolled hammocks, a ship's wright compartment with a yard being prepared for install, along with a set of trestle and cross trees and a mast cap that the carpenter would have been fitting out (or repairing). A sea chest for tools and a bench rounded out that cabin.
Above deck I did alot of little things that hopefully give life and authenticity to the build. Coiled ropes, water barrels (lashed to stanchions), a hanging bucket and mop. Fun things; many of which were just done spontaneously and simply.
Nothing left but to build a stand for it. The pedestal type fittings that came in the kit need to be prepped for when the hull can be turned upside down. At this stage in my build that isn't going to happen (I hope). So I'll probably build a cradle type stand. Then a plexiglass case (I can't believe the cost of plexiglass -- another reason that this will be the last of this size I build and another reason why not finishing the masts etc. was probably a good thing). Tip to all the A.L. Bounty builders: make sure you have some where to put the darn thing when its done.
Here's a couple sample pictures to end this build log. A full set of pix can be found in the Gallery section.
-
Captain Al got a reaction from thomaslambo in HMS Bounty by Grendel - Artesania Latina - Scale 1:48
I just posted my pix under Gallery. Much easier than posting under a build log. I never have learned how to caption a photo in the build log. As for tips on planking, I'll be happy to help but it will be coming from a strict amateur. For real technique see thomaslambo's work. I'm not sure if he's posted pix of his planking work yet but it is exquisite and done the right way.
-
Captain Al got a reaction from thomaslambo in HMS Bounty by Grendel - Artesania Latina - Scale 1:48
Great work Grendel. I'm amazed at how smoothly things are going for you. Unless of course you've not mentioned the tons of "adjustments" that were made. I will assume that the precision in which you are planning and working things out in advance is responsible for this smooth going. I wish i had paid more attention to things like frame leveling before I ran into the problems I did. Anyway, I wanted to say congratulations; the hard part is done and the fun (planking and rigging) are ahead. Take this with a grain of salt. I just "finished" my build and will post some photos in my log soon. I will explain the quote marks at that time. LOL.
-
 Captain Al got a reaction from Keith_W in HMS Bounty by Captain Al - FINISHED - Artesania Latina - Scale 1:48
So here I am almost 4 years into this project and 2 1/2 since I posted last. Lots of water under the keel so to speak, including long dry spells (working on the model) during which time I was either not inspired, very confused or doing chemotherapy. To be honest, the chemo was the least of my hurdles in so far as progress on the model was concerned.
I reached the masting and rigging point and found that I was spending much more time doing research and looking at pictures in books and on the net. It was then that I learned two things: (1) when it comes to masting and rigging it pays to know what you're doing before you start. By this I mean you should be thoroughly grounded in the terminology and be able to read the rigging plans so that you know when you strop on a block what line its for and where it will start and end. Clearly on a ship like Bounty that would take alot of experience and reading and that wasn't what I signed up for. (2) For the first time I really understood what some people meant when they said this kit was too advanced for a first time builder. I had muddled through everything up to this point, making adjustments and masking over mistakes in the woodworking phases. I really enjoyed doing that and worried little about mistakes. Even the hull planking, which some others dred, came out pretty well, albeit with tons of time and lots of glue and clamps.
Anyway, to make a long story short, when I realized I was in over my head with the masts and rigging I decided to build just far enough that the model would look nautical (though not precisely so) and (to the inexperienced eye) kind of complicated. I was looking for ways do more by doing less. I didn't want to leave it with just bare poles sticking up from the finished deck. So I've done all the lower shrouds, ratlines, platforms etc. Then I did most of the standing rigging. But I found of course that without upper masts there was no place for some of the stays to start or to end. So I began really to improvise. As I progressed I used my own sailing knowledge for some of the lines. In the end I accomplished what I set out to -- I finished the masts and rigging to a point where it looks visually like masts and rigging that are in process. I never did expect to put sails on so that's as far as I needed to go to feel I had finished the job.
I've spent the last month working on details and here's where the fun comes. I used up most of the stuff A.L. provided (barrels, cotton bales, etc.) but there was still lots of room down below. So I began to sort of paint a picture of what would be going on down there. I added ballast rock, wood and chain bins, rolled hammocks, a ship's wright compartment with a yard being prepared for install, along with a set of trestle and cross trees and a mast cap that the carpenter would have been fitting out (or repairing). A sea chest for tools and a bench rounded out that cabin.
Above deck I did alot of little things that hopefully give life and authenticity to the build. Coiled ropes, water barrels (lashed to stanchions), a hanging bucket and mop. Fun things; many of which were just done spontaneously and simply.
Nothing left but to build a stand for it. The pedestal type fittings that came in the kit need to be prepped for when the hull can be turned upside down. At this stage in my build that isn't going to happen (I hope). So I'll probably build a cradle type stand. Then a plexiglass case (I can't believe the cost of plexiglass -- another reason that this will be the last of this size I build and another reason why not finishing the masts etc. was probably a good thing). Tip to all the A.L. Bounty builders: make sure you have some where to put the darn thing when its done.
Here's a couple sample pictures to end this build log. A full set of pix can be found in the Gallery section.
-
Captain Al got a reaction from Grendel in HMS Bounty by Grendel - Artesania Latina - Scale 1:48
Great work Grendel. I'm amazed at how smoothly things are going for you. Unless of course you've not mentioned the tons of "adjustments" that were made. I will assume that the precision in which you are planning and working things out in advance is responsible for this smooth going. I wish i had paid more attention to things like frame leveling before I ran into the problems I did. Anyway, I wanted to say congratulations; the hard part is done and the fun (planking and rigging) are ahead. Take this with a grain of salt. I just "finished" my build and will post some photos in my log soon. I will explain the quote marks at that time. LOL.