

Mike 41
-
Posts
439 -
Joined
-
Last visited
Reputation Activity
-


-
 Mike 41 got a reaction from mcpwilk in HMS Beagle 1820 by Mike 41 - 1:48 scale - Cherokee-class brig-sloop
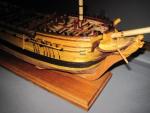
The bow was looking awful plain so I added the bowsprit and gammoning, false rail, naval hood, wash cant, lower and main rails, and bumpkins. This is a few photos of the installation.
-
Mike 41 reacted to 72Nova in HMY Fubbs 1682 by Mike 41 - FINISHED - Weasel Works – Stern Section – 1:24
A very unique looking model, love it!, especially the flooring👍
Michael D.
-
Mike 41 reacted to BANYAN in HMY Fubbs 1682 by Mike 41 - FINISHED - Weasel Works – Stern Section – 1:24
Hi Mike, sorry I missed your build here. That section model looks great- very nicely done.,
cheers
Pat
-
 Mike 41 got a reaction from CiscoH in HMY Fubbs 1682 by Mike 41 - FINISHED - Weasel Works – Stern Section – 1:24
Mizzen Mast, Channels and Lantern
The last remaining items were added to the model. The display stand will be next.
Progress photos:
-
Mike 41 got a reaction from CiscoH in HMY Fubbs 1682 by Mike 41 - FINISHED - Weasel Works – Stern Section – 1:24
All the carvings are CNC carved boxwood. This is a few photos of the starboard installation.
-
Mike 41 got a reaction from CiscoH in HMY Fubbs 1682 by Mike 41 - FINISHED - Weasel Works – Stern Section – 1:24
Stern Décor.
The stern decorations were easy to install after a few hours of cleaning and painting.
This is a few photos of the stern décor.
-
Mike 41 got a reaction from CiscoH in HMY Fubbs 1682 by Mike 41 - FINISHED - Weasel Works – Stern Section – 1:24
Stern Décor.
This is a few photos of the model before the addition of the stern decorations.
-
Mike 41 got a reaction from CiscoH in HMY Fubbs 1682 by Mike 41 - FINISHED - Weasel Works – Stern Section – 1:24
Cap Rail and Bulkhead Break
The cap rail with gold molding was added next. The bulkhead break pieces were precision laser cut and fit very well.
-
Mike 41 got a reaction from CiscoH in HMY Fubbs 1682 by Mike 41 - FINISHED - Weasel Works – Stern Section – 1:24
Tiller
This is a few photos of the tiller installation.
-
Mike 41 got a reaction from CiscoH in HMY Fubbs 1682 by Mike 41 - FINISHED - Weasel Works – Stern Section – 1:24
Rudder
The rudder consists of five CNC cut pieces that fit very well together very well. The rudder and stern post needed to be beveled at 45 degrees and the top of the rudder needed to be trimmed and shaped at the poop deck.
Progress photos.
-
Mike 41 got a reaction from CiscoH in HMY Fubbs 1682 by Mike 41 - FINISHED - Weasel Works – Stern Section – 1:24
Settee
The settee was built next. The construction is fairly simple. This is a few photos of the assembly.
-
Mike 41 got a reaction from CiscoH in HMY Fubbs 1682 by Mike 41 - FINISHED - Weasel Works – Stern Section – 1:24
Poop Deck
The poop deck clamps were installed next.
The deck framing was constructed in three sections to allow viewing of the great cabin interior.
The bulkhead break was assembled and set in place to verify elevations.
Progress photos:
-
Mike 41 got a reaction from CiscoH in HMY Fubbs 1682 by Mike 41 - FINISHED - Weasel Works – Stern Section – 1:24
Great Cabin Paneling
The great cabin paneling is cherry with lines etched to represent individual boards. The five panels were easy to install. I used a router bit in a Dremel tool to cut the window openings, it was fast and required using a file for cleanup work.
Progress photos
-
Mike 41 got a reaction from CiscoH in HMY Fubbs 1682 by Mike 41 - FINISHED - Weasel Works – Stern Section – 1:24
MikeS reminded me I should not have glued the floor in place before the exterior planking so it would not get dirty with sawdust. No damage was done, just some extra work.
Exterior Planking
The exterior planking is typical with the exception of a slot for the main and mizzen masts channels. The planking is Maple, and the wales and channel filler pieces are Walnut which makes a nice contrast.
Progress photos.
-
Mike 41 got a reaction from CiscoH in HMY Fubbs 1682 by Mike 41 - FINISHED - Weasel Works – Stern Section – 1:24
Quarterdeck Framing
A small section of the quarterdeck for the entre to the great cabin. I glued the floor in
place and trimmed the frames.
-
Mike 41 got a reaction from CiscoH in HMY Fubbs 1682 by Mike 41 - FINISHED - Weasel Works – Stern Section – 1:24
Great Cabin Floor.
This post shows the placement of the mast step, interior lining of the stern timbers and placement of the great cabin floor. The floor has not been attached to the deck clamps until the support columns art in place.
Progress photos:
-
Mike 41 got a reaction from CiscoH in HMY Fubbs 1682 by Mike 41 - FINISHED - Weasel Works – Stern Section – 1:24
Kellson & Waterway Limber Boards.
The keelson was soaked in hot water and bent to fit the curvature of the frames. I used glue and brass wire pins to secure the keelson to the frames. The limber boards were soaked in hot water and clamped to the keelson to dry. When dry I used spacers between them and the keelson and glued and pined them in place.
-
Mike 41 got a reaction from CiscoH in HMY Fubbs 1682 by Mike 41 - FINISHED - Weasel Works – Stern Section – 1:24
The Stern Framing continued.
These photos show the planking of the stern and finished framing.
-
Mike 41 got a reaction from CiscoH in HMY Fubbs 1682 by Mike 41 - FINISHED - Weasel Works – Stern Section – 1:24
The Stern Framing continued.
This is a few more progress photos of the stern.
-
Mike 41 reacted to threebs in USS New York by threebs - FINISHED - 74-gun ship of the line
Misc. stills of work on the New York.
-
Mike 41 reacted to Chuck in Sloop Speedwell 1752 by Chuck - Ketch Rigged Sloop - POF - prototype build
Finally finished up the stern details today. At least up to the point I would like to do them for this chapter.
First up was to paint the top of the transom before adding the actual carvings. I didnt have to paint all the way to the upper edge. I didnt want a painted seam to show afterwards. I also marked the lower areas so I knew where to stop the painting as well. You cant tell in the photos but its not black at all. Its a very muted brown black and even gray. I didnt want it to be too stark a black. I also dusted some blue on there as well. So much for my photo skills, LOL.
The two figures (port and starboard) were removed as they wont be added till last in this series of steps. Then the actual carved transom was glued into position. Once again this was after some initial cleanup and staining to make it match the wood color. Old masters gel stain (fruitwood) was used once again.
With the transom carving secure it was time to focus on the forward side of the carving. Basically the thickness of the carved transom is thicker port and starboard. Where it hangs over on both sides. There is a little carved detail in the center of this as well which can be seen on the contemporary model. My solution was to build up this area with two layers. The first middle layer is laser cut in boxwood. This layer was cleaned up of it laser char and then shaped a bit with some sandpaper and files. The edges were rounded off and I just had some fun with it. You can see my example being held in the clamp. You guys can do as much as you like with this piece. Photo is below. Then the most forward layer will be glued on as well. This is a resin casting.
When gluing them on you must finesse them a bit. Meaning you may have to trim some of the hull molding etc. You can fill any cracks or seams with wood filler and generally speaking try to blend them all together. The photo below shows these two layers on the model. They were glued to the forward side of the transom.
Next up was to add the columns. This is pretty straight forward. All of these pieces are laser cut for you. The tops and bottoms of the columns are 1/16" thick. They were cleaned of laser char and filed to suit. Then glued on the transom. The long fluted columns are thinner but laser cut as well. The laser char sanded from these and the each column was sanded to length for a tight fit between the tops and bottoms we just added. This takes a while to do but isnt difficult. You may also notice some molding at the base of each window. They are between the columns bases. These are laser cut too. Just remove the char and round off the top edge like a quarter round. Then glue them in.
Lastly we can put those two standing figures back where they belong. But before you do...there are tiny laser cut bases made for them. These bases or the floor...rock...the ground...whatever you would like to call them need to be shaped. They are shaped like a little step. I did this rather than incorporate them into the casting. Everybody's model is slightly different. You can customize this base so your figure fits perfect on your model. See the photo...
Just sand it free of char and file some bumps and grooves into it. Mine are hardly noticeable in the photo but they are there. Make it look like a stone or rock base. Using this keeps the nice run of the molding that wraps around the stern while covering the seams between all those layers we created. It covers up where the figures will stand while creating the correct angle for the figure to match the transom. It will be hardly visible. Shape yours to suit.
Here the figure is glued in place but not until after the tiny base was glued in position first. You can see the figure stepping on the small rock carved base. This pretty much finishes up the stern to the point where I want to be in this chapter. Its for the most part complete except for some very small features we add much much later. I think it came out rather nice considering this is a kit. But my goal was of course not to make it look kit-like at all.
The contemporary model...
-
 Mike 41 got a reaction from GrandpaPhil in HMY Fubbs 1682 by Mike 41 - FINISHED - Weasel Works – Stern Section – 1:24
Display stand / Finished Pictures
I used white oak and bloodwood for the stand and my pool table for the photos background. The Fubbs Stern Section was the largest section model I have made, three months from start to finish was possible due to the precision parts in the kit by Mike Shanks and the artwork by Jodie.
-
Mike 41 got a reaction from GrandpaPhil in HMY Fubbs 1682 by Mike 41 - FINISHED - Weasel Works – Stern Section – 1:24
Mizzen Mast, Channels and Lantern
The last remaining items were added to the model. The display stand will be next.
Progress photos:
-
Mike 41 reacted to DocBlake in Royal Yacht HMY Fubbs 1682 by DocBlake – 1:24 Scale - Stern Section
I glued up two stacks of frames: Frame 25 - Frame 30A and Frame 31 - Frame 36. I stacked these on each other. The two stacks are not glued together yet, just pinned, and I haven't started fairing the hull either.