

Mark Pearse
-
Posts
701 -
Joined
-
Last visited
Reputation Activity
-

 Mark Pearse got a reaction from GrandpaPhil in Ranger type yacht by Mark Pearse - 1:12 - SMALL
thank you all
one more shot of the boat being copied, from the stern, crossing behind Ranger, the 1933 original boat
-
 Mark Pearse got a reaction from Bedford in Ranger type yacht by Mark Pearse - 1:12 - SMALL
thank you all
one more shot of the boat being copied, from the stern, crossing behind Ranger, the 1933 original boat
-
 Mark Pearse got a reaction from KeithAug in Ranger type yacht by Mark Pearse - 1:12 - SMALL
thank you all
one more shot of the boat being copied, from the stern, crossing behind Ranger, the 1933 original boat
-
 Mark Pearse got a reaction from Jim Lad in Ranger type yacht by Mark Pearse - 1:12 - SMALL
thank you all
one more shot of the boat being copied, from the stern, crossing behind Ranger, the 1933 original boat
-
 Mark Pearse got a reaction from Jack12477 in Ranger type yacht by Mark Pearse - 1:12 - SMALL
thank you all
one more shot of the boat being copied, from the stern, crossing behind Ranger, the 1933 original boat
-
 Mark Pearse got a reaction from MAGIC's Craig in Ranger type yacht by Mark Pearse - 1:12 - SMALL
The planking is finished & I've spent a few hours sanding. This planking method (strip planking at scale) was visually messy, so it's very nice to see the hull lines start to become more visible. Although the nature of strip planks (being parallel sided), the planking lines throw the optics of the shape off a bit, as the line of the planks towards the keel don't bear much relation to the hull shape....the planking just follows the ones above with no tapering.
The stern photos show the excess hull near the transom - that planking needs to be cut away - as the hull has the sweep down from the upper deck to the height of the transom. Photo below shows that gently curved line of that transition.
I'll do a bit more sanding & then start on the keel & outer stem pieces. Also the infill piece that will turn the square cutaway at the stern into the curved propeller cutaway.
They are a fat boat.....
plus this for comparison:
thanks
-
 Mark Pearse got a reaction from CiscoH in Ranger type yacht by Mark Pearse - 1:12 - SMALL
The planking is finished & I've spent a few hours sanding. This planking method (strip planking at scale) was visually messy, so it's very nice to see the hull lines start to become more visible. Although the nature of strip planks (being parallel sided), the planking lines throw the optics of the shape off a bit, as the line of the planks towards the keel don't bear much relation to the hull shape....the planking just follows the ones above with no tapering.
The stern photos show the excess hull near the transom - that planking needs to be cut away - as the hull has the sweep down from the upper deck to the height of the transom. Photo below shows that gently curved line of that transition.
I'll do a bit more sanding & then start on the keel & outer stem pieces. Also the infill piece that will turn the square cutaway at the stern into the curved propeller cutaway.
They are a fat boat.....
plus this for comparison:
thanks
-
Mark Pearse got a reaction from CiscoH in Ranger type yacht by Mark Pearse - 1:12 - SMALL
The model has been progressing, but the planking is pretty slow, but it is getting there. The simpler nature of a 'strip plank' style hull does reduce the technical difficulties a lot, but balanced by the relatively narrow planks. And the previous planked model was using Huan Pine, which is very supple, this is Basswood / Limewood & it's much stiffer.
The lovely lines are appearing, although it's not so visible in the model yet - the scallops from the gunwale line around the cockpit hasn't been cut yet .... & it's probably normal anyway.
This one shows the technique: bulldog clip clamps to hold the planks to the moulds & rubber bands to assist pull the planks down to the previous plank. The gunwale scallop at the stern is marked approximately in pencil & will be cut after the model is fully planked & removed from the building frame.
I'm starting to use the heat gun to put some pre-twist into the planks.
The epoxy is messy, but all will be forgotten once the sanding starts, but for now another few weeks of a plank or two per day.
thanks
-
 Mark Pearse got a reaction from druxey in Ranger type yacht by Mark Pearse - 1:12 - SMALL
Since my lost post I have been preparing for planking & adding a keel.
I have made the front inner part of the stem; put solid blocking between the moulds (mainly to give the keel something solid to be fixed to); some solid blocking around the propellor cutaway (the final shape is best made from solid timber, so again the blocking gives something good to fix to); plus some timber next to the transom, just so the glueing surface is greater.
I did some fairing of the moulds, it's not yet 100% completed but the lower parts of the hull, towards the gunwales, are pretty accurate now. The hull is a raised decker, so the topmost full length plank is from the top of the transom, which is lower than the main deck line. I decided to do this plank first then plank up & down from it. The process was influenced by the fact that it won't be traditionally planked, because this actual yacht was built strip planked (ie: wood epoxy composite). I've realised it does give more flexibility on planking. Anyway, the do the first plank without pinholes in it, I pinned a temporary plank on each side, but 2 planks distant....2 planks so that I didn't glue the pinned plank to the moulds. Subsequent planks can be clamped to the ones already installed.
You can see it below, the glued plank is not pinned. Spacers offset so they didn't glue to the hull.
First plank done, some slight imperfections, but within 0.5mm sanding depth. Planks are 2mm thick, replicating the actual strip planks of 25 x 50mm approx.
I used epoxy for these two planks. I hoping that I can use it for all the planking, including the edges (ie: plank/plank). I'm hoping that it will give a more monocoque hull so the planking lines won't be visible. Strip planks don't run in the natural way, so seeing the trace of them will be off-putting, & given the hull colour is black detail issues will probably be more visible.
all the best
-
 Mark Pearse got a reaction from Javelin in Ranger type yacht by Mark Pearse - 1:12 - SMALL
The planking is finished & I've spent a few hours sanding. This planking method (strip planking at scale) was visually messy, so it's very nice to see the hull lines start to become more visible. Although the nature of strip planks (being parallel sided), the planking lines throw the optics of the shape off a bit, as the line of the planks towards the keel don't bear much relation to the hull shape....the planking just follows the ones above with no tapering.
The stern photos show the excess hull near the transom - that planking needs to be cut away - as the hull has the sweep down from the upper deck to the height of the transom. Photo below shows that gently curved line of that transition.
I'll do a bit more sanding & then start on the keel & outer stem pieces. Also the infill piece that will turn the square cutaway at the stern into the curved propeller cutaway.
They are a fat boat.....
plus this for comparison:
thanks
-
 Mark Pearse reacted to KeithAug in Cangarda 1901 by KeithAug - Scale 1:24 - Steam Yacht
Thank you Andy and John.
I spent a few hours today completing the rudder (excluding finishes).
The shaft is 0.16" diameter while the plate is .04" thick. I therefore needed to machine slots in the the cladding 0.08" radius by 0.06" deep. See blue arrows on next photo. I also cut the plate along the line of the shaft removing a .016" wide strip.
The brass pieces were then assembled on the cladding and glued in place using CA glue.
The other side of the gladding was then glued in place forming a brass sandwich.
The rudder is fitted with anodes. All the anodes on Cangarda are of the same flat plate type. I drilled the holes for later anode attachment.
To get the taper sanding of the cladding symmetrical I employed a flat sheet of aluminium oxide paper and a bulldog clip.
The bulldog clip is holding the front of the rudder clear of the sandpaper and at a constant angle while the taper is sanded. The bulldog clip spring is hard enough to resist the abrasion of the oxide paper. The taper on the front edge of the rudder was formed in a similar manner.
My plan is to get on to the planking next. I expect it to be a long job so if you want to skip it I suggest you rejoin in about 2 months.
-
Mark Pearse reacted to KeithAug in Cangarda 1901 by KeithAug - Scale 1:24 - Steam Yacht
Thank you Richard and Pat.
Gary - She says it is her greatest pleasure to be my forever financial burden. She also says my efforts are earning points which will influence her when choosing the quality of retirement home she will be putting me into when I can no longer look after myself.
And so on to the rudder.
I started with a brass sheet .040" thick.
I drilled a number of holes at the centre of the various edge curves. I also turned up some filing buttons - blue arrows.
I cut away the waste brass and using the buttons I filed the edge curves.
The rudder is profiled / streamlined although the front and rear edges are blunt.
The outer rudder shaft was made from brass tube with bearing ferrules at the upper and lower ends. The ferrules are drilled .040" diameter to take the fixed inner bearing shaft.
The small upper section shaft was made in a similar way. Below all 3 parts are assembled.
I will form the outer shape of the rudder by attaching mahogany to each side and then sanding to shape. Below the mahogany "cladding" has been cut and glued prior to attaching to the rudder shaft.
That's all for now.
-
Mark Pearse reacted to Scottish Guy in Ranger type yacht by Mark Pearse - 1:12 - SMALL
I asked Magnus Rassy about blueprints / plans but never just for line drawings, maybe I should specify my request again. I got the answer that their policy forbids to hand over any blueprints since the design is from German Frers (Argentina) and not by Hallberg Rassy themselves.
But thank you for the hint with the line drawings, I don´t really need the entire blueprints, the rest I can make out myself from all the pictures and 3D pictures I have of the yacht.
Micha
-
Mark Pearse got a reaction from GrandpaPhil in Ranger type yacht by Mark Pearse - 1:12 - SMALL
Hi Steve
Good to hear from you. Yes, I think Cliff had a good eye. I hope your new home is working out well. (south coast..?)
Hi Micha,
Thank you, & thanks for reading the log. Re your oped-for next build: have you asked the people building them if they will send you lines drawings? They might do it.
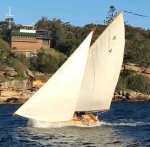
One more photo, it's the James Craig & the Ranger Cherub, bowsprit to bowsprit....Sydney Harbour a couple of years ago.
-
 Mark Pearse got a reaction from dvm27 in Ranger type yacht by Mark Pearse - 1:12 - SMALL
The planking is finished & I've spent a few hours sanding. This planking method (strip planking at scale) was visually messy, so it's very nice to see the hull lines start to become more visible. Although the nature of strip planks (being parallel sided), the planking lines throw the optics of the shape off a bit, as the line of the planks towards the keel don't bear much relation to the hull shape....the planking just follows the ones above with no tapering.
The stern photos show the excess hull near the transom - that planking needs to be cut away - as the hull has the sweep down from the upper deck to the height of the transom. Photo below shows that gently curved line of that transition.
I'll do a bit more sanding & then start on the keel & outer stem pieces. Also the infill piece that will turn the square cutaway at the stern into the curved propeller cutaway.
They are a fat boat.....
plus this for comparison:
thanks
-
 Mark Pearse got a reaction from FriedClams in 21' Fisherman's Launch by vaddoc - Scale 1:10 - Plans from Howard Chapelle's "Boatbuilding"
Hi Vaddoc
Perhaps matt finish below the waterline? Antifoul paint is usually matt, & if the hull is still moving it shows inconsistencies less. I used a matt acrylic below the waterline (one model only) & the results were good.
-
 Mark Pearse got a reaction from Scottish Guy in Ranger type yacht by Mark Pearse - 1:12 - SMALL
Hi Steve
Good to hear from you. Yes, I think Cliff had a good eye. I hope your new home is working out well. (south coast..?)
Hi Micha,
Thank you, & thanks for reading the log. Re your oped-for next build: have you asked the people building them if they will send you lines drawings? They might do it.
One more photo, it's the James Craig & the Ranger Cherub, bowsprit to bowsprit....Sydney Harbour a couple of years ago.
-
Mark Pearse got a reaction from Jack12477 in Ranger type yacht by Mark Pearse - 1:12 - SMALL
Hi Steve
Good to hear from you. Yes, I think Cliff had a good eye. I hope your new home is working out well. (south coast..?)
Hi Micha,
Thank you, & thanks for reading the log. Re your oped-for next build: have you asked the people building them if they will send you lines drawings? They might do it.
One more photo, it's the James Craig & the Ranger Cherub, bowsprit to bowsprit....Sydney Harbour a couple of years ago.
-
Mark Pearse got a reaction from druxey in Ranger type yacht by Mark Pearse - 1:12 - SMALL
The planking is finished & I've spent a few hours sanding. This planking method (strip planking at scale) was visually messy, so it's very nice to see the hull lines start to become more visible. Although the nature of strip planks (being parallel sided), the planking lines throw the optics of the shape off a bit, as the line of the planks towards the keel don't bear much relation to the hull shape....the planking just follows the ones above with no tapering.
The stern photos show the excess hull near the transom - that planking needs to be cut away - as the hull has the sweep down from the upper deck to the height of the transom. Photo below shows that gently curved line of that transition.
I'll do a bit more sanding & then start on the keel & outer stem pieces. Also the infill piece that will turn the square cutaway at the stern into the curved propeller cutaway.
They are a fat boat.....
plus this for comparison:
thanks
-
Mark Pearse got a reaction from KeithAug in Ranger type yacht by Mark Pearse - 1:12 - SMALL
The planking is finished & I've spent a few hours sanding. This planking method (strip planking at scale) was visually messy, so it's very nice to see the hull lines start to become more visible. Although the nature of strip planks (being parallel sided), the planking lines throw the optics of the shape off a bit, as the line of the planks towards the keel don't bear much relation to the hull shape....the planking just follows the ones above with no tapering.
The stern photos show the excess hull near the transom - that planking needs to be cut away - as the hull has the sweep down from the upper deck to the height of the transom. Photo below shows that gently curved line of that transition.
I'll do a bit more sanding & then start on the keel & outer stem pieces. Also the infill piece that will turn the square cutaway at the stern into the curved propeller cutaway.
They are a fat boat.....
plus this for comparison:
thanks
-
Mark Pearse got a reaction from druxey in Ranger type yacht by Mark Pearse - 1:12 - SMALL
The model has been progressing, but the planking is pretty slow, but it is getting there. The simpler nature of a 'strip plank' style hull does reduce the technical difficulties a lot, but balanced by the relatively narrow planks. And the previous planked model was using Huan Pine, which is very supple, this is Basswood / Limewood & it's much stiffer.
The lovely lines are appearing, although it's not so visible in the model yet - the scallops from the gunwale line around the cockpit hasn't been cut yet .... & it's probably normal anyway.
This one shows the technique: bulldog clip clamps to hold the planks to the moulds & rubber bands to assist pull the planks down to the previous plank. The gunwale scallop at the stern is marked approximately in pencil & will be cut after the model is fully planked & removed from the building frame.
I'm starting to use the heat gun to put some pre-twist into the planks.
The epoxy is messy, but all will be forgotten once the sanding starts, but for now another few weeks of a plank or two per day.
thanks
-
Mark Pearse got a reaction from Scottish Guy in Ranger type yacht by Mark Pearse - 1:12 - SMALL
Hi John, Steve
Thanks for the offer Steve, I have used quite a lot of epoxy. I built a small open gaff sailing boat some years ago (strip planked), helped my wife build a lovely plywood kayak, & myriad repairs on our boat Cherub. I'm using Araldite Super Strength for the model. Per ml it's expensive, but the tubes make it easy to proportion a serving, & the quantities will be small. Also, it is far tougher than it used to be. I have tried West System, Bote Cote, Norglass, Epiglue, Aradite & the SS Aradite is almost the equal of Epiglue. The 5-minute is good for some uses, but that doesn't include planking this model.
For a model, I would only consider an epoxy that was pre-mixed with fibres, that is a 1:1 ratio, & available in a convenient form in small quantities - other ratios wouldn't be practical for the quantities we typically mix. So that cuts out most of the above, & I'm not a fan of Norglass epoxy. Lastly, it is widely available.
Previous models I mainly used PVA, especially Titebond.
Do you use epoxy for models?
-
Mark Pearse got a reaction from Scottish Guy in Ranger type yacht by Mark Pearse - 1:12 - SMALL
Since my lost post I have been preparing for planking & adding a keel.
I have made the front inner part of the stem; put solid blocking between the moulds (mainly to give the keel something solid to be fixed to); some solid blocking around the propellor cutaway (the final shape is best made from solid timber, so again the blocking gives something good to fix to); plus some timber next to the transom, just so the glueing surface is greater.
I did some fairing of the moulds, it's not yet 100% completed but the lower parts of the hull, towards the gunwales, are pretty accurate now. The hull is a raised decker, so the topmost full length plank is from the top of the transom, which is lower than the main deck line. I decided to do this plank first then plank up & down from it. The process was influenced by the fact that it won't be traditionally planked, because this actual yacht was built strip planked (ie: wood epoxy composite). I've realised it does give more flexibility on planking. Anyway, the do the first plank without pinholes in it, I pinned a temporary plank on each side, but 2 planks distant....2 planks so that I didn't glue the pinned plank to the moulds. Subsequent planks can be clamped to the ones already installed.
You can see it below, the glued plank is not pinned. Spacers offset so they didn't glue to the hull.
First plank done, some slight imperfections, but within 0.5mm sanding depth. Planks are 2mm thick, replicating the actual strip planks of 25 x 50mm approx.
I used epoxy for these two planks. I hoping that I can use it for all the planking, including the edges (ie: plank/plank). I'm hoping that it will give a more monocoque hull so the planking lines won't be visible. Strip planks don't run in the natural way, so seeing the trace of them will be off-putting, & given the hull colour is black detail issues will probably be more visible.
all the best
-
Mark Pearse got a reaction from Scottish Guy in Ranger type yacht by Mark Pearse - 1:12 - SMALL
Good progress, I've cut the moulds & have started assembling them. It's always exciting when the model starts to go from 2D to 3D...
But first I have to make some comments that may assist others who choose to cut their own moulds from laser cut drawings they do themselves: the assembly was more difficult because when I worked out the shapes to have cut, I didn't include the building frame in my thinking. Assembling them was more complex then it needed to be. Anyway, it worked out ok.
I originally planned to screw the moulds to timber strips to hold them, but it's now quite obvious that if the moulds interlock in the way that these do, then screwing them together wasn't possible. So they were all glued to the main building frame beams with PVA.
The photo below includes a detail of the bow extension - the laser cutting bed was only 600mm long, so there were some extra pieces at the bow. This gave an opportunity to make the bow thick enough for the inner stem to land on & sit against. you can see how the front moulds include a cutout for the 8 x 8mm inner stem. You can also see the lateral pieces to give rigidity in the planking stage.
The inner stem will be glue laminated by the jigs I cut, also by laser. 3 thicknesses of 3mm plywood. The pale lines will help to position the final piece.
The transom piece has just been temporarily tacked on with hot-melt glue. The plywood is still loose, although I pinned it with dogs of hot-melt glue to stabilise it. In the next few days I'll glue them with epoxy glue.....once I've had a good long look at the frames to see if I need to tweak anything.
The uneven spacing of the moulds has a reason - the lines drawings I got were the actual moulds from the boat's build. The moulds were used to shape a series of glue laminated frames that were not evenly spaced. The hull was strip-planked (timber/epoxy composite construction) & there are only 10 or 11 frames (or ribs) instead of the 60 or 70 needed for traditional construction. So, because they were the only lines drawings I had to use that same spacing, which was to locate the frames in relation to hatches, mast etc.
thanks,
-
Mark Pearse got a reaction from Scottish Guy in Ranger type yacht by Mark Pearse - 1:12 - SMALL
Thank you,
I should be able to cut next week, below are the cutting plans. There's something I need to check on the weekend.
Black lines are cuts & red are scored lines. The perimeter boxes are the bed size of the cutter. The glued up moulds should be quite rigid, but I think there's still going to be good reasons to build it on a frame, so I put legs on the moulds & more setout lines.