Mark Pearse Posted April 11, 2023 Share #1 Posted April 11, 2023 I have been asked to make a model of a specific yacht, the yacht is a recent build of a 1930s Sydney design. My previous build logs are both of designs by Cliff Gale, & somewhat inevitably, this is a Cliff Gale design also. Actually, I'm thrilled, & it is a version of his most famous design, or at least his best known design. The yacht herself was built around 2000, & built strip-planked. The original yacht built to this design was called Ranger, & Cliff had her built for himself & his family. They are 24' (7.3m) long & 9'6" (2.9m) beam, so very beamy for a short boat. But they are excellent for their purpose: day sailing in Sydney Harbour, overnighting & near coastal sailing. This one has sailed as far as Tasmania, but with good preparation & picking the suitable weather windows. Since 1933, when the original was launched, around 9 or 10 have been built, some not especially close to the original design. But there's one completed a couple of years ago & another nearing completion, being built by retired shipwright & general legend Ian Smith. I'll let the photos do the talking, & if I think of more things to say I'll add them in following posts. I'll also try to find a couple more good photos of the yacht herself. Launch day, or close to it, I think around 2002. They are great day boats, & sail well with all that sail area. Quite a lot of usable room, for a small boat. Happily, I have the original lines drawings from the build. That's something you don't see very often in this forum....1:1 lines drawings from the actual build. These yachts vary a bit, the original one - Ranger - was adjusted during her build, to increase her load carrying capacity. This yacht, built 65 odd years later, is actually closer to the original designed lines than the first yacht built to the design. There's 3 main lines drawings, here's the first, taped to the dining room floor: The second, sitting on that: And the third: The lines are to the outside of the ribs / inside of planking. Fortunately, there is this doodle on one corner, in the top left side of the 2nd lines drawing: I have traced over these in a series of A1 tracing paper sheets, & they are getting scanned & I will assemble a digital compilation of the lines. Thanks, Mirabell61, michael mott, thibaultron and 9 others 11 1 Quote completed 1:12 28' Ranger type yacht, scratch build - COMPLETED 1:12 20' 1930 open sailing boat, half model, scratch built - COMPLETED 1:12 24' Ranger type yacht, scratch build Link to comment Share on other sites More sharing options...
Jim Lad Posted April 12, 2023 Share #2 Posted April 12, 2023 Great! Another model of one pf these beautiful little yachts! John Mirabell61, mtaylor, Mark Pearse and 1 other 4 Quote Link to comment Share on other sites More sharing options...
KeithAug Posted April 12, 2023 Share #3 Posted April 12, 2023 I’m looking forward to this Mark. mtaylor and thibaultron 2 Quote Keith Current Build:- Cangarda (Steam Yacht) - Scale 1:24 Previous Builds:- Schooner Germania (Nova) - Scale 1:36 https://modelshipworld.com/topic/19848-schooner-germania-nova-by-keithaug-scale-136-1908-2011/ Schooner Altair by KeithAug - Scale 1:32 - 1931 http://modelshipworld.com/index.php/topic/12515-schooner-altair-by-keithaug-scale-132-1931/?p=378702 J Class Endeavour by KeithAug - Amati - Scale 1:35 - 1989 after restoration. http://modelshipworld.com/index.php/topic/10752-j-class-endeavour-by-keithaug-amati-scale-135-1989-after-restoration/?p=325029 Other Topics Nautical Adventures http://modelshipworld.com/index.php/topic/13727-nautical-adventures/?p=422846 Link to comment Share on other sites More sharing options...
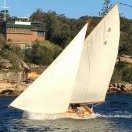
Mark Pearse Posted April 12, 2023 Author Share #4 Posted April 12, 2023 Hi Jim, Keith This photo is a good one, a displacement hull trying to exceed her hull speed. I was out on the day, motoring our boat with my heavily pregnant wife & watching the start of a race. It was 5-10 knots 5 minutes before this photo was taken. Best reminder ever to always check the weather forecast. This is the boat I'm doing a model of, & the benefits of her higher ballast ratio are showing - the hull is lighter because in strip planking the hull is lighter as timber never soaks up any water, so the boat needs more lead to pull her down to the waterline. bridgman, michael mott, GrandpaPhil and 6 others 9 Quote completed 1:12 28' Ranger type yacht, scratch build - COMPLETED 1:12 20' 1930 open sailing boat, half model, scratch built - COMPLETED 1:12 24' Ranger type yacht, scratch build Link to comment Share on other sites More sharing options...
Jim Lad Posted April 13, 2023 Share #5 Posted April 13, 2023 What a great photo, Mark. Very dramatic. John mtaylor, Mark Pearse, thibaultron and 1 other 4 Quote Link to comment Share on other sites More sharing options...
Mark Pearse Posted April 13, 2023 Author Share #6 Posted April 13, 2023 Below are the traced lines. The A1 sized tracings were scanned & loaded them into a draughting programme, then scaled & assembled. There doesn't seem to be enough lines though. The photo looks to show 11 frames plus tuck (transom - but it's called tuck on the drawings, so I'm following that, I believe it's what the older shipwrights in Sydney used), & the drawings shows 9 frames plus transom. I'll start by checking the lines drawings again, see if I missed anything. druxey, FlyingFish, Mirabell61 and 3 others 6 Quote completed 1:12 28' Ranger type yacht, scratch build - COMPLETED 1:12 20' 1930 open sailing boat, half model, scratch built - COMPLETED 1:12 24' Ranger type yacht, scratch build Link to comment Share on other sites More sharing options...
Jim Lad Posted April 14, 2023 Share #7 Posted April 14, 2023 Great image of the yacht under construction, Mark. John thibaultron 1 Quote Link to comment Share on other sites More sharing options...
Bedford Posted April 17, 2023 Share #8 Posted April 17, 2023 Well I decided to have a look to see if anyone I know had another build going and I found this. Having seen the last one in the flesh I know the owner ill be well pleased with your efforts. I'm tagging along. thibaultron 1 Quote Ships built :- Schooner for Port Jackson Thermoplylae Bluenose II Full size Tammie Norrie dinghy 1:8 scale Miss Caroline, model of the full size boat I built Under construction :- Royal Caroline, this one is special as it is in memory of my 13 year old daughter, Caroline who passed away in 2005 Miane three masted schooner R/C, scratch build (on hold) Charles W Morgan (on hold) Scratch designed and built R/C Mahogany and Walnut speedboat (on hold) In the que :- S.T. Waratah, maybe! Link to comment Share on other sites More sharing options...
Mark Pearse Posted April 17, 2023 Author Share #9 Posted April 17, 2023 Hi Steve Good to hear from you. Do you mean Marcus Cranney's Ranger build? Tweed River, I think is where he lives... thibaultron 1 Quote completed 1:12 28' Ranger type yacht, scratch build - COMPLETED 1:12 20' 1930 open sailing boat, half model, scratch built - COMPLETED 1:12 24' Ranger type yacht, scratch build Link to comment Share on other sites More sharing options...
Mark Pearse Posted April 20, 2023 Author Share #10 Posted April 20, 2023 I found the missing lines on one of the drawings, & will attach below the scans of my full size tracings, so 6x A1 sized sheets. Then my first go at the lines off them. I will next have a go at putting these lines with keel profiles, stem details, gunwale line, etc. The double lines on the lower drawing is because the original drawings I had to work off were to the inside of planking. The double lines therefore are the inside & outside of the planking. Mirabell61, Scottish Guy, michael mott and 4 others 7 Quote completed 1:12 28' Ranger type yacht, scratch build - COMPLETED 1:12 20' 1930 open sailing boat, half model, scratch built - COMPLETED 1:12 24' Ranger type yacht, scratch build Link to comment Share on other sites More sharing options...
Bedford Posted April 20, 2023 Share #11 Posted April 20, 2023 On 4/17/2023 at 1:13 PM, Mark Pearse said: Hi Steve Good to hear from you. Do you mean Marcus Cranney's Ranger build? Tweed River, I think is where he lives... I was referring to the Ranger model you took into SASC Mark Pearse and thibaultron 2 Quote Ships built :- Schooner for Port Jackson Thermoplylae Bluenose II Full size Tammie Norrie dinghy 1:8 scale Miss Caroline, model of the full size boat I built Under construction :- Royal Caroline, this one is special as it is in memory of my 13 year old daughter, Caroline who passed away in 2005 Miane three masted schooner R/C, scratch build (on hold) Charles W Morgan (on hold) Scratch designed and built R/C Mahogany and Walnut speedboat (on hold) In the que :- S.T. Waratah, maybe! Link to comment Share on other sites More sharing options...
KeithAug Posted April 20, 2023 Share #12 Posted April 20, 2023 On 4/13/2023 at 12:17 AM, Mark Pearse said: This photo is a good one, a displacement hull trying to exceed her hull speed. In my sailing days we used to call it "surfing". Very exciting in a short keel light displacement boat. Mark Pearse, Scottish Guy and thibaultron 3 Quote Keith Current Build:- Cangarda (Steam Yacht) - Scale 1:24 Previous Builds:- Schooner Germania (Nova) - Scale 1:36 https://modelshipworld.com/topic/19848-schooner-germania-nova-by-keithaug-scale-136-1908-2011/ Schooner Altair by KeithAug - Scale 1:32 - 1931 http://modelshipworld.com/index.php/topic/12515-schooner-altair-by-keithaug-scale-132-1931/?p=378702 J Class Endeavour by KeithAug - Amati - Scale 1:35 - 1989 after restoration. http://modelshipworld.com/index.php/topic/10752-j-class-endeavour-by-keithaug-amati-scale-135-1989-after-restoration/?p=325029 Other Topics Nautical Adventures http://modelshipworld.com/index.php/topic/13727-nautical-adventures/?p=422846 Link to comment Share on other sites More sharing options...
Mark Pearse Posted August 11, 2023 Author Share #13 Posted August 11, 2023 Hi everyone It's been a while, but it's been quite difficult to pin down some of the details & shapes. The builders never recorded the keel profile or the shape of the stem. But she was on the hard last week & I took some measurements & I'm now close to the next step. Just to recap, I'm going to cut an egg-cate style frame in plywood. My brother has a laser cutter so I can do them from 3mm plywood. The shape is the boat is done, or nearly done: I'll sort out spars etc later, for now it's just the hull. The pale blue shape in the drawing below is the lengthwise ply piece, which will also help support the stem. The drawing is assuming the stem is 10mm. You can see that mould #4 slides in from the top, the others slide in from the bottom. The ochre coloured lines are really reminders on how I will fabricate the cockpit area, using 2mm ply for that. The cockpit well is surprisingly steeply sloped, but the duckboard is packed up more at the stern end. There will be some lateral strips inserted in the forwards sections, narrower at the bow & then a wider one. Moulds half & 1 below. The red lines are not cut lines, they are burn lines to help an accurate setup: Moulds 1.5, 2, 2.5, 3: 3.5, 4, 4.5, 5, 5.5 & transom: There is a 28' version of the design, modified for ocean sailing, that just completed the Fastnet race. Below is the difficult conditions of the first day; the happy team approaching the rock. You can see the deeper keel & fuller shape in the first shot. Mirabell61, Roger Pellett, thibaultron and 4 others 7 Quote completed 1:12 28' Ranger type yacht, scratch build - COMPLETED 1:12 20' 1930 open sailing boat, half model, scratch built - COMPLETED 1:12 24' Ranger type yacht, scratch build Link to comment Share on other sites More sharing options...
Jim Lad Posted August 11, 2023 Share #14 Posted August 11, 2023 Nice to see this project continuing, Mark. John Mark Pearse, thibaultron and Mirabell61 3 Quote Link to comment Share on other sites More sharing options...
Bedford Posted August 11, 2023 Share #15 Posted August 11, 2023 (edited) I nearly forgot about this one Mark. Glad to see some progress! I'd heard Maluka did the Fastnet, he's keen shipping her all the way over there for a race! Edited August 11, 2023 by Bedford Mark Pearse and thibaultron 2 Quote Ships built :- Schooner for Port Jackson Thermoplylae Bluenose II Full size Tammie Norrie dinghy 1:8 scale Miss Caroline, model of the full size boat I built Under construction :- Royal Caroline, this one is special as it is in memory of my 13 year old daughter, Caroline who passed away in 2005 Miane three masted schooner R/C, scratch build (on hold) Charles W Morgan (on hold) Scratch designed and built R/C Mahogany and Walnut speedboat (on hold) In the que :- S.T. Waratah, maybe! Link to comment Share on other sites More sharing options...
Mark Pearse Posted August 18, 2023 Author Share #16 Posted August 18, 2023 Thank you, I should be able to cut next week, below are the cutting plans. There's something I need to check on the weekend. Black lines are cuts & red are scored lines. The perimeter boxes are the bed size of the cutter. The glued up moulds should be quite rigid, but I think there's still going to be good reasons to build it on a frame, so I put legs on the moulds & more setout lines. allanyed, druxey, KeithAug and 2 others 5 Quote completed 1:12 28' Ranger type yacht, scratch build - COMPLETED 1:12 20' 1930 open sailing boat, half model, scratch built - COMPLETED 1:12 24' Ranger type yacht, scratch build Link to comment Share on other sites More sharing options...
Mark Pearse Posted August 27, 2023 Author Share #17 Posted August 27, 2023 Good progress, I've cut the moulds & have started assembling them. It's always exciting when the model starts to go from 2D to 3D... But first I have to make some comments that may assist others who choose to cut their own moulds from laser cut drawings they do themselves: the assembly was more difficult because when I worked out the shapes to have cut, I didn't include the building frame in my thinking. Assembling them was more complex then it needed to be. Anyway, it worked out ok. I originally planned to screw the moulds to timber strips to hold them, but it's now quite obvious that if the moulds interlock in the way that these do, then screwing them together wasn't possible. So they were all glued to the main building frame beams with PVA. The photo below includes a detail of the bow extension - the laser cutting bed was only 600mm long, so there were some extra pieces at the bow. This gave an opportunity to make the bow thick enough for the inner stem to land on & sit against. you can see how the front moulds include a cutout for the 8 x 8mm inner stem. You can also see the lateral pieces to give rigidity in the planking stage. The inner stem will be glue laminated by the jigs I cut, also by laser. 3 thicknesses of 3mm plywood. The pale lines will help to position the final piece. The transom piece has just been temporarily tacked on with hot-melt glue. The plywood is still loose, although I pinned it with dogs of hot-melt glue to stabilise it. In the next few days I'll glue them with epoxy glue.....once I've had a good long look at the frames to see if I need to tweak anything. The uneven spacing of the moulds has a reason - the lines drawings I got were the actual moulds from the boat's build. The moulds were used to shape a series of glue laminated frames that were not evenly spaced. The hull was strip-planked (timber/epoxy composite construction) & there are only 10 or 11 frames (or ribs) instead of the 60 or 70 needed for traditional construction. So, because they were the only lines drawings I had to use that same spacing, which was to locate the frames in relation to hatches, mast etc. thanks, GrandpaPhil, michael mott, gsdpic and 4 others 7 Quote completed 1:12 28' Ranger type yacht, scratch build - COMPLETED 1:12 20' 1930 open sailing boat, half model, scratch built - COMPLETED 1:12 24' Ranger type yacht, scratch build Link to comment Share on other sites More sharing options...
Bedford Posted September 6, 2023 Share #18 Posted September 6, 2023 I love the lines of a Ranger, looking good Mark Mark Pearse 1 Quote Ships built :- Schooner for Port Jackson Thermoplylae Bluenose II Full size Tammie Norrie dinghy 1:8 scale Miss Caroline, model of the full size boat I built Under construction :- Royal Caroline, this one is special as it is in memory of my 13 year old daughter, Caroline who passed away in 2005 Miane three masted schooner R/C, scratch build (on hold) Charles W Morgan (on hold) Scratch designed and built R/C Mahogany and Walnut speedboat (on hold) In the que :- S.T. Waratah, maybe! Link to comment Share on other sites More sharing options...
MAGIC's Craig Posted September 6, 2023 Share #19 Posted September 6, 2023 This is one of my favorite stages in visualizing a new hull. Looking good! druxey and Mark Pearse 2 Quote Link to comment Share on other sites More sharing options...
michael mott Posted September 6, 2023 Share #20 Posted September 6, 2023 Great to see another one taking shape Mark. michael Mark Pearse and druxey 2 Quote Current builds Bristol Pilot Cutter 1:8; Skipjack 19 foot Launch 1:8; Herreshoff Buzzards Bay 14 1:8 Other projects Pilot Cutter 1:500 ; Maria, 1:2 Now just a memory Future model Gill Smith Catboat Pauline 1:8 Finished projects A Bassett Lowke steamship Albertic 1:100 Anything you can imagine is possible, when you put your mind to it. Link to comment Share on other sites More sharing options...
Mark Pearse Posted November 8, 2023 Author Share #21 Posted November 8, 2023 (edited) Since my lost post I have been preparing for planking & adding a keel. I have made the front inner part of the stem; put solid blocking between the moulds (mainly to give the keel something solid to be fixed to); some solid blocking around the propellor cutaway (the final shape is best made from solid timber, so again the blocking gives something good to fix to); plus some timber next to the transom, just so the glueing surface is greater. I did some fairing of the moulds, it's not yet 100% completed but the lower parts of the hull, towards the gunwales, are pretty accurate now. The hull is a raised decker, so the topmost full length plank is from the top of the transom, which is lower than the main deck line. I decided to do this plank first then plank up & down from it. The process was influenced by the fact that it won't be traditionally planked, because this actual yacht was built strip planked (ie: wood epoxy composite). I've realised it does give more flexibility on planking. Anyway, the do the first plank without pinholes in it, I pinned a temporary plank on each side, but 2 planks distant....2 planks so that I didn't glue the pinned plank to the moulds. Subsequent planks can be clamped to the ones already installed. You can see it below, the glued plank is not pinned. Spacers offset so they didn't glue to the hull. First plank done, some slight imperfections, but within 0.5mm sanding depth. Planks are 2mm thick, replicating the actual strip planks of 25 x 50mm approx. I used epoxy for these two planks. I hoping that I can use it for all the planking, including the edges (ie: plank/plank). I'm hoping that it will give a more monocoque hull so the planking lines won't be visible. Strip planks don't run in the natural way, so seeing the trace of them will be off-putting, & given the hull colour is black detail issues will probably be more visible. all the best Edited November 8, 2023 by Mark Pearse GrandpaPhil, ccoyle, druxey and 3 others 6 Quote completed 1:12 28' Ranger type yacht, scratch build - COMPLETED 1:12 20' 1930 open sailing boat, half model, scratch built - COMPLETED 1:12 24' Ranger type yacht, scratch build Link to comment Share on other sites More sharing options...
Jim Lad Posted November 8, 2023 Share #22 Posted November 8, 2023 Good to see you back in the workshop, Mark. John Scottish Guy and Mark Pearse 2 Quote Link to comment Share on other sites More sharing options...
Bedford Posted November 8, 2023 Share #23 Posted November 8, 2023 Hey Mark, nice to see some progress. What epoxy are you using and do you know the tricks of how to easily work with the stuff? If not feel free to ask Mark Pearse and Jack12477 2 Quote Ships built :- Schooner for Port Jackson Thermoplylae Bluenose II Full size Tammie Norrie dinghy 1:8 scale Miss Caroline, model of the full size boat I built Under construction :- Royal Caroline, this one is special as it is in memory of my 13 year old daughter, Caroline who passed away in 2005 Miane three masted schooner R/C, scratch build (on hold) Charles W Morgan (on hold) Scratch designed and built R/C Mahogany and Walnut speedboat (on hold) In the que :- S.T. Waratah, maybe! Link to comment Share on other sites More sharing options...
Mark Pearse Posted November 8, 2023 Author Share #24 Posted November 8, 2023 Hi John, Steve Thanks for the offer Steve, I have used quite a lot of epoxy. I built a small open gaff sailing boat some years ago (strip planked), helped my wife build a lovely plywood kayak, & myriad repairs on our boat Cherub. I'm using Araldite Super Strength for the model. Per ml it's expensive, but the tubes make it easy to proportion a serving, & the quantities will be small. Also, it is far tougher than it used to be. I have tried West System, Bote Cote, Norglass, Epiglue, Aradite & the SS Aradite is almost the equal of Epiglue. The 5-minute is good for some uses, but that doesn't include planking this model. For a model, I would only consider an epoxy that was pre-mixed with fibres, that is a 1:1 ratio, & available in a convenient form in small quantities - other ratios wouldn't be practical for the quantities we typically mix. So that cuts out most of the above, & I'm not a fan of Norglass epoxy. Lastly, it is widely available. Previous models I mainly used PVA, especially Titebond. Do you use epoxy for models? Jim Lad, Jack12477 and Scottish Guy 3 Quote completed 1:12 28' Ranger type yacht, scratch build - COMPLETED 1:12 20' 1930 open sailing boat, half model, scratch built - COMPLETED 1:12 24' Ranger type yacht, scratch build Link to comment Share on other sites More sharing options...
Bedford Posted November 9, 2023 Share #25 Posted November 9, 2023 I use PVA and a little C.A. where applicable unless it's going to get wet in which case I use epoxy. Used WEST on the first RC one I did and it's a nightmare, the stuff goes off while you're mixing it! I now swear by Bote Cote. No nasty chemicals and no hardening anxiety, it gives plenty of work time to get a good job. mtaylor 1 Quote Ships built :- Schooner for Port Jackson Thermoplylae Bluenose II Full size Tammie Norrie dinghy 1:8 scale Miss Caroline, model of the full size boat I built Under construction :- Royal Caroline, this one is special as it is in memory of my 13 year old daughter, Caroline who passed away in 2005 Miane three masted schooner R/C, scratch build (on hold) Charles W Morgan (on hold) Scratch designed and built R/C Mahogany and Walnut speedboat (on hold) In the que :- S.T. Waratah, maybe! Link to comment Share on other sites More sharing options...
Mark Pearse Posted November 9, 2023 Author Share #26 Posted November 9, 2023 1 hour ago, Bedford said: I now swear by Bote Cote That's what we used for the kayak, it came with the kit (kayak was a Chesapeake Light Craft LT17). It went well. Do you use this on any models or just on your lovely small boat? mtaylor 1 Quote completed 1:12 28' Ranger type yacht, scratch build - COMPLETED 1:12 20' 1930 open sailing boat, half model, scratch built - COMPLETED 1:12 24' Ranger type yacht, scratch build Link to comment Share on other sites More sharing options...
Bedford Posted November 9, 2023 Share #27 Posted November 9, 2023 (edited) I haven't used it on any models yet, I'm too busy taking Sheriff Brodys advice and building a bigger sail boat. Edited November 10, 2023 by Bedford Mark Pearse and mtaylor 2 Quote Ships built :- Schooner for Port Jackson Thermoplylae Bluenose II Full size Tammie Norrie dinghy 1:8 scale Miss Caroline, model of the full size boat I built Under construction :- Royal Caroline, this one is special as it is in memory of my 13 year old daughter, Caroline who passed away in 2005 Miane three masted schooner R/C, scratch build (on hold) Charles W Morgan (on hold) Scratch designed and built R/C Mahogany and Walnut speedboat (on hold) In the que :- S.T. Waratah, maybe! Link to comment Share on other sites More sharing options...
KeithAug Posted November 16, 2023 Share #28 Posted November 16, 2023 Good to find I haven't missed much during my absence. I'm looking forward to seeing her develop. Scottish Guy, Mark Pearse, mtaylor and 1 other 4 Quote Keith Current Build:- Cangarda (Steam Yacht) - Scale 1:24 Previous Builds:- Schooner Germania (Nova) - Scale 1:36 https://modelshipworld.com/topic/19848-schooner-germania-nova-by-keithaug-scale-136-1908-2011/ Schooner Altair by KeithAug - Scale 1:32 - 1931 http://modelshipworld.com/index.php/topic/12515-schooner-altair-by-keithaug-scale-132-1931/?p=378702 J Class Endeavour by KeithAug - Amati - Scale 1:35 - 1989 after restoration. http://modelshipworld.com/index.php/topic/10752-j-class-endeavour-by-keithaug-amati-scale-135-1989-after-restoration/?p=325029 Other Topics Nautical Adventures http://modelshipworld.com/index.php/topic/13727-nautical-adventures/?p=422846 Link to comment Share on other sites More sharing options...
Mark Pearse Posted February 7 Author Share #29 Posted February 7 The model has been progressing, but the planking is pretty slow, but it is getting there. The simpler nature of a 'strip plank' style hull does reduce the technical difficulties a lot, but balanced by the relatively narrow planks. And the previous planked model was using Huan Pine, which is very supple, this is Basswood / Limewood & it's much stiffer. The lovely lines are appearing, although it's not so visible in the model yet - the scallops from the gunwale line around the cockpit hasn't been cut yet .... & it's probably normal anyway. This one shows the technique: bulldog clip clamps to hold the planks to the moulds & rubber bands to assist pull the planks down to the previous plank. The gunwale scallop at the stern is marked approximately in pencil & will be cut after the model is fully planked & removed from the building frame. I'm starting to use the heat gun to put some pre-twist into the planks. The epoxy is messy, but all will be forgotten once the sanding starts, but for now another few weeks of a plank or two per day. thanks Bedford, Scottish Guy, JacquesCousteau and 3 others 6 Quote completed 1:12 28' Ranger type yacht, scratch build - COMPLETED 1:12 20' 1930 open sailing boat, half model, scratch built - COMPLETED 1:12 24' Ranger type yacht, scratch build Link to comment Share on other sites More sharing options...
KeithAug Posted February 7 Share #30 Posted February 7 All looking very neat Mark. I like the idea of the rubber bands pulling the planks together. Mark Pearse and Jack12477 2 Quote Keith Current Build:- Cangarda (Steam Yacht) - Scale 1:24 Previous Builds:- Schooner Germania (Nova) - Scale 1:36 https://modelshipworld.com/topic/19848-schooner-germania-nova-by-keithaug-scale-136-1908-2011/ Schooner Altair by KeithAug - Scale 1:32 - 1931 http://modelshipworld.com/index.php/topic/12515-schooner-altair-by-keithaug-scale-132-1931/?p=378702 J Class Endeavour by KeithAug - Amati - Scale 1:35 - 1989 after restoration. http://modelshipworld.com/index.php/topic/10752-j-class-endeavour-by-keithaug-amati-scale-135-1989-after-restoration/?p=325029 Other Topics Nautical Adventures http://modelshipworld.com/index.php/topic/13727-nautical-adventures/?p=422846 Link to comment Share on other sites More sharing options...

Recommended Posts
Join the conversation
You can post now and register later. If you have an account, sign in now to post with your account.