


Moonbug
-
Posts
1,028 -
Joined
-
Last visited
Reputation Activity
-

 Moonbug got a reaction from brunnels in HMS Sphinx 1775 by brunnels - Vanguard Models - 1:64 scale
Beautiful work!
-

 Moonbug reacted to brunnels in HMS Sphinx 1775 by brunnels - Vanguard Models - 1:64 scale
Over the weekend I was able to finish off the running rigging, and start attaching all the external pieces that were prone to be knocked off during rigging such as the anchors, lanterns, port lids, Captain figure, ships boats etc.
Captain Figure
This is the first miniature figure I have ever painted, while I have modeled off an on since I was a child, my model subjects were always vehicles. This was a first for me and I enjoyed it a bit more than I expected I would, while it isn't something I want to do a ton of, I do feel more comfortable painting figures in the future. The only tip I had received beforehand about painting mini figs, was to paint them in the order that they would be dressed. So I did a flat flesh for the skin tone, I then painted the socks and pants in Vallejo Off White, then the jacket in Prussian Blue with Ochre Brown trim, then the hat and shoes in grey black. I then went over the pants with a light wash. I basically have little clue if this is the best way to paint these, but I am happy with the result for my first time. Once the model was complete I cut away the base and slowly sanded away the remainder until the fleet were flat enough to be glued to the deck.
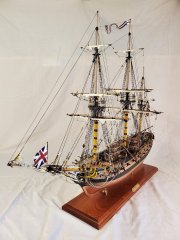
Completed Model!!!
My Second ship kit the Sphinx is 99% complete, the 1% left to do is rope coils but I probably won't get to those immediately as we are having a our first child, a little girl, at the end of April, plus I could use a change of subject from the Sphinx.
Here are some photos of the 99% complete ship, I may try to setup a light booth to get some more professional looking photos as I think it deserves it after a year of work.
I decided to only lash down the middle boat so I can display more of the gun deck if I wanted in the future.
Overall I am very happy with my model, it turned out much better than I was expecting mainly due to Vanguard just making an excellent kit that goes together so smoothly, plus it really helps when you have excellent database of knowledge on this site and excellent build logs to copy from such as @Blue Ensign, @hollowneck, @Moonbug's Pegasus and numerous others which I have taken Ideas from. There are a few sore spots like the decorations above the Quarter galleys roof that I goofed up, but maybe one day I will have the means to make something to replace that parts.
Thank you to everyone who helped and followed along the way. The Sphinx was a fantastic model kit and I highly recommend Vanguard models to anyone looking for a kit. My next kit will be to squeeze in the Speedy 2023 version before the Surprise kit releases, but I am undecided if there will be a build log or not with the baby coming, plus I'm not sure I can really offer much other Speedy log's haven't already covered.
-
 Moonbug got a reaction from Connor in Santa Maria by Moonbug - FINISHED - Artesania Latina - Bashed
Been working on finishing the rigging with deck accouterments, etc. As I mentioned in the past, I'm such a huge fan of the kinda of 'underway' look of working rigging and "messy coils" that I decided that was going to be my style for this build. Sure - doesn't say much toward the tidiness and efficiency of the crew. But - I'm going to go with the idea that since Captain Christopher had such disdain for the big slow Santa Maria, that all the slackers ended up on that deck. :-)
Anyway, here's a sneak peak at my look:
-
 Moonbug got a reaction from Zarkon in HMS Pegasus 1776 by Moonbug - Amati Models - 1:64
One of the things that I really enjoy about this forum and interacting with all you fine builders - is the plethora of ideas when it comes to home-made tools and techniques. Here's my version of a scribe tool for rails and strips - a 90 degree angle chisel with the edge filed off. The 90 degree end get butted up against the side of the wood strip to keep the line even.
I did need to compromise a little bit with the location of this particular strip; which after reading some of the other build logs is not uncommon. Apparently it's tough to get enough room to later attach the frieze, so I lowered this strip and instead notched out the tops of the sweep ports into it. Still looks pretty clean. From there it was about eight to ten hours of painting. First I masked each section off and hit light even coats with the airbrush to get the lines that I wanted, then I went through the entire ship touching up by hand. I've included my array of color choices: The Yellow is thinned down with a little brightness added to the yellow ochre. The Vermillion red is toned down with a nice earthy ochre, and the blue is Vallejo's blue grey. I'm still experimenting, but the sepia wash will be used to give the frieze texture after it's painted yellow ochre.
-
Moonbug got a reaction from Zarkon in HMS Pegasus 1776 by Moonbug - Amati Models - 1:64
Here are a few fun shots of sanding out the hull in the garage. I have a thinner version of wood glue standing by to fill in any gaps that show up. I slap some glue into the gap, wipe off the excess and then sand over it so the gap is filled with the glue and sawdust. Works pretty well for me. In the second shot - other than the mess - you'll see a 5 in rotary sander attachment. I love to use this to sand by hand because it's easy to hold, easy to switch out the velcro sandpaper, soft enough to have some 'give' over the hull, and still precise enough to get into the spots I need to get to - like along the keel.
Not quite @Chuck-worthy, but at the end of the day it was one of my better planking jobs. Going into this I'd briefly flirted with the idea of not coppering the hull - but there ended up being a few too many flaws so I'm going to go ahead with the copper. You may have also noticed in the stern shot that I got a little carried away in that area and thinned out the stern post so I'll be replacing that.
-
Moonbug got a reaction from Zarkon in HMS Pegasus 1776 by Moonbug - Amati Models - 1:64
My method for the stealer isn't really historically accurate, but I still think is a pretty functional way of handling my botched math. I ensured that planks didn't come to a sharp taper, and basically did a combo - split stealer - kinda deal to fill the remaining section. I started by gluing two of the planks together to create a wider double plank. Then I cut off the ends to create the same kind of butt that I use in a more 'traditional' stealer in the stern section. I traced out what needed to be filled then put a brand new blade in the x-acto to cut out and match the section to piece I created.
Filling in the stern stealers rounded out the second layer. These pictures are all before any sanding of course.
-
 Moonbug got a reaction from Techtonic in HMS Pegasus 1776 by Moonbug - Amati Models - 1:64
Not of lot of progress being made right now, just concentrating on faking down the rope coils. Everyone has their own individual processes and jigs for this. I have created a rope jig where I coil different size ropes in three main ways - coils for cleats, rope coils on the deck, and coils flopped over rails. Each rope is wrapped over the jib then slathered in diluted PVA. It is important to get the dilution of the pva correct as too thin means it doesn't hold and too think produces a sloppy coil with bits of glue visible.
I also hand loop coils for the deck, place them on a plastic sheet (so the glue comes up easily after it's dried) then coat them with the PVA. Obviously its also important to carefully match the rope sizes with the ropes that are seized. They are then placed in their various locations around the ship.
As shown above, the coils are coated again once they're in place and held with various clips and pins. A small metal wire holds the railing coils in place until they dry.
Honestly, I've never been a fan of coils that are too tidy. I did that on my San Juan build (which was my first) and never really dug it. Some bit of disheveled seems much more realistic to me. Meantime, I'm slowly moving from the aft to the fore of the ship, with much more work to go.
-
Moonbug got a reaction from Zarkon in HMS Pegasus 1776 by Moonbug - Amati Models - 1:64
Admittedly, I have a bit of an unhealthy fascination with Capstans. While the Capstan parts that come with the Peg are alright, I really wanted to get this one right. So - I did what any rational builder would do - I consulted not only Antscherl, but Dan Vadas' Capstan build for his Vulture.
I used the Victory kit capstan as a scale guide, and some leftover boxwood strips to build out the parts. Following Dan's process, I channeled out the slots in two halves of the top then worked them together. I had to rig up a way to get it into the lathe, but that allowed me to even out the circle and also carve out a channel for the ebony parts.
I don't have much in the way of equipment in my shipyard (other than my nifty Proxxon lathe), so I had to use some alternate tactics than Dan, including much use of pin files, x-acto, razor blades, and my handy dentist picks and tools. I also don't have any ebony or super dark wood in my stash, so I used ebony wood filler. I loaded it into the channel, then scrapped it flat and even with a razor blade. This particular wood putty doesn't dry solid, so sanding it requires at least 600 - 1000 grit paper and a VERY light touch or it just smears. I topped it all off with drilled holes and cut off pins.
The 'body' of the capstan is relatively standard stuff - I had to do each of the whelps individually without machinery. I split a couple of boxwood planks and glued them together, then filed out the shapes of the whelps. From there, it's gluing them to the base, filling in the gaps and sanding it all down. Clearly I'm going to have to do some work with the framing to get this guy to fit, as well as connect the two capstans. More to come on that.
The bottom capstan was relatively experimental, so I shored up my process for the upper capstan. I used the same basic process as the bottom for the drumhead, and I put the whole thing back in the lathe to even out the diameter and carve out the channel for the ebony. Lest you think this all went smoothly - my first attempt at the upper capstan turned out pretty crappy. Too wide of an ebony circle , kinda thin, and overall just kinda crappy looking.
So I gave it another shot using three sections of boxwood instead of two, carving out the capstan bar holes from the middle piece. This extra thickness gave me some wiggle room when it came to shaping the drumhead. I sacrificed one of my chisels to get the right sized notch for the ebony ring then used the same wood putty filler and smoothing the whole thing out.
Finally, after adding the whelps and filler pieces, I connected the two capstans for mounting later.
-
 Moonbug got a reaction from Nipper in HMS Pegasus 1776 by Moonbug - Amati Models - 1:64
Not of lot of progress being made right now, just concentrating on faking down the rope coils. Everyone has their own individual processes and jigs for this. I have created a rope jig where I coil different size ropes in three main ways - coils for cleats, rope coils on the deck, and coils flopped over rails. Each rope is wrapped over the jib then slathered in diluted PVA. It is important to get the dilution of the pva correct as too thin means it doesn't hold and too think produces a sloppy coil with bits of glue visible.
I also hand loop coils for the deck, place them on a plastic sheet (so the glue comes up easily after it's dried) then coat them with the PVA. Obviously its also important to carefully match the rope sizes with the ropes that are seized. They are then placed in their various locations around the ship.
As shown above, the coils are coated again once they're in place and held with various clips and pins. A small metal wire holds the railing coils in place until they dry.
Honestly, I've never been a fan of coils that are too tidy. I did that on my San Juan build (which was my first) and never really dug it. Some bit of disheveled seems much more realistic to me. Meantime, I'm slowly moving from the aft to the fore of the ship, with much more work to go.
-
Moonbug got a reaction from brunnels in HMS Pegasus 1776 by Moonbug - Amati Models - 1:64
Not of lot of progress being made right now, just concentrating on faking down the rope coils. Everyone has their own individual processes and jigs for this. I have created a rope jig where I coil different size ropes in three main ways - coils for cleats, rope coils on the deck, and coils flopped over rails. Each rope is wrapped over the jib then slathered in diluted PVA. It is important to get the dilution of the pva correct as too thin means it doesn't hold and too think produces a sloppy coil with bits of glue visible.
I also hand loop coils for the deck, place them on a plastic sheet (so the glue comes up easily after it's dried) then coat them with the PVA. Obviously its also important to carefully match the rope sizes with the ropes that are seized. They are then placed in their various locations around the ship.
As shown above, the coils are coated again once they're in place and held with various clips and pins. A small metal wire holds the railing coils in place until they dry.
Honestly, I've never been a fan of coils that are too tidy. I did that on my San Juan build (which was my first) and never really dug it. Some bit of disheveled seems much more realistic to me. Meantime, I'm slowly moving from the aft to the fore of the ship, with much more work to go.
-
 Moonbug got a reaction from AJohnson in HMS Pegasus 1776 by Moonbug - Amati Models - 1:64
I'm heading on vacation for a week, so I wanted to knock out the cluelines & sheets and buntlines for the topsail yards before I left. While these are all pretty straightforward in terms of path - they do take a fair amount of preplanning to run the lines so they are functional and don't foul other lines. The main topsail clue lines follow the same general pattern as the lower yards. The sheets (.40mm) are crown knotted (mine is simulated) and fed through the strop of the clue block (3.5mm). The clue lines are .30mm with the standing end timber hitched to the yard, run through the clue block, then back up through the clue block on the yard before heading down through the hole in the mast top to the deck. The Sheets run from the crown knot down to the lower shoulder block on the end of the lower yards, behind the yard to the quarter block then down to belay.
The main topsail lines run down to the breastwork at the mast or one of the available eye bolts. I'll be completely honest here - at this point, I'm finding any available railing, bitt, or eye bolt that allows for belaying without fouling any of the lines. There is VERY little room at the base of the masts at this point and belaying points are at a premium.
The Mizzen clues run in the same fashion, and once again I find real estate to belay lines. I've shifted the lines around at the base of the mizzen several times at this point, and will likely shift them more.
Once again (as with the lower yards) I'm running bunt lines even though there are no sails. Following the same policy as the lower yards, the buntlines for the topsail yards will knot at their respective blocks, then run their course. In the case of the topsail yards, the bunt lines are knotted at the two blocks attached to the center of the yard, then run up to two more blocks at the mast top before heading down along the mast to belay.
Following my policy of running sail lines without sails - I'm also running the mizzen's brail lines. Not something I've seen on very many (if any) models without sails. But, once again, I don't like seeing "empty" blocks, and the three pair of brail blocks on the gaff would typically hold the sail. The three pair are the throat brails (closest to the mast), the middle brails, and the peak brails. According to Marquardt (pg 214) and Lees (pg 109) the peak would belay at a cleat on the aft spirketting - I'm substituting an eyebolt in that area. The middle would run through a lead block down to a shroud cleat, and the throat brails would belay at the mast. As with the buntlines, I'm knotting the lines at the blocks and then running them along their designated path.
T'gallants are up next after I return from Vacation. In the meantime, here are a couple of gratuitous shots of the intricate spiderweb.
-
 Moonbug got a reaction from KARAVOKIRIS in HMS Pegasus 1776 by Moonbug - Amati Models - 1:64
Not of lot of progress being made right now, just concentrating on faking down the rope coils. Everyone has their own individual processes and jigs for this. I have created a rope jig where I coil different size ropes in three main ways - coils for cleats, rope coils on the deck, and coils flopped over rails. Each rope is wrapped over the jib then slathered in diluted PVA. It is important to get the dilution of the pva correct as too thin means it doesn't hold and too think produces a sloppy coil with bits of glue visible.
I also hand loop coils for the deck, place them on a plastic sheet (so the glue comes up easily after it's dried) then coat them with the PVA. Obviously its also important to carefully match the rope sizes with the ropes that are seized. They are then placed in their various locations around the ship.
As shown above, the coils are coated again once they're in place and held with various clips and pins. A small metal wire holds the railing coils in place until they dry.
Honestly, I've never been a fan of coils that are too tidy. I did that on my San Juan build (which was my first) and never really dug it. Some bit of disheveled seems much more realistic to me. Meantime, I'm slowly moving from the aft to the fore of the ship, with much more work to go.
-
Moonbug got a reaction from KARAVOKIRIS in HMS Pegasus 1776 by Moonbug - Amati Models - 1:64
Thankfully the T'Gallant masts are much simpler to outfit than the other masts. Both the fore and main T'gallants have just a pair of clueline blocks a short distance from the center. The horses do not have stirrups, with just a single on each side overlapping in the center. The blocks are 5" (once again 2.5mm is the smallest I use out of sheer practicality) and the horses are 1.5" (.20mm) lines.
There is nothing simple about the parrels however. A smaller version of the others, these little things have minuscule ribs that are 2.5mm long at scale, and trucks that are under a millimeter. I spent half a morning just scouring my shop looking for things to use to meet these requirements. I tried a few things that just didn't work before settling on a couple things that panned out. For the trucks, I found brown wire within an old ethernet cable. After pulling the copper out, I was able to slice the insulation into the appropriate sized trucks. At this scale (even measuring out a millimeter guide) I ended up cutting about 20 and then pulling out the ten that were the most consistent.
For the Ribs, I finally settled on a piece of thick, brown construction paper. Everything else I tried was either unmanageable at this scale (fell apart when I tried to cut, or manipulate) or was too think and looked out of scale. I started by cutting 3mm long by 1mm wide strips, cutting off the corners then creating a 'notch' with a scalpel to create the shape. The holes are made with a dental pick.
The parrel is put together on a .10mm line then attached to the t'gallant mast in the same way as the other parrels. First looped around the yard, then mounted to the mast wrapping the line around the 'valley' of the ribs and tying off each end. I took the picture of the parrel over the ruler on my hobby mat just to give some idea of just how small and fiddly this darn thing is.
The t'gallant yard tyes are 2" line (.25mm) with the fore being about 54' (256mm at scale) long and the main about 57' (270mm) long. The tye is hitched to the yard by looping the line under the back of the yard, bringing it up under the front, around behind itself then under the yard again, finally to be seized against itself. The Fully Framed Model has a very helpful illustration on page 132.
The tye runs up the fore side of the mast, through the sheave in the hounds, then down the back to a 5" (2.5mm) single block. Another 2.5mm single block is seized to an eye in the mast top. The falls of the tye run from the upper block, down through the bottom single, back up through the upper single, then down through the mast top to belay on the ever populated rail on the quarterdeck for the main and the bitts for the fore. With the masts lowered, the block on the halliard should be about midway down the length of the mast.
The yard lifts are a simplified version of the other yards. The top of the lifts is either a pair of thimbles or small blocks hitched around the top of the mast - I chose blocks because they are (in my opinion) cleaner and easier at this scale. The lifts are eye spliced to the ends of the yard arms (instead of blocks like the other yards), taken up through the aforementioned blocks. then down through the mast tops to belay on the cleats fixed to the upper shrouds.
The yard braces are also a simplified version of the other yards. They too are just eye spliced around the ends of the yard arms. However, the fore and main have different routes along their rigging path. The fore yard braces run aft to a pair of 2.5mm blocks on a span clove hitched around the main topmast stay near the mouse. Each fall is then taken forward to a block seized to an eyebolt on each side of the aft part of the fore top. From there, it descends to belay on the cleats either side of the belfry.
I apologize for the photos above flipping back and forth from the port and starboard perspectives which is a bit confusing, but hopefully you still get the idea. The run of the main t'gallant braces is less complicated. They start as eye splices around the yard arm, run to a similar pair of blocks on a span hitched around the top of the mizzen, then descend to belay on the rail near the aft shrouds.
At this point there is obviously a LOT going on with all the rigging, especially as it travels through the mast tops. So it took (and will probably still take) a lot of rerouting lines so they aren't fouled or bind against one another. I'll continue to take a look as this as I start to secure lines and add coils of rope - which will be my next step. It's also worth noting that according to Marquardt, T'gallant sheets were not used between 1735 and 1790, and I can't find any solid references to determine how the uppermost clue lines may have been rigged without sails; so those will not be included. With that, this marks the end of the running rigging for the Peg.
Here are a couple of overall shots. The white background emphasizes the standing rigging and the black background emphasizes the running rigging.
-
 Moonbug got a reaction from wvdhee in HMS Pegasus 1776 by Moonbug - Amati Models - 1:64
Not of lot of progress being made right now, just concentrating on faking down the rope coils. Everyone has their own individual processes and jigs for this. I have created a rope jig where I coil different size ropes in three main ways - coils for cleats, rope coils on the deck, and coils flopped over rails. Each rope is wrapped over the jib then slathered in diluted PVA. It is important to get the dilution of the pva correct as too thin means it doesn't hold and too think produces a sloppy coil with bits of glue visible.
I also hand loop coils for the deck, place them on a plastic sheet (so the glue comes up easily after it's dried) then coat them with the PVA. Obviously its also important to carefully match the rope sizes with the ropes that are seized. They are then placed in their various locations around the ship.
As shown above, the coils are coated again once they're in place and held with various clips and pins. A small metal wire holds the railing coils in place until they dry.
Honestly, I've never been a fan of coils that are too tidy. I did that on my San Juan build (which was my first) and never really dug it. Some bit of disheveled seems much more realistic to me. Meantime, I'm slowly moving from the aft to the fore of the ship, with much more work to go.
-
.thumb.jpeg.ffac2f8a24d212961a83eab4efb06a6c.jpeg) Moonbug got a reaction from RossR in HMS Pegasus 1776 by Moonbug - Amati Models - 1:64
Moonbug got a reaction from RossR in HMS Pegasus 1776 by Moonbug - Amati Models - 1:64
Not of lot of progress being made right now, just concentrating on faking down the rope coils. Everyone has their own individual processes and jigs for this. I have created a rope jig where I coil different size ropes in three main ways - coils for cleats, rope coils on the deck, and coils flopped over rails. Each rope is wrapped over the jib then slathered in diluted PVA. It is important to get the dilution of the pva correct as too thin means it doesn't hold and too think produces a sloppy coil with bits of glue visible.
I also hand loop coils for the deck, place them on a plastic sheet (so the glue comes up easily after it's dried) then coat them with the PVA. Obviously its also important to carefully match the rope sizes with the ropes that are seized. They are then placed in their various locations around the ship.
As shown above, the coils are coated again once they're in place and held with various clips and pins. A small metal wire holds the railing coils in place until they dry.
Honestly, I've never been a fan of coils that are too tidy. I did that on my San Juan build (which was my first) and never really dug it. Some bit of disheveled seems much more realistic to me. Meantime, I'm slowly moving from the aft to the fore of the ship, with much more work to go.
-
 Moonbug got a reaction from Knocklouder in HMS Pegasus 1776 by Moonbug - Amati Models - 1:64
Not of lot of progress being made right now, just concentrating on faking down the rope coils. Everyone has their own individual processes and jigs for this. I have created a rope jig where I coil different size ropes in three main ways - coils for cleats, rope coils on the deck, and coils flopped over rails. Each rope is wrapped over the jib then slathered in diluted PVA. It is important to get the dilution of the pva correct as too thin means it doesn't hold and too think produces a sloppy coil with bits of glue visible.
I also hand loop coils for the deck, place them on a plastic sheet (so the glue comes up easily after it's dried) then coat them with the PVA. Obviously its also important to carefully match the rope sizes with the ropes that are seized. They are then placed in their various locations around the ship.
As shown above, the coils are coated again once they're in place and held with various clips and pins. A small metal wire holds the railing coils in place until they dry.
Honestly, I've never been a fan of coils that are too tidy. I did that on my San Juan build (which was my first) and never really dug it. Some bit of disheveled seems much more realistic to me. Meantime, I'm slowly moving from the aft to the fore of the ship, with much more work to go.
-
 Moonbug got a reaction from Jack12477 in HMS Pegasus 1776 by Moonbug - Amati Models - 1:64
Not of lot of progress being made right now, just concentrating on faking down the rope coils. Everyone has their own individual processes and jigs for this. I have created a rope jig where I coil different size ropes in three main ways - coils for cleats, rope coils on the deck, and coils flopped over rails. Each rope is wrapped over the jib then slathered in diluted PVA. It is important to get the dilution of the pva correct as too thin means it doesn't hold and too think produces a sloppy coil with bits of glue visible.
I also hand loop coils for the deck, place them on a plastic sheet (so the glue comes up easily after it's dried) then coat them with the PVA. Obviously its also important to carefully match the rope sizes with the ropes that are seized. They are then placed in their various locations around the ship.
As shown above, the coils are coated again once they're in place and held with various clips and pins. A small metal wire holds the railing coils in place until they dry.
Honestly, I've never been a fan of coils that are too tidy. I did that on my San Juan build (which was my first) and never really dug it. Some bit of disheveled seems much more realistic to me. Meantime, I'm slowly moving from the aft to the fore of the ship, with much more work to go.
-
Moonbug got a reaction from Jack12477 in HMS Pegasus 1776 by Moonbug - Amati Models - 1:64
Thanks Walter, BE, Ross, and Andrew - Very much appreciate you all checking in and the kind words. Obviously I've found MSW invaluable over the last 12 years, and so the idea that my build(s) maybe helpful to others is flattering and humbling. I'll have an update soon - right now I'm coiling a lot of small rope - which is tedious and unglamorous.
-
 Moonbug got a reaction from vossiewulf in HMS Pegasus 1776 by Moonbug - Amati Models - 1:64
Not of lot of progress being made right now, just concentrating on faking down the rope coils. Everyone has their own individual processes and jigs for this. I have created a rope jig where I coil different size ropes in three main ways - coils for cleats, rope coils on the deck, and coils flopped over rails. Each rope is wrapped over the jib then slathered in diluted PVA. It is important to get the dilution of the pva correct as too thin means it doesn't hold and too think produces a sloppy coil with bits of glue visible.
I also hand loop coils for the deck, place them on a plastic sheet (so the glue comes up easily after it's dried) then coat them with the PVA. Obviously its also important to carefully match the rope sizes with the ropes that are seized. They are then placed in their various locations around the ship.
As shown above, the coils are coated again once they're in place and held with various clips and pins. A small metal wire holds the railing coils in place until they dry.
Honestly, I've never been a fan of coils that are too tidy. I did that on my San Juan build (which was my first) and never really dug it. Some bit of disheveled seems much more realistic to me. Meantime, I'm slowly moving from the aft to the fore of the ship, with much more work to go.
-
Moonbug reacted to Knocklouder in HMS Pegasus 1776 by Moonbug - Amati Models - 1:64
Just awesome work, beautiful. I have this booked marked as well, when ever I can get back to it. Lol. Thank you for posting this log , it has and will be very instrumental in finishing my Pegasus.
Thanks so much,
Bob M.
-
Moonbug got a reaction from AJohnson in HMS Pegasus 1776 by Moonbug - Amati Models - 1:64
Thanks Walter, BE, Ross, and Andrew - Very much appreciate you all checking in and the kind words. Obviously I've found MSW invaluable over the last 12 years, and so the idea that my build(s) maybe helpful to others is flattering and humbling. I'll have an update soon - right now I'm coiling a lot of small rope - which is tedious and unglamorous.
-
Moonbug got a reaction from wvdhee in HMS Pegasus 1776 by Moonbug - Amati Models - 1:64
Thanks Walter, BE, Ross, and Andrew - Very much appreciate you all checking in and the kind words. Obviously I've found MSW invaluable over the last 12 years, and so the idea that my build(s) maybe helpful to others is flattering and humbling. I'll have an update soon - right now I'm coiling a lot of small rope - which is tedious and unglamorous.
-
 Moonbug got a reaction from muratx in HMS Pegasus 1776 by Moonbug - Amati Models - 1:64
Thankfully the T'Gallant masts are much simpler to outfit than the other masts. Both the fore and main T'gallants have just a pair of clueline blocks a short distance from the center. The horses do not have stirrups, with just a single on each side overlapping in the center. The blocks are 5" (once again 2.5mm is the smallest I use out of sheer practicality) and the horses are 1.5" (.20mm) lines.
There is nothing simple about the parrels however. A smaller version of the others, these little things have minuscule ribs that are 2.5mm long at scale, and trucks that are under a millimeter. I spent half a morning just scouring my shop looking for things to use to meet these requirements. I tried a few things that just didn't work before settling on a couple things that panned out. For the trucks, I found brown wire within an old ethernet cable. After pulling the copper out, I was able to slice the insulation into the appropriate sized trucks. At this scale (even measuring out a millimeter guide) I ended up cutting about 20 and then pulling out the ten that were the most consistent.
For the Ribs, I finally settled on a piece of thick, brown construction paper. Everything else I tried was either unmanageable at this scale (fell apart when I tried to cut, or manipulate) or was too think and looked out of scale. I started by cutting 3mm long by 1mm wide strips, cutting off the corners then creating a 'notch' with a scalpel to create the shape. The holes are made with a dental pick.
The parrel is put together on a .10mm line then attached to the t'gallant mast in the same way as the other parrels. First looped around the yard, then mounted to the mast wrapping the line around the 'valley' of the ribs and tying off each end. I took the picture of the parrel over the ruler on my hobby mat just to give some idea of just how small and fiddly this darn thing is.
The t'gallant yard tyes are 2" line (.25mm) with the fore being about 54' (256mm at scale) long and the main about 57' (270mm) long. The tye is hitched to the yard by looping the line under the back of the yard, bringing it up under the front, around behind itself then under the yard again, finally to be seized against itself. The Fully Framed Model has a very helpful illustration on page 132.
The tye runs up the fore side of the mast, through the sheave in the hounds, then down the back to a 5" (2.5mm) single block. Another 2.5mm single block is seized to an eye in the mast top. The falls of the tye run from the upper block, down through the bottom single, back up through the upper single, then down through the mast top to belay on the ever populated rail on the quarterdeck for the main and the bitts for the fore. With the masts lowered, the block on the halliard should be about midway down the length of the mast.
The yard lifts are a simplified version of the other yards. The top of the lifts is either a pair of thimbles or small blocks hitched around the top of the mast - I chose blocks because they are (in my opinion) cleaner and easier at this scale. The lifts are eye spliced to the ends of the yard arms (instead of blocks like the other yards), taken up through the aforementioned blocks. then down through the mast tops to belay on the cleats fixed to the upper shrouds.
The yard braces are also a simplified version of the other yards. They too are just eye spliced around the ends of the yard arms. However, the fore and main have different routes along their rigging path. The fore yard braces run aft to a pair of 2.5mm blocks on a span clove hitched around the main topmast stay near the mouse. Each fall is then taken forward to a block seized to an eyebolt on each side of the aft part of the fore top. From there, it descends to belay on the cleats either side of the belfry.
I apologize for the photos above flipping back and forth from the port and starboard perspectives which is a bit confusing, but hopefully you still get the idea. The run of the main t'gallant braces is less complicated. They start as eye splices around the yard arm, run to a similar pair of blocks on a span hitched around the top of the mizzen, then descend to belay on the rail near the aft shrouds.
At this point there is obviously a LOT going on with all the rigging, especially as it travels through the mast tops. So it took (and will probably still take) a lot of rerouting lines so they aren't fouled or bind against one another. I'll continue to take a look as this as I start to secure lines and add coils of rope - which will be my next step. It's also worth noting that according to Marquardt, T'gallant sheets were not used between 1735 and 1790, and I can't find any solid references to determine how the uppermost clue lines may have been rigged without sails; so those will not be included. With that, this marks the end of the running rigging for the Peg.
Here are a couple of overall shots. The white background emphasizes the standing rigging and the black background emphasizes the running rigging.
-
Moonbug got a reaction from Knocklouder in HMS Pegasus 1776 by Moonbug - Amati Models - 1:64
Thankfully the T'Gallant masts are much simpler to outfit than the other masts. Both the fore and main T'gallants have just a pair of clueline blocks a short distance from the center. The horses do not have stirrups, with just a single on each side overlapping in the center. The blocks are 5" (once again 2.5mm is the smallest I use out of sheer practicality) and the horses are 1.5" (.20mm) lines.
There is nothing simple about the parrels however. A smaller version of the others, these little things have minuscule ribs that are 2.5mm long at scale, and trucks that are under a millimeter. I spent half a morning just scouring my shop looking for things to use to meet these requirements. I tried a few things that just didn't work before settling on a couple things that panned out. For the trucks, I found brown wire within an old ethernet cable. After pulling the copper out, I was able to slice the insulation into the appropriate sized trucks. At this scale (even measuring out a millimeter guide) I ended up cutting about 20 and then pulling out the ten that were the most consistent.
For the Ribs, I finally settled on a piece of thick, brown construction paper. Everything else I tried was either unmanageable at this scale (fell apart when I tried to cut, or manipulate) or was too think and looked out of scale. I started by cutting 3mm long by 1mm wide strips, cutting off the corners then creating a 'notch' with a scalpel to create the shape. The holes are made with a dental pick.
The parrel is put together on a .10mm line then attached to the t'gallant mast in the same way as the other parrels. First looped around the yard, then mounted to the mast wrapping the line around the 'valley' of the ribs and tying off each end. I took the picture of the parrel over the ruler on my hobby mat just to give some idea of just how small and fiddly this darn thing is.
The t'gallant yard tyes are 2" line (.25mm) with the fore being about 54' (256mm at scale) long and the main about 57' (270mm) long. The tye is hitched to the yard by looping the line under the back of the yard, bringing it up under the front, around behind itself then under the yard again, finally to be seized against itself. The Fully Framed Model has a very helpful illustration on page 132.
The tye runs up the fore side of the mast, through the sheave in the hounds, then down the back to a 5" (2.5mm) single block. Another 2.5mm single block is seized to an eye in the mast top. The falls of the tye run from the upper block, down through the bottom single, back up through the upper single, then down through the mast top to belay on the ever populated rail on the quarterdeck for the main and the bitts for the fore. With the masts lowered, the block on the halliard should be about midway down the length of the mast.
The yard lifts are a simplified version of the other yards. The top of the lifts is either a pair of thimbles or small blocks hitched around the top of the mast - I chose blocks because they are (in my opinion) cleaner and easier at this scale. The lifts are eye spliced to the ends of the yard arms (instead of blocks like the other yards), taken up through the aforementioned blocks. then down through the mast tops to belay on the cleats fixed to the upper shrouds.
The yard braces are also a simplified version of the other yards. They too are just eye spliced around the ends of the yard arms. However, the fore and main have different routes along their rigging path. The fore yard braces run aft to a pair of 2.5mm blocks on a span clove hitched around the main topmast stay near the mouse. Each fall is then taken forward to a block seized to an eyebolt on each side of the aft part of the fore top. From there, it descends to belay on the cleats either side of the belfry.
I apologize for the photos above flipping back and forth from the port and starboard perspectives which is a bit confusing, but hopefully you still get the idea. The run of the main t'gallant braces is less complicated. They start as eye splices around the yard arm, run to a similar pair of blocks on a span hitched around the top of the mizzen, then descend to belay on the rail near the aft shrouds.
At this point there is obviously a LOT going on with all the rigging, especially as it travels through the mast tops. So it took (and will probably still take) a lot of rerouting lines so they aren't fouled or bind against one another. I'll continue to take a look as this as I start to secure lines and add coils of rope - which will be my next step. It's also worth noting that according to Marquardt, T'gallant sheets were not used between 1735 and 1790, and I can't find any solid references to determine how the uppermost clue lines may have been rigged without sails; so those will not be included. With that, this marks the end of the running rigging for the Peg.
Here are a couple of overall shots. The white background emphasizes the standing rigging and the black background emphasizes the running rigging.