HOLIDAY DONATION DRIVE - SUPPORT MSW - DO YOUR PART TO KEEP THIS GREAT FORUM GOING! (Only 66 donations so far out of 49,000 members - Can we at least get100? C'mon guys!)
×

MarisStella.hr
-
Posts
479 -
Joined
-
Last visited
Content Type
Profiles
Forums
Gallery
Events
Everything posted by MarisStella.hr
-
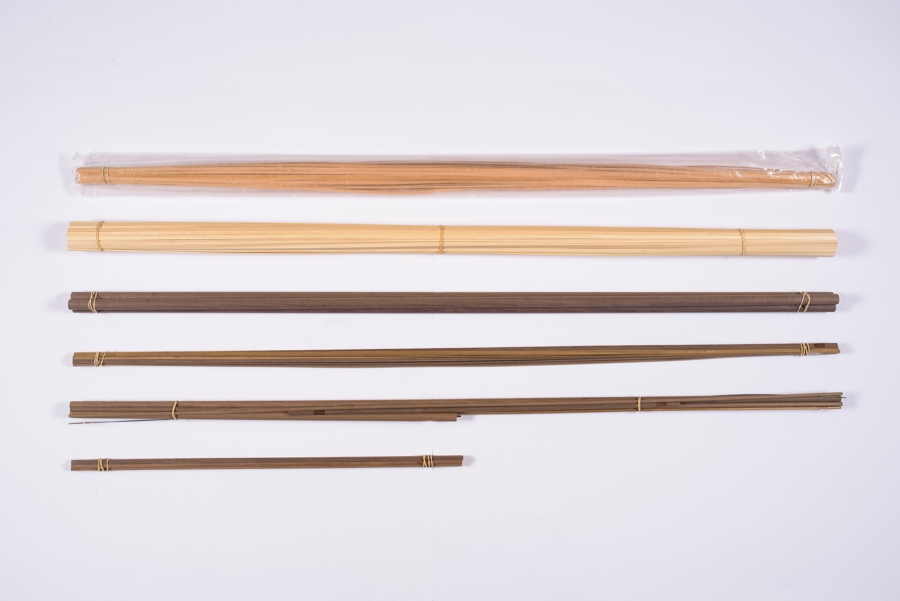
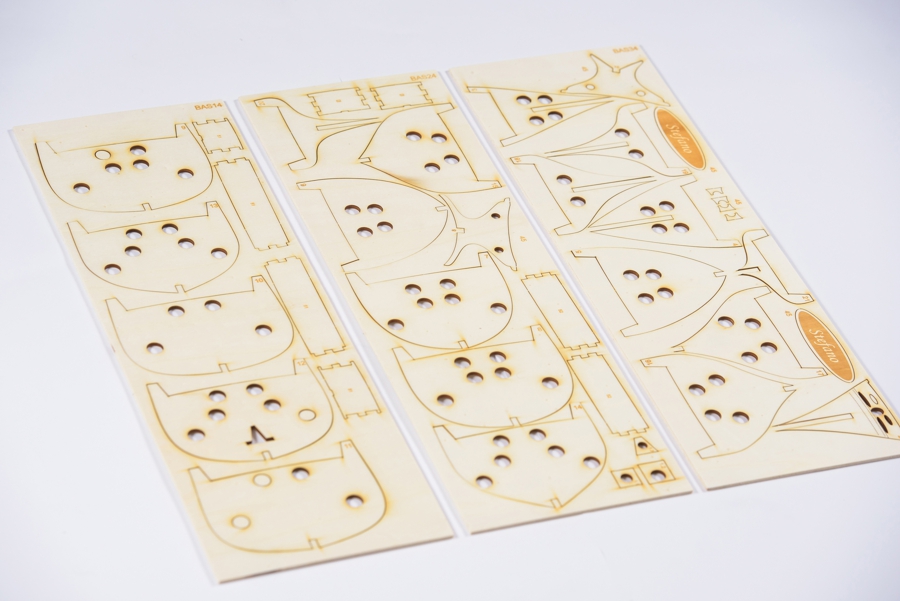
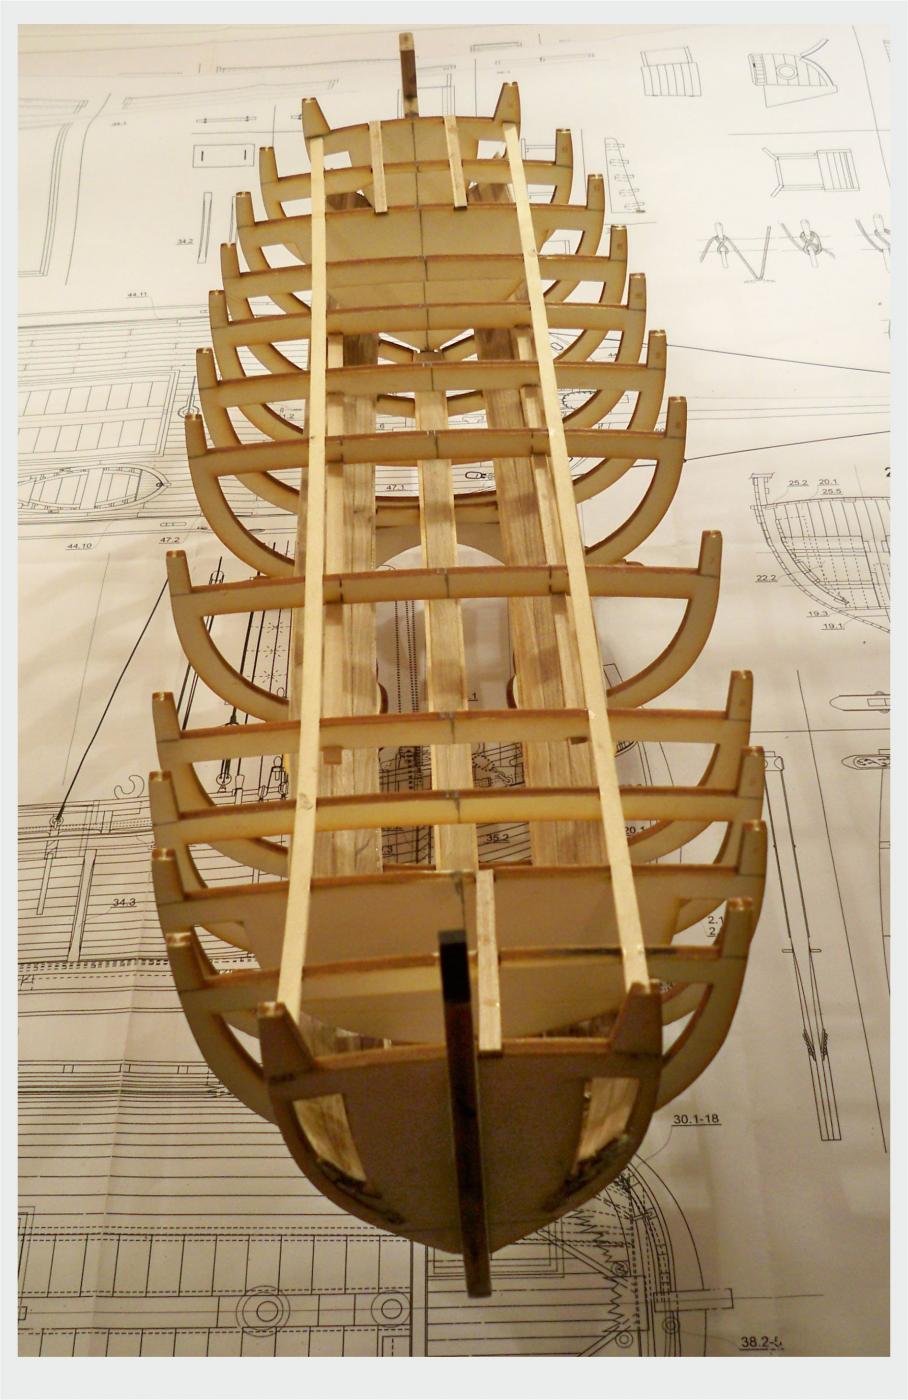
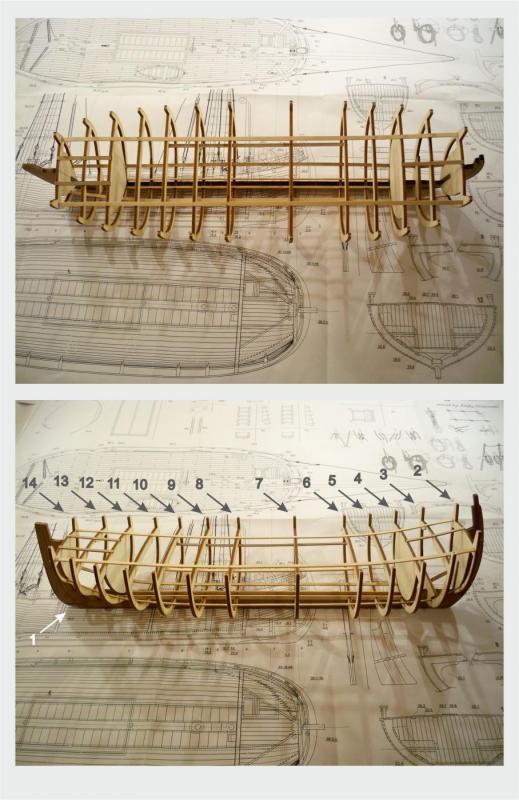
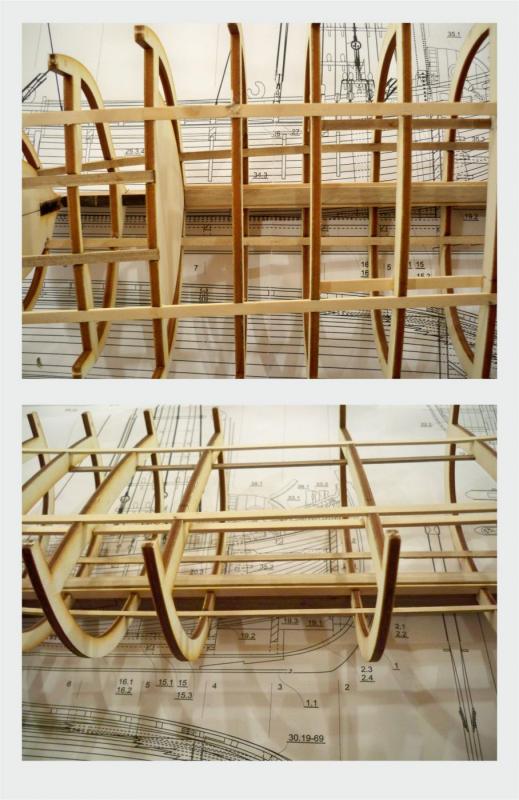
 Hi Mr Jack.... I am glad to discuss these things with You ... the first thing we had on our mind when designing a kit is to get a model in the end that looks as the original vessel. This is not an easy thing. At this example, particulary at those frames, You could imagine frames made of plywood. They would not look as the original.... Cutting those frames at the solid wood panel is ok... but they would be very fragile and some of them would be broken while sanded or glued at the place... So, the only solution was to use strips, that are the same dimensions (or very close) to the original ... Using some kind of tongs for strip bending is right thing because You could bend a frame at the place, according to the loop You have at the model. This is a very fast process ... Some of the frames at the bow and stern need to be done in a different way : some pieces of the strip should be glued to each other and then sanded to the shape ... ... There are 12 aditional frame sections ... You can find them at the sheet no 2 of the draft ... While making this kit design, I considered they would be quite enough. The other frames could be made very easily using those 12 sections because they are very like each other... ... Making this kind of the kits some very interesting thing happened : we get some of the scratch builders to build models out from those kits. I found this very interesting... Some of them are very advanced builders. They do care of each nail or wedge at the model, so all I am doing at this time period is making the advanced instructions (the specific ways of planking, nails, wedges etc...) . Now we care of those things thanks to them... Italian language is included into this, so , very soon, our complete program will be improved and available in Italian too ... Dear Mr. Jack, Your approach is very advanced one. Personaly, I enjoy following Your build. This notes, You put on the project, will be reviewed. I can see this placed into the advanced instruction set ... Thank You so much. I can't wait to see more . Regards, Zoran
- 174 replies
-
- 2
-

-
- gaeta falcata
- marisstella
- (and 1 more)
-
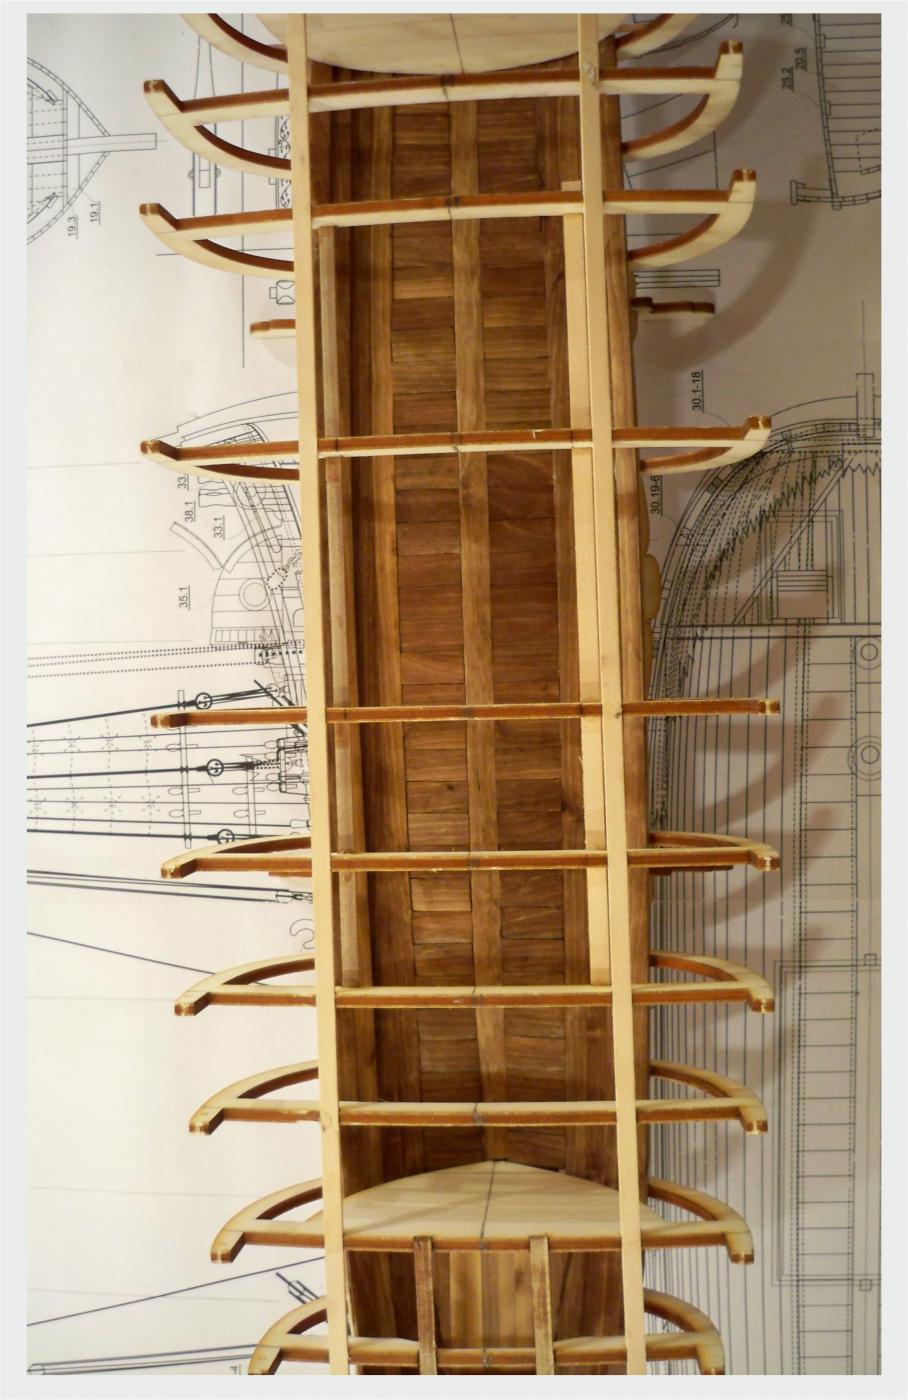
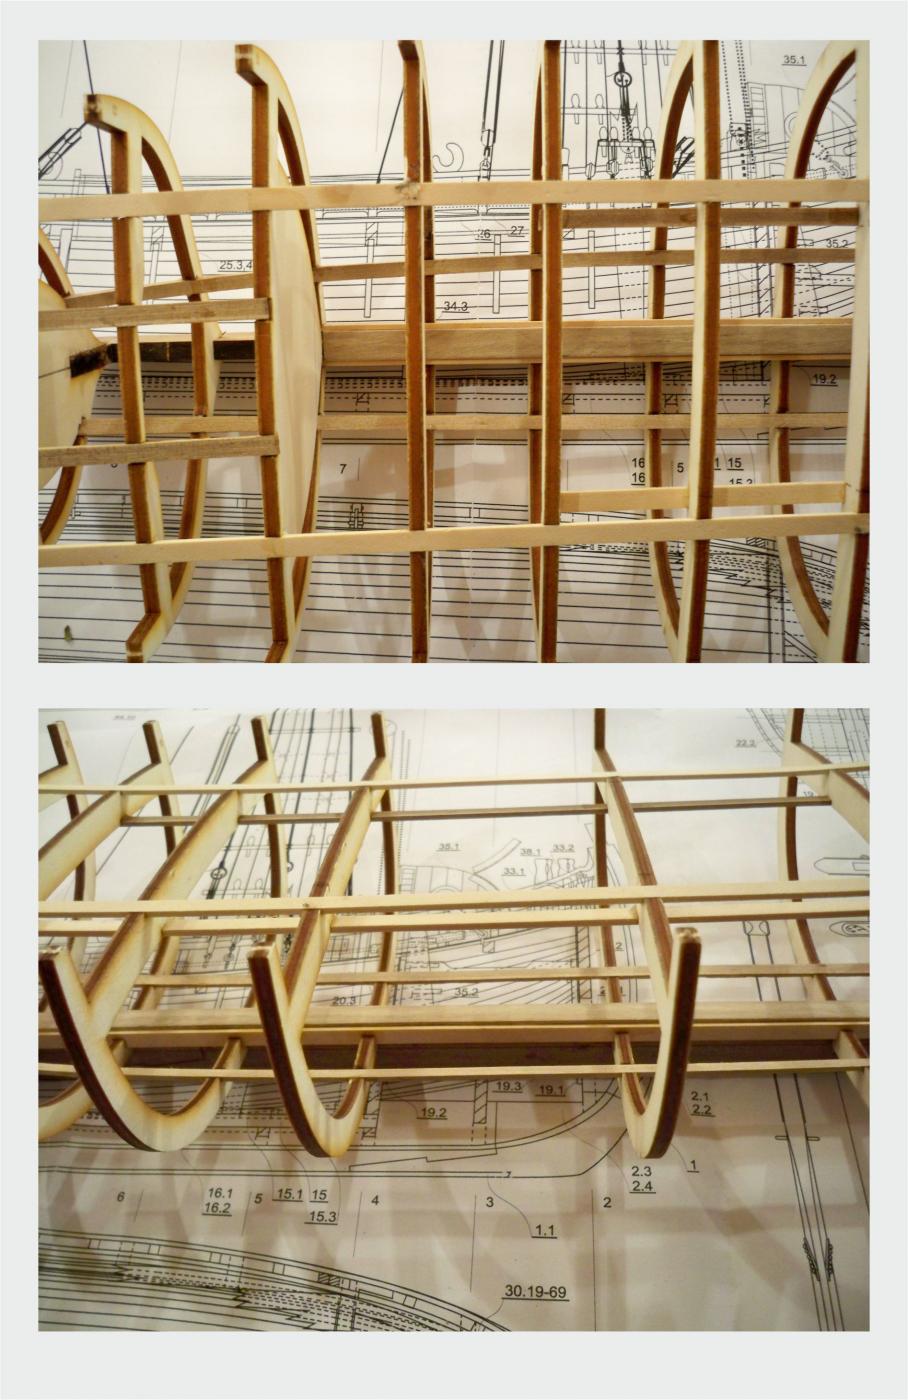
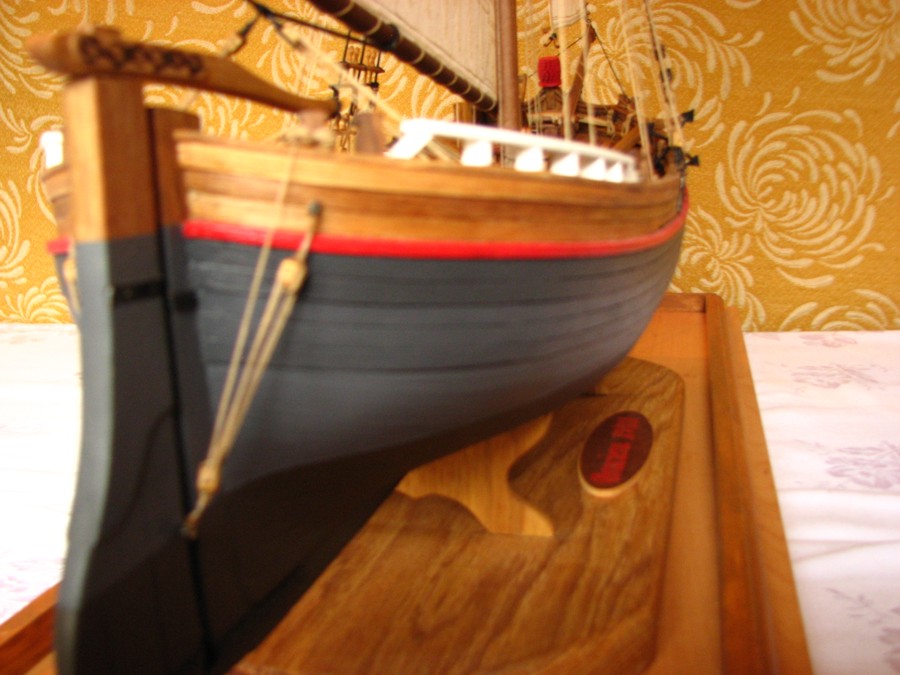
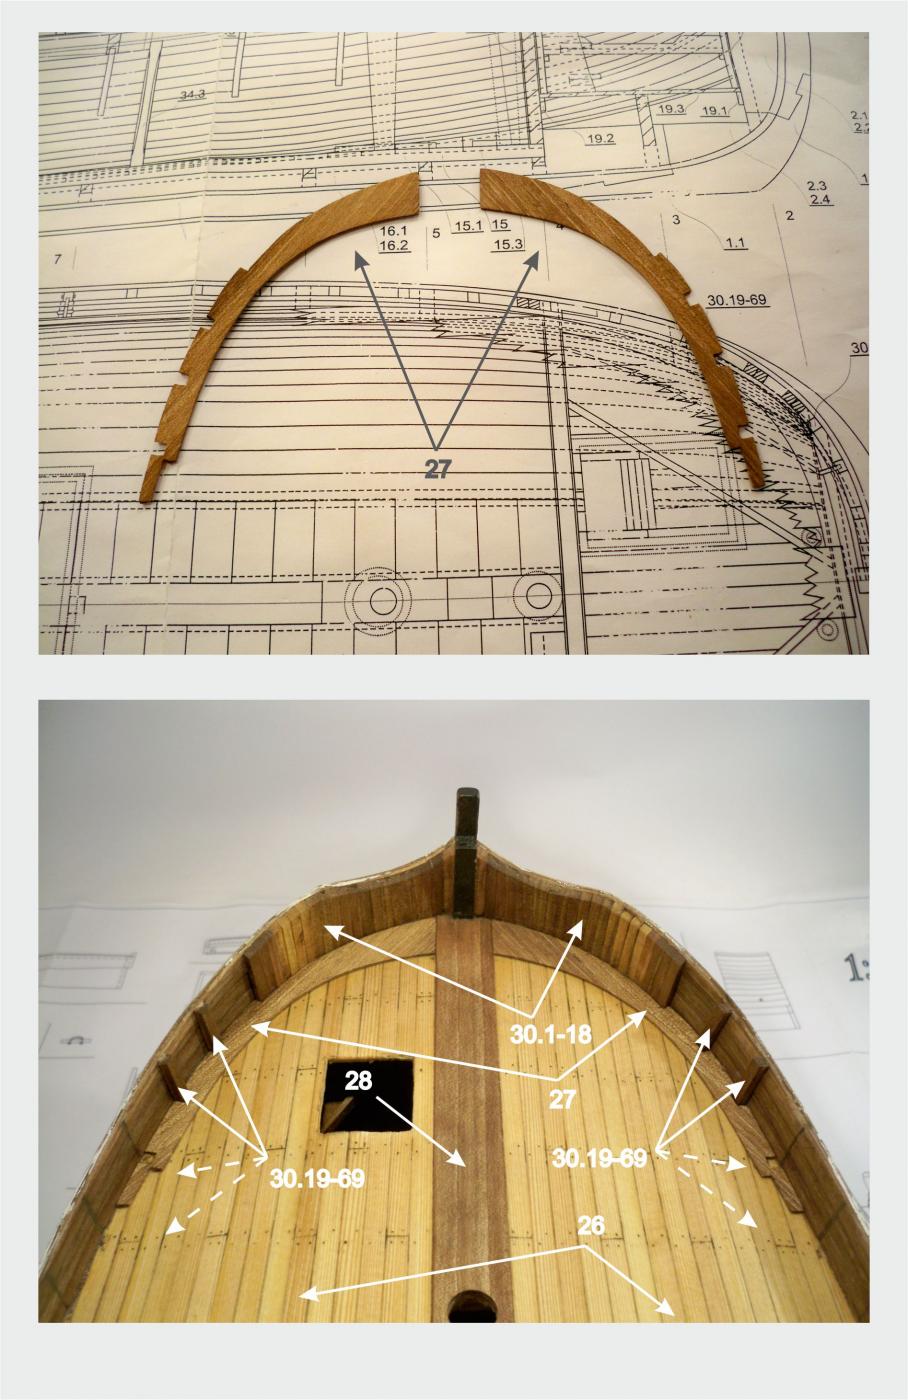
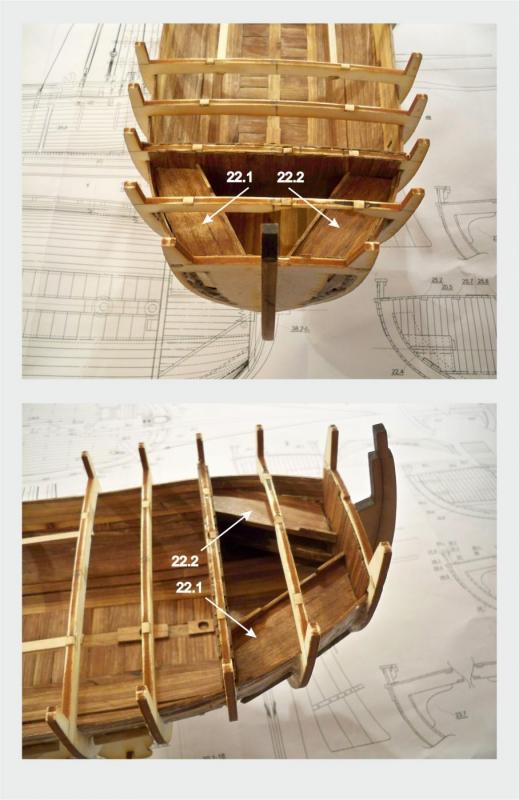
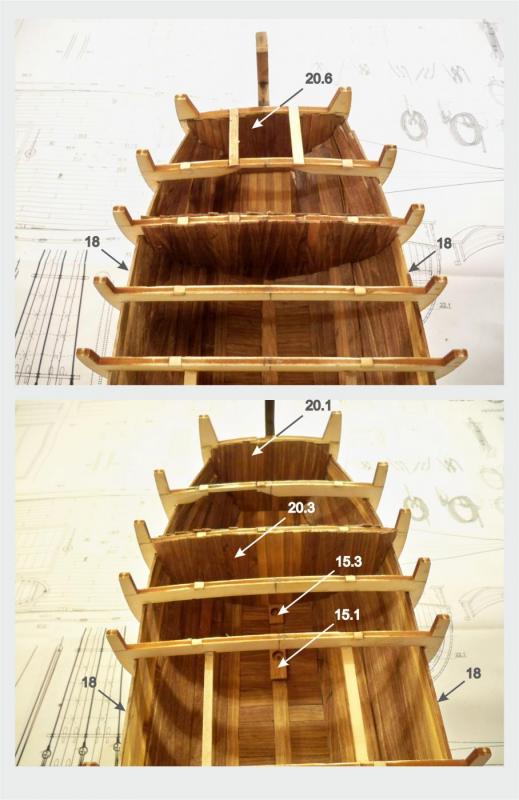
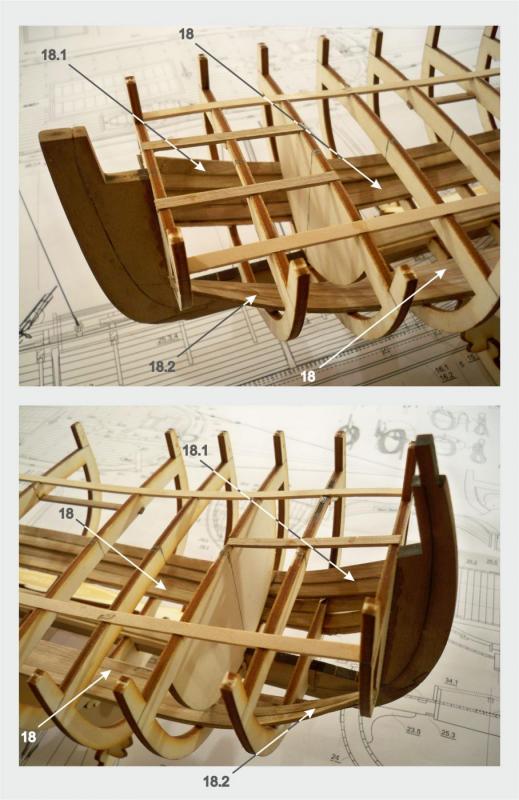
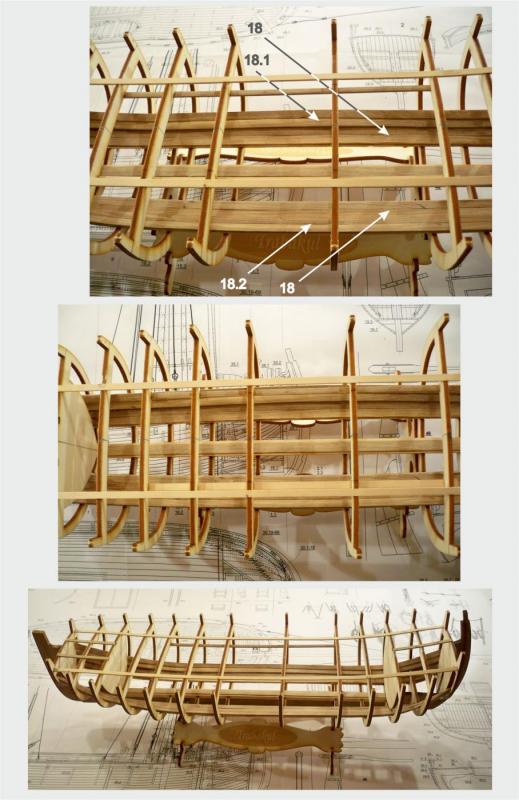
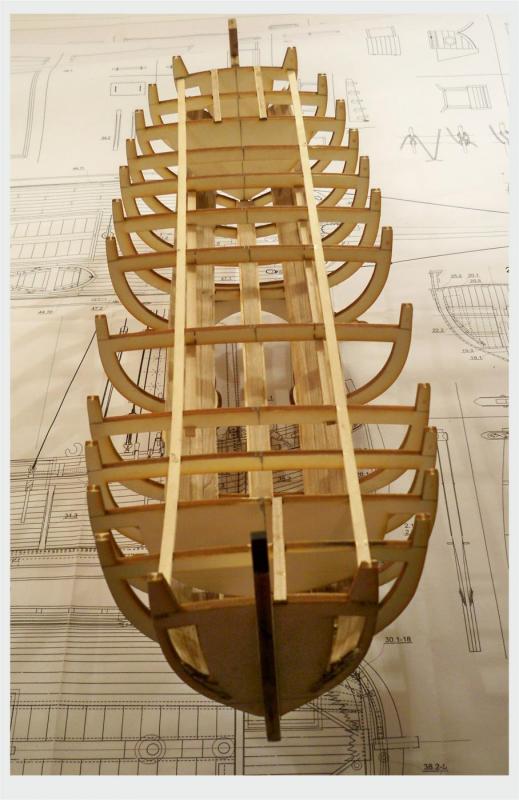
... The interior is finished by installing of beds ... two in the stern cabin and four into the bow cabin .... after this the construction should be prepared for planking ...
-
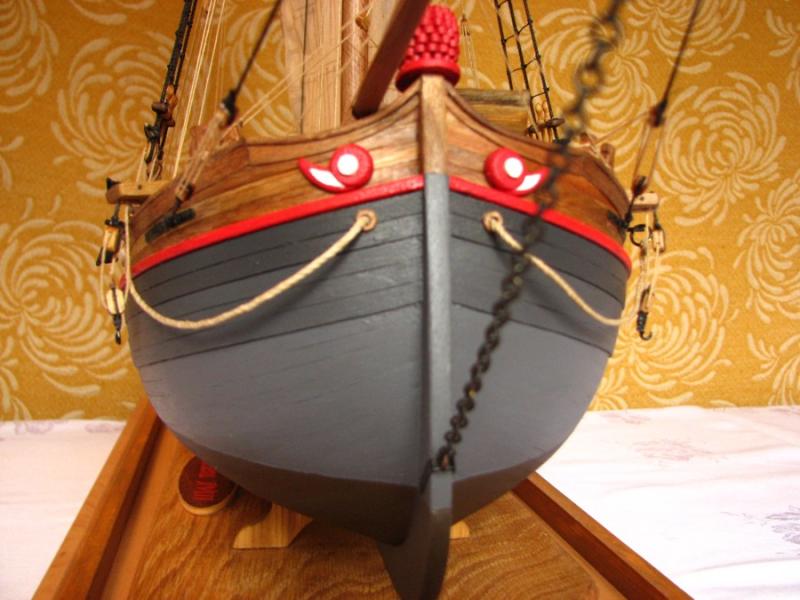
Hello all Dear Mr. Jean-Pierre, thanks for a very nice words, they are seriously encouraging ... Dear Mr. Jack ... now You have got me ! I have to say a few words about this method ... The first of all, our models, build from the kits, have one very important mark : this is that , when the model is finished, You would never say that it was a build from a kit ... This is very important in the ship modelling world ... This model has open hull , uncoloured from inside, so any laser cut frame would be recognizable ... The other thing is that the hull has a small deformation when removed from the mold, so this deformation is different at different models (of the same sort), so the laser cut elements are not fitting well enough ... One thing more : the natural wood is fragile and it is easy to break, not suitable for laser cut frames.... The price of the kit would be considerably higher with laser cut frames ... There is a nice , precise drawing for installing the frames in the kit, a bundle of the walnut strips as the bundle of the lime wood strips, so the modeler can make a choice what is he (or she) going to use... In the end You have a model not recognizable as the kit build ... This , all, we had in mind when designing this kit box... Dear Mr. Jack, Thank You very much for building one of these models ... Your build is very good one and Your approach is very detailed one... Don't take me in a wrong way please, but I must note : the complete work could be considerably faster by use of some other sorts of the glue and by use of some ''tongs'' for fast strip bending ... Our kit Pasara and Gajeta has the laser cut frames made of plywood, but interior is to be coloured, those frames are the part of the mold and they are not to be removed of the hull. They stay at the model, as a part of it ... So far , I must say, brilliant work Mr. Jack ... It is very nice to see Your art here .... Kind regards, Zoran
- 174 replies
-
- 2
-
-
- gaeta falcata
- marisstella
- (and 1 more)
-
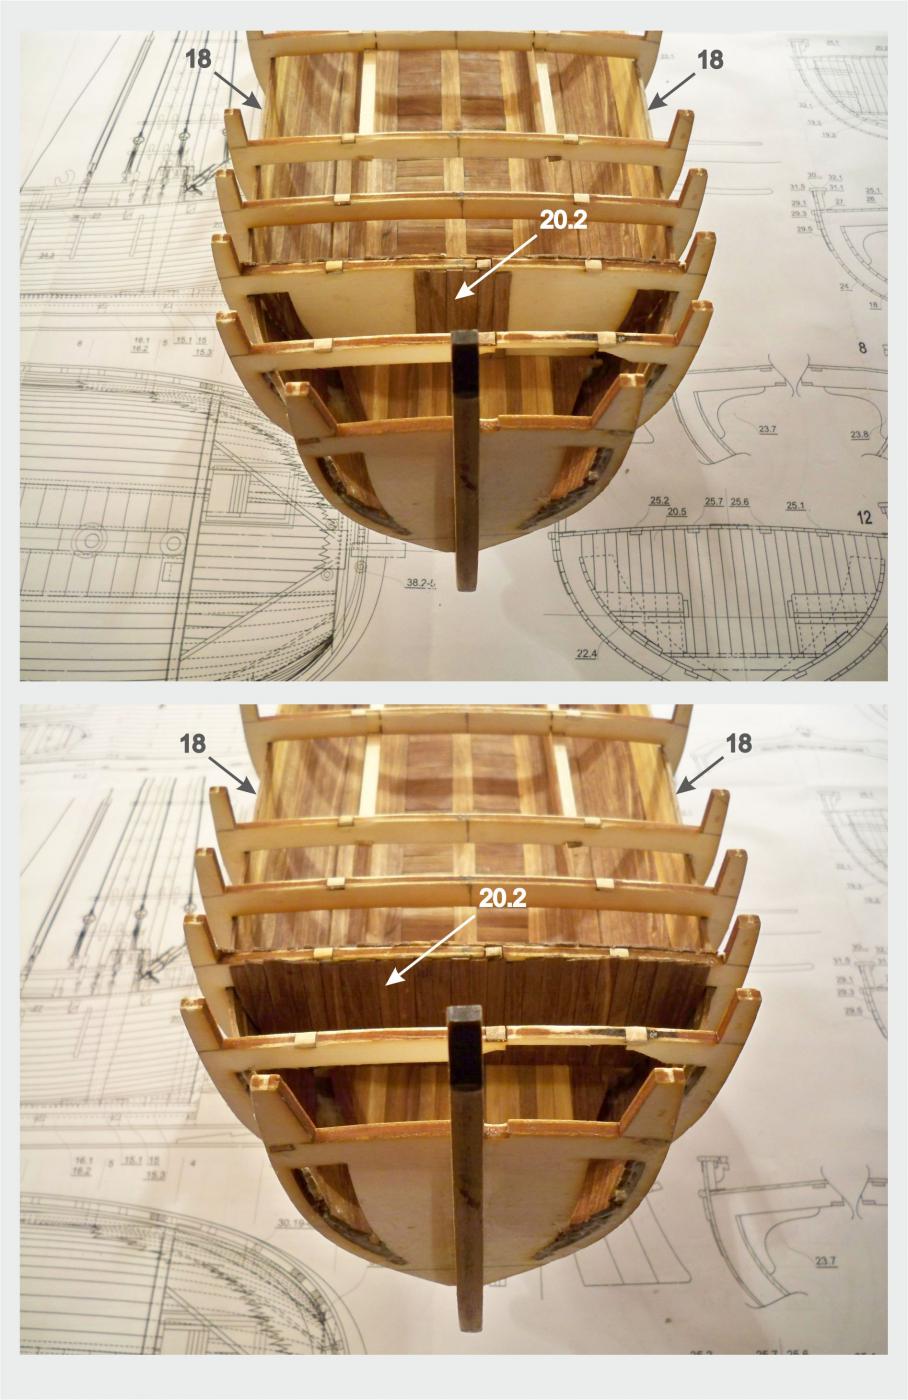
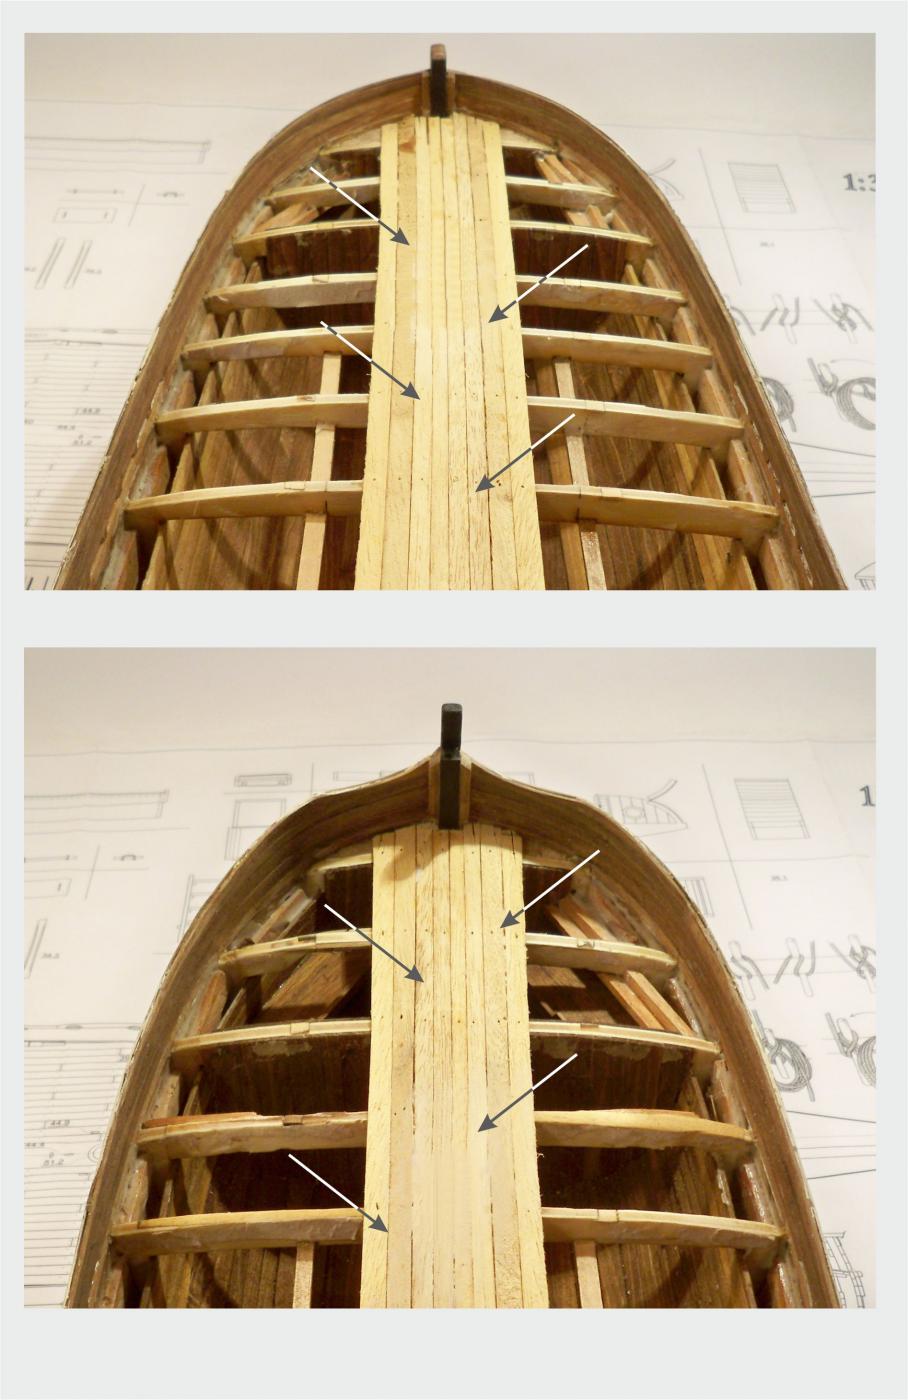
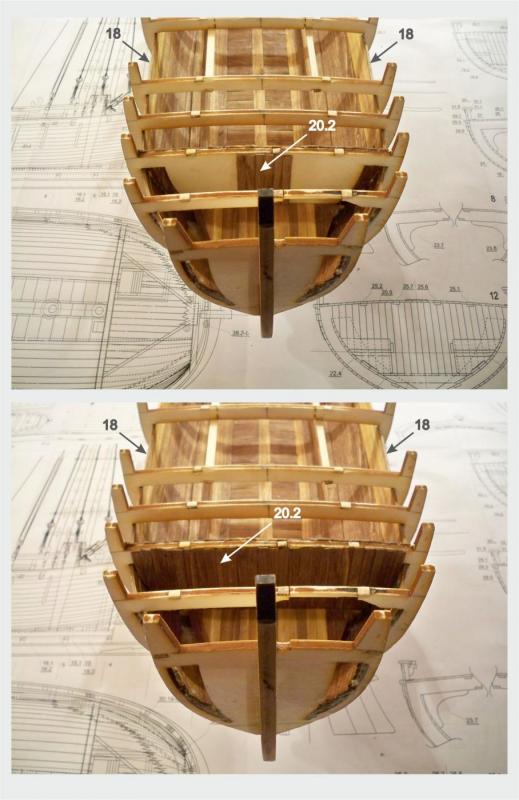
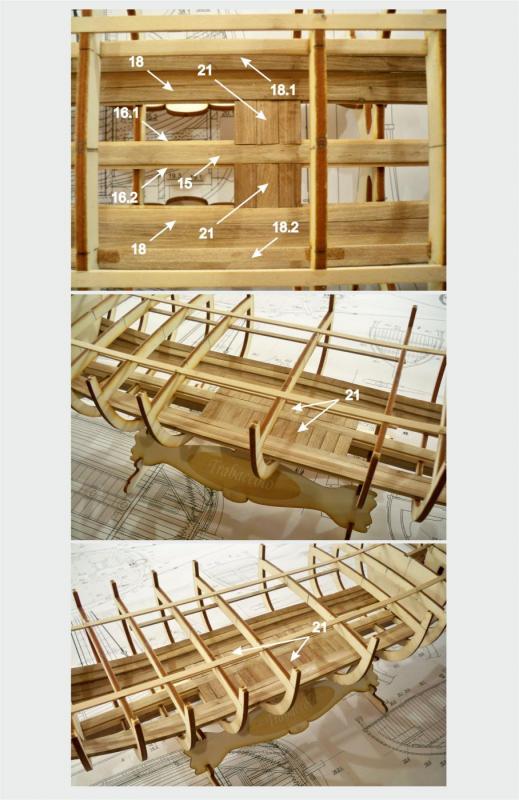
... then the planking of the bulkheads .. When I say bulkheads here I think of the real bulkheads that are the constructive parts of the Trabaccolo... Those are the ''walls'' that separate the storage area from the cabins, and that separate the cabins from the post at the stern and bow ... The bulkheads need to be planked vertically, with the strips 0,5x5mm ... The mast steps and the bitt steps need to be glued at their places ...

-
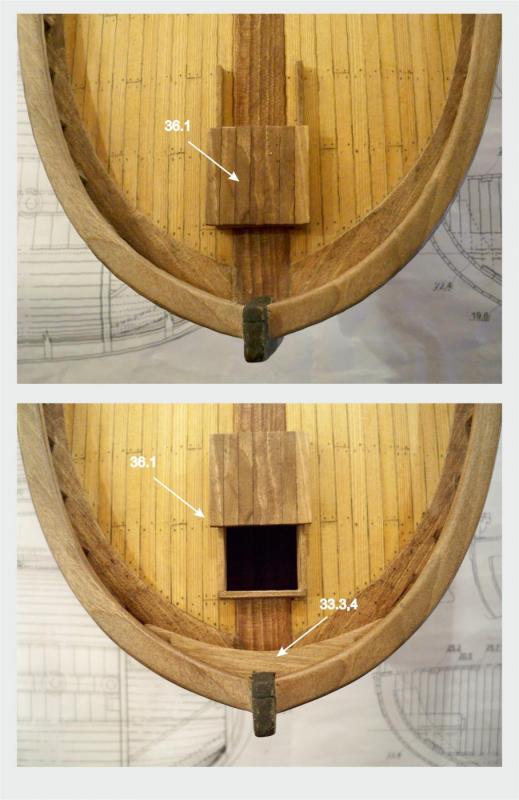
... Here are two cabins at Trabaccolo, one at the stern and one at the bow... It is time to install the floors inside of them ....
-
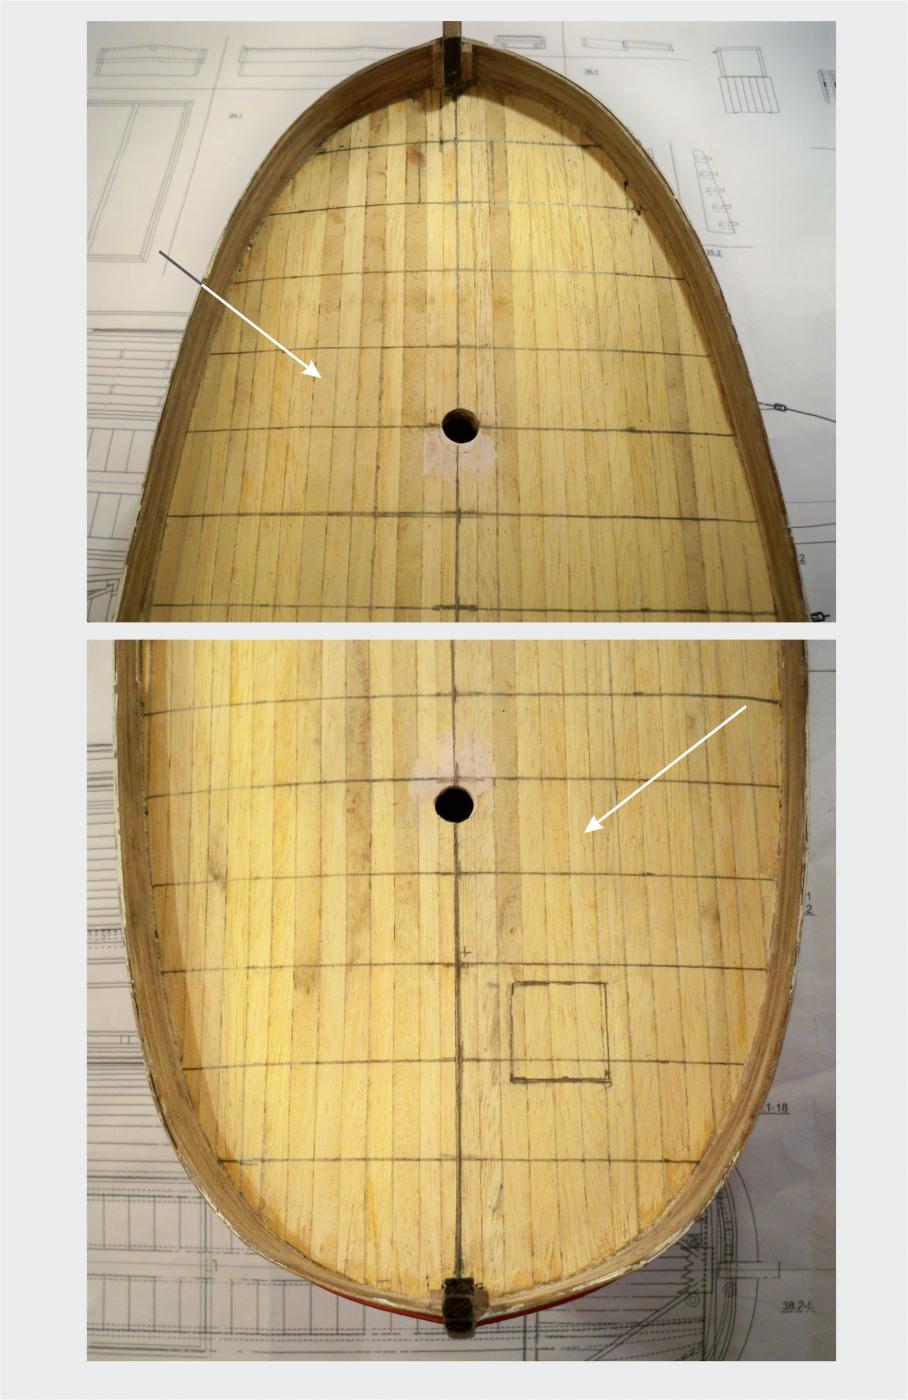
After installing the flooring, the internal planking goes to the deck ...
-
Jean-Pierre, Zoltan, Robinson and the other dear friends, thank you very much... I am going to post some experimental photos here a bit later.... The log will be posted here as well, but I can not promise when would it be ... This model, the one that my colleagues are building now, is preparing for the competition, so there are to many things to do ... But I am sure, You will see the complete build log here ... Best regards, Zoran
-
Thanks Don... Yes... Finally, there are some photographs from our website : ... It was a very hard work to complete this kit, but it was also enjoyable ... Starting from the research work, to the first prototypes, to the kit designing and finaly to the finished kit project ... This kit is producing as a regular MarisStella item now ... Thanks to all of the associates... Best regards, Zoran


-
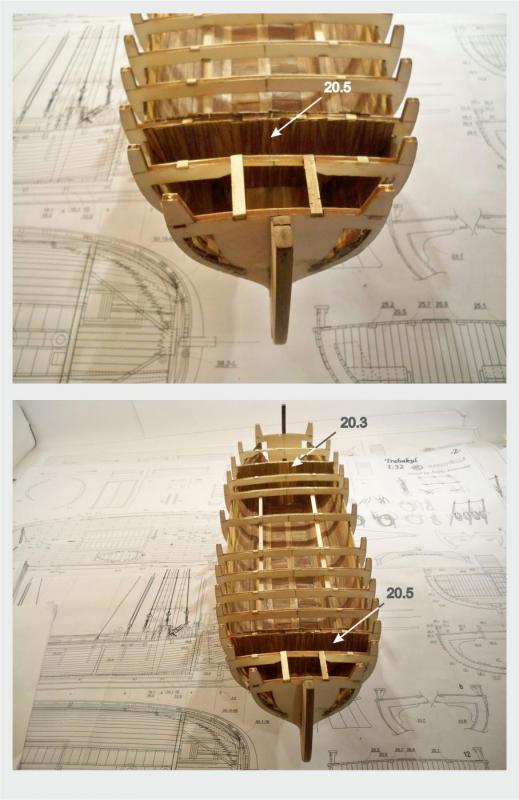
Hello again... I wish all the best in the new year to all of you dear friends... ... I would continue with the log ... So, the next step is putting the flooring between the keelson and the bilge keelson, to each side of the model ... It is good to do this before ending the interior planking because the manipulating is easier in this way... So it looks like this :

-
Thanks Don, Thanks to You all dear friends ... Enjoy New Year's Eve ... Zoran
-
Hello everyone... We wish you and your loved ones a very MERRY CHRISTMAS and the very best of everything in the New 2017 Year... All the best to you all... Zoran and MarisStella staff
-
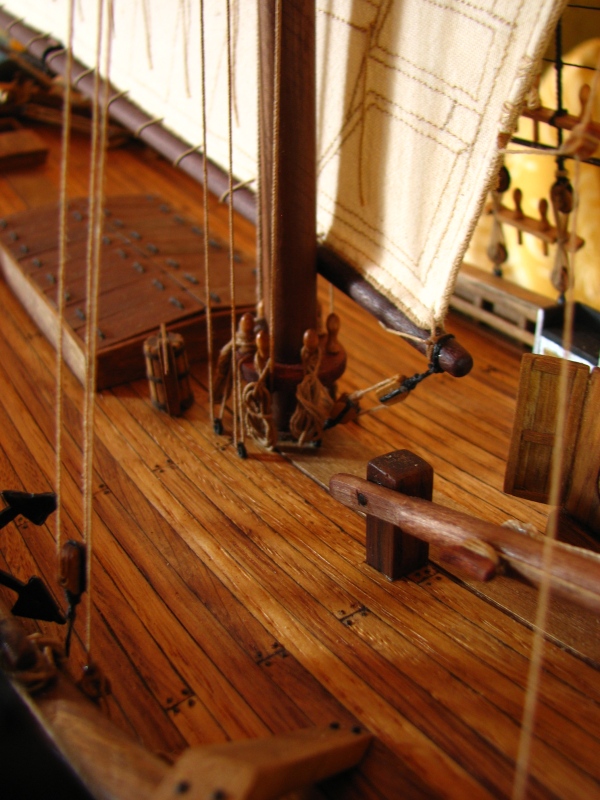
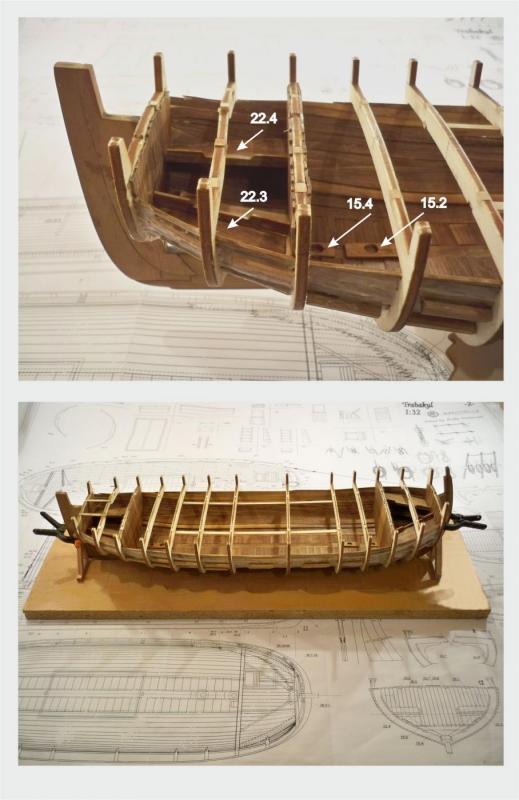
... then it comes the interior : let's start with the planking ... Do the planking until we reach the bilge keelson... Then we install the bilge keelson to the both sides :
- 221 replies
-
- 12
-
-
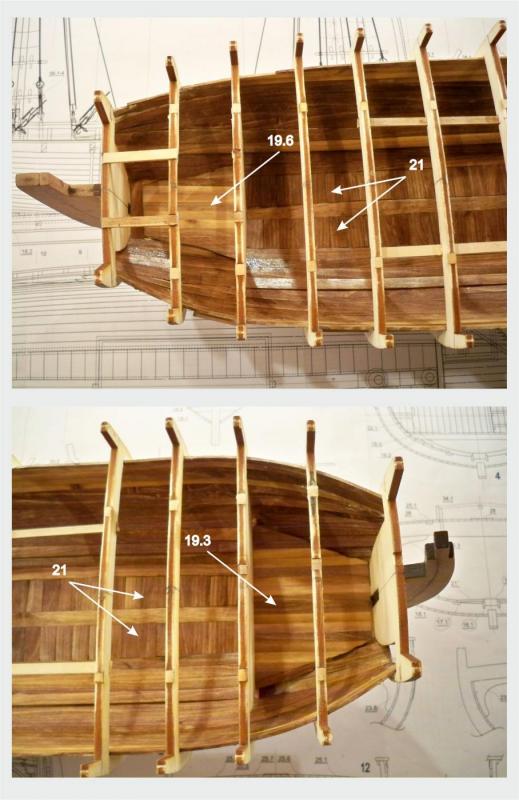
Hi Mr. Ian ... ... looks really good .. the belts are very good done (as the photos show)... This planking looks promising, the interior is very pretty and clean ... A very nice build is going on here ... ... These five first planks are very important for the wales, this will be seen later ... Best Regards, Zoran
- 107 replies
-
- 2
-
-
- brazzera
- marisstella
- (and 1 more)
-
Hello Everyone once again... I hope you all are well and healthy... My intention is to move forward, to show you some things about Trabaccolo now... So here, I am goin to do a very brief wiew through the construction, because this is a sort of the Brazzera extension, but design is different... At these days my colegues are arguing about the anchor... They prepared a briliant modell of this Trabaccolo, ready for the competition, but the last thing that is not finished yet is the anchor, so I hope the photographs will be done at the time to show them to you at this log... So, let's start : At the begining - the construction of the bulkheads :
- 221 replies
-
- 10
-
-
Hi Mr. Ian, this , what You have done to the last picture, is brilliant job ... hope to see some more of this good build... Best Regards, Zoran
- 107 replies
-
- 2
-
-
- brazzera
- marisstella
- (and 1 more)
-
Hello everyone, Don, there are some photographs in the posts before, through building the deck to the finished deck... We are up to make some new photographs of some new models, Brazzera is the one of them, so I will do this in the close future... I hope You will not be mad because of waiting Regards, Zoran
-
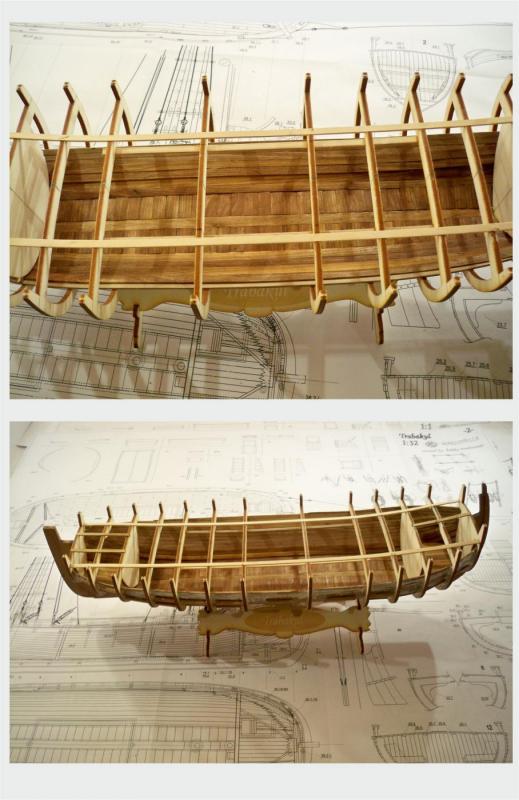
Here are some more photographs of the Brazzera, just to 'feel' the shape of the hull once more, before I do some brief view through the Trabaccolo build...

- 221 replies
-
- 17
-
-
Thanks Mr. Mike, thanks you all guys... ... and of course, as I explained to Mr. Rick a few days before and what could be interesting you (if not, just forget about it) : The meaning of the MarisStella term : This is latin, it comes out from two words: 'Maris' ... this means 'something or someone belonging to the sea... or 'of the sea'; and 'Stella' ... this means 'a star' or 'the star'... In the Latin this comes together and means : 'The Star of The Sea' Also , this term is very connected to the ships and the sailors, of course, especially to the older guys .... Regards, Zoran
- 653 replies
-
- 9
-
-
- trabakul
- marisstella
- (and 1 more)
-
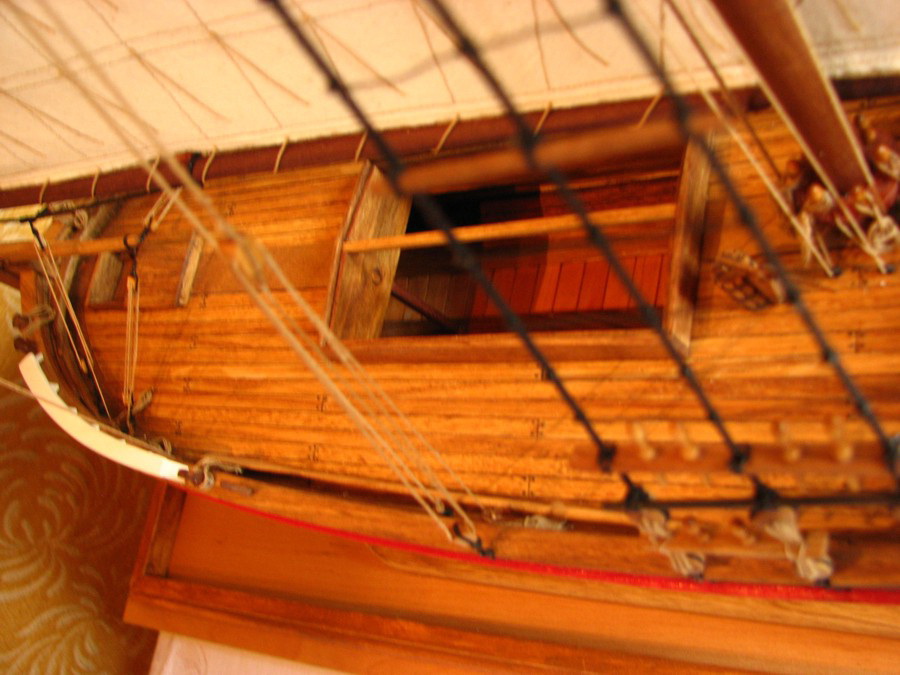
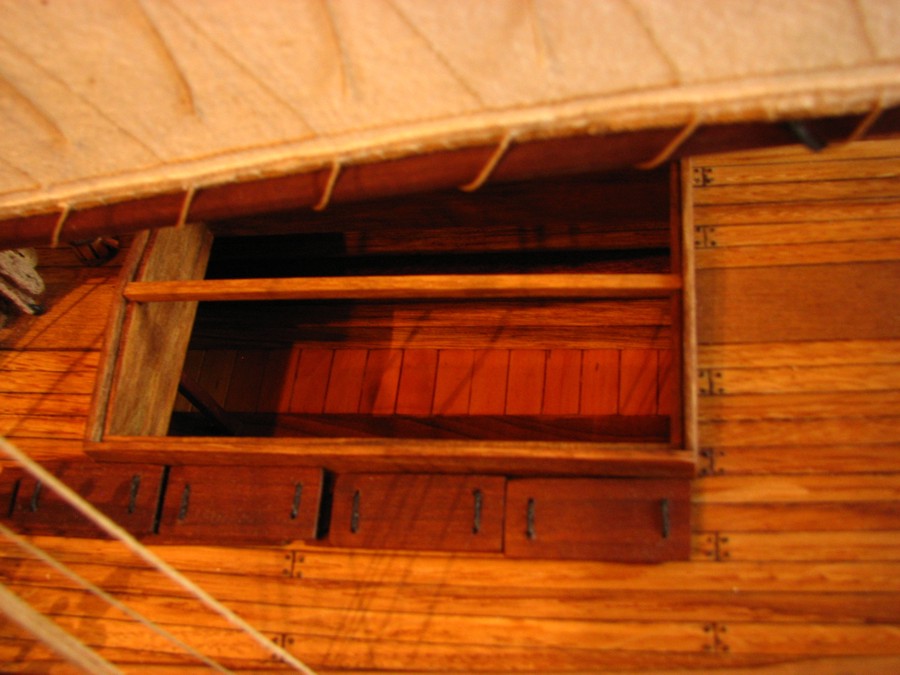
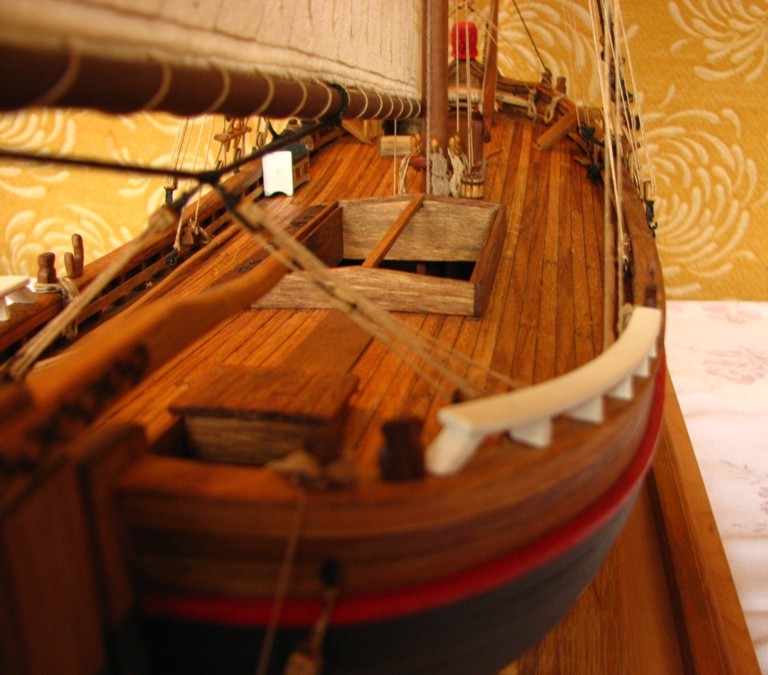
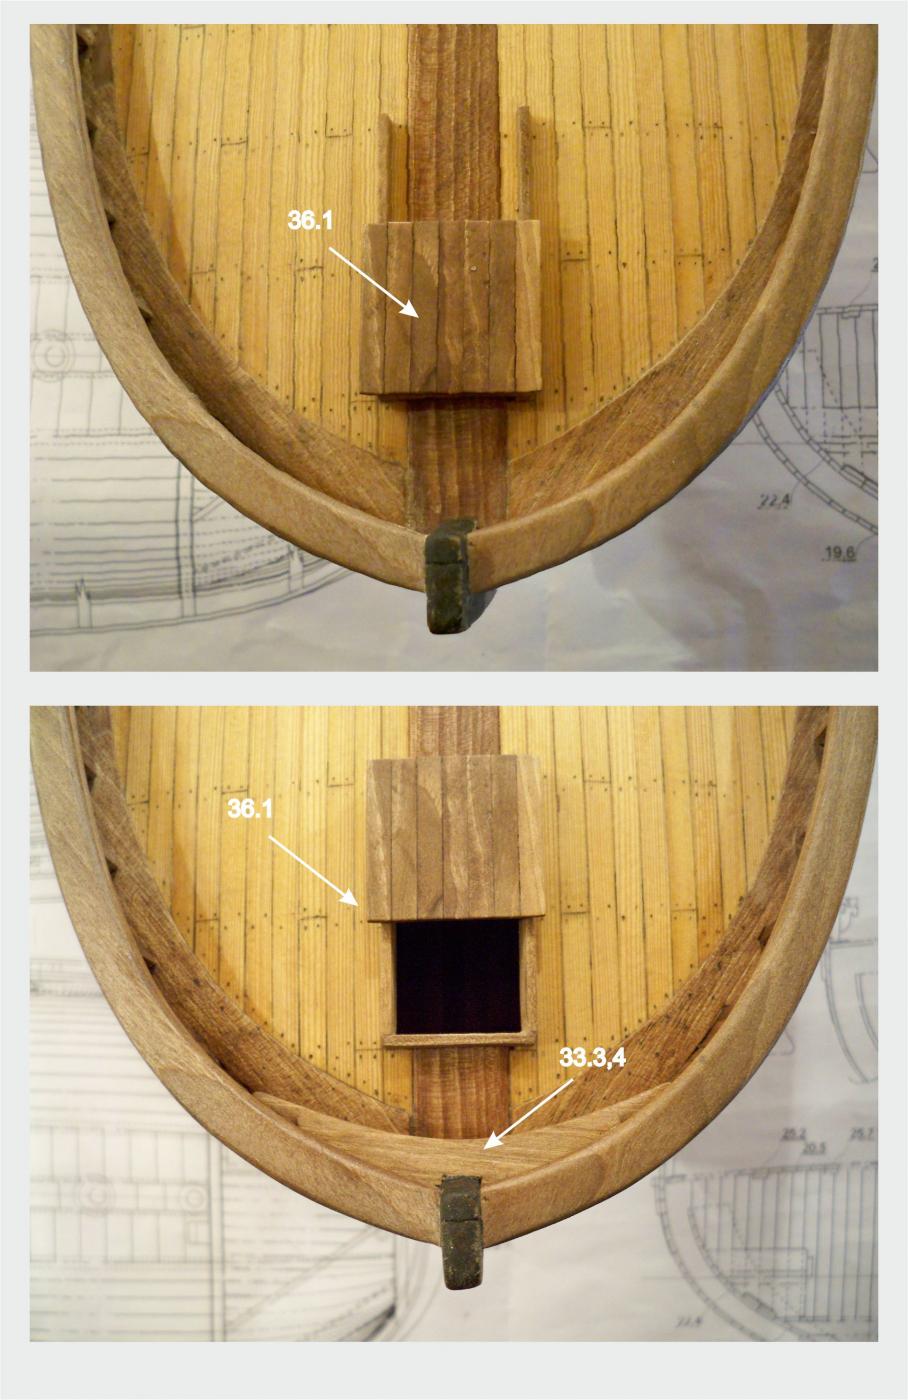
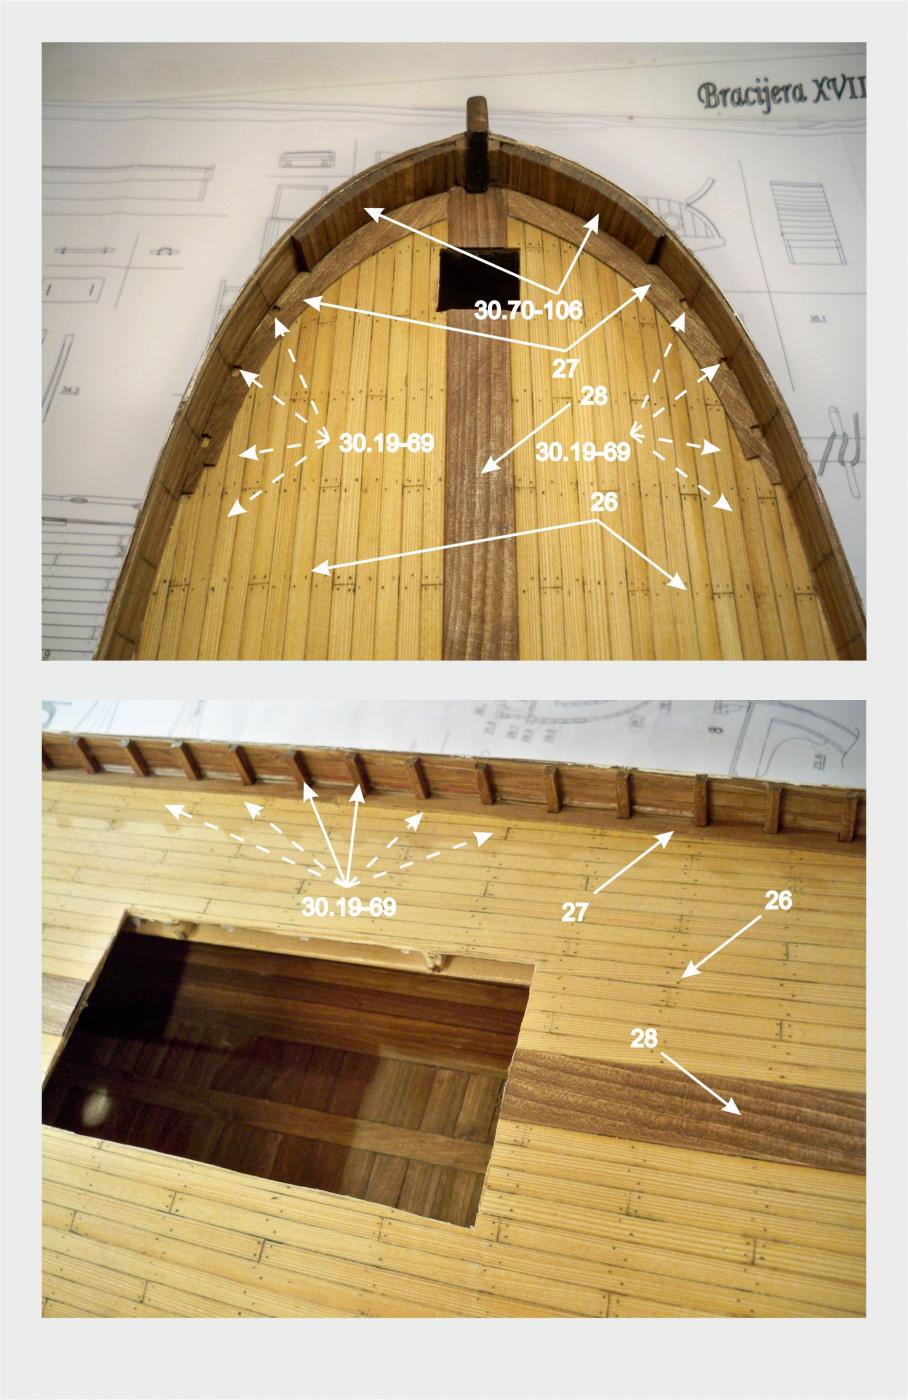
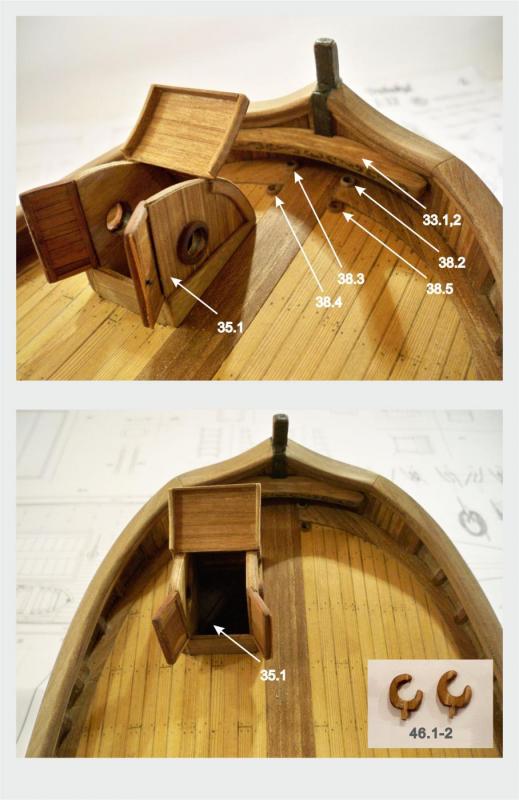
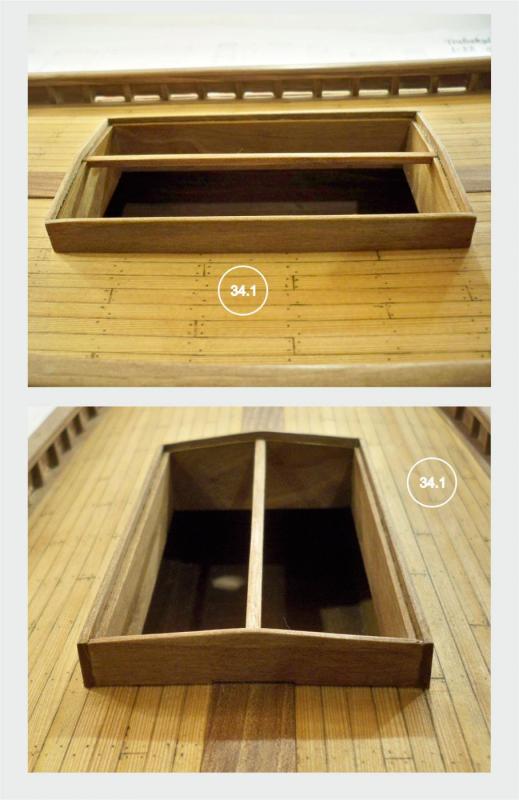
Here is the forecastle shuttle in the bow and the companionway in the stern ... The interior at this model turn out very well, so let the openings be wide open ...
- 221 replies
-
- 10
-
-
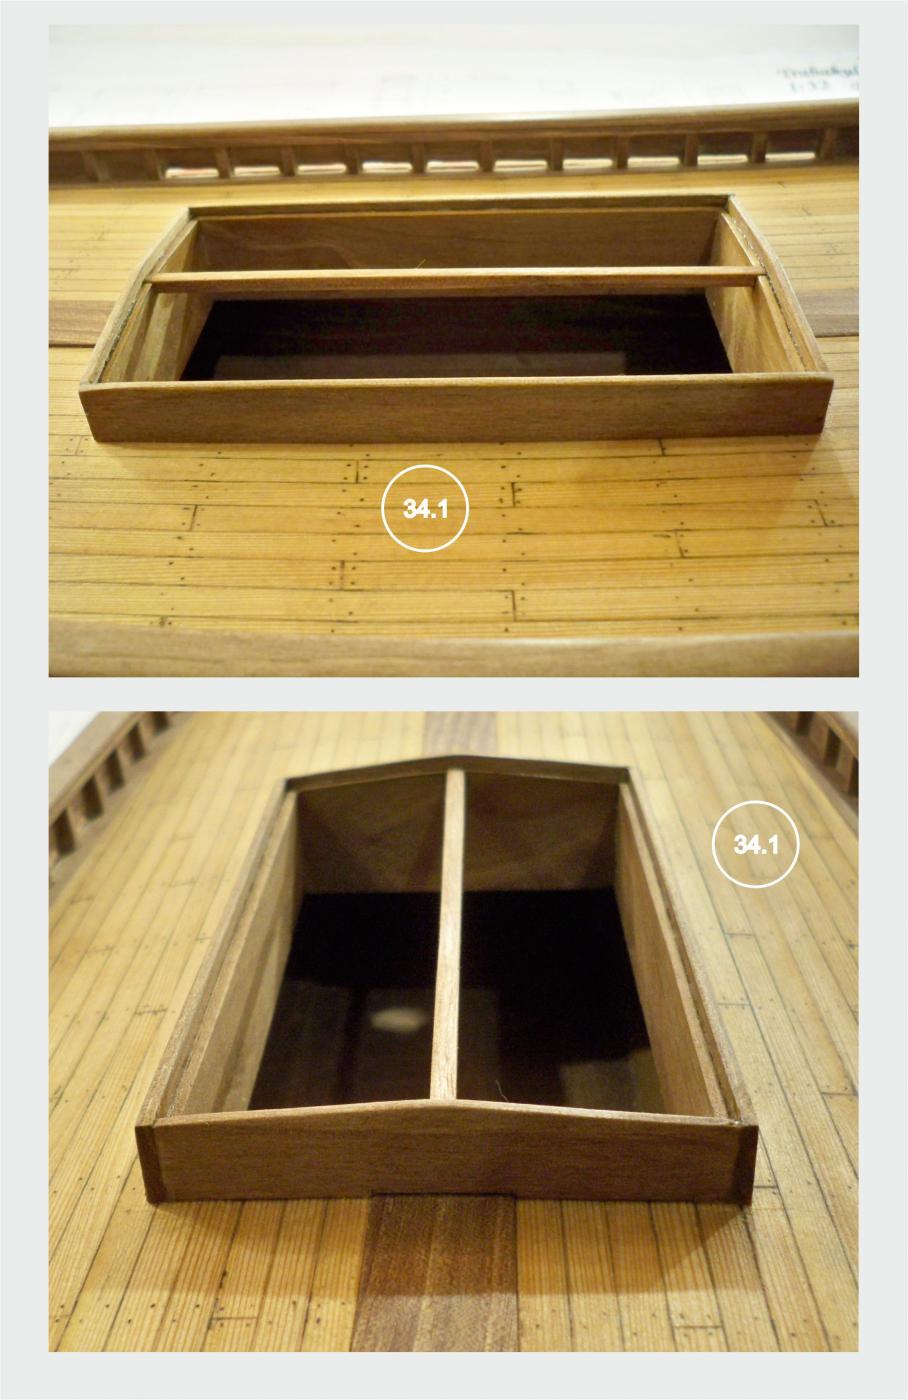
The hatch coamings are composed of 8 laser cut walnut panels and a lath... all that is needed is to put all together and polish a little bit... so the hatch coamings looks like this in the end :
- 221 replies
-
- 11
-
-
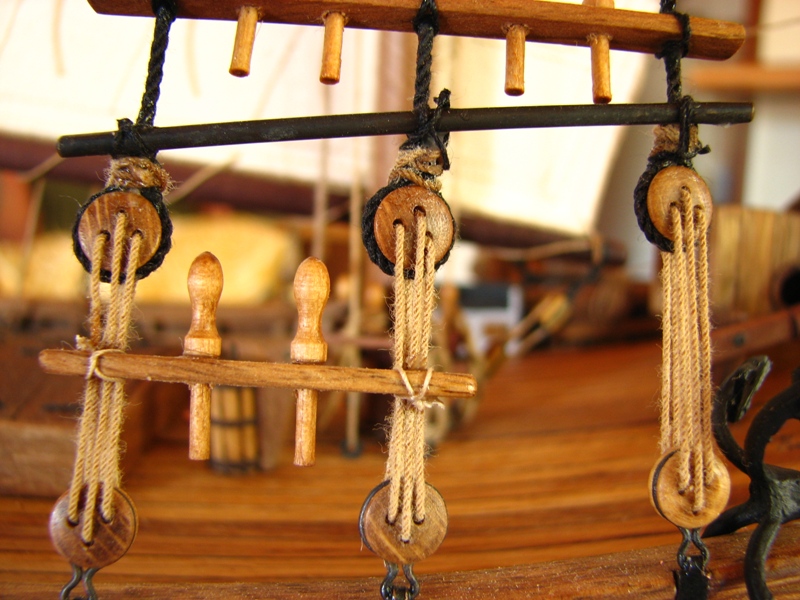
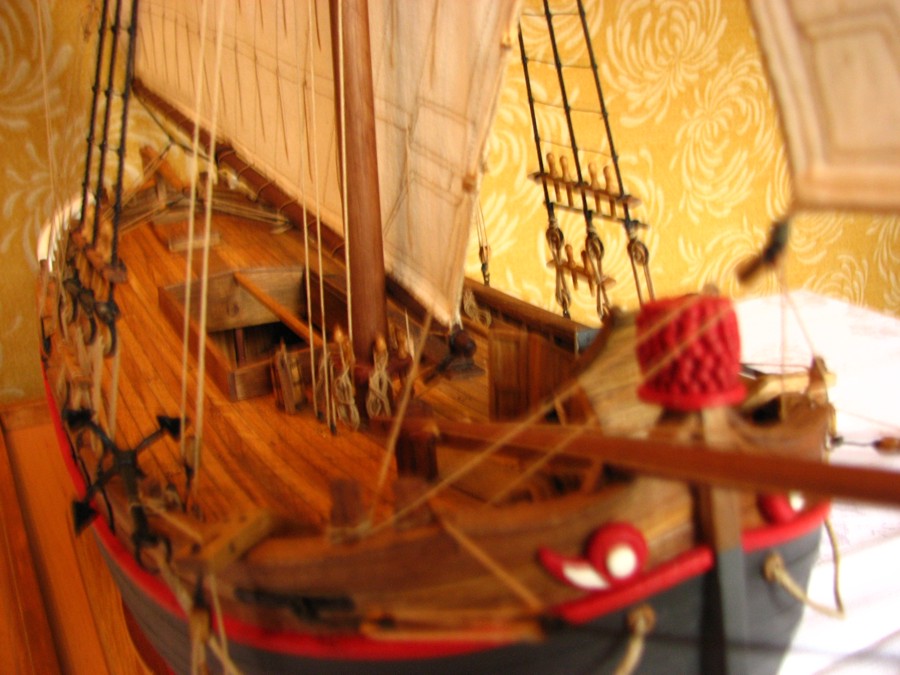
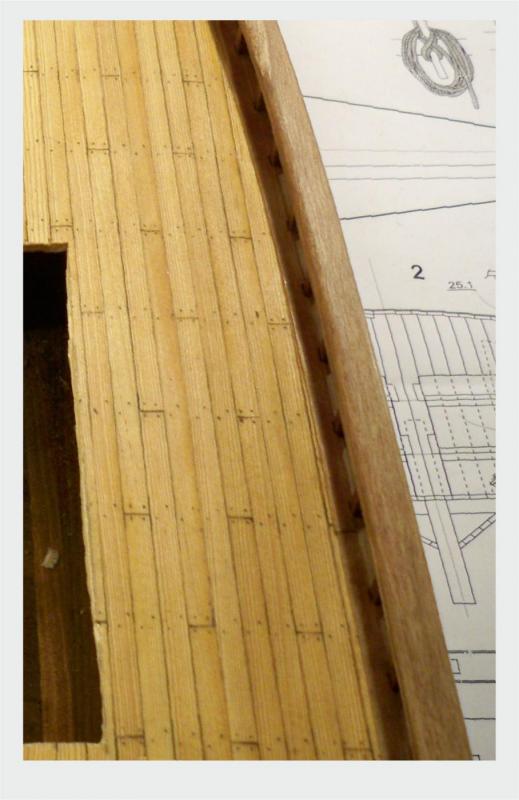
Dear ladies and gentlemen, as you can see , the openings should be cut off into the finished deck... after that step, there is the deck rail to be put, glued onto the deck... the top timber, made of the 3x3 strips, are coming next... in the end of this phase of build the topgallant rail needs to be put and sanded... There are the photographs below : Best regards, Zoran


- 221 replies
-
- 10
-
-
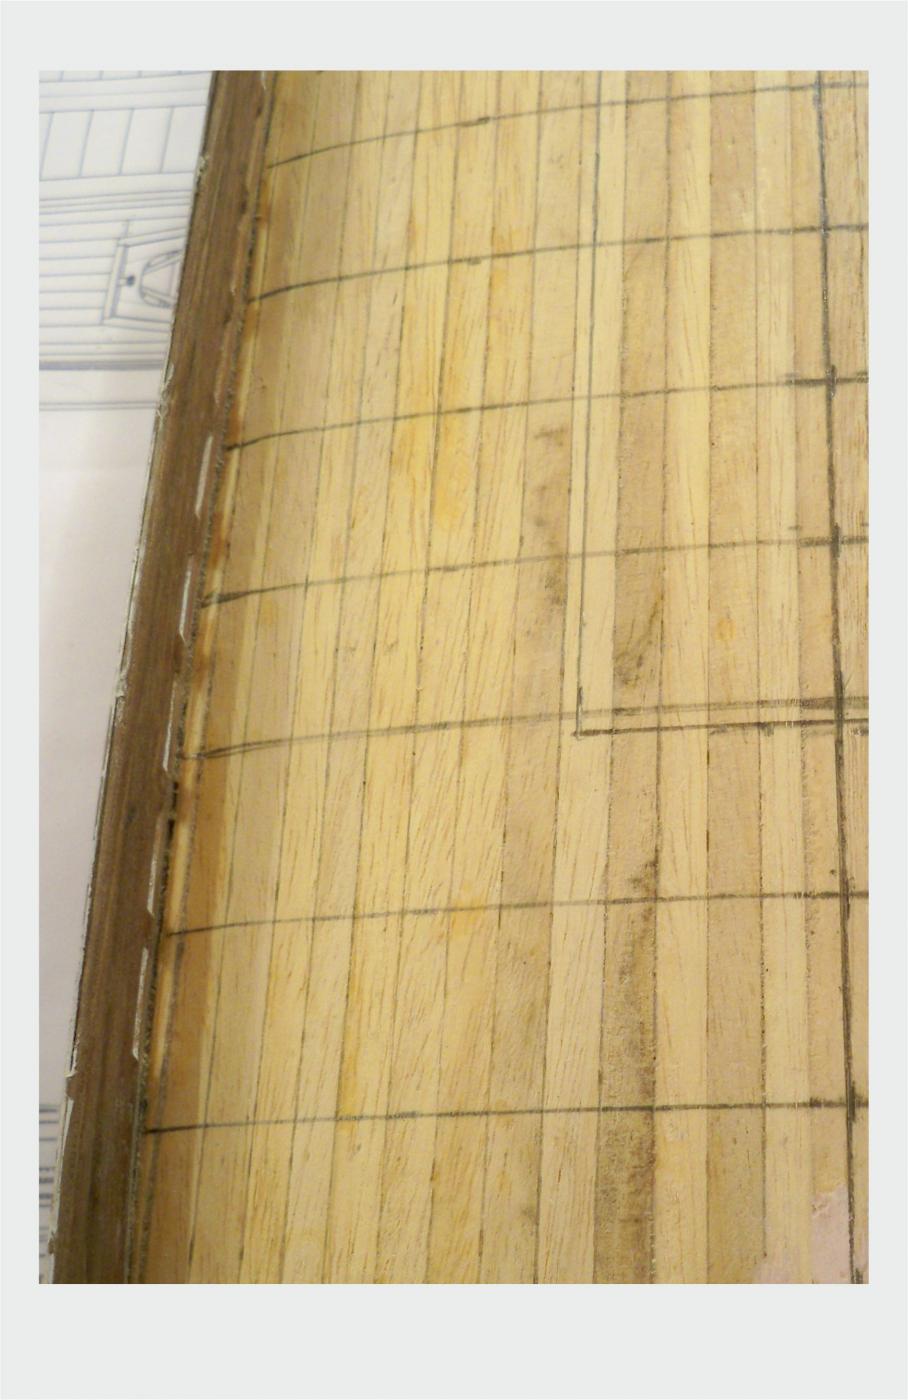
Hi Don, this is a fine build (or more than that). This all looks all right... I wanted to say something about the deck : MarisStella's models has the real shape of the deck , this means that every deck has a Camber Curve and a Sheer Line Curve... In the other words, each deck is bent across the cross-section and along the longitudinal section... So the deck's base can not be done of some flat veneer or plywood... The deck's base is made of strips placed one by the other and glued to the tops of the bulkheads... After doing this, the base needs to be sanded , treated with the wood putty and polished... After this it is good to draw the lines where the deck beams should pass below the deck. Those lines show the places of the deck's planks connections. The lines help in the next step : The gluing, from the stern to the tip of the bow, 0,5x5mm strips on the so prepared deck surface (base). Start from the middle and go to the left and right ends of the construction. So, plank the deck following the top view shown in the plan. Before gluing to the deck surface, on each strip cut a thin cut. The cuts are shown in the top view of the deck. It will look like it is, instead of the one long strip, several small bars lined up in a row. This procedure will give a very realistic look to the deck later. Setting up the central part of the deck is the next. This element may be broken up in the places where the storage's hatch and the opening for the masts are. It has not to be formed of one part. When you glue it into place, by grinding inward the central part of the deck askew slightly. The deck rail, that frames the deck, is the next to be set... Then adjusting visually fitting of the deck is to be done , as in the plan, drilling holes Ø 0.3 mm on the deck (you can use a needle) and fill them with a mixture of glue for wood and brown acrylic paint. You can also use colored putty for wood. When the mixture is dry, sand and polish the deck. In this way You get the ideal shape of the deck as if it were nailed with wooden pegs. Now the answer to Your question comes : when You get the compact, hard deck, with all of the strips glued well to the base, only then You can cut all the openings into it. You need to be careful here.... The other thing : The bow hatch cower is to be pushed a bit in to its opening , so it will not be so high as You mentioned... Sorry for been speaking English not very well, but I think I made not many mistakes... Cheers Don, let me be Your (imaginary, for this moment) friend over there, take Your beer and I will take my cold coffe... Our Trabaccolo is completed and she is ready for the national competition... I will post the photos as soon as I get them... Regards to all, Zoran
- 653 replies
-
- 11
-
-
- trabakul
- marisstella
- (and 1 more)
-
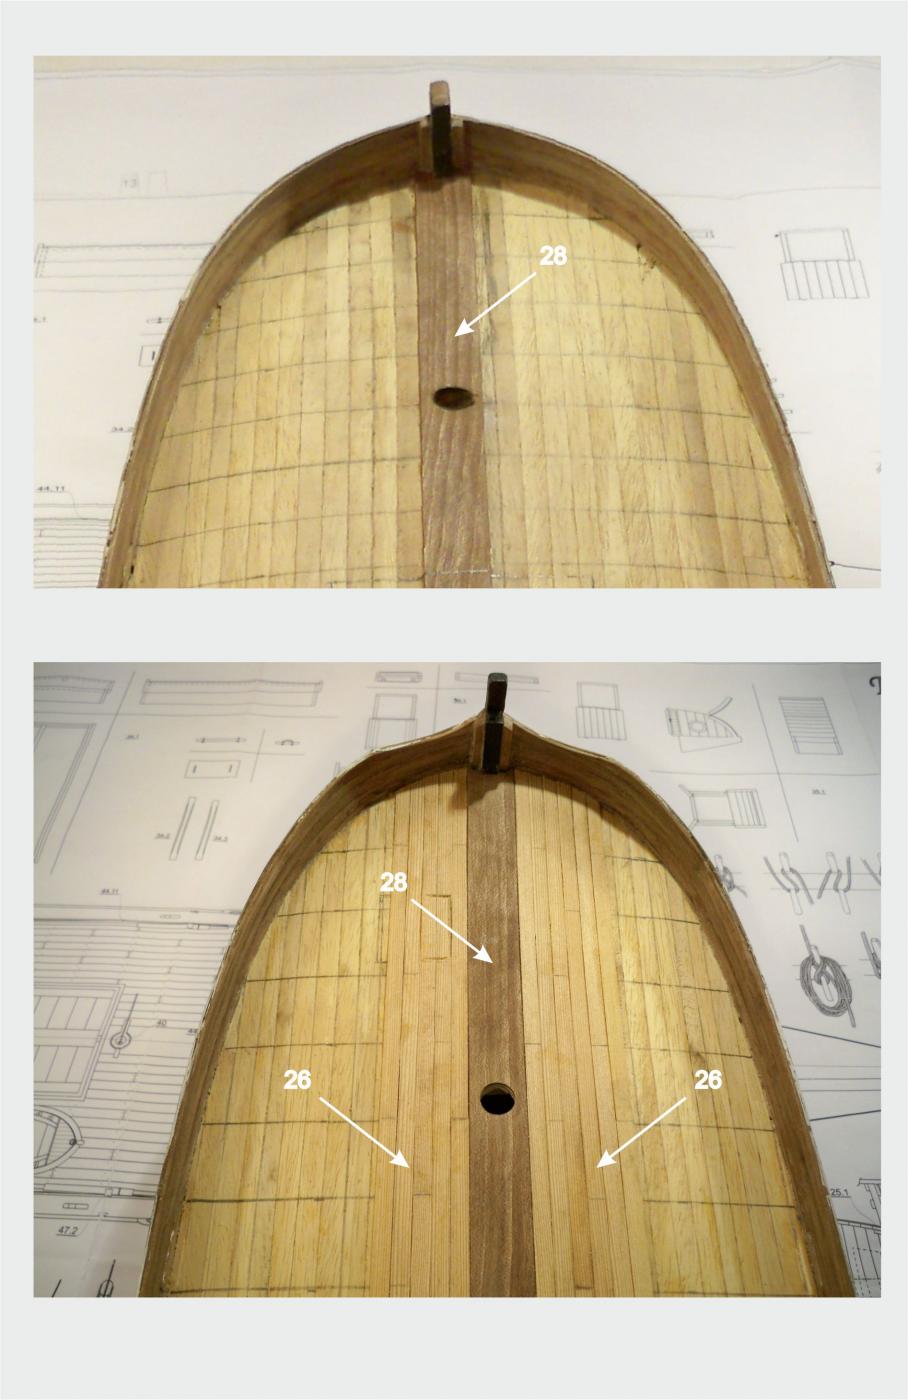
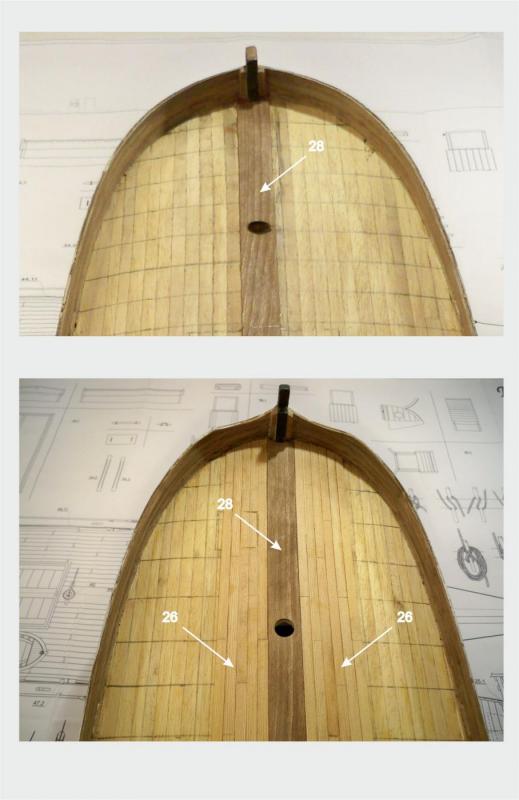
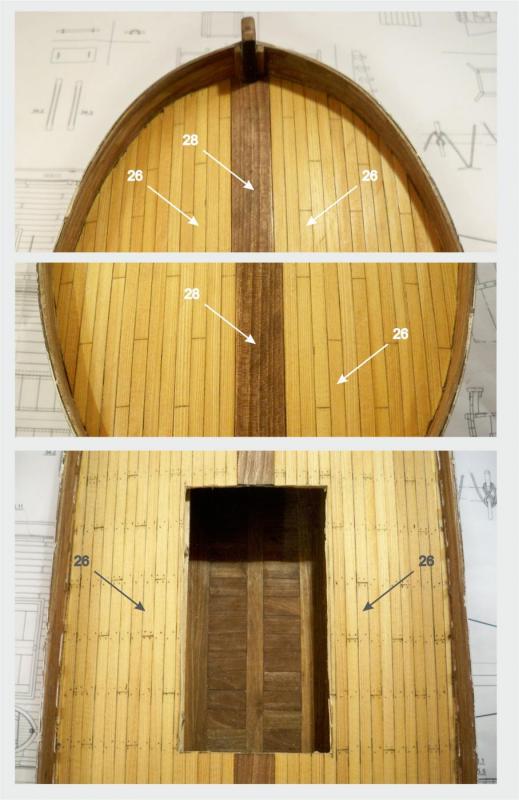
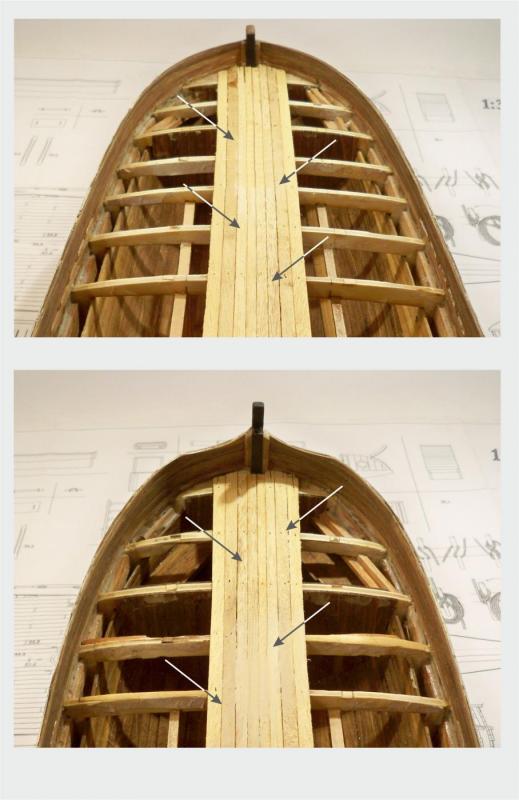
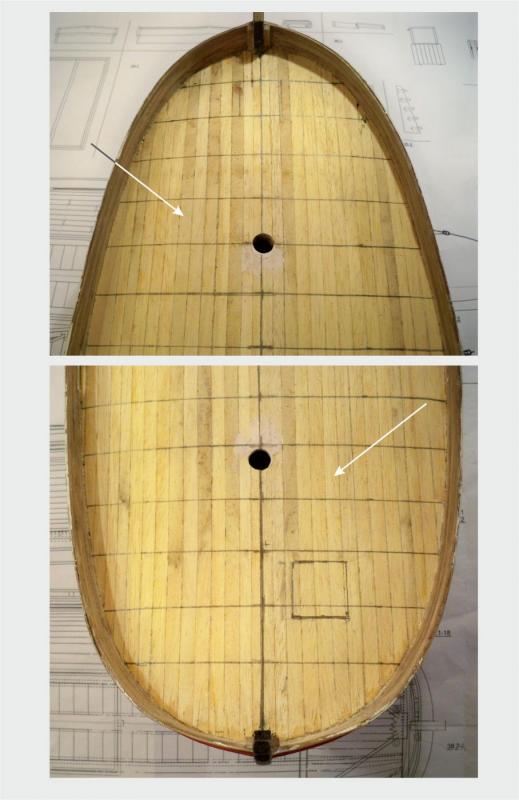
Now glue, from the stern to the tip of the bow, 0,5x5mm strips on the so prepared deck surface (base). Start from the middle and go to the left and right ends of the construction. So, plank the deck following the top view shown in the plan. Before gluing to the deck surface, on each strip cut a thin cut. The cuts are shown in the top view of the deck. It will look like it is, instead of the one long strip, several small bars lined up in a row. This procedure will give a very realistic look to the deck later. Now, set up the central part of the deck 28. It may be broken up in the places where there are the warehouse hatch and the opening for the mast. It has not to be formed of one part. When you glue it into place, by grinding inward the central part of the deck askew slightly. Now adjust visually fitting of the deck , as in the plan, drilling holes Ø 0.3 mm on the deck (you can use a needle) and fill them with a mixture of glue for wood and brown acrylic paint. You can also use colored putty for wood. When the mixture is dry, sand and polish the deck. In this way you get the ideal shape of the deck as if it were nailed with wooden pegs.
-
The deck of this model has a base, the deck's base.. Because the MarisStella models are models of the real ships, here are not flat decks... Each deck has a Camber Curve and a Sheer Line Curve... In the other words, each deck is bent across the cross-section and along the longitudinal section... So the deck's base can not be done of some flat veneer or plywood... The deck's base is made of strips placed one by the other and glued to the tops of the bulkheads... After doing this, the base needs to be sanded , treated with the wood putty and polished... After this it is good to draw the lines where the deck beams should pass below the deck. This helps in the next step, it shows the places of the deck's planks connections...

- 221 replies
-
- 10
-