HOLIDAY DONATION DRIVE - SUPPORT MSW - DO YOUR PART TO KEEP THIS GREAT FORUM GOING! (89 donations so far out of 49,000 members - C'mon guys!)
×


jburchfield1@wowway.com
-
Posts
302 -
Joined
-
Last visited
Content Type
Profiles
Forums
Gallery
Events
Everything posted by jburchfield1@wowway.com
-
 Your windlass looks really good but, I'm glad to hear that you also think they look "fragile" where the openings are. I'm just thinking about a real life situation and it doesn't look to me like there is enough wood to lever against if there is any stress/strain on the rope. This is just my opinion, and only my second model - iron bands or ropes wouldn't do much unless they were actually wrapped around where the openings are and then they would just get in the way. Although an "iron" band could have the holes punched through and if slightly wider than the holes would work to reinforce those really narrow edges. What I've decided to try (working on a new one now) is - I'm gonna make the holes just slightly smaller, maybe 1/32 overall, then when I make the handles I'm gonna make them with a square section that fits snugly and is the same length as the thickness of the windlass, then I would put on the two tapers as shown on the plans. In that way the handle would be applying pressure to both sides of the windlass cutting the pressure in half, instead of applying pressure to just one of those thin areas. At least that's my theory. It just doesn't look realistic (real life?) to me that they would have made the openings that large
- 425 replies
-
- 2
-

-
- bounty launch
- model shipways
- (and 1 more)
-
Thanks Matt, I can see something like being used since that crane/braces was basically removable. I also am interested in seeing your windlass as you build it. I've done it twice but it doesn't seem realistic (to me anyway) with the small amount of wood left when you make the holes the size indicated in the plans. Seems to me they would break the first time any strain was placed on the edges to rotate the winch. Maybe I'm just over-thinking it. I seem to have a habit of that.
- 425 replies
-
- 1
-
-
- bounty launch
- model shipways
- (and 1 more)
-
Just looked at your post Matt. Excellent work My crane looks pretty much as yours, although not nearly as good a job.
-
Well, hell, now I'm disappointed in the appearance of mine! Very excellent work there Matt. I like the looks of your crane and the way you handled the poop deck end. I just cut a square hole for mine. Could you explain how you made those two "handles" that are going thru the brace into the thwart?
- 425 replies
-
- 1
-
-
- bounty launch
- model shipways
- (and 1 more)
-
Capt Steve - after looking at those pictures again, the 1st one does seem to show the rudder shipped with the tiller unshipped. Not sure about the second one since it doesn't quite go far enough astern to be sure. Tks Mattsayers148. I just purchased a sheet of 1/8" to cut the two beams and the braces from. THANK YOU robin b - you just justified my decision to leave the rudder unshipped. The only other fix would have been to either disassemble the aft section to rebuild the entire crane (allowing it to protrude aft enough to let the rudder come through) and since I already built it 3 times I didn't really want to do that OR cut the crane in half at the thwart braces which would have resulted in a seam. I am going to add the gudgeons and pintles on both pieces (hull and rudder) and will attach the tiller to the rudder, then place(glue) the rudder into the rear section just to the side of the crane. The reason for doing the crane/winch was to add more interest to the interior of the boat - and placing the rudder into the boat will add even more interest and make the boat appear to be "working" - which was my ultimate goal. I've also decided that I'm going to furl the sails, to justify the rudder being unshipped since they would be "steering" with the oars I believe.
-
Well, Tom, that would be an option if I had thought far enough ahead. As it is, though, the crane does not extend far enough past the transom to allow the rudder to pass through. I would have to rebuild at least part of the crane (I could cut it off even with the braces and then make the new part longer) but as it is, I think I'll just leave the rudder unshipped and place it next to the crane inside the boat. I AM going to put the gudgeons/pintles where they belong so that it looks as if the rudder could just be lifted into place.
-
Tks Capt Steve. I did find another pick on Keith W's launch build showing the rudder as being unshipped with the crane installed but in that case the launch was installed on the Bounty itself. It "appears" in those photos that the rudder is unshipped also. Think that's the way I'm gonna go. I'll build the rudder/tiller and add the gudgeons/pintles but place the rudder assembly inside the launch.
-
Thanks David, but no, currently no plans for figures. As much as I would like to add at least a few (for interest-since this is going to Sawdust Dave's auction) that's an area (figures) where my "skills" are lacking. That's why I decided to add the crane/winch was to give it more interest. I may do some searching on the web to see if I can find some ready made/modifiable figures but currently have no plans to add them.
-
HELP!!!!!!!!!!!!! I can't find an example on here of anyone who installed the crane and I have a HUGE issue that I need to resolve. If anyone knows of an example build here and can point me to it, it would be much appreciated, if not maybe some one has an answer for this problem. I've built the launch with the crane installed. Didn't think far enough ahead and although I have it installed centered on the transom, the rudder should also center on the transom which would put the top of the rudder between the "arms" of the crane and the rope would pass directly "through" the tiller and the top of the rudder. Maybe the crane should have extended further past the transom to allow the top of the rudder to pass through the crane, or maybe, just maybe, they would have unshipped the rudder when using the crane? The reason I think that the latter may be the case is that the rope from the winch to the crane would pass right through where the tiller/top of the rudder would be if the rudder were installed. Somebody PLEASE tell me that the rudder would be un-shipped and steering would be done with the oars when using the crane???? But only if that's true. If this is the case, then I will build the gudgeons/pintles/rudder, but just place the rudder (with the tiller attached) inside the boat.
-
I've got the chuck that Chuck mentioned. It works great and it's cheap. Used it just last night to drill 8 holes in my mast partners. And it should chuck up in any dremel. -EDIT- BTW, my dremel is an old cheapie, non-variable, working at 30,000 RPM
-
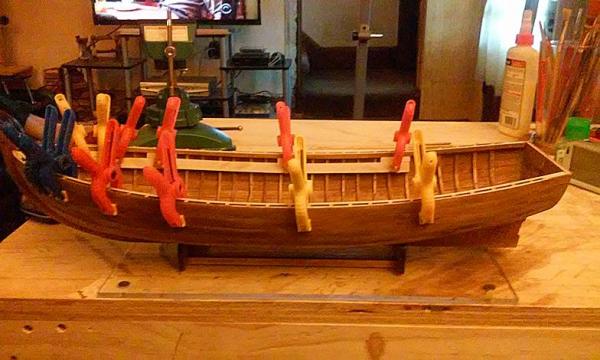
Tks for all the "likes" guys/gals. Didn't take any pictures of today's progress 'cause of that crappy camera. Gonna go hunting for a better one at some pawn shops later this week. But anyway, I finished those two braces for the crane that run from the backrest to the thwart just in front of the crane. Can't finish the winch until I get the miniature chisels I ordered from MicroMart (along with some miniature wood rasps and a handle which shipped today). Speaking of which, does anyone know if there is enough of the heavier line that comes with the kit to allow for installation of the crane or am I gonna have to order some more? Also, got both of the mast partners done and installed on the appropriate thwart, all of the belaying pins are now installed, and I remade the bow thwart because of a couple of issues - 1) the thwart was about 1/8" too narrow. This was probably because of improper installation/location of the fore mast step (that's my boo boo) which allowed the mast to lean too far forward. 2) I also noticed that the laser cutout for the fore mast was too large. It actually fit the main mast perfectly and the fore mast is 1/16" smaller, so I figured the extra 1/8" width on the thwart was an acceptable compromise. It's not really that noticeable when all parts are in place. I'm hoping to finish the trenailing for the floor boards tomorrow (I'm using a .5 millimeter mechanical pencil pushed into the board as a trenail substitute - that scales to about 1.5 inches if my math is correct) and damaged it so bad it won't work anymore - gotta get a couple more of those tomorrow. After that I can install ALL of the thwarts and start working on the masts. I'm not overly fond of the open sail look, so I'm gonna TRY to do this with the sails furled, but that's for later.
-
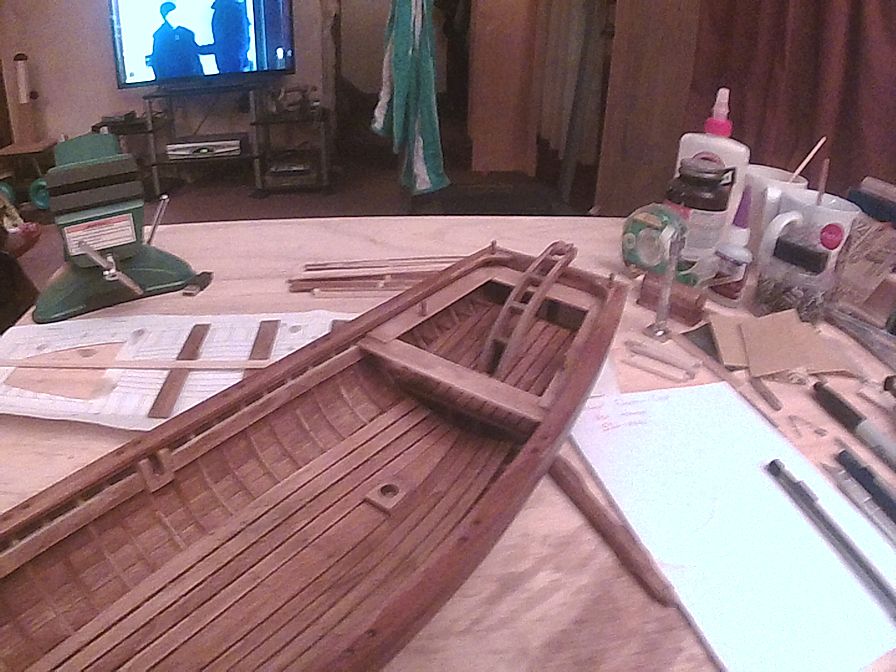
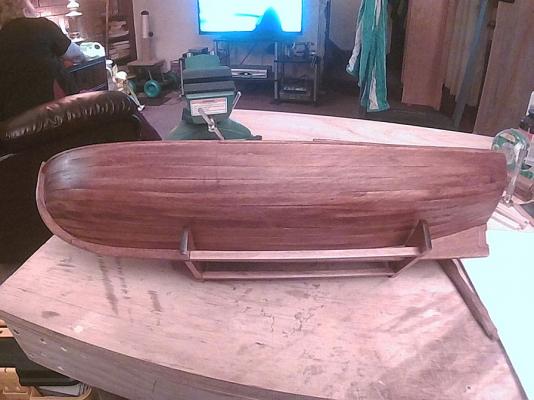
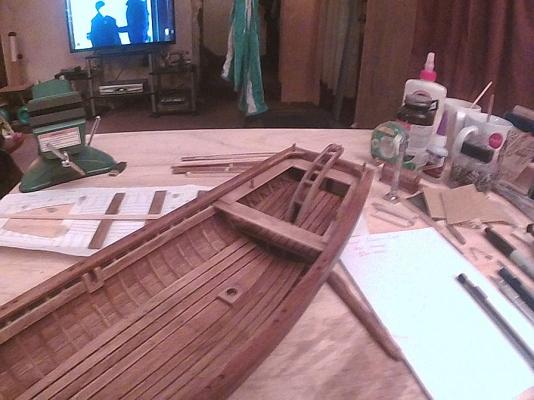
K, well it's been awhile and this "new" camera is crap, but here's a couple of shots. Gonna go find me a camera that can take closeups. You guys can't help me fix the flaws if you can't see them. 1st Here's a shot of the bow 2nd a shot of the hull And last, a shot of the crane assembly. This had to be done 3 times before I got something I could live with and I still need to make the two braces that go from the backrest to the thwart in front of the crane. Also, don't know if you can see it, but I trenailed the poop deck (correct?) and the floorboards. Not sure yet if I'm gonna try to do the hull proper. I'm just about done with the 2nd winch. Didn't do so well on the first one, but this one's pretty good. Once that done I'll be ready to get all the thwarts and the bow grate installed. Getting there.

-
Winch and Crane it is then! tks guys
-
Well, still don't have the mem card for my new camera so no pictures yet. (Boring huh?) But still working. I've gotten the thwart risers, winch keepers, and main floor in. Will be installing the gunnel tomorrow and I have the thwarts ready to install. And just about have the quarter deck ready for installation. But I'm in a quandry............ I know not too many people are watching this build, but I'm trying to decide if I should create and install the winch and the crane booms as it would have been while still on the Bounty. I know most people are not doing that - but this is to be auctioned and maybe the winch and crane would provide more interest? It would also give me more of a chance to "scratch" a couple of parts for the experience. What do you guys think? Winch/Crane Yes or No? Yeah, I know, it's my boat, do what I want, but I'm not really sure therefore this request for advice.
-
Let's talk 3D printers.
jburchfield1@wowway.com replied to Keith_W's topic in Modeling tools and Workshop Equipment
The detail is amazing! -
Thanks both, I got the thwart risers, main mast step, and winch keepers in today. I was sorta playing with the bow grate, foremast thwart and foremast step in preparation for tomorrow and realized that I'm going to have to try squeezing things together a little bit to get the bow grate to fit properly. Definitely don't want to have to try to remake that bad boy - not that talented yet. So here's hoping that nothing cracks/breaks or anything else goes horribly wrong. Going shopping tomorrow - I'm wanting to try that poly/stain combination product (MinWax) I saw at Lowes. Will definitely be testing on scrap but, if that stuff looks OK, then that could solve my issues with glue spots. Also want to look into some "stainable" wood filler. Well, more later. Hopefully some quality images soon. I'm waiting on a memory card for my camera.
-
Well, this picture is not very good, it was taken from a cell phone, but it shows that I'm still plugging away, currently working on the thwart risers. BUT, I've got a small problem that I know others have encountered. The sheer apparently spread apart when I removed it from the form and some of the thwarts are too short. Should I make new ones from scratch or try to squeeze the sheer together to make the kit thwarts work?
-
Let's talk 3D printers.
jburchfield1@wowway.com replied to Keith_W's topic in Modeling tools and Workshop Equipment
There is an article in this month's National Geographic about this very topic. It was interesting to note their take on this. While some companies are currently using this process (GE "General Electric" is using this method to produce fuel nozzles for aircraft engines made of titanium) those machines cost approx. 1 million US. Medical science has created a "biological" ear and other medical testing is underway using special inks. (again, very expensive). However, home production of highly detailed parts (no explanation was given of the term highly detailed) is NOT deemed likely. The home machines are not expected to have the resolution needed. I'm NOT saying Nat Geo is correct, just another viewpoint I read just yesterday. -
Looking good!
-
Well, don't have a picture right now. Dropped the camera and the focus won't work right. However, I have completed the planking. Looks ok, got a few small "cracks" that I'm gonna try to fill with either stainable wood putty (if there is such a thing), or maybe stained sawdust mixed with glue. May end up having to paint the outside and leave the inside natural. We'll see. Meanwhile, working on the tween? frames. Pictures as soon as I can.
-
That planking look really good to me!
-
Thanks for the reply. I figured a fairly large portion of the overall length was in the bowsprit
-
Any chance we could get the length of this thing (minus the bowsprit). I know the ad for it says 26" (I assume that's with the bowsprint) and I'm just curious as to it's hull length. I plan to build this one next.
-
Sorry to hear about your planking issues Vivian. I encountered the same issue with my Bounty Launch (had to remove and redo 3). I finally figured out it was caused by two problems (both my fault) - haste/hurrying and improper clamping. Glad to hear you got it solved.
-
Oh, BTW, Grimber - I can't take credit for the rope handles. That's the way it was done on the picture on the box. Just followed somebody else. Probably Bob Crane, since it's his kit design. Well, to fix the problem (I hope), I decided to remove the last 4 planks on the starboard side and redo them. Cutting new ones by hand since a couple of them split. It only happened on the one side (starboard). I looked at it real, real close today and the port side is fine, so maybe not as bad as I feared. I've GOT to learn to take more time with this fairing thing and pay CLOSER attention to how the planks are going to run!!!!!!!!