robipod
-
Posts
202 -
Joined
-
Last visited
Content Type
Profiles
Forums
Gallery
Events
Everything posted by robipod
-
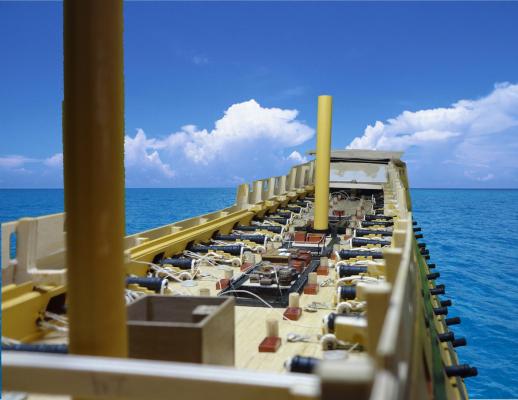
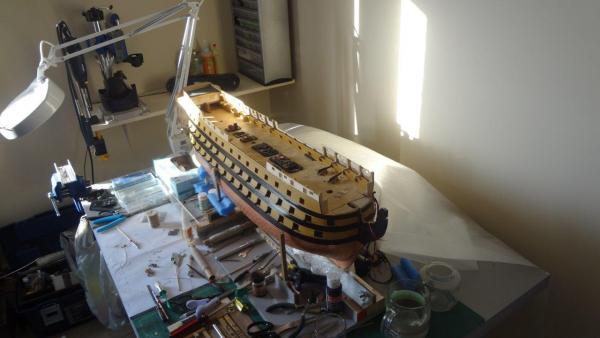
 Upper gun deck done! Even more items fell overboard today to clear the grates. Didn't think I would reach this point so soon. It's that same old 'just keep plugging away--it will eventually be done" or something like that. Having fun with the green cloth I hung behind the ship.. LOL... done with the graphics for a bit.
- 295 replies
-
- 2
-

-
- victory
- caldercraft
- (and 1 more)
-
Daniel, I never realized that the purpose of the grates was fresh air. Thanks for letting me know. Might pull the rest of the clutter off from your comment. I actually pulled the 'clutter' off the back two grates. I did however build in an air conditioning system for my crew in the lower decks Went for a cruise today. Some of the clutter went overboard. You are right. Looks better. Thank you and the crew does need air.
- 295 replies
-
- 2
-
-
- victory
- caldercraft
- (and 1 more)
-
Nick awesome to hear from you. I am looking forward to following your lead on the rigging. Keep going. You have at a least a year on me now.. I posted these two backwards didn't i? Sorry , Two NFL playoff games tomorrow. Will have to finish the coils between touchdowns!!!
-
Upper gun deck almost done. Clean up and a few coils left. Looking at Quarter deck and re-reading the manual to figure out what I've missed. LOL. Went for a sail today to test the cannons.. Decided to create a couple fill-in masts for the time being.
- 295 replies
-
- 4
-
-
- victory
- caldercraft
- (and 1 more)
-
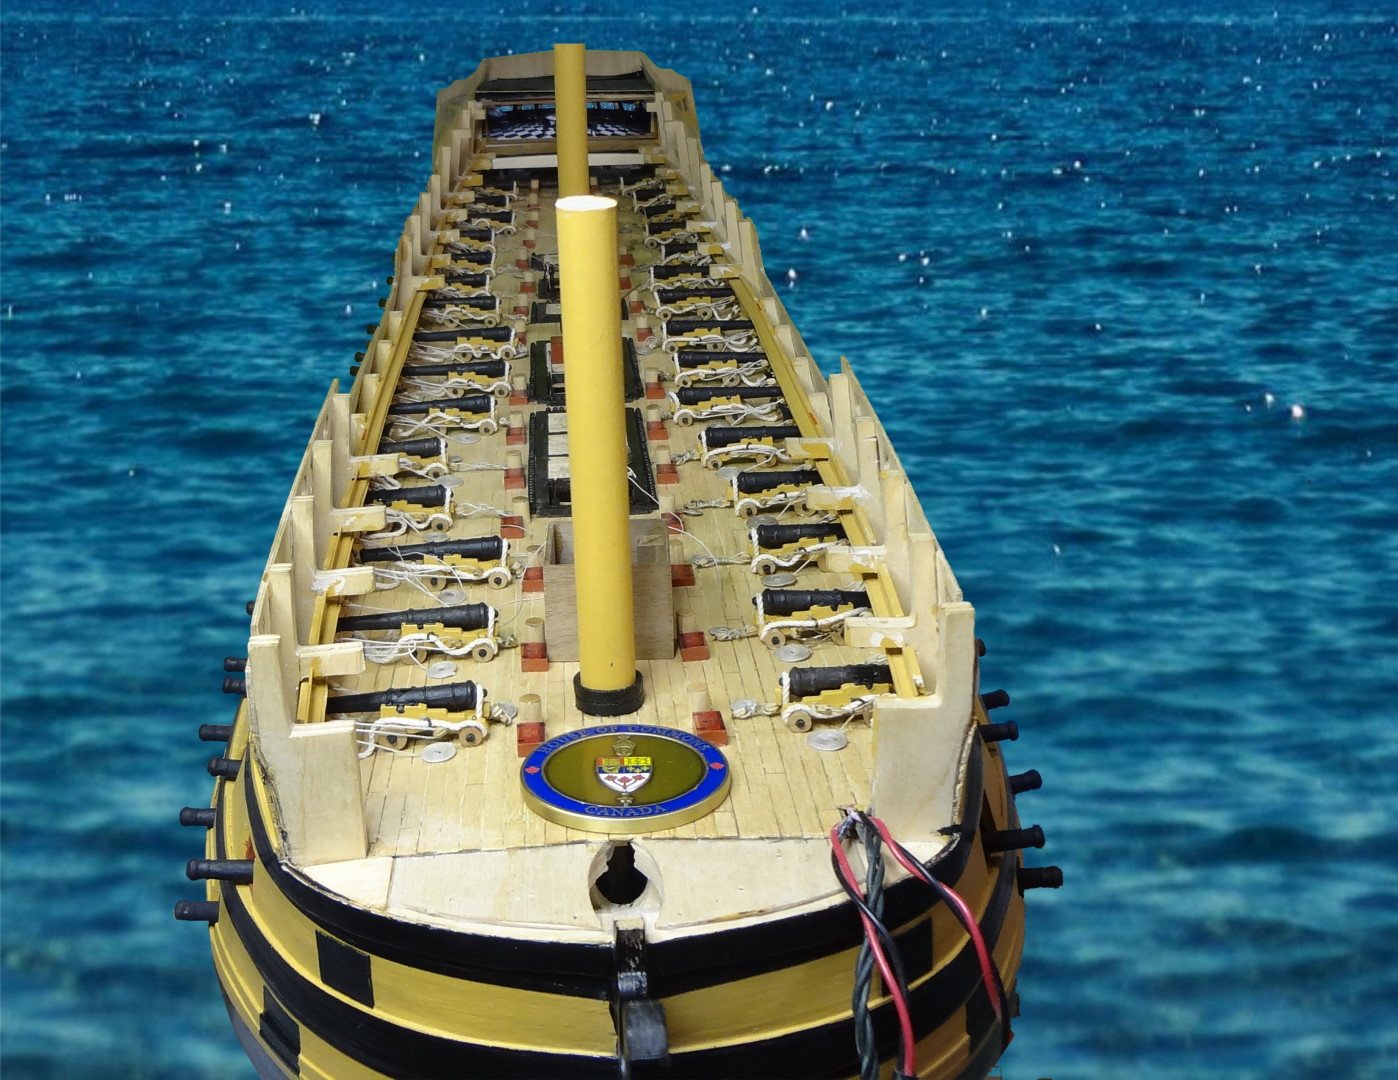
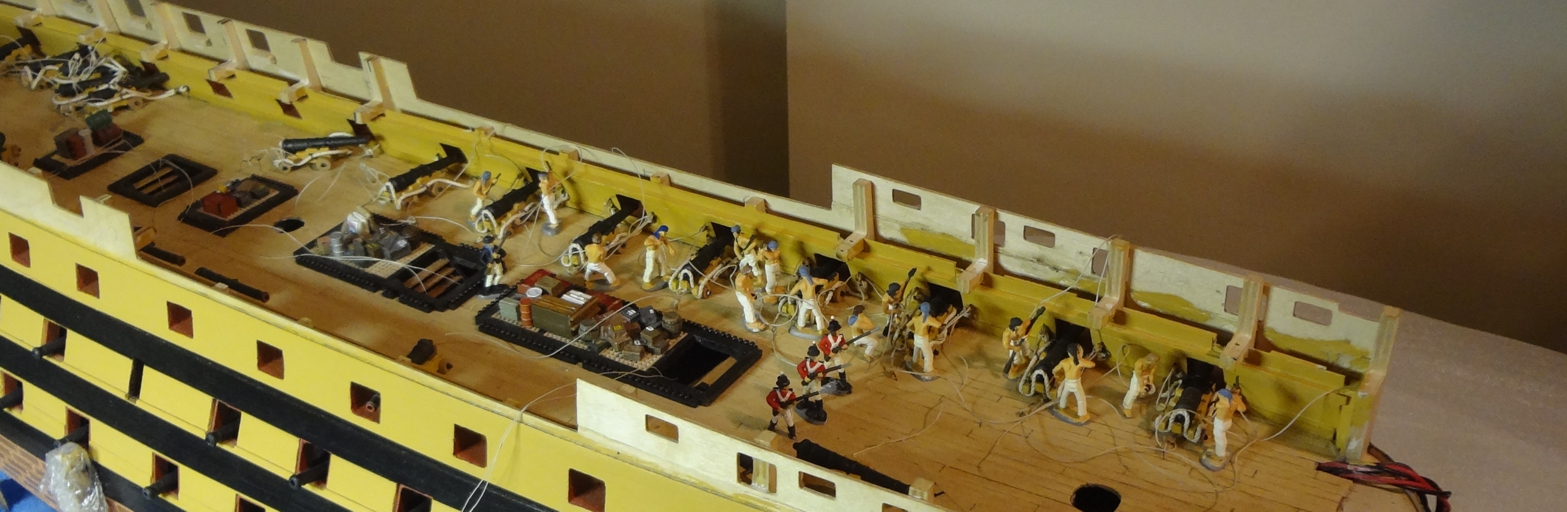
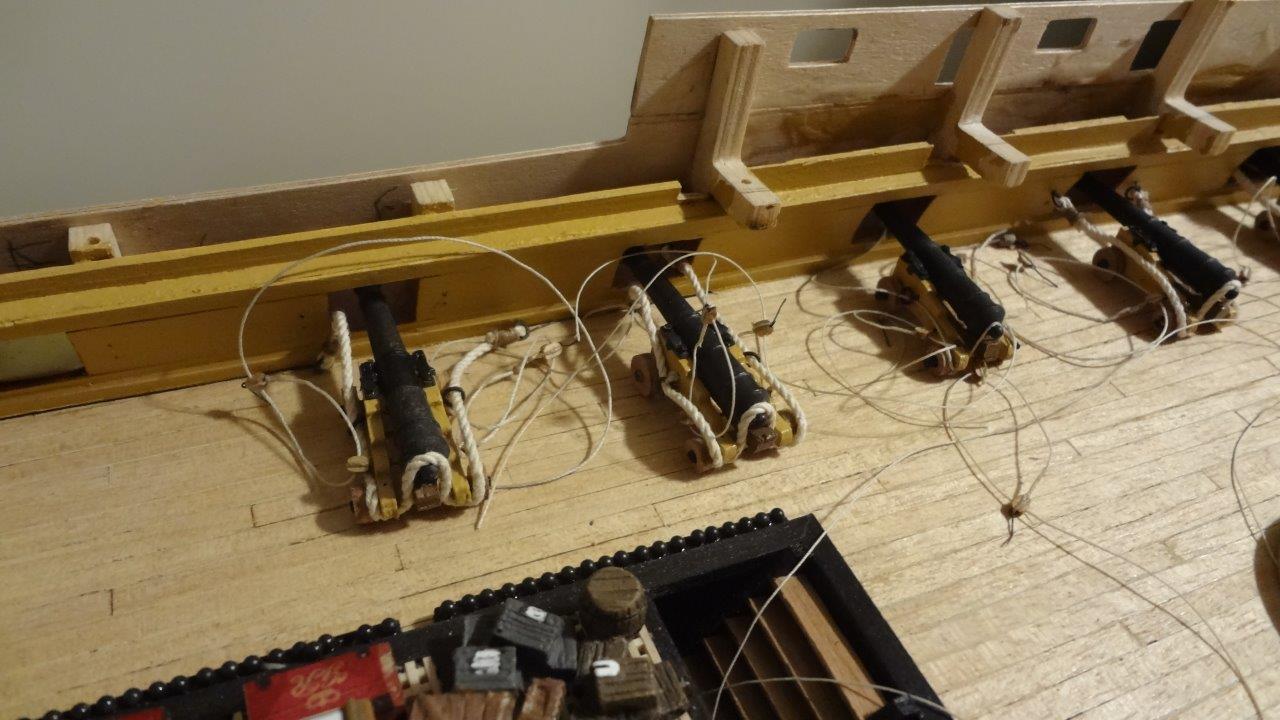
Thanks Lawrence. Last year was really busy. But that was last year. Am enjoying pressing forward with the upper gun deck. Chinook rolled in last night so one of those awesome mild days we get in Calgary during the winter. I am having many reservations about the modifications (however small) that I've been doing on the model. Have placed the cannons at various distances from the bulkheads and glued them to the deck. Most of them are glued at this point.. Now I'm not sure i should have done so. But I'm not going to change them LOL I was looking and photographing in the week hours last night and no longer sure of my decisions. Maybe I'll have a case for the ship that is filled with smoke! That might help. Going to put sailors in three places now on this deck. Midship stern and bow so when one looks into the model from those points one sees sailors. With so much hidden on upper gun deck i don't feel filling the deck with a hundred sailors is worthwhile Am stting at a nearby Tim'so on a tablet that arrived under the tree. Big difference from my two 24 inch monitors. Am saying this as I can't review what I've said LOL I do know that the experience making the cannons for this deck is invaluable for the guns that will be seen on deck! I consider the main item to try solving is the thread and rigging the cannons. Have not come up with a solution to having thread (ropes) lay on deck and just look natural. More reading required before last decks. Maybe will post a picture of what I've ended up with .
- 295 replies
-
- 2
-
-
- victory
- caldercraft
- (and 1 more)
-
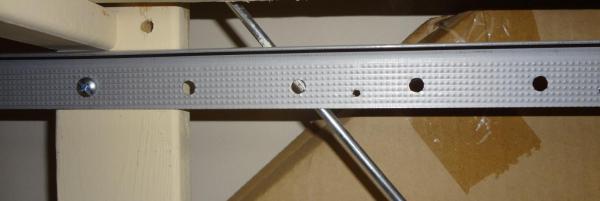
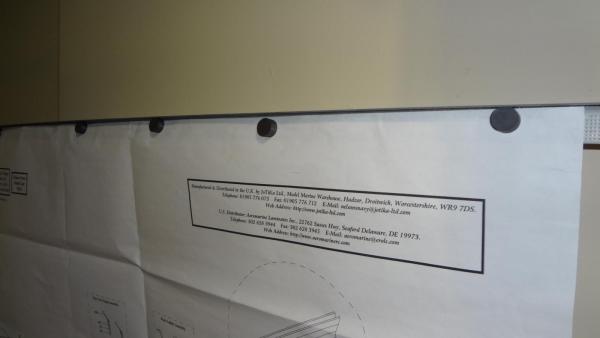
Amazing what one can get done when there are few distractions. Pushing along with cannons. All assembled with larger thread. Now figuring out coils and how I'm going to secure the lines on the deck. I understand that when the crew was in battle the ropes would just be on the gun deck. Hmmmm. As I'm going to add sailors etc. not sure what to do at the moment. Did my first reasonable coil tonight. Have to think more about them. Getting there. More done in a couple weeks than all of last year. But it's off to sunshine tomorrow for snowboarding. Maybe I will have a brain wave coming down the mountain. Modification to the shipyard. Added a 'plan holder'. Nothing fancy. A piece of metal (something- not sure what it is - close up attached) and some magnets. Total cost $9.04. Don't know why I didn't' think of a strip of light metal on the wall and use magnets to hold the plan. Works okay for now. Along with three screws too. Also added a larger tablet to view images. Well, the images are up once in a while, mostly Netflix... LOL..
- 295 replies
-
- 3
-
-
- victory
- caldercraft
- (and 1 more)
-
Found them! Thank goodness I have a carpet cover... (yes, pieces drop on the floor - seldom on the ceiling....)
- 295 replies
-
- 5
-
-
- victory
- caldercraft
- (and 1 more)
-
Robert... looks like you know what to do with the lights.. Wiring is my downfall. Check in on Pompeii's build. He is savvy with the light circuits etc. Way better than what I've done... and he has a great build. He get's to go see the real Victory any day he wants as he lives in historic Portsmouth. At the rate I'm heading these days you will be ahead of me in a couple months... then I can get some tips from you on those steps I've not done/attempted. Enjoy your build. We will too. Rob
- 527 replies
-
- 3
-
-
- caldercraft
- victory
- (and 1 more)
-
Thanks Robert. Hey, gotta like your name eh!.. LOL... will be following your build too. At the rate I'm going you will get done before me! I did get the port cannons rigged by New Year's.
-
Looking great Ian Finally got an opportunity to read your build! Good for you taking on the Calder craft for your first venture. You sure appear to know what you are doing with wood! Tell us, have you been in the wood business. .. lol I was debating leaving the copper plates off but as you have seen put them on. I remember going to many museums etc and one seldom saw any copper tiles on models It boils down to personal preference for me. I wouldn't worry too much about difference in Walnut shades. It adds to the the uniqueness and beauty of your ship. Looking forward to seeing more!
- 191 replies
-
- 4
-
-
- victory
- caldercraft
- (and 1 more)
-
Hope all had a merry Christmas. Now for another year next week too. Always seem to be the same since I was a kid... Christmas then a new year.. hmmmm... Have been plugging away at the canons and slowly they take shape on the deck. But, not as slow as last year. LOL... Have been drilling three sets and then rigging them. I was going to continue rigging the canons after I drilled the last of the holes on the bulwark. Woops, would have been a mistake to continue. Have included a picture of my drilling machine. LOL... If I had rigged the final canons I wouldn't be able to drill the holes on the starboard bulwark. So, there you go. Make sure there is room to drill the other side. Placed a canon on the starboard side to give some perspective. (I see finger drills are available but can't find any here in Calgary). Am pleased with the rigging. My canons will be in various positions as they will be "manned". Haven't figured out what to do with the ropes. Better figure out how to do coils. Nor have I figured out how many men and placement. Another challenge... down the line... have to figure out coils so they won't trip when I place them on the deck.


- 295 replies
-
- 6
-
-
- victory
- caldercraft
- (and 1 more)
-
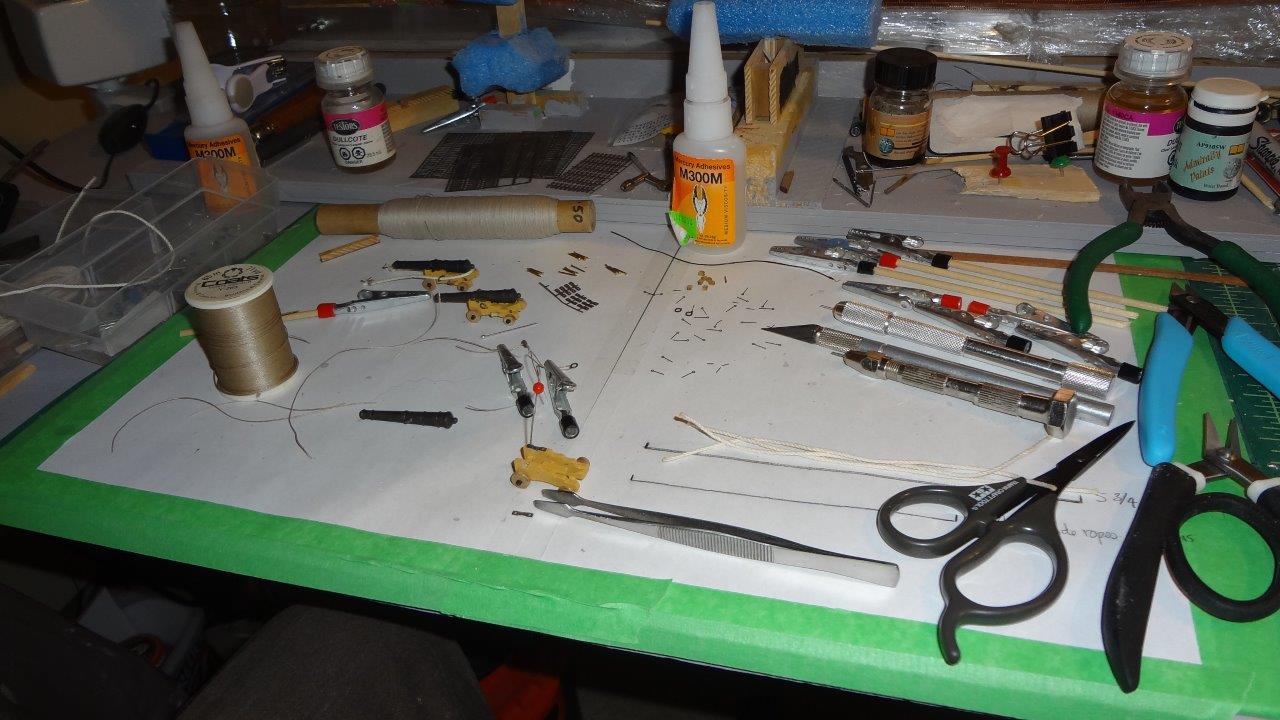
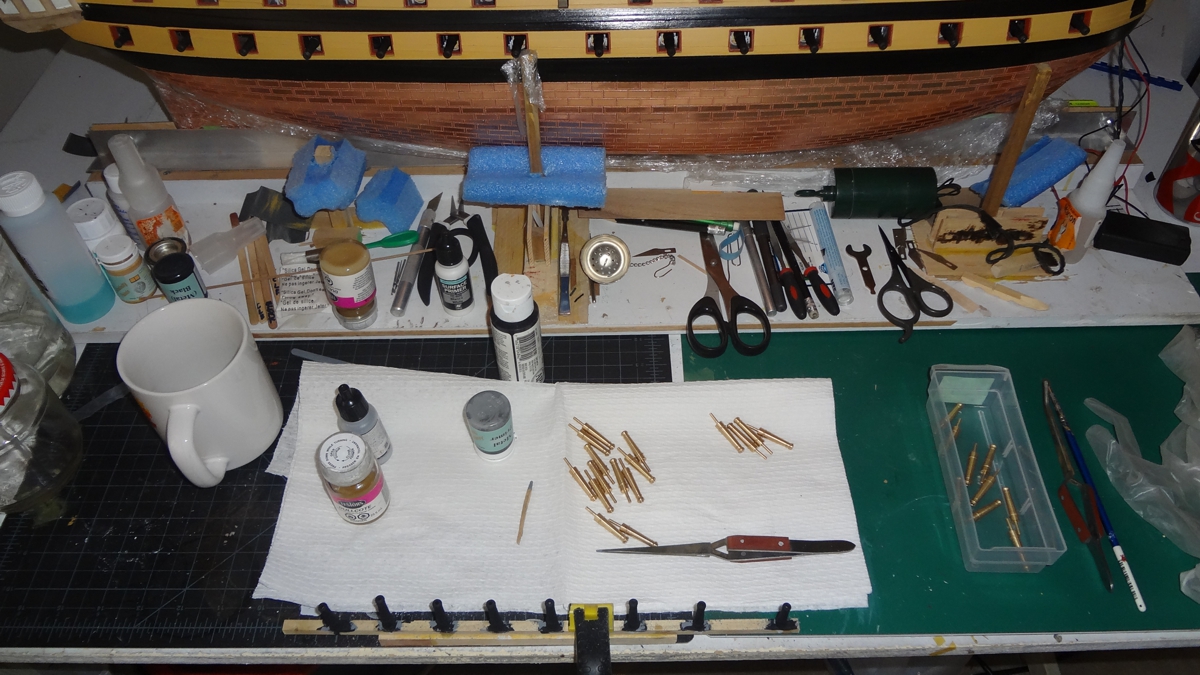
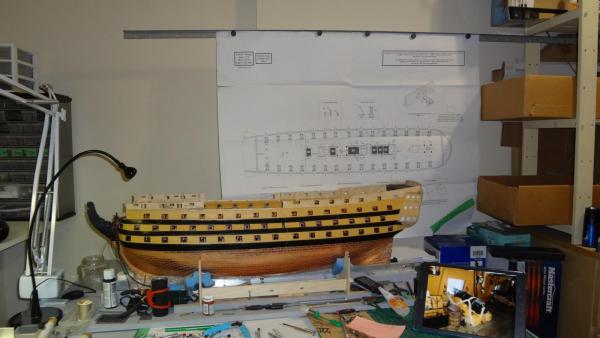
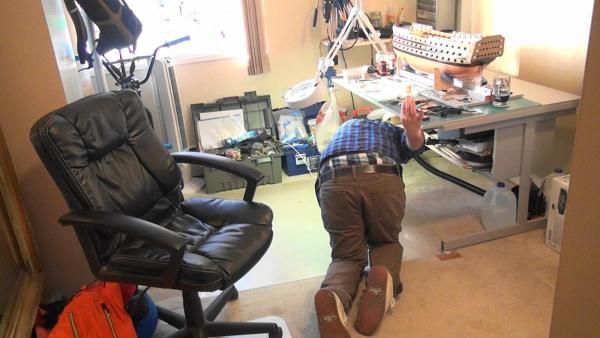
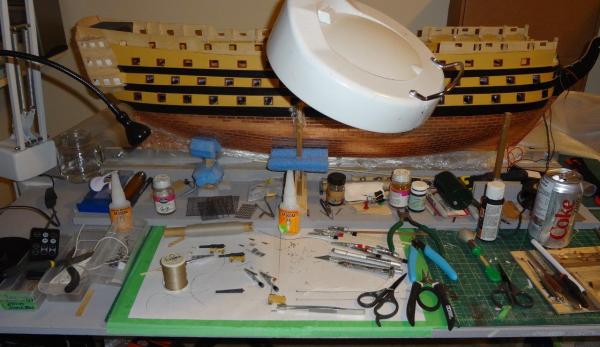
As I was messing around with the canons I thought someone might like to see the work area. Didn't realize how many tools i've been using. Hmmm.. might start surgery somewhere. I understand it pays well. Please ignore the overall mess. Heck it's a shipyard with only one builder..... The two pieces of white paper I put down on the cutting boards has been handy. Can see all the small parts. But I need the lighted magnifying glass to put them together.. LOL... Oh, and the small blade is there but i seldom use it. (it likes being in photos). Main tools are tweezers, flat pliers, (two pair to pull thread tight) and two type of scissors -- the Tamiya and the ones with a light blue handle. The blue handled ones are great for fine cutting the metals.) The clips are a great asset too. Oh, and two manual drills. The wire cutters are to cut the nails for the hinge plates on the canon. (I think that's what they are called --- I could look them up but... :im Not Worthy: ) I am really pathetic on proper names for the ship. Oh, and the best one is the black wire in front of the glue with the hook. Use it to snag the thread in and around the carriage while looking through the magnifying glass. Oh, for some younger eyes. It really is a mess and I did clean up for the photo but... the carriage at the front is number 15!

- 295 replies
-
- 3
-
-
- victory
- caldercraft
- (and 1 more)
-
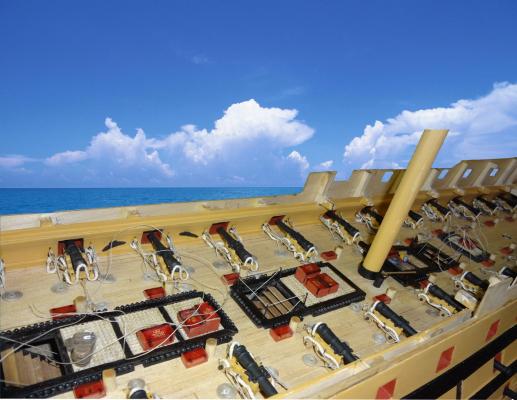
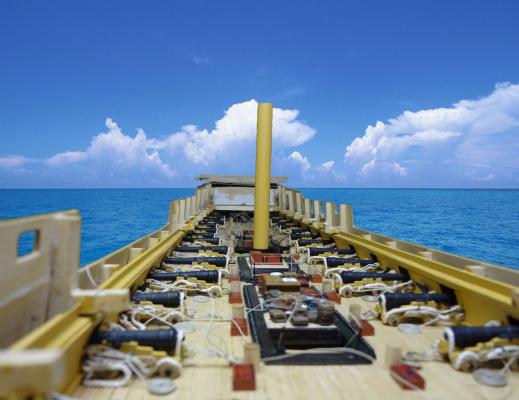
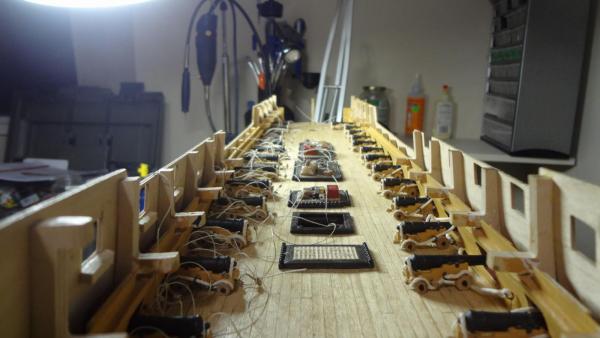
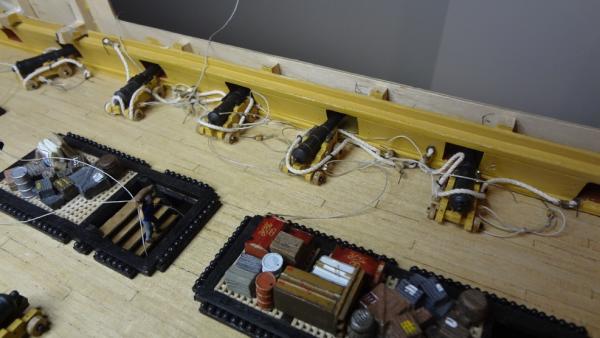
Moving along this week quite well. Now have 12 done. Have settled on this configuration.
- 295 replies
-
- 3
-
-
- victory
- caldercraft
- (and 1 more)
-
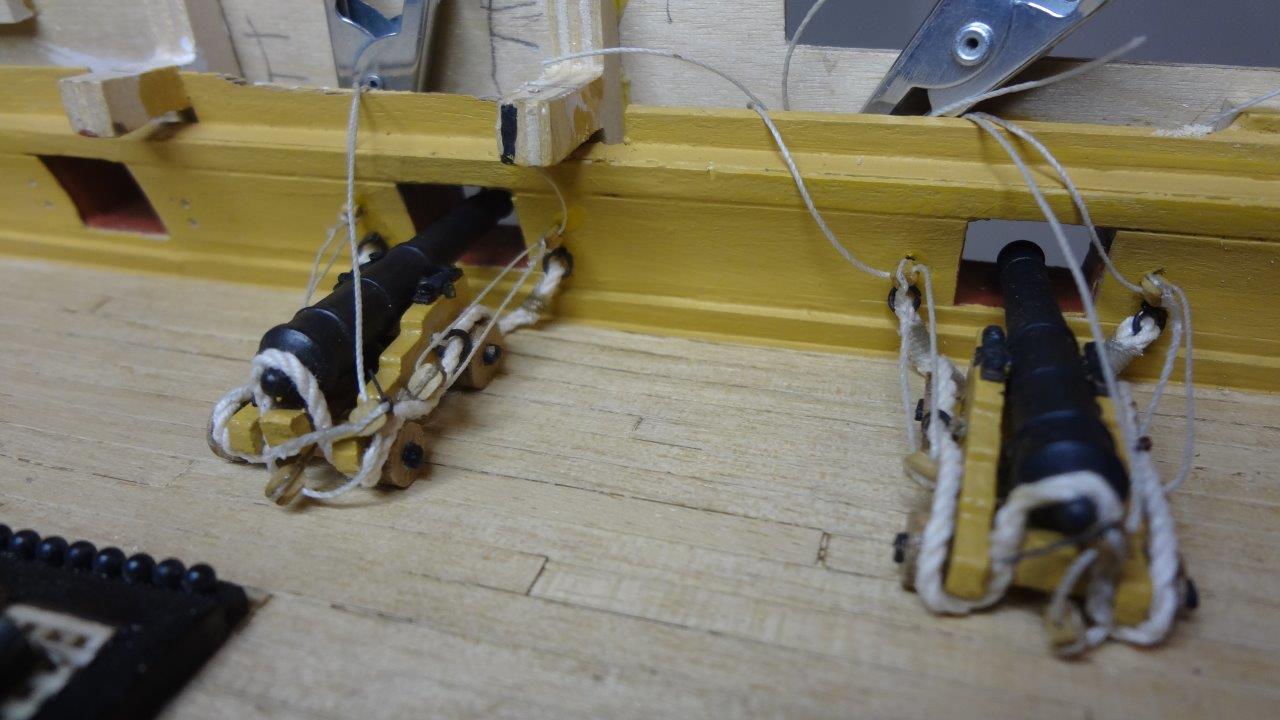
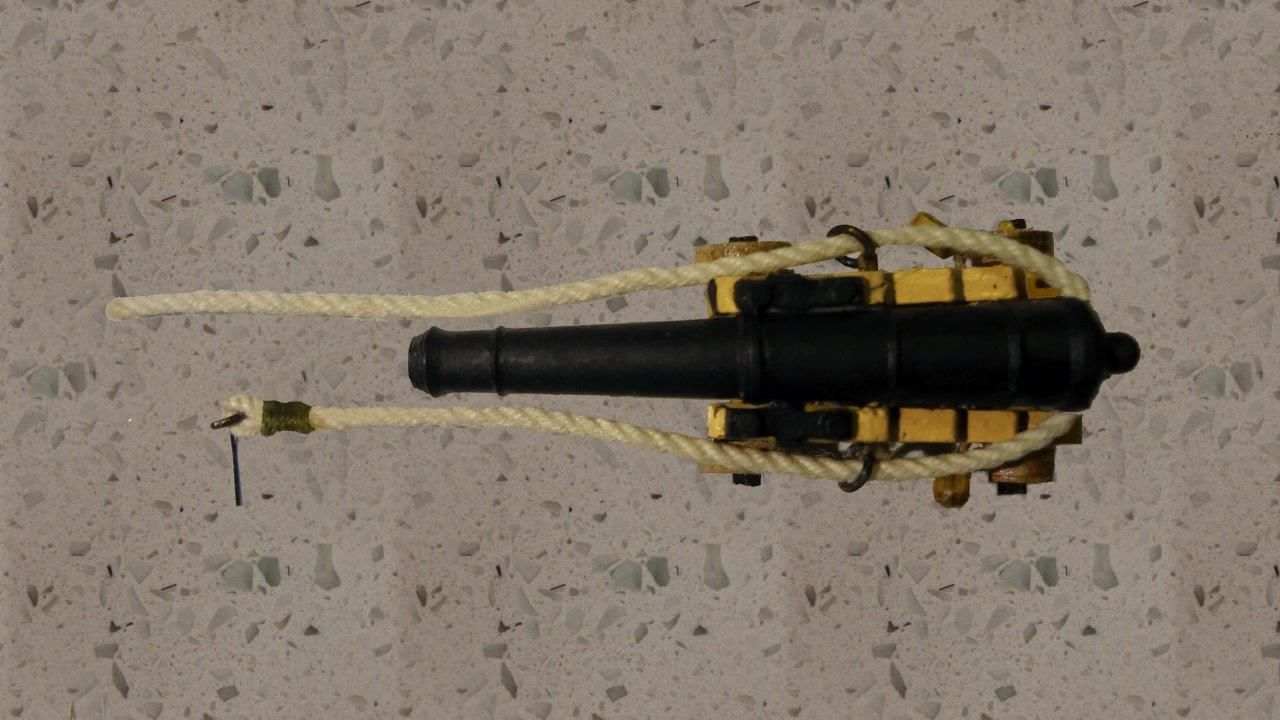
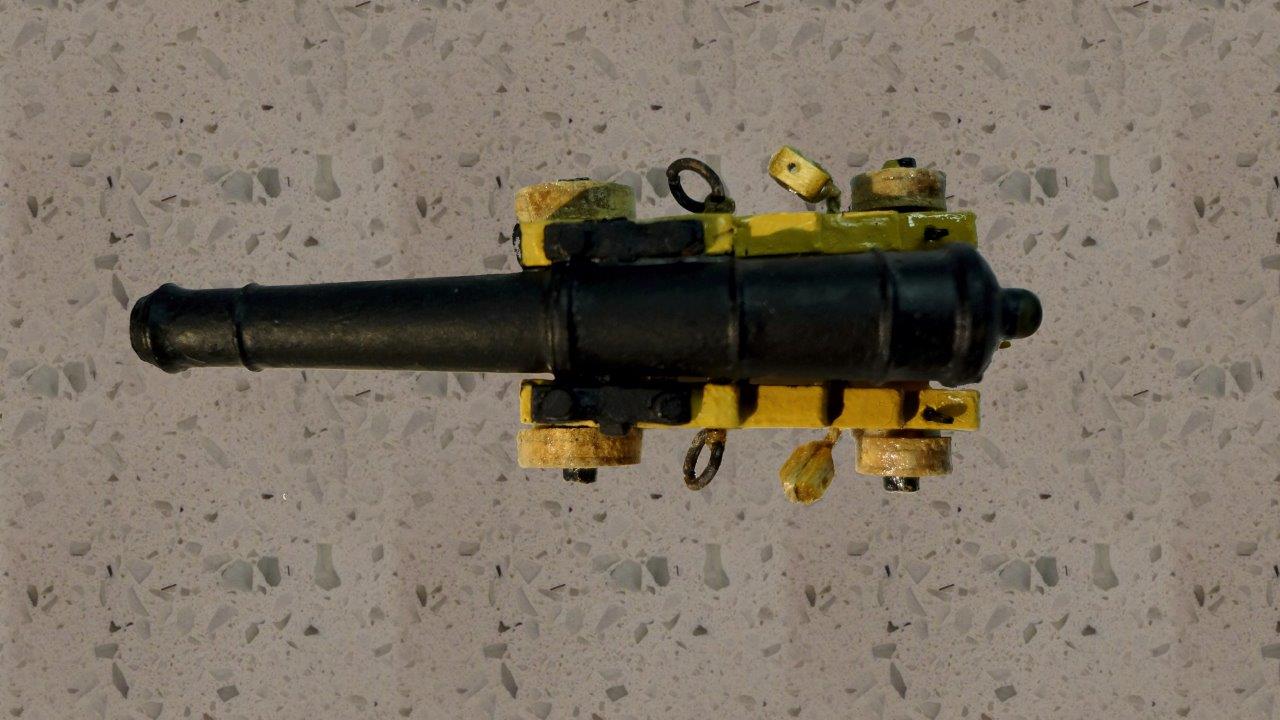
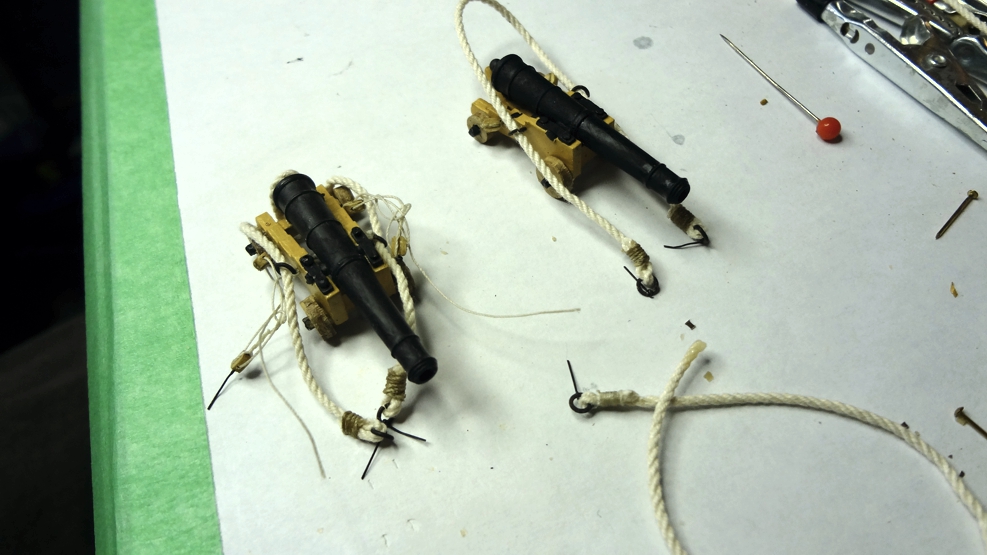
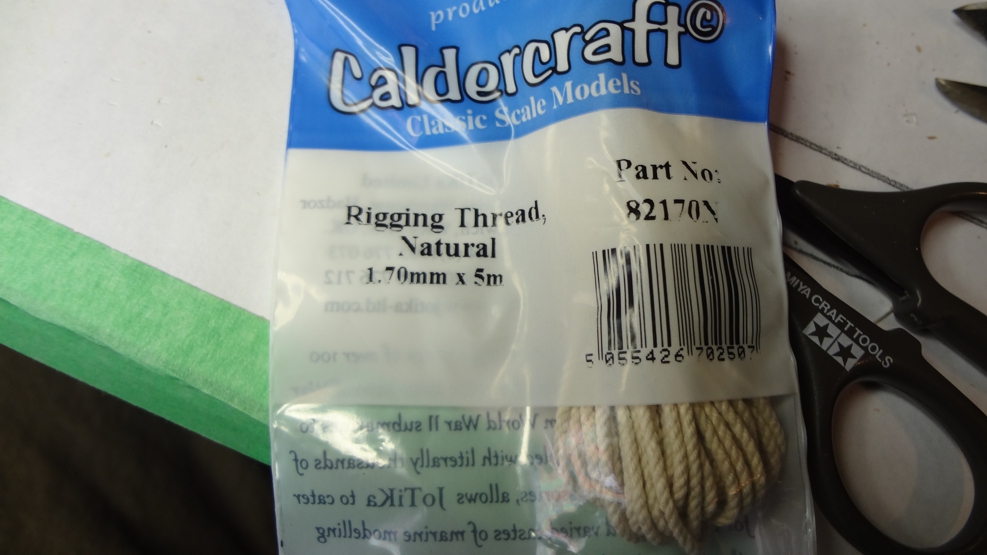
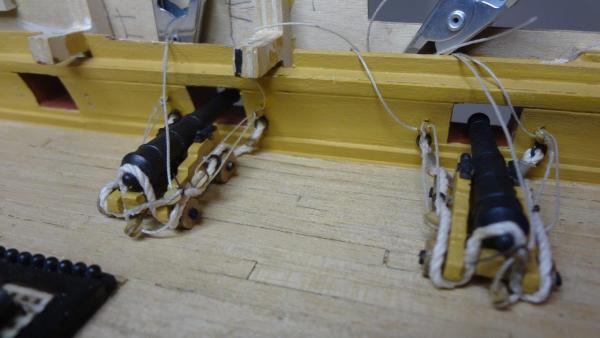
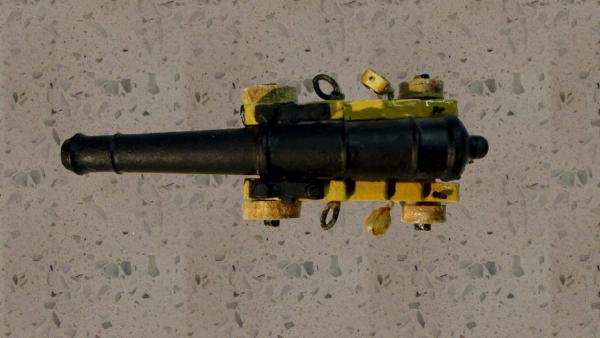
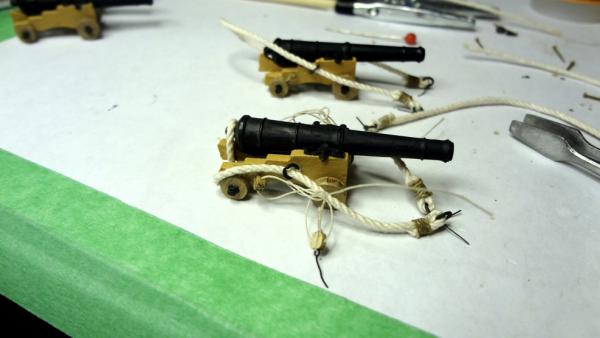
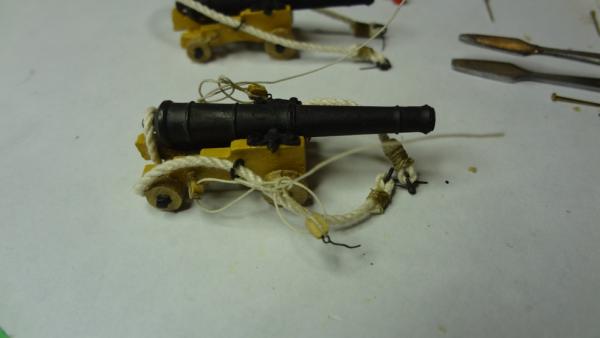
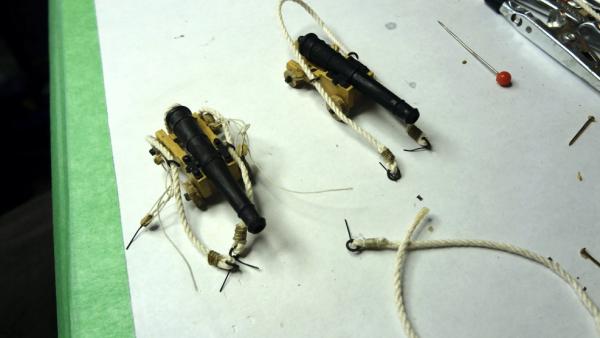
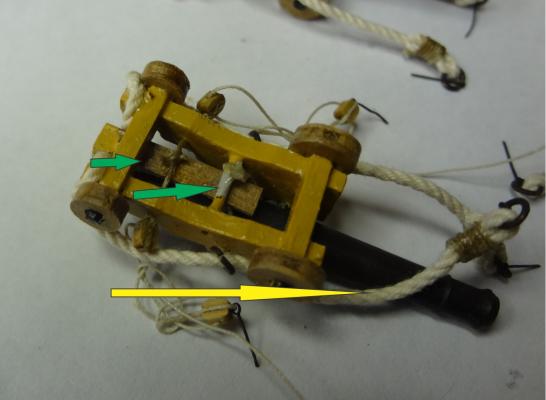
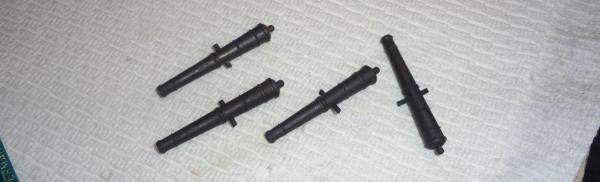
How time flies. Just haven't been able to get back to ship until now. This past year has been way too busy. LOL... I guess better than nothing to do. Snowboard season is upon us with great conditions in the mountains. But the shipyard calls and after a few interior modifications I've struck out again trying to sort out these darn canons. I've been procrastinating way to long. As usual, I've decided to modify and change things a bit. I've been doing the canons one at a time to get an idea how to best (for me) put them on the deck with their rigging etc. Rather than sticking with the 1 mm and .5 mm thread recommended in the plans I decided to upgrade to 1.7 mm for the thicker ropes. My view is that it is visually pleasing enough that I'm sticking with 1.7. The balance are .5 mmm thread. I also purchased a roll of thread that I use for the blocks and rings on the canons that I "mount". That is I use the commercial thread to make the block and pull tight to the side of the canon carriage. (I'm as wordy as ever!). I've included photos of my knot work. (Glue is awesome As it is all under the carriage I figured who other than those I tell will ever know. And, besides, there are only ten of the carriages on the upper gun deck that will be 'seen' so I can experiment and bury others deep inside ... Found an old chain somewhere and then separated each link. I use the ring to hold the 1.7 mm thread close to the carriage. It's a bugger to form the thread into some decent looking shape to 'lay' beside the carriage so the ring helps. ( I see that the heavier guns had rings on the carriage so I decided to make it standard for all my canons. Not to proper regulations but what the heck. The .5 mm is also a bugger to figure out how to tie down so it will look half decent but I best get all the first gun deck canons ready before I start to go solving the rigging appearance. There you go. I took a picture of some of the canons so you can get a sense of the 1.7 mm. Most of the canons you see, if not all, will be buried under the deck... They are just sitting there -- out of the way for now... Well, I'm back in the saddle so to speak.It's nice to be back.

- 295 replies
-
- 5
-
-
- victory
- caldercraft
- (and 1 more)
-
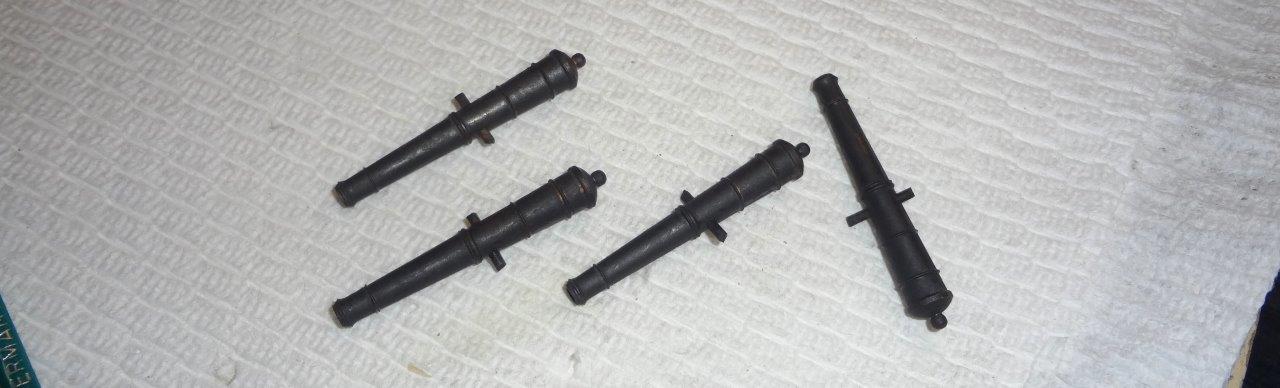
So much for "getting back to the build". Have been riding and riding this winter. Didn't expect so much of this: <iframe width="560" height="315" src="https://www.youtube.com/embed/yw2Ss9K1G7Q" frameborder="0" allowfullscreen></iframe> But I did make six canons. Still working out what will be the final product. Scale vs optics is the question for me. Not sure how it will work out. Will put canons I don't like buried inside... LOL..

- 295 replies
-
- 3
-
-
- victory
- caldercraft
- (and 1 more)
-
Thanks Rick.. I finally am getting back to the build. It's been a very busy summer. I was able to rig all of two cannons. LOL... not much and snowboarding started yesterday for the next six months. I best crack the whip! Painted the shipyard this summer and for that matter the whole place. Will see how the colour change works on pictures of the Victory. FYI - in the long run, lining the gun ports doesn't seem to make much difference. But it was fun coming up with an alternative. The biggest challenge on the gun ports is lining up the drill for the right angle of the guns... I was off a bit on some. Oh well, back now to the build.
- 295 replies
-
- 3
-
-
- victory
- caldercraft
- (and 1 more)
-
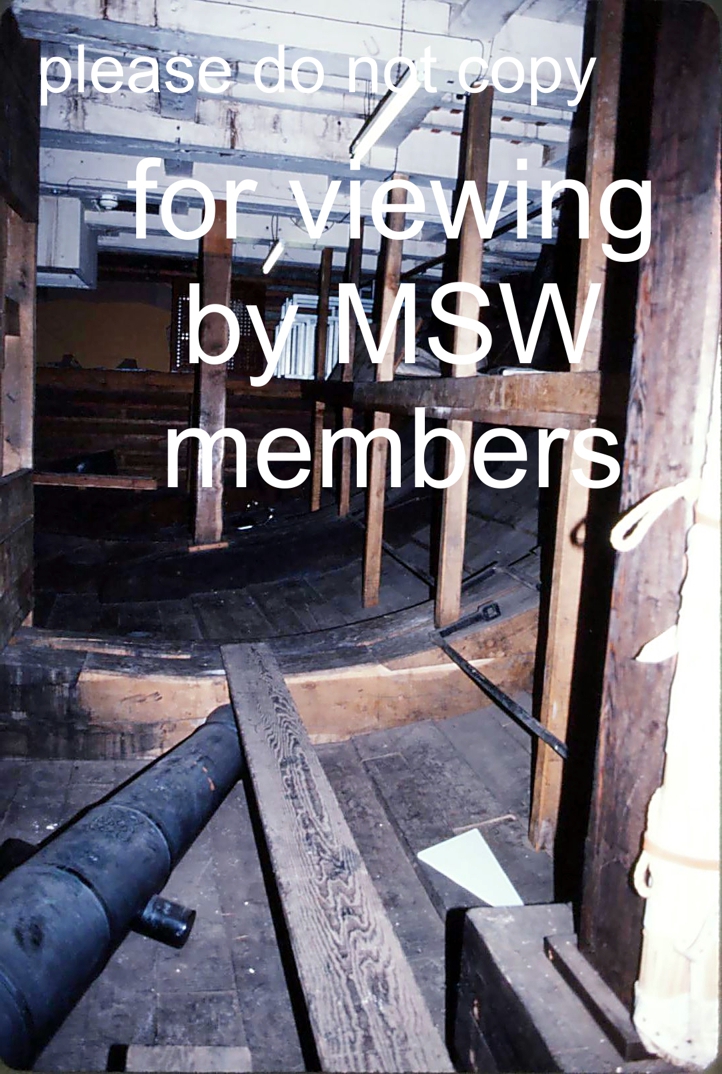
As mentioned have been painting the 32 pounders and now started the 24's. I must be avoiding the rigging of the 32 pounder carriages... LOL... Made my barrel holder and complete eight at a time. Two coats of Caldercraft metal primer. Two coats of dull black paint and one coat of matt lacquer. Not overly exciting but it seems to work. Was trying to figure out where to store them after I painted them and decided to push them into their holes of the gun ports. At least will know if I'm missing any. No 32's missing. Must do the red on them. Hmmm... thinking of an ink pad with red ochre paint on it. Wonder if that will work? Had fun with my "Lights on Video" and figured out how to embed a video rather than link. Am very pleased with the image that the video displays as the intro as it does seem to suggest my interior will look pretty good. The crazy part is that once I put the beakhead walls up nobody is going to see the 'view'. Here is my contraption for the painting. Made from 5 x 5 mm wood that I picked up at Canadian Tire for 1.99. Which reminds me to mention. At the Canadian Tire store there is a small display that has various pieces of small cut wood. Find it if you can. I notice it is in different sections in Calgary stores but close to the tools section. Cheap wood various thicknesses and convenient shopping. (for my fellow Canadians) I have found no pieces of wood etc. at Tims. The barrels in the back have just spent 5 hours in the white vinegar. Come out all shiney and ready for painting. Another sep that I take is to warm the barrels before painting. As I pre-soaked these ones, I will put eight in a cup and run them under hot water for five minutes before applying the metal primer. Just noticed there is no perspective as to size of the painting base. Will go find another image to add. Pictures are easier to look at I find. Bonus picture... Cannon barrel as seen by me in the hold of Victory when I made the tour way back when.. don't think we will see anything like this again for some time!

-
Lots to do on the upper gun deck but diverted to lighting. Went back to edit this post and the embedded video went to youtube land so I've lost the embedded option. Trying again to put up an embedded video.
- 295 replies
-
- 2
-
-
- victory
- caldercraft
- (and 1 more)
-
Made a decision that the inconsistencies are not going to show up in the long run. Did the last ten one at a time. Was doing them two at a time in the Blacken-It. I sense it worked a bit better one at a time but it sure took lots more time. Have now completed 30 cannons for the upper gun deck( the barrels that is). I am tempted to paint the dummy cannons so tried one after sitting in the vinegar, cleaned with water and then used a primer. Let it dry and put a matte varnish on it. It is not too shabby. As I am down to my last half ounce of blacken-it, another order is going to cost about $100 to do all the cannons. Painting the dummies will do just fine! While waiting for the blackening to work, I tried out my idea of cutting small clear plastic bases under the feet for the sailors. It is going to work out as well. Will round the ones in the picture rather than leaving rectangular as they are below. Apoligies for the grammar. LOL
- 295 replies
-
- 4
-
-
- victory
- caldercraft
- (and 1 more)
-
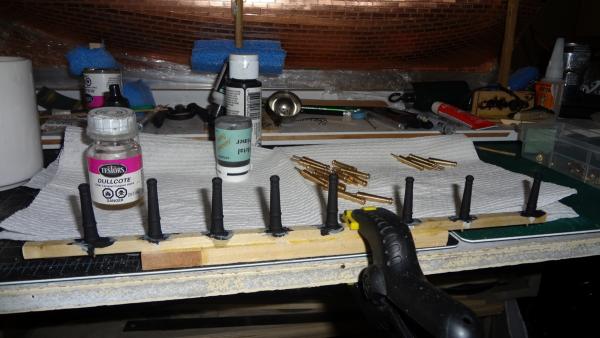
I see it's been over two months since I posted. Time flies when it is summer! No flood this year so just watied until Blacken-It arrived from Vancouver. Oh, did it take a while! Arrived a couple weeks ago but other activities have gotten in the way. Started the chemical baths for the cannons. It seems to take forever and very inconsistent. Each time seems to be an experiement and I've already gone through one two ounze bottle with ten cannons. And redone four. The third batch seems to be a bit better but I decided to just paint one black this evening and put a matte finish on it. That took about a minute to paint. This chemical dipping takes hours and hours and I've tried up to four at a time and figured it doesn't work so well with multiple cannons. So back to one at a time. The picture is cannons four to seven. I ended up with them going into the blacken-it three times. These have a coat of matte varnish. Have drawn no conclusions other than the time is a major consideration. I have decided to strip one to three and re-do. Have three more in the varnish stage that I've used chemicals. Oh, i use miratic acid bath, then distilled water, a dip in vinegar for a while followed by distilled water dip, then the blacken-it dip and again followed by distilled water. (The distilled water bath is separate for each one). So much for three coffee cups. LOL
-
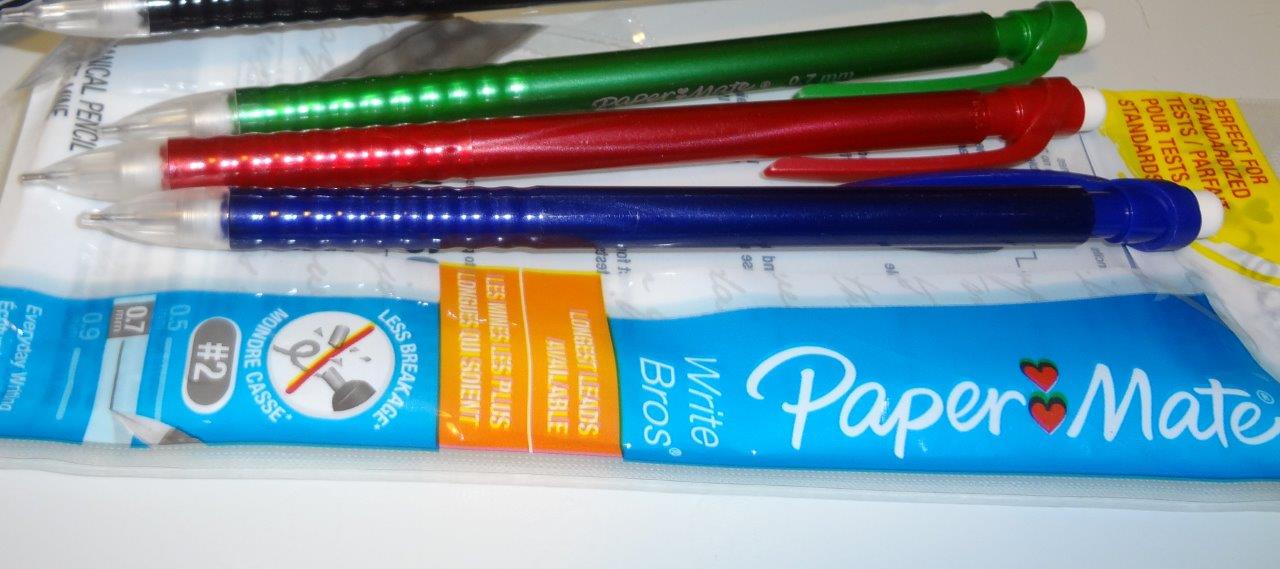
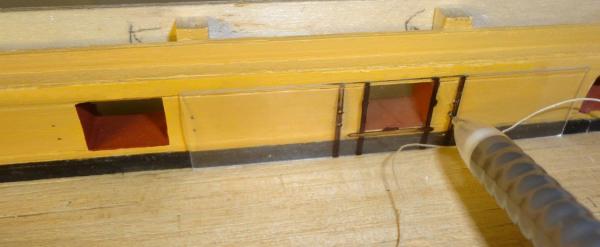
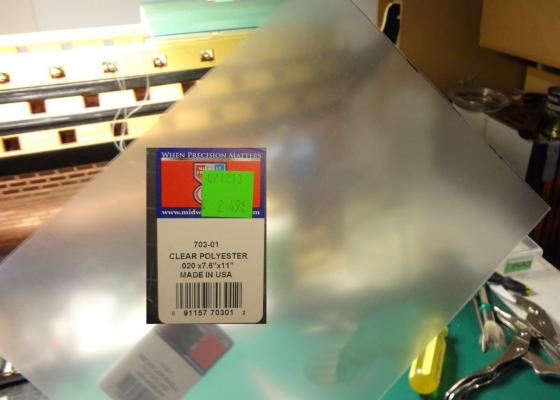
How did you line up the holes for the eyelets on the gun ports? This is how I've done it. Went to store and bought a clear polyester sheet .02x7.6"x11". Measured the height from deck to the top of the gun ports and cut a piece about 2 inches long. Used a black magic marker to highlight each side of a gun port and then measured 5mm on each side. Decided on the height of the two holes and manually drilled the holes with .07 drill bit. They lined up..(I was quite surprised and pleased to say the least. LOL) .Purchased a set of PaperMate mechanical pencils for $1.79 with .7 lead . So not counting the drive to hobby store and Walmart the cost was $4.49 (with tax). Used the lead pen to mark where I will manually drill the holes for the eyelets. (btw - there is a pull-off plastic protective sheet on each side of the sheet when you purchase it.) That's how I created my template. Here are the pictures.


- 295 replies
-
- 6
-
-
- victory
- caldercraft
- (and 1 more)
-
Saddened today to hear of the passing of Hubert Sicard. He made a wonderful contribution to the world with his Wooden Ship Modeling for Dummies. If you haven't visited his site take a few days and enjoy. http://www.shipmodeling.ca/aaplandusite.html
- 295 replies
-
- 1
-
-
- victory
- caldercraft
- (and 1 more)
-
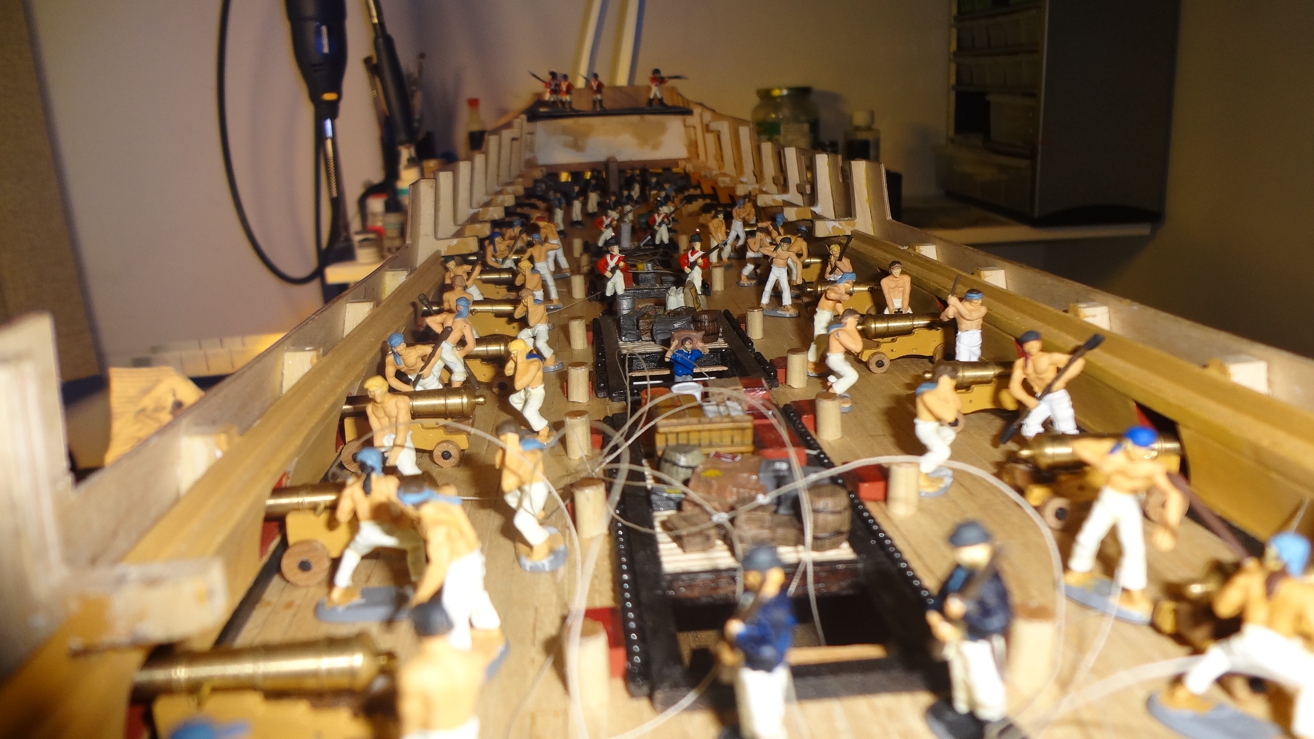
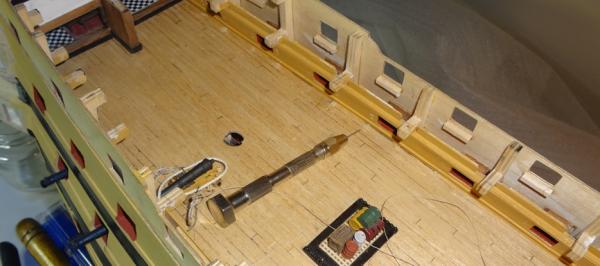
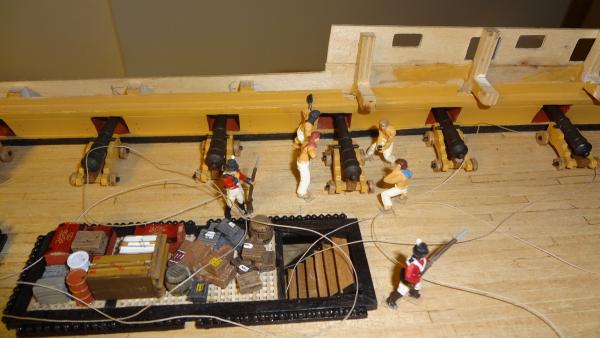
Continuing with building the upper gun deck cannons. Waiting for blackening solution to arrive for barrels etc. Recalled a partial crew for an hours drills. Threw it all together for a moment to pause and evaluate where I'm going with my 'extras'. Upon viewing this image am very satisfied that the deck will look 'alive'. Building the gun carriages like the copper tiles is not that tough a challenge. It looks daunting but I find it is going along reasonably well. I do two to four at a time. Thought about the idea of an assembly line approach like some have done but decided against it. Find that as I go along each gun carriage gets a bit better. A tip that I've figured out. When cutting the gun carriages and wheels out of the wood make a shallow cut on one side of the piece holding the object to the wood pattern. Flip it over and then make the final cut through the wood. It seems to make a better complete cut. I initially tried to push the blade all the way through from one side. Not sure I've explained well enough but there you go. On to the final gun carriages. Looks like rigging the cannons will be an interesting time!

- 295 replies
-
- 5
-
-
- victory
- caldercraft
- (and 1 more)
-
Mort - I made them up using printer, corel photopaint and the testors decal paper.
- 295 replies
-
- 1
-
-
- victory
- caldercraft
- (and 1 more)