robipod
-
Posts
202 -
Joined
-
Last visited
Content Type
Profiles
Forums
Gallery
Events
Everything posted by robipod
-
 Erik Just a quick comment re lights. I was really worried that the lights I put on the middle gun deck would be way too bright. To my relief last week I remounted the dummy cannons (just for fun). As I've got the upper gun deck sealed and built the grates etc. on the deck it turns out the lights are not too bright at all. Am sure you will experience the same. I put really bright white LEDs in the middle gun deck. The lower gun deck has flickering LEDs on mine. You are right, can't get an image that does it justice. As said, am sure yours will be just fine too. The cannon blocks a lot of light and with the background we've created for the gun bays it really does come out quite effective. Enjoy! Your build is coming along beautifully. At your rate you will be past me soon! LOL Wait, maybe you are past me! Rob
 -
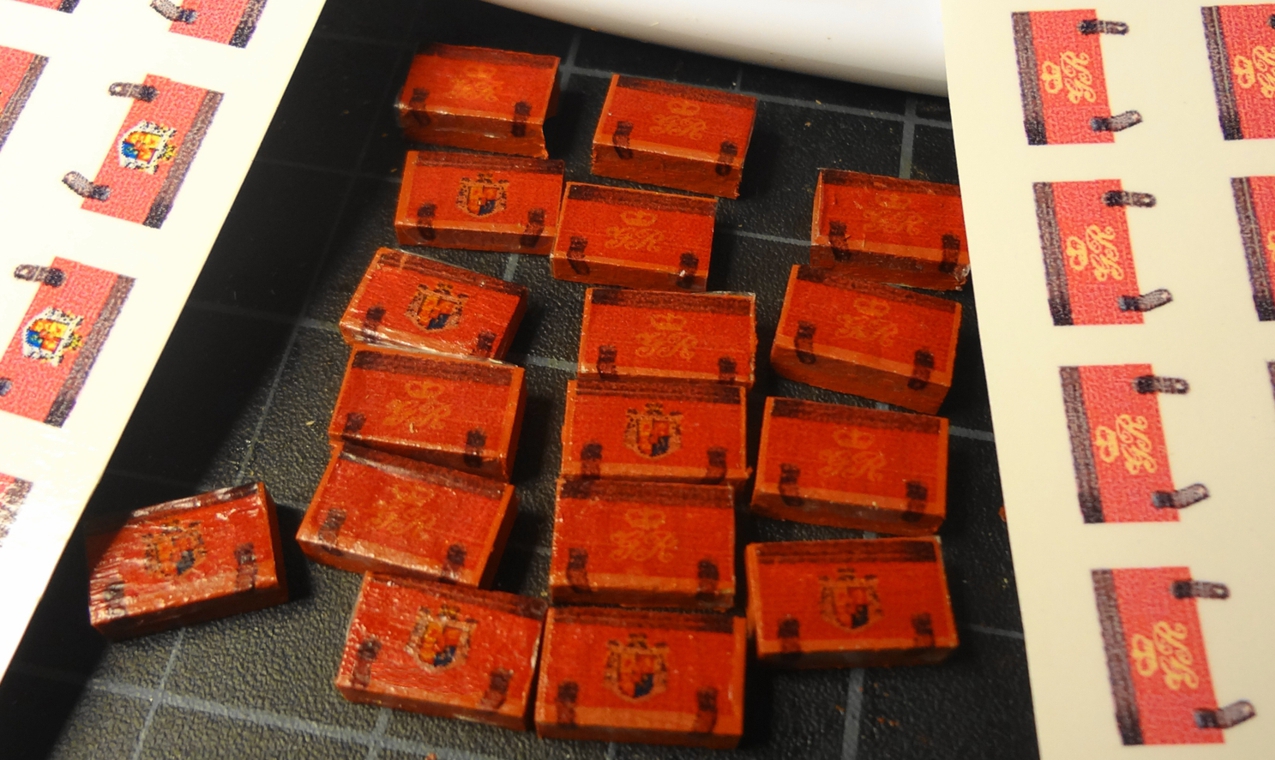
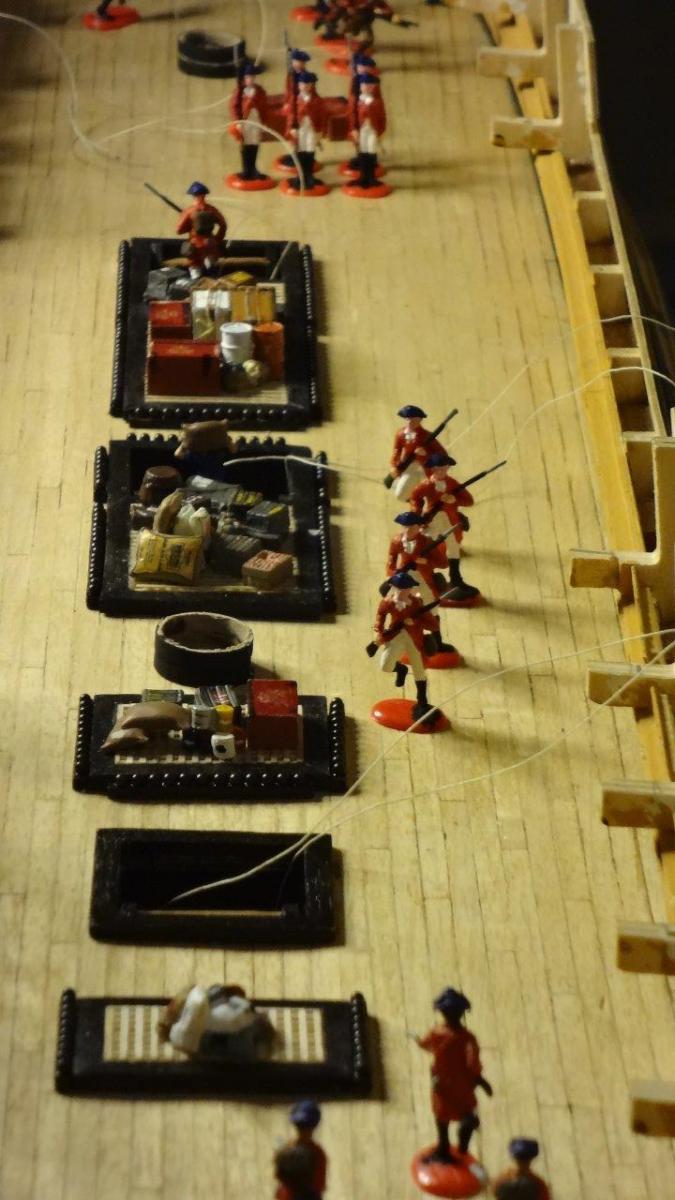
Lots of snow in the mountains and snow here in the city. Well, snow in the city until tomorrow. There is speculation in the weather forecasts that spring will arrive in the morning. We will see. Made two gun carriages. Am finding that it is important to keep the paint to a minimum. Will be diluting the third carriage paint a bit with distilled water to see if it makes a difference. Ordered Blacken-It from Imperial Hobbies in Vancouver to blacken the cannons and other brass. Unfortunately they are back ordered for four weeks. Guess that gives me no excuse and will have make the rest of the carriages. Diverted a bit this evening to re-create my ammunition boxes. Have made them 10 mm like Nick re-suggested to me. (I had forgotten he told me the size he used - the memory is great but really short.. LOL) Found the golden insignia does not show up as well on the smaller boxes. The ones I did before that were too big for ammunition boxes. I've scattered the larger ones around and the gold colour insignia shows up well on them. (there are some images a few pages back). A bit faint on these. I'm thinking they look like King George III royal cigar boxes... But they will do just fine... making up 45 at the moment. Will put them with each cannon station. Oh, each has one coat of testor's decal sealer and a matt finish decal solution Micro Flat by by Microscale Industries, Inc. Will try a second coat of the matt finish and see what happens. (edit - just looked at the decals and they are flat finish now - when I took the picture they were still a bit damp from the Micro Flat solution - won't need a second coat) Oh, you can see the decals that were made up to the right and left. I did the one with the gold GR and Nick did the other crest (am thinking so anyway - we did it a while ago). Used the testors decal sheets, my graphic design software (I use CorelDraw) and the colour inkjet printer. on to the carriages!

- 295 replies
-
- 1
-

-
- victory
- caldercraft
- (and 1 more)
-
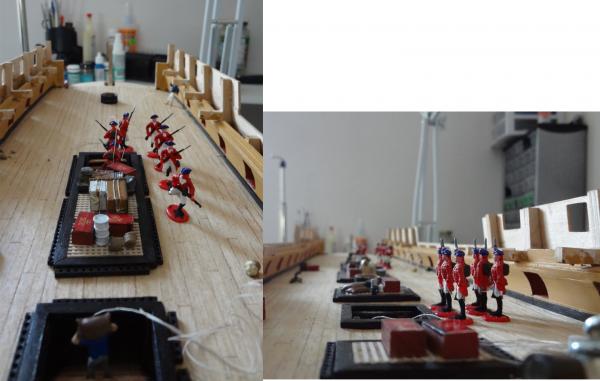
Done my first set of Hat 8098 figures. Now have a Navy to run the ship. As I won't get the next sets for a while it is on to the gun carriage assemblies and the rest of the deck. Can't get over how colourful the ship looks with the added figures. Really seems to bring her to life. As I will be gluing these guys on the deck I am going to work on the quarterdeck and fit it before I start rigging the gun carriage assemblies et al. Working with a relatively bare deck at this point will keep the bumps and scrapes to the deck features to a minimum. Will put the Navy on shore leave. Besides I have to figure out the lighting layout as well so best complete before the shore leave is over. My painting skills have improved but am happy these guys will be buried on the upper gun deck (no pun intended). Will do another set for this deck so there will be about another 46 sailors to add. There is a total of 82 figures on the deck at this time. Have been checking YouTube and there are plenty of suggestions on how to paint. One thing that I was told is to always have the paint warm. So the paint bottles sat on the radiator. When it was time to paint turned up the heat a couple degrees a half hour before I started. Here is one site that I found very useful on painting: http://www.youtube.com/watch?v=AJuQvVjdNCA Below is my first Navy -- of sailors and Marines. I just realized there are no officers. LOL... hmmmm. Well that is something to think about for the summer. Now back to the ship. Paints are put away. Am heading to the mountains. There is a ton of snow and only two more months before they close. Spring riding is the best!

- 295 replies
-
- 4
-
-
- victory
- caldercraft
- (and 1 more)
-
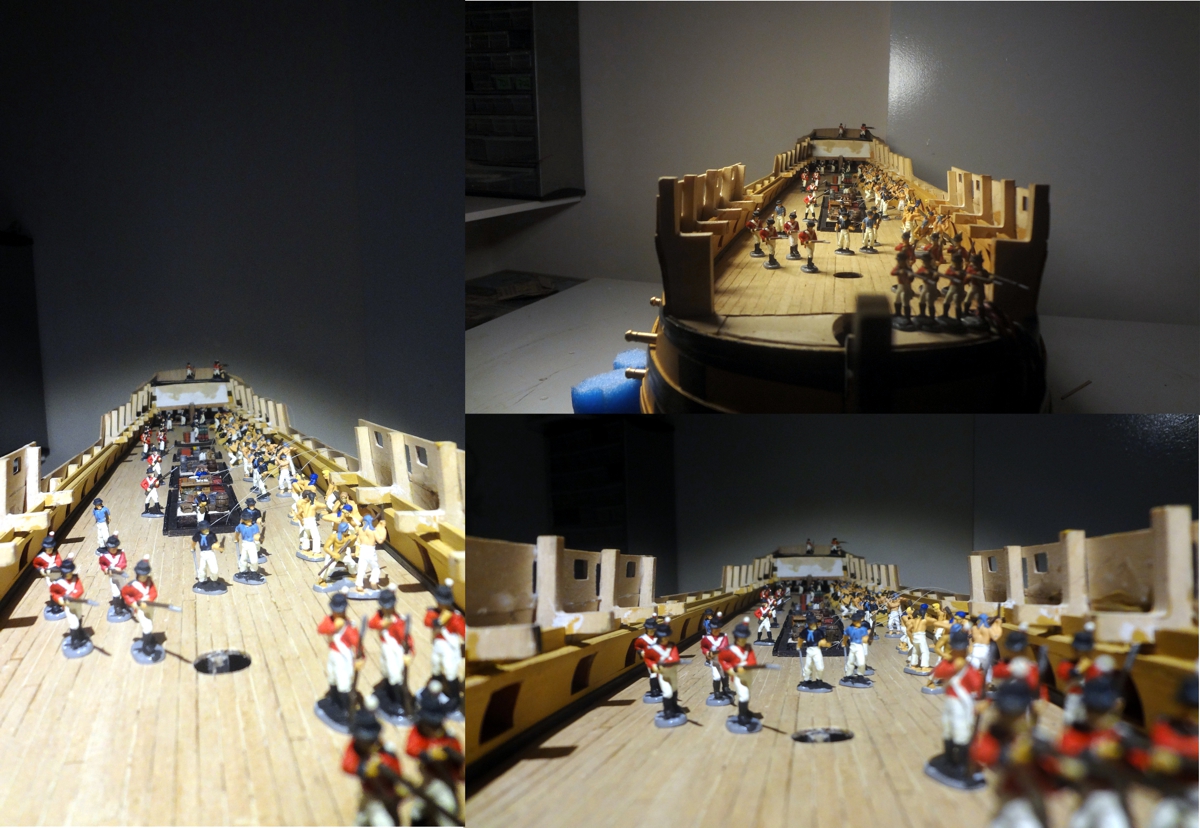
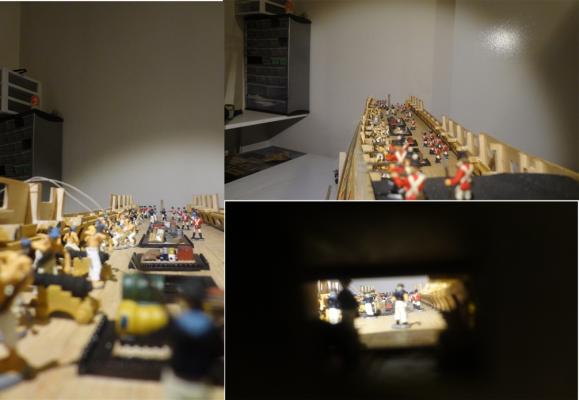
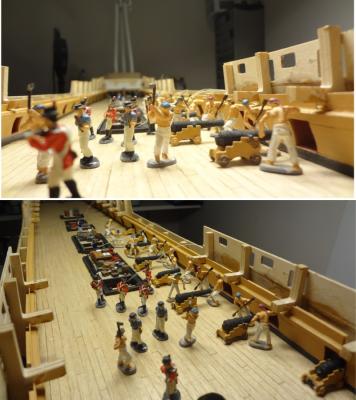
This exercise of painting figures is going to work for the visuals I am looking for in the completed build. Here are views looking through the stern and along the deck. You might ask why am I concerned about showing some interior 'action' if all enclosed. Yes it will be enclosed but I am going to have the whole deck lit so the interior will show from the stern and from topside a portion will show. The experiments on the figures on the middle deck were worth the 'delay'. By the way, the clear pvc for the figure base works! I've done several tests on the field Army. Am ready to roll on the Navy. It brings the figures a couple mm lower when I chop off the base.

- 295 replies
-
- 2
-
-
- victory
- caldercraft
- (and 1 more)
-
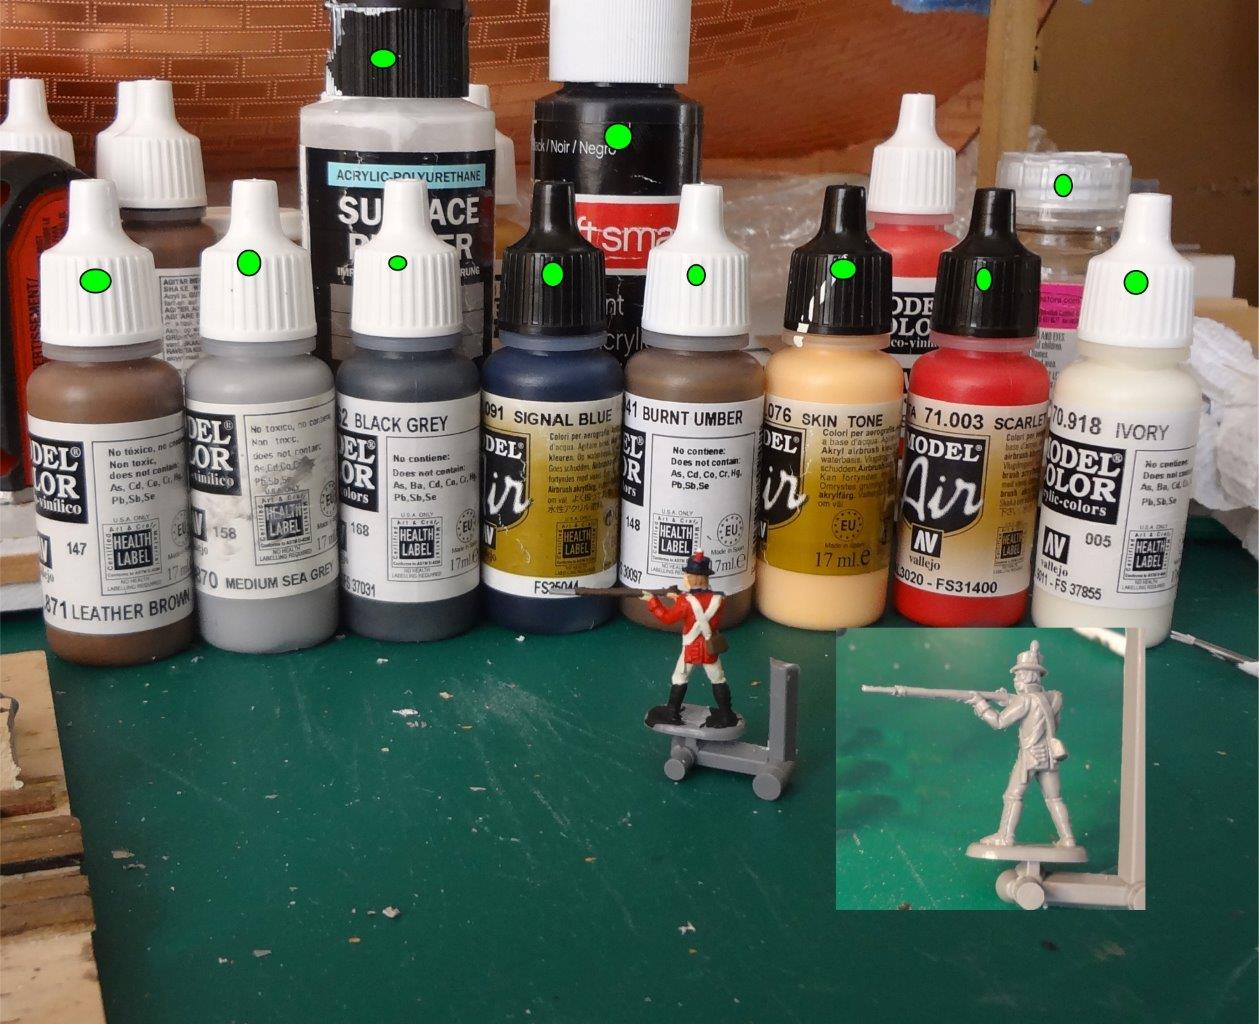
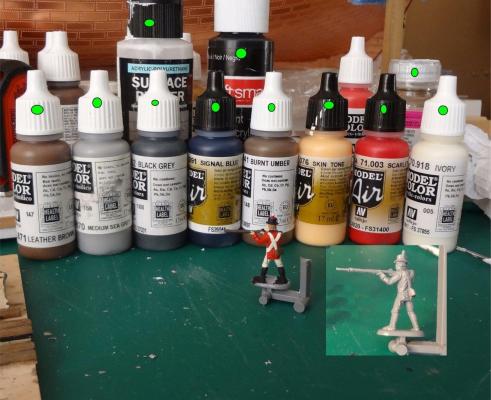
Here is a view of the paints for this dude. Eleven different colours. These are all Valejo paints (air and non-air) except one Testors. The air ones are thinner and fill in well. I noticed after taking the photo that there were a few extra caps in background so put a green dot on all used for this guy. The back right is Testors dullcote clear lacquer that I use as the final coat. The other two back row items are Valejo surface primer that I diluted with distilled water and a flat black paint I bought in Michael's. Tried to position so you can read the colour names. Next item to deal with on these figures is how to take the bases off and replace with something so there will be a little bit more surface to glue to deck other than their feet/boots. Picked up some clear pvc today .010 thick. Will experiment on my field army. Will cut their base off and glue to the pvc and then cut close to the feet. Will experiment.
- 295 replies
-
- 1
-
-
- victory
- caldercraft
- (and 1 more)
-
It's been a while. Practiced on the 1764 army figures and have been working on the Navy. Painted up the plastic cannons in the Hat 8098 set to size up the future appearance. Decided to have the cannons pulled back and being loaded. This should 'fill the deck' and it I think will look ok. One thing I noticed with the pictures is that I have to get rid of the different coloured head gear. Looks a bit too colourful.. specifically red and green.. LOL.... Still haven't done one cannon from the kit. Seem to be stuck on painting the navy and getting it ready for this deck. Am getting better as I go. Have settled on various paint colours and will be listing them in a bit for anyone going to paint of these guys too. It sure adds lots of colour to the deck. Figure these guys won't be seen too much. The most viewed will be those on the upper deck etc. The painting will have to be right on for them.
-
Mort I've been searching for a year! There are some scattered in some of the European shops. Am told I will get my next sets in three or four months if I'm lucky. These people have some in stock if you want to order from them: http://www.1001modelkits.com/ and they have a US company so give them a visit on the net.
-
Poking along. Am really diverted by the scale figures. Searched the net for tips and discovered that I should be priming the figures first with a base coat before painting. Am really pleased with my decision to add bodies to the model. It gives it a different perspective. Now for 70 odd sailors, marines and those cannons for this deck.... Here's where I'm at


- 295 replies
-
- 1
-
-
- victory
- caldercraft
- (and 1 more)
-
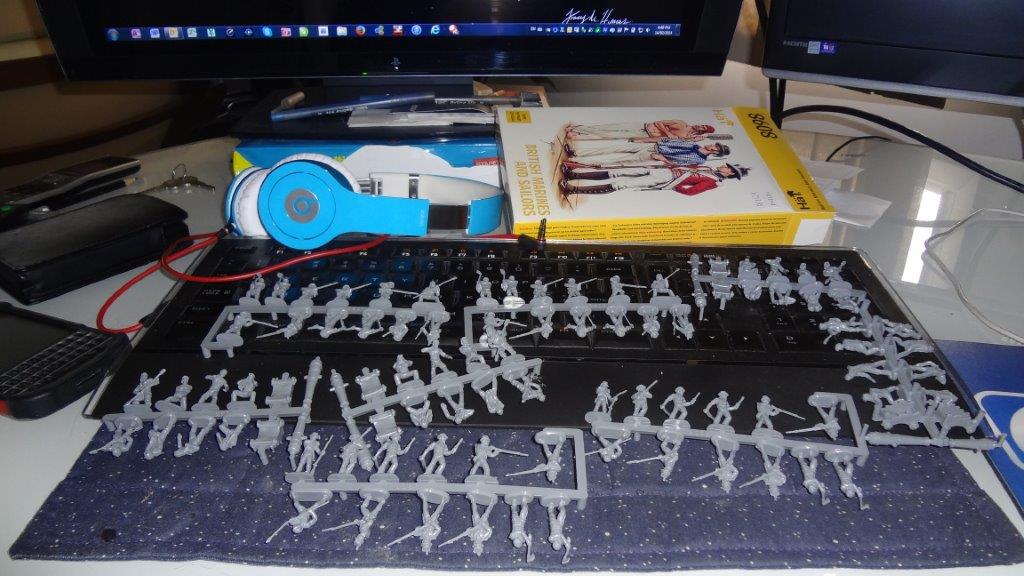
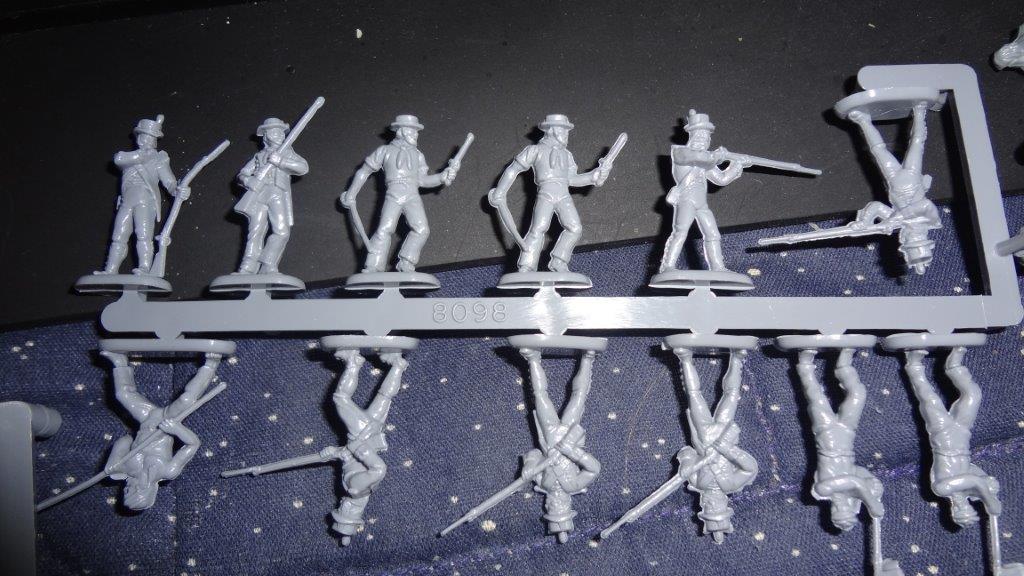
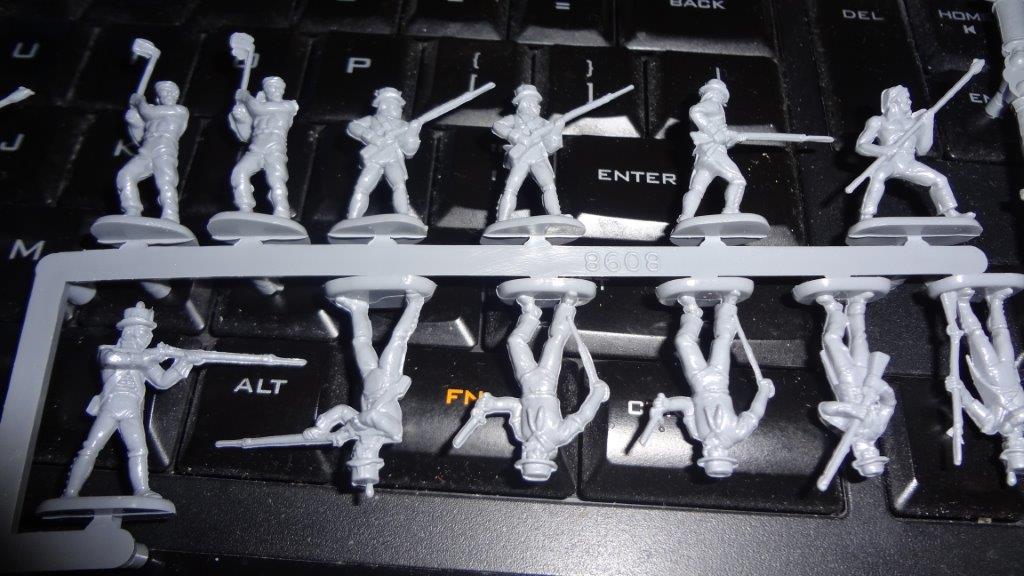
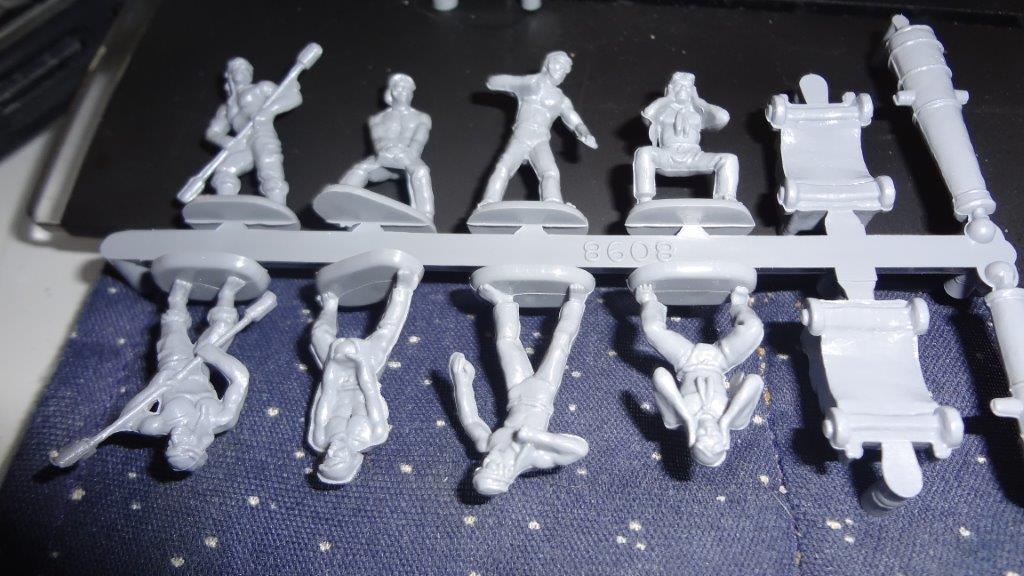
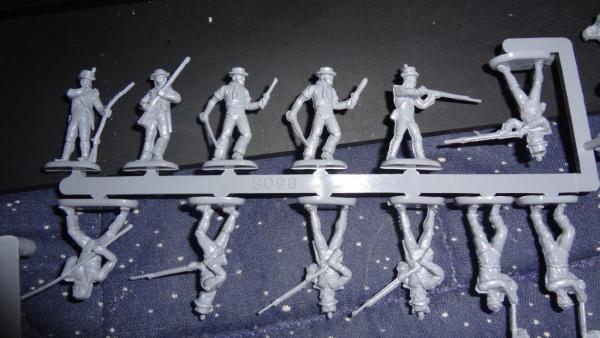
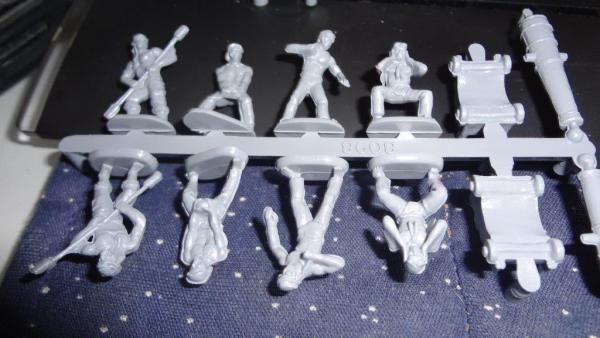
It's a long weekend here so I am not going anywhere near the mountains... Too crowded... LOL.. but this arrived in the mail today. For anyone who hasn't seen the Hat Industrie 8098 British Marines and Sailors here it is


- 295 replies
-
- 1
-
-
- victory
- caldercraft
- (and 1 more)
-
Lawrence: A m looking forward to the Hat figures. I see there seems to be a new batch released in Europe. The store I bought from in Vancouver - Imperial Hobbies - has two more sets on backorder for me. Maybe I should order another. So anyone in Canada, looks like Imperial can get them if you are interested. Here is their website. http://www.imperialhobbies.ca/
-
Nick I cut the boxes depth and am making new 'smaller' ones. Keeping some of the larger ones now as 'extra decoration'. I've been totally off-track the last couple days and bought some 1:72 scale figures and practiced painting them. One of my three sets of Hat Industrie 8098 British sailors is arriving this week so decided to do some test painting... The set I got is an American revolution British soldiers so a bit out of date and of course not marines but did them up. I've discovered that the bases are great when left on to hold the figures... LOL... won't be doing that... It is going to be somewhat difficult to paint these sailors when they arrive. Oh, and it helps to bathe the plastic in dish soaped water overnight. I am really pleased with the extra boxes and goods that I've found. Went to the model shops and the extras are from those 'country scene' HO scale. They work out great. Here's a sample. Am looking forward to the sailors arriving. Am putting off the cannons for the moment... Oh, discovered that it is advisable to paint the hands as well as face... Oh well, only practice... I know I cheated with the black baseboard on the deck...

-
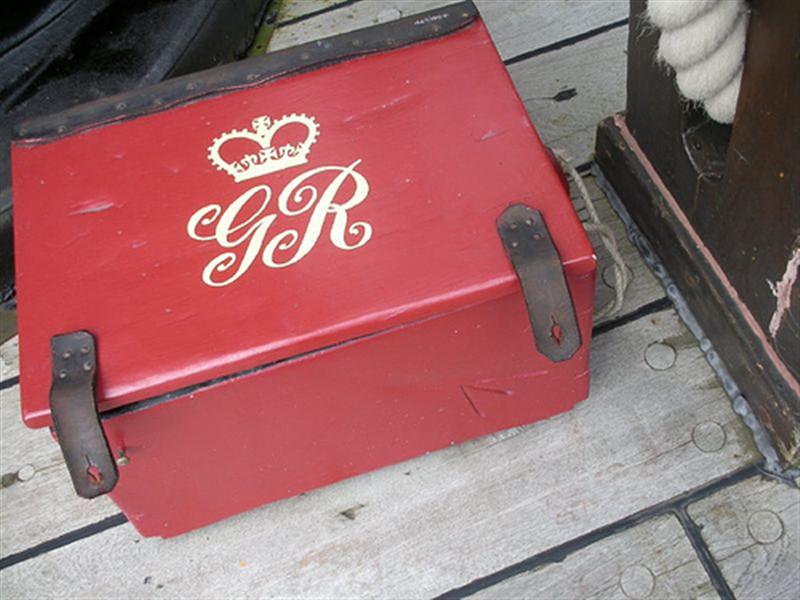
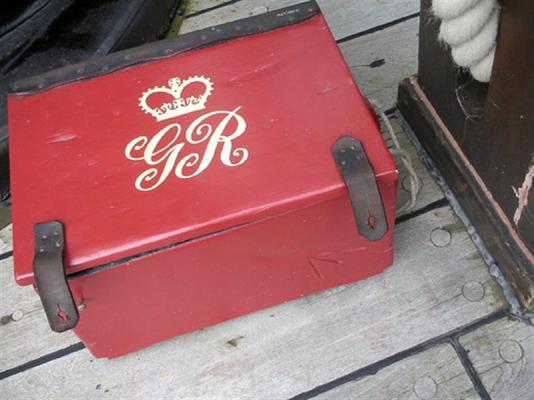
Lawrence the little red boxes are supposed to be the same ones on the current ship. I just remeasured them again and they still seem big. Here is what I'm trying to duplicate. (Nick did it well on his ship)
-
So you just brushed it on. I wouldn't have thought that easy. Did you use a wide brush? I've got one about 1/2 inch do you think that would do it Nick? Rob
-
Looking really cool Jerry. If you had the upper masts off it would look like the Victory today in Portsmouth... As I build, I don't get the sense of how large the ship will actually be when I'm finished. You have just given me some perspective. It is going to be one large model that we are building. Where is your Victory going to when it is finished Jerry? I'm not sure where to put mine after I'm done. You've got me thinking...
-
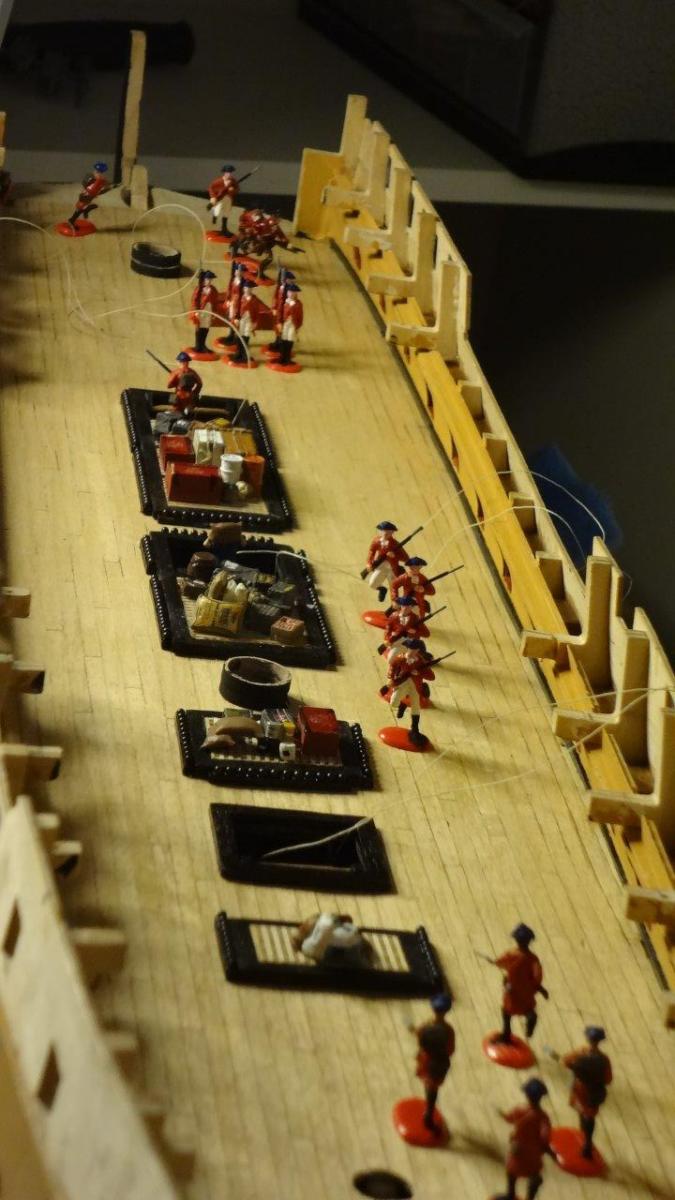
This is where I'm at tonight... I didn't go to the mountains so stuck to the shipyard... Question: I am thinking my red boxes are too big. Do you agree? (You may have to make the image larger) Thought they were the right size but they just appear too big and I am wondering if I should use them as much as I am thinking. One per gun! Have decided to put 'items' on the grates and have the one dude carrying a bag down the ladder. With the sailors and marines coming for sure am looking forward to 'populating' this deck. Only the dark coaming and grates, 2 x ladders are solidly glued at this point. Everything else is just sitting for the decision process. One more ladder to complete! Oh, guess I better figure out how to do the cannons too... I wondered about the dark walnut around the grates on this deck. I've noticed two styles in the photos of the real ship. Decided to go with the dark as it provides a nice contrast... Sometimes it is about appearance...

-
Theo... that's how it is done! I've got one of those calipers too ! Thanks for that idea....
-
Thanks for the ideas Nick. Yes, that is a super idea re the brass. Will look at it as I go along now... Did you use a can of spray poly to coat the tiles or did you brush it on? I just figured out how to do this... It was an interesting day... found a full box of Hat British Sailors and Marines in Vancouver. They say they can get more so I might have solved the 'seamen' problem I was having. One box of 98 pieces on the way... will have some sailors etc. for this deck even if I only get this one set...
-
Lawrence still haven't figured out what to do with the tiles. I like Patrick's idea. Will let it sit for a while longer... figure I can wait a bit longer before I decide what to do about the copper -- shiny or dull to corroding... Nick says he used polyurethane... I must ask him if it was a can of spray like Patrick suggested...
-
Patrick - Looking really nice. I see plastic clothes pins. I must go find some! Best part of this deck is that it covers up most of the upper deck. One can be a bit out on the upper deck and practice for the areas that can't be covered on quarter deck! I am going to try some of that Micro Glaze too. Looks interesting. Thanks for being ahead of me on the build. Here is a four gun salute for your efforts.
-
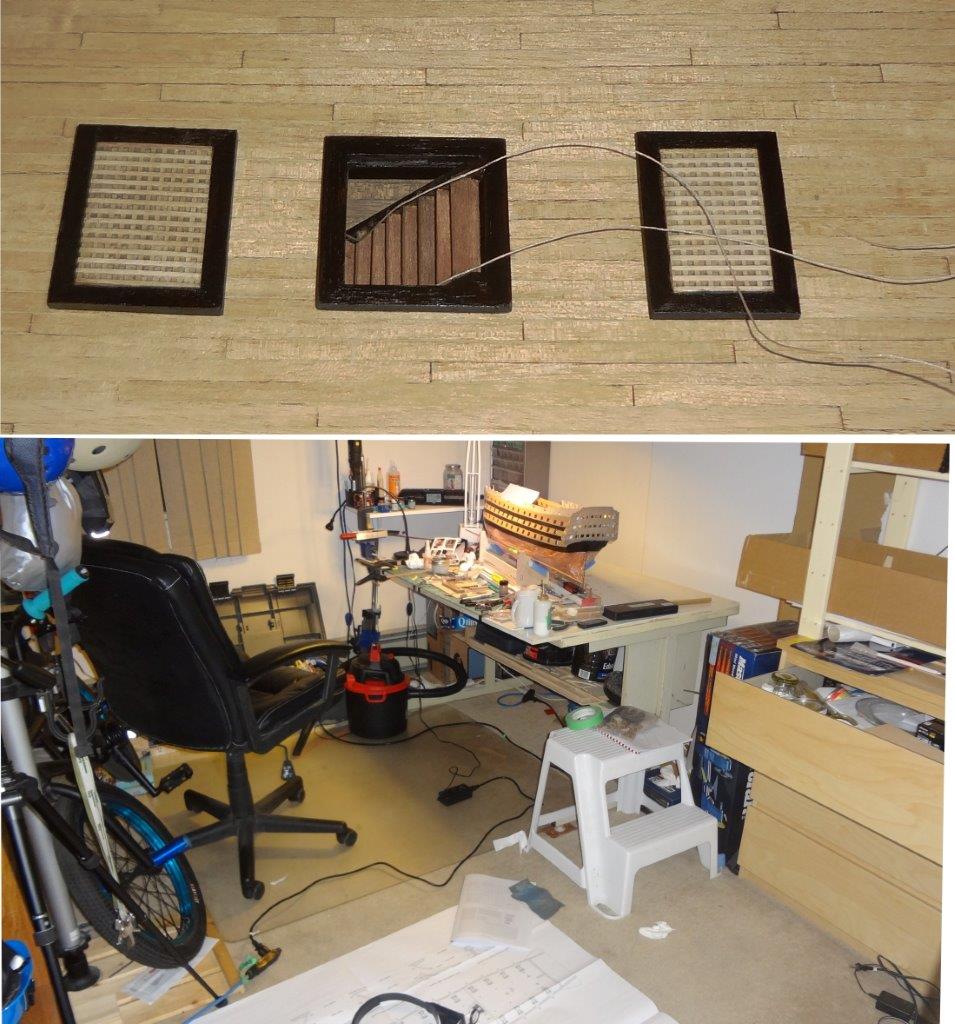
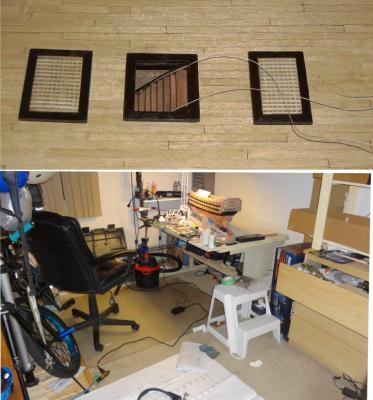
Have been working on the fixings and one ladder for the week. If you had told me it would be nine days to get four pieces done I would not have believed you. Below are the first. I ended up putting walnut stain on the 'real Victory' wood. What the heck. The real one is covered with paint too! And what a mess I've created in my shipyard. It was relatively tidy with just the copper tiles -- not a big mess at all. I've got stuff all over the place now.. LOL... it's worse than the bedroom ... Must figure a way to hang the plans on the wall behind my desk. The floor just doesn't cut it. I did a couple stupid things... decided I should paint the coamings on the outside of the grates first and then glue to the grates. So what did I do on the first one. Glued the coaming to the grate without painting them. Had to laugh at myself. At least did the right way around on the second. Also didn't put a weight on the first grate so it dried a bit "off" shall I say -- it was not close to flat... LOL... Am happy the first one won't show up so much. Was thrilled to see the numbers on the rope supplied by Caldercraft. When I read the instructions my initial reaction was "how am I going to figure out 0.25 rope?"...Thank goodness they numbered the rolls. Here's where I'm at. Only the main companionway is glued in place. The others are sitting on deck for right now. Oh, I put the sandpaper (rough side up) on the deck and moved fixings a bit to get them to form to the deck. Worked quite well. Fortunately didn't require too much sanding.
-
That is great to know Patrick. Thanks for the tip. I just might do the same. Better decide soon though.
-
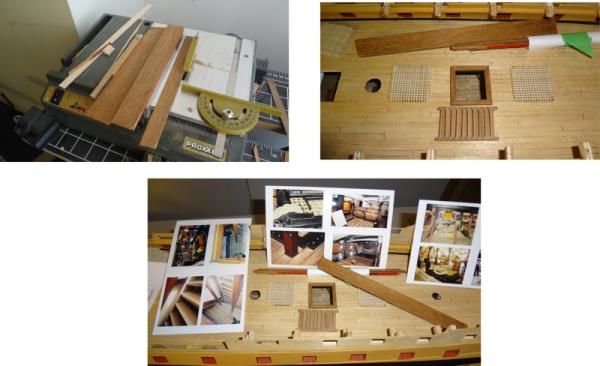
Have another question and thank anyone who may care to respond. In an earlier part of the build log I showed how I took three pieces of the "real Victory" and cut them so I could make the beakhead deck from these cut 'planks'. I got thinking yesterday as I saw all the extra pieces sitting on the saw -- Why not make the coaming and other parts of the decks features from the 'real Victory' as well. So I cut some more pieces and my first piece is the coaming for the main companionway on this the upper deck. (I intend to make the coaming of the each deck of the main companionway in this way, plus whatever else I can create. Now the question I ask is about painting/staining the 'real thing'. Would you stain or paint the wood or leave it "as is"? I am leaning towards staining the coaming with the Caldercraft walnut stain that I have on hand. The images I have of Victory show the coaming as very dark but most seem to leave the wood just shellacked or varnished. Should I go ahead and stain it or leave it 'as is'. I've attached photos that show the original wood and the pieces for the beakhead ect. Your thoughts would be appreciated. (Oh, I pulled the clear wrap down and have exposed the tiles.)
- 295 replies
-
- 2
-
-
- victory
- caldercraft
- (and 1 more)
-
Well, you might laugh at this one but I pulled the rudder out, placed a couple tiles on it without glue and said to myself "no way".... LOL... I couldn't start copper tiling the rudder.. so I decided to turn her over. To protect the tiles I draped clear food wrap over them and taped them. Now I wonder if I am asking for trouble. My thinking is if I create a humid area between the tiles and the wrap there is a possibility the glue on the tiles will start to do weird things. I also wonder if the wrap will make the tiles oxidize in a weird way. Does anyone have any thoughts/experience do this? Would appreciate some feedback/suggestion. Here is my Victory right way up now. The edible food portion is wrapped in the clear wrap.

-
Hey Patrick.. looking really great. Nice fix on the whales. Haven't been keeping an eye on anyone's log while I was pushing through the copper tiles. It seemed that all I could muster was copper tiles... not reading... LOL... too much magnified work! I'm going to have to decide on cannons soon too. Haven't decided. I want to keep the upper gun deck open and visible looking through the stern and bow so will see how I pull it off. It's going to require some thinking and planning. Thanks for being ahead of me! Will be able to push ahead now following your build. Rob
-
Just looked at your build Michael. Exceptional! Will have to take a few hours and go through a lot slower. Hope I can match your detail. I do find it awesome to have been on/visited the ship one is building. Makes it so much more fun! Rob