DONATION DRIVE - SUPPORT MSW - DO YOUR PART TO KEEP THIS GREAT FORUM GOING!
×


hof00
-
Posts
1,650 -
Joined
-
Last visited
Content Type
Profiles
Forums
Gallery
Events
Everything posted by hof00
-
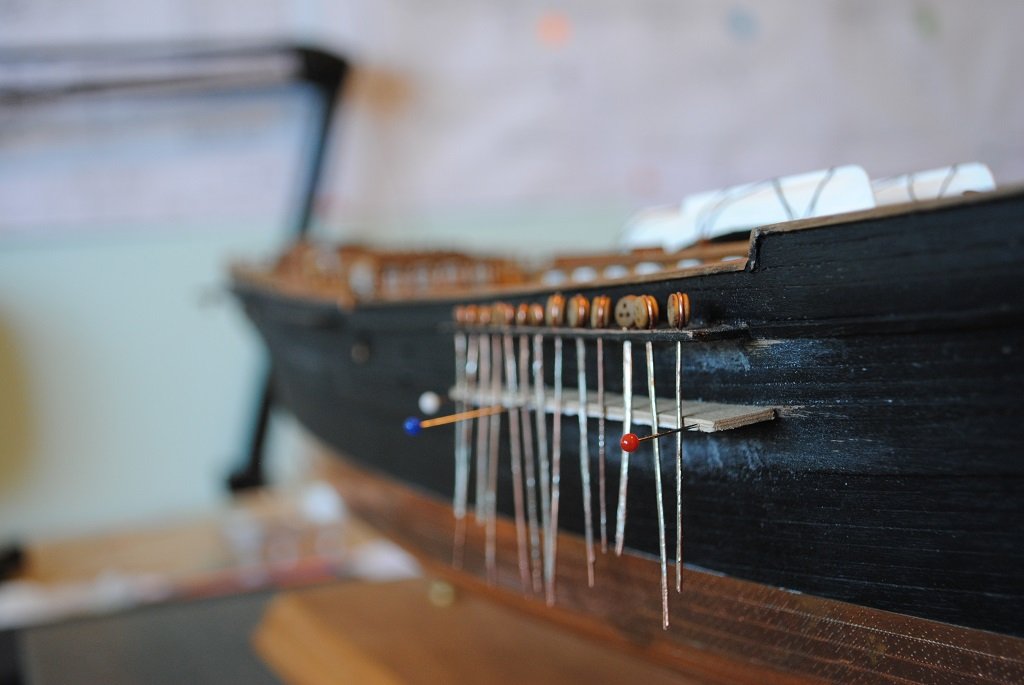
 Hi All, Small update: Starboard Fore Channels/Chainplates, (Raw), Pinned in place. A bit of a learning process for me. (I may redo these, well probably.... 🙂) Some takeouts: Lower Channel needs at least 3 pins along its length Slots for Chainplates need to be a tad deeper Spacer required between Channels to prevent bowing as Chainplates are installed Need a more accurate drilling/cutting method for Chainplates I need to make up some more Chainplates before having a go at the Fore Port side. Anyway, enough for the mo. Cheers.... HOF. Photos:


-
Hi Ian, That's a rather large Hull!! Several years ago, I remember a build Log for this. (Can't recall where, sorry.) Anyway, the builder ran out of Decking Planks/Material.... I guess be judicious with the "Waste." Cheers....HOF.
-
Thanks Rick.
-
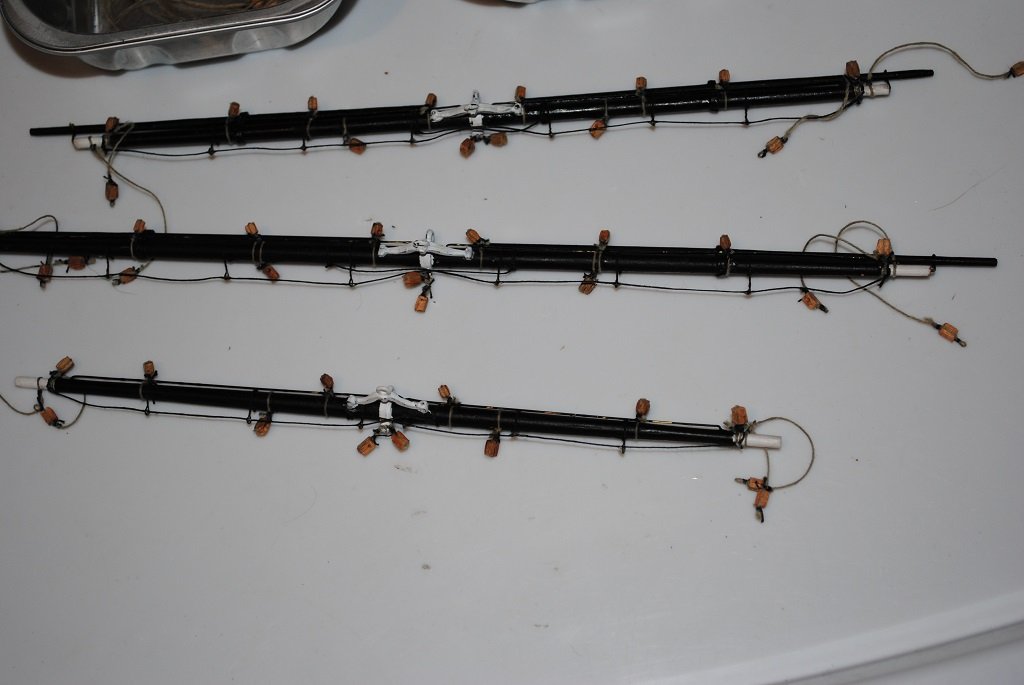
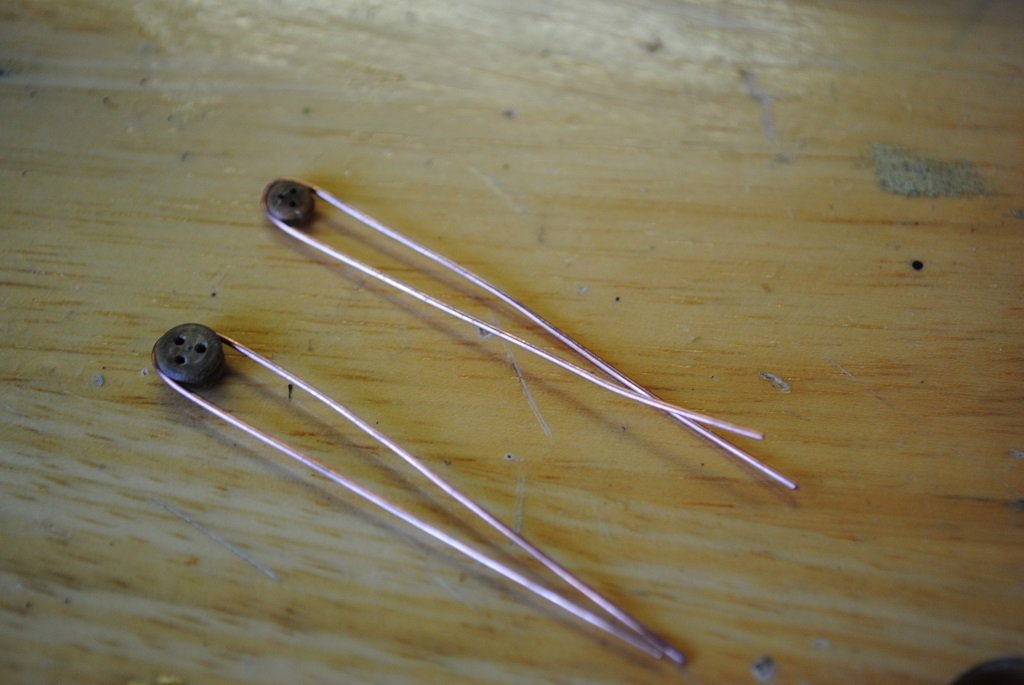
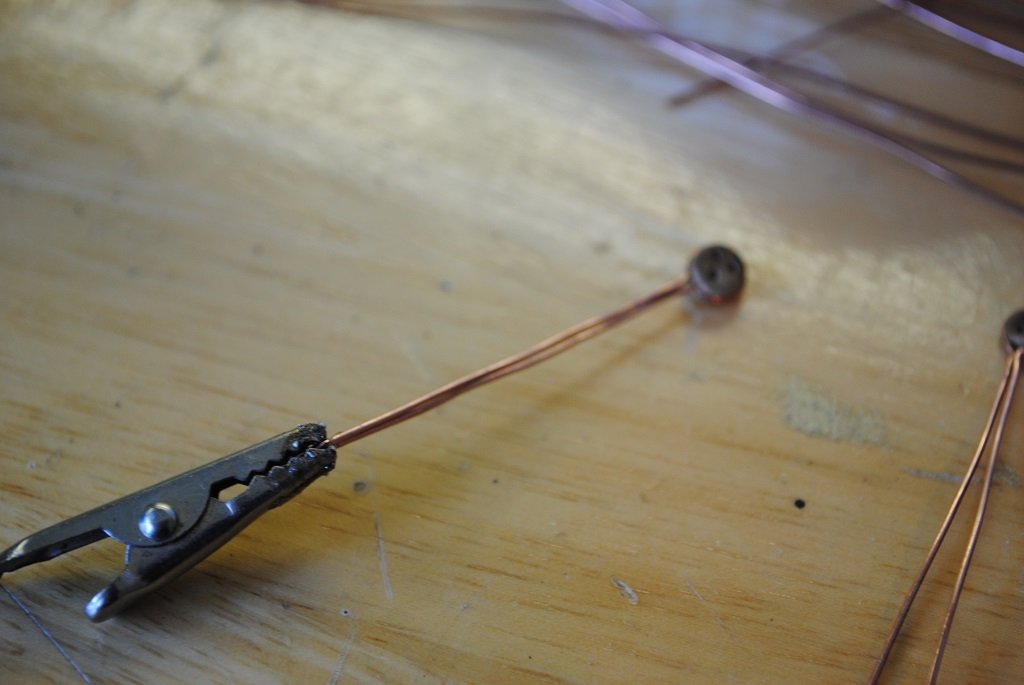
Hi Rick, Et All, I have taken a few photos to hopefully illustrate the method to the madness.... 🙂 At this time, I am concentrating on manufacture of the Chainplates and have not as yet "Notched" the lower Channels, nor have I Blackened/Filed/Drilled/Tweaked the Chainplates, so, you will have to imagine them fixed in place under the Lower Channel. Yes, the Chainplates are long at the mo., this will give me something to hold while "Manipulating." A big advantage, the Deadeyes sit "Flat" on the Channel, no nasty gap and in line. The method seems to work, a bit of time but very cheap, the wire was harvested from a bit of heavy electrical flex that I have in my Garage. The solder is 3% Silver, 1% Copper and 96% Tin with a "No Clean" Flux Paste. (I just have to be careful not to "Flame" the Deadeye. 🙂) Cheers.... HOF. Photos:


- 194 replies
-
- 2
-

-
- Flying Cloud
- Mamoli
- (and 1 more)
-
Hi Rick, Thank you for your kind comments and advice, appreciated. 🙂 I have started my Chainplate manufacturing process, ("Prototyping"), and have rescued my already constructed Lower Channels. Quite correct, I could not live with the kit Chainplates, they just did not look correct at all. (I had pinned the Fore Starboard-Side kit Chainplates, no good at all.) I have viewed your Flying Fish build on more than one occasion to see how you have done the Chainplate/Channel construction. I am utilizing 0.6mm Copper wire to form both the Deadeye Strop and Chainplate, pinch the wire together around the Deadeye and draw the wire, (Straight), together to form the Chainplate and run solder along the joint. (Chainplate) The only downside is no articulated Deadeye strop. Thus far I have almost completed the Fore Chainplates. I decided to use Copper wire as it is much more malleable especially around 3.0mm Deadeyes. (I did experiment with 0.6mm annealed Brass wire.) So, that's the state of affairs at the mo. and I'll get some photos when I have something to show for my time. 🙂 Cheers and Regards, Harry.
-
Hi All, Small update, no photos as yet. I have been struggling with the Chainplates for some time. I have decided to put the kit supplied parts in the "Too much trouble" basket and manufacture my own. This has the possibility of Lower Channels "Back in play" and this is what I am working towards.... (I am pleased that I kept these....) I have had many E-Mails with Daniel from Dusek Models to ascertain if he had replacements for Flying Cloud. (As it happens, he does, and they are an improvement in the form of Laser cut Aluminum.) I am still keeping my options open here, Daniel will review the Shipping cost in a couple of weeks but mentioned to me that the Shipping would probably be around 60.00 Euro. Hats' off to Daniel thus far for his efforts and Customer Service!! Tomorrow will be more "Experimenting" with Chainplates, and I'll post photos of development ideas in a few days. BTW All the best for everyone in 2026!! Cheers....HOF.
- 194 replies
-
- 2
-
-
- Flying Cloud
- Mamoli
- (and 1 more)
-
Hi Rob, Thank you very kindly for your comments, much appreciated. I'll go with what I am comfortable with and with what "Prototyping" shows me. Even though not 100% I am hopeful the finished result will be acceptable. 🙂 Cheers and Regards, Harry.
-
Thanks Ron, I'm trying my best, my first at 1/96.... Tolerances are much "Tighter." 🙂 Yup, the "Table" has already proved its worth, edge drilling 1.5mm Lower Channels, even though they will not be used. Cheers and Regards, Harry.
-
Hi All, Lower Channel update.... I began by pinning the Fore Lower Channels to the Hull, easy enough. I then decided to make s Mock-Up, (Prototype), the Channels to fit the Chainplates. (I had already drawn this out....) As per my Drawing, the Chainplates were too short, esp. the Backstay Chainplates. Regarding the Backstay Chainplate with respect to the Lower Channels, the slot that I would have to cut in the Lower Channel to accept the Chainplate would leave about 1.5mm thickness where the Channel meets the Hull, far too thin. The kit utilizes a 2.0mm thick strip mounted on the Lower Rub Rail to simulate the Lower Channels. I now have to choose the way forward: Not really keen to construct/replace the Chainplates Lower Channels are not designed for this kit Not 100% accurate to leave Lower Channels off Photo, (On Box), looks just fine without Lower Channels Pushing ahead with Lower Channels risks breakages KISS - Keep It Simple Stupid Finally, what am I building this for? It is something that I enjoy, not a gift or presentation. My decision to omit the Lower Channels may upset some who are following this thread but that's just the way it is, constraints of the kit, engineering/design do not allow for modification. So, in conclusion, this model will be "Devoid" of Lower Channels I have tried and prototyped to install these items; I have to admit a small defeat.... With this attempt out of the way, I can concentrate on mounting/positioning Chainplates with only Upper Channels. In saying all of the Above, I will most probably install a 1.0mm strip on the lower Rub Rail where the Channel would have been, this will assist in Marking and positioning individual Chainplates and will be more in keeping to the kit design. Onward!! Many more challenges ahead.... 🙂 Cheers....HOF. Photos:


- 194 replies
-
- 1
-
-
- Flying Cloud
- Mamoli
- (and 1 more)
-
Arado Ar-196 by Ian B - FINISHED - PLASTIC - German seaplane
hof00 replied to Ian B's topic in Non-ship/categorised builds
Hi Chap, Looking good!! I missed the scale, 1/48? I have been looking, just looking, at thr Revell 1/32 version, re-released this year. I'll be interested to see the final result. Cheers.... HOF. -
Hi All, It's been a while since I last posted so here is a little progress. I am, at present, working on the Lower Channels. I have been thinking about how to approach these for some time. The solution that I have settled on, (Hope it works.... 🙂) Photocopy Channel parts from plans Paste to 1.50mm Ply Cut out parts, Scroll Saw Drill holes, (Edgewise), through Channel Pin to Hull Mark Chainplate positions Remove Channels from Hull Cut Chainplate locations Install Channels Install Chainplates Install Channel Capping strips Simple? If you have a look at #156 in the photos you can see how much the Channel deviates from the photocopy template. this is due to the changing shape of the Hull towards the Bow. (I used a Profile Guage for this. The other Channels, #157/#158 will be sanded to fit closer to the time. I eyeballed the fit of these, the photocopy template is not too bad. (I have made two of each Channel, in case I need to re-work something.) To facilitate Edge Drilling these components, I took the plunge and purchased a X Y Table and Clamping Vise. from Ali Express for NZD $142.00. (Inc shipping) This item is available from many different sites on the internet. The Table will also be useful for many other tasks, i.e. Main-Top Fairleads, etc., etc. (I have had a play at edge drilling the Channel material, its quick and easy. 🙂) Right, so that's where I am at the mo. Much more "Jiggery Pokery" to go Cheers.... HOF. Photos:


-
Thanks Rob.
-
Hi Peter, Thanks for that. Yup, you're 100% correct, "Eat the Elephant one bite at a time." 🙂 Cheers and Regards, Harry.
-
Hi All, Small update: Today, I finished off the Sky-Sail Yards, (Royals completed last week.), that completes the full "Suite" of Spars inc. Boom and Gaff. (I hope that my work pays off.... As mentioned in a previous post, I wasn't 100% happy with my work. (At this juncture, "It is what it is." and it's time to move on with the build. 🙂)) I feel it's time to affix the last 3 Capstans and Mooring Bitts. After this small task, it will be time to work on Lower Channels and set up Shrouds/Chainplates, not something that I am looking forward to.... 🙂 Anyway, that's me for the mo. Cheers.... HOF. Photos:


- 194 replies
-
- 2
-
-
- Flying Cloud
- Mamoli
- (and 1 more)
-
Thanks Ian, I purchased some "Tiny" Black Glass beads, (NZD $3.00 for 100) (1.0mm)), I don't think that I'll be making Ribs for these at this scale. Possible I guess but not for me.... 🙂 Cheers and Regards, Harry.
- 194 replies
-
- 1
-
-
- Flying Cloud
- Mamoli
- (and 1 more)
-
Hi Chap, Thanks for the feedback, appreciated! Many more "Challenges" ahead.... 🙂 BTW your first build is looking pretty sharp!! Cheers and Regards, Harry.
-
Thanks Ian, The Lower Yard Trusses are kit provided, Main and Top-Sail Yards. I should have got someone to cast some copies of these in Brass. The Castings provided are White Metal and very, very fragile until they were located and fixed, that is. (I managed to break a couple of the locating pins.) I was not happy with the way the plans/instructions fixed the Upper Yards, (Tied on), to the Masts so decided to make Parrel Jaws? to ride on the Masts. (I hope it works out ok.... 🙂) Cheers and Regards, Harry.
-
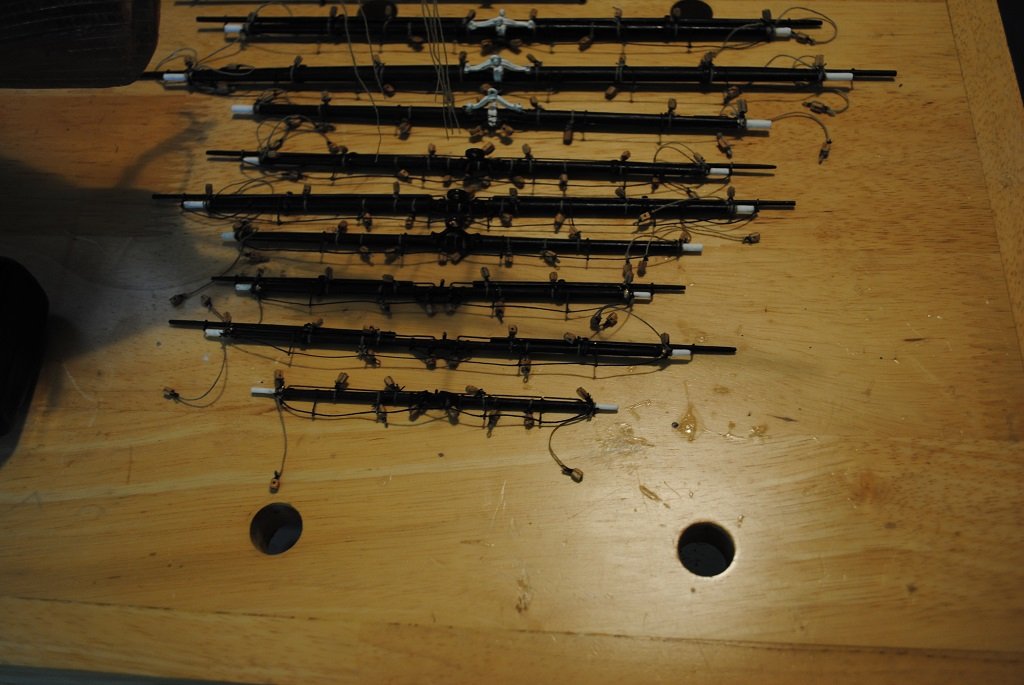
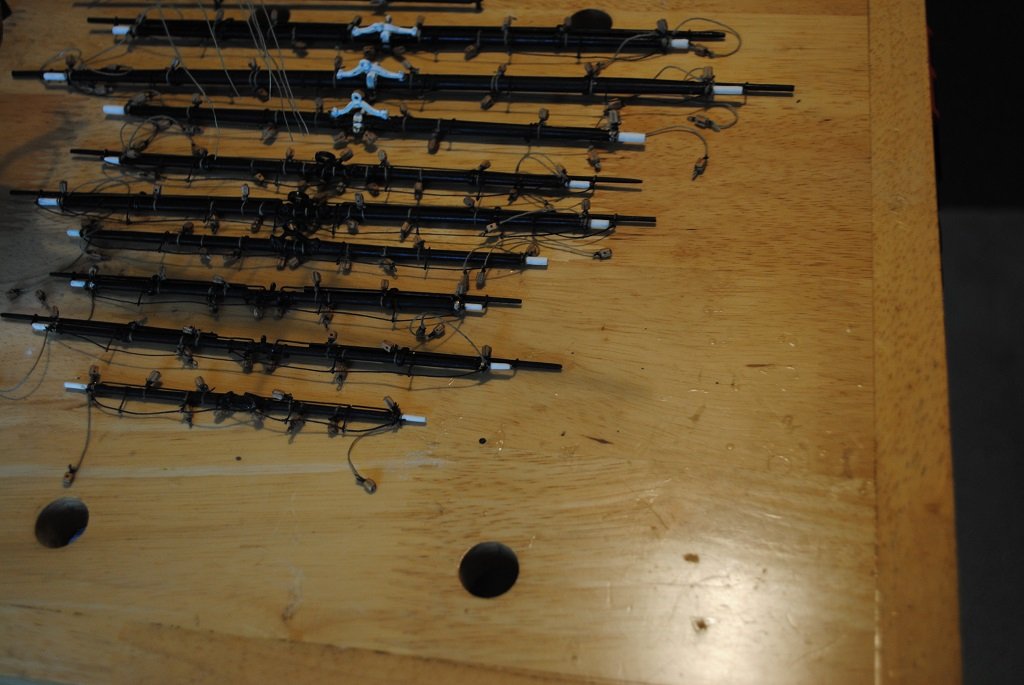
Hi All, Small update: More Yard work, this time the Topgallant yards are complete. Unsure if I am completely happy with my work thus far, (I don't think I'll ever be 100% satisfied though.... 🙂) If I had it over, I would be fixing the Blocks with annealed Brass wire. (I don't think I will be re-doing this, next time perhaps....) (I have, however, decided to use annealed Black wire for the Mast Block work So, a bit of a hybrid, Thread for the Yards/Boom/Gaff and wire for everything else.,) Anyway, next up the Royals followed by the Skysail Yards, six to go. I am hopeful that these won't take so long, the Block count is ever decreasing the further up the Yard and no Stunsail Booms to worry about, Nice!!🙂 Yards are painted, Jackstays installed on the Royals, no Jackstays on the Skysail Yards. I ordered a Contour Guage to assist with the Lower Channels, the Hull profile is completely different to the Upper Channels, Once the Channels are made, I will pin them to the Hull, mark and make the necessary slots for the Chainplates. Thanks to @Rick310 for the Flemish Horse idea. I have installed these on the Main and Mizzen Top-Sail Yards only, less work, less stress.... 🙂 That's me for the mo.... Cheers....HOF. Photos:
- 194 replies
-
- 3
-
-
- Flying Cloud
- Mamoli
- (and 1 more)
-
Thanks Jan, I think that sometimes I can't see the wood for the trees.... I do recall seeing this in Flying Fish instructions I downloaded years ago. I'll have a go once I have completed the remainder of the Flying Cloud Yards. The time spent on this task will give me more time to ponder my approach. Cheers and Regards, Harry.
-
Hi All, An issue, (Opportunity?), that I have currently, and one that has been playing on my mind is how do I install the Lower Channels and locate Chainplates within the Channels ensuring the correct angle of the Chainplate with respect to Shrouds/Backstays? Installation and placement of the Upper Channels was pretty much a "No Brainer." Kit instructions/plans show the installation of a "Chainplate Support," a 2.0 X 3.0mm strip to act as the Lower Channel. You would think this to be the simplest option. I had a tinker with this yesterday and it doesn't really seem to be.... For a start, the upper Channels are 1.5mm thick, 2.0mm Lower Channels are way too thick. Secondly, the spacing from Hull to Chainplate, (Chainplate hanging "Plumb" from the Upper Channel, varies from about 3.0mm, (Fore), 2.0mm, (Main) and 2.5mm (Mizzen)) One solution that I thought about, make a clone of the Upper Channels. (Lower Channel Width reduced of course.) The problem with this is that the slots that I would need in the Lower Channel would not allow for the angle of the individual Chainplate with respect to Shrouds/Backstays. (Chainplates would be "Vertical." The only other solution that I can think of is to omit the Lower channels altogether. (That would make my life a whole lot simpler.... 🙂) There are 72 Chainplates in total. So, what do others do? 😗 I am a bit "Stumped." Cheers... HOF. A couple of photos of the Fore Channels: (Channel Cap is "Pinned" only.)


-
Thanks Rick, There seem to be a few differing opinions regarding these. The late, great Manstini, (Ship Modelling Simplified), adv. Flemis Horses fitted on Yards with Studding Sail Booms. I'm leaning to Top-Sail Yards only. (Less work? 🙂) At the mo. I am struggling with the Lower Channels. Upper Channels are pretty much a doddle, but I cannot wrap my head around how to get the Chainplates set up to the correct angle with respect to Shrouds/Backstays and at the same time house the Chainplate. The kit instructions don't mention a dedicated Lower Channel but adv. to install a 2.0 X 3.0mm strip and call it a Chainplate Support. Any ideas? (I'll have a look at your build in a few minutes to see if I can see a way forward. Cheers and Regards, Harry.
-
Thanks Rob. I'll equip the Mainsail, Top-Sail and Topgallant Fore and Main with "Horses." 🙂 A question for you: Do you have a diagram/key for Running Rigging Fairleads associated with the Fore, Main and Mizzen Main Tops? (Platforms) I am trying to figure out if these were used for Sail Handling only or if Sheets, etc. utilized these, or, if they passed through the "Lubbers" hole in the Tops. Cheers and Regards, Harry.
-
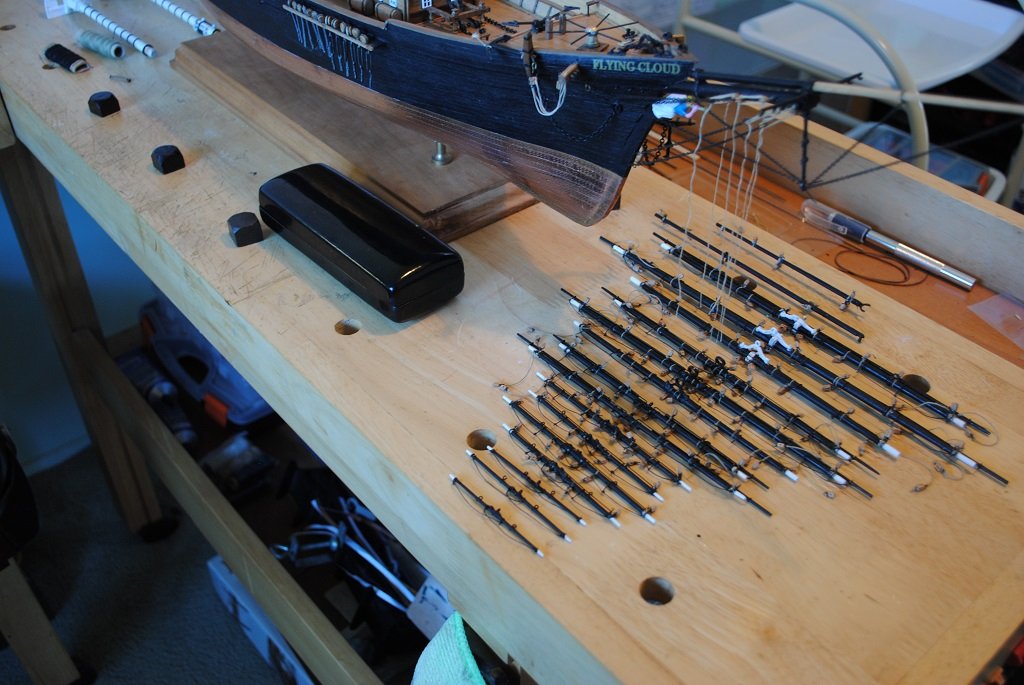
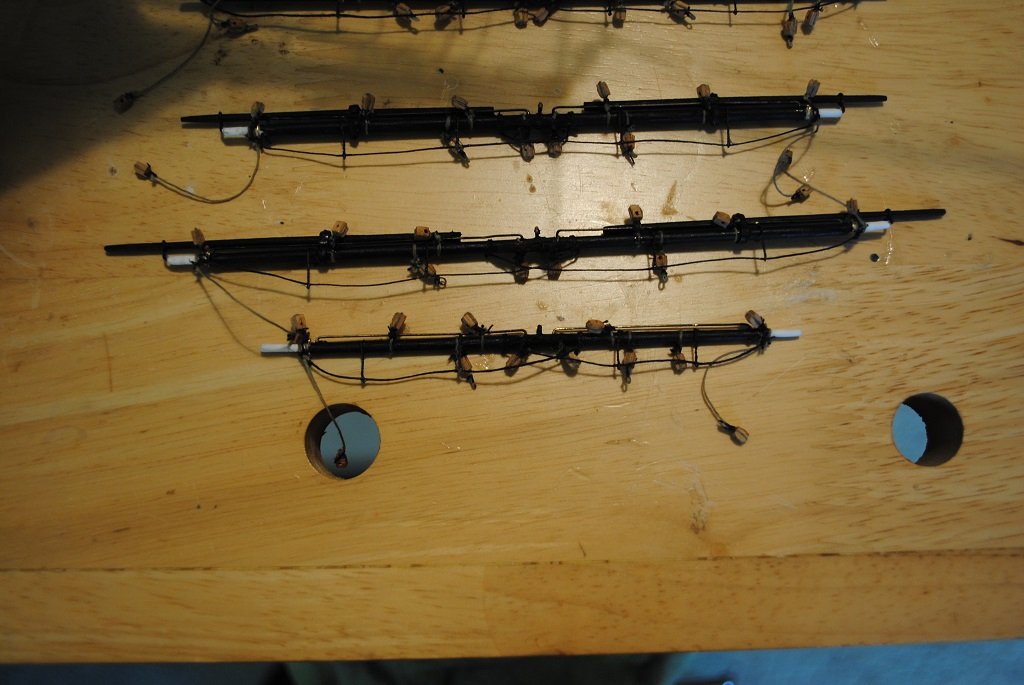
Hi All, Small update. A little dull perhaps just some progress on Yards. Photos are more or less complete Topsail Yards. (These require the addition of Flemish Horses and a bit of paint touch-up here and there.) I think about one month for these three items. (I am trying not to be too "Precious" with the Yards otherwise I would never get them done!! 🙂) I am also still trying to decide which Yard were equipped with Flemish Horses. Opinion seems a little divided on the subject. (The advice that I have received is that only Top-Sail Yards were equipped with Flemish Horses. I wonder if this applies to the Mizzen Top-Sail Yard also? If anyone has opinions regarding McCay's Ships, I'd be very keen to hear them.) I also include a couple of photos of the next three Yards, Topgallant, Fore, Main and Mizzen. (I prepped all Yards some time ago except for Paint and attaching Blocks and other items, prepared also.) Anyway, that's me for the mo. Cheers.... HOF.


-
Hi All, A quick update tonight. Completed the Fore, Main and Mizzen Yard. (Main Course?) I am reasonably happy with the result although the process took me a little time to figure out an assembly sequence that seems to work for me anyway. (I guess the next 12 Yards will be practice enough. 🙂) I decided to blacken, (Paint) the Jackstays as they just didn't look right "Bright." (I have prepped all remaking Jackstays Black.) Footropes are 5.0mm below the Yard and are 0.15mm A/L "Waxed" Black Thread. (In the photo, the Footropes look a bit "Random," they look much better "Off Camera.") Stirrups are 4 X strands of Copper wire, (0.1mm?), twisted together with a 0.5mm loop in the end for the Footropes. Just a couple of touch-ups on these items that I have just seen!! 🙂 Tomorrow, I'll make a start on the Top-Sail Yards. These are, (Painted)), ready for thier "Furniture" which is also prepared. Thats me for the Mo. Cheers....HOF. Photo: